

Page 1
SunSmart
RCL/RND
- When programming press
to clear ON/OFF setting
- When in clock mode, push
to activate random feature
SET
- Hold 5 seconds to set
clock/date
- Push to confirm a setting
and move to next option
TM
Digital Timer
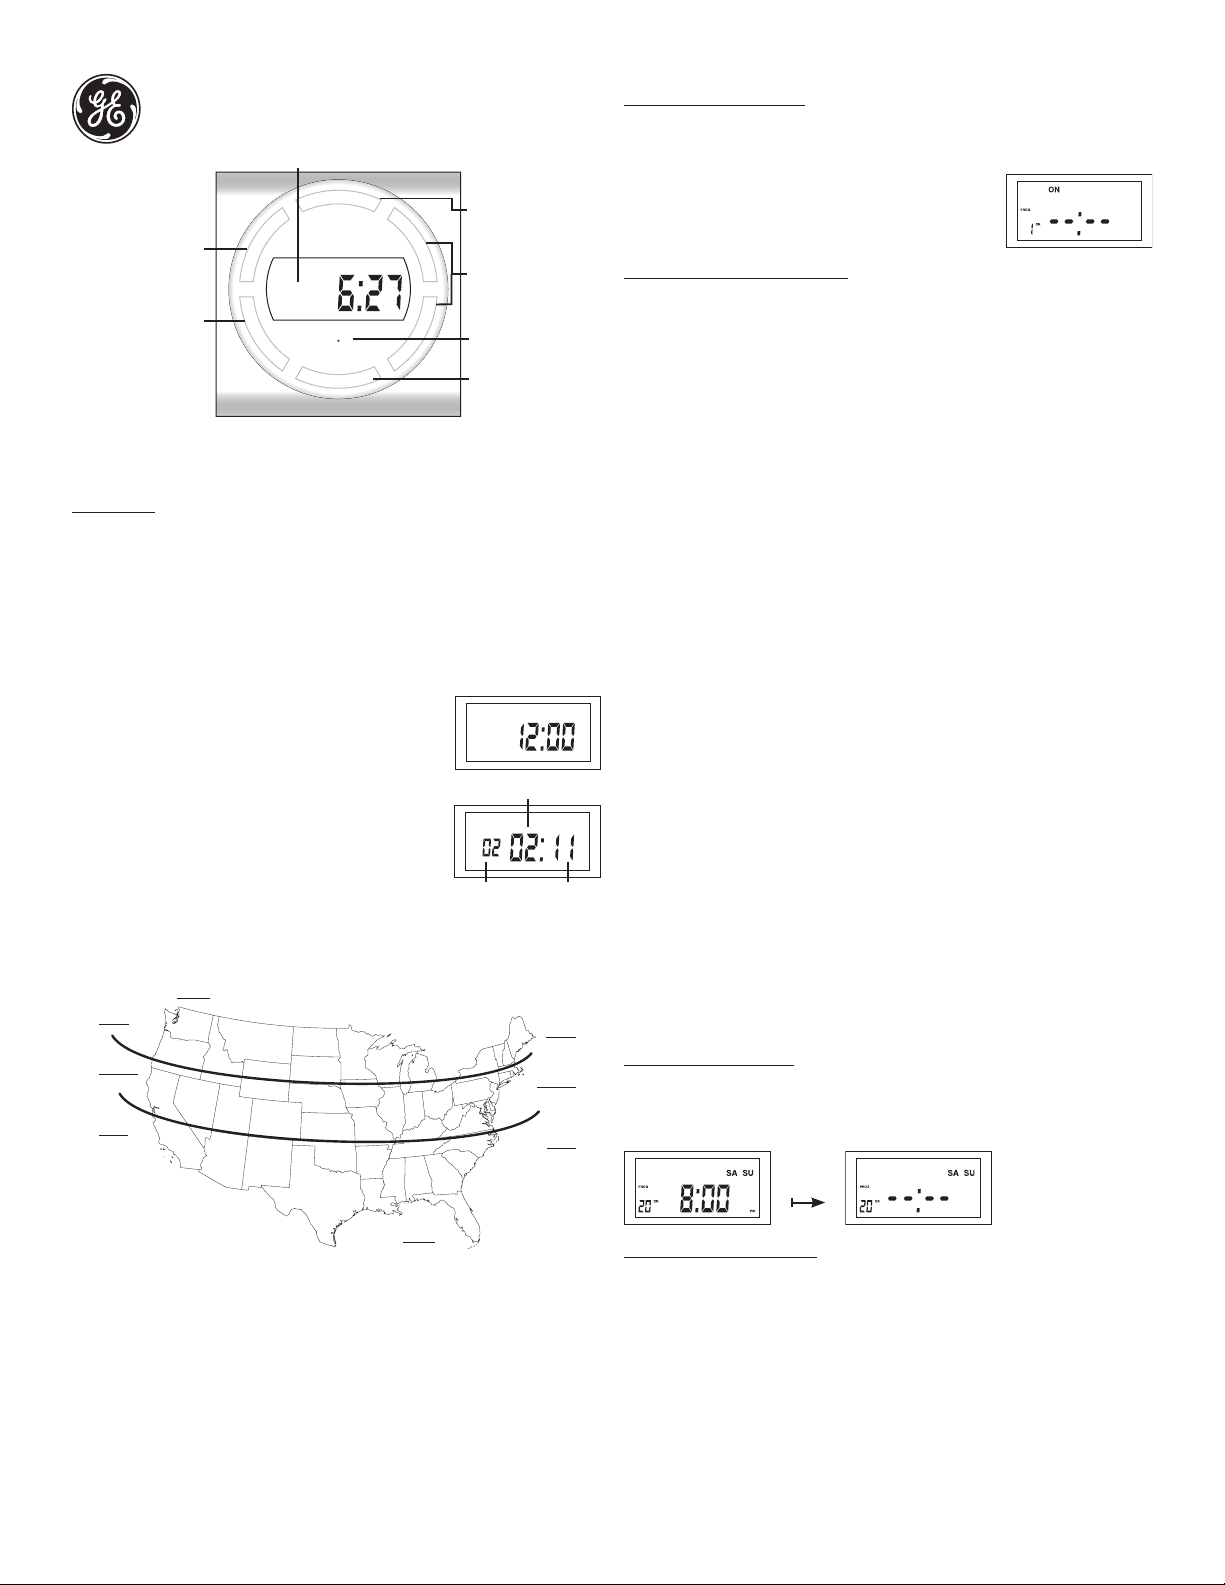
DISPLAY SHOWN IN STANDARD “CLOCK” MODE.
O
R
G
P
D
N
R
/
L
C
R
S
E
T
AUTO
PM
TU
RESET
O
N
F
/
O
U
P
N
W
O
D
F
PROGRAM
- Hold 5 seconds to program
ON/OFF timer settings
- Push when programming is
complete to activate timer
UP/DOWN
Scroll through settings options
RESET
Press and hold with toothpick
to clear all settings
ON/OFF (push to scroll)
ON= Always ON
Auto = Timer is active
OFF = Always OFF
Note: The timer will automatically return to clock mode if a button is not pushed
for 20 seconds while programming. Return to step 1 if this happens.
Initial Set Up:
1. If the LCD screen is displaying numbers, you are ready to program, please proceed
to step 2. If the screen is blank plug in the timer and leave for two hours to charge
internal battery before programing.
2. Use a toothpick or sharp pencil to push the RESET button. Once pushed, the screen
will go blank briefly and then display 12:00 AM. See Figure 1.
3. Press and hold the SET button for 5 seconds until hour begins to flash. Release button.
4. Press the UP/DOWN to adjust hour. Press SET to confirm. The timer HOUR is default to
12 AM. Take note of the AM/PM on the upper left of the screen when setting the hour.
5. Press the UP/DOWN to adjust minute. Press SET to confirm.
6. Press the UP/DOWN to adjust year. Press SET to confirm.
7. Press the UP/DOWN to adjust month. Press SET to confirm.
Figure 1 - Ready to set
AUTO
AM
8. Press the UP/DOWN to adjust day. Press SET to confirm.
9. Press the UP/DOWN to select DST ON or DST OFF. Press
TH
SET to confirm. Note: DST stands for Daylight Savings
Time. DST is either “ON” or “OFF”. DST will automatically
DAY
reset the times in the timer to match the current time
change, if DST is set to ON. The default DST time change
is 2:00 am, the second Sunday of March, and then the first
Sunday in November.
10. The next setting is the Zone for the SunSmartTM Feature.
MONTH YEAR
Look at the map below and determine which zone best fits
your location. Use the UP/DOWN buttons to scroll through the available zones in the
timer and stop when you find the zone where the timer is being installed. Press “SET”
to confirm zone.
ALASKA
NORTH
CENTRAL
SOUTH
NORTH
CENTRAL
SOUTH
Programming ON/OFF Times:
1. Hold down the PROG button for 5 seconds. Figure 3 should appear on the screen.
2. 1 ON --:-- is the first setting.
3. Press “SET” and the days of the week will begin blinking.
This will tell the timer the days of the week the timer will
Figure 3
be in control of the lights/devices plugged into the timer.
Press the UP/DOWN buttons to scroll through the multiple
weekday program options shown below.
Multiple Weekday Program Options:
Apart from individual week days, pressing the UP/DOWN keys to scroll through the
multiple day combinations such as:
• Monday thru Sunday • Tuesday & Thursday & Saturday
• M, T, W, Th, F, Sat & Sun • Saturday & Sunday
• Monday & Wednesday & Friday • Monday thru Friday
Choose the days you want the program to be active and press “SET”
4. Now that you have chosen the days the timer will function, the next step is to choose
the times the timer will turn ON. There are 3 options to choose from when selecting
the program ON time. Use the UP/DOWN buttons to scroll through the options.
CUSTOM TIME (12:00) – SUNUP – SUNSET.
A. If you would like to set the Program 1 ON Time to the pre-set SUNUP time, use the
UP/DOWN buttons to find the SUNUP time on the display and press “SET”. You will
now move to the Program 1 OFF time set. (Go to step 5).
B. If you would like to set the Program 1 ON Time to the pre-set SUNSET time, use
the UP/DOWN buttons to find the SUNSET time on the display and press “SET”. You
will now move to the Program 1 OFF time set. (Go to step 5).
C. If you would like to choose a custom time, use the UP/DOWN buttons to find the
screen showing 12:00 blinking and press “SET”. The hour will be blinking, use the
UP/DOWN buttons to find the hour you would like the timer to turn the program
ON. (Take note of the AM/PM on the upper left of the screen when setting the
HOUR.) Once you have found the hour desired press “SET”. The minutes will now be
blinking, use the UP/DOWN buttons to find the minute you would like the timer to
turn the program ON. Once you found the hour desired press “SET”. You will now
move to set the Program 1 OFF time.
5. The screen will now show 1 OFF --:--. and you will repeat the routine above to select a
CUSTOM TIME (12:00), SUNUP or SUNSET for the OFF time.
6. Repeat the same routine for Program 2 (P2) through P7 to set as many ON/OFF cycles
as desired. At any time, push PROG button to complete programming and return to
clock mode.
7. Once all programming is complete make sure lamp or device is set in the on position,
and AUTO shows at the top of the timer display. Plug the lights or devices into the
timer and plug the timer into the wall. Your timer is ready to use!
Note: The lamp or device will not come on until the next ON time is triggered. To
manually turn the device ON and start the program, cycle the ON/OFF button until the
light/device turns on. Then press once more to put timer in AUTO mode (timer active). You
can also use the ON/OFF button to override the timer and set to ON (always on) or OFF
(always off).
RCL (Clear settings) Button:
When programming ON/OFF times, push the RCL/RND button to clear an ON/OFF
setting. Press again to resume programming. See figure 5.
Figure 5 Current time display
HAWAII
11. The screen will show SUNUP and a time with the HOUR blinking. This is the timer’s
pre-set time for SUNUP. If the time is correct for SUNUP press “SET” twice to move to
the SUNSET setting. If the HOUR is not correct use the UP/DOWN buttons to adjust
the hour to match SUNUP for your area. Press “SET” to confirm. The minutes are
now blinking. If the minutes are not correct use the UP/DOWN buttons to adjust the
minutes to match SUNUP for your area. Press “SET” when minutes are correct.
12. The screen will show SUNSET and a time with the HOUR blinking. This is the timer’s
pre-set time for SUNSET. If the time is correct for SUNSET press “SET” twice to
complete time setting. If the HOUR is not correct use the UP/DOWN buttons to adjust
the hour to match SUNSET for your area. Press “SET” to confirm. The minutes are
now blinking. If the minutes are not correct use the UP/DOWN buttons to adjust the
minutes to match SUNSET for your area. Press “SET” when minutes are correct. This
completes the time set portion.
RCL/RND
Random Security Option (RND):
The program feature will turn lights ON and OFF using the programed times + or - 30
minutes, giving the house a more lived in appearance while occupant is away.
1. Push RCL/RND (random) button to activate the Random feature while in clock mode.
The screen will display RND in the top right corner.
2. Push RCL/RND button again to deactivate the Random feature and return the timer
to its set programming.
See www.jascoproducts.com for troubleshooting and frequently asked questions (FAQs).
15402
03-2011
 Loading...