

Page 1

2-9451
Four-Line Business Phone with Intercom
User’s Guide
We bring good things to life.
Page 2

FCC REGISTRATION INFORMATION
Your telephone equipment is registered with the Federal Communications Commission and is in compliance with parts 15 and
68, FCC Rules and Regulations.
1 Notification to the Local Telephone Company
On the bottom of this equipment is a label indicating, among other information, the FCC Registration number and Ringer
Equivalence Number (REN) for the equipment. You must, upon request, provide this information to your telephone
company.
The REN is useful in determining the number of devices you may connect to your telephone line and still have all of these
devices ring when your telephone number is called. In most (but not all) areas, the sum of the RENs of all devices connected
to one line should not exceed 5. To be certain of the number of devices you may connect to your line as determined by the REN,
you should contact your local telephone company.
Notes
• This equipment may not be used on coin service provided by the telephone company.
• Party lines are subject to state tariffs, and therefore, you may not be able to use your own telephone equipment if you are
on a party line. Check with your local telephone company.
• Notice must be given to the telephone company upon permanent disconnection of your telephone from your line.
2 Rights of the Telephone Company
Should your equipment cause trouble on your line which may harm the telephone network, the telephone company shall,
where practicable, notify you that temporary discontinuance of service may be required. Where prior notice is not
practicable and the circumstances warrant such action, the telephone company may temporarily discontinue service
immediately. In case of such temporary discontinuance, the telephone company must: (1) promptly notify you of such
temporary discontinuance; (2) afford you the opportunity to correct the situation; and (3) inform you of your right to bring a
complaint to the Commission pursuant to procedures set forth in Subpart E of Part 68, FCC Rules and Regulations.
The telephone company may make changes in its communications facilities, equipment, operations of procedures where
such action is required in the operation of its business and not inconsistent with FCC Rules and Regulations. If these changes
are expected to affect the use or performance of your telephone equipment, the telephone company must give you adequate
notice, in writing, to allow you to maintain uninterrupted service.
INTERFERENCE INFORMATION
This device complies with Part 15 of the FCC Rules. Operation is subject to the following two conditions: (1) This device may not
cause harmful interference; and (2) This device must accept any interference received, including interference that may cause
undesired operation.
This equipment has been tested and found to comply with the limits for a Class B digital device, pursuant to Part 15 of the FCC
Rules. These limits are designed to provide reasonable protection against harmful interference in a residential installation.
This equipment generates, uses, and can radiate radio frequency energy and, if not installed and used in accordance with the
instructions, may cause harmful interference to radio communications. However, there is no guarantee that interference will not
occur in a particular installation.
If this equipment does cause harmful interference to radio or television reception, which can be determined by turning the
equipment off and on, the user is encouraged to try to correct the interference by one or more of the following measures:
• Reorient or relocate the receiving antenna (that is, the antenna for radio or television that is “receiving” the interference).
• Reorient or relocate and increase the separation between the telecommunications equipment and receiving antenna.
• Connect the telecommunications equipment into an outlet on a circuit different from that to which the receiving antenna is
connected.
• Consult the dealer or an experienced radio/TV technician for help.
If these measures do not eliminate the interference, please consult your dealer or an experienced radio/television technician
for additional suggestions. Also, the Federal Communications Commission has prepared a helpful booklet, “How To Identify
and Resolve Radio/TV Interference Problems.” This booklet is available from the U.S. Government Printing Office,
Washington, D.C. 20402. Please specify stock number 004-000-00345-4 when ordering copies.
HEARING AID COMPATIBILITY
This telephone system meets FCC standards for Hearing Aid Compatibility.
FCC NUMBER IS LOCATED ON THE CABINET BOTTOM
REN NUMBER IS LOCATED ON THE CABINET BOTTOM
i
Page 3
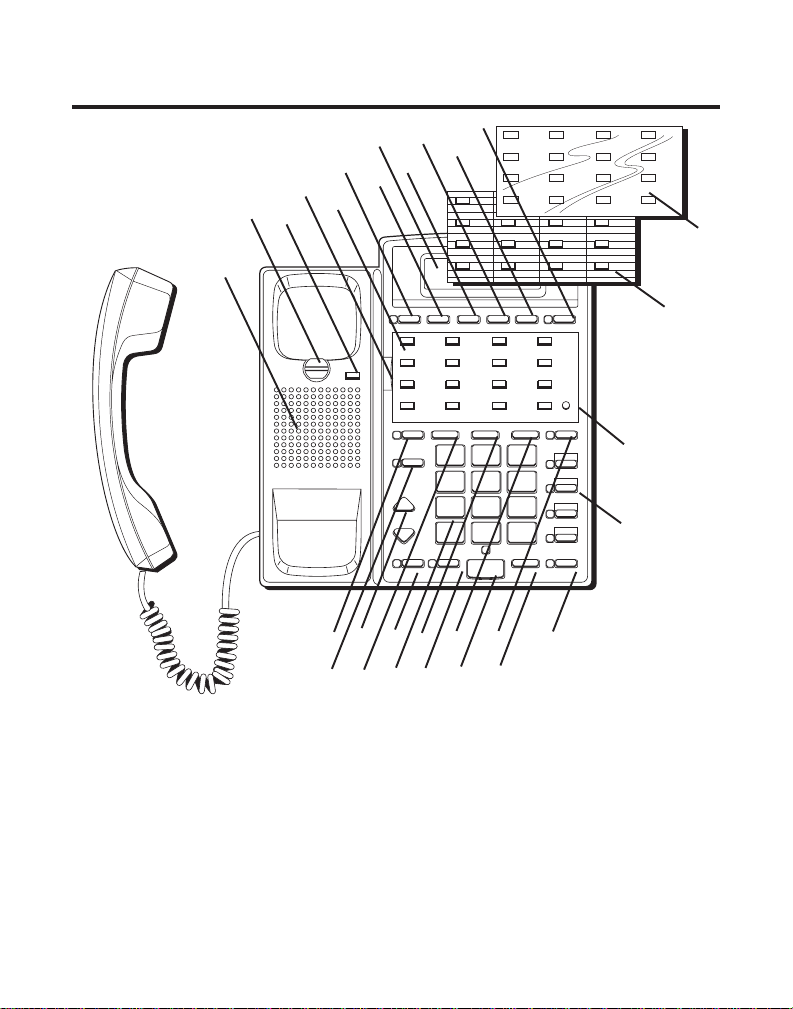
CONTROLS AND FEATURES
10
8
6
4
2
5
3
1
9
7
12
11
12 34
56 78
9101112
13 14 15 16
13
1. Speaker
2. Handset hook
3. PAGE button
4. Index lock
5. Memory buttons
6. STORE IN button
7. TIMER button
8. Display
PAGE
27
29
26
28
9. TIME SET button
10. MEMO button
11. REVIEW button
12. LOWER button
13. Index cover
14. Index card
15. PROGRAM
button
STORE IN TIMER TIME SET MEMO REVIEW LOWER
BUSY REDIAL FLASH PAUSE TRANSFER CONF CALL
PRIVACY
1
GHI
4
PQRS
7
VOLUME
TONE
*
HEADSET MUTE SPEAKERPHONE HOLD
21
23
25
20
22
24
DEF
3
ABC
2
MNO
6
JKL
5
WXYZ
9
TUV
8
OPER
0
#
19
18
16. LINE buttons
17. INTERCOM button
18. HOLD button
19. CONF CALL
button
20. SPEAKER PHONE
button
21. TRANSFER
button
LINE 4
LINE 3
LINE 2
LINE 1
INTERCOM
15
16
17
22. MUTE button
23. PAUSE button
24. Key pad buttons
25. HEADSET button
26. FLASH button
27. VOLUME buttons
28. PRIVACY button
29. BUSY/ REDIAL
button
14
ii
Page 4
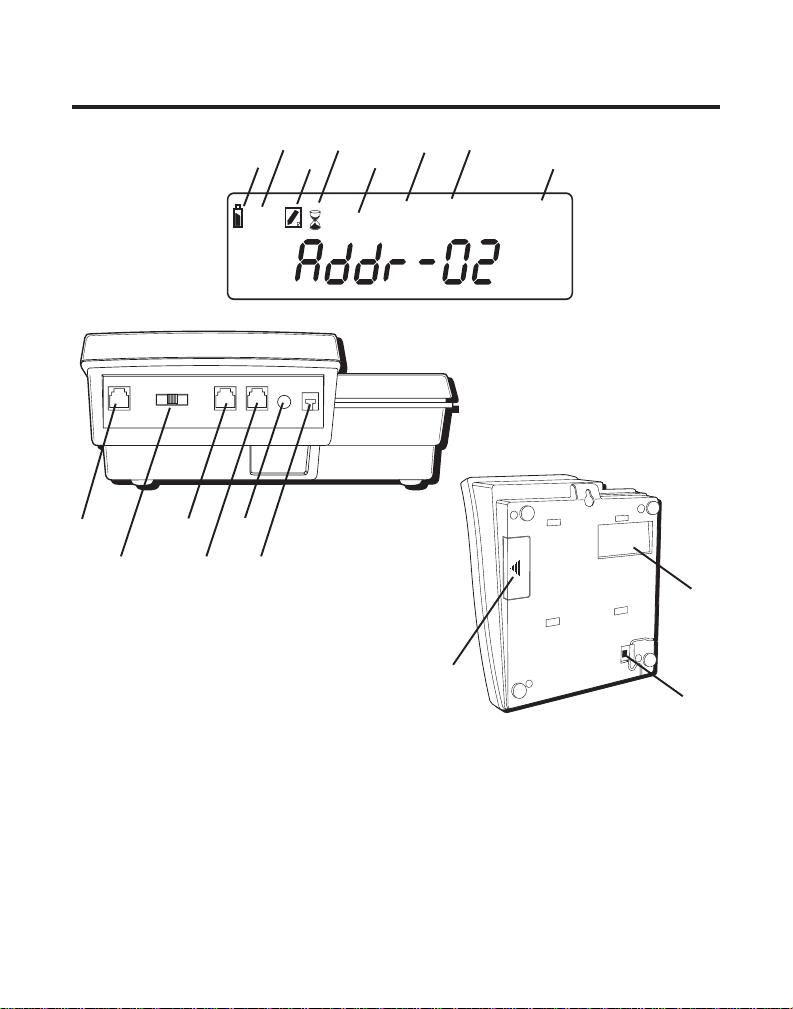
CONTROLS AND FEATURES
33
303132
34
35
36
37
38
39
30. Battery symbol
31. Touch-tone dialing
symbol
32. Memo symbol
33. Timer symbol
34. Data port symbol
35. Redial symbol
40
414243
TONE
DATA PORT
36. Line currently being used
37. Extension number
38. DATA PORT
39. DATA PORT line switch
40. LINE 1+2
41. LINE 3+4
42. AC power jack
REDIAL
LINE
46
EXT.
NUMBER
12343
44
45
43. Power cord strain relief
44. Battery compartment
door
45. Headset jack
46. Mini User’s Guide door
iii
Page 5

TABLE OF CONTENTS
TABLE OF CONTENTS............................................................................................. 1
NTRODUCTION ..................................................................................................... 4
I
EFORE YOU BEGIN .............................................................................................. 5
B
PARTS CHECKLIST ............................................................................................. 5
ODULAR JACK REQUIREMENTS .........................................................................6
M
ETTING STARTED ............................................................................................ 6
G
INSTALLATION .......................................................................................................7
ESKTOP INSTALLATION .................................................................................. 7
D
ALL MOUNT INSTALLATION .......................................................................... 9
W
SETTING UP YOUR STATION ADDRESS ...............................................................11
HANGING THE PHONE
C
TO
A 2-9450 MODEL ............................................................................... 13
SYSTEM VERIFICATION ..................................................................................... 14
THER STATIONS ........................................................................................ 14
O
OUR STATION ........................................................................................... 14
Y
CLOCK SETUP ................................................................................................ 15
ROGRAMMING THE HOUR FORMAT ................................................................15
P
ETTING THE TIME....................................................................................... 15
S
HEADSET ....................................................................................................... 15
ASIC OPERATION............................................................................................... 16
B
AKING OUTSIDE CALLS .................................................................................16
M
USING THE HANDSET ................................................................................... 16
SING THE SPEAKERPHONE ........................................................................... 16
U
SING THE HEADSET ................................................................................... 17
U
RECEIVING INCOMING CALLS ............................................................................. 17
SING THE HANDSET ................................................................................... 17
U
SING THE SPEAKERPHONE ........................................................................... 17
U
USING THE HEADSET ................................................................................... 18
WITCHING BETWEEN USING THE SPEAKERPHONE, HANDSET, AND HEADSET .........18
S
IMER ........................................................................................................... 18
T
MUTE ........................................................................................................... 19
O NOT DISTURB ...........................................................................................19
D
OLD ............................................................................................................ 20
H
PLACING A CALL ON HOLD ............................................................................ 20
ICKING UP A CALL ON HOLD .......................................................................20
P
LASH ...........................................................................................................20
F
TEMPORARY TONE ..........................................................................................20
EDIAL ..........................................................................................................21
R
1
Page 6

REVIEWING THE REDIAL BUFFER ..................................................................... 21
AUTOMATIC BUSY REDIAL ................................................................................21
HEN YOU RECEIVE A BUSY SIGNAL .............................................................21
W
USY REDIAL IS CANCELLED WHEN ................................................................ 22
B
TRANSFER...................................................................................................... 22
RANSFERRING A CALL TO ANOTHER STATION ..................................................22
T
ECEIVING A TRANSFER FROM ANOTHER STATION ............................................. 23
R
PRIVACY ........................................................................................................ 24
ROVIDING PRIVACY ON A CALL ..................................................................... 24
P
OLUME ........................................................................................................24
V
RINGER VOLUME ......................................................................................... 24
PEAKERPHONE, HANDSET, AND HEADSET VOLUME .......................................... 25
S
ONFERENCE ..................................................................................................25
C
INTERCOM ...................................................................................................... 26
NE-TOUCH INTERCOM ................................................................................. 26
O
NTERCOMING A STATION ..............................................................................26
I
OVERRIDING A STATION USING DO NOT DISTURB ............................................27
ECEIVING AN INTERCOM ..............................................................................27
R
AGING ALL STATIONS .................................................................................27
P
PAGING A GROUP........................................................................................ 28
ISABLING OR ENABLING PAGE...................................................................... 28
D
EMORY .......................................................................................................29
M
STORING A NUMBER ....................................................................................29
HANGING A STORED NUMBER...................................................................... 30
C
TORING A CHAIN OF NUMBERS .................................................................... 30
S
STORING THE LAST NUMBER DIALED ..............................................................31
TORING A PAUSE ....................................................................................... 31
S
TORING A FLASH .......................................................................................31
S
SPECIAL MEMORY STORAGE INFORMATION ...................................................... 31
IALING A STORED NUMBER ......................................................................... 32
D
HAIN DIALING ........................................................................................... 32
C
REVIEWING A NUMBER STORED IN A MEMORY LOCATION................................... 33
TORING A MEMO....................................................................................... 33
S
EVIEWING A MEMO ....................................................................................33
R
STORING A MEMO INTO A PERMANENT MEMORY LOCATION ...............................33
ATA PORT ....................................................................................................34
D
2
Page 7

SPECIAL FEATURES .............................................................................................. 35
ADJUSTING THE RINGERS ................................................................................. 35
DJUSTING THE CONTRAST OF THE DISPLAY ........................................................ 35
A
ETTING THE PRIORITY LINE.............................................................................. 36
S
PROGRAMMING THE PAUSE DURATION................................................................ 36
ROGRAMMING THE FLASH DURATION ................................................................ 36
P
ROGRAMMING THE EXTENSION NUMBER ........................................................... 37
P
PROGRAMMING A PAGE GROUP......................................................................... 37
ROGRAMMING THE PULSE/TONE MODE .............................................................37
P
DJUSTING DO NOT DISTURB .......................................................................... 38
A
ADJUSTING THE AUTOMATIC BUSY REDIAL TIME INTERVAL .................................... 38
DJUSTING THE WAIT FOR BUSY TONE DETECT .................................................. 38
A
ETTING AUTO INTERCOM ................................................................................ 39
S
CHANGING A STATION ADDRESS ........................................................................39
ROUBLESHOOTING GUIDE ...................................................................................40
T
EPLACING THE BATTERY ......................................................................................42
R
GENERAL PRODUCT CARE .................................................................................... 43
ERVICE ............................................................................................................44
S
NDEX ............................................................................................................... 45
I
LIMITED WARRANTY ............................................................................................ 47
WARNING:
OR ELECTRICAL SHOCK HAZARD,
DO NOT EXPOSE THIS PRODUCT
TO RAIN OR MOISTURE.
TO PREVENT FIRE
CAUTION
RISK OF ELECTRIC SHOCK
THE LIGHTNING
FLASH AND ARROW HEAD WITHIN THE
TRIANGLE IS A
WARNING SIGN
ALERTING YOU OF
"DANGEROUS
VOLTAGE" INSIDE
THE PRODUCT.
DO NOT OPEN
CAUTION: TO REDUCE THE
RISK OF ELECTRIC SHOCK,
DO NOT REMOVE COVER
(OR BACK). NO USERSERVICEABLE PARTS INSIDE. REFER SERVICING
TO QUALIFIED SERVICE
PERSONNEL.
SEE MARKING ON BOTTOM / BACK OF PRODUCT
THE EXCLAMATION
POINT WITHIN THE
TRIANGLE IS A
WARNING SIGN
ALERTING YOU OF
IMPORTANT
INSTRUCTIONS
ACCOMPANYING
THE PRODUCT.
3
Page 8

INTRODUCTION
Your Four-Line Business Phone with Intercom is a full-featured phone
ideally suited for home or office use. It is designed to receive up to 4
incoming telephone lines and to serve up to 16 station users. In an
installed system, your phone provides such features as: 32 memory
locations, busy redial, hold, conference call, intercom, call transfer, LCD
display, and speakerphone capabilities.
Please read this user’s guide carefully to familiarize yourself with all the
features of your new phone. Also, make sure to retain this guide for future
reference.
4
Page 9
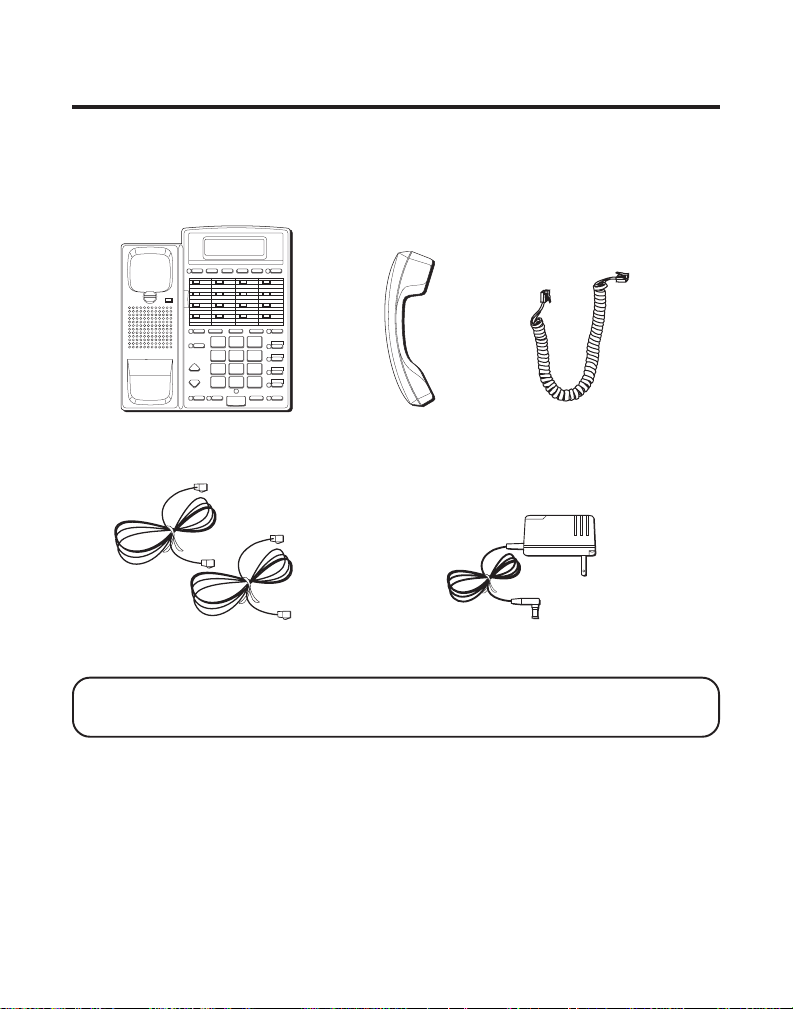
BEFORE YOU BEGIN
PARTS CHECKLIST
Make sure your package includes the following items:
STORE IN TIMER TIME SET MEMO REVIEW LOWER
1234
5678
PAGE
9101112
13 14 15 16
BUSY REDIAL FLASH PAUSE TRANSFER CONF CALL
PRIVACY
1
DEF
3
ABC
2
LINE 4
LINE 3
MNO
6
JKL
5
GHI
4
LINE 2
WXYZ
9
TUV
8
PQRS
7
VOLUME
TONE
HEADSET MUTE SPEAKERPHONE HOLD
LINE 1
OPER
0
*
#
INTERCOM
Base unit
Line cords
Handset
Handset cord
AC power supply
CAUTION: Use only the Thomson 5-2418 power supply that is compatible
with this unit. Using other power supplies may damage the unit.
5
Page 10

MODULAR JACK REQUIREMENTS
You need an RJ14 type modular jack, which is the most
common type of phone jack and might look like the one
pictured here. If you don’t have a modular jack, call your local
phone company to find out how to get one installed.
GETTING STARTED
VERY IMPORTANT: In order to have full system operation of your phone (i.e.
intercom, transfer, page, etc.), lines 1 and 2 must be connected and common
to all phones connected to the system. Only other 2-9451 or 2-9450 models are
compatible for full system operation. Also, the telephone lines must be
connected before AC power is connected. The phone may not install properly, otherwise.
Your Four-Line Business Phone with Intercom is designed for easy
installation in your home or office. It is important, however, to follow these
few simple guidelines:
• Take a few minutes to read this material so that you thoroughly
understand the sequence of steps to be followed for proper
installation of your business phone.
• As you read the instructions, you may require additional line
cords or other components not included with this product. These
items will be indicated by the words not provided.
NOTE: Make sure you keep these instructions for future reference. You may
need to add stations or make changes to the system later.
6
Page 11
INSTALLATION
IMPORTANT: It is imperative you follow these steps in sequence for proper
installation of the phone. Telephone line cords must be connected before AC
power connection is made. The phone may not install properly, otherwise.
Also, without AC power or the battery installed, pulse dialing and the flash
function will not operate.
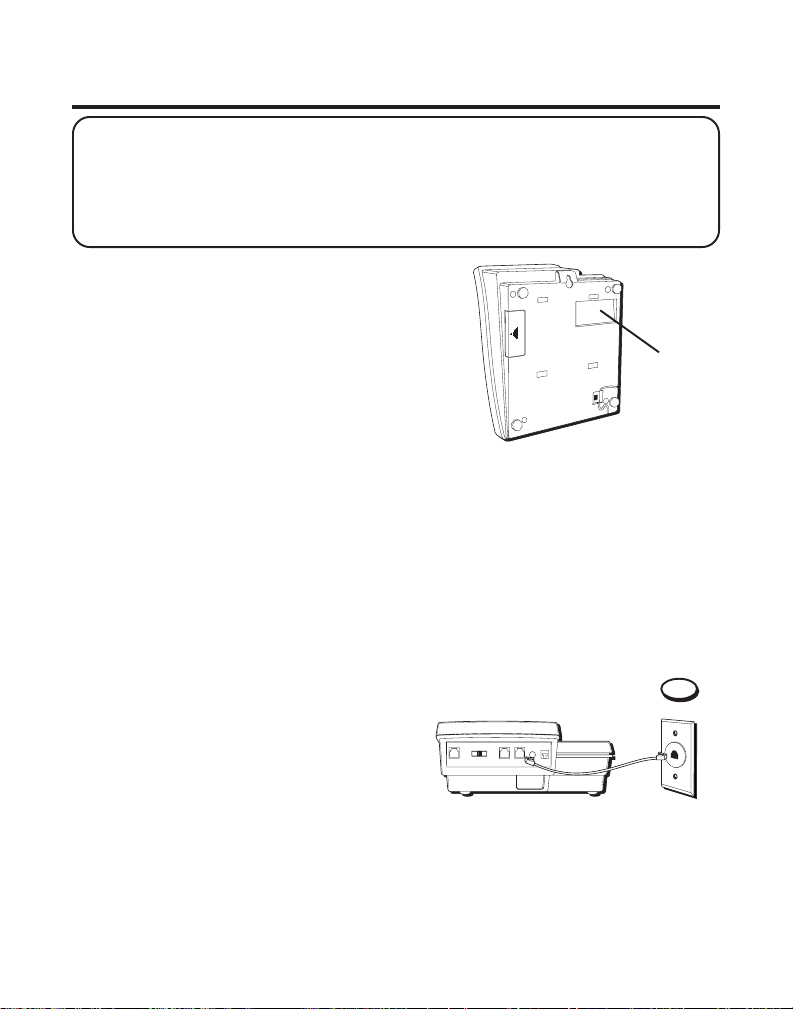
1. Carefully turn over the phone. On the
bottom is the battery compartment door.
Remove the screw on the door with a
screwdriver and open the door.
2. Install a 9V battery, paying close attention
to the battery polarity. Close the battery
compartment door, and tighten the screw
back in place. Carefully turn the phone over
again.
NOTE: The backup battery is important because should you experience a
power outage, you will still be able to use the phone.
DESKTOP INSTALLATION
1. Connect an end of one of the long
telephone line cords to the jack on
the back of the phone labeled LINE
1,2. Connect the other end to the
wall jack(s) labeled 1 & 2. There are
two possibilities for this connection.
• One 2-line RJ14 wall jack.
Connect the other end of the line
cord to the wall jack.
OR
Battery
compartment
door
1
7
Page 12
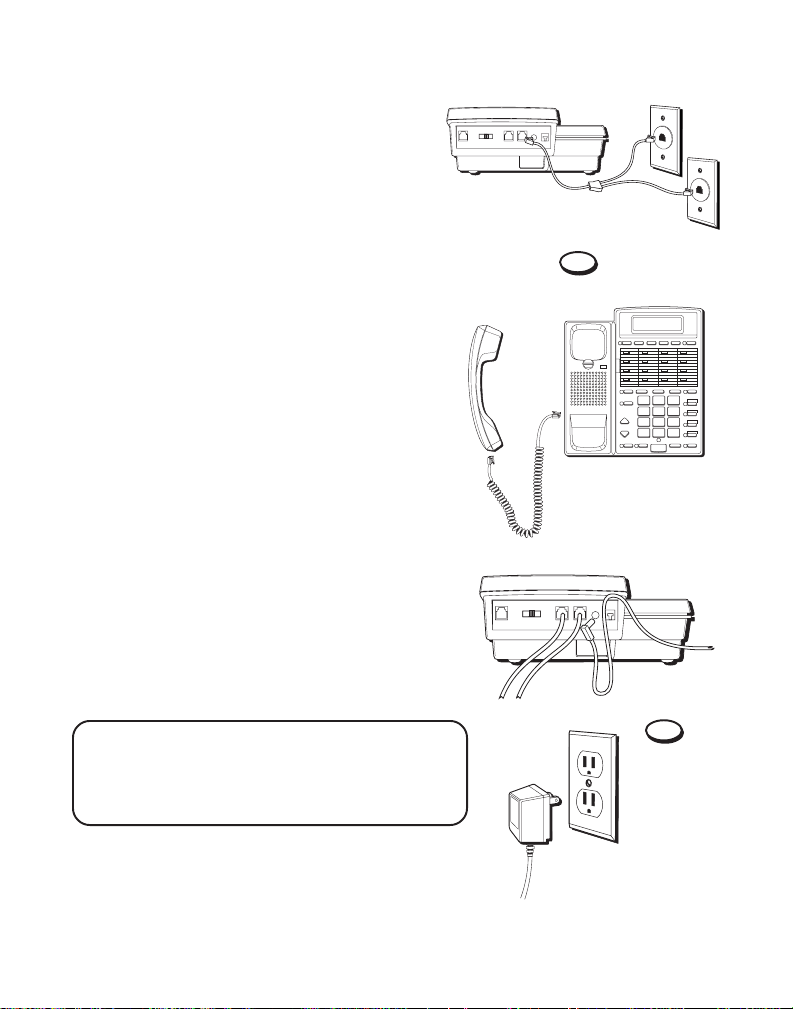
• Two single RJ11 wall jacks.
Connect the other end of the line cord
to a 2-line adapter (not
provided). Then connect the adapter
to the wall jacks with two short
telephone line cords (also not provided).
If you want to connect LINE 3 and 4, use
the same procedure as in step 1.
2. For the handset, connect one end of
the coiled handset cord to the jack on
the side of the base unit. Take the
other end of the cord and plug it into
the jack at the bottom of the handset.
Then place the handset in the cradle.
3. Plug the AC power supply cord into
the jack on the back of the unit labeled
AC 9V. Thread the cord behind the
strain relief to stabilize the cord to
prevent it from disconnecting easily.
Then plug the AC power supply into
an electrical outlet.
4. Follow the steps in “Setting Up Your
Station Address” to continue installing your phone.
2
STORE IN TIMER TIME SET MEMO REVIEW LOWER
1234
5678
PAGE
9101112
13 14 15 16
BUSY REDIAL FLASH PAUSE TRANSFER CONF CALL
PRIVACY
GHI
PQRS
VOLUME
TONE
HEADSET MUTE SPEAKERPHONE HOLD
1
DEF
3
ABC
2
LINE 4
LINE 3
MNO
6
JKL
5
4
LINE 2
WXYZ
9
TUV
8
7
LINE 1
OPER
0
*
#
INTERCOM
CAUTION: Use only the Thomson 5-2418
power supply that is compatible with this unit.
Using other power supplies may damage the
unit.
8
3
Page 13
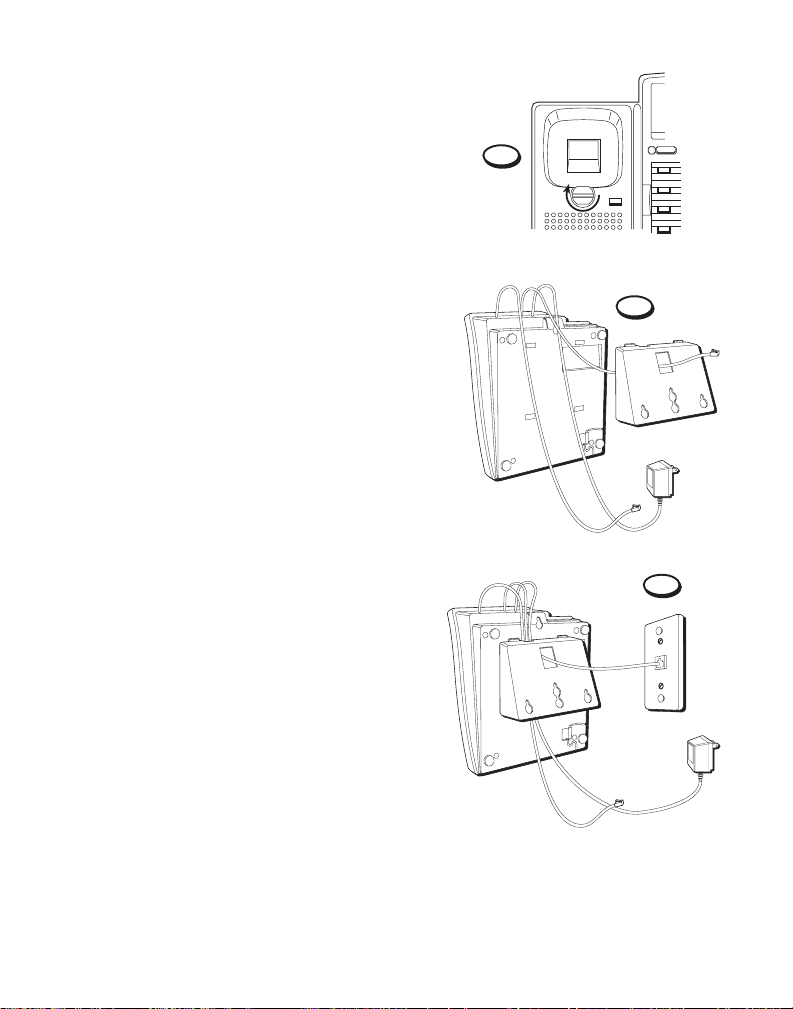
WALL MOUNT INSTALLATION
1. Turn the handset hook 180º until it
clicks into place.
2. Connect one end of the telephone
line cord to the jack on the back of
the phone labeled LINE 1,2. For full
4-line use, connect a line cord to the
LINE 3,4 jack. Thread the LINE 1,2
line cord through the hole in the
wall mount bracket. Insert the wall
mount bracket onto the bottom of
the base unit by lining up the tabs,
making sure to route the AC power
cord and the LINE 3,4 line cord into
the slot at the bottom of the bracket.
Snap it into place. Connect the LINE
1,2 and LINE 3,4 line cords to their
respective wall jacks.
3. Hold the phone against the wall
plate (not included) so that the posts
on the wall plate slide into the
keyholes on the wall mount bracket.
Slide the phone down firmly so that
it locks securely into place.
1
STORE IN
1
5
PAGE
9
13
2
3
9
Page 14
4. For the handset, connect one end of the
coiled handset cord to the jack on the
side of the base unit. Take the other end
of the cord and plug it into the jack at the
bottom of the handset. Then place the
handset in the cradle.
5. Plug the AC power supply cord into the
jack on the back of the unit labeled AC
9V. Thread the cord behind the strain
relief to stabilize the cord to prevent it
from disconnecting easily. Then plug the
AC power supply into an electrical outlet.
6. Follow the steps in “Setting Up Your
Station Address” to continue installing
your phone.
4
STORE IN TIMER TIME SET MEMO REVIEW LOWER
1234
5678
PAGE
9101112
13 14 15 16
BUSY REDIAL FLASH PAUSE TRANSFER CONF CALL
PRIVACY
GHI
PQRS
VOLUME
TONE
*
HEADSET MUTE SPEAKERPHONE HOLD
1
DEF
3
ABC
2
LINE 4
LINE 3
MNO
6
JKL
5
4
LINE 2
WXYZ
9
TUV
8
7
LINE 1
OPER
0
#
INTERCOM
5
10
CAUTION: Use only the
Thomson 5-2418 power
supply that is compatible
with this unit. Using other
power supplies may damage
the unit.
Page 15
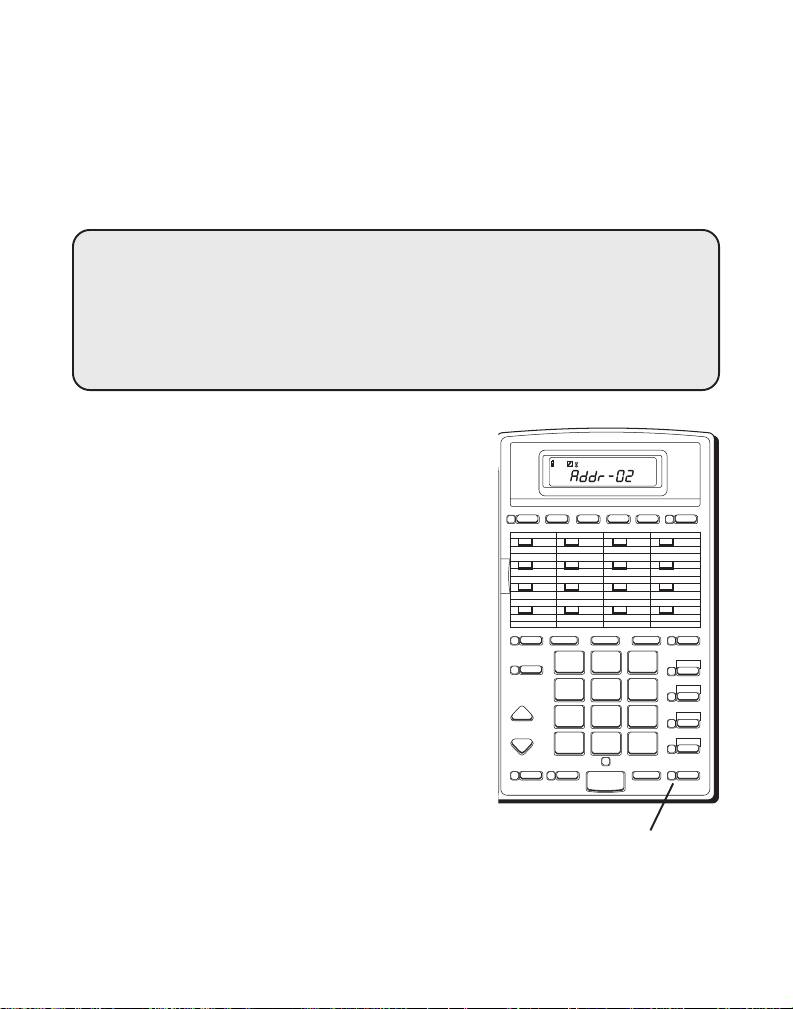
SETTING UP YOUR STATION ADDRESS
Your phone has the ability to be set up as either a 2-9451 (the default), or a
2-9450. If you have an existing 2-9450 system, this phone can be set to be
fully compatible with your system. See “Changing the Phone to a 2-9450
Model”.
VERY IMPORTANT: In order to have full system operation of your phone
(i.e. intercom, transfer, page, etc.), lines 1 and 2 must be connected and
common to all phones connected to the system. Only other 2-9451 or 2-9450
models are compatible for full system operation. Also, the telephone lines
must be connected before AC power is connected. The phone may not install
properly, otherwise.
The display reads
Addr-
.
1. Enter the station address number you want
to assign (01-16) or press the
corresponding memory button. The display
indicates what station you have entered.
2. Press the # key to confirm.The INTERCOM
indicator flashes red as it checks the
system line connections and station
address. If the line cords are connected
properly and the station address is valid,
you will hear a confirmation tone. This
indicates that the station address has been
successfully assigned.
TONE
STORE IN TIMER TIME SET MEMO REVIEW LOWER
12 34
56 78
9101112
13 14 15 16
BUSY REDIAL FLASH PAUSE TRANSFER CONF CALL
PRIVACY
PQRS
VOLUME
TONE
HEADSET MUTE SPEAKERPHONE HOLD
NUMBER
LINE
DATA PORT
12343
1
GHI
4
7
*
DEF
3
ABC
2
JKL
5
TUV
8
OPER
0
LINE 4
LINE 3
MNO
6
LINE 2
WXYZ
9
LINE 1
#
INTERCOM
EXT.
REDIAL
INTERCOM
indicator
11
Page 16
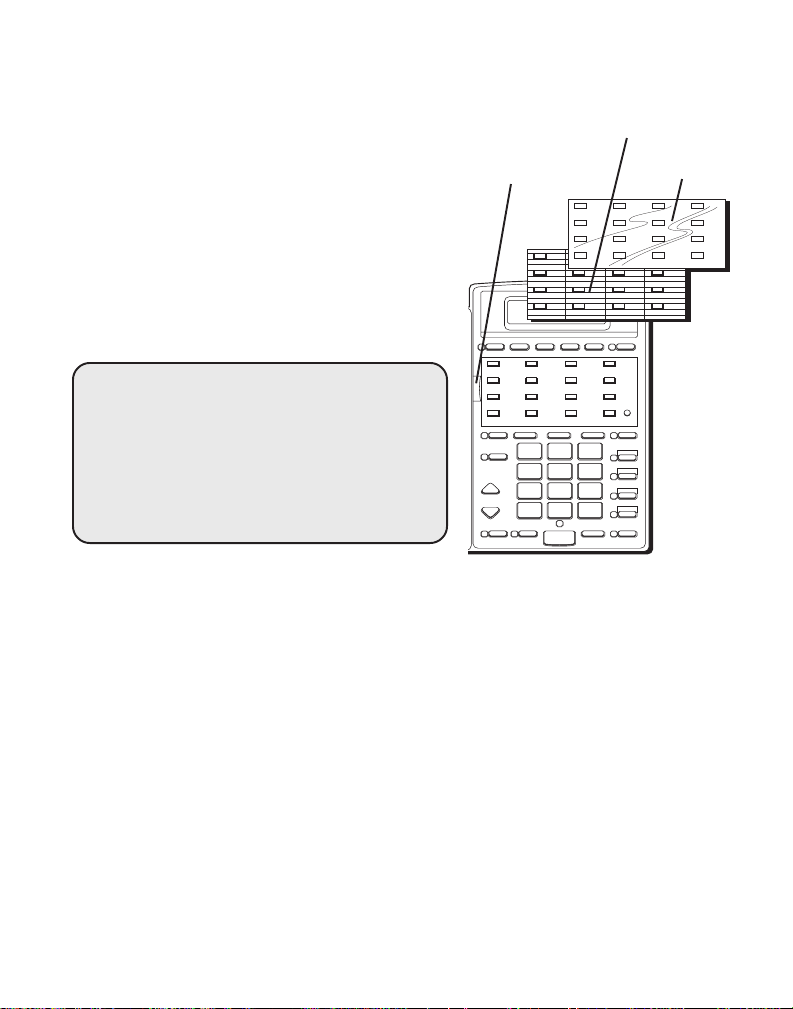
3. Push the index cover lock to the left
and lift up the acrylic memory index
cover. Remove the memory index
card. In pencil, write all the user’s
names next to the respective stations
on the memory index card.
4. Replace the memory index card, lower
the index cover back into place, and
push the index cover lock to the right
to secure the cover.
NOTE: If you hear an error tone, the
station address number you pressed has
already been assigned to another phone
or the line cords are not properly
connected. Check the line cord
connections, or change the station address
if necessary.
NOTE: If you have lines 3 and 4 on your
phone, you must program extension
numbers for correct operation of the
transfer feature. See “Programming the
Extension Number”.
Lines 3 and 4 DO NOT have to be common
for all phones on the system; therefore, the
system can have a total of up to 34 lines
connected.
Memory
index
Index
card
cover
lock
12 34
56 78
9101112
13 14 15 16
STORE IN TIMER TIME SET MEMO REVIEW LOWER
BUSY REDIAL FLASH PAUSE TRANSFER CONF CALL
PRIVACY
1
DEF
3
ABC
2
JKL
5
GHI
4
TUV
8
PQRS
7
VOLUME
HEADSET MUTE SPEAKERPHONE HOLD
OPER
0
TONE
*
LINE 4
LINE 3
MNO
6
LINE 2
WXYZ
9
LINE 1
#
INTERCOM
Memory
index
cover
12
Page 17

CHANGING THE PHONE
A 2-9450 MODEL
TO
This phone can also be set up to be
compatible with an existing 2-9450
system.
1. Press PROGRAM, which is under
the acrylic memory index cover
and memory index card.
2. Press 0.
3. Press the # key to confirm. The
display reads
4. Enter the station address number
you want to assign (01-16) or press
the corresponding memory button.
The display indicates what station
you have entered.
5. Press the # key to confirm.The
INTERCOM indicator flashes red as
it checks the system line
connections and station address. If
the line cords are connected
properly and the station address is
valid, you will hear a confirmation
tone. This indicates that the station
address has been successfully
assigned.
Addr-
.
123 4
567 8
9101112
13 14 15 16
STORE IN TIMER TIME SET MEMO REVIEW LOWER
PAGE
BUSY REDIAL FLASH PAUSE TRANSFER CONF CALL
PRIVACY
VOLUME
HEADSET MUTE SPEAKERPHONE HOLD
DEF
3
ABC
2
1
GHI
4
PQRS
7
TONE
*
LINE 4
PROGRAM
LINE 3
MNO
6
JKL
5
WXYZ
TUV
8
OPER
0
button
LINE 2
9
LINE 1
#
INTERCOM
INTERCOM
indicator
NOTE : If you program the 2-
9451 as a 2-9450, the Page
Group feature will not be
available. Line 3 and line 4 must
be common for all phones on
the system.
13
Page 18

SYSTEM VERIFICATION
The following procedures should be used to test the system’s
configuration and identify possible line connection errors. The phone must
be connected to the AC power outlet, lines 1 and 2 must be connected to
the LINE 1,2 jack, and the phone must be programmed with a station
address number.
OTHER STATIONS
1. Press LINE 1.
2. Look at all the other stations. If they all indicate line 1 is being used, the
connection is correct.
OR
1. Press the INTERCOM button. The display reads
indicator comes on.
2. Enter a station address to check by using the keypad. The display
indicates what station you have entered. If the station you entered is
connected to the system, a paging sound will be heard at the station
you are calling and the INTERCOM indicator will flash red. If the station
is not connected to the system, you will hear an error tone, and intercom will be cancelled.
YOUR STATION
1. Press REVIEW.
2. Press INTERCOM. The display will read
address (01-16).
NOTE: To change the station address, see “Changing a Station Address”.
Addr-
INT-
and the INTERCOM
with the two-digit station
14
Page 19

CLOCK SETUP
PROGRAMMING THE HOUR FORMAT
The clock is capable of being set to a 12- or 24-hour format. The default is
12-hour mode.
1. Press PROGRAM.
2. Press TIME SET.
3. Press 0 for 12-hour mode, or 1 for 24-hour mode.
4. Press # to confirm.
SETTING THE TIME
1. Press TIME SET.
2. Enter the 4-digit time. For instance, in 12-hour mode, 9:00 a.m. would
be 0900.
HEADSET
An optional headset can be used as an alternative to using the handset, and is especially
useful for long calls. Contact Hello-Direct,
Plantronics, or your local telephone products
dealer for the availability of a compatible
headset.
Connect the coiled headset cord to the headset
jack on the bottom of the base unit.
When the headset is not in use, simply press
the HEADSET button to turn off headset mode
and return to normal handset or speakerphone
mode.
Headset
jack
CAUTION: Use only an UL registered headset. Using a
non-registered headset may damage the unit.
15
Page 20

BASIC OPERATION
Your phone provides the convenience of accessing 4 separate telephone
lines, each obtained from the telephone company and each having its own
phone number. This is generally applicable to small offices. It provides for
16 telephones (or stations) to share multiple lines. Each station is
interconnected to all others by an intercom.
MAKING OUTSIDE CALLS
USING THE HANDSET
1. Pick up the handset and the phone will select an open line.
2. Wait for a dial tone.
3. Dial a phone number.
4. Hang up the handset when finished.
USING THE SPEAKERPHONE
1. Press the SPEAKERPHONE button and the phone will select an open
line.
2. Wait for a dial tone.
3. Dial a phone number.
4. Press SPEAKERPHONE when finished.
NOTE: Only one-way conversation is possible in speakerphone mode. When
you are speaking, you are transmitting. When you are listening, you are
receiving. You can’t do both at the same time. The phone will automatically
switch between transmitting and receiving depending on the level of the voice
or the room noise picked up by the speakerphone mic.
16
Page 21

USING THE HEADSET
1. Press the HEADSET button. The HEADSET indicator blinks.
2. Press the line you want.
3. Wait for a dial tone.
4. Dial a phone number.
5. Press HEADSET to turn it off.
NOTE: If the headset is not connected, an error tone is heard when the
HEADSET button is pressed.
RECEIVING INCOMING CALLS
USING THE HANDSET
When the phone rings, the corresponding line’s indicator flashes rapidly.
1. Pick up the handset. The line is automatically selected.
2. When you are finished, hang up the handset.
USING THE SPEAKERPHONE
When the phone rings, the corresponding line’s indicator flashes rapidly.
1. Press the SPEAKERPHONE button. The speakerphone comes on
automatically and selects a line.
2. When you are finished, press SPEAKERPHONE.
17
Page 22

USING THE HEADSET
1. When the phone rings, the corresponding line’s indicator flashes
rapidly.
2. Press the line button. If the headset mode is not on, you must first press
HEADSET. The HEADSET indicator blinks.
3. When you are finished, press the HEADSET.
NOTE: Whether you are making or receiving a call, the caller will be
disconnected if you press another line without putting the call on hold first.
SWITCHING BETWEEN USING THE SPEAKERPHONE, HANDSET, AND HEADSET
To switch to the speakerphone, press SPEAKERPHONE. The speakerphone
indicator will come on.
To switch to the handset, pick up the handset. The speakerphone or
headset will go off.
To switch to the headset, press HEADSET. The headset indicator will come
on.
TIMER
During a phone conversation, a call will be timed. The call time and timer
symbol show on the display. When finished, the total time of the call stays
on the display for 15 seconds. To review the timer once it has disappeared
from the display, press the TIMER button. To review the call timer for all 4
lines, continue pressing TIMER.
18
Page 23

MUTE
Use the MUTE button to interrupt a phone conversation to talk privately
with someone else in the room. A conversation can be muted with
speakerphone, handset, or headset use.
1. Press MUTE to activate the mute feature. The mute indicator will come
on.
2. Press MUTE again to turn it off.
NOTE: Switching from speakerphone to handset or headset cancels mute.
DO NOT DISTURB
This feature can be set at individual telephones to disable (silence) an
incoming ring signal, intercom, or page. To program the duration of Do
Not Disturb, see “Adjusting Do Not Disturb”.
1. While the phone is not in use, press PRIVACY. The indicator blinks and
the display shows, in hours, how long the ringer will be disabled. When
there is an incoming call or an intercom call, the status indicators will
function as normal but no ringing or voice announcements will be
heard.
2. To cancel, press PRIVACY again.
NOTE: To override Do Not Disturb, see “Intercom”. Do Not Disturb is
automatically cancelled when you place or answer a call.
19
Page 24

HOLD
PLACING A CALL ON HOLD
1. Press HOLD. The indicator for the line on hold flashes green.
2. Hang up or press another line button.
The phone emits a beep every 30 seconds as a reminder. At the other
stations, the indicator will blink red but no beep will be heard.
NOTE: If you put a call on HOLD while in PRIVACY mode, no one but you
can access the line on hold. Anyone trying to access the line will receive an
error tone.
PICKING UP A CALL ON HOLD
1. Lift the handset, or press SPEAKERPHONE or HEADSET.
2. Press the line on hold.
NOTE: The call on hold can be picked up at any station using this procedure.
FLASH
Use the FLASH button to activate custom calling services such as call waiting
or call transfer, which are available through your local phone company.
TEMPORARY TONE
If you have pulse (rotary) service, and want to access customer calling
services that require tone dialing (such as getting information from a local
bank), you can use this feature.
• Press the TONE button ( * ) after you have connected to the customer
calling service to enable tone dialing.
When you hang up, the phone automatically resumes pulse dialing.
TIP: Temporary Tone can also be used while storing numbers in memory by
pressing TONE ( * ) at the necessary point in the storage sequence.
20
Page 25

REDIAL
1. Pick up the handset, or press SPEAKERPHONE or HEADSET.
2. The line is automatically selected. (For headset, press the line you
want.)
3. Wait for a dial tone.
4. Press REDIAL.
NOTE: The redial function will not operate if the number to be redialed
contains more than 30 digits. If the number is longer than that, you will hear
an error tone.
REVIEWING THE REDIAL BUFFER
1. Press REVIEW.
2. Press REDIAL. The last number stored in the redial buffer shows on the
display.
AUTOMATIC BUSY REDIAL
If the phone number dialed is busy, your telephone can automatically
redial the number up to 10 times. It will use the line currently selected to
make the calls.
WHEN YOU RECEIVE A BUSY SIGNAL
1. Hang up the phone.
2. Press BUSY REDIAL. The busy redial indicator will flash between redial
attempts and the speaker will beep when a connection is made. If you
do not pick up the handset or speakerphone within 60 seconds, the
telephone will disconnect.
21
Page 26

BUSY REDIAL IS CANCELLED WHEN
• You press BUSY REDIAL again.
or
• A call comes in on the same line between redial attempts.
or
• You pick up the handset or press SPEAKERPHONE.
or
• Ten attempts have been made and the line is still busy.
NOTE: Auto busy redial is factory set to a 30 second interval between call
attempts. You can reprogram the interval if you desire. See “Adjusting Busy
Redial”.
TRANSFER
TRANSFERRING A CALL TO ANOTHER STATION
1. With the caller on the line, press TRANSFER.
2. Within 5 seconds of pressing TRANSFER, press the 2-digit station
location button (01-16) or memory button where you wish to transfer
the call. The line’s indicator blinks yellow until the party you are
transferring to picks up the call. Once picked up, the indicator will turn
solid red. The indicator on the receiving party’s line will rapidly flash
yellow and ring at a different frequency until he or she picks up the call.
• If the transferred call has not been picked up at the other station
within 30 seconds, you will hear a beep at your station. The transfer
cancels, the line is put on hold, and the line indicator flashes green.
22
Page 27

• If the party at the other station doesn’t pick up the transferred call,
and you wish to attempt to transfer to another station, press the line
you want and repeat the transfer process.
• If the station number you pressed is not valid, you will hear an error
tone and the transfer cancels.
• If the party you pressed is in Do Not Disturb mode,
DND
shows on the
display. The transfer is cancelled and the call is put on hold.
• If the party’s station is busy,
BUSY
shows on the display.
RECEIVING A TRANSFER FROM ANOTHER STATION
If a call is being transferred to your station, you will hear a different ring
sound. The indicator of the line being transferred to you flashes yellow. To
answer the call, press that line button.
If you are on the line when a call is being transfered to you, you will hear 3
pending beeps to alert you of the call and the light will flash yellow. You
can put your current call on hold by pressing HOLD, then pick up the new
transfered call by pressing the line button.
NOTE: During the transfer, the only two stations that can access the line being
transferred are: a) the transferring station, or; b) the station receiving the
transfer.
23
Page 28

PRIVACY
While in use, a line can be secured so that no one else can listen to the
conversation. This feature only applies to 2-9450/ 2-9451 phones, however.
Other phones which are not compatible with these models can still access
the line.
PROVIDING PRIVACY ON A CALL
At any time during a conversation, you can use the Privacy feature to
secure the line.
1. While on a line, press PRIVACY. The indicator will come on.
2. To cancel, press PRIVACY again or hang up.
NOTE: If you put a call on hold while in Privacy, no one but you can access the
line on hold.
VOLUME
The ringer, speaker, and handset/headset volumes can be set
independently with the VOLUME up and down buttons. Your telephone
comes with preset settings which can be adjusted to individual taste. To
return to the preset settings, press both the up and down buttons
simultaneously. There are 15 possible volume settings per mode. A tone
will indicate when the top or bottom level is reached.
RINGER VOLUME
1. While the phone is on the hook, press the VOLUME up or down button.
The phone will ring with the current setting.
24
Page 29

2. While holding the up or down button, the ringer volume will sound the
current setting. Release when you’ve reached the desired volume level.
Tapping either button, while the phone is ringing, will allow you to
adjust the volume one step at a time. The phone will store the setting
once the button is released.
NOTE: To turn the ringer off, on, or change the ringing pattern,
see “Adjusting the Ringers”.
SPEAKERPHONE, HANDSET, AND HEADSET VOLUME
• While the phone is in use, press the VOLUME up or down buttons
to the desired volume. The phone will store the setting once the button
is released.
NOTE: The handset and headset volumes will return to the default settings
after you hang up the phone.
CONFERENCE
This feature allows you to have a 3-way conversation using any
combination of 2 lines.
To connect
1. To place a call, press the line you want. If you already have someone on
the line, skip to step 2.
2. Press HOLD.
3. Place a call on another line.
4. Press CONFERENCE.
5. Talk to both parties.
NOTE: If you have more than one line on hold, and you are attempting a
conference, you must select the line you want to conference.
25
Page 30

To disconnect one of the parties
Simply press the line of the person you want to continue talking to, and
the other party will be automatically disconnected.
To disconnect both parties
Simply hang up the handset, or press SPEAKERPHONE or HEADSET.
NOTE: By pressing HOLD first, you may then disconnect from each party
individually .
INTERCOM
ONE-TOUCH INTERCOM
You can intercom a station by simply pressing the station number
(memory keys 1-16). The handset must be hung up and neither the
speakerphone nor the headset can be in use for this feature to work.
INTERCOMING A STATION
1. If the INTERCOM indicator is red, it is in use. Wait until the indicator
goes out.
2. Press INTERCOM. The indicator will turn green. (Pick up the handset if
you want to use it instead.)
3. Press the 2-digit station number (01-16) or memory button you want.
The station you want will ring and its INTERCOM indicator will flash red.
If the station called does not answer in 90 seconds, intercom will be
cancelled. When the person you want to call answers, the speakerphone
will automatically come on. If you want to use the handset, pick it up.
For the headset, press HEADSET.
4. To end the conversation, hang up or press INTERCOM.
26
Page 31

NOTE: You will hear an error tone if the station address is not valid or not
connected to the system. If the station you want to reach is busy, the display
will show BUSY and the party will hear a pending tone, alerting him of the
intercom. If the party’s station is in Do Not Disturb (DND) mode, your
station’s PRIVACY indicator will flash. To override DND, see “Overriding a
Station Using Do Not Disturb”.
OVERRIDING A STATION USING DO NOT DISTURB
1. Press INTERCOM.
2. Press the memory location for the station you want to reach. If the
station is in Do Not Disturb (DND), the display will read
DND
and the
PRIVACY indicator will flash.
3. To override DND, press LOWER, then PRIVACY. The intercom will then
ring at the desired station.
NOTE: This only overrides the privacy at the station you are trying to reach.
All other stations using DND will be unaffected.
RECEIVING AN INTERCOM
The INTERCOM indicator will flash red to let you know someone is trying
to intercom you. The display will also read
Int-
followed by the station
address attempting to reach you. Press INTERCOM. (Pick up the handset
or press HEADSET if you want to use it instead.)
PAGING ALL STATIONS
1. Lift the handset.
2. Press PAGE and listen for the beep. The other stations will automatically
activate their speakphones and receive your page.
3. Talk into the handset. You will have 30 seconds paging in this mode.
After 30 seconds, the page will be cancelled.
4. When finished, hang up.
NOTE: If no page group number is assigned, all stations will be paged.
27
Page 32

PAGING A GROUP
1. Lift the handset.
2. Press LOWER.
3. Press PAGE.
4. Press the one digit (1-9) number for the group you want to page. Press 0
to page all stations.
5. Listen for the beep. The other stations in the specified group will
automatically activate their speakphones and receive your page.
6. Talk into the handset. You will have 30 seconds paging in this mode.
After 30 seconds, the page will be cancelled.
7. When finished, hang up.
NOTE: To program your own page group number, see “Programming Your
Page Group”.
Also, phones which have the page function disabled or those that are in Do
Not Disturb mode cannot be paged. Paging can only be done from the
handset or headset.
DISABLING OR ENABLING PAGE
The station page can be disabled or enabled on each individual station.
The default is set to enable.
1. With the handset hung up, press STORE IN.
2. Press PAGE.
3. Press 0 for disable, 1 for enable.
4. Press # to confirm.
28
Page 33

MEMORY
Each of the 16 memory buttons has the capability of storing 2 separate
telephone numbers (up to 30 digits each). Each memory button accesses
an upper and a lower memory location. The LOWER button accesses those
numbers stored in the lower memory locations.
STORING A NUMBER
1. Press the STORE IN button. The STORE indicator comes on.
2. Enter the phone number you want to store using the keypad digits. The
numbers you enter show on the display.
3. Press STORE IN again. The STORE indicator blinks red.
4. Press the memory location button (1-16) where you want to store the
number. If you want to store it in upper memory, simply press the
memory location button. If you want to store it in lower memory, press
the LOWER button. The red indicator comes on. Press the memory
location button where you want to store the number.
5. For future reference, you may want to write the name or number of the
party you have stored in this location in the corresponding space on the
memory index card.
6. Repeat steps 1-5 for any additional numbers you want to store, up to a
total of 32.
7. To cancel the storing procedure at any time, press STORE IN. If the
indicator is blinking, press it once. If it is continuously lit, press it twice.
NOTE: The storage procedure will automatically cancel after 15 seconds if no
keys are pressed.
Also, when pulse mode is used, pressing the TONE “*” key before
programming will store all digits in tone.
29
Page 34

CHANGING A STORED NUMBER
If you want to change the stored number, simply enter the new number
over the old number using the previous memory storing procedure. To
erase a stored number, press STORE IN twice, then the memory location
you want to erase.
STORING A CHAIN OF NUMBERS
You can link together a dialing sequence of phone numbers in separate
memory locations by combining them in a single memory location or have
another memory location stored in one of the locations to be linked.
For example Memory Location
Local access number of long 6
distance company
Authorization code (ID) 7
Where entire sequence is to be stored 8
including long distance phone number
Storing
1. Press STORE IN.
2. Press memory location 6.
3. Press PAUSE.
4. Press memory location 7.
5. Press PAUSE.
6. Enter long distance number.
7. Press STORE IN.
8. Press location 8, where the entire location is to be stored.
9. Write the name for this location on the memory index card.
NOTE: When a chain number is stored in a memory location, it cannot be
stored as another chain number sequence in a separate memory location.
30
Page 35

STORING THE LAST NUMBER DIALED
You can quickly and easily store into memory the last number dialed by
pressing the redial button. Follow steps #1-7 of “Storing a Number ”, but
press REDIAL instead of entering the number through the keypad.
STORING A PAUSE
Use the PAUSE button to insert a pause when a delay is needed in the
dialing sequence (for example, when you must dial a 9 to get an outside
line or when you must enter codes to access your bank’s information line).
STORING A FLASH
Use the FLASH button to insert a flash into your stored numbers for
special features from your telephone company which may require it.
SPECIAL MEMORY STORAGE INFORMATION
If more than 30 digits are attempted to be stored, an error tone will occur
and the sequence will stop.
Because 30 is the maximum number of digits you can store in a single
memory location, it is important to note the number of digits consumed
when you store function keys. Memory digits are used as follows:
Button pressed Digits used
Telephone keypad number 1
Pause button 1
Flash button 1
Tone/pulse switching 2
Memory location 3
Redial button amount of redialed number
31
Page 36

DIALING A STORED NUMBER
1. Pick up the handset, press SPEAKERPHONE, or press HEADSET.
2. Press the line you want.
3. Wait for a dial tone.
4. Press the memory button of the person you want to call. If the number
is stored in lower memory, press the LOWER button first. The number
automatically dials.
CHAIN DIALING
This process allows you to dial a succession of stored numbers from
separate memory locations. This is useful when you must dial several
sequences of numbers, such as with frequent calls via a telephone
company long distance provider.
For example Memory location
Local access number of long 6
distance company
Authorization code (ID) 7
Long distance phone number 8
Using
1. Press the line you want.
2. Press memory location 6. (Press pause if needed.)
3. Press memory location 7. (Press pause if needed.)
4. Press memory location 8.
32
Page 37

REVIEWING A NUMBER STORED IN A MEMORY LOCATION
1. Press REVIEW.
2. Press the memory location you want to review. The display shows the
number stored in that location.
NOTE: If the memory location contains a chain dial number, the display
shows the number of the memory location only.
STORING A MEMO
With this feature, you are able to temporarily store a number into memory
(up to 30 digits), even while you are on the phone.
1. Press MEMO.
2. Enter the phone number you want to store using the keypad digits.
3. Press MEMO to exit.
REVIEWING A MEMO
1. Press REVIEW.
2. Press MEMO. The number will be displayed on the display.
STORING A MEMO INTO A PERMANENT MEMORY LOCATION
1. Press STORE IN.
2. Press MEMO.
3. Press STORE IN.
4. Press the memory location key where you want to store the memo.
33
Page 38

DATA PORT
This phone is equipped with a DATA PORT jack for you to connect an
auxiliary phone device, such as a fax machine, computer modem,
answering machine, or even a cordless phone.
The DATA PORT switch on the back of the phone controls the Data Port
function by enabling you to choose the line that the DATA PORT uses,
either line 1, line 2, line 3, or line 4.
You can use the DATA PORT to hook up your fax machine, for example,
and then set the DATA PORT switch to LINE 4 in order to receive faxes on
the phone number for line 4.
In the event that you are talking to someone on line 4 and want that
person to fax something to you, change the DATA PORT switch to LINE 2
or LINE 3, and give the person the phone number for line 2 or line 3. Your
fax machine now can receive calls on line 2 or line 3.
IMPORTANT: Be sure to switch the fax machine back to the normal line
when you are done because outside callers who do not know that you have
switched lines will not be able to reach your fax machine if they dial the line 4
number.
34
Page 39

SPECIAL FEATURES
ADJUSTING THE RINGERS
The ringers for all 4 of the lines can be set independent of one another.
1. Press STORE IN.
2. Press the desired line button.
3. Press 0-4 for different ringer sounds (0 disables).
4. Press # to confirm.
NOTE: The line indicators will still continue to flash for incoming calls even
with the ringer disabled.
ADJUSTING THE CONTRAST OF THE DISPLAY
1. Press STORE IN.
2. Press VOLUME up to increase the contrast, VOLUME down to decrease.
3. Press # to confirm.
NOTE: To change the display to the default contrast setting, press + and together, then # to confirm.
35
Page 40

SETTING THE PRIORITY LINE
A priority line allows you to select one of the 4 lines to have precedence
over the other 3 lines.
1. Press STORE IN.
2. Press LOWER.
3. Press any line button to enter Priority Line mode.
4. Press the line button you want to have priority.
5. Press # to confirm.
NOTE: To change the priority line, repeat the same process but choose a
different line in step 4.
PROGRAMMING THE PAUSE DURATION
1. Press PROGRAM.
2. Press PAUSE.
3. Press the amount for the duration (0-9); i.e. 1=100ms, 9=900ms. The
default is 0 for automatic dial tone detect.
4. Press # to confirm.
PROGRAMMING THE FLASH DURATION
1. Press PROGRAM.
2. Press FLASH.
3. Press the amount for the duration (1-9); i.e. 1=100ms, 9=900ms. The
default is 6.
4. Press # to confirm.
36
Page 41

PROGRAMMING THE EXTENSION NUMBER
The line 3 and line 4 extension numbers are used for some of the
advanced functions utilized by the system.
1. Press PROGRAM.
2. Press the line you want to set.
3. Enter the 4-digit extension number (0-9 for each digit).
4. Press # to confirm.
PROGRAMMING A PAGE GROUP
Your station can be assigned to one of a total of 9 groups for the paging
functions. Each station in a page group must be programmed as follows:
1. Press PROGRAM.
2. Press PAGE.
3. Press the page group number (0-9) you want to assign to your station.
4. Press # to confirm.
NOTE: The default is 0 for no page group assignment.
PAGE
shows on the display.
PROGRAMMING THE PULSE/TONE MODE
1. Press PROGRAM.
2. Press the asterisk (*) key.
3. Press 0 for tone, 1 for pulse.
4. Press # to confirm.
37
Page 42

ADJUSTING DO NOT DISTURB
The length of time before the Do Not Disturb feature is cancelled can be
adjusted from 1 to 9 hours, or unlimited.
1. Press STORE IN.
2. Press PRIVACY.
3. Press the keypad digit (1-9) for the desired length of time, or 0 for
unlimited.
4. Press # to confirm.
ADJUSTING THE AUTOMATIC BUSY REDIAL TIME INTERVAL
The busy redial default for the time between call attempts is set for 30
seconds but can be adjusted in 10 second increments between 0 and 90
seconds.
1. Press PROGRAM.
2. Press BUSY REDIAL.
3. Press the keypad digit 0-9 to set the desired length of time
corresponding to 0-90 seconds.
4. Press # to confirm.
ADJUSTING THE WAIT FOR BUSY TONE DETECT
The time the phone waits until it receives a busy tone can also be
adjusted.
1. Press PROGRAM.
2. Press LOWER.
3. Press BUSY REDIAL.
4. Press the keypad digit 0-5 to set the desired length of time
corresponding to 0.5-5.5 seconds.
5. Press # to confirm.
38
Page 43

SETTING AUTO INTERCOM
The intercom function requires picking up the handset or pressing
INTERCOM when you receive an intercom call. For “hands-free”
operation, the phone can be set to automatically answer in the
speakerphone mode when being intercommed.
TIP: You can use this feature for room monitoring.
1. Press PROGRAM.
2. Press LOWER.
3. Press INTERCOM.
4. Press the digit for the desired default mode. Press 1 for automatic
intercom operation during intercom, or 0 for manual intercom
operation.
5. Press # to confirm.
CHANGING A STATION ADDRESS
1. Press PROGRAM.
2. Press INTERCOM. The display reads
3. Press the new 2-digit station address (01-16) or memory location button
you want.
4. Press # to confirm. The indicator will blink red while the phone checks
the new station location. If it is already assigned, you will hear an error
tone. You must then select another one. The INTERCOM indicator will
turn off.
Addr-
.
39
Page 44

TROUBLESHOOTING GUIDE
In case of difficulty, please check the following Troubleshooting Guide
before seeking service.
Problem Solution
No dial tone • Check installation:
Dial tone is OK, but the • Make sure the pulse/tone mode is programmed correctly.
phone does not dial out.
You cannot be heard by • Is the handset or headset cord inserted properly and
the other party. securely?
–– Are the telephone line cords connected to the phone and
the wall jack? Are they damaged?
• Does the hook switch pop up when the handset is lifted?
• Check the SPEAKERPHONE button. Is the indicator off?
• Is the pulse/tone mode programmed correctly? Pulse or tone
may not be compatible with your local dialing service.
• Disconnect the phone from the wall jack and connect another
phone to the same jack. If there is no dial tone in the second
phone, the problem might be your wiring or local service.
• Is MUTE on?
Phone does not ring. • Is the ringer turned off?
• Is Do Not Disturb activated?
• You may have too many extension phones on your line. Try
unplugging some phones.
• See solutions for “No dial tone.”
40
Page 45

Problem Solution
Incoming voice too low • Check setting of volume control.
or none at all.
Indicator and tone • This is normal as power is fluctuating as phone dials.
feedback flutter when
dialing in pulse mode
Memory dialing
doesn’t work • Did you follow proper dialing sequence?
Battery LOW indicator • The 9V battery needs replacing or is not installed.
blinks or is solid
Intercom does not • Make sure lines 1 and 2 are connected properly and
function correctly common to all phones on the system.
Transfer does not • Make sure lines 1 and 2 are connected properly and
function correctly common to all phones on the system.
Display reads
Addr-
• Did you program the memory location keys correctly?
• Make sure the pulse/tone mode is programmed correctly.
• Make sure all station addresses involved have been
assigned.
• Check the connections for lines 3 and 4.
• Make sure the extension number has been programmed for
lines 3 and 4.
• The station address needs to be re-assigned due to a
duplicate station address in the system. See “Changing the
Station Address”.
41
Page 46

REPLACING THE BATTERY
Your Four-Line Business Phone with
Intercom has been designed to accept a
9-volt battery for backup power. In the
event you experience a power outage, you
will still be able to use the phone.
1. Carefully turn over the phone. On the
bottom is the battery compartment
door. Remove the screw on the door
with a screwdriver.
2. Open the door and remove the old
battery.
3. Install a new 9V battery, close the
battery compartment door, and tighten
the screw back in place.
CAUTION: Replace only with a 9-volt,
alkaline battery.
Battery
compartment
door
42
Page 47

GENERAL PRODUCT CARE
To keep your telephone working and looking good, follow
these guidelines:
• Avoid putting the phone near heating appliances and devices that
generate electrical noise (for example, motors or fluorescent lamps).
• DO NOT expose to direct sunlight or moisture.
• Avoid dropping the handset, as well as other rough treatment to
the phone.
• Clean the phone with a soft cloth.
• Never use a strong cleaning agent or abrasive powder because this will
damage the finish.
• Retain the original packaging in case you need to ship the phone at a
later date.
43
Page 48

SERVICE
The FCC requires this product to be serviced only by the manufacturer or
its authorized service agents. In accordance with FCC requirements,
changes or modifications not expressly approved by Thomson Consumer
Electronics could void the user’s authority to operate this product. For
instructions on how to obtain service, refer to the warranty included in this
guide or call Consumer Information at 1-800-448-0329.
Attach your sales receipt to the booklet for future reference or jot down the
date this product was purchased or received as a gift. This information will
be valuable if service should be required during the warranty period.
Purchase date _____________ Name of store_______________________
44
Page 49

INDEX
A
Adjusting Do Not Disturb 37
Adjusting the Automatic Busy Redial
time interval 38
Adjusting the contrast of the
display 35
Adjusting the ringers 35
Adjusting the wait for busy tone
detect 38
Automatic Busy Redial 21
B
Basic operation 16
C
Changing a station address 39
Changing the phone to a 2-9450
model 13
Cleaning the phone 43
Clock setup 15
Conference 25
D
DATA PORT jack 34
Desktop installation 7
Do Not Disturb 19
F
Flash 20
G
General product care 43
H
Headset 15
Hold 20
I
Installation 7
Intercom 26
Introduction 4
L
Limited warranty 47
M
Making outside calls 16
Memory 29
Modular jack requirements 6
Mute 19
P
Parts checklist 5
Product care 43
Programming a page group 37
Programming the extension number 37
Programming the Flash duration 36
Programming the Pause duration 36
Programming the pulse/tone mode 37
45
Page 50

INDEX
R
Receiving incoming calls 17
Redial 21
Replacing the battery 42
S
Service 44
Setting Auto Intercom 39
Setting the Priority Line 36
Setting up your station address 11
Special features 35
System verification 14
T
Timer 18
TONE button 20
Transfer 22
Troubleshooting guide 40
V
Volume 24
W
Wall mount installation 9
Warranty 47
46
Page 51

LIMITED WARRANTY
What your warranty covers:
• Any defect in materials or workmanship.
For how long after your purchase:
• One year.
(The warranty period for rental units begins with the first rental or 45 days from date of shipment to the
rental firm, whichever comes first.)
What we will do:
• Provide you with a new or, at our option, a refurbished unit.
• The exchange unit is under warranty for the remainder of the original product’s warranty period.
How to make a warranty claim:
• Properly pack your unit. Include any cables, etc., which were originally provided with the product. We
recommend using the original carton and packing materials.
• Include in the package evidence of purchase date such as the bill of sale. Also print your name and address
and a description of the defect. Send standard UPS or its equivalent to:
Thomson Consumer Electronics, Inc.
Product Exchange Center
11721 B Alameda Ave.
Socorro, Texas 79927
• Pay any charges billed to you by the Exchange Center for service not covered by the warranty.
• Insure your shipment for loss or damage. Thomson accepts no liability in case of damage or loss.
• A new or refurbished unit will be shipped to you prepaid freight.
What your warranty
• Customer instruction. (Your Owner’s Manual provides information regarding operating instructions and
user controls. For additional information, ask your dealer.)
• Installation and setup service adjustments.
• Batteries.
• Damage from misuse or neglect.
• Products which have been modified or incorporated into other products.
• Products purchased or serviced outside the USA.
• Acts of God, such as but not limited to lightning damage.
Product Registration:
• Please complete and mail the Product Registration Card packed with your unit. It will make it easier to
contact you should it ever be necessary. The return of the card is not required for warranty coverage.
How state law relates to this warranty:
• This warranty gives you specific legal rights, and you may have other rights which vary from state to state.
If you purchased your product outside the USA:
• This warranty does not apply. Contact your dealer for warranty information.
does not
cover:
47
Page 52

Model 2-9451
15339430 (Rev. 2 E/S)
99-06
Printed in China
© 1999 Thomson Consumer Electronics, Inc.
P.O. Box 1976, Indianapolis, IN 46206
Trademark(s) ® Registered
Marca(s) Registrada(s)
 Loading...