

Page 1
CombBind® C200
G
Instruction Manual
F
Manuel d’utilisation
D
Bedienungsanleitung
I
Manuale d’istruzioni
O
Gebruiksaanwijzing
E
Manual de instrucciones
P
Manual de Instruções
T
Kullanım Kılavuzu
K
Οδηγίες
c
Brugsvejledning
o
Käyttöopas
o
Bruksanvisning
S
Bruksanvisning
Q
Instrukcja obsługi
o
Návod k obsluze
H
Használati útmutató
o
Руководствo по
зкcплyатации
NO
FI
CZ
RUS
Page 2
English 4
Français 6
Deutsch 8
Italiano 10
Nederlands 12
Español 14
Português 16
Türkçe 18
Ελληνικά 20
Dansk 22
Suomi 24
Norsk 26
Svenska 28
Polski 30
Česky 32
Magyar 34
Pyccкий 36
Page 3
4
4 65
7 98
1 32
Page 4

4
Special notice
Thank you for choosing a GBC® Binding Machine.
We aim to produce quality binding machines at an
affordable price, with many advanced features to enable
you to create excellent results every time. Before using
your machine for the first time, please take a few
minutes to read through this guide.
Specifications
GBC® CombBind® C200
Letter, DIN A4 – 297mm
Max. 20 sheets (80gsm)
Max 2 sheets, 0.2mm each
5.2 kg
380x330x130mm
Max. width of paper
Punching capacity paper
Punching capacity, plastic covers
Net weight
Dimensions (W x D x H)
Safety instructions
YOUR SAFETY AS WELL AS THE SAFETY OF OTHERS
IS IMPORTANT TO ACCO BRANDS EUROPE. IN THIS
INSTRUCTION MANUAL AND ON THE PRODUCT
ARE IMPORTANT SAFETY MESSAGES. READ THESE
MESSAGES CAREFULLY.
m
Maintenance
Please ensure that the clippings tray is emptied on a
regular basis. This will prevent blockage and ensure that
the unit is always ready to punch. The clippings tray can
be accessed from the back of the machine.
In order to prevent overloading never try and
punch more than the maximum number of sheets
recommended (20 sheets of 80gsm).The unit is
maintenance free if handled correctly.
Service
Contact an authorised GBC® service representative for
any required repairs.
Helpful hints
Place front covers finish side down on the open comb
and the back covers finish side up.
For best results always use GBC
®
brand covers with
GBC
®
colour-coordinated binding combs.
The binding comb can be opened and closed again at
any time to replace or add individual sheets (see step 4).
Subject to technical changes without prior notice.
Page 5

5
G
Guarantee
Operation of this machine is guaranteed for 2 years from date of purchase, subject to normal use. Within the guarantee period, ACCO
Brands Europe will at its own discretion either repair or replace the defective machine free of charge. Defects due to misuse or use for
inappropriate purposes are not covered under the guarantee. Proof of date of purchase will be required. Repairs or alterations made by
persons not authorised by ACCO Brands Europe will invalidate the guarantee. It is our aim to ensure that our products perform to the
specifications stated. This guarantee does not affect the legal rights which consumers have under applicable national legislation governing
the sale of goods.
If you experience a technical fault with your product during the warranty period, please contact the relevant ACCO service centre.
Depending on the diagnostics and the model type, we will either arrange a service call by an engineer or we will ask you to return the
machine to ACCO. If you return the machine, ACCO will, at its discretion, in accordance with law, either (i) repair the machine using either
new or refurbished parts, or (ii) replace the machine with a new or refurbished machine that is equivalent to the machine being replaced.
Register this product online at www.gbceurope.com
How to bind
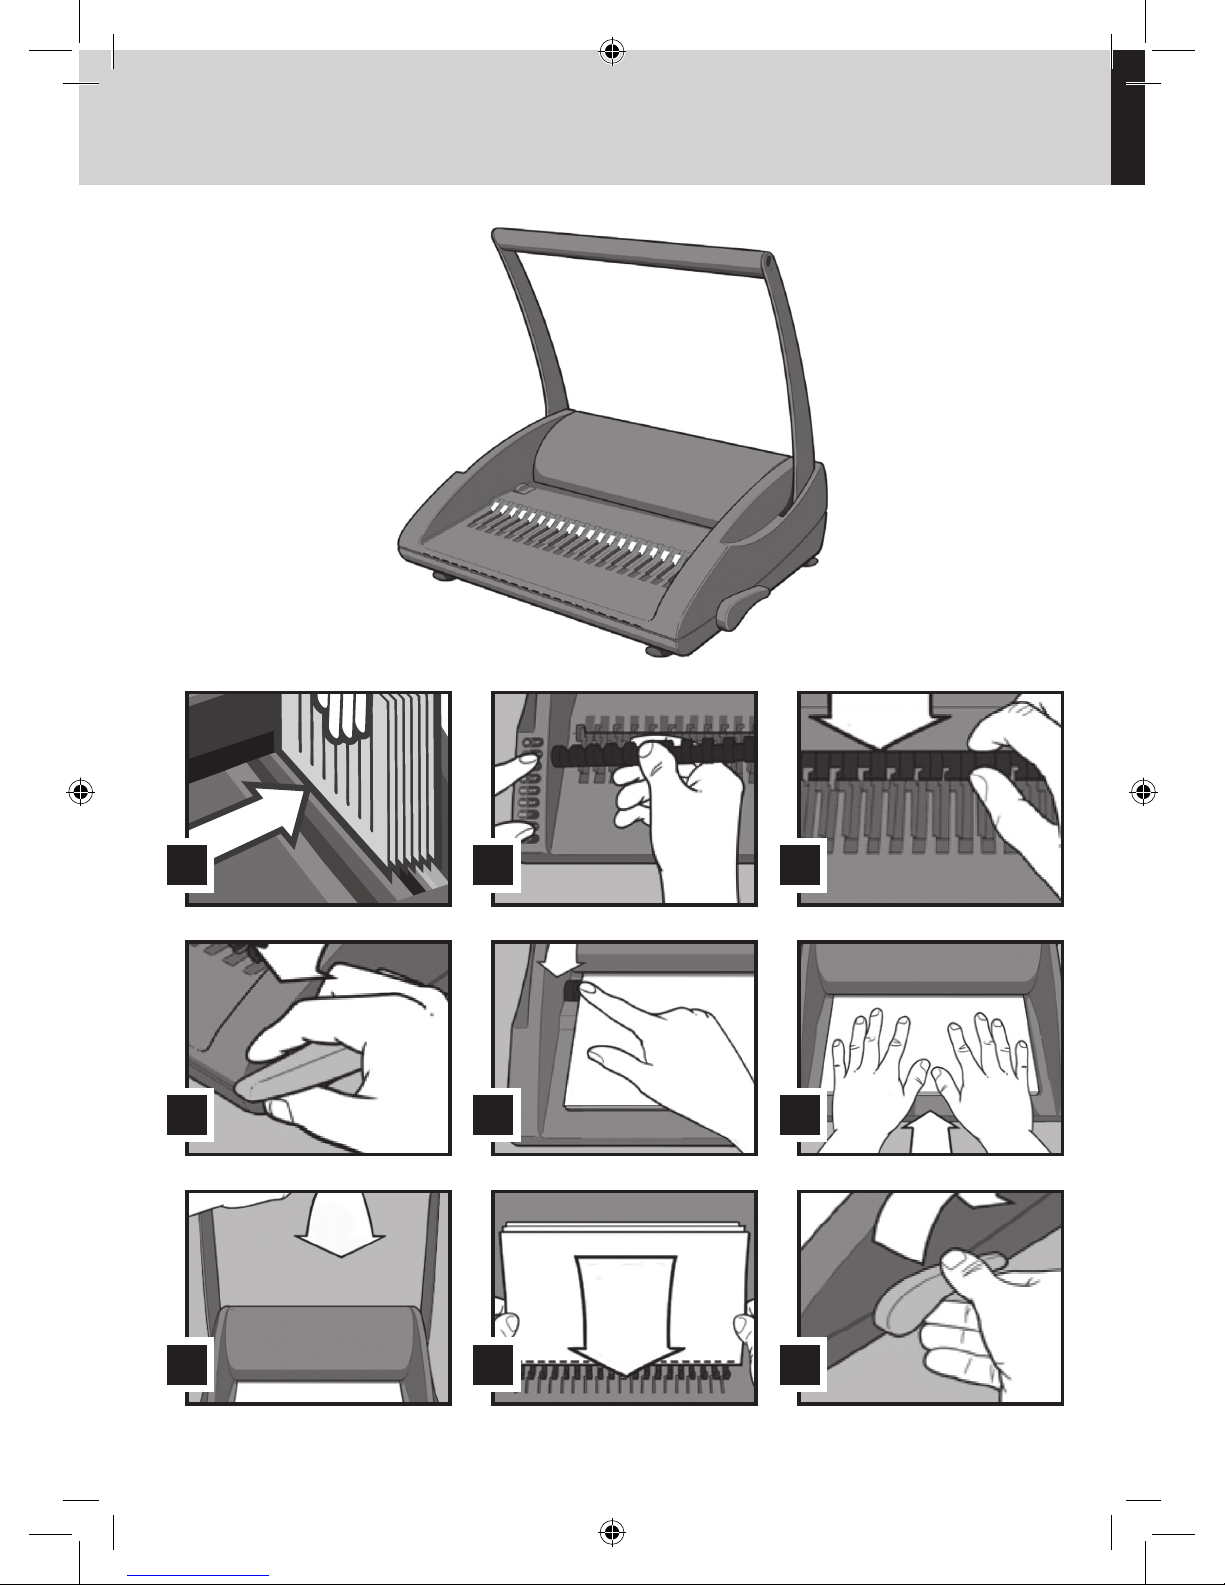
1
Measure document using colour coded guide
(fig.1)
2
Select comb which fits your document (fig.2)
Use the table to choose a suitable comb size. Please
note that this guide is based on 80gsm paper.
The sheet capacity of combs will vary depending
on the type and thickness of the cover sheets you
have chosen. If in doubt select the next comb up in
capacity.
3
Load comb onto machine (fig.3)
Insert the binding comb next to the white positional
arrow on the machine, behind the metal comb
support fingers, with the open side of the comb
pointing upwards.
Note: If using GBC
®
ProCombs™ the white arrow
on your comb should align to the white arrow on the
machine.
4
Open comb by turning lever towards you (fig.4)
The coloured arrows adjacent to the opening comb
act as a guide as to how far to open in order to allow
punched sheets to be easily inserted.
Note: If using GBC
®
ProCombs™ the coloured line
on your comb should align to the coloured arrows on
the machine for faster binding.
5
Select document size (fig.5)
Rotate the edge guide to the paper / cover size
you wish to bind; A4 (297mm x 210mm) or Letter
(215mm x 279mm). When using oversized covers,
rotate the edge guide to the oversize position, punch
the covers for your document and set aside. Then
rotate the edge guide to select either A4 or Letter
and proceed.
6
Load pages into slot (fig.6)
You can punch 2 cover sheets (0.2mm) or up to
20 sheets of paper (80gsm) at a time. Select the
quantity of sheets to punch and tap the edge of the
sheet stack against a flat surface to ensure that all
sheets are aligned. Push the side of the stack to be
punched into the punching slot as far as it will go,
and slide left to align with the edge guide.
7
Punch pages by pulling handle down (fig.7)
Then lift the handle back to the vertical position and
remove the punched sheets. Note: To prevent jams
do not attempt to punch more than one cover sheet
at a time.
8
Combine pages with comb (fig.8)
Remove the sheets from the punch slot and insert
onto the fingers of the binding comb.
9
Repeat process as required
Repeat stages 6-8 until your document is fully
loaded on the comb.
J
Close (fig.9)
Close comb and remove document.
Page 6

6
Notification spéciale
Merci d’avoir choisi une perforelieuse GBC®. Nous visons
à produire des machines de qualité à un prix abordable et
offrons de nombreuses fonctions sophistiquées garantissant
d’excellents résultats à chaque usage. Avant d’utiliser votre
machine pour la première fois, veuillez prendre quelques
minutes pour lire attentivement ce guide.
Consignes de sécurité
VOTRE SÉCURITÉ AINSI QUE CELLE DES AUTRES EST
IMPORTANTE POUR ACCO BRANDS EUROPE. DANS
CE MANUEL D’UTILISATION ET SUR LE PRODUIT, VOUS
TROUVEREZ DES MESSAGES DE SÉCURITÉ IMPORTANTS.
MERCI DE LES LIRE TRÈS ATTENTIVEMENT.
m
Maintenance
Veuillez vider le bac à confettis à intervalles réguliers pour
éviter les blocages et vous assurer que la machine est toujours
prête à perforer. Le bac à confettis est accessible à partir de
l’arrière de la machine.
Pour éviter toute surcharge, n’essayez jamais de perforer un
nombre de feuilles supérieur à la capacité de perforation (20
feuilles de 80 g/m
2
). La machine ne nécessite aucun entretien
en cas d’utilisation correcte.
Dépannage
Contactez un représentant de dépannage GBC® agréé pour
toute réparation requise.
Conseils utiles
Placez la première de couverture dans le peigne ouvert, face
de présentation vers le bas, puis la dernière de couverture,
face de présentation vers le haut.
Pour optimiser les résultats, utilisez les couvertures de marque
GBC
®
et les peignes de reliure de couleurs assorties GBC®.
Vous pouvez ouvrir et refermer le peigne à tout moment
afin de remplacer des feuilles ou d’en ajouter d’autres (voir
étape 4).
Spécifications
GBC® CombBind® C200
Letter, DIN A4 – 297 mm
20 feuilles (80 g/m²)
2 feuille de couverture de 0,2 mm
d’épaisseur
5,2 kg
380 x 330 x 130 mm
Largeur papier maxi
Capacité de perforation maxi, papier
Capacité de perforation maxi,
couvertures plastique
Poids net
Dimensions (l x p x h)
Données techniques sujettes à modification sans préavis.
Page 7

7
F
Garantie
Le fonctionnement de cet appareil est garanti pendant 2 ans à partir de la date d’achat, sous réserve d’un usage normal. Pendant
la période de garantie, ACCO Brands Europe décidera, à son gré, de réparer ou de remplacer gratuitement l’appareil défectueux.
Les défauts dus à un usage abusif ou un usage à des ns non appropriées ne sont pas couverts par cette garantie. Une preuve de la
date d’achat sera exigée. Les réparations ou modications eectuées par des personnes non autorisées par ACCO Brands Europe
annuleront la garantie. Notre objectif est d’assurer le bon fonctionnement de nos produits conformément aux spécications précisées.
Cette garantie ne compromet pas les droits légaux des consommateurs au titre de la législation nationale en vigueur régissant la vente
des biens de consommation.
En cas de défaillance technique de votre produit pendant la période de garantie, veuillez contacter votre centre de service client
ACCO. Nous organiserons une visite de dépannage par un technicien ou bien nous vous demanderons de retourner l’appareil à ACCO
en fonction du diagnostic et du type de modèle. Si vous retournez l’appareil, ACCO pourra à son gré, conformément à la loi, soit (i)
réparer l’appareil en utilisant des pièces neuves ou remises à neuf, soit (ii) remplacer l’appareil par un appareil neuf ou remis à neuf
équivalant à l’appareil défectueux.
Enregistrez ce produit en ligne à www.gbceurope.com
Comment relier
1
Mesurez le document à l’aide du guide à codage
couleur (fig. 1)
2
Sélectionnez le peigne plastique adapté à votre
document (fig. 2)
Utilisez l’indicateur de diamètre de peigne pour choisir le
peigne correct. Veuillez noter que cet indicateur est basé
sur l’utilisation de papier de 80 g/m2. La capacité de
reliure des peignes dépend du type et de l’épaisseur des
couvertures choisies. En cas de doute, sélectionnez un
peigne du diamètre au-dessus.
3
Chargez le peigne sur l’appareil (fig. 3)
Placez le peigne près de la flèche blanche de l’appareil,
derrière les doigts métalliques, en faisant en sorte que les
boucles du peigne s’ouvrent vers le haut.
Remarque : Si vous utilisez les peignes
GBC
®
ProCombs™, la flèche blanche du peigne doit s’aligner
avec la flèche blanche de l’appareil.
4
Ouvrez le peigne en tirant le levier vers vous (fig. 4)
Les flèches de couleur situées près du peigne ouvert
servent de guides pour savoir jusqu’où ouvrir le peigne afin
de faciliter l’insertion des feuilles perforées.
Remarque : Si vous utilisez les peignes
GBC
®
ProCombs™, la ligne de couleur du peigne doit s’aligner
avec la flèche de couleur de l’appareil pour assurer la
rapidité de la reliure.
5
Sélectionnez le format du document (fig. 5)
Réglez la butée papier avec la molette de butée en fonction
du format des feuilles/couvertures utilisées : A4 (297
mm x 210 mm) ou Letter (215 mm x 279 mm). En cas
d’utilisation de couvertures surdimensionnées, faites tourner
cette molette jusqu’à la position « oversize », perforez les
couvertures du document et mettez-les de côté. Tournez
ensuite la molette de butée pour sélectionner A4 ou Letter,
puis continuez.
6
Insérez les feuilles dans la fente de perforation
(fig. 6)
Vous pouvez perforer 2 feuille de couverture
(0,2 mm) ou jusqu’à 20 feuilles de papier
(80 g/m
2
) à la fois. Sélectionnez la quantité de feuilles à
perforer et taquez la pile de feuilles sur une surface plate
pour qu’elle soit bien homogène. Insérez le bord des feuilles
à perforer dans la fente de perforation. Insérez les feuilles
aussi profondément que possible et faites-les glisser vers la
gauche afin de bien les positionner contre la butée papier.
7
Perforez les feuilles en abaissant la poignée (fig. 7)
Remettez ensuite la poignée à la verticale et retirez les
feuilles perforées. Remarque : Pour éviter les bourrages,
n’essayez pas de perforer plus d’une feuille de couverture
à la fois.
8
Chargez le document sur le peigne plastique (fig. 8)
Retirez les feuilles de la fente de perforation et insérez-les
dans le peigne ouvert.
9
Répétez les étapes 6-8 autant de fois que nécessaire
Répétez les étapes 6-8 jusqu’au chargement complet du
document sur le peigne.
J
fermez le peigne (fig. 9)
Fermez le peigne et retirez le document.
Page 8
8
Spezieller Begriff
Wir danken Ihnen, dass Sie sich für ein GBC®
Bindegerät entschieden haben. Es ist unser
Ziel, Qualitätsbindegeräte mit vielen modernen
Leistungsmerkmalen zu einem günstigen Preis
anzubieten, damit Sie bei jedem Bindevorgang
ausgezeichnete Ergebnisse erzielen können. Vor dem
ersten Benutzen des Geräts sollten Sie sich bitte
einige Minuten Zeit nehmen, um diese Anweisungen
durchzulesen.
Technische Daten
GBC® CombBind® C200
DIN A4, US-Letter – 297 mm
max. 20 Blatt (80 g/m²)
max. 2 Einbanddeckel (je 0,2 mm)
5,2 kg
380 x 330 x 130 mm
Max. Arbeitsbreite
Stanzkapazität, Papier
Stanzkapazität, PVC-Einbanddeckel
Nettogewicht
Abmessungen (B x T x H)
Sicherheits-Instruktionen
ACCO BRANDS EUROPE MÖCHTE IHRE UND DIE
SICHERHEIT ANDERER SICHERSTELLEN. IN DIESEM
BEDIENUNGSHANDBUCH UND AM PRODUKT BEFINDEN
SICH WICHTIGE SICHERHEITSHINWEISE. BITTE LESEN
SIE DIESE HINWEISE SORGFÄLTIG DURCH.
m
Gerätepflege
Stanzabfallbehälter regelmäßig leeren. Dies
gewährleistet, dass der Stanzbereich nicht blockiert
wird und das Gerät stets betriebsbereit ist. Der
Stanzabfallbehälter befindet sich an der Geräterückseite.
Zur Vermeidung von Stanzproblemen die empfohlene
Stanzkapazität (20 Blatt à 80 g/m²) nicht überschreiten.
Bei korrekter Handhabung ist das Gerät wartungsfrei.
Kundendienst
Zur Durchführung von Reparaturarbeiten an den
autorisierten GBC
®
-Kundendienst wenden.
Tipps
Vorderen Einbanddeckel mit der Außenseite nach unten
und hinteren Einbanddeckel mit der Außenseite nach
oben in den offenen Binderücken einführen.
Zur Gewährleistung optimaler Ergebnisse wird die
Verwendung von Einbanddeckeln vom Typ GBC
®
sowie
von farbig abgestimmten Binderücken empfohlen.
Zum Austausch oder Hinzufügen einzelner Blätter
können die Binderücken jederzeit wieder geöffnet oder
geschlossen werden (s. Schritt 4).
Änderungen ohne vorherige Ankündigung vorbehalten.
Page 9

9
D
Gewährleistung
Der Betrieb des Geräts ist bei normaler Verwendung für 2 Jahre ab Kaufdatum gewährleistet. Innerhalb des Gewährleistungszeitraums
wird ACCO Brands Europe nach eigenem Ermessen das defekte Gerät entweder kostenlos instand setzen oder ersetzen. Die Garantie
deckt keine Mängel aufgrund missbräuchlicher oder unsachgemäßer Verwendung ab. Ein Nachweis des Kaufdatums muss vorgelegt
werden. Instandsetzungen oder Änderungen, die von nicht von ACCO Brands Europe autorisierten Personen vorgenommen werden,
setzen die Gewährleistung außer Kraft. Es ist unser Ziel, sicherzustellen, dass die Leistung unserer Produkte den angegebenen
technischen Daten entspricht. Diese Garantie stellt keine Einschränkung der nach dem geltenden Kaufvertragsrecht gültigen Rechte
des Verbrauchers dar.
Bei Auftreten eines technischen Fehlers an dem Gerät während des Gewährleistungszeitraums wenden Sie sich an die zuständige
ACCO-Kundendienststelle. Je nach diagnostiziertem Fehler und Gerätemodell wird entweder ein Kundendiensttechniker entsandt
oder eine Rücksendung des Geräts an ACCO organisiert. Bei Rücksendung des Geräts wird dieses von ACCO nach eigenem
Ermessen und gemäß gesetzlicher Bestimmungen entweder (I) unter Verwendung neuer oder generalüberholter Komponenten repariert
oder (II) durch ein neues oder generalüberholtes äquivalentes Gerät ersetzt.
Registrieren Sie dieses Produkt online bei www.gbceurope.com
Bindeverfahren
1
Dokumentstärke an der farbigen
Dokumentmesshilfe messen (fig.1)
2
Den passenden Binderücken für das Dokument
auswählen (fig.2)
Die Binderückengröße anhand der Auswahlhilfe
bestimmen. Die Auswahlhilfe gilt für Papier der Stärke
80 g/m². Die Bindekapazität des jeweiligen Binderückens
richtet sich nach Typ und Stärke der verwendeten
Einbanddeckel. Im Zweifelsfall den nächstgrößeren
Binderücken auswählen.
3
Den Binderücken in das Gerät einlegen (fig.3)
Den Binderücken an dem weißen Pfeil am Gerät
ausrichten und hinter die Metallfinger einsetzen. Dabei
muss die offene Seite des Binderückens nach oben
weisen.
Hinweis: Bei Verwendung von Binderücken vom
Typ GBC
®
ProCombs™ muss der weiße Pfeil des
Binderückens mit dem weißen Pfeil am Gerät
ausgerichtet sein.
4
Den Bindehebel nach vorne ziehen und so den
Binderücken öffnen (fig.4)
Anhand der seitlichen Farbmarkierungen lässt sich
die für die jeweilige Anzahl Stanzdokumente nötige
Binderückenöffnungsweite ermitteln.
Hinweis: Zur schnelleren Abwicklung des Bindevorgangs
bei Verwendung von Binderücken vom Typ GBC
®
ProCombs™ die Farbmarkierung auf dem Binderücken
mit der Farbmarkierung am Gerät ausrichten.
5
Dokumentformat einstellen (fig.5)
Die Papierführung am Einstellrad auf die dem Papier-/
Einbanddeckelformat entsprechende Größe einstellen:
A4 (297 x 210 mm) oder US-Letter (215 x 279 mm).
Bei Verwendung von Einbanddeckeln in Übergröße das
Einstellrad auf die Übergrößeneinstellung drehen, die
Einbanddeckel stanzen und beiseite legen. Anschließend
die A4- oder US-Letter-Einstellung wählen und mit dem
Stanzvorgang fortfahren.
6
Die Blätter in die Stanzöffnung einlegen (fig.6)
Pro Stanzvorgang 2 Einbanddeckel (0,2 mm) oder bis
zu 20 Blatt Papier (80 g/m²) einlegen. Die zu stanzende
Anzahl Blätter auf eine flache Oberfläche aufstoßen,
damit alle Blätter bündig sind. Die Blätter mit der zu
stanzenden Kante in die Stanzöffnung einlegen. Die
Blätter bis zum Anschlag einlegen und darauf achten,
dass die Blattkanten links an der Papierführung anliegen.
7
Stanzhebel nach unten drücken (fig.7)
Stanzhebel wieder senkrecht stellen und gestanzte Blätter
entnehmen. Hinweis: Zur Vermeidung von Papierstaus
stets jeweils nur einen Einbanddeckel stanzen.
8
Dokument in den Binderücken einführen (fig.8)
Die aus der Stanzöffnung entnommenen Blätter in den
offenen Binderücken einführen.
9
Die Schritte 6 bis 8 gegebenenfalls wiederholen
Die Schritte 6 bis 8 wiederholen, bis das gesamte
Dokument im Binderücken eingeführt wurde.
J
Binderücken Schliessen (fig.9)
Den Binderücken schließen und das Dokument
entnehmen.
Page 10

10
Avviso speciale
Grazie per aver scelto una rilegatrice
GBC®. La nostra
azienda si propone di produrre rilegatrici di qualità ad un
prezzo accessibile che presentano molte funzioni avanzate
per ottenere ogni volta risultati eccellenti. Prima di usare la
macchina per la prima volta, è opportuno leggere questa guida.
Specifiche
GBC® CombBind® C200
Letter, DIN A4 – 297 mm
Max. 20 fogli (80 g/m²)
Max. 2 copertina da 0,2 mm
ognuna
5,2 kg
380 x 330 x130 mm
Larghezza carta max.
Capacità perforazione, carta
Capacità perforazione, copertine
in plastica
Peso netto
Dimensioni (L x P x A)
Istruzioni di sicurezza
ALLA ACCO BRANDS EUROPE STA A CUORE LA SICUREZZA
DEGLI UTENTI E DEI TERZI. IN QUESTO MANUALE OPERATIVO
E SUL PRODOTTO SONO RIPORTATI IMPORTANTI INDICAZIONI
DI SICUREZZA, CHE VANNO LETTE ATTENTAMENTE.
m
Manutenzione
Controllare che il vassoio ritagli sia svuotato periodicamente.
Questo accorgimento evita che si blocchi la macchina ed
assicura che l’unità sia sempre pronta per le operazioni di
perforazione. Si può accedere al vassoio ritagli dal retro della
macchina.
Per prevenire eventuali sovraccarichi, non tentare mai di
perforare un numero di fogli superiore a quello massimo
raccomandato (20 fogli da 80gm
2
). L’unità non richiede
manutenzione se usata correttamente.
Assistenza
Rivolgersi ad un rivenditore o distributore GBC® per eventuali
riparazioni.
Consigli e suggerimenti utili
Inserire negli anelli aperti la prima di copertina con il lato
esterno rivolto verso il basso e l’ultima di copertina con il lato
esterno rivolto verso l’alto.
Per ottenere la migliore finitura, utilizzare sempre copertine
GBC
®
con anelli di rilegatura GBC® di colore abbinato.
Gli anelli possono essere aperti e chiusi di nuovo in qualsiasi
momento per sostituire o aggiungere singoli fogli (vedere le
informazioni riportate al punto 4).
Dati soggetti a variazioni tecniche senza preavviso.
Page 11

11
I
Garanzia
Il funzionamento di questa macchina è garantito per 2 anni dalla data di acquisto, subordinatamente a uso normale. Durante il periodo
di garanzia, ACCO Brands Europe provvederà, a propria discrezione, a riparare o sostituire gratuitamente la macchina difettosa. Difetti
provocati da un uso errato o un uso improprio non sono coperti dalla garanzia. Sarà richiesta la prova della data di acquisto. Riparazioni
o modiche eettuate da persone non autorizzate da ACCO Brands Europe rendono nulla la garanzia. È nostro obiettivo assicurare
il funzionamento dei prodotti secondo le speciche dichiarate. La presente garanzia non pregiudica alcun diritto riconosciuto ai
consumatori dalle leggi nazionali applicabili che regolano la vendita di beni.
Qualora si verichino guasti tecnici durante il periodo di validità della garanzia, si prega di rivolgersi al relativo centro di assistenza
clienti ACCO. A seconda del problema identicato e del tipo di modello, ACCO provvederà a richiedere l’intervento di un tecnico
dell’assistenza oppure a richiedere la resa del prodotto. Qualora venga restituito il prodotto, ACCO, a propria insindacabile discrezione,
provvederà, in conformità alla normativa vigente, a (i) riparare la macchina utilizzando parti nuove o revisionate, oppure (ii) sostituire il
prodotto con un apparecchio nuovo o revisionato equivalente a quello sostituito.
Registrare il prodotto online presso www.gbceurope.com
Rilegatura
1
Misurare il documento da rilegare utilizzando la
guida codificata per colore (fig.1)
2
Selezionare gli anelli plastici adatti al documento da
rilegare (fig.2)
Utilizzare la guida per scegliere il corretto diametro degli
anelli. Si prega di notare che questa guida si riferisce
a carta da 80 gm
2
. La capacità di rilegatura degli anelli
plastici varia a seconda del tipo e dello spessore delle
copertine utilizzate. In caso di dubbio, selezionare il
diametro successivo.
3
Caricare il dorso plastico nella rilegatrice (fig.3)
Inserire gli anelli plastici accanto alla freccia bianca situata
sulla macchina, dietro il meccanismo in metallo con il lato
aperto rivolto verso l’alto.
Nota - Se si usano gli anelli plastici GBC
®
ProCombs™, la
freccia bianca sugli anelli deve essere allineata alla freccia
bianca riportata sulla macchina.
4
Aprire gli anelli plastici portando la leva verso di sé
(fig.4)
Le frecce colorate adiacenti agli anelli che si aprono
fungono da guida per indicare la distanza di apertura degli
anelli necessaria a consentire un agevole inserimento dei
fogli perforati.
Nota - Se si usano gli anelli plastici GBC
®
ProCombs™, la
linea colorata sugli anelli deve essere allineata alle frecce
colorate riportate sulla macchina per consentire una più
veloce operazione di rilegatura.
5
Selezionare il formato del documento (fig.5)
Girare la rotella della guida di allineamento della carta fino
a raggiungere il formato del foglio/della copertina richiesto:
A4 (297 mm x 210 mm) o Letter (215 mm x 279 mm).
Quando si usano copertine di formato over-size, girare
la rotella della guida di allineamento della carta fino a
raggiungere la posizione “oversize”, perforare le copertine
del documento e mettere da parte. Girare quindi la rotella
della guida di allineamento della carta per selezionare A4
oppure Letter e quindi procedere.
6
Inserire i fogli nel vano di perforazione (fig.6)
È possibile perforare 2 copertina (0,2 mm) oppure fino a
20 fogli di carta (80gm
2
) alla volta. Selezionare la quantità
di fogli da perforare e dare un colpetto sul bordo del pacco
di fogli contro una superficie piana per assicurare che
tutti i fogli siano allineati. Inserire nel vano di perforazione
il bordo dei fogli da perforare. Inserire i fogli fino in fondo
e spostarli verso sinistra per allinearli con la guida di
allineamento della carta.
7
Perforare i fogli tirando la maniglia verso il basso
(fig.7)
Riportare quindi la maniglia in posizione verticale e
rimuovere i fogli perforati. N.B.: per evitare eventuali
inceppamenti, non cercare di perforare più di una
copertina alla volta.
8
Inserire il documento negli anelli (fig.8)
Togliere i fogli dal vano di perforazione ed inserirli negli
anelli aperti.
9
Ripetere le istruzioni riportate ai punti 6-8 a seconda
delle necessità
Ripetere le istruzioni riportate ai punti 6-8 fino a quando
il documento non è completamento inserito nel dorso
plastico.
J
chiusura degli anelli (fig.9)
Chiudere gli anelli e rimuovere il documento rilegato.
Page 12
12
Speciaal bericht
U bent nu de gelukkige eigenaar van een GBC®
inbindmachine. Wij hebben ons tot doel gesteld om
betaalbare inbindmachines van uitstekende kwaliteit
te produceren, met vele extra functies, zodat u keer
op keer uitstekende resultaten behaalt. Lees deze
instructies goed door, voordat u de machine voor het
eerst gebruikt.
Specificaties
GBC® CombBind® C200
Letter, DIN A4 – 297 mm
Max. 20 vellen (80 gsm)
Max. 2 omslag van 0,2 mm
5,2 kg
380 x 330 x 130 mm
Maximale papierbreedte
Ponscapaciteit, papier
Ponscapaciteit, plastic omslagen
Netto gewicht
Afmetingen (B x D x H)
Veiligheidsvoorschriften
UW VEILIGHEID EN DIE VAN ANDEREN HEEFT VOOR
ACCO BRANDS EUROPE HOOGSTE PRIORITEIT.
IN DEZE HANDLEIDING EN OP DE MACHINE
ZELF TREFT U VERSCHILLENDE BELANGRIJKE
VEILIGHEIDSVOORSCHRIFTEN AAN. LEES DEZE
ZORGVULDIG.
m
Onderhoud
Zorg ervoor dat de snipperlade regelmatig wordt
geleegd. Dit voorkomt een verstopping en zorgt ervoor
dat het toestel altijd gebruiksklaar is. De snipperlade
wordt uit de achterkant van het toestel getrokken.
Om overbelasting te voorkomen, mag u nooit meer dan
het maximumaantal vellen ponsen (20 vellen, 80 gsm).
Het toestel behoeft geen onderhoud, zolang hij juist
wordt gebruikt.
Reparaties
Neem contact op met een erkende GBC®-reparateur
voor alle benodigde reparaties.
Handige tips
Leg de vooromslag met de goede kant naar beneden op
de open bindrug en de achteromslag met de goede kant
naar boven.
Voor het beste resultaat gebruikt u altijd omslagen
van GBC
®
samen met de bindruggen van GBC® in een
bijpassende kleur.
U kunt de bindrug op elk moment weer openen en
sluiten, zodat individuele vellen verwijderd of toegevoegd
kunnen worden (zie stap 4).
Deze gegevens kunnen zonder voorafgaande kennisgeving gewijzigd worden.
Page 13

13
O
Garantie
Het gebruik van deze machine is gegarandeerd voor 2 jaar vanaf de datum van aankoop, uitgaand van normaal gebruik. Binnen de
garantieperiode zal ACCO Brands Europe naar eigen oordeel de defecte machine kosteloos repareren of vervangen. Defecten die te
wijten zijn aan verkeerd gebruik of gebruik voor ongeschikte doeleinden, vallen niet onder de garantie. Bewijs van datum van aankoop
wordt vereist. De garantie vervalt wanneer er reparaties of veranderingen worden uitgevoerd door personen die niet door ACCO Brands
Europe zijn bevoegd. Het is ons doel ervoor te zorgen dat onze producten functioneren volgens de vermelde specicaties. Deze
garantie maakt geen inbreuk op de wettelijke rechten van consumenten onder de geldende nationale wetgeving met betrekking tot de
verkoop van goederen.
Wanneer zich gedurende de garantieperiode een technische fout in uw product voordoet, neemt u contact op met de relevante ACCO-
klantenservice. Afhankelijk van de diagnostiek en het modeltype, zullen wij of een onderhoudstechnicus naar u sturen of u vragen
de machine aan ACCO te retourneren. Indien u de machine retourneert, zal ACCO naar eigen goeddunken en volgens de geldende
wetgeving ofwel (i) de machine repareren met gebruik van nieuwe of herwerkte onderdelen, of (ii) de machine vervangen door een
nieuwe of herwerkte machine die equivalent is aan de machine die wordt vervangen.
Registreer dit product online op www.gbceurope.com
Inbinden
1
Meet uw document aan de hand van de
kleurgecodeerde documentmeter (fig.1)
2
Kies de plastic bindrug voor uw document (fig.2)
Gebruik de schaalverdeling om de juiste maat bindrug te
selecteren. Let op: deze schaalverdeling is gebaseerd op
papier van 80 gsm. De velcapaciteit van de bindruggen
varieert al naar gelang de soort en de dikte van de
omslagen die u gebruikt. Als u twijfelt, moet u een maatje
groter selecteren.
3
Plaats de bindrug in de machine (fig.3)
Plaats de bindrug naast de witte pijl op de machine, achter
de metalen vingers, met de open kant naar boven.
N.B. Als u ProCombs™ van GBC
®
gebruikt, moet de witte
pijl van de bindrug op één lijn liggen met de witte pijl in de
machine.
4
Open de bindrug door de hendel naar u toe te halen
(fig.4)
De kleurgecodeerde pijlen, naast de bindrug die wordt
geopend, fungeren als leidraad voor hoe ver de bindrug
geopend moet worden, zodat alle geponste vellen
eenvoudig geplaatst kunnen worden.
N.B. Als u ProCombs™ van GBC
®
gebruikt, moet de
gekleurde lijn van de bindrug op één lijn liggen met
de gekleurde pijl in de machine. Zodoende wordt het
document sneller ingebonden.
5
Selecteer de papiermaat (fig.5)
Draai aan het randgeleiderwieltje om de gewenste papierof omslagmaat te kiezen: A4 (297 mm x 210 mm) of
Letter (215 mm x 279 mm). Wanneer oversized omslagen
worden gebruikt, zet u het wieltje op ‘Oversize’. Pons de
omslagen voor het document en leg ze terzijde. Draai het
randgeleiderwieltje vervolgens op A4 of Letter en ga door
met inbinden.
6
Steek de vellen in de ponsopening (fig.6)
U kunt 2 omslag (0,2 mm) of 20 vellen papier (80 gsm)
tegelijkertijd ponsen. Kies het aantal vellen dat geponst
moet worden en tik het stapeltje vellen tegen een plat
oppervlak, zodat alle vellen goed uitgelijnd zijn. Steek
de rand van de vellen die geponst moeten worden in
de ponsopening. Plaats de vellen zo diep mogelijk in
de machine en schuif ze naar links, zodat ze tegen de
randgeleider aan liggen.
7
Pons de vellen door de ponshendel naar beneden te
halen (fig.7)
Zet de ponshendel weer verticaal en verwijder de geponste
vellen. N.B. Probeer nooit meer dan één omslag per keer
te ponsen, om een verstopping te voorkomen.
8
Leg het document op de bindrug (fig.8)
Verwijder de vellen uit de ponsopening en leg ze op de
open bindrug.
9
Herhaal stappen 6-8, naar wens
Herhaal stappen 6-8, totdat het complete document op de
bindrug ligt.
J
Sluit de bindrug (fig.9)
Sluit de bindrug en verwijder het document uit de machine.
Page 14

14
Aviso especial
Gracias por escoger una máquina encuadernadora
GBC
®
. Nuestro objetivo es producir máquinas
encuadernadoras de calidad a precios asequibles y con
muchas funciones avanzadas que le permitan obtener
unos resultados excelentes cada vez. Antes de utilizar su
máquina por primera vez le rogamos pase unos minutos
leyendo esta guía.
Instrucciones de seguridad
SU SEGURIDAD AL IGUAL QUE LA SEGURIDAD DE
LOS DEMÁS ES IMPORTANTE PARA ACCO BRANDS
EUROPE. EN ESTE MANUAL DE INSTRUCCIONES Y
EN EL PRODUCTO SE ENCUENTRAN IMPORTANTES
MENSAJES DE SEGURIDAD. LEA ESTOS MENSAJES
CON ATENCIÓN.
m
Mantenimiento
No olvide vaciar la bandeja de residuos con frecuencia.
Con esto se evitarán los atascos y se garantizará que
la unidad esté siempre lista para perforar hojas. Puede
tener acceso a la bandeja de residuos desde la parte
trasera de la encuadernadora.
Para impedir la sobrecarga, no intente perforar nunca
más del número máximo recomendado de hojas (20
hojas de 80 g/m
2
). Si se manipula de forma correcta, la
encuadernadora no requiere ningún mantenimiento.
Servicio
Para cualquier reparación necesaria, póngase en
contacto con un representante de servicio autorizado
de GBC
®
.
Sugerencias
Coloque la tapa delantera con el lado acabado hacia
abajo sobre el canutillo abierto y la tapa trasera con el
lado acabado hacia arriba.
Para obtener un resultado óptimo, utilice tapas de la
marca GBC
®
, con los canutillos para encuadernar de
colores de GBC
®
.
El canutillo se puede abrir y cerrar de nuevo en
cualquier momento para sustituir o añadir hojas
específicas (consulte el paso 4).
Especificaciones
GBC® CombBind® C200
Carta, DIN A4 (297 mm)
Máximo de 20 hojas (80 g/m
2
)
Máximo de 2 tapa
(0,2 mm cada una)
5,2 kg
380 x 330 x 130 mm
Anchura del papel máxima
Capacidad de perforación, papel
Capacidad de perforación, tapas
de plástico
Peso neto
Dimensiones (A x P x A)
Sujeto a cambios técnicos sin previo aviso.
Page 15

15
E
Garantía
El funcionamiento de esta máquina está garantizado durante un período de 2 años a partir de la fecha de adquisición, siempre que
su utilización sea normal. Durante el plazo de garantía, ACCO Brands Europe, a su propia discreción, reparará o sustituirá el aparato
defectuoso gratuitamente. La garantía no cubre los defectos causados por uso indebido o por su utilización para nes inadecuados.
Se requerirá un comprobante de la fecha de compra. Las reparaciones o modicaciones realizadas por personas no autorizadas por
ACCO Brands Europe anularán la garantía. Nuestro objetivo es asegurar que nuestros productos funcionan según las especicaciones
indicadas. Esta garantía no afecta a los derechos legales que tienen los consumidores en virtud de la legislación vigente aplicable que
rige la venta de artículos.
Si se produce un fallo técnico en el producto durante el período de garantía, póngase en contacto con el centro de atención al
cliente de ACCO correspondiente. En función del diagnóstico y del tipo de modelo, enviaremos un ingeniero o le pediremos que
devuelva la máquina a ACCO. Si devuelve la máquina, de conformidad con la legislación vigente y a su discreción, ACCO: a) reparará
la máquina con piezas nuevas o reacondicionadas o b) sustituirá la máquina por otra nueva o reacondicionada que sea equivalente a la
reemplazada.
Registre este producto en línea en www.gbceurope.com
Instrucciones para encuadernar
1
Use la guía de colores para medir el documento
(fig.1)
2
Seleccione el canutillo de plástico que se ajuste a
su documento (fig.2)
Use la guía para elegir el tamaño correcto de canutillo.
Tenga en cuenta que esta guía se basa en papel de
80 g/m
2
. El número de hojas que admite un canutillo
depende del tipo y grosor de las tapas que utilice. Si
no está seguro, elija el siguiente tamaño superior de
canutillo.
3
Cargue el canutillo en la máquina (fig.3)
Coloque el canutillo junto a la flecha blanca de posición
de la encuadernadora y detrás de las lengüetas
metálicas, con el lado abierto orientado hacia arriba.
Nota: si utiliza canutillos ProCombs™ de GBC
®
, la
flecha blanca del canutillo debe estar alineada con la
flecha blanca de la encuadernadora.
4
Gire la palanca hacia usted para abrir el canutillo
(fig.4)
Las flechas de colores que hay junto al canutillo abierto
sirven de guía para saber cuánto hay que abrirlo a fin
de insertar las hojas perforadas fácilmente.
Nota: si utiliza canutillos ProCombs™ de GBC
®
,
conseguirá una encuadernación más rápida si alinea la
línea de color del canutillo con las flechas de colores de
la encuadernadora.
5
Elija el tamaño del documento (fig.5)
Gire la rueda del tope de papel hasta el tamaño de
papel/tapa que necesite: A4 (297 mm x 210 mm)
o Letter (215 mm x 279 mm). Si utiliza tapas de
tamaño superior, gire la rueda del tope de papel
hasta la posición “oversize”, perfore las tapas para el
documento y déjelas a un lado. A continuación, gire la
rueda del tope de papel hasta la posición A4 o Letter y
continúe.
6
Inserte las hojas en la ranura de perforación
(fig.6)
Puede perforar 2 tapa (0,2 mm) o un máximo de
20 hojas de papel (80 g/m
2
) cada vez. Seleccione
la cantidad de hojas que desea perforar y golpee
suavemente la pila de hojas sobre una superficie
plana para asegurarse de que todas las hojas están
alineadas. Inserte el borde de las hojas que se va a
perforar en la ranura de perforación. Inserte las hojas
al máximo que permitan y deslícelas hacia la izquierda
para alinearlas con el tope del papel.
7
Tire del asa hacia abajo para perforar las hojas
(fig.7)
A continuación, levante el asa de nuevo hasta la
posición vertical y extraiga las hojas perforadas. Nota:
para impedir que se produzca un atasco, no intente
perforar más de una tapa a la vez.
8
Cargue el documento en el canutillo (fig.8)
Extraiga las hojas de la ranura de perforación e
insértelas en el canutillo abierto.
9
Repita los pasos 6-8 según sea necesario.
Repita los pasos 6-8 hasta que haya cargado el
documento completamente en el canutillo.
J
Cierre el canutillo (fig.9)
Cierre el canutillo y retire el documento.
Page 16

16
Observação Especial
Agradecemos a sua escolha de uma encadernadora
GBC
®
. Empenhamo-nos em produzir encadernadoras
de qualidade a um preço competitivo, com muitas
características avançadas para poder obter sempre
resultados excelentes. Antes de utilizar a sua máquina pela
primeira vez, dedique uns minutos à leitura deste guia.
Instruções de segurança
A SUA SEGURANÇA, BEM COMO A SEGURANÇA DOS
OUTROS, É IMPORTANTE PARA A ACCO BRANDS EUROPE.
MENSAGENS IMPORTANTES SOBRE SEGURANÇA
ESTÃO PRESENTES NO SEU MANUAL DE OPERADOR
E NO PRÓPRIO PRODUTO. LEIA ESSAS MENSAGENS
CUIDADOSAMENTE.
m
Manutenção
Certifique-se de que o tabuleiro de aparas de papel é
esvaziado periodicamente. Isto impedirá que a máquina
fique obstruída com as aparas e assegurará que ela está
pronta a ser usada para furar as folhas. O acesso ao
tabuleiro de aparas de papel é feito pela parte posterior da
máquina.
Para evitar sobrecarregar a máquina, nunca tente furar
mais do que o número máximo de folhas recomendado
(20 folhas de 80 g/m
2
). A máquina não necessita de
manutenção se for usada correctamente.
Assistência Técnica
Contacte um representante de manutenção autorizado da
GBC
®
para qualquer tipo de reparação necessária.
Sugestões práticas
Coloque a capa dianteira na lombada aberta, com a face
da capa virada para baixo, e a contracapa, com a sua face
virada para cima.
Para obter os melhores resultados use sempre as capas da
GBC
®
com as lombadas GBC® de cor coordenada.
A lombada pode ser aberta e fechada novamente em
qualquer altura, para poder substituir ou adicionar folhas
individuais ao documento final (consulte a etapa 4).
Especificações
GBC® CombBind® C200
Letter, DIN A4 – 297 mm
Max. 20 folhas (80 g/m
2
)
Máx. 2 capa / 0,2 mm de
espessura
5,2 kg
380 x 330 x 130 mm
Largura máx. do papel
Capacidade de furação, papel
Capacidade de furação, capas de
plástico
Peso líquido
Dimensões (L x P x A)
As especificações estão sujeitas a alterações sem aviso prévio.
Page 17

17
P
Garantia
O funcionamento desta máquina está garantido por um período de 2 anos a contar da sua data de compra, em condições normais
de utilização. No período de garantia, a Acco Brands Europe efectuará a reparação ou substituição gratuita da máquina defeituosa,
segundo o seu critério exclusivo. Os defeitos resultantes de má utilização ou utilização imprópria não estão abrangidos por esta
garantia. É necessária a apresentação de prova da data de compra. As reparações ou alterações efectuadas por pessoas não
autorizadas pela ACCO Brands Europe anularão esta garantia. Estamos empenhados em assegurar que o desempenho dos nossos
produtos está de acordo com as especicações indicadas. Esta garantia não afecta os direitos legais dos consumidores ao abrigo da
legislação nacional aplicável que regula a venda de mercadorias.
Se ocorrer um problema de natureza técnica com a sua máquina durante o período de garantia, queira contactar o Centro de
Assistência Técnica da ACCO relevante. Dependendo do problema identicado e do modelo da máquina, organizaremos a visita de
um técnico ou pedir-lhe-emos que devolva a sua máquina à ACCO. Se devolver a máquina, a ACCO procederá, segundo seu critério
e em conformidade com a lei, à (i) reparação da máquina usando para tal peças novas ou recondicionadas, ou (ii) substituição da
máquina por uma nova ou recondicionada, equivalente à que está a ser substituída.
Registe este produto on-line em www.gbceurope.com
Como encadernar
1
Meça o seu documento usando como guia a escala
colorida (fig.1)
2
Seleccione a lombada de plástico adequada para o
seu documento (fig.2)
Use a escala gravada na máquina para seleccionar o
diâmetro correcto da lombada de plástico. Note que esta
escala pressupõe que a gramagem do papel é de 80 gsm.
A capacidade da lombada varia com o tipo e a espessura
das capas que usar. Em caso de dúvida, seleccione a
lombada seguinte de diâmetro superior.
3
Introduza a lombada na máquina (fig.3)
Introduza a lombada junto à seta branca de
posicionamento, indicada na máquina, por trás dos dentes
de retenção metálicos, com o lado aberto da lombada
virado para cima.
Nota: Se usar as lombadas GBC
®
ProCombs™, a seta
branca da lombada deve ficar alinhada com a seta branca
da máquina.
4
Abra a lombada puxando a alavanca na sua
direcção (fig.4)
As setas coloridas adjacentes à lombada que vai abrir
servem de guia para determinar quanto deve abrir a
lombada para poder introduzir facilmente as folhas
furadas.
Nota: Se usar as lombadas GBC
®
ProCombs™, a linha
colorida da sua lombada deve ficar alinhada com as setas
coloridas da máquina, para uma encadernação mais
rápida do seu documento.
5
Seleccione o tamanho do documento (fig.5)
Rode o botão rotativo de alinhamento do papel até este
indicar o tipo de papel / capa de que necessita: A4 (297
mm x 210 mm) ou Letter (215 mm x 279 mm). Quando
usar capas de tamanho superior ao tamanho padrão, rode
o botão rotativo de alinhamento do papel para a posição
“oversize” (maior que o tamanho padrão), fure as capas
do seu documento e ponha-as de lado. Em seguida rode o
botão rotativo de alinhamento do papel para seleccionar o
formato A4 ou Letter e prossiga com a encadernação.
6
Introduza as folhas na ranhura de furação (fig.6)
Pode furar 2 capa (de espessura 0,2 mm) ou até 20 folhas
de papel (80 g/m
2
) de cada vez. Seleccione o número de
folhas que deseja furar e bata com a borda da pilha de
folhas contra uma superfície plana para assegurar que
elas ficam todas alinhadas. Introduza o lado das folhas
a ser furado na ranhura de furação. Introduza as folhas
até ao máximo na ranhura de furação e deslize-as para a
esquerda, para as alinhar com a guia de alinhamento do
papel.
7
Fure as folhas, puxando para baixo a barra de
furação (fig.7)
Em seguida levante a barra para a sua posição vertical e
retire as folhas furadas. Nota: Para evitar que a máquina
encrave, não tente furar mais do que uma capa de cada
vez.
8
Introduza o documento na lombada (fig.8)
Retire as folhas da ranhura de furação e introduza-as na
lombada aberta.
9
Repita as etapas 6-8, como for necessário
Repita as etapas 6-8 até todo o documento ter sido
introduzido na lombada.
J
Fechar a lombada (fig.9)
Feche a lombada e retire o documento.
Page 18

18
Özel not
GBC® Ciltleme Makinesini seçtiğiniz için teşekkür ederiz.
Amacımız, her defasında mükemmel sonuçlar elde
etmenizi sağlayan gelişkin özelliklere sahip, uygun yatlı
ve kaliteli ciltleme makineleri üretmektir. Makinenizi ilk
kez kullanmadan önce, lütfen bu kılavuzu okumak için
birkaç dakika ayırın. Bu sayede standart belgeleri kolayca
ciltlemeniz mümkün olacaktır.
Teknik Bilgiler
GBC® CombBind® C200
Letter, DIN A4 – 297mm
Maksimum 20 yaprak (80gsm)
Maksimum 2 kapak/ her biri 0,2mm
5,2 kg
380x330x130mm
Maksimumkâğıtgenişliği
Delmekapasitesi,kâğıt
Delme kapasitesi, plastik kapak
Netağırlık
Boyutlar(ExDxY)
Güvenliktalimatları
SİZİN VE BAŞKALARININ GÜVENLİĞİ ACCO
BRANDS EUROPE İÇİN ÖNEMLİDİR. BU KULLANIM
KILAVUZUNDA VE ÜRÜNÜN ÜSTÜNDE ÖNEMLİ
GÜVENLİK BİLGİLERİ BULUNMAKTADIR. BU
BİLGİLERİ DİKKATLE OKUYUN.
m
Bakım
Lütfen çöp tepsisinin düzenli olarak boşaltılmasını
sağlayın. Böylelikle tıkanmalar önlenecek ve makineniz
her zaman delme işlemine hazır olacaktır. Çöp tepsisine
makinenin arka tarafından ulaşılır.
Aşırı yüklenmeyi önlemek için kesinlikle tavsiye edilen
maksimum sayfa sayısından (80gsm’lik 20 sayfa)
fazlasını delmeye çalışmayın. Makine, doğru kullanıldığı
takdirde, bakım gerektirmez.
Servis
Gereken her türlü onarım için GBC
®
yetkili servis
temsilcisine başvurun.
Yardımcıipuçları
Açık tarağın üstüne ön kapağı dış yüzü aşağı bakacak ve
arka kapağı dış yüzü yukarı bakacak şekilde yerleştirin.
En iyi sonucu almak için daima GBC
®
renk koordineli cilt
taraklarıyla GBC
®
marka kapakları kullanın.
Sayfaları değiştirmek veya münferit sayfalar eklemek için
tarağı açıp kapatmak her zaman mümkündür (4. adıma
bakın).
Önceden bildirimde bulunmaksızın teknik değişiklikler yapılabilir.
Page 19

19
T
Ciltyapımı
1
Renkkodlukılavuzukullanarakbelgeniziölçün
(g.1)
2
Doğrutarakboyunuseçmekiçinkılavuzu
kullanın(g.2)
Lütfen bu kılavuzun 80gsm kâğıda göre hazırlandığını
dikkate alın. Tarakların sayfa kapasitesi kullandığınız
kapakların türüne ve kalınlığına göre değişecektir.
Emin olamazsanız, bir üst tarak boyunu seçin.
3
Tarağımakineyetakın(g.3)
Tarağı makinenin üzerindeki beyaz ok işaretinin
hemen yanına, açık tarafı yukarı bakacak şekilde
metal parmakların arkasına yerleştirin.
Not: GBC
®
ProCombs™ tarak kullanıyorsanız,
tarağın üzerindeki beyaz ok işareti makinenin
üzerindeki beyaz ok işaretiyle aynı hizada olmalıdır.
4
Tarakkumandakolunukendinizedoğrugetirerek
tarağıaçın(g.4)
Açılan tarağın bitişiğinde bulunan renkli oklar,
delinmiş sayfaların kolayca takılması için tarağın ne
kadar açılması gerektiği konusunda yol gösterir.
Not: GBC
®
ProCombs™ tarak kullanıyorsanız,
ciltleme işlemini daha hızlı yapmak için tarağın
üzerindeki renkli çizgi makinenin üzerindeki renkli
oklarla aynı hizada olmalıdır.
5
Belgeboyutunuseçin(g.5)
Kenar kılavuzu düğmesini çevirerek istediğiniz kâğıt
boyutuna / kapak boyutuna getirin: A4 (297mm x
210mm) veya Letter (215mm x 279mm). Büyük
kapaklar kullanırken kenar kılavuzu düğmesini
“oversize” konumuna çevirin, kapakları delin ve bir
kenara koyun. Sonra kenar kılavuzu düğmesini A4
veya Letter seçmek üzere çevirin ve işleme devam
edin.
6
Sayfalarıdelmeyerineyerleştirin(g.6)
Bir seferde 2 kapak (0,2mm) veya en fazla 20 sayfa
kâğıt (80gsm) delebilirsiniz. Delinecek sayfa miktarını
seçin ve kâğıt destesinin kenarını düz bir yüzeye
hafçe vurarak tüm sayfaların aynı hizada olmasını
sağlayın. Delme yerine sayfaların delinecek kenarını
sokun. Sayfaları gidebildiği yere kadar sokun ve kenar
kılavuzuyla hizalamak için sola kaydırın.
7
Delmekolunuaşağıindirereksayfalarıdelin
(g.7)
Ardından kolu dikey konuma kaldırın ve delinmiş
sayfaları çıkarın. Not: Makinede sıkışma olmasını
önlemek için bir seferde bir taneden fazla kapak
delmeye çalışmayın.
8
Belgeyitarağatakın(g.8)
Sayfaları delme yerinden çıkarın ve açık tarağa
yerleştirin.
9
6-8adımlarınıgerektiğikadartekrarlayın
Belgenizin tamamı tarağa takılana kadar 6-8
adımlarını tekrarlayın.
J
Tarağikapatin(g.9)
Tarağı kapatın ve belgenizi alın.
Garanti
Bu makinenin işleyişi, normal şekilde kullanılması kaydıyla, satın alındığı tarihten itibaren 2 yıl süreyle garantilidir. Garanti süresi içinde
ACCO Brands Europe, kendi takdirine göre arızalı makineyi ücretsiz olarak ya tamir edecek ya da değiştirecektir. Kullanma hatalarından
veya makinenin amacı dışında kullanılmasından kaynaklanan arızalar garanti kapsamında değildir. Garantiden yararlanabilmek için
satın alma tarihinin kanıtlanması gerekmektedir. ACCO Brands Europe tarafından yetki verilmemiş kişilerce yapılacak onarımlar ya da
değişiklikler garantiyi geçersiz kılacaktır. Amacımız ürünlerimizin belirtilen teknik özelliklere göre performans göstermesini sağlamaktır.
Bu garanti, tüketicinin satılan mallara ilişkin ulusal mevzuat uyarınca sahip olduğu yasal hakları etkilemez.
Garanti süresi içerisinde üründe teknik bir kusur bulunması halinde, lütfen ilgili ACCO servis merkezi ile irtibat kurun. Sorun
tanımlanmasına ve model tipine bağlı olarak, ya bir mühendisin servis için sizi ziyaret etmesini sağlayacağız, ya da sizden makineyi
ACCO’ya iade etmenizi isteyeceğiz. Makineyi iade etmeniz halinde, takdir yetkisi kendine ait olmak üzere ve kanunlara uygun olarak
ACCO ya (1) makineyi yeni veya yenilenmiş parçalar kullanarak onaracak, ya da (2) makineyi eşdeğer yeni veya yenilenmiş bir
makineyle değiştirecektir.
Bu ürünü www.gbceurope.com adresinde online olarak kaydettirin.
Page 20

20
Ειδικήανακοίνωση
Σας ευχαριστούμε που επιλέξατε την μηχανή βιβλιοδεσίας
GBC
®
. Στόχος μας είναι να παράγουμε μηχανές
βιβλιοδεσίας ποιότητας, σε προσιτή τιμή, με πολλά
χαρακτηριστικά προχωρημένης τεχνολογίας που να σας
βοηθούν να επιτυγχάνετε εξαιρετικά αποτελέσματα, κάθε
φορά που τις χρησιμοποιείτε. Πριν χρησιμοποιήσετε την
μηχανή σας για πρώτη φορά, παρακαλούμε να διαβάσετε
προσεκτικά τον οδηγό.
Συντήρηση
Φροντίστε να αδειάζετε τακτικά το δίσκο των
αποκομμάτων. Έτσι θα αποφευχθεί η εμπλοκή και θα
διασφαλιστεί ότι η μονάδα είναι πάντοτε έτοιμη για
διάτρηση. Η πρόσβαση στο δίσκο των αποκομμάτων γίνεται
από το πίσω μέρος του μηχανήματος.
Προκειμένου να αποφευχθεί η υπερβολική φόρτωση, ποτέ
να μην επιχειρείτε να τρυπήσετε περισσότερες σελίδες
από το μέγιστο αριθμό που αναφέρεται (20 σελίδες
των 80 gs/m
2
). Η μονάδα δεν χρειάζεται συντήρηση εάν
χρησιμοποιείται σωστά.
Σέρβις
Επικοινωνήστε με μια εξουσιοδοτημένη αντιπροσωπία
σέρβις της GBC
®
για τυχόν απαιτούμενες επισκευές.
Χρήσιμεςσυμβουλές
Τοποθετήστε το εμπρός εξώφυλλο, με τη φινιρισμένη
(εξωτερική) πλευρά του στραμμένη προς τα κάτω στο
ανοιχτό σπιράλ και το πίσω εξώφυλλο με τη φινιρισμένη
πλευρά του στραμμένη προς τα επάνω.
Για καλύτερα αποτελέσματα, να χρησιμοποιείτε πάντοτε
καινούργια εξώφυλλα της GBC
®
με πλαστικά σπιράλ
GBC
®
, σε αντίστοιχους συνδυασμούς χρωμάτων.
Το σπιράλ μπορεί να ανοιχθεί και να κλειστεί ξανά
οποιαδήποτε στιγμή, για την αντικατάσταση ή την
προσθήκη μεμονωμένων φύλλων (βλ. βήμα 4).
Τεχνικάστοιχεία
GBC® CombBind® C200
Letter, DIN A4 – 297 mm
Μέγ. 20 φύλλα (80 gs/m
2
)
Μέγ. 2 εξώφυλλο/0,2 χλστ (mm)
το καθένα
5,2 kg
380 x 330 x 130 mm
Μέγ.πλάτοςχαρτιού
Αριθμόςφύλλωνγιαδιάτρηση,χαρτί
Αριθμόςφύλλωνγιαδιάτρηση,
πλαστικάεξώφυλλα
Καθαρόβάρος
Διαστάσεις(ΒxΥxΒ)
Υπόκειται σε αλλαγές των τεχνικών προδιαγραφών, χωρίς προειδοποίηση.
Οδηγίεςασφάλειας
Η ACCO BRANDS EUROPE ΘΕΩΡΕΙ ΣΗΜΑΝΤΙΚΗ ΤΗ
ΔΙΚΗ ΣΑΣ ΑΣΦΑΛΕΙΑ ΚΑΘΩΣ ΚΑΙ ΤΗΝ ΑΣΦΑΛΕΙΑ ΤΡΙΤΩΝ.
ΣΤΙΣ ΟΔΗΓΙΕΣ ΑΣΦΑΛΕΙΑΣ ΟΠΩΣ ΚΑΙ ΠΑΝΩ ΣΤΗΝ
ΙΔΙΑ ΤΗ ΜΗΧΑΝΗ ΘΑ ΒΡΕΙΤΕ ΣΗΜΑΝΤΙΚΑ ΜΗΝΥΜΑΤΑ
ΑΣΦΑΛΕΙΑΣ. ΔΙΑΒΑΖΕΤΕ ΤΑ ΜΗΝΥΜΑΤΑ ΜΕ ΠΡΟΣΟΧΗ.
m
Page 21

21
K
Πώςναβιβλιοδετήσετε
1
Μετρήστετοέγγραφόσας,χρησιμοποιώνταςτον
οδηγόχρωματικήςκωδικοποίησης(g.1)
2
Επιλέξτετοπλαστικόσπιράλπουταιριάζειστο
έγγραφόσας(g.2)
Χρησιμοποιήστε τον οδηγό για να επιλέξετε το σωστό
μέγεθος σπιράλ. Σημειώστε ότι αυτός ο οδηγός έχει
ρυθμιστεί με βάση χαρτί 80 gs/m
2
. Η χωρητικότητα των
σπιράλ σε σελίδες θα ποικίλλει, ανάλογα με τον τύπο
και το πάχος των εξώφυλλων που χρησιμοποιείτε. Εάν
αμφιβάλλετε, επιλέξτε το επόμενο μεγαλύτερο μέγεθος
σπιράλ.
3
Τοποθετήστετοσπιράλστομηχάνημα(g.3)
Τοποθετήστε το σπιράλ πλάι στο λευκό βέλος που υπάρχει
επάνω στο μηχάνημα και πίσω από τα μεταλλικά δάχτυλα,
με την ανοιχτή πλευρά του σπιράλ στραμμένη προς τα
επάνω.
Σημείωση:Εάν χρησιμοποιείτε το GBC
®
ProCombs™, το
λευκό βέλος που υπάρχει επάνω στο σπιράλ θα πρέπει να
ευθυγραμμίζεται με το λευκό βέλος επάνω στο μηχάνημα.
4
Ανοίξτετοσπιράλ,τραβώνταςτομοχλόπροςτο
μέροςσας(g.4)
Τα έγχρωμα βέλη που βρίσκονται πλάι στο ανοιγόμενο
σπιράλ λειτουργούν ως οδηγός για το πόσο θα πρέπει να
ανοιχθεί το σπιράλ, προκειμένου να εισχωρήσουν εύκολα οι
τρυπημένες σελίδες.
Σημείωση:Εάν χρησιμοποιείτε το GBC
®
ProCombs™
, η έγχρωμη γραμμή που υπάρχει επάνω στο σπιράλ θα
πρέπει να ευθυγραμμίζεται με τα έγχρωμα βέλη επάνω στο
μηχάνημα, για ταχύτερη βιβλιοδέτηση.
5
Επιλέξτεμέγεθοςεγγράφου(g.5)
Περιστρέψτε τον οδηγό άκρων και προσαρμόστε τον στο
μέγεθος του χαρτιού/των εξωφύλλων που θέλετε: A4
(297 mm x 210 mm) ή Letter (215 mm x 279 mm). Όταν
χρησιμοποιείτε υπερμεγέθη εξώφυλλα, να περιστρέφετε
τον οδηγό άκρων στη θέση “oversize”, να εκτελείτε
διάτρηση όλων των εξώφυλλων για τα έγγραφά σας και να
τα βάζετε στην άκρη. Στη συνέχεια, περιστρέψτε τον οδηγό
άκρων για να επιλέξετε είτε A4 είτε Letter και συνεχίστε.
6
Τοποθετήστετιςσελίδεςστηνσχισμήδιάτρησης
(g.6)
Μπορείτε να τρυπήσετε 2 εξώφυλλο (0,2 mm) ή έως και
20 φύλλα χαρτιού (80 gs/m2) συγχρόνως. Επιλέξτε την
ποσότητα των φύλλων που πρέπει να τρυπηθούν και
χτυπήστε το άκρο της στοίβας των σελίδων επάνω σε μια
επίπεδη επιφάνεια, για να διασφαλίσετε την ευθυγράμμιση
όλων των φύλλων. Τοποθετήστε το άκρο των φύλλων που
πρόκειται να τρυπηθούν μέσα στην σχισμή διάτρησης.
Ωθήστε τα φύλλα όσο το δυνατόν πιο μέσα και ολισθήστε
τα αριστερά, για να ευθυγραμμιστούν στο άκρο του οδηγού.
7
Τρυπήστετιςσελίδες,τραβώνταςτηνχειρολαβήπρος
τακάτω(g.7)
Στη συνέχεια, επαναφέρετε τη χειρολαβή στην κατακόρυφη
θέση και αφαιρέστε τα φύλλα που έχουν διατρηθεί.
Σημείωση: Για να αποφύγετε τις εμπλοκές, μην εκτελείτε
διάτρηση περισσότερων από ενός εξωφύλλου κάθε φορά.
8
Τοποθετήστετοέγγραφοεπάνωστοπλαστικόσπιράλ
(g.8)
Αφαιρέστε τα φύλλα από την σχισμή διάτρησης και
τοποθετήστε τα στο ανοιχτό σπιράλ.
9
Επαναλάβετεταβήματα6-8,σύμφωναμετιςανάγκες
Επαναλάβετε τα βήματα 6-8 ωσότου το έγγραφό σας να
τοποθετηθεί πλήρως στο σπιράλ.
J
Κλειστετοσπιραλ(g.9)
Κλείστε το σπιράλ και αφαιρέστε το έγγραφό σας.
Εγγύηση
Η λειτουργία της μηχανής είναι εγγυημένη για 2 χρόνια από την ημερομηνία αγοράς της, υπό τον όρο ότι υποβάλλεται σε συνηθισμένη
χρήση. Εντός της περιόδου της εγγύησης, η ACCO Brands Europe, κατά τη διακριτική της ευχέρεια, είτε θα επισκευάσει είτε θα
αντικαταστήσει δωρεάν την ελαττωματική μηχανή. Η εγγύηση δεν καλύπτει ελαττώματα που οφείλονται σε κακομεταχείριση ή σε χρήση
για ακατάλληλο σκοπό. Απαιτείται απόδειξη της ημερομηνίας αγοράς. Επισκευές ή τροποποιήσεις που γίνονται από άτομα που δεν είναι
εξουσιοδοτημένα από την ACCO Brands Europe ακυρώνουν την εγγύηση. Σκοπός μας είναι να εξασφαλίσουμε ότι τα προϊόντα μας έχουν
επιδόσεις σύμφωνες με τις αναφερόμενες προδιαγραφές. Η παρούσα εγγύηση δεν επηρεάζει τα από του νόμου απορρέοντα δικαιώματα
τα οποία έχουν οι καταναλωτές, σύμφωνα με τη νομοθεσία που ισχύει στη χώρα τους, που αφορά την πώληση αγαθών.
Αν αντιμετωπίσετε οποιαδήποτε τεχνική αστοχία με το προϊόν σας κατά τη διάρκεια της περιόδου ισχύος της εγγύησης, επικοινωνήστε
με το αντίστοιχο κέντροεπισκευώντηςACCO. Ανάλογα με τα αποτελέσματα του διαγνωστικού ελέγχου και τον τύπο του μοντέλου,
είτε θα κανονίσουμε μια επίσκεψη σέρβις από κάποιον μηχανικό είτε θα σας ζητήσουμε να επιστρέψετε το μηχάνημα στην ACCO. Αν
επιστρέψετε το μηχάνημα, η ACCO, κατά τη διακριτική της ευχέρεια και σύμφωνα με το νόμο, (i) θα επισκευάσει το μηχάνημα είτε με νέα
είτε με ανακατασκευασμένα μέρη ή (ii) θα αντικαταστήσει το μηχάνημα με ένα νέο ή ανακατασκευασμένο μηχάνημα, αντίστοιχο με το
μηχάνημα που αντικαταστάθηκε.
Για καταχώριση της μηχανής επισκεφθείτε τον ιστότοπο www.gbceurope.com
Page 22

22
Særlig bemærkning
Tak, fordi du har valgt en GBC®-indbindingsmaskine.
Det er vores mål at producere indbindingsmaskiner
af høj kvalitet til en overkommelig pris og med mange
avancerede funktioner, som giver dig mulighed for
at opnå et fremragende resultat hver gang. Inden du
bruger maskinen første gang, bør du bruge et par
minutter på at læse denne vejledning.
Tekniske data
GBC® CombBind® C200
Letter, DIN A4 – 297mm
Maks. 20 ark (80 gram)
Maks. 2 omslag /0,2mm hver
5,2 kg
380x330x130mm
Maks. papirbredde
Stansekapacitet, papir
Stansekapacitet, plastikomslag
Nettovægt
Mål (B x D x H)
Sikkerhedsinstruktioner
DIN OG ANDRES SIKKERHED ER VIGTIG FOR
ACCO BRANDS EUROPE. I DENNE BRUGSVEJLEDNING
OG PÅ PRODUKTET FINDER DU VIGTIGE
SIKKERHEDSMEDDELELSER. LÆS DISSE
MEDDELELSER NØJE.
m
Vedligeholdelse
Sørg for, at bakken med hulafklip tømmes jævnligt.
Herved undgås papirtilstopning, og enheden er altid klar
til at stanse. Du kan få adgang til bakken med hulafklip
fra bagsiden af maskinen.
For at forhindre overbelastning skal du aldrig prøve at
stanse mere end det maksimalt anbefalede antal ark
(20 ark på 80 gram). Enheden er vedligeholdelsesfri,
hvis den håndteres korrekt.
Eftersyn
Kontakt en autoriseret GBC®-servicerepræsentant, hvis
reparationer bliver nødvendige.
Nyttige tips
Anbring forsideomslaget med den færdige side nedad
på den åbne plastikspiral og bagsideomslaget med den
færdige side opad.
For at opnå de bedste resultater skal du altid anvende
GBC
®
-omslag med GBC®-plastikspiraler i matchende
farver.
Plastikspiralen kan altid åbnes og lukkes igen for at
udskifte eller tilføje enkelte ark (se trin 4).
Der tages forbehold for tekniske ændringer uden forudgående varsel.
Page 23

23
c
Garanti
Denne maskines drift er garanteret i 2 år fra købsdatoen, på betingelse af at den anvendes under normale betingelser. ACCO Brands
Europe vil efter eget skøn enten reparere eller ombytte den defekte maskine gratis inden for garantiperioden. Garantien dækker ikke
fejl, der skyldes misbrug eller brug til upassende formål. Der kræves bevis for købsdatoen. Reparationer eller ændringer foretaget
af personer, som ikke er autoriseret af ACCO Brands Europe, ugyldiggør garantien. Det er vores mål at sikre, at vores produkter
opfylder de anførte specikationer. Denne garanti har ingen indydelse på de juridiske rettigheder, som forbrugere har i medfør af
købeloven.
Kontakt det relevante ACCO-servicecenter, hvis du under garantiperioden oplever en teknisk fejl ved dit produkt. Vi vil, afhængig
af diagnosticeringen og modeltypen, enten arrangere et servicebesøg fra en tekniker eller bede dig om at returnere maskinen til
ACCO. Hvis du returnerer maskinen, vil ACCO, efter eget skøn, i henhold til loven enten (i) reparere maskinen vha. enten nye eller
istandsatte dele, eller (ii) udskifte maskinen med en ny eller istandsat maskine, der svarer til maskinen, der udskiftes.
Du kan registrere dette produkt online på www.gbceurope.com
Indbinding
1
Mål dit dokument med den farvekodede
vejledning (fig.1)
2
Vælg den plastikspiral, som passer til dit
dokument (fig.2)
Brug skalaen til at vælge den korrekte størrelse
plastikspiral. Bemærk, at denne skala er baseret på
80 gram papir. Spiralernes kapacitet med hensyn til
ark varierer afhængigt af typen af og tykkelsen på de
omslag, du bruger. Hvis du er i tvivl, skal du vælge
den næste størrelse spiral.
3
Læg spiralen på maskinen (fig.3)
Anbring spiralen ved siden af den hvide pil på
maskinen, bag metalfingrene, med den åbne side af
spiralen opad.
Bemærk: Hvis du anvender GBC
®
ProCombs™,
skal den hvide pil på spiralen flugte med den hvide
pil på maskinen.
4
Åbn spiralen ved at trække håndtaget mod dig
selv (fig.4)
De farvede pile ved siden af den åbne spiral fungerer
som et styr, der anviser, hvor meget spiralen skal
åbnes, så de hullede ark let kan isættes.
Bemærk: Hvis du anvender GBC
®
ProCombs™,
skal den farvede linje på spiralen flugte med de
farvede pile på maskinen for at opnå en hurtigere
indbinding.
5
Vælg dokumentstørrelse (fig.5)
Drej papirstyret til den papir-/omslagsstørrelse, du
ønsker: A4 (297mm x 210mm) eller Letter (215mm
x 279mm). Når du bruger store omslag, skal du
dreje papirstyret til positionen “oversize”, stanse
omslagene til dit dokument, og lægge dem til side.
Drej derefter papirstyret for at vælge enten A4 eller
Letter, og fortsæt.
6
Sæt arkene i stanseåbningen (fig.6)
Du kan stanse 2 omslag (0,2mm) eller op til 20 ark
papir (80 gram) ad gangen. Vælg det antal ark, der
skal stanses, og bank kanten af stakken med papir
let mod en flad overflade for at sikre, at alle arkene
er rettet ind efter hinanden. Sæt først kanten af de
ark, der skal stanses, ind i stanseåbningen. Sæt
arkene så langt som muligt ind, og skub dem til
venstre, så de flugter med papirstyret.
7
Stans arkene ved at trække stansehåndtaget
ned (fig.7)
Løft derefter håndtaget tilbage til den lodrette
position, og fjern de stansede ark. Bemærk: For at
undgå papirstop skal du ikke stanse mere end et
omslag ad gangen.
8
Læg dokumentet i plastikspiralen (fig.8)
Fjern arkene fra stanseåbningen, og sæt dem ind i
den åbne spiral.
9
Gentag trinene 6-8, som det er nødvendigt
Gentag trinene 6-8, indtil dit dokument er lagt helt i
spiralen.
J
Luk plastikspiralen (fig.9)
Luk plastikspiralen, og fjern dokumentet.
Page 24

24
Erikoishuomautus
Kiitämme teitä GBC®-sidontalaitteen valinnasta.
Tavoitteenamme on tuottaa hinnaltaan edullisia, mutta
laadukkaita sidontalaitteita, joiden monet pitkälle
kehitetyt ominaisuudet mahdollistavat loistavat
sidontatulokset kerta toisensa jälkeen. Kehotamme
teitä lukemaan tämän oppaan ennen kuin ryhdytte
käyttämään laitetta ensimmäistä kertaa.
Turvaohjeet
KÄYTTÄJIEN JA SIVULLISTEN TURVALLISUUS ON
TÄRKEÄÄ ACCO BRANDS EUROPELLE. TÄSSÄ
KÄYTTÖOPPAASSA JA TUOTTEESSA ON TÄRKEITÄ
TURVALLISUUSHUOMAUTUKSIA. LUE NÄMÄ
HUOMAUTUKSET HUOLELLISESTI.
m
Huolto
Silppualusta on tyhjennettävä säännöllisesti. Tämä estää
tukokset ja varmistaa, että laite on aina käyttövalmis.
Silppualustaan pääse käsiksi laitteen takaa.
Laitetta ei saa ylikuormittaa yrittämällä lävistää
suositusta suurempaa arkkimäärää (20 arkkia, 80 g/m
2
).
Laitetta ei tarvitse huoltaa, jos sitä käsitellään ohjeiden
mukaan.
Huolto
Ota yhteys valtuutettuun GBC®-huoltoon, jos laitetta on
korjattava.
Hyödyllisiä vihjeitä
Aseta etukansi avoimeen kampaan ulkopuoli alaspäin ja
takakansi ulkopuoli ylöspäin.
Paras lopputulos saavutetaan GBC
®
:n kansilla ja GBC®:n
värikoodatuilla sidontakammoilla.
Kampa voidaan avata ja sulkea milloin vain, jos on
tarpeen vaihtaa tai lisätä yksittäisiä arkkeja (katso
vaihe 4).
Tekniset tiedot
GBC® CombBind® C200
Letter, DIN A4 – 297 mm
Enintään 20 arkkia (80 g/m
2
)
Enintään 2 kansiarkki
(paksuus 0,2 mm/kpl)
5,2 kg
380 × 330 × 130 mm
Paperin enimmäisleveys
Rei’ityskapasiteetti, paperi
Lävistyskapasiteetti, muovikannet
Nettopaino
Mitat (L × S × K)
Oikeus teknisiin muutoksiin ilman ennakkoilmoitusta pidätetään.
Page 25

25
o
FI
Takuu
Laitteella on normaalikäytössä 2 vuoden takuu ostopäivästä lukien sen toiminnan osalta. Tänä takuuaikana ACCO Brands
Europe harkintansa mukaan korjaa tai vaihtaa viallisen laitteen veloituksetta. Takuu ei kata virheellisestä tai asiattomasta käytöstä
aiheutuneita vikoja. Ostotodistus on esitettävä. Jos laitetta korjaa tai muuttaa muu kuin ACCO Brands Europen valtuuttama henkilö,
takuu raukeaa. Tavoitteemme on varmistaa, että tuotteemme toimivat ohjeissa kuvatulla tavalla. Tämä takuu ei vaikuta lakisääteisiin
oikeuksiin, joita kuluttajilla on eri maissa sovellettavan kansallisen lainsäädännön nojalla ja joiden alaisuudessa tavaroita myydään.
Jos tuotteessa esiintyy tekninen vika takuuaikana, ota yhteys lähimpään ACCO-palvelukeskukseen. Vian tyypistä ja laitemallista
riippuen ACCO lähettää huoltoteknikon paikan päälle tai pyytää palauttamaan laitteen ACCOlle. Jos palautat laitteen, ACCO voi
harkintansa mukaan ja lain puitteissa (i) korjata laitteen uusilla tai kunnostetuilla osilla tai (ii) vaihtaa laitteen uuteen tai kunnostettuun
laitteeseen, joka vastaa vaihdettavaa laitetta.
Rekisteröi tuote Internetissä osoitteessa www.gbceurope.com
Sitominen
1
Mittaa asiakirja värikoodatun ohjeen avulla
(fig.1)
2
Valitse asiakirjaan sopiva muovikampa (fig.2)
Valitse oikea kamman koko ohjeen avulla. Huomaa,
että ohje perustuu 80 g/m
2
:n paperiin. Kampojen
arkkikapasiteetti vaihtelee käytettyjen kansien tyypin
ja paksuuden mukaan. Valitse kahdesta koosta
isompi, jos et ole varma oikeasta koosta.
3
Lataa kampa koneeseen (fig.3)
Aseta kampa koneeseen merkityn valkoisen nuolen
viereen metallisormien taakse siten, että kamman
avoin puoli osoittaa ylöspäin.
Huomio: Jos käytät GBC
®
ProCombs™ -kampoja,
kohdista kamman valkoinen nuoli koneen valkoiseen
nuoleen.
4
Avaa kampa vetämällä vipua itseesi päin
(fig.4)
Avautuvan kamman vieressä olevat värilliset nuolet
osoittavat, miten paljon kampaa on avattava, jotta
lävistetyt arkit on helppo asettaa paikalleen.
Huomio: Jos käytetään GBC
®
ProCombs™
-kampoja, sitomista voi nopeuttaa kohdistamalla
kamman värillinen viiva laitteen värillisiin nuoliin.
5
Valitse asiakirjan koko (fig.5)
Käännä reunaohjaimen pyörää vaadittavan paperi- ja
kansikoon mukaan: A4 (297 mm × 210 mm) tai
Letter (215 mm × 279 mm). Jos käytät ylisuuria
kansia, käännä reunaohjaimen pyörä oversizeasentoon, lävistä asiakirjan kannet ja aseta ne
sivuun. Käännä sitten reunaohjaimen pyörä A4- tai
Letter-asentoon ja jatka.
6
Aseta arkit lävistysaukkoon (fig.6)
Kerrallaan voidaan lävistää 2 kansiarkki (0,2
mm) tai enintään 20 paperiarkkia (80 g/m
2
).
Valitse lävistettävien arkkien määrä ja tasaa arkit
napauttamalla arkkipinon reunaa tasaista pintaa
vasten. Aseta arkit lävistysaukkoon lävistettävä reuna
edellä. Työnnä arkit niin pitkälle kuin mahdollista ja
liu’uta arkkeja vasemmalle reunaohjaimen kohdalle.
7
Lävistä arkit vetämällä kahva alas (fig.7)
Nosta vipu sitten takaisin pystyasentoon ja poista
lävistetyt arkit. Huomio: Älä yritä lävistää useampaa
kuin yhtä kansiarkkia kerrallaan, jotta laite ei juutu.
8
Syötä asiakirja kampaan (fig.8)
Poista arkit lävistysaukosta ja aseta ne avoimeen
kampaan.
9
Toista vaiheet 6-8 tarpeen mukaan
Toista vaiheet 6-8, kunnes koko asiakirja on syötetty
kampaan.
J
Sulje kampa (fig.9)
Sulje kampa ja poista asiakirja laitteesta.
Page 26

26
Merknad
Takk for at du valgte en GBC® innbindingsmaskin. Vårt
mål er å lage innbindingsmaskiner av høy kvalitet til en
rimelig pris og med mange avanserte funksjoner, slik
at du kan får flotte resultater hver gang. Før du bruker
maskinen for første gang, bør du bruke noen minutter
på å lese gjennom denne veiledningen.
Tekniske data
GBC® CombBind® C200
Letter, DIN A4 – 297 mm
Maks. 20 ark (80 g)
Maks. 2 omslagsark / 0,2 mm
5,2 kg
380 x 330 x 130 mm
Maks. papirbredde
Stansekapasitet, papir
Stansekapasitet, plastomslag
Nettovekt
Mål (B x D x H)
Sikkerhetsinstruksjoner
ACCO BRANDS EUROPE TAR DIN OG ANDRES
SIKKERHET PÅ ALVOR. DU FINNER VIKTIGE
SIKKERHETSINSTRUKSJONER I DENNE
BRUKSANVISNINGEN OG PÅ SELVE PRODUKTET.
LES DISSE INSTRUKSJONENE NØYE.
m
Vedlikehold
Tøm avskjærsskuffen med jevne mellomrom. Dette vil
forhindre blokkering og sørge for at enheten alltid er
klar til stansing. Avskjærsskuffen kan åpnes bak på
maskinen.
For å forhindre overbelastning, må du ikke stanse mer
enn anbefalt antall ark (20 ark på 80 g). Enheten trenger
ikke å vedlikeholdes hvis den brukes riktig.
Reparasjoner
Kontakt en autorisert GBC®-servicerepresentant for
reparasjoner.
Nyttige tips
Plasser det fremre omslaget slik at den ferdige siden
peker nedover på den åpne plastspiralen og det bakre
omslaget slik at den ferdige siden peker oppover.
For best resultat bør du bruke GBC
®
-omslagene i
samme farge som innbindingsplastspiralene.
Du kan åpne og lukke plastspiralen når som helst for å
bytte ut eller sette i flere ark enkeltvis (se trinn 4).
Med forbehold om at den tekniske informasjonen kan endres uten forutgående varsel.
Page 27

27
o
NO
Garanti
Denne maskinen har 2 års garanti fra kjøpsdato ved normal bruk. Innenfor denne garantiperioden vil ACCO Brands Europe etter
eget forgodtbennende enten reparere eller erstatte enheter med feil, vederlagsfritt. Feil som oppstår på grunn av feil bruk eller bruk
til uegnede formål, dekkes ikke av garantien. Kjøpsbevis må fremlegges. Hvis personer som ikke er autorisert av ACCO Brands
Europe foretar reparasjoner eller modikasjoner på maskinen, gjøres garantien ugyldig. Det er vårt mål å sørge for at våre produkter
er i overensstemmelse med de angitte spesikasjonene. Denne garantien påvirker ikke forbrukerens juridiske rettigheter i henhold til
nasjonal lovgivning for salg av varer.
Hvis du opplever en teknisk feil med produktet i løpet av garantiperioden, tar du kontakt med det relevante ACCO-servicesenteret.
Avhengig av problemtype og modelltype vil vi enten avtale et besøk fra en servicetekniker eller be om at du returnerer maskinen til
ACCO. Hvis du returnerer maskinen, vil ACCO, etter eget skjønn og i samsvar med lovgivning, enten (i) reparere maskinen ved hjelp
av nye eller renoverte deler, eller (ii) erstatte maskinen med en ny eller renovert maskin som tilsvarer maskinen som byttes ut.
Registrer produktet online på www.gbceurope.com
Fremgangsmåte
1
Mål dokumentet ditt ved hjelp av en
fargekodeguide (fig.1)
2
Velg plastspiralen som passer til dokumentet
(fig.2)
Bruk guiden når du skal velge riktig størrelse på
plastspiralen. Merk at guiden er basert på 80 g
tykt papir. Plastspiralens arkkapasitet vil variere
avhengig av type og tykkelse på omslaget du
bruker. Hvis du er i tvil, kan du velge en litt større
plastspiralstørrelse.
3
Sett plastspiralen i maskinen (fig.3)
Plasser plastspiralen ved siden av den hvite pilen på
maskinen og bak metallfingrene. Den åpne siden av
plastspiralen skal peke oppover.
Merk: Hvis du bruker GBC
®
ProCombs™ skal den
hvite pilen på plastspiralen være på linje med den
hvite pilen på maskinen.
4
Åpne plastspiralen ved dra spaken mot deg
(fig.4)
Fargepilene ved siden av plastspiralåpningen
indikerer hvor langt man skal åpne plastspiralen for
enkel isetting av de stansede arkene.
Merk: Hvis du bruker GBC
®
ProCombs™ skal
fargelinjen på plastspiralen være på linje med
fargepilene på maskinen, for raskere innbinding.
5
Velg dokumentstørrelse (fig.5)
Roter kantguidehjulet til ønsket papir-/
omslagsstørrelse: A4 (297 mm x 210 mm)
eller Letter (215 mm x 279 mm). Når du
bruker overdimensjonerte omslag, roterer du
kantguidehjulet til posisjonen Oversize, stanser
omslagene og legger dem til side. Roter deretter
kantguidehjulet for å velge enten A4 eller Letter og
fortsett.
6
Sett inn ark i stansesporet (fig.6)
Du kan stanse 2 omslagsark (0,2 mm) eller opp til
vanlige 20 ark (80 g) om gangen. Velg arkene du vil
stanse og kakk bunken mot en flate for å få en jevn
bunke. Sett kanten på arkene som skal stanses inn
i stansesporet. Sett arkene helt inn og skyv dem til
venstre så de er på linje med kantguiden.
7
Stans arkene ved å skyve ned stansehåndtaket
(fig.7)
Beveg deretter håndtaket tilbake til loddrett posisjon,
og ta ut de stansede arkene. Merk: Ikke stans mer
enn ett omslagsark om gangen, dette kan føre til
maskinstopp.
8
Legg dokumentet på plastspiralen (fig.8)
Fjern arkene fra stansesporet og legg dem på den
åpne plastspiralen.
9
Gjenta trinnene 6-8 etter behov
Gjenta trinnene 6-8 til du har satt i hele dokumentet
på plastspiralen.
J
Lukk plastspiralen (fig.9)
Lukk plastspiralen og fjern dokumentet.
Page 28

28
Säkerhetsinstuktioner
DIN SÄKERHET LIKAVÄL SOM ANDRAS ÄR EN
BETYDELSEFULL ANGELÄGENHET FÖR ACCO
BRANDS EUROPE. I DENNA ANVÄNDARHANDBOK
OCH PÅ SJÄLVA ENHETEN FINNS VIKTIGA
SÄKERHETSFÖRESKRIFTER. LÄS NOGGRANT IGENOM
DESSA FÖRESKRIFTER.
m
Speciell märka
Tack för att du valde en GBC® värmebindare. Vår
målsättning är att tillverka bindnings-maskiner av hög
kvalitet till överkomligt pris med många avancerade
funktioner som ger dig utmärkta resultat varje gång.
Innan du använder maskinen för första gången ber vi
dig sätta av några minuter till att läsa genom denna
bruksanvisning.
Specifikationer
GBC® CombBind® C200
Letter, DIN A4 – 297 mm
Max 20 ark (80 g/m
2
)
Max 2 omslag/0,2 mm
5,2 kg
380 x 330 x 130 mm
Max. pappersbredd
Stansningskapacitet, papper
Stansningskapacitet, plastomslag
Nettovikt
Mått (B x D x H)
Underhåll
Se till att avfallsbrickan töms regelbundet. Det förhindrar
blockage, och maskinen är alltid klar att stansa.
Avfallsbrickan koms åt från baksidan av maskinen.
Försök aldrig att stansa mer än det rekommenderade
högsta antalet ark (20 st. 80-gramsark). Maskinen är
underhållsfri om den hanteras korrekt.
Service
Kontakta en GBC®-godkänd verkstad om maskinen
behöver repareras.
Praktiska tips
Lägg främre omslaget med utsidan neråt på den öppna
spiralen och det bakre omslaget med utsidan uppåt.
Du får bäst resultat om du använder omslag av märket
GBC
®
och färgkoordinerade spiraler från GBC®.
Spiralen kan när som helst öppnas och stängas igen,
om enstaka ark skulle behöva bytas ut eller läggas till
(se steg 4).
Specifikationerna kan ändras utan varsel.
Page 29

29
S
Garanti
Maskinen garanteras fungera i 2 år från inköpsdatum vid normal användning. Inom denna garantiperiod reparerar eller ersätter
ACCO Brands Europe efter eget gottnnande, en defekt maskin utan kostnad. Garantin gäller inte för fel som uppstått på grund av
felaktig eller olämplig användning. Kvitto med inköpsdatum måste uppvisas. Om reparationer eller ändringar utförts av personer som
inte är auktoriserade av ACCO Brands Europe gäller inte garantin. Vår målsättning är att se till att våra produkter uppfyller angivna
specikationer. Denna garanti påverkar inte de rättigheter du har som konsument enligt lagen.
Om det uppstår ett tekniskt fel med din produkt under garantiperioden, ska du kontakta relevant ACCO kundtjänstcenter. Alltefter
diagnosen och modelltypen ordnar vi antingen med ett servicebesök från en tekniker eller kommer vi överens med dig om retur
av maskinen till ACCO. Om du returnerar maskinen kommer ACCO enligt eget godtycke och i enlighet med lagen att antingen (i)
reparera maskinen med nya eller renoverade delar, eller (ii) ersätta maskinen med en ny eller renoverad maskin som är likvärdig med
den som den ersätter.
Registrera produkten online på www.gbceurope.com
Bindning
1
Mät ditt dokument med hjälp av
färgkodsguiden (fig.1)
2
Välj vilken plastspiral som passar dokumentet
(fig.2)
Använd guiden för att välja rätt spiralstorlek.
Observera att guiden är baserad på
80-gramspapper. Spiralernas kapacitet varierar efter
vilken typ och tjocklek av omslag som används. Om
du är osäker bör du välja den större spiralstorleken.
3
Ladda spiralen på maskinen (fig.3)
Lägg spiralen intill den vita pilen på maskinen bakom
metallfingrarna med den öppna sidan av spiralen
uppåt.
OBS: Om du använder GBC
®
ProCombs™ ska den
vita pilen på spiralen vara i linje med den vita pilen
på maskinen.
4
Öppna spiralen genom att föra spaken mot dig
(fig.4)
De färgade pilarna intill spiralen fungerar som en
guide för hur mycket du ska öppna spiralen för att
de stansade arken ska kunna föras in med lätthet.
OBS: Om du använder GBC
®
ProCombs™ ska
det färgade strecket på spiralen vara i linje med
motsvarande färgad pil på bindaren. Då går
bindningen smidigare.
5
Ställ in dokumentstorlek (fig.5)
Vrid guidekantsratten till rätt pappersstorlek/
omslagsstorlek: A4 (297 mm x 210 mm) eller
Letter (215 mm x 279 mm). Om du använder
extra stora omslag vrider du guidekantsratten
till läget OVERSIZE, stansar omslagen för ditt
dokument och lägger dem åt sidan. Sedan vrider du
guidekantshjulet till A4 eller LETTER och fortsätter.
6
För in arken i stansspringan (fig.6)
Du kan stansa 2 omslag (0,2 mm) eller upp till 20
ark (80 g/m
2
) i taget. Lyft upp antalet ark som ska
stansas och knacka arkbuntens kant mot en plan
yta för att se till att alla arken kommer rakt. För in
kanten av arken som ska stansas i stanspringan. För
in arken så långt det går, och skjut dem sedan till
vänster så de vidrör guidekanten.
7
Stansa arken genom att dra handtaget nedåt
(fig.7)
Lyft sedan upp handtaget till vertikalt läge och ta ut
de stansade arken. OBS: Stansa bara ett omslag i
taget, annars kan det bli stopp.
8
Lägg dokumentet på spiralen (fig.8)
Ta ut arken ur stansspringan och för in dem i den
öppna spiralen.
9
Upprepa steg 6-8 så många gånger som det
behövs
Upprepa steg 6-8 tills du har laddat hela dokumentet
på spiralen.
J
Stäng spiralen (fig.9)
Stäng spiralen och ta ut dokumentet.
Page 30

30
Ważneinformacjedotyczące
bezpieczeństwa
BEZPIECZEŃSTWO, ZARÓWNO TWOJE JAK I
INNYCH OSÓB, JEST DLA FIRMY ACCO BRANDS
EUROPE BARDZO ISTOTNE. W NINIEJSZEJ
INSTRUKCJI OBSŁUGI, JAK I NA SAMYM
URZĄDZENIU, UMIESZCZONE SĄ WAŻNE
INFORMACJE DOTYCZĄCE BEZPIECZEŃSTWA.
PROSIMY O ICH UWAŻNE PRZECZYTANIE.
m
Uwaga specjalna
Dziękujemy za wybranie bindownicy marki GBC®.
Naszym celem jest produkowanie wysokiej jakości
urządzeń po przystępnych cenach, posiadających wiele
zaawansowanych funkcji, umożliwiających każdorazowe
osiąganie doskonałych rezultatów. Przed rozpoczęciem
pracy, prosimy o poświęcenie kilku minut na przeczytanie
niniejszej instrukcji obsługi.
Konserwacja
Należy regularnie opróżniać pojemnik na ścinki.
Zapobiega to blokadom i sprawia, że urządzenie jest
zawsze gotowe do dziurkowania. Dostęp do pojemnika
na ścinki znajduje się z tyłu urządzenia.
Aby zapobiec przeciążeniom, nie należy nigdy
podawać do dziurkowania większej ilości arkuszy niż
maksymalna zalecana liczba (20 arkuszy o gramaturze
80 g/m
2
). Urządzenie nie wymaga żadnych czynności
konserwacyjnych, jeśli jest prawidłowo używane.
Serwis
W razie potrzeby należy się skontaktować z
autoryzowanym przedstawicielem serwisu GBC
®
w celu
zlecenia wykonania koniecznych napraw.
Przydatnewskazówki
Okładkę przednią należy nakładać na otwarty grzbiet
stroną zewnętrzną skierowaną do dołu, a okładkę tylną –
stroną zewnętrzną ku górze.
Aby osiągnąć najlepsze rezultaty, zawsze używaj okładek
marki GBC
®
i dopasowanych kolorystycznie grzbietów
plastikowych GBC
®
.
Grzbiet plastikowy można w każdej chwili ponownie
otworzyć i zamknąć w celu wymiany lub dodania
pojedynczych arkuszy (patrz krok 4).
Dane techniczne
GBC® CombBind® C200
Letter, DIN A4 – 297 mm
Maks. 20 arkuszy (80 g/m
2
)
Maks. 2 arkusz okładki/
0,2 mm każdy
5,2 kg
380 x 330 x 130 mm
Maks.szerokośćpapieru
Liczbajednorazowodziurkowanych
arkuszy–papier
Liczbajednorazowodziurkowanych
arkuszy–okładkiplastikowe
Waga netto
Wymiary(SxGxW)
Dane techniczne mogą ulec zmianie bez uprzedzenia.
Page 31

31
Q
Gwarancja
Urządzenie jest objęte gwarancją eksploatacyjną ważną przez okres 2 lat od daty zakupu, przy założeniu normalnego użytkowania.
W okresie gwarancyjnym rma ACCO Brands Europe zobowiązuje się, według swojego uznania, bezpłatnie naprawić lub wymienić
wadliwe urządzenie. Gwarancja nie obejmuje uszkodzeń spowodowanych nieprawidłowym użytkowaniem lub wykorzystywaniem
urządzenia do celów, do których nie jest przeznaczone. Aby skorzystać z gwarancji, należy przedstawić dowód zakupu. Dokonanie
napraw lub modykacji urządzenia przez osoby nieupoważnione do tego przez rmę ACCO Brands Europe spowoduje unieważnienie
gwarancji. Dążymy do tego, aby nasze produkty działały zgodnie ze specykacją. Niniejsza gwarancja nie ogranicza praw
konsumentów wynikających z przepisów obowiązujących w danym kraju i dotyczących warunków sprzedaży towarów.
W przypadku wystąpienia w produkcie wady technicznej w okresie gwarancji prosimy o skontaktowanie się z właściwym punktem
obsługiklientaACCO. Zależnie od stwierdzonego problemu i modelu urządzenia, zorganizujemy wizytę pracownika serwisu
u klienta lub poprosimy klienta o zwrot produktu do rmy ACCO. Jeżeli urządzenie zostanie zwrócone, ACCO zobowiązuje się,
według swojego uznania i zgodnie z przepisami prawa: (i) naprawić urządzenie przy użyciu części nowych lub odnowionych albo (ii)
wymienić urządzenie na urządzenie nowe lub odnowione, które jest równorzędne z tym, które ma zastąpić.
Prosimy o zarejestrowanie produktu na stronie internetowej www.gbceurope.com
Sposóbwykonaniaoprawy
1
Zmierzdokumentzapomocądiagramu
oznaczonegokolorami(g.1)
2
Wybierzgrzbietplastikowyodpowiednido
dokumentu(g.2)
W doborze właściwego rozmiaru grzbietu pomoże
zamieszczony diagram. Należy mieć na uwadze fakt,
że diagram opracowano dla papieru o gramaturze
80 g/m
2
. Liczba arkuszy mieszczących się w
poszczególnych grzbietach jest zmienna zależnie
od rodzaju i grubości użytych okładek. W razie
wątpliwości zalecamy wybrać rozmiar grzbietu o
stopień wyższy.
3
Załóżplastikowygrzbietnabindownicę(g.3)
Umieść plastikowy grzbiet obok białej strzałki
widocznej na urządzeniu, za metalowymi zębami,
otwartą stroną ku górze.
Uwaga: W przypadku używania grzbietów GBC
®
ProCombs™ biała strzałka na grzbiecie powinna się
zrównać z białą strzałką na urządzeniu.
4
Otwórzgrzbiet,pociągającdźwigniękusobie
(g.4)
Kolorowe strzałki obok otwieranego grzbietu
wskazują, jak szeroko należy otworzyć grzbiet, aby
móc łatwo włożyć przedziurkowane kartki.
Uwaga: W przypadku używania grzbietów GBC
®
ProCombs™ barwna linia na grzbiecie powinna się
zrównać z barwnymi strzałkami na urządzeniu –
przyspiesza to proces bindowania.
5
Wybierzrozmiardokumentu(g.5)
Obróć pokrętło ogranicznika krawędzi do ustawienia
stosownego do formatu papieru/okładki: A4 (297
mm x 210 mm) lub Letter (215 mm x 279 mm). W
przypadku używania okładek o powiększonych
wymiarach ustaw pokrętło ogranicznika krawędzi w
pozycji „Oversize”, przedziurkuj okładki i odłóż na bok.
Następnie przestaw pokrętło ogranicznika krawędzi
do pozycji „A4” lub „Letter” i kontynuuj.
6
Umieśćarkuszewszczeliniedziurkacza(g.6)
Jednorazowo można przedziurkować 2 arkusz okładki
(0,2 mm) lub do 20 arkuszy papieru (80 g/m
2
). Wydziel
odpowiednią liczbę arkuszy do przedziurkowania
i postukaj krawędzią pliku o płaską powierzchnię,
aby wszystkie arkusze się zrównały. Włóż arkusze
do szczeliny dziurkacza krawędzią, która ma zostać
przedziurkowana. Wsuń arkusze jak najdalej i przesuń
je w lewo, aby dorównać do ogranicznika krawędzi.
7
Przedziurkujarkusze,pociągającuchwytwdół
(g.7)
Następnie podnieś uchwyt z powrotem do pozycji
pionowej i wyjmij przedziurkowane arkusze. Uwaga:
Aby uniknąć zakleszczeń, nie należy podejmować
prób dziurkowania jednorazowo więcej niż jednego
arkusza okładki.
8
Nałóżarkuszenagrzbiet(g.8)
Wyjmij arkusze ze szczeliny dziurkacza i nałóż je na
otwarty grzbiet.
9
Powtarzajkroki6-8wedługpotrzeb
Powtarzaj kroki 6-8 do chwili, aż cały dokument
zostanie nałożony na grzbiet.
J
Zamknijgrzbiet(g.9)
Zamknij grzbiet i wyjmij dokument.
Page 32

32
Důležitébezpečnostnípokyny
VAŠE BEZPEČNOST I BEZPEČNOST OSTATNÍCH
OSOB JE PRO ACCO BRANDS EUROPE DŮLEŽITÁ.
V TÉTO PŘÍRUČCE A NA PŘÍSTROJÍCH JSOU
DŮLEŽITÉ BEZPEČNOSTNÍ POKYNY. ČTÊTE TYTO
POKYNY POZORNĚ.
m
Zvláštníoznámení
Děkujeme vám, že jste si vybrali vázačku značky
GBC
®
. Za přístupné ceny se snažíme nabízet kvalitní
vázačky, jejichž užitečné vlastnosti vám zaručí dosažení
konzistentně výborných výsledkě. Než vázačku poprvé
použijete, přečtěte si laskavě pečlivě tuto příručku.
Údržba
Zajistěte pravidelné vyprazdňování zásobníku na odpad.
Předejte se tak zablokování a zajistí se, že je přístroj vždy
připravený k děrování. Přístup k zásobníku na odpad je
ze zadní strany přístroje.
Abyste předešli přetížení, nikdy se nepokoušejte
děrovat více než doporučený maximální počet listů
(20 listů 80g/m
2
). Při správném zacházení přístroj
nevyžaduje údržbu.
Servis
S žádostí o opravy kontaktujte autorizovaného servisního
zástupce GBC
®
.
Užitečnérady
Položte přední krycí desku dokončenou stranou dolů
na otevřený hřbet a poté zadní krycí desku dokončenou
stranou nahoru.
K dosažení nejlepších výsledků vždy používejte krycí
desky značky GBC
®
s barevně koordinovanými vázacími
hřbety GBC
®
.
Hřbet lze poté kdykoliv opět rozevřít a zavřít za účelem
výměny nebo přidání jednotlivých listů (viz krok 4).
Technické údaje
GBC® CombBind® C200
Letter, DIN A4 – 297 mm
Max. 20 listů (80 g/m
2
)
Max. 2 krycí deska / každá 0,2 mm
5,2 kg
380 x 330 x 130 mm
Max.šířkalistu
Děrovacíkapacita–papír
Děrovacíkapacita–plastovékrycí
desky
Čistáhmotnost
Rozměry(ŠxHxV)
Technické údaje podléhají změnám bez předchozího upozornění.
Page 33

33
o
CZ
Záruka
Na provoz tohoto přístroje je při běžném používání poskytována záruka 2 rok(y/ů) ode dne nákupu. Během záruční doby rma ACCO
Brands Europe podle svého uvážení vadný přístroj bezplatně opraví, nebo vymění. Na závady způsobené nesprávným použitím nebo
použitím pro nevhodné účely se záruka nevztahuje. V každém případě je nutno předložit platební doklad s datem nákupu. Opravy
a změny přístroje provedené osobou, jež k tomu není oprávněna rmou ACCO Brands Europe, zruší platnost záruky. Snažíme
se zajistit, aby naše výrobky fungovaly v souladu s uvedenými technickými údaji. Touto zárukou nejsou ovlivněna zákonná práva
vztahující se na prodej zboží, která spotřebitelům přísluší podle příslušných státních zákonů.
Objeví-li se během záruční doby u výrobku technická závada, obraťte se na příslušné servisnístřediskoACCO. V závislosti na
zjištěné závadě a modelovém typu s vámi domluvíme vyslání našeho servisního technika, nebo vás požádáme o vrácení přístroje
společnosti ACCO. Vrátíte-li přístroj, společnost ACCO dle vlastního uvážení a v souladu se zákonem buď (i) přístroj opraví pomocí
nových nebo repasovaných dílů, nebo (ii) přístroj nahradí novým, případně repasovaným zařízením, které je svými vlastnostmi
podobné nahrazovanému přístroji.
Tento výrobek si můžete zaregistrovat online na www.gbceurope.com
Jak vázat
1
Barevněkódovanýmvodítkemzměřtedokument
(g.1)
2
Zvolteplastovýhřbetodpovídajícívašemu
dokumentu(g.2)
K volbě správné velikosti hřbetu použijte vodítko.
Pamatujte, že toto vodítko předpokládá papír s
gramáží 80 g/m
2
. Kapacita hřbetu se bude lišit podle
typu a tloušťky krycích desek, které používáte. V
případě pochybností zvolte následující větší velikost
hřbetu.
3
Vložtehřbetdopřístroje(g.3)
Položte hřbet vedle bílé šipky na přístroji otevřenou
stranou nahoru a za kovové zuby.
Pozn.: Používáte-li GBC
®
ProCombs™ , bílá šipka
na hřbetu by měla být vyrovnaná s bílou šipkou na
přístroji.
4
Rozevřetehřbetpřitaženímpákyksobě(g.4)
Barevné šipky vedle rozevření hřbetu slouží jako
vodítko, nakolik hřbet rozevřít, aby bylo možné
proděrované listy snadno zasunout.
Pozn.: Používáte-li hřbety GBC
®
ProCombs™ , pro
rychlejší vázání by měla být barevná čára na hřbetu
vyrovnaná s barevnými šipkami na přístroji.
5
Zvoltevelikostdokumentu(g.5)
Kolečko zarážky papíru otočte k požadované velikosti
papíru / velikosti krycích desek: A4 (297 mm x 210
mm) nebo Letter (215 mm x 279 mm). Při použití
krycích nadrozměrných desek otočte kolečko zarážky
papíru k poloze „oversize”, proděrujte krycí desky
pro dokument a odložte je na stranu. Poté otočením
kolečka zarážky papíru zvolte velikost A4 nebo Letter
a pokračujte.
6
Zasuňtelistydoděrovacíštěrbiny(g.6)
Můžete proděrovat 2 krycí desku (0,2 mm) nebo
až 20 listů papíru (80 g/m
2
) najednou. Zvolte počet
listů k proděrování a poklepejte hranou stohu listů o
rovný povrch, aby byly všechny listy vyrovnané. Do
děrovací štěrbiny zasuňte hranu listů k proděrování.
Zasuňte listy co nejdále a posuňte je vlevo, aby byly
vyrovnané se zarážkou papíru.
7
Zataženímzarukojeťdolůlistyproděrujte(g.7)
Poté zvedněte rukojeť zpět do svislé polohy a
vytáhněte proděrované listy. Pozn.: Nepokoušejte se
děrovat více než jednu krycí desku najednou, abyste
zabránili zadření.
8
Dokumentuložtenahřbet(g.8)
Vyjměte listy z děrovací štěrbiny a zasuňte do
otevřeného hřbetu.
9
Dlepotřebyopakujtekroky6-8
Opakujte kroky 6-8, dokud nebude dokument zcela
navlečen na hřbetu.
J
Uzavřetehřbet(g.9)
Uzavřete hřbet a vyndejte dokument.
Page 34

34
Fontosbiztonságielőírások
AZ ÖN ÉS KÖRNYEZETÉBEN LÉVŐK BIZTONSÁGA
KIEMELKEDŐEN FONTOS AZ ACCO BRANDS
EUROPE SZÁMÁRA. EBBEN A HASZNÁLATI
ÚTMUTATÓBAN ÉS MAGÁN A TERMÉKENIS, FONTOS
BIZTONSÁGI ELŐÍRÁSOK TALÁLHATÓK. KÉRJÜK,
FIGYELMESEN OLVASSA EL AZ ÚTMUTATÁSOKAT.
m
Speciális észrevesz
Köszönjük, hogy GBC® fűzőgépet vásárolt. A célunk,
hogy olyan jó minőségű fűzőgépet gyártsunk elfogadható
áron, amely számos fejlett jellemzővel rendelkezik, ami
az Ön számára biztosítja mindenkor kiváló eredmények
elérését. Mielőtt használatba veszi a gépet, fordítson
néhány percet arra, hogy elolvassa ezt az útmutatót.
Karbantartás
A hulladéktálcát rendszeresen ürítse. Ezzel megelőzhető
az eltömődés, és biztosítani lehet, hogy a készülék
mindig készen álljon a lyukasztásra. A hulladéktálcához a
készülék hátoldalánál lehet hozzáférni.
A túlterhelés megelőzése érdekében soha ne lyukasszon
az ajánlott mennyiségnél több lapot (20 lap, 80 g/m
2
).
Megfelelő használat esetén az egység nem igényel külön
karbantartást.
Szerviz
Javítási igény esetén forduljon a GBC® hivatalos
szervizéhez.
Helpfulhints
Az elülső borítólapot a külső felével lefelé helyezze a
spirálba, majd a hátsó borítólapot a külső felével felfelé.
A legjobb eredmény elérése érdekében GBC
®
márkájú
borítólapokat és GBC
®
színkódolt spirálokat használjon.
A spirál bármikor kinyitható és bezárható, és így egyes
lapok később cserélhetők vagy újak is behelyezhetők
(lásd 4. lépés).
Műszakiadatok
GBC® CombBind® C200
Letter, DIN A4 – 297 mm
Max. 20 lap (80 g/m
2
)
Max. 2 borítólap (0,2 mm)
5,2 kg
380 x 330 x 130 mm
Max.papírszélesség
Lyukasztókapacitás–papír
Lyukasztásikapacitás,műanyag
borítólapok
Nettósúly
Méretek(szélesxmélyxmagas)
A műszaki adatok előzetes értesítés nélkül módosulhatnak.
Page 35

35
H
Garancia
A vásárlás dátumát követő 2 éven keresztül jótállást vállalunk a gép működéséért normál használat esetén. A jótállási időszak alatt
az ACCO Brands Europe – saját belátása szerint – díjmentesen megjavítja vagy kicseréli a meghibásodott gépet. A jótállás nem
vonatkozik a helytelen vagy nem rendeltetésszerű használat miatt fellépő hibákra. A jótállás igénybevételéhez be kell mutatni a
vásárlás dátumát igazoló dokumentumot. Az ACCO Brands Europe által nem feljogosított személy által végzett javítás vagy átalakítás
érvényteleníti a garanciát. Mindent megteszünk annak érdekében, hogy termékeink a műszaki adatoknál leírtaknak megfelelő
teljesítményt nyújtsák. A jelen jótállás nem befolyásolja azokat a törvényes jogokat, amelyekkel ügyfeleink az áruértékesítésre
vonatkozó nemzeti jogszabályok szerint rendelkeznek.
Ha a garanciális időszak alatt műszaki hibát észlel, forduljon az illetékes ACCOvevőszolgálatiközponthoz. A meghibásodás
jellegétől és a modelltől függően egyeztetünk, hogy vagy egy szakemberünk kimegy a helyszínre, vagy megkérjük, hogy a gépet
juttassa vissza az ACCO céghez. A gép visszajuttatása esetén az ACCO cég saját belátása szerint és a törvényekkel összhangban
vagy (i) új vagy felújított alkatrészek felhasználásával megjavítja a gépet, vagy (ii) kicseréli a gépet az eredetivel egyenértékű új vagy
felújított gépre.
A termék az interneten a következő címen regisztrálható: www.gbceurope.com
Akötésmenete
1
Mérjemegadokumentumotaszínes
vastagságmérővel(g.1)
2
Válasszakiadokumentumnakmegfelelő
műanyagspirált(g.2)
A spirálválasztó segítségével válassza ki a megfelelő
spirálméretet. A spirálválasztó adatai 80 g/m
2
papíron alapulnak. A spirálok lapkapacitása függ a
használt borítólapok típusától és vastagságától. Ha
bizonytalan, válassza az eggyel nagyobb méretet.
3
Helyezzebeaspiráltakészülékbe(g.3)
A készüléken látható fehér nyílnál helyezze a spirált a
nyitott oldalával felfelé a fémpeckek mögé.
Megjegyzés:GBC
®
ProCombs™ spirál használata
esetén a spirálon látható fehér nyíl illeszkedjen a
készüléken látható fehér nyílhoz.
4
Aspirálozókartmagafeléhúzvanyissakia
spirált(g.4)
A kinyíló spirál melletti színes nyilak jelzik, hogy
mennyire kell kinyitni a spirált ahhoz, hogy a
lyukasztott lapokat könnyen be lehessen helyezni.
Megjegyzés:GBC
®
ProCombs™ spirál használata
esetén a spirálon látható színes vonal illeszkedjen a
készüléken látható színes nyilakhoz, így gyorsabban
lehet a kötést elvégezni.
5
Válasszakiadokumentumméretet(g.5)
A papírvezetőgombot állítsa be a papírméretnek /
borítólapméretnek megfelelően: A4 (297 mm x 210
mm) vagy Letter (215 mm x 279 mm). Extra méretű
borítólapok esetén a papírvezetőgombot állítsa
„Oversize” állásba, lyukassza ki a dokumentum
borítólapjait, és tegye félre azokat. Ezután a
papírvezetőgombot állítsa A4 vagy Letter állásba, és
folytassa a kötést.
6
Helyezzenlapokatalyukasztórésbe(g.6)
Egyszerre 2 borítólapot (0,2 mm) vagy maximum 20
papírlapot (80 g/m
2
) lehet lyukasztani. Fogja meg a
lyukasztandó köteget, és a szélét ütögesse egy lapos
felülethez, hogy az összes lap egymáshoz igazodjon.
A lapokat úgy helyezze be a lyukasztórésbe, hogy
a lyukasztandó szélüket tolja be a résbe. A lapokat
ütközésig tolja be, majd csúsztassa balra, hogy
illeszkedjenek a papírvezetőhöz.
7
Alyukasztófogantyútlehúzvalyukasszakia
lapokat(g.7)
Hajtsa vissza a fogantyút függőleges állásba, és
vegye ki a kilyukasztott lapokat. Megjegyzés: Az
elakadás megelőzése érdekében soha ne lyukasszon
egyszerre egynél több borítólapot.
8
Helyezzeadokumentumotaspirálba(g.8)
Vegye ki a lapokat a lyukasztórésből, és helyezze a
nyitott spirálba.
9
Szükség szerint ismételje meg a 6-8 lépéseket
Addig ismételje meg a 6-8 lépéseket, amíg a teljes
dokumentum be nem kerül a spirálba.
J
Aspirálbezárása(g.9)
Zárja be a spirált, és vegye ki a dokumentumot.
Page 36

36
ПРАВИЛАТЕХНИКИ
БЕЗОПАСНОСТИ
ВАША БЕЗОПАСНОСТЬ И БЕЗОПАСНОСТЬ ДРУГИХ
ЛЮДЕЙ ВАЖНЫ ДЛЯ КОМПАНИИ ACCO BRANDS EUROPE.
B ЭТОЙ ИНСТРУКЦИИ И НА УСТРОЙСТВЕ СОДЕРЖАТСЯ
ВАЖНЫЕ УКАЗАНИЯ ПО ТЕХНИКЕ БЕЗОПАСНОСТИ.
ВНИМАТЕЛЬНО ПРОЧИТАЙТЕ ЭТИ УКАЗАНИЯ.
m
Специальныйнаблюдение
Благодарим за выбор переплетной машины GBC
®
.
Мы стремимся производить качественные переплетные
машины по доступной цене. Машины имеют множество
современных функций, обеспечивающих великолепный
результат при каждом использовании. Перед первым
использованием Вашей машины, просим посвятить
несколько минут чтению этой инструкции.
Обслуживание
Пожалуйста, обеспечьте регулярную очистку поддона
для бумажных отходов. Это позволит предотвратить
блокировку и обеспечит постоянную готовность устройства
к перфорированию. Доступ к поддону для бумажных отходов
осуществляется с задней части машины.
Для предотвращения перегрузки никогда не пытайтесь
выполнять перфорирование количества листов,
превышающего максимально рекомендуемое (20
листов плотностью 80 г/м
2
). При эксплуатации машины
надлежащим образом, в соответствии с данной
инструкцией, обслуживание не требуется.
Полезныесоветы
Положите лист передней обложки на открытую гребенку
лицевой стороной вниз, а лист задней обложки лицевой
стороной вверх.
Для получения наилучшего результата всегда используйте
обложки GBC
®
в сочетании с переплетными гребенками
GBC
®
, имеющими цветные маркировки положения.
Гребенку можно открывать и закрывать в любое время для
удаления или добавления отдельных листов (см. этап 4).
Техническиехарактеристики
GBC® CombBind® C200
формат Letter, DIN A4 – 297 мм
макс. 20 листов (80 г/м
2
)
макс. 2 обложка /0,2 мм каждая
5,2 кг
380 x 330 x 130 мм
Макс.ширинабумаги
Количествоодновременно
перфорируемыхлистов,бумага
Количествоодновременно
перфорируемыхлистов,
пластиковыеобложки
Массамашины(нетто)
Габаритныеразмеры(ШxГxВ)
Технические данные могут быть изменены без предварительного уведомления.
В случае возникновения неисправности следует связаться с
представителем службы технической поддержки компании
GBC
®
.
Ремонтно-техническое
обслуживание
Page 37

37
o
RUS
Гарантийныеобязательства
Работа данного устройства обеспечивается 2-летней гарантией с момента приобретения при условии его нормальной эксплуатации. В
рамках гарантийного периода компания ACCO Brands Europe на свое усмотрение произведет либо ремонт, либо замену неисправного
устройства бесплатно. Данная гарантия не распространятся на неисправности, вызванные несоблюдением правил эксплуатации или
использованием изделия в непредусмотренных целях. Необходимо подтверждение даты приобретения. Работы по ремонту и модификации,
проведенные лицами, не уполномоченными компанией ACCO Brands Europe, прекращают действие гарантии. Мы стремимся обеспечить
высокие эксплуатационные свойства изделия согласно предоставленной спецификации. Данная гарантия не затрагивает юридические права
потребителей в рамках соответствующего национального законодательства, регулирующего продажу товаров.
При возникновении неисправностей в устройстве в течение гарантийного срока просим обращаться в ближайший сервисныйцентр
ACCO. В зависимости от результатов диагностики и модели мы можем выполнить сервисное обслуживание, либо направив специалиста по
техническому обслуживанию, либо предложив вам вернуть бракованное изделие в ACCO. В случае возврата устройства, компания ACCO, по
своему усмотрению, в соответствии с требованиями применимого законодательства, выполнит следующие действия: (i) произведет ремонт
изделия с использованием новых или восстановленных деталей, либо (ii) заменит бракованное изделие на новое или восстановленное
изделие, равноценное заменяемому.
Информация о данном изделии находится на сайте www.gbceurope.com
Выполнениепереплета
1
Измерениетолщиныдокументаспомощьюцветной
шкалы-указателя(g.1)
2
Выберитепластмассовуюгребенку,подходящуюдля
вашегодокумента(g.2)
Воспользуйтесь шкалой-указателем для выбора
правильного размера гребенки. Обратите внимание, что эта
схема основана на плотности бумаги 80 г/м
2
. Количество
страниц, которое можно переплести с помощью гребенок,
будет отличаться в зависимости от толщины используемых
обложек. При возникновении сомнений рекомендуется
выбирать гребенку следующего размера.
3
Установкагребенкивпереплетнуюмашину(g.3)
Установите гребенку открытой стороной вверх на белую
стрелку, расположенную на машине за металлическими
пробойниками.
Примечание.Для переплетной машины GBC
®
ProCombs™ белая стрелка на гребенке должна
совпадать с белой стрелкой на машине.
4
Раскройтегребенку,потянуврычагнасебя(g.4)
Цветные стрелки, расположенные рядом с открывающейся
гребенкой, указывают, насколько необходимо раскрыть
гребенку для установки перфорированных листов.
Примечание.Для переплетной машины GBC
®
ProCombs™ для ускорения переплета цветные линии
на гребенке должны совпадать с цветными стрелками
на машине.
5
Выборразмерадокумента(g.5)
Поверните колесико направляющей края для установки
необходимого размера бумаги/ обложки: A4 (297 мм x
210 мм) или формат Letter («Письмо») (215 мм x 279 мм).
При использовании обложек, размер которых больше
размера переплетаемого документа, поверните колесико
направляющей края в положение «больший размер»,
выполните перфорирование обложек для своего документа
и отложите их в сторону. Затем поверните колесико
направляющей края для выбора формата A4 или Letter и
продолжите перфорирование документа.
6
Установкалистоввперфорационныйканал(g.6)
Одновременно можно перфорировать 2 обложку (0,2 мм)
или до 20 листов бумаги (плотностью 80 г/м
2
). Выберите
количество страниц, которые необходимо перфорировать,
и постучите стопкой бумаги по ровной поверхности
для выравнивания всех листов стопки по одному краю.
Поместите в перфорационный канал края листов, которые
необходимо перфорировать. Поместите стопку листов
максимально глубоко в канал и переместите ее влево для
выравнивания по направляющей края.
7
Выполнитеперфорированиелистов,нажавручкувниз
(g.7)
Затем верните ручку в вертикальное положение и
извлеките перфорированные листы. Примечание. Для
предотвращения замятия не пытайтесь выполнять
перфорирование нескольких обложек одновременно.
8
Установитедокументнагребенку(g.8)
Извлеките листы бумаги из перфорационного канала и
поместите их на открытую гребенку.
9
Вслучаенеобходимостиповторитеэтапы6-8
Повторяйте этапы 6-8 до тех пор, пока весь документ не
будет полностью размещен на гребенке.
J
Закрытиегребенки(g.9)
Закройте гребенку и извлеките документ из машины.
Page 38

Page 39

Page 40

ACCO Brands Europe
Oxford House
Oxford Road
Aylesbury HP21 8SZ
United Kingdom
www.accoeurope.com
Ref: C200/6820
Issue: 1 (09/13)
Service
GB ACCO Service Division
Hereward Rise, Halesowen,
West Midlands, B62 8AN
Tel: 0845 658 6600, Fax: 0870 421 5576,
service.uk@acco.com,
www.gbceurope.com\service
F ACCO France
Service Aprés-Vente
Tel: 0805630255,
Fax: 03 80 68 60 49,
service.fr@acco.com,
www.gbceurope.com\service
D ACCOBrandsBeneluxB.V.,
Holtum Noordweg 11,
6121 RE Born, Holland
Tel: 08000234931,
service.de@acco.com,
www.gbceurope.com\service
E / P ACCO Iberia SLP
Isaac Peral 19, 28820 Coslada (Madrid)
Tel: (E) 800300655 (P) 800855955,
servicio.ib@acco.com,
www.gbceurope.com\service
I CCOBrandsItaliaS.r.l,
Serizio post-vendita,
Via Oberdan, 33, 28070, Tornaco (NO).
Tel: 800029359,
service.it@acco.com,
www.gbceurope.com\service
B ACCOBrandsBeneluxB.V.,
Holtum Noordweg 11, 6121 RE Born,
Holland
Tel: 080048352,
service.be@acco.com,
www.gbceurope.com\service
L ACCOBrandsBeneluxB.V.,
Holtum Noordweg 11, 6121 RE Born,
Holland
Tel: 80027649/80027656,
service.lu@acco.com,
www.gbceurope.com\service
NL ACCOBrandsBeneluxB.V.,
Holtum Noordweg 11, 6121 RE Born,
Holland
Tel: 0800234931,
service.nl@acco.com,
www.gbceurope.com\service
S ACCO Brands Nordic AB
Makadamgatan 5, 254 64 Helsingborg,
Sweden
Tel: 0200899942,
service.nordic@acco.com,
www.gbceurope.com\service
DK ACCO Brands Nordic AB
Makadamgatan 5, 254 64 Helsingborg,
Sweden
Tel: 80251495,
service.nordic@acco.com,
www.gbceurope.com\service
N ACCO Brands Nordic AB
Makadamgatan 5, 254 64 Helsingborg,
Sweden
Tel: 80010953 ,
service.nordic@acco.com,
www.gbceurope.com\service
IS ACCO Brands Nordic AB
Makadamgatan 5, 254 64 Helsingborg,
Sweden
Tel: +46 42 38 36 00,
service.nordic@acco.com,
www.gbceurope.com\service
LV ACCOBrandsNordicAB
Makadamgatan 5, 254 64 Helsingborg,
Sweden
Tel: +46 42 38 36 00,
service.nordic@acco.com,
www.gbceurope.com\service
EST ACCO Brands Nordic AB
Makadamgatan 5, 254 64 Helsingborg,
Sweden
Tel: +46 42 38 36 00,
service.nordic@acco.com,
www.gbceurope.com\service
LT ACCO Brands Nordic AB
Makadamgatan 5, 254 64 Helsingborg,
Sweden
Tel: +46 42 38 36 00,
service.nordic@acco.com,
www.gbceurope.com\service
CZ/SK XERTECa.s.
Kloknerova, 2278/24 148 00,
Praha 4 - Chodov, Czech Republic
Tel.: +420 225 004 317, Fax: +420 225
004 162
www.xertec.cz,
www.gbceurope.com\service
PL VidisS.A.,
ul. Grabiszynska 241D, 53-234 Wroclaw,
Tel: +48 71 33 880 20,
service.pl@acco.com,
www.gbceurope.com\service
H ACCOHungáriaKft
Budapest, Ócsai út 4., 1239, Hungária
Tel: +36 1 283 1645,
Fax: +36 0 283 0928,
www. gbceurope.com\service
RUS Представительствокомпании
«АККОДойчландГМБХиКО.КГ»
Россия 105005, Москва,
Денисовский пер., д.26
Тел: (495) 933-51-63,
Факс: (495) 933-51-64,
www. gbceurope.com\service
UA «Полиграфическиесистемы»
ул.Набережно-Корчеватская,
78, г. Киев, 03035, Украина
Тел.: (+38) 044 252-7103,
(+38) 044 252-7104,
www. gbceurope.com\service
A ACCOBrandsBeneluxB.V.,
Holtum Noordweg 11,
6121 RE Born, Holland
Tel: 0800677671,
service.at@acco.com,
www.gbceurope.com\service
CH ACCOSchweiz
ABC Bürotechnik AG, Winkelbüel 4,
6043 Adligenswil
Tel: 0800001790 / 0800001791 /
0800001792,
service.ch@acco.com,
www. gbceurope.com\service
IRL ACCO Service Division
Hereward Rise, Halesowen, West
Midlands, B62 8AN
Tel: 0845 658 6600, Fax: 0870 421 5576,
service.ie@acco.com,
www.gbceurope.com\service
ZA RexelOceProducts(PTY)Ltd
Crusher Road, Crown Ext.3, PO Box 102,
Crown Mines, Johannesburg 2025,
South Africa
Tel: +27 (0) 11 837 7723,
service.za@acco.com
IND / PK / GBC Asia Pte Ltd
47 Ayer Rajah Crescent,
#05-08/17, Singapore 139947
Tel: +65 6776 0195,
Fax: +65 6779 1041,
service.asia@acco.com
J GBC-JapanK.K.
14F Harmony Tower, 1-32-2 Honcho,
Nakano-ku, Tokyo 164-8721
Tel: (81)-03-5351-1801,
Fax: (81)-03-5351-1831,
service.jp@acco.com
AUS PelikanArtlineHeadOce
2 Coronation Ave,
Kings Park NSW 2148
Tel: 02 9674 0900
Fax: 02 9674 0910
www.pelikanartline.com.au
BD
 Loading...