

Page 1
Model: VD7500LB OPERATING INSTRUCTIONS
Before Use:
READ ALL OPERATING INSTRUCTIONS BEFORE USE. Use extreme caution when checking electrical circuits to avoid injury due to electric
shock. Gardner Bender assumes basic knowledge of electricity on the part of the user and is not responsible for any injury or damages due to
improper use of this tester. OBSERVE AND FOLLOW all standard industry safety rules and electrical codes. When necessary call a qualified
electrician to troubleshoot and repair the defective electrical circuit.
FEATURES
Non-contact AC voltage detection: 12V-600VAC
Adjustable detection sensitivity
Audible and visual indication
Tests fuse
Tests bulb
Retractable light bulb remover
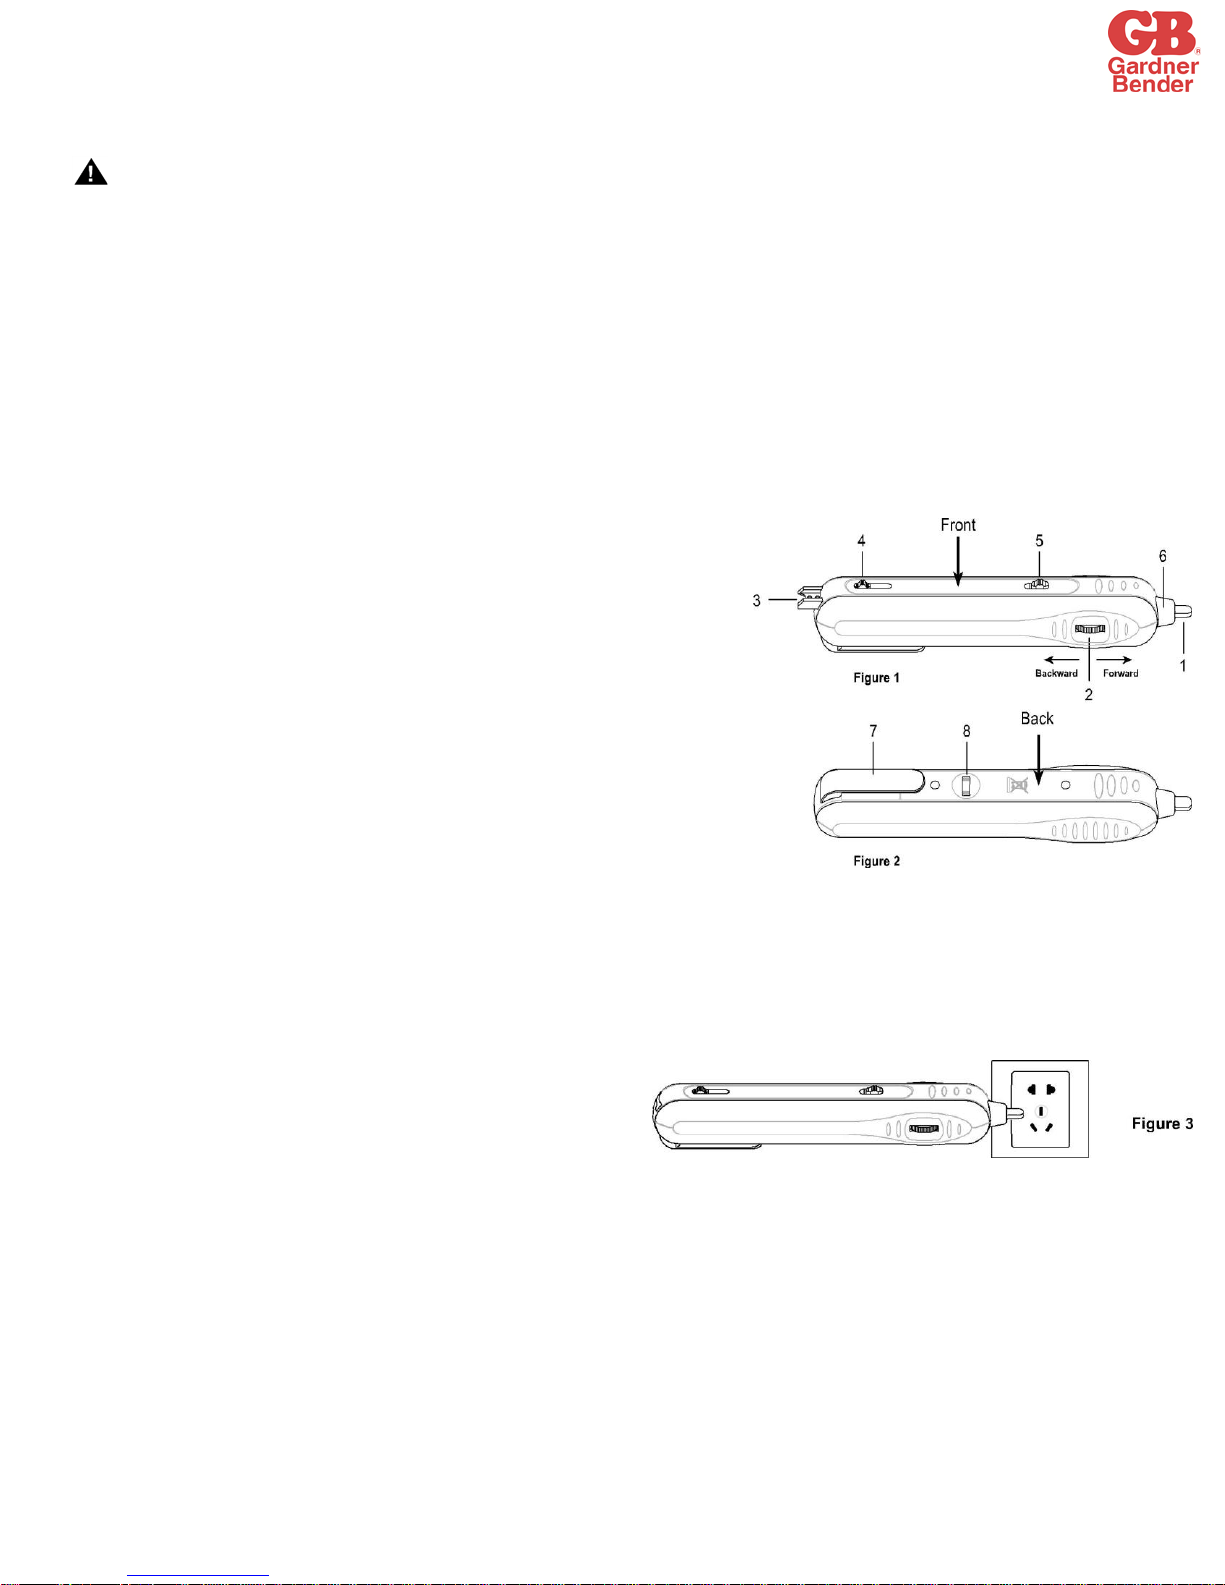
STRUCTURE
1. Probe: Used to sense AC voltage
2. Sensitivity Knob: Used to adjust the detection sensitivity for AC voltage detection.
Rotate it forward to decrease the sensitivity, rotate
it backward to increase the sensitivity.
3. Bulb Remover: Used to remove bulb from Christmas light set.
4. Bulb Remover Control
Used to stretch out or draw back the bulb remover.
5. Function Switch: Used to select desired function as well as to turn on or off the
instrument. There are three positions for this switch:
ON/FUSE TEST - AC voltage detection and fuse test are enabled.
OFF - The instrument is turned off
BULB TEST - Bulb test is enabled
6. LED
7. Pocket Clip & Battery Cover: To remove the pocket clip & battery cover, press it with
thumb and slide it out.
8. Fuse/Bulb Tester: Used to test bulb or fuse.
OPERATION INSTRUCTION
Checking the Instrument
1. Move the function switch to the "ON/FUSE TEST" position.
2. Move the probe close to a known AC power source (such as a live outlet). If the instrument's built-in buzzer sounds and the LED flash red, the
instrument is good and can be used for detection.
Detecting AC Voltage
3. Move the function switch to the "ON/FUSE TEST" position.
4. Move the probe close to the wire or socket to be to be detected. When
the instrument detects AC voltage, the built-in buzzer will sound and
the LED will flash red.
Note:
Don't set the instrument's sensitivity too high. A higher sensitivity means a longer detection distance and a higher possibility of being
interfered by ambient interference source. It is recommended to set the sensitivity to the lowest level at the beginning of detection, and
then set it to a suitable level if necessary. This can help minimize the interference. If the sensitivity is set too high, the detector may give
false alarm because of interference resulted from interference source (such as an adjacent wire or device).
If the instrument's sensitivity is high, the built-in buzzer will sound briefly and the LED will light briefly when you just move the function
switch to the "ON/FUSE TEST" position. It is normal.
The instrument may give alarm when you move it close to an object with static electricity or an iron near alternating current.
Gardner Bender - N85 W12545 Westbrook Crossing Menomonee Falls, WI USA 53051
Technical Support: 1-800-624-4320, press 2
Page 2
Notice:
1. The instrument's AC voltage detection range is: 12Vac ~ 600Vac, at 50/60Hz.Don’t use the instrument to detect an AC voltage below 12Vac or
above 600Vac. Do not use the instrument to detect DC voltage.
2. If there are several lines, such as 2-phase wires and 3-phase wire, separate them far enough apart from each other and perform voltage
detection on each line.
3. Always check the instrument on a known AC power source before detection.
4. Don't use the instrument if it is damaged
5. Shielded live conductor will not be detected.
6. Because the instrument's detection limit and sensitivity setting can affect detection, a line (or a device) under test may be live even if the built-in
buzzer does not sound and the LED does not light. To avoid electric shock and personal injury, don't touch any conductor with hand or skin.
7. To avoid a false alarm, don’t use the instrument in intense electric field environment.
Model: VD7500LB OPERATING INSTRUCTIONS
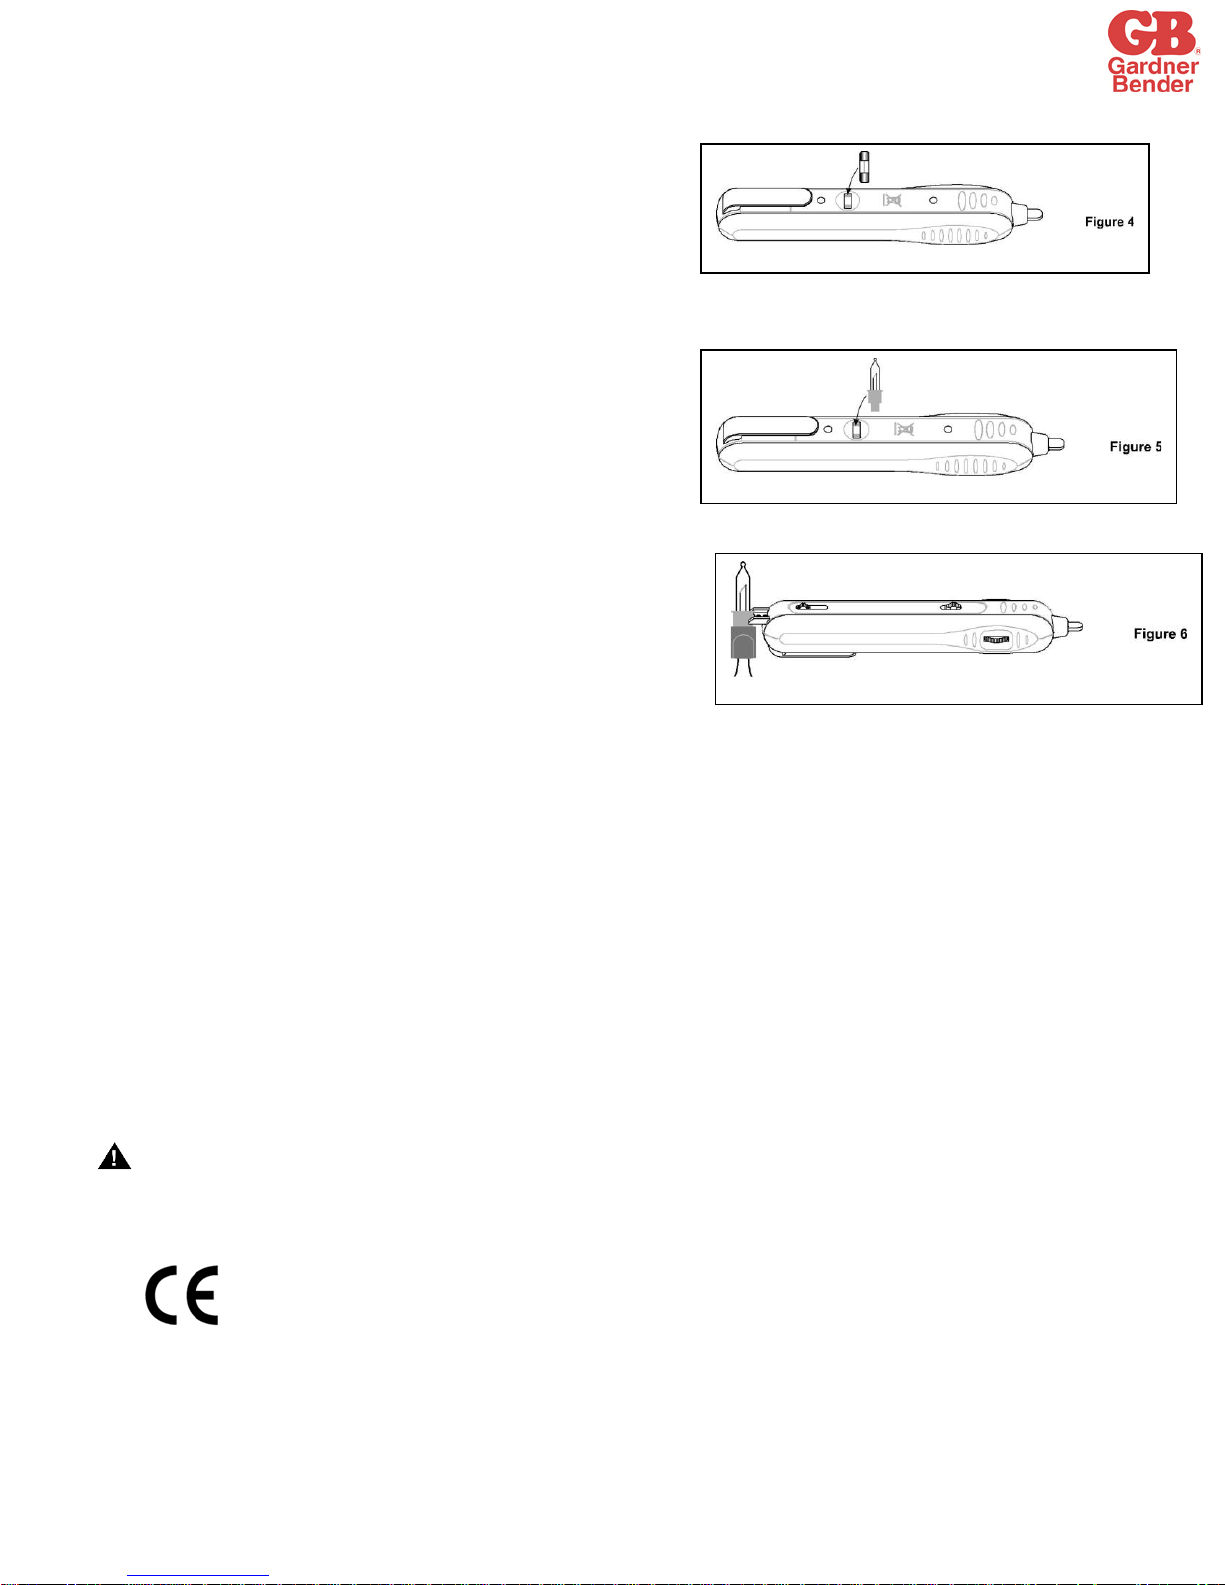
Testing a Fuse
1. Let the function switch to the "ON/FUSE TEST” position.
2. Hold the fuse size: < 0.157”x 0.4” to be tested in the middle and gently press
it against the fuse tester, make sure that the fuse's two terminals are
touching the two metal contacts of the fuse tester.
3. If the instrument's built-in buzzer sounds and the LED flashes red, the fuse is
good. If the instrument does not give alarm, the fuse is blown or damaged.
Testing a Bulb
1. Set the function switch to the "BULB TEST” position.
2. Hold the bulb to be tested by its tip and gently push the bulb's two
connecting terminals against the two metal contacts of the bulb tester,
make sure that the bulb's two terminals are touching the two metal contacts
of the bulb tester.
3. If the bulb lights, then it is good. If the bulb does not light, it is damaged.
Removing Bulb from Light String/Set
1. Move the bulb remover control to stretch out the bulb remover.
2. Hold the control with thumb and insert the metal plate of the bulb remover
between the bulb husk and the bulb base to make the bulb loose, the pull out
the bulb with your fingers. (Note: Some light strands have what is known as a
"locking" base or clip. These require you to unlock the bulb husk from the base
in order to remove the bulb)
Battery Replacement
If the LED does not flash when the built-in buzzer sounds, the button cells are low and should be replaced immediately. To replace the button cells, set
the function switch to the "OFF” position first, then press and slide the pocket clip & battery cover out. Replace the exhausted button cells with two new
1.5V LR44 button cells according to the polarity indication. Reinstall the pocket clip & battery cover.
CAUTION:
REFER TO THIS MANUAL BEFORE USING THIS TESTER
DO NOT ATTEMPT TO REPAIR THIS TESTER. IT CONTAINS NO SERVICEABLE PARTS
Operating environment is: 0°C ~ 40°C; relative humidity <85%; indoor use
Gardner Bender - N85 W12545 Westbrook Crossing Menomonee Falls, WI USA 53051
Technical Support: 1-800-624-4320, press 2
 Loading...