

Page 1
BASE-FIX
Future perFect
DE/EN/IT/FR/NL/PL/HU/CZ/SK/ES/PT
Page 2

DE - WARNUNG! Die folgende Kurzanleitung dient nur der Übersicht. Um maximale Sicherheit und maximalen
Komfort für Ihr Kind zu erreichen, ist es unbedingt notwendig, die gesamte Gebrauchsanleitung aufmerksam zu
lesen.
EN - WARNING! This short manual serves as an overview only. For maximum protection and best comfort for your
child it is essential to read and follow the entire instruction manual carefully.
IT - ATTENZIONE! Queste istruzioni sono solo un sommario. Per garantire la massima sicurezza e comfort al
vostro bambino è molto importante leggere attentamente ed interamente il manuale d‘istruzioni e seguirne
scrupolosamente le indicazioni.
FR - AVERTISSEMENT! Ce court manuel abrégé n‘est qu‘un résumé. Pour une protection et un confort optimal pour
votre enfant, il est essentiel de lire et de suivre toutes les instructions du manuel soigneusement.
NL - WAARSCHUWING! Deze korte handleiding dient enkel als overzicht. Voor maximale bescherming en komfort
van uw kind, is het belangrijk de handleiding volledig en zorgvuldig te lezen.
PL - OSTRZEŻENIE! Niniejsza skrócona instrukcja jest tylko obrazkowym streszczeniem. Aby zagwarantować
swojemu dziecku maksymalne bezpieczeństwo oraz wygodę należy uważnie przeczytać całą instrukcję użytkowania.
HU - FIGYELMEZETÉS! Ez a rövid használati utasítás áttekintésül szolgál. Gyermeke maximális védelméért és
kényeleméért fontos, hogy a komplett használati utasítást elolvassa és aszerint járjon el.
CZ - VAROVÁNÍ! Následující stručný průvodce je pouze přehled. Pro maximální bezpečnost a maximální pohodlí
Vašeho dítěte je důležité si přečíst pozorně všechny instrukce.
SK - VAROVANIE! Nasledujúci stručný sprievodca je iba prehľad. Pre maximálnu bezpečnosť a maximálne pohodlie
Vášho dieťaťa je dôležité si prečítať pozorne všetky inštrukcie.
ES - ADVERTENCIA! Esta guía rápida es útil para obtener una visión general. Para una máxima protección y un
óptimo confort para su hijo es esencial leer y cumplir detenidamente el manual de instrucciones.
PT - AVISO! Este guia rápido é útil para obter uma visão geral. Para uma máxima protecção e um óptimo conforto
para o seu filho é aconselhável ler e cumprir detalhadamente o manual de instruções.
2
Page 3
Kurzanleitung - ISOFIX
Short instruction - ISOFIX
Sommario - ISOFIX
Instructions abrégées - ISOFIX
Korte handleiding - ISOFIX
Skrócona instrukcja - ISOFIX
Rövid instrukció - ISOFIX
Stručné instrukce - ISOFIX
Stručné instrukce - ISOFIX
Instrucciones abreviadas - ISOFIX
Instruçõnes abreviadas - ISOFIX
8 | INHALT
9 | CONTENT
9 | ARGOMENTI
38 | CONTENU
DEENITFRNLPLHUCZES SKPT
PUSH!
1 2 3
39 | INHOUD
39 | SPIS TREŚCI
66 | TARTALOM
PUSH!
CLICK!
67 | OBSAH
67 | OBSAH
4
1
CLICK!
65
7
94 | CONTENIDO
95 | CONTEÚDO
2
8
10
119
3
Page 4

Page 5
Kurzanleitung - 3-Punkt-Gurt
Short instructions - 3-Point-Belt
Sommario - Cintura a 3 punti
Instructions abrégées - Ceinture 3-points
1 2 3
CLICK!
CLICK!
4
Korte handleiding - 3 puntsgordel
Skrócona instrukcja - 3-Punktowe pasy
Rövid instrukció - 3 pontos öv
Stručné instrukce - 3-bodový pás
65
Stručné instrukce - 3-bodový pás
Instrucciones abreviadas - Cinturón de 3 puntos
Instruções abreviadas - Cinto de 3 pontos
CLICK!
PUSH!
7
8 | INHALT
9 | CONTENT
9 | ARGOMENTI
38 | CONTENU
39 | INHOUD
39 | SPIS TREŚCI
66 | TARTALOM
67 | OBSAH
67 | OBSAH
94 | CONTENIDO
DEENITFRNLPLHUCZES SKPT
1
CLICK!
95 | CONTEÚDO
2
8
11109
5
Page 6
6
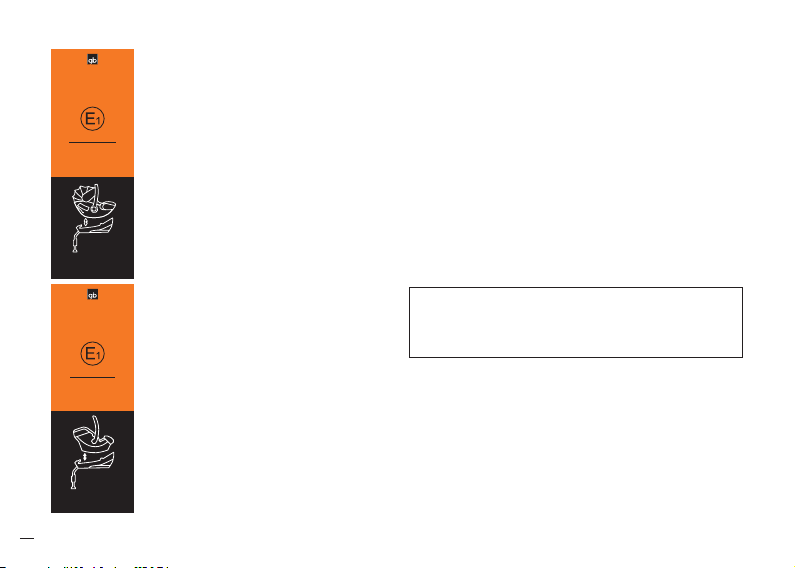
BASE-FIX
GB IDAN
UNIVERSAL
SEMI-UNIVERSAL
0 - 13 kg
04301332
ECE R 44/04
gb GmbH
Riedingerstr. 18, 95448 Bayreuth
Germany
Approved for
BASE-FIX
GB ARTIO
UNIVERSAL
SEMI-UNIVERSAL
0 - 13 kg
04301331
ECE R 44/04
gb GmbH
Riedingerstr. 18, 95448 Bayreuth
Germany
Approved for
BASE-FIX
11/2015
ZULASSUNG
Base-Fix
ECE R44/04 Gruppe 0+
Gewicht: Bis 13kg
EMPFOHLEN
Für Fahrzeuge mit ISOFIX (Klasse
E) Für Fahrzeuge mit 3-PunktAutomatik-Gurt nach ECE R16
oder gleichwertigem Standard.
HOMOLOGATION
Base-Fix
ECE R44/04 group 0+
Weight: Up to 13kg
RECOMMENDED
For vehicle seats with ISOFIX
(class E) For vehicle seats with
3-point automatic-retractor-belt
according to ECE R16 or other
equivalent standards.
OMOLOGAZIONE
Base-Fix
ECE R44/04 Gruppo 0+
Peso: fino a 13kg
ADATTO
Per autoveicoli con sedili dotati
di ISOFIX (class E) e cinture di
sicurezza automatiche a tre punti
secondo norme ECE R16 oo
standard equivalente.
SEHR GEEHRTER KUNDE,
vielen Dank, dass Sie sich entschieden haben, die
Base-Fix zu erwerben. Wir versichern Ihnen, dass bei
der Entwicklung der Base-Fix Sicherheit, Komfort
und Bedienungsfreundlichkeit im Vordergrund
gestanden haben. Das Produkt wird unter besonderer
Qualitätsüberwachung hergestellt und erfüllt strengste
Sicherheitsanforderungen.
HINWEIS! Bewahren Sie diese Anleitung immer
gribereit
/ Artio B
Die Basisstation ist für alle Idan / Artio Varianten
geeignet.
im dafür vorgesehenen Fach unten an der Idan
abyschale auf.
WARNUNG! Um den optimalen Schutz für ihr Kind
!
zu gewährleisten, muss die Base-Fix unbedingt
so verwendet werden, wie es in der Anleitung
beschrieben wird.
Page 7

DEAR CUSTOMER,
thank you very much for purchasing the Base-Fix. We
assure you that in the development process of the BaseFix we focused on safety, comfort and user friendliness.
The product is manufactured under special quality
surveillance and complies with the strictest safety
requirements.
GENTILE CLIENTE,
grazie per avere acquistato Base-Fix. Le assicuriamo
che nel progettare Base-Fix i nostri principali obiettivi
sono stati la sicurezza, il comfort e la facilità di utilizzo.
Il prodotto è stato elaborato sotto uno stretto controllo
qualitativo e risponde ai più severi standard di sicurezza.
DEENIT
NOTE! Please always have the user guide at hand and
store it in the dedicated slot under the Idan / Artio
infant carrier.
The base is suitable for all Idan / Artio variants.
WARNING! For your child’s maximum protection,
!
it is essential to use and install the Base-Fix
according to the instructions in this user guide.
NOTA BENE! Raccomandiamo di tenere il manuale
d’istruzioni sempre a portata di mano e di conservarlo
nell’apposito alloggiamento sotto il seggiolino.
La base è adatta a tutte le varianti Idan / Artio.
ATTENZIONE! Per garantire la massima
!
protezione del Vostro bambino è molto
importante che l‘uso e l‘installazione di Base-Fix
siano eettuati seguendo scrupolosamente le
istruzioni contenute in questo manuale.
7
Page 8

DE INHALT
KURZANLEITUNG - ISOFIX........................................................................................3
KURZANLEITUNG - 3-PUNKT-GURT ..................................................................5
ZULASSUNG..........................................................................................................................6
ZULASSUNG / KOMPATIBILITÄT .........................................................................10
ZUM SCHUTZ IHRES FAHRZEUGES .................................................................12
VERWENDUNG IM FAHRZEUG ............................................................................12
SICHERHEIT FÜR IHR BABY ...................................................................................14
SICHERHEIT BEIM EINBAU INS FAHRZEUG ...............................................16
EINBAU DER BASE-FIX – ISOFIX ........................................................................18
EINBAU DER BASE-FIX – 3-PUNKT-GURT..................................................22
EINSTELLEN DES STÜTZFUSSES ......................................................................24
EINRASTEN DER IDAN / ARTIO BABYSCHALE .....................................26
LÖSEN DER IDAN / ARTIO BABYSCHALE .................................................28
AUSBAU DER BASE-FIX – ISOFIX .....................................................................28
AUSBAU DER BASE-FIX – 3-PUNKT-GURT .............................................. 30
VERHALTEN NACH EINEM UNFALL ..............................................................30
PFLEGE .................................................................................................................................30
PRODUKTLEBENSDAUER .....................................................................................30
ENTSORGUNG ..................................................................................................................32
INFORMATIONEN ZUM PRODUKT ...................................................................32
GARANTIEBESTIMMUNGEN ................................................................................ 34
8
Page 9

EN CONTENT
SHORT INSTRUCTION - ISOFIX ..............................................................................3
SHORT INSTRUCTIONS - 3-POINT-BELT ........................................................5
HOMOLOGATION ..............................................................................................................6
APPROVAL / COMPATIBILITY .................................................................................11
FOR THE PROTECTION OF YOUR CAR ........................................................ 13
THE BEST POSITION IN THE CAR ......................................................................13
SAFETY FOR YOUR BABY ....................................................................................... 15
SAFETY IN THE CAR .................................................................................................... 17
INSTALLING THE BASE-FIX – ISOFIX .............................................................. 19
INSTALLING THE BASE-FIX - 3-POINT-BELT ............................................23
AJUSTING THE SUPPORT LEG............................................................................25
ENGAGING OF THE IDAN / ARTIO ...................................................................27
REMOVING OF THE IDAN / ARTIO ..................................................................29
REMOVING OF THE BASE-FIX – ISOFIX.......................................................29
REMOVING OF THE BASE-FIX – 3-POINT-BELT .....................................31
WHAT TO DO AFTER AN ACCIDENT..............................................................31
PRODUCT CARE ..............................................................................................................31
DURABILITY OF THE PRODUCT .........................................................................31
DISPOSAL .............................................................................................................................33
PRODUCT INFORMATION .......................................................................................33
WARRANTY ........................................................................................................................35
IT ARGOMENTI
SOMMARIO - ISOFIX .......................................................................................................3
SOMMARIO - CINTURA A 3 PUNTI ......................................................................5
OMOLOGAZIONE..............................................................................................................6
OMOLOGAZIONE / COMPATIBILITA‘ .................................................................11
PROTEGGERE I SEDILI ................................................................................................13
LA POSIZIONE PIÙ CORRETTA ALL‘INTERNO DEL VEICOLO ....13
SICUREZZA DEL BAMBINO ....................................................................................15
SICUREZZA NELL‘AUTO ............................................................................................17
INSTALLARE BASE-FIX - ISOFIX ......................................................................... 19
INSTALLAZIONE DI BASE-FIX - CINTURA A 3 PUNTI .......................23
REGOLAZIONE DEL PIEDE DI SUPPORTO ................................................25
FISSARE IL SEGGIOLINO IDAN / ARTIO ALLA BASE ........................27
TOGLIERE IL SEGGIOLINO IDAN / ARTIO ..................................................29
RIMOZIONE DI BASE-FIX - ISOFIX ....................................................................29
RIMOZIONE DI BASE-FIX - CINTURA A 3 PUNTI ....................................31
COSA FARE A SEGUITO DI UN INCIDENTE ................................................31
MANUTENZIONE .............................................................................................................31
DUREVOLEZZA DEL PRODOTTO ...................................................................... 31
SMALTIMENTO .................................................................................................................33
INFORMAZIONI SUL PRODOTTO ......................................................................33
GARANZIA ...........................................................................................................................35
DEENIT
9
Page 10
ZULASSUNG / KOMPATIBILITÄT
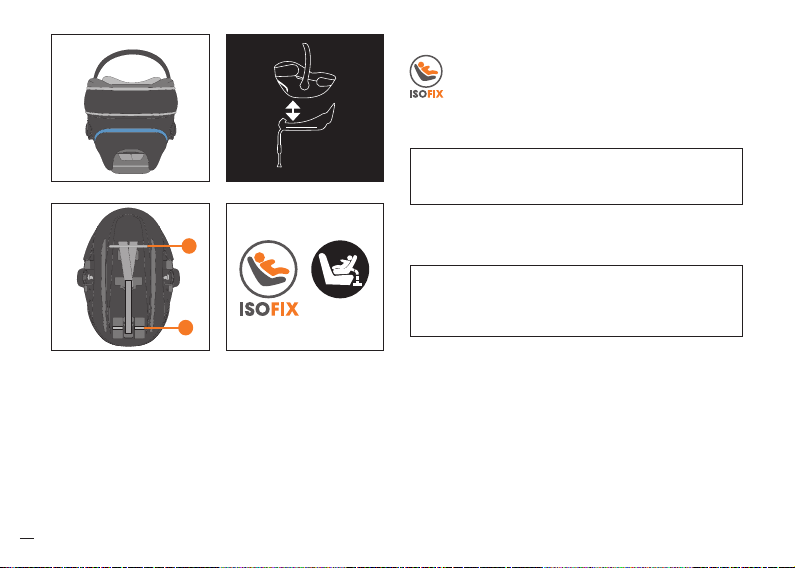
Die Base-Fix wird mittels ISOFIX System im
Fahrzeug fixiert und ist nur in Kombination mit
einer Idan / Artio Babyschale mit Raststangen
(r & z) für Kinder bis zu 13 kg (Gruppe 0+, ab
der Geburt bis ca. 18 Monate) geprüft und
zugelassen.
WARNUNG! Verwenden Sie niemals gebrauchte
APPROVED FOR BASE-FIX
z
r
10
!
Produkte deren Herkunft Sie nicht eindeutig
kennen.
HINWEIS! Die Kompatibilität der Idan / Artio
Babyschale ist mit dem Schriftzug „APPROVED FOR
BASE-FIX“ gekennzeichnet.
WARNUNG! Weder Idan / Artio noch Base-Fix
!
dürfen mit anderen Systemen kombiniert und
verwendet werden. Die Zulassung erlischt, sobald
an der Base-Fix etwas verändert wird.
Für die Befestigung der Idan / Artio Babyschale mit der
Base-Fix besteht eine semi-universelle Genehmigung
nach ECE R44/04. Aus diesem Grund darf die BaseFix nur in bestimmten Fahrzeugen eingesetzt werden.
Die zugelassenen Fahrzeuge entnehmen Sie bitte der
beigelegten Kfz-Typenliste. Die aktuelle Typenliste
finden Sie auf www.gb-online.com.
Page 11

APPROVAL / COMPATIBILITY
The Base-Fix has to be fixed with ISOFIX to the
car. The Base-Fix is only tested and approved in
combination with an Idan / Artio infant carrier
with locking bars (r & z) for children up to 13kg
(group 0+, 0-18 months).
WARNING! Don’t use second-hand products with
!
an uncertain background.
NOTE! The compatibility of the Idan / Artio infant
carrier is marked with the following imprint „APPROVED
FOR BASE-FIX“
WARNING! Neither the Idan / Artio nor the Base-
!
Fix may be used with other systems. The approval
of the Base-Fix expires immediately in case of any
modification.
Fastening the Idan / Artio infant carrier in combination
with the Base-Fix is based on a semi-universal approval
according to ECE R44/04. Hence the Idan / Artio may
be used only in certain cars.
Please refer to the list of approved cars to check your
vehicle’s compatibility. This list is updated regularly and
the latest version can be accessed online at
www.gb-online.com.
OMOLOGAZIONE / COMPATIBILITA‘
Base-Fix deve essere fissata con sistema ISOFIX
alla vettura. Base-Fix è testata e omologata per
l‘uso con seggiolino di sicurezza Idan / Artio
dotato di barre di fissaggio (r & z) per bambini
con peso fino a 13 kg (Gruppo 0+, da 0 a 18 mesi)
ATTENZIONE! Non utilizzare mai prodotti di
!
seconda mano di cui non si conosce l’utilizzo
precedente.
NOTA BENE! La compatibilità di Idan / Artio con la
Base-Fix è contrassegnata dall‘etichetta con la dicitura
„APPROVED FOR BASE-FIX“
ATTENZIONE! Né il seggiolino Idan / Artio né la
!
Base-Fix possono essere utilizzati con sistemi di
altro tipo/marca. Qualsiasi modifica al prodotto
invalida automaticamente l‘omologazione della
Base-Fix.
L‘installazione del seggiolino Idan / Artio con la BaseFix ha omologazione semi-universale secondo la
norma ECE R44/4. Utilizzo ammesso soltanto in certe
autovetture.
Vi preghiamo di controllare l‘elenco dei veicoli approvati
per verificare la compatibilità con la Vostra auto.
L‘elenco è aggiornato regolarmente, l‘ultima versione è
sempre disponibile nel nostro sito www.gb-online.com
DEENIT
11
Page 12
ZUM SCHUTZ IHRES FAHRZEUGES
An einigen Auto-Sitzbezügen aus empfindlichem
Material (z.B. Velours, Leder etc.) können durch die
Benutzung eines Kindersitzes Gebrauchsspuren
auftreten. Um das zu vermeiden, können Sie z.B. eine
Decke oder ein Handtuch unterlegen.
VERWENDUNG IM FAHRZEUG
Prüfen Sie vor dem Kauf der Base-Fix immer, ob sich
diese ordnungsgemäß in Ihrem Fahrzeug einbauen lässt.
Ein ordnungsgemäßer Einbau kann entweder über das
ISOFIX System oder den 3-Punkt-Gurt des Fahrzeuges
j
x
12
erfolgen.
j
x
WARNUNG! Eine gleichzeitige Verwendung
!
beider Systeme ist nicht gestattet.
Steht die Base-Fix samt Babyschale nicht stabil oder zu
steil auf dem Fahrzeugsitz, so können Sie dies mit einer
zusätzlichen Decke geringfügig ausgleichen oder Sie
wählen einen anderen Sitzplatz im Fahrzeug.
WARNUNG! Befestigen Sie die Base-Fix wie
!
abgebildet immer mit dem ISOFIX System und
dem zugehörigen Stützfuß, oder alternativ mit
dem 3-Punkt-Gurt des Fahrzeuges und dem
Stützfuß.
Page 13

FOR THE PROTECTION OF YOUR CAR
On some car seat covers which are made of sensitive
material (e.g. velour, leather etc.) the use of a child
safety seat may lead to traces of wear and tear. In
order to avoid this, you should put a blanket or a towel
underneath the child seat.
PROTEGGERE I SEDILI
Nel caso di autovetture con rivestimento dei sedili
in materiali particolarmente delicati (per esempio
velluto, pelle, ecc), l‘uso del seggiolino di sicurezza
potrebbe danneggiarli. Prima di installare la Base-Fix
o il seggiolino consigliamo di stendere un telo per
proteggere il sedile.
DEENIT
THE BEST POSITION IN THE CAR
Please check before you purchase the Base-Fix if it
can be installed properly in your vehicle. A proper
installation can be done either with the ISOFIX system
or with the 3-point-belt.
WARNING! A simultaneous use of both systems is
!
not permitted.
If Base-Fix together with the Idan / Artio infant carrier
should not be stable or sits too steeply in the car,
a blanket or towel can be used to compensate this.
Alternatively, please choose another position in the car.
WARNING! The Base-Fix must be used (as
!
pictured) with the ISOFIX System and the
appropriated support leg or as second option with
the 3-point-belt of the car and the support leg.
LA POSIZIONE PIÙ CORRETTA ALL‘INTERNO DEL
VEICOLO
Vi preghiamo di controllare prima dell‘acquisto di
Base-Fix se è possibile una corretta installazione con il
sistema ISOFIX o con cintura a 3 punti.
ATTENZIONE! Non è ammesso l‘utilizzo
!
contemporaneo di entrambi i sistemi.
Nel caso Base-Fix assieme al seggiolino Idan / Artio
appaia poco stabile o se appoggia troppo in alto
nell‘auto, si dovrà utilizzare un panno o un asciugamano
arrotolato per livellare. Oppure, scegliere un‘altra
posizione all‘interno della vettura.
ATTENZIONE! Base-Fix dev‘essere utilizzata
!
(come illustrato) con il sistema ISOFIX e l‘apposito
piede di supporto, oppure, in alternativa, con la
cintura a 3 punti dell‘auto e il piede di supporto.
13
Page 14

SICHERHEIT FÜR IHR BABY
• Verwenden Sie die Base-Fix ausschließlich in einem
PKW und immer nur in Kombination mit einer dafür
geeigneten Idan / Artio Babyschale.
• Sie sind immer selbst für die Sicherheit ihres Kindes
verantwortlich.
• Vergewissern Sie sich immer, dass die Base-Fix
am Fahrzeug eingerastet bzw. ordnungsgemäß
angegurtet ist, der Stützfuß muss ausgeklappt sein
und stabil am Fahrzeugboden aufliegen.
• Stellen Sie sicher, dass die Idan / Artio Babyschale
fest mit der Base-Fix verbunden ist. Kontrollieren Sie
hierzu die Indikatortaste x an der Entriegelungstaste j.
WARNUNG! Die Kunststoteile der Base-Fix
!
heizen sich in der Sonne auf. Schützen Sie ihr
Baby und die Base-Fix indem Sie intensive
Sonneneinstrahlung vermeiden.
HINWEIS! Lassen Sie Ihr Baby nie unbeaufsichtigt im
Fahrzeug zurück.
14
Page 15
SAFETY FOR YOUR BABY
• Use the Base-Fix exclusively in vehicles and only in
combination with an Idan / Artio infant carrier.
• You are always responsible for the safety of your child.
• Ensure that the Base-Fix is always secured correctly,
the support leg must be extended and resting sturdily
on the vehicle floor.
• Check the indicator button x on the unlock key j for
the proper installation of the Idan / Artio infant carrier.
WARNING! Plastic parts of the Base-Fix heat up in
!
the sun. Protect your Baby and the Base-Fix from
intense exposure to the sun.
NOTE! Never leave your child in the vehicle
unattended.
SICUREZZA DEL BAMBINO
• Utilizzare Base-Fix soltanto su autoveicoli e solo in
combinazione con il seggiolino di sicurezza Idan /
Artio.
• Siete responsabili della sicurezza del Vostro bambino.
• Assicuratevi che la Base-Fix sia sempre fissata nel
modo corretto.
• Controllare sempre l‘indicatore di scurezza x sulla
maniglia di sblocco j per verificare l’ancoraggio
corretto del seggiolino Idan / Artio.
ATTENZIONE! Le parti in plastica della Base-Fix
!
si surriscaldano al sole. Proteggete il Bambino e la
Base-Fix da un‘esposizione eccessiva al sole.
NOTA BENE! Non lasciare mai il bambino nell‘auto
incustodito.
DEENIT
15
Page 16
SICHERHEIT BEIM EINBAU INS FAHRZEUG
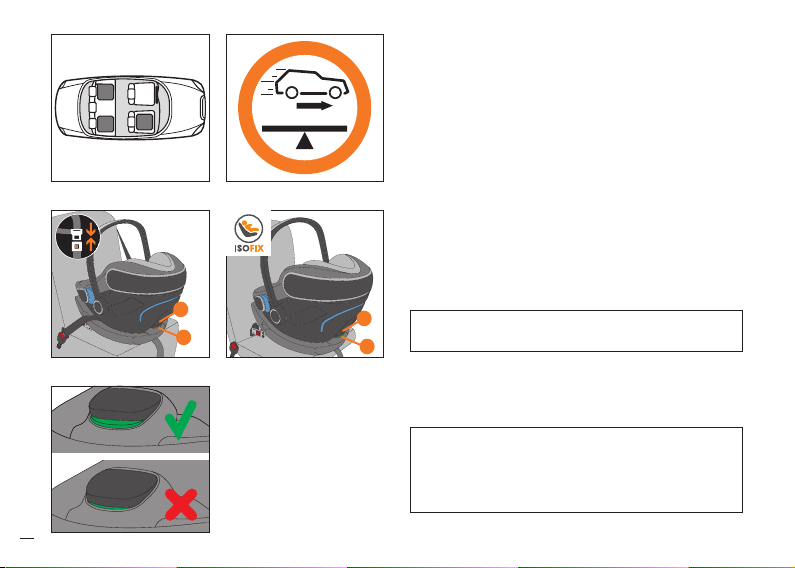
WARNUNG! Verwenden Sie die Idan / Artio
!
Babyschale samt Base-Fix nicht auf einem Sitz,
auf dem ein Frontairbag aktiviert ist. Dies gilt nicht
für die sogenannten Seitenairbags.
Achten Sie zum Schutz aller Fahrzeuginsassen stets
darauf, dass…
• die umklappbaren Rückenlehnen der Fahrzeugsitze
eingerastet sind und sich in einer möglichst aufrechten
Position befinden.
• bei Einbau der Base-Fix auf dem Beifahrersitz dieser
in der hintersten Position steht.
• im Fahrzeug alle beweglichen Gegenstände gesichert
sind.
• alle Personen im Fahrzeug angeschnallt sind.
WARNUNG! Die Base-Fix muss auch dann, wenn
!
sie nicht benutzt wird, immer mit dem Fahrzeug
verbunden sein. Bereits bei einer Notbremsung
oder einem geringen Aufprall kann eine
unbefestigte Base-Fix andere Mitfahrer und Sie
selbst verletzen.
16
Page 17

SAFETY IN THE CAR
WARNING! Do not use the Base-Fix in
!
combination with the Idan / Artio infant carrier in
front seats equipped with activated front-airbag.
This does not apply to so-called side-airbags.
In order to guarantee the best possible safety for all the
passengers make sure that …
• foldable backrests in the car are locked in their
upright position.
• when installing the Base-Fix on the front passengers
seat, move the car seat into the rearmost position.
• you properly secure all objects likely to cause injury in
the case of an accident.
• all passengers in the car are buckled up.
WARNING! The Base-Fix must always be
!
connected to the vehicle, even if not in use.
In case of an emergency stop or accident, an
unsecured Base-Fix may injure other passengers
or yourself.
SICUREZZA NELL‘AUTO
ATTENZIONE! Non utilizzare mai la Base-Fix con
!
il seggiolino Idan / Artio su sedili anteriori dotati
di airbag frontale che non sia stato disattivato. Lo
stesso non vale per i cosiddetti airbag laterali.
Onde assicurare la massima sicurezza per tutti i
passeggeri verificare che…
• i braccioli reclinabili della vettura siano ben fissati nella
posizione sollevata.
• il sedile passeggero anteriore sia arretrato al massimo
prima di installare Base-Fix in quella posizione.
• tutti gli oggetti potenzialmente pericolosi in
caso di incidente siano stati ben fissati all’interno
dell’abitacolo.
• tutti i passeggeri abbiano le cinture allacciate.
ATTENZIONE! Base-Fix deve sempre essere
!
fissata al veicolo, anche se non utilizzata. In
caso di brusca frenata o di incidente, la Base-Fix
non fissata potrebbe ferire il guidatore o altri
passeggeri.
DEENIT
17
Page 18
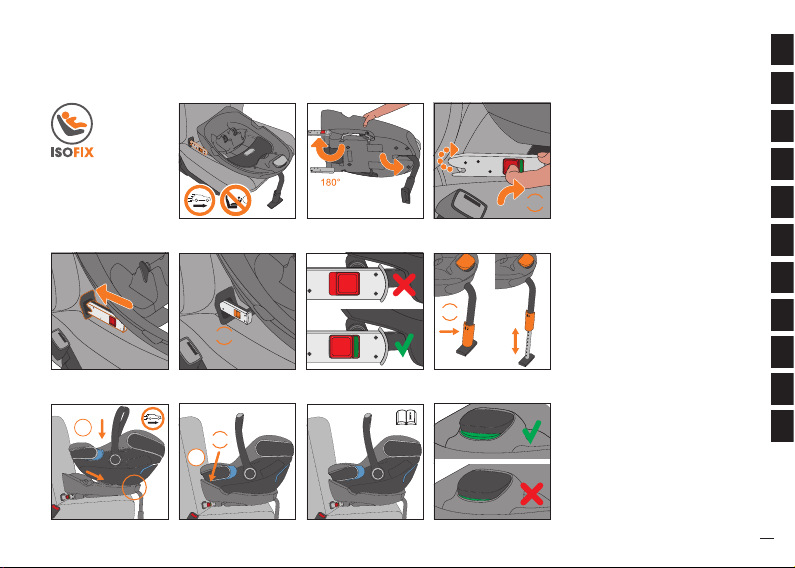
EINBAU DER BASE-FIX – ISOFIX
f
c
18
B
u
Mit dem ISOFIX System können Sie die Idan
/ Artio Babyschale fest mit dem Fahrzeug
verbinden und so die Sicherheit Ihres Kindes
erhöhen.
HINWEIS! Stellen Sie keine Gegenstände in den
Fußraum vor der Base-Fix.
• Wählen Sie einen zulässigen Fahrzeugsitz
entsprechend der beigelegten bzw. auf der Homepage
befindlichen Typenliste aus.
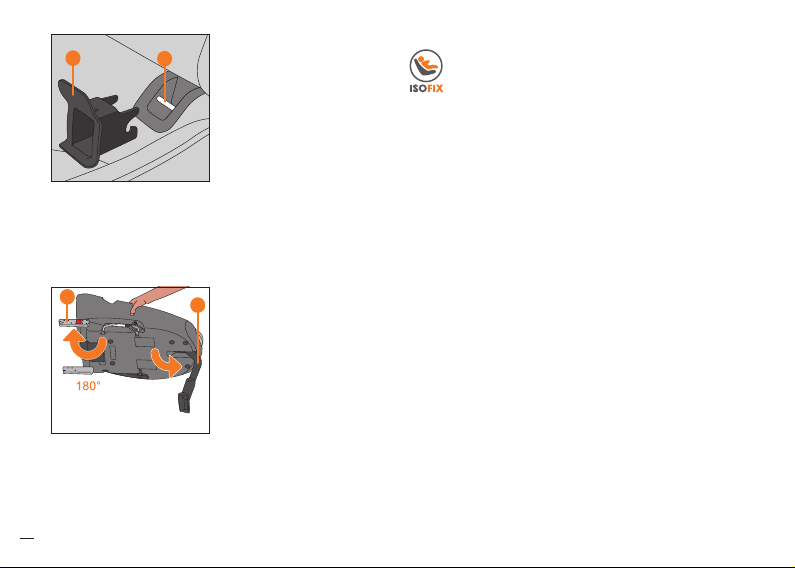
• Sind die ISOFIX Punkte ihres Fahrzeugs schwer
zugänglich, so können sie zur Schonung des Bezuges
die mitgelieferten ISOFIX Einführhilfen f in den
beiden ISOFIX Befestigungspunkten B dauerhaft
einhängen. In manchen Fahrzeugen eignet sich
eine entgegengesetzte Einbaurichtung der ISOFIX
Einführhilfen f besser.
HINWEIS! Die ISOFIX Befestigungspunkte B sind zwei
Metalllaschen pro Sitzplatz und befinden sich zwischen
Rückenlehne und Sitzfläche des Fahrzeuges. Im
Zweifelsfall nehmen Sie die Bedienungsanleitung Ihres
Fahrzeuges zu Hilfe.
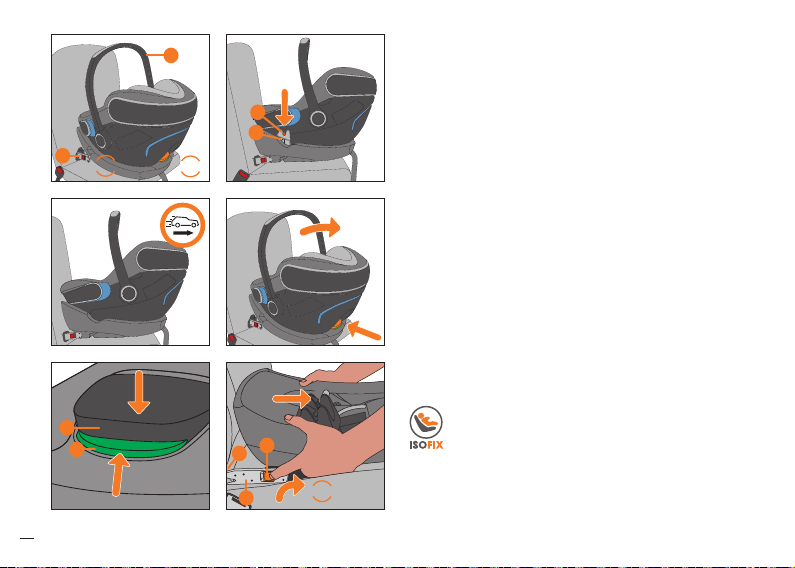
• Klappen Sie den Stützfuß u aus.
• Drehen Sie nun die ISOFIX Rastarme c um 180°, damit
sie in Richtung der ISOFIX Einführhilfen f zeigen.
Page 19

INSTALLING THE BASE-FIX – ISOFIX
The safety of your child will be increased using
the ISOFIX system linking the Base-Fix tightly
with the vehicle.
NOTE! Do not place any objects in the leg room in front
of your Base-Fix.
• Select a suitable car seat, according to the enclosed
typelist.
• Connect the two enclosed ISOFIX guides f (their
longer parts pointing upwards) with the ISOFIX
anchorage points B. An opposite installation (longer
parts pointing downward) is also possible.
NOTE! The car‘s ISOFIX anchorage points B are two
metal rings per seat, situated between the backrest and
sitting area. In case of doubt please refer to your vehicle
owner‘s manual.
• Unfold the support leg u.
• Now rotate the ISOFIX connectors c by 180° until they
are pointing into the direction of the ISOFIX guides f.
INSTALLARE BASE-FIX - ISOFIX
La sicurezza del Vostro bambino sarà maggiore
utilizzando il sistema ISOFIX che collega Base-Fix
saldamente al veicolo.
NOTA BENE! Non lasciare oggetti nel pozzetto di fronte
alla Base-Fix.
• Scegliere la posizione all‘interno del veicolo, secondo
quanto suggerito nella lista allegata.
• Collegare le due guide ISOFIX f - con la parte più
lunga rivolta verso l‘alto - ai punti di ancoraggio
ISOFIX B. E‘ possibile anche l‘installazione con le parti
più lunghe rivolte verso il basso.
NOTA BENE! I punti di ancoraggio ISOFIX della vettura
B sono rappresentati da due anelli metallici per ciascun
sedile, posizionati tra la seduta e lo schienale. In caso
di dubbi vi preghiamo di fare riferimento al manuale
istruzioni della vettura.
• Aprire il piede di supporto u.
• Ruotare i connettori ISOFIX c di 180° fino a che le
punte siano rivolte verso le guide ISOFIX f.
DEENIT
19
Page 20
c
PUSH!
u
E
D
f
c
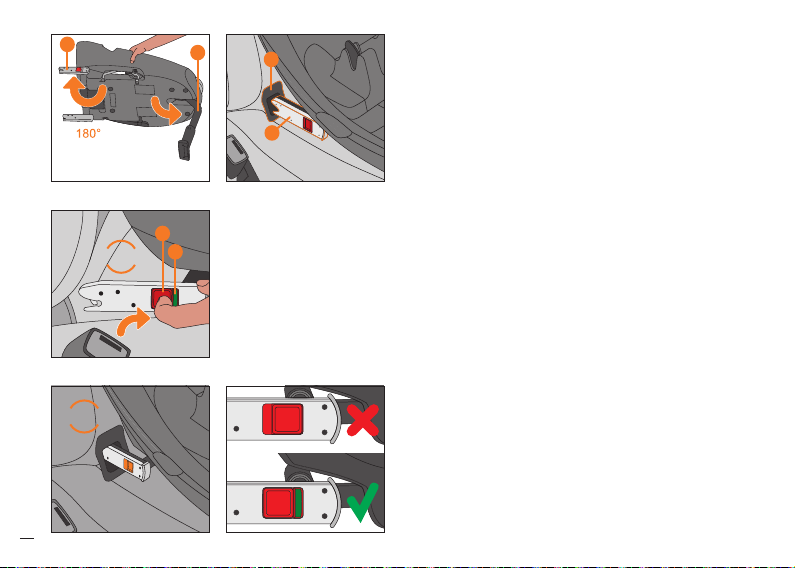
HINWEIS! Achten Sie darauf, dass die beiden grünen
Sicherheitsindikatoren D, an den ISOFIX Rastarmen
c, vor dem Einbau nicht sichtbar sind. Entriegeln Sie
gegebenenfalls die ISOFIX Rastarme c, indem Sie die
rote Entriegelungstaste E drücken und zurückziehen.
Wiederholen Sie den Vorgang gegebenenfalls auch
beim zweiten Rastarm.
• Schieben Sie die beiden ISOFIX Rastarme c in die
Einführhilfen f bis diese mit einem hörbaren KLICK an
den ISOFIX Befestigungspunkten B einrasten.
• Vergewissern Sie sich, dass die Base-Fix gut hält,
indem Sie versuchen sie herauszuziehen.
• Der grüne Sicherheitsindikator D muss an den beiden
roten Entriegelungstasten E gut sichtbar sein.
• Jetzt können Sie mit dem Kapitel „EINSTELLEN DES
STÜTZFUSSES“ fortfahren.
HINWEIS! Falls Ihr Fahrzeug über keine ISOFIX
Befestigungspunkte verfügt, können Sie den BaseFix auch mittels 3-Punkt-Gurt sichern. Die richtige
Vorgehensweise wird im Abschnitt „EINBAU DER
BASE-FIX - 3-PUNKT-GURT“ beschrieben.
CLICK!
20
Page 21

NOTE! Make sure that the green safety indication D
of the connectors is not visible before installation. If
necessary, release them by pushing and simultaneously
pulling back the red release button E. Repeat this
procedure with the other connector.
• Push both of the ISOFIX connectors c into the
ISOFIX guides f until you hear them clicking into the
anchorage points B.
• Make sure that the Base-Fix is connected safely by
trying to pull it out.
• The green safety indication D must be clearly visible
on both sides of the red release buttons E.
• Now please refer to „ADJUSTING THE SUPPORT
LEG“.
NOTE! In case your vehicle is not equipped with
ISOFIX anchorage points, please continue to chapter
„INSTALLING THE BASE-FIX – 3-POINT-BELT“.
NOTA BENE! Verificare che l'indicatore verde di
sicurezza D dei connettori non appaia visibile prima
dell'installazione. Se necessario, sbloccarli premendo e
contemporaneamente tirando all'indietro i pulsanti di
rilascio E di colore rosso. Ripetere anche sul connettore
dall'altro lato.
• Spingere entrambi i connettori ISOFIX c all‘interno
delle guide f fino a sentire il CLICK di aggancio ai
punti di ancoraggio B.
• Provare a tirare indietro Base-Fix per verificare che sia
ben agganciata.
• Gli indicatori di sicurezza di colore verde D devono
risultare ben visibili su ambo i lati dei pulsanti di
rilascio di colore rosso E.
• Passare ora al punto „REGOLAZIONE DEL PIEDE DI
SUPPORTO“.
NOTA BENE! Nel caso la Vostra vettura non sia
dotata di ancoraggi ISOFIX, passare al capitolo:
„INSTALLAZIONE DI BASE-FIX - CINTURA A 3 PUNTI“.
DEENIT
21
Page 22

u
v
w
CLICK!
l
k
CLICK!
q
22
w
CLICK!
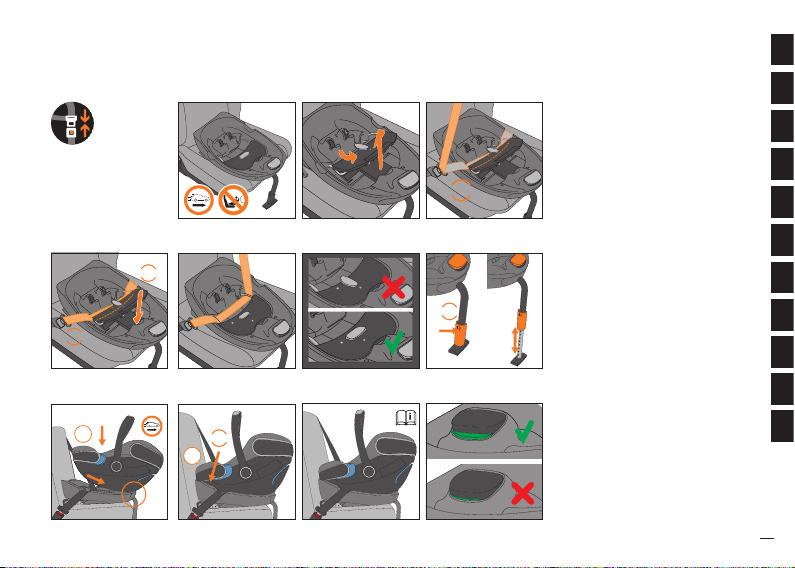
EINBAU DER BASE-FIX – 3-PUNKT-GURT
HINWEIS! Stellen Sie keine Gegenstände in den
Fußraum vor der Base-Fix.
• Klappen Sie den Stützfuß u aus.
• Positionieren Sie die Base-Fix auf einem der
zulässigen Fahrzeugsitze, entsprechend der
beigelegten Typenliste.
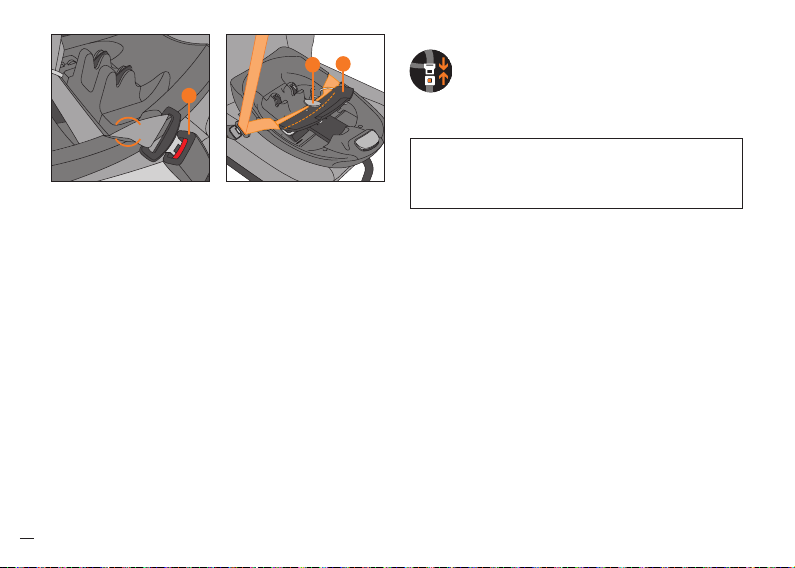
• Nun betätigen Sie den Verriegelungsmechanismus
v der Spannvorrichtung w durch eine 90°
Drehbewegung gegen den Uhrzeigersinn und önen
diese bis zur Rastposition.
• Legen Sie den Beckengurt k unter der
Spannvorrichtung w ein und rasten Sie die
Schlosszunge in das Fahrzeug-Gurtschloss q ein.
• Nun ziehen Sie leicht am Diagonalgurt l, bis der
Beckengurt k nicht mehr lose durchhängt.
HINWEIS! Ein zu stra gespannter Beckengurt k
erschwert den ordnungsgemäßen Einbau.
• Führen Sie danach den Diagonalgurt l parallel über
den Beckengurt k und unter der Spannvorrichtung w
zurück.
Page 23
INSTALLING THE BASE-FIX - 3-POINT-BELT
NOTE! Do not place any objects in the leg room
in front of your Base-Fix.
INSTALLAZIONE DI BASE-FIX - CINTURA A 3 PUNTI
NOTA BENE! Non lasciare mai oggetti nel
pozzetto di fronte alla Base-Fix.
DEENIT
• Unfold the support leg u.
• Place the Base-Fix on a suitable car seat position,
according to the enclosed typelist.
• To unlock, turn the locking mechanism v 90°
counterclockwise and lift the fastening device w up to
the maximum position.
• Insert the lap belt k under the fastening device w
across the Base-Fix and insert the buckle tongue into
the vehicle seat buckle q.
• Now please fasten the lap belt k slightly by pulling on
the shoulder belt l, to avoid any slack in the belt.
NOTE! Don’t fasten the lap belt too tight or you will
have problems to finalize the installation process
properly.
• Guide the shoulder belt l parallel and over the lap
belt k across the Base-Fix back under the fastening
device w.
• Mettere in posizione il piede di supporto u.
• Appoggiare Base-Fix sul sedile in una delle posizioni
possibili, secondo l‘elenco allegato.
• Aprire il meccanismo di bloccaggio v ruotandolo in
senso antiorario di circa 90° e sollevare il dispositivo
di fissaggio w al massimo.
• Far passare la parte di cintura addominale k sotto il
dispositivo di ancoraggio w attraverso la base BaseFix ed agganciare l‘estremità nell‘apposita fibbia sul
sedile q.
• Per ottimizzare il fissaggio della cintura addominale
k tirare la parte diagonale l, assicurandovi che la
tensione sia corretta.
NOTA BENE! La tensione della cintura addominale
non deve essere eccessiva per permettere la corretta
chiusura del sistema di ancoraggio.
• Far passare la cintura diagonale l, sovrapponendola
alla cintura addominale k, sotto il dispositivo di
ancoraggio w attraverso la Base-Fix.
23
Page 24

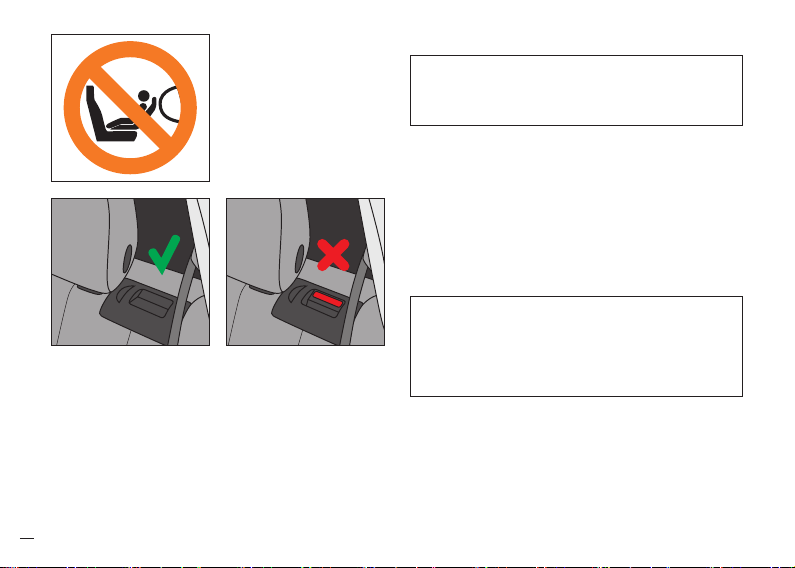
WARNUNG! Achten Sie darauf, dass der
!
Gurtumlenkpunkt an der Schlosszunge F nicht
über den Rand der Base-Fix hinausragt.
HINWEIS! Der Diagonalgurt l muss über dem
Beckengurt k verlaufen und beide dürfen nicht verdreht
sein.
• Drücken Sie die Spannvorrichtung w nach unten,
F
PUSH!
u
y
24
bis diese ordnungsgemäß und mit einem hörbaren
KLICK verriegelt. Achten Sie darauf, dass die
Verriegelungstaste v auf das richtige Schlosssymbol
zeigt.
• Rütteln Sie an der Base-Fix um den festen Einbau zu
überprüfen.
HINWEIS! Kontrollieren Sie in regelmäßigen Abständen
den festen Einbau der Base-Fix. Falls notwendig
spannen Sie den Fahrzeuggurt wieder nach, denn dieser
kann sich während seiner Benutzungsdauer etwas
lockern.
EINSTELLEN DES STÜTZFUSSES
Drücken Sie auf die Verstelltaste y und ziehen Sie den
Stützfuß u soweit heraus, bis dieser sicher auf dem
Fahrzeugboden steht.
WARNUNG! Der Stützfuß muss immer
!
direkten Bodenkontakt haben. Es dürfen keine
Gegenstände dem Stützfuß untergelegt werden.
HINWEIS! Achten Sie drauf, dass die Base-Fix flächig
auf dem Fahrzeugsitz aufliegt.
WARNUNG! Bei Staufächern im Fußraum wenden
!
Sie sich unbedingt an den Fahrzeughersteller.
Page 25

WARNING! The buckle of the vehicle seat belt
!
must not project into the frame of the Base-Fix.
NOTE! The shoulder belt l must be positioned over the
lap belt k. Do not twist the belt.
• Push the fastening device w down until it engages
with an audible CLICK. Make sure that the dial of the
locking mechanism v points at the correct symbol.
• Jiggle the Base-Fix to check that it is securely
installed.
NOTE! Please check in regular intervals that Base-Fix is
still securely fastened. If necessary, retighten the vehicle
seat belt as there may be slack after prolonged use.
AJUSTING THE SUPPORT LEG REGOLAZIONE DEL PIEDE DI SUPPORTO
Push the adjustment button y and pull out the support
leg u until it rests firmly on the floor of the vehicle.
WARNING! The support leg must always have
!
direct contact to the floor. No objects may be
placed under the support leg.
NOTE! Ensure that the support leg does not raise the
Base-Fix from the surface of the vehicle seat.
WARNING! In case your car features a storage
!
tray in the leg room, please contact the vehicle
manufacturer.
ATTENZIONE! La fibbia di aggancio delle cinture
!
del veicolo non deve superare in altezza la
struttura della Base-Fix.
NOTA BENE! La parte di cintura diagonale l deve
scorrere sopra la cintura addominale k. Non attorcigliare
mai la cintura.
• Spingere verso il basso il dispositivo di ancoraggio
w fino a sentire il CLICK di aggancio. Verificare che
la manopola del meccanismo di blocco v sia rivolta
verso il simbolo corretto.
• Scuotere con una certa forza Base-Fix per verificare
che sia installata saldamente.
NOTA BENE! Eseguire il controllo dell‘ancoraggio
di Base-Fix ad intervalli regolari. Nel caso di uso
prolungato, se necessario, provvedere a tendere
nuovamente le cinture.
Premere il pulsante di regolazione y sul piede di
supporto u allungandolo fino al pavimento della vettura.
ATTENZIONE! Il piede di supporto deve sempre
!
appoggiare sul pavimento del veicolo. Non porre
alcun oggetto sotto il piede di supporto.
NOTA BENE! Assicuratevi che la barra di supporto non
sia troppo allungata da rialzare Base-Fix dal sedile.
ATTENZIONE! Nel caso di auto dotate di botola
!
portaoggetti nel pozzetto, raccomandiamo di
contattare il produttore del veicolo.
DEENIT
25
Page 26
IDAN ARTIO
a a
26
EINRASTEN DER IDAN / ARTIO BABYSCHALE
HINWEIS! Stellen Sie sicher, dass die Oberfläche der
Base-Fix frei von Fremdkörpern ist.
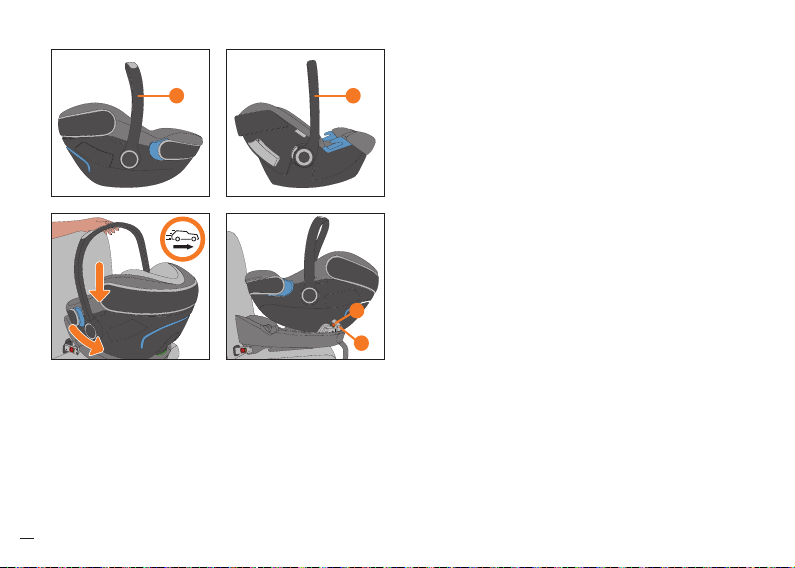
Nehmen Sie die Bedienungsanleitung der Idan / Artio
Babyschale zur Hand und vergewissern Sie sich, dass
sich der Tragebügel in der „Fahrzeugposition“ befindet
sowie, dass das Kind mit dem integrierten Gurtsystem
gesichert wurde. Zur Verstellung des Tragebügels a
verweisen wir auf die Idan / Artio Bedienungsanleitung.
• Positionieren Sie die Idan / Artio Babyschale entgegen
der Fahrtrichtung über der Base-Fix.
• Führen Sie die Idan / Artio Babyschale entlang der
Fahrzeug-Rückenlehne nach unten und hängen Sie
diese zuerst mit der Raststange r am Kopfende in die
Raststangenaufnahme i ein.
r
i
Page 27

ENGAGING OF THE IDAN / ARTIO
NOTE! Ensure that the top of the Base-Fix is free of
foreign objects.
Referring to the user guide please ensure that the
carrying handle a is in the „driving position“ and the
child is secured with the integrated harness system.
Please refer to the user guide of the Idan / Artio for
adjusting the carrying handle.
• Place the Idan / Artio infant carrier reverse to the
driving position above the Base-Fix.
• Move the Idan / Artio down along the backrest and
connect the locking bar r at the head end with the
locking bar retainer i.
FISSARE IL SEGGIOLINO IDAN / ARTIO ALLA BASE
NOTA BENE! Assicuratevi che non vi sia alcun oggetto
sopra Base-Fix.
Controllare il manuale d‘uso del seggiolino
Idan / Artio e verificare che il manico per il trasporto
sia nella „posizione di viaggio“ e che il bambino
sia correttamente allacciato con le cinture. Per la
regolazione del manico di trasporto del seggiolino
Idan / Artio fare riferimento allo specifico manuale
d‘uso.
• Appoggiare il seggiolino, in senso inverso alla
direzione di marcia, sopra Base-Fix.
• Spostare il seggiolino verso lo schienale del sedile
passeggero e connettere la barra di fissaggio r che
si trova sotto il seggiolino, lato testa, all‘apposito
aggancio i.
DEENIT
27
Page 28
• Senken Sie nun das Fußende der Idan / Artio
a
z
o
z
CLICK!
CLICK!
j
x
28
E
f
c
PUSH!
Babyschale ab, bis der Rasthaken o mit der zweiten
Raststange z, hörbar, mit einem KLICK verriegelt.
• Kontrollieren Sie ob die Indikatortaste x aus der
Entriegelungstaste j ragt und ziehen Sie am
Tragebügel a der Idan / Artio Babyschale, um den
ordnungsgemäßen Einbau zu überprüfen.
LÖSEN DER IDAN / ARTIO BABYSCHALE
• Durch Drücken der Indikatortaste x wird die
Entriegelungstaste j freigegeben.
• Betätigen Sie die Entriegelungstaste j und neigen Sie
gleichzeitig die Idan / Artio Babyschale etwas nach
vorne bis die Raststange z am Fußende frei ist.
• Nun können Sie die Entriegelungstaste j loslassen und
gleichzeitig die Idan / Artio Babyschale komfortabel
von der Base-Fix abheben.
AUSBAU DER BASE-FIX – ISOFIX
• Führen Sie die Einbauschritte in umgekehrter
Reihenfolge durch.
• Entriegeln Sie die ISOFIX Rastarme c beidseitig,
indem Sie die roten Entriegelungstasten E
drücken und gleichzeitig zurückziehen.
• Ziehen Sie die Base-Fix aus den ISOFIX
Einführhilfen f heraus.
• Bringen Sie die ISOFIX Rastarme c in Ihre
Ausgangsposition indem Sie sie um 180°drehen.
Page 29

• Now lower the foot end of the Idan / Artio infant
carrier until the second locking bar z engages with the
locking hooks o, audible with a CLICK.
• Ensure that the indicator button x on the unlock key j
is clearly visible. Pull on the carrying handle a to verify
a proper installation.
REMOVING OF THE IDAN / ARTIO TOGLIERE IL SEGGIOLINO IDAN / ARTIO
• Push the indicator button x to release the unlock key j.
• Simultaneously press the unlock key j and tilt the
infant carrier slightly forward until the locking bar z
disengages from the locking hooks o on the foot end
side.
• Now Idan / Artio can be lifted out of the base.
• Abbassare ora il lato piedi del seggiolino dove è posta
la seconda barra di fissaggio z che deve collegarsi agli
appositi ganci di bloccaggio o con un sonoro „click“.
• Assicuratevi che l‘indicatore di corretto ancoraggio x
sulla maniglia di sblocco j sia ben visibile. Verificare la
corretta installazione sollevando il manico di trasporto a.
• Premere il pulsante indicatore di corretto ancoraggio x
per sbloccare la chiave di rilascio j.
• Premere la chiave di rilascio j e contemporaneamente
inclinare leggermente in avanti il seggiolino fino a
staccare la barra z dagli agganci o dal lato piedi.
• Ora è possibile sollevare agevolmente l‘Idan / Artio
dalla sua base.
DEENIT
REMOVING OF THE BASE-FIX – ISOFIX RIMOZIONE DI BASE-FIX - ISOFIX
• Perform all installation steps in reverse order.
• Release the ISOFIX connectors c by
simultaneously pulling and slinging back the
red release buttons E.
• Pull Base-Fix out of the ISOFIX guides f.
• Rotate the ISOFIX connectors c by 180° to
bring them to their original position.
• Eseguire tutti i passaggi dell‘installazione
nell‘ordine inverso.
• Rilasciare i connettori ISOFIX c premendo e
contemporaneamente tirando all‘indietro i
pulsanti di rilascio E di colore rosso.
• Sfilare Base-Fix dalle guide ISOFIX f.
• Ruotare i connettori ISOFIX c di 180° per
riportarli alla posizione originaria.
29
Page 30
AUSBAU DER BASE-FIX – 3-PUNKT-GURT
w
v
q
PUSH!
30
• Önen Sie zuerst das Gurtschloss q.
• Lösen Sie den Verriegelungsmechanismus v
an der Spannvorrichtung w.
• Klappen Sie die Spannvorrichtung w bis
zum Anschlag nach oben und nehmen Sie
den Gurt heraus.
WARNUNG! Das Gurtsystem steht unter Spannung.
!
Önen Sie daher immer zuerst das Gurtschloss q
bevor Sie den Verriegelungsmechanismus v der
Spannvorrichtung w betätigen.
VERHALTEN NACH EINEM UNFALL
Aufgrund eines Unfalles können an der Base-Fix
Beschädigungen auftreten, die nicht mit bloßem Auge
erkennbar sind. Bitte tauschen Sie nach einem Unfall die
Base-Fix unbedingt aus. Im Zweifelsfall wenden Sie sich
bitte an den Händler oder Hersteller.
PFLEGE
• Die Kunststoteile können mit einem milden
Reinigungsmittel und warmen Wasser gereinigt
werden.
• Alle wichtigen Teile der Base-Fix sollten regelmäßig
auf Beschädigung kontrolliert werden.
• Die mechanischen Bauteile müssen einwandfrei
funktionieren.
PRODUKTLEBENSDAUER
Alle GB Produkte sind so ausgelegt, dass sie für die
gesamte maximale Verwendungszeit ihre Eigenschaften
erfüllen. Da jedoch in Fahrzeugen sehr große
Temperaturschwankungen und unvorhersehbare
Belastungen auftreten können, ist es notwendig
folgende Punkte zu beachten:
Page 31

REMOVING OF THE BASE-FIX – 3-POINT-BELT RIMOZIONE DI BASE-FIX - CINTURA A 3 PUNTI
• Unfasten the vehicle seat belt buckle q.
• Disengage the lock mechanism v at the
fastening device w.
• Fold the fastening device w up to the
stopper and take the vehicle seat belt out of
the belt guide.
WARNING! The whole system is under tension.
!
Always open the vehicle seat belt buckle q first
before you try to release the locking mechanism v.
WHAT TO DO AFTER AN ACCIDENT COSA FARE A SEGUITO DI UN INCIDENTE
In an accident the Base-Fix can sustain damages which
are invisible to the eye. Therefore the Base-Fix should
be replaced immediately after an accident. In case of
doubt please contact your retailer or the manufacturer.
PRODUCT CARE MANUTENZIONE
• You can clean the plastic parts with a mild detergent
and warm water.
• All important parts of the Base-Fix should be
examined for any damages on a regular basis.
• The mechanical parts must function flawlessly.
DURABILITY OF THE PRODUCT DUREVOLEZZA DEL PRODOTTO
All GB products are designed to function fully during
the expected durability. However, as Base-Fix may be
exposed to severe temperature fluctuations or other
unforeseeable strains please note the following:
• Sganciare la cintura di sicurezza dalla
fibbia q.
• Disinnestare il meccanismo di blocco v sul
dispositivo di ancoraggio w.
• Piegare il dispositivo di ancoraggio w fino al
fermo e togliere la cintura dalla guida.
ATTENZIONE! Il sistema è in tensione. Slacciare
!
sempre la cintura dalla fibbia q prima di rilasciare
il meccanismo di ancoraggio v.
Durante un incidente la Base-Fix potrebbe subire
danni non immediatamente visibili. Pertanto, dopo un
incidente, dovrà essere immediatamente sostituita. In
caso di dubbi Vi preghiamo di contattare il rivenditore
o il produttore.
• Le parti in plastica possono essere lavate con acqua
tiepida ed un detersivo neutro.
• Tutte le parti importanti di Base-Fix devono essere
sottoposte ad un regolare controllo per verificare
eventuali danni.
• Le parti meccaniche devono funzionare in modo
corretto e scorrevole.
Tutti i prodotti GB sono progettati per adempiere
alle proprie funzioni per tutta la durata di utilizzo
raccomandata. Tuttavia, poiché la Base-Fix può essere
esposta a notevoli variazioni di temperatura o a
circostanze imprevedibili all‘interno del veicolo è in ogni
caso importante prendere nota di quanto segue:
DEENIT
31
Page 32

• Wenn das Fahrzeug längere Zeit der prallen Sonne
ausgesetzt ist, muss die Base-Fix aus dem Fahrzeug
entfernt oder mit einem hellen Tuch abgedeckt
werden.
• Prüfen Sie in regelmäßigen Abständen alle
Kunststoteile der Base-Fix auf Beschädigung oder
Veränderung von Form und Farbe.
• Stellen Sie eine Veränderung fest, ist die Base-Fix
unbedingt zu entsorgen oder vom Hersteller zu prüfen
und muss gegebenenfalls ausgetauscht werden.
ENTSORGUNG
Am Ende der Produktlebensdauer ist eine sachgemäße
Entsorgung vorzunehmen. Die Abfallentsorgung
kann kommunal unterschiedlich geregelt sein. Um
eine vorschriftsmäßige Entsorgung des Produktes zu
gewährleisten, setzen Sie sich mit Ihrer kommunalen
Abfallentsorgung bzw. Verwaltung Ihres Wohnortes
in Verbindung. Beachten Sie auf jeden Fall die
Entsorgungsbestimmungen Ihres Landes.
INFORMATIONEN ZUM PRODUKT
Bei Fragen wenden Sie sich zuerst an Ihren Händler.
Folgende Angaben sollten Ihnen vorliegen:
• Seriennummer (siehe Aufkleber).
• Marke und Typ des Autos und die Position auf der die
Base-Fix samt Babyschale verwendet wird.
• Gewicht, Alter und Größe des Kindes.
Weitere Informationen zu unseren Produkten finden Sie
32
auch unter www.gb-online.com.
Page 33

• If the car is exposed to direct sunlight for a longer
period of time, the Base-Fix must be taken out of the
car or covered with a cloth.
• Examine all plastic and metal parts of the Base-Fix for
any damages or changes to their form or colour on a
yearly basis.
• In case any changes should be noticed Base-Fix
should be disposed or examined by the manufacturer
and replaced, if necessary.
DISPOSAL SMALTIMENTO
At the end of the lifespan of the Base-Fix, it must be
disposed properly. Waste disposal regulations may vary
regionally. In order to ensure proper disposal of the
Base-Fix, please contact your local waste management
authority or local council. In all cases, please note the
waste disposal regulations of your country.
• Nel caso l‘automobile venga lasciata al sole per un
lungo periodo di tempo consigliamo di estrarre BaseFix dall‘auto o di ripararla con un telo di copertura.
• Raccomandiamo di controllare accuratamente tutte le
parti in plastica ed in metallo di Base-Fix almeno una
volta l‘anno per verificare eventuali danni, modifiche di
forma o di colore.
• In caso di modifiche evidenti consigliamo di non
utilizzare Base-Fix o di inviarla al produttore per un
controllo e, se necessario, sostituirla.
Alla fine dell‘utilizzo di Base-Fix è necessario provvedere
al suo smaltimento nel modo appropriato. Le norme per
lo smaltimento variano localmente. Al ine di garantire lo
smaltimento corretto preghiamo di contattare l‘ucio
di competenza della vostra città. In ogni caso, seguire
sempre le normative dello stato di residenza.
DEENIT
PRODUCT INFORMATION
If you have questions, please contact your retailer first.
Please make sure to have the following information at
hand:
• Serial Number (see sticker).
• Brand name, type of car and the position where the
seat is mounted normally.
• Weight, size, age of the child.
For further information about our products please visit
www.gb-online.com.
INFORMAZIONI SUL PRODOTTO
Per qualsiasi dubbio rivolgetevi prima al rivenditore.
Ricordatevi di avere con voi la necessaria
documentazione prima di ogni richiesta:
• Numero di Serie (vedi adesivo)
• Marca e modello dell‘autovettura e posizione dove il
seggiolino viene normalmente installato.
• Peso, età e altezza del bambino.
Per maggiori informazioni sui nostri prodotti vi invitiamo
a visitare il sito www.gb-online.com.
33
Page 34

GARANTIEBESTIMMUNGEN
Die nachfolgenden Garantiebestimmungen gelten nur
in dem Land, in dem dieses Produkt erstmalig über den
Einzelhandel an einen Verbraucher verkauft wurde.
1. Die Garantie deckt sämtliche Herstellungs- und
Materialfehler ab, die im Zeitpunkt des Kaufs
bestanden haben oder die innerhalb von drei (3)
Jahren nach dem Erstverkauf dieses Produkts
über den Einzelhandel an einen Verbraucher in
Erscheinung getreten sind (Herstellergarantie). Bitte
überprüfen Sie das Produkt nach dem Kauf oder
wenn es im Versandhandel gekauft wurde nach Erhalt
umgehend auf Vollständigkeit, Herstellungs- und
Materialfehler.
2. Falls Schäden vorhanden sind, darf das Produkt nicht
mehr benutzt werden. Um Leistungen im Rahmen
dieser Garantie in Anspruch nehmen zu können, muss
das Produkt in einem vollständigen und sauberen
Zustand an den Einzelhändler zurückgegeben
werden, der es erstmalig verkauft hat und ein
Nachweis über den Kauf (Kaufbeleg oder Rechnung)
im Original vorgelegt werden. Bitte bringen oder
schicken sie das Produkt nicht direkt zum Hersteller!
3. Die Garantie deckt keine Schäden ab, die durch
Fehlgebrauch, äußere Einflüsse (Wasser, Feuer, Unfälle
o.ä.), normalen Verschleiß oder durch Behandlung
und Benutzung entstanden sind, die im Gegensatz zu
den Instruktionen dieser Gebrauchsanweisung stehen.
Die Garantie wird nur gewährt, wenn Reparaturen
oder Veränderungen ausschließlich durch Personen
vorgenommen wurden, die hierzu befugt waren und
stets nur originale Bau- und Zubehörteile verwendet
wurden.
4. Durch diese Garantie werden weder bestehende
Verbraucherrechte noch Rechte gegen den Verkäufer
34
wegen Vertragswidrigkeit des Produkts beeinflusst.
Page 35

WARRANTY GARANZIA
The following warranty applies solely in the country
where this product was initially sold by a retailer to a
customer.
1. The warranty covers all manufacturing and material
defects, existing and appearing, at the date of
purchase or appearing within a term of three (3)
years from the date of purchase from the retailer
who initially sold the product to a consumer
(manufacturer’s warranty). Please check the product
with respect to completeness and manufacturing or
material defects immediately at the date of purchase
or immediately after receipt. Please always keep your
dated proof of purchase.
2. In case of a defect, stop using the product
immediately. To obtain the warranty please take or
ship the product to the original retailer, who initially
sold this product to you in a clean and complete
condition and submit an original proof of purchase
(sales receipt or invoice). Please do not take or ship
the product to the manufacturer directly.
3. This warranty does not cover any damages which
result from misuse, environmental influence (water,
fire, accidents etc.), normal wear and tear or failure
to comply with the instructions provided in this user
manual. The warranty does not apply if modifications
and services were performed by unauthorized
persons or if non-original components and
accessories were used.
4. This warranty does not aect any statutory consumer
rights, including claims in tort and claims with respect
to a breach of contract, which the buyer may have
against the seller or the manufacturer of the product.
La seguente garanzia vale soltanto nella nazione in
cui il prodotto è stato originariamente venduto da un
rivenditore al consumatore.
1. La garanzia copre eventuali difetti di fabbricazione e di
materiali riscontrati all‘acquisto o entro un periodo di 3
anni dalla data di acquisto presso il rivenditore (garanzia
del produttore). La garanzia è valida soltanto se il
prodotto è stato sottoposto ad un accurato controllo
di completezza, funzionalità all’acquisto e se eventuali
manchevolezze di produzione o di materiali sono state
prontamente segnalate dopo il ricevimento del prodotto.
Conservare accuratamente la prova di acquisto con la
data.
2. In caso si riscontri qualsiasi danneggiamento smettere
di utilizzare il prodotto Per avere diritto alla garanzia
è necessario riportare o spedire il prodotto pulito e
completo al rivenditore presso il quale è stato acquistato
ed è indispensabile fornire la prova di acquisto (scontrino
fiscale, fattura, ecc.) in originale. Preghiamo di non
riportare o spedire il prodotto direttamente al produttore.
3. La garanzia non copre danni provocati da utilizzo
improprio o cause ambientali (acqua, fuoco, incidenti
stradali, ecc.), dal normale deperimento d’uso o
dall'innosservanza delle indicazioni fornite in questo
manuale d'uso. La garanzia non è valida in caso di
modifiche o riparazioni effettuate da personale non
autorizzato e se non sono state utilizzate parti ed
accessori originali.
4. Questa garanzia non esclude, limita o comunque
pregiudica eventuali diritti legali dei consumatori,
comprese istanze in caso di torto e in caso di una
violazione del contratto che l'acquirente può avere nei
confronti del rivenditore o del produttore.
DEENIT
35
Page 36

36
GB IDAN
UNIVERSAL
SEMI-UNIVERSAL
0 - 13 kg
04301332
ECE R 44/04
gb GmbH
Riedingerstr. 18, 95448 Bayreuth
Germany
Approved for
BASE-FIX
GB ARTIO
UNIVERSAL
SEMI-UNIVERSAL
0 - 13 kg
04301331
ECE R 44/04
gb GmbH
Riedingerstr. 18, 95448 Bayreuth
Germany
Approved for
BASE-FIX
11/2015
HOMOLOGATION
Base-Fix
ECE R44/04 group 0+
Poids: jusqu‘à 13 kg
RECOMMANDÉ
Pour véhicules avec ISOFIX
(classe E). Pour véhicules avec
ceintures 3 points avec enrouleur
automatique ECE R16 ou
équivalent.
GOEDKEURING
Base-Fix
ECE R44/04 groep 0+
Gewicht: Tot 13 kg
AANBEVOLEN
Voor autostoelen met ISOFIX
(klasse E) Voor autostoelen met
driepuntsgordel met automatisch
oprolmechanisme volgens ECE R16
of vergelijkbare normen.
DOPUSZCZENIE DO UŻYTKU
BAZA DO FOTELIKA Base-Fix
ECE R44/04 grupa 0+
Waga do 13 kg
ZALECANA DO
Przeznaczona do samochodów
z mocowaniem ISOFIX (klasa
E); siedzenia z 3-punktowym
automatycznie zwijającym się
pasem bezpieczeństwa zgodnie
z normą ECE R16 lub innym
równorzędnym standardem.
CHER CLIENT,
Merci de nous avoir fait confiance en achetant la
Base-Fix.
Nous vous assurons que le développement de la
Base-Fix a été focalisé sur la sécurité, le confort et la
facilité d‘emploi. Ce produit est fabriqué en suivant un
contrôle qualité sévère et est conforme aux exigences
de sécurité les plus strictes.
REMARQUE! Merci de toujours conserver le guide
d’utilisation à portée de main. Vous pouvez le ranger
sous le siège auto Idan / Artio dans l‘endroit prévu à
cet eet.
La base Idan / Artio est utilisable pour tous les sièges
Idan / Artio.
AVERTISSEMENT! Pour la protection maximale
!
de votre enfant, il est essentiel de suivre les
instructions de ce manuel lors de l‘installation et
de l‘utilisation.
Page 37

BESTE KLANT,
Wij danken u voor het aankopen van de Base-Fix.
Wij garanderen u dat bij de ontwikkeling van de BaseFix, veiligheid, komfort en gebruiksvriendelijkheid
voorop stonden. Dit produkt werd vervaardigd onder
een strenge kwaliteitscontrole en beantwoordt aan de
strengste veiligheidsnormen.
LETOP! Hou de gebruiksaanwijzing bij de hand en berg
deze op in de daarvoor bestemde vak onder het stoeltje.
De base is gechikt voor alle Idan / Artio modellen.
WAARSCHUWING! Om de maximale veiligheid
!
van uw kind te garanderen is het essentieel dat u
de Base-Fix installeert in overeenstemming met
de richtlijnen in deze handleiding.
DRODZY KLIENCI,
Bardzo dziękujemy za zakup BAZY do fotelika Base-Fix.
Możemy Państwa zapewnić, że opracowując bazę
do fotelika Base-Fix, najwięcej uwagi poświęciliśmy
bezpieczeństwu, wygodzie oraz prostocie użytkowania.
Produkt ten wyprodukowano w oparciu o system
ścisłej kontroli jakości i spełnia on najsurowsze wymogi
bezpieczeństwa.
UWAGA! Instrukcja powinna być zawsze pod ręką i
należy ją przechowywać w przeznaczonym do tego
schowku pod fotelikiem.
Baza pasuje do wszystkich modeli fotelika Idan / Artio.
OSTRZEŻENIE! Aby zapewnić dziecku
!
maksymalne bezpieczeństwo, należy zamontować
i użytkować bazę Base-Fix zgodnie z niniejszą
instrukcją użytkowania.
FRNLPL
37
Page 38

FR CONTENU
INSTRUCTIONS ABRÉGÉES - ISOFIX ................................................................3
INSTRUCTIONS ABRÉGÉES - CEINTURE 3-POINTS ..............................5
HOMOLOGATION ...........................................................................................................36
HOMOLOGATION / COMPATIBILITÉ ..............................................................40
PROTECTION DE VOTRE VEHICULE .............................................................40
LA MEILLEURE POSITION DANS LA VOITURE.......................................42
SECURITÉ POUR VOTRE ENFANT ...................................................................42
SECURITÉ DANS LA VOITURE............................................................................44
INSTALLATION DE L`BASE-FIX – ISOFIX ...................................................46
INSTALLATION DE L`BASE-FIX CEINTURE 3 POINTS .....................50
REGLAGE DE LA JAMBE DE FORCE ..............................................................52
FIXER L`IDAN / ARTIO ..............................................................................................54
RETIRER LA COQUE IDAN / ARTIO ................................................................56
RETRAIT DE LA BASE-FIX- ISOFIX...................................................................56
RETRAIT DE LA BASE-FIX - 3 POINTS D‘ANCRAGE ..........................58
QUE FAIRE APRES UN ACCIDENT ...................................................................58
ENTRETIEN DU PRODUIT ........................................................................................58
DUREE DE VIE DU PRODUIT .................................................................................58
RECYCLAGE ......................................................................................................................60
INFORMATION PRODUIT ........................................................................................60
GARANTIE ...........................................................................................................................62
38
Page 39

NL INHOUD
PL SPIS TREŚCI
KORTE HANDLEIDING - ISOFIX .............................................................................3
KORTE HANDLEIDING - 3 PUNTSGORDEL ..................................................5
GOEDKEURING ................................................................................................................36
GOEDKEURING / COMPATIBILITEIT .................................................................41
VOOR DE BESCHERMING VAN UW AUTO .................................................41
DE BESTE POSITIE IN DE AUTO ........................................................................43
VEILIGHEID VOOR UW KIND ............................................................................... 43
VEILIGHEID IN DE AUTO..........................................................................................45
DE BASE-FIX INSTALLEREN – ISOFIX ...........................................................47
DE BASE-FIX INSTALLEREN - 3-PUNTSGORDEL.................................. 51
DE STEUNSTANG AANPASSEN..........................................................................53
DE IDAN / ARTIO BEVESTIGEN ..........................................................................55
DE IDAN / ARTIO VERWIJDEREN ....................................................................57
DE BASE-FIX VERWIJDEREN - ISOFIX .........................................................57
DE BASE-FIX VERWIJDEREN – 3-PUNTSGORDEL .............................59
WAT MOET U DOEN NA EEN ONGEVAL ....................................................59
ONDERHOUD ....................................................................................................................59
DUURZAAMHEID VAN HET PRODUKT.........................................................59
VERWIJDERING ................................................................................................................61
PRODUKTINFORMATIE .............................................................................................. 61
GARANTIE ...........................................................................................................................63
SKRÓCONA INSTRUKCJA - ISOFIX ....................................................................3
SKRÓCONA INSTRUKCJA - 3-PUNKTOWE PASY ...................................5
DOPUSZCZENIE DO UŻYTKU ..............................................................................36
DOPUSZCZENIE DO UŻYTKU / KOMPATYBILNOŚĆ ..........................41
OCHRONA TWOJEGO SAMOCHODU ...........................................................41
NAJLEPSZE MIEJSCE W SAMOCHODZIE .................................................43
BEZPIECZEŃSTWO TWOJEGO MALUSZKA .......................................... 43
BEZPIECZEŃSTWO W SAMOCHODZIE ......................................................45
MONTAŻ BAZY BASE-FIX - ISOFIX .................................................................47
MONTAŻ BAZY BASE-FIX - 3 PUNKTOWE PASY..................................51
REGULACJA DŁUGOŚCI PODPÓRKI ..............................................................53
MONTAŻ FOTELIKA IDAN / ARTIO ..................................................................55
DEMONTAŻ FOTELIKA IDAN / ARTIO ..........................................................57
DEMONTAŻ BAZY BASE-FIX - ISOFIX ..........................................................57
DEMONTAŻ BAZY BASE-FIX - 3-PUNKTOWE PASY
BEZPIECZEŃSTWA .......................................................................................................59
POSTĘPOWANIE PO WYPADKU .......................................................................59
KONSERWACJA PRODUKTU ...............................................................................59
TRWAŁOŚĆ PRODUKTU ..........................................................................................59
UTYLIZACJA .......................................................................................................................61
INFORMACJA O PRODUKCIE ................................................................................ 61
GWARANCJA ....................................................................................................................63
FRNLPL
39
Page 40

HOMOLOGATION / COMPATIBILITÉ
La Base-Fix doit être fixée avec ISOFIX à la
voiture. La Base-Fix a seulement été testé et
approuvé en association avec un porte-bébé Idan
/ Artio avec barres de verrouillage (r & z) pour
les enfants jusqu‘à 13 kg (groupe 0 +, 0-18 mois).
AVERTISSEMENT! N‘utilisez pas de produits
!
d‘occasion dont l‘historique est incertain.
APPROVED FOR BASE-FIX
z
r
40
NOTE! La compatibilité de la coque pour bébé
Idan / Artio est marquée par les mots «APPROVED FOR
BASE-FIX»
AVERTISSEMENT! Ni la coque Idan / Artio, ni la
!
Base-Fix ne peuvent être utilisées avec d‘autres
systèmes. L‘homologation de la Base-Fix n‘est
plus valable en cas de modifications.
La fixation de la coque Idan / Artio avec une Base-Fix
est basée sur une homologation semi-universelle selon
ECE R/44/04. Idan / Artio ne peut donc être utilisée
que dans certains véhicules. Merci de vous référer
à la liste de véhicules approuvés afin de vérifier la
compatibilité de votre véhicule. Cette liste est mise à
jour régulièrement et la dernière version est disponible
en ligne sur www.gb-online.com.
PROTECTION DE VOTRE VEHICULE
Le contact d‘un siège enfant avec certains habillages
fragiles (velours, cuir etc…) peut laisser des traces.
Protégez votre véhicule en mettant une couverture ou
une serviette sous le siège enfant.
Page 41

GOEDKEURING / COMPATIBILITEIT
De Base-Fix dient met ISOFIX in de auto
vastgemaakt te worden. De Base-Fix is enkel
getest en goedgekeurd in combinatie met een
Idan / Artio babyzitje met vergrendelstangen
(r & z) voor kinderen tot 13kg (groep 0+, 0-18
maanden).
WAARSCHUWING! Gebruik geen
!
tweedehandsprodukten waarvan u de
achtergrond niet kent.
OPGELET! De geschiktheid van het Idan / Artio
babyzitje wordt aangegeven met de woorden
„APPROVED FOR BASE-FIX“
WAARSCHUWING! Noch de Idan / Artio, noch de
!
Base-Fix mogen met andere systemen gebruikt
worden. De goedkeuring van de Base-Fix vervalt
onmiddellijk in geval van enige wijziging.
Het vastzetten van de Idan / Artio babydrager op de
Base-Fix gebeurt volgens de semi-universele norm
ECE R44/4. Bijgevolg mag de Idan / Artio enkel in
bepaalde auto‘s gebruikt worden. Gelieve de lijst met
goedgekeurde auto‘s te controleren om te zien of uw
wagen geschikt is. De lijst wordt regelmatig bijgewerkt
en de laatste versie kan steeds geraadpleegd worden op
www.gb-online.com.
VOOR DE BESCHERMING VAN UW AUTO
Sommige autozetels die gemaakt zijn in een gevoelig
materiaal (bv. daim, leder, enz.) kunnen sporen
van slijtage ondervinden door het gebruik van een
babydrager. Leg om dit te voorkomen, een deken of
handdoek onder het kinderzitje.
DOPUSZCZENIE DO UŻYTKU / KOMPATYBILNOŚĆ
Baza Base-Fix powinna być mocowana do
systemu ISOFIX samochodu. Baza ta została
przetestowana i dopuszczona do użytku
wyłącznie w komplecie z fotelikiem dla niemowląt
Idan / Artio z prętami mocującymi
(r & z) dla dzieci o wadze do 13 kg (grupa 0+,
0-18 miesięcy).
OSTRZEŻENIE! Nie używaj produktów kupionych
!
z drugiej ręki, gdyż nie masz pewności, czy nie
były w samochodzie, który uległ wypadkowi.
UWAGA! Fotelik Idan / Artio, którego można używać z bazą
posiada wytłoczony napis: APPROVED FOR BASE-FIX“
OSTRZEŻENIE! Fotelika Idan / Artio ani bazy
!
Base-Fix nie można używać w połączeniu z innymi
systemami zabezpieczającymi. W przypadku
jakichkolwiek modyfikacji dopuszczenie do użytku
bazy Base-Fix natychmiast wygasa.
Montaż fotelika Idan / Artio za pomocą bazy Base-Fix
jest atestowany do użytku zgodnie z normą ECE R44
jako system pół-uniwersalny. Dlatego też może być w
ten sposób montowany tylko w określonych typach
samochodów. Sprawdź, czy Twój samochód znajduje się
na liście dopuszczonych pojazdów. Lista dostępna na
stronie internetowej www.gb-online.com jest na bieżąco
aktualizowana.
OCHRONA TWOJEGO SAMOCHODU
Delikatna tapicerka foteli samochodowych (np.
welurowa czy skórzana) może ulec uszkodzeniu przez
dziecięcy fotelik samochodowy. Aby tego uniknąć,
należy podłożyć pod fotelik kocyk lub ręcznik.
FRNLPL
41
Page 42

LA MEILLEURE POSITION DANS LA VOITURE
S‘il vous plaît vérifier avant d‘acheter le Base-Fix si elle
peut Une bonne installation peut se faire soit avec le
système ISOFIX ou avec les 3 points d‘ancrage.
ATTENTION! Une utilisation simultanée des deux
!
systèmes n‘est pas autorisée
Si Base-Fix avec la coque pour bébé Idan / Artio ne
devrait pas être stables ou se trouve trop raide dans la
voiture, une couverture ou une serviette peuvent être
utilisés pour compenser cela. Sinon, s‘il vous plaît choisir
une autre place dans la voiture.
ATTENTION! La Base-Fix être utilisé (photo) avec
!
le système ISOFIX et la jambe d‘appui approprié
ou deuxième option avec les 3 points d‘ancrage
de la voiture et la jambe d‘appui.
j
x
42
SECURITÉ POUR VOTRE ENFANT
j
• N‘utilisez la Base-Fix que dans un véhicule et
seulement avec une coque Idan / Artio.
x
• Vous êtes toujours responsable de la sécurité de votre
enfant.
• Assurez vous que la Base-Fix est toujours installée
correctement.
• Vérifier le bouton indicateur de dispositif x sur la clef
de déverrouillage j pour l‘installation correcte de la
coque Idan / Artio.
AVERTISSEMENT! Les parties en matière
!
plastique de la Base-Fix chauent au soleil.
Protégez votre enfant et la Base-Fix de
l‘exposition au soleil.
NOTE! Ne laissez jamais votre enfant seul dans le véhicule.
Page 43

DE BESTE POSITIE IN DE AUTO
Controleer alvorens de Base-Fix aan te kopen dat
hij korrekt geïnstalleerd kan worden met een ISOFIX
systeem of met een 3-puntsgordel.
OPGELET! Het gelijktijdig gebruik van beide
!
systemen is verboden.
Indien het Idan / Artio babyzitje en de Base-Fix, niet
stabiel of te stijl in de auto staan, kunt u een dekentje
gebruiken om te compenseren waar nodig. U kan ook
een andere positie in auto kiezen.
OPGELET! De Base-Fix moet met het
!
ISOFIX systeem (zie afbeelding) en de juiste
steunvoet gebruikt worden of eventueel met de
3-puntsgordel van de wagen de steunvoet.
VEILIGHEID VOOR UW KIND
• Gebruik de Base-Fix enkel in auto‘s in combinatie met
de Idan / Artio babydrager.
• U bent altijd verantwoordelijk voor de veiligheid van
uw kind.
• Zorg ervoor dat de Base-Fix steeds korrekt
vastgemaakt is.
• Controleer de indicatieknop x op de
ontgrendelinstoets j om te zien dat de Idan / Artio
babydrager korrekt geïnstalleerd is.
WAARSCHUWING! De plastieken onderdelen van
!
de Base-Fix warmen op in de zon. Bescherm uw
kind en de Base-Fix tegen intensieve blootstelling
aan de zon.
NAJLEPSZE MIEJSCE W SAMOCHODZIE
Przed zakupem bazy Base-Fix sprawdź, czy można ją
prawidłowo zamontować za pomocą systemu ISOFIX
lub 3-punktowych pasów bezpieczeństwa.
OSTRZEŻENIE! Jednoczesny montaż bazy za
!
pomocą obu systemów jest niedozwolony.
Jeśli fotelik Idan / Artio zamocowany na bazie Base-Fix
jest niestabilny lub nie stoi prosto, można spróbować
podłożyć pod niego kocyk lub ręcznik, aby poprawić
jego stabilność. Ewentualnie należy wybrać inne miejsce
w samochodzie.
OSTRZEŻENIE! Baza Base-Fix musi być używana
!
(jak na rysunku) z systemem ISOFIX oraz
podpórką lub ewentualnie z 3-punktowymi pasami
bezpieczeństwa samochodu oraz podpórką.
BEZPIECZEŃSTWO TWOJEGO MALUSZKA
• Bazy Base-Fix używaj tylko w samochodzie i wyłącznie
w komplecie z fotelikiem Idan / Artio.
• Zawsze to Ty jesteś odpowiedzialny (-a) za
bezpieczeństwo swojego dziecka.
• Zawsze sprawdzaj, czy baza Base-Fix jest prawidłowo
zamocowana.
• Sprawdzaj wskaźnik poprawnego montażu fotelika
Idan / Artio x znajdujący się na przycisku zwalniającym j.
OSTRZEŻENIE! Plastikowe części bazy Base-Fix
!
do fotelika Idan / Artio nagrzewają się na słońcu.
Chroń swoje dziecko oraz bazę przed nadmiernym
działaniem promieni słonecznych.
UWAGA! Nigdy nie zostawiaj dziecka w samochodzie
bez opieki.
FRNLPL
43OPGELET! Laat uw kind nooit alleen in het voertuig.
Page 44

SECURITÉ DANS LA VOITURE
AVERTISSEMENT! N‘utilisez pas la Base-Fix avec
!
la coque Idan / Artio sur un siège avant équipé
d‘airbags frontaux activés. Ceci ne s‘applique pas
aux airbags dits latéraux.
Pour garantir la sécurité maximale de tous les passagers
assurez vous que…
• les dossiers repliables de la voiture sont verrouillés
dans la position verticale.
• en cas d‘installation de la Base-Fix sur un siège
passager avant, ajustez le siège au maximum en
arrière.
• attachez tous les objets pouvant blesser en cas
d‘accident.
• vérifiez que tous les passagers sont attachés.
AVERTISSEMENT! La Base-Fix doit toujours être
!
fixée avec la ceinture, même quand elle n‘est pas
utilisée. En cas d‘arrêt brutal ou d‘accident, une
Base-Fix non attachée peut blesser les passagers
ou vous-même.
44
Page 45

VEILIGHEID IN DE AUTO
WAARSCHUWING! Gebruik de Base-Fix niet
!
in combinatie met de Idan / Artio babydrager
op de voorste passagierzetel indien deze
een geactiveerde airbag heeft. Dit is niet van
toepassing op de zogenaamde zijdelingse airbags.
Om de grootst mogelijke veiligheid voor alle passagiers
te garanderen, dient u ervoor te zorgen dat...
• plooibare rugsteunen in de auto rechtop vergrendeld
staan.
• wanneer u de Base-Fix op de voorste passagierszetel
installeert, deze volledig naar achter geschoven is.
• u alle voorwerpen die bij een ongeval verwondingen
kunnen veroorzaken goed vastzet.
• alle passagiers in de auto een gordel dragen.
WAARSCHUWING! De Base-Fix moet steeds met
!
de zetelgordel vastgemaakt worden, ook wanneer
hij niet gebruikt wordt. In geval van een noodstop
of een ongeval, kan een onbeveiligde Base-Fix
uzelf of andere passagiers verwonden.
BEZPIECZEŃSTWO W SAMOCHODZIE
OSTRZEŻENIE! Nie używaj fotelika
!
samochodowego Idan / Artio wraz z bazą na
przednim fotelu samochodowym z włączoną
przednią poduszką powietrzną. Nie dotyczy to
poduszek bocznych.
Aby zapewnić bezpieczeństwo wszystkim pasażerom
samochodu, upewnij się, czy …
• oparcia foteli samochodowych ustawione są w pozycji
pionowej.
• przy montażu bazy Base-Fix do fotelika Idan /
Artio na przednim fotelu pasażera, fotel ten jest
maksymalnie odsunięty do tyłu.
• wszystkie przedmioty w samochodzie są
zabezpieczone przed przemieszczaniem się.
• wszyscy pasażerowie są przypięci pasami.
OSTRZEŻENIE! Baza Base-Fix do fotelika
!
Idan / Artio musi być zawsze przymocowana
w samochodzie, nawet jeśli nie jest używana.
Niezabezpieczona baza Base-Fix w przypadku
gwałtownego hamowania czy zderzenia może
zranić pasażerów samochodu.
FRNLPL
45
Page 46

INSTALLATION DE L`BASE-FIX – ISOFIX
f
c
46
B
u
La sécurité de votre enfant sera augmentée en
utilisant le système ISOFIX reliant la base BaseFix étroitement avec le véhicule.
NOTE! Ne placez pas d‘objets dans l‘espace pour les
jambes à l‘avant de votre Base-Fix.
• Sélectionnez un siège d‘auto approprié,
conformément à la liste des types ci-joint.
• Connecter les deux guides clos ISOFIX f (de leurs
pièces plus vers le haut) avec les points d‘ancrage
ISOFIX B. Une installation en face (plus les pièces vers
le bas) est également possible.
NOTE! Les points d‘ancrage ISOFIX voiture B sont
deux anneaux en métal par siège, situé entre la zone
de dossier et assise. En cas de doute s‘il vous plaît
consulter votre manuel du propriétaire du véhicule.
• Déplier la jambe d‘appui u.
• Maintenant, tournez les connecteurs ISOFIX c de 180°
jusqu‘à ce qu‘ils soient pointant dans la direction des
guides ISOFIX f.
Page 47

DE BASE-FIX INSTALLEREN – ISOFIX
De veiligheid van uw kind zal aanzienlijk verhogen
indien u de Base-Fix nauw met het voertuig
verbindt.
OPGELET! Plaats geen voorwerpen in de beenruimte
vóór uw Base-Fix.
• Selecteer een geschikte autozetel op basis van de
ingesloten typelijst.
• Verbind de twee ingesloten ISOFIX geleiders f (hun
lange delen moet naar boven wijzen) met de ISOFIX
verankeringspunten B. Een omgekeerde installatie
(lange delen wijzen naar beneden) is eveneens
mogelijk.
OPGELET! De ISOFIX verankeringspunten B bestaan
uit 2 metalen ringen per zetel. Deze bevinden zich
tussen de rugsteun en het zitgedeelte. Raadpleeg de
handleiding van uw voertuig in geval van twijfel.
• Ontvouw de steunvoet u.
• Draai de ISOFIX connectoren c nu 180° tot ze in de
richting van de ISOFIX geleiders f wijzen.
MONTAŻ BAZY BASE-FIX - ISOFIX
Bezpieczeństwo Twojego dziecka zwiększa
się, jeśli mocuje się bazę Base-Fix za pomocą
systemu ISOFIX.
UWAGA! Nie umieszczaj żadnych przedmiotów na
podłodze samochodu przed fotelikiem Base-Fix.
• Wybierz właściwe miejsce w samochodzie zgodnie z
załączoną listą.
• Połącz dwa dołączone plastikowe elementy
pomocnicze ISOFIX f (ich dłuższe części skierowane
do góry) z uchwytami ISOFIX B. Odwrotne
mocowanie (dłuższe części skierowanie do dołu) jest
także dopuszczalne.
UWAGA! Uchwyty ISOFIX B to dwa metalowe haki
znajdujące się w szczelinie pomiędzy oparciem a
siedziskiem fotela samochodowego. W razie wątpliwości
należy zajrzeć do instrukcji obsługi samochodu.
• Rozłóż podpórkę u.
• Następnie obróć zaczepy ISOFIX c o 180°, tak aby
były zwrócone w kierunku elementów pomocniczych
ISOFIX f.
FRNLPL
47
Page 48

c
PUSH!
u
E
D
f
c
NOTE! Assurez-vous que l´indicateur de sécurité vert
D des connecteurs n‘est pas visible avant installation.
Si nécessaire, pousser et tirer simultanément sur le
bouton rouge E. Répétez cette opération avec l‘autre
connecteur.
• Pousser les deux connecteurs ISOFIX c dans les
guides ISOFIX f jusqu‘à ce que vous entendez en
cliquant dessus dans les points d‘ancrage B.
• Assurez-vous que la Base-Fix est connecté en toute
sécurité en essayant de le sortir.
• L‘indication de sécurité vert D doit être clairement
visible des deux côtés de les boutons de
déverrouillage rouge E.
• Maintenant, s‘il vous plaît se référer à la section
„REGLAGE l‚ appui“.
NOTE! Dans le cas où votre véhicule n‘est pas équipé
de points d‘ancrage ISOFIX, s‘il vous plaît continuer au
chapitre „INSTALLATION DE LA BASE-FIX - 3 points
d‘ancrage“.
CLICK!
48
Page 49

LET OP! Zorg dat de groene veiligheidsindicator D
van de grijparmen vóór installatie niet zichtbaar is.
Ontgrendel de grijparmen zo nodig door de rode knop
E tegelijkertijd in te drukken en naar achteren te trekken.
• Duw beide ISOFIX connectoren c in de ISOFIX
geleiders f tot u ze in de verankeringspunten B hoort
vastklikken.
• Controleer dat de Base-Fix veilig vastzit door eraan
te trekken.
• De groen veiligheidsindicatoren D moeten duidelijk
zichtbaar zijn aan beide kanten van de rode
ontgrendelingsknoppen E.
• Gelieve nu verder te gaan naar „DE STEUNVOET
AANPASSEN“.
OPGELET! Indien uw voertuig niet uitgerust is met
ISOFIX verankeringspunten, dient u verder te gaan
naar hoofdstuk „DE BASE-FIX INSTALLEREN 3-PUNTSGORDEL“.
UWAGA! Upewnij się, że zielone wskaźniki
bezpieczeństwa D znajdujące się na łącznikach bazy nie
są widoczne przed instalacją. Jeśli to konieczne, zwolnij
przycisk naciskając i jednocześnie odciągając czerwony
przycisk zwalniający E. Jeśli zajdzie taka potrzeba, to
samo powtórz z drugim łącznikiem.
• Wsuń oba zaczepy ISOFIX c do elementów
pomocniczych, aż usłyszysz, że zatrzasnęły się w
uchwytach ISOFIX A.
• Pociągnij za bazę, aby sprawdzić, czy jest prawidłowo
zamocowana.
• Zielone przyciski zabezpieczające D powinny
być widoczne z obu stron i powinny wystawać z
czerwonych przycisków zwalniających E.
• Następnie zajrzyj do części: „REGULACJA
PODPÓRKI“.
UWAGA! Jeżeli Twój samochód nie jest wyposażony w
system mocowania ISOFIX, przejdź do części „MONTAŻ
BAZY - 3-PUNKTOWE PASY BEZPIECZEŃSTWA“.
FRNLPL
49
Page 50

u
v
w
CLICK!
l
k
CLICK!
q
50
w
CLICK!
INSTALLATION DE L`BASE-FIX CEINTURE 3 POINTS
NOTE! Ne pas placer d‘objets au pied du
fauteuil devant votre Base-Fix.
• Déplier la jambe d‘appui u.
• Placez le Base-Fix sur une position de siège de voiture
approprié, conformément à la liste des types ci-joint.
• Pour déverrouiller, tourner le mécanisme de
verrouillage v 90 ° vers la gauche et soulevez le
dispositif de fixation w jusqu‘à la position maximale.
• Insérez la ceinture sous-abdominale k dans le cadre
du dispositif de fixation w à travers la Base-Fix et
insérer la boucle langue dans la ceinture du véhicule q.
• Maintenant, s‘il vous plaît attacher la ceinture de
sécurité k un peu en tirant sur la ceinture d‘épaule l,
pour éviter tout jeu dans la ceinture.
NOTE! Ne serrez pas la ceinture de sécurité trop serré
ou vous aurez des problèmes pour finaliser le processus
d‘installation correctement.
• Guide de la ceinture d‘épaule l parallèles et sur la
ceinture sous-abdominale k à travers la Base-Fix
arrière sous le dispositif de fixation w.
Page 51

DE BASE-FIX INSTALLEREN - 3-PUNTSGORDEL MONTAŻ BAZY BASE-FIX - 3 PUNKTOWE PASY
OPGELET! Plaats geen voorwerpen in de
voetruimte vóór uw Base-Fix.
• Ontvouw de steunvoet u.
• Plaats de Base-Fix op een geschikte plaats op de
autozetel. Raadpleeg hiervoor de type-lijst.
• Om te ontgrendelen, draait u het
vergrendelingsmechanisme v 90° in tegenwijzerzin en
heft u het bevestigingsstuk w maximaal op.
• Glijd de heupgordel k onder het bevestigingsstuk w
over de Base-Fix en steek de tong van de gesp in de
gesp van de autozetel q.
• Gelieve de heupgordel k nu aan te spannen door
lichtjes aan de schoudergordel l te trekken. De hele
gordel moet goed aangespannen zijn.
OPGELET! Span de heupgordel niet te fel aan, zoniet
zal u problemen hebben om het installatieproces goed
te beëindigen.
• Leid de schoudergordel l parallell en over de
heupgordel k, over de Base-Fix en terug onder het
bevestigingsstuk w.
UWAGA! Nie umieszczaj żadnych przedmiotów
na podłodze samochodu przed fotelikiem
Base-Fix.
• Rozłóż podpórkę u.
• Połóż bazę Base-Fix na wybranym miejscu w
samochodzie, według załączonej listy.
• Otwórz mechanizm blokujący v, przekręcając go o
90° w kierunku przeciwnym do ruchu wskazówek
zegara i podnieś pokrywę w aż do oporu.
• Przełóż pas biodrowy k pod pokrywą w w poprzek
bazy i zapnij pas q.
• Teraz napnij pas biodrowy k, pociągając delikatnie za
pas barkowy l, tak by nie było luzu.
UWAGA! Nie napinaj pasa biodrowego zbyt mocno,
gdyż możesz mieć trudności z prawidłowym
dokończeniem montażu.
• Umieść pas barkowy l pod pokrywą bazy Base-Fix w
na pasie biodrowym k, równolegle do niego.
FRNLPL
51
Page 52

ATTENTION! La boucle de la ceinture du véhicule
!
doivent pas dépasser dans le cadre de la Base-Fix.
NOTE! La ceinture de l‘épaule l doit être placée sur la
ceinture abdominale k. Ne pas tordre la courroie
• Poussez le dispositif de fixation w vers le bas jusqu‘à
ce qu‘elle s‘enclenche avec un clic audible. Assurezvous que le cadran du dispositif de verrouillage v les
F
PUSH!
u
y
52
points au symbole correct.
• Secouez la Base-Fix pour vérifier qu‘il est bien installé
NOTE! S‘il vous plaît vérifier à intervalles réguliers que
Base-Fix est toujours solidement fixée. Si nécessaire,
resserrez la ceinture du véhicule comme il peut y avoir
de jeu après une utilisation prolongée.
REGLAGE DE LA JAMBE DE FORCE
Poussez le bouton de règlage y et tirez la jambe de
force u jusqu‘à ce qu‘elle repose fermement sur le
plancher du véhicule.
AVERTISSEMENT! La jambe de force doit toujours
!
être en contact direct avec le plancher. Il ne doit
pas y avoir d‘objets sous la jambe de force.
NOTE! Assurez vous que la jambe de force ne soulève
pas la Base-Fix du siège.
AVERTISSEMENT! Si vous avez un tiroir de
!
rangement dans le plancher de votre voiture,
veuillez contacter le fabricant du véhicule.
Page 53

OPGELET! De gesp van de autogordel mag niet
!
verstrengeld raken met het frame van de Base-Fix.
OPGELET! De schoudergordel l moet over de heupgordel
k lopen. Draai de gordel niet.
• Duw het bevestigingsstuk w naar beneden tot u het
duidelijk hoor vastklikken. Controleer dat de wijzer van
het vergrendelingsmechanisme v het juiste symbool
aanduidt.
• Schud de Base-Fix om te controleren dat hij goed
vastzit.
OPGELET! Controleer regelmatig dat de Base-Fix goed
vastzit. Indien nodig dient u de zetelgordel opnieuw
goed aan te spannen aangezien deze bij langer gebruik
losser kan komen te zitten.
DE STEUNSTANG AANPASSEN REGULACJA DŁUGOŚCI PODPÓRKI
Duw de aanpassingsknop y in en trek de steunstang u
naar buiten tot hij de bodem van het voertuig raakt.
WAARSCHUWING! De steunstang moet steeds
!
in contact komen met de bodem. Er mogen
geen voorwerpen onde de steunstang geplaatst
worden.
OPGELET! Controleer dat de steunstang de Base-Fix
niet naar boven duwt.
WAARSCHUWING! Contacteer de fabrikant van
!
uw voertuig indien er zich opbergvakken in de
voetruimte van uw auto bevinden.
OSTRZEŻENIE! Klamra pasa bezpieczeństwa nie
!
może zachodzić na bazę.
UWAGA! Pas barkowy l musi przechodzić nad pasem
biodrowym k. Nie skręcaj pasa.
• Dociśnij pokrywę bazy w, aż się zatrzaśnie ze
słyszalnym KLIKNIĘCIEM. Upewnij się, że tarczka
mechanizmu blokującego v skierowana jest w
kierunku właściwego symbolu.
• Pociągnij za bazę, aby sprawdzić, czy jest prawidłowo
zamontowana.
UWAGA! Okresowo sprawdzaj, czy baza nadal jest
prawidłowo zamontowana. Jeśli to konieczne, ponownie
naciągnij pas samochodowy.
Naciśnij przycisk regulacji y i ciągnij za podpórkę u, do
momentu aż oprze się o podłogę samochodu.
OSTRZEŻENIE! Podpórka musi zawsze opierać
!
się na podłodze samochodu. Nie wolno niczego
umieszczać pod podpórką.
UWAGA! Upewnij się, czy podpórka nie odrywa bazy
Base-Fix od fotela samochodu.
OSTRZEŻENIE! Jeśli w podłodze samochodu
!
znajduje się jakiś schowek, skontaktuj się z
producentem samochodu.
FRNLPL
53
Page 54

IDAN ARTIO
a a
54
FIXER L`IDAN / ARTIO
NOTE! Assurez vous qu‘il n‘y a pas d‘objets étrangers
sur la surface de la Base-Fix.
Consultez le manuel Idan / Artio pour vérifier que
la poignée a est dans la „position-en voiture“ et que
l‘enfant est bien attaché avec le harnais intégré. Se
référer au manuel de la coque Idan / Artio pour ajuster
la poignée a.
• Positionnez la coque Idan / Artio, position dos à la
route, au dessus de la Base-Fix.
• Abaissez la coque Idan / Artio le long du dossier du
siège passager et connectez la barre de verrouillage r
côté tête avec le loquet de barre i.
r
i
Page 55

DE IDAN / ARTIO BEVESTIGEN
OPGELET! Controleer dat de bovenkant van de Base-
Fix vrij is van vreemde voorwerpen.
Neem de handleiding van de Idan / Artio in de hand
en controleer dat de draagarm a zich in de „rijdende
positie“ bevindt en dat het kind veilig vastgemaakt werd
met het geïntegreerde harnassysteem. Wij verwijzen
naar de handleiding van de Idan / Artio voor het
aanpassen van de draagarm a.
• Plaats de Idan / Artio babydrager tegen de rijrichting
in boven de Base-Fix.
• Beweeg de Idan / Artio langs de rugsteun van
de passagierszetel naar beneden en verbind de
vergrendelbaar r aan het hoofduiteinde met de
houder van de vergrendelbaar i.
MONTAŻ FOTELIKA IDAN / ARTIO
UWAGA! Upewnij się, czy na wierzchu bazy Base-Fix
nic nie leży.
Korzystając z instrukcji użytkowania fotelika Idan / Artio,
upewnij się, że rączka fotelika a znajduje się w położeniu
„jazda“ oraz że dziecko jest prawidłowo zapięte
szelkami fotelika. Informacje dotyczące regulacji rączki
fotelika a znajdują się w instrukcji użytkowania fotelika.
• Umieść fotelik Idan / Artio nad bazą tyłem do
kierunku jazdy.
• Opuść fotelik w dół i włóż pręt mocujący r znajdujący
się z tyłu fotelika w zaczep i.
FRNLPL
55
Page 56

• Ensuite abaissez le côté pied de la coque Idan / Artio
a
z
o
z
CLICK!
CLICK!
j
x
56
E
f
c
PUSH!
jusqu‘à ce que la deuxième barre de verrouillage z se
connecte avec les crochets de verrouillage o, avec un
CLIC audible.
• Assurez vous que le bouton indicateur de dispositif
x sur la poignée de déverrouillage j soit clairement
visible. Tirez sur la poignée a pour vérifier l‘installation.
RETIRER LA COQUE IDAN / ARTIO
• Poussez le bouton indicateur du dispositif x pour
libérer la poignée j.
• Simultanément, appuyez sur la poignée de
déverrouillage j et penchez la coque un peu en avant
jusqu‘à ce que la barre de verrouillage z se désengage
des crochets o.
• Maintenant vous pouvez détacher la coque Base-Fix
en la soulevant.
RETRAIT DE LA BASE-FIX- ISOFIX
• Eectuer toutes les étapes de l‘installation dans
l‘ordre inverse.
• Date de sortie les connecteurs ISOFIX c en
tirant simultanément et d‘élingage dos les
boutons de déverrouillage rouge E.
• Tirer Base-Fix sur les guides Isofix f.
• Tourner les connecteurs ISOFIX c de 180 ° pour
les ramener à leur position initiale
Page 57

• Breng nu het voetuiteinde van de Idan / Artio
babydrager naar beneden tot de tweede
vergrendelbaar z met een hoorbare KLIK vastklikt in
de vergrendelhaken o. Controleer dat de indicatieknop
x van de ontgrendelingsknop j goed zichtbaar is.
• Trek aan de draagarm a om te controleren dat de
installatie goed gebeurd is.
DE IDAN / ARTIO VERWIJDEREN DEMONTAŻ FOTELIKA IDAN / ARTIO
• Duw de aanduidingsknop x in om de
ontgrendelingsknop j los te maken.
• Duw de ontgrendelingsknop j tegelijkertijd in en
hef de babydrager lichtjes naar voren totdat de
vergrendelbaar z loskomt van de vergrendelingshaken
o aan de kant van het voeteinde.
• Nu kan u de Idan / Artio babydrager gerust van de
Base-Fix opheen.
• Następnie opuść przód fotelika Idan / Artio, aż drugi
pręt mocujący z zahaczy się o zaczep o ze słyszalnym
KLIKNIĘCIEM.
• Sprawdź, czy wskaźnik x znajdujący się na przycisku
blokującym j jest dobrze widoczny. Pociągnij fotelik
za rączkę a, aby sprawdzić, czy jest prawidłowo
zamocowany.
• Naciśnij przycisk x zwalniający blokadę j.
• Jednocześnie naciśnij blokadę j i przechyl fotelik
delikatnie do przodu, aż pręt mocujący z wyjdzie z
zaczepu o.
• Teraz możesz całkowicie zdjąć fotelik Base-Fix.
FRNLPL
DE BASE-FIX VERWIJDEREN - ISOFIX DEMONTAŻ BAZY BASE-FIX - ISOFIX
• Voer de installatiestappen in omgekeerde
volgorde uit.
• Ontgrendel de ISOFIX connectoren c door
gelijktijdig de rode ontgrendelknoppen E in te
drukken en naar achter te duwen.
• Trek de Base-Fix uit de ISOFIX geleiders f.
• Draai de ISOFIX connectoren c 180° en breng
ze terug naar hun oorspronkelijke positie.
• Wykonaj wszystkie czynności montażowe w
odwrotnej kolejności.
• Zwolnij zaczepy ISOFIX c, wciskając i
przesuwając czerwone przyciski zwalniające E.
• Wyjmij bazę z Base-Fix z elementów
pomocniczych ISOFIX f.
• Obróć zaczepy ISOFIX c o 180° tak, by wróciły
do oryginalnego położenia.
57
Page 58

RETRAIT DE LA BASE-FIX - 3 POINTS D‘ANCRAGE
w
v
q
PUSH!
58
• Débouclez la ceinture de sécurité du
véhicule q.
• Ouvrez le mécanisme de verrouillage w
avec le dispositif de fermeture w.
• Repliez le mécanisme de verrouillage
jusqu‘à la butée et sortez la ceinture du
guide-ceinture.
AVERTISSEMENT! Tout le système est tendu.
!
Toujours déboucler la ceinture q avant de tenter
de déverrouiller le mécanisme de la base v.
QUE FAIRE APRES UN ACCIDENT
Lors d‘un accident, la Base-Fix peut avoir subi des
dommages invisibles à l‘oeil. Après un accident la base
doit être remplacée immédiatement. En cas de doute,
contactez votre détaillant ou le fabricant.
ENTRETIEN DU PRODUIT
• Les parties plastiques peuvent être nettoyées avec du
savon doux et de l‘eau tiède.
• Toutes les pièces importantes de la Base-Fix doivent
être examinées régulièrement.
• Les parties mécaniques doivent fonctionner
parfaitement.
DUREE DE VIE DU PRODUIT
Tous les produits GB sont conçus pour remplir leur
fonction sur la durée de vie prévue du produit.
Cependant, en cas de changements de température
importants ou d‘autres facteurs imprévus agissant sur la
Base-Fix, il est important de noter ce qui suit:
Page 59

DE BASE-FIX VERWIJDEREN – 3-PUNTSGORDEL DEMONTAŻ BAZY BASE-FIX - 3-PUNKTOWE PASY
• Maak de gesp q van de zetelgordel los.
• Ontsluit het vergrendelingssysteem v van
het bevestigingsstuk w.
• Vouw het bevestigingsstuk w op tot aan
het stopstuk en neem de gordel van het
voertuig uit de gordelgeleider.
WAARSCHUWING! Het hele systeem staat
!
onder druk. Open altijd eerst de de gesp
van de zetelgordel q en probeer dan pas het
ontgrendelingsmechanisme v te activeren.
WAT MOET U DOEN NA EEN ONGEVAL
In geval van een ongeluk kan de Base-Fix schade
ondervinden die onzichtbaar is voor het blote oog.
Daarom moet de Base-Fix onmiddellijk vervangen
worden na een ongeval. Raadpleeg uw verdeler of de
fabrikant in geval van twijfel.
ONDERHOUD
• Reinig de plastieken onderdelen met een milde
detergent en warm water.
• Alle belangrijke onderdelen van de Base-Fix moeten
regelmatig op schade gecontroleerd worden.
• De mechanische onderdelen moeten vlot werken.
DUURZAAMHEID VAN HET PRODUKT
Alle GB produkten zijn zodanig ontwerpen dat ze
funktioneel en duurzaam zijn. Aangezien extreme
temperatuurverschillen en andere onvoorzienbare
belasting op de Base-Fix kan optreden, is het belangrijk
het volgende in acht te nemen:
BEZPIECZEŃSTWA
• Odepnij pas samochodowy q.
• Zwolnij mechanizm blokujący v na pokrywie
mocującej w.
• Podnieś pokrywę w aż do oporu i wyjmij
pas samochodowy z prowadnic.
OSTRZEŻENIE! Pamiętaj, aby ze względów
!
bezpieczeństwa zawsze przed zwolnieniem
mechanizmu blokującego v najpierw odpiąć
klamrę pasa samochodowego q.
POSTĘPOWANIE PO WYPADKU
W razie wypadku w bazie mogą powstać niewidoczne
gołym okiem uszkodzenia. Dlatego też zawsze po
wypadku bazę należy wymienić na nową. Jeśli masz
wątpliwości, skontaktuj się ze sklepem.
KONSERWACJA PRODUKTU
• Plastikowe elementy bazy Base-Fix można myć ciepłą
wodą z delikatnym detergentem.
• Regularnie należy sprawdzać wszystkie elementy bazy
pod kątem ich ewentualnych uszkodzeń.
• Wszystkie mechaniczne części muszą działać
bezbłędnie.
TRWAŁOŚĆ PRODUKTU
Wszystkie produkty firmy GB są zaprojektowane
tak, by można z nich korzystać tak długo jak mogą
być użytkowane. Tym niemniej z uwagi na możliwe
duże różnice temperatury czy inne nieprzewidziane
sytuacje, które mają wpływ na stan bazy, należy zawsze
przestrzegać następujących wskazówek:
FRNLPL
59
Page 60

• Si le véhicule est exposé au soleil pendant une longue
durée, la Base-Fix doit être retirée du véhicule ou
recouverte d‘un tissu.
• Vérifiez tous les ans que les parties plastique et métal
de la Base-Fix n‘ont pas subi de changement de
couleur ou de forme.
• En cas de changement, vous devez cesser d‘utiliser la
Base-Fix ou la faire examiner par le fabricant en vue
d‘un remplacement éventuel.
RECYCLAGE
A la fin de la vie du produit, veillez à respecter les lois
en vigueur pour le traitement des déchets. Les normes
de traitement des déchets ou de recyclage varient en
fonction des zones géographiques. Merci de contacter
les autorités compétentes en cas de doute.
INFORMATION PRODUIT
Si vous avez des questions, veuillez d‘abord contacter
votre détaillant. Assurez vous d‘avoir les informations
suivantes:
• Numéro de série (voir étiquette).
• Marque et type du véhicule où le siège est
habituellement installé, ainsi que la position dans le
véhicule.
• Poids (âge, taille) de l‘enfant.
60
Pour plus d‘informations sur nos produits, merci de
visiter www.gb-online.com
Page 61

• Indien de auto langere tijd blootgesteld wordt aan
direct zonlicht, dient de Base-Fix uit de wagen
genomen worden en met een doek bedekt worden.
• Controleer alle plastieken en metalen onderdelen van
de Base-Fix jaarlijks op schade of verandering in vorm
of kleur.
• Indien u veranderingen vaststelt, moet u de Base-Fix
weggooien of laten controleren of indien nodig, laten
vervangen door de fabrikant.
VERWIJDERING UTYLIZACJA
Aan het einde van zijn levenscyclus moet de
Base-Fix op een korrekte manier verwijderd
worden. De richtlijnen voor afvalverwerking
kunnen regionaal verschillen. Contacteer uw lokale
afvalverwerkingsautoriteiten om zeker te zijn dat u de
Base-Fix korrekt verwijdert. Informeer u in elk geval naar
de afvalverwerkingsrichtlijnen van uw land.
• Jeśli samochód stoi na słońcu przez dłuższy czas,
bazę Base-Fix należy wyjąć z samochodu lub ją
przykryć.
• Przynajmniej raz w roku należy sprawdzać wszystkie
plastikowe i metalowe części bazy pod kątem zmiany
ich koloru czy kształtu.
• Po stwierdzeniu zmian baza powinna zostać
wyrzucona lub sprawdzona przez producenta i
ewentualnie wymieniona na nową.
Po zakończeniu użytkowania bazy Base-Fix należy
ją zutylizować zgodnie z przepisami. Przepisy
dotyczące utylizacji mogą się różnić w poszczególnych
krajach, dlatego też aby postąpić zgodnie z prawem,
należy skontaktować się z lokalnymi władzami
lub przedsiębiorstwem, zajmującym się utylizacją
odpadków. W każdym przypadku stosuj się do lokalnych
przepisów prawnych.
FRNLPL
PRODUKTINFORMATIE
Raadpleeg eerst uw verdeler indien u vragen heeft. Zorg
ervoor dat u volgende informatie bij de hand heeft:
• Serienummer (zie sticker).
• Merk en type van uw auto en de positie waar het zitje
normaal geïnstalleerd wordt.
• Gewicht, leeftijd en grootte van het kind.
Voor bijkomende informatie over onze produkten,
gelieve te surfen naar www.gb-online.com.
INFORMACJA O PRODUKCIE
Jeśli masz jakieś pytania, w pierwszej kolejności
skontaktuj się ze sklepem. Upewnij się, że masz
następujące informacje:
• Numer seryjny (patrz nalepka).
• Nazwa marki i rodzaj samochodu oraz miejsce, gdzie
zwykle montowany jest fotelik.
• Waga, wiek oraz wzrost dziecka.
Więcej informacji uzyskasz na stronie
www.gb-online.com
61
Page 62

GARANTIE
Les conditions de garantie suivantes ne sont valables
que dans le pays dans lequel, ce produit a été vendu à
l'origine par un détaillant à un consommateur.
1. La garantie couvre tous les défauts de fabrication
et de matériaux, qui existaient au moment de
l‘achat ou qui sont devenus apparents dans les
3 ans suivant l‘achat initial auprès d‘un détaillant
par un consommateur (garantie fabricant). Vous
devez vérifier sans délai à réception que le produit
est complet et qu‘il ne présente aucun défaut de
fabrication ni aucun défaut matériel. Vous devez
toujours conserver votre preuve d´achat.
2. En cas de défaut, arrêtez immédiatement d'utiliser
le produit. Pour toute réclamation dans le cadre de
la garantie, le produit doit être retourné au détaillant
auprès duquel il a été acheté propre et complet
accompagné de l´original de la preuve d´achat (ticket
de caisse ou facture). Ne pas expédier le produit
directement au fabricant.
3. La garantie ne couvre pas les dommages provoqués
par une mauvaise utilisation, des influences
extérieures (eau, feu, accidents de la route, etc.),
l´usure normale ou un problème résultant d´une
utilisation non conforme au manuel d´utilisation.
La garantie ne s´applique pas si des réparations ou
modifications ont été eectuées par des personnes
non-autorisées ou si des pièces et accessoires
employés ne sont pas sont d’origine.
4. La présente garantie ne saurait en aucun cas invalider
ou limiter les droits du consommateur ou les droits
de recours contre le revendeur sur la base d´une
62
infraction au contrat d’achat tel qu’autorisé par la
législation en vigueur.
Page 63

Deze garantie is uitsluitend van toepassing in het
land waar dit product oorspronkelijk door een
detailhandelaar is verkocht aan een klant.
1. De garantie dekt alle fabricage- en materiaalfouten die
bestaan of zichtbaar worden op de dag van aankoop
of zichtbaar worden binnen een periode van 3 jaar
na de datum van aankoop bij het verkooppunt dat
het product oorspronkelijk aan een consument heeft
verkocht (fabrieksgarantie). U dient het product op de
aankoopdatum of na ontvangst onmiddellijk te controleren
op compleetheid en fabrieks- of materiaalfouten. Bewaar
altijd uw gedateerde aankoopbewijs.
2. In geval van een defect dient u het gebruik van het
product te staken. Om voor garantie in aanmerking
te komen, dient u het product in schone en volledige
toestand te retourneren aan het verkooppunt dat het
oorspronkelijk aan u heeft verkocht en een origineel
aankoopbewijs (kassabon of factuur) te overleggen.
Verstuur het product niet rechtstreeks naar de fabrikant of
lever het niet daar af.
3. Deze garantie dekt geen schade veroorzaakt
door verkeerd gebruik, omgevingsfactoren (zoals
water, brand, aanrijdingen) of normale slijtage of
nalatigheid om de instructies in de handleiding op
te volgen. De garantie geldt niet als er aanpassingen
of onderhoudswerkzaamheden zijn uitgevoerd door
onbevoegde personen of als niet-originele onderdelen en
accessoires zijn gebruikt.
4. De wettelijke rechten van de consument, inclusief
vorderingen uit onrechtmatige daad en vorderingen
inzake contractbreuk die de koper kan hebben jegens
de verkoper of fabrikant van het product worden niet
beïnvloed door deze garantie.
GWARANCJAGARANTIE
Niniejsza gwarancja obowiązuje wyłącznie w kraju, w
którym dokonano sprzedaży produktu.
1. Gwarancja obejmuje wszelkie wady materiałowe
i produkcyjne istniejące w momencie zakupu czy
wykryte w ciągu 3 lat od daty zakupu produktu w
sklepie detalicznym przez pierwszego właściciela
(gwarancja producenta). Prosimy o sprawdzenie
produktu pod kątem jego kompletności lub
jakichkolwiek wad w chwili jego zakupu. W przypadku
sprzedaży wysyłkowej - natychmiast po jego
otrzymaniu. Zachowaj dowód zakupu.
2. W przypadku stwierdzenia wady należy zaprzestać
użytkowania produktu i dostarczyć lub odesłać go do
sklepu, w którym został po raz pierwszy zakupiony.
Reklamowany w ramach gwarancji produkt powinien
zostać dostarczony czysty i kompletny wraz z
oryginałem dowodu zakupu (paragon lub faktura).
Prosimy nie wysyłać produktu bezpośrednio do
producenta.
3. Gwarancja nie obejmuje uszkodzeń wynikających
z niewłaściwego użytkowania, czynników
zewnętrznych (woda, ogień itp.) lub standardowego
zużycia wynikającego z eksploatacji. Gwarancja nie
obowiązuje również w przypadku, gdy produkt był
użytkowany niezgodnie z instrukcją użytkowania,
jeśli był naprawiany lub modyfikowany przez
nieuprawnione osoby oraz, gdy użyto w tym celu
nieoryginalnych części i akcesoriów.
4. Niniejsza gwarancja nie wyłącza, nie ogranicza ani
nie zawiesza uprawnień kupującego wynikających z
niezgodności towaru z umową konsumencką.
FRNLPL
63
Page 64

64
GB IDAN
UNIVERSAL
SEMI-UNIVERSAL
0 - 13 kg
04301332
ECE R 44/04
gb GmbH
Riedingerstr. 18, 95448 Bayreuth
Germany
Approved for
BASE-FIX
GB ARTIO
UNIVERSAL
SEMI-UNIVERSAL
0 - 13 kg
04301331
ECE R 44/04
gb GmbH
Riedingerstr. 18, 95448 Bayreuth
Germany
Approved for
BASE-FIX
11/2015
ENGEDÉLY
Base-Fix
ECE R44/04 Korcsoport 0+
Testtömeg: 13 kg-ig
AJÁNLOTT
ISOFIX (E osztály) rendszerrel
Kizárólag hárompontos biztonsági
övvel felszerelt ülésre köthető be,
az UN/ECE 16. számú biztonsági
követelményeknek, ill. egyenértékű
standardnak megfelelően.
SCHVÁLENÍ
Base-Fix
ECE R44/04 skupina 0+
Váha: Až do 13 kg
DOPORUČENÍ
Pro sedadla ve vozidle s ISOFIXem
(třída E). Pro sedadla ve vozidle
se samonavíjecím 3bodovým
bezpečnostním pásem dle ECE R16
nebo jiných odpovídajích norem.
SCHVÁLENIE
Base-Fix
ECE R44/04 skupina 0 +
pre váhu dieťaťa do 13 kg
ODPORÚČANIE
Pre sedadlá vo vozidle s ISOFIXom
(trieda E). Pre sedadlá vo vozidle
sa samonavíjacím 3bodovým
bezpečnostným pásom podľa
ECE R16 alebo iných odpovídajích
noriem.
KEDVES VÁSÁRLÓNK,
Köszönjük, hogy megvásárolta Base-Fix termékünket.
Biztosíthatjuk, hogy a Base-Fix termék kifejlesztésénél
is a biztonságra, kényelemre és a felhasználóbarát
kezelhetőségre törekedtünk. A termék szigorú minőségi
előírásoknak megfelelően készül, így megfelel a
legszigorúbb biztonsági előírásoknak.
FIGYELEM! Jelen útmutatót mindig tartsa kéznél a
Idan / Artio babahordozó erre a célra fenntartott
rekeszében.
Ez a hozzáférési pont minden Idan / Artio változat
esetében alkalmazható.
FIGYELEM! Gyermeke maximális biztonsága
!
érdekében feltétlenül fontos, hogy az Base-Fix
ezen használati utasítás szerint szerelje be és
használja.
Page 65

VÁŽENÝ ZÁKAZNÍKU,
Velice Vám děkujeme za zakoupení Base-Fix.
Ujišťujeme Vás, že jsme se během vývoje Base-Fix
soustředili na bezpečnost, pohodlí a uživatelskou
přívětivost. Produkt je vyroben pod speciálním
kvalitativním dohledem a splňuje nejpřísnější
bezpečnostní požadavky.
VÁŽENÝ ZÁKAZNÍK,
Veľmi Vám ďakujeme za zakúpenie Base-Fix.
Uisťujeme Vás, že sme sa počas vývoja Base-Fix
sústredili na bezpečnosť, pohodlie
a užívateľskú prívetivosť. Produkt je vyrobený pod
špeciálnym kvalitatívnym dohľadom a spĺňa
najprísnejšie bezpečnostné požiadavky.
UPOZORNĚNÍ! Prosíme mějte návod k použití vždy po
ruce a uschovejte jej v k tomu určené přihrádce pod
autosedačkou Idan / Artio.
Základna je vhodná pro všechny varianty autosedačky
Idan / Artio.
UPOZORNĚNÍ! Pro maximální ochranu Vašeho
!
dítěte je nezbytné, instalovat a používat Base-Fix
přesně podle instrukcí v tomto manuálu.
UPOZORNENIE! Prosíme majte návod na použitie vždy
po ruke a uschovajte ho v k tomu určenej priehradke
pod autosedačkou Idan / Artio.
Základňa je vhodná pre všetky varianty autosedačky
Idan / Artio.
VAROVANIE! Pre maximálnu ochranu Vášho
!
dieťaťa je nevyhnutné, inštalovať a používať BaseFix presne podľa inštrukcií v tomto manuáli.
HUCZSK
65
Page 66

HU TARTALOM
RÖVID INSTRUKCIÓ - ISOFIX ...................................................................................3
RÖVID INSTRUKCIÓ - 3 PONTOS ÖV ................................................................5
ENGEDÉLY .......................................................................................................................... 64
MEGFELELÉS / KOMPATIBILITÁS ..................................................................... 68
AUTÓJA VÉDELMÉÉRT ............................................................................................ 68
A LEGJOBB POZÍCIÓ AZ AUTÓBAN ............................................................. 70
GYERMEKE BIZTONSÁGA ..................................................................................... 70
BIZTONSÁG AZ AUTÓBAN ....................................................................................72
AZ BASE-FIX - ISOFIX BESZERELÉSE ...........................................................74
AZ BASE-FIX BESZERELÉSE 3-PONTOS ÖV ...........................................78
A TÁMASZTÓLÁB BEÁLLÍTÁSA ........................................................................ 80
AZ BASE-FIX RÖGZÍTÉSE .......................................................................................82
AZ IDAN / ARTIO BABAHORDOZÓ KIEMELÉSE ................................. 84
AZ BASE-FIX - ISOFIX ELTÁVOLÍTÁSA......................................................... 84
AZ BASE-FIX - 3-PONTOS ÖV ELTÁVOLÍTÁSA ..................................... 86
TENNIVALÓK BALESET UTÁN ...........................................................................86
ÁPOLÁS ................................................................................................................................ 86
A TERMÉK ÉLETTARTAMA ................................................................................... 86
ÁRTALMATLANÍTÁS ....................................................................................................88
A TERMÉKRE VONATKOZÓ INFORMÁCIÓK ............................................88
GARANCIÁLIS FELTÉTELEK.................................................................................90
66
Page 67

CZ OBSAH
SK OBSAH
STRUČNÉ INSTRUKCE - ISOFIX .............................................................................3
STRUČNÉ INSTRUKCE - 3-BODOVÝ PÁS.......................................................5
SCHVÁLENÍ ........................................................................................................................64
SCHVÁLENÍ / KOMPATIBILITA.............................................................................69
PRO OCHRANU VAŠEHO VOZIDLA...............................................................69
NEJLEPŠÍ POZICE VE VOZIDLE ........................................................................... 71
BEZPEČNOST PRO VAŠE DÍTĚ ............................................................................ 71
BEZPEČNOST VE VOZIDLE ...................................................................................73
MONTÁŽ BASE-FIX - ISOFIX .................................................................................75
MONTÁŽ BASE-FIX - 3-BODOVÝ PÁS ...........................................................79
NASTAVENÍ OPĚRNÉ NOHY ..................................................................................81
ZAPOJENÍ IDAN / ARTIO ........................................................................................83
VYJÍMÁNÍ IDAN / ARTIO ...........................................................................................85
VYJÍMÁNÍ BASE-FIX - ISOFIX ................................................................................85
VYJMUTÍ BASE-FIX - 3- BODOVÝ PÁS ..........................................................87
CO DĚLAT PO NEHODĚ ............................................................................................87
PÉČE O PRODUKT ........................................................................................................87
TRVANLIVOST PRODUKTU ....................................................................................87
LIKVIDACE........................................................................................................................... 89
INFORMACE O PRODUKTU ..................................................................................89
ZÁRUKA .................................................................................................................................91
STRUČNÉ INSTRUKCE - ISOFIX .............................................................................3
STRUČNÉ INSTRUKCE - 3-BODOVÝ PÁS.......................................................5
SCHVÁLENIE .....................................................................................................................64
SCHVÁLENIE / KOMPATIBILITA .........................................................................69
PRE OCHRANU VÁŠHO VOZIDLA ................................................................... 69
NAJLEPŠÍ POZÍCIE VO VOZIDLE ........................................................................ 71
BEZPEČNOSŤ VÁŠHO DIEŤAŤA ..........................................................................71
BEZPEČNOSŤ VO VOZIDLE...................................................................................73
MONTÁŽ BASE-FIX – ISOFIX .................................................................................75
MONTÁŽ BASE-FIX - 3-BODOVÝ PÁS ...........................................................79
NASTAVENIE OPORNÉ NOHY ..............................................................................81
ZAPOJENIE IDAN / ARTIO ......................................................................................83
VYBERANÍ IDAN / ARTIO ........................................................................................85
VYBERANÍ BASE-FIX – ISOFIX ............................................................................85
VYBERANÍ BASE-FIX – 3-BODOVÝ PÁS ......................................................87
ČO ROBIŤ PO NEHODE .............................................................................................87
STAROSTLIVOSŤ O PRODUKT ............................................................................87
POUŽITEĽNOSŤ PRODUKTU ................................................................................87
LIKVIDÁCIA ......................................................................................................................... 89
INFORMÁCIE O PRODUKTE .................................................................................89
ZÁRUKA .................................................................................................................................91
HUCZSK
67
Page 68

MEGFELELÉS / KOMPATIBILITÁS
Az Base-Fix terméket ISOFIX rendszerrel kell
rögzíteni az autóba. Az Base-Fix kizárólag az Idan
/ Artio hordozóval történő együttes használatra
elfogadott, a rjazon jelölt záró reteszekkel (r & z)
gyermekek számára, 13 kg-ig (0+,0-18 hó)
FIGYELEM! Ne használjon másodkézből kapott
!
(már használt) terméket, amelynek nem ismeri a
APPROVED FOR BASE-FIX
z
r
68
múltját!
FIGYELEM! Az Idan / Artio újszülött hordozó
kompatibilitása így vn jelölve: „APPROVED FOR BASE-FIX“
FIGYELEM! Sem az Idan / Artio sem pedig
!
az Base-Fix terméket nem szabad egyéb
rendszerekkel használni. Az Base-Fix
megfelelősége azonnal érvényét veszti bármilyen
módosítás esetén.
Az Idan / Artio hordozó és Base-Fix együttes rögzítése
az ECE44/04-es szabvány alapján történő megfelelőség
szerint. A továbbiakban az Idan / Artio meghatározott
típusú gépjárművekben használható. Kéjük tekintse
át a megfelelő autók listáját ahhoz, hogy ellenőrizze
gépjárműve kompatibilitását. A listát folyamatosan
frissítjük, az aktuális legutóbbi verzió megtekinthető a
www.gb-online.com weboldalon.
AUTÓJA VÉDELMÉÉRT
Olyan típusú autós üléseken, amelyek huzata kényesebb
anyagból készült (pl. velúr, bőr, stb.), a biztonsági
gyermekülés használata bizonyos nyomokat hagyhat.
Ennek elkerülése érdekében a biztonsági gyermekülés
használatakor tegyen egy plédet vagy törölközőt a
biztonsági gyermekülés alá.
Page 69

SCHVÁLENÍ / KOMPATIBILITA
Base-Fix musí být k vozidlu zajištěn pomocí
systému ISOFIX. Base-Fix je testován a schválen
pouze v kombinaci s dětskou autosedačkou
Idan / Artio se zamykacími tyčemi (r & z), pro
děti až do 13 kg (skupina 0+, 0-18 měsíců).
UPOZORNĚNÍ! Nepoužívejte bazarové výrobky z
!
druhé ruky s nejistou minulostí.
POZNÁMKA! Kompatibilní autosedačka Idan / Artio
je označena následujícím textem: „APPROVED FOR
BASE-FIX“
UPOZORNĚNÍ! Idan / Artio, ani Base-Fix, není
!
možné používat s jinými systémy. Schválení
produktu Base-Fix přestává platit ihned po
jakékoli úpravě.
Upevňování dětského nosítka Idan / Artio v kombinaci
s Base-Fix je založeno na semi-univerzálním schválení
podle ECE R44/04. Proto je Idan / Artio možné
používat pouze v určitých automobilech. K ujištění se
kompatibility Vašeho auta, Vás proto prosíme o přečtení
seznamu schválených vozidel. Seznam je pravidelně
aktualizován a je možné jej shlédnout online na
www.gb-online.com
PRO OCHRANU VAŠEHO VOZIDLA
Na některých potazích sedadel z citlivých materiálů
(např. velur, kůže apod.), může používání dětské
bezpečnostní autosedačky zanechat stopy opotřebení.
K vyvarování se tomuto poškození, byste měli pod
dětskou autosedačku vložit ručník nebo deku.
SCHVÁLENIE / KOMPATIBILITA
Base-Fix musí byť k vozidlu zaistený pomocou
systému ISOFIX. Base-Fix je testovaný
a schválený len v kombinácii s detskou
autosedačkou Idan / Artio so zamykacích tyčami
(r & z), pre deti až do 13 kg (skupina 0 +, 0-18
mesiacov).
VAROVANIE! Nepoužívajte bazarové výrobky z
!
druhej ruky s neistou minulosťou.
UPOZORNENIE! Kompatibilná autosedačka Idan / Artio
je označená nasledujúcim textom: „APPROVED FOR
BASE-FIX“
VAROVANIE! Idan / Artio, ani Base-Fix, nie je
!
možné používať s inými systémami. Schválenie
produktu Base-Fix prestáva platiť ihneď po
akejkoľvek úprave.
Upevňovanie detského nosidlá Idan / Artio v kombinácii
s Base-Fix je založené na semi-univerzálnom schválenie
podľa ECE R44/04. Preto je Idan / Artio možné
používať len v niektorých automobiloch. K uistenie sa
kompatibility Vášho auta, Vás preto prosíme o prečítaní
zoznamu schválených vozidiel. Zoznam je pravidelne
aktualizovaný a je možné ho zhliadnuť online na
www.gb-online.com
PRE OCHRANU VÁŠHO VOZIDLA
Na niektorých poťahoch sedadiel z citlivých
materiálov (napr. velúr, koža a pod), môže používanie
detskej bezpečnostnej autosedačky zanechať stopy
opotrebovania. K vyvarovanie sa tomuto poškodeniu,
by ste mali pod detskú autosedačku vložiť uterák alebo
deku.
HUCZSK
69
Page 70

A LEGJOBB POZÍCIÓ AZ AUTÓBAN
Az Base-Fix termék megvásárlása előtt bizonyosodjon
meg arról, hogy a termék beszerelése A ISOFIX
rendszerrel vagy B az autó 3-pontos biztonsági
övrendszerével lehetséges.
FIGYELEM! A kétféle rendszer egyidejű használata
!
nem megengedett.
Ha az Base-Fix és az Idan / Artio újszülött hordozó
együttes használata a kocsiban nem teljesen stabil
vagy túl meredek, akkor ez egy takaró vagy törölköző
használatával kompenzálható. Más megoldás gyanánt
válasszon egy másik pozíciót a kocsiban.
FIGYELEM! Az Base-Fix terméket (ahogy a kép
!
is mutatja) az ISOFIX rendszerrel és a megfelelő
kitámasztó lábbal vagy másik opcióként az autó
3-pontos biztonsági övével és a kitámasztó lábbal
j
x
70
j
x
kell használni.
GYERMEKE BIZTONSÁGA
• Használja az Base-Fix kizárólag az autóban és együtt
az Idan / Artio hordozóval
• Ön mindig felelős gyermeke biztonságáért.
• Mindig bizonyosodjon meg arról, hogy az Base-Fix
megfelelően van rögzítve.
• Ellenőrizze a jelzőgombot x a kioldó kulcson j az Idan
/ Artio hordozó megfelelő beszereléséhez.
FIGYELEM! Az Base-Fix műanyag részei
!
felmelegedhetnek a napon. Védje gyermekét és az
Base-Fix terméket a közvetlen napsugárzástól.
FIGYELEM! Soha ne hagyja gyermekét a járműben
őrizetlenül.
Page 71

NEJLEPŠÍ POZICE VE VOZIDLE
Před zakoupením produktu Base-Fix, se prosíme
ujistěte, že může být do Vašeho vozidla řádně
namontován. Řádná instalace může být provedena buď
se systémem ISOFIX nebo pomocí 3-bodového pásu.
UPOZORNĚNÍ! Použití obou systému společně
!
není povoleno.
Pokud by Base-Fix společně s dětským nosítkem Idan /
Artio nebyl ve vozidle stabilní nebo by byl příliš prudce
nakloněn, může být k jeho vyrovnání použita deka nebo
ručník. Jako další řešení je možné zvolit jinou pozici ve
vozidle.
UPOZORNĚNÍ! Base-Fix musí být používán (podle
!
obrázku) se systémem ISOFIX a s přiloženou
opěrnou nohou nebo, jako druhá možnost, s
3-bodovým pásem vozidla a opěrnou nohou.
BEZPEČNOST PRO VAŠE DÍTĚ
• Base-Fix používejte pouze v automobilech a jen v
kombinaci s dětským nosítkem Idan / Artio.
• Za bezpečnost Vašeho dítěte jste vždy odpovědní vy.
• Vždy se ujistěte, že je Base-Fix správně zajištěn.
• Pro správnou instalaci dětského nosítka Idan / Artio,
zkontrolujte indikátor x na odemykacím tlačítku j.
UPOZORNĚNÍ! Plastové části produktu Base-Fix
!
se na slunci zahřívají. Chraňte Vaše dítě a Base-Fix
před ostrým slunečním záření.
POZNÁMKA! Nikdy nenechávejte Vaše dítě ve vozidle
bez dozoru.
NAJLEPŠÍ POZÍCIE VO VOZIDLE
Pred zakúpením produktu Base-Fix, sa prosíme uistite,
že môže byť do Vášho vozidla riadne namontovaný.
Riadna inštalácia môže byť vykonaná buď so systémom
ISOFIX alebo pomocou 3-bodového pásu.
VAROVANIE! Použitie oboch systému spoločne
!
nie je povolené.
Ak by Base-Fix spoločne s detským nosičom Idan /
Artio nebol vo vozidle stabilný alebo by bol príliš prudko
naklonený, môže byť na jeho vyrovnanie použitá deka
alebo uterák. Ako ďalšie riešenie je možné zvoliť inú
pozíciu vo vozidle.
VAROVANIE! Base-Fix musí byť používaný (podľa
!
obrázku) so systémom ISOFIX a s priloženou
opornou nohou alebo, ako druhá možnosť, s
3-bodovým pásom vozidla a opornou nohou.
BEZPEČNOSŤ VÁŠHO DIEŤAŤA
• Base-Fix používajte iba v automobiloch a len v
kombinácii s detským nosičom Idan / Artio.
• Za bezpečnosť Vášho dieťaťa ste vždy zodpovední vy.
• Vždy sa uistite, že je Base-Fix správne zaistený.
• Pre správnu inštaláciu detského nosidlá Idan / Artio,
skontrolujte indikátor x na odemykacím tlačidle j.
VAROVANIE! Plastové časti produktu Base-Fix sa
!
na slnku zahrievajú. Chráňte Vaše dieťa a Base-Fix
pred ostrým slnečným žiarením.
UPOZORNENIE! Nikdy nenechávajte Vaše dieťa vo
vozidle bez dohľadu.
HUCZSK
71
Page 72

BIZTONSÁG AZ AUTÓBAN
FIGYELEM! Soha ne használja az Base-Fix az
!
Idan / Artio hordozóval az elülső üléseken,
amelyeknél a légzsák funkció be van kapcsolva.
Ez nem vonatkozik az úgynevezett oldalsó
légzsákokra.
Az utasok lehető legmagasabb fokú biztonságának
érdekében bizonyosodjon meg arról, hogy....
• az állítható háttámlák az autóban függőleges
pozícióban rögzültek.
• amikor beszerelik az Base-Fix az elülső ülésre,
beigazította az autó ülését a leghátulsó pozícióba.
• biztonságosan rögzített vagy eltávolított minden
olyan tárgyat, ami egy esetleges baleset során sérülést
okozhat.
• az autó minden utasa be van kötve biztonsági övvel.
FIGYELEM! AZ Base-Fix mindig rögzíteni
!
kell a biztonsági övvel, még akkor is, ha nincs
használatban. Bármiféle hirtelen fékezés vagy
baleset során a nem rögzített Base-Fix az utasok
sérülését okozhatja.
72
Page 73

BEZPEČNOST VE VOZIDLE
UPOZORNĚNÍ! Base-Fix nepoužívejte v kombinaci
!
s dětským nosítkem Idan / Artio na předních
sedadlech, vybavených aktivovaným předním
airbagem. Toto neplatí pro takzvané boční airbagy.
Pro zajištění největší bezpečnosti všech pasažérů se
ujistěte, že…
• sklápěcí opěrky zad ve vozidle jsou uzamčeny v jejich
vzpřímené poloze.
• při instalaci produktu Base-Fix na sedadlo
spolujezdce, zasuňte toto sedadlo co nejvíce dozadu.
• řádně zabezpečte veškeré předměty, které by v
případě nehody, mohli způsobit zranění.
• všichni pasažéři ve vozidle jsou připoutáni.
UPOZORNĚNÍ! Base-Fix musí být vždy připojen
!
k vozidlu, i v případě, že není používán. V případě
nouzového zastavení nebo nehody, může
nezajištěný Base-Fix způsobit zranění Vám nebo
ostatním pasažérům.
BEZPEČNOSŤ VO VOZIDLE
VAROVANIE! Base-Fix nepoužívajte v kombinácii
!
s detským nosičom Idan / Artio na predných
sedadlách, vybavených aktivovaným predným
airbagom. Toto neplatí pre takzvané bočné
airbagy.
Pre zaistenie najvyššej bezpečnosti všetkých pasažierov
sa uistite, že…
• sklápacie opierky chrbta vo vozidle sú uzamknuté v
ich vzpriamenej polohe.
• pri inštalácii produktu Base-Fix na sedadlo
spolujazdca, zasuňte toto sedadlo čo najviac dozadu.
• riadne zabezpečte všetky predmety, ktoré by v
prípade nehody, mohli spôsobiť zranenie.
• všetci pasažieri vo vozidle sú pripútaní.
VAROVANIE! Base-Fix musí byť vždy pripojený
!
k vozidlu, aj v prípade, že nie je používaný. V
prípade núdzového zastavenia alebo nehody,
môže nezaistený Base-Fix spôsobiť zranenie vám
alebo ostatným pasažierom.
HUCZSK
73
Page 74

AZ BASE-FIX - ISOFIX BESZERELÉSE
f
c
74
B
u
Gyeremekét megnövelt biztonságban tudhatja
az autóban az ISOFIX rendszerel megfelelően
rögzített Base-Fix termékkel.
FIGYELEM! Ne helyezzen semmiféle tárgyat a
lábrészhez, az Base-Fix elé.
• Válassza ki a megfelelő autós ülést, a mellékelt lista
alapján.
• Csatlakoztassa a két ISOFIX vezetőt f (a hosszabbik
felfelé mutató részeket) az ISOFIX csatlakozási
pontokhoz B. Ellenkező installáció (lefelé mutató
hosszabb részek) szintén lehetséges.
FIGYELEM! Az autó ISOFIX csatlakozási pontjai B
ülésenkét két fém gyűrűből állnak, a háttámla és az
ülőrész között elhelyezve. Kérdés esetén vegye fel a
kapcsolatot gépjárműve gyártójával.
• Csukja össze a kitámasztó lábat u.
• Most forgassa el az ISOFIX csatlakozókat c 180°
fokkal mindaddig, amíg azok nem mutatnak az ISOFIX
vezetők f felé.
Page 75

MONTÁŽ BASE-FIX - ISOFIX
Bezpečnost Vašeho dítěte bude zvýšena
používáním systému ISOFIX, pevně spojujícím
Base-Fix s vozidlem.
POZNÁMKA! Do prostoru nohou naproti Vašemu
produktu Base-Fix, neumisťujte žádné předměty.
• Podle přiloženého seznamu zvolte vhodné sedadlo
ve vozidle.
• Spojte dva přiložené ISOFIX zavaděče f (jejich delší
části směřují vzhůru) s ISOFIX ukotvovacími body B.
Také je možná opačná instalace (delší části směřují
dolů).
POZNÁMKA! Ukotvovací body ISOFIX B jsou dva
kovové kroužky, umístěné mezi opěrkou zad a sedákem.
V případě jakýchkoli pochyb, postupujte podle
uživatelského manuálu Vašeho automobilu.
• Rozložte opěrnou nohu u.
• Nyní otočte konektory ISOFIX c o 180° tak, aby přímo
směřovaly do ISOFIX zavaděčů f.
MONTÁŽ BASE-FIX – ISOFIX
Bezpečnosť Vášho dieťaťa bude zvýšená
používaním systému ISOFIX, pevne spájajúcim
Base-Fix s vozidlom.
UPOZORNENIE! Do priestoru nôh naproti Vášmu BaseFix, neumiestňujte žiadne predmety.
• Podľa priloženého zoznamu zvoľte vhodné sedadlo
vo vozidle.
• Spojte dva priložené ISOFIX zavádzača f (ich dlhšej
časti smerujú nahor) s ISOFIX kotviacimi bodmi B.
Tiež je možná opačná inštalácie (dlhšej časti smerujú
nadol).
UPOZORNENIE! Ukotvovacie body ISOFIX B sú dva
kovové krúžky, umiestnené medzi opierkou chrbta a
sedadlom. V prípade akýchkoľvek pochýb, postupujte
podľa užívateľského manuálu Vášho vozidla.
• Rozložte opornou nohu u.
• Teraz otočte konektory ISOFIX c o 180 ° tak, aby
priamo smerovali do ISOFIX zavádzačov f.
HUCZSK
75
Page 76

c
PUSH!
u
E
D
f
c
FIGYELEM! Ügyeljen arra, hogy az ISOFIX
csatlakozókon c lévő mindkét zöld jelzőgomb D
a beépítés előtt ne legyenek láthatóak. A piros
kioldógomb E megnyomásával adott esetben kioldhatja
és kihúzhatja az ISOFIX csatlakozót c. Adott esetben
ismételje meg a folyamatot a második csatlakozónál is.
• Nyomja mindkét ISOFIX csatlakozót c AZ ISOFIX
vezetőkbe f mindaddig, amíg nem hallja hogy azok
rögzültek a csatlakozási pontokba B.
• Bizonyosodjon meg arról, hogy az Base-Fix
biztonságoan rögzült, úgy, hogy próbálja meg azt
kihúzni.
• A zöld jelzésnek D jól láthatónak kell lennie a piros
kioldó gombok E mindkét oldalán.
• Most figyelje a „KITÁMASZTÓ LÁB BEÁLLÍTÁSA“
részt.
FIGYELEM! Amennyiben gépjárműve nincs felszerelve
ISOFIX csatlakozási pontokkal, folytassa az „BASEFIX 3-PONTOS ÖVVEL TÖRTÉNŐ BESZERELÉSE“
fejezettel.
CLICK!
76
Page 77

UPOZORNĚNÍ! Před instalací se ujistěte, že není
viditelné zelené bezpečnostní značení D. V případě
potřeby je uvolněnte současným stisknutím a zatažením
za červené uvolňovací tlačítko E. Opakujte tento postup
také i u druhého konektoru.
• Se slyšitelným zacvaknutím do ukotvovacích bodů B,
zatlačte oba konektory ISOFIX c do ISOFIX zavaděčů f.
• K ujištění, že je Base-Fix bezpečně připojen, se jej
pokuste vytáhnout.
• Zelená bezpečnostní indikace D musí být jasně viditelná
na obou stranách červených odjišťovacíh tlačítek E.
• Nyní prosíme přejděte k „NASTAVENÍ OPĚRNÉ NOHY“.
POZNÁMKA! V případě, že není Vaše vozidlo vybaveno
ukotvovacími body ISOFIX, prosíme, pokračujte ke
kapitole „MONTÁŽ BASE-FIX - 3-BODOVÝ PÁS“.
UPOZORNENIE! Pred inštaláciou sa uistite, že nie je
viditeľné zelené bezpečnostné značenie D. V prípade
potreby je uvoľnite súčasným stlačením a zatiahnutím za
červené uvoľňovacie tlačidlo E. Opakujte tento postup
tiež aj u druhého konektora.
• S počuteľným zacvaknutím do ukotvovacích bodov
B, zatlačte oba konektory ISOFIX c do ISOFIX
zavádzačov f.
• K uistenie, že je Base-Fix bezpečne pripojený, sa ho
pokúste vytiahnuť.
• Zelená bezpečnostná indikácie D musí byť jasne
viditeľná na oboch stranách červených odisťovaciech
tlačidiel E.
• Teraz prosíme prejdite k „NASTAVENIE OPORNÉ
NOHY“.
UPOZORNENIE! V prípade, že nie je Vaše vozidlo
vybavené kotviacimi bodmi ISOFIX, prosíme, pokračujte
ku kapitole „MONTÁŽ BASE-FIX - 3-BODOVÝ PÁS“.
HUCZSK
77
Page 78

u
v
w
CLICK!
l
k
CLICK!
q
78
w
CLICK!
AZ BASE-FIX BESZERELÉSE 3-PONTOS ÖV
FIGYELEM! Ne helyezzen semmiféle tárgyat a
lábrészhez, az Base-Fix elé.
• Csukja össze a kitámasztó lábat u.
• Helyezze az Base-Fix-et egy megfelelő pozícióba az
autóban, a list szerint.
• Kioldáshoz fordítsa el a záró szerkezetet v 90°fokkal
az óra mutató járásával megegyezően és emelje fel a
szorító szerkezetet w a maximum pozícióba.
• Helyezze a csípő övet k a szorító szerkezet w alá, az
Base-Fix-en keresztül, és helyezze a csat nyelvét a
gépjármű ülésének csatjába q.
• Most szorítsa meg a csípő övet k azáltal, hogy kissé
meghúzza a váll övet l, így elkerülhető, hogy túl laza
legyen az öv.
FIGYELEM! Ne húzza túl szorosra a csípő övet,
vagy problémái adódhatnak a beszerelés megfelelő
befejezésével.
• Vezesse a váll övet l párhuzamosan és a csipő öv(k)
felett, át az Base-Fix hátulsó részén, és a rögzítő rész
w alatt.
Page 79

MONTÁŽ BASE-FIX - 3-BODOVÝ PÁS MONTÁŽ BASE-FIX - 3-BODOVÝ PÁS
POZNÁMKA! Do prostoru nohou, před Váš
Base-Fix, neumisťujte žádné předměty.
• Uvolněte opěrnou nohu u.
• Podle přiloženého seznamu uložte Base-Fix na
sedadlo do vhodné pozice.
• K odemčení, otočte zamykací mechanismus v o
90° ve směru proti hodinových ručiček a zdvihněte
utahovací zařízení w do nejvyšší polohy.
• Břišní pás vozidla k protáhněte, přes Base-Fix, pod
utahovacím zařízení w a zasuňte koncovku pásu do
spony vozidla q.
• Nyní, prosíme, jemně utáhněte břišní pás k, zatažením
za pás ramenní l, vyvarujete se tak jakémukoli
prověšení v pásu.
POZNÁMKA! Břišní pás neutahujte příliš pevně, mohli
byste mít problémy s dokončením správné instalace.
• Rovnoběžně s pásem břišním k, protáhněte
pás ramenní l, přes Base-Fix a břišní pás k, pod
utahovacím zařízením w.
UPOZORNENIE! Do priestoru nôh, pred Váš
Base-Fix, neumiestňujte žiadne predmety.
• Uvoľnite opornou nohu u.
• Podľa priloženého zoznamu uložte Base-Fix na
sedadlo do vhodnej pozície.
• K odomknutie, otočte zamykací mechanizmus v o
90 ° v smere proti hodinových ručičiek a zdvihnite
uťahovacie zariadenia w do najvyššej polohy.
• Brušný pás vozidla k pretiahnite, cez Base-Fix, pod
uťahovacím zariadenia w a zasuňte koncovku pásu do
spony vozidla q.
• Teraz, prosíme, jemne utiahnite brušný pás k,
zatiahnutím za pás ramenné l, vyvarujete sa tak
akémukoľvek preveseniu v páse.
UPOZORNENIE! Brušný pás neuťahujte príliš pevne,
mohli by ste mať problémy s dokončením správnej
inštalácie.
• Ramenný pás l veďte paralelne cez brušnú pás k a cez
Base-Fix späť pod utazovacím zariadením w.
HUCZSK
79
Page 80

FIGYELEM! A gépjármű biztonsági övének
!
csatjának nem szabad túllógnia az Base-Fix váz
részén.
FIGYELEM! A váll övet l a csípő öv k felett kell
pozícionálni. Ne tekerje meg az övet.
• Nyomja lefelé a rögzítő szerkezetet w mindaddig,
amíg az egy jól hallható KLIKKEL nem rögzül.
F
PUSH!
u
y
80
Bizonyosodjon meg arról, hogy a záró mechanizmus
tekerő része v a megfelelő szimbólum felé mutat.
• Próbálja mozdítani az Base-Fix, hogy az megfelelően
rögzült-e.
FIGYELEM! Rendszeres időközönként ellenőrizze, hogy
az Base-Fix megfelelően rögzült. Ha szüksges, újból
húzza szorosabbra a gépjármű biztonsági övét, mert
kilazulhat egy bizonyos idő után.
A TÁMASZTÓLÁB BEÁLLÍTÁSA
Nyomja meg a beállítógombot y, és húzza ki a
támasztólábat u addig, míg az biztonságosan nem áll a
gépjármű alján.
FIGYELMEZTETÉS! A támasztólábnak mindig
!
közvetlenül kell érintkeznie a gépjármű aljával.
Semmit nem szabad a támasztóláb alá tenni!
UTASÍTÁS! Mindig ügyeljen arra, hogy az Base-Fix teljes
felületén feküdjön fel a gépjármű ülésére.
FIGYELMEZTETÉS! Ha a gépkocsi lábrészénél
!
tárolóhely van, feltétlenül vegye fel a kapcsolatot
a gépkocsi gyártójával.
Page 81

UPOZORNĚNÍ! Pásová spona vozidla nesmí
!
zasahovat do rámu Vašeho Base-Fix.
POZNÁMKA! Ramenní pás l musí být umístěný nad
pásem břišním k. Pásy nepřekrucujte.
• Utahovací zařízení w tlačte dolů, dokud se nezajistí
slyšitelným CVAKNUTÍM. Ujistěte se, že ukazatel
zamykacího mechanismu v, ukazuje na správný
symbol.
• Pro kontrolu bezpečné instalace, s Vaším Base-Fix
zkuste zatřást.
POZNÁMKA! Prosíme, pravidelně kontrolujte, zda je
Base-Fix bezpečně upevněn. V případě potřeby, znovu
utáhněte pásy, po delším používání může vzniknout
prověšení pásů.
NASTAVENÍ OPĚRNÉ NOHY NASTAVENIE OPORNÉ NOHY
Stiskněte nastavovací tlačítko y a zatáhněte za opěrnou
nohu u tak, aby se dotýkala podlahy ve vozidle.
VAROVANIE! Pásová spona vozidla nesmie
!
zasahovať do rámu Vášho Base-Fix.
UPOZORNENIE! Ramenný pás l musí byť umiestnený
nad pásom brušným k. Pásy neprekrúcajte.
• Uťahovací zariadenie w tlačte nadol, kým sa nezaistí
počuteľným CVAKNUTÍM. Uistite sa, že ukazovateľ
zamykacieho mechanizmu v, ukazuje na správny
symbol.
• Pre kontrolu bezpečnej inštalácie, skúste zatriasť s
Vaším Base-Fix.
UPOZORNENIE! Prosíme, pravidelne kontrolujte, či je
Base-Fix bezpečne upevnený. V prípade potreby, znovu
utiahnite pásy, po dlhšom používaní môže vzniknúť
preveseniu pásov.
Stlačte nastavovacie tlačidlo y a zatiahnite za opornou
nohu u tak, aby sa dotýkala podlahy vo vozidle.
HUCZSK
UPOZORNĚNÍ! Opěrná noha musí být vždy v
!
přímém kontaktu s podlahou. Pod opěrnou nohou
by neměli být umístěny žádné předměty.
POZNÁMKA! Ujistěte se, že opěrná noha nezvedá BaseFix z povrchu sedadla auta.
UPOZORNĚNÍ! V případě, že je Vaše vozidlo
!
v oblasti nohou dítěte vybaveno skladovacím
prostorem, prosíme, kontaktujte jeho výrobce.
VAROVANIE! Oporná noha musí byť vždy v
!
priamom kontakte s podlahou. Pod opornou
nohou by nemali byť umiestnené žiadne predmety.
UPOZORNENIE! Uistite sa, že oporná noha nedvíha
Base-Fix zo sedadla auta.
VAROVANIE! V prípade, že je vaše vozidlo
!
v oblasti nôh dieťaťa vybavené skladovacím
priestorom, prosíme, kontaktujte jeho výrobcu.
81
Page 82

IDAN ARTIO
a a
82
AZ BASE-FIX RÖGZÍTÉSE
UTASÍTÁS! Győződjön meg arról, hogy az Base-Fix
felületén nincs idegen test.
Vegye a kezébe az Idan / Artio babahordozó kezelési
utasítását, és győződjön meg arról, hogy a hordozókar
az „vezető-pozíció“ van, valamint hogy a gyermeket
a beépített övrendszerrel rögzítette. A hordozókar
beállítását lásd az Idan / Artio Kezelési utasításában.
• Helyezze az Idan / Artio babahordozót menetiránnyal
szemben az Base-Fix fölé.
• A gépkocsi háttámlája mentén tolja le az Idan / Artio
babahordozót, először a fej felőli végen akassza be a
megfelelő rúddal r a rúd tartóelemébe i.
r
i
Page 83

ZAPOJENÍ IDAN / ARTIO ZAPOJENIE IDAN / ARTIO
POZNÁMKA! Ujistěte se, že na vrchní straně Vašeho
Base-Fix nejsou žádné předměty.
S odkazem na uživatelskou příručku, musí být madlo na
přenášení a v „vozidlo posice“ a dítě musí být bezpečně
zajištěno pomocí systému pásů. Pro nastavení madla viz.
uživatelská příručka produktu Idan / Artio.
• Dětskou autosedačku Idan / Artio umístěte v pozici
proti směru jízdy nad Base-Fix.
• Podél opěrky zad pokládejte Idan / Artio dolů a
na konci v oblasti hlavy, spojte zamykací tyč r se
zachycovačem zamykací tyče i.
UPOZORNENIE! Uistite sa, že na vrchnej strane Vášho
Base-Fix nie sú žiadne predmety.
S odkazom na návod, musí byť držadlo na prenášanie a
v „poloha pri jazde“ a dieťa musí byť bezpečne zaistené
pomocou systému pásov. Pre nastavenie madlá viď.
užívateľská príručka produktu Idan / Artio.
• Detskú autosedačku Idan / Artio umiestnite v pozícii
proti smeru jazdy nad Base-Fix.
• Pozdĺž opierky chrbta pokladajte Idan / Artio dole
a na konci v oblasti hlavy, spojte zamykací tyč r so
zachytávačom zamykací tyče i.
HUCZSK
83
Page 84

• Most süllyessze le az Idan / Artio babahordozó láb
a
z
o
z
CLICK!
CLICK!
j
x
84
E
f
c
PUSH!
felőli végét, míg a rögzítőhorog o hallható kattanással
nem rögzül a második rögzítőrúdba z.
• Ellenőrizze, hogy az indikátorgomb x kinyúlik-e a
rögzítőgombból j, és húzza meg az Idan / Artio
babahordozó tartófülét a, hogy ellenőrizze a
beszerelés előírásos voltát.
AZ IDAN / ARTIO BABAHORDOZÓ KIEMELÉSE
• Az x indikátorgomb megnyomásával a rögzítőgomb
j kiold.
• Nyomja meg a rögzítőgombot j, és egyidejűleg kissé
hajtsa előre az Idan / Artio babahordozót, míg a láb
felőli végen lévő rögzítőrúd z szabaddá nem válik.
• Most elengedheti a rögzítőgombot j, és egyidejűleg
kényelmesen kiemelheti az Idan / Artio babahordozót
az Base-Fix.
AZ BASE-FIX - ISOFIX ELTÁVOLÍTÁSA
• Végezzen el minden összeszerelési lépést
fordított sorrendben.
• Oldja ki az ISOFIX csatlakozókat c a piros
kioldó gombok E egyidejűleges nyomásával és
húzásával.
• Húzza ki az Base-Fix-et az ISOFIX vezetőkből f.
• Forgassa el az ISOFIX csatlakozókat c
180°fokkal, így azok visszaállnak eredeti
pozíciójukba.
Page 85

• Nyní pokládejte i konec dětské autosedačky
Idan / Artio v oblasti nohou, dokud se druhá zamykací
tyč z, pomocí zamykacích háčku o, se slyšitelným
CVAKNUTÍM nezajistí.
• Ujistěte se, že je indikátor(x) na odemykacím tlačítku j
jasně viditelný. Ke zjištění správné montáže zatáhněte
za madlo a.
VYJÍMÁNÍ IDAN / ARTIO VYBERANÍ IDAN / ARTIO
• K uvolnění odmykacího tlačítka j, stiskněte indikátor x.
• Stiskněte odemykací tlačítko j a zároveň dětské
nosítko jemně vykloňte dopředu tak, aby se zamykací
tyč, na straně chodidel, z odjistila ze zamykacího
háčku o.
• Nyní lze Idan / Artio vyjmout z báze.
• Teraz pokladajte aj koniec detské autosedačky
Idan / Artio v oblasti nôh, kým sa druhá zamykací
tyč z, pomocou zamykacích háčikov o, s počuteľným
cvaknutím nezaistí.
• Uistite sa, že je indikátor x na odemykacím tlačidle
j jasne viditeľný. Na zistenie správnej montáže
zatiahnite za rukoväť a.
• K uvoľneniu odomykacieho tlačidla j, stlačte indikátor
x.
• Stlačte odomykací tlačidlo j a zároveň detské nosítko
jemne vykloňte dopredu tak, aby sa zamykací tyč, na
strane chodidiel z odistila zo zamykacieho háčika o.
• Teraz je možné Idan / Artio vybrať z bázy.
HUCZSK
VYJÍMÁNÍ BASE-FIX - ISOFIX VYBERANÍ BASE-FIX – ISOFIX
• Proveďte všechny montážní kroky v opačném
pořadí.
• Současným zatažením a zdvižením
uvolňovacích tlačítek E, uvolněte konektory
ISOFIX c.
• Vytáhněte Base-Fix ze zavaděčů ISOFIX f.
• Otočte konektory ISOFIX c o 180° a vraťte je
tak do původní pozice.
• Vykonajte všetky montážne kroky v opačnom
poradí.
• Súčasným zatiahnutím a zdvihnutím
uvoľňovacích tlačidiel E, uvoľnite ISOFIX
konektory c.
• Vytiahnite Base-Fix zo zavádzačov ISOFIX f.
• Otočte ISOFIX konektory c o 180 ° a vráťte je
tak do pôvodnej pozície.
85
Page 86

AZ BASE-FIX - 3-PONTOS ÖV ELTÁVOLÍTÁSA
w
v
q
PUSH!
86
• Nyissa ki az öv zárját q.
• Oldja ki a rögzítőelemen w lévő záró-
mechanizmust v.
• Ütközésig hajtsa fel a rögzítőelemet w, és
vegye ki az övet.
FIGYELMEZTETÉS! Az övrendszer meg van
!
feszítve. Ezért először mindig nyissa ki az öv zárját
q, mielőtt működtetné a rögzítőelem w zárómechanizmusát v.
TENNIVALÓK BALESET UTÁN
Egy baleset során szabad szemmel nem látható
sérülések érhetik az Base-Fix. Kérjük, baleset után
feltétlenül cserélje ki az Base-Fix. Kétséges esetben
forduljon a kereskedőhöz vagy a gyártóhoz.
ÁPOLÁS
• A műanyag elemek kímélő tisztítószerrel és meleg
vízzel tisztíthatók.
• Az Base-Fix minden fontos elemét sérülés
szempontjából rendszeresen ellenőrizni kell.
• A mechanikus alkatrészeknek kifogástalanul kell
működniük.
A TERMÉK ÉLETTARTAMA
Minden GB terméket úgy méreteztünk, hogy azok
maximális használhatósági idejük végéig megtartják
tulajdonságaikat. Mivel azonban a gépkocsiban nagyon
nagy hőmérséklet-ingadozások és előre nem látható
terhelések léphetnek fel, az alábbi pontokat ellenőrizni
kell:
Page 87

VYJMUTÍ BASE-FIX - 3- BODOVÝ PÁS VYBERANÍ BASE-FIX – 3-BODOVÝ PÁS
• Uvolněte pásovou sponu q ve vozidle.
• Odpojte zamykací mechanismu v umístěný
v utahovacím zařízení w.
• Zdvihněte utahovací zařízení w nahoru a
vytáhněte pás automobilu.
UPOZORNĚNÍ! Celý systém je pod napětím.
!
Vždy před tím, než se pokusíte uvolnit zamykací
mechanismus v, uvolněte pásovou sponu vozidla q.
CO DĚLAT PO NEHODĚ ČO ROBIŤ PO NEHODE
Během nehody se můžou na Base-Fix objevit poškození,
která nejsou pouhým okem viditelná. Proto by měl být
ihned po nehodě Base-Fix vyměněn. V případě pochyb,
prosíme, kontaktujte Vašeho prodejce nebo výrobce.
PÉČE O PRODUKT STAROSTLIVOSŤ O PRODUKT
• Plastové části můžete čistit pomocí jemného saponátu
a teplé vody.
• Všechny důležité části produktu Base-Fix by měly být
kontrolovány, zda nejsou jakkoliv poškozeny.
• Všechny mechanické části musí bezvadně fungovat.
TRVANLIVOST PRODUKTU POUŽITEĽNOSŤ PRODUKTU
Všechny produkty GB jsou navrženy tak, aby zcela
fungovaly během předpokládané doby trvanlivost. BaseFix však může být vystaven těžkému kolísání teplot
nebo jiným nepředpovídatelným zatížením, proto berte
na vědomí následující:
• Uvoľnite pásovú sponu q vo vozidle.
• Odpojte zamykací mechanizmus v,
umiestnený v uťahovacím zariadenie w.
• Zdvihnite uťahovací zariadenie w nahor a
vytiahnite pás vozidla.
VAROVANIE! Celý systém je napnutý. Vždy
!
pred tým, než sa pokúsite uvoľniť zamykací
mechanizmus v, uvoľnite pásovú sponu vozidla q.
Počas nehody sa môžu na Base-Fix objaviť poškodenia,
ktoré nie sú voľným okom viditeľné. Preto by mal byť
ihneď po nehode Base-Fix vymenený. V prípade pochýb,
prosíme, kontaktujte Vášho predajca alebo výrobca.
• Plastové časti môžete čistiť pomocou jemného
saponátu a teplej vody.
• Všetky dôležité časti produktu Base-Fix by mali byť
kontrolované, či nie sú akokoľvek poškodené.
• Všetky mechanické časti musí bezchybne fungovať.
Všetky produkty GB sú navrhnuté tak, aby úplne
fungovali počas predpokladanej doby trvanlivosti. BaseFix však môže byť vystavený ťažkému kolísanie teplôt
alebo iným nepředpovídatelným zaťažením, preto berte
na vedomie nasledujúce:
HUCZSK
87
Page 88

• Ha a gépkocsi hosszabb ideig a tűző nap hatásának
van kitéve, ki kell venni belőle, vagy egy világos
ruhával le kell takarni az Base-Fix
• Rendszeres időközönként ellenőrizze az Base-Fix
sérülések vagy alakjának és színének megváltozása
szempontjából.
• Ha változást vesz észre, akkor az Base-Fix feltétlenül
ki kell selejtezni, vagy meg kell vizsgáltatni a gyártóval,
és szükség esetén ki kell cserélni.
ÁRTALMATLANÍTÁS
A termék élettartama végén azt szakszerűen
ártalmatlanítani kell. A hulladékok ártalmatlanítására
településenként más-más szabályok vonatkozhatnak.
A termék előírásos ártalmatlanítása érdekében vegye
fel a kapcsolatot a kommunális hulladékkezelővel,
ill. a lakóhelye illetékesével. Mindenkor tartsa be az
országának ártalmatlanításra vonatkozó rendelkezéseit.
A TERMÉKRE VONATKOZÓ INFORMÁCIÓK
Ha kérdése van, először forduljon a kereskedőhöz. Az
alábbi adatokra van szüksége:
• sorozatszám (lásd a matricát).
• Annak az autónak a márkája és típusa és az a pozíció,
amivel az Base-Fix a babahordozóval együtt használni
kívánja.
• A gyermek súlya és kora, nagysága.
Termékeinkre vonatkozó további információkat talál a
88
www.gb-online.com oldalon is.
Page 89

• Pokud je vozidlo vystaveno přímému slunečnímu
záření po delší dobu, musí být Base-Fix z vozidla
vyjmut nebo přikryt pomocí látky.
• Všechny plastové a kovové části produktu Base-Fix
pravidelně kontrolujte a ujistěte se, že nejsou přítomna
žádná poškození nebo změny tvaru či barvy.
• V případě jakýchkoli zaznamenaných změn, by měl
být Base-Fix zlikvidován nebo zkontrolován výrobcem
a v případě potřeby vyměněn.
LIKVIDACE LIKVIDÁCIA
Na konci jeho životnosti, musí být Base-Fix řádně
zlikvidován. Předpisy o likvidaci odpadů se můžou
regionálně lišit. K ujištění se, správné likvidace odpadu,
prosíme, kontaktujte lokální sběrné místo. Ve všech
případech dodržujte předpisy o likvidaci odpadu ve vaší
zemi.
INFORMACE O PRODUKTU INFORMÁCIE O PRODUKTE
Pokud máte otázky, prosíme, nejdříve kontaktujte
Vašeho dodavatele. Ujistěte se, že máte po ruce
následující informace:
• Sériové číslo (viz nálepka).
• Značka, typ vozidla a pozice, ve které je sedačka
normálně namontována.
• Váha, velikost a věk dítěte.
Pro další informace o našich produktech, prosíme,
navštivte www.gb-online.com.
• Ak je vozidlo vystavené priamemu slnečnému žiareniu
po dlhšej dobu, musí byť Base-Fix z vozidla vyňatý
alebo prikrytý pomocou látky.
• Všetky plastové a kovové časti produktu Base-Fix
pravidelne kontrolujte a uistite sa, že nie sú prítomné
žiadne poškodenia alebo zmeny tvaru či farby.
• V prípade akýchkoľvek zaznamenaných zmien, by
mal byť Base-Fix zlikvidovaný alebo skontrolovaný
výrobcom a v prípade potreby vymenený.
Na konci jeho životnosti, musí byť Base-Fix riadne
zlikvidovaný. Predpisy o likvidácii odpadov sa môžu
regionálne líšiť. K uistenie sa, správnej likvidácie odpadu,
prosíme, kontaktujte lokálne zberné miesto. Vo všetkých
prípadoch dodržujte predpisy o likvidácii odpadu vo
vašej krajine.
Ak máte otázky, prosíme, najskôr kontaktujte Vášho
dodávateľa. Uistite sa, že máte po ruke nasledujúce
informácie:
• Sériové číslo (viď nálepka).
• Značka, typ vozidla a pozície, v ktorej je sedačka
normálne namontovaná.
• Váha, veľkosť a vek dieťaťa.
Pre ďalšie informácie o našich produktoch, prosíme,
navštívtewww.gb-online.com.
HUCZSK
89
Page 90

GARANCIÁLIS FELTÉTELEK
Alábbi garanciális feltételek kizárólag arra az országra
érvényesek, amelyben a terméket először adták el
kiskereskedelemben felhasználónak.
1. A garancia számos gyártási és anyaghibát fedez,
melyek a vásárlás időpontjában jelen voltak vagy a
termék kiskereskedelemben történt első értékesítése
után 3 éven belül merültek föl (gyártói garancia).
Közvetlenül a vásárlás után, vagy ha csomagküldő
szolgáltatás révén vásárolta, közvetlenül a kézhezvétel
után ellenőrizze a terméket hiánytalanságra, gyártási
és anyaghibákra.
2. Amennyiben hibát fedez fel, nem használható a
termék. Ahhoz, hogy a garancia keretein belül
szolgáltatásokat vegyen igénybe, a terméket
hiánytalan és tiszta állapotban kell visszaadni annak a
kiskereskedőnek, aki először értékesítette, valamint a
vásárlásról az eredeti bizonylatokat (vásárlási nyugta
vagy számla) fel kell mutatnia. Ne vigye vagy küldje a
terméket közvetlenül a gyártónak!
3. A garancia nem fedez olyan károkat, amelyek
a helytelen használat, külső tényezők (víz, tűz,
balesetek stb.), a normális elhasználódás vagy kezelés
és használat során keletkeztek, és jelen használati
útmutatóban leírtakkal ellentétesek. A garancia csak
akkor érvényes, ha a javításokat vagy átalakításokat
kizárólag olyan személyek hajtották végre, akik erre
jogosultak és kizárólag eredeti komponenseket és
alkatrészeket használtak.
4. Jelen garancia nem befolyásolja a hatályos fogyasztói
jogokat, sem azokat a jogokat, amelyek az eladóval
szemben fennálnak a termékkel kapcsolatos
szerződészegés esetében.
90
Page 91

Následující záruka platí výhradně v zemi, kde byl
produkt původně prodán prodejcem zákazníkovi.
1. Záruka se vztahuje na všechny výrobní a materiálové
vady, které existují a které se objeví v den nákupu
nebo v období 3 let od data nákupu od prodejce,
který původně prodal výrobek spotřebiteli (výrobní
záruka). V den nákupu nebo ihned po obdržení
prosíme zkontrolujte, zda je výrobek v kompletním
stavu bez výrobních nebo materiálových vad. Prosíme
vždy si ponechte váš datovaný doklad o nákupu.
2. V případě poruchy přestaňte výrobek okamžitě
používat. Pro uplatnění záruky přivezte nebo zašlete
produkt původnímu prodejci, který vám jej prodal,
v čistém a kompletním stavu a předložte originál
dokladu o nákupu (účtenka nebo faktura). Prosíme
nevozte nebo neposílejte produkt přímo výrobci.
3. Tato záruka nezahrnuje jakákoliv poškození,
způsobená nesprávným používáním, vlivem okolního
prostředí (voda, oheň, nehody atd.), běžným
obnošením a opotřebováním nebo nesplněním
pokynů v tomto uživatelském manuálu. Záruka
neplatí také pokud byly úpravy a opravy prováděny
neautorizovanými osobami nebo při použití
neoriginálních dílů a příslušenství.
4. Tato záruka se nevztahuje na omezení nebo na jiné
vlivy zákonných práv spotřebitele, zahrnující nároky z
porušení práva s ohledem na porušení smlouvy, které
může mít kupující proti prodávajícímu nebo výrobci
produktu.
ZÁRUKAZÁRUKA
Nasledujúca záruka platí výhradne v krajine, kde bol
výrobok pôvodne predaný predajcom zákazníkovi.
1. Záruka sa vzťahuje na všetky výrobné a materiálové
chyby, ktoré existujú a ktoré sa objaví v deň
nákupu alebo v období 3 rokov od dátumu nákupu
od predajca, ktorý pôvodne predal výrobok
spotrebiteľovi (výrobná záruka). V deň nákupu
alebo ihneď po obdržaní prosíme skontrolujte, či je
výrobok v kompletnom stave bez výrobných alebo
materiálových vád. Prosíme vždy si ponechajte váš
datovaný doklad o nákupe.
2. V prípade poruchy prestaňte výrobok okamžite
používať. Pre uplatnenie záruky prineste alebo pošlite
produkt pôvodnému predajcovi, ktorý vám ho predal,
v čistom a kompletnom stave a predložte originál
dokladu o nákupe (účtenka alebo faktúra). Prosíme
nevozte alebo neposielajte produkt priamo výrobcovi.
3. Táto záruka nezahŕňa akákoľvek poškodenia,
spôsobené nesprávnym používaním, vplyvom
okolitého prostredia (voda, oheň, nehody atď.),
bežným obnošením a opotrebovaním alebo
nesplnením pokynov v tomto užívateľskom
manuáli. Záruka neplatí tiež ak boli úpravy a opravy
vykonávané neautorizovanými osobami alebo pri
použití neoriginálnych dielov a príslušenstva.
4. Táto záruka sa nevzťahuje na obmedzenie alebo na
iné vplyvy zákonných práv spotrebiteľa, zahŕňajúci
nároky z porušenia práva s ohľadom na porušenie
zmluvy, ktoré môže mať kupujúci voči predávajúcemu
alebo výrobcovi produktu.
HUCZSK
91
Page 92

92
GB IDAN
UNIVERSAL
SEMI-UNIVERSAL
0 - 13 kg
04301332
ECE R 44/04
gb GmbH
Riedingerstr. 18, 95448 Bayreuth
Germany
Approved for
BASE-FIX
GB ARTIO
UNIVERSAL
SEMI-UNIVERSAL
0 - 13 kg
04301331
ECE R 44/04
gb GmbH
Riedingerstr. 18, 95448 Bayreuth
Germany
Approved for
BASE-FIX
11/2015
HOMOLOGACIÓN
Base-Fix
ECE R44/04 Grupo 0+
Peso: Hasta los 13 kg
RECOMENDADO
Para asientos de coche con ISOFIX
(clase E) Para asientos de vehículos
con cinturón de seguridad de 3
puntos con sistema retractorautomático de acuerdo con la
normativa ECE R16 u otras normas
equivalentes.
HOMOLOGAÇÃO
Base-Fix
ECE R44/04 Grupo 0+
Peso: Até aos 13 kg
RECOMENDADO
Para assentos do automóvel com
ISOFIX (class E).Para assentos de
automóveis de cintos com retrator
automático de 3-pontos de acordo
com ECE R16 ou outros standarts
equivalentes.
APRECIADO CONSUMIDOR,
Muchas gracias por adquirir la Base-Fix.
Le aseguramos que durante el proceso de desarrollo
de este producto nos hemos centrado en la seguridad,
el confort y la facilidad de uso. Este producto se ha
fabricado bajo una especial atención en la calidad y
cumple con los más estrictos requisitos de seguridad.
¡AVISO! Por favor, tenga siempre a mano este manual
de instrucciones y guárdelo en el compartimento
destinado a ello bajo la silla. La Base-Fix es adecuada
para todas las variantes de Idan / Artio.
¡ADVERTENCIA! Para una máxima protección
!
del niño es esencial usar e instalar la Base-Fix de
acuerdo con las instrucciones de esta guía de uso.
Page 93

CARO CONSUMIDOR,
Muito obrigado por ter adquirido a Base-Fix da Idan /
Artio.
Asseguramos-lhe que durante o processo de
desenvolvimento deste produto concentrámo-nos na
segurança, no conforto e na facilidade de utilização.
Este produto foi fabricado com uma especial atenção
à qualidade e cumpre os mais estritos requisitos de
segurança.
NOTA! Por favor,tenha sempre à mão este manual de
instruções e guarde-o no compartimento destinado por
baixo da cadeira. La Base-Fix é adequada para todas as
variantes de Idan / Artio.
AVISO! Para uma máxima protecção da criança é
!
essencial usar e instalar a Base-Fix de acordo com
as instruções do manual de utilização.
ESPT
93
Page 94

ES CONTENIDO
INSTRUCCIONES ABREVIADAS - ISOFIX .......................................................3
INSTRUCCIONES ABREVIADAS - CINTURÓN DE 3 PUNTOS ........5
HOMOLOGACIÓN ..........................................................................................................92
HOMOLOGACIÓN / COMPATIBILIDAD ........................................................ 96
PARA LA PROTECCIÓN DEL AUTOMÓVIL ...............................................96
LA MEJOR POSICIÓN EN EL VEHÍCULO .................................................... 98
SEGURIDAD PARA EL BEBÉ ................................................................................ 98
SEGURIDAD EN EL AUTOMÓVIL ....................................................................100
INSTALACIÓN DE LA BASE-FIX - ISOFIX ..................................................102
INSTALACION DE LA BASE-FIX -CINTURON DE 3 PUNTOS .... 106
AJUSTE DE LA PATA DE SOPORTE ..............................................................108
COLOCACIÓN DE LA SILLA DE SEGURIDAD IDAN / ARTIO .....110
RETIRAR LA SILLA DE SEGURIDAD IDAN / ARTIO ............................112
DESMONTAJE DE LA BASE-FIX -ISOFIX .....................................................112
DESMONTAJE DE LA BASE-FIX - CINTURÓN DE 3 PUNTOS .... 114
QUÉ HACER DESPUÉS DE UN ACCIDENTE ............................................114
MANTENIMIENTO DEL PRODUCTO ...............................................................114
DURACIÓN DEL PRODUCTO ...............................................................................114
RECICLADO ....................................................................................................................... 116
INFORMACIÓN DE PRODUCTO......................................................................... 116
GARANTÍA ...........................................................................................................................118
94
Page 95

PT CONTEÚDO
INSTRUÇÕNES ABREVIADAS - ISOFIX ............................................................3
INSTRUÇÕES ABREVIADAS - CINTO DE 3 PONTOS ............................5
HOMOLOGAÇÃO ...........................................................................................................92
HOMOLOGAÇÃO / COMPATIBILIDADE .......................................................97
PARA A PROTECÇÃO DO AUTOMÓVEL .....................................................97
A MELHOR POSIÇÃO NO VEÍCULO ...............................................................99
SEGURANÇA PARA O BEBÉ ................................................................................99
SEGURANÇA NO AUTOMÓVEL ........................................................................ 101
INSTALAÇÃO DA BASE-FIX - ISOFIX............................................................103
INSTALAÇÃO DA BASE-FIX - CINTO DE 3 PONTOS ........................107
REGULAÇÃO DO PÉ DE SUPORTE ..............................................................109
COLOCAÇÃO DA CADEIRA DE SEGURANÇA IDAN / ARTIO .....111
RETIRAR A CADEIRA DE SEGURANÇA IDAN / ARTIO ...................113
DESMONTAGEM DA BASE-FIX - ISOFIX ......................................................113
DESMONTAGEM DA BASE-FIX - CINTO DE 3 PONTOS ..................115
O QUE FAZER DEPOIS DE UM ACIDENTE .................................................115
MANUTENÇÃO DO PRODUTO ...........................................................................115
DURAÇÃO DO PRODUTO .......................................................................................115
RECICLAGEM .....................................................................................................................117
INFORMAÇÃO DE PRODUTO ...............................................................................117
GARANTIA .......................................................................................................................... 119
ESPT
95
Page 96

HOMOLOGACIÓN / COMPATIBILIDAD
La debe estar fijada mediante el sistema
ISOFIX al coche. La Base-Fix ha sido aprobada
únicamente en combinación con una silla
Idan / Artio utilizando las barras blocantes (r & z)
con niños de hasta 13 kg. (grupo 0+, 0-18 meses).
¡ADVERTENCIA! No use productos de segunda
!
mano de incierta procedencia.
APPROVED FOR BASE-FIX
z
r
96
Aviso! La compatibilidad de la silla infantil Idan / Artio
está señalizada con el texto: „APPROVED FOR
BASE-FIX“
¡ADVERTENCIA! Ni la Idan / Artio ni la Base-
!
Fix deben utilizarse con otros sistemas. La
homologación de la Base-Fix vence de inmediato
en caso de cualquier modificación.
El anclaje de la silla infantil Idan / Artio en la Base-Fix
se basa en una homologación de tipo semi-universal
de acuerdo con la normativa ECE R44/4. De ahí que
la Idan / Artio tan sólo pueda usarse en determinados
vehículos.
Por favor consulte nuestra lista de vehículos para
comprobar la compatibilidad de su automóvil. La lista
se actualiza constantemente y puede consultar la última
versión en www.gb-online.com
PARA LA PROTECCIÓN DEL AUTOMÓVIL
En algunas tapicerías hechas de materiales sensibles
(por ejemplo, piel, terciopelo, etc.), el uso de una silla de
seguridad puede dejar señales de desgaste. Para evitar
esto, recomendamos colocar una manta o bien una
toalla debajo de la silla de seguridad.
Page 97

HOMOLOGAÇÃO / COMPATIBILIDADE
A Base-Fix tem que ser fixa com o sistema ISOFIX
ao automóvel. A Base-Fix foi testada e aprovada
em combinação com a cadeira de infantil Idan /
Artio com bloqueio de barras (r & z) para crianças
até 13kg (Grupo 0 +, 0-18 meses).
AVISO! Não utilize produtos de segunda mão de
!
proveniência duvidosa.
Nota! A compatibilidade da cadeira infantil Idan /
Artio, está marcada com as palavras: „APPROVED FOR
BASE-FIX“
AVISO! Nem a Idan / Artio nem a Base-Fix
!
devem ser utilizadas com outros sistemas. A
homologação da Base-Fix vence de imediato em
caso de qualquer modificação.
O encaixe da cadeira infantil Idan / Artio na BaseFix tem uma homologação de tipo semi-universal de
acordo com a norma ECE R44/4. Assim, a Idan / Artio
só pode ser usada em determinados veículos.
Por favor consulte a nossa lista de veículos para
comprovar a compatibilidade do seu veículo. A lista é
actualizada constantemente e pode consultar a última
versão em: www.gb-online.com
PARA A PROTECÇÃO DO AUTOMÓVEL
Em alguns estofos de materiais sensíveis (por exemplo:
pel, camurça, etc...) a utilização de uma cadeira de
segurança poderá deixar sinais de desgaste. Para evitar
isto, recomendamos colocar uma protecção por baixo
da cadeira de segurança.
ESPT
97
Page 98

LA MEJOR POSICIÓN EN EL VEHÍCULO
Por favor, verifique que la Base-Fix puede instalarse
correctamente tanto con el sistema ISOFIX como con el
cinturón del vehículo de 3 puntos antes de adquirirla.
¡ATENCIÓN! El uso simultáneo de ambos sistemas
!
no está permitido.
Si la Base-Fix junto con la silla infantil Idan / Artio no
queda estable o queda demasiado reclinada en el
asiento se pueden utilizar una toalla o una sábana para
compensarlo. También puede instalarse en otro asiento
del automóvil.
¡ATENCIÓN! La Base-Fix debe ser utilizada (como
!
se muestra en la imagen) con el sistema ISOFIX
y la pata de soporte o, alternativamente, con el
cinturón de 3 puntos del automóvil y la pata de
soporte.
j
x
98
SEGURIDAD PARA EL BEBÉ
j
• Use la Base-Fix exclusivamente en vehículos y
solamente en combinación con la silla infantil Idan /
x
Artio.
• Usted es el responsable de la seguridad de su hijo.
• Asegúrese siempre de que la Base-Fix está fijada
correctamente.
• Compruebe que el botón indicador del dispositivo
x está en posición abierta j para una instalación
apropiada de la silla de seguridad Idan / Artio.
¡ADVERTENCIA! Las partes de plástico de la
!
Base-Fix se calientan con el sol. Proteja al niño y la
Base-Fix de una intensiva exposición al sol.
¡AVISO! Nunca deje al niño desatendido dentro del
vehículo.
Page 99

A MELHOR POSIÇÃO NO VEÍCULO
Por favor verifique que a Base-Fix pode ser instalada
correctamente tanto com o sistema ISOFIX como com o
cinto de 3 pontos do veículo antes de a adquirir.
ATENÇÃO! A utilização de ambos os sistemas não
!
é permitido.
Se a Base-Fix juntamente com a cadeira infantil Idan /
Artio não ficar estável ou ficar demasiado inclinada no
assento, pode utilizar uma manta ou uma toalha para
compensar e ajustar à inclinação correcta. Também
pode ser instalada noutro assento de automóvel.
ATENÇÃO! A Base-Fix deve ser utilizada (como
!
indica a imagem) com o sistema ISOFIX e o pé
de suporte, ou como alternativa, com o cinto de 3
pontos do veículo e o pé de suporte.
SEGURANÇA PARA O BEBÉ
• Use a Base-Fix exclusivamente em veículos e
únicamente em combinação com a cadeira infantil
Idan / Artio.
• Voçê é responsável pela segurança do seu filho.
• Certifique-se sempre de que a Base-Fix está
correctamente fixada.
• Comprove que o botão indicador do dispositivo x está
em posição aberta j para uma instalação apropriada
da cadeira de segurança Idan / Artio.
AVISO! As partes de plástico da Base-Fix
!
aquecem com o sol. Proteja a criança e a Base-Fix
de uma intensiva exposição ao sol.
NOTA! Nunca deixe a criança sem atenção no interior
do veículo.
ESPT
99
Page 100

SEGURIDAD EN EL AUTOMÓVIL
¡ADVERTENCIA! No utilice la Base-Fix en
!
combinación con la silla infantil Idan / Artio en los
asientos delanteros si estos están equipados con
un sistema de airbag activado. Esto no afecta a
los airbags laterales.
Para garantizar la mejor seguridad a todos los pasajeros
asegúrese de que...
• Los respaldos plegables están fijados en su posición
vertical.
• Cuando instale la Base-Fix en el asiento delantero,
ajuste el asiento lo más atrás posible.
• Coloque correctamente todos aquellos objetos que en
caso de accidente pudieran causar daños.
• Todos los pasajeros están sujetos con el cinturón de
seguridad.
¡ADVERTENCIA! La Base-Fix debe estar siempre
!
sujeta con el cinturón de seguridad aunque ésta
no se use. En caso de un frenazo de emergencia o
un accidente, una Base-Fix Idan / Artio mal sujeta
podría dañar a otros pasajeros o a usted mismo.
100
 Loading...