

Page 1

Contents
Chapter 1: Getting Started
Keyboard and LCD ..................................................................................4
System status indicators ...........................................................................6
Left side.....................................................................................................7
Back ..........................................................................................................8
Bottom ................................................................................................... 10
Right side............................................................................................... 12
Chapter 2: Using Your System
Connecting AC power........................................................................... 14
Starting up.............................................................................................. 15
LCD panel.............................................................................................. 15
Using the keyboard................................................................................ 16
Function key combinations............................................................ 17
Special keys.................................................................................... 19
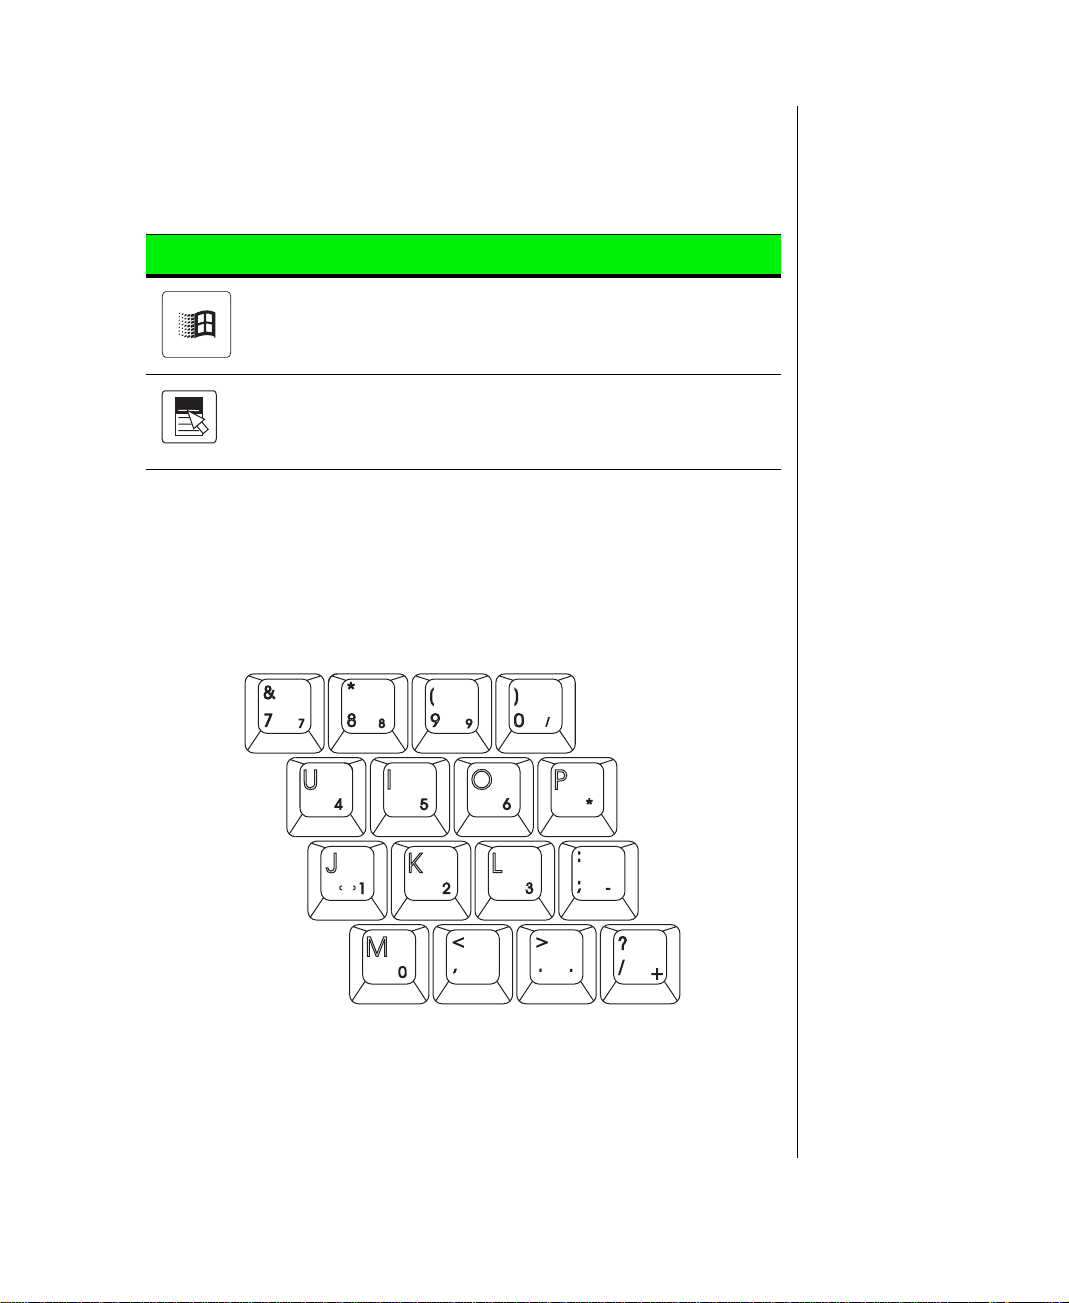
Numeric keypad ............................................................................. 19
Using the pointing device...................................................................... 20
Connecting the modem .................................................................. 28
Swapping Option Bay modules............................................................ 29
Using audio............................................................................................ 32
Adjusting the volume..................................................................... 32
Making an audio recording............................................................ 33
Using disc media ................................................................................... 34
Playing an audio CD ...................................................................... 35
Removing or replacing the hard disk drive .......................................... 37
Using PC Cards ..................................................................................... 39
About CardBus cards ..................................................................... 40
Using Universal Serial Bus (USB) ports.............................................. 40
Using Fast Infrared (IR) ports............................................................... 40
Using Composite Video Out................................................................. 41
Using ATI Player............................................................................ 42
....................................................................3
......................................................... 13
Chapter 3: Managing Power Consumption
Maintaining battery power.................................................................... 46
Battery learning software............................................................... 46
Battery status .................................................................................. 48
................................. 45
i
Page 2

Swapping batteries.................................................................................49
Maximizing battery life .........................................................................51
Managing power ....................................................................................52
Windows 98 ....................................................................................52
Windows 95 and Windows NT .....................................................55
Using the Power menu........................................................................... 56
Status menu..................................................................................... 58
Chapter 4: Getting Online
Using the Internet................................................................................... 60
Using e-mail....................................................................................61
Sending e-mail ................................................................................62
Checking your e-mail .....................................................................63
Exploring the World Wide Web ....................................................65
Using Microsoft Fax.............................................................................. 67
Setting up Microsoft Fax................................................................67
Sending and receiving faxes........................................................... 69
Appendix A: Solo Notebook Accessories
Accessories.............................................................................................72
Appendix B: Contacting Gateway
Contacting Gateway...............................................................................74
Index
...........................................................................................................75
...................................................................59
.....................................71
....................................................73
ii Using Your Gateway Solo TM 9150 Notebook
Page 3

Chapter 1:
Getting Started
Keyboard and LCD ................................................. 4
System status indicators .......................................... 6
Left side.................................................................... 7
Back.......................................................................... 8
Bottom.................................................................... 10
Right side ............................................................... 12
Page 4
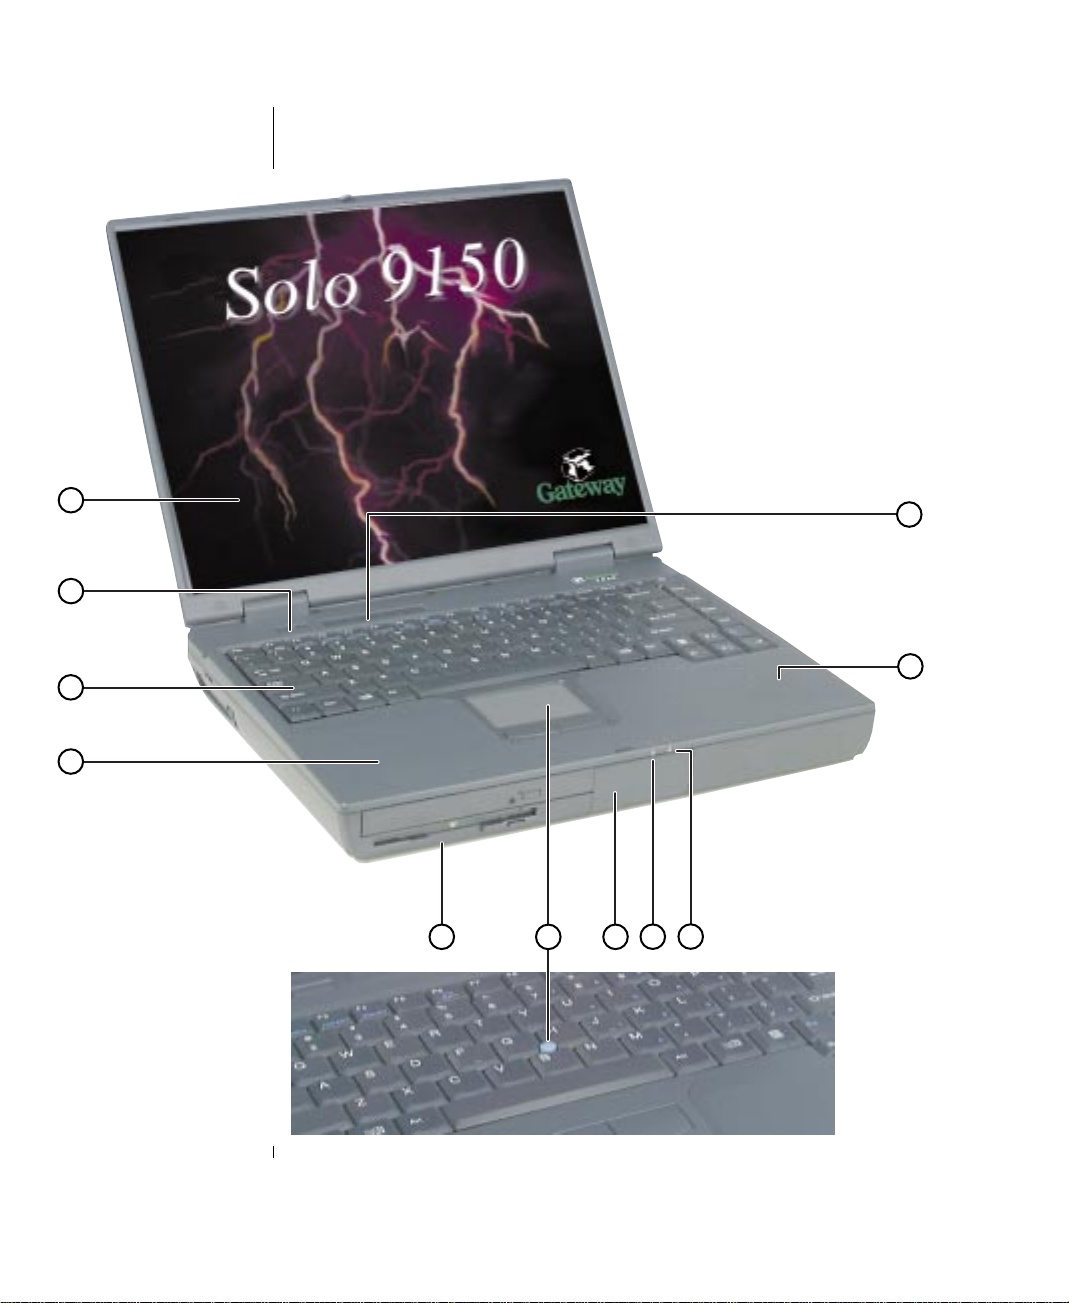
Keyboar d and LCD
A
B
C
D
E
F
G
I
H
J
D
4 Using Your Gateway Solo TM 9150 Notebook
Page 5

Component Description
A. XGA TFT Color Liquid
Crystal Display (LCD)
B. Power button Turns power ON or OFF. Can also be config-
C.Keyboard Provides full functionality of a desktop com-
D.Speakers Provide high quality sound reproduction for
E. DVD/120MB SuperDisk
-orCD/diskette
F. EZ-Pad™ TouchPad or
EZ-Point™ stic kpoint
G.Hard drive access cover Opens to reveal the hard disk drive.
H.Power LED Indicates the power status mode:
Backlit anti-glare screen.
ured to Standby/Resume mode.
puter keyboard. Many of these keys have
assigned alternate functions, including shortcut keys for Windows 98 and Windows 95,
Status Display menus, and numeric keypad.
software and audio CDs.
Reads DVDs, CDs, standard diskettes, and
120MB diskettes.
-orReads CDs and standard diskettes
Controls the cursor movement on the screen.
(EZ-Point™ stickpoint - U.S. keyboards only.)
• Steady green light indicates power is on and
computer is in operation.
• Flashing green light indicates that the computer is in standby mode.
• No light indicates that the computer is off.
I. Battery LED Indicates the battery status mode:
• Green light indicates that the battery is fully
charged.
• Yellow light indicates that the battery is
charging.
• Red light indicates a battery malfunction.
• No LED indicates that the system is running
on the battery because the AC adapter is
either not connected or is not providing
power to the computer.
J. System status indica-
tors
Indicate system status modes.
Chapter 1: Getting Started 5
Page 6
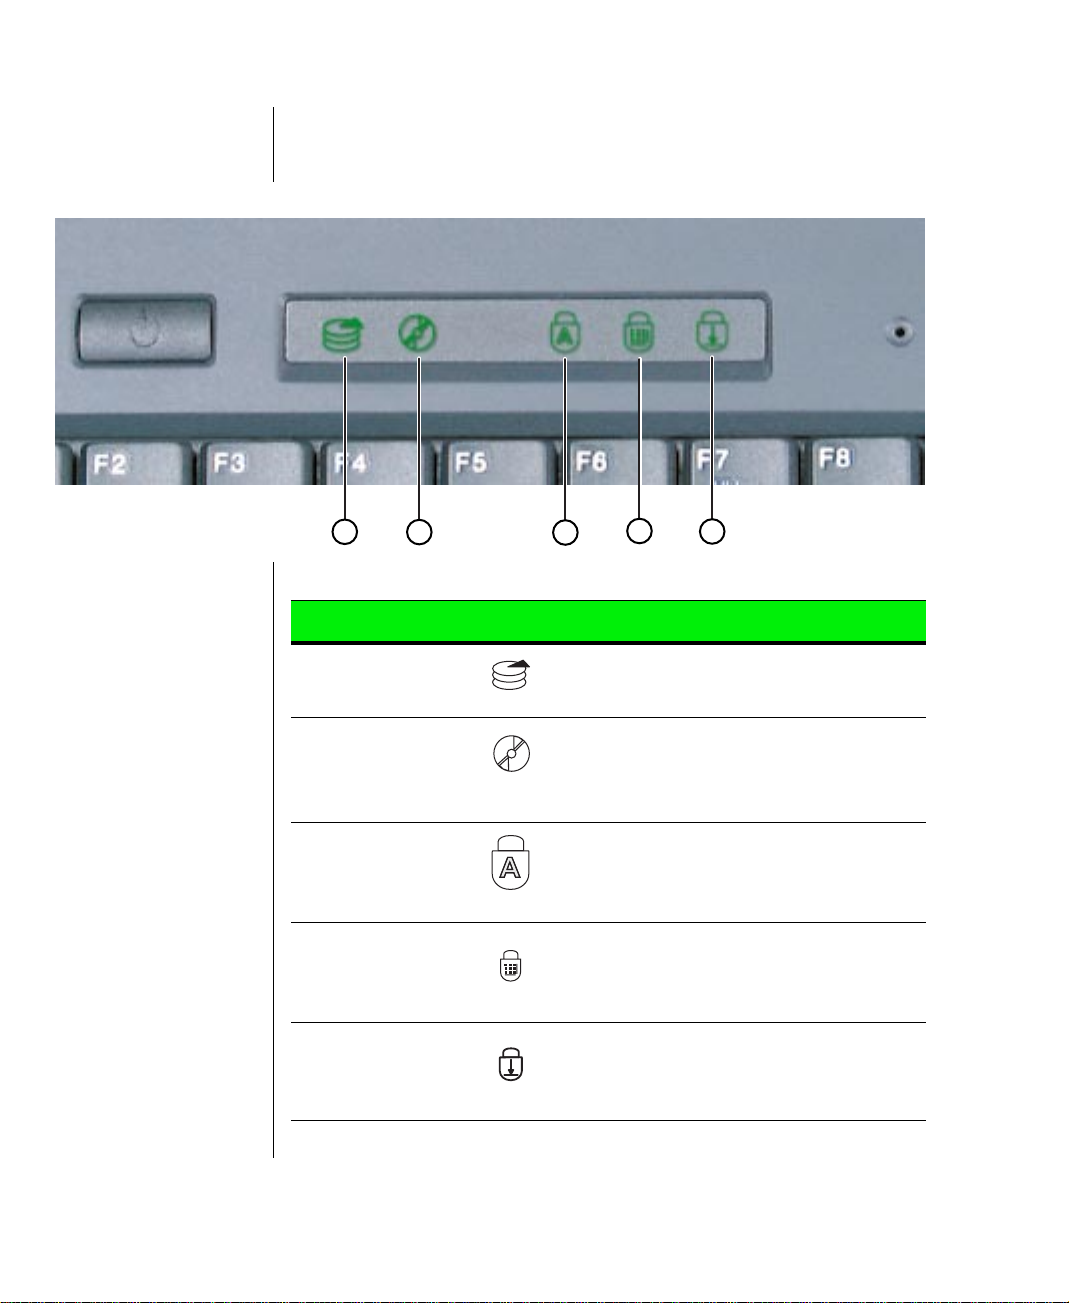
System status indicators
A
B
C
D
E
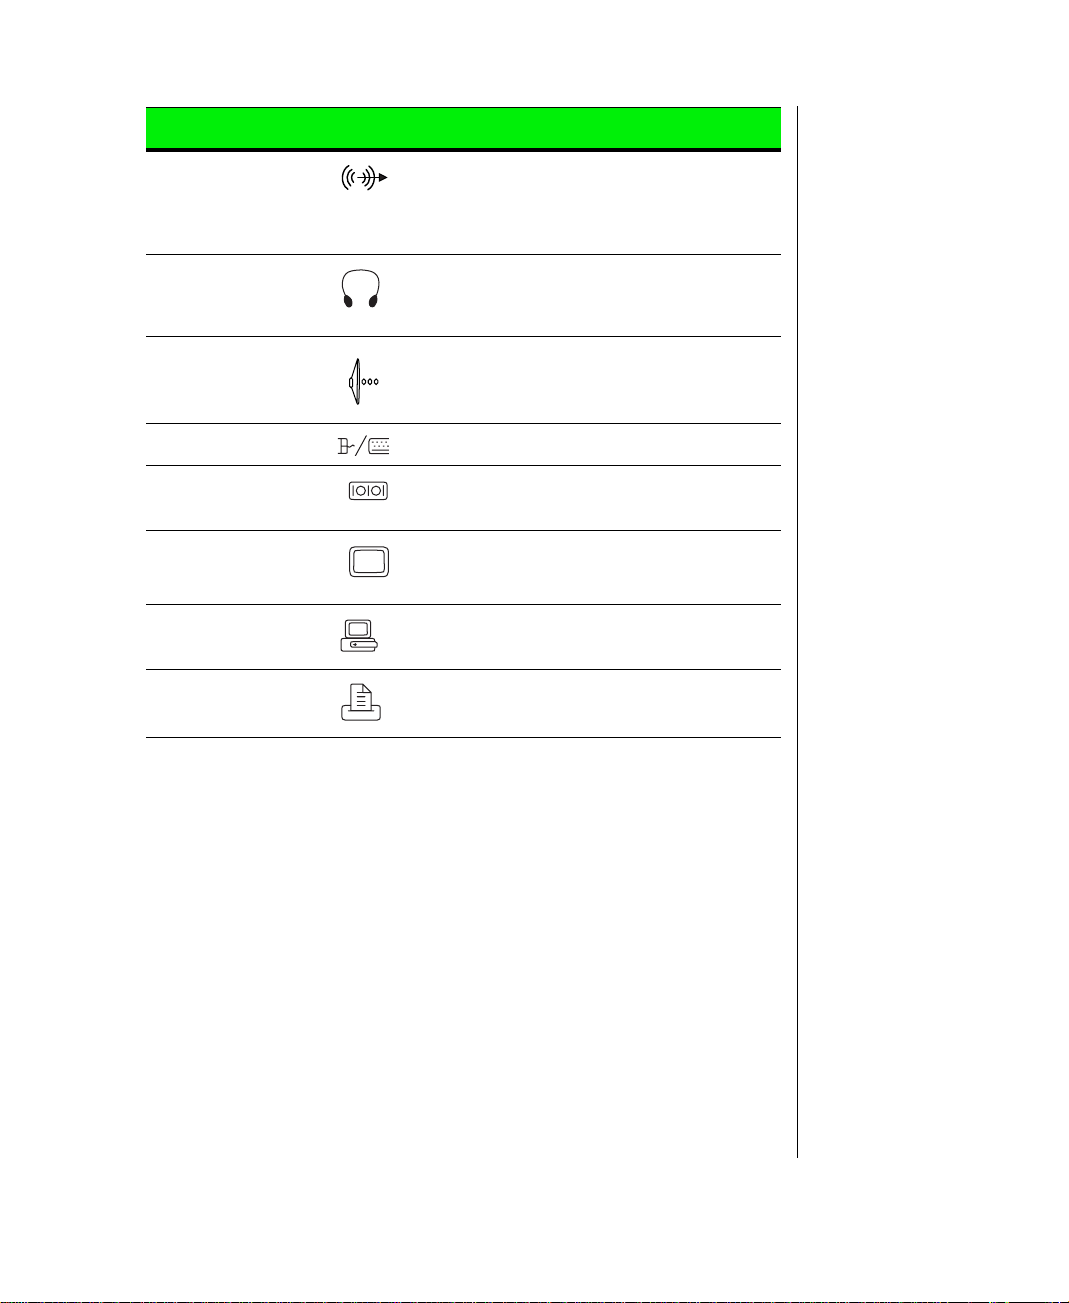
Indicator Icon Description
A. Hard drive
access light
B. DVD/120 MB
SuperDisk or
CD/diskette
drive
C.Caps lock Indicates that the caps lock in on. When the
D.Pad lock Indicates that the pad lock is on. When the
E. Scroll lock Indicates that the scroll lock is on. With some
Indicates that the hard drive is in use.
Indicates that the DVD/120 MB SuperDisk or
CD/diskette drive is in use.
Caps lock light is on, you type in all capital
letters.
Pad lock light is on, you can access the secondary numeric keypad.
programs, you can scroll through large volumes of text when scroll lock is turned on.
6 Using Your Gateway Solo TM 9150 Notebook
Page 7
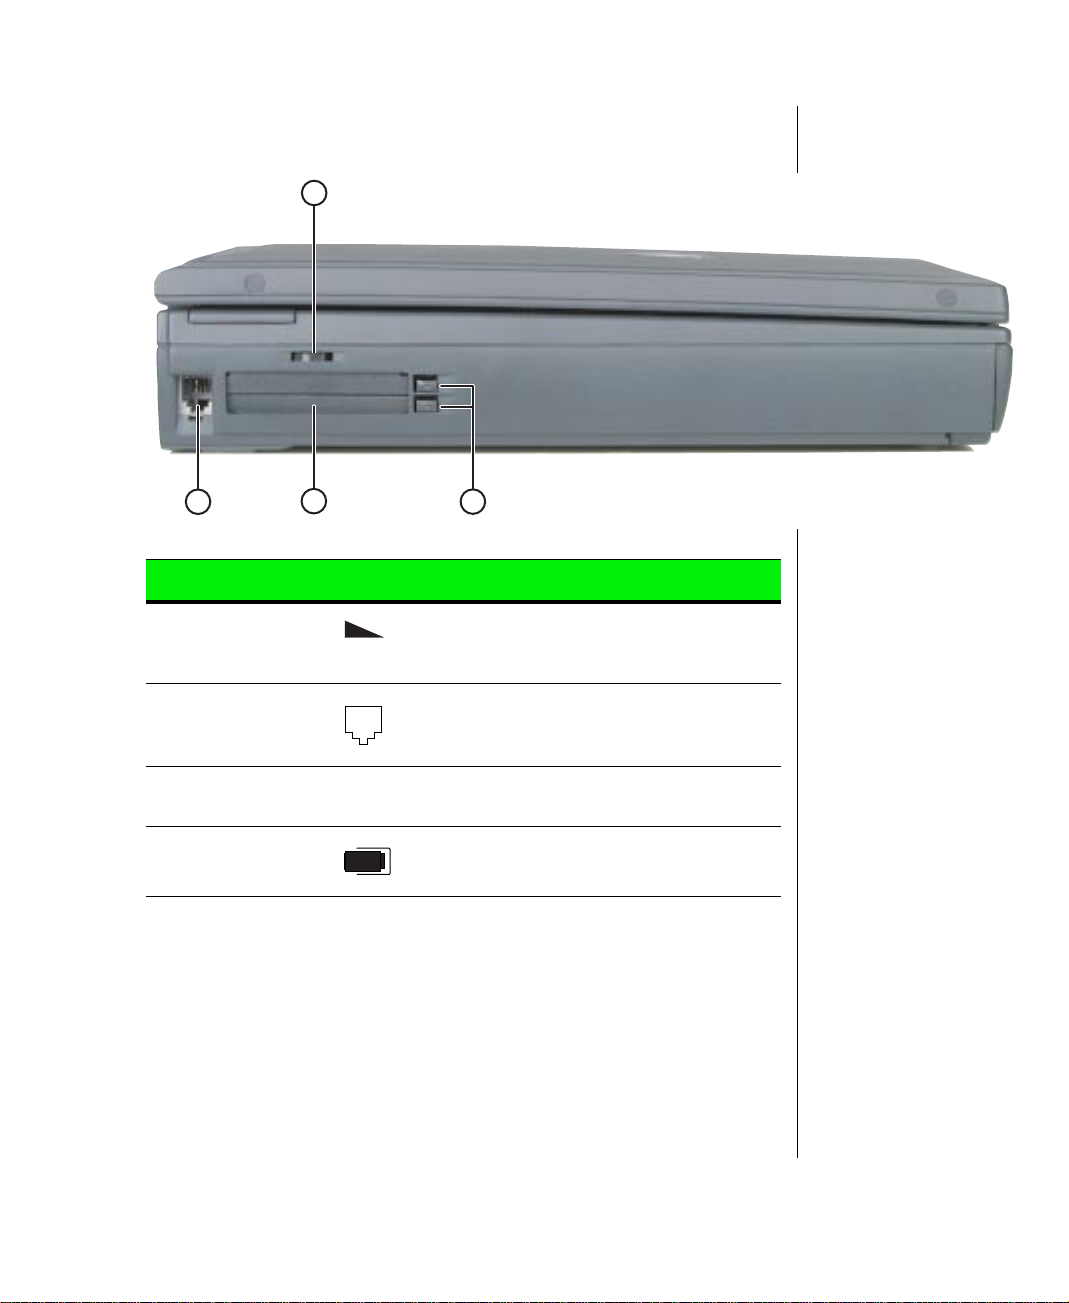
Left side
A
B
C
D
Component Icon Description
A. Volume wheel Adju s t s b u i l t - i n s p e aker , extern a l s p e a k e r, and
headphone volume. V olume le vels are also controlled by multimedia software.
B. Modem jack Plug a phone line into this jack to connect the
notebook’s on-board modem to an analog
phone system.
C.PC Card slots Accepts one Type III PC Card or two Type I
or Type II PC Cards.
D.Eject buttons Ejects the PC Cards from the PC Card slots.
Chapter 1: Getting Started 7
Page 8
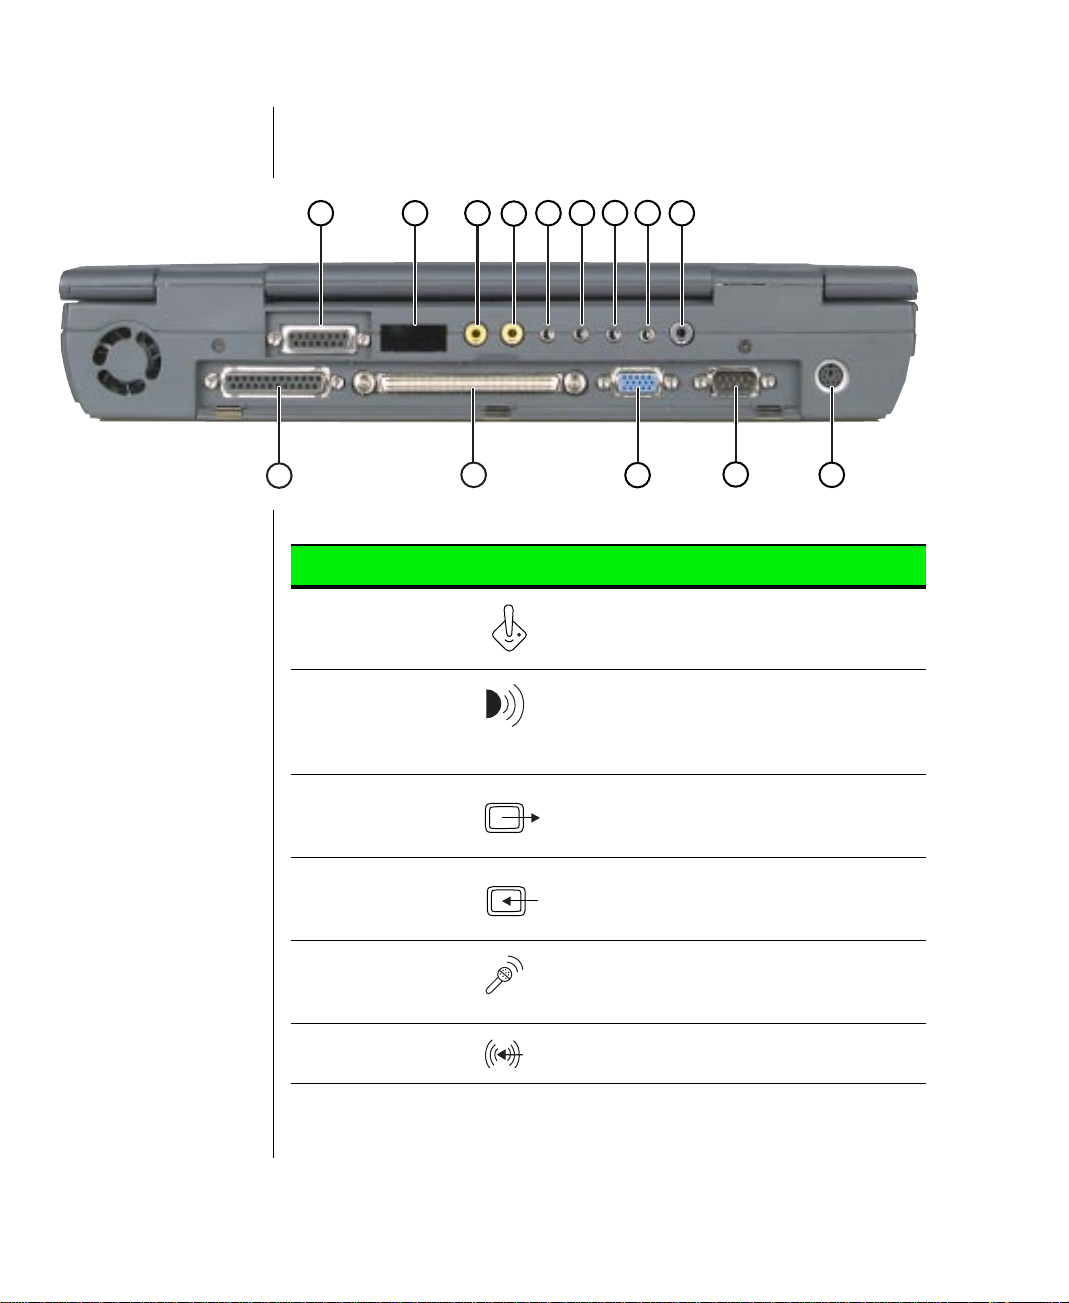
Back
A
N
B
C
E
D
F
M
Port Icon Description
A. Joystick/MIDI
port
B. Fast IR (Infra-
red) port
C.Composite
Video Out
Connect a game joystick or an electronic
MIDI musical instrument to this port. The port
provides both MIDI In and Out capabilities.
Sends infrared signals between the notebook
and a remote device, such as another computer, printer, or peripheral. You can place
infrared devices up to 3 feet (1 meter) apart.
You can view your notebook screen on a TV
by connecting the notebook to the TV or
VCR using a standard video cable.
G
I
H
L
K
J
D.Composite
Video In
E. Mic Connect to an external microphone. (Using
F. Line In Audio line lev el input from another computer ,
8 Using Your Gateway Solo TM 9150 Notebook
You can display NTSC or PAL format video
on your notebook’s screen from a VCR or
video camera using a standard video cable.
this connection will disable the built-in microphone.)
stereo equipment, or a VCR.
Page 9
Port Icon Description
G.Line Out Audio line level output to another computer,
stereo equipment, or a VCR. Line Out is not
capable of driving unamplified speakers or
headphones.
H.Speaker out/
Headphone jack
I. Dolby Digital
Out
J. PS/2 port Connect to an external mouse or keyboard.
K. Serial port Connect to an optional serial device.
L. VGA Connect to a VGA monitor cable.
M.Docking station
port
N.Parallel port
(LPT1)
Connect to external speakers or headphones. Supports small unamplified speakers. (1/8-inch/3.5-mm jack.)
Connect to an (optional) surround-sound
decoder. This connection will only provide
DVD audio.
Connect an optional docking station to this
port.
Connect a parallel device (such as a printer)
to this port.
Chapter 1: Getting Started 9
Page 10
Bottom
A
H
A
B
G
10 Using Your Gateway Solo TM 9150 Notebook
F
E
D
C
Page 11

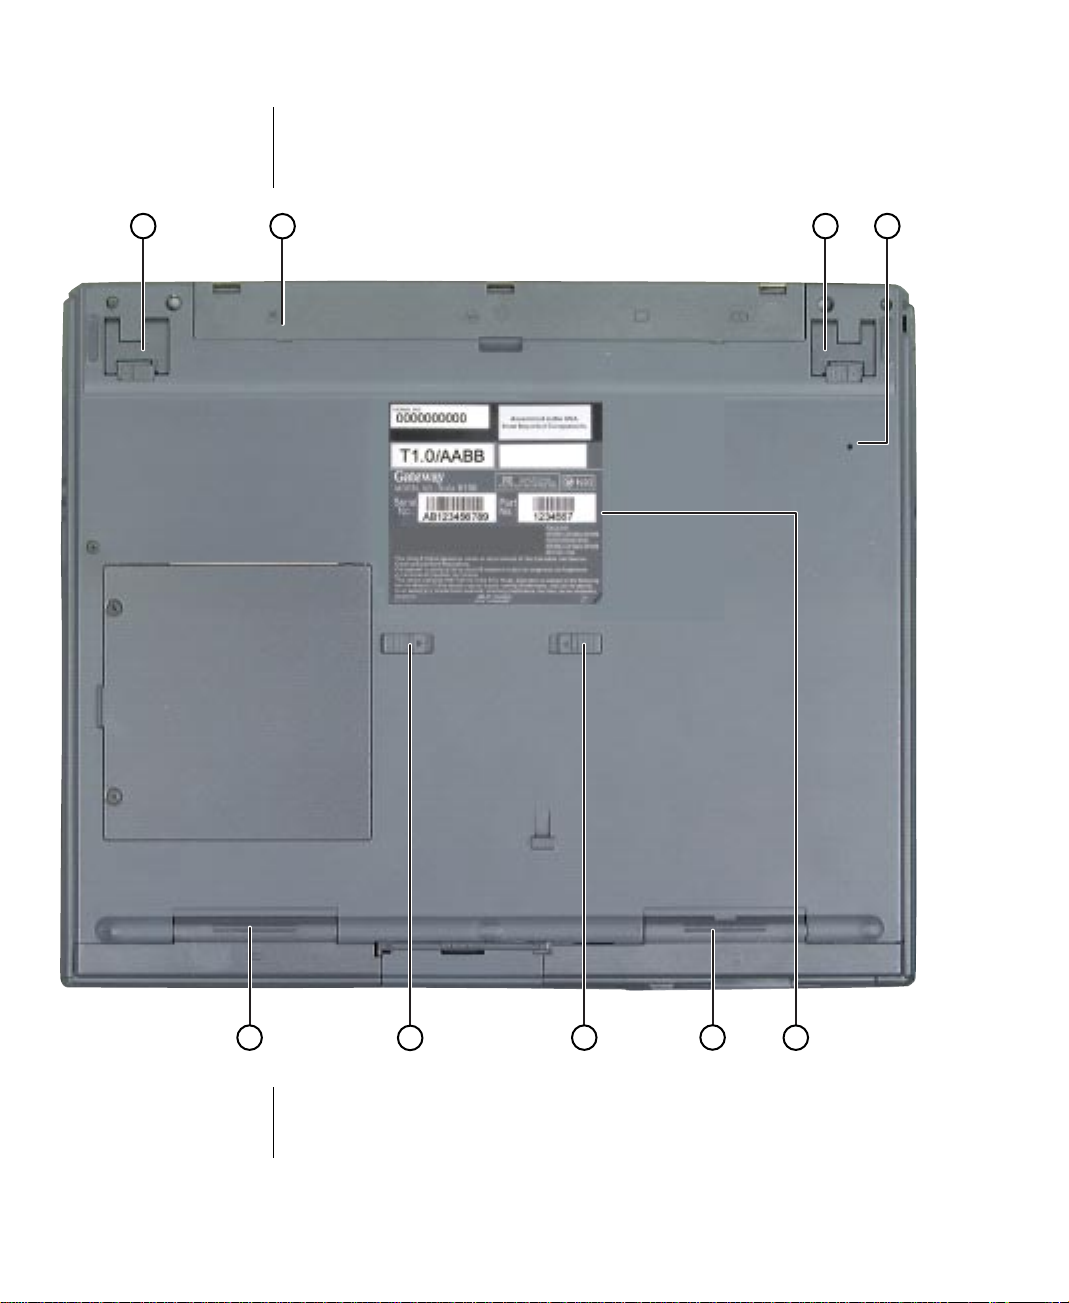
Component Description
A. Flip foot Flips out to tilt the notebook.
B. Reset switch Restarts the notebook, if necessary. Insert a
paper clip to press switch.
C.System identification
label
D.Combination module Slide module into bay for use of a DVD/
E. Combination module
release latch
F. Battery release latch Slide the latch to release the battery pack
G.Battery pack bay Slide battery pack into bay for battery power
H.Back ports cover (open
position)
Provides product model number, serial number, display type, and processor speed.
120MB SuperDisk or CD/diskette combination module.
Slide the latch to release the combination
drive module from the bay.
from the battery pack bay.
and battery charging.
Flips open to reveal ports.
Chapter 1: Getting Started 11
Page 12
Right side
A
B
C
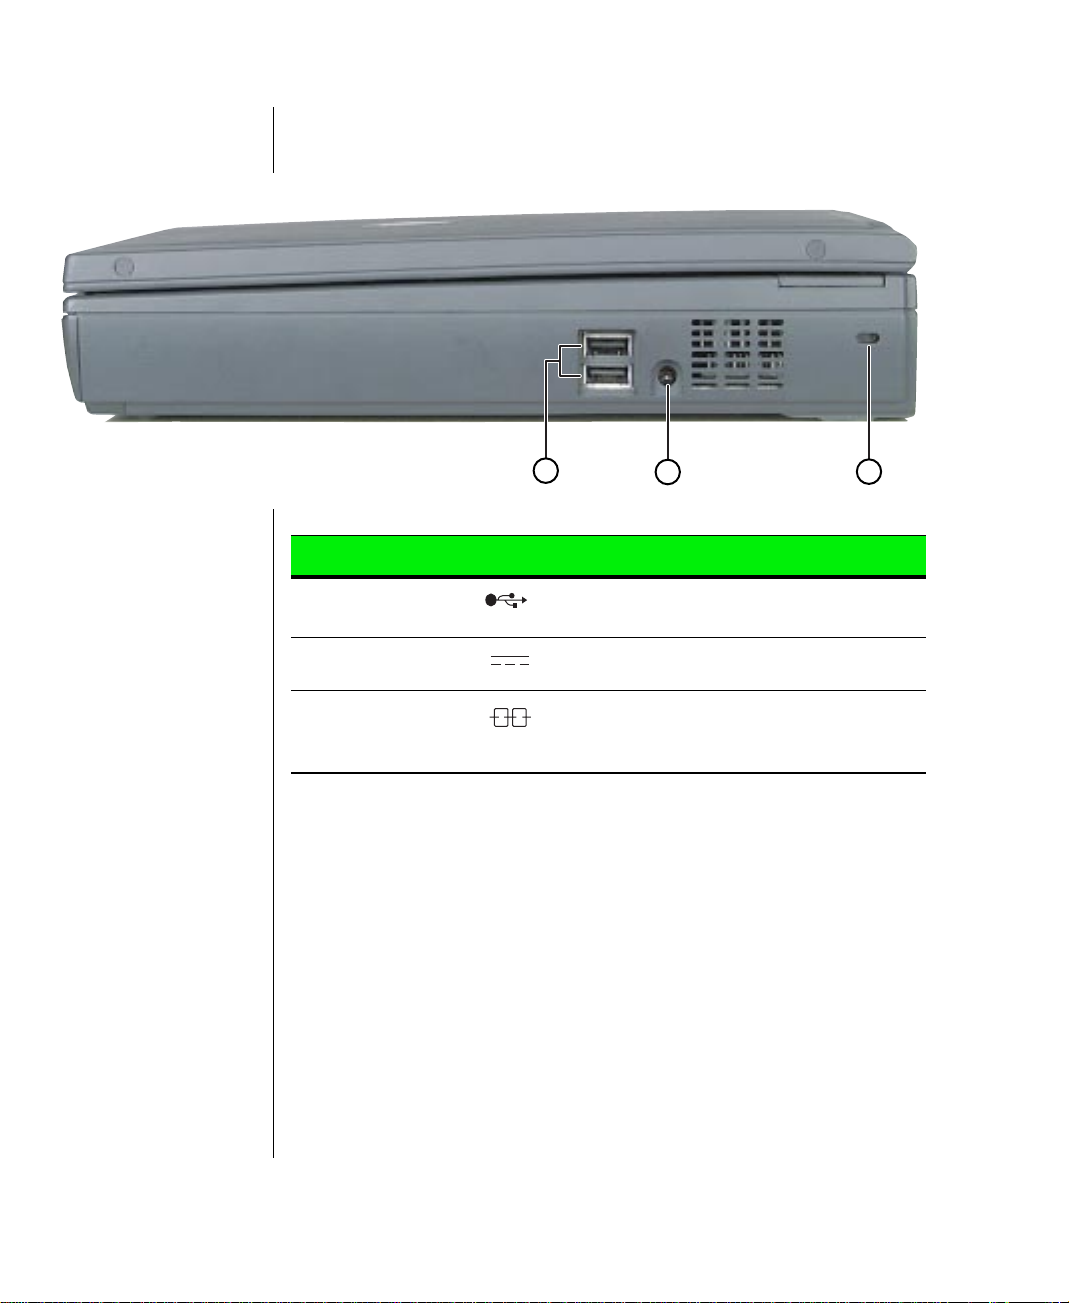
Component Icon Description
A. USB ports Plug optional USB serial devices into these
ports.
B. Power connector Connect to an AC power adapter.
C.Kensington lock
slot
Attach a Kensington lock into this slot. A
Kensington lock is an optional cable lock for
portable computers.
12 Using Your Gateway Solo TM 9150 Notebook
Page 13

Chapter 2:
Using Your System
Connecting AC power........................................... 14
Starting up.............................................................. 15
LCD panel.............................................................. 15
Using the keyboard................................................ 16
Using the pointing device...................................... 20
Using an external mouse or keyboard................... 27
Swapping Option Bay modules ............................29
Using audio............................................................ 32
Using disc media ................................................... 34
Removing or replacing the hard disk drive........... 37
Using PC Cards ..................................................... 39
Using Universal Serial Bus (USB) ports .............. 40
Using Fast Infrared (IR) ports............................... 40
Using Composite Video Out................................. 41
Page 14
Warning!
To avoid serious injury,
replace the power cord if it
becomes damaged. The
replacement cord must be
of the same type and
voltage rating as the
original cord.
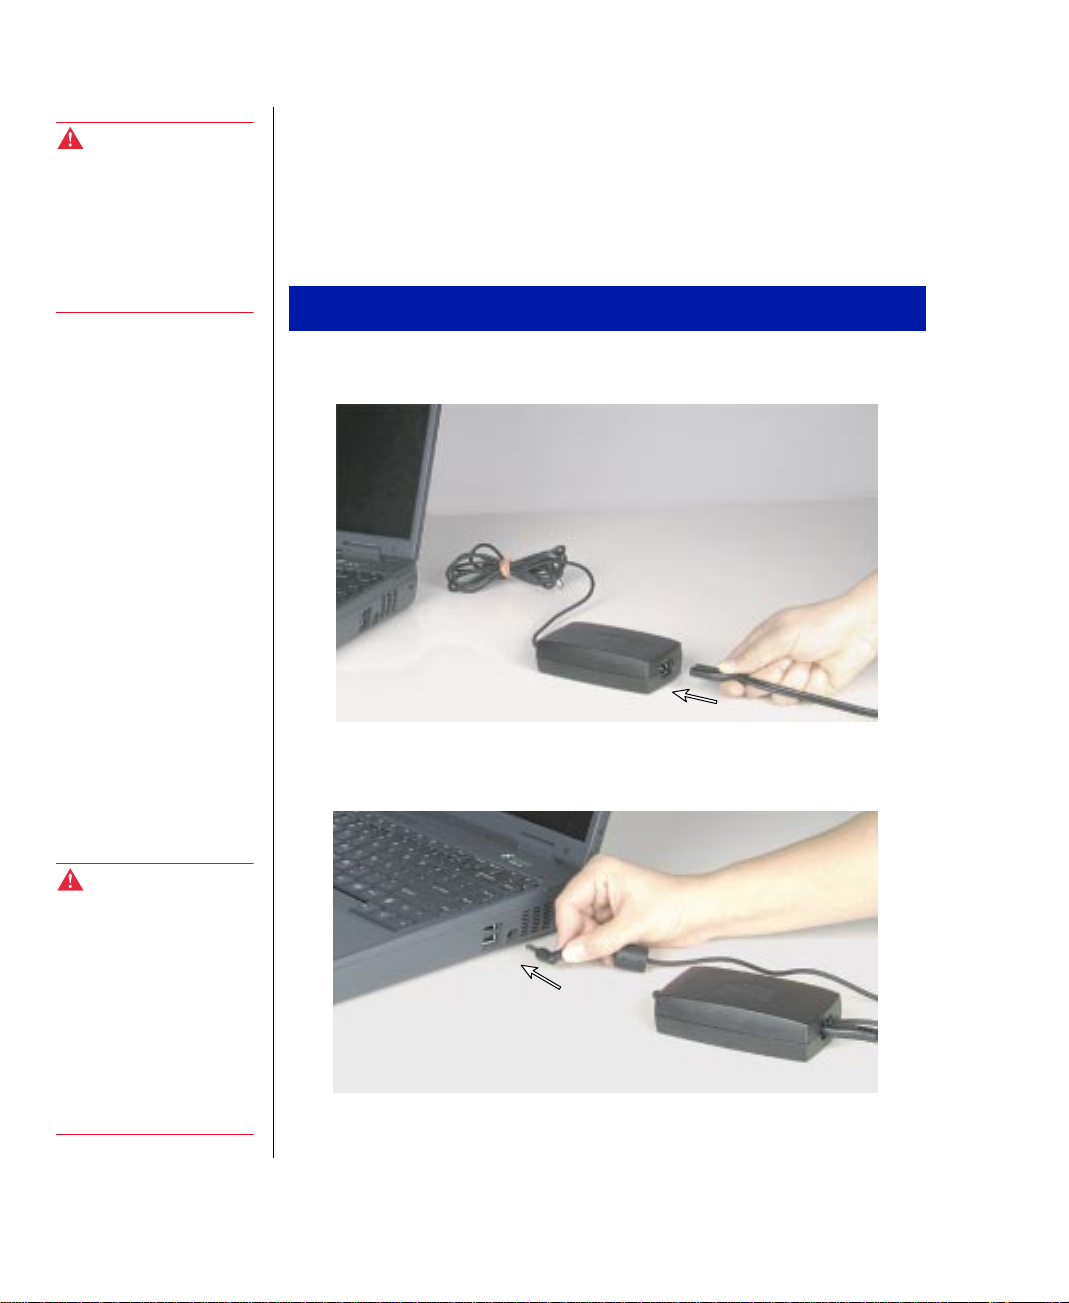
Connecting A C power
Your notebook is powered by one of the longest-lasting batteries available
and was shipped to you charged and ready to use. You may want to use the
AC adapter while you are checking out some of the features.
Connecting the AC adapter
Connect the power cord to the AC adapter.
1.
Plug the AC adapter into your notebook’s power connector.
2.
Warning!
Do not attempt to
disassemble the A C
adapter. The AC adapter
has no user-replaceable or
user-serviceable parts
inside and has dangerous
voltages that can cause
serious personal injury or
death. Contact Gateway
about returning defective
AC adapters.
Plug the power cord into an electrical outlet.
3.
14 Using Your Gateway Solo™ 9150 Notebook
Page 15
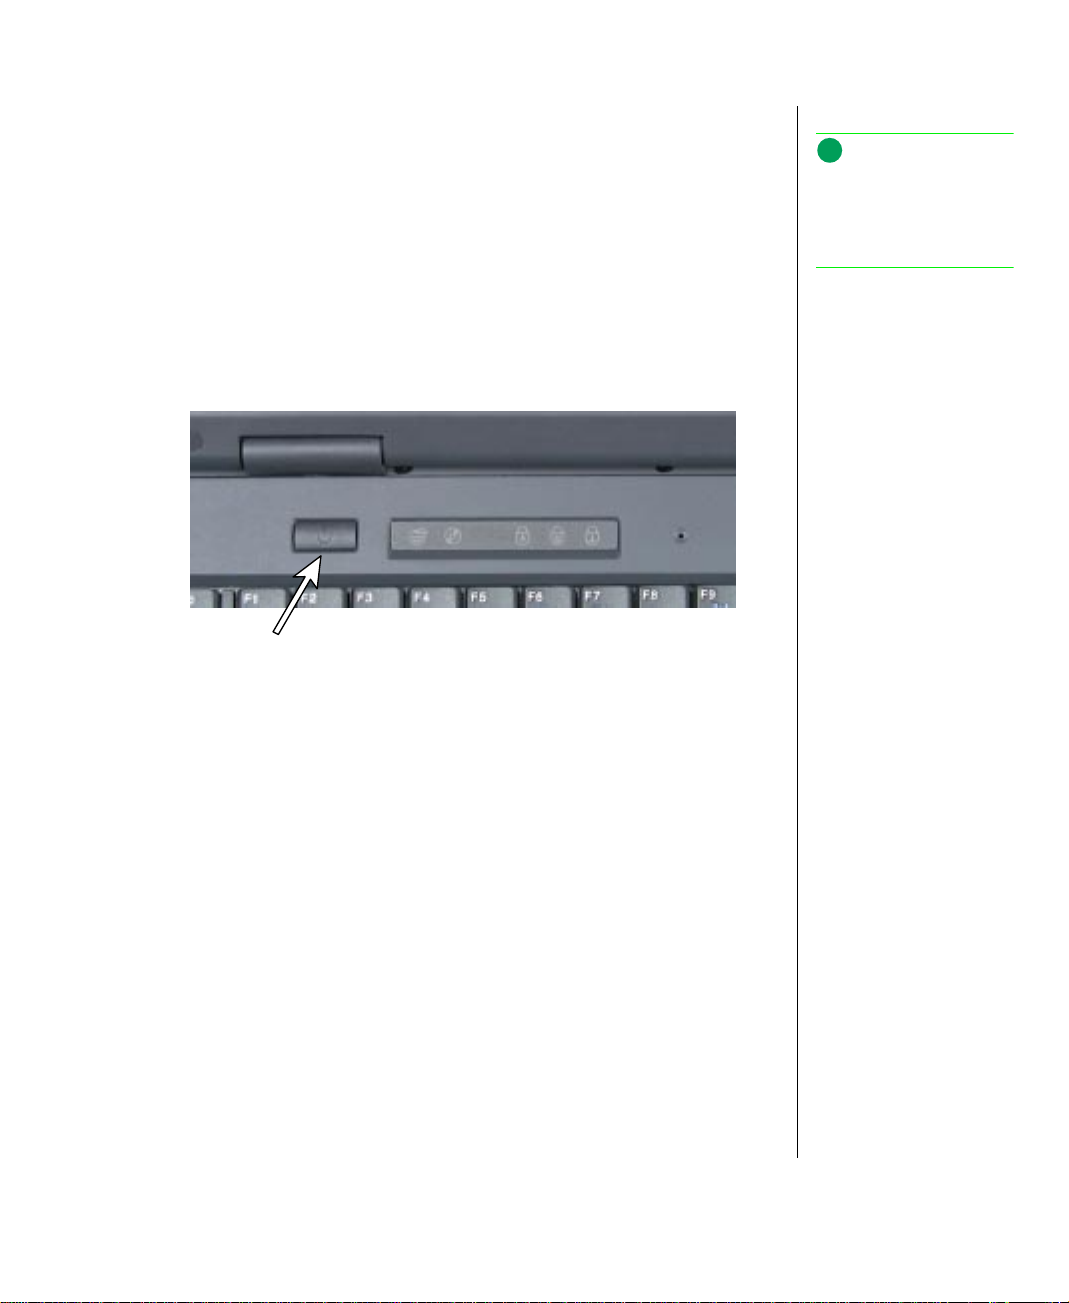
Starting up
Slide the latch on the front face of your notebook to the right to release the
cover and open up your notebook. To turn on your notebook, press the
power button, located in the upper left corner of the notebook and close to
the left LCD hinge.
The power button on your notebook is preset to On/Off mode. However,
you can set it to function either in On/Off or Standby/Resume mode using
the power menu.
Power
button
Note:
For instructions on
accessing the power menu ,
see “Using the Power
menu” on page 56.
LCD panel
Your notebook features a color LCD XGA TFT 14.1-inch or 15.0-inch
panel that provides sharp, crisp resolution and up to 16 million colors.
This notebook is shipped with the “Auto dim with battery” feature
enabled. Auto dim cuts LCD power 50% when your notebook is
operating on battery power. To disable this feature, refer to the chapter
“Using Your BIOS Setup Program” in the Maintaining and
Troubleshooting Guide that shipped with your notebook.
Tilt your notebook’s entire cover forward or backward to adjust the viewing
N
angle. Press the F
control display brightness.
key together with the up arrow and down arrow keys to
Chapter 2: Using Your System 15
Page 16
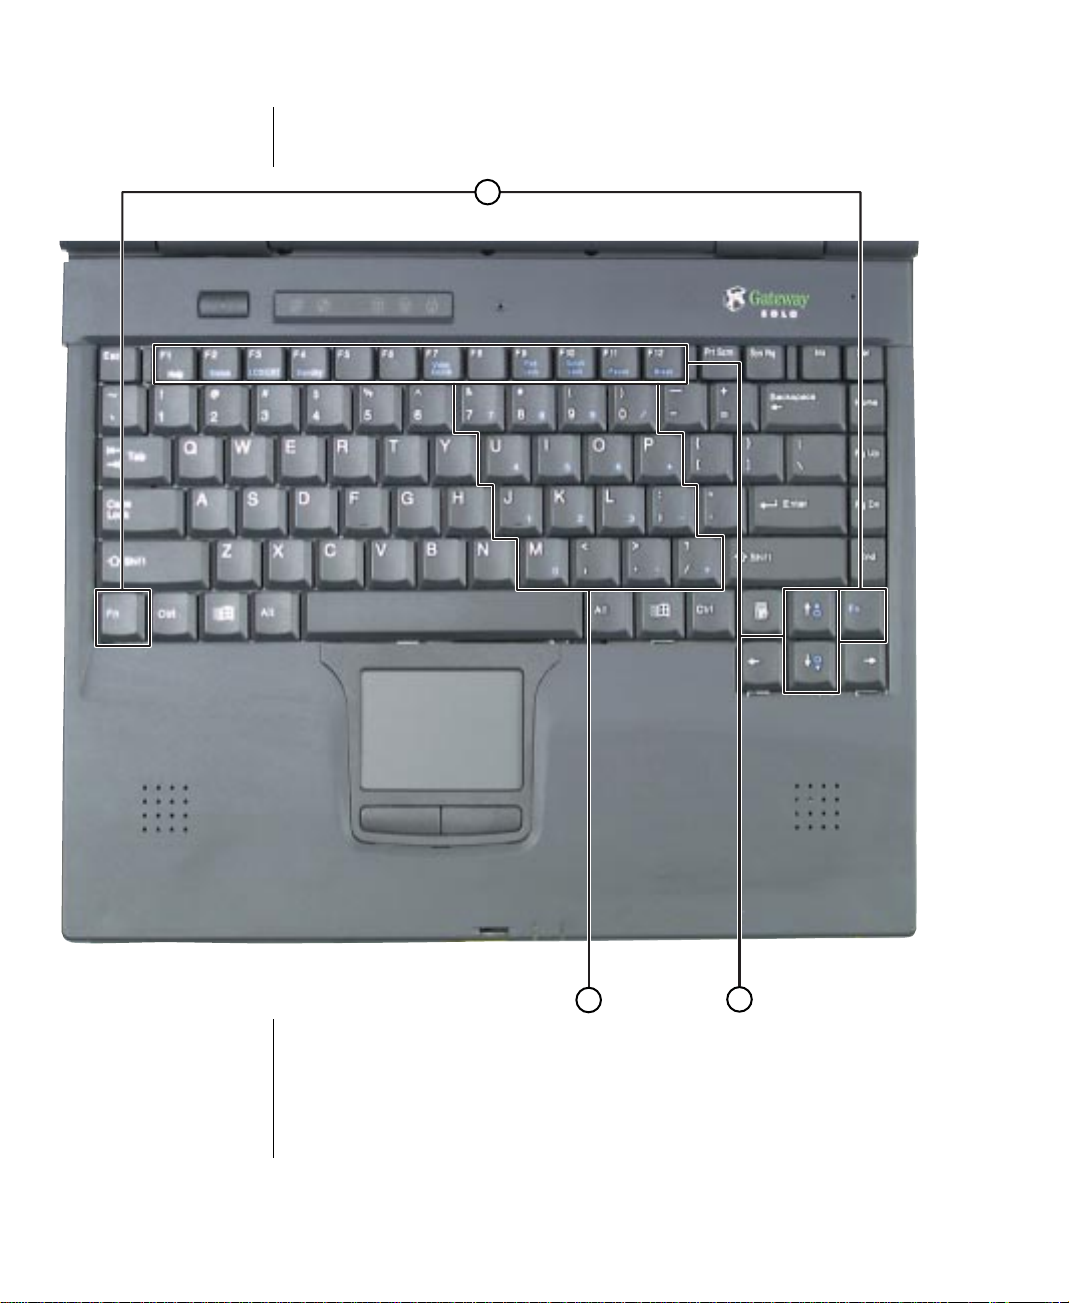
Using the keyboar d
C
Numeric keypad
A.
Function keys
B.
Shortcut keys
C.
16 Using Your Gateway Solo™ 9150 Notebook
A
B
Page 17
Your notebook features a full-size keyboard that has the same functionality
as a desktop computer keyboard. Many of the keys have been assigned
alternate functions, including shortcut keys for Windows, function keys for
particular system operations, and padlock keys that enable a numeric
keypad.
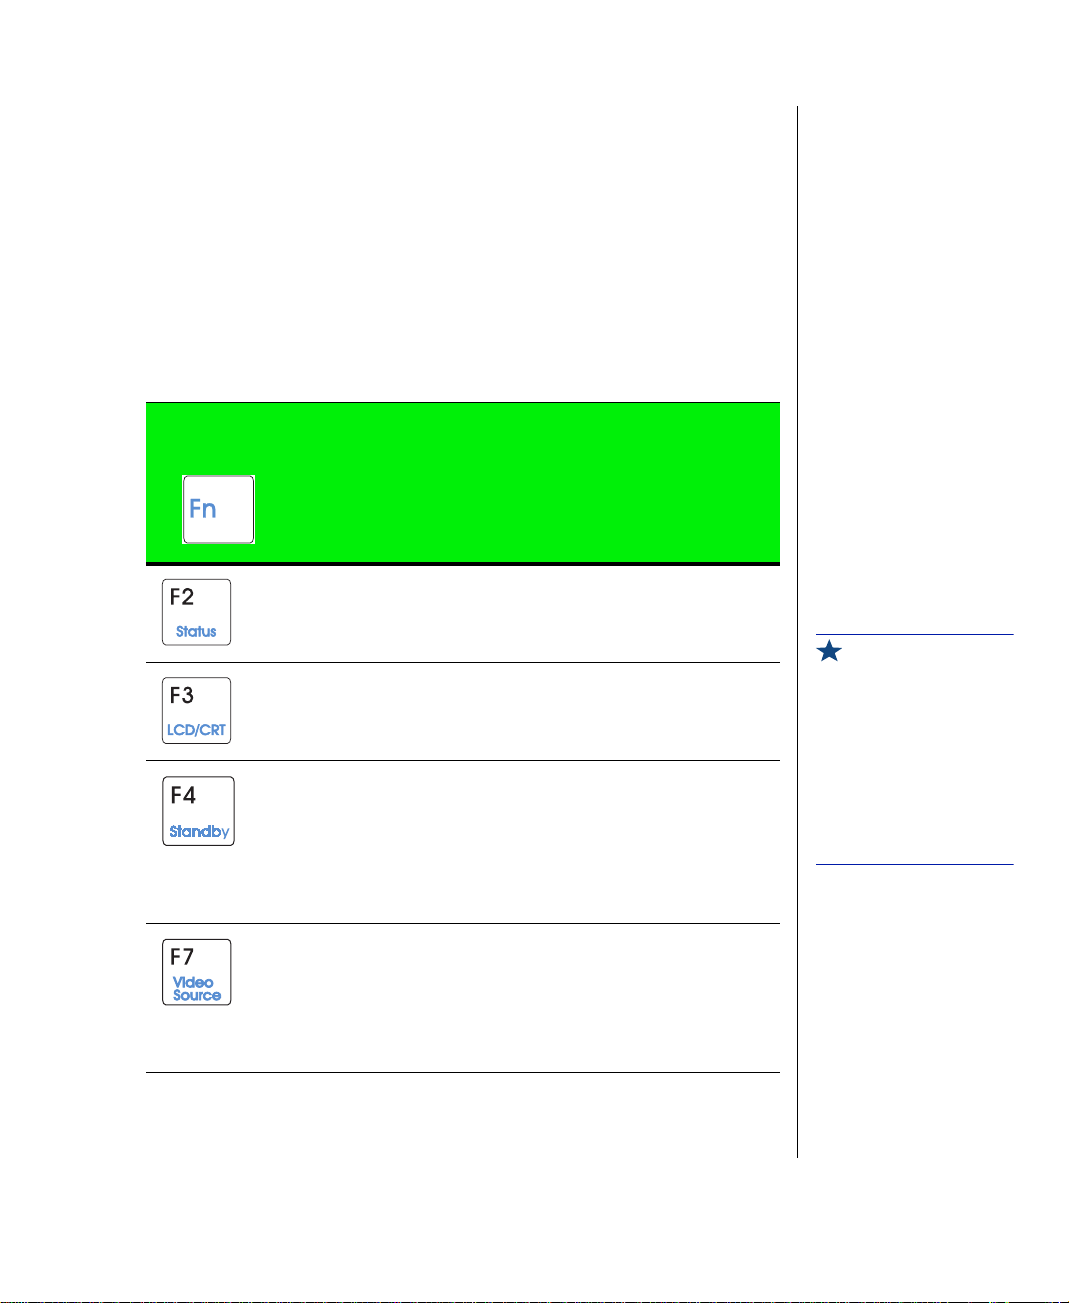
Function ke y combinations
F
Press the
the-fly” functions:
N
key together with one of the following keys to get these “on-
Key
Combination
+
Description
Displays the power status in the upper left corner of the
Windows desktop. Press the key combination again to
make the power status disappear.
T oggles between the LCD displa y , e xternal monitor, both
displays at the same time, or TV display (NTSC or PAL
format).
™
Windows 98
Pressing the power button brings the notebook out of
Standby mode.
Windows 95
Suspend mode. Pressing the power button brings the
notebook out of Suspend mode.
Makes changes to the video source (VIDEOSRC) settings by toggling the following settings:
- if using the DVD drive.
DVD
- if using the Composite Video In port.
TV IN
PCMCIA
DISABLED
: Notebook goes into Standby mode.
™
and Windows NT™: Notebook goes into
- if using a zoomed video card in PCMCIA slot.
- if 30 seconds pass, display disappears.
Important!
In Windows 98™,
Microsoft® has replaced
the term “Suspend” with
“Standby .”
Standby is used when
referring to Windows 98™
and Suspend is used when
referring to Windows 95™
or Windows NT™.
Chapter 2: Using Your System 17
Page 18
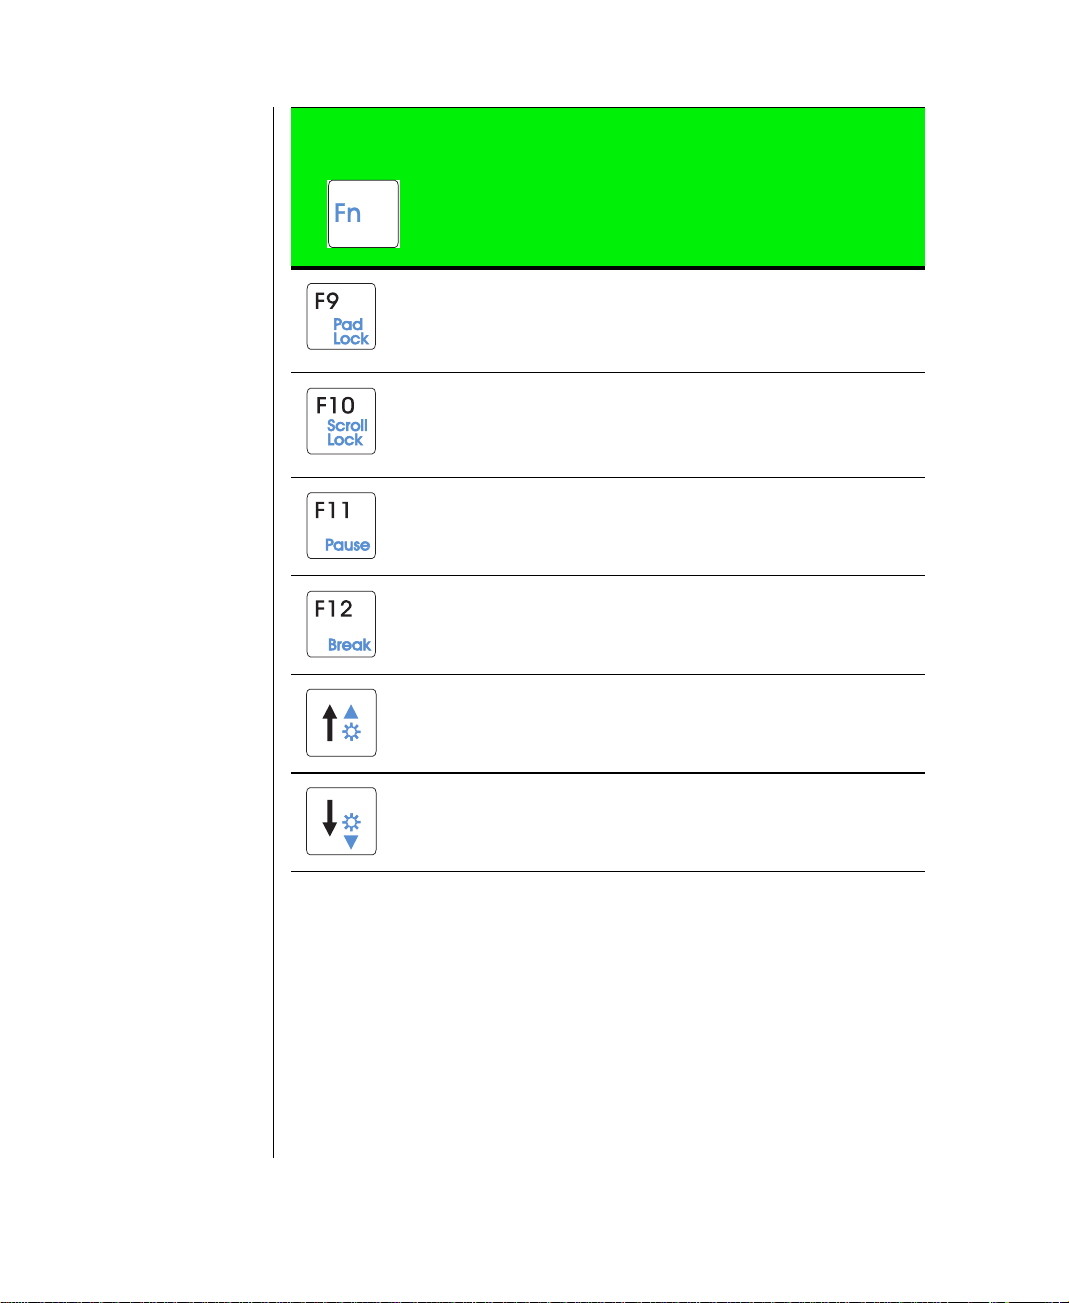
Key
Combination
+
Description
Enables the Pad Lock function so you can use the
numeric keypad. The Pad Lock icon stays lit while this
function is enabled. Press the key combination again to
disable the numeric keypad.
In some applications, this lets you scroll through large
volumes of text.
The Scroll Lock icon stays lit as long as this function is
enabled.
In some programs, this key combination pauses the display when text is scrolling quickly. Press any key to continue the text flow.
In some programs this key combination breaks text
scrolling on a DOS screen.
Increases LCD brightness and displays the brightness
meter for the Popup Status Display. Use the
combination to make the display disappear.
+F2 key
F
N
18 Using Your Gateway Solo™ 9150 Notebook
Decreases LCD brightness and displays the brightness
meter for the Popup Status Display. Use the
combination to close the brightness meter.
+F2 key
F
N
Page 19
Special ke ys
The following keys help you use shortcuts when working with some
software:
Key Description
Displays the Windows Start menu.
Provides quick access to shortcut menus and help
assistants in Windows.
Numeric keypad
FN+F9 (PAD L
Press
of keyboard below functions as a numeric keypad. Press
the keyboard to standard mode.
OCK
) keys to activate the numeric keypad. The section
FN+F9
to return
Chapter 2: Using Your System 19
Page 20
Using the pointing device
Your notebook came with either the EZ Pad™ TouchPad or the EZ Point™
stickpoint pointing device. Like a mouse, these pointing devices control the
cursor movements on the display.
Also, you can use an external mouse. Connect the mouse device to the PS/2
port, the USB port, or the serial port. Review this section to find out more
about these pointing device options.
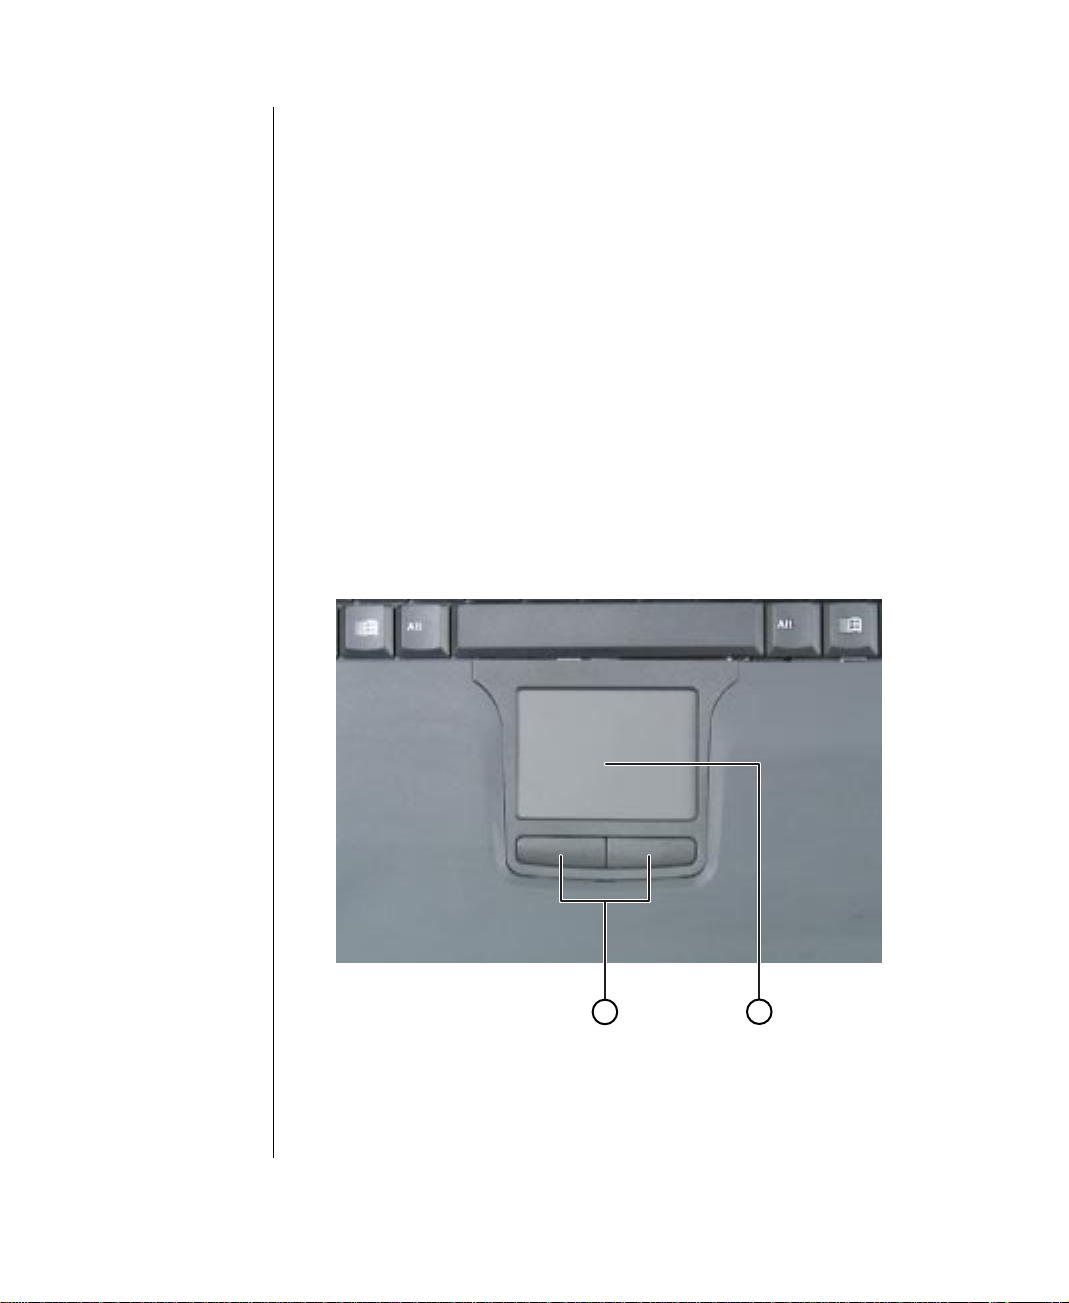
Using the EZ Pad TouchPad
The EZ Pad TouchPad provides you with fast and easy navigation in large
documents, spreadsheets, e-mails, and when using the Internet. You can
scroll, zoom, autoscroll, and pan with the convenience of the touchpad.
Scrolling capabilities are available in some Windows applications,
including Microsoft Office.
EZ Pad (TouchPad)
A.
EZ Pad buttons (mouse buttons)
B.
20 Using Your Gateway Solo™ 9150 Notebook
A
B
Page 21
This touchpad uses one surface for both mouse and wheel actions, which
means you can perform all of the wheel mouse actions without using the
buttons on the notebook. The touchpad also uses movements of one, two, or
three fingers to perform the left, middle, and right mouse button actions.
When your finger reaches the edges of the touchpad, you can continue to
move the cursor and drag objects. You can also move horizontally and
vertically without being constrained by the size of the touchpad. This is
especially useful when dragging objects and selecting text because there is
no need to remove your finger until the action is complete.
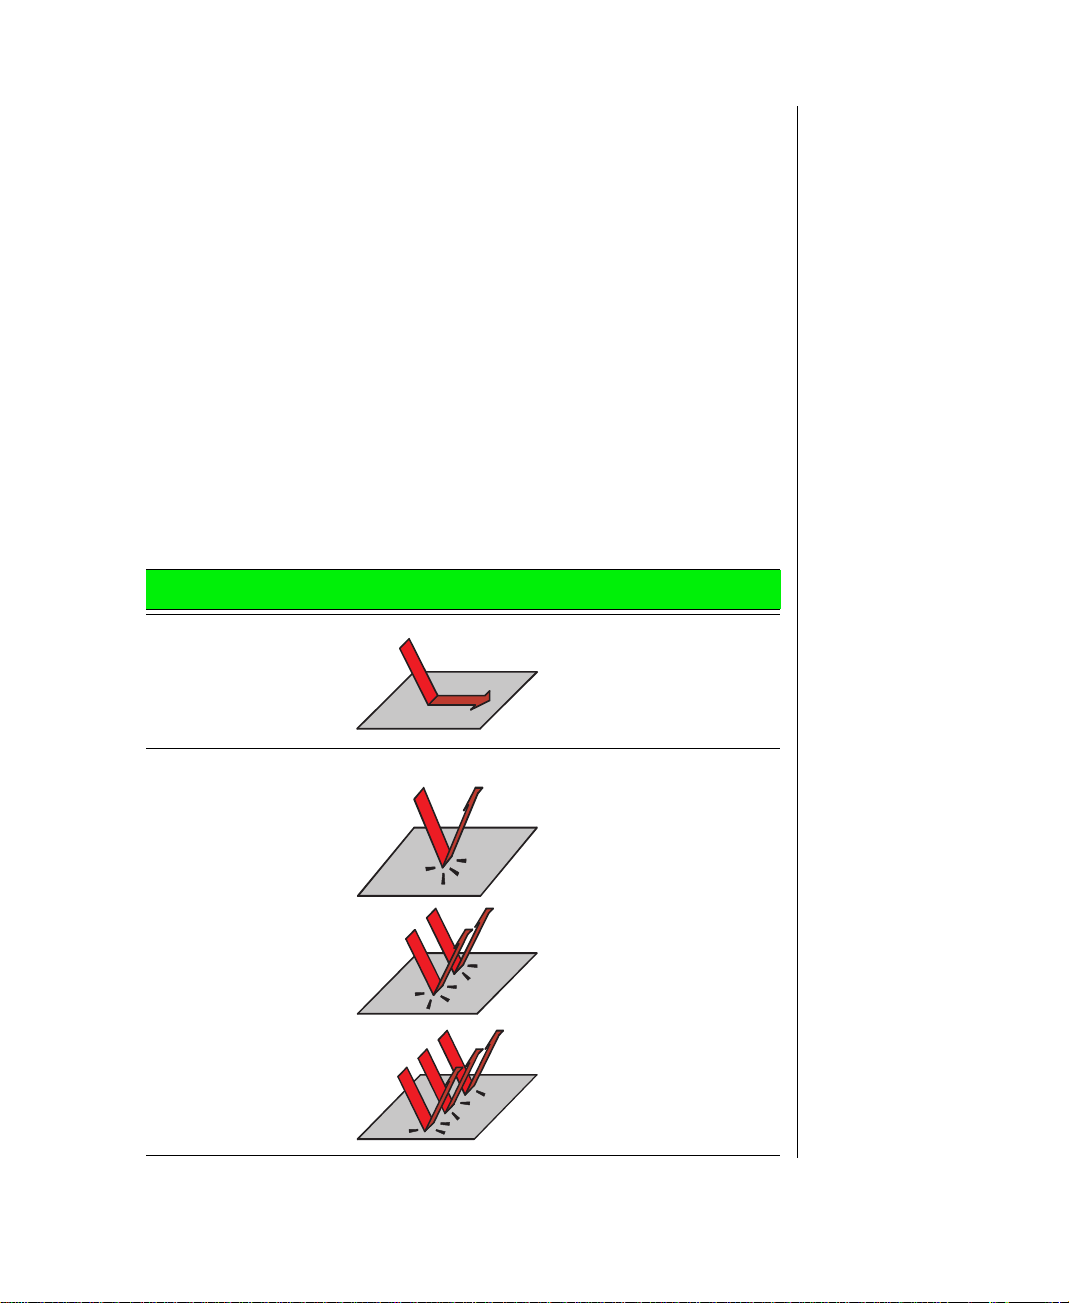
Mouse and TouchPad action equivalents
All of the mouse and wheel functions are illustrated and described in the
following table.
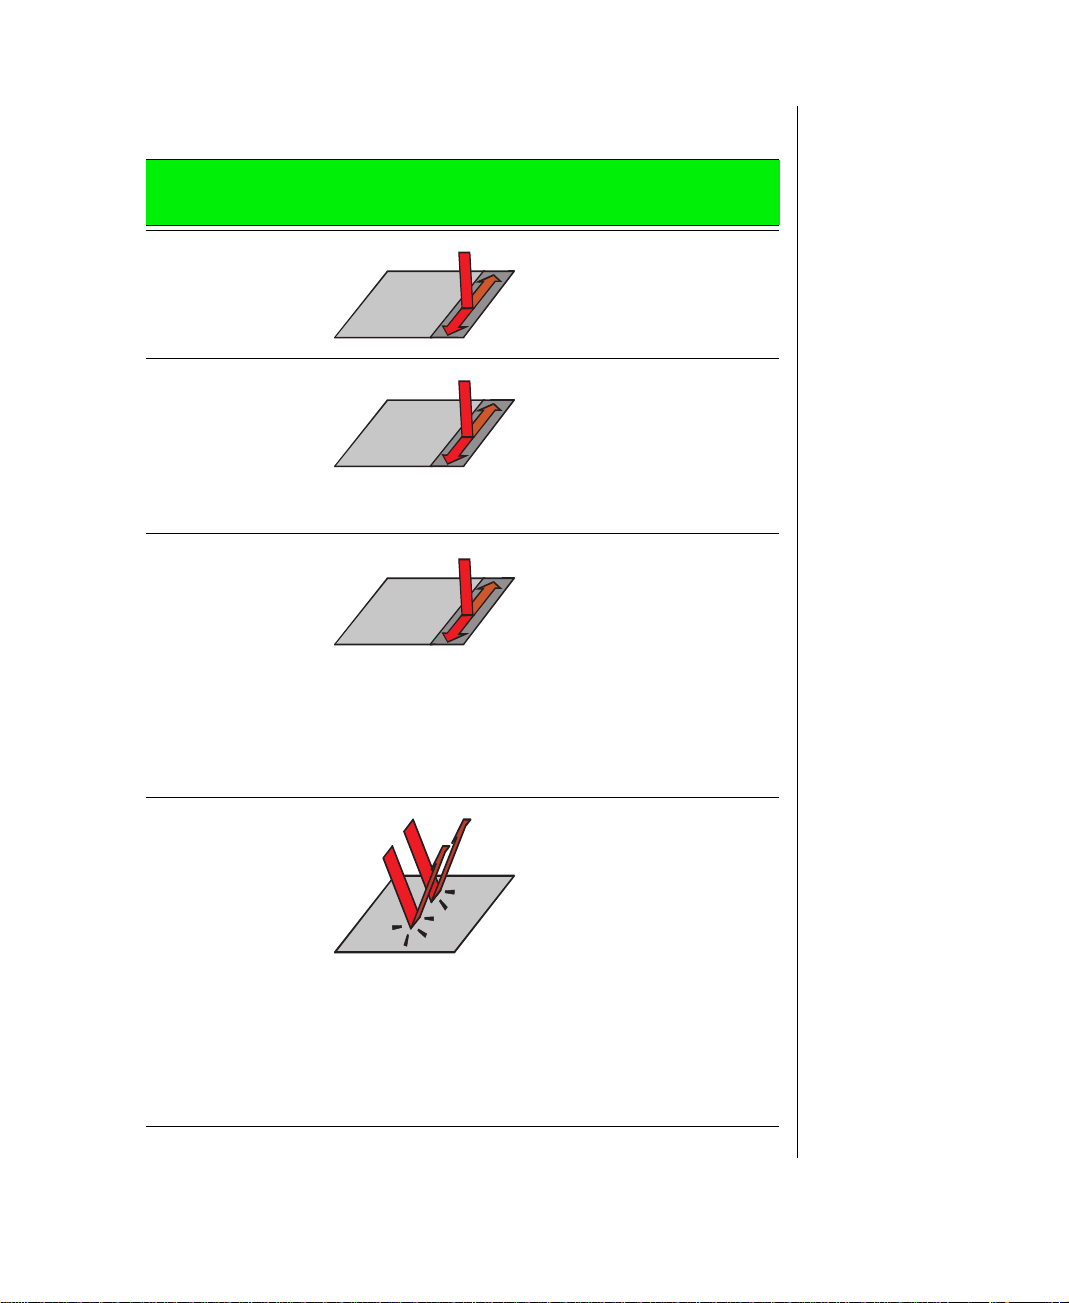
Mouse Action TouchPad Action
Move cursor Slide finger.
Left button click
Middle button click
Right button click
Tap one finger.
Tap 2 fingers.
Tap 3 fingers.
Chapter 2: Using Your System 21
Page 22
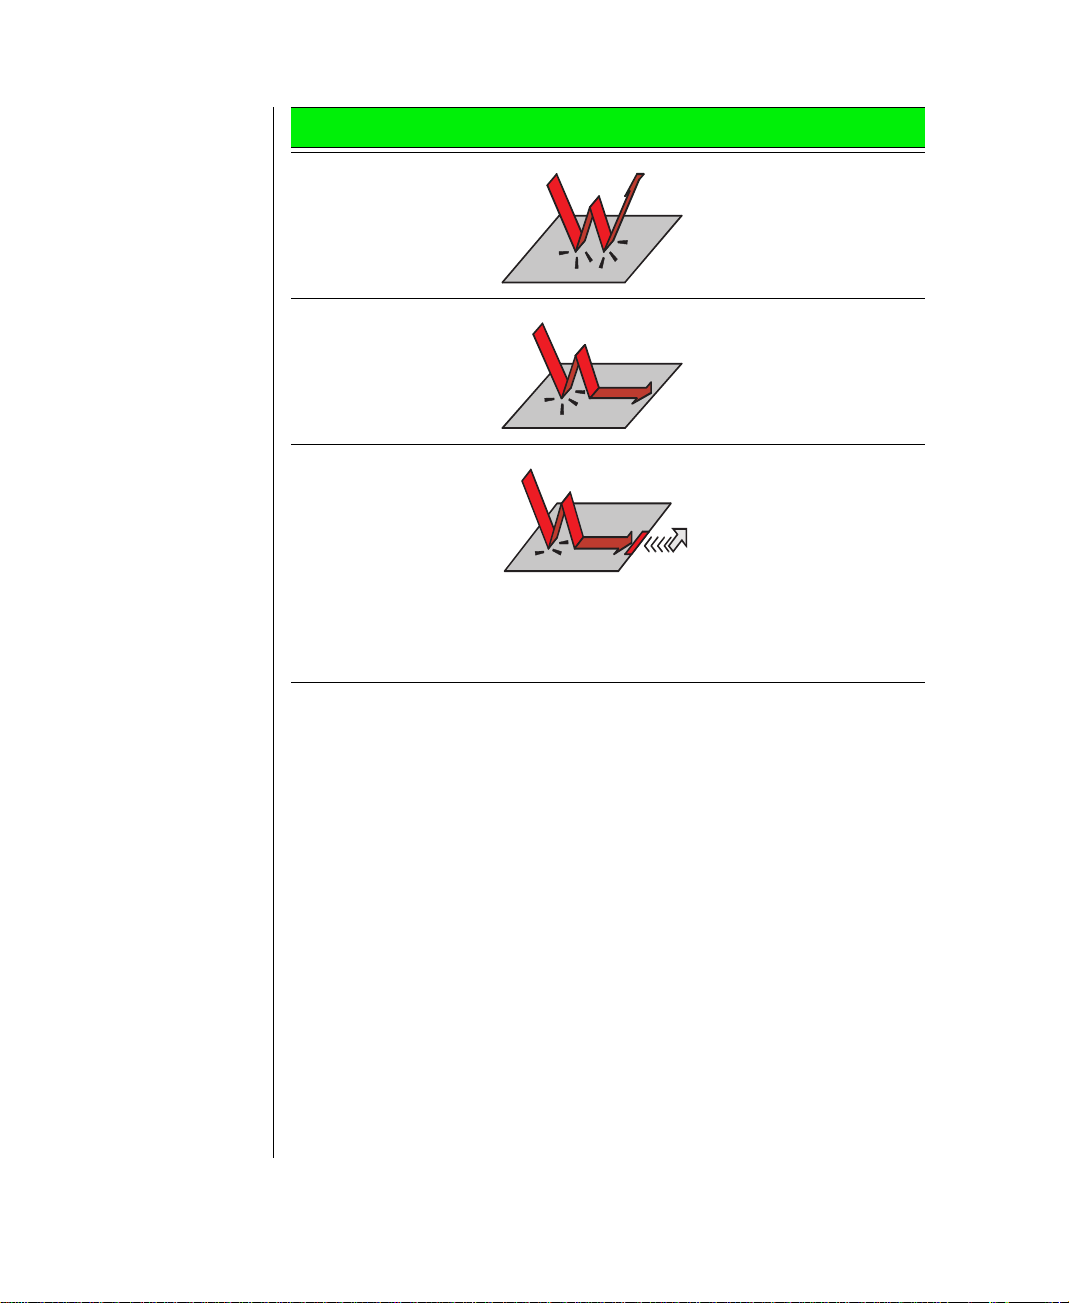
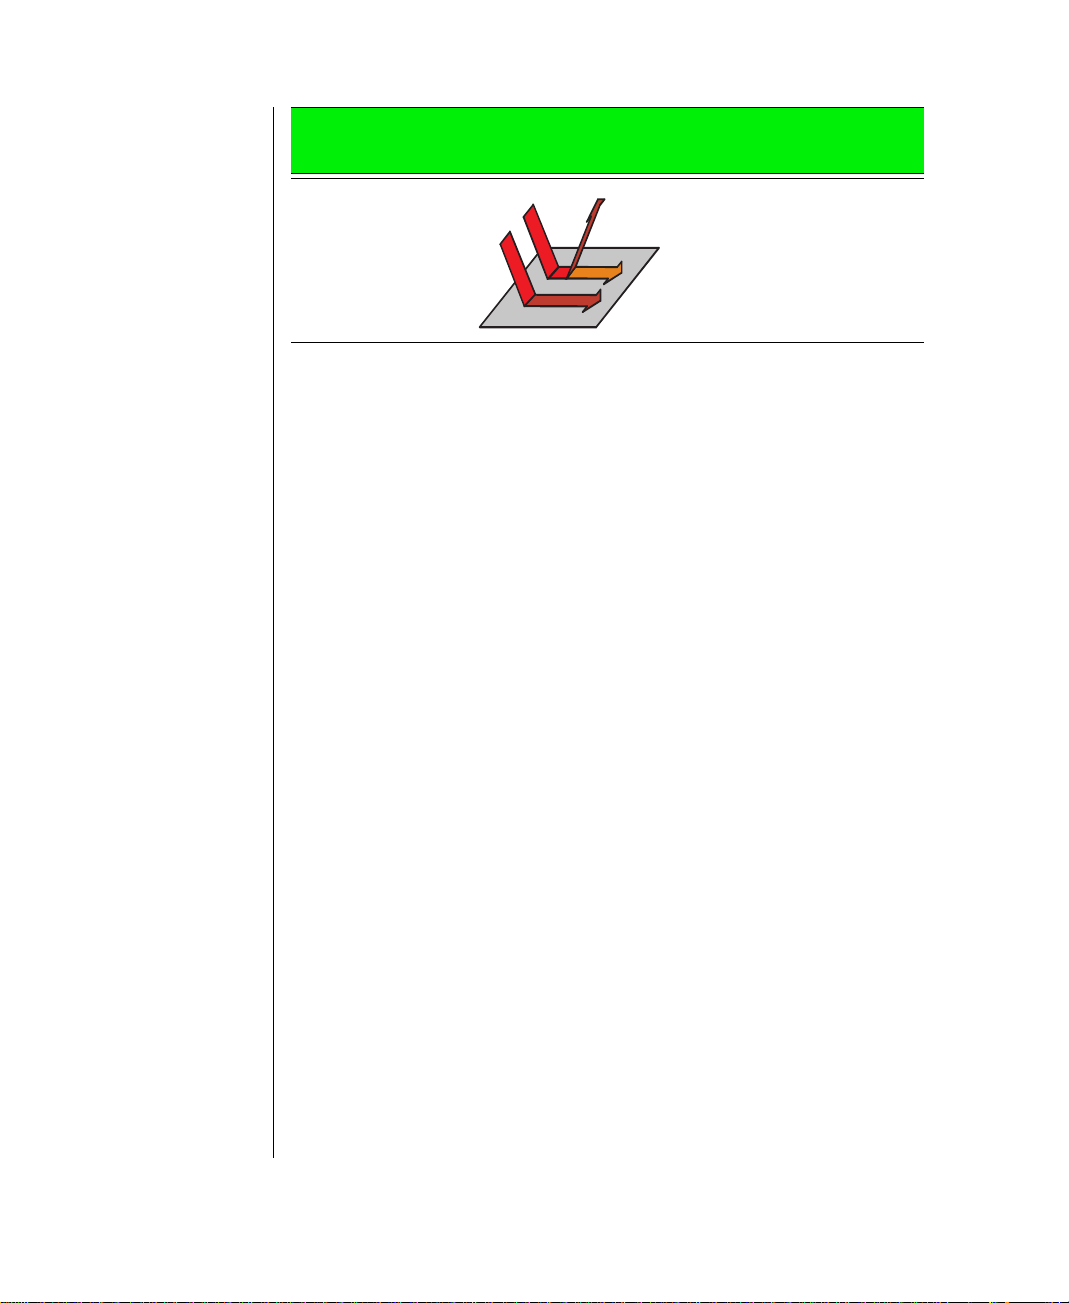
Mouse Action TouchPad Action
Left button double
click
Left button drag Double tap and drag.
Smart Edges Double tap and drag.
Double tap 1 finger.
When your finger stops
at an edge of the
TouchPad, the cursor
continues moving
across the screen until
you lift or move your
finger away from the
edge of the TouchPad.
22 Using Your Gateway Solo™ 9150 Notebook
Page 23
Mouse wheel equivalents
Wheel Mouse
Action
Rotate the mouse
wheel (roller)
CTRL + rotate the
wheel
SHIFT + rotate
the wheel
TouchPad
Equivalent
Scrolling Up/Down
Place finger on right edge
of the TouchPad and move
up/down.
Zoom in/out
Press CTRL while moving
finger along the right edge
of the TouchPad. This
changes the magnification
of the document.
Data zoom
Press SHIFT while moving
finger along the right edge
of the touchpad. You can
jump to a hyperlink, return
to previous Web sites using
Internet Explorer, or
expand or collapse menu
trees in Windows Explorer
using this method.
:
:
:
Click on the
wheel (middle
mouse button)
Autoscroll
T ap with two fingers to drop
Origin
an
sor moves away from this
origin, the document
scrolls. The direction and
distance from the origin
controls the scrolling direction and speed.
Any subsequent keystroke, mouse click, or
roller action stops the
scrolling action.
:
mark. As the cur-
Chapter 2: Using Your System 23
Page 24
Wheel Mouse
Action
TouchPad
Equivalent
Press the wheel
(middle mouse
button)
Panning
Same function as Autoscroll, except that the
action stops when you lift
your fingers.
:
24 Using Your Gateway Solo™ 9150 Notebook
Page 25
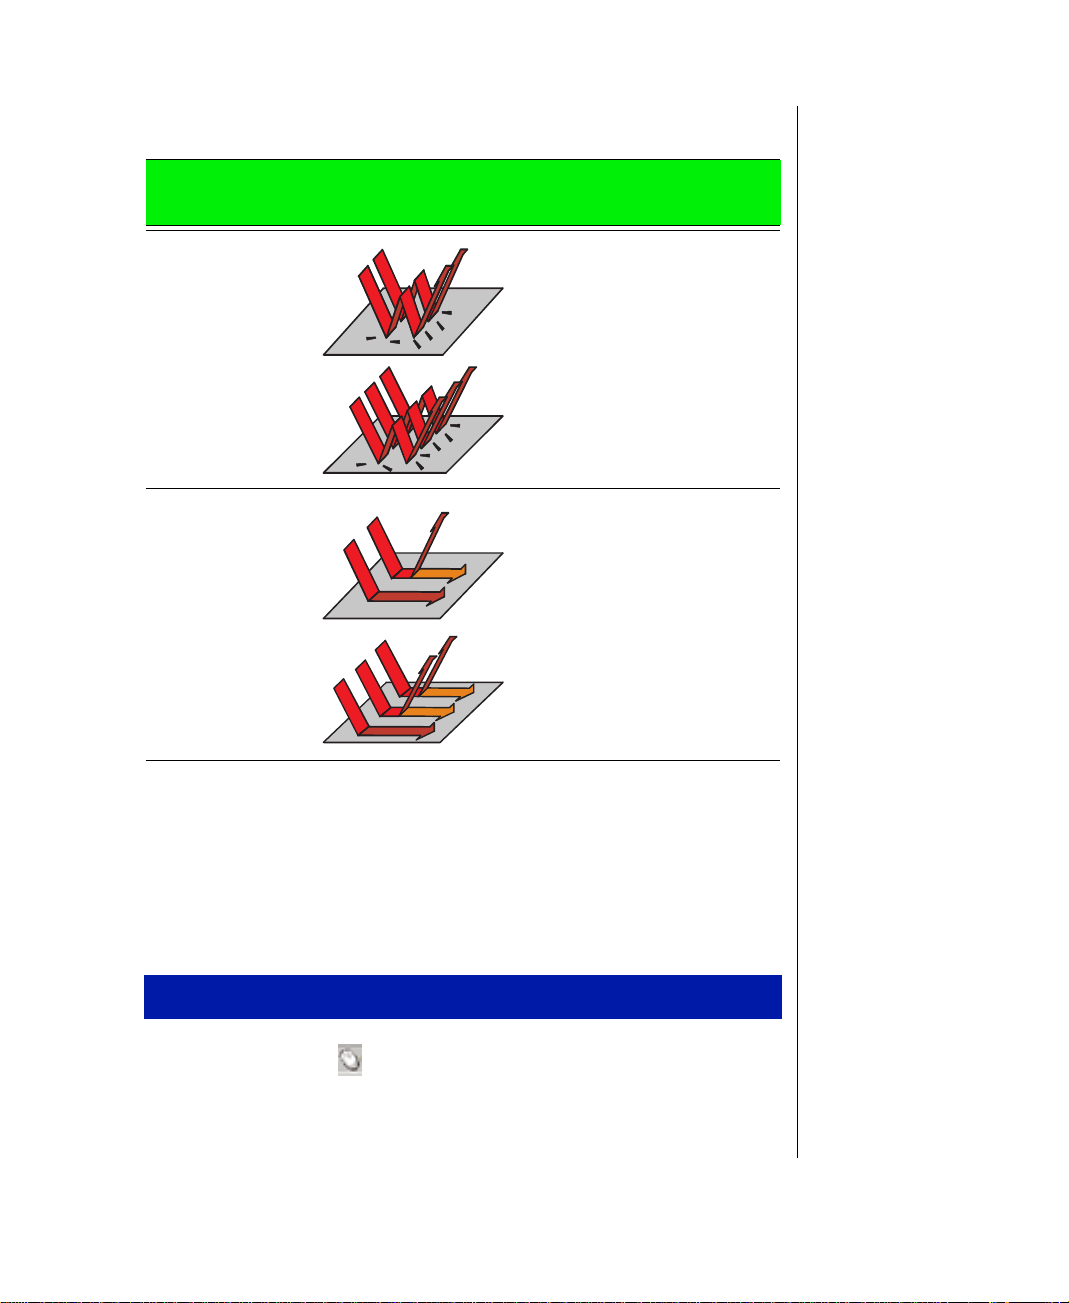
Advanced mouse and TouchPad action equivalents
Mouse
Action
Middle button
double click
Right button
double click
Middle button
drag
Right button
drag
TouchPad
Action
Double tap 2 fingers.
Double tap 3 fingers.
Slide 2 fingers. (2nd finger
does not need to stay on the
pad.)
Drag 3 fingers. (2nd and 3rd
finger do not need to stay on
the pad.)
Changing touchpad properties
Use the following procedure to change EZ Pad properties including pointer
size, button assignments, cursor speed and acceleration, scrolling speed,
and edge motion.
To customize the EZ Pad
Double-click the icon in the task tray (bottom right corner). The
1.
touchpad dialog box opens.
Chapter 2: Using Your System 25
Page 26
Click a tab in the
2.
Mouse Properties
dialog box, then customize the
touchpad functions.
In the taskbar located in the lower left corner of your screen click , then
MouseWare Help
to find more help about using the touchpad.
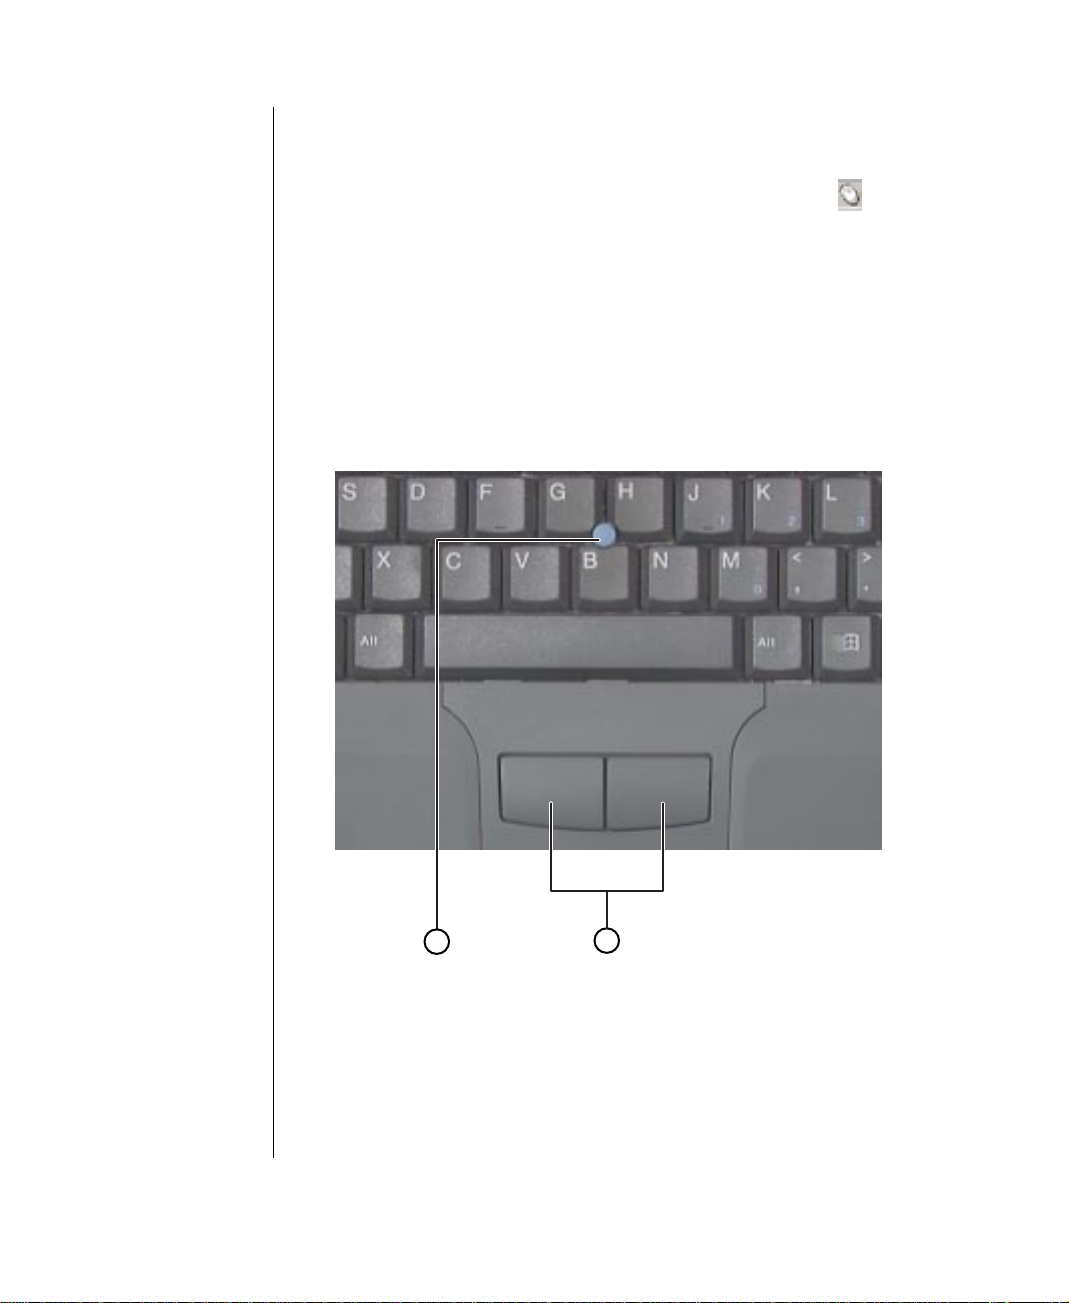
Using the EZ Po int stickpoint
The EZ Point pointing device (U.S. keyboards only) provides an easy way
to move the cursor across the screen and navigate through software. The EZ
Point consists of a stick located on the keyboard between the G and H keys
and two click buttons below the spacebar.
EZ Point stickpoint
A.
EZ Point select buttons (mouse buttons)
B.
26 Using Your Gateway Solo™ 9150 Notebook
A
B
Page 27

To use the EZ Point
Place your hands in the typing position and press the EZ Point
1.
stickpoint in the direction you want to move the cursor.
Press the EZ Point buttons to select items as you would with a mouse.
2.
Changing EZ P oint properties
Use the following instructions to change EZ Point properties including
pointer size, button assignments, cursor speed, and acceleration.
To customize the EZ Point
Click
1.
2.
3.
Start, Settings,
Double-click the
Click the tab of your choice and customize the EZ Point features.
Click
to save a change and keep the
Apply
then
Mouse
Control Panel
icon. The
. The Control Panel opens.
Mouse Properties
Mouse Properties
window opens.
window
open.
When all modifications have been made, click OK. The
4.
Mouse Properties
window closes.
Using an external mouse or keyboard
You can attach an external mouse or keyboard to the notebook using the
PS/2 port, the USB port, or the serial port. It is not necessary to shut down
the notebook before connecting to an external PS/2 mouse or keyboard.
Chapter 2: Using Your System 27
Page 28

Connecting the modem
Your Solo 9150 notebook came with a built-in 56K data/fax/voice modem
and a telephone cable. (The Solo 9150’s internal modem is only available in
the U.S., Canada, Japan, and Australia.)
To connect and use the modem
Insert one end of the telephone cable into the modem jack on the left
1.
side of the notebook.
Insert the other end of the telephone cable into any analog telephone
2.
wall jack.
Start your computer, then start your communications software.
3.
For more information on using your notebook’s modem and network
connections, see Chapter 4, “Getting Online.”
28 Using Your Gateway Solo™ 9150 Notebook
Page 29

Swapping Option Bay modules
Your notebook shipped with a DVD/120 MB SuperDisk or CD/diskette
combination drive. The modular option bay will accept the combination
drive or an additional battery. You must restart your notebook each time
they are swapped.
Modular Option Bay
Chapter 2: Using Your System 29
Page 30

To switch the combination module for the battery module
Save all work.
1.
Use your operating system’s
2.
Close the cover and turn your notebook over.
3.
Locate the modular bay access latch.
4.
Slide and hold the latch open, then place your fingers over the raised
5.
Shut Down
procedure.
bar near the front of the notebook.
Pull the combination drive module straight out and away from your
6.
notebook, then release the latch.
30 Using Your Gateway Solo™ 9150 Notebook
Page 31

Install the correct faceplate on the second battery. For details, see the
7.
instructions that come with the second battery.
Turn the battery module over. (Your notebook was already turned over,
8.
so the module being installed must be turned over as well.)
Firmly push the module straight into the bay until the latch clicks into
9.
place. If you don’t hear the click, try it firmly again, making sure it
clicks.
Important!
Anytime you replace a
module, you must restart
your notebook for the
module to work. The restart
has to occur
module is correctly seated.
after
the
Restart your system.
10.
Chapter 2: Using Your System 31
Page 32

Using audio
You can record audio for presentations, attach voice messages to your
e-mail, listen to audio CDs, and use your notebook’s audio function for
many other multimedia applications.
Adjusting the volume
There are many ways to adjust audio input and output on your Solo
notebook computer. The volume control wheel controls the Speaker Out
port and the internal system speakers. The volume level for other ports is
controlled by the multimedia software.
To adjust playback and recording volume levels
Click
1.
2.
Start, Settings
Double click the
, then
Control Panel
Multimedia
icon. The
.
Multimedia Properties
dialog box
opens.
Click the
3.
Set the
4.
Playback
Audio
tab.
and
Recording
levels to your preference.
To adjust volume controls
Double-click the Speaker icon on the taskbar.
1.
A
Volume Control
controls for master volume control, CD audio, wave, synthesizer, line,
microphone, and 3D Enhanced settings.
dialog box opens, containing volume and balance
32 Using Your Gateway Solo™ 9150 Notebook
Page 33

Slide the various volume and balance controls to suit your
2.
requirements.
Making an audio recording
To make an audio recording, use the built-in microphone or connect an
external microphone to the Mic port.
To make an audio recording
Note:
Connecting an external
microphone will disable the
built-in microphone.
1.
Click
Start, Programs, Accessories, Multimedia
, then
Sound Recorder
Sound Recorder opens.
Click
2.
3.
4.
5.
6.
Edit, Audio Properties,
Click OK.
Click ● (Record). Recording starts.
When you are finished recording, click ■ (Stop). Recording stops.
Click
File
, then
Save As
then set or check record volume levels.
.
. The
Chapter 2: Using Your System 33
Page 34

Name the recording.
7.
Important!
Be sure to place the D VD in
the tray so that the label side
is facing up. If the disc has
two play able sid es, place the
disc so that the name of the
side you want to p lay i s
facing up.
8.
Click
.The recording is saved.
Save
To play back a recording in Media Player
Click
1.
Start, Programs, Accessories, Multimedia
Media Player opens.
Click
2.
Select the file to play back.
3.
Click
4.
To play the file, click (Play) button. To stop the file, click ■ (Stop)
5.
File
Open
, then
.
Open
. The
dialog box appears.
Open
button.
, then
Media Player.
The
Using disc media
Your notebook may have a DVD drive. This section describes some of the
ways to use it.
To insert a DVD
Press the eject button. The DVD drive tray opens.
1.
Insert the DVD.
2.
Press down carefully on the DVD to ensure that it snaps under the
3.
clips that hold the DVD in the tray.
Push the tray in. The tray closes.
4.
34 Using Your Gateway Solo™ 9150 Notebook
Page 35

To access information on the DVD drive
After inserting the DVD, the program should autorun. If it does not,
follow the directions below.
Double-click the
1.
Double-click the DVD-ROM drive icon. The DVD application will
2.
My Computer
icon. The My Computer window opens.
appear.
Playing an audio CD
Both DVD and CD-ROMs accept standard data and music CDs. You can
play and control an audio CD using the Windows 98 or Windows 95 CD
Player application.
To play an audio CD
Insert an audio CD. After a few seconds, the CD starts playing
1.
automatically.
If the CD did not auto-start, then click
2.
Multimedia
Slide the mouse pointer slowly over the control buttons on the CD
3.
, and
CD player
to start the CD player software.
Start, Programs, Accessories
Player software to get familiar with each button function.
,
Chapter 2: Using Your System 35
Page 36

You can change music tracks, view playing times, control the volume,
set preferences, define a play list, and even set the system to
continuous or random play using the dialog box.
Control audio play as desired.
4.
36 Using Your Gateway Solo™ 9150 Notebook
Page 37

Removing or replacing the har d disk drive
If you choose to increase your storage space with a larger hard disk drive,
follow the instructions below to remove and replace the drive.
To remove and replace the hard disk drive
Save all work.
1.
Use your operating system’s shut down procedure to turn your
2.
notebook completely off.
Close the LCD lid.
3.
Disconnect the AC power and turn your notebook over.
4.
Locate the modular bay access latch on the bottom of your notebook,
5.
then slide and hold the latch open.
Remove the combination DVD/120 MB SuperDisk or CD/diskette
6.
module from the modular option bay.
Chapter 2: Using Your System 37
Page 38

Open the flap door next to the modular option bay to expose the hard
7.
drive.
A
B
Flap door
A.
Hard disk drive
B.
Grasp the hard disk drive flap and pull the hard disk drive straight out
8.
from the notebook.
38 Using Your Gateway Solo™ 9150 Notebook
Page 39

Slide the new hard drive firmly into your notebook and close the door.
9.
Do not force the hard disk drive!
Reinstall the drive module and connect the AC adapter.
10.
Chapter 2: Using Your System 39
Page 40

Important!
If you are using a Type III PC
Card, it must be inserted into
the bottom slot.
Using PC Cards
PC Cards, such as network and modem cards, interface with your hard disk
drive. Your notebook’s PC Card slots (also known as PCMCIA card slots)
are located behind the PC Card doors. These slots accept PC Card 16, PC
Card 32 (CardBus), or Zoomed Video cards.
You do not need to restart your notebook when changing most cards
because your notebook supports “hot-swapping.” This means that you can
insert a PC Card while your notebook is running. If your PC Card does not
work after hot swapping, refer to the PC Card manufacturer’s
documentation for further information.
To insert a PC Card
Insert the PC Card with the label face up.
1.
Push the card firmly into the PC Card slot. When the card is installed
correctly, the computer plays a two-toned beep.
To remove a PC Card
Click the
1.
Click the card that you want remove.
2.
Click
3.
Stop
the device.
Click OK.
4.
Press the PC Card eject button once to release the eject button.
5.
Press the PC Card eject button twice to eject the PC Card.
6.
Press the PC Card eject button three times to reset the eject button.
7.
40 Using Your Gateway Solo™ 9150 Notebook
icon in the taskbar.
PC Card
. A screen appears telling you that you may safely remove
Page 41

About CardBus cards
The 32-bit CardBus technology (sometimes referred to as “PC Card 32
cards”) supports DMA and bus mastering technologies that are useful in
performance-intensive applications such as full-motion video, high speed
network connections, full-motion video capture and display, and high
performance peripheral interfaces.
32-bit CardBus cards can be used interchangeably with 16-bit cards in your
notebook. However, some Solo docking solutions do not support CardBus.
CardBus cards function only in your notebook’s PC Card slots.
Using Universal Serial Bus (USB) ports
USB is an interface that serves as a single port alternative to connecting
devices that traditionally have required their own specific ports such as
mice, joysticks, keyboards, scanners, video conferencing cameras, and
speakers.
To use a USB-compatible device, connect it to the USB port. The USB
automatically installs and configures the necessary drivers and notebook
resources.
Using Fast Infrared (IR) ports
The IR port uses infrared technology to send and receive signals between
the notebook and a remote device also equipped with an IR port.
Your notebook shipped with the IR port enabled. A variety of desktop
computers, printers, and other peripherals are IR-equipped. To set up a
remote IR device, follow manufacturer instructions.
If you do not use the IR port and need to make more resources (IRQs)
available for other commonly used devices, the IR port can be disabled.
Chapter 2: Using Your System 41
Page 42

Note:
Reset your displa y setting
to 640 × 480 resolution with
large text fonts f or best
viewing.
Using Composite Video Out
By connecting a standard video cable to the Composite Video Out, you can
view your notebook display on a TV screen. The Composite Video In lets
you view and capture motion video or still images from a VCR or video
camera. Video capture software programs require windows drivers, which
are supplied with your notebook.
To perform the functions described in this section, you need to have a video
display program installed.
To connect your notebook to a TV
Connect one end of a standard video cable to the Composite Video
1.
Out on the notebook.
Connect the other end of the cable to the Video In connector on your
2.
television or VCR.
Press FN+F3 to switch to Composite Video Out.
3.
To connect a VCR/Camera to your notebook
Connect one end of a standard video cable to the Composite Video In
1.
on the notebook.
Connect the other end of the cable to the Video Out connector on your
2.
VCR or camera.
Switch to the TV IN video source by pressing FN+F7.
3.
42 Using Your Gateway Solo™ 9150 Notebook
Page 43

Using ATI Play er
ATI Player is a video capture utility program that lets you display, capture,
and edit video (single frame or video stream) from Composite Video In.
To use ATI Player
Important!
Your notebook
configuration does not
support Tuner Mode.
Connect Video Out of your external source, such as a video camera, to
1.
the Composite Video In on your notebook.
Connect Audio Out of your external source, if available, to the Line In.
2.
Press FN+F7 until
3.
appears in the VIDEOSRC window in the
TV IN
upper left corner of your screen.
4.
Click
Start, Programs, ATI Multimedia
, then
ATI Player
. The program starts.
The following information will assist you in getting started.
A
B
E
C
D
Note:
Click the
further details on the
capabilities of this progr am.
Help
button (E) for
F
G
V
O
Q
S
U
R
T
P
N
M
K
L
I
J
H
Chapter 2: Using Your System 43
Page 44

ATI Player Descriptions
CD Audio mode: Plays standard audio CDs.
A.
MPEG mode: Plays compressed/decompressed video and audio.
B.
TUNER mode: Not supported.
C.
CAPTURE mode: Captures still images from video input and
D.
displays full-motion video.
Displays
E.
Displays current file position.
F.
Opens file(s).
G.
Opens setup dialog where you can display player options.
H.
Mutes audio volume.
I.
Controls audio volume.
J.
Selects between audio tracks on dual mode MPEG CDs.
K.
Plays previous track.
L.
Plays next track.
M.
Displays current file name.
N.
Skips to last frame.
O.
Advances to 10 seconds later.
P.
Returns to 10 seconds before.
Q.
Skips to first frame.
R.
information.
Help
Plays full screen video.
S.
Plays current track or playlist repeatedly.
T.
Plays or stops playback.
U.
Slides to randomly search through the file and select a location.
V.
44 Using Your Gateway Solo™ 9150 Notebook
Page 45

Chapter 3:
Managing Power Consumption
Maintaining battery power.................................... 46
Battery learning software............................... 46
Battery status .................................................. 48
Swapping batteries................................................. 49
Maximizing battery life......................................... 51
Managing power.................................................... 52
Windows 98.................................................... 52
Windows 95 and Windows NT ..................... 55
Using the Power menu .......................................... 56
Status menu..................................................... 58
Page 46

Important!
Removing the battery or
disconnecting the AC
power will interrupt the
learning cycle. If the
learning cycle is
interrupted, it must be
restarted from the
beginning to properly
condition the battery.
Maintaining battery power
The notebook can run on a fully charged battery for about 3 to 4 hours of
normal use before the battery needs recharging.
As long as the AC adapter is properly connected, the battery will charge
while your notebook is operating.
Battery learning software
About once a year you will need to run the Battery Learning Software
to re-calibrate the battery gauge. This learning cycle increases the battery
gauge accuracy (gauge accuracy changes over time).
Because the learning cycle can take as long as 16 hours per battery, we
suggest that you let the Learning Cycle program run overnight.
To perform a learning cycle on the battery pack
Insert the battery into the battery bay.
1.
Plug the AC adapter into the notebook, then to an AC outlet.
2.
Insert the Portable System Restoration CD.
3.
Start up your notebook.
4.
After pressing the power button, watch for a message to appear on the
5.
bottom left side of your screen. This message will prompt you to press
F2.
Press F2 as soon as the message appears. The BIOS Setup program
6.
opens.
In the
7.
8.
Main
Change the
key.
Select the
9.
46 Using Your Gateway Solo™ 9150 Notebook
menu, select
Boot sequence
menu by pressing the right arrow key.
Exit
Boot sequence
value to
by pressing the down arrow key.
CD-ROM
by pressing the ( - ) minus
Page 47

10.
Select
Save Changes & Exit
by pressing E
NTER
, then press E
NTER
again.
At the next screen, select
11.
12.
Press E
NTER
. After the program loads memory for approximately 5 to
Boot from CD-ROM
.
10 seconds, another screen appears.
13.
14.
Select
Go to other options
Select
Battery learning...
by pressing the down arrow, then press E
(of your particular notebook model) by
pressing the down arrow.
15.
Press E
NTER
. A screen with a description of the Battery Learning
Software appears.
Press E
16.
After reading the last screen of instructions, press any key to continue.
17.
Type Y, then press E
18.
NTER
.
NTER
. After a couple of minutes, a screen showing
the progress of the Battery Learning Software appears.
Once the cycle is complete, follow the on-screen instructions.
19.
NTER
.
Chapter 3: Managing Power Consumption 47
Page 48

Battery status
You can check the battery status in several ways.
Position the cursor over the power cord or battery icon in the lower
♦
right corner of the taskbar. A battery status popup window appears.
Moving the cursor anywhere on the display closes the window.
Click twice on the power cord or battery icon in the lower right corner
♦
of the taskbar. A battery status window opens. Click on the
upper right corner of the screen to close it.
in the
X
Click on
♦
Management
Start, Settings
icon. You can view the battery status and set power
preferences from the
Press the FN and the F2 keys simultaneously. The Power Status
♦
, then
Control Panel
Power Management Properties
. Double click on the
window.
window appears in the upper left corner of the display. This window
monitors battery status and the power management selection. BAT1
monitors the status of the battery pack in the battery bay. Press the F
and the F2 (Status) keys again to close the window.
When the battery level gets low:
The system beeps three times.
♦
The battery icon in the lower right task bar has a red “X” over it.
♦
The Low Battery window appears, advising you to change your
♦
battery or switch to AC power immediately to prevent losing your
work. Connect the AC adapter to the notebook to recharge the battery.
Power
N
48 Using Your Gateway Solo™ 9150 Notebook
Page 49

Swapping batteries
Battery packs can be “warm-swapped.” This means that you can change
battery packs while in Standby mode.
To replace the battery pack
Save all work.
1.
Press the FN and the F4 keys simultaneously. The notebook goes into
2.
Standby mode.
Close the cover and turn your notebook over.
3.
Slide the battery release latch toward the center of the notebook.
4.
Hold the latch in its release position and place your fingers over the
5.
raised bar on the battery pack next to the latch.
Important!
Since notebooks only
operate in Standby mode
for a short time without
power, battery swapping
should be done quickly.
Slide the battery pack straight out and away from your notebook, then
6.
release the battery release latch.
Chapter 3: Managing Power Consumption 49
Page 50

Slide a recharged battery pack (bottom side up) straight into the
7.
battery bay until it snaps into place.
Turn the notebook right side up and open the cover.
8.
Press the power button. The notebook resumes power.
9.
50 Using Your Gateway Solo™ 9150 Notebook
Page 51

Maximizing battery life
You can extend the battery life by following these practices:
Dim the display brightness as low as is comfortable.
♦
Close the LCD lid when not in use. The LCD display stays off until
♦
you open the lid.
If your PC Card uses battery power even when not in use, remove the
♦
card between uses. Check the PC Card manufacturer’s documentation
for your card’s power requirements.
Keep the battery pack in the computer when using AC power to
♦
continuously charge the battery.
Use the DVD or CD-ROM only when necessary. (Both of these drives
♦
use a large amount of battery power.)
See “Managing power” on page 52 for more information about changing
the power management settings in Windows 98.
See “Using the Power menu” on page 56 for more information about
accessing the Power menu settings in the BIOS Setup program for
Windows 95 and Windows NT.
Chapter 3: Managing Power Consumption 51
Page 52

Managing power
Power management is handled differently in Windows 98 than in Windows
95 and Windows NT. The following sections address these differences.
Refer to the section that applies to your operating system.
Windows 98
To manage your power management settings in Windows 98, you do not
need to open the BIOS Setup program. This is only necessary if you want to
change the power button setting. Instead, Windows 98 includes a Power
Management Properties dialog box.
To use the Power Management Properties
Click
1.
2.
3.
Start, Settings
In the Control Panel window, double-click the
The
Power Management Properties
Click the appropriate tab to view and modify settings.
, then
Control Panel
dialog box appears.
.
Power Management
icon.
52 Using Your Gateway Solo™ 9150 Notebook
Page 53

Creating power schemes
The
Portables/Laptop
power scheme changes the settings to maximize the
battery life of your notebook.
You can select one of three pre-defined power schemes from the
schemes
drop-down list.
You can also create your own power scheme and add it to the list.
To create a power scheme
Click on
1.
Double-click the
2.
Start, Settings
Properties window appears.
Click to select the Power Schemes tab.
3.
Set the properties as you want them to be in your power scheme, then
4.
Save As
.
click
Type a name for your power scheme, then click OK.
5.
Select your power scheme from the
6.
, then
Control Panel
Power Management
.
icon. The Power Management
Power scheme
drop-down list.
Power
Click OK to apply the change.
7.
Chapter 3: Managing Power Consumption 53
Page 54

Alarm settings
Your notebook is equipped with alarms that can alert you if your battery
power is running low.
An Alarms tab is located in your Power Management Properties dialog box.
You can turn the alarms on and off, set the time when your notebook alerts
you of a low battery, then select how you want to be notified.
54 Using Your Gateway Solo™ 9150 Notebook
Page 55

Using Standby mode in Windows 98
Windows 98 uses Standby mode (which is referred to as Suspend mode in
Windows 95). When in Standby mode, your notebook enters a sleep state,
cutting off power to most devices except memory.
The following table shows how to change the system modes in
Windows 98.
If your
notebook
...and you
want to...
...then do this
is...
Off Start up Press the power button.
On Standby Click Start, Shut Down, Standby, then
click OK.
- OR -
FN+F4.
Press
In Standby
mode
On Shut down Click Start, Shut Down, click Shut Down
Resume
power
Press the power button briefly.
again, then click OK.
Windows 95 and Windows NT
To manage your power management settings in Windows 95 and
Windows NT, you need to go into the BIOS Setup program and change the
power management settings. See “Using the Power menu” on page 56 for
more information on these settings and how to modify them.
Using Suspend mode in Windows 95 and Windows NT
Windows 95 and Windows NT use Suspend mode (which is referred to as
Standby mode in Windows 98). When in Suspend mode, your notebook
enters a sleep state according to the power management settings. Suspend
mode cuts off power from most devices except memory.
Chapter 3: Managing Power Consumption 55
Page 56

The following table shows how to change the system modes in Windows 95
and Windows NT.
If your
notebook
...and you
want to...
then do this
is...
Off Start up Press the power button.
On Suspend Click Start, then Suspend.
In Suspend
mode
On Shut down Click Start, Shut Down, Shut down the
Resume
power
Press the power button briefly.
computer, then click Yes.
Using the P ower menu
The Power menu is a part of the BIOS Setup Utility that contains the power
management settings. Use the Power menu to make changes to the
notebook to improve the battery-powered session time and performance.
The rest of the BIOS Setup screens are explained in Maintaining and
Troubleshooting Your Solo Notebook.
To access the Power menu
Start your notebook.
1.
Press the F2 key when prompted to do so.
2.
56 Using Your Gateway Solo™ 9150 Notebook
Page 57

The “Entering Setup...” message appears briefly and then the Main
3.
menu appears.
PhoenixBIOS Setup Utility
Main Advanced Security Power Exit
Item Specific Help
Power Button Mode:
PM Control:
Power Savings:
Sleep timeout:
Standby timeout:
Hard disk timeout:
Video timeout:
Audio timeout:
Battery Low standby:
Resume On Modem Ring:
Resume On Time:
Resume Time:
Auto Dim With Battery Only:
F1 Help ↑↓ Select Item -/+ Change Values F9 Setup Default
ESC Exits ←→ Select Menu Enter Select > Sub-Menu F10 Save and Exit
Use the keys identified at the bottom of the screen to navigate through
4.
Cooling Control:
[On/Off]
[Battery]
[Maximum Battery Life]
2 Minutes
10 Minutes
2 Minutes
4 Minutes
2 Minutes
[On]
[Off]
[Off]
[00:00:00]
[On]
[Silence]
Select Power button
functionality.
Standby/Resume: Button
functions as “Standby/
Resume” switch. If you
want to turn the power
off in this mode, you
must press and hold
power button over 2
seconds.
On/Off: Button functions
as “On/Off” switch.
the various options. An Item Specific Help bar providing additional
information is also located to the right of each menu.
This screen example is similar to what you see on your LCD.
However, you may have a notebook with a newer BIOS version than
the one described in this manual. If there are differences, see the
information in the Item Specific Help box in the right column of the
BIOS Setup menu.
Chapter 3: Managing Power Consumption 57
Page 58

Important!
In Windows 98™,
Microsoft® has replaced
the term “Suspend” with
“Standby .”
Standby is used when
referring to Windows 98™
and Suspend is used when
referring to Windows 95™.
Important!
Changes in power
management levels are
temporary and do not affect
the power settings in the
BIOS setup screens. The
changes are only in effe ct
until the notebook is
restarted, then the BIOS
power settings are restored.
The following settings are most commonly changed:
♦
Power button mode
sets power switch functionality. When you press the
power button, the notebook can be set to either Shut Down or Standby.
Press the spacebar to select
♦
PM Control
•
provides preset or customized power management.
Setting this option to
Maximum Performance
On/Off
or
Standby/Resume
.
gives the best system
performance.
•
Setting this option to
Maximum Battery Life
gives the best battery
performance.
•
Setting this option to
Hard disk,
and
Video timeouts
Customize
lets you manually set the
. Press the spacebar to choose between
options.
♦
Auto dim with battery
battery power only. Press the spacebar to select
decreases the LCD brightness 50% when using
.
or
On
Off
Status menu
The
in the upper left corner and closes after about 30 seconds.
menu is supported by the VGA controller chip. The menu opens
Status
Standby,
♦
Power status display appears when you press the F
with the F2 (Status). It shows current battery status. The display is
updated when you change any function choice.
♦
Battery status appears in the top two lines. The first line reflects the
status of the primary battery pack. The second line reflects the status
of the optional secondary battery.
The power management levels appear in the third and fourth lines. You
can change power management levels during setup.
AC power status is monitored on the fifth line.
♦
The Brightness meter shows the brightness level for the LCD panel.
Press the F
to increase or decrease the brightness level.
58 Using Your Gateway Solo™ 9150 Notebook
N
key together
N
key simultaneously with the up arrow or down arrow key
Page 59

Chapter 4:
Getting Online
Using the Internet .................................................. 60
Using e-mail.................................................... 61
Sending e-mail................................................ 62
Checking your e-mail..................................... 63
Exploring the World Wide Web.................... 65
Using Microsoft Fax.............................................. 67
Setting up Microsoft Fax................................ 67
Sending and receiving faxes .......................... 69
Page 60

Using the Internet
The Internet is a worldwide network of computers linked together to
provide information to users everywhere. You can access this global
network by connecting your computer to a normal phone line and signing
up with an Internet service provider. Internet services include e-mail and
the World Wide Web.
E-mail (electronic mail) lets you send messages to anyone in the world, as
long as you and the recipient both have Internet connections and
e-mail addresses.
Note:
For more info rmation on
modems, see “Connecting
the modem” on page 28.
Important!
Downloading (receiving
files from the Internet) is not
always f ast. Sometimes
large files and slow
connection speeds
contribute to slow
downloading.
The World Wide Web is a user-friendly interface to the Internet that gives
you point-and-click access to millions of sources of information. Almost
everything is available for download, including pictures, sounds, and
programs.
To begin your journey through the Internet you need:
♦
Modem — a device installed in the computer that connects the
computer to a phone line. Your Solo 9150 notebook has a built-in 56K
data/fax/voice modem.
♦
Internet service provider (ISP) — a connection between the modem
and the Internet, such as gateway.net.
♦
Web browser — an application that translates information from the
Internet service provider to the computer. The Microsoft® Internet
Explorer™ Web browser is already installed on your notebook.
To understand Internet functions, you should know the following terms:
♦
Electronic mail (E-mail) — messages transmitted by telephone lines.
♦
E-mail address — an Internet address to which e-mail can be sent.
This address designates a location on the Internet that messages and
files can be sent to.
♦
Downloading — transferring a copy of a file from a remote server
(see definition on following page) or computer to your computer’s
hard drive.
♦
Link — a word or image within a Web page on which you can click to
go to another Web page or access additional information.
60 Using Your Gateway Solo TM 9150 Notebook
Page 61

♦
Home page — a file that appears after connection has been made to a
Web site address. This page contains links that will guide you
throughout the Web site and may link you to other Web sites.
♦
Server — a computer or computer program that saves data in a
storage area. This data can be downloaded to your computer for
manipulation or printing purposes.
Using e-mail
You can send e-mail (electronic mail) over the Internet to anyone on the
Internet with an e-mail address.
Sending e-mail requires no postage or other additional fees — it is a free
service of your Internet account. And, because the Internet never “closes,”
you can send e-mail messages at any time of the day or night. Your e-mail
arrives at most Internet e-mail addresses in minutes.
An e-mail address consists of a user name, the @ symbol, and the “domain
name” of the ISP or company that “hosts” that user. Your e-mail address is
assigned when you sign up for an account with an ISP. For example, a
person with an account with the gateway.net ISP might have this e-mail
address:
jdoe@gateway.net
which is...
User name at Internet domain name
The domain name of gateway.net ISP users ends with .net (to designate a
network-oriented host). However, other Internet domain names may have
other suffixes such as .com (mostly US commercial hosts), .edu (US
educational hosts), .org (organizations), or .gov (US government).
Regardless of the Internet domain name, the steps in sending and receiving
e-mail are the same.
Chapter 4: Getting Online 61
Page 62

Sending e-mail
If you have signed up for an account with the gateway.net Internet access
service, your e-mail is set up and ready to use.
To send e-mail
Important!
These instructions are
specific to the gateway .net
Internet access service.
If you have an ac count with
a different Internet Service
Provider, or are using a
different e-mail application,
refer to the documentation
from that ISP or software
manufacturer.
Log on to your gateway.net account (or other ISP account).
1.
After the computer connects, the Web browser opens. (If you are using
another ISP, start your Web browser.)
From the Web browser start your e-mail application:
2.
•
If you use the Microsoft Internet Explorer Web browser, click Go,
then
. This opens the Microsoft Outlook Express e-mail
Mail
application.
•
If you use the Netscape Navigator Web browser, click
Communicator
, then
Messenger Mailbox
. This opens the Netscape
Messenger e-mail application.
Open a new message window:
3.
•
If you use the Microsoft Outlook Express e-mail application, click
Compose
•
If you use the Netscape Messenger e-mail application, click
Message
In the new message window type the e-mail address of the person you
4.
, then
, then
New Message
New Message
want to send your message to in the
.
.
field (if you have multiple e-
To :
mail addresses, separate them with semicolons), then type in the
Subject:
and your message.
62 Using Your Gateway Solo TM 9150 Notebook
Page 63

New Message window i n
Microsoft Outlook Express
5.
Click
Send
.
After the message has been sent, you can close your e-mail and Web
browser applications and disconnect from your Internet service.
The e-mail is routed over the Internet and, after a few minutes
(or longer, depending upon Internet conditions), it arrives at the
recipient’s e-mail account.
Because your e-mail address is contained in your message, the recipient
only needs to click a “reply” button to respond to your e-mail.
Checking y our e-mail
For you to receive e-mail, someone must first send an e-mail to your e-mail
address. (If you have an account with the gateway.net ISP, your address is
your user name at gateway.net, for example, jdoe@gateway.net.)
When someone sends an e-mail to you, it arrives at your e-mail account on
a gateway.net computer usually within minutes (depending upon Internet
conditions).
To check your e-mail
Log on to your gateway.net account (or other ISP account).
1.
Important!
These instructions are
specific to the gateway .net
Internet access service.
If you have an ac count with
another Internet Service
Provider, or are using
another e-mail application,
refer to the documentation
from that ISP or software
manufacturer.
Chapter 4: Getting Online 63
Page 64

After your computer has connected, the Web browser opens. (If you
are using another ISP, start your Web browser.)
Start your e-mail application:
2.
•
If you are using the Microsoft Internet Explorer Web browser, click
Go
, then
. This opens the Microsoft Outlook Express e-mail
Mail
application.
•
If you are using the Netscape Navigator Web browser, click
Communicator
, then
Messenger Mailbox
. This opens the Netscape
Messenger e-mail application.
Check for new messages:
3.
•
If you are using the Microsoft Outlook Express e-mail application,
Too ls
, then
Send and Receive
, then
New
click
•
If you are using the Netscape Messenger e-mail application, click
File, Get Messages
.
.
If you have new e-mail, it is downloaded to your computer and
displayed in your e-mail inbox.
To read a message, double-click it.
4.
The message opens.
After you have received your e-mail messages, they remain on your
computer until you delete them. (For information about deleting a
message, see your e-mail application's online help.) Also, you do not
need to be connected to the Internet to read messages that you have
already received.
64 Using Your Gateway Solo TM 9150 Notebook
Page 65

Exploring the World Wide Web
Once your Internet service is set up, you are ready to explore the Internet.
To do this, you need to use a Web browser. In our example below we use
Microsoft Internet Explorer to visit the Gateway Web site.
To browse the World Wide Web
Connect to the Internet service. Depending upon your Internet service
1.
provider, you may be prompted to provide your user ID and password.
Double-click the
2.
Internet Explorer
Internet Explorer opens.
Go to a Web site by typing its address in the browser’s address bar (for
3.
example,
http://www.gateway.com
icon on the desktop. Microsoft
) then pressing E
NTER
.
Important!
Web site addresses are not
always permanent. If an
error screen appears that
states the file cannot be
found, verify that y ou ha ve
typed the correct address. If
a screen stating the file
cannot be found appears
again, the Web site has
either changed location or
no longer exists.
Chapter 4: Getting Online 65
Page 66

The Web browser locates the site, downloads the text and graphics to
the computer, and displays the site in the browser window. In the
following illustration, the Gateway Web site appears in Microsoft
Internet Explorer.
Address bar
Display area f or
Web pages
Refer to the Web browser’s online help to learn more about using the Web
browser, exploring the Web, and printing and saving information.
66 Using Your Gateway Solo TM 9150 Notebook
When you move the cursor over the screen
and it changes to a hand, you can click to link
to another page or section of the Web site.
Page 67

Using Microsoft F ax
To fax documents with Windows 98 and Windows 95, we recommend using
Microsoft Fax, which is available in both operating systems.
Setting up Microsoft F ax
Although Windows 98 and Windows 95 look very similar, the setup
required for Microsoft Fax is different for each operating system.
To set up Microsoft Fax in Windows 95
Double-click the
1.
. The Control Panel appears.
Panel
Click
2.
3.
Add/Remove Programs
If it is not already selected, click to select the
My Computer
the check box is already selected, exit
icon on your desktop, then click
, then click the
Windows Setup
Microsoft Fax
Add/Remove Programs
tab.
check box. If
and stop
here. If a message asks you to include all required components, click
and go to next step.
Yes
Click OK at the bottom of the
4.
Add/Remove Programs
window. If the Inbox
Setup Wizard appears, go to Step 5. If the Inbox Setup Wizard does
not appear, follow the instructions on the screen.
In the Inbox Setup Wizard, click the
5.
Properties
button and make sure
your active modem is selected. If the wizard prompts you for mail
information you do not have, click
restart the wizard and clear the check boxes for
Internet Mail
The default Answer mode is
6.
.
Don’t Answer
to exit the wizard, then
Cancel
Microsoft Mail
. If another program uses the
and
same COM port as your modem, keep the default setting. Otherwise,
change the Answer mode to either
Manual
or
Answer After
. Select
if you will use your phone line for voice calls or other programs. If you
will use your modem only for faxing, choose
Answer After
. Click OK to
save changes.
Control
Manual
Chapter 4: Getting Online 67
Page 68

Click to indicate whether you want Microsoft Fax to answer all
7.
incoming calls, then click
Next
.
Fill in your personal and phone line information, then click
8.
If you chose to install Microsoft Mail, enter the path to your Post
9.
Office, which you can get from a server administrator.
If you chose to install Internet Mail, enter the information requested in
10.
the next few windows.
If this is your first Microsoft Fax installation, select the default path for
11.
Personal Address Book by clicking
Choose whether you want Microsoft Exchange to automatically run
12.
Next
.
when you start Windows 95. Remember that you need to have
Microsoft Exchange running to receive faxes. Click
13.
Click
. Microsoft Exchange opens. If the Mail logon dialog box
Finish
Next
.
appears and states that you do not have a post office set up, click
. You will still be able to use Microsoft Fax.
Offline
To set up Microsoft Fax in Windows 98
Insert the Windows 98 CD into your DVD or CD drive.
1.
Next
.
Double-click on the DVD or CD icon in Microsoft Windows Explorer,
2.
then open the folder
Double-click the file
3.
installation instructions.
After Windows Messaging is installed, double-click the file
4.
and follow the Microsoft Fax instructions.
68 Using Your Gateway Solo TM 9150 Notebook
\tools\oldwin95\message\us\
wms.exe
, then follow the Windows Messaging
.
awfax.exe
Page 69

Sending and receiving fax es
To send a fax
To send a fax using the Start button:
Click the
1.
Click
2.
Start, Programs
, then click
Fax
, then
Accessories
Compose New Fax
.
. The Compose New Fax Wizard
opens to guide you in preparing your fax. Follow the instructions on
the screen.
- OR -
To send a fax using Microsoft Exchange:
Double-click the
1.
Click the
2.
Compose
icon to run Microsoft Exchange.
Inbox
menu, then click
New Fax
. Follow the instructions in
the Compose New Fax Wizard.
- OR -
To send a fax by printing to Microsoft Fax:
Open the document that you want to fax (for example, a Microsoft
1.
Word document).
Select the
2.
Select
3.
menu, then click
File
Microsoft Fax
.
Print
from the list of printers, then click OK. Follow the
instructions in the Compose New Fax Wizard.
To receive, view, and print a fax
Double-click the
1.
If you have already changed the Answer Mode to
2.
go to Step 8. Otherwise, go to the next step.
Click the
3.
Properties
menu,
Tools
window appears.
icon. Microsoft Exchange opens.
Inbox
Microsoft Fax Tools
, then
Answer After
Options
. The
or
Manual
Microsoft Fax
Chapter 4: Getting Online 69
Page 70

Click the Modem tab in the Microsoft Fax Properties window.
4.
Click the
5.
Properties
selected. (The default Answer mode is
button and make sure your active modem is
Don’t Answer
.)
If another program uses the same COM port as your modem, keep the
default setting. Otherwise, you must change the Answer mode to be
able to receive faxes.
If you will use your phone line for voice calls or other programs, select
6.
.
Manual
- OR -
If you will use your modem only for faxing, select
7.
Click OK to save changes.
8.
Close the Microsoft Fax Properties window, but leave Microsoft
9.
Answer After
Exchange open to receive faxes. You are notified when a fax arrives.
After a fax is received, click the
10.
folder in the Personal Folders
Inbox
window, then double-click the first fax in the list. The fax document
opens in the FaxViewer.
11.
Click
to print the fax.
Print
.
70 Using Your Gateway Solo TM 9150 Notebook
Page 71

Appendix A:
Solo Notebook Accessories
Page 72

Note:
For more info rmation on
this or other Gateway
accessories for your
notebook, visi t o ur we bs it e
www.gateway.com
at
(800) 846-2000.
or call
Accessories
We offer many accessories that can help you make the most of using your
Solo notebook. Check out our web site or call our Add Ons group to find
products that will best fit your needs.
The Docking station is a full-featured expansion unit designed for mobile
users who require the modularity and functionality of a desktop system.
The docking station’s key features include two dual expansion slots (PCI or
ISA), a 3.5" hard drive expansion bay, a 5.25" or 3.5" device expansion bay,
two PC Card slots, built-in stereo speakers, and a removable monitor stand.
Other features are the MIDI/game port and two PS/2 ports. These ports give
you the capability to attach such peripheral devices as a mouse, joystick, or
an external keyboard to the docking station. Once you connect the
peripherals, you can leave them attached for the next use.
The Mini-docking station enhances the capabilities of your Solo notebook
by providing a connection to external devices such as a monitor, keyboard,
mouse, printer, serial device, joystick, external power, speakers, and
microphone. This docking station provides additional PC Card slots for
expanded functionality when using network cards, SCSI adapters, and
modems.
The extra battery pack provides power when you’re on the road and
cannot use the AC power adapter.
The battery charger charges your notebook’s battery packs. It takes
approximately two to three hours to charge a fully discharged battery. This
battery charger has two LEDs to indicate battery charge status.
The automobile/airplane adapter provides a safe and easy way to plug
your notebook into industry-standard EmPower in-seat power receptacles.
These receptacles can be found on major airlines, cars, boats, or recreation
vehicles.
Accessories such as memory modules, external keyboards, speakers,
carrying cases, printers, tape backup units, hard drives, modems, network
cards, software, and uninterruptable power supplies (UPS) are also
available.
72 Using Your Gateway Solo TM 9150 Notebook
Page 73

Appendix B:
Contacting Gatewa y
Page 74

Contacting Gateway
If you have any trouble while using your Gateway Solo Multimedia
Notebook, please contact Gateway. You will need to supply your Client ID,
serial number, and order number to the customer support technicians. Your
Client ID number and order number can be found on your invoice. The
serial number can be found on the bottom of your notebook. Make a
note of these numbers here.
Client ID: _____________________________
Serial Number: _________________________
Order Number: _________________________
If your computer is ever stolen, be sure to contact your local police and a
Gateway representative at once. We will put a note on the account so that if
anyone calls trying to use your notebook serial number, we will contact you
immediately.
Gateway offers a wide range of customer service, technical support, and
information services. If you have questions or problems, contact the
Gateway service that is most appropriate.
For assistance or
information about:
Systems, pricing,
orders, billing statements, warranty service,
and other non-technical
issues.
Problems with hardware or software.
The Gateway Web site
which contains a variety
of information about
Gateway. (Modem
required.)
74 Using Your Gateway Solo TM 9150 Notebook
Contact: At:
Sales & client support:
If outside the US,
check your warranty
booklet for numbers
Portables technical
support:
US - toll free
Canada - toll free
World Wide Web:
US and Canada http://www.gateway.com
800-846-2000
800-846-2302
800-846-3609
Page 75

Index
A
AC connector 12
power 14
accessories
notebook 72
address bar 65
answer mode 67
answer after 67
manual 67
applications
e-mail 62
key 19
Microsoft Internet Explorer 65
Web browser 65
arrow down 18
arrow up 18
assistance resources 74
ATI player 42
audio
connectors 41
Dolby Digital Out 9
Line In 8
Line Out 9
speakers 5
audio recording
creating 31
auto dim with battery 15
automobile/airline adapter 72
69
,
33
,
58
,
B
back ports cover 11
battery 46
battery learning
battery LED 5
72
,
charger 72
gauge 46
latch 11
maintaining 46
status 48
software 46
battery life
maximizing 51
battery pack
bay 11
replacing 49
battery status 58
BIOS setup utility 57
brightness 18
browser 60
button
eject 7
power 5
reset 11
15
,
C
calling Gateway 72, 74
Caps lock 6
CardBus 39
CD-ROM
drive 5
playing 35
charging
battery pack 48
client ID 74
combination module 11
composite video (TV) 41
connecting
AC power 14
modem 7
contacting Gateway 72
, 40,
75
,
D
data modem 60
decrease
LCD brightness 18
display 5
display type 11
docking station 72
docking station port 9
Dolby Digital Out 9
,
TV 17
15
74
75
Page 76

downloading 60
drive
120 MB SuperDisk 5
CD-ROM 5
combination 5
diskette 5
DVD 5
hard disk 5
DVD
drive 5
playing 34
E
eject buttons 7
e-mail 60
checking 63
introduction 61
sending 62
e-mail address 60
external
headphones 9
microphone 8
monitor 5
mouse 27
speakers 9
EZ-Pad
touchpad 5
touchpad properties 25
EZ-Point
stickpoint 5
stickpoint properties 27
15
,
,
,
F
F10 18
F11 18
F12 18
F2 17
F3 17
F4 17
F7 17
F9 18
Fast IR port 8
fax modem 60
40
,
20
26
faxes
printing 69
receiving 69
viewing 69
11
,
flip foot 11
function keys 16
pad lock 18
pause 18
scroll lock 18
G
Gateway
contacting 74
Gateway Web site 65
gateway.net
checking e-mail 63
sending e-mail 62
H
hard drive 5, 37
access cover 5
access light 6
removing 37
replacing 37
home page 61
http://www.gateway.com (US site) 74
hyperlink 60
I
increase
LCD brightness 18
indicator 6
Caps lock 6
CD/diskette drive 6
DVD/120 MB drive 6
hard drive access light 6
Pad lock 6
system status 5
infrared port 8
inserting PC cards 39
Internet 60
e-mail 60
Gateway Web site 65
World Wide Web 65
40
,
, 61, 62,
63
76 Using Your Gateway Solo TM 9150 Notebook
Page 77

Internet Explorer 60, 65
Internet service provider 60
ISP 60
J
jack
modem 7
speaker out/headphone 9
joystick/MIDI port 8
K
Kensington lock slot 12
keyboard 5
keypad 18
keys
application 19
break 18
F10 18
F11 18
F12 18
F2 17
F3 17
F4 17
F7 17
F9 18
Fn 17
function 16
pad lock 19
shortcut 16
special 19
Windows 19
, 16,
17
L
LCD 5, 15
brightness 18
LED
battery 5
power 5
lid switch
on/off 58
standby/resume 58
suspend/resume 58
Line In 8
Line Out 9
58
,
link 60
lock slot
Kensington 12
LPT1 9
M
managing power 52
manual answer mode 67
maximizing
battery life 51
Mic 8
Microsoft Exchange 68
Microsoft Fax
setting up 67
MIDI
In 8
Out 8
mini-docking station 72
mode
answer 67
battery status 5
power status 5
standby 55
suspend 55
system status 5
model number 11
modem 7
monitor 5
mouse
mousepad 20
60
,
external 17
TV display 17
external 27
58
,
58
,
56
,
N
notebook
accessories 72
numeric keypad 16
, 18,
O
on/off mode 58
order number 74
69
,
19
77
Page 78

P
Pad lock 6
pad lock
function keys 18
parallel port 9
password 65
pause
function key 18
PC Card
32 Card 40
eject buttons 7
inserting 39
removing 39
slots 7
using 39
phone line jack 7
playing
CD-ROM 31
DVD 34
pointing device
EZ-Pad touchpad 5
EZ-Point stickpoint 5
pop-up status display 17
portables technical support 74
ports
docking station 9
Fast IR 8
joystick/MIDI 8
parallel (LPT1) 9
PS/2 9
serial 9
Universal Serial Bus (USB) 12
post office 68
power
button 5, 15
LCD 15
LED 5
power button 56
power button mode 58
power connector 12
75
,
,
40
19
,
power management 52
Windows 95 55
Windows 98 52
Windows NT 55
power menu 56
power schemes 53
power status 58
printing faxes 69
processor speed 11
properties
stickpoint 27
touchpad 25
PS/2 port 9
R
receiving faxes 69
removing
battery 11
combination modules 30
hard disk drive 37
PC Cards 39
replacing
batteries 49
combination modules 31
hard disk 37
reset switch 11
S
sales & customer support 74
Scroll lock 6
scroll lock
function key 18
serial number 11
serial port 9
server 61
setting
alarm 54
power button 56
standby/resume 56
shortcut keys 16
shutdown
Windows 98 55
software
battery learning 46
74
,
78 Using Your Gateway Solo TM 9150 Notebook
Page 79

speaker out/headphone jack 9
speakers 5
volume 7
special keys 19
standby mode 17
standby/resume 15
lid switch 58
status
batteries 48
menu 58
stickpoint 5
customizing 27
properties 27
suspend mode 55
suspend/resume
power button 58
system
identification 11
system status indicators 5
55
,
T
technical support 74
touchpad 5
customizing 25
properties 25
20
,
U
Universal Serial Bus (USB) ports 12, 40
user ID 65
using
EZ Point 26
Fast IR port 40
keyboard 27
mouse 27
PC Cards 39
touchpad 20
75
,
V
VGA 9
video
capture 42
In 8
42
,
Out 8
42
,
ports 41
source 17
viewing faxes 69
volume wheel 7
W
Web
browser 65
See also World Wide Web
Windows
key 19
Windows 95
power management 55
suspend mode 55
Windows 98
power management 52
standby mode 55
Windows Messaging 68
Windows NT
power management 55
suspend mode 55
World Wide Web 60
,
Z
zoomed video 39, 75
65
79
Page 80

Regulatory Compliance Statements
American Users:
Caution!
The Federal
Communications
Commission warns the
users that changes or
modifications to the unit not
expressly approv ed b y the
party responsible for
compliance could void the
user’s autho rity to oper ate
the equipment.
This device has been tested and found to comply with the limits for a Class B
digital device, pursuant to Part 15 of the FCC rules. These limits are designed to
provide reasonable protection against harmful interference in a residential
installation. This equipment generates, uses and can radiate radio frequency energy
and, if not installed and used in accordance with the instructions, may cause
harmful interference to radio or television reception. However, there is no
guarantee that interference will not occur in a particular installation. If this
equipment does cause interference to radio and television reception, which can be
determined by turning the equipment off and on, the user is encouraged to try to
correct the interference by one or more of the following measures:
♦
Reorient or relocate the receiving antenna
♦
Increase the separation between the equipment and receiver
♦
Connect the equipment into an outlet on a circuit different from that to which
the receiver is connected
♦
Consult the dealer or an experienced radio/TV technician for help.
Accessories: This equipment has been tested and found to comply with the limits
of a Class B digital device. The accessory associated with this equipment is the
shielded power cord.
This accessory is required to be used in order to ensure compliance with FCC
rules.
Canadian Users:
This digital apparatus does not exceed the Class B limits for radio noise emissions
from digital apparatus as set out in the radio interference regulations of Industry
Canada.
Le présent appareil numérique n’émet pas de bruits radioélectriques dépassant les
limites applicables aux appareils numériques de Classe B prescrites dans le
règlement sur le brouillage radioélectrique édicté par Industrie Canada
Attention!
Couper le courant av ant l’entretien.
80 Using Your Gateway Solo TM 9150 Notebook
Page 81

This Information Technology Equipment has been tested and found to comply with
the following European directives:
[i]EMC Directive 89/336/EEC amending directive 92/31/EEC & 93/68/EEC as per
- EN 50081-1:1992 according to
EN 55022:1995 Class B
EN 61000-3-2:1995 or EN 60555-2:1986
EN 61000-3-3: 1995
- EN50082-1:1992 according to
EN 61000-4-2:1995 or IEC 801-2:1984
ENV 50140:1994 or IEC 801-3:1984
EN 61000-4-4:1988 or IEC 801-4:1998
[ii]Low Voltage Directive (Safety) 73/23/EEC as per EN 60950: 1992
European Users:
This equipment is in the Class 2 category (Information Technology Equipment to
be used in a residential area or an adjacent area thereto) and conforms to the
standards set by the Voluntary Control Council for Interference by Information
Technology Equipment aimed at preventing radio interference in such residential
area.
When used near a radio or TV receiver, it may become the cause of radio
interference. Read instructions for correct handling.
This device has been tested and found to comply with the limits for a Class B
digital device, pursuant to the Australian/New Zealand standard AS/NZS 3548 set
out by the Spectrum Management Agency.
Caution!
Disconnect power bef ore servicing.
Japanese Users:
Australian and New
Zealand Users:
81
Page 82

Regulatory Compliance Statements
FCC Part 68
This modem complies with the FCC, Part 68 Rules and Regulations.
The telephone company may request the following information:
• The ringer equivalence number*
• The FCC Registration number*
*This information is printed on the FCC label provided on the bottom of your
notebook.
Note:
The Ringer Equivalence Number (REN) is used to determine the quantity of
devices which may be connected to the telephone line. Excessive REN’s on the
telephone line may result in the devices not ringing in response to an incoming
call. In most, but not all areas, the sum of the REN’s should not exceed five
(5.0). To be certain of the number of devices that may be connected to the line,
as determined by the total REN’s, contact the telephone company to determine
the maximum REN for your area.
If the modem malfunctions, disconnect it from the telephone line until the problem
is corrected. If you do not disconnect the modem and correct the problem, the
telephone company may temporarily disconnect your service.
The telephone company must notify you if it makes changes to the telephone line
that would affect the modem in any way. If advance notice is not practical, the
phone company will contact you as soon as possible. Also, you will be advised of
your rights to file a complaint with the FCC if you believe it is necessary.
Do not connect this modem to a coin telephone line or party line.
This modem uses the following USOC jacks:
• US: RJ-11C
• CANADA: CA11A
If you have any problems, contact Gateway Client Care.
82 Using Your Gateway Solo TM 9150 Notebook
Page 83

Notices
Copyright © 1999 Gateway 2000, Inc.
All Rights Reserved
610 Gateway Drive
N. Sioux City, SD 57049 USA
All Rights Reserved
This publication is protected by copyright and all rights are reserved. No part of it may be reproduced
or transmitted by any means or in an y f orm, withou t prior con sent in writin g from Gate w a y 2000.
The information in this m anual has been careful ly chec k ed a nd is be lie v ed to be ac cur ate. How e v e r,
changes are made periodically. These changes are incorporated in ne w er pub lic ation ed ition s.
Gateway 20 00 ma y impro v e and /or change product s described i n this pub licati on at an y ti me . Due to
continuing system improv e ments , Gate w a y 200 0 is not re sponsi ble f or inac curat e inf ormation whic h
may appear in this manual. For the latest product updates, consult the Gateway 2000 web site at
www.gateway.com
incidental, or consequential damages resulting from any defect or omission in this manual, even if
advised of the possibility o f such damages .
In the interest of continue d prod uct de v e lopmen t, Gate w a y 2000 res erves the rig ht to m ak e
improvements in t his man ual an d the p roducts i t desc ribes at an y time , wi thout no tices o r ob ligat ion.
T r ademark Acknowledgments
AnyKey, black-and-white spot de sign, CrystalScan, Dest ination, EZ P ad , EZ Point, Field Mouse, Solo,
T eleP ath, Vivitron, stylized “G” design, and “You’ve got a friend in the business” slogan are registered
trademarks and GATEWAY, Gat ew a y Solo , green s tyliz ed GATEWAY , g reen styl ized Gatew a y logo, and
the black-and-white spotte d bo x logo are t rad emarks of Gate w a y 2000, Inc. Int el, Int el Ins ide logo, and
Pentium are registered trademarks and MMX is a trademark of Intel Corporation. Microsoft, MS, MSDOS, and Windows are tr ademarks or regi stered tr ademarks of Microsoft Corporation. All o ther
product names mentioned herein are u sed f or i dentifica tion purposes only, and may be the tradem arks
or registered trademarks of their respective companies.
Copyright © 1999 Advanced Logi c Resear c h, Inc. (ALR)
All Rights Reserved
9401 Jeronimo
Irvine, CA 92618 USA
. In no event will Gateway 2000 be liable for direct, indirect, special, exemplary ,
All Rights Reserved
This publication is protected by copyright and all rights are reserved. No part of it may be reproduced
or transmitted by any means or in any form, without prior consent in writing from ALR.
The information in this m anual has been careful ly chec k ed a nd is be lie v ed to be ac cur ate. How e v e r,
changes are made periodically. These changes are incorporated in ne w er pub lic ation ed ition s. AL R
may improv e and/or c hange p roduct s described i n this pub licat ion at an y t ime . Due to c ontin uing
system improvements , ALR is not resp onsib le f o r inaccur ate in f ormation which may appear in this
manual. For the latest product updates, consult the ALR web site at
be liable for di rect, i ndirect, specia l, e x e mplary, incidental, or consequential damages resulti ng from
any defect or omission in this manual, even if advised of the possibility of such damages.
In the interest of continued product development, ALR reserves the right to make improvements in this
manual and the products i t describes a t any time , witho ut not ices or o b ligatio n.
www.alr.com
. In no event will ALR
T r ademark Acknowledgments
ALR is a registered trademark of Adv anced L ogic Researc h, Inc. Al l other pro duct name s mention ed
herein are used for identification purposes only, and may be the trademarks or registered trademarks
of their respective companie s.
83
Page 84

84 Using Your Gateway Solo TM 9150 Notebook
 Loading...