

Page 1

U
p
d
a
t
e
U
p
d
a
t
e
U
p
d
a
t
e
U
p
d
a
t
e
Important Information About Your
Second Hard Disk Drive Module
This Gateway Update contains the following information:
◆ how to modify your system settings to work with the second
◆ how to install the hard disk drive module in the modular option
◆ how to switch hard disk drives in the mounting bracket
◆ suggestions for ways to use your second hard disk drive
For additional technical information about hard disk drives, see
Maintaining and Troubleshooting Your Solo Notebook.
Modifying your system settings
Some changes need to be made to your system settings so your second
hard disk drive works correctly with your system.
hard disk drive module
bay
If you purchased your second hard disk drive when you purchased
your notebook, these changes are already made and you do not need
to perform the following procedure.
To modify the system settings:
1. Start up the notebook.
2. Press F2 when prompted to enter the BIOS Setup utility. The
Main menu opens.
3. Using the down arrow key, highlight Secondary Master.
4. Press ENTER. In the screen that opens, the Type: [AUTO] option is
highlighted.
Page 2

5. Press the spacebar until the Type: option is set to [NONE].
6. Press F10, then ENTER. The system restarts.
7. Right-click the My Computer icon, then select Properties. The
System Properties dialog box opens.
8. Click the Device Manager tab.
9. Click the + next to Disk drives. Three drives are listed.
10. Click the second Generic IDE Disk in the list, then click
Properties. The Generic IDE Drive Properties dialog box
opens.
11. Click the Settings tab.
12. In the Options area, click to remove the check mark from the Int
check box.
13 unit
If this option is unavailable, check the
assignment:
text box and make sure that C: does not appear. If
Current drive letter
C: does appear, click Cancel and select the other Generic IDE
Disk option in the list and repeat this Steps 11 and 12.
13. Click OK, then click OK again.
2 Update
Page 3
Installing the module in the notebook
Your notebook features a modular option bay located in the front
panel of the notebook. In addition to your hard disk drive module,
this bay also accepts CD-ROM, DVD, diskette, or LS-120 disk drive
modules.
To install your hard disk drive module:
1. Close any open files and shut down your notebook.
2. Close the cover and turn your notebook over.
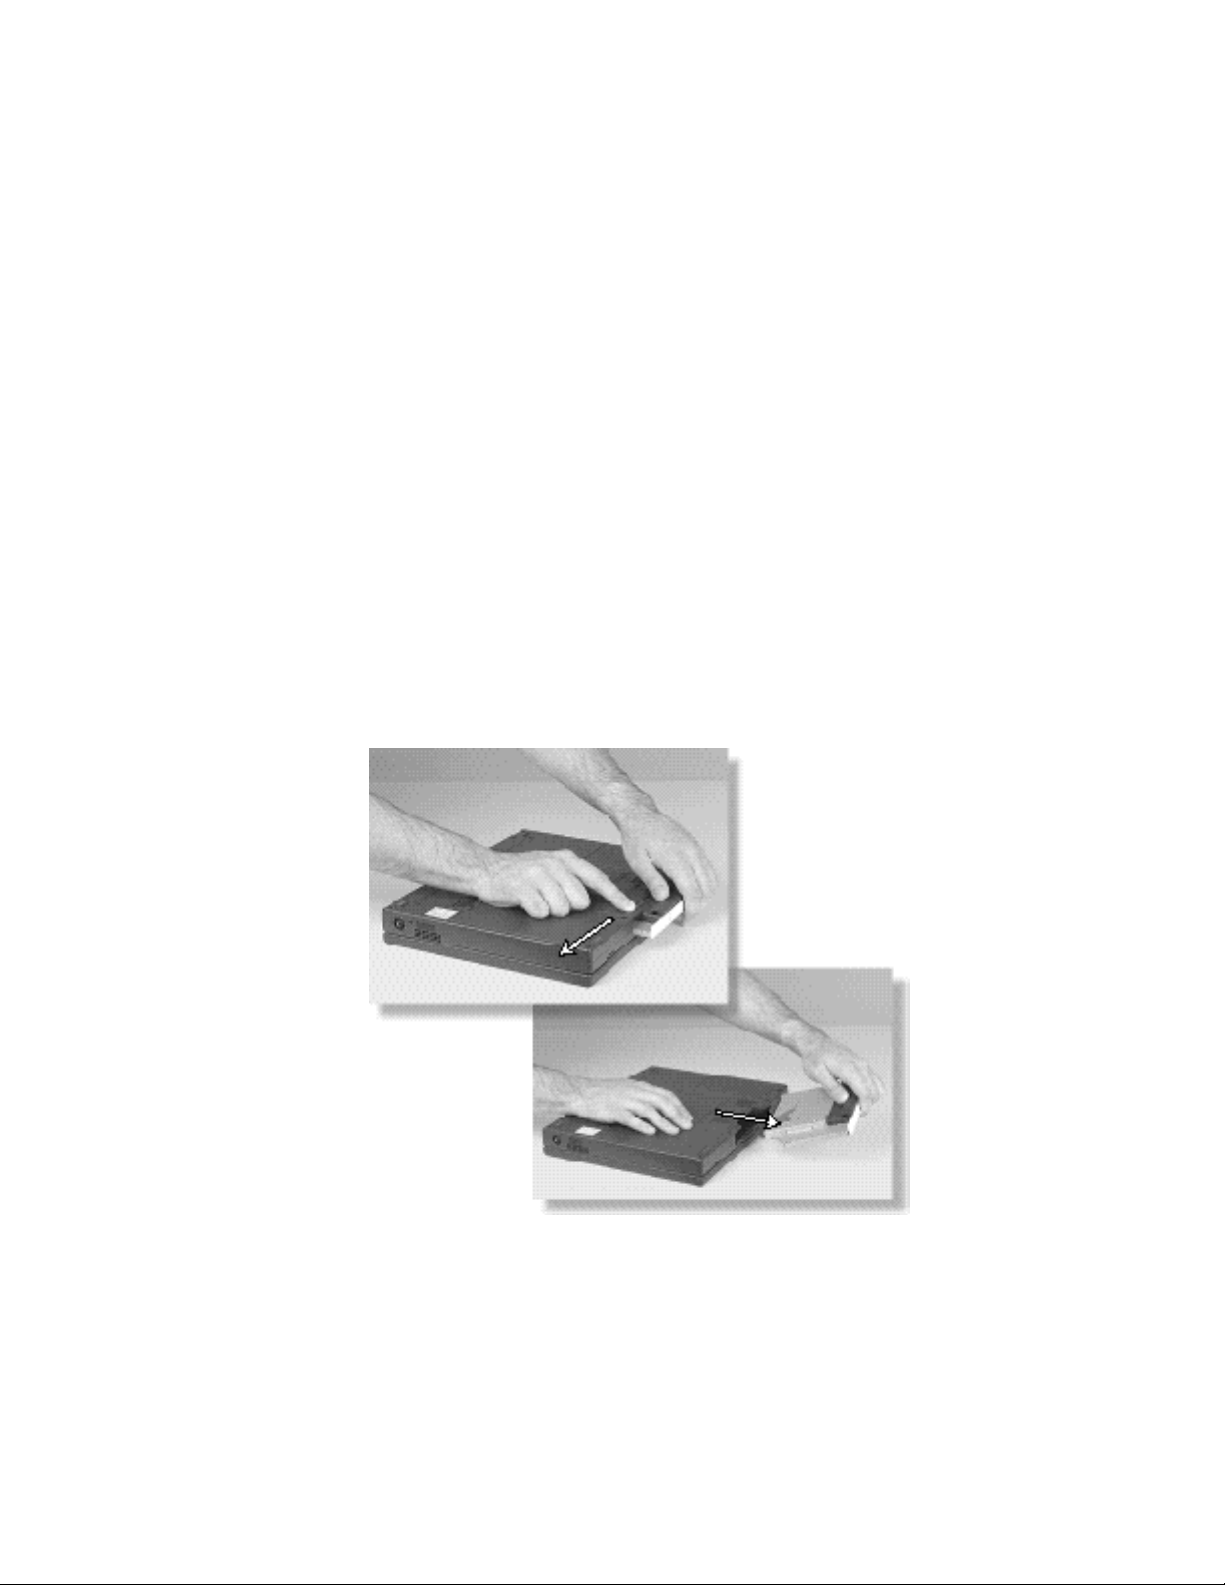
3. Locate the modular bay access latch. Slide and hold the latch
open and use the grip near the front of the notebook to pull the
drive module out of the notebook.
Important Information About Your Second Hard Disk Drive Module 3
Page 4

4. Turn your notebookb back over.
5. Firmly push the hard disk drive module into the bay until the
latch clicks into place and is firmly seated. If you don’t hear the
click, try it again.
6. Open the lid and press the power button to resume using your
notebook.
4 Update
Page 5

Switching hard disks in the mounting bracket
Use this procedure to switch hard disks in the mounting bracket.
To switch hard disks in the mounting bracket:
1. Remove the screws securing the hard disk drive to the
mounting bracket.
2. Remove the hard disk drive from the mounting bracket, then
disconnect the hard disk drive from the ribbon cable connector.
Important Information About Your Second Hard Disk Drive Module 5
Page 6

3. Position the hard disk drive on the mounting bracket connector,
making sure the connector pins are lined up correctly by
aligning the connectors as shown below.
4. After aligning the connectors, push down to secure the
attachment.
6 Update
Page 7

5. Slide the hard disk drive into the mounting bracket.
6. Secure the hard disk drive to the mounting bracket with the
screws you removed in Step 1.
The hard disk drive module is ready to be installed in your
notebook’s modular option bay.
Important Information About Your Second Hard Disk Drive Module 7
Page 8

Some uses for your hard disk drive module
◆ Data protection. To protect the data on your primary hard
disk drive, copy your data files onto the second hard disk drive
icon using My Computer or Windows Explorer, then keep the
second hard disk drive in a safe place. You can perform this
easy backup procedure as often as you need to.
◆ Moving data from one notebook to another more easily.
Instead of filling up boxes of diskettes to move data files from
one notebook to another, copy the files to the hard disk drive
module, insert the drive module in the notebook you need the
files copied to, then copy the files.
◆ Data archiving. When you create a large project or
presentation that takes up a lot of room on your primary hard
drive, copy the files to your second hard disk drive and archive
it.
◆ Additional storage space. Instead of carrying along several
CDs, keep games or MPEG files on your second hard disk
drive for easier transport.
8 Update
MAN US 2ND HDD MNT UPD R0 11/98
8503907
 Loading...