

Page 1

Maintaining & Troubleshooting Your Solo 5100
Part #8502415 MAN SYS US SL51 TECH REF R0 12/97
In our ef for t t o use na tu re’s resourc e s e ff icie nt ly and wisel y, G a tewa y 2000 pri nts al l manuals on rec yc le d pape r s t ha t m eet the
mini mum requ ire me nt s e stablished by the Federal EP A in its guide li ne s f or r e cy cle d pa pe r produc ts.
Page 2

Notices
Copyright © 1997 Gateway 2000, Inc.
All Rights Reserved
610 Gateway Drive
N. Sioux City, SD 57049 USA
All Rights Reserved
This publication is protected by copyright and all rights are reserved. No part of it may be r eproduced or
transmitt ed by any means or in an y form, without prior consent in writing from Gat ew ay 2000.
The information in this manual has been carefully checked and is believed to be accurate. However, changes are
made periodically. The se changes are incorporated in newer publication editions. Gateway 2000 may improve
and/or change products described in this publi cation at any time. Due to continuing s ystem improve ments ,
Gateway 2000 is not responsible for inaccurate information which may appear in this manual. For the latest
product updates, consult the Gatewa y 2000 web site at w ww. ga tew ay.com. In no event will Ga tew ay 2000 be
liable for direc t, indir e ct, specia l, exemplary , incide nta l, or conse quent ia l damages resulting from any defect o r
omission in this manual, even if advised of the possibility of such damages.
In the interest of continued product development, Gateway 2000 reserves the right to make improvements in this
manual and the products it describes at any time , without noti ces or obligation.
Trademark Acknowledgments
AnyKe y, black-and-white spot design, ColorBook, CrystalScan, Des tination, EZ Pad, EZ Point, Field Mouse,
Gateway 2000, HandBook, Liberty , TelePath, Vivit ron, stylized “G” design, and “You’ve got a friend in the
business” slogan are registered trademarks and “All the big trends start in South Dakota” slogan, GA TEWA Y, and
Gateway Solo are trademarks of Gateway 2000, Inc. Intel, Intel Inside logo, and Pentium are registered
trademarks and MMX is a trademark of Intel Corporation. Microsoft, MS, MS-DOS, and Windows are
trademarks or registered trademarks of Microsoft Corporation. All other product names mentioned herein are
used for identification purposes only, and may be the trademarks or registered trademarks of their respective
companies.
Copyright © 1997 Advanced Logic Research, Inc. (ALR)
All Rights Reserved
9401 Jeronimo
Irvine, CA 92618 USA
All Rights Reserved
This publication is protected by copyright and all rights are reserved. No part of it may be r eproduced or
transmitt ed by any means or in an y form, without prior consent in writing from ALR.
The information in this manual has been carefully checked and is believed to be accurate. However, changes are
made periodically. The se changes are incorporated in newer publication editions. ALR may improve and/or
change products described in this publication a t any time. Due to c ontinuing system improvements, ALR is not
responsible for inaccurate information which may appear in this manual. For the latest product updates, consult
the ALR web site at
incidental, or consequential damages resulting from any defect or omission in this manual, even if advised of the
possi bility of s uch damag es.
In the interest of continued product development, ALR reserves the right to make improvements in this manual
and the products it describes at any time, without notices or obligation.
Trademark Acknowledgments
ALR is a registered trademark of Advanced Logic Research, Inc. All other product names mentioned herein are
used for identification purposes only, and may be the trademarks or registered trademarks of their respective
companies.
www.alr. com
ii Maintaining and Troubleshooting Your Solo Notebook
. In no event will ALR be liable for direct, indirect, special, exemplary,
Page 3

Contents
Notices ..................................................................................................... ii
Chapter 1: Maintaining Your Notebook ........................................5
Using This Book...................................................................................... 6
Identifying Your Model .......................................................................... 7
Maintaining Your System....................................................................... 8
Virus checking.................................................................................. 9
Hard drive utilities............................................................................ 9
Chapter 2: ReinstallingWindows 95 System Software ...............11
Reinstalling Your Windows 95 System ............................................... 12
Partitioning and formatting the hard drive .................................... 12
Partitioning the hard drive.............................................................. 13
Formatting the hard drive............................................................... 18
Installing Windows 95 ................................................................... 19
Chapter 3: Reinstalling Windows NT System Software ............25
Reinstalling Your Windows NT System.............................................. 26
Partitioning and formatting the hard drive .................................... 26
Partition formatting with FAT file system .................................... 26
Installing Windows NT.................................................................. 27
Chapter 4: Installing Drivers and Related Software ..................29
About Device Drivers............................................................................ 30
Installing device drivers ................................................................. 30
Installing CD-ROM drivers ........................................................... 31
Installing for Windows 95 ............................................................. 32
Installing for Windows NT............................................................ 45
Chapter 5: Managing System Resources ......................................55
Port/IRQ Configurations ....................................................................... 56
Solo notebook interrupts (IRQs).................................................... 56
Checking Windows 95 resources .................................................. 57
iii
Page 4

Chapter 6: Using Modem Documentation ...................................61
Accessing Modem Documentation ..................................................... 62
Chapter 7: Adding Memory Modules ..........................................65
Installing Additional Memory.............................................................. 66
Chapter 8: BIOS Setup ...................................................................71
Setup (BIOS) Screens........................................................................... 72
Main menu ..................................................................................... 72
Advanced menu ............................................................................. 73
Security menu ................................................................................ 74
Power menu ................................................................................... 75
Boot menu ...................................................................................... 76
Exit menu ....................................................................................... 77
Chapter 9: Troubleshooting Your Notebook ...............................79
Troubleshooting .................................................................................... 80
Start up ........................................................................................... 80
General ........................................................................................... 81
Frequently asked questions ........................................................... 82
Error messages ............................................................................... 86
Appendix A: Contacting Gateway ................................................89
Contacting Gateway.............................................................................. 90
Calling Gateway ............................................................................ 90
Calling Gateway when outside the U.S. ....................................... 90
Index ..................................................................................................91
iv Maintaining and Troubleshooting Your Solo Notebook
Page 5

Chapter 1:
Maintaining Your Solo Notebook
Contents
Using This Book...................................................... 6
Identifying Your Model ..........................................7
Maintaining Your System ....................................... 8
Virus checking.................................................. 9
Hard drive utilities ............................................9
Page 6

Using This Book
Welcome to
designed this manual to help you understand technical details not covered in the
Using Your Notebook
Chapter 1, “Maintaining Your Solo Notebook”, contains information about
identifying which notebook model you have and includes basic maintenance
information.
Chapter 2, “Reinstalling Windows 95 System Software”, contains basic
information about partitioning, formatting, and reinstalling Windows 95 operating
system software.
Chapter 3, “Reinstalling Windows NT System Software”, contains basic
information about reinstall ing Windows NT operating system software.
Chapter 4, “Installing Drivers and Related Software”, contains information about
drivers and instructions to install drivers from the System CD and driver diskettes.
Chapter 5, “Managing System Resources”, contains information about PC Cards
(including CardBus), USB (Universal Serial Bus), Port/IRQ configurations, and
help with configuration conflicts.
Chapter 6, “Using Modem Documentation”, contains information about how to
get to the online information about a particular modem model.
Chapter 7, “Adding Memory Modules”, contains information about the memory
modules and instructions for removing or adding memory modules.
Maintaining and Troubleshooting Your Notebook
guide.
Guide. We have
Chapter 8, “BIOS Setup”, contains information about the individual Setup menu
screens for checking and changing BIOS settings.
Chapter 9, “Troubleshooting Your Notebook”, contains Frequently Asked
Questions (FAQs) and information about error messages.
6 Maintaining and Troubleshooting Your Solo Notebook
Page 7
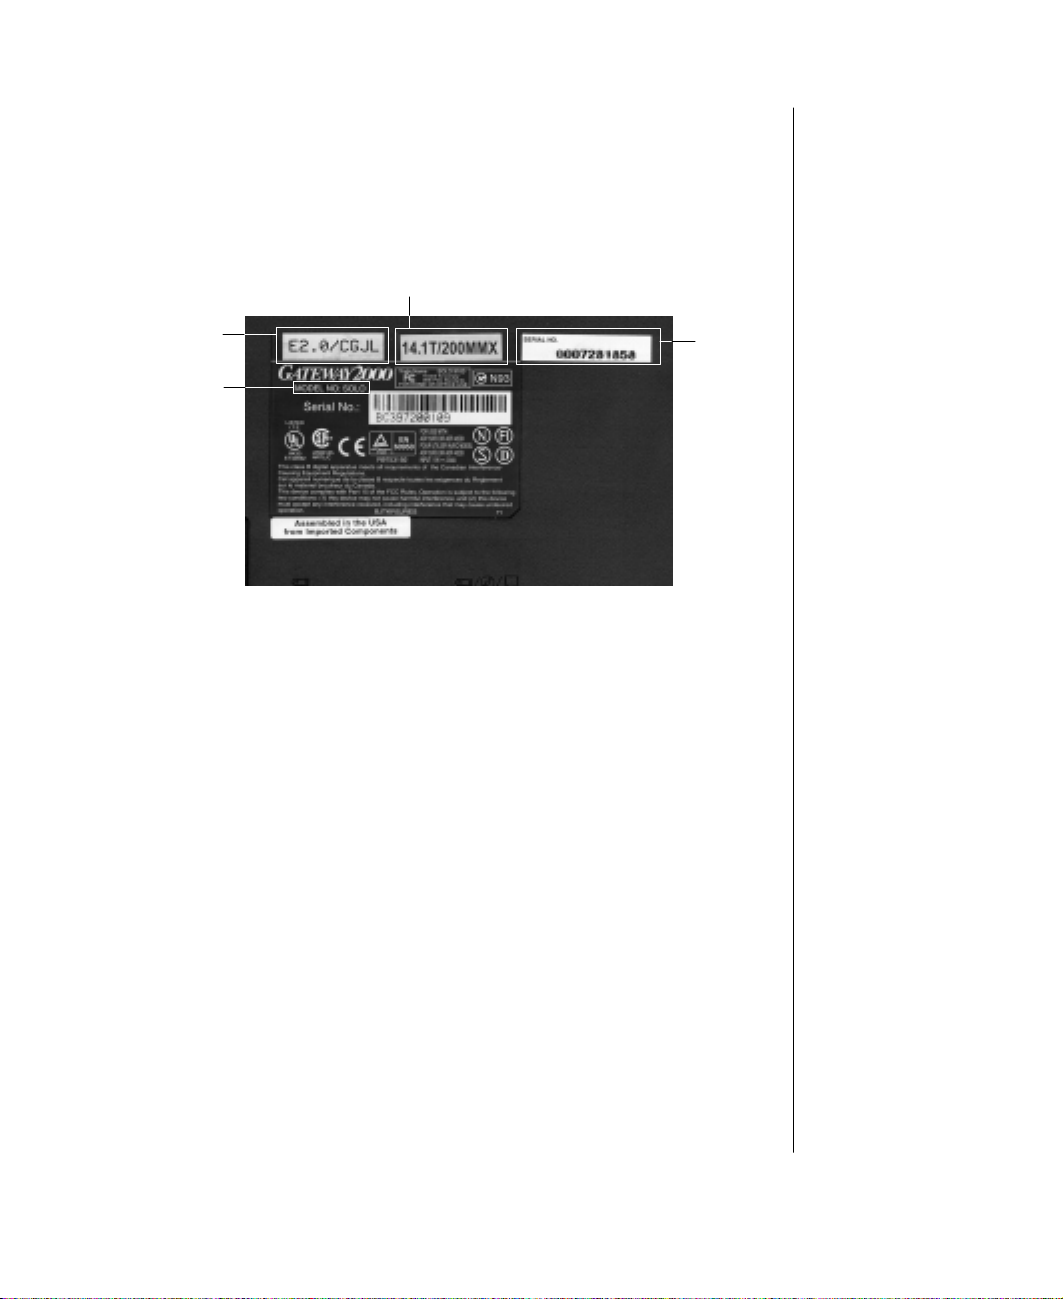
Identifying Your Model
To make sure you know the correct model and serial number for your notebook,
check the label on the bottom of the notebook.
Display Type/
Processor Speed
V ersion
Model
Number
Identifying your notebook model and serial number
Gateway
Serial
Number
Chapter 1: Maintaining Your Solo Notebook 7
Page 8

Maintaining Your System
Caution!
The LCD display is made of
specially coated glass and can
be scratched or damaged by
abrasive or ammonia-based
window cleaners.
The Gateway Solo Multimedia Notebook is a durable product. However, when
transporting your notebook, we recommend that you put it in a computer carrying
case or briefcase.
Other ways to extend the life of your system:
♦
Don't subject your notebook to shock and don't put objects on top of your
notebook. The case, although tough, isn’t made to support a lot of extra
weight.
♦
Keep diskettes and modular drives away from magnetic fields. Magnetic
fields can erase data on both diskettes and hard drives.
♦
Set up a maintenance schedule for your system. Routinely run virus checks,
ScanDisk and disk defragmenter. This keeps your system performing
smoothly and prevent the loss of vital data.
♦
Never turn off your notebook when the Hard Disk Drive LED is on because
data on the hard drive could be lost or corrupted.
♦
Avoid subjecting your notebook to extreme temperature changes. The cases
become very brittle and easy to break in the cold and could melt in the high
temperatures. Damages due to either extreme are not covered by your
warranty.
♦
♦
♦
♦
♦
8 Maintaining and Troubleshooting Your Solo Notebook
Don't get your notebook wet or expose to water, coffee, or soft drinks. These
fluids are particularly damaging to the electronic components and can result in
extremely expensive repair charges that are not covered under your warranty.
Avoid areas with a high concent ration of dust and dirt. Dust and dirt clogs the
internal mechanisms.
Keep the port covers closed when you are not using the external device ports
so that the connectors remain clean and the pins are not bent or broken.
Clean the exterior with a non-abrasive cleaner and a soft cloth moistened with
water. Gently dry with a soft cloth.
Clean the LCD display with a soft cloth moistened only with water. Wet the
cloth, wipe the display, and then dry the LCD with a soft cloth.
Page 9

Virus checking
A “virus” is a hidden program that is usually attached to an executable file (the file
extension is .exe). Some viruses could destroy information or damage your system.
Other viruses simply print out a message or prevent you from performing normal
computing functions. When you start the f ile that contains the virus, it becomes
active. Your system can catch a virus from shared disks or downloaded files.
Setting up a maintenance schedule will make running your virus check a habit.
Once a month might be often enough to run a check. If you use your system more
often, once a week might be more appropriate.
Hard drive utilities
Some system tools can help you preserve the performance of your hard drive. Set
up a maintenance schedule and perform these functions regularly.
Disk Defragmenter
A disk defragmenter program finds file fragments and puts them together. This
saves hard drive space and lets the system run faster and more efficiently.
T o use Disk Defragmenter from Windows 95
Note:
You can program your
notebook to remind you to
perform a virus check using
the Virus check reminder on
Security
the
Note:
Disk Defragmenter cannot
defragment your CD-ROM or
any network drive.
menu.
1.
Click Start, Programs, Accessories, System Tools, then Disk Defragmenter. The
Select Drive window appears.
2.
Use the <Down Arrow> button to select the drive you want to defragment,
and click OK. The Disk Defragmenter window appears.
3.
Click Start to begin the program. The screen follows the program's progress.
When the program has finished running, another Disk Defragmenter window
appears.
4.
Click Yes if you are ready to quit Disk Defragmenter.
Chapter 1: Maintaining Your Solo Notebook 9
Page 10

ScanDisk
This disk scan program checks your hard drive and fixes most errors.
T o use ScanDisk from Windows 95
1.
Click Start, Programs, Accessories, System Tools, then ScanDisk. The ScanDisk window appears.
2.
Select the drive you want to have checked for errors. Click Automatically fix
errors
check box if you want to use that option.
3.
Click Start to begin the program. You can follow the program's progress and
when the program has f inished running, the ScanDisk Results window
appears.
4.
Click Close after you have read the screen, then click Close again to exit the program.
10 Maintaining and Troubleshooting Your Solo Notebook
Page 11

Chapter 2:
Reinstalling
Windows 95
System Software
Contents
Reinstalling Your Windows 95 System ............... 12
Partitioning and formatting the hard drive..... 12
Partitioning the hard drive.............................. 13
Formatting the hard drive............................... 18
Installing Windows 95 with the
Solo Boot diskette...........................................18
Page 12

Reinstalling Your Windows 95
Warning!
Partitioning and formatting
erases all files on the hard
drive. Before partitioning or
formatting the hard drive,
make sure any software that
you may need is backed up.
System
This chapter discusses the process of reinstalling Windows 95. To accomplish the
installation, we recommend that you use the following process:
1.
Remove the hard drive partitions. See “Deleting partitions on the hard drive”
on page 14.
2.
Create new hard drive partitions. See “Creating partitions on the hard drive”
on page 16.
3.
Format the hard drive. See “Formatting the hard drive” on page 18.
4.
Install Windows 95. See “Installing Windows 95” on page 19.
5.
Install device drivers and related software. See “Installing device drivers” on
page 30.
Before starting the reinstall process, m ake sure you have the necessary diskettes
and/or CDs readily available to partition, format, and install device drivers on the
hard drive. You’ll need the following diskettes:
♦
Solo Boot Diskette to start your system from the A: drive and use menu
options to install your operating system.
♦
Windows 95 CD to load the operating system.
♦
♦
Partitioning and formatting the hard drive
For an operating system (such as MS-DOS or Windows) to store files on a hard
drive, the hard drive must be partitioned and formatted.
Partitioning a hard drive designates which areas of the disk are used for the
operating system files. Windows uses the MS-DOS partition file fdisk.exe to set
up a primary DOS partition, extended DOS partitions, and logical drives within the
extended DOS partitions.
12 Maintaining and Troubleshooting Your Solo Notebook
Gateway System CD to install the device drivers.
Gateway Windows 95 Driver diskettes to install recently updated drivers that
may be newer than those on the Gateway System CD.
Page 13

♦
A Primary D OS p artiti on contains the essential files to start your system from
the hard drive (system f iles). To start Windows from your hard drive, you must
have a primary DOS partition and it must be set to active.
♦
An Extended DOS partition is a portion of a hard drive where non-system
files can be stored. Unlike a primary DOS partition, you cannot start your
system from an extended DOS partition. Your system does not require an
extended partition to function.
♦
A Logical DOS Drive is an area of an Extended DOS partition that you can set
up to group directories and files. It does not increase disk storage capacity.
Yo u must set up an extended DOS partition before you can establish a logical
drive. You can create up to 23 logical drives in an extended DOS partition.
Fo rm a t t i n g a hard drive prepares the partition(s) to receive files. Windows uses the
MS-DOS file format.com to format disks. You may use format.com to format
your hard drive or your hard drive automatically formats when using the Install An
Operating System On Your Hard Drive
option on the Solo Boot Disk menu. See
“Installing Windows 95” on page 19. for further information.
Partitioning the hard drive
Partitioning your hard drive using fdisk.exe lets you set up hard drives larger than 2
GB by setting up a primary DOS partition, extended DOS partition, and logical
drives within the extended DOS partition.
To conf igure a hard disk using fdisk.exe you will complete the following tasks:
♦
Delete DOS partitions, logical drives, any extended DOS partitions, and the
existing primary DOS partition.
♦
Create a new primary DOS partition
♦
Create an extended partition and logical drives, if you want any.
Formatting the partition with FAT16 file system
When partitioning the hard drive using fdisk.exe you may be provided the option to
use the FAT16 or FAT32 file system. Your system has been shipped from Gateway
with the FAT16 file system. To reinstall your system as it shipped from the factory,
use the FAT 16 file system. FAT 16 provides access to other operating systems. You
must have Windows 95B or Windows 95C as your operating system to use FAT 32.
Chapter 2: Reinstalling Windows 95 System Software 13
Note:
To help ensure a clean
installation, we recommend
that you partition and format
the hard drive before
reinstalling Windows 95.
Howeve r, if you are want to
preserve valuable data by not
erasing files on the hard drive,
you can first try installing the
operating system using the
procedure “Insta lling
Windows 95” on page 19. If
you continue to have difficulty
with the operating system
working properly, then return
to the partitioning and
formatting procedures before
installing Windows 95.
Page 14
These operating systems do not recognize FAT32:
Caution!
Partitioning the hard drive
erases all information on the
drive! Back up your files on
the drive before partitioning.
Note:
An Important Note screen may
appear that gives information
on the FAT32 file system. If
so, the software asks if you
wish to enable large disk
support (Y/N)? We
recommend you select [N]
(default value). Selecting [N]
formats your hard drive with
FAT16 as it was shipped from
Gateway. See “Formatting the
partition with FAT16 file
system” on page 13.
♦
Windows for Workgroups 3.1x
♦
Windows NT
♦
Windows 95A
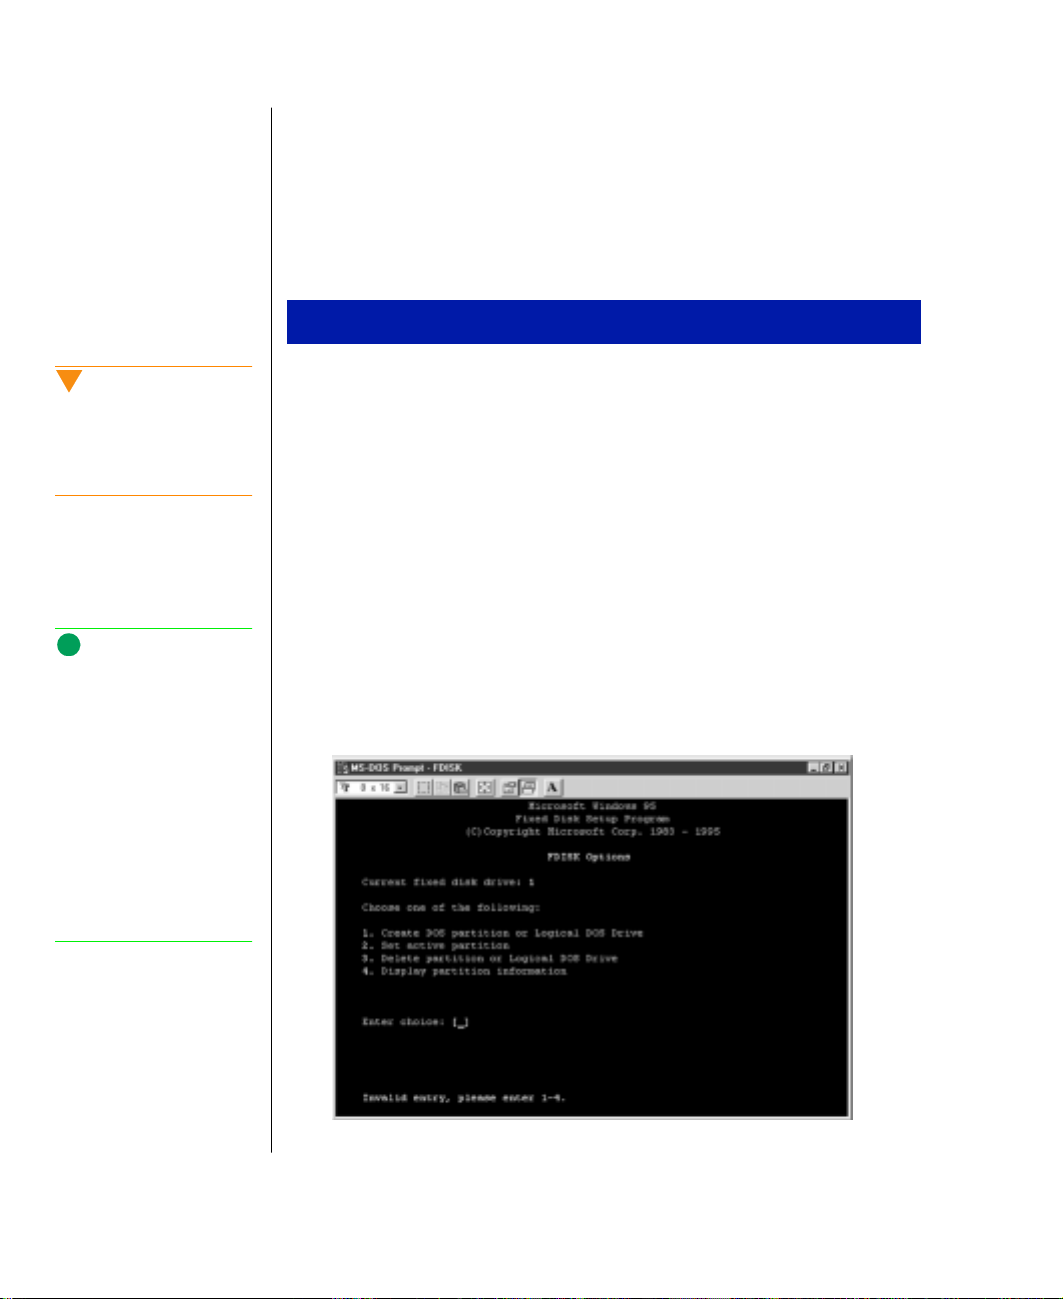
Deleting partitions on the hard drive
1.
Place the Solo Boot Diskette or the MS-DOS Setup disk in the diskette drive.
2.
Power up the computer or restart the system if you already have the power on.
3.
The boot disk main menu appears. Select Exit Program, Go Back to DOS. The
A:\> prompt appears on the screen.
4.
Type:
cd dos
then press <Enter>.
5.
At the A:\DOS prompt type:
fdisk
14 Maintaining and Troubleshooting Your Solo Notebook
then press <Enter>. The FDISK Options menu appears.
FDISK Options menu
Page 15
6.
Select option [4] Display partition information, then press <Enter>.When the
Display Partition Information screen appears, write down the following
information to help you later in this process:
Partition shows the number of partitions currently existing on the hard
•
drive.
Ty pe shows the type of partition used for logical, extended or primary
•
DOS drive.
Volume Label shows the label (name) used for the hard drive partition.
•
7.
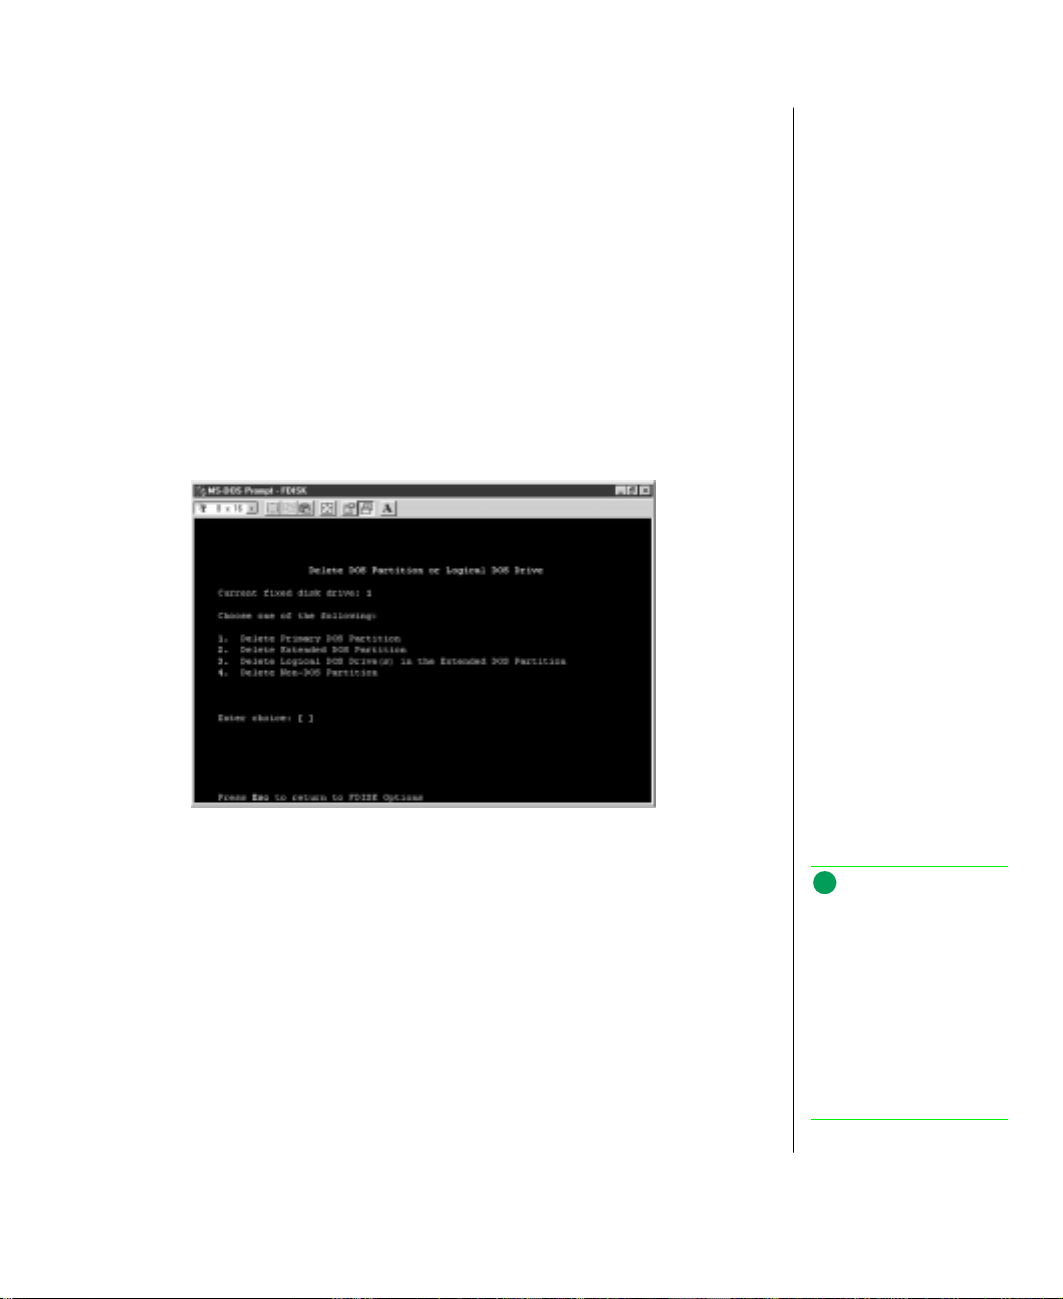
Press <Esc>. The program returns you to the FDISK Options menu.
8.
Select option [3] Delete partition or Logical DOS Drive, then press <Enter>.
The Delete DOS Partition or Logical DOS Drive menu appears.
Delete DOS Partition or Logical DOS Drive menu
9.
Select option 1 through 4 to delete a specific type of partition. Follow the
onscreen instructions and repeat the Delete partition or Logical DOS Drive steps
to delete any additional logical drives or partitions. Delete partitions in the
following order of priority:
a. Delete Non-DOS Partition (see item four in above figure)
b. Delete Logical DOS Drive(s) in the Extended DOS Partition (see item three
in above figure)
c. Delete Extended DOS Partition (see item two in above figure)
d. Delete Primary DOS Partition (see item one in above figure)
Chapter 2: Reinstalling Windows 95 System Software 15
Note:
If the Pri ma ry DO S Part iti on
will not delete due to the
Volume Label not matching
(when you are typing the
correct label information in
the delete process), try
formatting the hard drive and
give it a new volume label.
See “Formatting the hard
drive” on page 18.
Page 16
Use the information displayed at the top of the screen to answer the onscreen
questions. Key information you need to know is the Partition Number,
Partition Type, and the Volume Label on your hard drive.
10.
Once you have deleted each of the logical drives or partitions, you’re ready to
create new partitions. Press <Esc> to return to FDISK Options menu.
Continue to the next section “Creating partitions on the hard drive.”
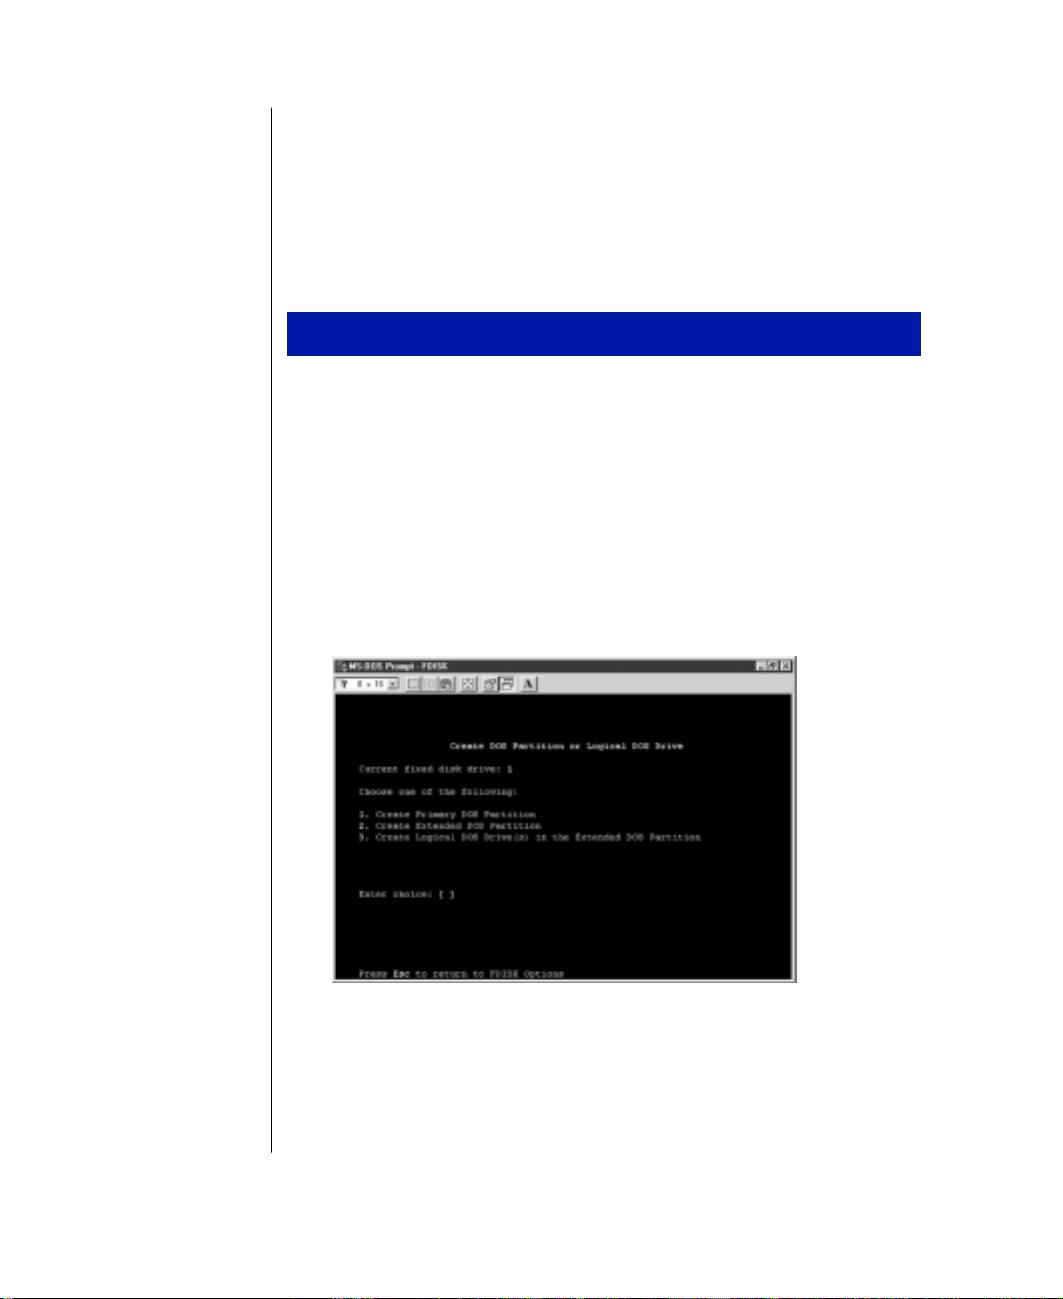
Creating partitions on the hard drive
1.
If you have already exited the FDISK utility, then follow steps one through
five of “Deleting partitions on the hard drive” on page 14 to restart it.
2.
Select option [1], Create DOS Partition or Logical DOS Drive from the FDISK
Options menu and press <Enter>.
3.
Next choose from options 1 through 3 to create the type of partition you want.
(It’s likely you will want to create the same type of partition(s) that existed
originally on your system. Refer to the information you noted in Step 6 of
“Deleting partitions on the hard drive.” to determine the original hard drive
settings).
.
Create DOS Partition or Logical DOS Drive menu
16 Maintaining and Troubleshooting Your Solo Notebook
Page 17

Follow the onscreen instructions and repeat the steps for creating any
additional logical drives or partitions. You should create partitions in the
following order:
a. Create Primary DOS Partition
b. Create Extended DOS Partition
c. Create Logical DOS Drive(s) in the Extended DOS Partition
To read more about the partition types, see “Partitioning and formatting the
hard drive” on page 12.
Remember that if you choose to make the primary DOS partition less than
the maximum size, you must create an extended DOS partition to make full
use of the hard drive.
4.
If you created more than one hard disk partition or logical drive you must set
the partitions to active. You are prompted to set disk 1 partition to active.
Select [2] to go to the Set Active Partition menu.
5.
When prompted to enter partition number to make active, enter [1].
6.
Press <Esc> to return to the FDISK Options menu.
7.
Press <Esc> to exit the FDISK program.
Chapter 2: Reinstalling Windows 95 System Software 17
Page 18

Formatting the hard drive
Note:
To help ensure a clean
installation, we recommend
that you partition and format
the hard drive before
reinstalling Windows 95.
Howeve r, if you are want to
preserve valuable data by not
erasing files on the hard drive,
you can first try installing the
operating system using the
procedure “Insta lling
Windows 95” on page 19. If
you continue to have difficulty
with the operating system
working properly, then return
to the partitioning and
formatting procedures before
installing Windows 95.
Warning!
Formatting the hard drive
erases all information on the
drive! Back up your files on
the drive before formatting.
Note:
If the
Fixed disk boot sector
option in the
Security
menu is
se t to
Write protect
, the boot
sector of the hard disk drive is
write-protected, and you
cannot format the hard drive.
Refer to the “Security menu”
section on page 71 to enable.
Formatting your hard drive using format.exe creates a new root directory and File
Allocation Table (FAT) on the hard drive. You will need to reformat the hard drive
and reinstall Windows 95 if your operating system has been damaged.
Formatting the hard drive
1.
Place the Solo Boot Diskette or the MS-DOS Setup diskette in the drive.
2.
Start the computer or restart the system if you already have the power on.
3.
The boot disk Main menu appears. Select Exit Program, Go Back to DOS. The
A:\> prompt appears on the screen.
4.
Type:
cd dos
then press <Enter>.
5.
At the A:\DOS prompt type:
format c: /s
-OR-
18 Maintaining and Troubleshooting Your Solo Notebook
6.
7.
type the letter of the partition you want to format. Example:
format d: /s
then press <Enter>.
The format program asks if you wish to proceed with the format. Press Y to continue.
When the hard drive is formatted, the system asks you to label the hard drive.
Labeling is optional:
If you want to clear the question press <Enter>
-ORIf you want to give the hard drive a label name, type a label name and press
<Enter>.
Page 19
Installing Windows 95
Once you have partitioned and formatted your hard drive, you’re ready to install
Windows 95. Use the following instructions to install Windows 95
Startup with the Solo Boot Diskette
1.
Make sure the Floppy disk drive module is in the modular option bay.
2.
If not already installed, place the Solo Boot Diskette or the MS-DOS Setup
disk in the diskette drive.
3.
Start up the notebook or reboot the system if you already have the power on.
If the power button is configured for Suspend/Resume, press and hold the
power button for about four seconds to restart the system.
4.
Select Install an operating system on your hard drive, then press <Enter>.
Note:
The Solo Boot Diskette will
automatically partition and
format the hard drive (if not
already done) during the
Install An Operating
System On Your Hard
Drive
procedure. The boot
disk program will only create
a primary DOS partition on
the hard drive (up to 2.0 GB
maximum partition). The
remaining hard drive space
should be partitioned and
formatted after the Windows
95 installation is completed.
Solo Boot disk Main menu options. Installing the operating system.
5.
The next screen message describes the operating system install process which
takes place in two phases. The first phase partitions and formats the hard
drive if it’s not already done (this takes few minutes). The percent completed
appears as the program progresses. The second phase steps through the
Windows installation process. Press <F1> to continue.
6.
When you are prompted to do so, turn off your notebook and remove the floppy drive module.
Chapter 2: Reinstalling Windows 95 System Software 19
Page 20

Swapping to the CD-ROM module
1.
Insert the CD-ROM module and restart the system.
2.
The next screen message tells you that you are about to install an operating
system. Insert the Windows 95 CD-ROM and press <F1> to continue.
3.
Press <Esc> when you are asked if you want to continue or quit Setup.
Removing the config.sys and aut oexec.bat fi les
1.
At the DOS prompt type:
del config.sys
then press <Enter>
2.
Type:
del autoexec.bat
then press <Enter>.
Copying .cab files to the hard drive
1.
Type:
md win95
then press <Enter>
2.
Type:
e:
(where e: is assumed to be your CD-ROM drive)
then press <Enter>
3.
Type:
copy e:\win95\*.* c:\win95
press <Enter>
4.
When the files are finished copying,
20 Maintaining and Troubleshooting Your Solo Notebook
Page 21

Swapping to the floppy m odule
1.
Press the power button to shutdown the system. Remove the CD-ROM
module and install the floppy drive module.
2.
Press the power button to restart your system.
3.
When prompted to enter the mm/dd/yy, press <Enter>. You can set the clock
later after Windows is installed.
4.
When prompted to enter the time. Press <Enter>. You can set the time later
after Windows is installed.
Copying .vxd and .inf files to the hard drive
1.
Insert the Solo 5100 VXD / INF diskette.
2.
Type:
a:\
then press <Enter>
3.
Type:
copy *.* c:\win95
then press <Enter>
4.
Press the power button to shutdown the system.
Starting Windows 95 Setup program
1.
Press the power button to restart your system.
2.
When prompted to enter the mm/dd/yy, press <Enter>. You can set the clock
later when Windows is installed.
3.
When prompted to enter the time. Press <Enter>. You can set the time later
after Windows is installed.
Chapter 2: Reinstalling Windows 95 System Software 21
Page 22

4.
Note:
You may add or remove
Windows 95 program
components later by clicking
Start, Settings, Control
Panel
, double-click
Add/
Remove Programs
, and
select the
Windows Setup
tab. Follow the instructions.
Type:
cd win95
then press <Enter>
5.
Type:
setup
then press <Enter>
6.
Windows Setup tells you it will perform a routine check on your system.
Press <Enter> to continue.
7.
When ScanDisk is finished follow the onscreen prompts to continue loading.
8.
The Windows 95 Setup window appears. Click Continue.
9.
The Software License Agreement appears. Click Yes if you agree to the terms
and want to continue. Click Next to continue.
10.
The Windows Setup Wizard starts. Click Next to continue.
11.
The Setup Wizard opens a dialog box to select the directory to install
Windows in. Make your selection and click Next to continue.
12.
The Windows 95 Setup Options dialog box appears with setup preference
options. Select the type of Windows load you want: Typical, Portable,
Compact, or Custom. Click Next to continue.
13.
14.
15.
22 Maintaining and Troubleshooting Your Solo Notebook
16.
Setup Wizard prompts you to enter the serial number from the Certificate of
Authenticity located on the cover of the Windows 95 manual. Type the serial
number.
The next dialog box asks for a name and company information. Fill-in appropriate information.
Setup Wizard m ay ask you if you want to install a CD-ROM Drive. If so, click
the check box to install it. The Setup Wizard also provides options for
Network Adapter and Sound, Midi, or Video Capture card. Click Network
Adapter
if you plan to use a network card. Click the check box for Sound,
Midi, or Video Capture card
. Click Next. The Setup Wizard begins analyzing
your computer for available hardware.
Next, the Setup Wizard opens a Windows Components dialog box. Select the
option you prefer. (We recommend you select the Install the most common
components
option.) Click Next and follow the prompts.
Page 23

17.
The next dialog box provides an option to create a Startup Disk. Click No to
skip creating a Startup disk. Click Next to continue.
18.
The Setup Wizard is ready to start copying Windows 95 files to your hard
drive. Click Next to continue.
19.
Windows begins copying f iles to the hard drive. A progress indicator appears
showing installation progress. Follow the onscreen prompts.
20.
After Setup Wizard has completed the installation and is ready to restart the
computer to complete the setup. Click Finish.
21.
Windows restarts the system, begins detecting hardware, and setting up
software. You’ll be prompted to select information such as the time-zone
you’re in and the printer you’ll be using. Follow the onscreen prompts.
22.
When Windows 95 Setup Wizard is f inished configuring your system, it asks
you to restart your computer. Click OK to restart. When the system restarts to
Windows, the screen may displ ay at 640 x 480, leaving a black area around
the display. This corrects itself after the proper display driver is installed later
in this procedure.
23.
Last you’ll need to enable some hardware, install the remaining Windows 95
device drivers and software from the diskettes or Solo System CD. For more
information about installing device drivers, see “Installing device drivers” on
page 30.
Note:
It is best to create a Startup
disk after installing Windows
because the CD-ROM drive is
installed in your system
during the Windows install
process. To create a Startup
disk later click Start,
Settings, Control Panel,
double-click Add/Remove
Programs
Startup Disk tab. Follow the
instructions.
, and select the
Chapter 2: Reinstalling Windows 95 System Software 23
Page 24

24 Maintaining and Troubleshooting Your Solo Notebook
Page 25

Chapter 3:
Reinstalling
Windows NT
System Software
Contents
Reinstalling Your Windows NT System.............. 26
Partitioning and formatting the hard drive..... 26
Partition formatting with FAT file system .... 26
Installing Windows NT.................................. 27
Page 26

Reinstalling Your
Warning!
Partioning and formatting
erases all files on the hard
drive. Before partitioning or
formatting the hard drive,
make sure any software that
you may need is backed up.
Windows NT System
This chapter includes the process of reinstalling Windows NT. We recommend that
you use the Windows NT Workstation CD-ROM t o partition and format the hard
drive and install Windows NT. Once you’ve installed Windows NT, you’ll need to
install some device drivers to get all the system hardware working.
♦
The Windows NT setup program steps you through the process of partitioning
and formatting your hard drive. Use the Solo boot disk to start your system
from the A: drive.
Make sure you have the necessary diskettes and/or CDs available before starting to
install Windows NT and the device drivers on the hard drive. You’ll need:
♦
Windows NT Workstation Start Here guide for further information on
installing Windows NT.
♦
Windows NT Workstation CD to continue the Windows NT install process.
♦
Windows NT Service Pack CD to install the device drivers. In some cases,
newer drivers may be shipped on additional diskettes.
♦
Windows NT Setup Diskettes to partition and format the hard drive and
begin the operating system load. (Optional. The instructions in this chapter
instruct you to install Windows NT using the Windows NT CD-ROM only.)
Partitioning and formatting the hard drive
For an operating system such as MS-DOS or Windows to store files on a hard
drive, the hard drive must be partitioned and formatted. Windows NT steps you
through the process during the Windows NT setup process. Refer to the
Windows NT manual for more information about partitioning, formatting and
setting up Windows NT.
Partition formatting with FAT file system
Your system has been installed from the factory to operate using the File Allocation
Table (FAT) f ile system. This provides access to other operating systems and
supports a wider variety of software.
26 Maintaining and Troubleshooting Your Solo Notebook
Page 27

During the Windows NT install process, you will have the option to use the File
Allocation Table (FAT) file system or Windows NT File System (NTFS). Refer to
the section “Choosing a File System for the Windows NT partition” in the
Windows NT manual for information about each file system.
Installing Windows NT
If your operating system has been damaged, you may need to reinstall
Windows NT. Use the following installation instructions to do this.
Setting system to boot to CD-ROM disc
1.
Install the CD-ROM module in the notebook.
2.
Start the computer.
3.
Press <F2> at the prompt. The BIOS Setup Utility opens.
4.
Highlight the Boot menu by pressing the right arrow key.
5.
Press the down arrow key to highlight CD-ROM Drive selection. Press
<Shift+> to move CD-ROM Drive to the top of the list. Moving the CD-ROM
drive to the top of the list will cause the system to boot to the CD-ROM drive.
6.
Press the arrow key to highlight the Advanced menu.
7.
Highlight Plug & Play O/S, then press <Enter> and arrow up to highlight No. Press <Enter>.
8.
Press <F10>, select Yes to save the new configuration, then press <Enter> to exit.
Note:
If the Fixed disk boot sector:
option in the
is set to Write protect, the boot
sector of the hard disk drive is
write-protected, and you
cannot format the hard drive.
Security
menu
Installing Windows NT
1.
Install the Windows NT Workstation CD in the CD-ROM module. The
system begins the Windows NT Workstation Setup menu.
2.
Refer to the Installation section in the “Start Here Microsoft Windows NT
Workstation” manual to continue the install process. The manual steps you
through important information to consider throughout the Windows NT
installation process.
Chapter 3: Reinstalling Windows NT System Software 27
Page 28

3.
After f irst part of the setup is completed, eject the Windows NT Workstation
CD-ROM, then press <Enter> to restart the system.
4.
When prompted, select NT 4.0 Operating System. Press <Enter>.
5.
Follow the remaining Windows NT Setup screens. Refer to the Installation
section in the “Start Here Microsoft Windows NT Workstation” manual to
continue the install process.
6.
Once completed with the Microsoft Windows NT installation, click Start,
Shut Down, and then OK to exit Windows NT.
Setting the syste m to boot to the diskette drive
1.
Restart your system and press <F2> when prompted to enter BIOS Setup Utility.
2.
Press the right arrow key to highlight the Boot menu.
3.
Press the down arrow key to highlight the Diskette Drive selection. Press
<Shift+> to move Diskette Drive to the top of the list. This will cause the
system to boot to the Diskette drive.
4.
Once the Diskette Drive is first in the list, continue pressing <Shift+> to move
Hard Drive to the second position. This will cause the system to boot to the
Diskette Drive first, the Hard Drive second, and the CD-ROM Drive last.
5.
Press the arrow key to highlight the Advanced menu.
6.
Press the right arrow key to highlight the Exit menu. Highlight Exit Saving
Changes
and press <F10>, <Yes>, and then <Enter> to exit. Windows NT
restarts.
7.
Install the remaining Windows NT device drivers and software from the
diskettes or Solo System CD. For more information about installing device
drivers, see “Installing device drivers” on page 30.
28 Maintaining and Troubleshooting Your Solo Notebook
Page 29

Chapter 4:
Installing Drivers and Related Software
Contents
About Device Drivers............................................ 30
Installing device drivers ................................. 30
Installing CD-ROM drivers ........................... 31
Installing for Windows 95.............................. 32
Installing for Windows NT............................ 45
Page 30

About Device Drivers
Device drivers are programs used to control devices attached to the computer such
as printers, keyboards, LCD display, and PC Cards. Drivers translate between the
devices and the programs. Many drivers come with the operating system while
other drivers must be loaded when a new device is added. Thi s chapter discusses
how to load additional device drivers.
This chapter is divided into three main sections. Before installing drivers specific to
your operating system, read the next section “Installing device drivers.” Then you
can m ove on to the appropriate section for your system: “Installing for
Windows 95” on page 32 or “Installing for Windows NT” on page 45.
Installing device drivers
There are two methods you can use to install the drivers:
♦
Install from the System CD Browser
♦
Install using driver diskettes that may have shipped with your system
Installing drivers using the Solo System CD
Installing drivers from the System CD is the simplest way to load drivers. The
System CD provides online instructions to step you through the process of loading
each driver. When you launch the System CD a window appears providing you a
choice of Windows 95 or Windows NT operating system. Select the operating
system your notebook uses, then choose your Solo notebook model. The drivers for
your system are listed. Follow the online instructions to load the drivers.
You may have also received some drivers on diskette. If so, they are likely to be
newer than the ones on the Solo System CD. Use the instructions “Installing drivers
using the driver diskettes” on page 30 to install from diskette.
Installing drivers using the driver diskettes
Your system may have shipped with driver diskettes. Sometimes these diskettes are
included with your system because they are updated drivers from the ones included
on the system CD. If we shipped drivers on diskette see “Installing for
Windows 95” on page 32 and “Installing for Windows NT” on page 45 to install
them from diskette.
30 Maintaining and Troubleshooting Your Solo Notebook
Page 31

Installing CD-ROM drivers
To install other drivers and software, it’s important to first get the CD-ROM driver
installed so you can use the CD-ROM drive. If you have just reinstalled Windows
NT or Windows 95, the drivers are installed along with the operating system.
If, however, you are having difficulty getting the CD-ROM drive to work and have
not installed a new operating system, then use the following instructions to install
the CD-ROM driver. Once the CD-ROM drive is accessible by the computer, you
can move on with other installation processes.
Installing the CD-ROM driver
1.
Place the Solo Boot Diskette in the diskette drive.
2.
Start the notebook or restart the system if you already have the power on. If
the power button is configured for Suspend/Resume, then press and hold the
power button for about four seconds to restart the system. The Main menu
appears.
3.
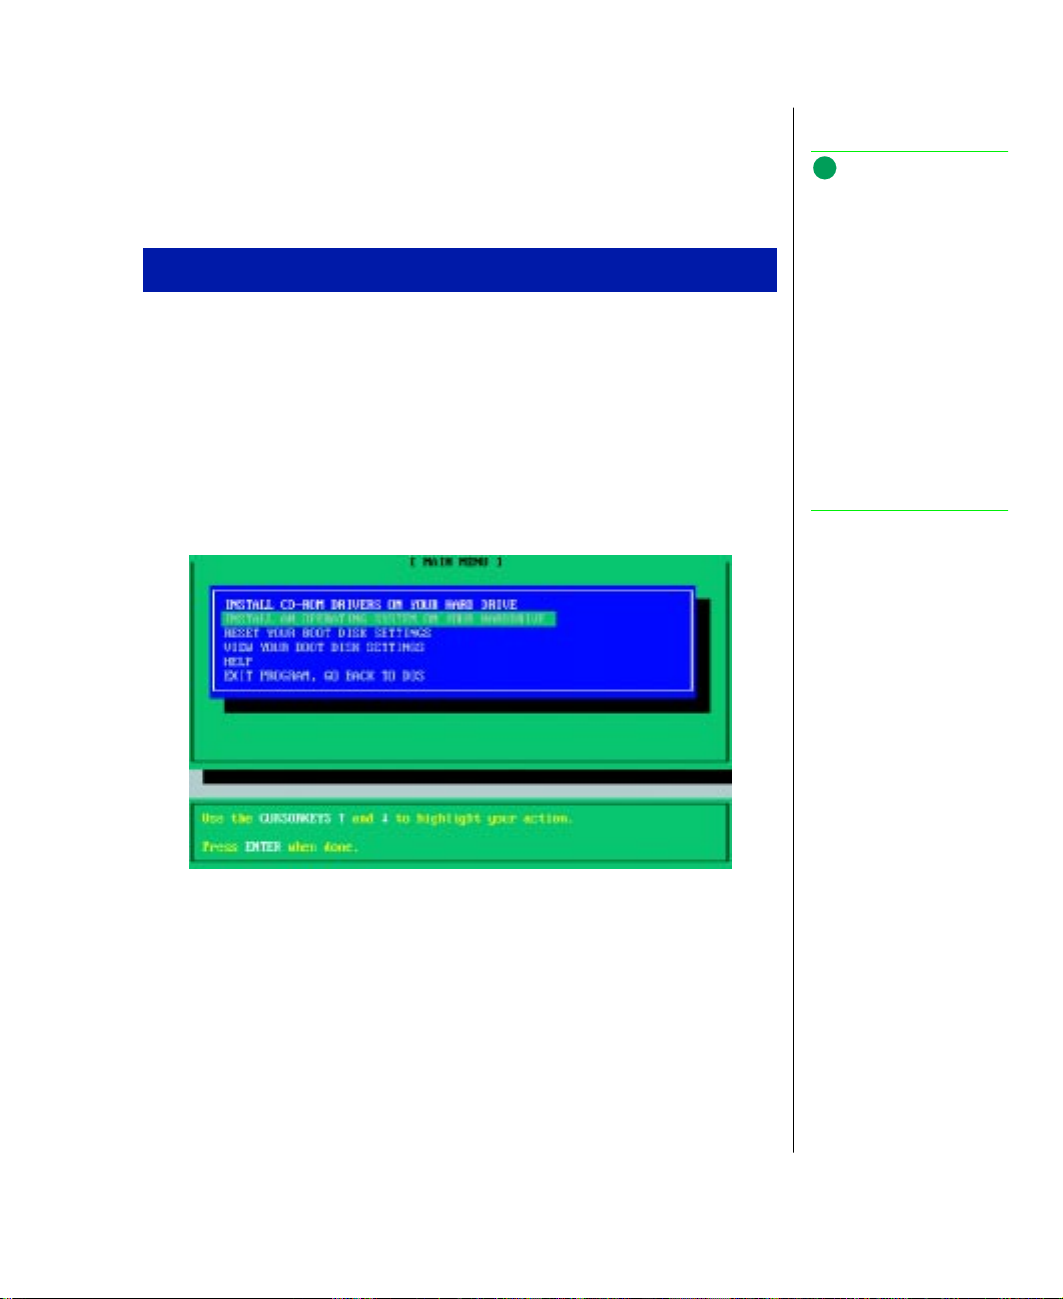
Use the arrow key to highlight the Install CD-ROM Drivers On Your Hard Drive,
then press <Enter>. An information screen appears.
Solo Boot disk Main menu options. Installing CD-ROM drivers.
Chapter 4: Installing Drivers and Related Software 31
Page 32

CD-ROM drivers information screen
Press <F1> to continue.
4.
The installation is complete. Press any key to return to the Main menu.
5.
At the Main menu, use the arrow keys to select Exit Program, Go Back To DOS.
Installing for Windows 95
If you have reinstalled Windows 95, you will need to install device drivers and
take steps to enable devices that support the notebook hardware components. Use
the procedures discussed in this section to load and enable the following devices:
♦
Video
♦
Audio
♦
Mouse (touchpad)
♦
Enable PCMCIA sockets
♦
Enable USB ports
♦
Install software updates
If you have not reinstalled Windows 95, but are having difficulty with a video,
sound, or others, then try reinstalling the device driver by using the procedures
covered in this section.
32 Maintaining and Troubleshooting Your Solo Notebook
Page 33

Windows 95 display drivers
When Windows 95 is installed on a newly formatted hard drive it detects t he
display as a Standard PCI Graphics Adapter. Use the following instructions to
install the Windows 95 display driver that optimizes your Solo display. If the Solo
System CD shipped with your system, you may use it to install the driver instead of
installing from diskette.
Installing the Solo 5100 Chips and T echnologies video driver
1.
If the floppy drive module is not already installed, shut down the system and
install. Restart Windows.
2.
Click Start, Settings, then Control Panel. Double-click the Display icon and
click the Settings tab in the Display Properties window.
3.
Click Advanced Properties.
4.
On the Adapter tab, click Change.
5.
Insert the display driver disk in drive A:\ and then click Have Disk....
6.
Click OK in the Install From Disk dialog box.
7.
Chips and Tech. 65555 PCI appears in the Models list of the Select Device
dialog box. Click OK.
8.
The files copy to the hard drive. Click Apply.
9.
If Windows asks if you want to restart your computer now, select No.
10.
Click Monitor tab, then click Change.
11.
Select (Standard monitor types) under the Manufacturers list, click Laptop
Display Panel (1024 x 768)
12.
In the Monitor tab dialog box click Apply, then click OK to return back the
Settings tab.
13.
Change the Color palette by clicking the Color palette drop-down l ist box.
Click High Color (16 bit) or the color depth of your choice.
14.
Change the Desktop area (display resolution) by sliding the Desktop area
slider to the right to adjust pixel resolution to 1024 x 768 to get full use of the
display area.
. Click OK.
Chapter 4: Installing Drivers and Related Software 33
Page 34

15.
Click Apply, then Yes to restart the computer. If you are reinstalling the
Windows 95 operating system and need to inst all additional drivers, you can
click No to restart the computer. Continue installing the other drivers before
restarting.
Windows 95 audio and game port drivers
If you have re-installed Windows 95 operating system you will need to re-install
the audio driver. When Windows 95 is installed on a newly formatted and
partitioned hard drive the audio chips are not properly detected. Use the following
instructions to remove the “Unknown Devices” and install the audio drivers. If the
Solo System CD shipped with your system, you may use it to install the driver
instead of installing the drivers from diskette.
If you are experiencing problems with audio or game ports re-installing the
drivers may correct the problem.
Installing the Solo 5100 ESS Audio Driver
1.
If the floppy drive module is not already installed, shut down the system and
install the floppy drive. Restart Windows.
2.
Click Start, Settings, Control Panel. Double-click System icon and select the
Device Manager tab.
3.
(Only required if Windows 95 has been reinstalled) On Device Manager tab
click the + next to Other Devices. You will see ?Unknown Device in the list.
34 Maintaining and Troubleshooting Your Solo Notebook
Page 35

Locating and removing the Unknown Devices
4.
(Only required if Windows 95 has been reinstalled) Click
and click
5.
(Only required if Windows 95 has been reinstalled) Click OK to confirm that
Remove
.
?Unknown Device
you want to remove the unknown device.
6.
Next, scroll down the list of devices and click the + next to
game controllers
7.
Insert the ESS 1879 Audio driver diskette in the floppy drive module.
8.
Click the
+
Update Driver
Click
9.
The Update Device Driver Wizard appears asking if you want Windows to
Driver
tab in the
. Double-click
.
search for the driver. Click
10.
Direct the path to the A: drive by typing:
!ESS 1688 Plug and Play AudioDrive
ESS ES1688 AudioDrive Properties
Yes, Next
, then
Finish
.
Sound, video and
dialog box.
a:\
in the dialog box. Click OK.
.
Chapter 4: Installing Drivers and Related Software 35
Page 36

Click Yes to restart your computer. If you are reinstalling the Windows 95
operating system and need to install additional drivers, you can click No to restart
the computer. Continue installing the other drivers before restarting.
Enabl ing the s oftw are w a ve tabl e
1.
Click Start, Settings, Control Panel. Double-click System icon and select the
Device Manager tab.
2.
On Device Manager tab click the + next to Sound, video and game controllers.
You will see ?ES1879 Plug and Play AudioDrive in the list.
3.
Double-c lick ES1879 Plug and Play AudioDrive.
4.
The ES1879 Plug and Play AudioDrive Properties box appears. Click the
Wavetable tab.
5.
Click the Enable check box under ESS Software Wavetable.
Enabling ESS Software Wavetable
6.
Click OK to close the properties box, then click OK to close System Properties.
36 Maintaining and Troubleshooting Your Solo Notebook
Page 37

Windows 95 EZ Pad Plus (touchpad) drivers
Use the following instructions to install the Windows 95 touchpad driver that
supports your touchpad. If the Solo System CD shipped with your system, you may
use it to install the driver instead of installing the drivers from diskette.
Installing the touchpad Driver
1.
If the floppy drive module is not already installed, shut down the system and
install the floppy drive. Restart Windows.
2.
Click Start, Settings, Control Panel. Double-click Mouse icon.
3.
Select the General tab. Click Change.
Changing the mouse device driver
4.
Insert the touchpad driver disk in drive A:\ then click Have Disk....
5.
Make sure the path is directed to the a:\ directory in the Copy Manufacturers
Files From
6.
Select the Hagiwara Point Pad driver from the Models list. Click OK .
7.
The files will copy to the hard drive. Click Close.
box. Click OK in the Install From Disk dialog box.
Chapter 4: Installing Drivers and Related Software 37
Page 38

8.
Click Yes to restart Windows. If you are reinstalling the Windows 95
operating system and need to install additional drivers, you can click No to
restart the computer. Continue installing the other drivers before restarting.
Enabling PCMCIA socket for Windows 95
The only time it should be necessary to enable the PCMCIA socket is if you have
formatted the hard drive and reinstalled Windows 95.
Enabling the TI PCI-1250 CardBus Controller
1.
Click Start, Settings, Control Panel. Double-click the System icon and select
the Device Manager tab.
2.
Click the + next to PCMCIA socket to expand the list. Double-click PCIC or
compatible PCMCIA controller
.
Selecting the PCIC or compatible PCMCIA controller properties
3.
In the Controller Properties dialog box under Device usage click Disable in
this hardware profile
38 Maintaining and Troubleshooting Your Solo Notebook
to clear the check box. Click OK.
Page 39

Clearing the check box to enable the PCIC controller properties
4.
When the PC Card (PCMCIA) Wizard appears, read the dialog box and click
No, then click Next.
5.
Click No then click Next again in the following wizard dialog box.
6.
Follow the PC Card Wizard prompts, then click Finish.
7.
When asked to shutdown Windows, click Yes. Windows shuts the system down.
8.
Press the Power Button to restart the system.
The figure below shows how your Texas Instruments PCI-1250 CardBus
Controller appears in the Device Manager when properly installed
Chapter 4: Installing Drivers and Related Software 39
Page 40

Properly installed TI PCI-1250 CardBus Controller drivers in the Device
Manager
USB (Universal Serial Bus)
USB is a new type of serial interface that serves as a single-port alternative to
connecting devices that traditionally have required their own specific ports, such as
printers, joystick/MIDI devices, external mouse, or keyboards.
The USB detects when devices are added or removed, then automatically
determines what host resources are needed. The USB makes those resources,
including driver software and bus bandwidth, available to the peripheral without
any user intervention.
Your notebook has two USB ports where two peripheral devices plug directly into
the notebook. If you have an expansion hub built into an external keyboard or
monitor, or if you have a stand-alone USB box, you can connect even more
peripherals (currently up to 127 different devices) at the same time.
Examples of common devices that can connect to the USB include keyboards,
joysticks, mice and peripherals such as telephones, modems, printers,
microphones, digital speakers, scanners, digital cameras, and game controllers.
40 Maintaining and Troubleshooting Your Solo Notebook
Page 41

Enabling USB ports
Your Gateway computer shipped with the USB ports enabled. However, if for some
reason you have to reload Windows, use the following instructions to reload the
USB driver supplement.
In addition, if you are adding a new USB device, you must load the USB device
driver according to the device manufacturer's instructions. If the Solo System CD
shipped with your system, you may use it to install the driver instead of installing
the drivers from diskette.
Enabling the USB ports for Windows 95
1.
If not already installed, shut down and install the floppy drive module. Restart Windows.
2.
Click Start, Settings, Control Panel. Double-click System icon and select the
Device Manager tab.
3.
Under Device Manager tab click + next to Other Devices. You will see ?PCI
Universal Serial Bus
in the list.
Locating and removing the Unknown Devices
4.
Click ?PCI Universal Serial Bus and click Remove.
Chapter 4: Installing Drivers and Related Software 41
Page 42

5.
Click OK to confirm that you want to remove the unknown device. Click
Close.
6.
Place the usbsupp.exe driver disk in drive A.
7.
Click Start, Run, then type:
a:\ usbsupp.exe
then click OK.
8.
Click Yes on the next two windows if you want to continue with the
installation and you agree to the warranty terms.
9.
When the USB drivers finish installing, remove the diskette. Click OK to restart.
10.
The Update Device Driver Wizard appears. Click Next.
11.
Wait a few seconds for the Update Device Driver Wizard to find the drivers. Click Finish.
12.
When Windows restarts, the Copying Files dialog box appears and displays a
message that it is looking for file uhcd.sys. Redirect the path by typing:
C:\W indows\System
Click OK.
Redirecting the path in the Copying Files dialog box
13.
Next you must install a USB update. Click Start, Run, then type:
a:\ usbupd1.exe
click OK.
14.
The Updating Windows dialog box appears. Click Ye s to continue.
42 Maintaining and Troubleshooting Your Solo Notebook
Page 43

15.
Once the update is complete, click OK.
16.
Click Start, Shutdown, Restart the computer? to initialize the USB installation.
When completed, the correct USB driver appears in the Device Manager as
shown below.
Properly installed USB drivers shown in the Device Manager
Installing software updates
Install the following software updates to complete the system install.
Installing the UHCD.SYS update
1.
Place the uhcdupd.exe driver disk in drive A.
2.
Click Start, Run, then type:
a:\ uhcdupd.exe
then click OK.
3.
Click Yes to continue with the installation.
Chapter 4: Installing Drivers and Related Software 43
Page 44

4.
When the UHCD drivers finish installing, remove the diskett e. Click OK.
5.
Click Start, Shut Down, Restart the computer? to initialize the update.
Installing the VMMUSB supplement
1.
Place the vmmusbup.exe driver disk in drive A.
2.
Click Start, Run, then type:
a:\ vmmusbup.exe
then click OK.
3.
Click Yes to continue with the installation.
4.
When the supplement completes the installation, remove the diskette. Click
OK.
5.
Click Start, Shut Down, Restart the computer? to initialize the supplement.
44 Maintaining and Troubleshooting Your Solo Notebook
Page 45

Installing for Windows NT
If you have reinstalled Windows NT, next you will need to install device drivers
to support the notebook hardware components. (The video, audio, and touchpad
are not functional after reinstalling Windows.) Also, you will need to install Card
Wizard software for controlling the PC Card slots and Power Profiler software for
power management.
To make these components and software functional, use the procedures discussed
in this section to load the following drivers and software:
♦
Video
♦
Audio
♦
Card Wizard and Power Profiler
♦
Windows NT Service Pack 3
♦
Mouse (EZ Pad Plus)
If you have not reinstalled Windows NT, but are experiencing difficulty with a
specific hardware device(s) such as video, sound or others, then try reinstalling the
device driver by using the procedures in this section.
Windows NT display drivers
When Windows NT is installed on a newly formatted hard drive it detects the
display as a Standard PCI Graphics Adapter. Use the following instructions to
install the Windows NT display drivers that optimize your Solo display.
If the Solo System CD shipped with your system, you may use it to install the
driver instead of installing the drivers from diskette.
Installing the Solo 5100 Chips and T echnologies video driver
1.
If the floppy drive module is not already installed, shut down the system and install.
2.
Restart Windows.
3.
Click Start, Settings, Control Panel. Double-click Display icon. The Display
Properties
dialog box appears.
Chapter 4: Installing Drivers and Related Software 45
Page 46

Selecting the Display icon
4.
Click the Settings tab in the Display Properties window.
Selecting the Settings tab for display configuration
5.
Click Display Type.
6.
In the Display Type window, click Change under Adapter Type.
46 Maintaining and Troubleshooting Your Solo Notebook
Page 47

7.
Insert the Windows NT 4.0 Video Driver disk in drive A:\ and click Have
Disk...
.
8.
The Install From Disk window appears. A:\ will be the default path listed. Click OK.
9.
A Change Display dialog box appears showing the Chips Video Accelerator driver. Click OK.
10.
A warning window appears stating the driver is a third-party driver and asks
if the installation should proceed. Click Ye s.
11.
Files will be copied, then a window appears stating the drivers were
successfully installed. Click OK.
12.
Close the Display Properties setup boxes and take out the disk.
13.
Click Yes to restart the system for changes to take effect.
14.
After restarting the computer, an Invalid Display Settings window appears
stating a new graphics driver has been installed and a display resolution must
be set. Click OK to remove the error message.
15.
The Display Properties window opens automatically. Set the display
resolution and colors. Click Color palette list box arrow and click 65536
Colors
or the color depth of your choice.
16.
Move the Desktop area (display resolution) slider to the right to adjust pixel
resolution to 1024 x 768 to get full use of the display area. Click Test, OK to
make sure your settings work.
17.
Click Yes if you saw the test screen properly or make changes to the settings
and test again if the settings did not work.
18.
Click Apply, OK.
Windows NT audio drivers
When Windows NT is installed on a hard drive with a new Windows NT operating
system load, the audio chips are not properly detected. Use the following
instructions to install the audio drivers that support your Solo audio and game
ports. If the Solo System CD shipped with your system, you may use it to install the
driver instead of installing the drivers from diskette.
Chapter 4: Installing Drivers and Related Software 47
Page 48

Installing the Solo 5100 ESS Audio Driver
1.
Click Start, Settings, Control Panel. Double-click Multimedia icon.
Selecting the Multimedia icon
2.
Click Devices tab.
Selecting the Devices tab for audio configuration
48 Maintaining and Troubleshooting Your Solo Notebook
Page 49

3.
Highlight Audio Devices and then click Add.
4.
In the Add dialog box highlight Unlisted or Updated Driver and click OK.
5.
Type the default path of A:\, insert the Windows NT 4.0 Audio driver disk,
click OK.
6.
Click to highlight ES1879/1869/1878/1868/1887/1888 AudioDrive. Click OK.
7.
A window appears stating that the driver has been installed and the system
needs to be restarted for changes to take effect. Remove the disk and click
Restart Now. If you are reinstalling the Windows NT operating system and
need to install additional drivers, you can click Don’t Restart Now and
continue installing the other drivers before restarting.
8.
After rebooting, sounds should play when entering Windows NT. If you do
not hear sound, verify the volume settings in software and the volume level on
the volume wheel control on the left side of the system.
Installing CardWizard and PowerProfiler
CardWizard for Windows NT aids with PC Card configuration and PowerProfiler
for Windows NT handles power management issues. Your notebook has been
factory configured with CardWizard and PowerProfiler.
CardWizard and PowerProfiler programs are located on a three-disk set. Both
programs are installed through a single setup process. To reinstall CardWizard for
Windows NT insert the diskette into the appropriate drive and follow the on-screen
prompts. If you need assistance, refer to the following instructions.
Installing CardWizard & PowerProfiler software
1.
If the floppy drive module is not already installed, shut down the system and
install the floppy drive. Restart Windows.
2.
With Windows NT running, insert Windows NT 4.0 CardWizard Drivers
Disk 1of 3 in drive A:. Click Start, Run, and on the command line type:
a:\setup
then Click OK.
3.
The SystemSoft logo appears with a window stating that the InstallShield
Wizard is being prepared. This may take a minute.
Chapter 4: Installing Drivers and Related Software 49
Page 50

4.
Note:
After adding a new device
such as a network card or
others, reinstall the
Windows NT Service Pack to
update drivers and associated
files.
A window appears stating this program installs PowerProfiler and
CardWizard. Close all other Windows programs before continuing. Click
Next to continue.
5.
The next window asks what options to install. Checkmark the boxes for
PowerProfiler and CardWizard. Click Next.
6.
Choose the destination directory. The default path is C:\Program
Files\Systemsoft. Click Next to accept the default.
7.
A CardWizard logo window appears. Click Next to continue. A welcome to
installation window appears. Click Next to continue.
8.
The next window states CardWizard cannot be installed if there are cards in
the PCMCIA slots. Remove all cards and click Ye s to continue.
9.
The Select Type of Platform window appears. Click to checkmark the box for
Gateway Solo 5100, then click Next.
10.
The files copy, then a window appears stating the CardWizard readme file
should be viewed. Click No to continue.
11.
Insert disk 2 when prompted. Click OK.
12.
Insert disk 3 when prompted. Click OK.
13.
Click Yes or No to view the PowerProf iler readme file.
14.
Windows NT Service Pack CD
The Service Pack CD-ROM disc contains updates to Windows NT features and for
products operating with Windows NT. Use this CD-ROM to update the
Windows NT install.
1.
50 Maintaining and Troubleshooting Your Solo Notebook
A window appears stating the system should be restarted. Remove the
diskette in drive A: and click Finish. The system restarts with Windows NT.
The CardWizard and PowerProfiler icons appear on the Program menu.
Installing WindowsNT Service Pack (NT updates)
If not already installed, shut down and install the CD-ROM module. Restart Windows.
Page 51

2.
With Windows NT running, insert Windows NT Service Pack CD-ROM into
the CD drive. The service pack automatically launches into Microsoft
Internet Explorer.
3.
Read the information that further details the contents of the service pack, then
scroll down the screen to the Install Service Pack link. Click the Install Service
Pack
link.
4.
Read the onscreen message and click Open to continue.
5.
A DOS screen launches, then a Welcome screen appears. Click Next.
6.
The Software License Agreement appears. Click Yes to continue.
7.
The Service Pack Setup wi ndow appears. Click Next to continue.
8.
Next click Yes or No to install an uninstall directory. Click Next to continue.
9.
Click Finish to complete the installation. During the f inal install process a
WindowNT Service Pack Setup window appears asking if you would like to
overwrite the PCMCIA.SYS file that is already on your system. Click No.
10.
The final setup window asks you to remove any disks from the floppy drive.
Eject any diskettes that may be in the a: drive.
Windows NT EZ Pad Plus (touchpad) drivers
Use the following instructions to install the Windows NT touchpad drivers that
support your touchpad. If the Solo System CD shipped with your system, you may
use it to install the driver instead of installing the drivers from diskette.
Installing the Solo 5100 touchpad drive r
1.
If the floppy drive module is not already installed, shut down the system and
install the floppy drive. Restart Windows.
2.
Insert the Solo Mouse Driver for Windows NT 4.0 diskette into the floppy
drive.
3.
Click Start, Run, and on the command line type:
a:\mouse\setup
then click OK.
4.
Microsoft IntelliPoint Setup window appears. Click Next to continue.
Chapter 4: Installing Drivers and Related Software 51
Page 52

5.
The next window displays the IntelliPoint identification number. Copy this
number down for future product support reference. Click Next.
6.
Keep the default installation directory. Click Next.
7.
Click Finish to start copying driver files.
8.
Click Close to exit the setup program.
9.
Click Restart Windows to complete the driver installation. If you are
reinstalling the Windows NT operating system and need to install additional
drivers, you can click Return to Windows and continue installing the other
drivers before restarting.
Windows NT Intel BusMaster IDE drivers
Use the following instructions to install the Windows NT Intel BusMaster IDE
drivers. If the Solo System CD shipped with your system, you may use it to install
the driver instead of installing the drivers from diskette.
Installing the Solo 5100 Intel BusMaster IDE drivers
1.
If the floppy drive module is not already installed, shut down the system and
install the floppy drive. Restart Windows.
2.
Insert the Solo 5100 Windows NT Intel BusMaster IDE diskette into the
floppy drive.
3.
Click Start, Run, and on the command line type:
a:\setup
then click OK.
4.
PIIX IDE Bus Master Driver File Installation Setup window appears. Click
Yes to continue the installation.
5.
Click Yes if you agree to the license agreement.
6.
The default installation location appears. Click OK to continue.
7.
Click Yes to view the README.TXT file which supplies further installation
instructions. Close the file and continue with the instruction in this
procedure.
8.
Click Start, Settings, Control Panel. Double-click SCSI Adapters icon.
52 Maintaining and Troubleshooting Your Solo Notebook
Page 53

Selecting the SCSI Adapters icon
9.
Click Drivers tab.
Selecting the Drivers tab for BusMaster IDE configuration
10.
Click to highlight the IDE CD-ROM (ATAPI 1.2)/Dual-channel PCI IDE Co... , then click Remove.
11.
Click Yes to remove.
12.
Click Add. When the Install Driver window appears, click Have Disk....
Chapter 4: Installing Drivers and Related Software 53
Page 54

13.
Type:
c:\piixide
then click OK.
14.
The Install Driver dialog box appears with the Intel PIIX PCI Bus Master IDE
Controller
15.
Click Yes to restart your system and initialize the drivers.
highlighted. Click OK.
54 Maintaining and Troubleshooting Your Solo Notebook
Page 55

Chapter 5:
Managing System Resources
Contents
Port/IRQ Configurations ....................................... 56
Solo notebook interrupts (IRQs).................... 56
Checking Windows 95 resources .................. 57
Page 56

Port/IRQ Configurations
Your notebook supports the use of multiple peripheral devices. By default, your
system has two free IRQs (normally IRQ 10 and 11). 16-bit and 32-bit devices (PC
Cards) cannot share the same interrupt. The IRQs that may be used by normal 16bit PC Cards are 3, 4, 5, 7, 10 and 11. IRQ 9 is not available for 16-bit PC Cards
because they are reserved as PCI style interrupts for USB and 32-bit Cardbus PC
Cards.
Solo notebook interrupts (IRQs)
Use this information to help determine which IRQ(s) to disable if you need to freeup resources for a new device.
5100 IRQs Dev ice us e
0 System timer
1 Keyboard
2 Programmable interrupt controller
3 IR port (COM2) - shipped disabled
4 Serial communications port (COM1)
5 Sound
6 Floppy disk controller
7 Parallel port (printer)
8 System CMOS/Real time clock
9 USB - IRQ holder (32-bit PCI style IRQ)
10 Free
11 Free
12 Touchpad (mouse)
13 Numeric data processor
14 Hard disk
15 CD-ROM drive
56 Maintaining and Troubleshooting Your Solo Notebook
CardBus - (32-bit PCI style IRQ)
Page 57

Checking Windows 95 resources
You may also check your current system resources (IRQ) information using the
Windows Device Manager under the System icon.
Checking IRQ usa ge in the Windows 95
System Properties Device Manager
1.
Click Start, Settings, Control Panel. Double-click System icon and click Device
Manager
Computer, Properties in the item list.
tab. Under Device Manager tab click View devices by type. Click
Selecting computer properties
2.
The Computer Properties dialog box appears. Click Interrupt request (IRQ).
This provides you with a current list of system IRQ usage and helps you
determine which interrupts you may want to disable to free system resources.
Chapter 5: Managing System Resources 57
Page 58

Viewing system resources properties
If you install a PC Card and it does not work (freeing up
resources)
1.
Make sure the card was installed properly. Check the PC Card's
documentation if you have any installation questions.
2.
Plug in a second PC Card. If it does not work there may be a resource problem (unavailable IRQ).
3.
Click Start, Settings, Control Panel. Click System icon, click Device Manager tab.
4.
Check the properties for the PC Card you installed. A PC Card with a
resource conflict “appears” as an exclamation point in a yellow circle. A PC
Card that is disabled “appears” with an X through the icon.
5.
If there is a resource conflict, remove the second PC Card you are trying to install.
6.
Determine which one of your ports that you do not need to use for the time
being, possibly the IR port, serial port, or parallel port. You also can disable
the sound chip if you prefer.
To disable a device, select the port you want to disable (for example, COM1)
and click Properties.
58 Maintaining and Troubleshooting Your Solo Notebook
Page 59

Selecting a port to free up resources (IRQs)
7.
Place a check in the box next to
check box, then click OK.
Disabling a port to free up resources
Disabled in this profile
in the
Device usage
Chapter 5: Managing System Resources 59
Page 60

8.
Re-install the second PC Card. You should hear a two-tone beep, indicating
that the card is enabled.
9.
To later use the port you disabled, go back into Device Manager and remove
the check in the Disabled box. The port should be immediately available for
use.
If the PC Card is still not configured correctly, try shutting down and restarting
your system.
If you are running the Windows 95 operating system, check the BIOS Setup to see
that the setting for Plug and Play OS is set to Yes see “Advanced menu” on page 73.
If Plug and Play OS was set to no, then try Steps 1-9 again. If you are running the
Windows NT operating system do not set the CMOS to Plug and Play OS.
60 Maintaining and Troubleshooting Your Solo Notebook
Page 61

Chapter 6:
Using Modem Documentation
Contents
Accessing Modem Documentation ...................... 62
To access online modem documentation
in Windows 95................................................ 60
To load online modem documentation
in Windows 95................................................ 61
Page 62

Accessing Modem Documentation
Online modem documentation is available with additional information regarding:
♦
Sending and Receiving Data
♦
Sending and Receiving Faxes
♦
Setup under Microsoft Windows NT 4.0
♦
Using the Internet
♦
AT commands
♦
S Registers
♦
Troubleshooting
♦
Gateway Online
♦
Glossary
To access online modem documentation in Windows 95
1.
Click Start, Programs, then click Gateway Reference Library icon. A list of titles appears.
2.
Click Gateway 2000 TelePath User Guide and follow any on-screen
instructions.
Accessing the Gateway Reference Library
62 Maintaining and Troubleshooting Your Solo Notebook
Page 63

To load online modem documentation in Windows 95
The online modem documentation is already loaded on your portable system when
shipped. If this file ever needs to be reinstalled, use the following instructions to
reload the online documentation.
1.
Insert the installation diskette into the floppy drive.
2.
Click Start, then Run....Type:
a:\install
on the command line. Click OK. The Installation window appears.
3.
Click OK to accept the destination drive and directory defaults. The
Installation window reappears.
4.
Click OK to confirm the source drive. The Done window appears verifying installation.
Note:
Make sure the floppy disk
drive module is installed in the
system.
Chapter 6: Using Modem Documentation 63
Page 64

64 Maintaining and Troubleshooting Your Solo Notebook
Page 65

Chapter 7:
Adding Memory Modules
Contents
Installing Additional Memory............................... 66
To install memory modules ........................... 66
To remove memory modules......................... 68
Page 66

Installing Additional Memory
Caution!
T o help av oid possible damage
to your computer from static
electricity, follow these
procedures every time you
work inside your computer.
Your notebook supports two 144-pin memory modules called
SO-DIMMs
(Small
Outline Dual Inline Memory Modules). The modules are available in various
capacities and can be placed in either slot.
To install memory modules
1.
Save all work.
2.
Use your operating system’s Shut Down procedure to turn your notebook completely off.
3.
Close the LCD lid. Before opening your system case, read and follow these
precautions to prevent damage from static electricity.
Caut io n ! Preventing Stati c Electricity Damage
The components inside your system are extremely sensitive to static electricity, also
known as electrostatic discharge (ESD). Static electricity can cause irreparable
damage to your system; however, if you follow these preventions and precautions,
you should prevent such damage.
Static Electricity Preventions
♦
WEAR A G RO UNDING WRIS T STR AP (available at most electronic sto res).
♦
Turn off the system power.
♦
REMOVE THE BATTERY PACK.
♦
Remove all external cords and cables.
Static Electricity Precautions
♦
♦
♦
♦
4.
5.
66 Maintaining and Troubleshooting Your Solo Notebook
Avoid static-causing surfaces such as plastic and styrofoam in your work area.
Remove the parts from their antistatic bags only when you are ready to use them. Do not lay
parts on the outside of antistatic bags since only the inside provides antistatic protection.
Always hold cards by their edges and their metal mounting bracket. Avoid touching
components on the cards and the edge connectors that connect to expansion slots.
Never slide cards or other parts over any surface.
Remove the battery pack, disconnect the AC power, and then turn your notebook over.
Remove the screw on the memory bay door, then use your fingernail or
flathead screw driver to pop the door off.
Page 67

Remove screw
Removing the memory bay door
6.
To insert a memory module, hold it at a 30-degree angle and slide it into an
empty memory slot. Align the memory module slot with the key. The “key
slot” prevents incorrect installation.
Memory
module slot
aligned with
key
Inserting memory module
7.
Gently push down on the memory module until it clicks into place under the
two clips on either side of the memory module.
Chapter 7: Adding Memory Modules 67
Page 68

Seating the memory module
8.
Replace the memory module door and power connections.
T o remove memory modules
1.
Save all work.
2.
Use your operating system’s Shut Down procedure to turn your notebook completely off.
68 Maintaining and Troubleshooting Your Solo Notebook
Page 69

3.
Close the LCD lid. Before opening your system case, read and follow these
precautions to prevent damage from static electricity.
Caut io n ! Preventing Stati c Electricity Damage
The components inside your system are extremely sensitive to static electricity, also
known as electrostatic discharge (ESD). Static electricity can cause irreparable
damage to your system; however, if you follow these preventions and precautions,
you should prevent such damage.
Static Electricity Preventions
♦
WEAR A G RO UNDING WRIS T STR AP (available at most electronic sto res).
♦
Turn off the system power.
♦
REMOVE THE BATTERY PACK.
♦
Remove all external cords and cables.
Static Electricity Precautions
♦
Avoid static-causing surfaces such as plastic and styrofoam in your work area.
♦
Remove the parts from their antistatic bags only when you are ready to use them. Do not lay
parts on the outside of antistatic bags since only the inside provides antistatic protection.
♦
Always hold cards by their edges and their metal mounting bracket. Avoid touching
components on the cards and the edge connectors that connect to expansion slots.
♦
Never slide cards or other parts over any surface.
4.
Remove the battery pack, disconnect the AC power, and then turn your notebook over.
Caution!
T o help av oid possible damage
to your computer from static
electricity, follow these
procedures every time you
work inside your computer.
5.
Remove the screw on the memory bay door, then use your fingernail or
flathead screwdriver to pop off the door.
Remove screw
Removing the memory bay door
6.
To remove the memory modul e, gently press outward on both clips at either
end of the memory module at the same time until the memory module snaps
out of the memory socket and tilts upward.
Chapter 7: Adding Memory Modules 69
Page 70

Removing the memory module
7.
Pull the memory module out of the slot.
8.
Replace the memory module door and power connections.
Memory module clips
70 Maintaining and Troubleshooting Your Solo Notebook
Page 71

Chapter 8:
BIOS Setup
Contents
Setup (BIOS) Screens............................................ 72
Main menu...................................................... 72
Advanced menu.............................................. 73
Security menu................................................. 74
Power menu .................................................... 75
Exit menu........................................................ 77
Page 72

Setup (BIOS) Screens
Your notebook contains a series of Setup menus that control basic setup, security,
and power settings. Using these menus you can adjust options such as the system
clock, your Boot Password, virus check reminder, power management option, and
others.
The menu screens include the Main, Advanced, Se curity, Pow e r , Boot, and Exit.
Entering the Setup menus disables all function (Fn) keys and power saving
functions.
The menu screens shown in this chapter may differ somewhat from those shown on
your computer. If so, you may have a newer BIOS than described here but the
screens will be similar enough to get the information you need. Follow the onscreen instructions and helps to navigate through the menus.
To access the Setup menus
1.
Start your notebook.
2.
Press the <F2> key when prompted to do so. The “Entering Setup...”
message briefly shows and then the Main menu appears.
3.
Follow the instructions along the bottom of the menus to navigate through the
different options and menus. An Item Specific Help area providing additional
information is also located along the right side of each menu.
Main menu
The Main menu controls a variety of basic setup options.The following provides a
view of the options controlled through the Main menu:
72 Maintaining and Troubleshooting Your Solo Notebook
Page 73

PhoenixBIOS Setup Utility
Main
Advanced S ecurity Power Boot E xit
Item Specific Help
System Time:
System Date:
Floppy Disk Drive A:
Floppy Disk Drive B:
>Primary Master:
>Secondary Master:
Memor y Cache:
System Memory:
>System Information:
Numlock:
TV Out:
Display Device:
Text Mode Expansion:
Graphics Mode Expansion:
QuickBoot Mode:
Floppy check:
Boot-time Diagnostic Screen:
F1 Help ↑↓ S elect I tem -/ + Change Values F9 S etup De fault
ESC Exits ←→ Select Menu Enter Select > Sub-Menu F10 Save and Exit
[HH :MM:SS ]
[MM/DD/YYYY]
[1.44/1.25 MB 31/2”]
[D isabl ed]
[NNN MB]
[None]
[Enabled]
NNN KB
[O ff]
[D isabl ed]
[Simultaneous]
[Enabled]
[Enabled]
[Enabled]
[Enabled]
[Enabled]
Enter System Time.
<Tab>, <Shift-Tab>, or
<Enter> selects field.
Main menu
Press the <Esc> key to access the Exit menu and accept or discard changes. Press
<F9> to return to the factory defaults, or <No> to return to the previous settings.
Use the right arrow key to move over to the next menu.
Note:
The Setup menu screen shown
may differ somewhat from
that shown here. If there are
differences, follow the onscreen instructions and helps.
Advanced menu
The Advanced menu contains operating system, system al location (IRQ and
register settings) and port assignment (COM and LPT) information.
To access the Setup menus
1.
Start your notebook.
2.
Press the <F2> key when prompted to do so. The “Entering Setup...”
message briefly shows and then the Main menu appears.
3.
Follow the instructions along the bottom of the menus to navigate through the
different options and menus. An Item Specific Help area providing additional
information is also located along the right side of each menu.
Chapter 8: BIOS Setup 73
Page 74

PhoenixBIOS Setup Utility
Caution!
Setting items on this menu to
incorrect values may cause
your system to malfunction.
Note:
The Setup menu screen shown
may differ somewhat from
that shown here. If there are
differences, follow the onscreen instructions and helps.
Advanced
Main
Setting items on this menu to
incorrect values may cause your
>I/O Device Configuration
F1 Help ↑↓ S elect I tem -/ + Change Values F9 S etup De fault
ESC Exits ←→ Select Menu Enter Select > Sub-Menu F10 Save and Exit
Security Power Boot Exit
Setup Warning
system to malfunction
Plug & Play O/S:
USB Keyboard
>PCI Configuration
Local B us IDE adapter:
Large Disk Access Mode:
>Audio Options Menu
[Ye s]
[D isabl ed]
[Enabled]
[Both]
[D OS]
Item Specific Help
Select ‘Yes’ if you are
using a Plug & Play
capable operating system.
Select ‘No’ if you need
the BIOS to configure
non-boot devices.
Advanced menu
Press the <Esc> key to access the Exit menu and accept or discard changes. Press
<F9> to return to the factory defaults, or <No> to return to the previous settings.
Use the right arrow key to move over to the next menu.
Security menu
The Security menu primarily lets you set passwords, either Supervisor or user, that
limit access to your BIOS setup and thus protect your system.
1.
2.
74 Maintaining and Troubleshooting Your Solo Notebook
To access the Setup menus
Start your notebook.
Press the <F2> key when prompted to do so. The “Entering Setup...”
message briefly shows and then the Main menu appears.
Page 75

3.
Follow the instructions at the bottom of the menus to navigate through the
different options and menus. An Item Specific Help area providing additional
information is also located along the right side of each menu.
PhoenixBIOS Setup Utility
Advanced
Main
F1 Help ↑↓ S elect I tem -/ + Change Values F9 S etup De fault
ESC Exits ←→ Select Menu Enter Select > Sub-Menu F10 Save and Exit
Security Power Boot Exit
Supervisor password is:
User password is:
Set supervisor password
Set user password
Password on Boot:
Fixed disk boot sector:
HDD Password Is:
Set HDD Password
Disabled
Disabled
[Enter]
[Enter]
[D isabl ed]
[N orma l]
Disabled
[Enter]
Item Specific Help
Supervisor Password
controls access to the
setup utility and enables
User Password. If you
forget the password, your
computer may have to be
sent in for service.
Security menu
Press the <Esc> key to access the Exit menu and accept or discard changes. Press
<F9> to return to the factory defaults, or <No> to return to the previous settings.
Use the right arrow key to move over to the next menu.
Note:
The Setup menu screen shown
may differ somewhat from
that shown here. If there are
differences, follow the onscreen instructions and helps.
Caution!
We have made the password
function very secure with no
easy way to erase a forgotten
password. If you forget your
password and have not used
the Backup password:
function, you must send your
notebook back to us for a
time-consuming repair.
Power menu
The Power menu contains the power management and system timeouts settings.
To access the Setup menus
1.
Start your notebook.
2.
Press the <F2> key when prompted to do so. The “Entering Setup...”
message briefly shows and then the Main menu appears.
3.
Follow the instructions along the bottom of the menus to navigate through the
different options and menus. An Item Specific Help area providing additional
information is also located along the right side of each menu.
Chapter 8: BIOS Setup 75
Page 76

PhoenixBIOS Setup Utility
Note:
The Setup menu screen shown
may differ somewhat from
that shown here. If there are
differences, follow the onscreen instructions and helps.
Main Advanc ed Security
Low Battery Beep:
Cooling Control:
> AC Mode Power Savings:
>DC Mode Power Savings:
Resume On Time:
Resume On Modem Ring:
F1 Help ↑↓ S elect I tem -/ + Change Values F9 S etup De fault
ESC Exits ←→ Select Menu Enter Select > Sub-Menu F10 Save and Exit
Power
Power Switch:
Lid Switch:
Resume Time:
Boot Exit
Item Specific Help
[O n/Off]
[Backlight Off]
[Enabled]
[Performance]
[O ff]
[00:00:00]
[O ff]
Power menu
Press the <Esc> key to access the Exit menu and accept or discard changes. Press
<F9> to return to the factory defaults, or <No> to return to the previous settings.
Use the right arrow key to move over to the next menu.
Boot menu
The Boot menu allows you to change the sequence of devices from which your
notebook is to boot.
1.
2.
3.
76 Maintaining and Troubleshooting Your Solo Notebook
To access the Setup menus
Turn on your notebook.
Press the <F2> key when prompted to do so. The “Entering Setup...”
message briefly shows and then the Main menu appears.
Follow the instructions along the bottom of the menus to navigate through the
different options and menus. An Item Specific Help area providing additional
information is also located along the right side of each menu.
Page 77

PhoenixBIOS Setup Utility
Main Advanced S ecurity Power
1. [Diskette Drive]
2. [Hard Drive]
3. [CD ROM Drive]
F1 Help ↑↓ S elect I tem -/ + Change Values F9 S etup De fault
ESC Exits ←→ Select Menu Enter Select > Sub-Menu F10 Save and Exit
Boot
Exit
Item Specific Help
Use <Up Arrow> or
<Down Arrow> to s elect a
device, then press <+> to
move it up the list or <->
to move it down the list.
Press <Esc> to exit this
menu.
Boot menu
Exit menu
The Exit menu contains the options available once you have made changes t o the
Setup menus. Use the arrow keys to make your selection and follow all screen
prompts.
PhoenixBIOS Setu p Utility
Main Advanced Security Power Boot Exit
Item Specific Help
Exit Saving Changes
Exit Discarding Changes
Load Setup Defaults
Discard Changes
Save Changes
Exit System Setup and
save your cha nge s to
CMOS.
Note:
The Setup menu screen shown
may differ somewhat from
that shown here. If there are
differences, follow the onscreen instructions and helps.
Note:
The Setup menu screen shown
may differ somewhat from
that shown here. If there are
differences, follow the onscreen instructions and helps.
F1 H elp ¦Ø Select Item -/+ Ch ange Va lues F9 S etup Defau lt
ESC Exits ¨Æ Select Menu Enter Select > Sub-Menu F10 Save and Exit
Exit menu
Press the <Esc> key to access the Exit menu and accept or discard changes. Press
<F9> to return to the factory defaults, or <No> to return to the previous settings.
Use the right arrow key to move over to the next menu.
Chapter 8: BIOS Setup 77
Page 78

78 Maintaining and Troubleshooting Your Solo Notebook
Page 79

Chapter 9:
Troubleshooting Your Notebook
Contents
Troubleshooting..................................................... 80
Start up ............................................................ 80
General............................................................81
Frequently asked questions............................ 82
Error messages................................................ 86
Page 80

Troubleshooting
This section includes tips and solutions from our technical support organization as
well as information that may answer your questions without you having to make a
technical support call.
Other sources of helpful information include our web site at www.gateway.com;
and other online information found on your system CD (if available).
If these solutions do not solve your problem, see the warranty that shipped with
your notebook that describes several ways to request help, including traditional
Portables Technical Support and our FaxBack service.
Start up
When your notebook is turned on, the hard disk makes a whirring noise, the screen
shows various images (words or graphics), and the system LED is lit. If any of
these do not occur, check the following components and their connectors:
The CD-ROM or floppy disk module won't work
Make sure that the module is correctly seated in the modular option bay. To do this,
remove the module, re-insert it firmly into the drive bay (you should hear it click
into place), then restart your notebook.
The hard disk drive can’t be accessed
Make sure that the hard disk drive is correctly seated. Remove and firmly reinstall
(you should hear it click into place), then restart your notebook.
If your notebook has recently been subjected to an excessive amount of static
electricity or physical shock, you may need to reinstall the system files from the
Windows 95 CD.
The system may be attempting to start from the floppy drive first. Go to the Setup
menus and check the Boot sequence: setting under the Boot menu.
Your notebook isn't working from the battery (if using battery power)
Make sure the battery is installed properly.
Make sure the battery is charged.
Your notebook isn't working from AC power (if using AC power)
Make sure all connections are secure.
80 Maintaining and Troubleshooting Your Solo Notebook
Page 81

Make sure electricity is supplied to the outlet for the power cord.
Make sure the cables are free from cuts or damage. Replace any damaged cables.
Something is wrong with the display
Press <Fn+F3> to cycle the system back to LCD panel mode. It is possible it is in
CRT or TV mode.
Make sure that the brightness is turned up. The screen simply may be too dark t o
see.
If you want the screen to be brighter when starting your system with the battery,
make sure the “Auto dim with battery” option in the Power menu is set to OFF.
General
Even after your notebook is on and running, you may encounter one or more of the
following problems. If any of these happen, check the appropriate parts and their
connectors, then try the solutions suggested:
The notebook won't accept your password.
Check the LED indicators for Caps Lock and Pad Lock. If either one is on, turn it
off (you can do this before entering the password). Then try retyping the password.
You forgot your password.
We made the password feature very secure with no easy way to erase a forgotten
password. Call Customer Support for instructions.
The screen looks a little dark.
Check the brightness control. If powered by battery, the notebook's auto-dim
function could be enabled.
The system locks up and nothing seems to work to get it restarted.
Whether your notebook is on or off, the system does a cold restart after you press
this internal reset button. Use a small prod (such as a straightened paper clip) to
depress the reset button in the recessed area located on the right side between the
Fast IR and the PS/2 ports.
Chapter 9: Troubleshooting Your Notebook 81
Page 82

Frequently asked questions
V ideo display
Suspend
Note:
If you use a docking station,
you will want to select a
setting that shows the Suspend
option ONLY when the
notebook is undocked.
Question
:
Why is the video display on SVGA systems loaded with MS Office appear to
be “washed out” when switching between applications (the screen appears to
have only 16 colors instead of 65,000 or 256 colors)?
Answer:
1.
Right click MS Office Toolbar control box.
2.
Select Customize..., then the View tab.
3.
Deselect the Use Gradient Fill box.
Question:
How do I change the video resolution on my LCD or my external monitor?
Answer:
1.
In Windows 95, right-click the desktop, and select Properties.
2.
Click Settings tab of the Display Properties, then adjust the resolution and
color depth. Remember, at the highest resolutions, not all color depths may be
available.
Question
Answer:
1.
2.
3.
4.
82 Maintaining and Troubleshooting Your Solo Notebook
:
Why doesn't the Suspend option appear on my Windows 95 Start Menu?
Click Start, Settings, then Control Panel.
Double click Power icon.
Make sure that Always is selected under Show Suspend command on the Start menu; then click OK.
The Suspend option always appears on the Start menu.
Page 83

Question
:
How do I set up a printer on my notebook?
Answer:
1.
Click Start, Settings, then Printers.
2.
Double-click Add Printer icon, then follow the instructions from the Add Printer Wizard.
Printer setup
Question
:
Why can’t I print after the mini-docking station is disconnected from my
system?
Answer:
1.
Click Start, and Settings.
2.
Right click Printer icon for your printer.
3.
Make sure that Set as Default is selected. If Work Offline is selected, click it to
deselect it. Now, your print job sent when you were docked should print.
Question
:
I accidentally deleted a file. Can I get it back?
Answer:
1.
Double-c lick Recycle Bin icon.
2.
Highlight the file you deleted by clicking on it.
3.
Click Edit and Undo Delete and the file will be retrieved.
Recovering deleted files
If the file was deleted at a DOS prompt, however, the f ile is gone.
Question
:
How do I get rid of the Windows 95 password box that appears every time I
start my notebook?
Passwords
Chapter 9: Troubleshooting Your Notebook 83
Page 84

Answer:
ScanDisk
Sound
Connecting to the Internet
Type your first name in the User Name box. Don’t type anything in the
Password box and click OK. Windows 95 asks you to confirm your password.
Click OK again.
Question:
When I started my notebook, it ran ScanDisk? What’s happening?
Answer:
The notebook may have been disconnected from power, had its power
interrupted, or was im properly shut down. Windows 95 automatically runs
Scan Disk when it senses that the notebook was improperly shut down. This
is usually a good thing because ScanDisk fixes any errors on your notebook’s
hard disk drive and minimizes data loss.
Question:
I started my new notebook, and I’m not getting any sound from my speakers.
What can I do?
Answer:
Question:
Answer:
84 Maintaining and Troubleshooting Your Solo Notebook
If you are using external speakers, check your speaker connections, making
sure the connectors are in the correct ports. Make sure the volume is turned
up for the speakers (using the volume wheel) and in Windows 95. Click
Speaker icon in the lower right corner of the screen and drag the volume
slider up if necessary. Also make sure that the mute box is not checked.
How do I connect to my Internet provider?
To get access to the Internet, you need an Internet Service Provider (ISP). It
may be a service like AOL, CompuServe, or the Microsoft Network, or a
local company. You already have the basic software needed to browse, but the
ISP actually connects you.
Page 85

Most ISPs provide a packet of information when you subscribe to their
service. This information, in most cases, contains detailed instructions for
configuring your computer to connect to their service. Most ISPs allow you
to use Windows Dial Up Networking to make the connection to the ISP.
Generally it is a good idea to contact the specific ISP if you are having
difficulties connecting.
Question:
I have a very large hard drive and I’m using WindowsNT 4.0. I am trying to
use the smallest number of partitions possible. How large can I make my
bootable partition?
Answer:
The largest bootable partition in Windows NT 4.0 is 4 GB. This is true if you
format with FAT or NTFS. When you create the partition during
Windows NT setup, the system is running in DOS Real Mode which allows
4 GB as the maximum partition size.
Question:
My CD-ROM drive is not reading any CD’s. How can I get it to work?
Answer:
The CD may not be properly seated in the CD tray. There are retaining clips
built into the CD spindle. When you place a CD into the CD-ROM drive,
ensure you press the CD firmly onto the spindle so the retaining clips hold the
CD in place.
Bootable hard drive partition
(Windows NT)
CD ROM drive
Question:
How can I use both the floppy drive and my CD-ROM drive on my
notebook?
Answer:
A cable is available that fits on the back of the floppy drive and plugs into the
parallel port. This lets you access the floppy drive while using the CD-ROM
drive.
External floppy drive
Chapter 9: Troubleshooting Your Notebook 85
Page 86

Question:
Battery life
Note:
Message text appears in the
margin.
Access denied
Bad command or file name
Why is my battery life so short? My battery is reporting 100% charged, then
loosing power shortly after?
Answer:
In most cases, this may be caused by the battery not being conditioned
properly. To properly condition the battery, it must be fully charged until the
battery charge light goes out. Then ensure the Battery Low Suspend and the
Power Management Control options are disabled in the BIOS setup.
To make changes to the BIOS setup:
1.
Press <F2> when the message Press <F2> to enter SETUP appears during star tup.
2.
Arrow to the Power menu, then arrow down to the PM Control option; change the value to Disabled.
3.
Arrow down to the Battery Low Suspend option; change the value to Off.
4.
Arrow to the Exit menu and select Save Changes & Exit.
5.
Leave the system operating using only battery power until the system shuts down on its own.
6.
Error messages
This section alphabetically lists commonly occurring error messages with the
suggested solution or referral instructions provided opposite the error message.
Many times these messages indicate only procedural errors: an incorrect keystroke,
a write protect tab not removed, etc.
Try saving to a new file or diskette, or move the write protection tab over the
hole on the back of the diskette.
Check to make sure you typed the correct command. Verify which drive was
specified and retry. A bad command or file name may be in the AUTOEXEC.BAT
or the CONFIG.SYS file. The boot sector may have been altered by a virus. To exit
from MS-DOS to Windows 95 type exit and press <Enter>.
86 Maintaining and Troubleshooting Your Solo Notebook
Plug in the AC adapter and fully charge the battery; this conditions the
battery. You many want to enter the BIOS setup again to enable the PM
Control
and the Battery Low Suspend options.
Page 87

This is usually a result of a defective area on the disk. To fix disk problems
click Start button in Windows 95, click Programs, click Accessories, click System
Tools
, and click ScanDisk.
Data error
You need to make a change in the BIOS setup menu. To do this press <F2> to enter
the Setup menu during startup. A message appears that reads “Warning the CMOS
checksum is invalid. Default values will be loaded.” Then press <Enter> to go to
the Exit menu and choose Save the changes and exit. The system restarts and the
error message will not appear.
Try restarting a couple of times by pressing <Ctrl+Alt+Del>. Reseat the hard drive.
Make sure your notebook isn't too cold. If nothing works, call Customer Support.
If possible, save your files to another disk or drive. To check the space left on
the disk or diskette click Start button, click Programs, click Windows Explore.
Click the appropriate disk icon that you would like to check. To create more storage
space, delete the unnecessary files you no longer need. If the hard disk drive (C:\) is
full, copy any files not used regularly to floppy drive or other backup device, and
delete them from the hard disk drive.
Carefully re-enter the password again. If it is a software program that is asking
for a password consult the documentation that shipped with it for the specific
instructions to clear the password so you may enter a new one.
Remove any objects resting on the keyboard and restart the computer. If you
are already in Windows 95, restart the computer.
Restart the computer and press <F2> when the computer restarts to enter the
Setup Program. Upon entering the Setup Program, the computer automatically
recognizes the amount of memory installed. To exit the Setup Program, go to
the Exit menu and save the changes.
Divide overflow error
General failure reading drive
C:
Insufficient disk space
Invalid password
Keyboard stuck or key failure
Memory size error
Make sure the memory modules are inserted correctly and securely on the
system board. See “Installing Additional Memory” on page 66. for instructions
on inserting memory modules.
Eject the diskette from the floppy drive and press <Enter>.
Close any programs you are not using.
Chapter 9: Troubleshooting Your Notebook 87
Memory error
Non-system disk or disk error
Not enough memory
Page 88

Wait until some files have been printed before sending additional files to the
Print queue is full
Printer is out of paper
Required parameter missing
Syntax error
Time and date not set
Write protect error
printer. Make sure the printer is not set to work “off-line.” If you print large or
many files at one time to the printer you may want to add additional memory to
the printer. Consult the printer documentation for instructions for adding
additional memory.
Make sure the printer is turned on, then add paper to the printer. After adding
paper, make sure the printer is “online.” Most printers have an “online/offline”
button you need to press after adding paper.
Carefully re-enter the command and check the spelling. To exit from MS-DOS
to Windows 95 type exit and press <Enter>.
Re-type the command and make sure the command is spelled correctly and any
other parts of the command are. To exit from MS-DOS, type exit and press
<Enter>.
The internal battery that keeps the clock/calendar going ran completely down.
This can happen if you leave the battery pack out of your notebook or fully
discharged for a day or more. To correct the problem, restart the computer and
press <F2> to enter the Setup Program. At the Main menu, change the time
and/or date to the proper settings. After changing the settings, go to the Exit
menu and save the changes.
Remove the write protection or use another diskette. To remove the write
protection from the diskette, slide the tab over the hole on the back of the
diskette.
88 Maintaining and Troubleshooting Your Solo Notebook
Page 89

Appendix A:
Contacting Gateway
Contents
Contacting Gateway.............................................. 90
Calling Gateway............................................. 90
Calling Gateway when outside the U.S......... 90
Page 90

Contacting Gateway
Note:
Y our C ustomer ID number and
order number can be found on
your invoice; the serial
number can be found on the
bottom of your notebook; see
“Identifying Your Model” on
page 7.
If you experience any trouble while using your Gateway Solo Multimedia
Notebook, feel free to contact Gateway. You will need to supply your Customer ID,
serial number, and order number to the customer support technicians. Make a note
of these numbers here.
If your computer is ever stolen, be sure to contact your local police and a Gateway
representative at once. We can put a note on the account, so that if anyone calls in
using the serial number for your notebook we can contact you immediately.
Customer ID: __________________________
Serial Number: _________________________
Order Number: _________________________
Calling Gateway
Gateway offers a wide range of customer service, technical support and
information services. If you have questions or problems, contact the Gateway
service that is most appropriate for your needs:
Assistance
resource
Sales & Customer
Support
Portables Technical
Support
Toll free from the US
Toll free from Canada
World Wide Web
US and Canada
UK
Calling Gateway when outside the U.S.
90 Maintaining and Troubleshooting Your Solo Notebook
Please refer to your Gateway Warranty Booklet for information and the contact
numbers for Gateway outside the U.S.
How to reach Information
available
800-846-2000 Information about systems,
pricing, orders, billing statements, warranty service and
other non-technical issues.
Call this number if you have
:
800-846-2302
800-846-3609
:
http://www. gateway.com
http://www. gw2k.co.uk
a problem with hardware or
software.
Modem required. The Gateway Web site contains a
variety of information about
Gateway.
Page 91

Index
A
AC power 80
access denied 86
accessing modem documentation 62
advanced setup menu 72, 73
assistance resources 90
audio drivers
installing 47
autoexec.bat
removing 20
B
bad command or file name 86
batteries
auto dim with battery 81
battery life
FAQs 86
boot password 75
boot setup menu 72
bootable hard drive
FAQs 85
BusMaster
IDE drivers 52
C
cab files
copying 20
calling Gateway 90
CardBus controller
enabling Cirrus Logic 38
CardWizard
installing 49
care and maintenance 8
CD ROM drive
FAQ s 85
CD-ROM
FAQs 85
installing driver 31
checking IRQ usage 57
Chips and Technologies
installing 45
installing video drivers 33
Windows NT 45
cleaning
exterior 8
LCD display 8
config.sys
removing 20
connecting to the internet
FAQ s 84
contacting Gateway 90
copying files
cab 20
inf 21
vxd 21
creating
hard drive partitions 16
customer ID 90
D
data error 87
defragment 9
deleting
hard drive partitions 14
device drivers
how to install 30
installing CD-ROM 31
installing Chips and Technologies
video 45
installing ESS audio 34
installing from CD-ROM 30
installing from diskettes 30
installing Windows 95 32
disk defragmenter
using 9
diskettes
setup for Windows NT 26
display 7
display drivers
Windows 95 33
Index 91
Page 92

Windows NT 45
display type/processor speed 7
divide overflow error 87
DOS drive
logical 13
DOS partition
extended 13
primary 13
driver diskettes
installing drivers from 30
drivers. See device drivers.
E
enabling
PCMCIA socket 38
enabling USB ports
Windows 95 41
error messages 86
access denied 86
bad command or file name 86
data error 87
divide overflow error 87
general failure reading drive C 87
insufficient disk space 87
invalid password 87
keyboard stuck or key failure 87
memory error 87
memory size error 87
non-system disk or disk error 87
not enough memory 87
print queue is full 88
printer is out of paper 88
required parameter missing 88
syntax error 88
time and date not set 88
write protect error 88
ESS audio driver
installing 34
exit setup menu 72, 77
extended DOS partition 13
exterior
cleaning 8
external floppy drive
FAQs 85
EZ Pad Plus
installing drivers 51
F
FAQs
battery life 86
bootable hard drive 85
CD ROM drive 85
connecting to the internet 84
external floppy drive 85
password 83
printer setup 83
recovering deleted files 83
ScanDisk 84
sound 84
suspend 82
video display 82
FAT16 file system
partitioning with 13
formatting
hard drive 12
partition with FAT16 file system 13
formatting drive for NT 26
formatting hard drive 18
formatting with FAT file system 26
freeing up resources 58
frequently asked questions (FAQs) 82
G
Gateway
contacting 90
Gateway serial number 7
Gateway System CD 12
general
troubleshooting 81
general failure reading drive C 87
H
hard drive
formatting 18
partitioning 13
hard drive partitions
creating 16
92 Maintaining and Troubleshooting Your Solo Notebook
Page 93

deleting 14
hard drive utilities 9
how to
access modem online documenta-
tion 62
create partitions 16
delete partitions 14
enable Cirrus Logic CardBus con-
troller 38
enable USB ports in Windows 95
41
format hard drive and install Win-
dows 95 21
identify your model 7
install device drivers 30
install memory modules 66
install Windows 95 12
install Windows NT 27
remove memory modules 68
http://www.gateway.com (US site) 90
http://www.gw2k.co.uk 90
I
IDE
BusMaster drivers 52
identifying your model 7
inf files
copying 21
installing
audio ESS driver 34
CardWizard 49
CD-ROM driver 31
Chips and Technologies video driv-
ers 33, 45
drivers from driver diskettes 30
drivers from Solo system CD 30
EZ Pad Plus drivers 51
memory 66
PC Cards 58
PowerProfiler 49
Windows 95 12, 19
Windows 95 audio drivers 34
Windows 95 display drivers 33
Windows 95 drivers 32
Windows 95 game port drivers 34
Windows NT 27
Windows NT audio drivers 47
Windows NT display drivers 45
Windows NT Service Pack CD 51
52
installing drivers
using Solo system CD 30
installing Windows 95 12
installing Windows NT 26
insufficient disk space 87
Intel BusMaster
IDE drivers 52
interrupt request (IRQ) 57
invalid password 87
IRQs
checking usage 57
freeing up resources 58
interrupt request 57
K
keyboard stuck or key failure 87
L
LCD display
cleaning 8
logical DOS drive 13
M
main setup menu 72
maintaining your system 8
memory
installing 66
memory error 87
memory module clips 70
memory modules
installing 66
removing 68
memory size error 87
messages
error messages 86
model identification 7
model number 7
,
Index 93
Page 94

modem documentation
online (how to access) 62
N
non-system disk or disk error 87
not enough memory 87
O
online modem documentation 62
order number 90
P
partition with FAT16 file system 13
partitioning
hard drive 12, 13
partitioning drive for NT 26
password
FAQs 83
troubleshooting 81, 83
PC Cards
installation problems 58
PCMCIA
enabling 38
PCMCIA cards. See PC Cards.
portables technical support 90
power
auto dim with battery 81
power setup menu 72
PowerProfiler
installing 49
primary DOS partition 13
print queue is full 88
printer is out of paper 88
printer setup
FAQs 83
processor 7
R
recovering deleted files
FAQs 83
reinstalling Windows 95 12
reinstalling Windows NT 26
removing
config.sys and autoexec.bat files 20
required parameter missing 88
S
sales & customer support 90
ScanDisk
FAQs 84
using 10
security setup menu 72
serial number 90
Service Pack CD
for Windows NT 26
installing 51, 52
setup menus
advanced 72, 73
boot 72
exit 72, 77
main 72
power 72, 75
security 72
SO-DIMM 66
Solo boot diskette 19
startup 19
Windows 95 12
Solo system CD
installing drivers 30
sound
FAQs 84
startup
troubleshooting 80
using Solo boot diskette 19
suspend
FAQs 82
syntax error 88
T
technical support 90
time and date not set 88
troubleshooting 80
general 81
password 81, 83
startup 80
U
USB (Universal Serial Bus) 40
94 Maintaining and Troubleshooting Your Solo Notebook
Page 95

using
disk defragmenter 9
V
video display
FAQs 82
virus checking 9
vxd files
copying 21
W
Website
http://www.gateway.com (US site)
90
http://www.gw2k.co.uk 90
Window NT
installing 27
Windows 95
audio drivers 34
game port drivers 34
installing 12, 19
installing display drivers 33
installing drivers 32
reinstalling 12
Solo boot diskette 12
Windows 95 driver diskettes 12
Windows 95 drivers
installing 32
Windows NT
bootable hard drive (FAQs) 85
formatting drive 26
formatting with FAT file system 26
how to install 27
installing 27
installing audio drivers 47
installing Chips and Technologies
video drivers 45
installing display drivers 45
installing EZ Pad Plus drivers 51
partitioning drive 26
reinstalling 26
Service Pack CD 26, 51, 52
setup diskettes 26
workstation CD 26
workstation CD
Windows NT 26
write protect error 88
Index 95
 Loading...