

Page 1

Contents
Checking out your documentation......................................................... iii
Chapter 1: Checking Out Your Notebook ........................................1
Keyboard and LCD panel.................................................................2
Top panel buttons and indicators......................................................4
Rear panel..........................................................................................5
Right side...........................................................................................6
Left side .............................................................................................7
Bottom ..............................................................................................8
Chapter 2: Getting Starte d ................................................................. 11
Getting your system running................................................................. 12
Installing the battery pack.............................................................. 12
Connecting the AC power.............................................................. 13
Turning on the power..................................................................... 14
Chapter 3: Usin g Yo ur Notebo ok ..................................................... 17
Using your Solo 3150............................................................................ 18
Using the keyboard......................................................................... 18
Using key combinations................................................................. 19
Using the LCD................................................................................ 22
Using the EZ Point......................................................................... 23
Connecting the modem cable......................................................... 26
Connecting the network................................................................. 27
Using the audio............................................................................... 27
Using 3.5" diskettes........................................................................ 30
Using CDs and DVDs.................................................................... 30
Using the USB port........................................................................ 33
Removing and replacing the hard disk drive ................................ 33
Using PC Cards.............................................................................. 35
Using the IR port............................................................................ 36
i
Page 2

Chapter 4: Getti ng O nline ...................................................................37
Using the Internet...................................................................................38
E-mail..............................................................................................39
World Wide Web............................................................................39
Using Microsoft Fax..............................................................................41
Setting up Microsoft Fax................................................................41
Sending and receiving faxes...........................................................43
Manually answering with your modem.........................................44
Locating the COM port address.....................................................45
Chapter 5: Ma naging Pow er Usage ................................................47
Managing battery power........................................................................48
Charging the battery pack...............................................................48
Using the battery.............................................................................50
Monitoring the battery status..........................................................51
Changing the power button setting ................................................51
Using the Suspend and Standby modes.........................................52
Maximizing battery life.........................................................................55
Chapter 6: Using the Port Replicator ..............................................57
Port replicator components....................................................................58
Ports.................................................................................................59
Attaching to the replicator..............................................................60
Separating from the replicator........................................................61
Setting up the video out port ..........................................................63
Appendix A: A ccessorie s ....................................................................65
Accessories.............................................................................................66
Appendix B: Us ing th e B IOS Se tup Pr ogra m .............................67
About the BIOS Setup utility.................................................................68
Appendix C: Contact ing Gateway ...................................................71
Contacting Gateway...............................................................................72
Regulatory Compliance Statements .............................................. 74
Index ...........................................................................................................79
ii Using Your Gateway Solo 3150 Notebook
Page 3

Chec king out your documentation
In addition to this User Guide, w e’ v e also pro vided othe r documentation to
help you get the most fro m your Solo 3150. Pl ease refer to the fo llo wing
printed and online documentation for additional resources :
Printed manuals
♦ Maintaining and T r oub leshooting Your Gateway Solo Notebook
contains information about managing system resources, p reserving
your system performance, reinst alling your operating system and
drivers, and gene ral troubl eshooting tips.
♦ The Windo ws manual provides information about using the operating
system, learning about advanced features , netw orking, getting help,
and more.
♦ The Internet and gate way.net provides an o v erview of the Internet and
tells you ho w to set up a n Internet account on gate w a y.net
♦ Specifications for the Gatew ay Solo 3150 Notebook gi ves detailed
information about your computer’s tec hnical specifications.
SM
.
Online documentation
Electronic manuals on your hard dr iv e giv e you ac cess to this
documentation when y ou are tra v eling or w hen the printed manu als are not
accessible. To access the online documentation click
Documentation
Gateway W eb site
If you ha ve a subsc ription to an Internet service pro vider , y ou can tap into
some of the latest help and other information on our Web site. We provide
notebook support help, technical documents, tech tips, fre quently as ked
questions (FAQs), gloss ary , soft ware libr ary with BIOS updates, and other
resources that can help y ou make the most of using your not ebook.
, then select the manual you w ant to re vie w.
(http://www .gatew ay.com)
Start, select Online
iii
Page 4

iv Using Your Gateway Solo 3150 Notebook
Page 5

Chapter 1:
Checking Out Your Notebook
Keyboard and LCD panel ................................ 2
Top panel buttons and indicators..................... 4
Rear panel......................................................... 5
Right side.......................................................... 6
Left side............................................................. 7
Bottom .............................................................. 8
Page 6
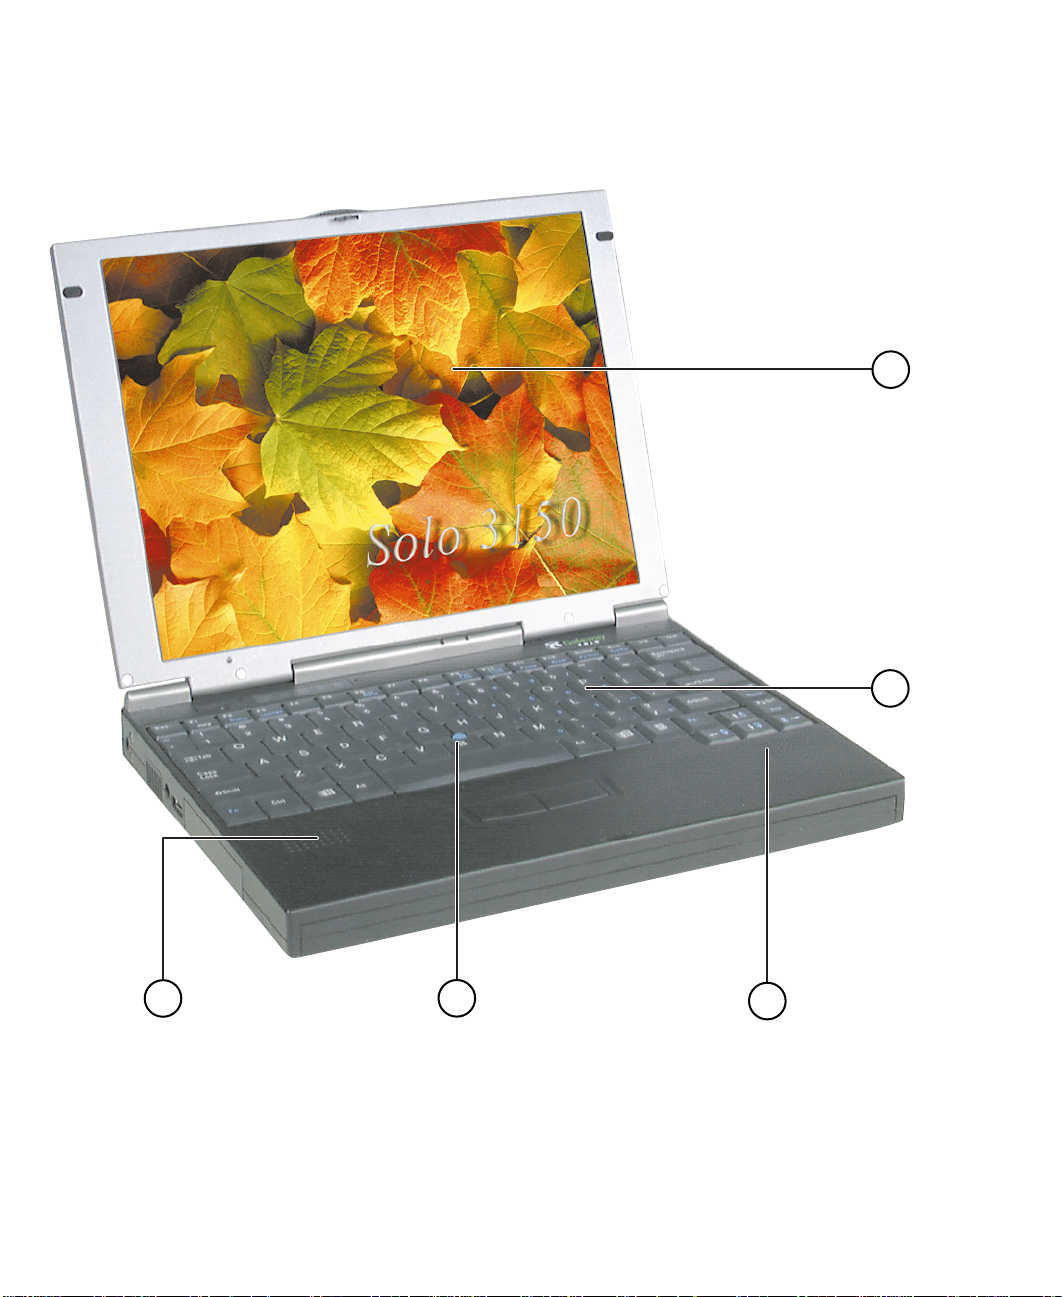
K eyboard and LCD panel
A
B
C
2 Using Your Gateway Solo 3150 Notebook
D
C
Page 7

Component Description
A. 12.1" TFT Color
LCD (Liquid
Crystal Display)
B. Keyboard Provides full functionality of a desktop com-
C.Speakers Provides high-quality sound reproduction for
D. EZ Point™ Controls the cursor movement on th e sc reen .
Provides sharp, crisp resolution with backlit
anti-glare screen.
puter keyboard. Many keys have been
assigned alternate functions.
software, audio CDs, and DVDs.
Chapter 1: Checking Out Your Notebook 3
Page 8
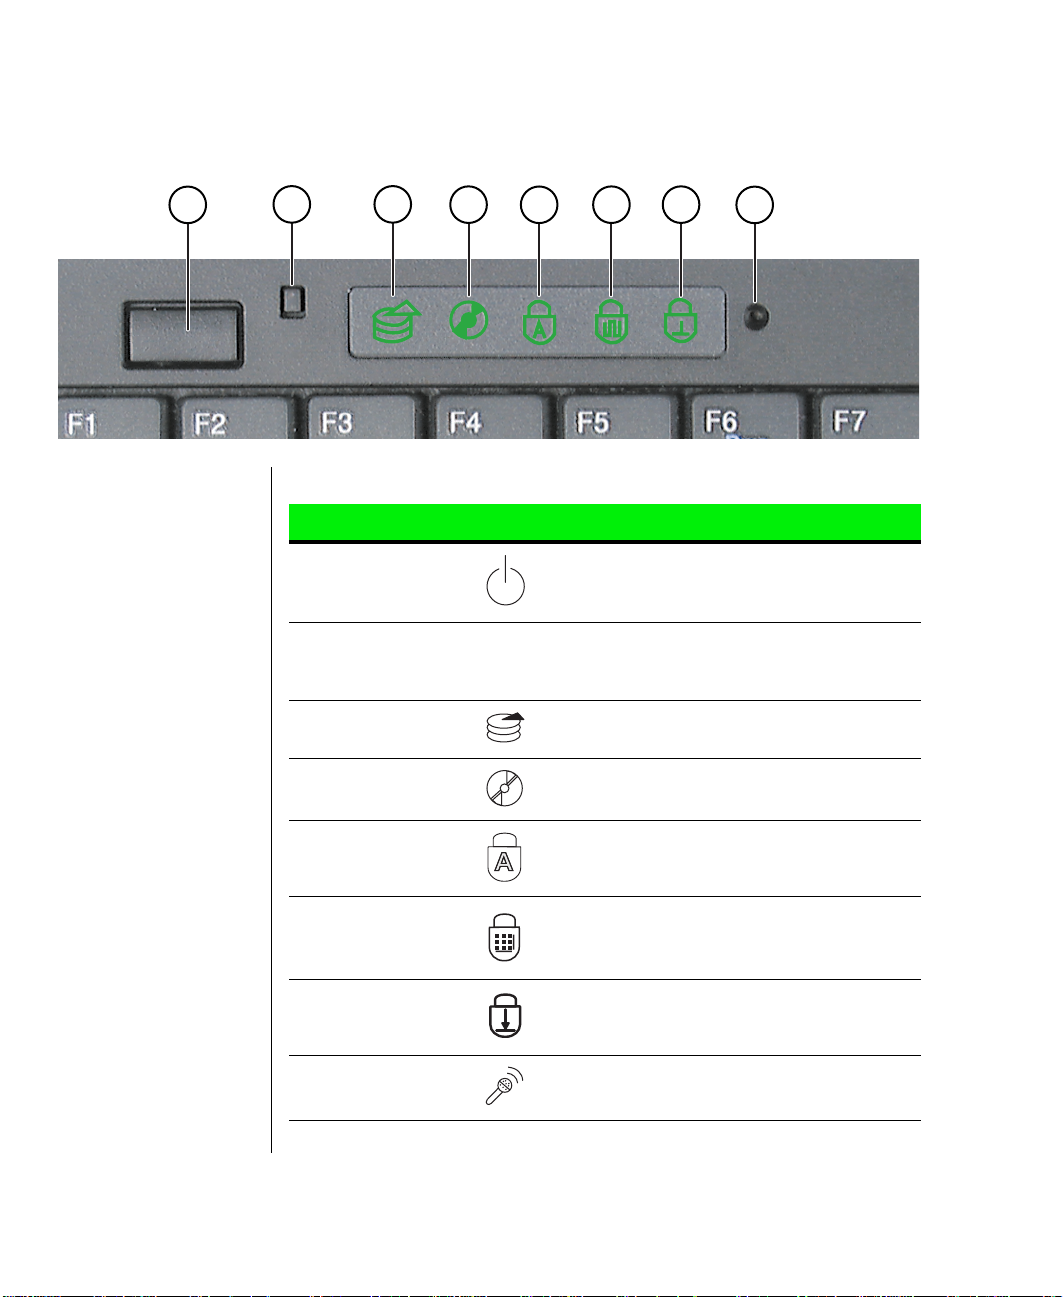
Top panel buttons and indicators
A
B
C
D
E
F
Component Icon Description
A. Power or
Suspend/
Standby button
B. Display off
button
C. Hard drive
activity indicator
D. DVD or CD
indicator
Can be set to either turn the system on and
off or suspend and resume. Pressing the
button for five seconds restarts the system.
Turns off the LCD display. Activated
automatically when you close the notebook
lid.
Lights when the compu ter accesses the hard
drive.
Displays when the com pu t er acc es s es the
DVD or CD (Compact Disc ) drive.
G
H
E. Caps lock
indicator
F. Pad lock
indicator
G.Scroll lock
indicator
H.Microphone Records sounds when the system is
4 Using Your Gateway Solo 3150 Notebook
Lights when Caps Lock is enabled.
Lights when Pad Lock is enabled.
Lights when Scroll Lock is enabled.
recording.
Page 9
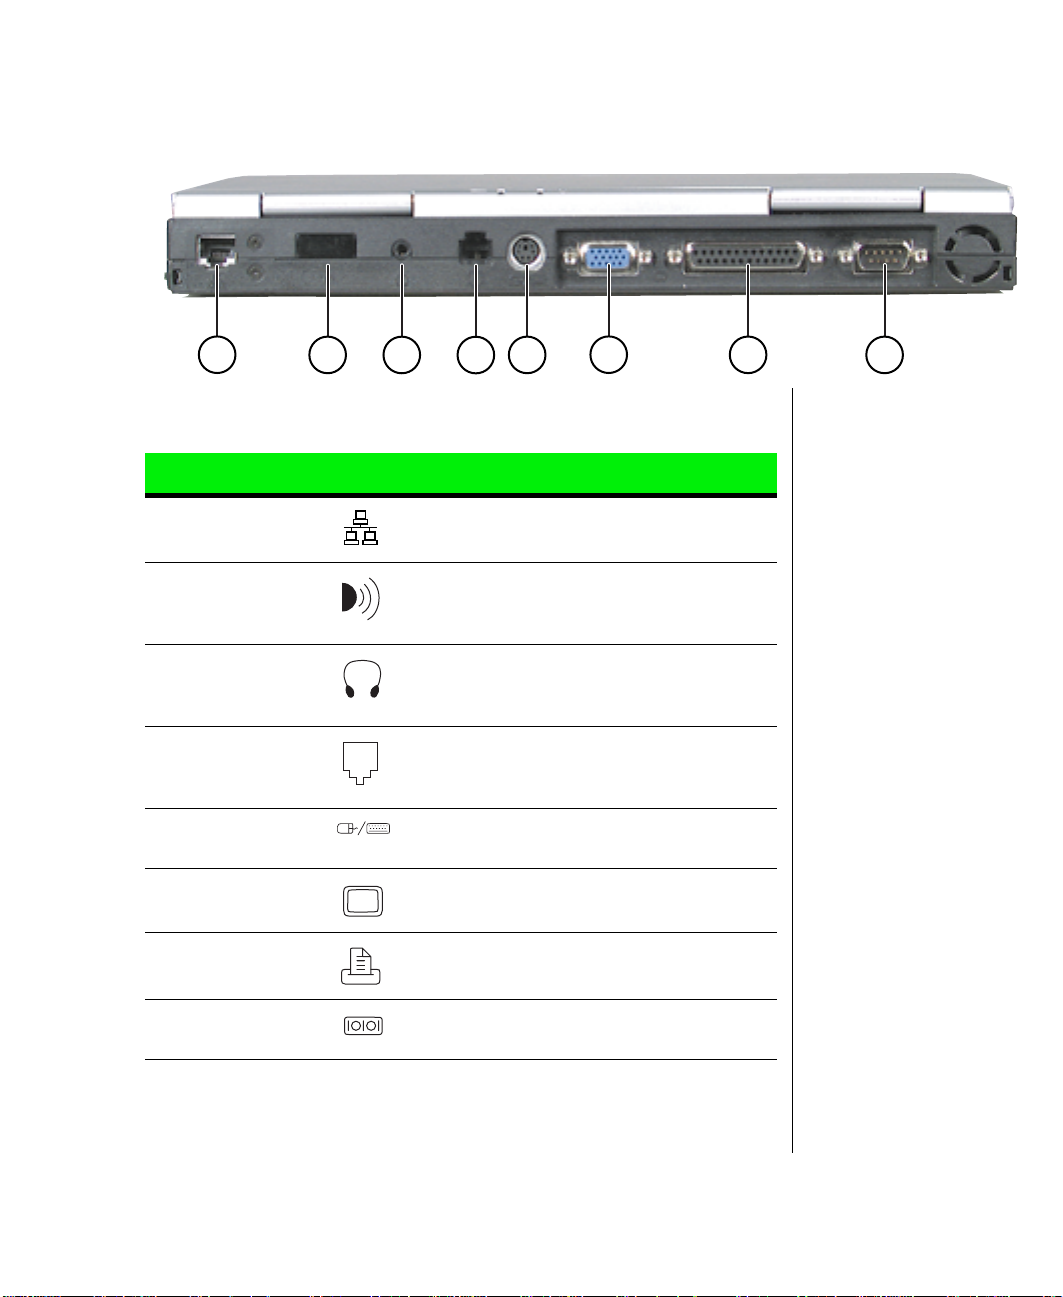
Rear panel
A
B
C
D
E
F
G
Port Icon Description
A. LAN Provides an Ethernet 10/100 connection to a
network.
B. Fast IR
(Infrared) port
C.Speaker out/
Headphone jack
D . Modem jack Plug a phone line into this jac k to connec t the
E. PS/2 port Connect an external keyboard, mouse,
F. VGA port Connect a VGA (Video Graphics Adapter)
Sends infrared si gnals betwe en the notebook
and a remote device that uses infrared (for
example, a printer or other peripheral).
Connect external speak ers or headphon es to
this port. Supports small unamplif ied speakers. (1/8 inch/3.5 mm jack.)
notebook’s on-board modem to an analog
phone system.
numeric keypad, or other device to this port.
monitor cable to this port.
H
G.Parallel port
(LPT1)
H.Serial port Connect a serial device such as a serial
Connect a parallel de vice suc h as a printer to
this port.
mouse to this port.
Chapter 1: Checking Out Your Notebook 5
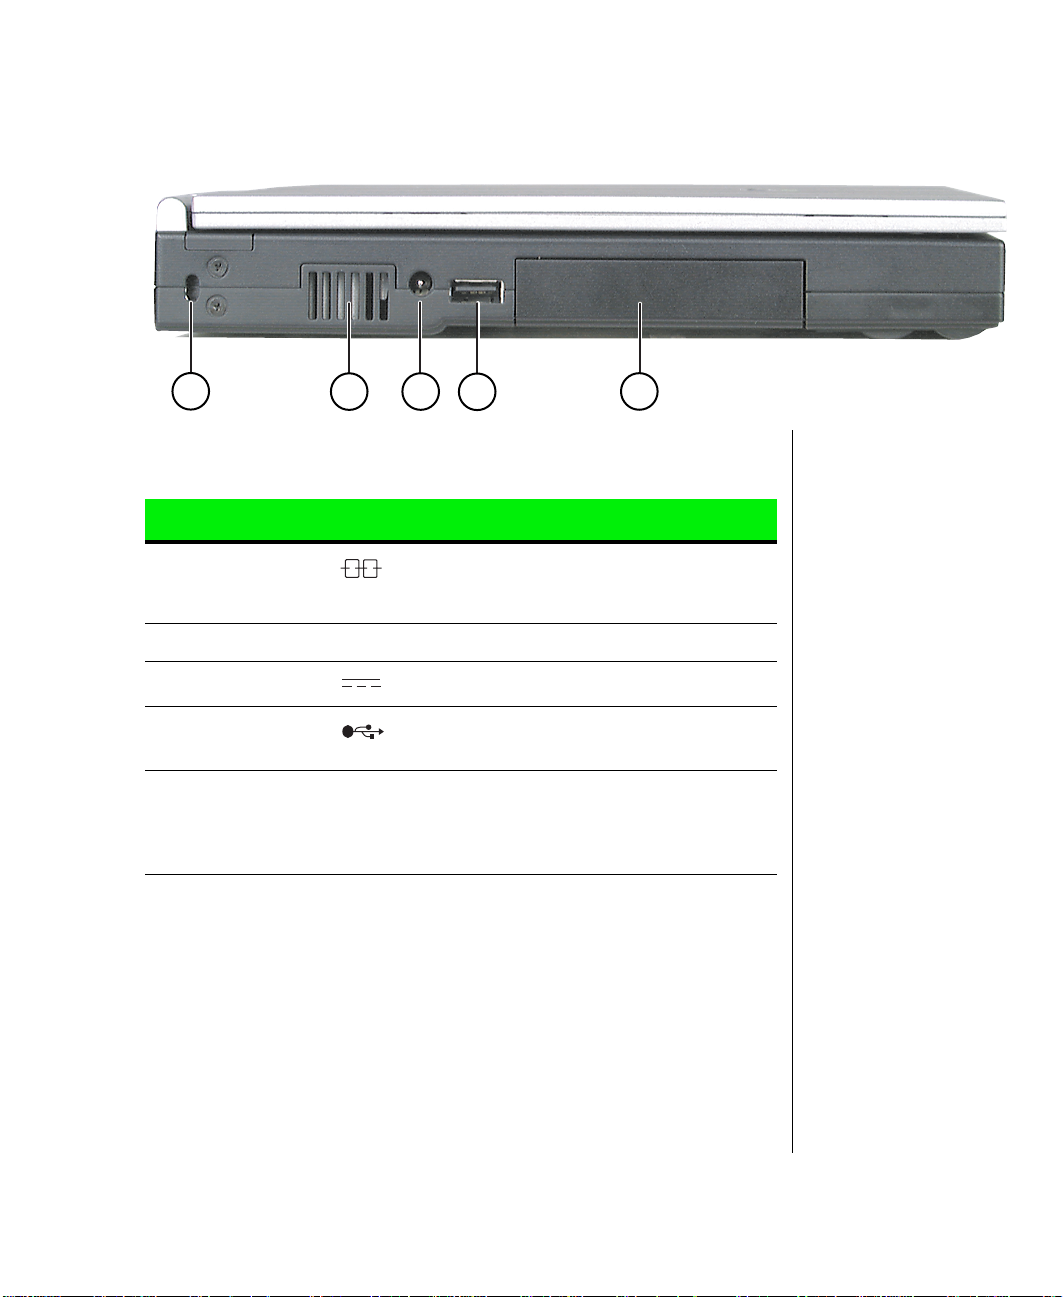
Page 10
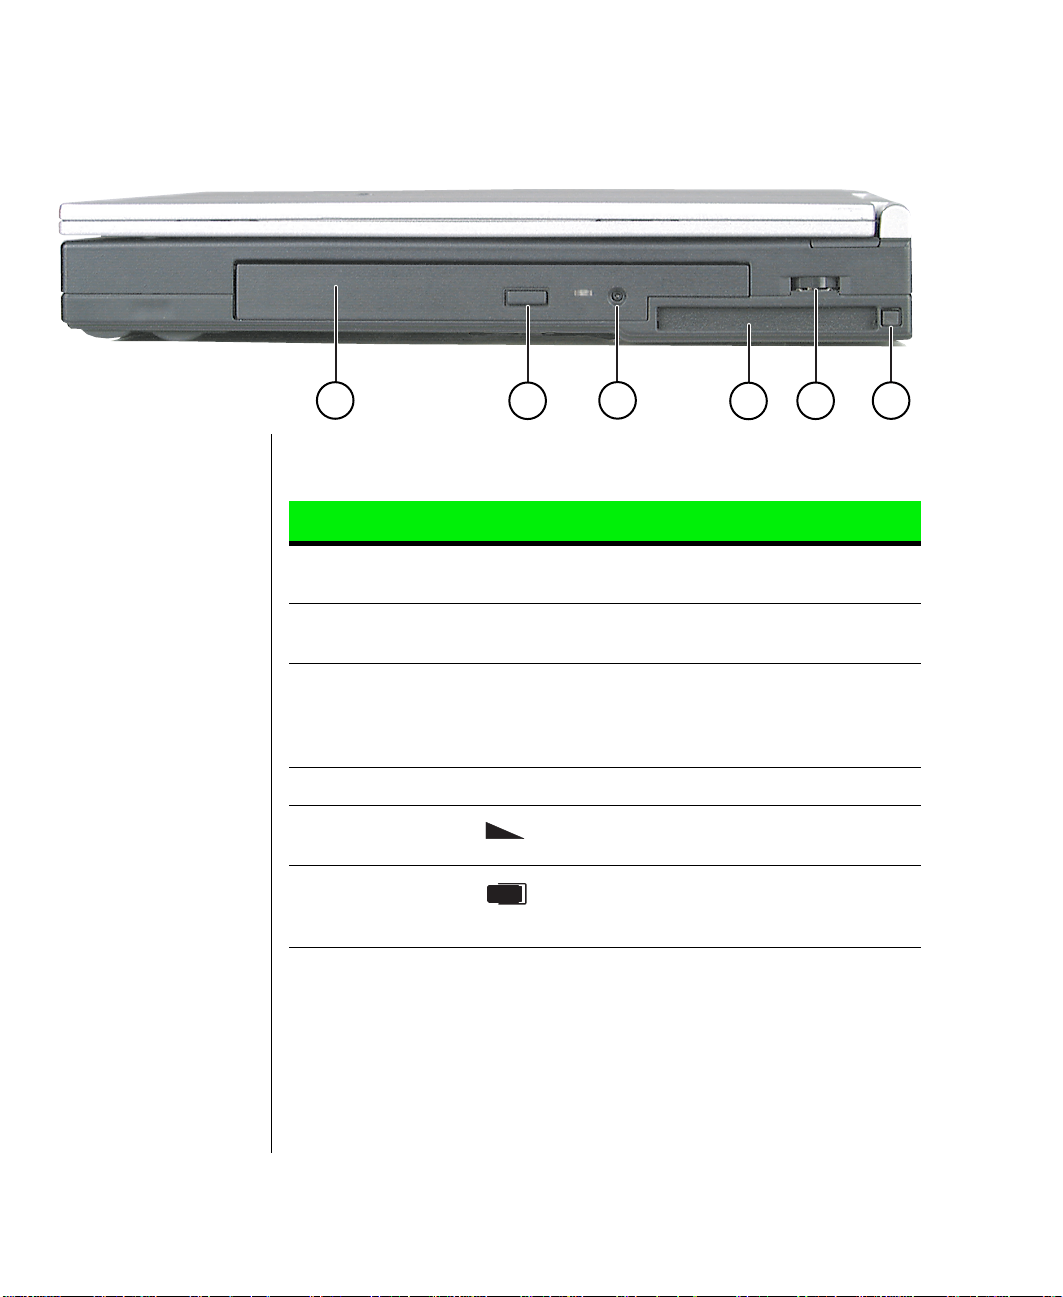
Right side
A
B
C
D
E
F
Component Icon Description
A. DVD or
CD-ROM drive
B. Eject button Ejects the DVD or CD tray from the drive.
C. Manual eject
button
D. PC Card slot Accepts one Type I or Type II PC Card. E. Volume wheel Adjusts speaker volume. Other port volume
F. PC Card eject
button
Reads data and audio CDs (and DVDs if you
have a DVD drive).
This button works only when the power is on.
Provides man ual ej ect ca pabil ity to rem ove a
DVD or CD if power is unavailable. Insert a
straightened paper cl ip or other stif f wire and
push to open the DVD or CD tray.
levels are controlled by multimedia software.
Push to release the eject button, then push
again to eject the PC Card. Push a third time
to retract the button into the chassis.
6 Using Your Gateway Solo 3150 Notebook
Page 11
Left side
A
Component Icon Description
A. Kensington lock
slot
B. Air outlet port Outlet for air intake to cool components. C. Power connector Connect the AC power adapter to this port.
D . USB port Plug Universal Serial Bu s (USB) de v ices i nto
E. Hard disk drive Hard disk drive storage bay. The hard drive
B
C
D
Attach a Kensington lock into this slot. A
Kensington lock is an optional cable lock for
portable computers.
this port.
can be removed only by first removing the
mounting screw on the bottom of the notebook, then sliding the drive out.
E
Chapter 1: Checking Out Your Notebook 7
Page 12
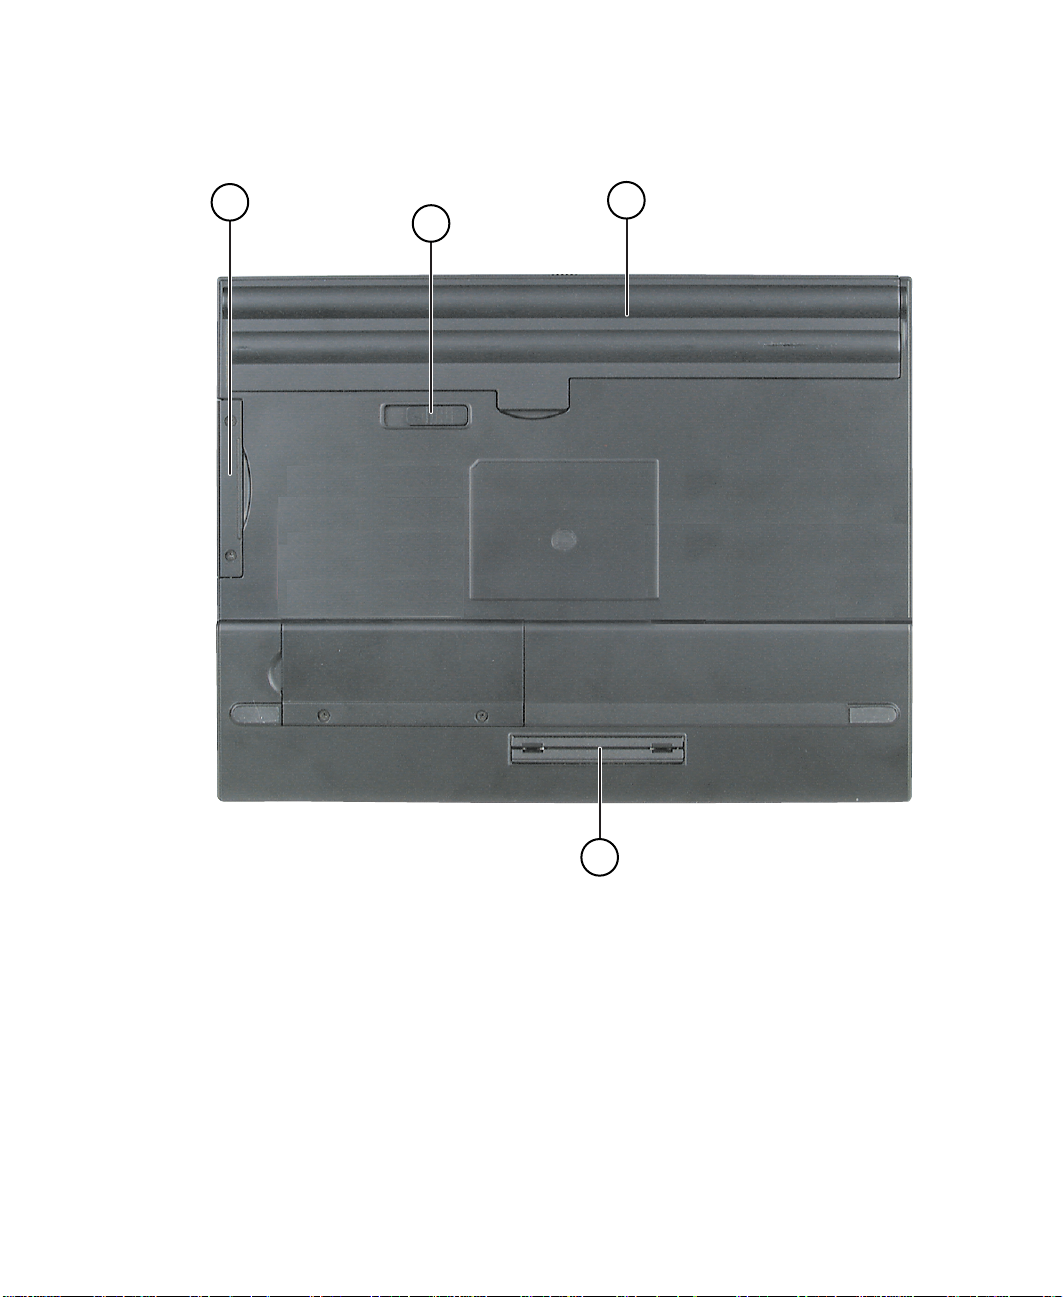
Bottom
C
A
B
8 Using Your Gateway Solo 3150 Notebook
D
Page 13
Component Icon Description
A. Battery pack Slide battery pack into bay for battery power
and battery charging.
B. Battery release
latch
C.Hard disk drive The hard drive can be removed only by first
D. Replicator port
E. Memory bay Open the memory bay cover to install or
Slide the latch to release the battery pack
from the battery pack bay.
removing the two m ou nti ng sc rews, then sliding the drive out.
Connect the port replicator to this port.
remove RAM memory modules.
Chapter 1: Checking Out Your Notebook 9
Page 14

10 Using Your Gateway Solo 3150 Notebook
Page 15

Chapter 2:
Getting Started
Getting your system running.................................12
Installing the battery pack.............................. 12
Connecting the AC power.............................. 13
Turning on the power..................................... 14
Page 16

Getting your system running
T o get the computer started , you’ ll need to install the ba ttery pack, connect
to AC po w er , open the LCD (Liquid Crystal Displa y) panel, and turn on the
pow er.
Installing the battery pack
Your notebook is shipped to you with the battery partially charged. When
you first get started, y ou ma y w ant to use the AC adapter to full y char ge the
battery and provi de a constant suppl y of po w er w hile y ou are checking out
some of your notebook’s features.
If your battery is not insta lled , you need to inst all the battery pack and
charge it. The battery charges whene ver y our notebook is connect ed to A C
pow er.
The notebook can run on a fully char ged battery for about 2.5 to 3 hours,
but battery life varies depe nding on configuration, pow er management
settings, and features used. Clic k the battery gauge icon in the taskbar to
track the a vailab le battery po w er.
Battery life is affected b y ho w much y ou use the syst em components such
as the hard driv e, CD/DVD drive, LCD display, and other components.
Other factors such as the po w er management set tings also af fect battery
life. See Chapter 5, “Managing P o w er Usage” for more information about
pow er management and monito ring the battery status.
1.
T urn the notebo ok o ver so the ba ttery ba y is facing up.
2.
Insert the front end of the battery into the battery ba y, then press the
battery down until it secu rel y latches.
12 Using Your Gateway Solo 3150 Notebook
To install the battery pack
Page 17
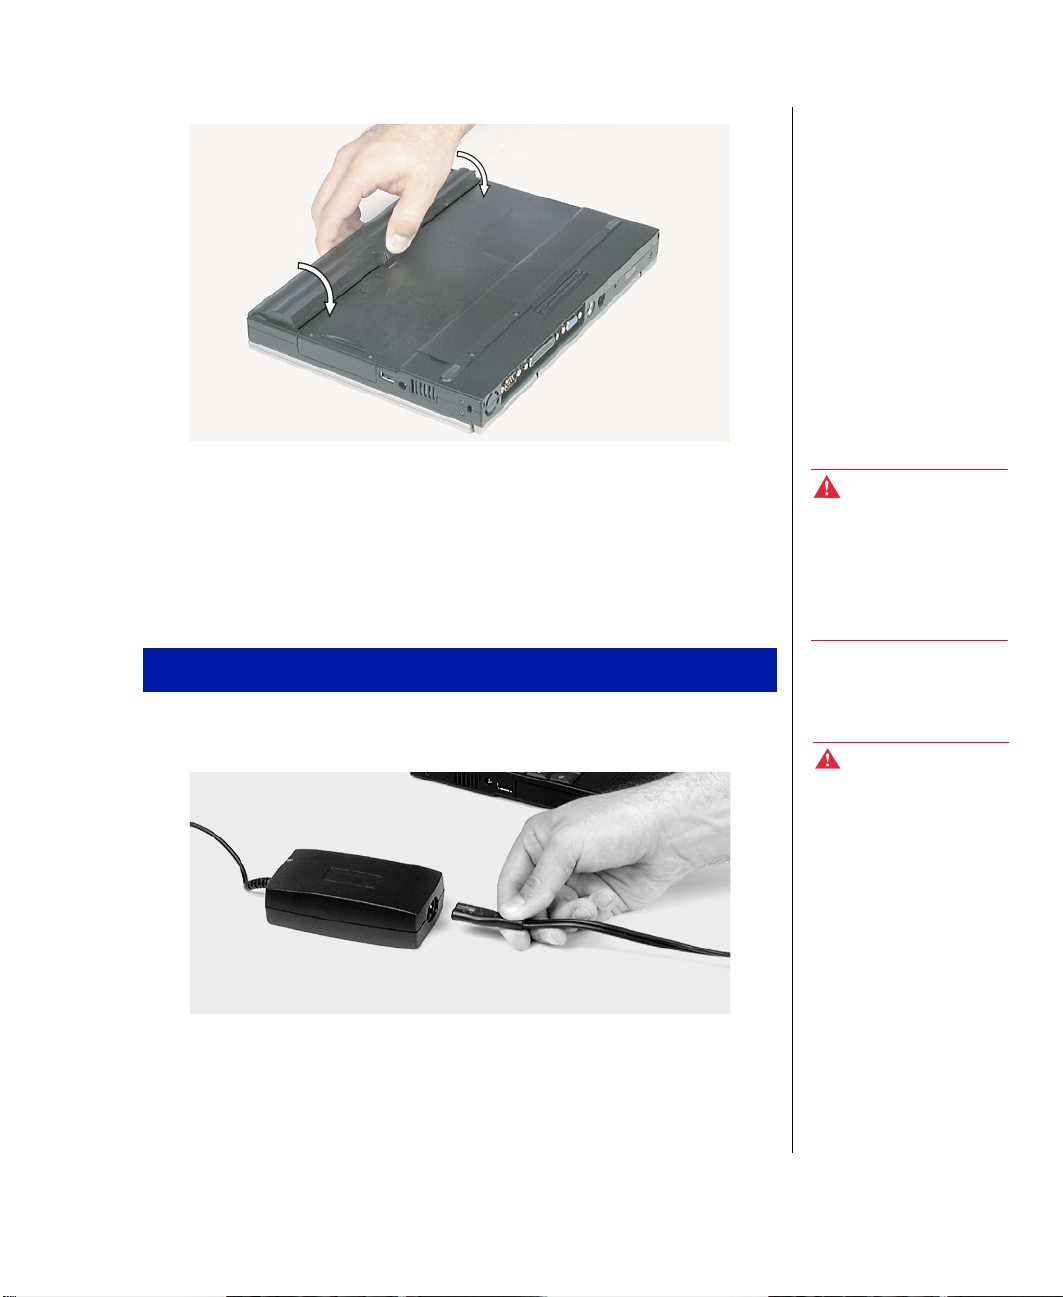
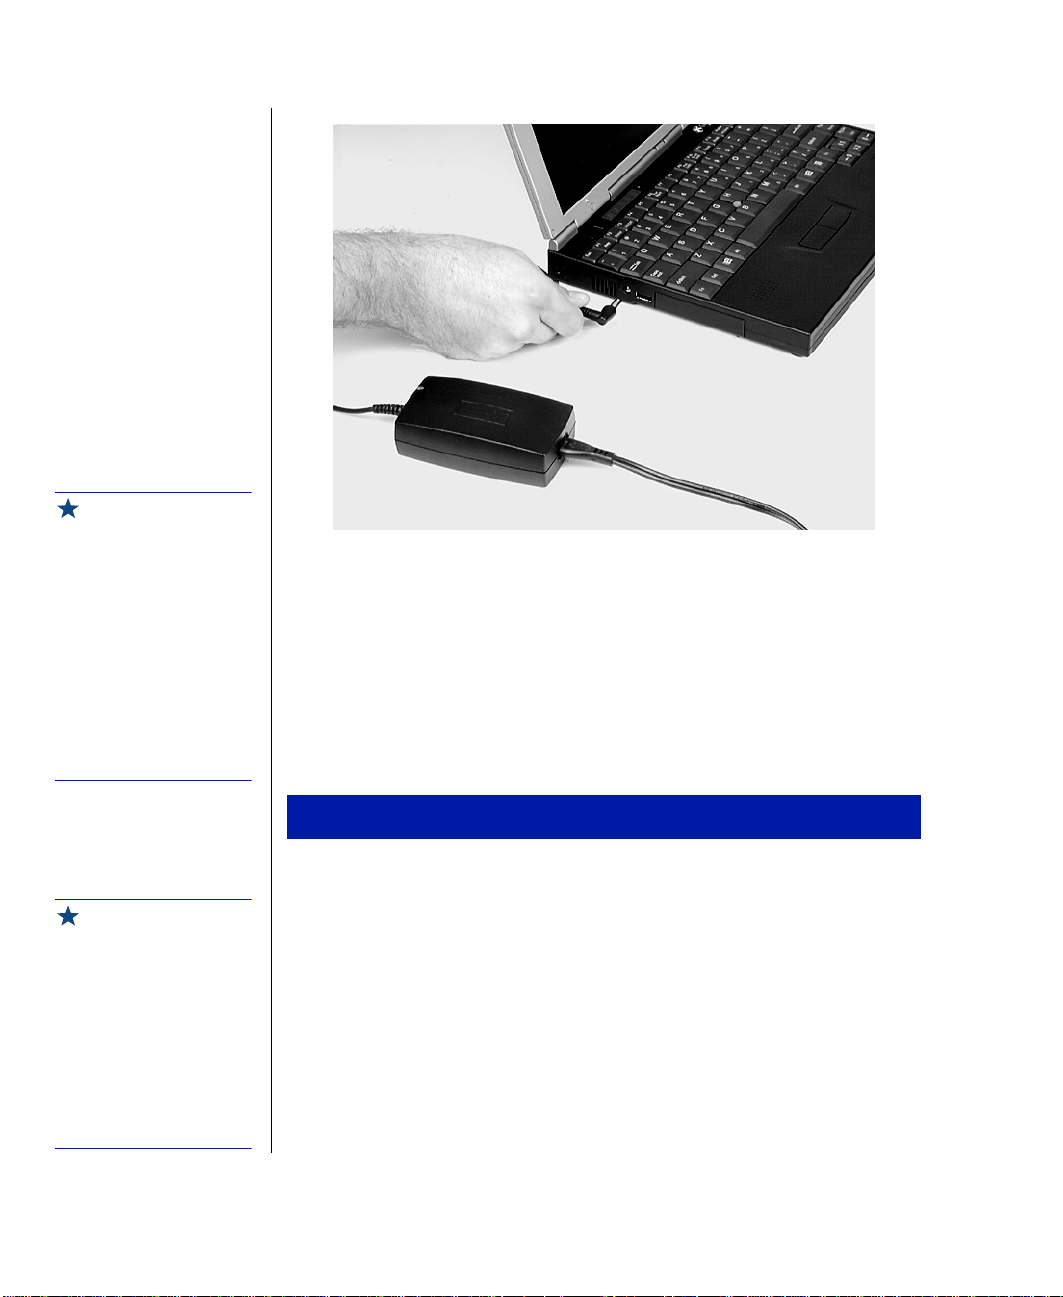
Connecting the AC po wer
Your AC adapter comes in tw o parts, the po w er cor d and the A C po w er
adapter .
To connect the AC adapter
1.
Connect the po w er cord to the A C po w er adapter .
2.
Plug the AC power adapter into the notebook po w er connector on the left side of the notebook.
Warning!
Replace the power cord if it
becomes damaged. The
replacement cord must be
of the same type and
voltage rating as the
original cord.
Warning!
The AC adapter has
dangerous voltages that
can cause serious personal
injury or death. Do not
attempt to disassemble the
AC adapter . The AC
adapter has no userreplaceable or userserviceable parts inside.
Contact Gateway about
returning defective AC
adapters.
Chapter 2: Getting Started 13
Page 18
Important!
The power button is preset
to On/Off mode. You can
set it to function either in
On/Off or Standby/Resume
mode using the BIOS setup
program. See “About the
BIOS Setup utility” on page
68 for more information
about accessing the BIOS
Power men u settings to
change the Pow er b utton
mode.
3.
Plug the power cord into an electrical outlet.
Turning on the power
You can turn on the power after the battery is installed and t he A C po w er
adapter is plugged in.
1.
Release the LCD panel by sl iding the latch to the right, then adjust the
Important!
This system ships with the
“Auto dim with battery”
feature enabled. Auto dim
cuts LCD power 50% when
your notebook is operating
on battery power. See
“About the BIOS Setup
utility” on page 68 for
information about the
Power menu options.
14 Using Your Gateway Solo 3150 Notebook
LCD panel for the proper vie wing angle b y tilting it .
2.
Press the po wer button. W indo ws® starts.
3.
Change display br ightness for suitab le vie wing b y pressing
FN+↑orFN+↓.
4.
If you are starting the computer for the first time, complete the
Windo ws setup b y following the on-screen instructions. (You can
disregard the Printer Set up dialog box es.)
To start up the computer
Page 19

5.
When the Certificate of Authenticity dialo g bo x opens, type in the
Product ID number located on the Certificate of Authenticity on the
cov er of the W indo ws manual .
For more information about ho w to use W indo ws, see y our Microsoft
Windo ws manual.
Important!
The software for your
computer has been
installed at the factory. Use
your software CDs or
diskettes only when
re-installing a program or if
a program prompts you to
use it.
Chapter 2: Getting Started 15
Page 20

16 Using Your Gateway Solo 3150 Notebook
Page 21

Chapter 3:
Using Your Notebook
Using your Solo 3150............................................ 18
Using the keyboard......................................... 18
Using key combinations.................................19
Using the LCD................................................22
Using the EZ Point......................................... 23
Connecting the modem cable......................... 26
Connecting the network................................. 27
Using the audio............................................... 27
Using 3.5" diskettes........................................ 30
Using CDs and DVDs.................................... 30
Using the USB port ........................................ 33
Removing and replacing the hard disk drive. 33
Using PC Cards .............................................. 35
Using the IR port ............................................36
Page 22
Using y our Solo 3150
This chapter co vers using the components on y our computer . Spend some
time getting familiar with the v ersatility built into y our Solo notebook.
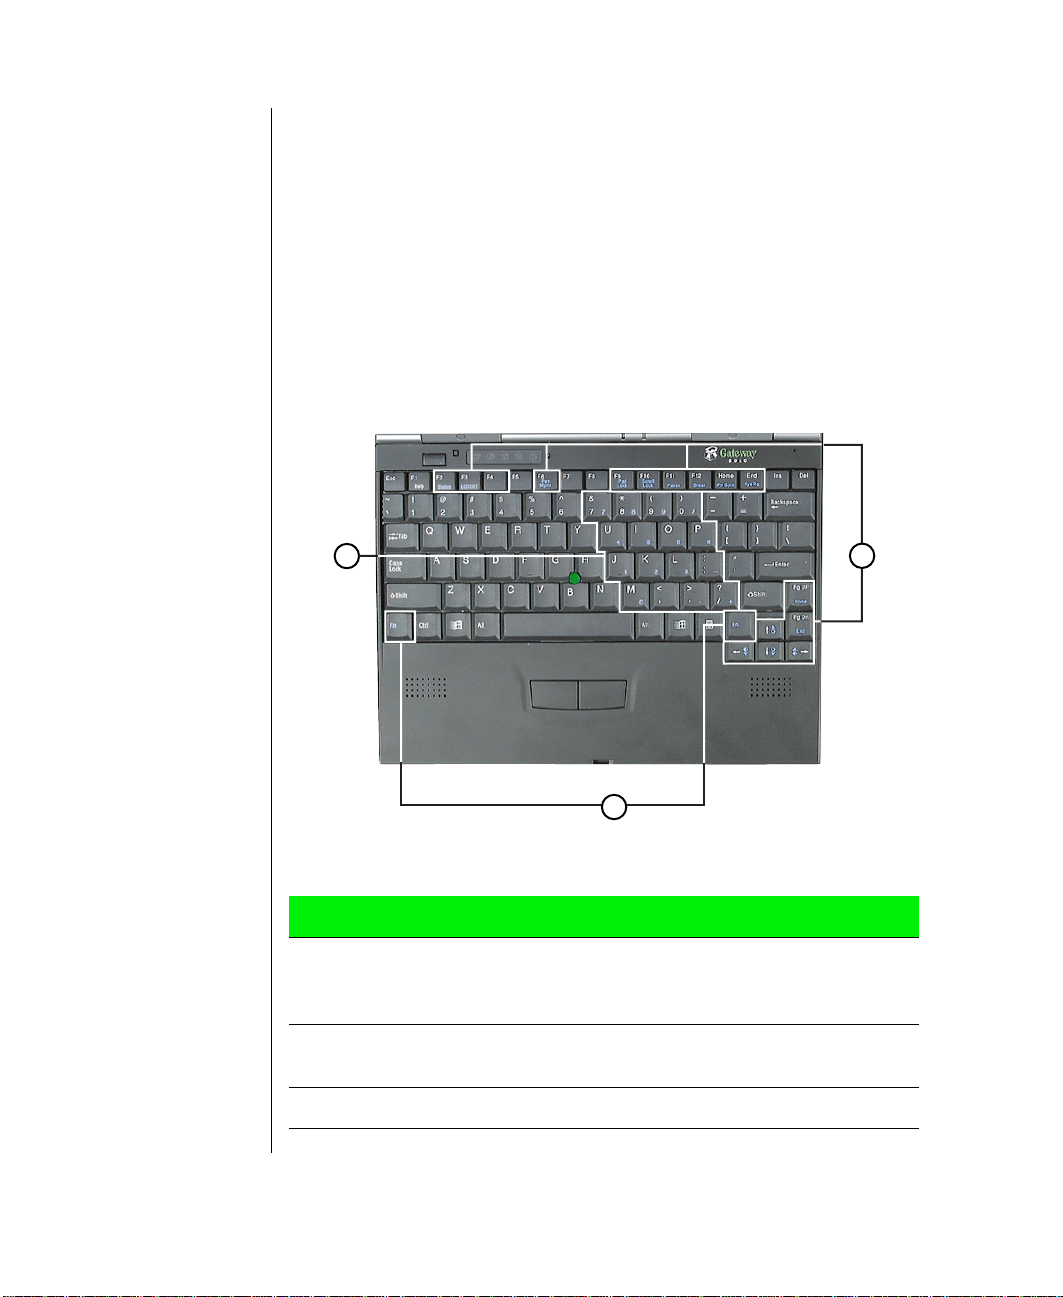
Using the ke yboard
Your notebook features a keyboard that has the fu ll functionality of a
desktop computer keyboard. Man y of the k eys ha ve be en assigned alternate
functions, including shortcut keys, f unction key s for specific system
operations, and pad lock keys for the numeric ke ypad.
C
Key Action
A. Fn (function)
Combination
keys
B. Fn (function)
keys
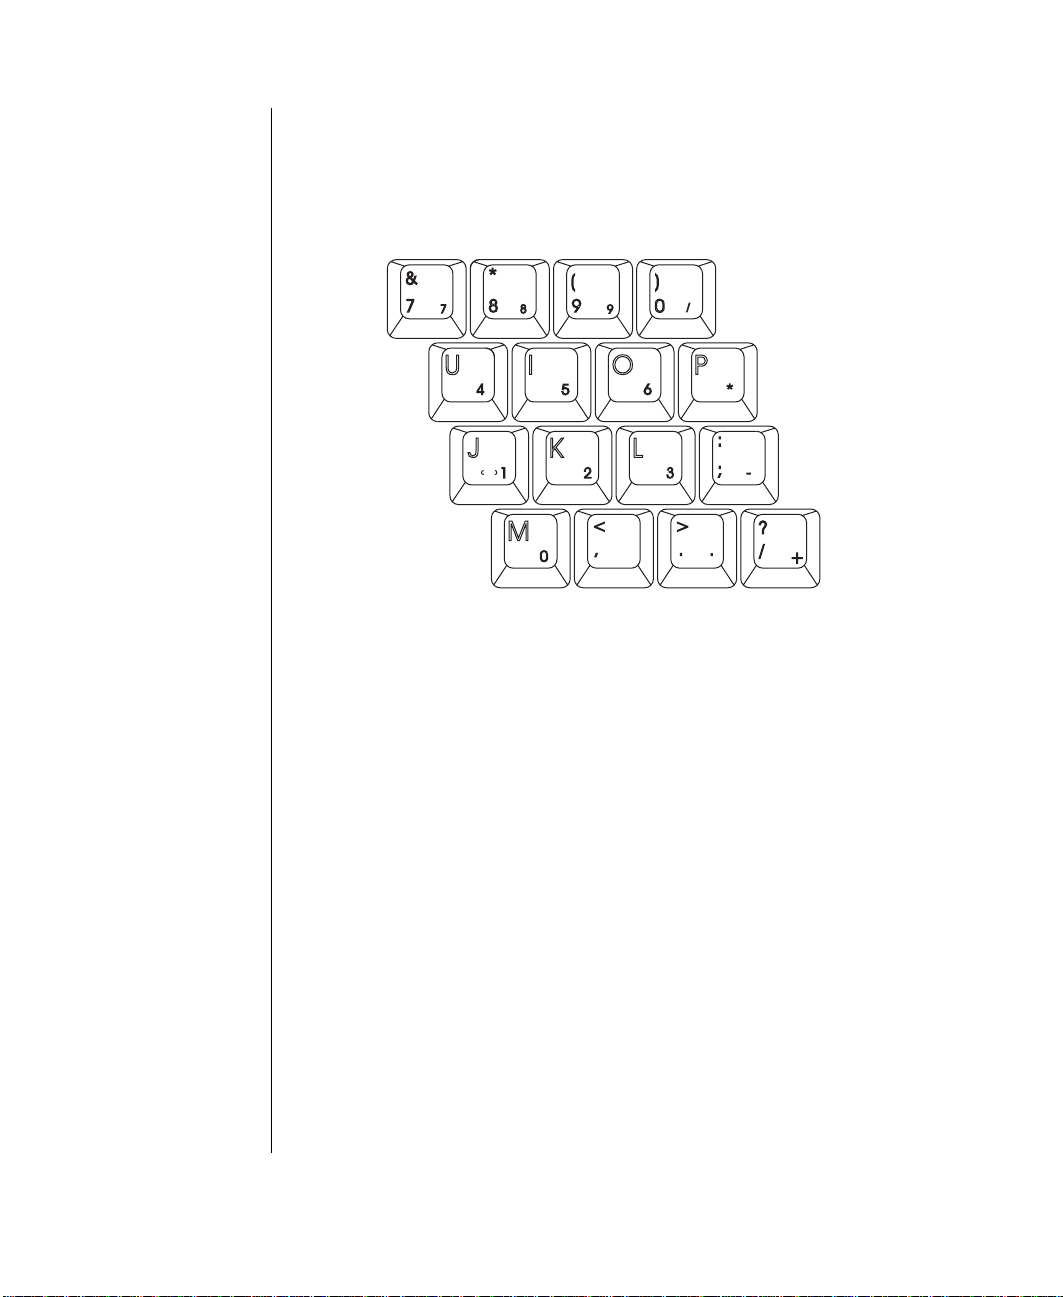
C.Numeric keypad
Press
F
(blue) to perform a specific function. For example,
FN+F2
Press
F
as
F2, F3, F4
Press
FN+F9
B
key plus one of the Fn Combination keys
N
shows the Pop-up status display.
key pl us ano ther Fn C om bi nati on key (such
N
, etc.) to perform a specific function.
to activate the numeric keypad.
A
18 Using Your Gateway Solo 3150 Notebook
Page 23
Using key combinations
For normal key functio ns:
♦ Press the key to get nume rals, punctuation marks, and lo w er case
letters.
♦ Press the key to gether with t he
S
key to get symbols and stand ard
HIFT
upper case letters.
Special keys
The follo wing keys hel p you use shortcuts w hen w orking with some
software:
Key Description
Use this key to disp lay th e Windows Start menu. Pressing
C
TRL+ESC
Use this key to provide quick access to shortcut menus
and help assistants in W indows . In man y cases , this k e y
functions like a right mouse click.
also displays the Start menu.
Chapter 3: Using Your Notebook 19
Page 24
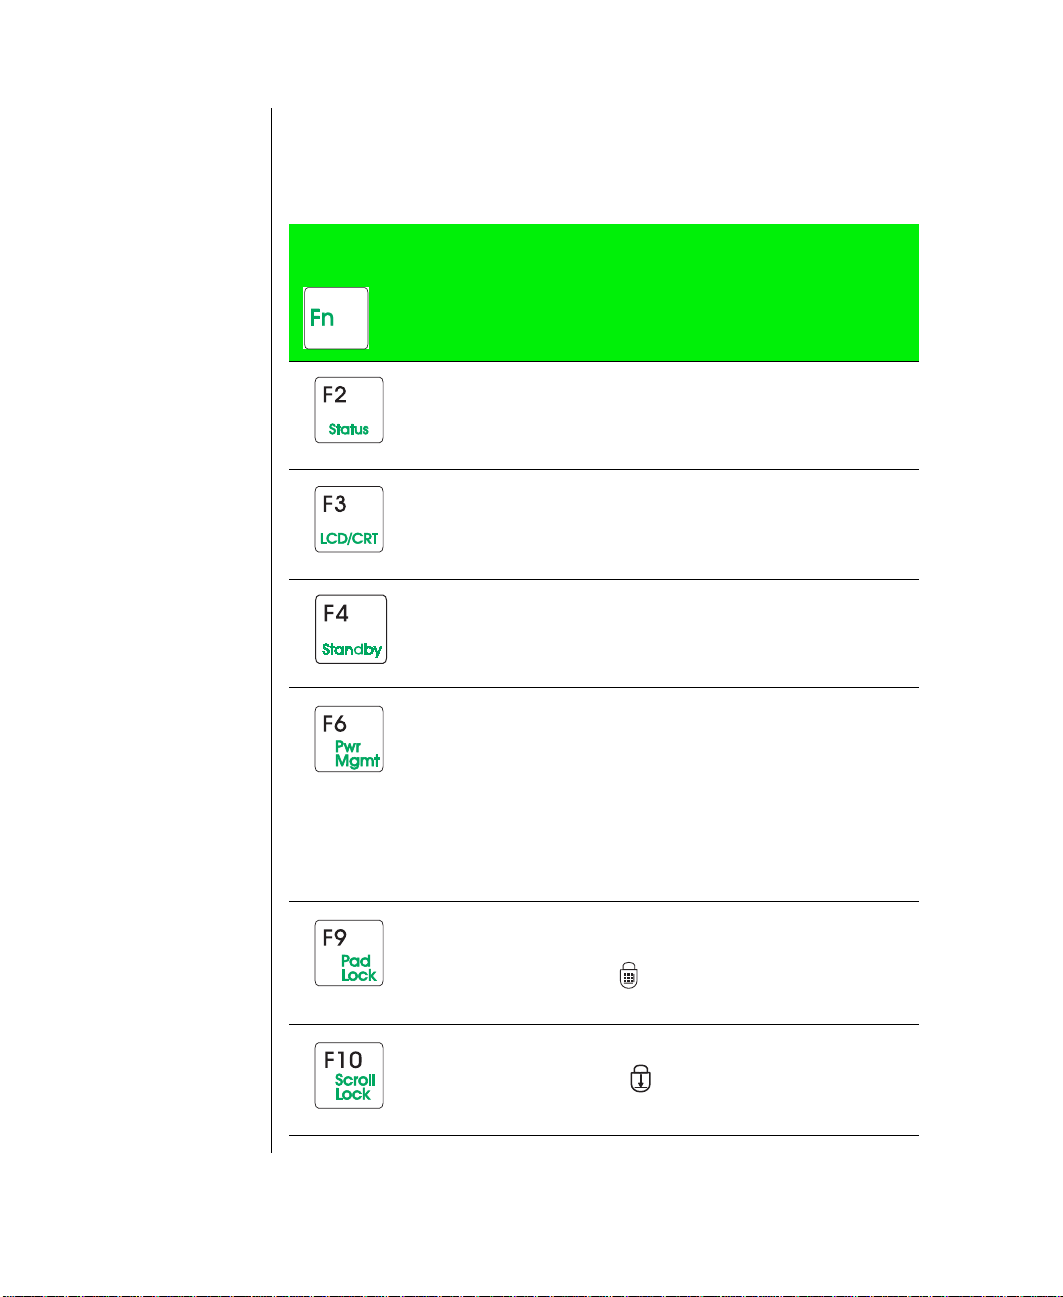
Function keys
Press the
F
key to gether with one of the foll o wing ke ys (with blue let ters)
N
to get these “on-the-fl y” functions:
Key
Description
Combination
+
Displays the power status in the upper left corner of the
Windows 95 and Windows 98 desktop. Press the key
combination again to make the display disappear. See
“Pop-up status display” on page 51.
Toggles between the Liquid Crystal Display (LCD),
external monitor, both displays at the same time, or TV
display (NTS C or PAL format) as the active displa y. See
“Using the LCD” on page 22.
Places the system in Standb y mo de. See “Using the
Suspend and Standby modes” on page 52 for more
information about the Standby mode.
Makes temporary changes to the power management
(PM) mode settings by toggling the setting options:
•PM ON enables power management
•PM DC enables power management when the
notebook is using battery power only.
•PM OFF disables power management.
The selected option is not saved when the system is
turned off. The power management settings selected in
the BIOS setup tak e eff e ct wh en the syst em is restarted.
20 Using Your Gateway Solo 3150 Notebook
Enables the Pad Lock function so you can use the
numeric keypad.
The Pad Lock icon stays lit while this function is
enabled. Press the keys again to clear the display.
In some progr am s you can scroll thro ugh la rge volumes
of text.
The Scroll Loc k i con s ta y s lit as l ong as this funct ion
is enabled.
Page 25
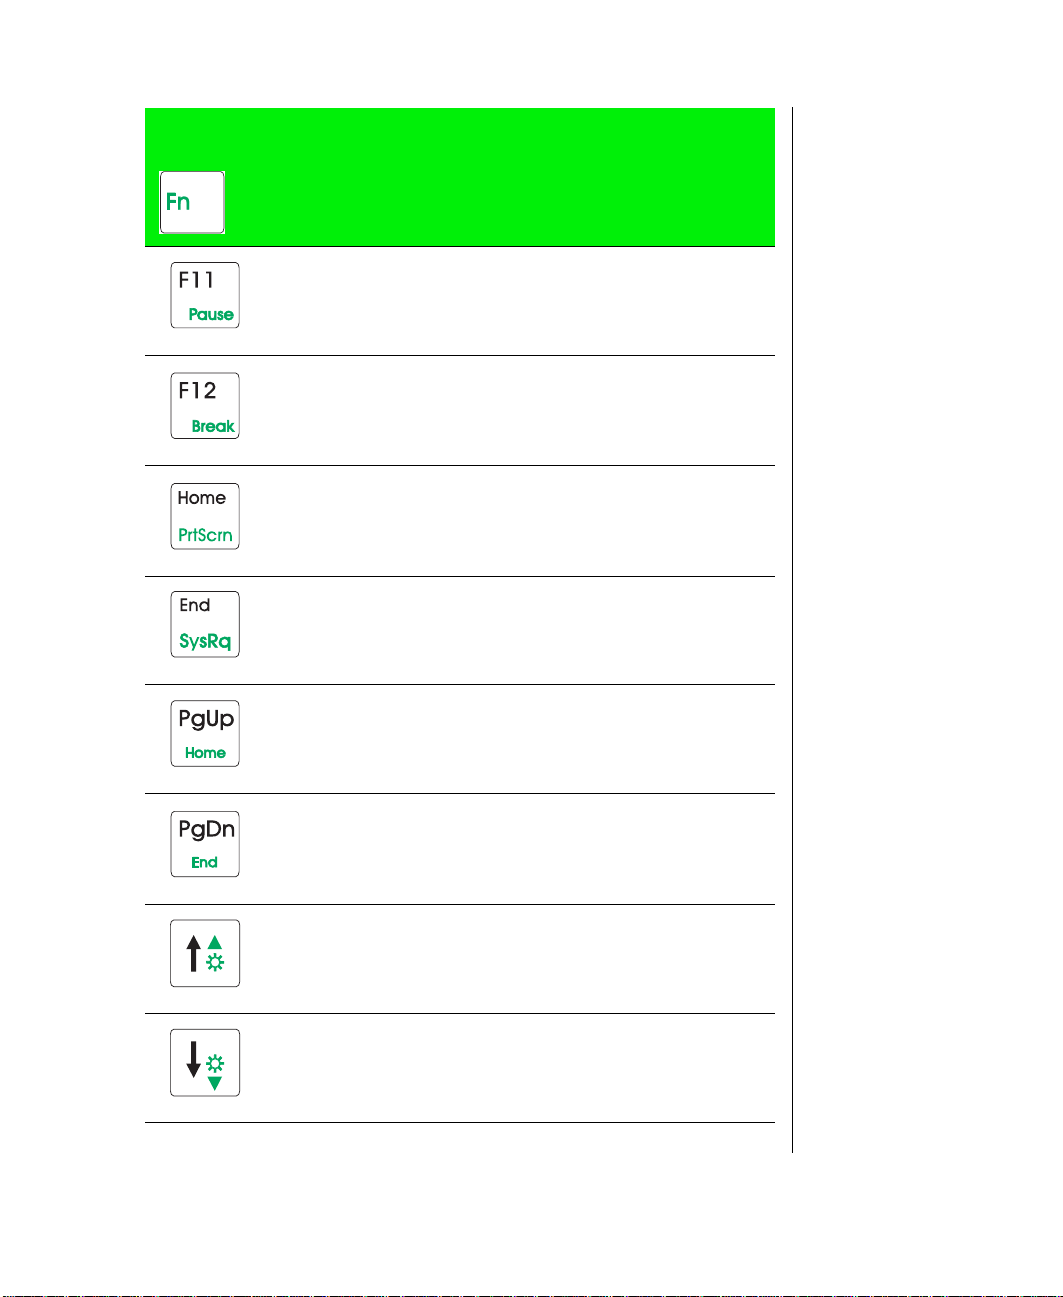
Key
Combination
+
Description
In some programs this key combination pauses the display when text is scrollin g very quickly. Press any key to
continue the text flow.
In some programs this key combination breaks text
scrolling in a DOS screen.
Prints the screen if a printer is connected to your notebook (DOS only). In Windows, this key copies a picture
of the screen to the clipboard. You can then paste the
picture into another program display or print it.
SysRq (System Request) is reserved for certain applications such as in some DOS programs.
In some programs this key combinat ion will send you to
the starting point of your document.
In some progr ams this k ey combinatio n sends y ou to the
end point of you r document.
Increases LCD brightness and displays the brightness
meter for the Popup Status Display reflecting the
changes. Use the
display disappear.
Decreases LCD brightness and displays the brightness
meter for the Popup Status Display reflecting the
changes. Use the
display disappear.
+F2 key combination to make the
F
N
+F2 key combination to make the
F
N
Chapter 3: Using Your Notebook 21
Page 26
Pad lock keys
FN+F9 (PAD L
Press
the keyboard will functi on like a numeric k eypad. Press
keyboard back into standar d mode.
) keys to acti v ate the ke ypad. The ke ypad section of
OCK
FN+F9
to put the
Using the LCD
Your notebook features a built-in, backlit, color LCD . The LCD uses
Thin-Film T ransistor (TFT) technolo gy t hat pro vides sha rp resolution and
brilliant colors. The notebook’s display supports a maximum resolution of
800 × 600 and a maximum color depth of 24-bit color .
In addition to using y our LCD panel for displa y, you can also attach an
external monitor for presentati ons and other multimedia purposes.
Setting up an external computer monitor
You can connect an external computer monitor to your notebook through
the V GA (V ideo Graphics Adapt er) port on the back of your noteboo k. If
you are using an optional port replicator , y ou can also connec t an external
computer monitor to the replicator ’s VGA port.
22 Using Your Gateway Solo 3150 Notebook
Page 27

To connect the computer to an external monitor
1.
Connect one end of a V GA cab le to the VGA port on the back of the
notebook, and the other end to the video connect or on the monitor.
2.
Press
FN+F3
to change the activ e displa y from LCD onl y, to LCD and
monitor, or monitor only. Continue changing the displa y options until
you get the desired di spla y.
Depending upon the external monitor you a re using, you ma y ha v e to lo w er
the video resolution to 640 x 480. Refer to your monitor manual to find out
its displa y resolution capabil ities.
To change the display resolution for an external monitor
1.
Right-click the Monitor icon in the taskbar tra y.
2.
Select the desired resoluti on. The screen resolution cha nges.
Monitor i con does not appear on the t askbar and you w ant to hav e it
If the
display th ere, right-click on t he desktop, select
tab, then check the
Show settings icon on taskbar checkbo x. The Monitor icon
Properties, cl ick the Settings
appears in the taskbar tra y.
Using the EZ P oint
Your system includes the EZ Point™ stickpoint pointing devi ce. Like a
mouse, this pointing device c ontrols the cursor mo v ements on the di spla y.
Chapter 3: Using Your Notebook 23
Page 28

Controlling the EZ Point
The EZ Point pr ov ides an easy wa y to mov e the cursor across the screen and
navigate through softw are. The EZ P oint c onsists of a stick l ocated on the
keyboard betw een the G and H keys and tw o buttons located be lo w the
spacebar on the keyboa rd.
A.
EZ Point
B.
EZ Point sel ect button (left mou se button)
C.
EZ Point sel ect button (right mous e button)
1.
Place your hands in the typing p osition and press the EZ P oint (A) in
the direction you w ant to mo v e the cursor.
2.
Press the EZ P oint select buttons (B and C) locat ed belo w the spacebar
to select as you w ould wit h a mouse. You can also press the EZ Point
directly do wnw ard to perform a mouse click.
24 Using Your Gateway Solo 3150 Notebook
A
B
To use the EZ Point
C
Page 29

Changing EZ Point properties
You can change EZ Point properties such as button assignments, cursor
speed , and accelerati on. You can also enable scrolling, press to select,
release to select, and magnifying glass .
To customize the EZ Point
1.
Click Start, Settings, then C ontrol Pa nel. The Control P anel appears.
2.
Double-click the EZ Point icon. The EZ Point Prop erties dialo g bo x appears.
3.
Click the tab of your choice t o customize functions of t he EZ P oint.
Replacing the EZ Point cap
The cap on the EZ P oint is remo vab le. If the cap bec omes w orn or damaged ,
remov e the cap fro m the stick and replace it with one of the spares in cluded
with your notebook.
Using an external mouse or keyboard
You can attach an external mouse or keyboard to the noteb ook using the PS/
2 port, the USB port, or the serial port. The optional port replicator also has
ports for external connections. It is not nec essary to shut do wn the system
to connect an external PS/2 mouse or ke yboard. Just connect it to the port
and start to work.
Chapter 3: Using Your Notebook 25
Page 30

If the EZ P oint driv ers do not support the e xternal mouse, refer to the mouse
documentation and follo w the ins tallation instructions.
Connecting the modem cable
Your Solo 3150 notebook comes with a built-in 56K data/fax modem and a
telephone cable.
To connect the modem cable
1.
Insert one end of the telephone cab le into the modem jack on t he rear panel of the notebook.
2.
Insert the other end of the telephone cab le into an y analo g telephone wall jack.
3.
Start your computer , then start your communicati ons softwa re.
For more information on using your not ebook’s modem connection, see
Chapter 4, “Getting Online.”
26 Using Your Gateway Solo 3150 Notebook
Page 31

Connecting the network
Your notebook comes with a built-in 10/100 Ethernet netw ork card that
supports W ake on LAN. If y ou plan to connect your c omputer to a local
area netw ork (LAN), you ma y w ant to connect it to t he netw ork before
starting the system.
To connect to the network
1.
Insert one end of the netw ork cable i nto the Ethernet port on the rear panel.
2.
Insert the other end of the cabl e into a netw ork jack (as k your ne tw ork
system administrator to help y ou select the correct netw ork jack). Your
Solo 3150 is no w ph ysicall y connected to the network. Your network
system administrator can help y ou lo g on to estab lish an acti ve
network conne ction.
Using the audio
Your system provides 16-bit stere o audio with SoundBlaster Pro
compatibility. You can record audio for presentations, attach v oice
messages to your e-mail, list en to audio CDs, and use it for man y other
multimedia applications.
Chapter 3: Using Your Notebook 27
Page 32

Adjusting the volume
You can use several methods to adjust audio input and out put on your Solo
notebook computer . The v olume control whee l on the left side of the system
controls the Speaker Out port and the internal system speak ers. The v olume
level f or other ports is controlled b y the mult imedia softw are, as e xplained
below.
To adjust playback and recording volume levels
1.
Click Start, select Settings , t hen select Control Pane l.
2.
Double-click the Mult imedia icon. The Mul timedia Proper ties dial og box appears.
3.
Click the Audio tab, then set the Playback and Recording le vel s to your preference.
To “quick-adjust” volume controls
1.
Double-click the Speak er icon on the taskbar . The Volume Control
dialog bo x appears. This dialo g bo x contains vol ume and balance
controls for master volume, w a ve , microphone, CD audio, MIDI, and
synthesizer .
2.
Slide the volume and balance controls to sui t your lis tening requirements.
28 Using Your Gateway Solo 3150 Notebook
Page 33

Making an audio recording
T o mak e an audio recording, use the built-in microphone or co nnect an
external microphone to the port replicator . Conne cting an external
microphone disables the built-in microphone.
To make an audio recording
1.
Click Start, Programs, Accessories, Multimedia, then Sound Recorder. The Sound Recorder opens.
2.
Click Edit, then Audio Properties to set or record volume levels.
3.
Click OK.
4.
Click the ● (Record) button to start recording.
5.
Click the ■ (Stop) button to stop recording.
6.
Click File, then Save As.
7.
Name the recording, then click Save.The recording is sa ved .
To play back a recording in Media Player
1.
Click Start, Programs, Accessories, Multimedia, t hen Media Player. The Media Play er opens.
2.
Click File, then Open. The Open dialog box appears.
3.
Select the file to play back, then click Open.
4.
Click the (Pla y) button to pl a y the file.
5.
Click the ■ (Stop) button to stop pla ying the file.
Chapter 3: Using Your Notebook 29
Page 34

Using 3.5" diskettes
Caution!
Do not expose diskettes to
water or magnetic fields.
Exposure could damage
the data on the diskette .
Your system has an external 3.5" diskette dri ve, w hich enab les you to use
3.5" diskettes with up to 1.44 MB capacity.
To connect the external diskette drive
1.
T urn of f your note book.
2.
Plug the driv e cable i nto the parallel port on the back of the notebook.
3.
Tighten the c onnector scre ws, then start up y our notebook.
Using CDs and D VDs
Your system has a CD-ROM or D VD d riv e. This section describes s ome of
the wa ys to use CD-R OM or DVD media.
30 Using Your Gateway Solo 3150 Notebook
Page 35

To insert a CD or DVD
1.
Press the CD or D VD dri v e’s eject button. The drive tra y opens.
2.
Insert the CD or D VD. Press down carefully on t he disc to ensure i t
snaps onto the clips that hold t he disc in the tra y.
3.
Push the tra y back into the dri ve.
To access information on the CD or DVD drive
1.
Double-click the My Computer icon. The My Computer window opens .
2.
Double-click the CD-ROM drive icon.
Playing an audio CD
The CD-ROM accepts standard CDs, music CDs, and photo CDs. You can
play and control an audio CD using the CD Pla y er application in W indo ws.
If your notebook has the optional DVD drive, it can also pla y DVDs.
Important!
Be sure to place the disc in
the tray so that t he label
side is facing up . If the disc
has two playable sides,
place the disc so that the
name of the side you want
to play is facing up.
To play an audio CD
1.
Insert an audio CD. Aft er a fe w seconds, the CD starts pla ying.
2.
Click the CD Play er tas kbar button to use the CD Pla y er softw are.
- OR -
Chapter 3: Using Your Notebook 31
Page 36

If the CD did not start automaticall y, click Start, then select Programs,
Accessories, Multimedia, and CD Player. The CD Pla yer opens.
3.
Hold the mouse pointer o ver the cont rol buttons on the CD Pla y er to
get familiar with each button function. By clicking the butt ons, you
can change music tracks, view pl ayi ng times, control the volume,
define a play list, and set continuous or random pla y.
4.
Control audio pla y as desired.
Using manual eject for disc media
You may encounter a circumstance when it is not pos sible or c on venient to
open the CD or D VD dri ve using the eject button (f or example, w hen the
computer is shut do wn).
1.
Carefully insert a stif f wire (s uch as a straightened, heavy-duty paper
clip) into the manual eject hol e until you f eel resistance.
32 Using Your Gateway Solo 3150 Notebook
To use the manual eject button
Manual eject hole
Page 37

2.
Gently press harder until the dri ve tr ay s lides out.
3.
Grasp the front of the tra y and pull it out.
Using the USB port
Universal Serial Bus (USB) is a ne w type of serial interface that serves as a
single-port alternative to conn ecting de vices that tr aditionall y ha ve requir ed
their own spec ific ports, such as mice, jo ysticks, keyboard s, scanners, video
cameras, and speakers.
T o use, connect the USB-compatib le periphera l into the USB port. The
USB automatically install s and configures the necessary drivers and the
system resources. The instal lation ma y prompt y ou to load discs or diskettes
to complete the installation.
Removing and replacing the hard disk drive
You can remove the hard di sk dri ve from y our notebook to s w ap to a sec ond
drive. If y ou decide to add a ne w dri ve, use t he documentation that comes
with the driv e to prepare the it for use.
To remove the hard disk drive
1.
Save all work.
2.
Click Start, Shut Down, then click OK.
3.
Close the LCD panel, then disconnect the A C po w er .
4.
Remov e the battery.
Caution!
Do not expose the hard
drive to liquid or magnetic
fields. Exposure could
damage the data on the
hard drive.
Chapter 3: Using Your Notebook 33
Page 38

5.
Remov e the tw o scre ws that s ecure the hard disk dri ve .
6.
Pull the driv e straight out.
1.
Make sure the po w er is turned off, the AC power is disconnected, and the battery is remo ved.
2.
Slide the new dri ve firmly into the ba y, then secure the drive wit h the two screws.
3.
T urn the notebo ok o ver , co nnect the A C adapter , and i nsert the battery.
4.
Start up the system. If this is a first-time installation, follo w the
information that accompanied the dri ve to pr epare it for use.
34 Using Your Gateway Solo 3150 Notebook
To replace the hard disk drive
Page 39

Using PC Cards
Your notebook’s PC Card slot (also known as a PCMCIA card slot) i s
located on the right side of y our notebook. This slot ac cepts PC Card 16,
PC Card 32 (CardBus), or Zoomed V ideo cards. Your notebook is
configured to automatically accept most PC Cards.
You do not need to restart your notebook when changing most car ds
because your notebook supports “hot-s w apping.” This means that y ou can
usually insert a PC Ca rd and the system reco gnizes it without shutting do wn
the notebook. If your PC Card does not w ork whe n hot-sw apping, refer t o
the PC Card manufacturer’s documentation for further information.
To insert a PC Card
1.
Insert the PC Card with the label facing up.
2.
Slide the card firmly into the PC Card slot. When the card is install ed
correctly , t he computer emits a tw o-t oned beep.
3.
Fol lo w the W indo ws Se tup W izard installati on steps the first time you
insert a PC Card. Operate the device as rec ommended in the PC Card
manufacturer’s manual.
Chapter 3: Using Your Notebook 35
Page 40

To remove a PC Card
1.
Click the PC Card icon in the taskbar , t hen click the card y ou w ant to remove.
2.
Click Stop. A message states that y ou ma y safel y remo ve the devic e.
3.
Click OK.
4.
Press the PC Card eject button, located to the right of the PC Card slot,
to release the eject button.
5.
Press the PC Card eject button a sec ond time to eject the PC Card.
6.
Press the PC Card eject button a third time to replace the button into the chassis.
Using the IR port
The IR (infrared) port built into the back of y our notebook uses infrared
technolog y to send and recei v e signals betw e en the notebook and a remote
device equipped with a n IR port. A variety of deskt op computers, printers,
and other peripherals are IR-equ ipped. Use the manufacturer’s
documentation to setup a remote IR d evice.
36 Using Your Gateway Solo 3150 Notebook
Page 41

Chapter 4:
Getting Online
Using the Internet .................................................. 38
E-mail..............................................................39
World Wide Web ........................................... 39
Using Microsoft Fax.............................................. 41
Setting up Microsoft Fax................................ 41
Sending and receiving faxes.......................... 43
Manually answering with your modem......... 44
Locating the COM port address..................... 45
Page 42

Using the Internet
The Internet is a worl dwide netw ork of computers linked to gether to
provi de information to users e verywhere . You can access this global
network b y connecting y our computer to a normal phone line and signing
up with an Internet service pro vider . In ternet services include e-mail and
the W orld Wide Web.
E-mail (electronic mail) let s you send mes sages to an yone in the world, as
long as you and the reci pient both ha ve Inte rnet connections and
e-mail addresses.
The World Wide Web is a user-friendly int erface to the Internet that gi ves
you point-and-click access to millions of sou rces of information. Man y
types of files are availab le for do wnload, including pictures, sounds, and
programs.
T o be gin y our journey through the Internet y ou need:
♦ A modem – a device installe d in the computer that connect s the
computer to a phone line. Your Solo 3150 notebook has a built-in 56K
data/fax modem.
♦ An Internet service provider (ISP) – a connection betw een the modem
and the Internet, such as gate wa y.net.
♦ A Web browser – an application that trans lates information from the
Internet service provider to the computer . The M icrosoft Internet
Explorer Web browser is installed on the computer.
T o underst and Internet functions, you shoul d kno w the follo wing terms:
♦ E-mail (electr onic mail) – messages transmitt ed by tel ephone lines.
Important!
Downloading (receiving
files) is not always f ast.
Sometimes large files and
slow connection speeds
can contribute to slow
downloading.
♦ E-mail address – an Internet address to w hich e-mail can be sent .
This address designates a locati on on the Internet that messages and
files can be sent to.
♦ Downloadi ng – transferring a cop y of a file from a remote server or
computer to your computer’s hard drive.
♦ Link – a word or i mage within a Web page on which y ou can click to
access another Web page or additional information.
38 Using Your Gateway Solo 3150 Notebook
Page 43

♦ Home page – a file that appears after connection has been made to a
Web site address. This page contains links that will guide you
throughout the Web site and may link y ou to other Web sites.
♦ Server – a computer or computer pro gram that sav es data in a storage
area. This data can be do wnloaded to y our computer for manipulati on
or printing purposes.
♦ Web browser – softw are that allo ws y ou to access and na vig ate Web
sites found on the World Wide Web. Netscape Na vigator and
Microsoft Internet Explorer are tw o popular Web browsers.
E-mail is an electronic mail service that lets you communicat e with others
around the globe. You need an Internet connection and an e-mail address to
send or retrie ve e-mail. For more information on using e-mail, see the
manual The Internet and gate way.net.
W orld Wide Web
After you ha ve y our Internet service set up, y ou are ready to e xplore the
Internet. T o do this, y ou need to use a Web browser. I n our example belo w
we use Microsoft Internet Explorer to visit the Gatew a y Web site.
To browse the World Wide W eb
1.
Connect to the Internet service. Depending upon your Internet service
provi der , you ma y be prompted to pr o vide your user ID and pass w ord.
2.
Double-click the Internet Explorer icon on the desktop to start Microsoft
Internet Explorer . The Web browser opens.
3.
Go to a Web site by typing its address in the bro w ser’s Address Bar
(for example,
http://www .gateway.com), then press E
NTER
.
Important!
Web site addresses are not
always permanent. If an
error screen appears that
states the file cannot be
found, verify that you ha ve
typed the correct address. If
a screen stating the file
cannot be found appears
again, the Web site has
either changed location or
no longer exists.
Chapter 4: Getting Online 39
Page 44

The Web browser locates the site, downloads the text and graphics to
the computer , and displa ys the site in t he bro wser windo w. In the
followi ng illustration, the Gatew a y Web site appears in Microsoft
Internet Explorer .
Address Bar
Displa y ar ea for
Web pages.
When you move the cursor ov er t he screen
and it changes to a hand, you can click to link
to another page or section of the Web site .
Refer to the Web browser’s online help to learn more about using the Web
browser , e xploring the Web, printing, and sa ving information.
40 Using Your Gateway Solo 3150 Notebook
Page 45

Using Micr osoft Fax
T o fax documents from y our multimedia note book with W indo ws 98 and
Windo ws95, we recommend using Microsoft Fax, which is avail able in
both operating systems. You must set up Microsoft F a x so that y ou can send
and receiv e faxes.
Setting up Microsoft Fax
Although Windo ws 95 and W indo ws 98 look v ery similar, the setup
required for Microsoft Fax is different for each operating system.
To set up Microsoft Fax in Windows 95
1.
Double-click the My Computer icon on your desktop, then cl ick Control
Panel. The Control Panel appears.
2.
Click Add/Remove P rog rams , then clic k the Windows Setup tab.
3.
Click to select the Micro soft F ax chec k box if it is not already se lected. If
the check box is alre ady selected, exit Add/Remove Programs and y ou
can stop here. If a message asks y ou to include all requi red
components, click
Yes and continue to step 4.
4.
Click OK at the bottom of the Add/Remo ve Programs windo w. If the
Inbox Setup W izard appears, go t o step 5. If the Inbo x Setup W izard
does not appear , follo w the ins tructions on the screen.
5.
In the Inbox Setup W izard, click the Properties button and make sure
your activ e modem is selected. If the wizard prompts y ou for mail
information you do not ha ve, clic k
restart the wizard and clear the check bo x es for
Internet Mail.
Cancel to exit the wizard , t hen
Microsoft Mail and
Chapter 4: Getting Online 41
Page 46

6.
The default Answ er mode is Don’t A nswer. If another program uses the
same COM port as your modem, keep the default setting. Otherwise,
change the Answ er mode to eit her
Manual or Answer A fter. Select Manual
if you will use y our phone line for v oice call s or other pro grams.
Select
Answer After if you will use y our modem onl y for faxing. Click
OK to sav e changes.
7.
Click the checkbox to ind icate wh ether you w ant Micros oft F a x to
answ er all incoming ca lls, then click
8.
Fill in y our personal and phone line information, then click Next.
9.
If you chose to insta ll Microsoft Mail, enter t he path to y our P ost
Next.
Office, which you can get from a server administrator.
10.
If you chose to i nstall Internet Mail, ent er the information requested i n the next fe w windo ws.
11.
If this is your first Microsoft F ax installation, choose th e default path
for Pers onal Address Book b y clicking
12.
If this is your first installation, choose the default pat h for P ersonal
folder file by clicking
13.
Select whether y ou w ant Microsoft Exchange to aut omaticall y run
Next.
Next.
when you start W indo ws. Remember tha t you need to ha v e Microsoft
Exchange running to receive fax es. Click
Next.
14.
Click Finish. Microsoft Exchange opens. If the Mail lo gon sho ws and
you do not ha ve a P ost Of fice set up, click
to use Microsoft F ax.
1.
Insert the Windo ws 98 CD into the CD drive, then on the CD open the
folder
2.
Run the file wms.exe by doub le-clicking on i t, then follo w the
instructions to install W indo ws Messaging.
42 Using Your Gateway Solo 3150 Notebook
Offline. You will still be able
To set up Microsoft Fax in Windows 98
\tools\oldwin95\message\us\.
Page 47

3.
After Windows Messaging is installed, run the file awfax.exe in the
same folder and follo w the ins tructions to install MicrosoftFax.
Sending and receiving faxes
To send a fax
Microsoft F ax lets y ou send fax es in the fol lo wing w ay s:
♦ Using the Start button
1.
Click the Start button, then click Programs, th en click Accessories.
2.
Click Fax, then click Compose New Fax. The Compose New Fax W iza rd
opens to guide you in preparing y our fax. Follow the instructions on
the screen.
♦ Using Microsoft Exchange
1.
Double-click the Inbox icon to run Microsoft Exchange.
2.
Click the Compose me nu, then click New Fax. F ollo w the instructions in
the Compose New F ax Wizard.
♦ Printing to Microsoft Fax
1.
Open the document that you w ant to fax (for e xample, a Microsoft Word document).
2.
Select the File menu and click Print.
3.
Select Micr osoft Fax f rom the list of print ers, then click OK. F ollo w the
instructions in the Compose New F ax Wizard.
Chapter 4: Getting Online 43
Page 48

To receive, view, and print a fax
1.
Double-click the In box icon t o open Microsoft Exchange.
2.
If you ha ve already chan ged the Ans wer Mode to Answer Af ter or
Manual, go to Step 8.
3.
Click the Tools menu, click Microsoft Fax T ools, then click Options.
4.
Click the Modem tab in the Microsoft F ax Pr operties windo w.
5.
Click the Properties button and make sure your activ e modem is
selected. The default answ er mode is
uses the same COM port as your modem, keep the default setti ng.
Otherwise, you must change the answ er mode to be able t o receiv e
faxes.
6.
If you will use yo ur phone line for voi ce calls or other pro grams, select
Manual. If you will use your modem onl y for faxing, select Answer After.
Click
OK to sav e changes.
7.
Close the Microsoft F ax Pro perties windo w, but leave Microsoft
Exchange open in order to recei ve fax es. You are notified when a fax
arrives.
Don’t Answer. If another program
8.
After a fax is receiv ed , cl ick the Inbo x folder in the Personal Folders
window, then double-click the first fax in the list. The fax document
opens in the F axV ie w er.
9.
Click Print to print the fax.
Manually answ ering with your modem
If you set the modem’s answer mode to Manual, y ou must manuall y answ e r
the phone when it rings. To manually answ er the phone, doub le-click the
modem icon in the taskbar’s status area, then click the
the dialog bo x that appears.
44 Using Your Gateway Solo 3150 Notebook
Answer Now button in
Page 49

Locating the COM port address
Some modem applications require you to kn o w the COM port address that
Windo ws assigne d to your mode m.
To locate the COM port address and verify settings
1.
Click Start, Settings, and Cont rol Panel, then do uble-click the Modems
icon. The Modems Properties dialog bo x appears.
2.
Click the Diagnostics tab. The assigned COM port appears.
3.
Click the COM port, then click More Info. The More Info dialog bo x appears.
The Command and Response section of the dialo g box s ho ws sev eral
command and response selections.
4.
Click OK twice.
Chapter 4: Getting Online 45
Page 50

46 Using Your Gateway Solo 3150 Notebook
Page 51

Chapter 5:
Managing P ower Usage
Managing battery power ....................................... 48
Charging the battery pack.............................. 48
Using the battery............................................. 50
Monitoring the battery status......................... 51
Changing the power button setting................ 51
Using the Suspend and Standby modes......... 52
Maximizing battery life......................................... 55
Page 52

Managing battery power
Your system has many wa ys to tailor po w er managemen t and maximize
battery operating time to best fit how you use y our notebook. This ch apter
contains information about charging and using the batte ry pack, changing
the pow er button s ettings, and usi n g St an db y, Susp en d, and ot h er notebook
settings to maximize battery po w er.
Charging the b attery pack
The battery must be installed in the notebook and con nected to an A C
pow er sour ce to charge . The battery charges a ny time y our notebook is
connected to an A C po w er source.
You can also purchase an external battery charger or an airplane/automobile
adapter from Gatew a y Add-Ons. The exte rnal charger can char ge an
additional battery while y our notebook is char ging its own attached battery.
The airplane/automobile adapter lets you po w er y our notebook and char ge
your battery from po w er plugs on airplanes and automobiles.
To charge a battery pack
♦ Install the battery pack in the notebook, the n connect the A C po w er to
the notebook. The A C po w er begi ns to recharg e the battery pack.
Swapping the battery pack
Battery packs can be “warm-swa pped.” This means y ou can change battery
packs while in Suspend mode (Windows 95) or Standby mode
(Windows 98). The backup battery that supports warm sw apping has a
limited pow er supply of ab out ten minutes. Make the battery swap quickl y
to conserve the backup battery po w er .
48 Using Your Gateway Solo 3150 Notebook
Page 53

To remove the battery pack
1.
Save all work.
2.
If you are using W indo ws 95 or Windows NT , cli ck Start on the
taskbar , then click
- OR -
Suspend. The syste m goes into Suspend mode.
If you are using W indo ws 98, cli ck
Down, Standby, then OK. The system goes into Standby mode.
Start on the taskbar , then click Shut
- OR Shut down the s ystem.
3.
Close the LCD panel and turn your notebook o v er .
4.
Slide the battery release latch to release the battery pack.
5.
Hold the latch forwar d and lift the batte ry pack from the notebook.
Chapter 5: Managing Power Usage 49
Page 54

Important!
Removing the battery or
disconnecting the AC
power will interrupt the
learning cycle. If the
learning cycle is
interrupted, it must be
restarted from the
beginning to properly
condition the battery.
Using the battery
Your notebook can run on a fully charged battery for about 2.5 to 3 hours,
depending on ho w much you use the syst em components. F or e xample,
battery life is reduced if you use a screen sa ver rather than the Suspend
function. Battery life is also reduced b y pla ying an audio CD or DVD. Other
factors such as the po w er management set tings also af fect the batt ery life.
See “Maximizing battery life” on page 55 for more i nformation about
pow er management.
Battery learning software
About once a y ear y ou wil l nee d to run the Batt ery Learning Soft w are
to re-calibrate the battery gauge. This learning cycle increases the battery
gauge accuracy (gauge a ccuracy c hanges o ver ti me).
Because the learning cycle can tak e as long as 16 hours per bat tery , we
suggest that you start the Learning Cycle pro gram and run it o vernight.
To perform a learning cycle on the battery pack
1.
Plug the AC adapter into the notebo ok and an A C outlet.
2.
Connect the external diskette driv e, then insert the Batte ry Learning
Cycle diskette into the dr iv e.
3.
Start up your notebook. The Learning Cycle softwar e starts.
4.
Foll o w the on-screen dir ections for the batt ery learning software.
50 Using Your Gateway Solo 3150 Notebook
Page 55

Monitoring the battery status
Use one of the follo wing batte ry indicators to monitor the battery po w er
level:
♦ Battery gauge icon
This icon appears in the taskbar tray. Double-click the
open the Battery Meter window. The Battery Meter window tells y ou
what the current po w er source is and the total battery po w er
remaining.
Battery icon to
♦ Pop-up sta tus displa y
FN+F2
Press
corner of the LCD panel. The menu displa ys the follo wing system
information:
•
The first line shows battery charge status pe rcentage, w here 100%
represents a full y charged ba ttery. If the battery level is lo w, a
warning icon appears.
•
The second line indicates the current po w er management set ting
(OFF, ON, or DC).
•
The third line sho ws the current po w er source (A C ON or A C
OFF).
•
The fourth line displays the c urrent BIOS used on the system.
(status key) to di spla y the pop-up menu in the upper l eft
Changing the power button setting
You can change the pow er button function from On/Of f to St andby/Resume
in the BIOS Setup utility. See “ About the BIOS Setup utility” on page 68
for more information about accessing the BIOS P o w er menu settings to
change the po wer button mode.
Chapter 5: Managing Power Usage 51
Page 56

Using the Suspend and Standby modes
Setting the system to the Suspend mode (Windo ws95 and Windo ws NT) or
Standby mode (W indo ws98) mode helps conserve battery pow er without
turning the system pow er off, le ts you lea v e softw are applicati ons running,
and lets you “a w aken” t he system without going through t he full start-up
process.
You may be using Windo ws 95, Windows 98, or WindowsNT operating
system on your notebook. Each operating system handles the system modes
differentl y. Use the table belo w to see the mode differ ences in each
operating system.
System
Definition Operating
mode
Suspend
(“Sleeping
state”)
Resume “A wakens” system from Sus pend an d
Sleep Turns off:
Standby
(“Sleeping
state”)
Resume “Awakens” system from Standby
Causes the system to remove power
from most devices except RAM.
Pressing the power button restores
power to the notebook.
restores power to the notebook.
•CPU clock
•Video controller
•Hard disk
•Input/output controller
•Audio
Any activity on the keyboard, mouse,
or a modem ring brings the notebook
back to full power.
Equivalent to the Suspend mode in
Windows 95
mode. Restores power to the notebook.
system
Windows 95
Windows NT
Windows 95
Windows NT
Windows 95
Windows 98
Windows 98
52 Using Your Gateway Solo 3150 Notebook
Page 57

Suspend in Windows 95 and Windows NT
Windo ws95 and Windo ws NT use Suspend mode. The table below sho ws
how to change t he system modes in W indo ws 95 and Windo ws NT.
If your
notebook
...and you
want to...
...do this:
is...
OFF Start up Press the power button.
ON Suspend Click
- OR Press
In Suspend
mode
ON Shut down Click
Restore
power
Press the power button.
down the computer
, then select
Start
FN+F4.
, then select
Start
Suspend.
Shut Down, Shut
, then click
Yes.
The system also starts a sleep mode automaticall y based on the s leep and
timeout settings in the P o w er menu of the BIOS Set up program. To access
this menu, see “About the BIOS Setup utility” on page 68. Also see the
example BIOS settings tab le in “Maximizi ng battery life” on page 55 for
sleep and timeout settings.
Standby in Windows 98
Windo ws98 uses Standby mode. The table belo w sho w s ho w to change the
pow er modes in W i ndo ws 98.
Chapter 5: Managing Power Usage 53
Page 58

If your
notebook
...and you
want to...
...do this:
is...
OFF Start up Press the power button.
ON Standby Click
Standby
- OR Press
In Standby
mode
ON Shut down Click
Restore
power
Press the power button.
Down
, then select
Start
, and
OK.
FN+F4.
, then select
Start
again, then click
Shut Down
Shut Down, Shut
OK.
,
The system may go into a sleep mode automaticall y based on slee p and
timeout settings made in the
T o access t he P o w er Management Pr operties dialog bo x, click
select
Settings, Control Panel, and Power Management. Adjust the po w er
Control Panel Power Management settings.
Start, then
settings to fit the way y ou use y our system.
54 Using Your Gateway Solo 3150 Notebook
Page 59

Maximizing battery life
You can extend the battery life by follo wing thes e practices:
♦ Low er the displ ay b rightness as much as is comfortab le.
♦ Close the LCD panel when not in use.
♦ Adjust the P o w er menu settings in the BIOS setup pro gram for
maximum battery life.
♦ Some PC Cards use battery pow er e ven w hen the y are not in use.
Remov e them when no t in use. Check the PC Card manufacturer’s
documentation to find out if the card uses pow er when not in use.
♦ Keep the battery pack in the computer when usin g A C po w er to
continuously char ge the battery.
♦ Minimize your use of the DVD or CD-ROM drive . D VD and
CD-ROM dri ves us e considerabl e battery pow er.
♦ Use the optional external char ger to char ge an additional bat tery pack
while you work.
Chapter 5: Managing Power Usage 55
Page 60

56 Using Your Gateway Solo 3150 Notebook
Page 61

Chapter 6:
Using the P ort Replicator
Port replicator components................................... 58
Ports ................................................................ 59
Attaching to the replicator.............................. 60
Separating from the replicator........................61
Setting up the video out port.......................... 63
Page 62

P ort replicator components
The optional port replicator for th e Solo 3150 giv es you a conv enient w ay t o
attach external de vices such as a monitor , a full-size k eyboard, or an AC
pow er ada pter . Alth ough devices can be attached directl y to the ports on the
notebook’s rear panel, the port replicator let s you make al l of those
connections in one step. The port replicator al so giv es you ac cess to
additional ports not found on the notebook’s rear panel.
A
D
B
C
B
A
C
The replicator uses the following parts to securel y hold your notebo ok:
Component Description
A. Notebook
release buttons
B. Notebook
securing tabs
C.Notebook
elevating
platforms
These buttons are pressed to lift the
notebook off the replicator.
These tabs help secure the notebook to the
replicator.
When the notebook release buttons are
pressed, these platforms rise and help
release t he notebook from the replicator.
D. Docking
connector
58 Using Your Gateway Solo 3150 Notebook
This is the electronic c onnection b etween th e
notebook and the replicator.
Page 63

Ports
The replicator pro vides the f ollo wing ports and connections:
B
C
D
E
F
Provides speaker output.*
recording equipment.
attached.*
network.*
G
H
A
Port Icon Description
A. Headphone/
Speaker Out
B. Line Out Provides audio output directl y to sound
C.Keyboard Allows attachment of a full-size keyboard.*
D. Mouse Allows any external pointing device to be
E. LAN Provides an Ethernet 10/100 connection to a
F. Video Provides output for an external monitor.*
G.Parallel Provides output f o r parallel devices.*
I
K
J
M
L
H.Serial Provides output for serial devices .*
Chapter 6: Using the Port Replicator 59
Page 64

Port Icon Description
I. Modem Conne cts your notebook’s modem to your
telephone line.*
J. USB (Universal
Serial Bus)
K. NTSC TV/video
out
L. Microphone Lets you connect an external microphone,
M.power Attaches the AC power adapter to your
Allows attachment of any USB device.*
Sends the monitor signal out as a standard
video signal. You can send monitor images to
a television or to a recorder.
which disables the internal microphone.
notebook.*
*This port also exists on your not ebook.
Attaching to the replicator
You can attach your notebook to the port replicator w hile your not ebook is
Off, On, or in Standb y/Suspend mode.
To attach your notebook to the replicator
1.
Connect any ext ernal devices to t he ports on the replicator’s rear panel.
2.
Close the notebook’s LCD panel, then align the interface connectors.
60 Using Your Gateway Solo 3150 Notebook
Page 65

3.
Gently press the n otebook do wn until the securing t abs lock into place.
If you ha ve dif ficulty attaching the notebook to the replicator , remo v e
the notebook and look for an ything that might be in terfering with the
connection, then try again.
4.
Open the notebook’s LCD panel and resume your work.
Separating from the replicator
You can remove your notebook from the replicator at any time.
Chapter 6: Using the Port Replicator 61
Page 66

To separate the notebook from the replicator
1.
Firmly press down on the replicator’s notebook release buttons with your thumbs.
2.
While holding do wn the release buttons, gentl y lift the notebook off the replicator .
62 Using Your Gateway Solo 3150 Notebook
Page 67

Setting up the video out port
The composite video (TV Out) port lets you vie w y our notebook’s display
on a TV screen or record to a VCR, although TV screen displa y re solution
will not be as clear as an external monitor. This option is typically used with
large-screen TVs to gi v e presentations and for other multimedia needs .
To set up and connect the computer to a TV or VCR
1.
Click Start, then select Settin gs, the n Control Panel. Double-click the
Display icon and click the S etting s tab in the Display Properties window.
2.
Change the desktop area (displa y resolution) by sl iding the Desktop area
slider to adjust pix el resoluti on to 640 x 480.
3.
Change the font size to Large Font.
4.
Click Apply, then OK. Windo ws cha nges the displa y settings.
5.
Connect one end of a video cable to the Composite V ideo (TV) Out
port on the port replicator and the other end to the V ideo I n connector
on the television or VCR.
6.
Press
FN+F3
to change the activ e displa y to LCD only, LCD and TV, or
TV only.
If the displa y is distorted on the tele vision scr een, check to see if the BIOS
setting is correct for NTSC or PAL (NTSC is used primarily in the United
States). See “About the BIOS Setup utility” on page 68 for more
information about changing the TV Mode.
Chapter 6: Using the Port Replicator 63
Page 68

64 Using Your Gateway Solo 3150 Notebook
Page 69

Appendix A:
Accessories
Page 70

Accessories
We offer many accessories that c an help y ou make the most of us ing your
Solo notebook. Many accessories are a v ailab le such as memory modules,
external keyboards, speak ers, carrying cases, printers, tape backup units,
hard driv es, modems, netw ork cards, softw are, and uninterruptable po w er
supplies (UPS). Check out our Web site or call our Add-Ons group to help
you find products that will best fit your needs.
Here are more accessories w e of fer:
♦ A carrying case protects y our notebook and carries accessories. This
soft case is room y enough to hold other items as w ell. A no-slip
shoulder strap is included.
♦ An extra battery is handy for w hen you’re on the road and hav e no
place to plug in your notebook. Pur chase an additional battery to keep
you w orking.
♦ The battery charg er charges a fully di scharged bat tery in about tw o
to three hours. This battery charge r has tw o LEDs to indicat e battery
charge status.
♦ The automobile/airplane adapter pro vi des a safe and easy wa y to
plug any Solo notebook int o the industry-standard EmP o w er i n-seat
pow er receptacles no w av ailable on major airl ines, or into any cigarette
lighter in a car , boat, or RV. In addition to pro viding a saf e external
pow er sour ce, it lets y ou con venientl y r echarge y our notebook’s
batteries during tra vel.
For more information on these or other Gat ew a y solutions f or your
notebook call 1-800-846-2000.
66 Using Your Gateway Solo 3150 Notebook
Page 71

Appendix B:
Using the BIOS Setup Program
Page 72

Caution!
Setting items in the BIOS
utility menus to incorrect
values may cause y our
system to malfunction.
Make note of the settings
before making changes so
you can change the
settings back if needed.
About the BIOS Setup utili ty
The computer’s BIOS has a built-in program that lets you set many basi c
system characteristics. These se ttings are stored and sav ed e ven w hen the
pow er is of f. This section contains information about this setup utility and is
intended to serve as a guide so that y ou can mak e changes to y our system
BIOS when necessary.
To enter the BIOS Setup utility
1.
Restart the system.
2.
When prompted during the start-up process, press F2. The Main menu appears.
Refer to the help area to the ri ght for information about the menu
options.
The command bar at the bottom of the scre en sho ws the ke ystrokes
necessary to access help, navig ate through the menus, and perf orm other
functions.
•
F1 opens the Help screen, pro viding general hel p for using the
BIOS Setup utility.
•
The up arrow and do wn arro w keys se lect items in the menu .
•
The + (plus sign) and - (minus si gn) change va lues in fields or
mov e an item up or do wn in a list .
•
F9 opens a screen that lets y ou return all va lues to default sett ings.
•
ESC closes the current screen and returns to the pre vious screen.
•
The left arrow and right arro w keys mo ve betw een the menus .
•
E
•
F10
made changes and then exit the BIOS Set up utility.
68 Using Your Gateway Solo 3150 Notebook
mov es you to a su bmenu or allo ws editing of the field.
NTER
opens a screen that lets y ou load pre vious v alues before y ou
Page 73

The main screen has the follo wing menu s elections at the top of the screen:
•
Main giv es you acc ess to basic info rmation and settings related to
your system hardw are and configuration.
•
Adv anced gi v es you access t o information and settings for syst em
resources, hardware , and system configuration.
•
Security giv es you a ccess to settings rel ated to system pass w ords.
•
Power gives you access to information and settin gs related to
pow er -sa ving functions av ailab le with y our system.
•
Exit gives you access to op tions for e xiting the BIOS Setup util ity.
69
Page 74

70 Using Your Gateway Solo 3150 Notebook
Page 75

Appendix C:
Contacting Gatewa y
Page 76

Contacting Gate way
If you experience a ny troub le w hile using y our Gate wa y Solo Multimedia
Notebook, feel free to contact Gate w a y. You will need to supply y our Client
ID , serial number , a nd order number to the sup port technicians. Your Client
ID and order number can be found on y our in v oice; the seri al number can
be found on the bottom of your notebook. Make a note of these numb ers
here:
Client ID: _____________________________
Serial Number: _________________________
Order Number: _________________________
If your computer is st olen, be sure to contact y our loc al police and a
Gateway representative at once. We can put a note on the account, so that if
anyone ca lls trying to use your notebook serial number, we can c ontact y ou
immediately.
Gateway offers a wide range of client services. If you ha v e questions or
problems, contact the Gate w a y service belo w that is most appropri ate for
your needs. Please refe r to your Gate w a y Warranty booklet for information
and the contact numbers for Gate wa y outs ide the U.S.
Service How to reach Description
Sales & Client
Support
Portables Technical
Support
Toll free from the U.S.
Toll free from Canada
World Wide Web
U.S. and Canada
72 Using Your Gateway Solo 3150 Notebook
:
800-846-2000 General information
about systems, pricing,
orders, billing, and warranties.
800-846-2302
800-846-3609
:
http://www.gateway.com Modem required. The
Call this number if you
have a problem with
hardware or software.
Gateway Web site contains a variety of information about Gateway.
Page 77

73
Page 78

Regulatory Compliance Statements
American users:
Caution!
The Federal
Communications
Commission warns the
users that changes or
modifications to the unit not
expressly approved by the
party responsible for
compliance could void the
user’s authority to oper ate
the equipment.
Caution!
Because the laser beam
used in this DVD-ROM
drive unit is harmful to the
eyes, do not attempt to
disassemble the cabinet.
Refer servicing to qualified
personnel only. Use of
controls or adjustments or
performance of procedures
other than those specified
herein may result in
hazardous radiation
exposure.
FCC Part 15
This device has been tested and found to comply with the limits for a Class B
digital device, pursuant to Part 15 of the FCC rules. These limits are designed to
provide reasonable protection against harmful interference in a residential
installation. This equipment generates, uses and can radiate radio frequency energy
and, if not installed and used in accordance with the instructions, may cause
harmful interference to radio or television reception. Howe ver , there is no
guarantee that interference will not occur in a particular installation. If this
equipment does cause interference to radio and television reception, which can be
determined by turning the equipment off and on, the user is encouraged to try to
correct the interference by one or more of the following measures:
Reorient or relocate the receiving antenna
♦
Increase the separation between the equipment and receiver
♦
Connect the equipment into an outlet on a circuit different from that to which
♦
the receiver is connected
Consult the dealer or an experienced radio/TV technician for help.
♦
Accessories: This equipment has been tested and found to comply with the limits
of a Class B digital device. The accessories associated with this equipment are as
follows:
Shielded video cable
♦
Shielded po w er cord.
♦
These accessories are required to be used in order to ensure compliance with FCC
rule s .
74 Using Your Gateway Solo 3150 Notebook
Page 79

FCC Part 68
This modem complies with the FCC, Part 68 Rules and Regulations.
The telephone company may request the follo wing information:
• The ringer equivalence number*
• The FCC Registration number*
*This information is printed on the FCC label provided on the system.
Note:
The Ringer Equivalence Number (REN) is used to determine the quantity of
devices which ma y be connected to the telephone line. Excessive REN’s on the
telephone line may result in the devices not ringing in response to an incoming
call. In most, but not all areas, the s um of t he REN’s should not exceed five
(5.0). T o be certain of the number of devices that may be connected to the line,
as determined by the total REN’s, contact the telephone company to determine
the maximum REN for your area.
If the modem malfunctions, disconnect it from the telephone line until the problem
is corrected. If you do not disconnect the modem and correct the problem, the
telephone company may temporaril y disconnect y our service.
The telephone company must notify you if it makes changes to the telephone line
that would af fect the modem in any wa y. If advance notice is not practical, the
phone company will contact you as soon as possible. Also, y ou will be advised of
your rights to file a complaint with the FCC if you believe it is necessary.
Do not connect this modem to a coin telephone line or party line.
This modem uses the following USOC jacks:
• US: RJ-11C
• CANAD A: CA11A
If you hav e any prob lems, contact Gatew a y Client Care.
75
Page 80

Canadian users:
This digital apparatus does not exceed the Class B limits for radio noise emissions
from digital apparatus as set out in the radio interference regulations of Industry
Canada.
Le présent appareil numérique n’émet pas de bruits radioélectriques dépassant les
limites applicables aux appareils numériques de Classe B prescrites dans le
règlement sur le brouillage radioélectrique édicté par Industrie Canada.
Caution!
Disconnect power before servicing.
Attention!
Couper le courant avant l’entretien.
European users:
This Information T echnolo g y Equipment has been tested and found to comply wit h
the following European directiv es:
[i]EMC Directive 89/33 6/EEC amending directive 92/31/EEC & 93/68/EEC as per
- EN 50081-1:1992 according to
EN 55022:1995 Class B
EN 61000-3-2:1995 or EN 60555-2:1986
EN 61000-3-3: 1995
- EN50082-1:1992 according to
EN 61000-4-2:1995 or IEC 801-2:1984
ENV 50140:1994 or IEC 801-3:1984
EN 61000-4-4:1988 or IEC 801-4:1998
[ii]Low Voltage Directive (Safety) 73/23/EEC as per EN 60950: 1992
76 Using Your Gateway Solo 3150 Notebook
Page 81

This equipment is in the Class 2 category (Information T echnolog y Equipment to
be used in a residential area or an adjacent area thereto) and conforms to the
standards set by the Voluntary Control Council for Interference by Information
T e chnolog y Equipment aimed at prev enting radio interference in such residential
area.
When used near a radio or TV receiver, it ma y become the cause of radio
interference. Read instructions for correct handling.
Japanese users:
This device has been tested and found to comply with the limits for a Class B
digital device, pursuant to the Australian/New Zealand standard AS/NZS 3548 set
out by the Spectrum Management Agency .
Australian and New
Zealand users:
77
Page 82

Notices
Copyright © 1999 Gateway 2000, Inc.
All Rights Reserved
610 Gateway Drive
N. Sioux City, SD 57049 USA
All Rights Reserved
This publication is protected by copyright and all rights are reserved. No part of it may be reproduced
or transmitted by any means or in any form, without prior consent in writing from Gateway 2000.
The information in this manual has been carefully checked and is believed to be accurate. However,
changes are made periodically. These changes are incorporated in newer publication editions.
Gateway 2000 may improve and/or change products described in this publication at any time. Due to
continuing system improvements, Gateway 2000 is not responsible for inaccurate information which
may appear in this manual. For the latest product updates, consult the Gateway 2000 web site at
www.gateway .com
incidental, or consequential damages resulting from any defect or omission in this manual, even if
advised of the possibility of such damages.
In the interest of continued product development, Gateway 2000 reserves the right to make
improvements in this manual and the products it describes at any time, without notices or obligation.
Trademark Acknowledgments
AnyKey, black-and-white spot design, CrystalScan, Destination, EZ Pad, EZ Point, Field Mouse, Solo,
TelePath, Vivitron, stylized “G” design, and “Y ou’ve got a friend in the business” slogan are registered
trademarks and GATEW AY , Gatew ay Solo, Gateway Profile, green stylized GATEWAY, green stylized
Gateway logo, and the blac k-and-white spotted box logo are trademarks of Gateway 2000, Inc. Intel,
Intel Inside logo, and Pentium are registered trademarks and MMX is a trademark of Intel Corporation.
Microsoft, MS, MS-DOS, and Windows are trademarks or registered trademarks of Microsoft
Corporation. All other product names mentioned herein are used for identification purposes only, and
may be the trademarks or registered trademarks of their respective companies.
Copyright © 1999 Advanced Logic Research, Inc. (ALR)
All Rights Reserved
9401 Jeronimo
Irvine, CA 92618 USA
. In no event will Gatew ay 2000 be liable for direct, indirect, special, ex e mplary,
All Rights Reserved
This publication is protected by copyright and all rights are reserved. No part of it may be reproduced
or transmitted by any means or in any form, without prior consent in writing from ALR.
The information in this manual has been carefully checked and is believed to be accurate. However,
changes are made periodically. These changes are incorporated in newer publication editions. ALR
may improve and/or change products described in this publication at any time. Due to continuing
system improvements, ALR is not responsible for inaccurate information which may appear in this
manual. For the latest product updates, consult the ALR web site at
be liable for direct, indirect, special, exemplary, incidental, or consequential damages resulting from
any defect or omission in this manual, even if advised of the possibility of such damages.
In the interest of continued product development, ALR reserves the right to make improvements in this
manual and the products it describes at any time, without notices or obligation.
Trademark Acknowledgments
ALR is a registered trademark of Advanced Logic Research, Inc. All other product names mentioned
herein are used for identification purposes only, and may be the trademarks or registered trademarks
of their respective companies.
78 Using Your Gateway Solo 3150 Notebook
www.alr.com
. In no event will ALR
Page 83

Index
A
AC connector 7
AC power 60
connecting 13
accessing CD/DVD 30
accessories 66
active display 23
adapter
AC 60
address bar 39
air outlet port 7
answer mode 42
answer after 42
manual 42
answering manually 44
applications
Microsoft Internet Explorer 39
Web browser 39
assistance resources 72
attaching to the replicator 60
audio 59
adjusting volume 28
audio input 60
audio output 59
auto dim 14
automobile/airline a dapte r 66
,
44
,
60
B
battery 66
bay 9
charger 66
charging 12
gauge 50
installing 12
latch 9
life 12
managing power 48
status 51
swapping 48
using 50
,
51
,
55
battery learning software 50
BIOS
menu descriptions 69
navigating 68
setup utility 68
updating iii
break
function key 21
brighten LCD 21
brightness
display 14
browser.
Web browser
See
C
cable lock 7
caps lock 4
CardBus 35
CD/DVD
drive 4
inserting 30
changing
display resolution 23
stickpoint properties 25
charging the battery 12
client ID 72
COM port address 45
combination keys 18
components iii
composite video out 60
connecting
AC power 13
modem 26
network 27
to TV 63
to VCR 63
contacting Gateway 72
contrast
display 14
,
48
,
63
D
details iii
79
Page 84

devices
external 60
diagnostics 45
dim LCD 21
dimensions iii
diskettes
using 30
display 2
docking
docking connector 58
documentation iii
downloading 38
,
3
active 23
brightness 14
changing resolution 23
contrast 14
system status 51
TFT 22
TV 20
type 9
port 9
station 58
E
ejecting
CD/DVD 6
PC Card 6
elevating platforms 58
e-mail 38
emergency eject 6
Ethernet 5
external
external keyboard 59
external monitor 58
external mouse 59
external pointing device 59
, 27,
59
devices 60
,
, 58,
59
59
,
59
keyboard 25
mouse 25
speakers 59
video 59
changing resolution 23
setting up 22
external speakers 59
EZ Point 3
,
23
replacing cap 25
F
FAQs iii
fast IR 5
faxes 44
function keys 18
break 21
pad lock 20
page down 21
page up 21
pause 21
power management 20
print screen 21
scroll lock 20
SysRq 21
,
G
Gateway
contacting 72
Web site iii
,
39
H
hard disk drive 4
removing 33
replacing 34
headphone port 5
help 72
home page 39
hyperlink 38
,
I
icons
battery gauge 51
caps lock 4
CD/DVD 4
docking port 9
fast IR 5
hard disk drive 4
pad lock 4
parallel port 5
PS/2 port 5
20
59
80 Using Your Gateway Solo 3150 Notebook
Page 85

scroll lock 4
serial port 5
VGA port 5
input
audio 60
inserting PC Cards 35
installing
battery 12
interface
connectors 60
port 58
Internet 38
e-mail 38
Gateway Web site 39
World Wide Web 39
Internet Explorer 38
Internet service provider 38
IR
using 36
ISP 38
,
39
J
jacks
headphones/speakers 5
K
Kensington lock 7
key combinations 19
keyboard 2
keypad 18
keys
, 3, 18, 58,
external 25
, 20,
22
application 19
combination 18
end 21
function 18
pad lock 22
page down 21
page up 21
print screen 21
right-click 19
Windows 19
,
20
59
L
LAN
connecting 27
, 27,
port 5
LCD 3
auto dim 14
brighten 21
brightness 14
contrast 14
dim 21
panel 2
line out port 59
link 38
lock 7
59
M
manual
gateway.net iii
Internet iii
manual answer mode 42
manually ejecting 6
manuals iii
memory bay 9
microphone in port 60
Microsoft Exchange 42
Microsoft Fax
setting up 41
Microsoft Fax Tools 44
model number 9
modem 38
modem port 60
modes
monitor 58
monitoring
mouse 23
,
60
diagnostics 45
port 60
standby 52
suspend 52
,
59
external 20
TV display 20
battery status 51
,
59
external 25
,
44
81
Page 86

port 25
N
navigating
BIOS utility 68
network
connecting 27
port 27
notebook elevating platforms 58
22
,
62
,
61
notebook release buttons 58
notebook securing tabs 58
NTSC out port 60
numeric keypad 18
,
63
, 20,
O
online documentation iii
order number 72
output
audio 59
video 60
P
pad lock 4
function keys 20
page down 21
page up 21
PAL out port 63
parallel port 5
password 39
pause
function key 21
PC Cards
ejecting 6
inserting 35
removing 6
slots 6
PCMCIA. See PC Car ds
personal folder 42
PgDn 21
PgUp 21
pointing device 23
pop-up status display 20
port replicator 58
ports
,
22
,
59
,
36
,
36
,
59
,
51
,
60
AC 7
air outlet 7
docking 9
Ethernet 27
,
36
, 27,
,
,
,
,
59
33
,
22
36
59
59
fast IR 5
IR 5
LAN 5
modem 60
network 27
parallel 5
PS/2 5
serial 5
TV out 63
USB 7
USB port 60
VGA 5
post office 42
power 48
adapter 60
button 51
power connector 7
power management 48
function key 20
settings 54
power management properties 54
print screen 21
printed documentation iii
printing faxes 44
processor speed 9
properties
stickpoint 25
PS/2 port 5
Q
quick adjust
audio volume 28
R
receiving faxes 44
recording
audio levels 28
release buttons 58
removing
battery 9
,
62
82 Using Your Gateway Solo 3150 Notebook
Page 87

hard disk drive 33
PC Cards 36
replacing
hard disk drive 33
replicator 58
attaching 60
interface port 58
release buttons 62
resolution
changing display 23
resources 72
resume 52
,
S
sales and client support 72
scroll lock 4
securing tabs 58
security cab l e lo ck 7
serial number 9
serial port 5
server 39
services 72
setting
setting up
setup
shutdown
shutting down
size iii
sleep mode 52
software
speaker out port 59
speakers 3
,
20
,
72
,
59
on/off 51
power button 51
standby/resume 51
external monitor 22
BIOS 68
Windows 98 53
Windows 95 and NT 53
battery learning 50
setup 14
,
59
external 5
out port 5
34
volume 6
specifications iii
specs iii
standby mode 20
Windows 98 52
starting up 14
status
battery 51
stick point 3
stickpoint 23
customizing 25
replacing cap 25
support 72
suspend mode 52
swapping
battery 48
SysRq
function key 21
system
identification 9
request 21
startup 14
status display 51
,
52
,
53
T
tech tips iii
technical specifi cat ions iii
technical support 72
telephone line 60
television 60
TFT display 22
TV
connecting to 63
TV out port 60
,
63
U
USB 60
USB port 7
user ID 39
using
,
33
battery 50
EZ Point 24
IR port 36
keyboard 18
,
25
83
Page 88

mouse 25
PC Cards 35
pointing device 23
your system 18
V
VCR 60
connecting to 63
VGA port 5
video out port 59
viewing faxes 44
volume 28
volume wheel 6
,
60
W
Web
See also
Web browser 39
Web site
Gateway iii
weight iii
Windows 95 and NT
suspend mode 52
Windows 98
standby mode 52
Windows key 19
Windows Messaging 43
World Wide Web 38
World Wide Web
,
,
53
39
Z
Zoomed Video 35
84 Using Your Gateway Solo 3150 Notebook
 Loading...