

Page 1

Do not post this document to any publicly
available location. For a public version
(HTML) of this document, refer to the
Gateway.com technical docs library.
Page 2

Contents
1Getting Started . . . . . . . . . . . . . . . . . . . . . . . . . . . . . . . . . . . . . . . . . . . . . . . . . . 1
Connecting AC power . . . . . . . . . . . . . . . . . . . . . . . . . . . . . . . . . . . . . . . . . . . . . . . . 2
Starting your computer . . . . . . . . . . . . . . . . . . . . . . . . . . . . . . . . . . . . . . . . . . . . . . . 4
Waking up your computer . . . . . . . . . . . . . . . . . . . . . . . . . . . . . . . . . . . . . . . . . . 4
Turning off your computer . . . . . . . . . . . . . . . . . . . . . . . . . . . . . . . . . . . . . . . . . . . . . 5
Using the keyboard . . . . . . . . . . . . . . . . . . . . . . . . . . . . . . . . . . . . . . . . . . . . . . . . . . 6
Using function key combinations . . . . . . . . . . . . . . . . . . . . . . . . . . . . . . . . . . . . 7
Using the EZ Pad touchpad . . . . . . . . . . . . . . . . . . . . . . . . . . . . . . . . . . . . . . . . 8
Using an external mouse or keyboard . . . . . . . . . . . . . . . . . . . . . . . . . . . . . . . 10
System status indicators . . . . . . . . . . . . . . . . . . . . . . . . . . . . . . . . . . . . . . . . . . 11
Multi-function buttons . . . . . . . . . . . . . . . . . . . . . . . . . . . . . . . . . . . . . . . . . . . . 12
Front . . . . . . . . . . . . . . . . . . . . . . . . . . . . . . . . . . . . . . . . . . . . . . . . . . . . . . . . . . . . 13
Back . . . . . . . . . . . . . . . . . . . . . . . . . . . . . . . . . . . . . . . . . . . . . . . . . . . . . . . . . . . . . 14
Right side . . . . . . . . . . . . . . . . . . . . . . . . . . . . . . . . . . . . . . . . . . . . . . . . . . . . . . . . . 15
Left side . . . . . . . . . . . . . . . . . . . . . . . . . . . . . . . . . . . . . . . . . . . . . . . . . . . . . . . . . . 16
Bottom . . . . . . . . . . . . . . . . . . . . . . . . . . . . . . . . . . . . . . . . . . . . . . . . . . . . . . . . . . . 17
Accessories . . . . . . . . . . . . . . . . . . . . . . . . . . . . . . . . . . . . . . . . . . . . . . . . . . . . . . . 18
2 Using Your Notebook . . . . . . . . . . . . . . . . . . . . . . . . . . . . . . . . . . . . . . . . . . 19
Adjusting the LCD panel . . . . . . . . . . . . . . . . . . . . . . . . . . . . . . . . . . . . . . . . . . . . . 20
Customizing the multi-function buttons . . . . . . . . . . . . . . . . . . . . . . . . . . . . . . . . . . 20
Using diskettes . . . . . . . . . . . . . . . . . . . . . . . . . . . . . . . . . . . . . . . . . . . . . . . . . . . . 21
Using the CD/DVD drive and multimedia features . . . . . . . . . . . . . . . . . . . . . . . . . 22
Inserting a CD/DVD . . . . . . . . . . . . . . . . . . . . . . . . . . . . . . . . . . . . . . . . . . . . . 22
Adjusting the volume . . . . . . . . . . . . . . . . . . . . . . . . . . . . . . . . . . . . . . . . . . . . 22
Listening to audio CDs . . . . . . . . . . . . . . . . . . . . . . . . . . . . . . . . . . . . . . . . . . . 24
Recording and playing audio files . . . . . . . . . . . . . . . . . . . . . . . . . . . . . . . . . . 25
Using the Media Player . . . . . . . . . . . . . . . . . . . . . . . . . . . . . . . . . . . . . . . . . . . 26
Playing a DVD . . . . . . . . . . . . . . . . . . . . . . . . . . . . . . . . . . . . . . . . . . . . . . . . . 27
Connecting the modem . . . . . . . . . . . . . . . . . . . . . . . . . . . . . . . . . . . . . . . . . . . . . . 28
Connecting the network . . . . . . . . . . . . . . . . . . . . . . . . . . . . . . . . . . . . . . . . . . . . . . 29
Using PC Cards . . . . . . . . . . . . . . . . . . . . . . . . . . . . . . . . . . . . . . . . . . . . . . . . . . . . 30
Using the USB port . . . . . . . . . . . . . . . . . . . . . . . . . . . . . . . . . . . . . . . . . . . . . . . . . 32
Changing batteries . . . . . . . . . . . . . . . . . . . . . . . . . . . . . . . . . . . . . . . . . . . . . . . . . 33
Changing option bay modules . . . . . . . . . . . . . . . . . . . . . . . . . . . . . . . . . . . . . . . . . 35
Upgrading memory . . . . . . . . . . . . . . . . . . . . . . . . . . . . . . . . . . . . . . . . . . . . . . . . . 37
Replacing the hard drive . . . . . . . . . . . . . . . . . . . . . . . . . . . . . . . . . . . . . . . . . . . . . 39
i
Page 3

3 Travel Tips . . . . . . . . . . . . . . . . . . . . . . . . . . . . . . . . . . . . . . . . . . . . . . . . . . . . . .41
Modem . . . . . . . . . . . . . . . . . . . . . . . . . . . . . . . . . . . . . . . . . . . . . . . . . . . . . . . . . . .42
Files . . . . . . . . . . . . . . . . . . . . . . . . . . . . . . . . . . . . . . . . . . . . . . . . . . . . . . . . . . . . . .43
Security . . . . . . . . . . . . . . . . . . . . . . . . . . . . . . . . . . . . . . . . . . . . . . . . . . . . . . . . . . .43
Power . . . . . . . . . . . . . . . . . . . . . . . . . . . . . . . . . . . . . . . . . . . . . . . . . . . . . . . . . . . .44
Changing power settings . . . . . . . . . . . . . . . . . . . . . . . . . . . . . . . . . . . . . . . . . .45
4 Using the Internet . . . . . . . . . . . . . . . . . . . . . . . . . . . . . . . . . . . . . . . . . . . . . . .53
Learning about the Internet . . . . . . . . . . . . . . . . . . . . . . . . . . . . . . . . . . . . . . . . . . .54
Setting up an Internet account . . . . . . . . . . . . . . . . . . . . . . . . . . . . . . . . . . . . . . . . .55
Accessing your Internet account . . . . . . . . . . . . . . . . . . . . . . . . . . . . . . . . . . . .55
Using the World Wide Web . . . . . . . . . . . . . . . . . . . . . . . . . . . . . . . . . . . . . . . . . . .56
Connecting to a Web site . . . . . . . . . . . . . . . . . . . . . . . . . . . . . . . . . . . . . . . . . .57
Downloading files . . . . . . . . . . . . . . . . . . . . . . . . . . . . . . . . . . . . . . . . . . . . . . . .58
Using e-mail . . . . . . . . . . . . . . . . . . . . . . . . . . . . . . . . . . . . . . . . . . . . . . . . . . . . . . .59
Sending e-mail . . . . . . . . . . . . . . . . . . . . . . . . . . . . . . . . . . . . . . . . . . . . . . . . . .59
Checking your e-mail . . . . . . . . . . . . . . . . . . . . . . . . . . . . . . . . . . . . . . . . . . . . .60
5Getting Help . . . . . . . . . . . . . . . . . . . . . . . . . . . . . . . . . . . . . . . . . . . . . . . . . . . .61
For more information . . . . . . . . . . . . . . . . . . . . . . . . . . . . . . . . . . . . . . . . . . . . . . . .62
Microsoft Windows guide . . . . . . . . . . . . . . . . . . . . . . . . . . . . . . . . . . . . . . . . . .62
. . . . . . . . . . . . . . . . . . . . . . . . . . . . . . . . . . . . . . . . . . . . . . . . . . . . . . . . . . . . . .62
Discover Windows 98 tutorial . . . . . . . . . . . . . . . . . . . . . . . . . . . . . . . . . . . . . . .62
Online help . . . . . . . . . . . . . . . . . . . . . . . . . . . . . . . . . . . . . . . . . . . . . . . . . . . . .63
QuickANSWERS . . . . . . . . . . . . . . . . . . . . . . . . . . . . . . . . . . . . . . . . . . . . . . . .64
Gateway Web site . . . . . . . . . . . . . . . . . . . . . . . . . . . . . . . . . . . . . . . . . . . . . . .65
Before calling for technical support . . . . . . . . . . . . . . . . . . . . . . . . . . . . . . . . . . . . .66
Technical support resources . . . . . . . . . . . . . . . . . . . . . . . . . . . . . . . . . . . . . . . . . .67
6 Safety, Regulator y, and Notices . . . . . . . . . . . . . . . . . . . . . . . . . . . . . . . .69
American users . . . . . . . . . . . . . . . . . . . . . . . . . . . . . . . . . . . . . . . . . . . . . . . . .72
Canadian users . . . . . . . . . . . . . . . . . . . . . . . . . . . . . . . . . . . . . . . . . . . . . . . . .74
European users . . . . . . . . . . . . . . . . . . . . . . . . . . . . . . . . . . . . . . . . . . . . . . . . .75
Japanese users . . . . . . . . . . . . . . . . . . . . . . . . . . . . . . . . . . . . . . . . . . . . . . . . .76
Australia and New Zealand users . . . . . . . . . . . . . . . . . . . . . . . . . . . . . . . . . . .77
Index. . . . . . . . . . . . . . . . . . . . . . . . . . . . . . . . . . . . . . . . . . . . . . . . . . . . . . . . . . . . . . . 81
ii
Page 4

Getting Started
This chapter provides basic information about your Gateway computer
hardware and software. Read this chapter to:
■ Learn how to connect power, start the notebook, and turn off the
notebook
■ Learn how to operate the pointing device and keyboard
■ Understand indicators
■ Identify all ports, connectors, and buttons
■ Learn about available a ccessories
1
1
Page 5
Connecting AC power
Your notebook battery was shipped to you partially charged and ready to use.
You may want to use the AC adapter to complete charging the battery while
you are checking out some of the features.
Caution Replace the power cord if it becomes damaged. The
replacement cord must be of the same type and voltage
rating as the original cord.
Warning Do not attempt to disassemble the AC adapter. The
AC adapter has no user-replaceable or user-serviceable
parts inside. The AC adapter has dangerous voltages that
can cause serious personal injury or death. Contact
Gateway about returning defective AC adapters.
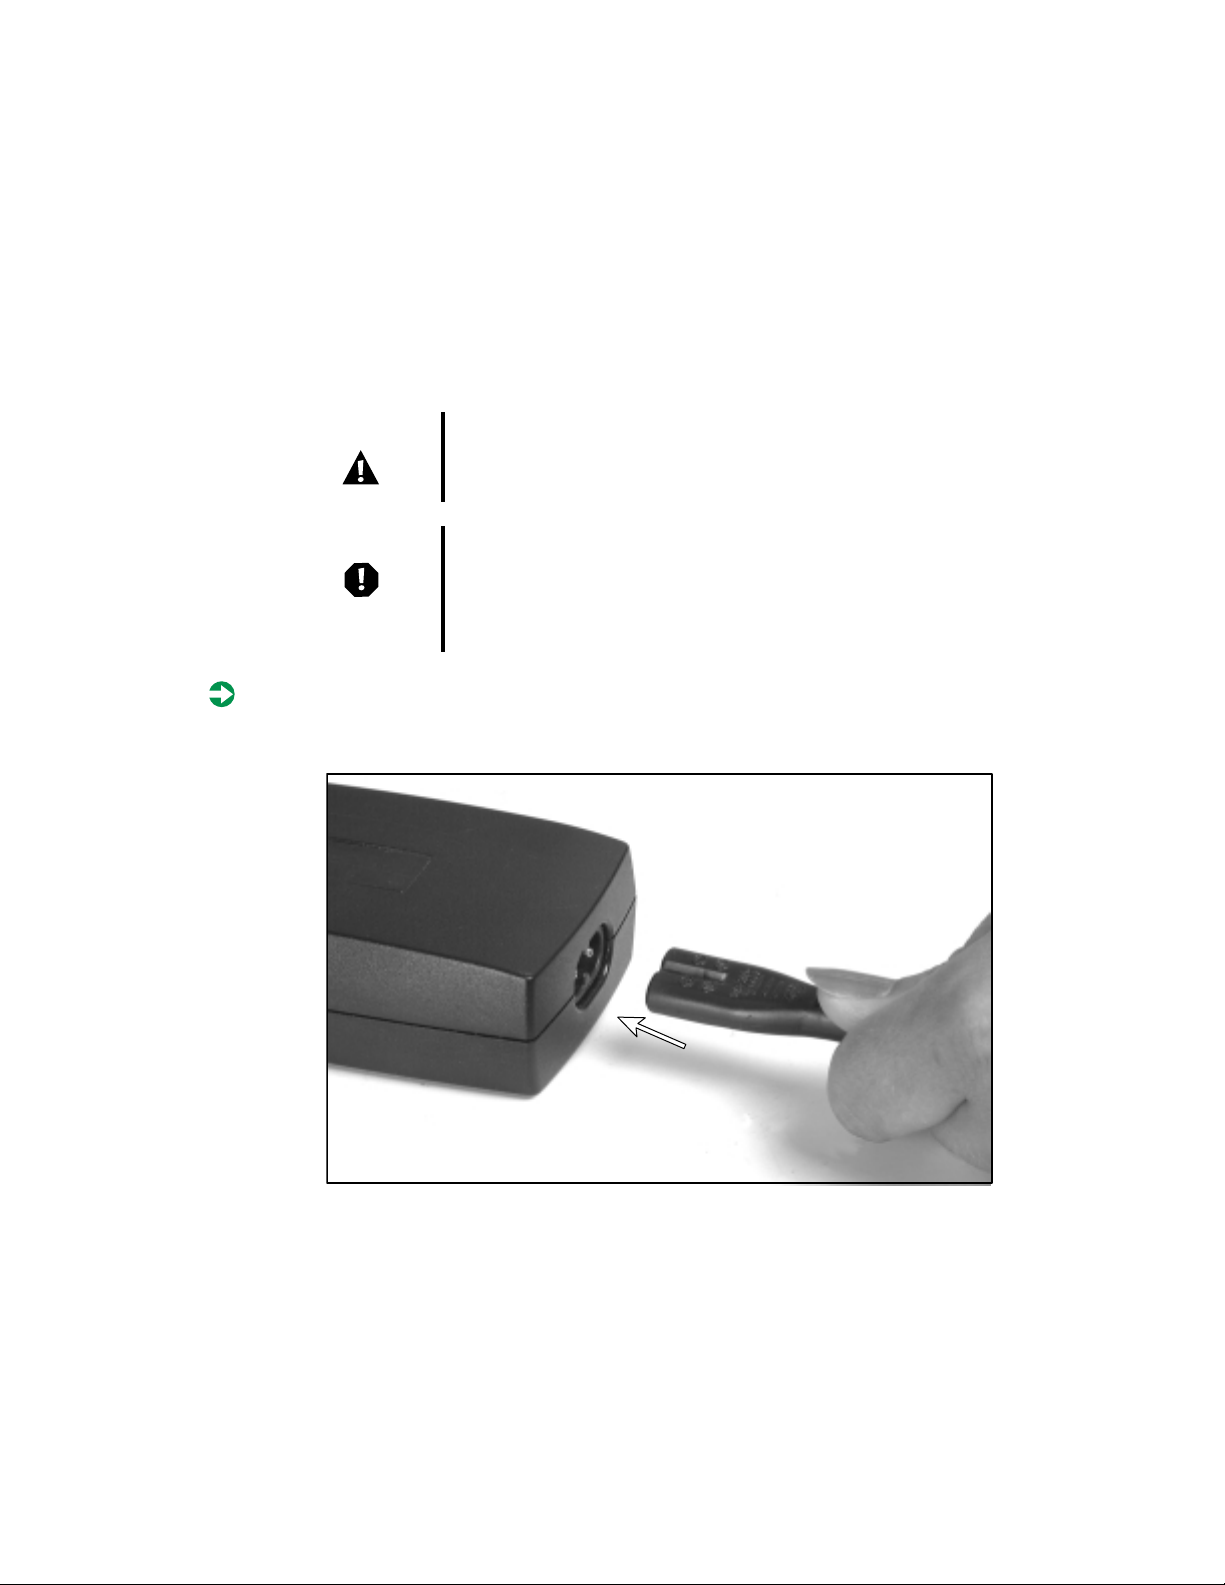
To connect the AC adapter:
1 Connect the power cord to the AC adapter.
2 Getting Started
Page 6
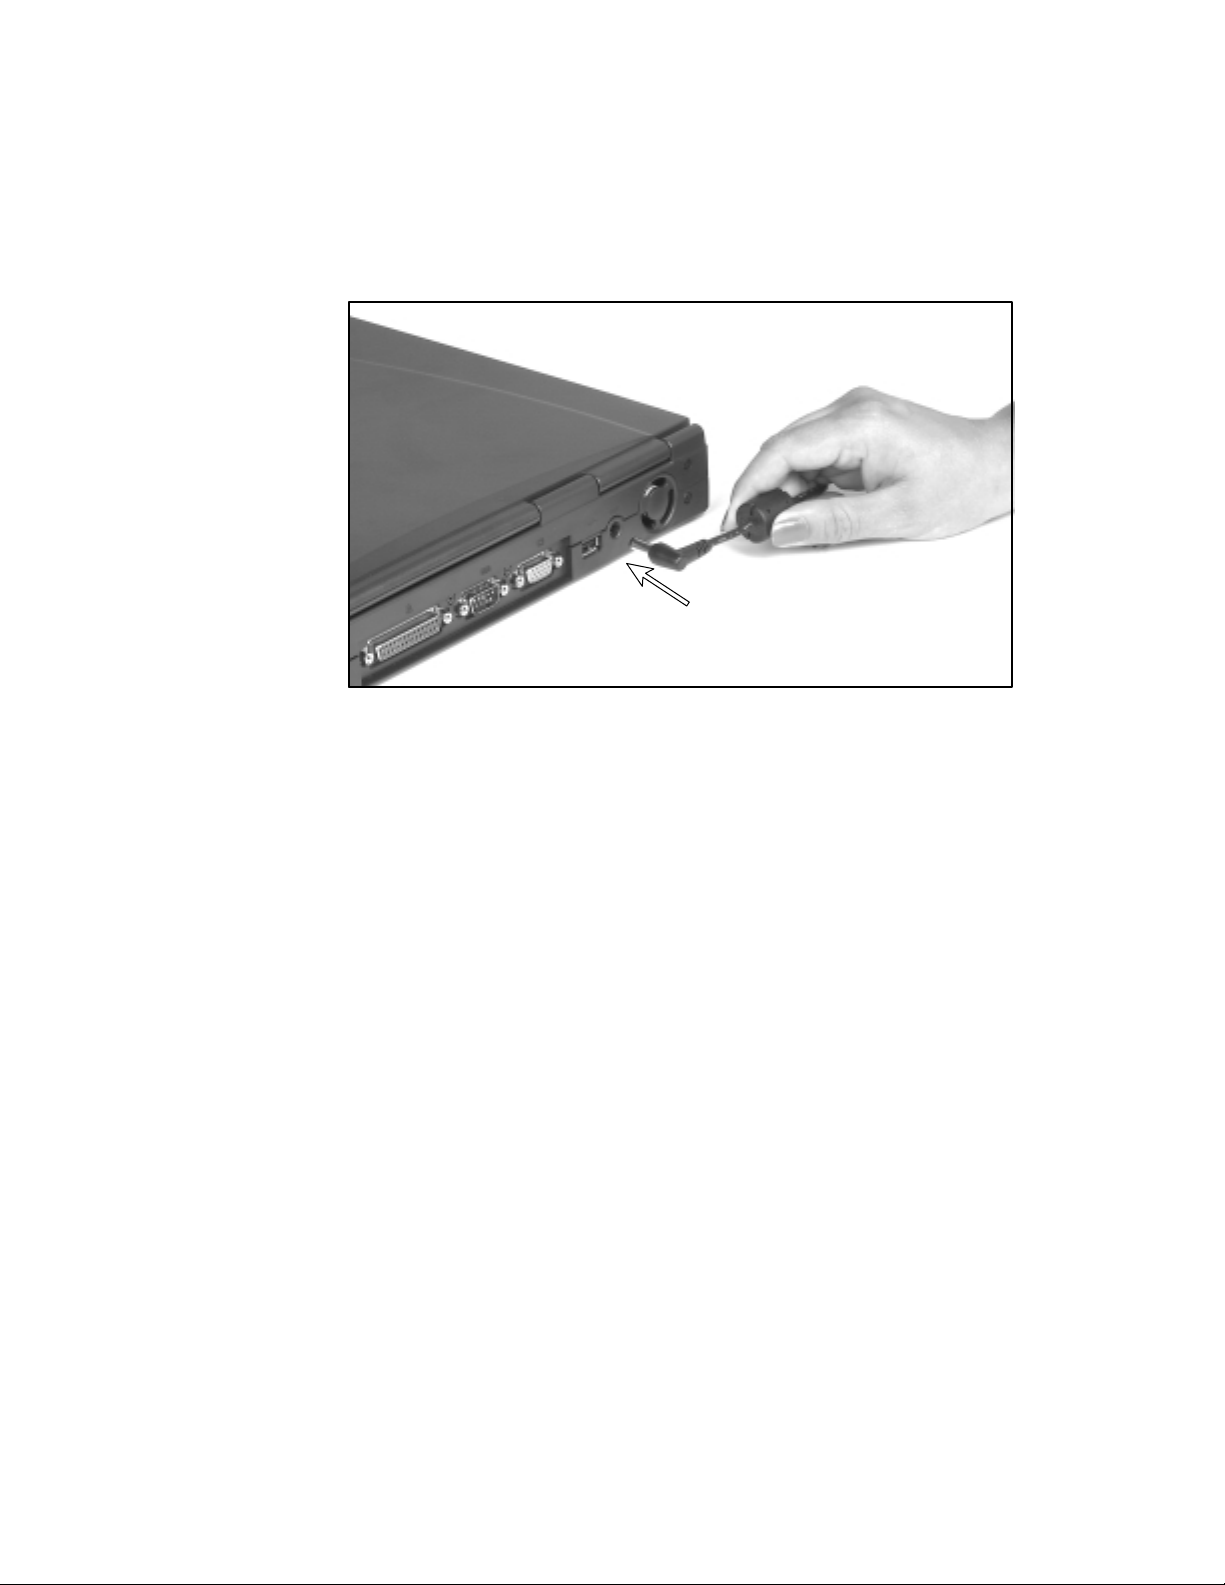
Plug the AC adapter into the notebook power connector.
2
3 Plug the power cord into an electrical outlet.
Connecting ACpower 3
Page 7
Starting your computer
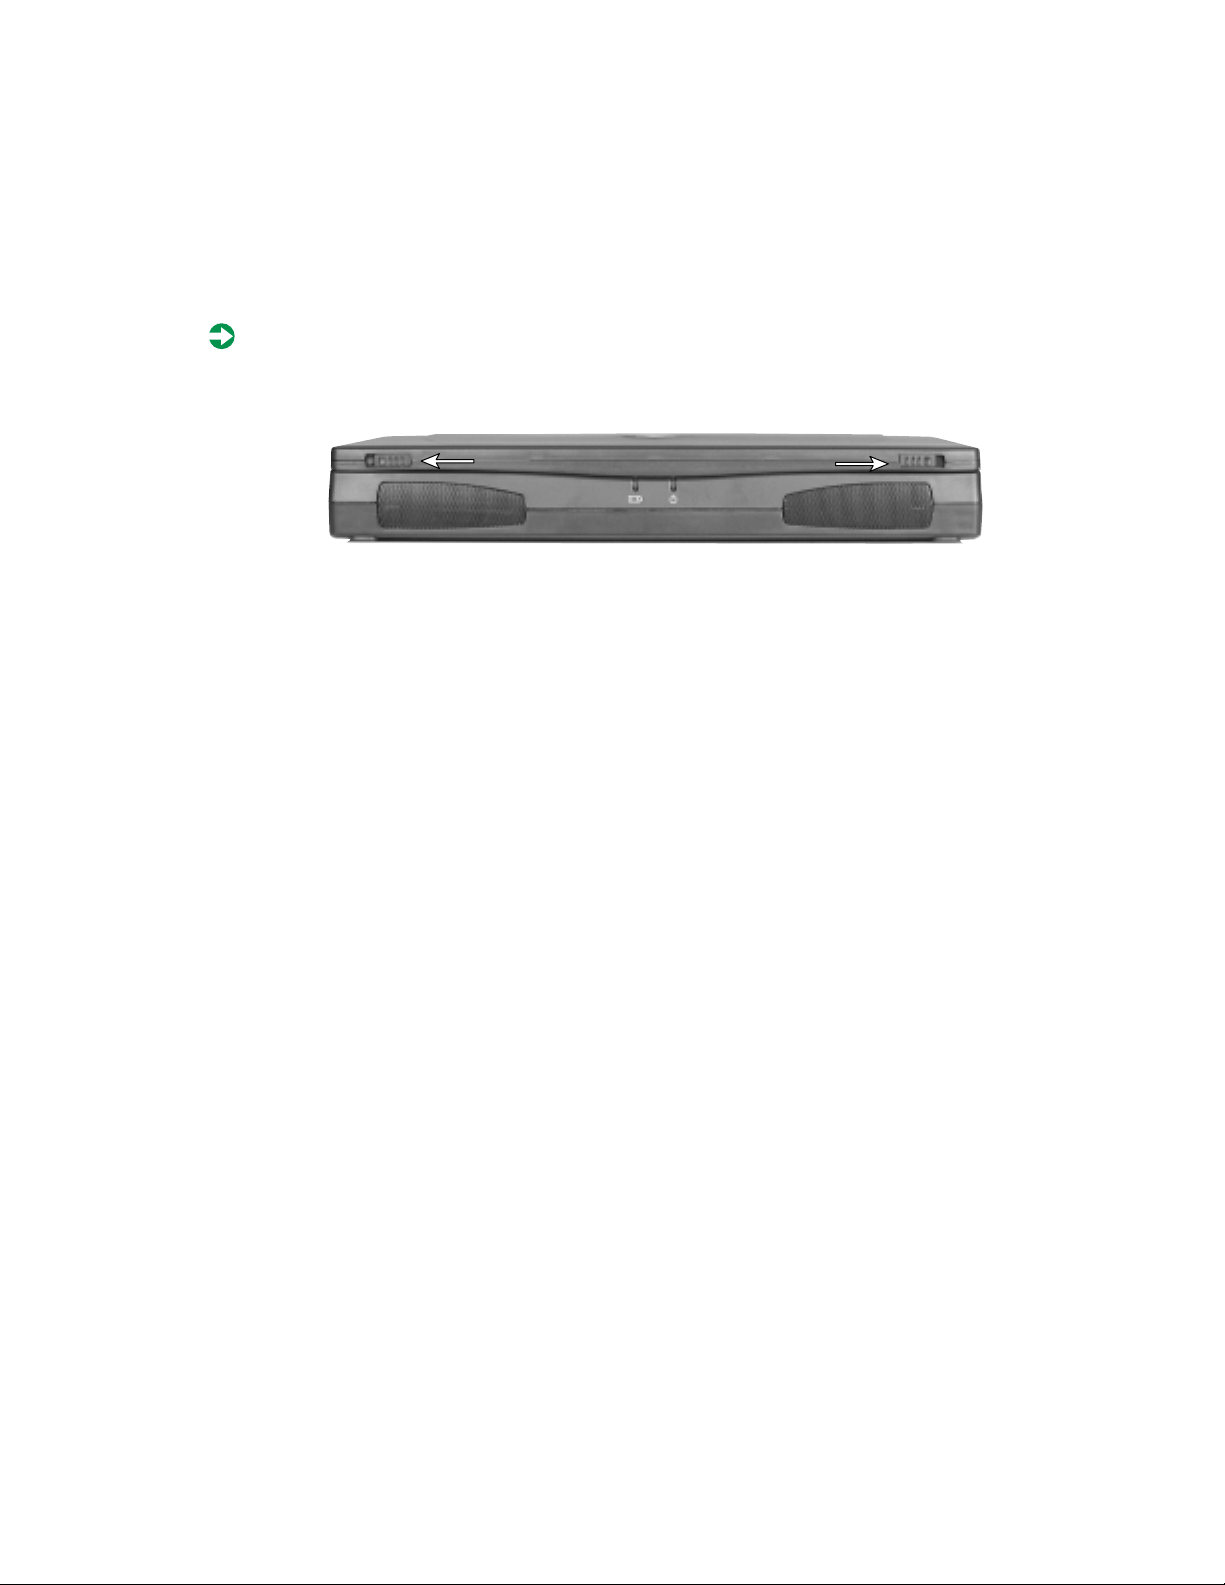
To start your computer:
1 Slide the latches on the front of your notebook outward and lift the cover.
2 Press the power button.
The power button is preset to On/Off mode. Y ou can also set it to function
in either Standby/Resume mode or Hibernate mode. For more
information on changing the power button mode, see “C hanging settings
in Windows 98” on page 45.
3 The first time you turn on your computer, follow the on-screen
instructions to complete the software setup. For information on signing
up for an Internet Service Provider (ISP) account, see “Setting up an
Internet account” on p age 55.
W aking up your computer
■ When you have not used your computer for several minutes, it will go
into a power-saving mode called Standby. While in Standby , the computer
screen darkens and the power indicator light blinks every two seconds.
When you are ready to use your computer, “wake” it up by pressing a
button or key on the keyboard. For more information on changing
power-saving settings, see “Changing power settings” on page 45.
4 Getting Started
Page 8

T urning off your computer
To turn off your notebook:
1 Click Start, then select Shut Down. The Shut Down Windows dialog bo x
opens.
2 Select Shut down, then click OK. Windows shuts down your computer.
If your computer does not respond to keyboard or mouse commands and
you are unable to use the Shut Down option, press and hold the power
button for at least four seconds.
Turning off your computer 5
Page 9
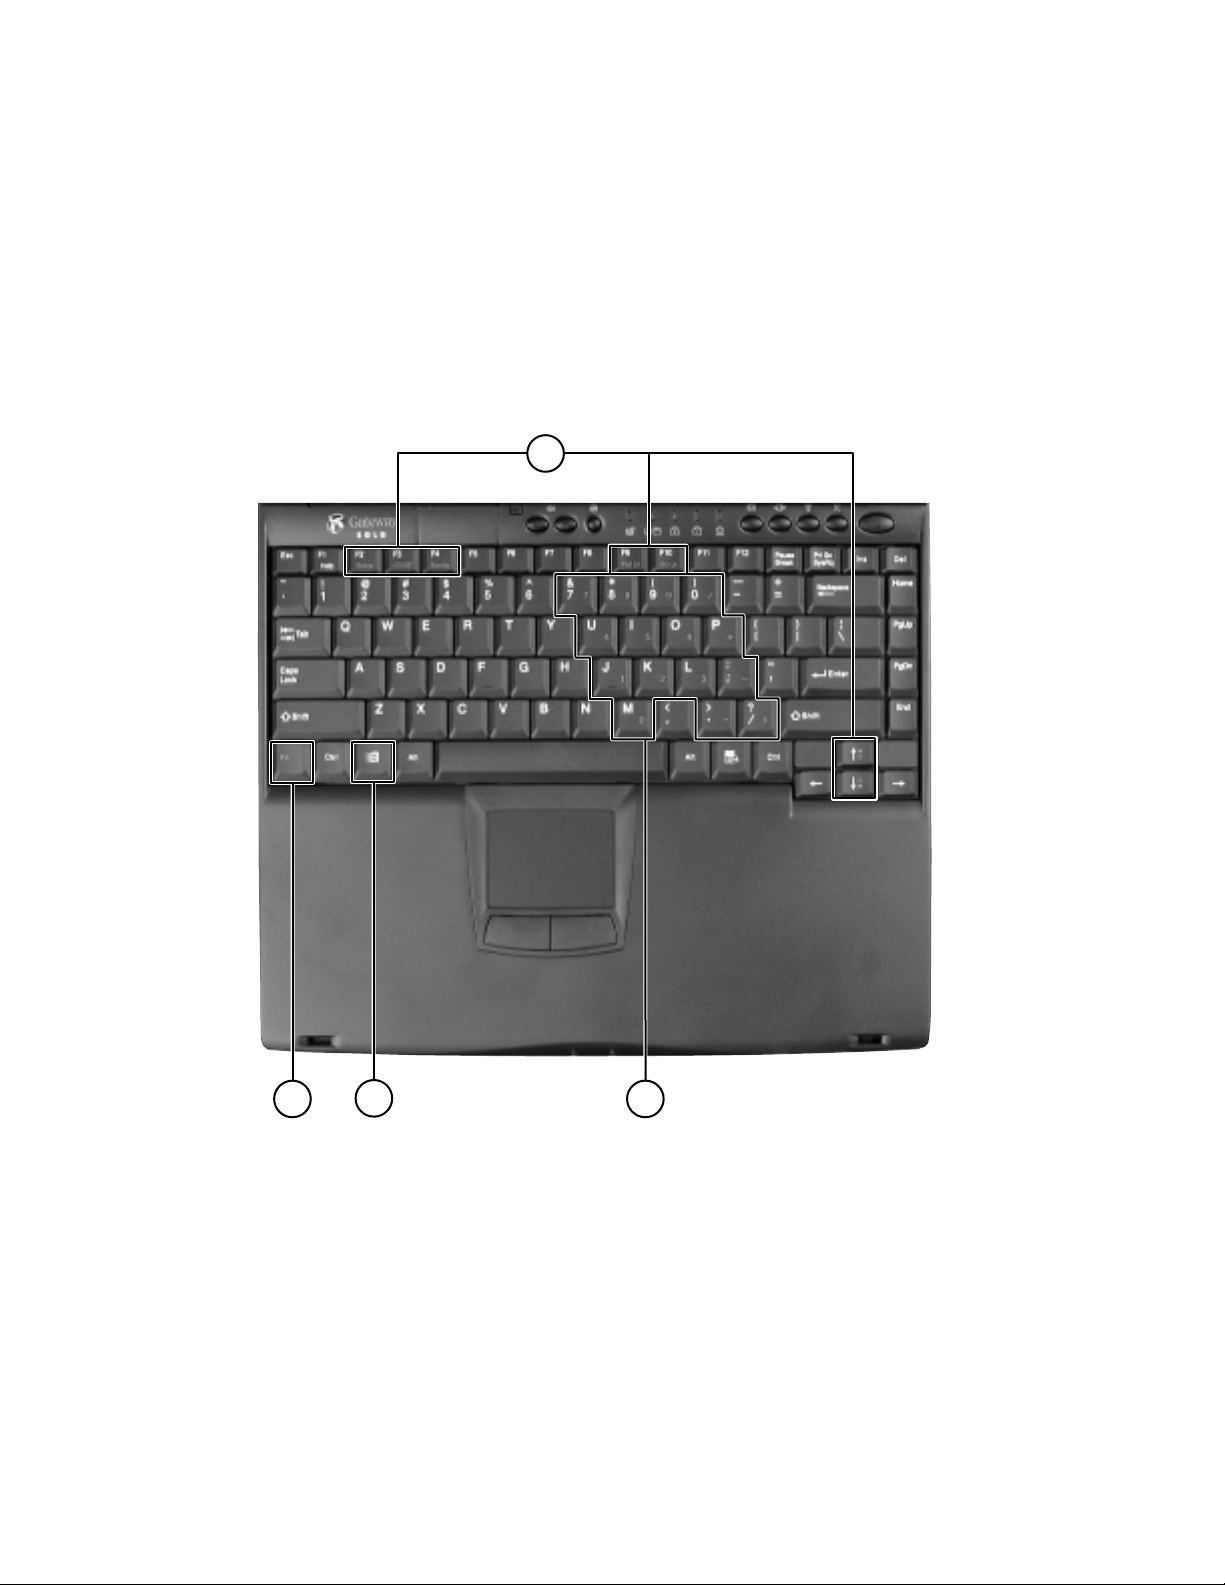
Using the keyboard
Your notebook features a keyboard that has the same functionality as a
desktop computer keyboard. Many of the keys have been assign ed alternate
functions, including shortcut keys for Windows, function keys for system
operations, and a Pad Lock key that enables the embedded numeric keypad.
A
D
6 Getting Started
C
A Fn combination k eys
B Numeric keypad
C Win do ws k ey
D Fn (function) key
B
Page 10
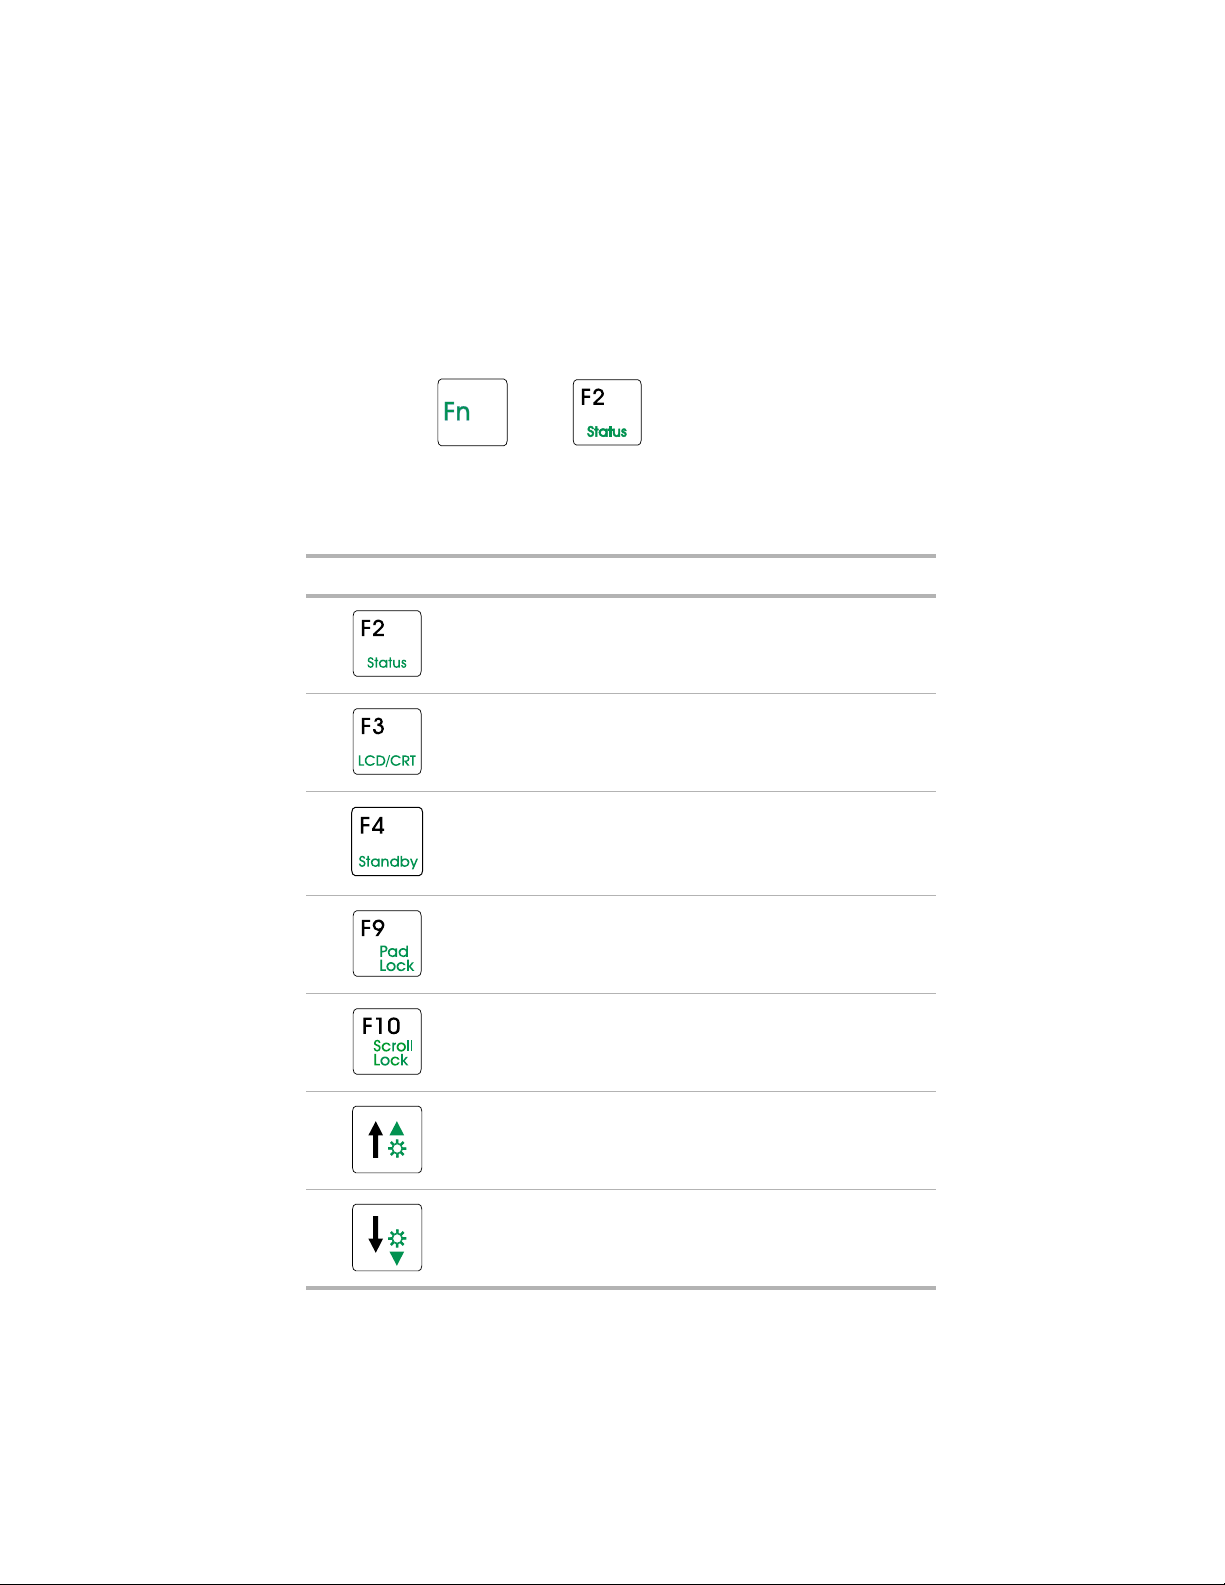
Using function key combinations
Press the FN key together with one of the following keys to perform the
function:
+=
Combination Key Function
Displays the power status in the upper left corner of the
Windows desktop. Press the key combination again to
make the power status disappear.
Toggles between the LCD display, external monitor, or
both displays at the same time.
Activates Standby mode in Windows 98 and Suspend
mode in Windows95 and Windows NT. Pres s the power
button to bring the notebook out of Standby/Suspend
mode.
Activates Pad Lock so you can use the embedded
numeric keypad. The Pad Lock status indicator stays lit
while this function is enabled.
Function
Combination
key
Activates Scroll Lock so you can scroll through large
volumes of text in some applications. The Scroll Lock
status indicator stays lit while this function is enabled.
Increases LCD brightness.
Decreases LCD brightness.
Using the keyboard 7
Page 11
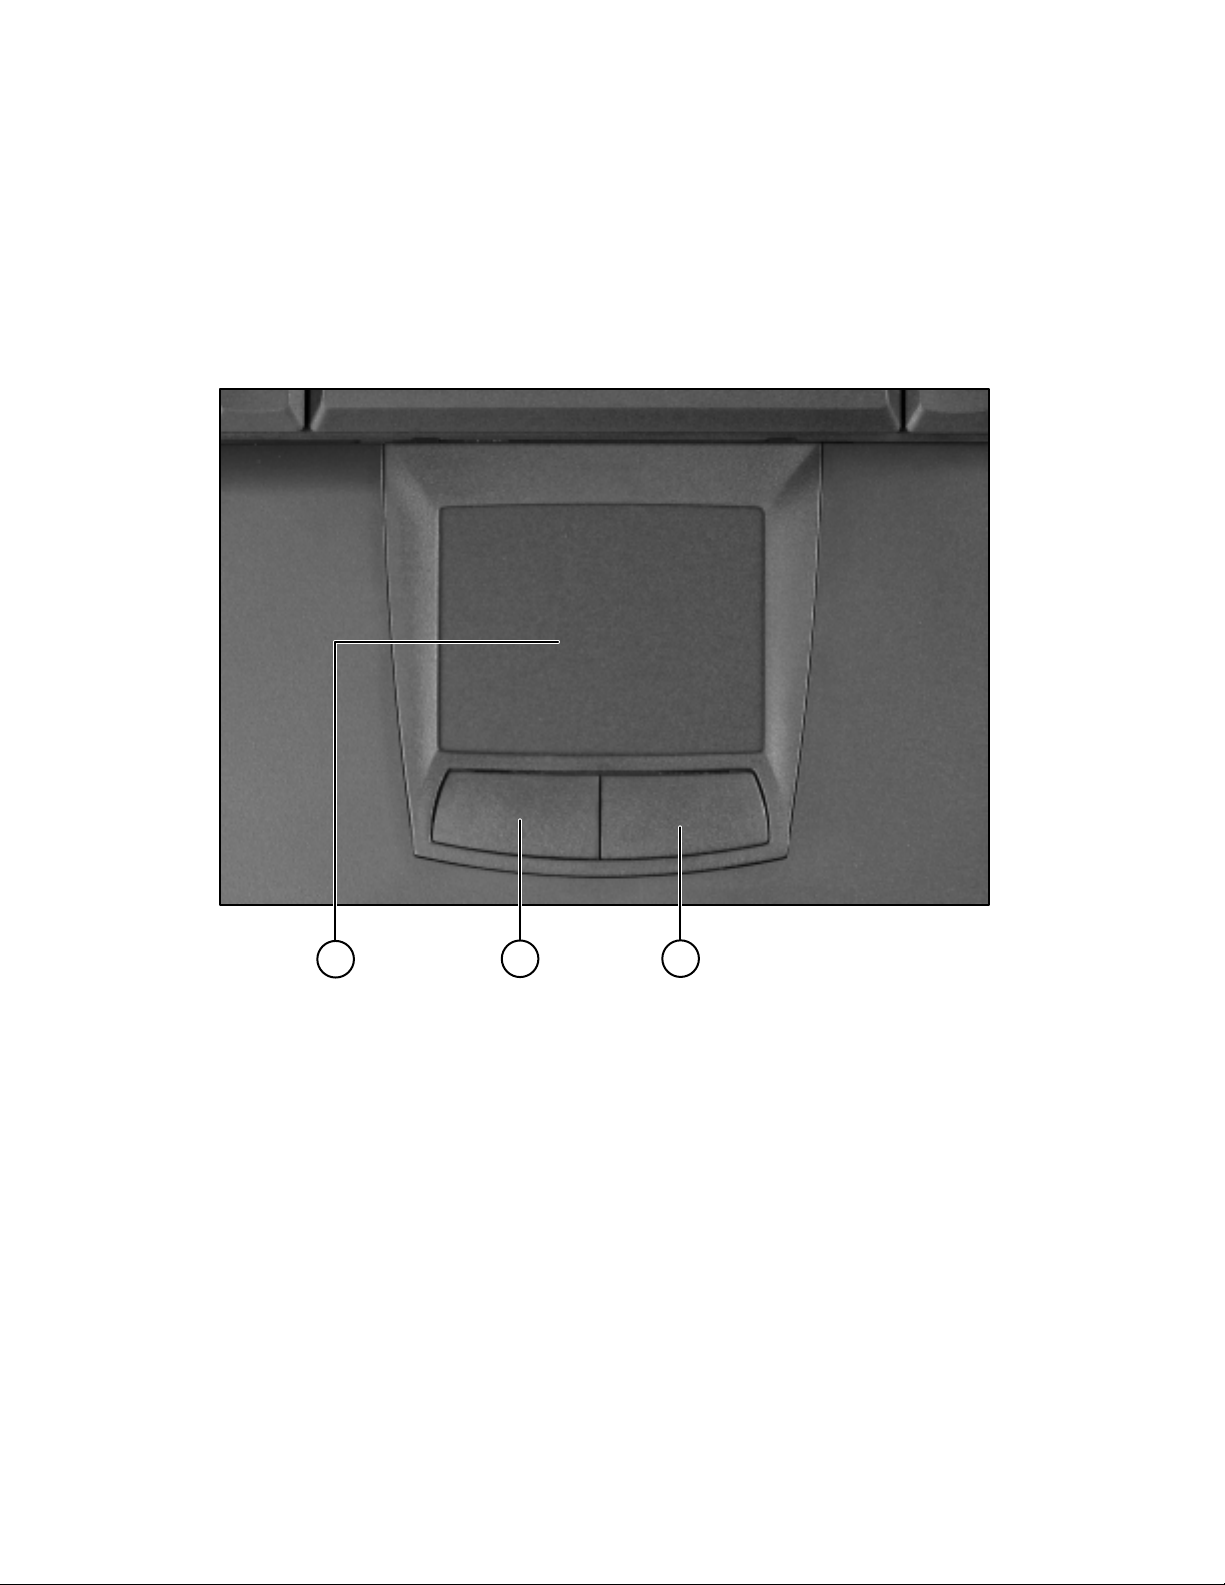
Using the EZ Pad touchpad
Like a mouse, the EZ Pad® touchpad pointing device controls the pointer
movements on the display. You can also use an external mouse.
A
A EZ Pad touchpad
B Left EZ Pad button (for left mouse clicks)
C Right EZ Pad button (for right mouse clicks)
8 Getting Started
B
C
Page 12
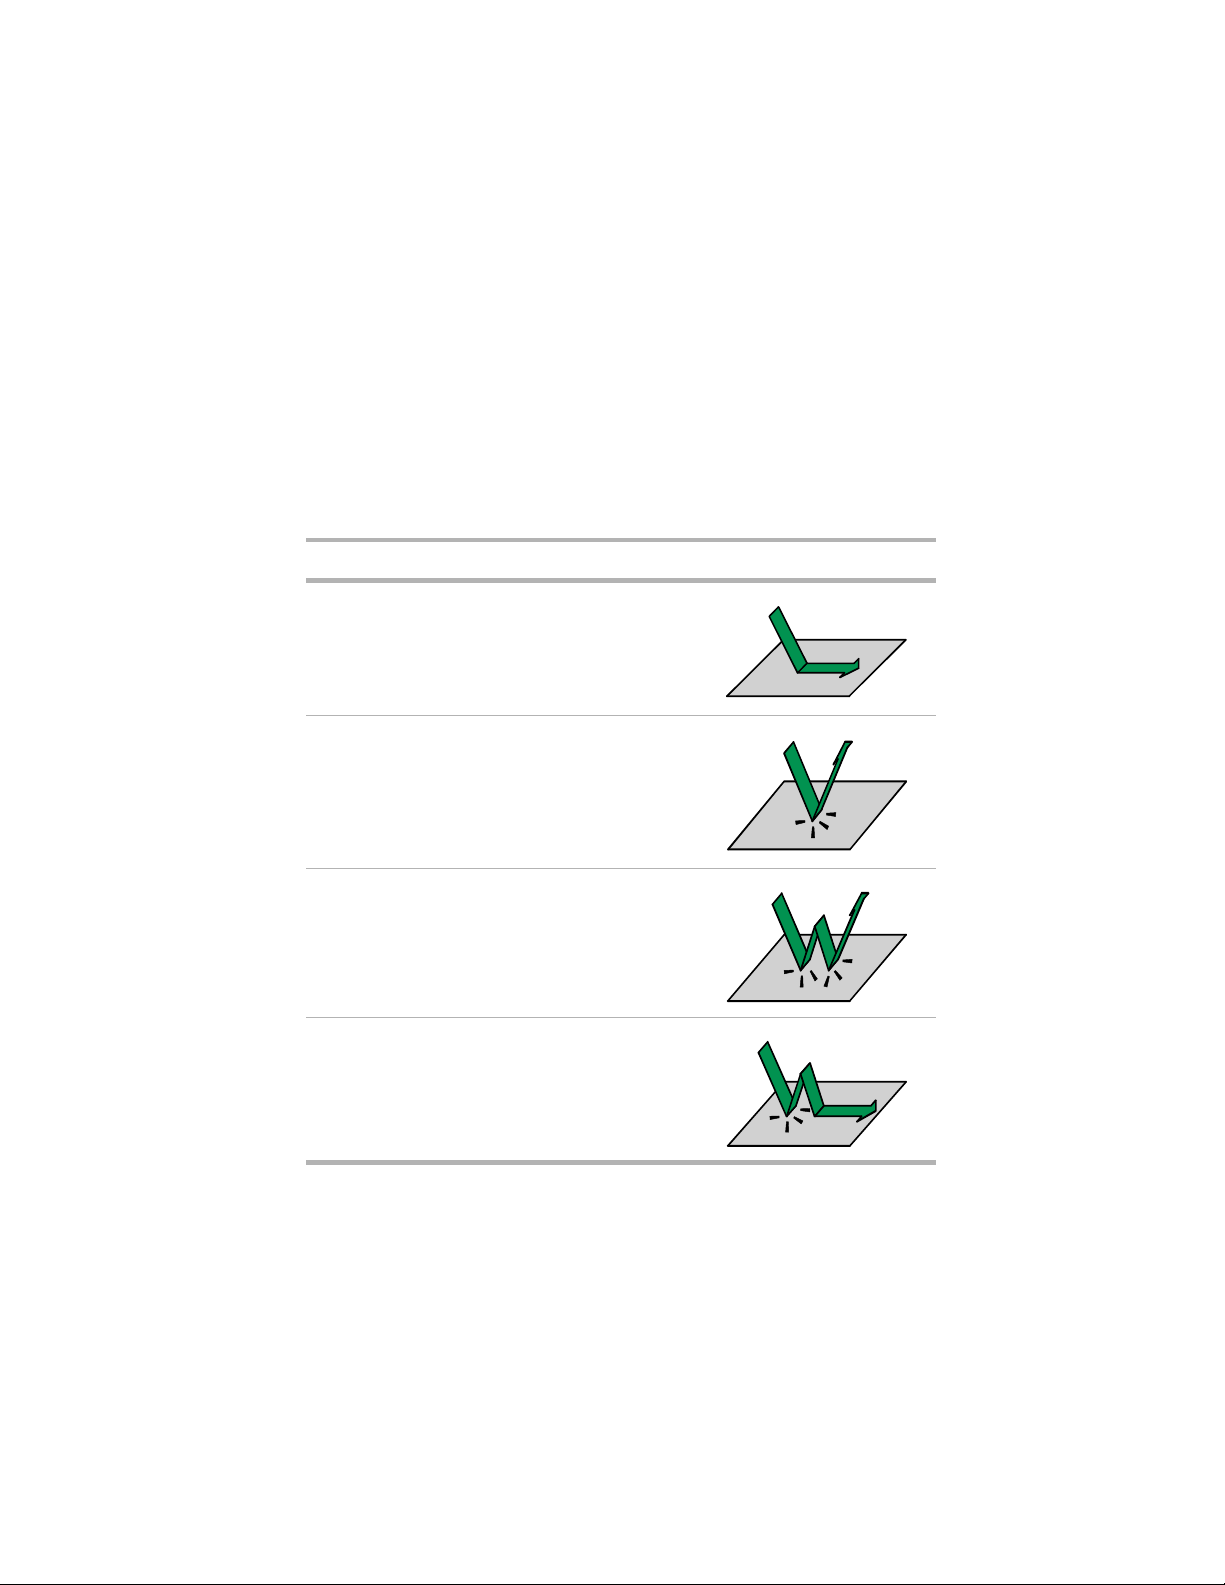
Mouse and touchpad action equivalents
This touchpad uses one surface for both mouse and wheel actions, which
means you can perform all of the wheel mouse actions without using the
buttons on the notebook.
When your finger reaches the edges of the touchpad, you can continue to
move the pointer an d drag objects. You can also move horizontally and
vertically without being constrained by the size of the touchpad. This is
especially useful when dragging objects and selecting text becaus e there is no
need to remove your finger until the action is complete.
To... ...do this:
Move pointer Slide finger.
Left button click Tap one finger.
Left button
double-click
Left button drag Double-tap and drag.
Double-tap one finger.
Using the keyboard 9
Page 13
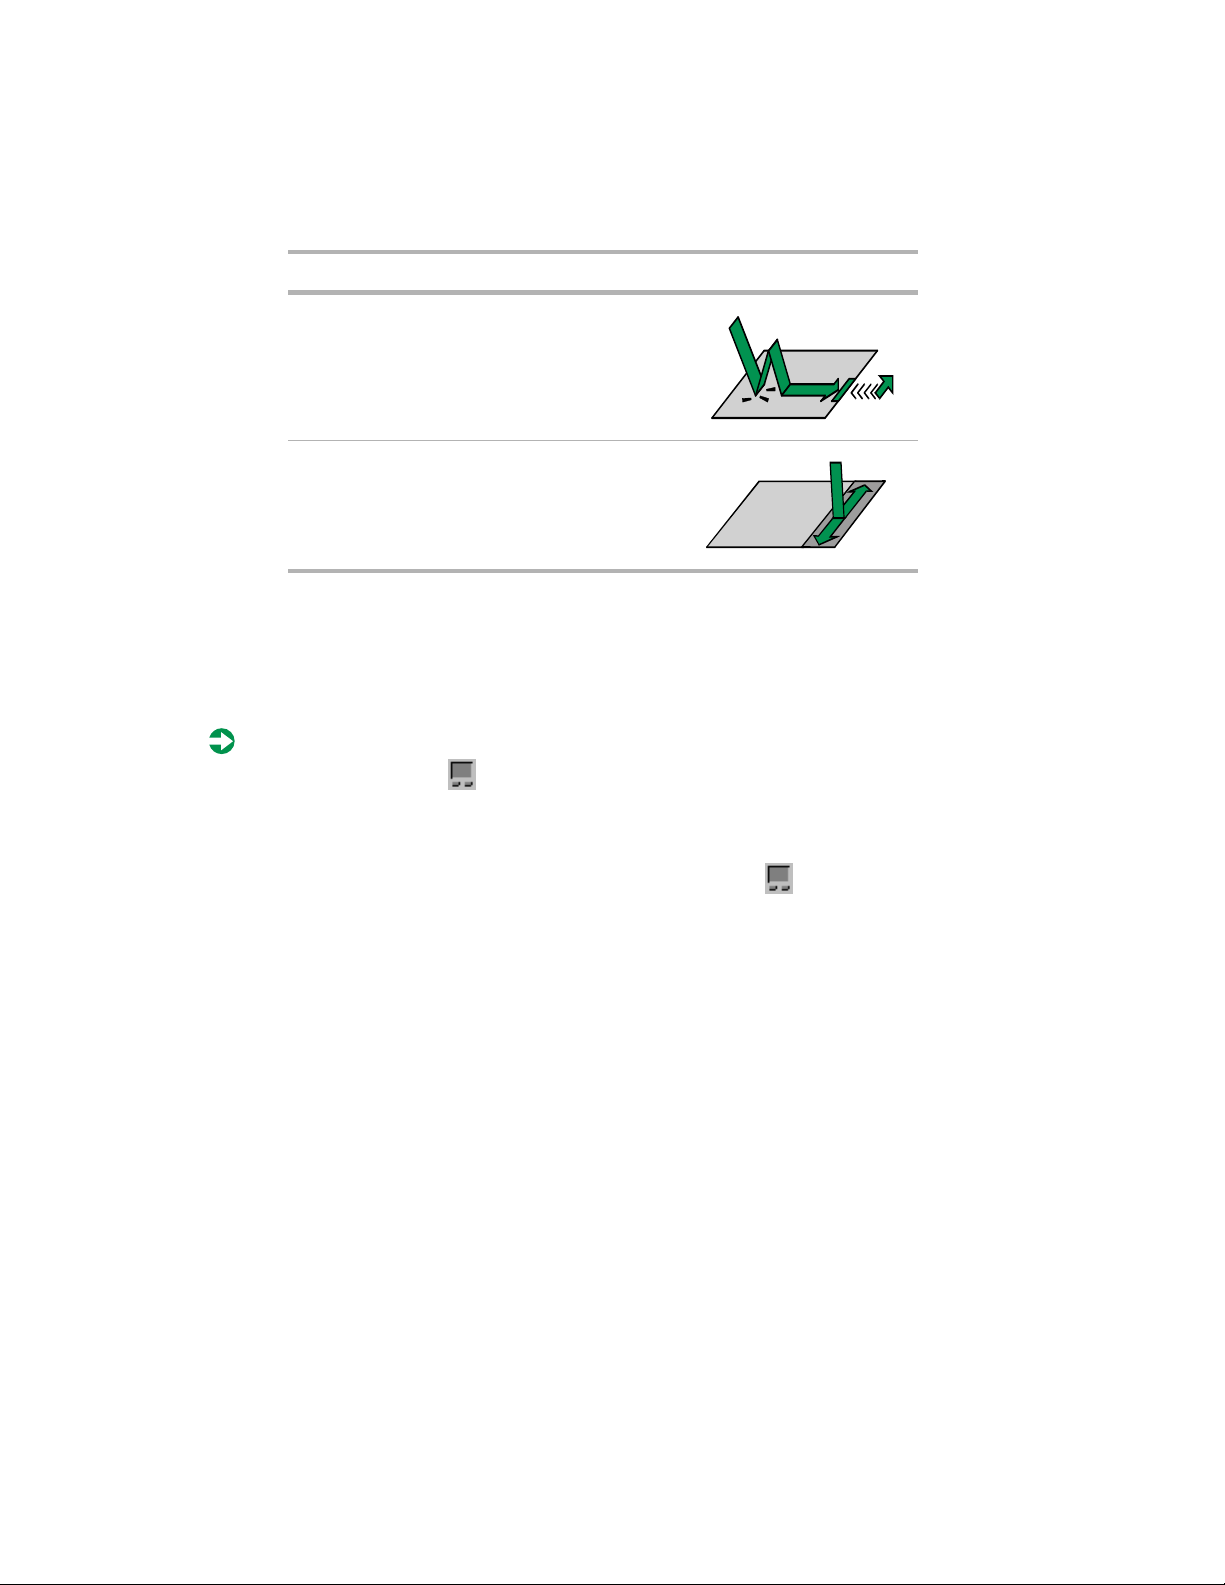
To... ...do this:
Use smart Edges Double-tap and drag.
When your finge r stop s
at an edge of the
touchpad, the pointer
continue s moving
across the s creen.
Scroll up and down Place finger on right
edge of the touchpad
and move up/d own.
Changing touchpad properties
Use the following procedure to change EZ Pad properties including pointer
size, button assignments, pointer speed and acceleration, scrolling speed, and
edge motion.
To customize the EZ Pad touchpad:
1 Double-click on the taskbar. The Mouse Properties window opens.
2 Click a tab in the Mouse Prop erties window , then customize the touchpa d
functions.
To find more help about using the touchpad, click on the taskbar, then
Help.
select
Using an external mouse or keyboard
Y ou can attach an external mouse or keyboard to the notebook using the PS/2,
USB, or serial port. You do not need to shut down the notebook before
connecting to an external P S/2 mouse or keyboard.
10 Getting Started
Page 14
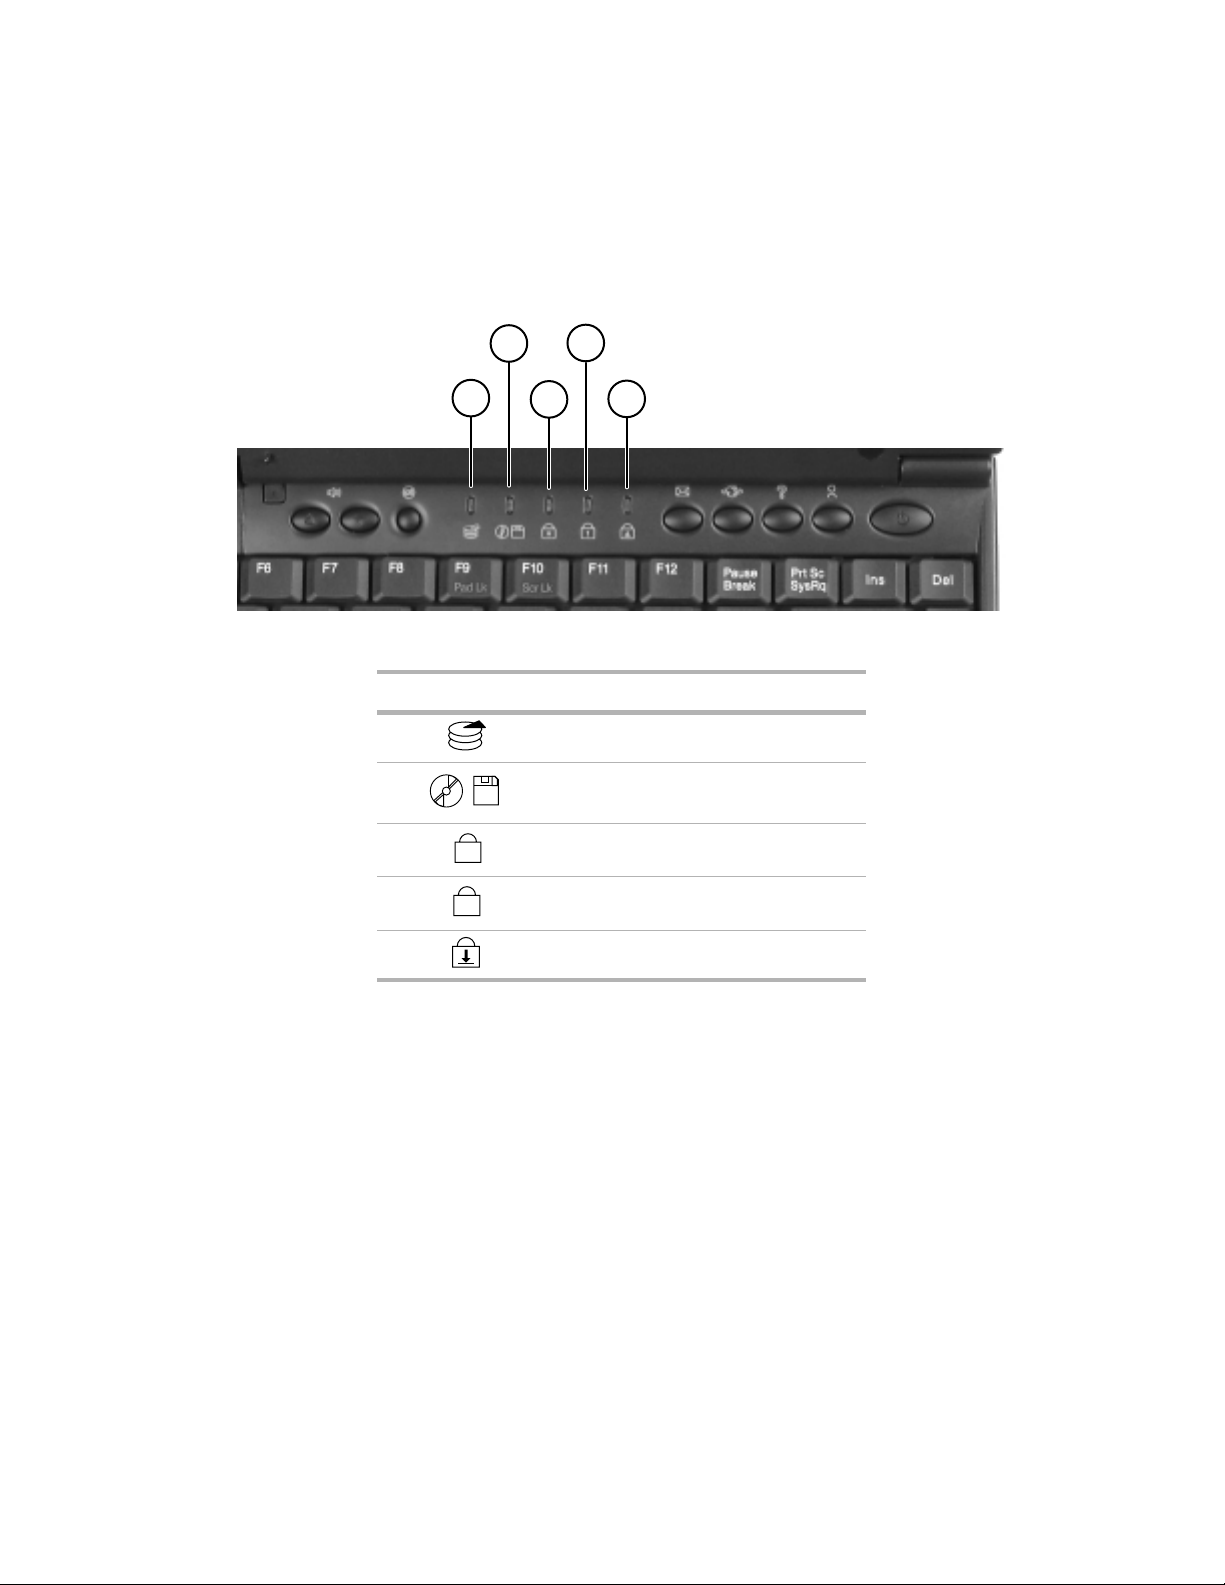
System status indicators
A
B
A
This light... turns on when...
A The hard disk is accessed.
B The diskette drive, ZIP drive, or CD/DVD
C The Caps Lock is enabled.
D The Pad Loc k is enabl ed.
1
D
C
drive is accessed.
E
E The Scroll Lock is enabled.
Using the keyboard 11
Page 15
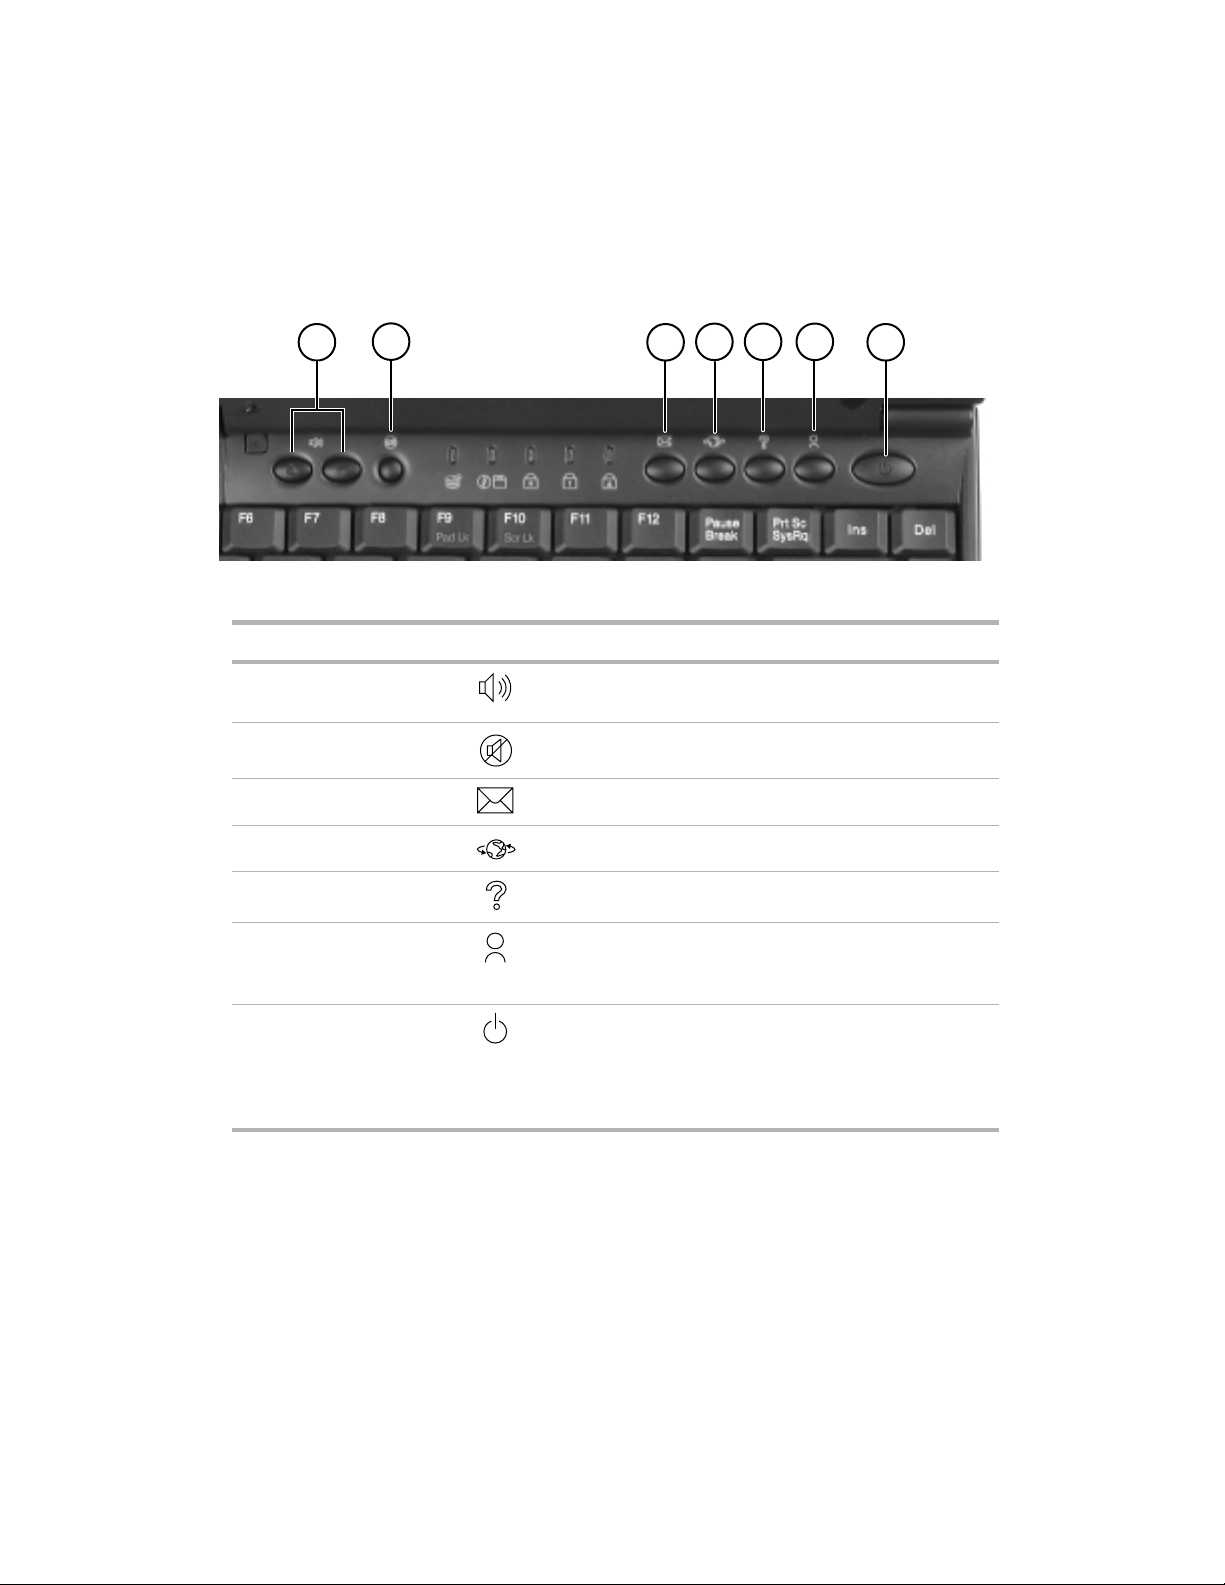
Multi-function buttons
A
Button Icon Description
A Volume controls Adjust volume. Left button increases volume. Right
B Mute Turns off all sound. Press again to turn sound on.
C E-mail Launches an e-mail program.
D Web browser Launches your Web browser.
E Help Launches Help.
B
D
C
button decreases volume.
E
F
G
F Shortcut Launches a prog ram you specify. To pro gram this button
to launch a specific program, see “Customizing the
multi-function buttons” on page 20.
G Power Turns power on and off. Can also be configured to
Standby/Resume mode or Hibernate mode. For more
information on mapping the power button to power
saving mod es, see “To change advanced p ower
managemen t settings :” on page 4 8.
12 Getting Started
Page 16
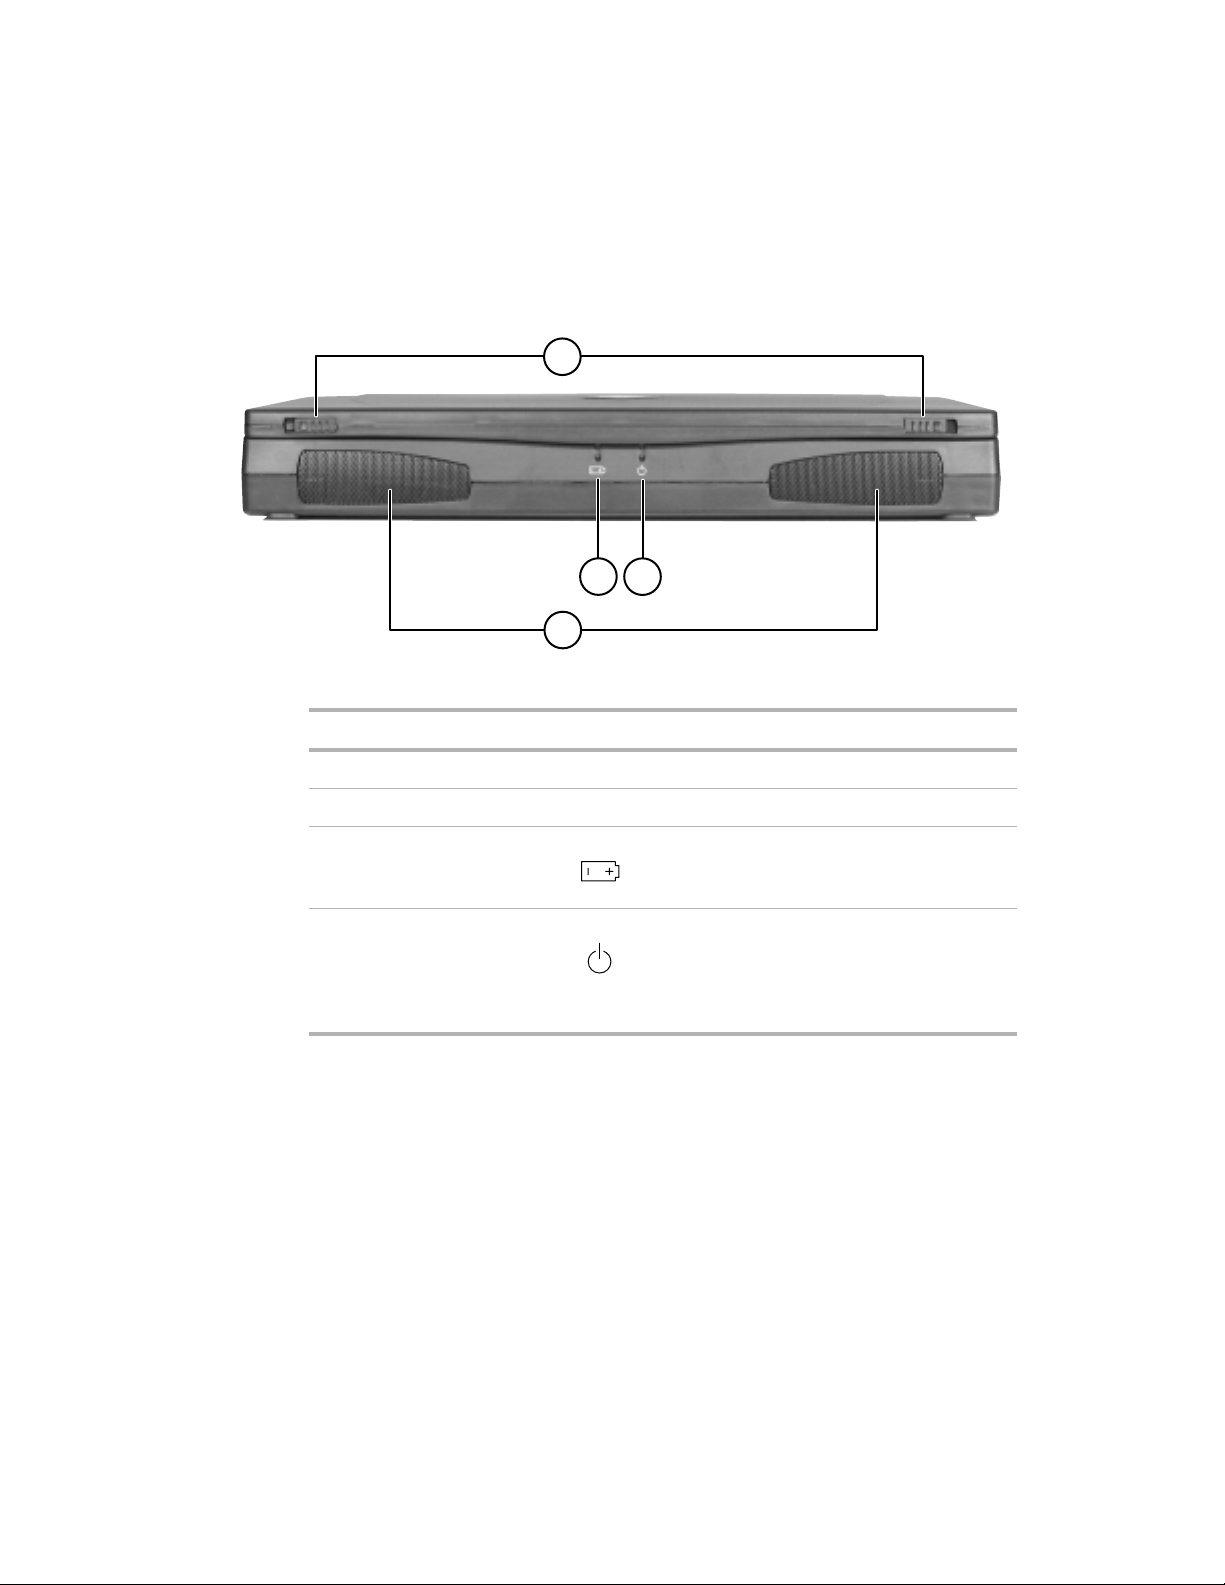
Front
[
Component Icon Description
A Release latches Release the LCD panel.
B Speakers Provide stereo output.
A
B
C
D
C Battery indicator light Indicates battery charge status:
D Power indicator light Indicates notebook power status:
■
Green – Battery is fully charged.
■
Orange – Bat tery is charg ing.
■
Steady – Po wer is o n.
■
Blinking – Notebook is in Standby mode.
■
Off – Po wer is of f o r syst em is in Hibe rnat e
(save to disk) mode.
Front 13
Page 17
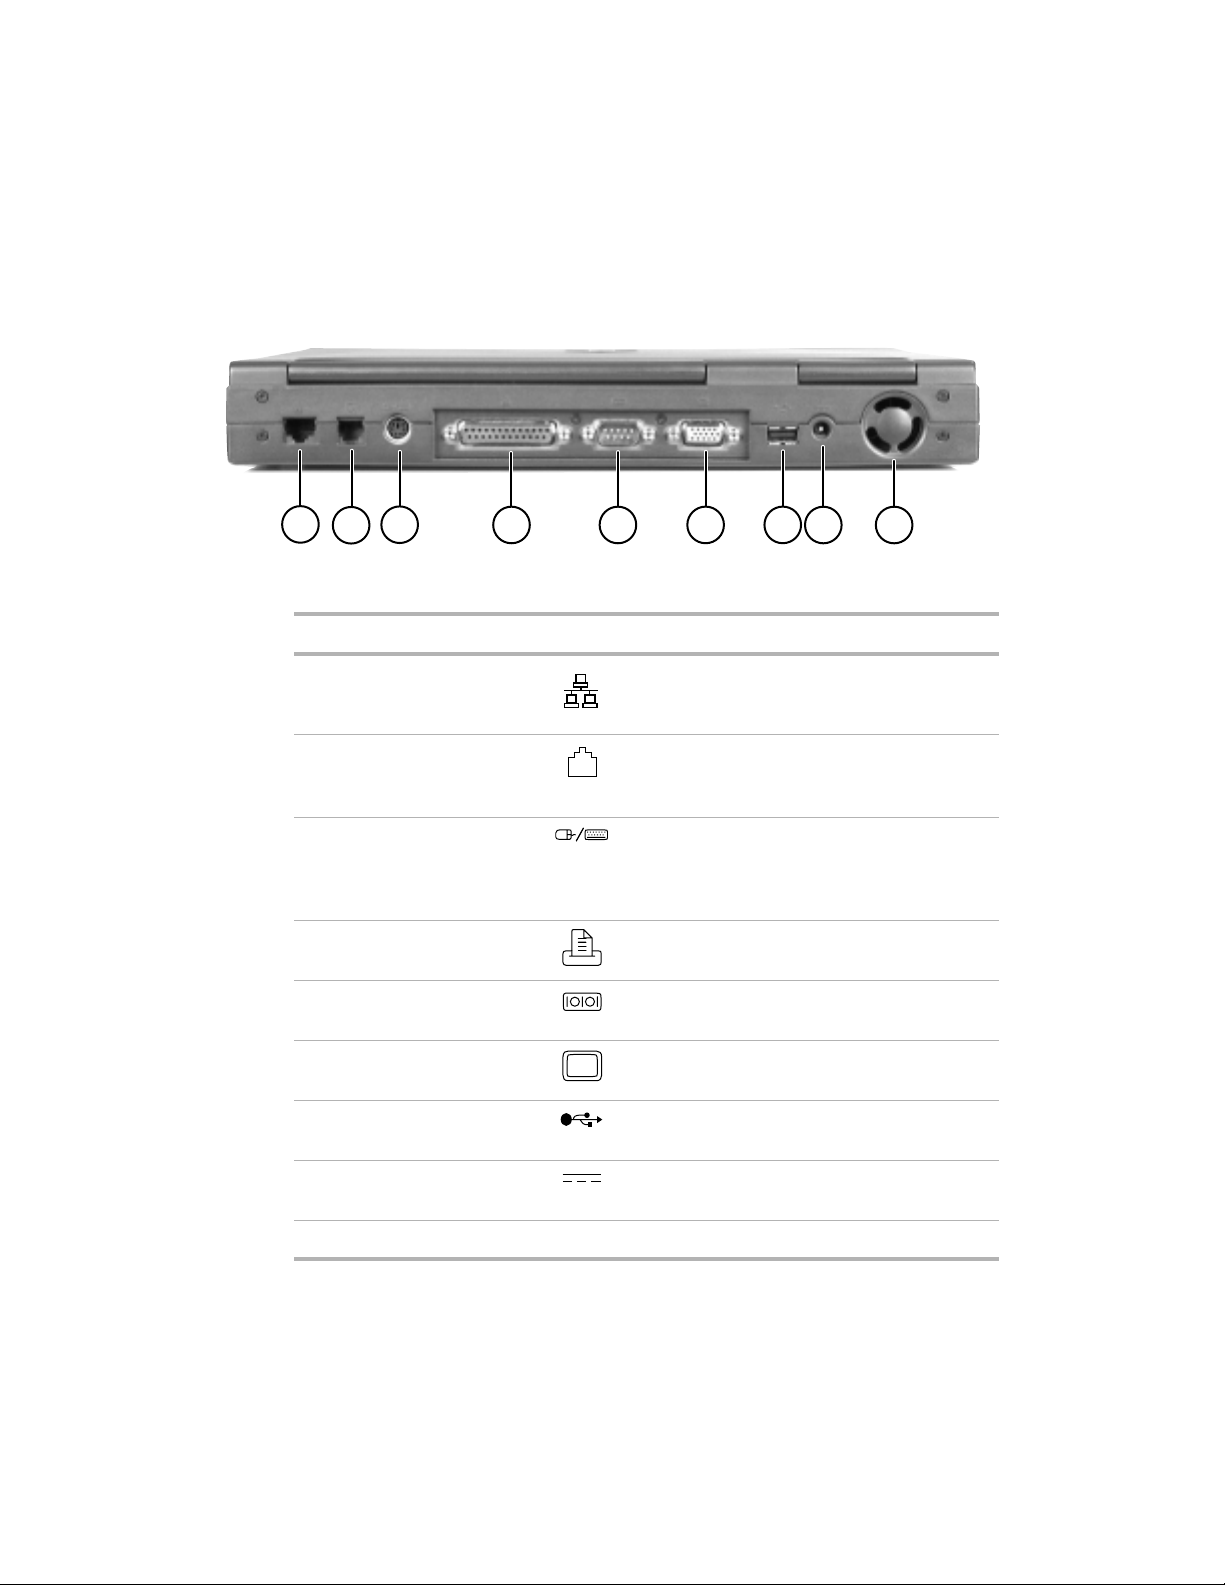
Back
A
Component Icon Description
A Network jack Provides an Ethernet 10/100 c onnec tion to a
B Modem jack Connects the built-in modem to an analog
C Keyboard or mouse port Connects your notebook to an ex tern al PS/2
D Parallel port Connects your notebook to a parallel device ,
E Serial port Connects your notebook to a serial device,
F External monitor port Connects your notebook to an external VGA
B
C
D
E
network.
phone system using a standard telephone
cable.
keyboard or mouse. With a PS/2 Y-splitter,
you can connect an external mouse and
keyboard at the same time.
such as a printer.
such as a serial mouse.
monitor using an analog video cable.
F
G
IH
G USB port Connects your notebook to a USB device,
H Power connector Connects your notebook to the Gateway
I Cooling fan outlet Helps cool internal components.
14 Getting Started
such as a USB scanner.
Solo 2150 AC adapter.
Page 18

Right side
A
B
D
Component Icon Description
A Diskette drive Accepts standard 3.5-inch diskettes.
B Diskette activity light Indicates diskett e activity . While this light is
C Diskette eject button Ejects a diskette from the drive.
D CD/DVD or ZIP drive The CD/DVD drive accepts all CDs. The
E
C
F
G
H
on, do not eject the diskette.
DVD drive also accepts DVDs. The ZIP
drive accepts only ZIP disks.
I
J
E CD/DVD activity light Indicates CD/DVD activity. While this light
is on, do not open the drive tray.
F CD/DVD eject button Ejects the CD/DVD drive tray.
G CD/DVD manual tray
release
H Hard drive face plate Provides access to the hard drive.
I Microphone In Connects your notebook to an external
J Speaker
Out/Headphone jack
Lets you open the CD/DVD drive tray
manually using a straightened paper clip.
microphone.
Connects y our note book to ex ternal
speakers or headphones.
Right side 15
Page 19
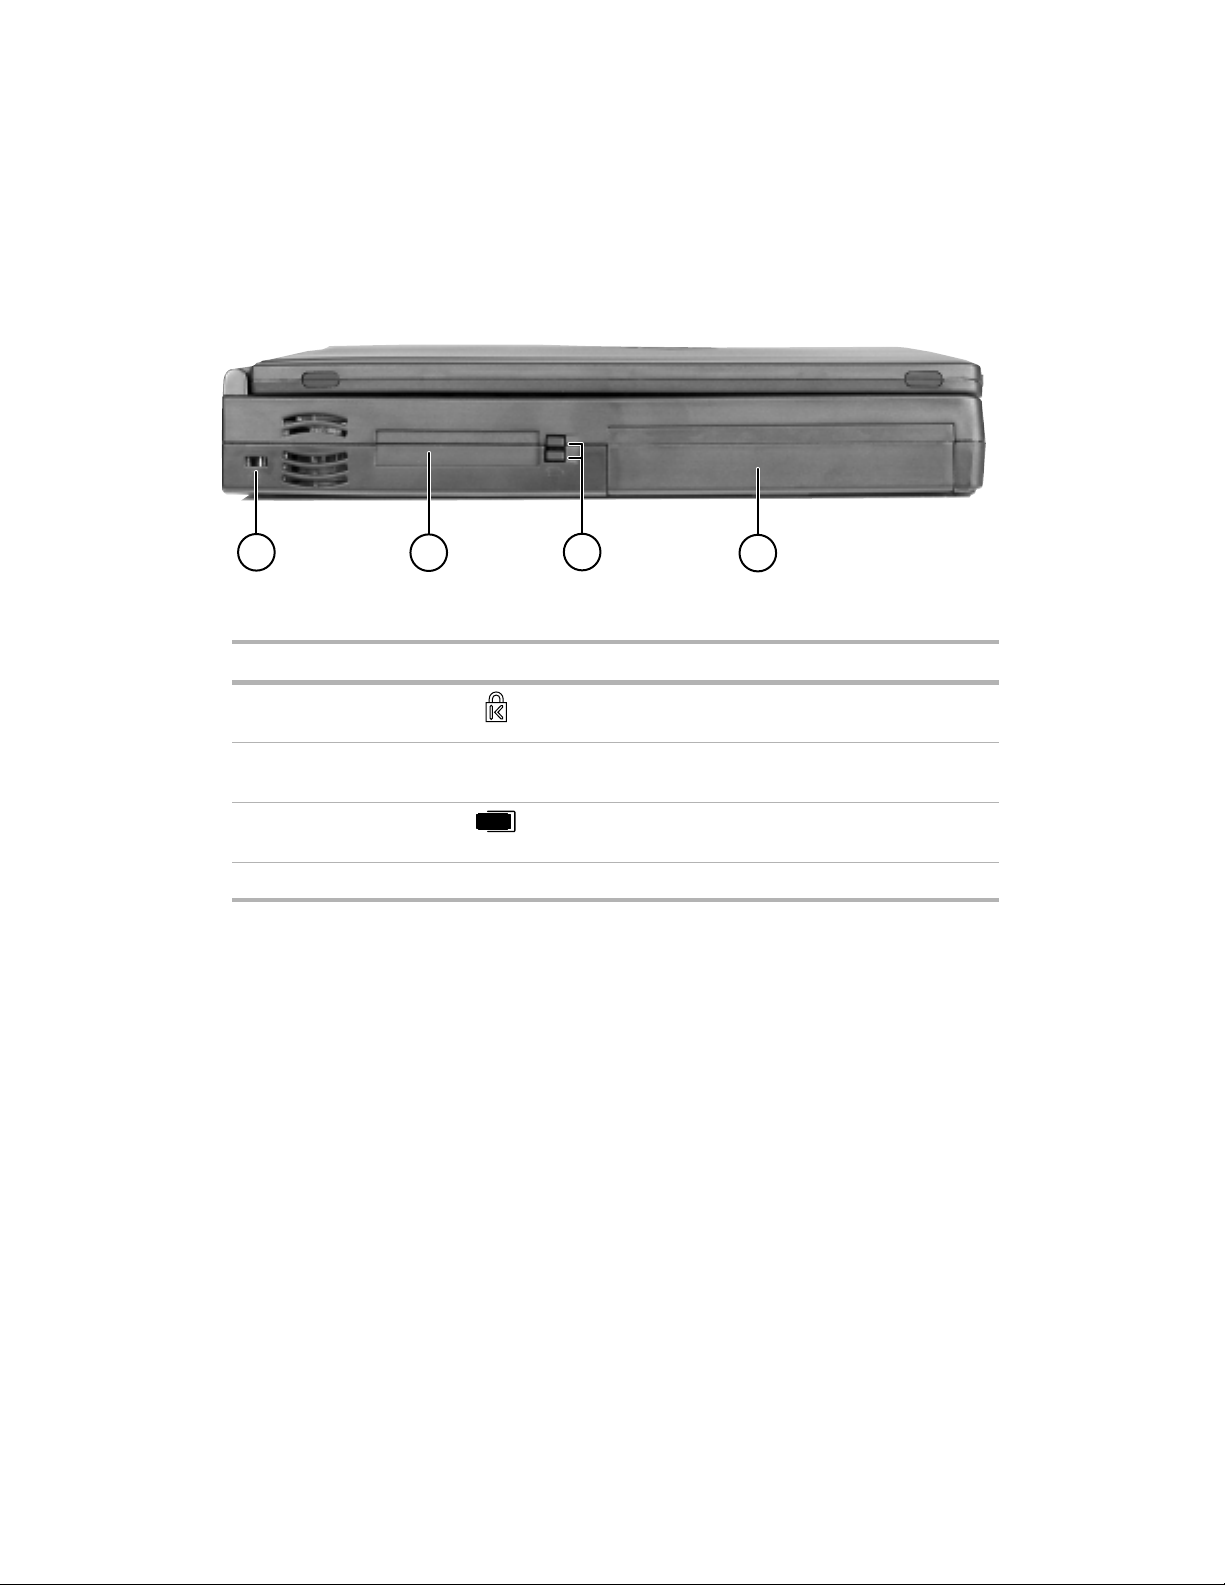
Left side
A
Component Icon Description
A Kensington lock slot Used with a Kensington cable lock to secure your
B PC Card slots Accept one T ype III PC Card o r two T ype I or II PC Car ds.
C PC Card eject
buttons
D Battery bay Contains the battery for power and for charging.
B
C
notebook to a heavy or immovable object.
For more information, see “Using PC Cards” on page 30.
Eject PC Cards from PC card slots.
D
16 Getting Started
Page 20
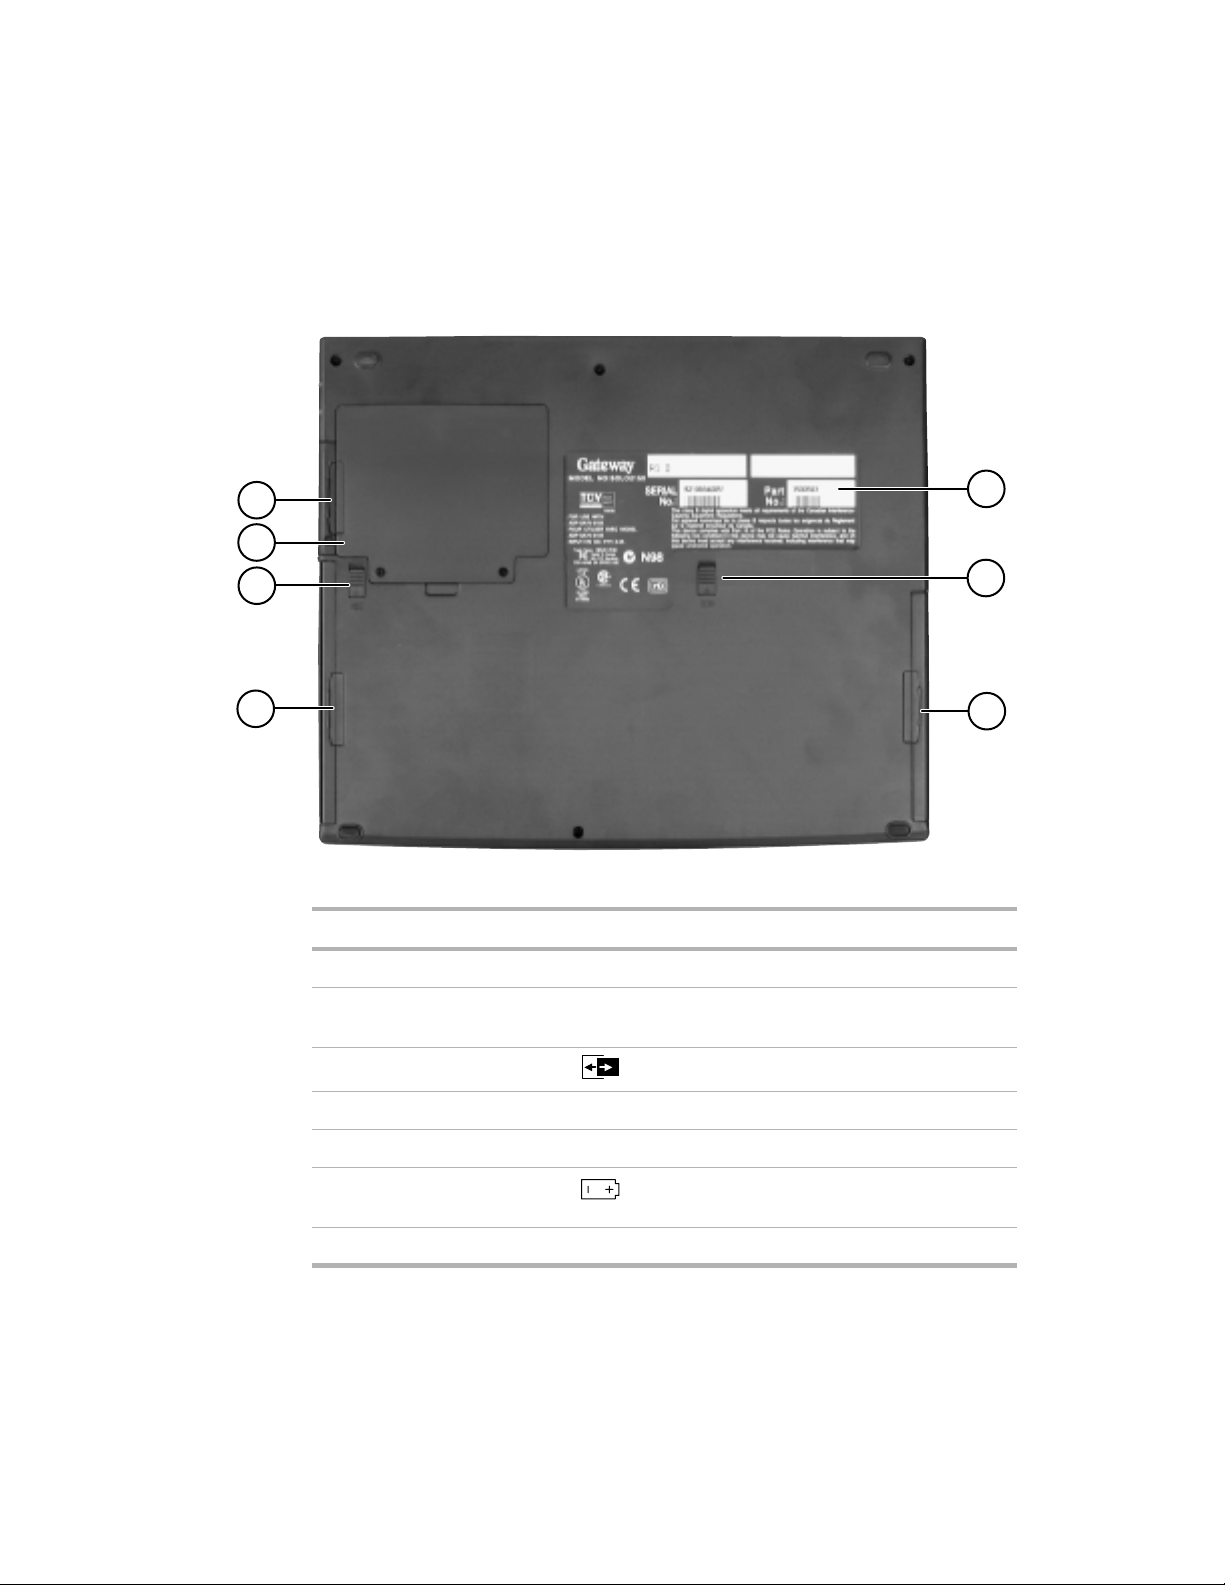
Bottom
A
B
C
D
G
F
E
Component Icon Description
A Hard drive face plate Provides access to the hard drive.
B Memory bay Memory bay contains one SO-DIMM memory
module slot.
C Modular bay latch Releases the CD/DVD or ZIP drive.
D Modular bay Contains a CD/DVD drive or ZIP drive.
E Battery bay Holds the battery.
F Battery release latch Releases the battery so you can swap it for
a fully charged battery.
G System label Provides system information.
Bottom 17
Page 21

Accessories
Gateway offers many accessories that can help you make the most of using
your Solo notebook:
■ Batteries
■ Automobile/airplane power adapters
■ Memory modules and hard drives
■ External keyboards and speakers
■ Modem and network cards
■ Tape backup units
■ Carrying cases
■ Printers
■ Software
Important For more information on these or other Gateway
accessories for your noteb ook, vis it the Gateway Web site
at www.gateway.com or call 800-846-2000.
18 Getting Started
Page 22

Using Y our
Notebook
This chapter provides information on using your Gateway computer . Read this
chapter to find out how to:
■ Adjust the display panel angle and brightness
■ Use and program the multifunction buttons
■ Use the diskette and CD/DVD drives
■ Record and play audio files
■ View video files
■ Connect the modem
■ Install PC Cards
■ Replace the battery
■ Swap drive modules
■ Replace the har d drive
2
19
Page 23

Adjusting the LCD panel
Your notebook features a color LCD TFT panel that provides sharp resolution
and up to 16 million colors.
To adjust the viewing angle of the display:
■ Tilt the display panel forward or backward.
To control display brightness:
■ Press the FN key together with the up arrow or down arrow key.
This notebook is shipped with the “Auto dim with battery” feature
enabled. Auto dim cuts LCD power 50% when your notebook is operating
on battery power. To learn how to disable this feature, see “Changing
power settings” on page 45.
Customizing the multi-function
buttons
The Multi-function Keyboard utility lets you change the actions of some of
the multi-function buttons. For a description of the buttons, see
“Multi-function buttons” on page 12.
To program the multi-function buttons:
1 Click Start, then select Settings, then Control Panel.
2 Double-click the Multi-function Keyboard icon. The Gateway
Multi-function Keyboard utility window opens.
3 Click the tab for the button to change which program each button starts.
20 Using Your Notebook
Page 24

Using diskettes
The diskette drive uses 3.5-inch diskettes (sometimes called floppies or floppy
disks). Diskettes are useful for saving files for archive purposes or to use on
another computer.
Warning Do not expose diskettes to water or magnetic fields.
Exposure could damage the data on the diskette.
To use a diskette:
1 Insert the diskette into the diskette drive with the label facing up.
2 To access a file on the diskette, use a pro gram to view the drive A:
contents, then locate and open the file.
3 T o remove the diskette, make sure the drive activity light is off, then press
the diskette eject button. The diskette is ejected from the drive.
Using diskettes 21
Page 25

Using the CD/DVD drive and
multimedia features
You can use your computer to enjoy a wide variety of multimedia (audio and
video) features, such as making recordings, listening to audio CDs, and
watching DVD mo vies.
Inserting a CD/DVD
To insert a CD/DVD:
1 Press the eject button on the CD/DVD drive, then pull the disc tray
completely open.
2 Place the CD/DVD in the tray with the label side up, then press down
carefully on the disc until it snaps into place.
3 Push the tray in until it closes.
Adjusting the volume
Y ou c an use the volume controls to a djust the overall volume and the volume
of specific sound devices in your computer.
To adjust overall volume level:
■ Click the volume control icon on the taskbar, then drag the slider to
change the volume or s elect the
- OR On the keyboard, press the volume buttons to change the volume,
or press the mute button to turn off all sound.
22 Using Your Notebook
Mute check box to turn off all sound.
Page 26
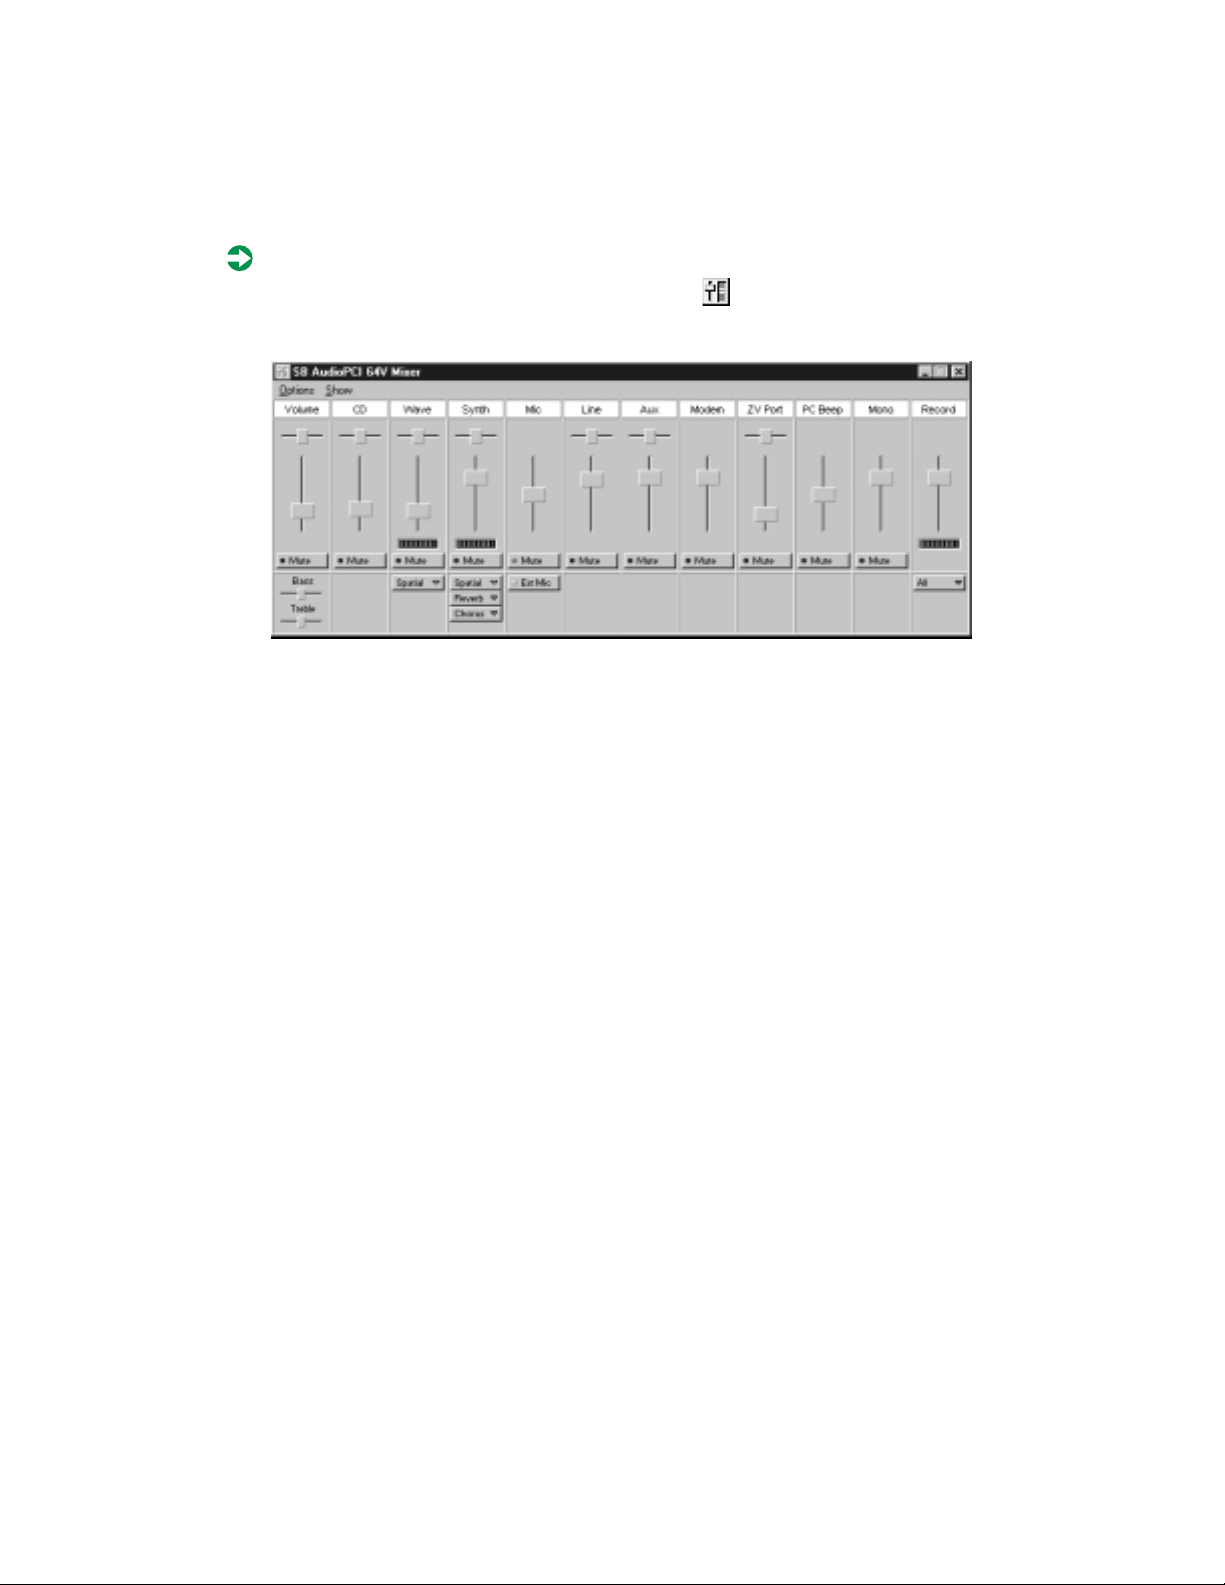
To adjust specific volume levels:
1 Double-click the volume control icon on the taskbar. The
SB AudioPCI 64V Mixer dialog box opens.
2 Drag the volume level and balance sliders for the device you want to
adjust, then close the window. For more information about the volume
controls, select
Help in the Volume Con trol dial og box.
Using the CD/DVD drive and multimedia features 23
Page 27
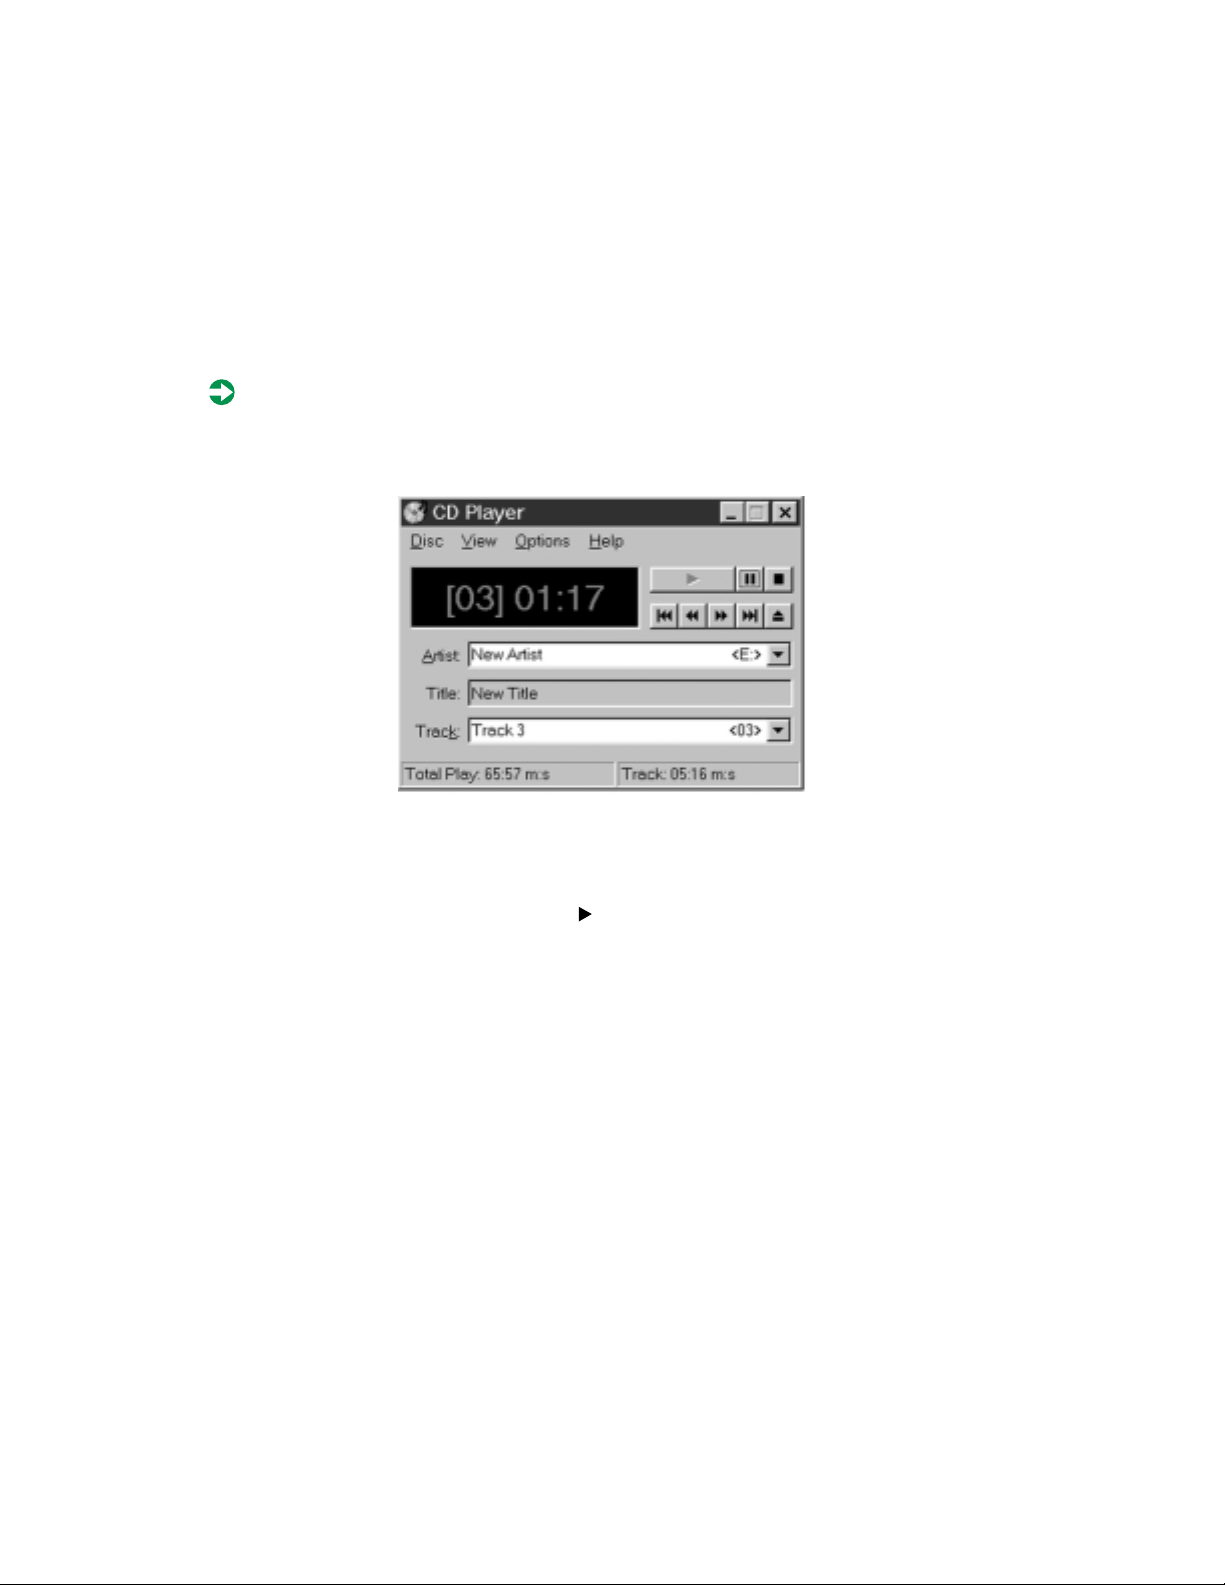
Listening to audio CDs
Use the CD/DVD drive and the Windows CD Player to play, pause,
fast-forward, rewind, or go to the next or prev ious track on any audio CD.
To play a CD:
■ Insert an audio CD into the CD/DVD drive. The CD Player opens and
the CD plays.
If the CD Player do es not open automatically when you insert the CD,
open it from the Start menu by clicking
Accessories, Entertainment or Multimedia, then CD Player. When the
CD Player opens, click the (play) button.
Start, then selecting Programs,
If you do not hear the audio or you want to increase or decrease the volume,
see “Adjusting the volume” on page 22 .
24 Using Your Notebook
Page 28

Recording and playing audio files
Use the instructions below to make an audio recording by speaking into the
microphone.
To make an audio recording:
1 Click Start, then select Programs, Accessories, Entertainment or Multimedia,
Sound Recorder. The Sound Rec order opens.
then
2 Click the (record) button, then speak into the microphone.
3 When you finish recording, click the (stop) button.
4 Select File, then Save As. The Save As dialog box opens.
5 Name the recording, specify the path, then click Save. The recording is
saved.
To play an audio recording in the Sound Recorder:
1 Open the Sound Recorder.
2 Select File, then Open. The Open dialog box opens.
3 Select the file you want to play back, then click Open.
4 Play the file by clicking the (play) button, then stop playing the file
by clicking the (stop) button.
Using the CD/DVD drive and multimedia features 25
Page 29

Using the Media Player
The Media Player can play several types of audio and video files, including
WAV, MIDI, MP3, AU, AVI, MPEG, and MOV formats.
To play a file using the Media Player:
1 Click Start, then select Programs, Accessories, Entertainment or Multimedia,
Media Player. The Media Player opens.
then
Stop
Play
Pause
Video
screen
Video file
information
2 Select File, then Open. The Open dialog box opens.
3 Select the file you want to play, then click Open.
4 Play the file by clicking the (play) button, then stop playing the file
by clicking the (stop) button.
For more informa tion abou t the Med ia P layer, select
26 Using Your Notebook
Help.
Page 30

Playing a DVD
A Digital Versatile Di sc (DVD) is similar to a standard CD but has greater data
capacity. Because of this increased capacity, full-length movies, several albums
of music, or several gigabytes of data can fit on a single disc. If your computer
has a DVD drive, you can p lay DVDs on the DVD Player software.
Important Y ou should disa ble your syst em screen sav er and standby
To play a DVD:
1 Make sure that the speakers are turned on or the headphones are plugged
in and that the volume is turned up.
2 Click Start, then select Programs, DVD Player, then DVD Player. The
DVD Player v ideo screen and control panel open.
- OR If you have the optional Margi™ DVD-to-Go™ card and playe r, insert
the DVD-to-Go card into the lower PC Card slot and click
Programs, Margi, then DVD-to-Go.
select
timers to prevent interruption while playing a DVD movie.
Start, then
3 Insert a DVD into the DVD drive, then click the (play) button. The
DVD plays.
4 To control the DVD or adjust the volume, use the controls in the DVD
player. For more information on using the DVD player, see its online help.
Using the CD/DVD drive and multimedia features 27
Page 31

Connecting the modem
Your notebook came with a built-in V.90 56K modem and a telephone cable.
To connect the modem:
1 Insert one end of the telephone cable into the modem jac k on the back
of the notebook.
2 Insert the other end of the telephone cable into any analog telephone
wall jack.
3 Turn on your notebook.
4 Start your communications software.
For more information on using your notebook’s modem connections, see
Chapter 4, “Getting Online.”
28 Using Your Notebook
Page 32

Connecting the network
Y our notebook came with a built-in network port that connects to a ny 10/100
Ethernet network.
To connect the network:
1 Insert one end of the network cable into the network jack on the back
of the notebook.
2 Insert the other end of the network cable into a network jack. Ask your
network system administrator to help you select the correct network jack.
Y our notebook is now phy sically connected to the ne twork. Y our network
system administrator can help you log on to establish an active network
connection.
Connecting the network 29
Page 33

Using PC Cards
The PC Card slots (also known as PCMCIA card slots) are located on the left
side of your notebook. Install Type I or Type II PC Cards in either the top or
bottom PC Card slot. Install Type III PC Cards (such as Zoomed Video or DVD
decoder cards) in the bottom PC Card slot.
These PC Cards can be used in your notebook:
■ PC Card 16
■ PC Card 32 (CardBus)
■ Zoomed Video cards (in bottom slot only)
You do not need to restart your notebook after changing most cards because
your notebook supports hot-swapping (the ability to insert a PC Card while
your notebook is running). If your PC Card does not work after hot-swapping,
refer to the PC Card manufacturer’s documentation for further information.
To insert a PC Card:
1 Insert the PC Card with the label facing up.
30 Using Your Notebook
Page 34

Slide the card firmly into the PC Card slot until it is flush with the side
2
of the notebook.
3 Follow the Windows Setup Wizard installation steps the first time you
insert a PC Card. Operate the device as recommended in the guide that
came with your PC Card.
To remove a PC Ca rd:
1 Click the PC Card icon in the taskbar.
2 Click the card you want to remove.
3 Click OK.
4 Release the eject button by pressing the PC Card eject button once.
5 Eject the PC Card by pressing the eject button again.
6 Reset the eject button by pressing the PC Card eject button again.
Using PCCards 31
Page 35

Using the USB port
The Universal Serial Bus (USB) port lets you connect devices such as mice,
joysticks, keyboards, scanners, video conferencing cameras, and speakers that
traditionally have required their own specific ports.
To set up a USB device:
1 Connect the device to the USB port. The USB-compatible device is
automatically recognized and installed by the system.
2 If additional drivers or disks are r equired, follo w the on -screen p rompts
to complete the installation.
32 Using Your Notebook
Page 36

Changing batteries
Important Batteries must be changed while the system is turned off
or in Hibernate mode. If the power is on during battery
swapping, the computer turns off and you lose any
unsaved work.
Warning Danger of explosion if battery is incorrectly replaced.
Replace only with the Gateway Solo 2150 Li-Ion battery.
Discard used batteries according to the manufacturer’s
instructions.
The battery used in this device may present a fire or
chemical burn hazard if mishandled. Do not disassemble,
heat above 212° F (100° C), or incinerate. Dispose of used
battery promptly. Keep away from children.
To replace the battery:
1 Save all work and turn off your notebook.
2 Close the cover and turn your notebook over.
Changing batteries 33
Page 37

3 Slide the battery release latch forward and hold it while sliding the battery
straight out from the notebook.
4 Slide the recharged ba ttery into the bay and sn ap it into place.
5 Turn the notebook right side up, then open the cover.
6 Press the power button. The notebook restarts.
34 Using Your Notebook
Page 38

Changing option bay modules
Your notebook has an option bay that can hold a CD drive, DVD drive, or
ZIP drive.
Important When changing modules, you must shut down your
notebook before replacing the module and restart the
notebook after the new modul e is corre ctly in stalle d. If the
computer is already o ff, make sure it is not in Hibernat e
mode and that Windows is completely shut down.
To swap option bay modules:
1 Save all work and turn off your notebook. Make sure the notebook is
actually off, and not in Hibernate mo de. For more information on
Hibernate mode, see “Changing settings in Windows 98” on page 45.
2 Close the cover and turn your notebook over.
3 Slide and hold the option bay latch open, then pull the module straight
out and away from your notebook.
Changing option bay modules 35
Page 39

4 Firmly push the new module straight into the bay until the latch clicks
into place.
5 Restart your notebook.
36 Using Your Notebook
Page 40

Upgrading memory
To add a memory (RAM) module, you must access the memory bay. Your
notebook has one memory slot that accepts one SO- DIMM memory mo dule.
If you want to use Hibernate (Save to Disk) mode to save power, you must
run a memory configuration utility after changing the memory. For more
information on Hibernate mode, see “Changing settings in Windows 98” on
page 45.
Caution Disconnect all powe r suppl y cord s and remov e the batte ry
before the memory bay cover is removed. Replace the
cover before you restore power.
To add a memory module:
1 Shut down the notebook, then disconnect the power cord and remove
the battery.
2 Turn the notebook over, then remove the two screws that secure the
memory bay cover.
Upgrading memory 37
Page 41

3 Remove the cover.
4 Remove the old memory module and insert the new one. For information
on adding or replacing memory modules, see “Adding or replacing
memory modules” in Maintaining and Troubleshooting Your Gateway Solo
Notebook.
5 After inserting the new module, replace the memory bay cover.
To run the memory utility:
1 Reconnect power and start the system. Press F8 while the system is
starting. The Startup Menu opens.
2 Select Command prompt only by pressing the down arrow key, then
pressing E
3 Type chks2d, then press ENTER. The Hibernate mode memory file is
regenerated.
4 Restart the computer.
NTER. The comman d prompt (C:\>) appears.
38 Using Your Notebook
Page 42

Replacing the hard drive
You can remove the hard drive from your notebook to swap it for a second
hard drive. If you add a new hard drive, use the documentation that comes
with the hard drive to prepare the drive for use.
Caution Do not expose the h ard dr ive t o liqui d
or magnetic fields. Exposure could
damage the data on the hard drive.
To replace the hard drive:
1 Save all work, then shut down your computer.
2 Close the cover and turn the notebo ok over.
3 Disconnect the AC power, then remove the battery. For instructions on
removing the battery, see “Changin g batteries” on page 33.
4 Remove the screw that holds the hard drive to the notebook case.
Replacing the hard drive 39
Page 43

5 Slide the hard drive kit out.
6 Slide the new hard drive kit into the notebook case.
7 Secure the hard drive kit to the notebook case with the single screw.
8 Turn on the notebook when you are ready to use it.
9 If this is a first-time installation, follow the instructions that came with
the hard drive to prepare the drive for use.
40 Using Your Notebook
Page 44

T ravel Tips
Use these ideas to make travelling with your computer more convenient and
trouble-free. When travelling without this manual or an Internet connection,
double-click the
information about your computer and how to solve common problems. This
chapter provides information on:
■ Using the modem
■ Transferring files
■ Protecting your computer from loss and theft
■ Efficiently managing your computer’s power
QuickAnswers icon on the Windows desktop for more
3
41
Page 45

Modem
■ Bring a telephone cord to connect the modem to any available telephone
jack. If travelling internationally, bring telephone jack adapters or an
acoustic handset coupler.
■ Bring a telephone line protector.
■ Bring a telephone line tester to check for unsafe lines, especially if
travelli ng inter nationa lly.
■ Bring remote access in formation with you so you can connect to your
ISP while outside of your usual calling area. A li st of country dialing codes
may be especially useful.
■ Download entire web sites that you frequently refer to for off-line viewing
if you will be travelling for extended periods without access to an Internet
connection.
■ If your modem has difficulty making a dialing connection, try picking
up a telephone handset and dialing the sequence your modem is
attempting. Dialing by hand may help diagnose where the automatic
dialing encounters problems:
■ If you do not get a dial tone, check for problems on the telephone
line.
■ If you get a busy si gnal, try dialing ag ain later.
■ If you hear an automated voice message that requires you to pause
42 Travel Tips
for several seconds between entered number sequences or change
the sequence of numbers, adjust the dialing sequences you have
programmed on your computer. If you need to program a pause
within a dialing sequence, use a comma to represent a two-second
pause.
Page 46

Files
■ Make copies of your working files from your desktop computer to your
notebook before you travel.
■ If you will need to access your desktop computer’s files from your
notebook while travelling, set up the desktop computer for remote access.
■ Bring diskettes to quickly transfer files between computers.
Security
■ Use a locking cable for your computer so you can leave your c omputer
in your hotel room while you are away. Your Gateway notebook has a
Kensington cable lock slot.
■ While waiting in airports, train stations, or bus terminals, always keep
your computer with you. While going through security checkpoints, be
ready to claim your notebook as soon as it passes through the x-ray
machine.
■ Before going to sleep in a public area, place your computer under your
arm or against your leg so that any attempt to take it awakens you.
■ Write down your computer’s model number and serial nu mber in case
of theft or loss, and keep the information in a safe place. Also, tape your
business card or an address label to your notebook and accessories.
■ Use a startup password to restrict access to your computer. You can often
find the password setup in the Security menu of the BIOS.
■ Remember that whoever sits next to you or behind you can see your
computer screen. Avoid working with confidential documents until you
can be sure of your pri vacy.
Files 43
Page 47

Power
To get the best performance out of the battery, use power sources other than
the battery, monitor the battery charge status, and use the most efficient
power management settings.
Use alternate power sources
■ Use your computer’s AC power adapter to charge your notebook’s battery
whenever possible. If travelling internationally, bring electrical adapters.
Save the battery for times when you cannot use a power adapter.
■ If you will have access to an EmPower™ in-flight power receptacle or an
automobile cigarette lighter, bring an airplane/automobile power adapter .
Save the battery for times when you cannot use a power adapter.
■ To use the power adapter in airports, look for AC power outlets next to
support pillars, in large areas such as boarding gates, and under banks
of telephones.
■ Bring a single-plug power surge protector.
■ Bring an extra battery for your notebook and fully charge all batteries
before leaving on your trip. For information on how to change the
battery, see “Changing batteries” on page 33.
Monitor the battery charge
Closely monitor the battery charge. When the battery charge gets low, change
the battery or connect to AC power immediately to prevent losing any
unsaved work. Monitor the battery charge by:
■ Positioning the cursor over the power cord icon or batter y icon in the
taskbar . A ba ttery status popup window app ears. Moving the cursor a way
from the icon closes the window.
■ Pressing Fn+F2 to view the Status pop-up display, which appears in the
upper left corner of the screen. The Status display shows the current
power source, the battery charge, and the power management mode.
■ Watching for these other low battery warnings:
■ Three beeps
■ A red “X” appearing on the battery icon in the taskbar
■ A Low Battery message box appearing
44 Travel Tips
Page 48

Conserve battery power
While using the battery to power your computer, conserve power by:
■ Dimming the display as low as is comfortable.
■ Removing PC Cards when you do not need them. Many PC Cards use a
small amount of power while inserted, even if they are not being used.
■ Modifying the Power Management settings for maximum power sav ings.
For more information on changing these settings, see “Changing power
settings” on page 45.
■ Closing the display panel to turn off the display while you are not using
your computer. The display stays off until you open the panel again.
■ Enabling Hibernate mode support and using Hibernate mode for powe r
savings while the computer is not in use. For more information on
Hibernate mode, see “To enable Hibernate mode support:” on page 49.
■ Using the CD/DVD drive only when nece ssary. CD and DVD drives use
a large amount of power.
Changing power settings
You can change the behavior of the power button, Standby key, and
power-saving timers by changing power settings on your computer.
Changing settings in Windows 98
You can completel y customize your computer’s power settings through the
Windows Control Panel by selecting power schemes, setting power alarms,
adjusting advanced po wer settings, and enabli ng Hibernate mode.
Power schemes let you change power saving options such as when the
monitor or hard drive is turned off. You can also select one of the pre-defined
power schemes or make changes and save it as a custom power scheme.
Power alarms can alert you when the battery charge is low.
Advanced power settings let you reassign the power button and Standby key
to activate different power saving mode s.
Hibernate mode saves more power than other modes because it uses no power
at all. Hibernate mode (also called save to disk) writes all current memory
(RAM) information to the hard drive, then t urns the computer compl etely off.
The next time you turn on the computer, the memory information is read
Power 45
Page 49

from the hard drive and Windows is restored to the same condition when
you activated Hibernate, with the same applications running and the same
documents open.
To change the power scheme:
1 Click Start, then select Settings, Control Panel , then double-click Power
Management
. The Power Management Properties dialog box op ens.
2 Select a pre-defined power scheme from the drop-down list. The
Portables/Laptop scheme changes the settings to maximize battery life.
- OR Set the timers for
then save your custom power scheme by clicking
a name.
3 Apply the changes by cl icking OK.
46 Travel Tips
System Standby, Turn off monitor, and Turn off hard disks,
Save As and typing in
Page 50

To change the alarm options:
1 Click Start, then select Settings, Control Panel , then double-click Power
Management
2 Click the Alarms tab.
. The Power Management Properties dialog box op ens.
3 Adjust the alarm settings, then apply the changes by clicking OK.
Power 47
Page 51

To change advanced power management settings:
1 Click Start, then select Settings, Control Panel , then double-click Power
Management
2 Click the Advanced tab.
. The Power Management Properties dialog box op ens.
3 Change the settings, then save the changes by clicking OK.
48 Travel Tips
Page 52

To enable Hibernate mode support:
1 Click Start, then select Settings, Control Panel , then double-click Power
Management
2 Click the Hibernate tab.
. The Power Management Properties dialog box op ens.
3 Select the Enable hibernate support check box, then click Apply. Hibernate
mode is now an option you can select in the Advanced tab of the Power
Management Properties dialog box. For more inform ation on changing
the Advanced tab settings, see “T o change advanc ed po wer manage ment
settings:” on page 48.
Power 49
Page 53

Changing settings in Windows 95
To change power settings in Windows 95, you need to enter the BIOS Setup
utility.
To change power settings in Windows 95:
1 Turn on or restart your notebook.
2 As soon as a startup screen appears, press F2. The BIOS Setup utility opens.
3 Select the Power m enu by using the right arrow key. The screen example
shown below is similar to what you see.
PhoenixBIOS Setup Utility
Main Advanced Security Power Boot Exit
Power Switch:
Lid Switch:
Low Battery Beep:
Cooling Control:
> AC Mode Power Savings:
> DC Mode Power Savings:
Resume On Time:
Resume On Modem Ring:
SuspendMode at ResumeOnRing:
Resume Time:
[On/Off]
[Backlight off]
[Enabled]
[Performance]
[Off]
[00:00:00]
[Off]
[STR]
Item Specific Help
Set the power button to
On/Off to work normally.
Set to Suspend/Resume to
work as a suspend/resume
button. Hold button 5
seconds to shut off
system.
F1 Help ↑↓ Select Item -/+ Change Values F9 Setup Default
ESC Exits ←→ Select Menu Enter Select > Sub-Menu F10 Save and Exit
4 Navigate through the options using the keys identified at the bottom of
the screen. The Item Specific Help column on the right side of the screen
provides additional information about each menu selection.
50 Travel Tips
Page 54

The following settings are most commonly changed:
■ Power switch sets power switch functionality. When you press the power
button, the notebook can be set to either turn off or change to Standby
mode. Press the spacebar to select
■ Power Savings pr ovides preset or cus tomized power ma nagement for both
AC Mode an d DC Mode.
■ Setting this option to Maximum Performance gives the best system
performance (fastest processing speed).
■ Setting this option to Ma ximum Po wer Savings gives the best battery
performance.
■ Setting this option to Customized lets you manually set the Standby,
Auto Suspend
, Video, and Hard Disk timeouts, and lets you choose
whether to have the LCD brightness decr ease 50% while using only
battery power.
Changing settings in Windows NT
In Windows NT, you can set low battery warnings and monitor the time
remaining on the battery.
To set the low battery warning:
1 Double-click the battery icon or power cord icon in the taskbar. The
APM for NT dialog box opens.
On/Off or Standby/Resume.
2 Click the Settings tab, then select the Enable Low Battery Warning check
box.
3 Click OK. When the battery charge is very low, a message box appears
warning you about the low battery.
To monitor the time remaining on the battery:
1 Double-click the battery icon or power cord icon in the taskbar. The
APM for NT dialog box opens.
2 Click the Power Status tab. The current battery charge and estimated time
remaining appears.
3 Click OK.
Power 51
Page 55

52 Travel Tips
Page 56

Using the Internet
4
This chapter provides information about the Internet and basic instructions
about setting up Gateway.net
These services give you access to the World Wide Web ( WWW), e-mail, and
other Internet resources.
SM
or America Online® (AOL) Internet services.
53
Page 57

Learning about the Internet
The Internet is a worldwide network of computers linked together to provide
information to people everywhere. The two most popular services on the
Internet are e-mail an d the World Wide Web. You can access this network by
connecting your computer to a phone line and signing up with an Internet
Service Provider ( ISP).
Internet Servers
store information so other
computers can access it
from the Internet.
Your computer
connects to the
Internet through
an ISP.
ISP Servers
let you connect to
the Internet and
access your e-mail
messages.
If you want to access the Internet you need:
■ A modem – a device that connects your computer , using a telephone line,
to other computers or servers. If you have a modem jack on your
computer, you have a modem.
■ An Internet Service Provider – a service that provides access to the Internet
through an ISP s erve r. When you connect to an ISP, the ISP server lets yo u
access the Internet and you r e-mail messages.
■ A Web browser – a program that displays information from the World
Wide Web .
■ An e-mail program – a program that lets you create, send, and receive
e-mail messages over the Internet.
54 Using the Internet
Page 58

Setting up an Internet account
Before you can view the information on the Web, you need to set up an
Internet account with an Internet Service Provider (ISP). If you selected
Gateway .net or AOL as an ISP, follow these instructions to set up and connect
to your account.
If you set up an account with Gateway.net or AOL, an Internet e-mail address
is created for you. After completing the setup you are ready to access the
Internet.
To set up an Internet account with Gateway.net or AOL:
1 Double-click the Re gister with Gateway.net or the America Online icon.
2 Follow the on-screen instructions. After setting up your account, you can
connect to the Internet and access your e-mail services.
Accessing your Internet account
To connect to your Gateway.net or AOL Internet account:
1 Double-click the Connect to Gateway.net or America Online icon. The
Connect dialog box opens.
2 Complete the member name and password information, then click
Connect. The computer dials the Internet account phone number.
After connecting, the W eb browser opens. For information about the W eb
and the Web browser, see “Using the World Wide Web” on page 56.
To disconnect from your Gateway.net or AOL Internet account:
■ Click X in the top right corner of the Web browser. Your computer
disconnects from the Internet.
Important Make sure that your computer disconnects properly from
your Internet account. If you do not have an “unlimited
hours” ISP account, you may have to pay for the time tha t
you are co nnected.
Setting up an Internet account 55
Page 59

Using the World Wide Web
The World Wide Web is a user-friendly multimedia window to the Internet
that gives you easy access to millions of sources of information.
The information you access on the Internet appears in Web pages. A group
of related Web pages is called a Web site. You can access Web sites to shop,
track investments, read the news, download progra ms, and much more.
You can travel through a Web site or visit other Web sites by clicking areas
on the Web page called links, or hyperlinks. A link can be colored text
(sometimes underlined), a picture, or an animated imag e. You can identify a
link by moving the mouse pointer over it. If the pointer changes to a hand,
the item is a link.
T o learn more about using the W eb browser features click
Web
page
Link
Linked Web page
Help in the menu bar.
56 Using the Internet
Page 60

Connecting to a Web site
After you set up an account with an Internet Service Provider (ISP) such as
Gateway.net or AOL, you are ready to begin accessing the many information
sources on the World Wide Web.
To connect to a Web site:
1 Connect to your Internet account. After the computer connects, the
browser home page opens.
2 If you want to go to a different Web site, type the address (for example
www.gateway.com) in the browser address bar, then click the
next to the browser address bar.
- OR Click a li nk to a Web site.
The Web browser locates the server computer on the Internet, transfers
(downloads) data to your computer, and displays the page in the Web
browser.
GO button
Sometimes W eb pages displ ay slowly. The speed that a Web page displays
on your screen depends on the comp lexity of the Web page and other
Internet conditions.
Using the WorldWide Web 57
Page 61

Downloading files
Downloading is the process of transferring files from a computer on the
Internet to a folder on your computer.
T o prot ect your comput er against v iruses, make sure that you run a virus sc an
on files that you download. For more information about scanning for viruses,
see Maintaining and Troubleshooting Your Gateway Solo Notebook.
To download files or programs from a Web site:
1 Connect to your Internet account.
2 In the address bar, type the address of the Web site that contains the file
or program you want to download, then click the
browser address bar.
- OR Click on links to navigate to the Web site where you want to download
a file.
3 On your computer, create a folder where you want to store the file.
4 Click the link for the file that you want to download.
5 Follow the on-screen instructions to save the file in the folder that you
created.
GO button next to the
A copy of the file is downloaded to your comp uter. The time that it takes
to transfer the file to your computer depends on file size and other
Internet conditions.
6 Open the folder that you created.
7 Install or view the downloaded file by double-clicking it. If applicable,
follow the instructions provided on the Web site to run or install the
program.
58 Using the Internet
Page 62

Using e-mail
E-mail (electronic mail) programs let you send messages to anyone who has
an Internet connection and e-mail address. E-mail is a free service of your
Internet account.
The Internet never closes, so you can send e-mail messages at any time of
the day or night. Your e-mail messages arrive at most e-mail addresses in
minutes.
An e-mail address consists of a user name, the @ symbol, and the Internet
domain name of the Internet Servic e Provider (ISP) or com pany that “hosts”
that user. Your e-mail address is assigned when you sign up for an account
with an ISP. For example, a person with an account with the Gateway.net ISP
might have an e-mail address that is similar to this one:
User name Internet domain name
Sending e-mail
jdoe@gateway.net
To send e-mail using Gateway.net or AOL:
1 Connect to your Gateway.net or AOL account.
2 Click Create Mail.
- OR Click
Write.
3 Type the e-mail address of the recipient you want to send e-mail to in
Send To box.
the
4 Type the subject of your e-mail in the Subject box.
5 Compose the e-mail message.
6 When finished, click Send Now.
Your e-mail is sent over the Internet to the e-mail address you specified.
Using e-mail 59
Page 63

Checking your e-mail
To check your e-mail using Gateway.net or AOL:
1 Connect to your Gateway.net or AOL account.
2 Click Read Mail.
- OR Click
Read.
For more information about managing and organizing your e-mail
messages, see the online help in your e-mail program.
60 Using the Internet
Page 64

Getting Help
This chapter tells you about additional information resource s available to help
you use your computer.
If these resources do not provide the information you need, technical support
resources are available.
5
61
Page 65

For more information . . .
Gateway has provided these additional resources to help you get the most out
of your Gateway PC.
Microsoft Windows guide
Use this guide to find information about using the operating
system, getting help, organizing your files, using programs,
troubleshooting, and learning about other advanced features
such as connect ing to a network .
Discover Windows 98 tutorial
Use the interactive Windows
tutorial, “Discover
Windows 98,” to become
more familiar with Windows
features and lear n mor e abo ut
using and getting the most out
of your computer.
Start the program by clicking
Start, then selecting Programs,
Accessories, System Tools,
Welcome to Windo ws. The
then
Windows tutorial starts.
62 Getting Help
Page 66

Online help
Many programs provide information online so you can research a topic or
learn how to perform a task while you are using the program. Most online
help information can be accessed by selecting a topic from a
by clicking a
Usually you can search for information by looking for a keyword, browsing
through the contents of the online help, or searching for a topic.
Help menu or
Help button.
For more information .. . 63
Page 67

QuickANSWERS
QuickANSWERS is an easily accessible interactive guide designed to help you
quickly discover and use the many features of your Gateway computer.
Double-click the
finding a file to backing up your hard drive.
QuickAnswers icon to get help with everything from
64 Getting Help
Page 68

Gateway Web site
Gateway provides a variety of information on its Web site to help you use
your computer.
Visit the Gateway Web site at www.gateway.com for:
■ Technical documentation and produc t manuals
■ Technical tips and support
■ Hardware drivers
■ A glossary of computer terms
■ Frequently asked questions (FAQs)
For more information about connecting to the Internet, see “Using the
Internet” on page 53.
For more information .. . 65
Page 69

Before calling for technical support
If you have a technical problem with your computer, follow these
recommendations before contacting Gateway technical support:
■ Make sure that your computer is connected properly to a grounded
AC outlet that is supplying power. If you use a power strip, make sure
that it is switched on.
■ If a peripheral such as a keyboard or mouse does not appear to work, make
sure that all cables are plugged in securely.
■ If you have recently installed hardware or software, make sure that you
have installed it according to the instructions provided with it. If you
did not purchase the hardware or software from Gatew ay, refer to the
manufacturer’s documentation and technical support resources.
■ If you have “how to” questions about using a program, consult:
■ Online Help
■ Printed documentation
■ The Microsoft Windows manual
■ The software publisher’s Web site
■ Consult the troubleshooting chapter of this guide or the appropriate chapter
of the Maintainin g and Troubleshooting guid e.
Warning To avoid bodily injury, do not attempt to troubleshoot your
66 Getting Help
computer pr oblem if:
■
Power cords or plugs are damaged
■
Liquid has been spilled into your computer
■
Your computer was dropped
■
The cabine t was dama ged
Instead, unplug your computer and contact a qualified
computer technician.
Page 70

T echnical support resources
Gateway offers a wide range of customer service, technical support, and
information services. If you have questions or problems, contact the Gateway
service that is most appropriate for your needs:
Resource Service description How to reach
Automated
troubleshooting
system (ATS)
FaxBack
support
Gateway’s
fee-based
software
tutorial service
World Wide
Web
Online
technical
support
Gateway Client
Care
Use an automated menu system and your telephone keypad to
find answers to a common problems.
Order a catalog of doc ument s on c ommon proble ms, th en orde r
documents by do cument n umbers. T he docum ents wi ll be fax ed
to you.
Get tutorial assistance for software issues billed by the issue or
by the minute.
Access a variety of online information about Gateway, its
products, and its software and hardware manufacturers.
Get answers to questions using e-mail. Make sure you include
a detailed description of your problem including any error
messages and steps you have taken to solve the problem.
Include your e-mail address, name, customer ID or order
number, and system in formati on.
T alk to a Gateway Client C are representative abo ut a non-tutorial
support question. Make sure you are at your computer where
you can try troubleshooting ideas with the technician. Be
prepared to explain the problem including any error messages
you have received or steps that you have taken to solve the
problem. Have you r e-ma il address, name, cu stomer ID or order
number, serial number, and system information available.
800-846-2118
800-846-4526
800-229-1103 (by issue)
900-555-4695 (by minute)
www.gateway.com/support
support@gateway.com
Desktop:
800-846-2301 (US)
Portable:
800-846-2302 (US)
800-846-3609 (Canada)
Gateway.net
AOL
CompuServe
Sales,
accounting,
and warranty
Get support for your ISP account. 877-247-2051
800-827-6364
800-848-8990
Get information about available systems, pricing orders, billing
statements, warranty service, or other non-technical issues.
Technical support resources 67
800-846-2000
Page 71

68 Getting Help
Page 72

Safety,
Regulatory , and
Notices
Important safety information
Y our Gateway system is designed and tested to meet the latest standards for safety of information
technology equipment. However , to ensure s afe use of this pro duct, it is importan t that the safety
instructions marked on the product and in the documentation are followed.
Warning Always follow these instructions to help guard against
personal injury and damage to your Gateway system.
6
69
Page 73

Setting up your system
■
Read and follow all instructions marked on the product and in the documentation before you
operate your system. Retain all safety and operating instructions for future use.
■
Do not use this product near water or a heat source such as a radiator.
■
Make sure you set up the system on a stable work surface.
■
The product should only be operated from the type of power source indicated on the rating
label.
■
If your computer has a voltage selector switch, mak e sure that the switch is in the proper
position for your area. The voltage selector switch is set at the factory to the correct voltage.
■
Openings in the computer case are provided for ventilation. Do not block or cover these
openings. Make sure you provide adequate space, at least 6 inches (15 cm), around the system
for ventilation when you set up your work area. Never insert objects of any kind into the
computer ventilation openings.
■
Some products are equipped with a three-wire power cord to make sure that the product is
properly grounded when in use. The plug on this cord will only fit into a grounding-type outlet.
This is a safety feature. If you are unable to insert the plug into an outlet, contact an electrician
to install the appropriate outlet.
■
If you use an extension cord with this system, make sure that the total ampere rating on the
products plugged into the extension cord does not exceed the extension cord ampere rating.
■
If your system is fitted with a TV Tuner, cable, or satellite receiver card, make sure that the
antenna or cable system is electrically grounded to prevent against voltage surges and build
up of static charges.
Care during use
■
Do not walk on the power cord or allow anything to rest on it.
■
Do not spill anything on the system. The best way to avoid spills is to avoid eating and drinking
near your system.
■
Some products have a replaceable CMOS battery on the system board. There is a danger of
explosion if the CMOS battery is replaced incorrectly. Replace the battery with the same or
equivalent type recommended by the manufacturer. Dispose of batteries according to the
manufacturer’s instructions.
■
When the computer is turned off, a small amount of electrical current still flows through the
computer. Always unplug all power cables and modem cables from the wall outlets before
cleaning the system.
■
Unplug th e system from th e wall ou tlet and refer ser vicing to qual ified pe rsonnel i f:
■
The power cord or plug is damaged.
■
Liquid has been spilled into the system.
■
The system does not operate properly when the operating instructions are followed.
■
The system was dropped or the cabinet is damaged.
■
The system performance changes.
70 Safety, Regulatory, and Notices
Page 74

Replacement parts and accessories
Use only replacement parts and accessories recommended by Gateway.
Important Do not use Gateway products in areas classified as
hazardous locations. Such areas include patient care
areas of medical and dental facilities, oxygen-laden
environmen ts, or indu strial fa cilities.
Caution To reduce the risk of fire, use only No. 26 AWG or larger
telecommunications line cord.
71
Page 75

Regulatory compliance statements
American user s
FCC Part 15
This device has been tested and found to comply with the limit s for a Class B digital device,
pursuant to Part 15 of the FCC rules. These limits are designed to provide reasonable protection
against harmful interferenc e in a resident ial installat ion. This equi pment generates, us es, and can
radiate radio frequency energy and, if not inst alled and used in accordance wi th the inst ructions,
may cause harmful interference to radio or television reception. However, there is no guarantee
that interference will not occur in a particular installation. If this equipment does cause
interference to radio and televi sion reception, which can be determined by turning the eq uipment
off and on, the user is encouraged to try to correct the interf erence by one or more of the following
measures:
■
Reorient or reloc ate the r eceivin g antenn a
■
Increase the separation between the equipment and receiver
■
Connect the equipment into an outlet on a circuit different from that to which the receiver
is connected
■
Consult the dealer or an experienced radio/TV technician for help.
Caution Changes or modifications not expressly approved by
Gateway could void the FCC Compl iance and ne gate your
authority to operate the product.
Declaration of conformity
Responsible p arty:
Gateway Companies, Inc.
610 Gateway Drive, North Sioux City, SD 57049
(605) 232-2000 Fax: (605) 232-2023
Product:
■
Gateway Solo 2150
This devic e compl ies with Part 1 5 of the F CC Rules . Oper ation of this pr oduct i s subjec t to the
following two conditions: ( 1) thi s devic e may no t caus e har mful int erf eren ce, and ( 2) thi s device
must accept any interference received, including interfer ence that may cause undesired operation.
Caution The Federal Communications Commission warns the
users that changes or modifications to the unit not
expressly approved by the party responsible for
complianc e cou ld void t he user’s authority to operate the
equipment.
72 Safety, Regulatory, and Notices
Page 76

FCC part 68 (applicable to products fitted with USA modems)
Your modem complies with Part 68 of the Federal Communications Commission (FCC) rules.
On the computer or modem card is a label that contains the FCC re gistration n umber and Ringer
Equivalence Number (REN) for this device. If requested, this information must be provided to
the telephone company.
An FCC-compliant telephone line cord with a modular plug is required for use with this device.
The modem is designed to be connected to the telephone network or premises wiring using a
compatible modular jack which is Part 68 compliant. See installation instructions for details.
The Ringer Equivalence Number (REN) is used to determine the number of devices which may
be connected to the telephone line. Excessive RENs on a telephone lin e may result in t he devices
not ringing in response to an in comin g c all. In mo st areas , the su m of REN’s should not exceed
five (5.0). To be certain of the number of devices that may be connected to a line, as determined
by the total RENs, contact the local telephone company.
If this device causes harm to the telephone network, the telephone company will notify you in
advance that temporary discontinuance of service may be required. The telephone company may
request that you disconnect the equipment until the problem is resolved.
The telephone company may make changes in its facilities, equipment, operations, or procedures
that could affect the operation of this equipment. If this happens the telephone company will
provide advance notice in order for you to make necessary modification s to maintain
uninterrupted service.
This equipment cannot be used on telephone company-provided coin service. Connection to
party line service is subject to state tariffs. Contact the state public utility commission or public
service commission for information.
When programming or making test calls to emergency numbers:
■
Remain on the line and briefly explain to the dispatcher the reason for the call.
■
Perform such activities in the off-peak hours such as early morning or late evenings.
The United States Telephone Consumer Protection Act of 1991 makes it unlawful for any person
to use a computer or other electronic device to send any message via a telephone fax machine
unless such message clearly contains, in a margin at the top or bottom of each transmitted page
or on the first page of the transmission, the date and time it is sent and an identification of the
business or other entity, or other individual sending the message and the telephone number of
the sending machine or such business, oth er entity, or individual. Refer to your fax
communication software documentation for details on how to comply with the fax-branding
requirement.
73
Page 77

Canadian users
ICES-003
This digital apparatus does not exceed the Class B limits for radio noise emissions from digital
apparatus as set out in the radio interference regulations o f Industry Canada.
Le présent appareil numérique n’émet pas de bruits radioélectriques dépassant les limites
applicables aux appareils numériques de Classe B prescrites dans le règlement sur le brouillage
radioélectrique édict é par Industrie Canada.
DOC notice (for products fitted with an IC compliant modem)
The Industry Canada label identifies certified equipment. This certification means that the
equipment meets certain telecommunications network protective, operation, and safety
requirements. The Department does not guarantee the equipment will operate to the users’
satisfaction.
Before installing this equipment, users should make sure that it is permissible to be connected
to the facilities of the local telecommunications company. The equipment must also be installed
using an acceptable method of connection. In some cases, the inside wiring associated with a
single-line individual service may be extended by means of a certified connector assembly. The
customer should be aware that compliance with the above conditions may not prevent
degradation of service in some situations.
Repairs to certified equipment should be made by an authorized Canadian maintenance facility
designated by the supplier. Any repairs or alterations made by the user to this equipment, or
equipment malfunctions, may give the telecommunications company cause to request the user
to disconnect the equipment.
Users should make sure for their own protection that the electrical ground connections of the
power utility, telephone lines, and internal metallic water pipe system, if present, are connected
together. This precaution may be particularly important in rural areas.
Warning To avoid electrical shock or equi pme nt m al func ti on do not
attempt to make el ectrical gro und connec tions by yo urself.
Contact the appropriate inspection authority or an
electrician, as appropriate.
The Ringer Equivalence Numbe r ( REN) assigned t o each t erminal device p rovides an indic at ion
of the maximum number of terminals allowed to be connected to a telephone interface. The
termination on an interface may consist of any combination of devices subject only to the
requirement that the sum of the Ringer Equivalence Numbers of all the devices does not exceed 5.
74 Safety, Regulatory, and Notices
Page 78

European users
European di rectives
This Information T echnology Equipment has been tested and found to comply with the following
European directives:
■
EMC Directive 89/336/EEC amending direct ive 92/31/EEC & 93/68/EEC as per
- EN 50081-1:1992 according to
EN 55022:1994 Class B
EN 61000-3-2:1995 or EN 60555-2:1987
EN 61000-3-3:1995 or EN 60555-3:1987
- EN 50082-1:1992 according to
EN 61000-4-2:1995 or IEC 801-2:1984
EN 61000-4-3:1996 or IEC 801-3:1984
EN 61000-4-4:1995 or IEC 801-4:1988
■
Low Voltage Directive (Safety) 73/23/EEC as per EN 60950:1992(A1/A2/A3/A4/A 11)
European telecommunication information (for pr oducts fitted with E U approved
modems)
Marking by the symbol indicates compliance of this equipment to the Telecom
Terminal Equipment and Satellite Earth Stations Directive 98/13/EEC. Such marking is indicative
that this equipment meets or exceeds the following technical standards:
CTR 21 (1998) - Attachment requirements for pan-European approval for connection to the
analogue Public Switched Telephone Networks (PSTNs) of TE (excluding TE supporting voice
telephony services) in which network addressing, if provided, is by means of Dual Tone Multi
Frequency (DTMF) signaling.
Warning Although this equipment can use either loop disconnect
(Pulse) or DTMF (Tone) signaling, only the performance
of the DTMF signaling is subject to regulatory
requirements for correct operation. It is therefore strongly
recommended that the equipment is set to use DTMF
signaling for access to public or private emergency
services. DTMF signaling also provides faster call setup.
This equipment has been approved to Council Decision 98/482/EEC—“CTR 21” for Pan-European
single terminal connection to the Public Switched Telephone Network (PSTN). However, due to
differences between the individual PSTNs provided in different countries, the approval does not,
of itself, give an unconditional assurance of successful operation on every PSTN termination
point. In the event of problems, you should contact Gateway customer support.
75
Page 79

Japanese users
VCCI stat ement
This equipment is in the Class B category (Information Technology Equipment to be used in a
residential area or an adjacent area thereto) and conforms to the standards set by the Voluntary
Control Council for Interference by Information Technology Equipment aimed at preventing
radio interference in such residential areas. When used near a radio or TV receiver, it may become
the cause of radio interference. Read instructions for correct handling.
76 Safety, Regulatory, and Notices
Page 80

Australia and New Zealand users
EMI statem ent
This device has been tested and found to comply with the limit s for a Class B digital device,
pursuant to the Australian/New Zealand standard AS/NZS 3548 set out by the Australian
Communications Authority and Radio Sp ectrum Management Agency.
New Zealand telecommunication statement (for products fitted with T elepermit
approved modems)
The grant of a Telepermit for any item of terminal equipment indicates only that Telecom has
accepted that the item co mplies with mini mum conditions for connection to its network. It
indicates no endorsement of the product by Telecom, nor does it provide any sort of warranty.
Above all, it provides no assurance that any item will work correctly in all respects with another
item of Telepermitted equipment of a different make or model, nor does it imply that any product
is compatible with all of Telecom’s network services.
This equip ment sh all not be set up to make auto matic c alls to the Telecom ‘111’ Emergency
Service.
Important Under power failure conditions, this telephone may not
operate. Make sure that a separate telephone, not
dependent on local power, is available for emergenc y use.
Some parameters required for compli ance with T el ecom’s Telepermit requir ements are dependent
on the equipment (PC) associated with this device. The associated equipment shall be set to
operate within the following limits for compliance with Telecom’s specifications:
(a) There shall be no more than 10calls to the same number within any 30-minute period for
any single manual call initiation, and
(b) The equi pment shall go on-hook for a period of not less than 30 seconds between the end
of one attempt and the beginning of the next attempt.
The equipment shall be set to make sure that automatic calls to different numbers are spaced
such that there is no less than 5 seconds between the end of one call attempt and the beginning
of another.
The equipment shall be set to make sure that calls are answered between 3 and 30 seconds of
receipt o f ringing .
77
Page 81

Laser safety statement
All Gateway systems equipped with CD and DVD drives comply with the appropriate safety
standards, including IEC 825. The laser devices in these components are classified as “Class 1 Laser
Products” under a US Department of Health and Human Services (DHHS) Radiation Performance
Standard. Should the unit ever need servicing contact an authorized service location.
Warning Use of controls or adjustments or performance of
procedures other than those spec ifi ed in thi s ma nual may
result in hazardous radiation exposure. To prevent
exposure to laser beam s, do n ot try to op en the e nclos ure
of a CD or DVD drive.
78 Safety, Regulatory, and Notices
Page 82

Notices
Copyright © 1999 Gateway, Inc.
All Rights Reserved
4545 Town Centre Court
San Diego, CA 9212 1 USA
All Rights Reserved
This publication is protected by copyright and all rights are reserved. No part of it may be reproduced or
transmitted by any means or in any form, without prior consent in writing from Gateway.
The information in this manual has been carefully checked and is believed to be accurate. However, changes
are made periodically. These changes are incorporated in newer publication editions. Gateway may improve
and/or change products described in this publication at any time. Due to continuing system improvements,
Gateway is not responsible for inaccurate information which may appear in this manual. For the latest product
updates, consult the Gateway Web site at www.gateway.com. In no event will Gateway be liable for direct,
indirect, special, exemplary, incidental, or consequential damages resulting from any defect or omission in this
manual, even if advised of the possibility of such damages.
In the interest of continued product development, Gateway reserves th e right to make improvements in this
manual and the products it describes at any time, without notices or obligation.
Trademark Acknowledgments
AnyKey, black-and-white spot design, CrystalScan, Destination, EZ Pad, EZ Point, Field Mouse, Solo, TelePath,
Vivitron, stylized “G” design, and “You’ve got a friend in the business ” slogan are registered trademarks and
GATEWAY, Gateway Profile, Gateway Solo, Gateway Astro, green stylized GATEWAY, green stylized Gateway
logo, and the black-and-white spotted box logo are trademarks of Gateway, Inc. Intel, Intel Inside logo, and
Pentium are registered trademarks and M MX is a trademark of Intel Corporat ion. Microsof t, MS, MS -DOS, and
Windows are trademarks or registered trademarks of Microsoft Corporation. All other product names mentioned
herein are used for identification purposes only, and may be the trademarks or registered trademarks of their
respective companies.
79
Page 83

80 Safety, Regulatory, and Notices
Page 84

Index
A
AC power 14
adapters 44
outlets 44
accessories 71
acoustic handset coupler 42
activity lights 15
adapter
14
AC
airplane/automobile power adapter 44
America Online. See AOL
AOL
checking e-mail
connecting to 55
disconnecting from 55
icon 55
sending e-mail 59
setting up 55
AU file 26
audio
output
record 15
audio CD
playing
auto dim with battery 20
AVI file 26
13
24
60
B
battery
16, 17
bay
changing 33
charge status 44
charging 13
indicator light 13
managing power 45
release latch 17, 34
browser
button
busy signal 42
buttons
12
configurable
E-mail 12
Help 12
multi-function 12
mute 12
on/off 12
power 12
programmable 12
Shortcut 12
user 12
volume 12
Web browser 12
12
C
cable 43
cable lock 16
Caps Lock
indicator light
CD/DVD 22
activity light 15
drive 15, 17, 35
eject button 15
indicator light 11
inserting 22
manual eject 15
playing audio CDs 24
release latch 17
changing
batteries
drives 35
modules 35
checking e-mail 60
Client Care
contacting
tips before contacting 66
combination ke ys 6
computer
using on line help
using Qu ickANSWE RS 64
configurable button 12
11
33
67
63
81
Page 85

connecting
external keyboard
external mouse 8, 10
ISP account 55
modem 28
network 29
Web site 57
controls
volume
copyright notice 79
coupler
acoustic handset
customizing
multi-function buttons
touchpad 10
22
10
42
20
D
DC power 14
dial tone 42
dialing
42
codes
pause 42
sequence 42
disc drive 15
disconnecting ISP accou nt 55
diskette 15, 43
activity light 15
drive 15, 21
eject button 15
indicator light 11
display 20
adjusting 20
type 17
documentation
Gateway Web site
online help 63
QuickANSWERS 64
domain name 59
downloading software 58
drives
CD/DVD
diskette 21
DVD 27
22
65
decoder card 30
drive 15, 35
DVD-to-Go 27
playing 27
E
eject button 15, 16
ejecting a PC Card 31
E-mail
button
e-mail 59
address 59
checking 60
organizing 60
sending 59
software 54
emergency eject 15
EmPower adapter 44
external
keyboard
microphone 15
monitor 14
mouse 8, 10, 14
speakers 15
EZ Pad 8
12
10, 14
F
fan outlet 14
files 43
copying 43
transferring 43
floppy drive 15
Fn keys 6, 7
function keys 6, 7
G
Gateway
Web address
Web site 65
Gateway.net
checking e-mail
connecting to 55
disconnecting from 55
65
60
82
Page 86

icon 55
sending e-mail 59
setting up 55
H
handset coupler 42
hard drive 15, 17
indicator light 11
replacing 39
Headphones jack 15
help
63
online
Help button 12
Hibernate mode 4, 13
hot-swapping 30
hyperlinks 56
I
indicator lights 11
inserting CD/DVD 22
Internet 42, 54
connecting to 55
disconnecting from 55
setting up ISP 55
Internet Service Provider. See ISP
54
ISP
setting up 55
J
jacks
Headphones
Microphone In 15
Modem 14, 28
Speakers 15
15
K
Kensington cable lock 16, 43
keyboard 6
customizing 20
external 10
function keys 7
multi-function buttons 20
port 14
keypad 6
keys
combination
Fn 6
function 6
Windows 6
6
L
label 17
latches 13
LCD
adjusting
latches 13
screen 20
lights
indicators
line protector 42
line tester 42
links
Web pages
locking cable 43
20
11
56
M
manual eject 15
Margi DVD-to-Go 27
Media Player 26
memory 37
bay 17
removing 37
Microphone In 15
MIDI file 26
model number 17, 43
modem 14, 42, 54
connecting 28
international adapter 42
jack 14, 28
modular bay 17, 35
latch 17
monitor
14
port
mouse
external
port 14
10
83
Page 87

MOV file 26
MP3 file 26
MPEG file 26
multi-function buttons 12
customizing 20
multimedia 22
Media Player 26
playing audio CD 24
playing DVD 27
Sound Recorde r 25
mute button 12
N
navigating
Web site
network
cable
connecting 29
port 29
numeric keypad 6
56
29
O
off-line viewing 42
on/off
button
mode 4
online help 63, 64
option bay 35
12
P
Pad Lock
indicator light
panel
latches
Parallel port 14
password 43
PC Card 30
ejecting 16, 31
icon 31
slots 16
PCMCIA card 30
ejecting 16, 31
icon 31
13
11
slots 16
playing
audio CD
audio/video files 25, 26
DVD 27
Media Player file 26
pointing devi ce
customizing
touchpad 8
ports
external VGA
Headphones 15
Keyboard 14
Microphone In 15
Mouse 14
Network 14, 29
Parallel 14
power 14
Printer 14
PS/2 14
serial 14
USB 14, 32
power 44
AC 2
battery 45
button 4, 12
indicator light 13
port 14
settings in Windows 95 50
settings in Windows 98 45
settings in Windows NT 51
starting up 4
power management 44
Printer port 14
processor speed 17
programmable button 12
PS/2 port 14
24
10
14
Q
QuickANSWERS 41
using 64
84
Page 88

R
RAM
17
bay
removing 37
recording a file 15
Sound Recorde r 25
regulatory compliance
Australian users
Canadian users 74
European users 75
Japanese users 76
New Zealand users 77
U.S. users 72
release latches 13
remote access 42, 43
removable hard drive 15
removing a PC Card 31
replacing
batteries
CD/DVD driv es 35
hard drive 39
memory 35, 37
modules 35, 37
33
77
S
safety precautions 69, 70
Save to Disk mode 13
screen 20
Scroll Lock
indicator light
security 43
sending e-mail 59
serial number 17, 43
Serial port 14
setting up
ISP account
safety precautions 69
Shortcut button 12
SO-DIMM module
adding
bay 17
software
downloading from Web site
37
11
55
58
sound
adjusting volume
controls 12, 22
muting 22
Sound Recorder
making audio recordings
playing file 25
speakers 13
controls 12
external 15
Standby/Resume mode 4, 13
Start button key 6
starting your notebook 4
surge protector 44
system identification 17
22
25
T
technical support
automated troubleshooting
Client Care 67
e-mail 67
FaxBack suppor t 67
resources 66, 67
tips before contacting 66
tutorial service 67
World Wide Web 67
telephone
28
cable
handset 42
line protector 42
line tester 42
theft 43
touchpad 8
customizing 10
travel tips 41
turning off computer 5
67
U
Universal Serial Bus. See USB port
USB port
user name 59
14, 32
85
Page 89

V
VGA port 14
viewing
Web site
volume
adjusting
control 12
muting 22
56, 57
22
W
WAV file 26
Web
browser
site 56
Web browser button 12
Web site 56
connecting to 57
downloading software 58
Gateway 65
navigating 56
viewing 56, 57
Windows key 6
World Wide Web 56
54
Y
Y-splitter 14
Z
ZIP drive 15, 17, 35
indicator light 11
latch 17
Zoomed Video card 30
86
 Loading...