

Page 1

Using the Gateway PRMPH Port
Replicator
The optional port replicator gives you a convenient way to attach external
devices such as a monitor, a full-size keyboard, or an AC adapter.
Although devices can be attached directly to the ports on your notebook, the
port replicator lets you make all of those connections in one step. The port
replicator also gives you access to additional ports not found on your notebook.
Read this guide to learn:
■ Where ports and jacks are located
■ How to connect and disconnect the port replicator
■ How to secure the port replicator with a locking cable
www.gateway.com
1
Page 2
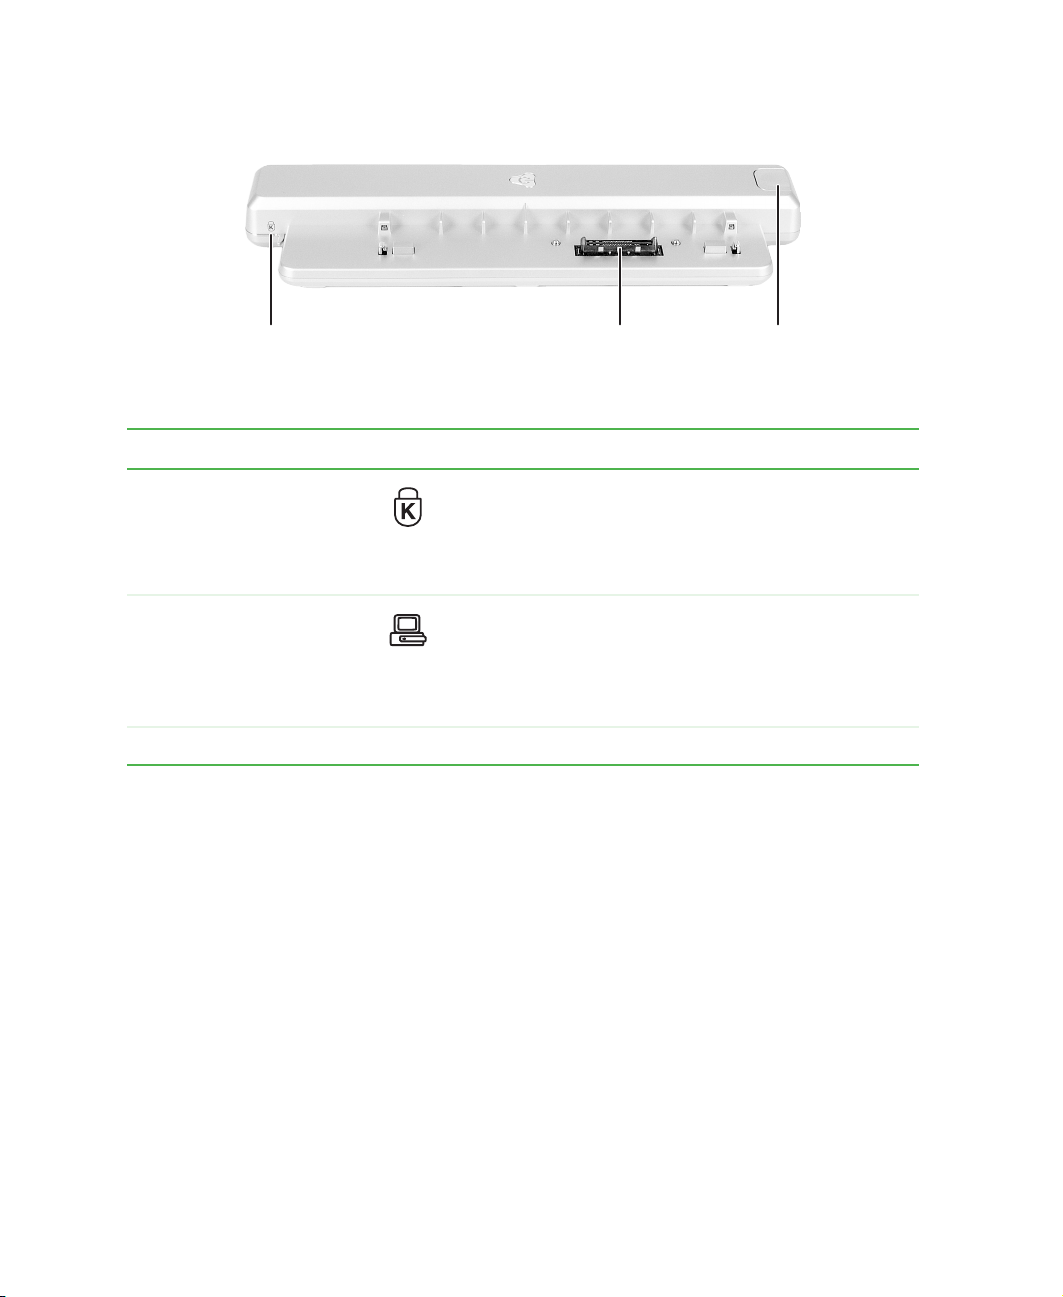
Front
Kensington
lock ring
Docking
port
Docking
release
latch
Component Icon Description
Kensington™ lock ring Secure your notebook and port replicator to an object by
connecting a Kensington cable lock through this ring and
into the Kensington lock slot on your notebook. For more
information, see “Securing your port replicator” on
page 9.
Docking port Connect your notebook to this port.
Warning! Power is passed through this port. This
docking connection is certified to UL 1950 for use only
with notebooks designed for your Gateway port
replicator.
Docking release latch Press the release latch to release your notebook.
2
www.gateway.com
Page 3

Back
USB
ports
Monitor
port
Universal jack 3
Universal jack 1 Universal jack 5
port
Ethernet
jack
Serial
Power
connector
PS/2 mouse port
PS/2 keyboard port
S-Video
out jack
Parallel
port
Modem
jack
S/PDIF
digital
audio
jack
Universal jack 2
Universal jack 4
Component Icon Description
USB ports Plug USB (Universal Serial Bus) devices (such as a USB
Iomega™ Zip™ drive, printer, scanner, camera,
keyboard, or mouse) into these ports.
Monitor port Plug an analog VGA monitor into this port.
Serial port Plug a serial device (such as a digital camera) into this
port.
Ethernet jack Plug a 10/100/1000 Ethernet network cable into this jack.
www.gateway.com
3
Page 4

Component Icon Description
-1
Universal jack 1
(blue plug)
Universal jack 3
(green plug)
This jack is user configurable for one of the following:
■
Off (Default)
■
Stereo in: an external audio input source (such as a
stereo) can be plugged into this jack so that you can
record sound on your notebook or play sound through
your notebook speakers.
■
Stereo out: an amplified external audio device (such
as a stereo) can be plugged into this jack so you can
play your notebook audio through that device.
Important: Stereo out can be configured as Stereo
Left/Right, Center/Subwoofer, and Surround
Left/Right.
For information on configuring this jack, see your user’s
guide.
This jack is user configurable for one of the following:
■
Headphone: headphones or amplified speakers can
be plugged into this jack. The built-in speakers are
turned off when speakers or headphones are plugged
into this jack.
Important: A headphone can only be plugged into this
jack or universal jack 2 on your notebook.
■
Off
■
Stereo in: an external audio input source (such as a
stereo) can be plugged into this jack so that you can
record sound on your notebook or play sound through
your notebook speakers.
■
Stereo out: an amplified external audio device (such
as a stereo) can be plugged into this jack so you can
play your notebook audio through that device.
Important: Stereo out can be configured as Stereo
Left/Right (Default), Center/Subwoofer, and Surround
Left/Right.
For information on configuring this jack, see your user’s
guide.
4
www.gateway.com
Page 5

Component Icon Description
-3
Universal jack 5
(orange plug)
This jack is user configurable for one of the following:
■
Off
■
Stereo in: an external audio input source (such as a
stereo) can be plugged into this jack so that you can
record sound on your notebook or play sound through
your notebook speakers.
■
Stereo out: an amplified external audio device (such
as a stereo) can be plugged into this jack so you can
play your notebook audio through that device.
Important: Stereo out can be configured as Stereo
Left/Right, Center/Subwoofer (Default), and Surround
Left/Right.
For information on configuring this jack, see your user’s
guide.
Power connector Plug the AC adapter cable into this connector.
PS/2 mouse port Plug a Personal System/2 (PS/2) mouse into this port.
Attaching a PS/2 mouse to your port replicator may
deactivate the touchpad.
PS/2 keyboard port Plug a Personal System/2 (PS/2) keyboard into this port.
Attaching a PS/2 keyboard to your port replicator may
deactivate the built-in keyboard.
S-Video out jack Plug a standard S-Video cable into this jack and the jack
on an S-Video device (such as a television or VCR).
Parallel port Plug a parallel device (such as a printer) into this port.
Modem jack Plug a modem cable into this jack.
S/PDIF digital audio jack Plug an optical (Toslink) AC-3 digital audio cable into this
jack.
www.gateway.com
5
Page 6

Component Icon Description
-2
Universal jack 2
(pink plug)
Universal jack 4
(black plug)
This jack is user configurable for one of the following:
■
Microphone: a microphone can be plugged into this
jack (Default).
Important: A microphone can only be plugged into this
jack or universal jack 1 on your notebook.
■
Off
■
Stereo in: an external audio input source (such as a
stereo) can be plugged into this jack so that you can
record sound on your notebook or play sound through
your notebook speakers.
■
Stereo out: an amplified external audio device (such
as a stereo) can be plugged into this jack so you can
play your notebook audio through that device.
Important: Stereo out can be configured as Stereo
Left/Right, Center/Subwoofer, and Surround
Left/Right.
For information on configuring this jack, see your user’s
guide.
This jack is user configurable for one of the following:
■
Off
■
Stereo in: an external audio input source (such as a
stereo) can be plugged into this jack so that you can
record sound on your notebook or play sound through
your notebook speakers.
■
Stereo out: an amplified external audio device (such
as a stereo) can be plugged into this jack so you can
play your notebook audio through that device.
Important: Stereo out can be configured as Stereo
Left/Right, Center/Subwoofer, and Surround Left/Right
(Default).
For information on configuring this jack, see your user’s
guide.
6
www.gateway.com
Page 7

Connecting to the port replicator
You can attach your notebook to the port replicator while your notebook is
off, on, or in Standby mode.
Attaching to the port replicator
To attach your notebook to the port replicator:
1 Connect external devices to the ports on the port replicator.
2 Align the connector holes on the bottom of your notebook with the
docking posts on the port replicator.
3 Press down on your notebook until it snaps into place.
Warning Press down on the outside edges of your notebook. Do
not press in the middle or you may damage the LCD
screen.
Important Your notebook may detect additional devices and add
drivers after being attached to the port replicator. This
process must be completed for components to work
correctly. Follow any on-screen instructions, if necessary.
www.gateway.com
7
Page 8

Disconnecting from the port replicator
You can separate your notebook from the port replicator while your notebook
is off or on (not in Standby or Hibernate mode).
To separate your notebook from the port replicator:
1 If your notebook is off, go to Step 2.
-OR-
If your notebook is on and using Windows XP, click
Computer
only while your notebook is docked.
-OR-
If your notebook is on and using Windows 2000, click
PC
notebook is docked.
. The Undock Computer menu item appears in the Start menu
. The Eject PC menu item appears in the Start menu only while your
Start, then click Undock
Start, then click Eject
2 Press down on the docking release latch. Your notebook will spring up
slightly.
3 Lift your notebook off of the port replicator.
8
www.gateway.com
Page 9

Securing your port replicator
You can secure your notebook and port replicator to an object by using the
security ring located on the left side of the port replicator and the Kensington
lock slot located on the left side of your notebook.
To secure your notebook and port replicator:
1 Open the security ring on the port replicator.
2 Attach your notebook to the port replicator.
3 Secure one end of the Kensington cable to a solid object, then run the other
end of the cable through the security ring and lock it into the slot provided
on the left side of your notebook.
www.gateway.com
9
Page 10

Safety, Regulatory, and Legal Information
United States of America
Telecommunications per FCC part 68
(applicable to products fitted with USA modems)
Your modem complies with Part 68 of the Federal Communications Commission (FCC) rules. On
the computer or modem card is a label that contains the FCC registration number and Ringer
Equivalence Number (REN) for this device. If requested, this information must be provided to the
telephone company.
An FCC-compliant telephone line cord with a modular plug is required for use with this device.
The modem is designed to be connected to the telephone network or premises wiring using a
compatible modular jack which is Part 68-compliant. See installation instructions for details.
The Ringer Equivalence Number (REN) is used to determine the number of devices which may be
connected to the telephone line. Excessive RENs on a telephone line may result in the devices not
ringing in response to an incoming call. In most areas, the sum of RENs should not exceed five
(5.0). To be certain of the number of devices that may be connected to a line, as determined by the
total RENs, contact the local telephone company.
If this device causes harm to the telephone network, the telephone company will notify you in
advance that temporary discontinuance of service may be required. The telephone company may
request that you disconnect the equipment until the problem is resolved.
The telephone company may make changes in its facilities, equipment, operations, or procedures
that could affect the operation of this equipment. If this happens, the telephone company will
provide advance notice in order for you to make necessary modifications to maintain
uninterrupted service.
This equipment cannot be used on telephone company-provided coin service. Connection to party
line service is subject to state tariffs. Contact the state public utility commission or public service
commission for information.
When programming or making test calls to emergency numbers:
■
Remain on the line and briefly explain to the dispatcher the reason for the call.
■
Perform such activities in the off-peak hours such as early morning or late evenings.
The United States Telephone Consumer Protection Act of 1991 makes it unlawful for any person to
use a computer or other electronic device to send any message via a telephone fax machine unless
such message clearly contains, in a margin at the top or bottom of each transmitted page or on the
first page of the transmission, the date and time it is sent, an identification of the business, other
entity, or other individual sending the message, and the telephone number of the sending
machine or such business, other entity, or individual. Refer to your fax communication software
documentation for details on how to comply with the fax-branding requirement.
10
www.gateway.com
Page 11

Canada
Telecommunications per Industry Canada CS-03
(for products fitted with an IC-compliant modem)
The Industry Canada label identifies certified equipment. This certification means that the
equipment meets certain telecommunications network protective, operation, and safety
requirements. The Department does not guarantee the equipment will operate to the users’
satisfaction.
Before installing this equipment, users should make sure that it is permissible to be connected to
the facilities of the local telecommunications company. The equipment must also be installed
using an acceptable method of connection. In some cases, the inside wiring associated with a
single-line individual service may be extended by means of a certified connector assembly. The
customer should be aware that compliance with the above conditions may not prevent
degradation of service in some situations.
Repairs to certified equipment should be made by an authorized Canadian maintenance facility
designated by the supplier. Any repairs or alterations made by the user to this equipment, or
equipment malfunctions, may give the telecommunications company cause to request the user to
disconnect the equipment.
Users should make sure, for their own protection, that the electrical ground connections of the
power utility, telephone lines, and internal metallic water pipe system, if present, are connected
together. This precaution may be particularly important in rural areas.
Warning To avoid electrical shock or equipment malfunction do not
attempt to make electrical ground connections by yourself.
Contact the appropriate inspection authority or an
electrician, as appropriate.
The Ringer Equivalence Number (RE N) assi gned to ea ch te rmin al devic e pro vide s an i ndic atio n of
the maximum number of terminals allowed to be connected to a telephone interface. The
termination on an interface may consist of any combination of devices subject only to the
www.gateway.com
11
Page 12

Additional information
See your user’s guide for additional technical support, safety, regulatory, and
legal information.
© 2003 Gateway, Inc. All rights reserved. Gateway, Gateway Country, the Gateway stylized logo, and the
black-and-white spot design are trademarks or registered trademarks of Gateway, Inc. in the United States and
other countries. All other brands and product names are trademarks or registered trademarks of their respective
companies.
12
MAN M675 PORTREPLICATOR GDE R0 11/03
www.gateway.com
 Loading...