

Page 1
ORiNOCO USB Client
Peer-to-Peer
Setup Instructions
Page 2
Introduction
Net
d
Installation overview
This setup guide supplements the existing ORiNOCO™
Getting Started guide. Use the procedures in this guide
to setup a peer-to-peer wireless network. To setup
residential gateway or LAN infrastructure network, refer
to the ORiNOCO Getting Started guide.
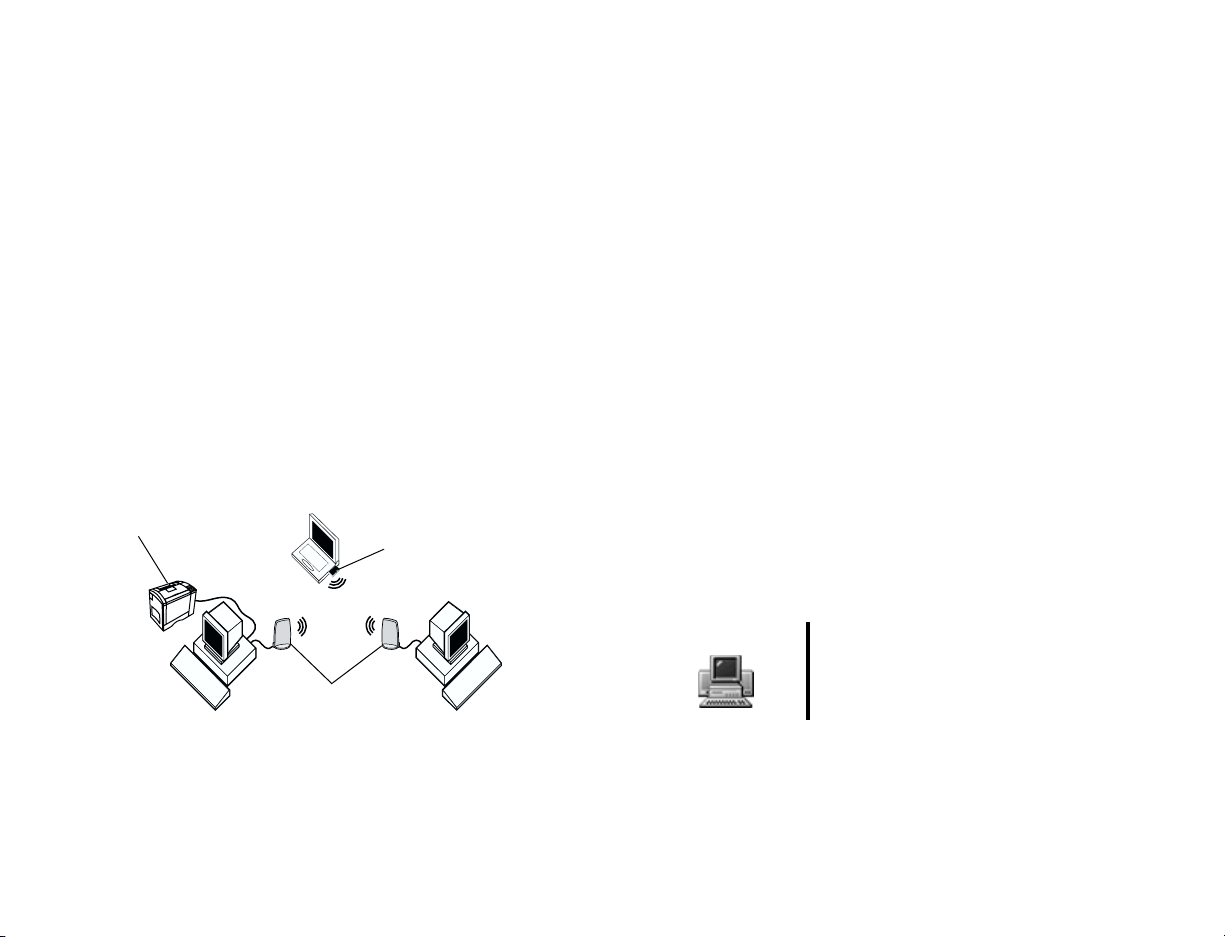
Peer-to-peer wireless
network setup
A peer-to-peer network lets you share files and printers
on each computer in the same workgroup. In a typical
home or office scenario, you can attach multiple
computers to a network, such as a notebook with
desktop computers.
worke
printer
USB clients
The procedures in this guide show you how to connect
two desktop computers with two wireless USB
clients/devices and connect a printer to the network.
Optional wireless
PCMCIA card
When you set up the wireless network, the procedures
will use two example users: Pat and Chris. When
prompted to enter specific information in your computer,
substitute your information in place of the example
users.
Important: Although the instructions in this setup guide
are complete, they do not provide exact detail on each
text field, option, or dialog box that you may encounter
in the software. To get more information on these items,
click the items Help or refer to the ORiNOCO Getting
Started guide.
Sequence of steps
It is recommended that you set up one computer at a
time. Once one computer is configured, follow the same
instructions to set up the second computer.
If a procedure is applicable for one computer, or the
same for both computers, it is represented by a
computer icon with additional information that explains
the specific set up items.
Computer 1 & 2
This is example text for a procedure
that is applicable for computer 1 and
computer 2.
Introduction 1
Page 3

To properly configure a peer-to-peer network, you will
perform a series of steps:
■ Install the Client Manager software
■ Install the USB Client hardware and install drivers
■ Configure the Client Manager software
■ Configure Windows settings
■ Enable file and print sharing
■ Log on the network and share files
®
Users installing the USB client on Windows
2000
computers should configure Windows setting as
described in “Windows 2000 configuration” on page 12.
If you encounter problems while setting up the network,
there are support sources that you can call or e-mail to
get answers to your questions. For more information,
see “Before contacting Gateway technical support” on
page 16.
Before you start
Unpack the ORiNOCO box and make sure you have the
following:
■ Installation CD
■ Installation Guide
■ One wireless USB client and USB connector cable
Installing the software
The ORiNOCO Client Manager software lets you
configure your workgroup and gives you capabilities to
monitor your network connection.
Important: You must install the Client Manager
software before connecting the USB client hardware,
otherwise the program files may not install correctly.
To install the Client Manager software:
1 Turn on the computer.
2 Insert the ORiNOCO CD into the CD drive. The CD
autoruns, then displays the ORiNOCO Main Menu.
3 Click Install Software from the Main Menu.
4 Click Client Manager from the Install Software
Menu, then follow the on-screen instructions.
5 Uncheck the I’d like to start Client Manager
checkbox before the installation wizard completes
installing the program. The program starts
automatically later in the setup process.
6 Click Finish. A readme.TXT file appears. Close the
file when you are finished reading the document.
7 Close the ORiNOCO window.
USB client
USB cable
2 Installing the software
Installation
guide and CD
Page 4

Connecting hardware and
Configuring Client Manager
installing the drivers
Once you install the Client Manager software, connect
the USB client to the computer, then install the drivers.
Important: Make sure that you have installed the Client
Manager software before completing this procedure.
To connect the USB client to the computer and install
the drivers:
1 Connect one end of the USB cable to the USB
client, then connect the other end to the USB port
on the computer.
2 If the Add New Hardware wizard appears, browse
the ORiNOCO CD and select the appropriate
operating system driver for your computer. For
example: Windows 2000 operating system would
be, D:\Drivers\Win_2000.
3 Once the drivers have been installed, the Add/Edit
Configuration Profile dialog box appears. Keep this
dialog box open and continue with configuring the
Client Manager software.
If the dialog does not open, click the icon in
the lower-right corner on the Task bar.
software
Once you install the drivers, specify a profile in the Client
Manager software.
Computer 1 & 2
1 In the Select Profile area, type a name for the
network configuration that you will be using. For
example: Home.
2 From the drop-down list, select Peer-to-Peer
Group.
3 Click Edit Profile. The Edit Configuration dialog
box appears.
The settings for computer 1 and
computer 2 must be the same.
Connecting hardware and installing the drivers 3
Page 5
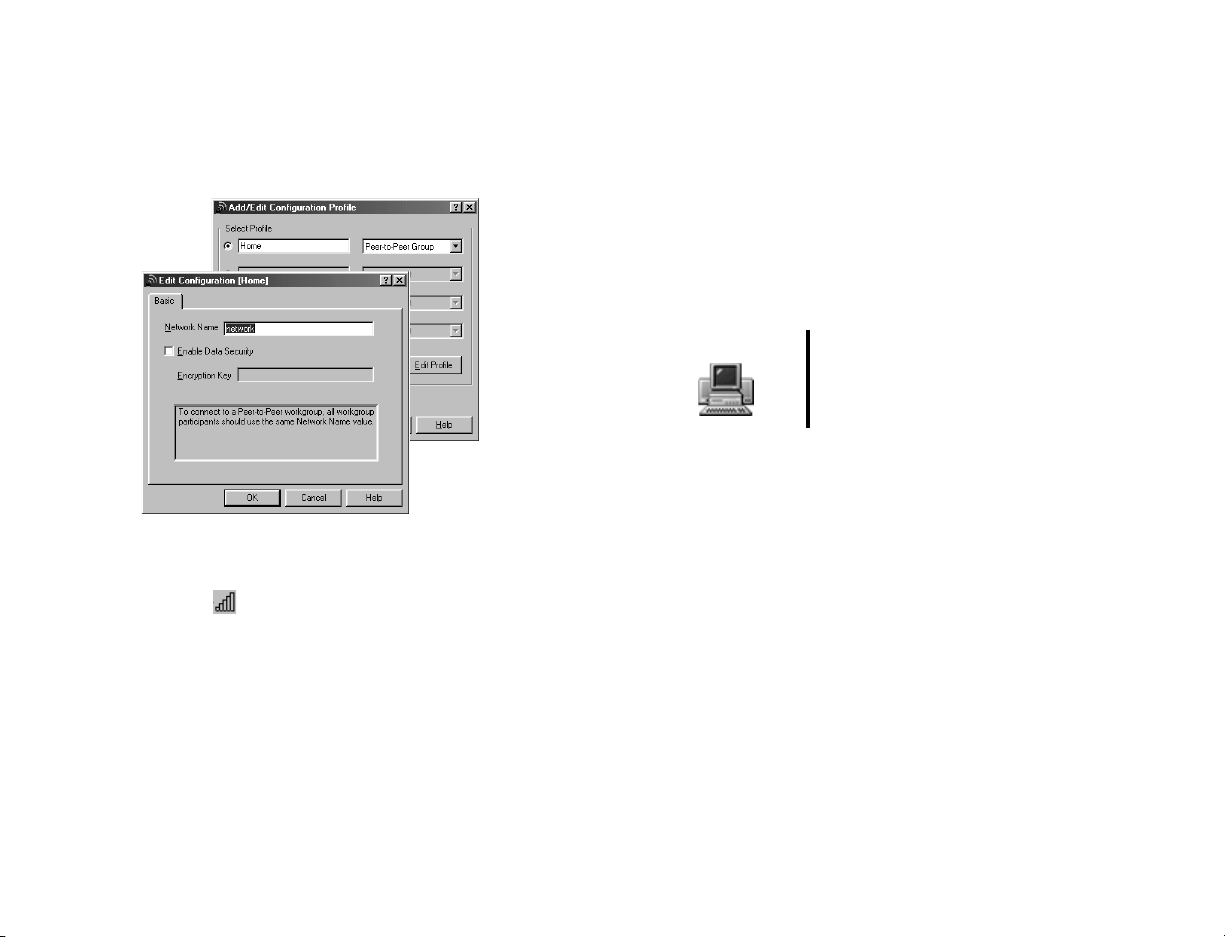
4 On the Basic tab, type a network name in the
Network Name field. For example, network.
This field is case-sensitive and must entered the
same for each computer.
5 Click OK to exit each dialog box. Perform the next
steps to verify your Client Manager configuration
settings.
6 Click the icon in the lower-right corner on the
Task bar. The ORiNOCO Client Manager dialog box
opens.
7 Click Actions, point to Select Configuration
Profile, then click Home.
8 Click OK.
9 Remove the CD from the CD drive.
Configuring Windows
Important: When installing the USB client on a
Windows 2000 computer, perform the configuration
procedures as shown in “Windows 2000 configuration”
on page 12.
The next series of configuration settings use the
Windows Network dialog box. This part of the set up
process is where you will substitute your specific
information in place of the example users: Pat and Chris.
Computer 1 & 2
To name the computer and network:
1 On the desktop, right-click Network
Neighborhood or My Network Places, then
select Properties. The Network dialog box opens.
2 Click the Identification tab. In the following
fields, enter:
■ Computer name - Pat (Computer 1)
■ Computer name - Chris (Computer 2)
This field identifies the computer to other users
on the network. Use a computer name of up to
15 characters with no blank spaces. Each
computer name must be unique on your network.
■ Workgroup - workgroup (Computers 1 & 2)
Configure the second computer after
you set up the first computer.
4 Configuring Windows
Page 6
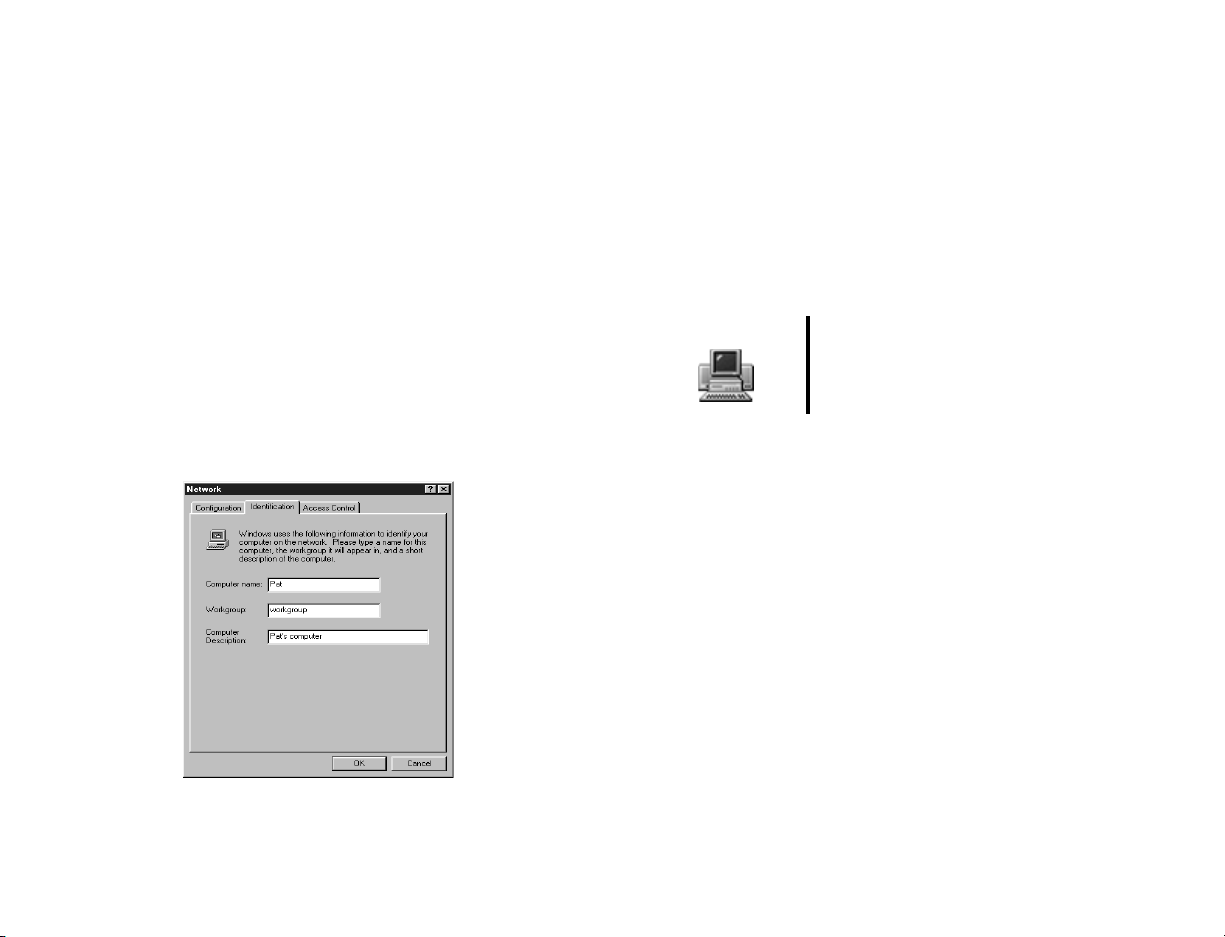
Identifies the group on the network to which this
computer belongs. Use a workgroup name of up
to 15 characters with no blank spaces (it cannot
contain of any of these characters: ; : " < >
* + = \ | ? ,).
The workgroup name must be the same for all
computers in your network workgroup, and must
be different than any computer name on your
network.
■ Computer Description - Pat’s computer
(Computer 1)
■ Computer Description - Chris’s computer
(Computer 2)
This is an optional comment that other users will
see when they look at your computer on the
network.
3 Leave the Network dialog open and continue with
entering IP addresses in the next section.
Entering IP Address and Subnet
Mask
Each computer connected to the wireless network must
have a unique address. To use the TCP/IP protocol on
each computer, you must manually set a static IP
address (one that does not change).
Computer 1 & 2
To enter the IP Address and Subnet Mask:
1 While in the Network dialog box, click the
Configuration tab.
2 Select the TCP/IP -> ORiNOCO USB Card
(Windows Me, TCP/IP -> ORiNOCO USB
Adapter) protocol from the list, then click
Properties.
3 On the IP Address tab, select Specify an IP
address.
4 Enter the following information:
■ IP Address - 192.168.1.1 (Computer 1)
■ IP Address - 192.168.1.2 (Computer 2)
Configure the second computer after
you set up the first computer.
Configuring Windows 5
Page 7

The last number can be any number between 1
and 252. For this network, use 1 for the first
computer, then use 2 for the next computer, and
so on for each additional computer that you may
add to the network.
■ Subnet Mask - 255.255.255.0
Enabling file and printer sharing
Computer 1 & 2
Configure the second computer after
you set up the first computer.
This number is the same for the second computer.
5 If you are running Windows Me, make sure the
Detect Connection to Network Media
checkbox is selected.
6 Click OK to return to the Network dialog box, then
continue with enabling file and printer sharing.
To enable File and Printer Sharing:
1 While in the Network dialog box, click the
Configuration tab.
2 Click File and Print Sharing. The File and Print
Sharing dialog box opens.
3 Select the appropriate file and print sharing
options:
■ To let this computer share its files, select the
option
I want to be able to give others access to
my files.
■ To let this computer share its printer, select the
option
I want to be able to allow others to print
to my printer(s).
4 Click OK to close this dialog box and the Network
dialog box, then restart the computer to save your
network settings.
5 The computer restarts. The network settings are
completed.
6 Continue with sharing folders and drives.
6 Configuring Windows
Page 8

Sharing folders and drives
Follow the next steps to allow other users on the network
to see your folders and drives.
Computer 2
To set up folder and drive sharing:
1 Right-click on My Computer, then select
Explore.
2 Navigate to the folder or drive that you want to
share, right-click on it, then select Sharing. The
Sharing page of the properties dialog box opens.
(
When setting up the second
computer, share the drives and
folders that you want computer 1 or
others on the network to see.
3 Click Share as, then type the required
information in the fields:
■ Share Name - MYDOCUMENTS (Computer 1)
■ Share Name - Chrisdocs (Computer 2)
This is the name that others see when they view
the shared folder or drive over the network. You
can either keep the suggested name or change it.
The entry should not contain any spaces.
■ Comment - Monthly project reports
(Computer 1)
■ Comment - Chris C drive (Computer 2)
This is an optional field that you can use to add
more information about the shared folder or drive.
This information will remain in the Comment field
on the Sharing tab of the Properties window.
■ Access type - Read-Only (Computer 1)
■ Access type - Full (Computer 2)
Lets you specify the type of access others have
to the folder. To let others open or copy files, click
Read-Only. To let them also change, add, or
remove files, click Full. To enable different types
of access based on a password, click Depends
on Password.
■ Passwords - <optional> (Computers 1 & 2)
Lets you specify the passwords that others need
to use to access the shared folder. If you do not
want to use a password, leave the password box
blank.
Configuring Windows 7
Page 9

4 Click OK to accept the settings. The folder icon
now has a hand under it to show that it is shared.
Sharing a printer
If you have a printer attached to your computer, you can
allow others to print documents from their computer to
your printer.
Computer 1
To set up printer sharing:
1 Install the printer hardware and software on the
computer, according to the instructions that came
with the printer. Make sure that the printer is
working properly before continuing.
2 Click Start, then select Settings, then Printers.
The Printer window opens.
8 Configuring Windows
Perform this procedure on the
computer that is connected to the
printer.
3 In the Printers window, click the printer that you
want to share.
4 Right-click the printer icon, then select Sharing.
The Sharing page of the printer’s properties dialog
box opens.
Page 10

5 On the Sharing page, select the Shared As
option, type the appropriate information:
■ Share Name - HP
This is the name that others see when they view
the shared printer over the network. Keep the
suggested name or change it.
■ Comment - Pat’s shared printer
This an optional field that you can use to add more
information about your shared printer.
■ Password - <optional>
Lets you specify a password that others need to
access your shared printer. If you do not want to
use a password, leave the password box blank.
6 Click OK to accept the settings. The printer icon
now has a hand under it to show that it is shared.
Now that you have installed and shared the printer, see
“Accessing a shared printer” on page 10 to let others
print to the networked printer.
Logging on the network
Once you complete all the configuration settings, you
need to log off the computers, then log on to the
network. This enables you to access the networked
printer and view files on the workgroup.
To log on to the network:
Use this procedure to log on to the network with
Windows 98 and Windows Me computers. This procedure
creates a custom profile for each user.
Computer 1 & 2
1 On each Windows 98 or Windows Me computer,
click Start, then select Logoff to log off the
current session. The computer restarts and the
Enter Network Password dialog box appears.
2 Type the user name in the User Name field, then
enter the password, if applicable.
■ User name - Pat (Computer 1)
■ User name - Chris (Computer 2)
Perform this procedure for both
computers.
Configuring Windows 9
Page 11

3 Click OK.
4 Access the file and folders as described in
“Accessing shared files” on page 10.
9 Once the drivers have been installed, indicate
whether you want to print a test page, then click
Finish. The printer is added to your Printer page.
Accessing a shared printer
Computer 2
To access a shared printer:
1 Click Start, then select Settings, then Printers.
The Printer window opens.
2 Double-click the Add Printer icon.
3 When the Add Printer Wizard opens, click Next.
4 Select Network Printer, then click Next.
5 Click Browse and search your network to find the
computer to which the printer is attached.
6 Highlight the printer you want to share, then click
OK. The network path to the printer appears.
7 Click Next to continue.
8 Type the printer name, or accept the default, then
click Next. Windows installs the printer driver to
your computer.
If the printer files are not found, you may need
to install the printer drivers from the printers
installation disk.
Once the printer has been installed
and configured, repeat the following
procedure on each networked
computer.
Accessing shared files
This procedure is applicable for sharing files between
Windows 98 and Windows Me operating systems. If you
want to share files between Windows 98, Windows Me,
and Windows 2000, you must create a user name in
Windows 2000, then log on to each operating system
using that name.
To create a user logon in Windows 2000, see “Creating
users in Windows 2000” on page 14.
10 Configuring Windows
Page 12

To access shared files:
1 Double-click the Network Neighborhood or My
Networking Places icon on the desktop. The
Network Neighborhood window opens.
2 Double-click the computer (for example, Pat) that
has the files you need.
To view computers on other workgroups,
double-click Entire Network. A window opens
containing any items shared by computers on
other workgroups.
3 Double-click the drive, folder, or file you want to
use. A window opens containing the contents of
the shared item.
Disabling file and print sharing
There may be times when you do not want other network
users to access your files or print from the networked
printer. Use the following steps to disable those features.
To disable file and print sharing:
1 On the desktop, right-click Network
Neighborhood or My Network Places. The
Network dialog box opens.
2 Select the Configuration tab.
3 Click File and Print Sharing. The File and Print
Sharing dialog box opens.
4 Deselect the file and print sharing options from
the File and Print Sharing dialog box.
5 Click OK. The Network dialog box closes.
Configuring Windows 11
Page 13

Windows 2000
configuration
After installing the ORiNOCO software, the USB client
and drivers, follow these procedures to:
■ Configure Windows 2000 settings (IP address)
■ Enable file sharing
■ Create a new user
■ Share a drive
■ Log on to the network and access shared files
Entering IP Address and Subnet
Mask
Each computer connected to the wireless network must
have a unique address. To use the TCP/IP protocol on
each computer, you must manually set a static IP
address (one that does not change).
To enter the IP Address and Subnet Mask:
1 On the desktop, right-click My Network Places,
then select Properties. The Network and Dial-up
Connection dialog box opens.
2 Right-click the LAN connection icon, then select
Properties. The LAN connection dialog box
opens.
3 Select the Internet Protocol (TCP/IP) from the
list, then click Properties.
4 On the Internet Protocol (TCP/IP) Properties page,
select Use the following IP address.
5 Enter the following information:
12 Windows 2000 configuration
Page 14

■ IP Address - 192.168.1.3 (Computer 3)
The last number can be any number between 1
and 252.
■ Subnet Mask - 255.255.255.0
This number is the same for each computer.
6 Click OK. Continue with enabling file sharing.
Enable file sharing in Windows 2000
To enable file sharing:
1 On the desktop, right-click My Network Places,
then select Properties. The Network and Dial-up
Connection dialog box opens.
2 Right-click the LAN connection icon, then select
Properties. The LAN connection dialog box
opens.
3 Select the File and Printer Sharing for
Microsoft Networks option from the list, then
select the checkbox.
4 Click OK and continue with the next procedure.
Windows 2000 configuration 13
Page 15

Creating users in Windows 2000
Use this procedure to create a new user logon in
Windows 2000. The user name must match for each
computer on the network. For example, Windows 98 and
Windows Me user names must be entered as the
Windows 2000 name.
Important: You must have Administrator privileges to
create new users.
To create a new user in Windows 2000:
1 Click Start, then select Settings, then Control
Panel. The Control Panel window opens.
2 Double-click the Users and Passwords icon. The
Users and Passwords dialog box opens.
3 Click Add. The Add New User wizard appears.
4 Follow the wizard and enter the appropriate
information in the fields:
■ User name - Pat
When others want to see your shared files, they
must log on their computer with this user name.
■ Full name - <optional>
■ Description -<optional>
5 Click Next to continue through the wizard.
6 Select the Standard User option, then click
Finish. The Users and Passwords dialog box
returns.
7 Click OK, then close the open dialog boxes.
Continue with the next procedure.
14 Windows 2000 configuration
Page 16

Sharing drives in Windows 2000
Sharing a drive in Windows 2000:
1 Right-click on My Computer, then select
Explore.
2 Navigate to the folder or drive that you want to
share, right-click on it, then select Sharing. The
Sharing property page appears.
3 Click Share this folder, then type the required
information in the fields:
■ Share name - patsdocs
This is the name that others see when they view
the shared folder or drive over the network. You
can either keep the suggested name or change it.
The entry should not contain any spaces.
■ Comment - <optional>
This is an optional field that you can use to add
more information about the shared folder or drive.
4 Select the Maximum allowed option from the
User limit field. This setting specifies the type of
access others have to the folder.
5 Click OK to accept the settings.
Logging on the network with
Windows 2000
Use this procedure to log on to the peer-to-peer wireless
network and share files with other computers.
Prior to logging on to this computer you must have
created a user name profile on the Windows 2000
computer. To create a user in Windows 98 or Windows
Me, see “Logging on the network” on page 9.
Windows 2000 configuration 15
Page 17

To log on to a network with multiple-operating
systems:
1 Restart the Windows 2000 computer and log on
to the network with the user name Pat.
2 On the Windows 98 or Windows Me computer, click
Start, then select Logoff to end the current
session. The Enter Network Password dialog box
appears.
3 Type the user name Pat, in the User Name field,
then enter the password, if applicable.
4 Click OK.
5 On the Windows 2000 computer:
■ To access file and folders, double-click My
Networking Places icon on the desktop. The
Network Neighborhood window opens.
■ To view computers on other workgroups,
double-click Entire Network. A window opens
containing any items shared by computers on
other workgroups.
6 Double-click the drive, folder, or file you want to
use. A window opens containing the contents of
the shared item.
Before contacting Gateway
technical support
See the ORiNOCO Getting Started guide and Windows
online Help to get answers to your peer-to-peer
networking questions. You can also go to
www.gateway.com and get assistance from Gateway
technical support.
Specially trained technical support professionals are
available to provide you with technical assistance for
your networking product 24 hours a day, seven days a
week.
16 Before contacting Gateway technical support
Page 18

MAN WIRELESS USB CARD GDER0 07/01
 Loading...