

Page 1

STARTERGUIDE
®
Page 2

Thank you!
Thank you for your purchase! We want to make your
experience a satisfying one, so we’ve put together tips
to help you get started with your Gateway computer.
Page 3

Contents
Getting started with Windows ...............................................4
Internet ........................................................................................... 8
E-mail ............................................................................................... 9
Playing CDs and DVDs .............................................................10
Creating CDs and DVDs ...........................................................11
System recovery .........................................................................12
Security .........................................................................................16
Wireless networking .................................................................20
More help .....................................................................................22
Page 4
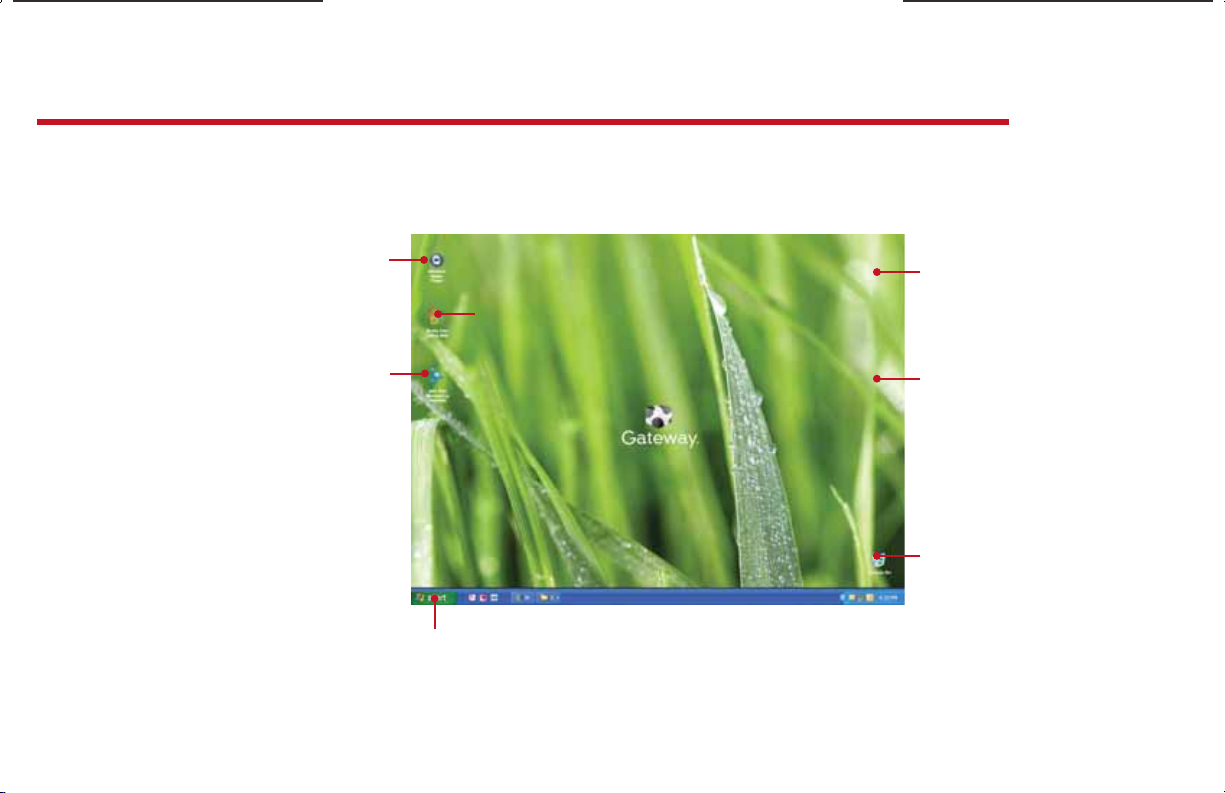
we do Windows
After you start your computer and complete the Windows® setup, the rst thing you’ll see on
your screen is the Windows desktop. The desktop includes a taskbar, Start button, and Recycle
Bin icon. Other icons can be added depending on your computer’s con guration.
Click the
Windows
Media Player
icon to play
CDs and DVDs
Click the
AOL icon
to set up
and send
e-mail
4
Click the O ce Trial icon
to write letters or create a
spreadsheet
Click the Start button to access programs
and to turn your computer o
For more information about Windows, see “Windows basics” under Help and Support in the Start menu.
This is the
Windows
desktop
Add icons
of your own
- see your
user guide for
instructions
Drag items to
the Recycle
Bin to delete
them
Page 5
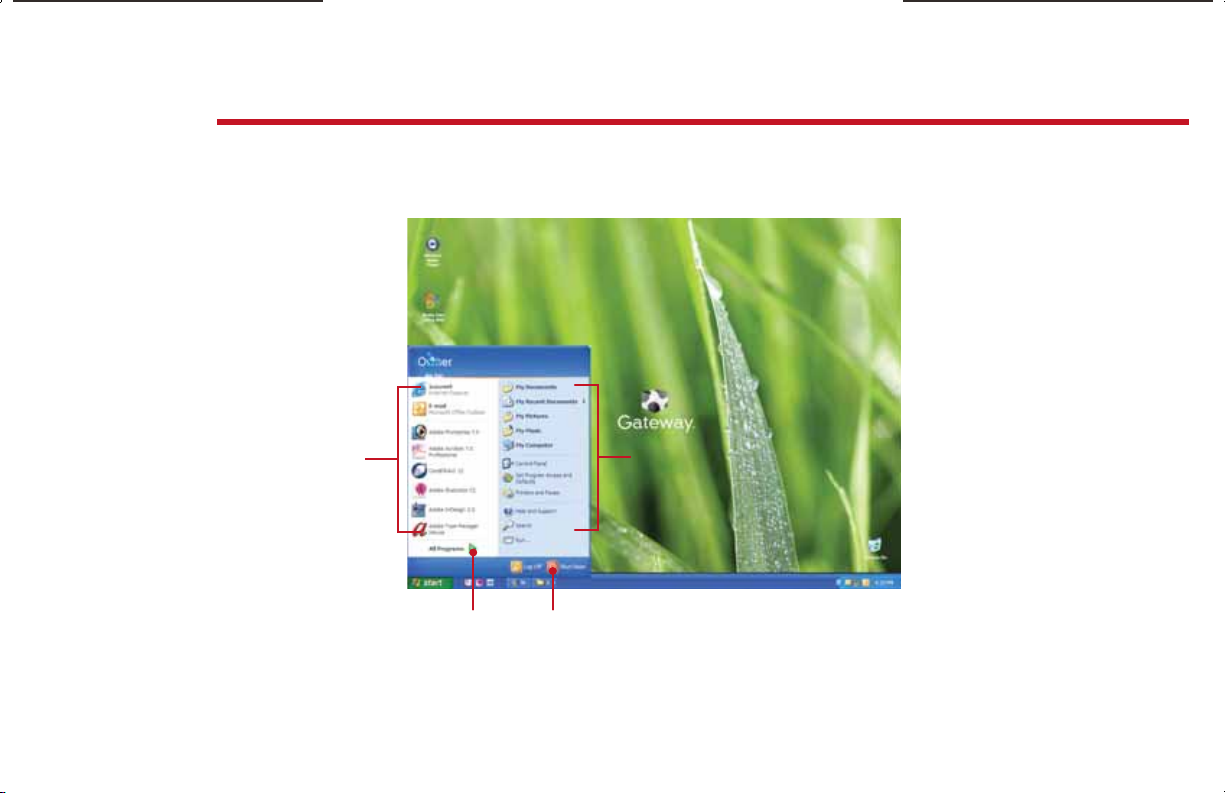
getting things started
The Start menu is the command center of your computer. Whether you want to start a program,
nd a le, or change settings on your system, the Start menu is where it all begins.
Click here to
access the
Internet, e-mail,
and your most
frequently used
programs
Click here to nd a le or folder,
to change settings on your
computer, or to get help.
Click here to see
all your programs
Click here to shut
down your computer
For more information about Windows, see “Windows basics” under Help and Support.
5
Page 6
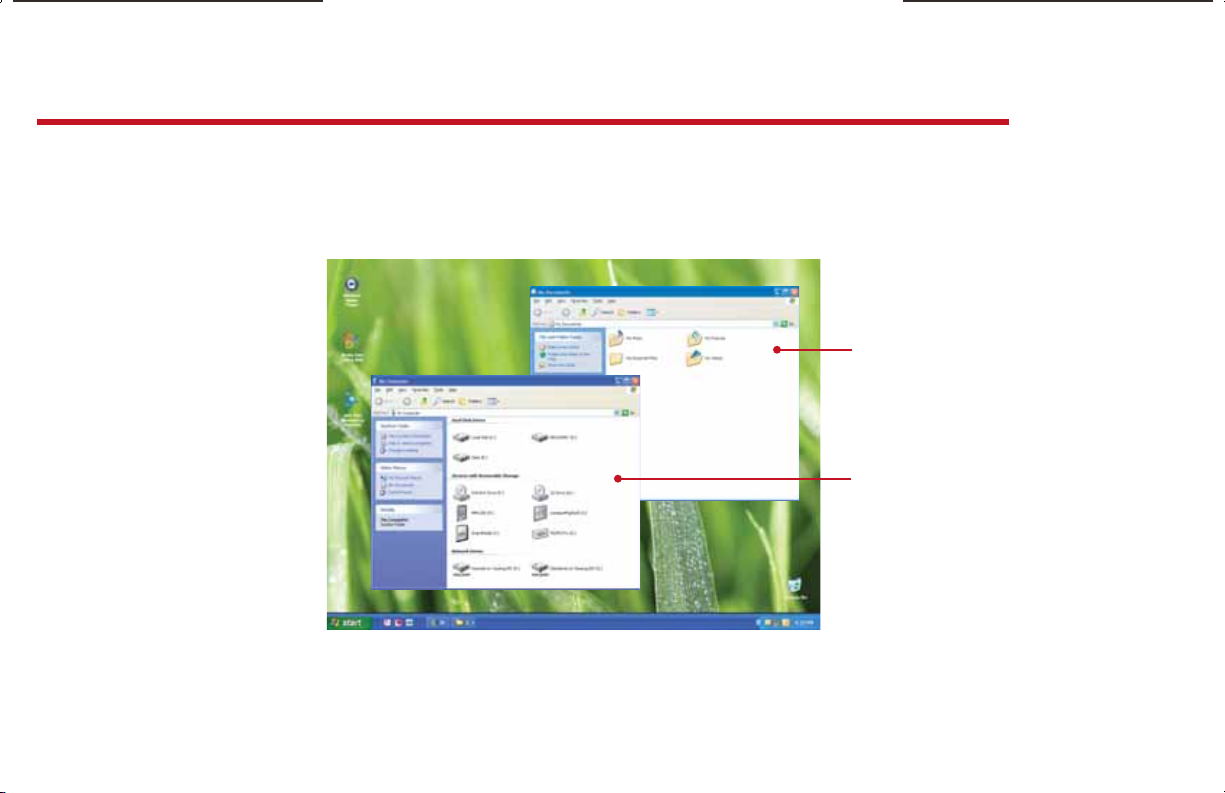
maintaining order
Managing les and folders starts with My Computer. From there, you can see everything on
your computer. To get to My Computer, click the Start button, then click My Computer. To
save something right away, use the My Documents folder that has already been set up for you.
To access that folder, click the Start button, then click My Documents.
My Documents
Already created
for you, this
folder is ready for
immediate use
My Computer
Look here to see
what’s on your
computer
6
For more information about Windows, see “Windows basics” under Help and Support.
Page 7
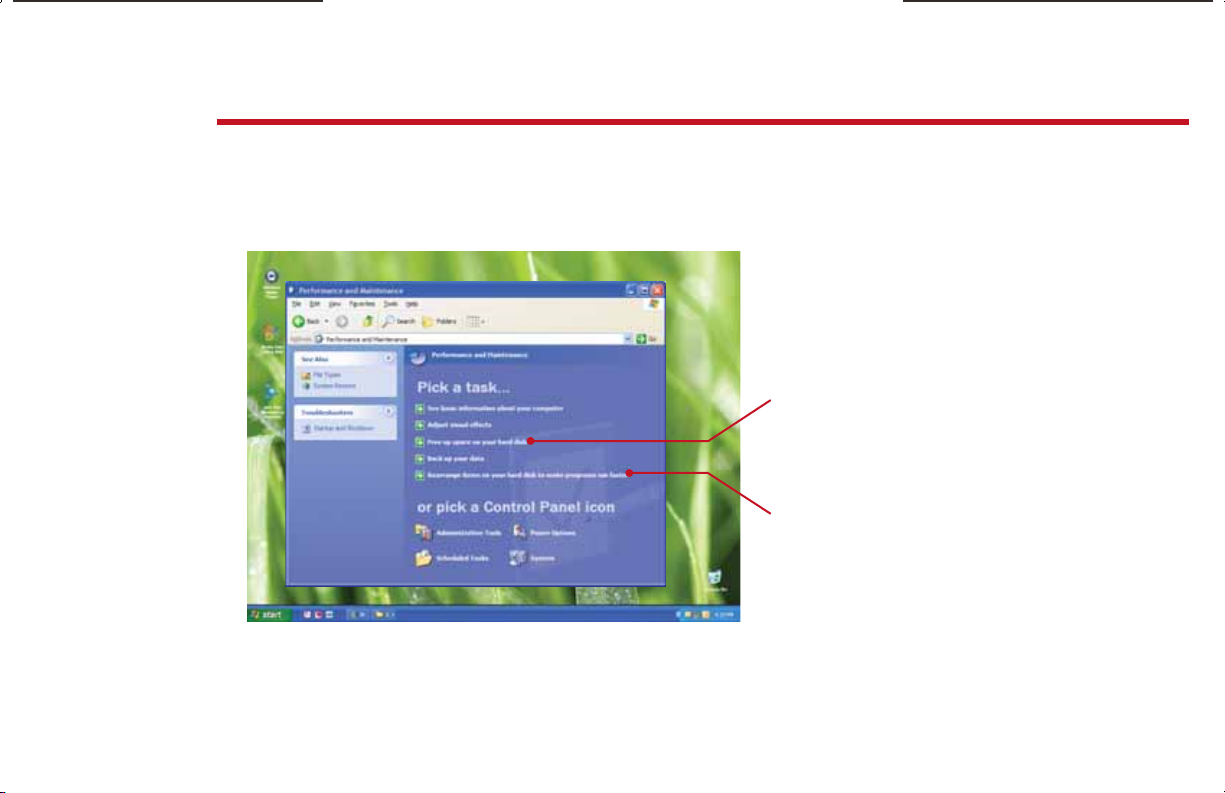
improving performance
Keep your computer in top running condition with regular maintenance. Click Start, Control
Panel, then click Performance and Maintenance. Select an option and follow the instructions.
Do this regularly and you’ll have a smoother-running system.
Clean it up
Click here to eliminate
performance and hard
drive space problems
Speed it up
Click here to help
programs run faster
and to open les
more quickly
For more information, see “Performance and maintenance” under Help and Support.
7
Page 8
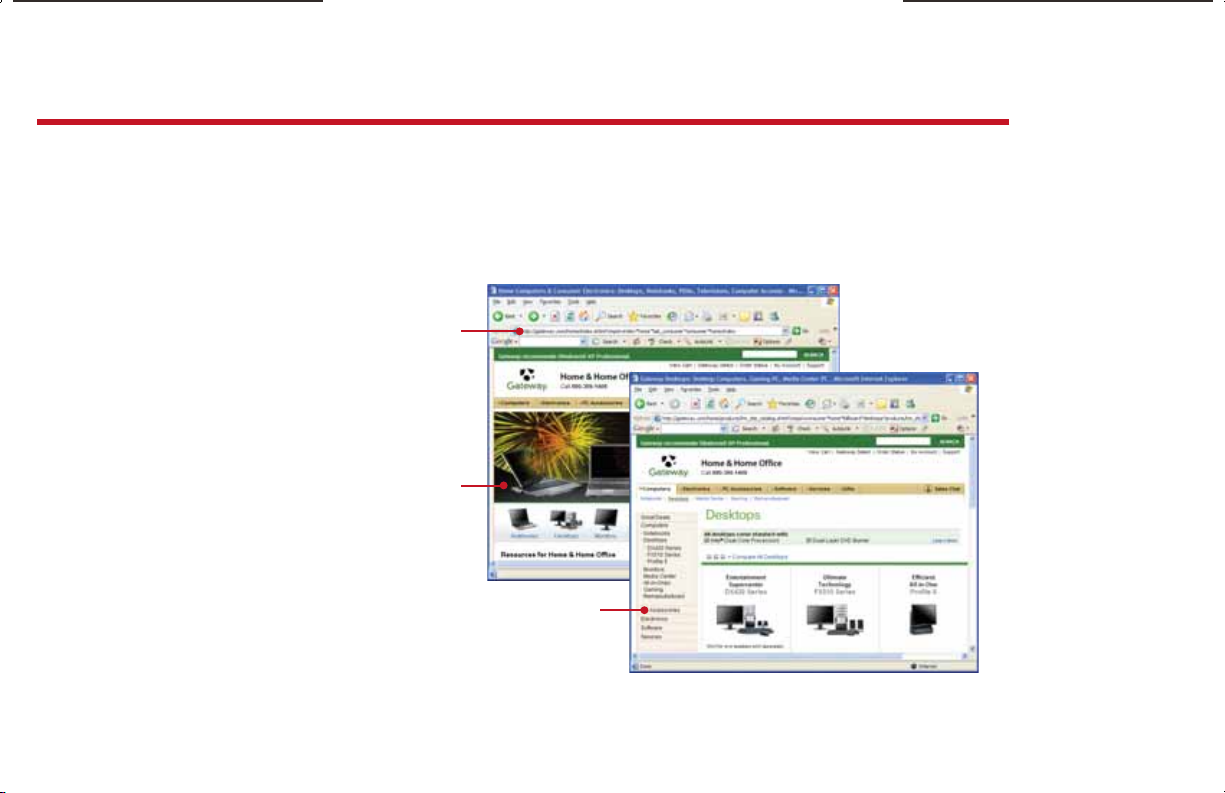
surfi ng the ’net
Explore the World Wide Web with an Internet connection. Just connect your computer to
a telephone line, Digital Subscriber Line (DSL), or cable TV line and sign up with an Internet
Service Provider (ISP) like America Online.
To get to the Internet, click Start, then click Internet Explorer or the ISP you’ve connected with.
Type in an Internet address, such as www.gateway.com, click Go, and you’re on your way.
The address bar is
where you type in
the Internet address
or URL (Universal
Resource Locator)
This is a
Web page
This is a linked Web page
If your pointer arrow turns into a hand
when you move over something, it’s a link.
Click on it and see where it takes you!
8
To learn more about America Online, click the AOL icon on your Windows desktop.
Page 9

welcome to e-mail!
Staying in touch with family and friends is easy with e-mail and is usually free with your Internet
account.
To send e-mail, connect to your ISP, click Start, then click E-Mail. When your default e-mail
program opens. Complete any setup required, then click New and type the e-mail address of
the person that you want to send a message to in the To box. Add a description in the Subject
box, type the e-mail message, then click Send. Your message will arrive at most e-mail addresses
in seconds.
Type the e-mail
address of the person
you want to send a
message to here
Include others in your
message by typing
their e-mail addresses
here or in the To box
For more information about e-mail, see “Using the Internet” in your online user guide.
This is the user name
part of an e-mail address
Type a short description
of your message here
This is the Internet domain name
part of an e-mail address
9
Page 10

for your listening and viewing pleasure...
Enjoy listening to favorite music CDs or watching DVDs with software already installed on your
new Gateway computer.
To listen to a music CD or watch a movie on DVD, click the Windows Media Player icon on
your Windows desktop. Put the CD or DVD into the CD or DVD drive on your computer, then
click the Play button (
Media Player.
Note: You
must have a
DVD drive to
play a DVD
). You can control how the music CD or video DVD plays from Windows
Songs
or scene
selections
from the CD
or DVD you
are playing
are listed here
Click these buttons to play, pause, or stop a CD
or DVD. You can also control the volume here.
10
For more information about using media, see your online user guide.
Page 11

rip, burn, play
Create a custom music CD with MP3s you rip yourself, or create a video DVD of home movies
or special videos. If your computer came with a DVD burner, you can do it all with easy-to-use
software already installed on your Gateway computer.
Create an MP3 music le
To create an MP3, click the Windows Media Player
icon on your Windows desktop. Put a music CD in
the CD drive on your computer. Make sure the song
or songs you want to create MP3s of are checked,
then click Rip. Windows Media Player will create
MP3s and save them to the My Music folder in My
Documents.
Create a DVD
To save content such as data or movies to DVD, open
Power2Go from the Start menu. Put a blank, writable
DVD into the DVD burner on your computer. Click
Video/Photo Disc , then select your DVD burner
and the type of disc you are creating. Click OK, then
click Add Files. Select the les or folders you want
to burn to the DVD, then click Import. When you
have added all of your les, make any selections to
customize your video DVD, click Burn, then click OK.
Note: you
must have a
DVD burner to
create a DVD
For more information about using media, see your online user guide.
11
Page 12

recovering your system
In the unlikely event that you experience software problems, tools for recovering your computer
have been included. You can:
• Return your computer to a previously working condition.
• Reinstall individual programs or device drivers from recovery discs.
• Reinstall the complete operating system and return your computer to its factory
condition.
First things rst
When you rst get your computer, we recommend that you make a backup copy of the drivers
and programs that are hidden on your hard drive. Your backup copy is called a recovery disc.
Before you create one, make sure that your computer has a recordable drive and have blank
discs ready. You’ll need either several CD-R discs or one DVD-R or DVD+R disc, depending on the
type of recordable drive you use. (CD-RW, DVD-RW, and DVD+RW discs will not work).
To create the disk, click Start, All Programs, System
Recovery, then click Create My Drivers-Applications
CD(s). Click Burn ISO, Start Creation, then click the type
of recordable disc you want to use. Insert a blank disc
into the recordable drive, then click OK and follow the
on-screen prompts. Label each disc after it has recorded.
When you see the message The Recovery ISO Image has
been created successfully, remove the last disc from the drive, then click OK.
12
For more information on restoration, see “Recovering Your System” in your online user guide.
Page 13

backing up a bit
Take a trip back in time
Microsoft System Restore lets you roll back your computer to a previous state when everything
worked right. Every time you install new software, and every 24 hours (while your computer is
turned on), Microsoft System Restore takes a snapshot of your system settings and saves it as a
restore point. In most cases of hard-to-resolve software problems, you can return to one of these
restore points to get your computer running again.
1 Click Start, Help and Support, then click
Undo changes to your computer with
System Restore.
2 Click Restore my computer to an earlier
time, then click Next.
3 Click a bold date on the calendar (Step 1 on
the screen), click a restore point in the list
(Step 2 on the screen), then click Next.
4 Read all notices on the screen, click Next,
then follow the on-screen instructions to
nish the restoration.
For more information on restoration, see “Recovering Your System” in your online user guide.
13
Page 14

back to basics
Reinstalling software
If you know which application (program) or device driver is causing problems, you can x it by
using the recovery discs you created.
1 Click Start, All Programs, System
Recovery, then click Application &
Driver Recovery.
2 Click the driver or application you want
to install, then click Next. When the
installation is nished, click Ye s to install
more drivers or applications, or click Quit
to exit.
Reinstalling the operating system
A backup copy of your hard drive’s original factory-installed contents is saved on a hidden area
of your hard drive. If you need to restore your computer to its original factory settings, you can
recover from your hard drive.
1 Get the operating system disc that came with your computer and have it ready.
2 Turn on or restart your computer, then press the F11 key on your keyboard while your
computer is starting.
3 Follow the on-screen instructions and insert the operating system disc when prompted.
14
For more information on system recovery, see “Recovering Your System” in your online user guide.
Page 15

back to basics, continued...
4 Continue to follow the on-screen instructions, and click one of the following system
recovery options when prompted:
• Full System Restore (Destructive) reformats the hard drive and restores the
system software as it was when you purchased your computer. This process
deletes your data les.
• Full System Restore with Backup (recommended) moves the contents of the
hard drive to the C:\ My Backup folder and installs a new copy of Windows XP.
This option saves your existing data les, but all programs must be reinstalled
and the program settings recon gured. You need at least 4 GB of hard drive
space to use this restore option.
5 Click Next, then click Ye s .
6 When le recovery has nished, click Restart. Your computer restarts, and Windows
nishes its setup and installation.
IMPORTANT
• If your hard drive has failed and you can’t restore the software from the hard drive, contact
Gateway Customer Care for help.
• After you restore your computer, it will appear with the same les and programs it had when it
shipped from the factory. You still need to download Windows updates and antivirus updates to
bring your computer’s software up to date.
For more information on system recovery, see “Recovering Your System” in your online user guide.
15
Page 16

keeping your computer safe
Your Gateway computer comes with hardware and software features that let you use your
computer safely and securely. Use these tools regularly to improve the security of personal
information stored on your computer. To keep information secure you should:
• Regularly update your McAfee SecurityCenter software
• Install all critical updates for Microsoft Windows
• Use BigFix, a program provided by Gateway, to give you access to the latest information
ranging from software bugs to security alerts
16
For more information on security, see “Protecting Your Computer” in your online user guide.
Page 17

playing it safe
McAfee SecurityCenter
McAfee SecurityCenter helps protect your computer from viruses, hackers, and privacy threats.
At the same time it helps prevent e-mail fraud and keep con dential information safe.
To run McAfee SecurityCenter, click Start, All Programs, McAfee, then click McAfee
SecurityCenter.
Your computer came with McAfee
VirusScan, Personal Firewall, and
Spamkiller turned on. McAfee Privacy
Service is turned o . To turn on that
service and keep the other ones on as
well, connect to the Internet and register
McAfee SecurityCenter when prompted.
You need to extend your subscription
to update McAfee SecurityCenter after
the complimentary trial period ends.
For more information on security, “Protecting Your Computer” in your online user guide.
17
Page 18

safe and sound
Windows Update
If a hacker nds a way to bypass the security features built into Windows XP, Microsoft creates a
high-priority Windows update to x the problem. You should update Windows regularly to keep
your computer secure.
To run Windows Update, click Start, All Programs, then click Windows Update. Click Express
to download high priority updates including those that are security-related.
You can
schedule
automatic
updates with
Windows
Update
18
For more information on security, see “Protecting Your Computer” in your online user guide.
Page 19
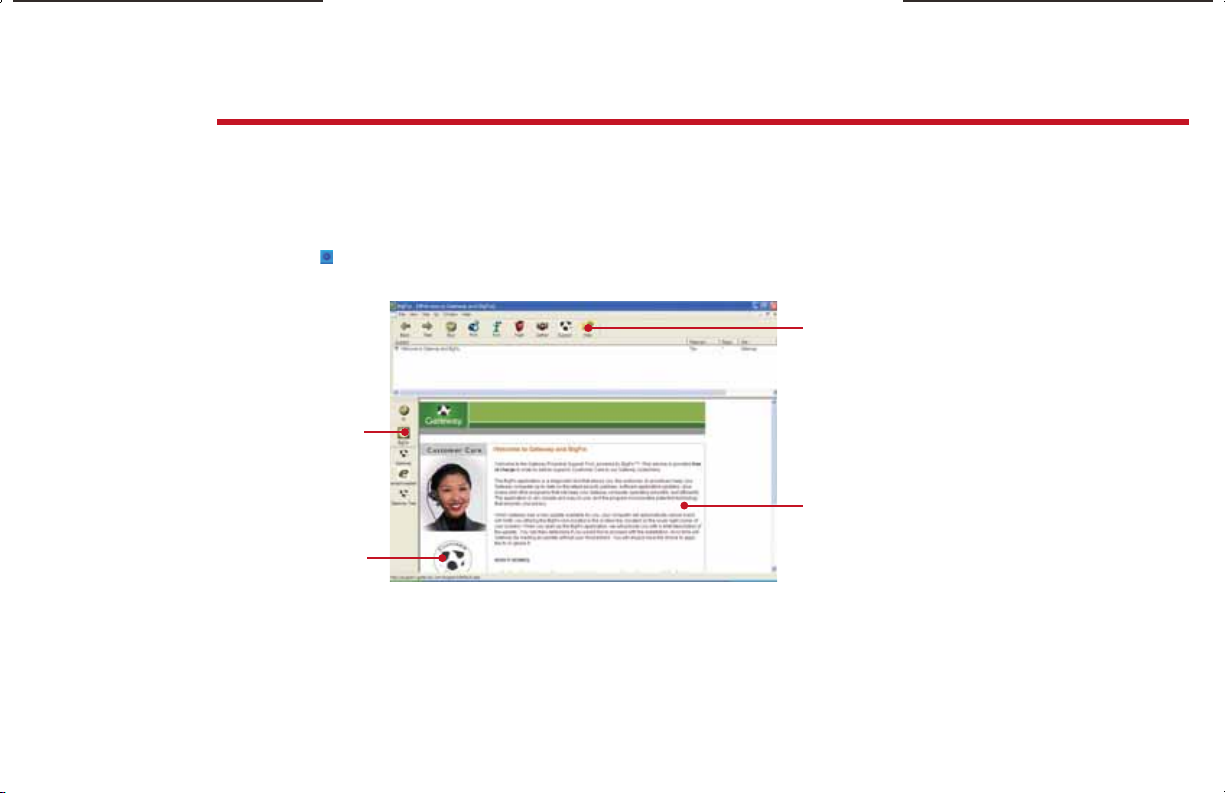
maintaining security
BigFix
Your computer may include BigFix. BigFix monitors your computer for problems and con icts.
It automatically gathers information about the latest bugs, security alerts, and updates from
BigFix sites on the Internet. Whenever BigFix detects a problem, it alerts you by ashing the blue
taskbar icon ( ). To x the problem, click that icon and BigFix will open.
Click here,
then click
Tutorial to
learn more
about BigFix
Click here for
information about
updates speci c
to your computer
Details and
information
Click here to go
directly to the
Gateway Web
support site
about updates
are provided here
For more information on security, see “Protecting your computer” in your online user guide.
19
Page 20

no more wires
You can use your computer wherever you like. With wireless networking, you can check e-mail,
surf the ‘net, work on that important paper, even use your printer, all from the comforts of the
sofa, the kitchen, the patio—anywhere you want!
You can set a network up in your home by purchasing an access point and either purchasing or
renting a cable or DSL modem (see your Internet service provider for more information).
Desktop or notebook computer
Cable or
DSL modem
Access point
Many Gateway notebooks come with wireless networking already installed. If your notebook
does not have wireless installed, you can buy a wireless PC Card from Gateway at
accessories.gateway.com.
20
For more information about networking, see “Networking Your Computer” in your online user guide.
Page 21

going wireless
Despite what you might think, wireless networks are not just for notebooks. You can also
connect your desktop computer to your wireless network with a wireless PCI card or USB
adapter. Check out accessories.gateway.com for these and other wireless supplies.
What about printing? You can print from every computer on your network even if you have only
one printer. There are a few ways to do that:
• Use a printer with built-in wireless networking
• Connect the printer to your networked desktop computer, then share the printer
• Connect the printer to your access point if the access point includes a USB or parallel
port
• Use a wireless print server
Hotspots
If you are on the road with your wireless notebook and want to
check e-mail or browse the Internet, you’ll need to connect to a
hotspot. A hotspot is a high-speed wireless Internet access point
that’s often available in places like airports, libraries, co ee shops,
and hotels. You may need to sign up to get access. When you sign
up, you’ll get the information you need to connect.
For more information about networking, see “Networking Your Computer” in your online user guide.
21
Page 22
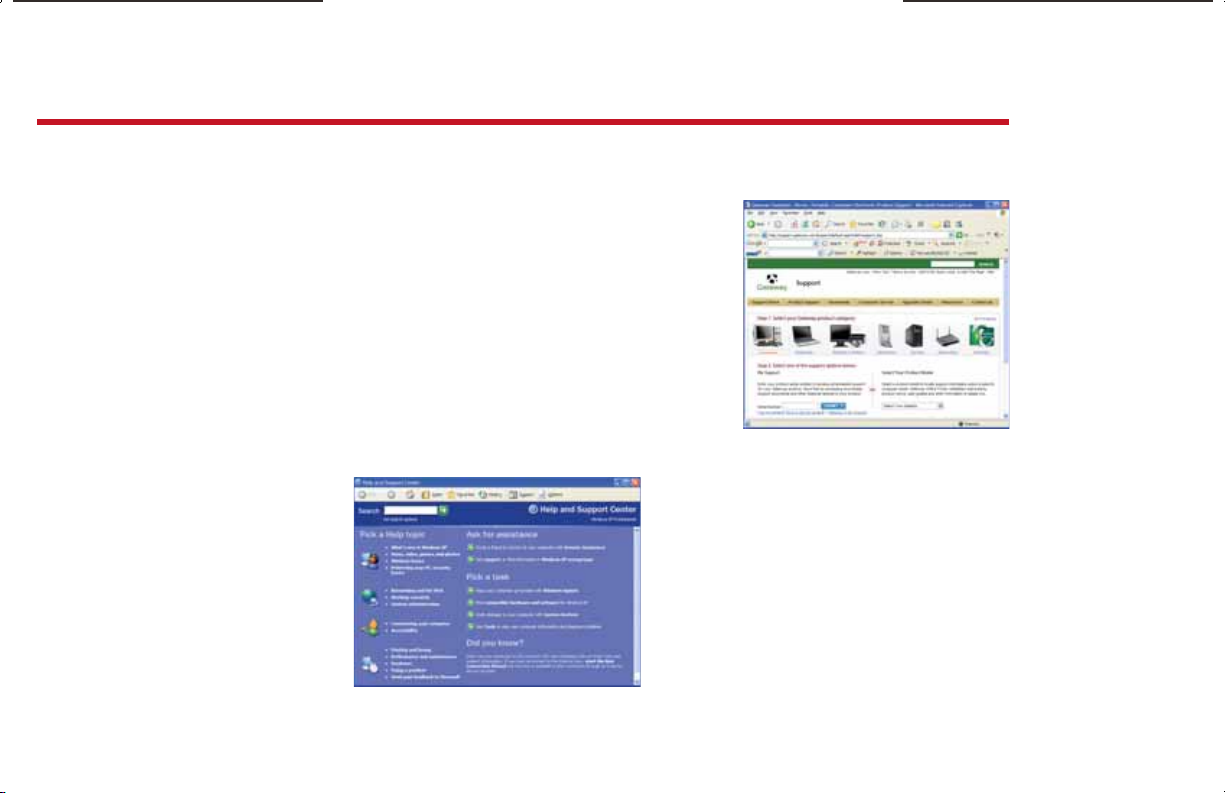
need additional help?
If you need a little extra help with something on your computer, Gateway o ers several options
designed to meet your needs:
• Gateway Web support—Available 24/7,
Gateway’s online support provides current drivers,
product speci cations, tutorials, and personalized
information about your computer. Visit us at
support.gateway.com.
• Help and Support—This collection of help
and troubleshooting information, along with
automated support, is easily accessible. Just click
Start, then click Help and Support. Click a link, do
a search, or browse the index to nd what you’re
looking for.
Help and
Support is a
quick and easy
way to get
information
Gateway’s Web support is available 24 hours
a day, 7 days a week
22
Page 23
help, continued...
• User guide—For clear, yet comprehensive, information on
everything from basic de nitions to more complex tasks, see
the user guide installed on your computer. To open it, click
Start, All Programs, then click Gateway Documentation.
• Tech support—For help and advice you can trust, talk to
people who know computers. You can nd the number on the
label that’s on the side or bottom of your desktop or notebook
computer.
Web sit e:
Online support:
Tech Support Phone:
Tech Support Hours:
Find contact
information and
your computer’s
serial number on
this label
Check your online user guide for
easy-to-understand information
on a variety of topics
• BigFix—Pre-installed for you on your Gateway computer, BigFix checks your computer
for problems and con icts and lets you know if it nds something. To start BigFix, click
Start, All Programs, Accessories, System Tools, then click BigFix. Click Help, then click
Tutorial to learn more about it.
®
23
Page 24

MAN GW DT/PTB GET STARTED R2 9/06
 Loading...