

Page 1

Contents
1 Checking Out Your Gateway Tablet PC. . . . . . . . . . . . . . . . . . . . . . . . . . 1
Box contents . . . . . . . . . . . . . . . . . . . . . . . . . . . . . . . . . . . . . . . . . . . . . . . . . . . . . . . 1
Button panel . . . . . . . . . . . . . . . . . . . . . . . . . . . . . . . . . . . . . . . . . . . . . . . . . . . . . . . 2
Power switch side . . . . . . . . . . . . . . . . . . . . . . . . . . . . . . . . . . . . . . . . . . . . . . . . . . . 4
Ports side . . . . . . . . . . . . . . . . . . . . . . . . . . . . . . . . . . . . . . . . . . . . . . . . . . . . . . . . . . 5
Speakers side . . . . . . . . . . . . . . . . . . . . . . . . . . . . . . . . . . . . . . . . . . . . . . . . . . . . . . 6
Back . . . . . . . . . . . . . . . . . . . . . . . . . . . . . . . . . . . . . . . . . . . . . . . . . . . . . . . . . . . . . . 7
Accessories . . . . . . . . . . . . . . . . . . . . . . . . . . . . . . . . . . . . . . . . . . . . . . . . . . . . . . . . 8
Hard top . . . . . . . . . . . . . . . . . . . . . . . . . . . . . . . . . . . . . . . . . . . . . . . . . . . . . . . 8
Desktop stand . . . . . . . . . . . . . . . . . . . . . . . . . . . . . . . . . . . . . . . . . . . . . . . . . . . 8
Motion FlexDock . . . . . . . . . . . . . . . . . . . . . . . . . . . . . . . . . . . . . . . . . . . . . . . . . 9
Keyboard with integrated touchpad . . . . . . . . . . . . . . . . . . . . . . . . . . . . . . . . . 10
Other accessories and upgrades . . . . . . . . . . . . . . . . . . . . . . . . . . . . . . . . . . . 10
Specifications . . . . . . . . . . . . . . . . . . . . . . . . . . . . . . . . . . . . . . . . . . . . . . . . . . . . . . 12
2Getting Started. . . . . . . . . . . . . . . . . . . . . . . . . . . . . . . . . . . . . . . . . . . . . . . . . . 15
Safety instructions . . . . . . . . . . . . . . . . . . . . . . . . . . . . . . . . . . . . . . . . . . . . . . . . . . 15
General tips . . . . . . . . . . . . . . . . . . . . . . . . . . . . . . . . . . . . . . . . . . . . . . . . . . . . 15
Using the battery . . . . . . . . . . . . . . . . . . . . . . . . . . . . . . . . . . . . . . . . . . . . . . . . 17
Using the AC adapter . . . . . . . . . . . . . . . . . . . . . . . . . . . . . . . . . . . . . . . . . . . . 17
Basic safety precautions . . . . . . . . . . . . . . . . . . . . . . . . . . . . . . . . . . . . . . . . . . 17
Connecting your tablet . . . . . . . . . . . . . . . . . . . . . . . . . . . . . . . . . . . . . . . . . . . . . . 19
Removing the hard top . . . . . . . . . . . . . . . . . . . . . . . . . . . . . . . . . . . . . . . . . . . 19
Connecting the power . . . . . . . . . . . . . . . . . . . . . . . . . . . . . . . . . . . . . . . . . . . . 19
Turning on your tablet . . . . . . . . . . . . . . . . . . . . . . . . . . . . . . . . . . . . . . . . . . . . 20
Using the pen . . . . . . . . . . . . . . . . . . . . . . . . . . . . . . . . . . . . . . . . . . . . . . . . . . . . . 21
Calibration . . . . . . . . . . . . . . . . . . . . . . . . . . . . . . . . . . . . . . . . . . . . . . . . . . . . . 21
Gestures . . . . . . . . . . . . . . . . . . . . . . . . . . . . . . . . . . . . . . . . . . . . . . . . . . . . . . 22
Pen button . . . . . . . . . . . . . . . . . . . . . . . . . . . . . . . . . . . . . . . . . . . . . . . . . . . . . 22
Tips . . . . . . . . . . . . . . . . . . . . . . . . . . . . . . . . . . . . . . . . . . . . . . . . . . . . . . . . . . 23
Tablet Input Panel (TIP) . . . . . . . . . . . . . . . . . . . . . . . . . . . . . . . . . . . . . . . . . . 23
Connecting the DVD/CD-RW drive . . . . . . . . . . . . . . . . . . . . . . . . . . . . . . . . . . . . . 25
Getting help . . . . . . . . . . . . . . . . . . . . . . . . . . . . . . . . . . . . . . . . . . . . . . . . . . . . . . . 27
Using the tutorials . . . . . . . . . . . . . . . . . . . . . . . . . . . . . . . . . . . . . . . . . . . . . . . 27
More helpful startup pages and programs . . . . . . . . . . . . . . . . . . . . . . . . . . . . 27
About Windows XP Tablet PC Edition . . . . . . . . . . . . . . . . . . . . . . . . . . . . . . . 28
Using the display . . . . . . . . . . . . . . . . . . . . . . . . . . . . . . . . . . . . . . . . . . . . . . . . . . . 30
Using the FlexDock . . . . . . . . . . . . . . . . . . . . . . . . . . . . . . . . . . . . . . . . . . . . . . . . . 31
Using an external monitor . . . . . . . . . . . . . . . . . . . . . . . . . . . . . . . . . . . . . . . . . . . . 33
i
Page 2

Travel tips . . . . . . . . . . . . . . . . . . . . . . . . . . . . . . . . . . . . . . . . . . . . . . . . . . . . . . . . .34
Packing your tablet . . . . . . . . . . . . . . . . . . . . . . . . . . . . . . . . . . . . . . . . . . . . . . .34
Traveling by air . . . . . . . . . . . . . . . . . . . . . . . . . . . . . . . . . . . . . . . . . . . . . . . . . .34
Additional travel tips . . . . . . . . . . . . . . . . . . . . . . . . . . . . . . . . . . . . . . . . . . . . . .35
Managing power . . . . . . . . . . . . . . . . . . . . . . . . . . . . . . . . . . . . . . . . . . . . . . . . . . . .36
Charging the battery . . . . . . . . . . . . . . . . . . . . . . . . . . . . . . . . . . . . . . . . . . . . . .36
Battery status indicators . . . . . . . . . . . . . . . . . . . . . . . . . . . . . . . . . . . . . . . . . . .36
Changing the battery . . . . . . . . . . . . . . . . . . . . . . . . . . . . . . . . . . . . . . . . . . . . .38
Power management tips . . . . . . . . . . . . . . . . . . . . . . . . . . . . . . . . . . . . . . . . . .39
3 Customizing . . . . . . . . . . . . . . . . . . . . . . . . . . . . . . . . . . . . . . . . . . . . . . . . . . . . .41
Display . . . . . . . . . . . . . . . . . . . . . . . . . . . . . . . . . . . . . . . . . . . . . . . . . . . . . . . . . . .41
Changing display orientation . . . . . . . . . . . . . . . . . . . . . . . . . . . . . . . . . . . . . . .41
Adjusting brightness . . . . . . . . . . . . . . . . . . . . . . . . . . . . . . . . . . . . . . . . . . . . . .42
Adjusting pen properties . . . . . . . . . . . . . . . . . . . . . . . . . . . . . . . . . . . . . . . . . . . . . .43
Tablet and pen settings . . . . . . . . . . . . . . . . . . . . . . . . . . . . . . . . . . . . . . . . . . .43
Programming the buttons . . . . . . . . . . . . . . . . . . . . . . . . . . . . . . . . . . . . . . . . . .44
Adding a PC Card . . . . . . . . . . . . . . . . . . . . . . . . . . . . . . . . . . . . . . . . . . . . . . . . . .45
Using the modem and network . . . . . . . . . . . . . . . . . . . . . . . . . . . . . . . . . . . . . . . .46
LAN and modem tips . . . . . . . . . . . . . . . . . . . . . . . . . . . . . . . . . . . . . . . . . . . . .46
Going wireless . . . . . . . . . . . . . . . . . . . . . . . . . . . . . . . . . . . . . . . . . . . . . . . . . .46
Locking your tablet . . . . . . . . . . . . . . . . . . . . . . . . . . . . . . . . . . . . . . . . . . . . . . . . . .46
Using the Motion Dashboard . . . . . . . . . . . . . . . . . . . . . . . . . . . . . . . . . . . . . . . . . .47
Using speech recognition . . . . . . . . . . . . . . . . . . . . . . . . . . . . . . . . . . . . . . . . . . . . .49
Using Sign-On and Sign-It . . . . . . . . . . . . . . . . . . . . . . . . . . . . . . . . . . . . . . . . . . . .50
4 Maintaining . . . . . . . . . . . . . . . . . . . . . . . . . . . . . . . . . . . . . . . . . . . . . . . . . . . . . .51
Display screen . . . . . . . . . . . . . . . . . . . . . . . . . . . . . . . . . . . . . . . . . . . . . . . . . . . . .52
Pen . . . . . . . . . . . . . . . . . . . . . . . . . . . . . . . . . . . . . . . . . . . . . . . . . . . . . . . . . . . . . .53
Replacing the pen point . . . . . . . . . . . . . . . . . . . . . . . . . . . . . . . . . . . . . . . . . . .53
Adding memory . . . . . . . . . . . . . . . . . . . . . . . . . . . . . . . . . . . . . . . . . . . . . . . . . . . . .54
5 Troubleshooting. . . . . . . . . . . . . . . . . . . . . . . . . . . . . . . . . . . . . . . . . . . . . . . . .57
Help and Support Center . . . . . . . . . . . . . . . . . . . . . . . . . . . . . . . . . . . . . . . . . . . . .57
Troubleshooting . . . . . . . . . . . . . . . . . . . . . . . . . . . . . . . . . . . . . . . . . . . . . . . . . . . .58
Power . . . . . . . . . . . . . . . . . . . . . . . . . . . . . . . . . . . . . . . . . . . . . . . . . . . . . . . . .58
Battery . . . . . . . . . . . . . . . . . . . . . . . . . . . . . . . . . . . . . . . . . . . . . . . . . . . . . . . .59
Display . . . . . . . . . . . . . . . . . . . . . . . . . . . . . . . . . . . . . . . . . . . . . . . . . . . . . . . .59
Pen . . . . . . . . . . . . . . . . . . . . . . . . . . . . . . . . . . . . . . . . . . . . . . . . . . . . . . . . . . .60
Interface/Ports . . . . . . . . . . . . . . . . . . . . . . . . . . . . . . . . . . . . . . . . . . . . . . . . . .60
Audio . . . . . . . . . . . . . . . . . . . . . . . . . . . . . . . . . . . . . . . . . . . . . . . . . . . . . . . . .61
Operating system . . . . . . . . . . . . . . . . . . . . . . . . . . . . . . . . . . . . . . . . . . . . . . . .61
ii
Page 3

Communications . . . . . . . . . . . . . . . . . . . . . . . . . . . . . . . . . . . . . . . . . . . . . . . . 62
FAQs . . . . . . . . . . . . . . . . . . . . . . . . . . . . . . . . . . . . . . . . . . . . . . . . . . . . . . . . . . . . 63
Support options . . . . . . . . . . . . . . . . . . . . . . . . . . . . . . . . . . . . . . . . . . . . . . . . . . . . 65
Using eSupport . . . . . . . . . . . . . . . . . . . . . . . . . . . . . . . . . . . . . . . . . . . . . . . . . 65
Calling Gateway technical support . . . . . . . . . . . . . . . . . . . . . . . . . . . . . . . . . . 66
ANotices. . . . . . . . . . . . . . . . . . . . . . . . . . . . . . . . . . . . . . . . . . . . . . . . . . . . . . . . . . 67
Index. . . . . . . . . . . . . . . . . . . . . . . . . . . . . . . . . . . . . . . . . . . . . . . . . . . . . . . . . . . . . . . 79
iii
Page 4

iv
Page 5

Checking Out
Your Gateway
Bo x contents
Your Gateway Tablet PC box includes:
■ A pen, plus a spare and several replacement tips
■ An AC power adapter and inst alled battery
■ A soft cloth for cleaning the screen
■ Operating system and software CDs
Tablet PC
■ An adjustable desktop stand
■ A docking station
■ A mobile USB keyboard with touchpad
■ A hard top cover
■ A combination DVD/CD-RW d rive
Your box al so contains any additional accessories you h ave
ordered.
If any of these components appears on the p ackin g sli p b ut
not in the box, search the packaging again and check the
shipping invoice for information about back orders. If you
still are unable to account for the component, contact
Gateway.
www.gateway.com
1
Page 6

Chapter 1: Checking Ou t Your Gateway Table t PC
Button panel
Security
Hot key 2
Cursor pad
Hot key 1
Fn
Pen
Esc Status LEDs
Item Icon Primary function Secondary function
(Fn button+button)
Security Opens the Windows Task Manager.
Also used for domain authentication
or logon screen.
Hot key 2 Rotates display orientation. Opens Tablet Input Panel.
Hot key 1 Opens Motion Dashboard. Opens Windows Journal.
■
Cursor pad
The edges serve the same
function as the arrow keys on a
keyboard.
■
The center of the cursor pad is the
None
Can also be re prog ramm ed.
Can also be re prog ramm ed.
Left arrow:
Right arrow: TAB
Up arrow: PAGE UP
Down arrow: PAGE DOWN
SHIFT+TAB
ENTER key.
Fn Press the F n ( Funct io n) butt on with
another button to activate the
button’s secondary function.
None
Esc Equivalent to a keyboard’s
2
ESC key. ALT+TAB.
www.gateway.com
Page 7
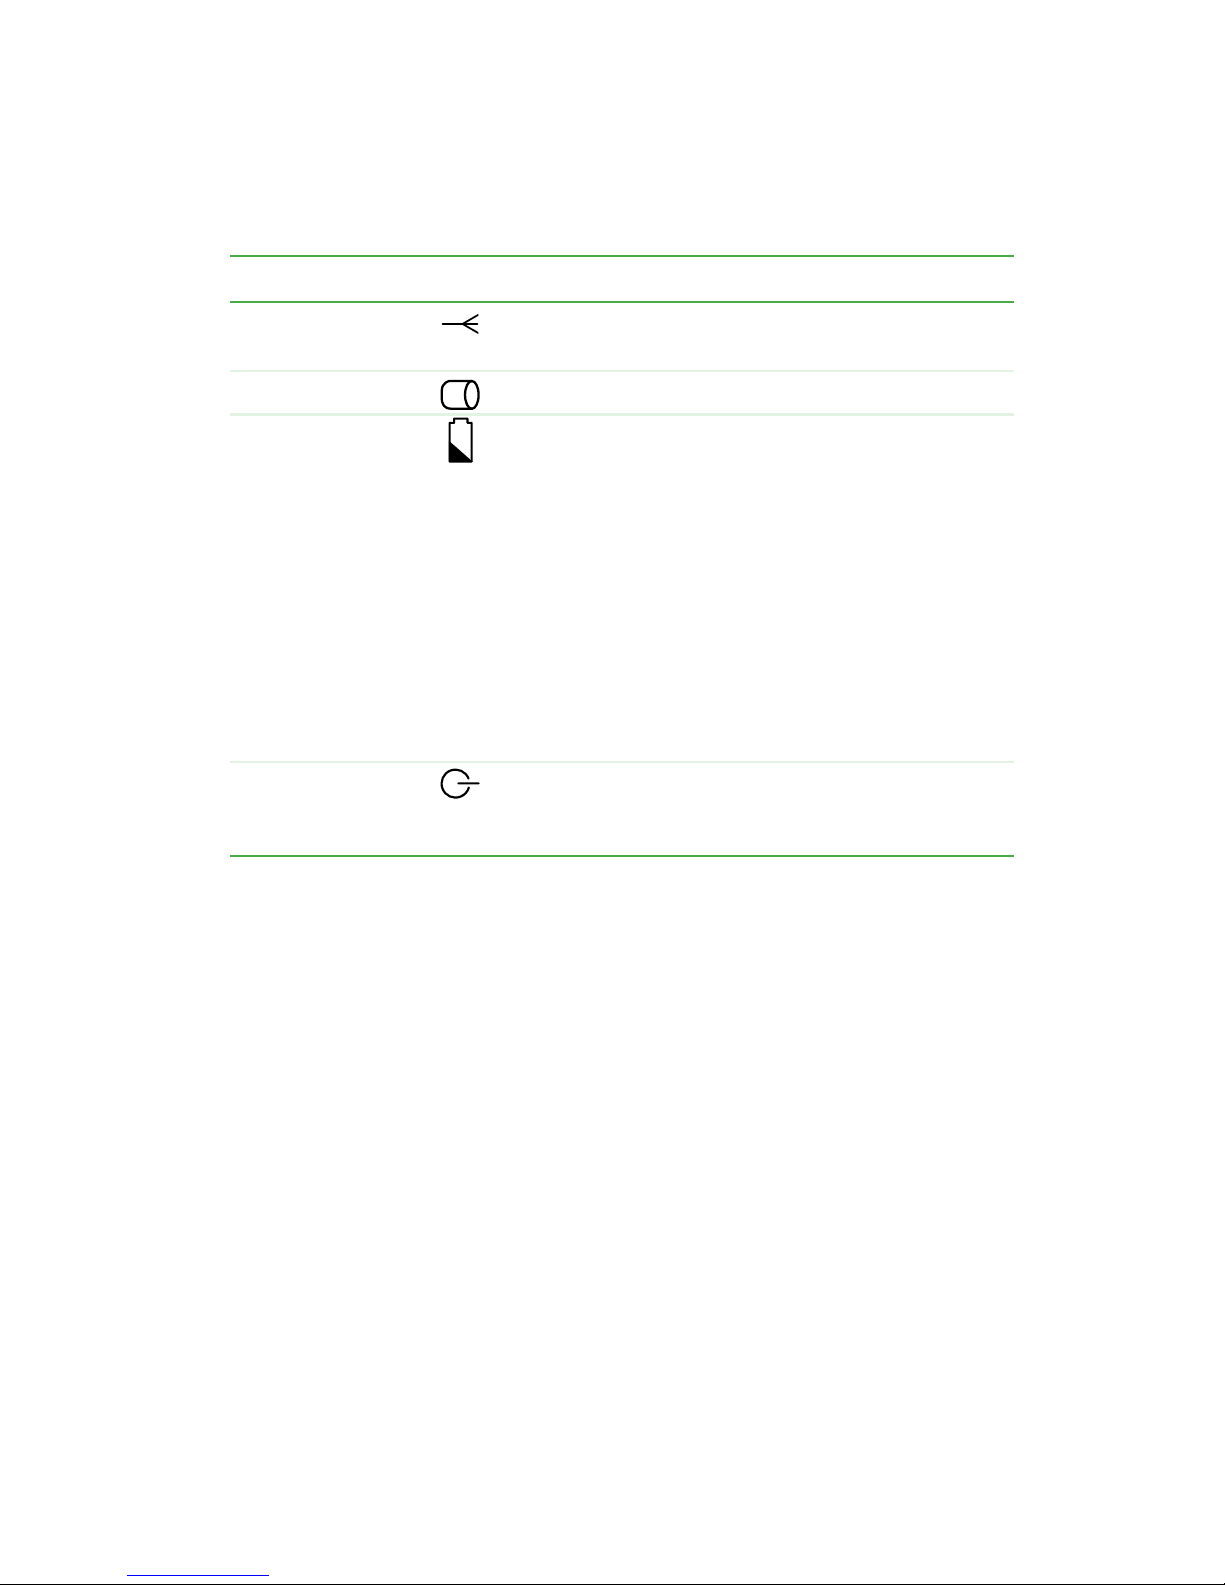
The status LEDs show you the current activity of system components.
Status LED Meaning
Button panel
Wireless activity
Hard drive
Battery status
Power
■
Steady or flashing green: Wireless 802.11b is on
Off: Wireless 802.11b is off
■
Flashing: The hard drive is being read or written to
■
Steady green: AC adapter plugged in and battery
fully charged
■
Steady yellow: AC adapter plugged in and battery
charging
■
Steady orange: Battery overheated or defective
■
Flashing green and orange: Battery discharging
abnormally and should be replaced
■
Slow-flashing orange: AC unplugged and battery
less than 10 percent
■
Fast-flashing orange: AC unplugged and battery
less than 5 percent
■
Off: AC unplugged and battery fully discharged or
removed
■
Steady gree n: Tablet is turned on
■
Flashing green: Tablet is in Standby mode
■
Off: Tablet is off.
www.gateway.com
3
Page 8
Chapter 1: Checking Ou t Your Gateway Table t PC
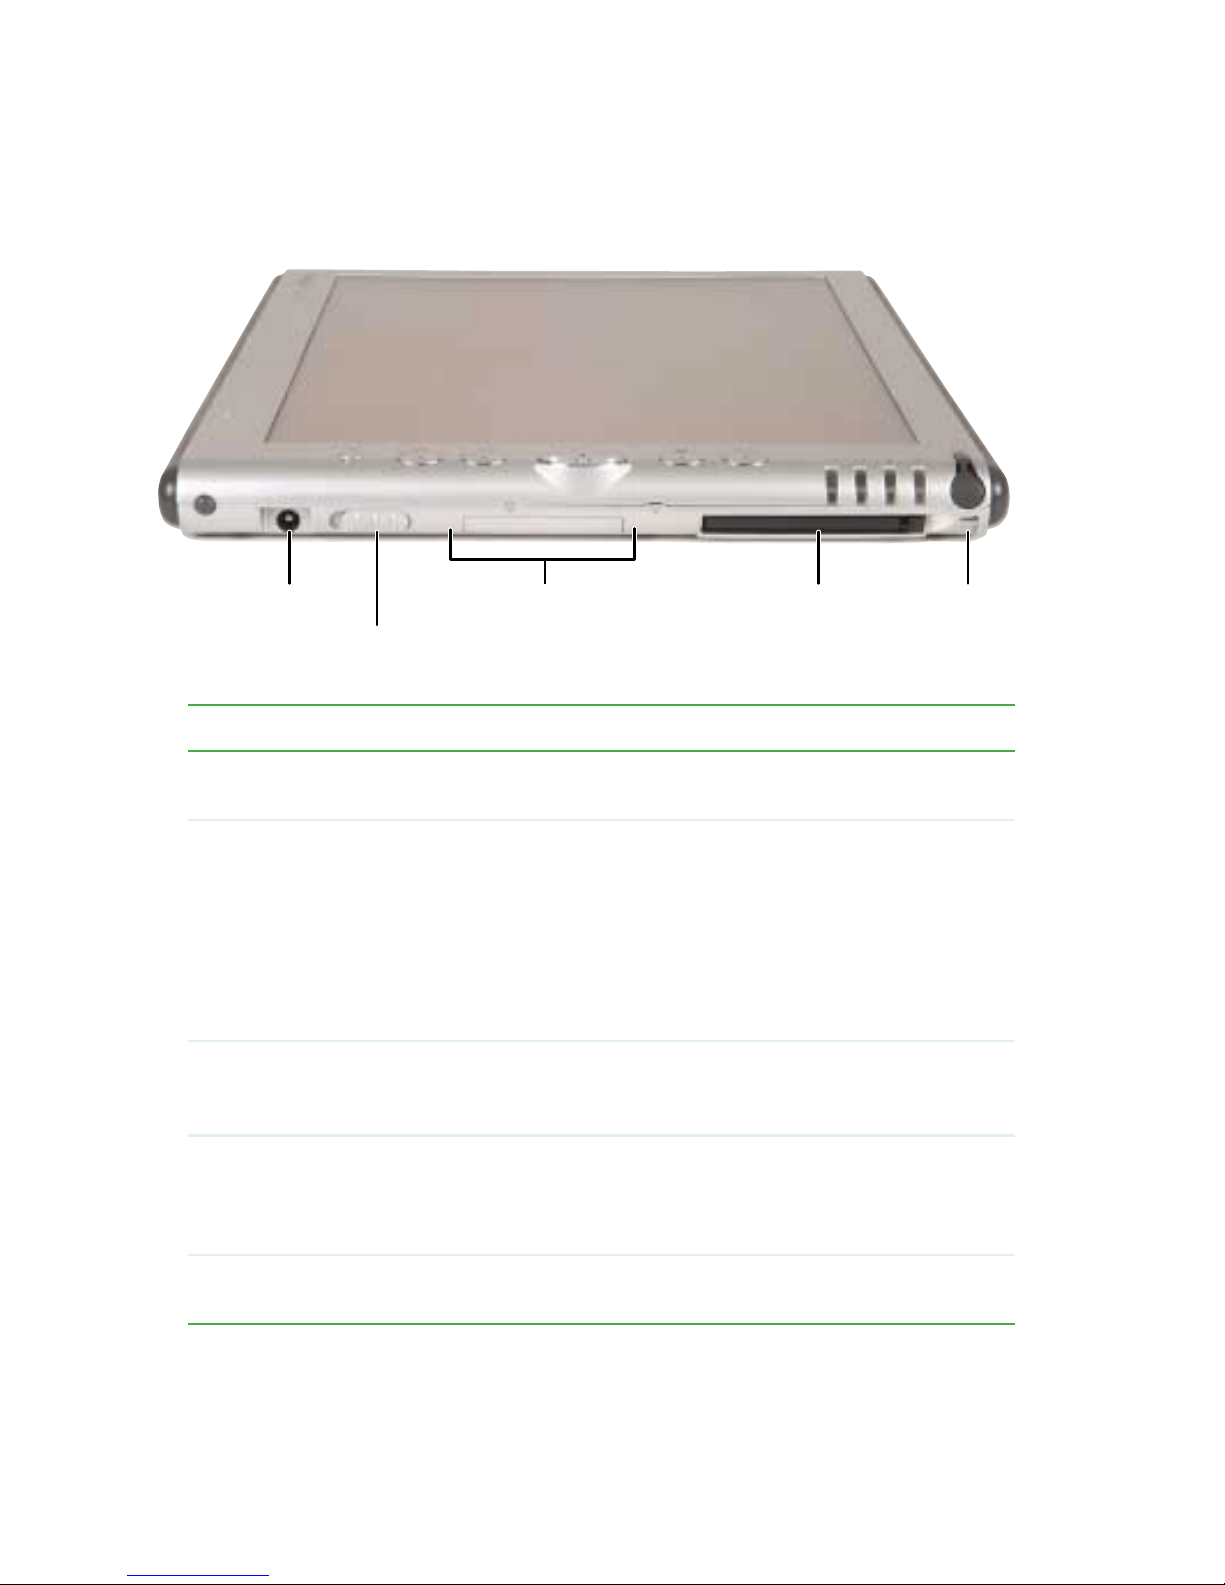
Power switch side
Power
connector
Pow er sw i t c h
Antenna area Pen tether
PC Card slot
anchor
Item Function
Power connector Plug the AC power adapter into this connector. Do not substitute
another adapter or use this connector for any other purpose.
Pow e r s wi t c h
Antenna zone The wireless netw o rking a nte nna s are l oc ate d i n th is are a. Be s ure
PC Card slot Holds one Type-II PC Card for networ king, memory expansion, or
■
Turn on the tablet by sliding and holding the switch for about
½ second.
■
When the Gateway Tablet PC is on, slide the switch briefly to
activate Stan dby (or Hibernate if it is enabled thro ugh the Control
Panel’s Power Options Proper ties dialog box).
■
Sliding and holding t he switch for more than 4 seco nds (when the
tablet is turned o n) will cause a f orced shutd own, whic h is the la st
resort when the tablet is completely unresponsive.
to keep your hands clear of this zone when using wireless
connectivity in areas where reception is weak.
peripheral connections. A plastic blank ships with the Gateway
Tablet PC, and you can leave it in place whenever the slot is not in
use.
Pen tether
anchor
Use this tether anchor to tether the pen to the tablet.
4
www.gateway.com
Page 9

P orts side
Ports side
Modem
Network
VGA
FlexDock USB
Headphones
Microphone
IEEE 1394
Item Function
Modem Fits a standard RJ-11 connector.
Network Fits a standard RJ-45 interface connector for a 10/100 network.
VGA Fits a standard DB-15 male monitor connector for an external
monitor or LCD projector.
FlexDock Be sure the Gateway Tablet PC sits firmly on the docking
connector.
USB Each Universal Serial Bus port connects a USB 1.1 peripheral
device, such as a keyboard, mouse, printer, or digital camera.
IEEE 1394 Connects IEEE 1394 4-pin per ipheral devices such as drives,
video cameras, and other electronics.
Microphone Input jack for microphone. Plugging in an external microphone
disables the built-in microphone.
Headphones Input jack for headphones. Plugging in headphones mutes the
built-in spe akers.
www.gateway.com
5
Page 10
Chapter 1: Checking Ou t Your Gateway Table t PC
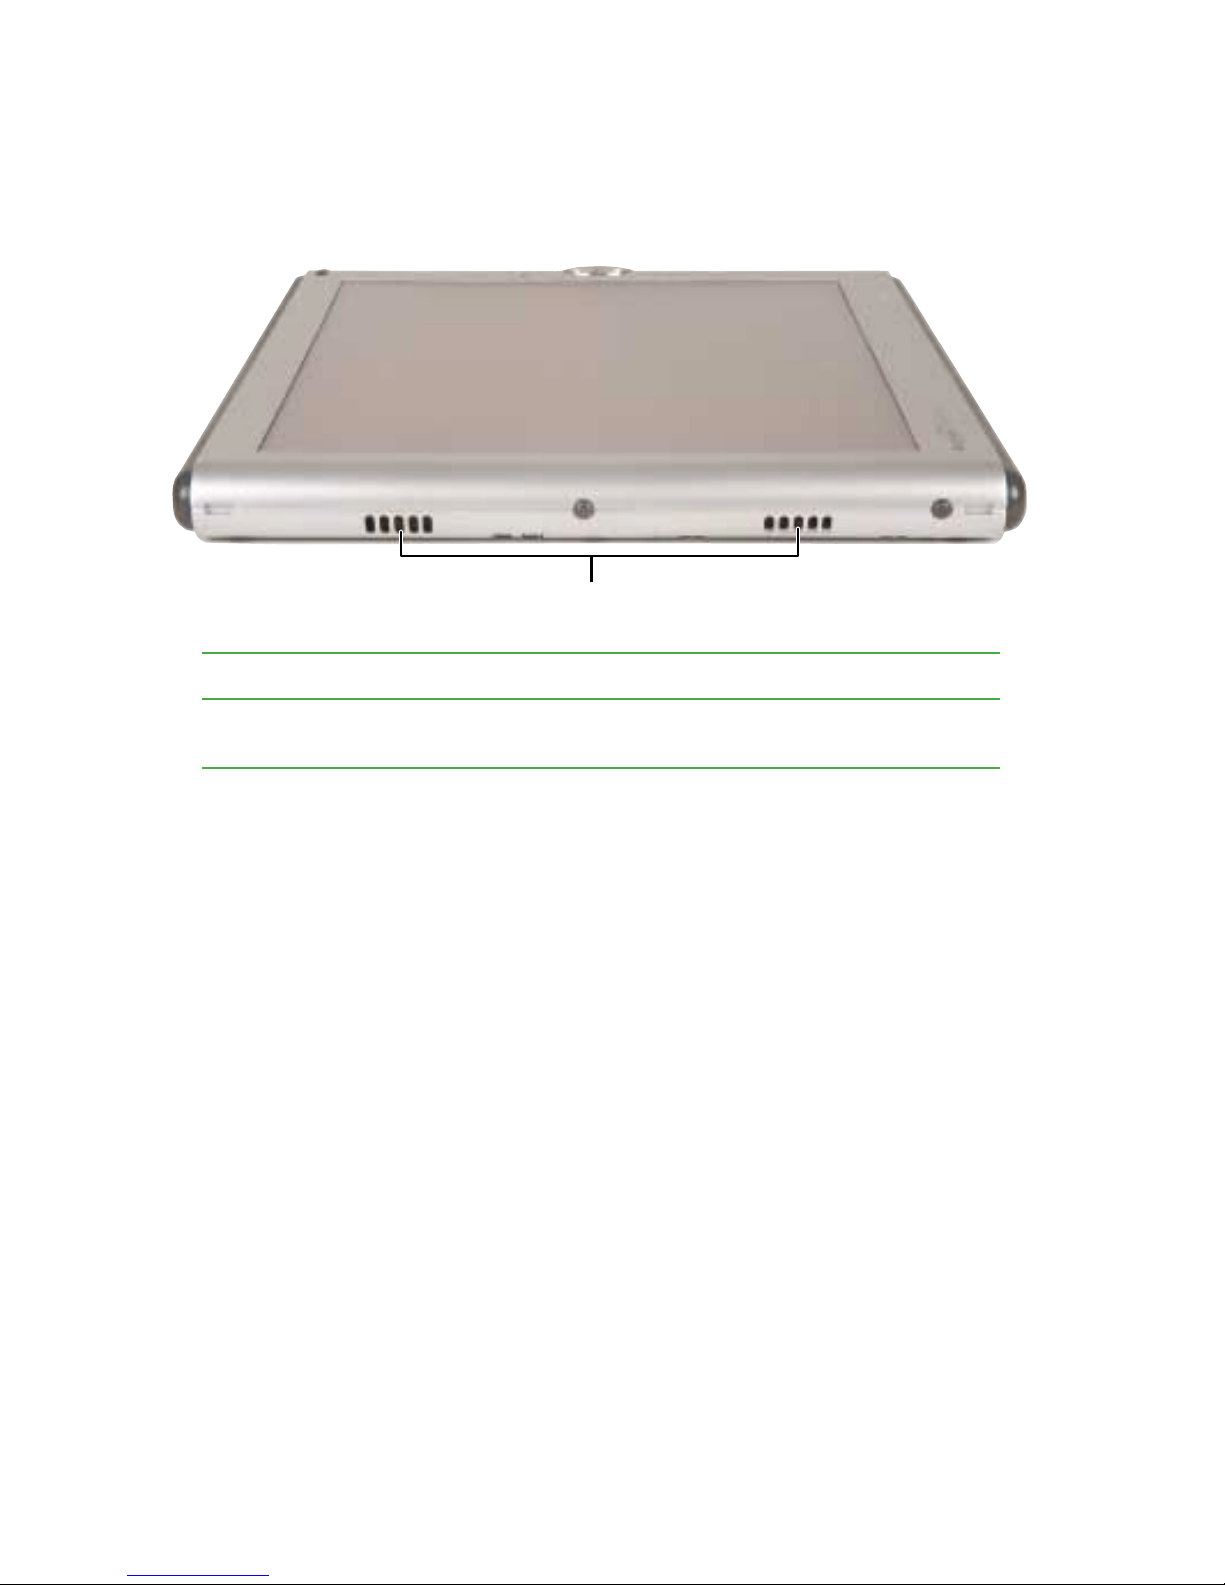
Speakers side
Speakers
Item Function
Speakers Outputs sound. Speakers are disabled when headphones are
plugged in.
6
www.gateway.com
Page 11

Back
Back
Hard drive Battery Battery gauge Battery latch Memory access Antenna
zone
Item Function
Hard drive Contains the 40 GB hard drive.
Battery User-swappable batter y.
Battery gauge Push the button next to the LEDs to check the battery’s charge.
Battery latch Slide to remove the battery.
Memory access Access panel for servicing memory.
Antenna zone The wireless networking antennas are located in this area.
www.gateway.com
7
Page 12

Chapter 1: Checking Ou t Your Gateway Table t PC
Accessories
Hard top
Your tablet comes with a hard protective screen cover . The cover fits across the
front of the tablet to protect the display when not in use. Inverted, it attaches
to the back while the tablet is in use.
Desktop stand
Open the desktop stand to different widths to change the Gateway Tablet PC’s
display angle. The wider you open the stand, the mo re the Gatew ay Tablet PC
tilts back.
Some connectors may interfere with the tablet’s seating in the desktop stand.
You can change the tablet’s orientation 180° (by pressing Hot Key 2 twice for
secondary landscape orientation) to use the tablet with t he port si de up . If yo u
regularly connect several peripheral accessories to your tablet, consider using
the FlexDock.
8
www.gateway.com
Page 13

Motion FlexDoc k
Accessories
The Motion FlexDock, a desktop docking station, includes most of the tablet’s
peripheral device connectors.
■ LAN (RJ-45)
■ IEEE 1394
■ USB ports (2 rear, 1 front)
■ Microphone jack
■ Headphone jack
■ VGA monitor
■ AC powe r adapter connector
The tablet joins the FlexDock at the docking connector in the center of the
frame holder. Be sure the tablet sits firmly on the connector to access all ports.
■ The silver crossbar adjusts to support the tablet at a range of angles for
viewing and writing.
■ In addition to the two USB ports on the back, the FlexDock includes an
extra USB port on the front for convenience.
www.gateway.com
9
Page 14

Chapter 1: Checking Ou t Your Gateway Table t PC
■ When using the tablet’s modem, plug the telephone cord into the tablet
through the cutout on the front of the FlexDock.
■ The FlexDock senses and automatically adjusts the tablet’s display
orientation when rotated between Primary Landscape and Primary Portrait
modes. When you are ready to move from desktop to mobile mode, the
FlexDock is completely Grab-and-Go. This means you can safely lift the
tablet out of the FlexDock without shutting d own, putting the tablet in
Standby mode, or stopping any peripherals through Windows XP . However,
you must disconnect the modem cable before removing the tablet.
Keyboar d with integrated touchpad
Your tablet comes with an external USB keyboard with integrated touchpad.
Plug the keyboard into any USB port on the tablet or FlexDock.
The touchpad has a scroll zone similar to a scroll wheel on a mouse. Press on
the right edge of the touchpad surface and drag your finger up to scroll
backward through a doc ument or drag down to sc roll forward.
Other accessories and upgrades
Gateway and Motion offer a variety of ways to customize and upgrade your
Gateway Tablet PC. You can order:
■ Additional SO-DIMM memory modules for total memory up to 1 GB
■ Additional peripherals, such as desktop speakers and headsets, and a flash
memory drive
10
www.gateway.com
Page 15

Accessories
Available accessories and upgr ades can be found on the Ga teway Web s ite at
accessories.gateway.com
www.motioncomputing.com
and Motion’s Web site at
.
www.gateway.com
11
Page 16

Chapter 1: Checking Ou t Your Gateway Table t PC
Specifications
Item Description
Tablet
CPU Intel Pentium IIIM, 866 MHz
Chipset Intel 830MG
Memory Minimum 256 M B base memor y (user upgradable to 1 G B)
PC13 3 SO -DIM M so ckets ( 2)
Hard drive 40 GB
I/O Microphone in
Headphone out
DC power in
USB 1.1 (2)
IEEE 1394
RJ-11
RJ-45
VGA m o ni t o r
FlexDock docking connector
Buttons Portrait/landscape rotation key with available secondary function
Cursor pad
Fn key
Security button (equivalent to
Programmable hot keys with secondary functions (2)
PC Card controller O2 Micro OZ6912T PCI Cardbus
PC Card slot Single Type-II PCMCIA cardbus slot
Audio Sigmatel AC 97 audio codec
Display 12.1-inch XGA TFT LCD
Graphics Intel 830 MG integrated graphics with UMA rotational support
Pointing device Wacom active digitizer pen with single button
12
www.gateway.com
CTRL+ALT+DELETE)
Page 17

Specifications
Item Description
Docking Desktop FlexDock (microphone in, headphone out, DC power in,
USB × 3, IEEE 1394, RJ-45, VGA, docking connector)
LED status indicators Power/Standby, Battery Status, Hard Drive Access, Wi reless Activity
Software (standard) Microsoft Windows XP Tablet PC Edition, Adobe® Acrobat®, Motion
Dashboard, Sign-On, online documentation, drivers.
Communications
Ethernet 10/100: Realtek RTL8100B LAN on system board
Modem PC Tel sof t modem built in, V.92 56.6Kbps/ 15.5Kbps transceiver fax
Wireless Gemtek 802.11b via Type-IIIA mini PCI interface
Battery/power
management
Batter y Type 6 prismatic Li-ion cel ls, Smbus control , 40 Whr
Battery Life Maximum 4 hours with battery mark 4.0
Physical
characteristics
Size 11.7 × 9.4 × 0.90 inches (296 mm × 240 mm × 22 mm)
Carrying weight <3.0 lbs. (1.36 KG)
External peripherals
USB keyboard with integrated touchpad, USB DVD/CD-RW drive
Agency certifications
Tablet UL1950, CUL, FCC, ICES-003, CB REPORT, CE Mark, TUV EN950,
VCCI, IEC 61000-4-2
Adapter CUL, UL1950, CE Mark, TUV EN950, CB report, MITI
Battery CUL, UL1950, CE Mark, TUV EN950
Telecom FCC part 68, CTR21, JATE
EMC FCC - Class B, Industry Canada - ICES-003- Class B , CE , EN 5 502 2,
EN ff024, EN 61000-3-2, EN6000-3-3, EN 55011
www.gateway.com
13
Page 18

Chapter 1: Checking Ou t Your Gateway Table t PC
14
www.gateway.com
Page 19

Getting Started
Safety instructions
Certain precautions should be observed to further reduce
the risk of personal injury or damage to the tablet.
General tips
■ When setting up the tablet for work, place it on a level
surface.
■ Before you clean your tablet, turn if off, unplug it from
its power source, and remove the battery.
■ Do not push objects into air vents or openings of your
tablet. Doing so can cause fire or electric shock by
shorting out interior components.
■ Handle components with care. Hold a component such
as a memory module by its edges, not its pins.
■ When you disconnect a cable, pull on its connector, not
on the cable itself. As you pull out the connector, keep
it evenly aligned to avoid bending any connector pins.
Also, before you connect a cable make sure both
connectors are correctly oriented and aligned.
www.gateway.com
15
Page 20

Chapter 2: Getting Started
■ Use of mobile phones can interfere with the sound system. The tablet
operation is not impaired but we recommend that a distance of 30 cm be
maintained between the tablet and the mobile phone.
■ When you move your tablet between environments with very different
humidity or temperature ranges, condensation may form on or within the
tablet. T o avoid damaging the tablet, allow s ufficient time for the moisture
to evaporate before using the tablet.
■ When traveling, do not check the tablet as baggage. Y ou can put your tablet
through an X-ray security machine, but never put your tablet through a
metal detector. If you have the tablet checked by hand, be sure to have a
charged battery available in case you are asked to turn on the tablet.
■ When traveling with the hard drive removed from the tablet, wrap the
drive in a non-conducting material, such as cloth or paper.
■ When traveling, do not place the tablet in overhead storage compartments
where it could slide around. Do not drop your tablet or subject it to other
physical shock s.
■ To completely turn off all tablet power, turn the tablet off, remove the
battery, and disconnect the AC adapter from the electrical outlet.
Warning The base of the tablet can become very warm. Although
the temperature w ill not b e too h ot to th e touc h, prolo nged
physical c ontact may result in a temporary heat imprint on
the skin. We recommend that prolonged physical contact
be avoided.
If the tablet has been in use for a long time, avoid direct
contact with the metal plate supporting the ports because
it can become hot.
■ Do not apply heavy pressure to the tablet or subject it to strong impact.
Excessive pressure or impact can cause damage to tablet components or
otherwise cause malfunctions.
■ Some PC Cards can become hot with prolong ed use. Overheating of a
PC Card can result in errors or instability in the card’s operation. Be careful
when you remove a PC Card that has been used for extended periods.
16
www.gateway.com
Page 21

Using the battery
■ Do not carry a battery in your pocket, purse, or other container where
metal objects (such as car keys) could short-circuit th e battery terminals.
The resulting excessive current flow can cause extremely high temperatures
and may result in heat damage.
■ Protect your tablet, battery, and hard drive from environmental hazards
such as dirt, dust, food, liquids, temperature extremes, and overe xposure
to sunlight.
■ Replace only with a Motion batter y to avoid risk of fire or explosion.
■ Dispose of used batteries according to the manufacturer’s in struc tions. Do
not dispose of batteries in a fire. They may explode.
Using the A C adapter
■ Place the adapter in a ventilated area, such as a d esktop or on the floor,
when you use it to run the tablet or to charge the battery. Do not cover
the adapter with papers or othe r items that will reduce cooling, and do
not use the adapter while it is inside a carrying case.
Safety instruc tions
■ Be sure that nothing rests on your adapter's power cable a nd that the cable
is not located where it can be tripped over or stepped on.
■ Use only the adapter and power cord approved for use with this tablet.
Use of another type of adapte r may create a risk of fire or explosion.
■ If you use an extension cable with your adapter, ensure that the total
ampere rating of the products plugged in to the extension cable does not
exceed the ampere rating of the extension cable.
Basic saf ety precautions
When using your tablet and peripheral devices, basic safety precautions should
always be followed to reduce the risk of fire, electric shock, and injur y to
persons, including the following:
■ Do not use this product near water. For example, do not use it near a
bathtub or kitchen sink.
■ Avoid using the wired modem or LAN during an electrical storm. There
may be a remote risk of electric shock from lightning.
www.gateway.com
17
Page 22

Chapter 2: Getting Started
■ The cable used with the modem sho uld be manufactur ed with a minimum
wire size of 26 American wire gauge (AWG) and an FCC-compliant RJ-11
modular plug.
■ To help avoid the potential hazard of electric shock, do not connect or
disconnect any cables or perform maintenance or reconfiguration of this
product during an electrical storm.
Warning When wor king w ith peri pherals or r eplacing me mory
modules, a lways follow in sta llatio n ins tructions clo sely. Do
not attempt to service the tablet yourself. (See “Support
options” on page 65 for service information.)
18
www.gateway.com
Page 23
Connecting your tablet
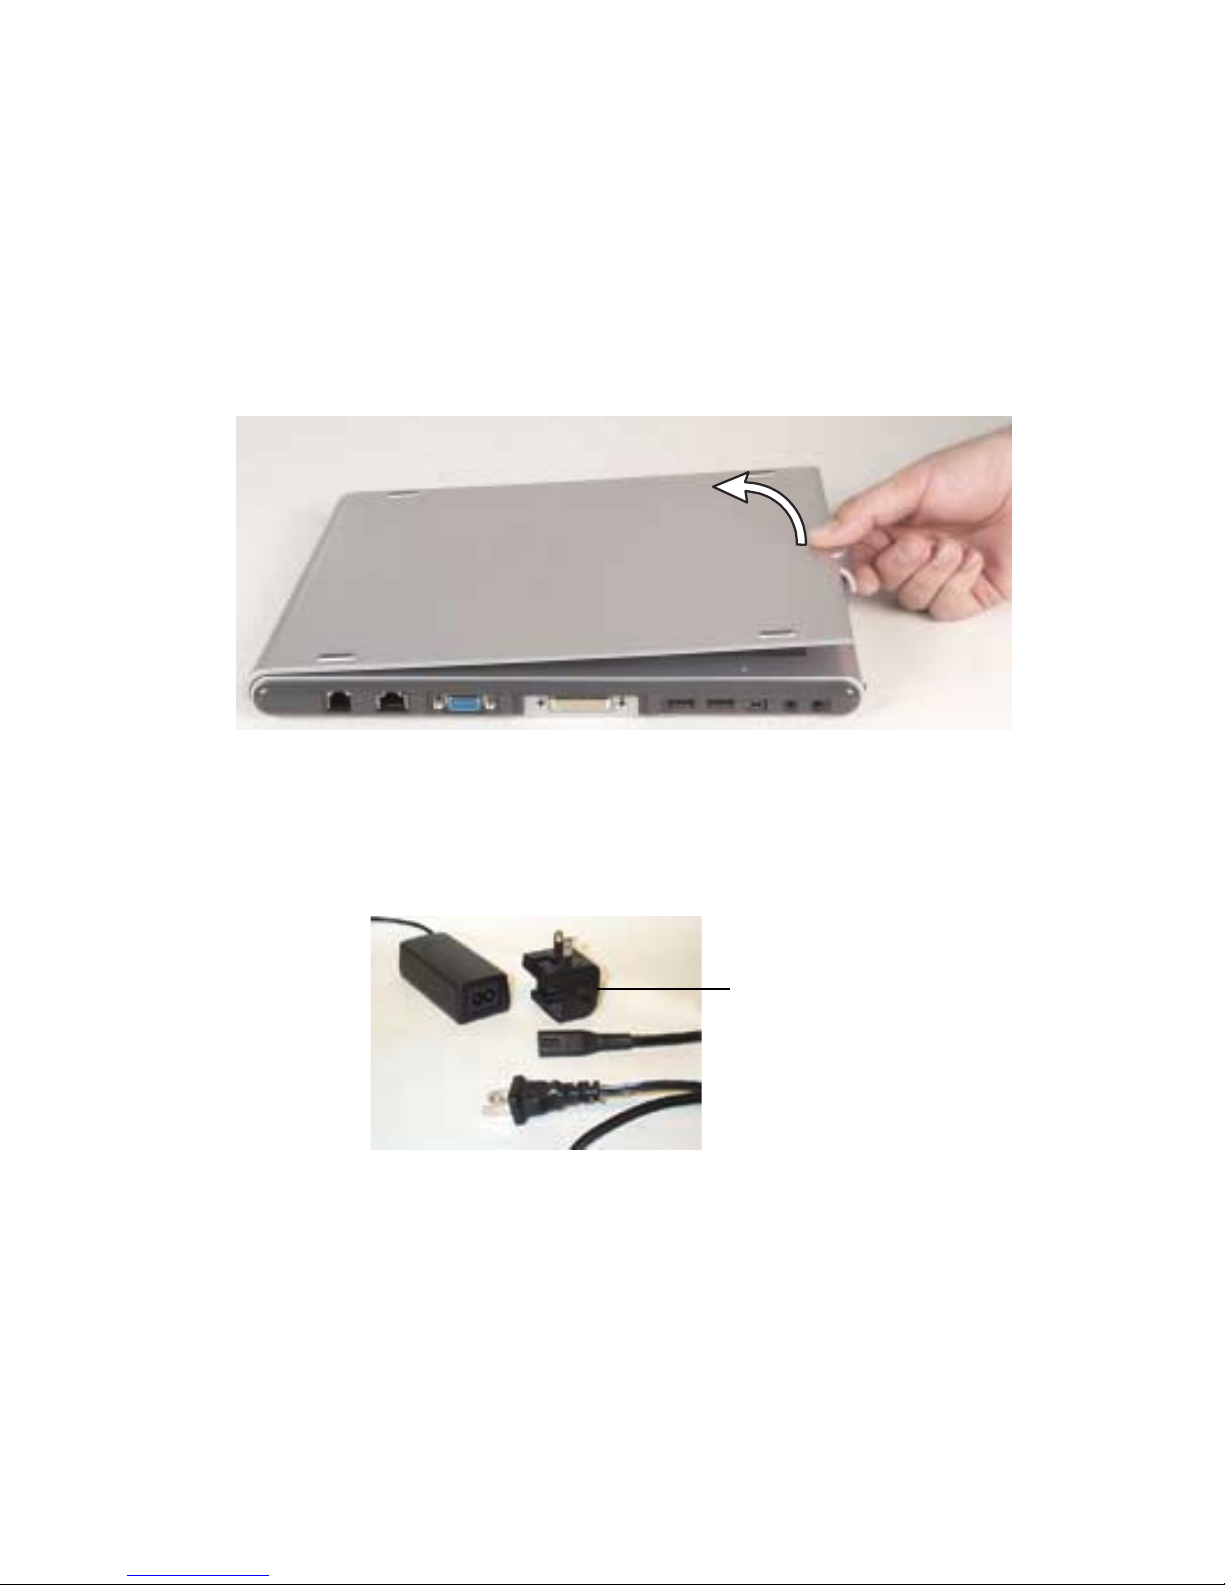
Removi ng the hard top
Your tablet comes with the hard top screen cover in place. Remove the cover
by pulling on the clip on the right side.
Connecting your tablet
Connecting the po wer
Connect the power cord to the AC power adapter and a wall outlet, then
connect the adapter to your tablet.
The AC mini-plug attaches to the AC adapter just as the power cord does, and
can be used when extra cord length is not needed.
Use only a Gateway Tablet PC power supply with the tablet, and do not use
the power supply wi th any other devices.
AC mi ni- pl ug
www.gateway.com
19
Page 24

Chapter 2: Getting Started
Turning on your tablet
To turn on your tablet:
1 If this is the first time turning on your tablet, connect the USB keyboard
to a USB port.
2 Slide and hold the power switch for about ½ second. The tablet turns on.
■ While the tablet is on, sliding and holding the switch will activate the
low-power Standby or H ibernation mode.
■ While the tablet is on, sliding and holding the switch for more than
4 seconds will cause a forced shutdown, which should be the last resort
when the tablet is completely unresponsive.
3 When the Windows XP startup appears, remove the pen and follow the
on-screen instructions to complete the setup.
20
www.gateway.com
Page 25

Using the pen
Different from any other stylus or pen you have used before, the cordless pen’s
internal electronics make it the only way to write, tap, and input directly on
the tablet’s display.
Warning A finger-tap or PDA styl us has no effect on the tablet’s
display, and ink pens and other pointed objects could
damage the surf ace, so alw ays us e the pen tha t came with
your tablet. You can order extra pens from Gateway.
The pen can do everything a mouse does. Just think “tap” instead of “click:”
With a mouse: With a pen:
Point and click Point and tap
Double-click Double-tap
Using the pen
Click-and-drag Tap-and-drag
Right-click Button-tap
Calibration
The first time you use your tablet, you should calibrate your pen for both
portrait and landscape orientations. In just a few seconds, calibration ensures
the accuracy of the pen and adjusts the screen’s performance for different users.
If the on-screen pointer does not seem to line up with the tip of the pen—for
example, because someone else has used your tablet and adjusted it for their
own use—recalibrate it to your tapping patterns.
Recalibrate if you write with the opposite hand from the previous
user—right-handed writer to left-handed writer, for example.
(press pen button while tapping)
www.gateway.com
21
Page 26

Chapter 2: Getting Started
To open the calibration program:
1 Launch Motion Dashboard by pressing Hot Key 1 , then tapping the
Calibrate
- OR -
button.
Double-tap (
Options
Gestures
■ Open the Tablet Input Panel by waving the pen back and forth over the
screen.
■ Backspace by drawing a right-to-left line on the display surface.
■ In most text input programs, you can erase text by scratching it out.
Windows interprets a scratchout as a delete command.
Tablet and Pen Settings) in the taskbar, then tap the Pen
tab.
■ To erase, draw a short, wide “Z.”
■ Y ou will find more information about gestures and gesture symbols, as well
as handwriting tips, in the
Pen b utton
The pen button serves the same function as the right but ton on a mouse. Press
it and tap (button-tap) to open right-click menus when they are available.
22
Help section of the TIP’s Tools menu .
www.gateway.com
Page 27

Tips
Using the pen
■ Hold the pen the same way you hold a writing pen, and stea dy your writing
hand by resting it on the display surface.
■ Line up the pointer before you tap, in cases where the pointer and pen
point are out of alignment. The screen reads the positio n of the pointer,
not the tap.
■ Store the pen in the Gateway Tablet PC’s pen holder. Store extra p ens in
a drawer to avoid prolonged pressure on the pen tip.
■ The pen has internal electronics, so keep it dry and avoid contact with
liquids.
■ The tablet responds to most Penabled™ EMR pens manufactured by
Wacom
®
.
T ab let Input Panel (TIP)
Tap (the Keyboard icon) near the Start button to open the T ablet Input Panel
(TIP). Use the TIP to enter data by hand, soft keyboard, or voice into a word
processing program or a text-entr y form.
■ Access the TIP keyboard and writing pad by tapping the tabs near the
bottom of the window.
■ To set up speech options, tap Tools, then tap Speech.
TIP tips
■ Open a program for your input (for example, a word processing program
or a Web form ) before using the writing pad or soft keyboard.
www.gateway.com
23
Page 28

Chapter 2: Getting Started
■ To adjust writing pad and keyboard settings, tap Tools, then tap Options.
■ For security and accuracy when entering masked text (such as passwords),
use the Tablet PC Input Panel’s soft keyboard instead of the writing pad.
24
www.gateway.com
Page 29

Connecting the DVD/C D-RW drive
Connecting the D VD/CD-RW drive
Everything you need to read or write a CD and to read a DVD is included in
this package:
■ DVD/CD-RW drive
■ AC powe r adapter and power cord
■ IEEE 1394 cable
■ USB 1.1 or 2.0 cable. Either cable will work, but both will run the drive
at USB 1.1 speed.
■ Installation card
■ Software C Ds:
■ Ahead Software’s Nero Burning ROM™
■ CyberLink
®
PowerDVD™
Choosing an appropriate cable connection
After you unpack your drive, consider which cable connection best suits your
requirements:
IEEE 1394 Provides the fastest transfer rates and is recommended
for DVD video and multimedia games.
USB 1.1 Good transfer rate for photographs, data, music, and
installation CDs.
Important The USB 1.1 cable must be us ed if you are perfor ming a
new operati ng s ys te m i nstallation or similar operation th at
requires the tablet to start up (boot) directly from the
CD drive.
www.gateway.com
25
Page 30

Chapter 2: Getting Started
Setting up your DV D/CD-RW drive
To set up your DVD/CD-RW drive:
1 Verify that the S/W switch (located on the back of the drive) is set to OFF.
Headphone jack DC power
36-pin
connector
S/W switch
Eject button Status Manual
eject ho le
2 Plug the power cord into the DC in connector on the back of the drive ,
then plug it into an AC power outlet. Use only the AC power adapter that
came with your drive.
3 Plug one end of the IEEE 1394 or USB 1.1 cable into the 36-pin connector
on the back of the drive.
4 With the tablet turned on, plug the other end of the cable into the
corresponding port on the tablet or into the FlexDock. Windows XP
automatically recognizes the new drive and installs the correct dr iver.
5 Open the drive tray by pressing the eject button, then insert the Nero
Burning ROM CD into the drive and follow the on-screen instructions to
complete the installation.
6 Insert the CyberLink PowerDVD CD into the drive and follow the on-screen
instructions to complete the installation.
26
www.gateway.com
Page 31

Getting help
Using the tutorials
Learning about the basics of using a tablet PC and pen will give you a running
start into tablet computing.
Getting help
To run the tutorials, tap the
Center.
Help and
Support
To open the Help and Support Center, tap Start, then tap
Help and Support.
Welcome to Tablet PC link in the Help and Support
More helpful startup pages and prog rams
■ Get Going with Tablet PC
This interactive introduction offers more usage hints and helps you
calibrate the pen and di splay. You shoul d calibrate the pen right aw ay.
To op en Get Going with Tablet PC, tap
Tablet PC
.
www.gateway.com
Start, then tap Get Going with
27
Page 32

Chapter 2: Getting Started
■ Ta k e a To u r o f W i n d ow s X P
If this is your first experience with the W i ndows XP operating sy stem, this
tour is a good introduction. Tap on the taskbar popup, or link to it in the
Help and Support Cen ter.
Help and
Support
■ After you finish the tutorials, you can play Inkball t o hone your p en skills.
To play Inkball, ta p
To open the Help and Support Center, tap Start, then tap
Help and Support.
Start, All Programs, Games, then tap Inkball.
About Windows XP Tab let PC Edition
The Microsoft Windows XP Tablet PC Edition operating system is a fully
functioning version of Windows XP Professional with added pen-based
computing features:
■ Tablet and P en Setting s — set properties for the pen, tablet buttons, and
display screen
■ Tablet PC Input Panel (TIP) — use its writing pad, soft keyboard, and voice
recognition for entering data
■ Windows® Journal — hand-write documents, then turn them into text or
image files
28
www.gateway.com
Page 33

Getting help
■ Sticky Notes — make a quick note with your pen or voice and drop it into
another program
■ Document annotation — insert handwritten notes i nto W ord documents and
other programs
■ Enhanced speech and vo ice recognition — say what you are thinking, and your
tablet will understand
■ Inkball — practice and master pen input with this game of strategy
What’s New in Wind ows XP link in the He lp and Support Center and th e
The
Windows XP Start Here booklet that shipped with your tablet can help you learn
more about using Windows XP Tablet PC Edition.
To run the H elp and Sup port Cent er, tap
Start, then tap Help and Support.
www.gateway.com
29
Page 34

Chapter 2: Getting Started
Using the display
The tablet’s screen combines the eye-soothing readability of a liquid-crystal
display with the responsiveness of a pen controller. The screen provides a hard
writing surface, minimizes glare, and increases readability.
■ The display screen is durable but it is still part of a sensitive piece of
equipment, so treat it with the care you would give a ny computer monitor.
■ Unlike other touchscreens and PDAs, the tablet’s display responds only to
the tablet’s pen. The tablet will not respond to a PDA pen or the touch of
a fingertip.
■ Steady your hand on the display surface wh en you write . The pressure of
your hand will not affect any open programs.
■ Switching from AC to battery power dims the display slightly to save
power.
30
www.gateway.com
Page 35

Using the FlexDoc k
The FlexDock lets you rotate the tablet from portrait to landscape and adjust
the viewing angle. The FlexDock automatically changes the display orientation
as you rotate the tablet. The unique design also lets you write on the tablet at
any angle and stores flat for travel.
Using the FlexDock
Crossbar
End cap
To set up the FlexDock:
1 Lift and slide the crossbar on the FlexDock forwa rd to set the desired
viewing angle.
2 Install the end caps in the slots on each side of the FlexDock base, then
slide them forward until they lock into the slots.
3 Verify that the FlexDock is horizontal (with the Motion logo horizontal)
and the docking connector on the bottom.
4 With the docking connector pointing down, gently slide the Tablet into
the FlexDock until it clicks into place. (Spring tabs on each side secure it
in place.)
5 T urn on the tablet by sliding the power button, which is fo und on the right
side of the tablet.
www.gateway.com
31
Page 36

Chapter 2: Getting Started
6 Test the screen rotation by turning the tablet in the FlexDock. The
FlexDock will sense the change and automatically adjust the screen.
7 Install the optional equipment you have purchased. We recommend that
you install one item at a time, waiting about two minutes before
connecting the next accessory to ensure successful discovery and
installation.
32
www.gateway.com
Page 37

Using an external monitor
To attach an external monitor:
1 Plug the monitor cable into the VGA port on the tablet or FlexDock. Turn
on the tablet if it is turned off.
2 Plug the monitor’s power cord into an AC power source and turn it on.
Windows XP recognizes the new hardwa re and searches for its driver. You
may need to install the driver from the disk supplied by the monitor’s
manufacturer or download t he driver from the manufacturer’s Web site.
If you need to install a driver from the manufacturer’s CD, you must first
attach the DVD/CD-RW drive. For more information, see “Connecting the
DVD/CD-RW drive” on pag e 25.
3 After the driver is installed, open Display Properties by button-tapping on
any empty space on the desktop and tap ping
drop-down menu.
Properties from the
Using an externa l monitor
4 In the Display Properties dialog box, tap the Settings tab.
5 Button-tap the second monitor icon (labeled 2) and tap Attached on the
drop-down menu.
6 Ta p th e Apply button.
7 Adjust properties such as Screen R esoluti on or Color Quality if necessary.
www.gateway.com
33
Page 38

Chapter 2: Getting Started
T ra vel tips
Pac king your tablet
■ Remove all peripherals and cables. Remember to pack those you will need
while traveling, and do not forget to pack at least one tablet pen.
■ Attach the Hard Top or slip the Gateway Tablet PC into its portfolio to
protect the display.
■ Protect the pen by keeping it in the tablet’s pen holder during travel.
■ Pack the Gateway Tablet PC securely into a br iefcase or hand-carrie d
luggage, and keep it separate from toiletries, liquids, and food. Do not pack
it in checked luggage.
■ Keep the tablet stable during travel. Secure it to prevent it from sliding
around in overhead bins and car trunks.
Traveling by air
■ Prepare for airport secu rity by charging the batter y in case Security asks
you to start the tablet.
■ Have it hand-inspect ed or sent through the X-ra y sc ann er, but never carry
it through the metal detector.
■ Turn off the tablet for takeoff and landing.
■ Disable wireless operation before boarding the plane, and do not enable
wireless while in flight. The easiest way to disable wireless operations is
by unchecking the
in “Using the Motion Dashboard” on page 47.
■ Do not check the tablet as baggage.
Wireless check box in the Motion Dashboard as shown
34
www.gateway.com
Page 39

Additional travel tips
■ Before extended use in the field or long trips away from AC power, adjust
the power properties to maximize battery conservation. Tap the
Power/Battery icon in the taskbar to open the Power Options Properties dialog
box. See the Performance and Maintenance section of the Help and Support
Center for details about power settings.
■ For international travel, obtain and use the appropriate adapters for your
destination’s electrical outlets. A current converter is not necessary.
■ Carry proof of ownership or a merchandise passport when traveling
internationally.
■ Consult your insurance company and credit card company to learn about
emergency travel assistance if your tablet is lost or damaged.
■ Take the DVD/CD-RW drive, its cables, and its power adapter in case you
need to install software. T ake your system restoration CDs in case you need
to restore your operating system.
Travel tips
www.gateway.com
35
Page 40

Chapter 2: Getting Started
Managing po wer
A 6-cell lithim-ion prismatic battery comes installed in the Gateway Tablet PC.
Fully charged, a new battery can power the tablet for several hours, depend ing
on conditions and usage patterns.
Extra batteries are available through Motion. Use only Motion batteries in the
Gateway Tablet PC.
Handle the battery with care. Do not open, puncture, short , or expo se it to fire
or water. Keep the battery in an ambient temperature of less than 140°F (60°C).
Do not leave it in a closed car in hot weather.
Charging the battery
Your tablet ships with a charged 6-cell lithium-ion battery (or, optionally, a
lightweight 3-cell) in its bay.
You may own other devices that advise you to charge the battery before first
use, but the Gateway T ablet PC battery does not require it. If a charge is needed,
just plug in the AC adapter and let the battery charge while you are working.
■ With the tablet turned off, plug the AC adapter into the tablet and a wall
outlet.
■ A full charge will take up to two hours. Press the button next to the battery
gauge. When all five LEDs glow green, the battery is fully charged.
■ Whenever the tablet is connected to AC power and the battery is in place,
the tablet will automatically char ge the battery until it reaches 100 perc ent.
The Battery Status LED glows steady yellow while the battery is charging
and changes to steady green when cha rging is complete.
Battery status indicators
The Gateway Tablet PC has two external battery status indicators: the Battery
Status LED light on the front and the battery status gauge on the back. (When
the tablet is turned on, the
battery status.)
Power/Battery icon in the taskbar also indicates
Battery status LED
This LED glows or flashes depending on the state of the ba ttery:
36
www.gateway.com
Page 41

LED Meaning
Steady green Battery charged (AC adapter plugged in)
Steady yellow Battery charging (AC adapter plugged in)
Steady orange Battery overheated or defective
Managing power
Flashin g green
and orange
Slow-flashing
orange
Fast-flashing
orange
Off Battery discharged (AC unplugged) or battery removed
Battery status gauge
This gauge is on the battery on the back of the tablet, and its five lights each
represent about 20 percent of available power. Read the gauge by pushing on
the button next to the LEDs.
Low battery alarm
When Power Management issues a low-battery alarm (which it will do when
the battery charge is 10% or less), save all work immediately and either conn ect
to AC power or put the tablet in Standby and switch to a new battery.
When the battery reaches critical low capacity, the tablet puts itself into
Hibernate to preserve data in any ope n programs.
Battery discharging abnormally and should be replaced
Battery charge less than 10% (AC unplugged)
Battery charge less than 5% (AC unplugged)
Adjust Power Management alarms through the
Properties dialog box. You can reach this dialog box either by button-tapping
Power/Battery icon in the taskbar or through the Control Panel.
the
www.gateway.com
Alarms tab of the Power Optio ns
37
Page 42

Chapter 2: Getting Started
Changing the battery
The battery may be changed while the tablet is turned on, even when the
Gateway Tablet PC is not connected to an AC power source. Use only batteries
obtained from Motion.
To change the batter y:
1 If the tablet is turned on, save all active files, then place the tablet in
Standby mode by tapping the
You may now switch batteries safely, but keep in mind that the tablet’s
internal battery can only hold the tablet in Standby for less than a minute
when the battery is removed. Be sure to have a charged replacement battery
close at hand before removing the first.
2 Push the battery release latch, then lift the battery away from the tablet.
Standby button in the Motion Dashboard.
3 Insert the new battery until it clicks into place.
After swapping batteries without connection to AC power, the internal battery
needs to recharge for about three hours before it can support another battery
swap.
38
www.gateway.com
Page 43

P ower management tips
■ Use AC power whenever available to lengthen the batter y’s usable life.
Leave the battery in place when using AC.
■ Use AC power when installing software or writing to a CD and, for best
performance, when using the DVD player.
■ Whether using AC or battery power, place the tablet in Standby or
Hibernate mode when leaving it unattended.
■ Keep in mind that the display, processor, PC cards, wireless cards, and
peripheral drives all draw on the batter y, so adjust properties and disable
unused peripherals an d PC cards when operating on battery power.
■ Before unplugging the AC adapter, adjust the power mode and display
brightness to lower settings to prolong the battery’s charge. We recommend
operating in Max Battery mode to prolong the battery’s charge—tap t he
taskbar’s
setting.
Power/Battery icon to open the popup menu to choose your power
Managing power
■ Turn off the 802.11b wireless networking.
www.gateway.com
39
Page 44

Chapter 2: Getting Started
40
www.gateway.com
Page 45

Customizing
Display
Changing display orientation
Changing the display orientation from the default,
landscape (horizontal), to portrait (vertical) or secondary
landscape (180 degrees from the default) happens with the
press of a button:
■ Press Hot Key 2 to scroll through display options.
- OR T o use the Motion Dashboard, press Hot Key 1 , then
tap the orientation you want in the Display Orientation
section.
To change orientation properties:
■ Double-tap the Tablet and Pen Settings icon in the
taskbar and tap the
■ Tap the Tablet Buttons tab to change Hot Key functions.
Display tab.
www.gateway.com
41
Page 46

Chapter 3: Customizing
Adjusting brightness
When the light around you changes, you might want to adjust the brightness
level of the Gateway Tablet PC’s display. All it takes is a couple of taps.
To adjust screen brightness:
■ Open Dashboard and choose the desired lev el on the Display Brightness
slider.
- OR Double-tap on the
Display tab. Choose the type of settings from the drop-down men u,
the
then adjust the
Tablet and Pen Settings icon in the taskbar and tap on
Brightness slider.
42
www.gateway.com
Page 47

Adjusting pen properties
T ab let and pen settings
Windows XP Tablet PC Edition includes a control panel for adjusting pen,
display, and button preferences such as:
■ Right-handed vs. left-handed use
■ Pen calibration in portrait and landscape modes
■ Screen brightness
■ Button functions
■ Pen actions such as double-tapping
To change tablet and pen settings:
Adjusting p en properties
1 Double-tap (Tablet and Pen Setti ngs) in the tas kbar.
2 When the Tablet and Pen Properties dialog box opens, tap the Pen Options
tab.
www.gateway.com
43
Page 48

Chapter 3: Customizing
Programming the b uttons
Most of the buttons on the tablet’s front can be reprogrammed with new
function s and second ary funct ions.
To reprogram button functions:
1 Double-tap (Tablet and Pen Setti ngs) in the taskbar.
2 When the Tabl et and Pe n Pro perties dialog box opens, tap th e Tablet Options
tab.
3 Change the button settings, then click OK.
44
www.gateway.com
Page 49

Adding a PC Card
The PC Card slot, located on the power switch side of the tablet, holds one
Type-II PC Card. The tablet ships with a spac er in the PC Card slot. Wh eneve r
the slot is not in use, leave the spacer in place.
To remove or ins ert a PC Card:
1 To remove the PC Card, click the Eject PC Card icon in the taskbar, push
the button next to the slot until the button pops out, then push it again
to eject the card.
2 To insert the the PC Card, insert it into the slot with the PC Card’s label
facing the same direction as the front of the tablet.
Adding a PC Card
www.gateway.com
45
Page 50

Chapter 3: Customizing
Using the modem and network
The Gateway Tablet PC has a modem and a network jack. They look similar
but serve different purposes and should not be confused. To see their location,
see “” on page 5.
■ The modem port is a standard RJ-11 (a phone cord) connector.
■ The tablet’s internal V.92 modem operates at a maximum of 56K
throughput and has fax capabilities.
■ The modem should only be connec ted to an analog telephone ja ck. Do
not connect to a digital telephone network jack.
■ The network jack, which is used for network, cable modem, and DSL
connections, fits a standard RJ-45 network interface connector.
■ Because it is easy to confuse the modem jack and network jack, be sure to
plug the telephon e cord into the mode m jack, no t the netw ork jack.
LAN and modem tips
■ When using wireless connectivity in low-reception areas, be sure to keep
your hands clear of the antenna zones.
■ Be sure to disable the Gateway Tablet PC’s wireless LAN during air travel
by deselecting Dashboard’s
Wireless Op eration check box before takeoff.
Going wireless
Your tablet has an 802.11b mini-PCI card for wireless communications
Locking y our tablet
A Kensington-style security-cable lock can be atta ched to your tablet a t the slot
located on the back, in the corner next to the power switch. You can purchase
a cable and lock from G ateway.
46
www.gateway.com
Page 51

Using the Motion Dash board
Using the Motion Dashboard
The Motion Dashbo ard can act as a control panel , a status display, and an
application launcher.
From Dashboard you can:
■ Open the Motion Welcome Page for helpful information any time
■ Adjust the Gateway Tablet PC’s volume, power, and display options
■ Check tablet status readings
■ Enable wireless operations
■ Open applications
■ Reprogram H ot Keys
www.gateway.com
47
Page 52

Chapter 3: Customizing
When you open the Motion Dashboard, almost everything you need to manage
tablet properties is right at your pen tip. To run the Motion Dashboard, press
Hot K ey 1 . Properties adjust as soon as you change them.
This feature: does this:
Speaker V olum e Adjust s or mutes the v olum e of the Gate wa y Tabl et PC’s
audio output: built-in speakers, external speakers, or
headphones.
Display
Brightness
Calibrate Opens the Pen Calibration utility.
Display Rotation Changes the display’s orientation.
Graphics
Properties
Properties Opens the Power Management Properties dialog box.
Power Scheme Provides access to Power Schemes.
Power Button Adjusts the function of the Power Switch.
Wireless
Operation
Battery Displays battery status.
Wireless Status D isplays the status and strength of the optional wi reless
Quick Keys Performs the keyboard equivalent of various keystrokes.
Adjusts the display’s brightness level.
Adjusts the display proper ties for an external monitor.
Enables or disables the mini-PCI wireless networ k.
LAN’s signal.
Shor tcuts Provide s shor tcut acces s to desig nated soft ware
Display Keyboard Opens the on-screen Tablet Input Panel for typing,
Stand By Puts the tabl et in Standby mode for safe battery
48
programs.
writing, and voice input.
swapping or temporary suspension.
www.gateway.com
Page 53

Using speech recognition
The Gateway Ta blet PC is designed to accept and interpret the human voice,
both for dictation (speech recognition) and for keyboard-equivalent voice
commands.
■ Set up speech recognition through the Tablet PC Input Panel’s Tools menu.
■ Learn more about voice commands in the Accessibility section of the Help
and Support Cente r.
■ Use the built-in microphone or connect an external microphone.
Using speech rec ognition
www.gateway.com
49
Page 54

Chapter 3: Customizing
Using Sign-On and Sign-It
Sign-On™ software, when activated, lets you safeguard your tablet, as well as
folders and individual files, by using your signature instead of a password. More
than one person can register a Sign-On signature on the same tablet.
■ Install the Sign-On software according to the manufacturer’s instructions.
■ Press the pen button and tap (button-tap) on the Sign-On icon in the
taskbar.
■ From the pop-up menu, choose Enroll Signature, and follow the instructions
to set up a signature template.
■ To lock and protect an individual document, button-tap on the open
document and choose
■ T o unlock a locked document, butto n-tap on its ic on in W indows Explorer
and select
More information is available in the Sign-On Online User Guide.
Sign-On (Lock) from the pop-up menu.
Sign-On (Unlock) from the pop-up menu.
The Gateway Tablet PC also includes a trial version of Sign-It
®
biometric
electronic signature software for embedding your signature into forms and
documents.
50
www.gateway.com
Page 55

Maintaining
The Gateway Tablet PC is more durable than the standard
notebook PC, from its writing surface to its housing. Give
it the care and respect you use on any other piece o f
sensitive electronic equipment, and your Gateway Tablet PC
can keep you computing for a long time.
■ Protect the Gateway Tablet PC from exposure to
extreme temperatures, shock, liquids, strong magnetic
fields, and turbulent conditions.
■ Optimal operating temperature range: 41°F to 95°F (5°C
to 35°C)
■ Do not block the side heat vent.
■ Do not open or disassemble the tablet other than to
replace memory modules.
■ When storing the tablet for an extended period of time,
unplug AC power and remove the battery after
discharging it partway.
■ Do not place he avy objects on top of the tablet.
www.gateway.com
51
Page 56

Chapter 4: Maintaining
Display screen
While the surface of the Gateway Tablet PC’s display was designed for durability ,
it still needs careful treatment.
■ Use only the tablet’s pen on the display. Do not write on the surface with
an ink pen or pencil.
■ Nothing heavier than your writing hand should be placed on top of the
display.
■ Protect the display surface from unnecessary contact by using the Hard T op
or a case when transporting the Gateway Tablet PC.
■ Never spray or pour liquids directly on the display surface.
■ Avoid prolonged exposure to direct sunlight.
■ Use the included cleaning cloth or similar soft fabric to wipe away dust
and fingerprints. Dampen the cloth with wa ter or computer-screen cleaner
if necessary, but never spray anything directly on the surface. If liquid
collects around the edges, wipe it up immediately.
52
www.gateway.com
Page 57

Pen
■ Always store the pen in the Gateway Tablet PC’s pen holder when not in
use.
■ Store extra pens horizontally in a bo x or drawer.
■ Pens should not be stored vertically on the tip, as constant tip pressure
can affect pen- screen interaction .
■ The pen has electronics in it, so it should not be exposed to or immersed
in liquids.
Replacing the pen point
Normal use wears down the pen’s point, so the pen ships with extra points and
a replacement tool. To use the tool, grasp the old point with the ring and pull.
Insert a new point and apply slight pressure to set it in place.
Pen
www.gateway.com
53
Page 58

Chapter 4: Maintaining
Adding memory
Your tablet comes installed with 256 MB of memory. Additional memory helps
improve tablet performance and increase battery life.
Warning T o a void the risk of persona l injury or damage to the ta blet,
To add memory:
1 Turn off the tablet, unplug the power, and remove the battery.
2 Ground yourself by touching the tablet or another grounded appliance.
when performing the following tasks, turn off your tablet,
unplug the A C power connection, an d rem o ve the battery .
Ground your self b y touch ing th e tab let. A v oi d t ouching t he
pins and leads o n th e m em ory and t he internal circuitry of
the tablet.
3 Remove the two screws from the L-shaped cove r on the back of the tablet.
4 If you are removing a module, release the clips on each side of the memory
module. The memory modu le lifts up to a 25-degree angle for easy removal.
54
www.gateway.com
Page 59

Adding memory
5 Install the new memory module in the slot at the same angle.
6 Press down the memory module until it snaps into place. Be sure the new
memory modules are aligned and firmly seated in their slots.
7 Replace both screws on the external cover and turn on the tablet.
8 T o check that the memory module has been installed successfully , tap Start,
My Computer, then tap View System Information. The General tab shows the
amount of memory now installed in your tablet.
Important If the amount of m emory shown and the memory yo u hav e
just installed d iffer , the memory module ma y not be s eated
correctly. Remove the module and repeat the procedure.
www.gateway.com
55
Page 60

Chapter 4: Maintaining
56
www.gateway.com
Page 61

Troubleshooting
Help and Support Center
For information about your Gateway Tablet PC and the
Microsoft Windows XP operating system, visit the Help and
Support Cen ter (tap
Start, then tap Help and Support).
Whenever you open the Help and Support Center while the
Gateway Tablet PC is online, the Did Yo u Know section
checks for updates from Microsoft and M otion, such as
tablet usage hints, and notices from Motion about your
Gateway Tablet PC.
www.gateway.com
57
Page 62

Chapter 5: Troubles hooting
Troubleshooting
The Gateway T ablet PC has passed a rig orous series of usage and quality-control
tests, but now and then a problem may appear. If you do not see a solution
among the following issues, see “Support options” on page 65.
Power
The tablet will not turn on .
■ The Power switch has not been fully engaged. Slide and hold the Power
switch for at least a hal f-second, but no more than three seconds.
■ The battery is fully discharged but AC power is not connected. Connect
the AC adapter to power the tablet and charge the battery.
The tablet turns on and the hard drive LED flashes, but nothing
appears on the display.
■ Display brightness is set too low. Shut down and restart the tablet. If the
problem continues, connect an external VGA monitor and adjust the
brightness in Tablet and Pen Settings.
The tablet will not enter Hiber nation mode.
■ Hibernation is not enabled. Enable Hibernation through Power Option
Properties.
The tablet will not come out of Standby or Hi bernation mode when
running on battery power .
■ The battery fully discharged but AC power is not connected. Connect the
AC power adapter to power the tablet and charge the battery.
The display goes blac k while the tablet is still tur ned on.
■ T ablet has gone into Standby after sitting idle (power LED is flashing green).
Slide and hold the Power switch for about a second to resume operations.
■ T ablet has gone into low-battery Hibernation (power L ED is flashing green).
Slide and hold the Power switch for about a second to resume operations,
and charge the battery.
58
www.gateway.com
Page 63

Battery
Data loss during battery swap.
■ Battery swap took too long .
The battery seems to run down very quickly.
■ Peripher al de vice s such as a DVD pl aye r an d ap pli catio ns that mak e hea vy
use of the hard drive drain the battery more quickly. Use AC power
whenever possible, and readjust the
AC p ower is unavailable.
Troubleshooting
■ Before swapping batteries, save all active files.
■ Make sure the replacement battery is charg ed.
■ Put the tablet into Standby.
■ Take no more than a minute swapping batteries—the quicker the
better
Power Proper ties to Max Battery when
■ The battery is weakening or defective. All batteries run down in time, but
if a new battery appears to be defective, contact Gateway about replacing it.
Display
The desktop is too big for the displ ay , and I cannot see all of the
desktop icons.
■ Screen resolution is set lower than the default 1024 × 768 with 32-bit
resolution. Increase the
Display Propert ies dialog box.
The display looks dim.
■ Brightness is set too low. Adjust brightness through the Pen Settings tab
of the Tablet and Pen Settings dialog box.
The screen is unreadable or distorted.
■ Screen resolution or color quality are set incorrectly. Reset resolution to
1024 × 768 and color quality to 32-bit under the
Properties dialog box.
Screen R esoluti on under the Settings tab of the
Settings tab of the Display
■ Display driver has become corrupted or uninstalled.
www.gateway.com
59
Page 64

Chapter 5: Troubles hooting
To reinstall the display driver:
1 Open the System Properties dialog box (through the C ontrol Panel’s
Performance and Maintenance category) and tap the
2 Tap Device Manager, then double-tap Monitors.
3 Tap Default Monitor.
4 Choose Update Driver from the pull-down menu and follow the Wizard.
You may need to attach the DVD/CD-RW drive.
Pen
The tablet does not respond to the pen.
■ You are not using the correct pen. Us e only Penabled digitizer pens by
W acom such as your tablet’s pen. The Gateway T ablet PC does not respond
to some other tablet pens or plastic pens.
Hardware tab.
The pen tip does not line up with the pointer when I tap on the screen.
■ The pen and display need recalibrating in both Landscape and Portrait
mode. Recalibrate through the
dialog box.
Interface/Ports
The buttons on the Gatewa y T ablet’s front do not do what I expected.
■ Button functions have been changed. Reset button functions in the
Buttons tab of the Tablet and Pen Settings dialog box.
The tablet does not recognize the PC Card I inserted.
■ The card is incorrectly inserted. Eject the card and re-insert it with the label
side up.
The tablet does not recognize a USB or 1394 peripheral device.
■ The peripheral is not connected to the Gateway Tablet PC correctly . Check
the connection cable, and be sure it is inserted in the correct port on the
tablet and the peripheral device.
Pen Settings tab of the T ablet and P en Settings
60
www.gateway.com
Page 65

■ The correct driver is not built into Windows XP. Use the device’s
The tablet is sitting in the Fle xDock but t he tablet does not recognize
peripheral device s.
■ The Gateway T ablet PC is not fully seated in the FlexDock. Reseat the tablet
Audio
The built-in micr ophone does not seem to hear my v oice correctly .
■ The built-in microphone’s frequency response is too low for your purposes.
■ Something is connected to the microphone jack. Unplug the device.
No sound is coming from the built- in speakers.
■ Connecting a headset or external speakers mutes the built-in speakers.
Troubleshooting
installation CD or check the manufacturer’s Web site for the correct driver.
in the FlexDock.
Headset microphones are recommended for those using dictation
frequently.
Disconnect the headset or external speakers if not in use.
No sound is coming from any speaker s.
■ Audio volume is too low. Adjust volume by tapping the Speaker icon in
the taskbar.
Operating system
The program I am working i n has stopped responding but the cu rsor
moves and other pr ograms w ork.
■ The program has crashed. Press the small button (Security) on the Gateway
Ta blet PC’s front to open the Task Manager and close the non-responsive
program.
The tablet keeps showing the wr ong date and time even after resetti ng.
■ The CMOS battery on the system board may need to be replaced. Contact
Gateway technical support.
www.gateway.com
61
Page 66

Chapter 5: Troubles hooting
The tablet seems to be operating more slowl y than usual.
■ The hard drive is full or nearly full. Run the Disk Cleanup utility to clear
out unnecessary and temporary files, and remove unneeded programs and
files. Consult the Performance and Maintenance section of the Help and
Support Center.
■ The disk needs defragmentin g. Run Di sk Defragme nter t o consolid ate files
and folders on the hard drive. Consult the Performance and Maintenance
section of the Help and Support Center.
■ The tablet is in Portrait or Secondary Landscape orientation. Though
changing the orientation should not slow the tablet considerably, try
changing back to Primary Landscape orientation.
Communications
Wireless communication s keeps connecting even when I do not want
it to.
■ The default setting is On. Uncheck the Wireless Communications check box
in the Motion Dashboard.
Data does not tr ansfer thr ough wired Ethernet.
■ The cable is not connected correctly. Reconnect and check for activity in
green and orange lights next to the LAN port.
62
www.gateway.com
Page 67

FAQs
How long will the battery stay char ged?
This can vary according to usage conditions, but a new, fully charged standard
battery can last several hours.
Are there ways to make the battery charge last longer?
■ Adjust the Power properties to Max Battery (double-tap on the taskbar’s
Power ic on to open the menu)
■ Dim the display brightness (double-tap on the taskbar’s Tablet icon and
choose the
■ Disconnect LAN/modem connections and disable wireless
communications when not in use (uncheck the Wireless Commu nications
check box in the Motion Dashboard)
■ Turn off optional and unnecessary background pro grams and turn off or
disconnect unused periphe ral equipment from USB and IEEE 1394 ports
Display tab)
FAQs
What is the average life of the battery?
This varies widely, depending on usage patterns and conditions.
What does the tablet need for use in another country?
Just an outlet adapter, which you can find in airports and travel stores. The
AC adapter will adjust automatically to different voltage when plugged into the
correct location-appropriate power adapter. You should also bring a modem
adapter.
What is the best wa y to clean the displa y screen?
Use the soft cloth, dry or dampened, that came with your Gateway Tablet PC.
Do not use spray cleaners or spray/pour any liquid on any surface of the tablet.
Will scratches affect the display’s performanc e?
Testing has not found appr eciable loss of performance on a scratched display.
How sensitive is t he screen to sunlight and the elements?
As with any computer or electronic device, the Gateway Tablet PC should be
protected from liquids, dirt and sand, other contaminants, and extreme heat.
www.gateway.com
63
Page 68

Chapter 5: Troubles hooting
Will the tablet work with an y monitor or USB peripheral keyboard,
mouse, or drive?
Any device will work as long as the device’s driver is available either in Windows
XP or from the manufacturer, and it carries the Windows XP logo or
certification. See www.microsoft.com/hcl
Why does the tablet and FlexDock not have parallel, serial, or PS2
ports?
Microsoft Tablet PC certification requires the tablet to be completely
Grab-and-Go—that is, to be able to dock with and undock from all peripherals
without putting the tablet into suspend or shutting it down. Connection
through legacy ports (serial, parallel, PS2) often requires suspending or
restarting the tablet, which prevents you from moving between desktop mode
and mobile mode seamlessly in one docking/undoc king step.
How do I adjust the tablet for left-handed use?
Through the Settings tab of the Tablet and Pen Settings dialog box. Access it by
double-tapping on the
for more information.
Tablet an d Pen Settin gs icon in the taskbar.
How can I impro ve the wireless s ignal?
Make sure that the antenna zone is not covered up by hands, cases, or other
objects.
64
www.gateway.com
Page 69

Support options
Gateway's online support is available 24 hours per day, 7 days per week and
provides the most current drivers, product specifications, tutorials and
personalized information about your tablet. Visit the Gateway eSupport
Web site at support.gateway.com
Using eSupport
The eSupport site is divided into four major areas:
■ Support Home
■ Downloads
■ Contact Us
■ Account Info
Support options
.
Each of these areas is represented by a tab across the top o f the Web page.
Support Home tab
To get specific information about your tablet, type your serial number into the
My System Information box, then tap
The Support Inform ation link lets you access product documentation. By entering
your serial number, you get specific documents related to your tablet. You can
also browse through the reference area to loca te an article specific to the
question you have.
The Tutorials link lets you access an extensive library of how-to articles and
videos on topics such as making audio C Ds.
Downloads tab
The Downloads tab provides the latest software updates for BIOS and driver
upgrades. By entering your serial number you get drivers specific to your tablet.
All Downloads to walk through a step-by-step wizard to locate your drivers.
Tap
Contact Us tab
The Contact Us tab contains links to technical support with a live technician,
including chat and e-mail. Tap
numbers for both sales and support.
GO, or tap Look up my serial number for me.
Call Us to get a list of Gateway telephone
www.gateway.com
65
Page 70

Chapter 5: Troubles hooting
Account Info tab
The Account Info tab contains support for non-technical issues, like the status
of your order or changing your a ccount address.
Calling Gatewa y technical support
Before calling Gateway , make sure your question is not already answered in the
Troubleshooting or FAQ section. To speak with a support technician,
call 800-846-2303.
66
www.gateway.com
Page 71

Notices
Important safety
information
Y our Gateway system is designed and tested to meet the latest standards
for safety of information technology equipment. However, to ensure safe
use of this product, it is important that the safety instructions marked on
the product and in the documentation are followed.
Warning Always f ollow these instructi ons to help guard
against personal injur y and damage to your
Gateway system.
Setting up your s ystem
■
Read and follow all instru ctions marked on the product and in the
documentation before you operate your system. Retain all safety and
operating instructions for f uture use.
■
Do not use this product near water or a heat source such as a radiator .
■
Set up the system on a stable work surface.
■
The product should be operated o nly from the type of power source
indicated on the rating label.
■
Openings in the tablet case are provided for ventilation. Do not block or
cover these openings. Make sure you provide adequate space, at least
6 inches (15 cm), around the system for ventilation when you set up
your work area. Never insert objects of any kind into the tablet
ventilation openings.
www.gateway.com
67
Page 72

Appendix A: Notic es
■
Some products are equipped with a three-wire power cord to make sure that the product is
properly grounded when in use. The plug on this cord will fit only into a grounding-type outlet.
This is a safety feature. If you are unable to insert the plug into an outlet, contac t an electrician
to install the appropriate outlet.
■
If you use an extension cord with this system, make sure that the total ampere rating on the
products plugged into the extension cord does not exceed the extension cord ampere rating.
■
If your system is fitted with a TV Tuner , cable, or satellite receiver c ard, make sure that the
antenna or cable system is electrically grounded to provide some protection against voltage
surges and buildup of static charges.
Care during use
■
Do not walk on the power cord or allow anything to rest on it.
■
Do not spill anything on the system. The best way to avoid spi lls is to avoid eating and drinki ng
near your system.
■
Some products have a replaceable CMOS battery on the system board. There is a danger of
explosion if the CMOS battery is replaced incorrectly . Replace the battery with the same or
equivalent type recommended by the manufacturer . Dispose of batteries according to the
manufacturer’s instructions.
■
When the tablet is turned off, a small amo unt of elec trical current st ill flows thr ough the tablet .
To avoid electrical shock, always unplug all power cables and modem cables from the wall outlets
before cleaning the system.
■
Unplug the system from the wall outlet and refer servicing to qualified personnel if:
■
The power cord or plug is damaged.
■
Liquid has been spilled into the system.
■
The system does not operate properly when the operating instructions are followed.
■
The system was dropped or the cabinet is damaged.
■
The system performance changes.
Replacement parts and accessories
Use only replacement parts and accessories recommended by Gateway.
Important Do not use Gateway products in areas classified as
hazardous locations. Such areas include patient care
areas of medical and dental facilities, oxygen-laden
environments, or industrial facilities.
Caution To reduce the risk of fire, use only No. 26 AWG or larger
telecommunications line cord.
68
www.gateway.com
Page 73

Regulatory compliance
statements
Wireless Guidance
Low power, Radio LAN type devices (radio frequency (RF) wireless communication devices),
operating in the 2.4 GHz Band, may be present (embedded) in your notebook system. The
following section is a general overview of cons iderations while operatin g a wireless device.
Additional limitations, caut ions, and concerns for specific countries are listed in the specifi c
country sections (or country group sections). The wireless devices in your system are only qualified
for use in the countries identifie d by the Radio Approval Marks on the system rating label. If the
country you will be using the wireless device in, is not li sted, please contact your local Radio
Approval agency for requirements. Wireless devices are closely regulated and use may not be
allowed.
The power output of the wireless device or devices that may be embedded in your notebook is well
below the RF exposure limits as known at this time. Because the wireless devices (which may be
embedded into your notebook) emit less energy than is allowed in radio frequency safety standards
and recommendations, Gateway believes these devices are safe for use. Regardless of the power
levels, care should be taken to minimi ze human contact during normal opera tion.
As a general guideline, a separation of 20 cm (8 inches) between the wireless device and the body ,
for use of a wireless device near the body (this does not include extremities) is typical. This device
should be used more than 20 cm (8 inches) from the body when wireless devices are on and
transmitting.
Some circumstances require restrictions on wireless devices. Examples of common restrictions are
listed below:
Regulatory comp liance statements
Warning Radio frequency wireless communication can interfere
with equipment on commercial aircraft. C urrent aviation
regulations requi re wirel es s devices to be turned off while
traveling in an ai rplane. 8 02 . 11B (a l so k nown a s w ire l es s
Ethernet or Wifi) and Bluetoo th communication de vices are
examples of devices that provide wireless com m un ic ati on.
Warning In environments where the risk of interference to other
devices or services is harmful or perceived as harmful, the
option to use a wireless device may be restricted or
eliminated. Airports, Hospitals, and Oxygen or flammable
gas laden atmospheres are limited examples where use
of wireless devices may be restricted or eliminated. When
in environments where you are uncertain of the sanction
to use wireless devices, ask the applicable authority for
authorization prior to use or turning on the w ireless de vic e.
www.gateway.com
69
Page 74

Appendix A: Notic es
Warning Every country has different restrictions on the use of
wireless devices. Since your system is equipped with a
wireless device, when traveling between countries with
your system, check with the local Radio Approval
authorities prior to any move or trip for any restrictions on
the use of a wireless device in the destination countr y.
Warning If your system came equipped with an internal embedded
wireless device, do not operate the wireless device unless
all covers and shiel ds ar e in pl ace an d the sy stem is full y
assembled.
Warning Wirele ss devices ar e not us er servicea ble. Do not modi fy
them in any wa y. Modification to a wireless de vice will void
the authorization to use it. Please contact Gateway for
service.
Warning Only use drivers approved for the country in which the
device wil l be us ed. See the Gate w a y Sys tem R estor ation
Kit, or c ontact Gat eway Te chnical S uppor t for additi onal
information.
Warning In order to comply with FCC requirements this transmitter
must not be operated (or co-located) in conjunction with
any other transmitter or antenna installed in the notebook.
70
www.gateway.com
Page 75

United State s of America
Federal Communications Commission (FCC)
Intentional emitter per FCC Part 15
Low power, Radio LAN type devices (radio frequency (RF) wireless communication devices),
operating in the 2.4 GHz Band, may be present (embedded) in your notebook system. This section
is only applicable if these devices are present. Refer to the system label to verify the presence of
wireless devices.
Wireless devices that may be in your system are only qualified for use in the United States of
America if an FCC ID number is on the system label.
The FCC has set a general guideline of 20 cm (8 inches) separation between the device and the
body, for use of a wireless device near the body (this does not include extremities). This device
should be used more than 20 cm (8 inches) from the body when wireless devices are on. The power
output of the wireless device (or devices) , which may be embedded in your notebook, is well below
the RF exposure limits as set by the FCC.
Operation of this device is subject to the followi ng two conditions: (1) This device may not cause
harmful interference, and (2) this device must accept any interference received, including
interference that may cause u ndesired operation o f the device.
Warning Wirel ess device s are n o t us er servicea ble. Do n ot mo di fy
them in any wa y. Modification to a wireless de vice will void
the authorization to use it. Contact Gateway for service.
Regulatory comp liance statements
Unintentional emitter per FCC Part 15
This device has been tested and found to comply with the limits for a Class B digital device,
pursuant to Part 15 of the FCC rules. These limits are designed to provide reasonable protection
against harmful interference in a res idential installatio n. This equipment generates, uses, and can
radiate radio frequency energy and, if not installed and used in accordance with the instructions,
may cause harmful interference to radio or television reception. However , there is no guarantee
that interference will not occu r in a particular installat ion. If this equipment does c ause
interference to radio and television reception, which can be determined by turning the equipment
off and on, the user is encouraged to try to correct the interference by one or more of the following
measures:
■
Reorient or relocate t he receiving antenna
■
Increase the separation between the equipment and receiver
■
Connect the equipment into an outlet on a circuit different from that to which the receiver is
connected
■
Consult the dealer or an experienced radio/TV technician for help.
Compliance Accessories: The accessories associated with this equipment are: shielded video cable
when an external monitor is connected. These accessories are required to be used in order to
ensure compliance with FCC rules.
This device complies with Part 15 of the FCC Rules. Operation of this product is subject to the
following two conditions: (1) this device may not cause harmful inter ference, and (2) this devic e
must accept any interference r eceived, including interference th at may cause undesir ed operation.
www.gateway.com
71
Page 76

Appendix A: Notic es
FCC declaration of conf ormity
Responsible party:
Motion Computing, Inc.
9433 Bee Caves Road
Building 1, Suite 250
Austin, TX 78733
512-637-1100 Fax: 512-637-1199
Product:
■
Motion M1200
This device complies with Part 15 of the FCC Rules. Operation of this product is subject to the
following two conditions: (1) this device may not cause harmful inter ference, and (2) this devic e
must accept any interference r eceived, including interference th at may cause undesir ed operation.
Caution Changes or modifications not expressly approved by
Motion could void the FCC compliance and negate your
authority to operate the product.
72
www.gateway.com
Page 77

T elecommunications per FCC part 68
(applicable to produc ts fitted with USA modems)
Y our modem compli es with Part 68 of the Federal Communications Commission (FCC) rules. On
the computer or modem card is a label that contains the FCC registration number and Ringer
Equivalence Number (REN) for this device. If requested, this information must be provided to the
telephone company.
An FCC-compliant telephone line cord with a modular plug is requ ired for use with this device.
The modem is designed to be connected to the telephone network or premises wiring using a
compatible modular jack which is Part 68-compliant. See installation instructions for details.
The Ringer Equivalence Number (REN) is used to determine the number of devices which may be
connected to the telephone line. Excessive RENs on a telephone line may result in the devices not
ringing in response to an incoming call. In most areas, the sum of RENs should not exceed five
(5.0). T o be certain of the number of devices that may be connected to a line, as determined by the
total RENs, contact the local telephone company.
If this device causes harm to the telephone network , the telephone company will notify you in
advance that temporary discontinuance of service may be required. The telephone company may
request that you disconnect the equipment until the problem is resolved.
The telephone company may make changes in its facilities, equipment, operations, or procedures
that could affect the operation of this equipment. If this happens, the telephone company will
provide advance notice in order for you to make necess ary modifications to maintain
uninterrupted service.
This equipment cannot be used on telephone company-provided coin service. Connection to party
line service is subject to state tariffs. Contact the state public utility commission or public s ervice
commission for information.
When programming or making test calls to emergency numbers :
■
Remain on the line and briefly explain to the dispatcher the reason for the call.
■
Perform such activities in the off-peak hours such as early morning or late evenings.
Regulatory comp liance statements
The United States T elephone Consumer Protection Act of 1991 makes it unlawful for any person to
use a computer or other electronic device to send any message via a telephone fax machine unless
such message clearly contains, in a margin at the top or bottom of each transmitted page or on the
first page of the transmission, the dat e and time it is sent, an identifica tion of the business, other
entity , or other individual sending the message, and the telephone number of the sending
machine or such business, other entity, or individual. Refer to your fax communication software
documentation for details on how to co mply with the fax-branding requi rement.
www.gateway.com
73
Page 78

Appendix A: Notic es
Canada
Industry Canada (IC)
Intentional emitter per RSS 210
Low power, Radio LAN type devices (radio frequency (RF) wireless communication devices),
operating in the 2.4 GHz Band, may be present (embedded) in your notebook system. This section
is only applicable if these devices are present. Refer to the system label to verify the presence of
wireless devices.
Wireless devices that may be in your system are only qualified for use in Canada if an Industry
Canada ID number is on the system label.
As a general guideline, a separation of 20 cm (8 inches) between the wireless device and the body ,
for use of a wireless device near the body (this does not include extremities) is typical. This device
should be used more than 20 cm (8 inches) from the body when wireless devices are on. The power
output of the wireless device (or devices) , which may be embedded in your notebook, is well below
the RF exposure limits as set by Industry Canada.
Operation of this device is subject to the followi ng two conditions: (1) This device may not cause
harmful interference, and (2) this device must accept any interference received, including
interference that may cause u ndesired operation o f the device.
Warning To prevent radio interference to licensed service, this
device is intended to be operated indoors and away from
windows to pr o v ide ma xi m um s hie ldi ng. Equipment (or its
transmit antenna) that is installed outdoors is subject to
licensing.
Warning Wirele ss devices ar e not us er servicea ble. Do not modi fy
them in any wa y. Modification to a wireless de vice will void
the authorization to use it. Contact Gateway for service.
Unintentional emitter per ICES-003
This digital apparatus does not exceed the Class B limits for radio noise emissions from digital
apparatus as set out in the radio interf erence regulations of Industry Canada.
Le présent appareil numérique n’émet pas de bruits radioélectriques dépassant les limites
applicables aux appareils numériques de Classe B prescrites dans le règlement sur le brouillage
radioélectrique édicté par Industrie Canada.
74
www.gateway.com
Page 79

T elecommunications per DOC notice
(for pr oducts fitted with a n IC-compliant modem)
The Industry Canada label identifies certified equipment. This certif ication means that the
equipment meets certain telecommunications network protecti ve, operation, and safety
requirements. The Department does not guarantee the eq uipment will o perate to the users’
satisfaction.
Before installing this equipment, users should make sure that it is permis sible to be connected to
the facilities of the local telecommunications company. The equipment must also be installed
using an acceptable method of connection. In some cases, the inside wiring associated with a
single-line individual service may be extended by means of a certified connector assembly. The
customer should be aware that compliance with the above conditions may not prevent
degradation of service in some situations.
Repairs to certified equipment should be made by an authorized Cana dian maintenance facility
designated by the supplier. Any repairs or alterations made by the user to this equipment, or
equipment malfunctions, may give the telecommunications company cause to request the user to
disconnect the equipment.
Users should make sure, for their own protection, that the electrical ground connections of the
power utility , telephone lines, and internal metallic water pipe system, if present, are connected
together . This precaution may be partic ularly important in rural areas .
Warning To avoid electrical shock or equipment malfunction do not
attempt to make el ectrical gro und connecti ons by y ourself .
Contact the appropriate inspection authority or an
electrician, as appropriate.
Regulatory comp liance statements
The Ringer Eq uivalence Num ber (REN) assigned to each terminal device provides an indication of
the maximum number of terminals allowed to be connected to a telephone interface. The
termination on an interface may consist of any combinatio n of devices subject only to the
requirement that the sum of the Ringer Equivalence Numbers of all the devices does not exceed 5.
www.gateway.com
75
Page 80

Appendix A: Notic es
Mexico
Intentional emitter
Low power, Radio LAN type devices (radio frequency (RF) wireless communication devices),
operating in the 2.4 GHz Band, may be present (embedded) in your notebook system. This section
is only applicable if these devices are present. Refer to the system label to verify the presence of
wireless devices.
Wireless devices that may be in your system are only qualified for use in Mexico if a SCT ID is on
the system label.
As a general guideline, a separation of 20 cm (8 inches) between the wireless device and the body ,
for use of a wireless device near the body (this does not include extremities) is typical. This device
should be used more than 20 cm (8 inches) from the body when wireless devices are on. The power
output of the wireless device (or devices) , which may be embedded in your notebook, is well below
the RF exposure limits as set by SCT.
Unintentional emitter
At this time there are no mandatory requirements for Unintentional Emitters. However , this device
does comply with multiple requirements for other countries and region s as listed on the system
label and in the user’s manual.
76
www.gateway.com
Page 81

Laser safety statement
All Gateway systems equipped with CD and DVD drives comply with the appropriate safety
standards, including IEC 825. The laser devices in these components are classified as “Class 1 Laser
Products” under a US Department of Health and Human Services (DHHS) Radiation Performance
Standard. Should the unit ever need servicing, contact an authorized service location.
Warning Use of controls or adjustments or perfor mance of
procedures other than those specified in this manual may
result in hazardous radiation exposure. To prevent
exposure to la ser beam s , do not try to open the enclos ure
of a CD or DVD drive.
Laser safety statemen t
www.gateway.com
77
Page 82

Appendix A: Notic es
Notices
Copyright © 2002 Gateway, Inc.
All Rights Reserved
14303 Gateway Place
Pow ay, CA 92064 USA
All Rights Reserved
This publication is protected by cop yright and all rights are reserved. No part of it may be reproduced or
transmitted by any means or in any f orm, without prior consent in writing from Gateway.
The information in this manual has been carefully checked and i s believ ed to be accurate. How ev er , changes are
made periodically . These changes are incorporated in newer publication editions. Gate way ma y improve and/ or
change products described in this publication at any time. Due to continuing system improvements, Gate way is
not responsible for inaccurate inf ormation which may appear in this manual. For the latest product updates,
consult the Gateway W eb site at www .gatewa y.com
exemplary, incidental, or consequential damages resulting from any defect or omission in this manual, ev en if
advised of the possibility of such damages.
In the interest of continued product dev elopment, Gatewa y reserves the right to make improvements in this
manual and the products it describes at any time, without notices or obligation.
T rademark Acknowledgments
1-800-GA TEW AY, ActiveCPR, ALR, AnyKey, black-and-white spot design, CrystalScan, Destination, DestiVu, EZ
Pad, EZ P oint, Field Mouse, Gatewa y 2000, Gate way Country, gateway.net, Gateway stylized logo , P erfect
Scholar, Solo , TelePath, Vivitron, stylized “G” design, and “You’ve got a friend in the business” slogan are
registered trademarks and black-and-white spotted box logo, GATEWA Y, Gateway Astro, Gatew ay@W ork,
Gateway Connected touch pad, Gatewa y Connected music pla yer , Gatew ay Cyber:)Ware, Gate way
Education:)W are , Gatew ay Flex Ca se, Gate wa y Gamin g:)W are, Gat ewa y GoBa ck, Gatewa y Gol d, Gate wa y
Learning:)Ware, Gateway Magazine, Gate way Micro Server , Gatewa y Money:)Ware , Gatewa y Music:)Ware,
Gateway Networking Solutions, Gatew ay Online Network (O. N.) solution, Gatewa y Photo:)Ware, Gate way
Professional PCs, Gatewa y Profile, Gatewa y Solo , green stylized GATEWAY, green stylized Gateway logo ,
Gateway Teacher:)Ware, Gatewa y Video:)Ware, HelpSpot, Inf orManager, Just click it!, Learn@Gatewa y, Kids
BackPack, SER VE-T O-ORDER, Server Watchdog, SpotShop, Spotshop. com, and Your:)Ware are trademarks of
Gateway, Inc. Intel, Intel Inside logo, and P entium are registered trademarks and MMX is a trademark of Intel
Corporation. Microsoft, MS, MS-DOS, and Windows are trademarks or registered trademarks of Microsoft
Corporation. All other product names mentioned herein are used for identification purposes only , and may be the
trademarks or registered trademarks of their respective companies.
Motion Computing is a registered trademark of Motion Computing, Inc. Microsoft Windows, Windows XP,
Windows XP T ab let PC Edition, and Windows Journal are either registered trademarks or trademarks of
Microsoft Corporation in the United States and/or other countries.
Wacom is a registered trademark and Penabl ed is a trademark of Wacom Technology Company. Acrobat is a
registered trademark of Adobe Systems Incorporated. CIC and Sign-It are registered trademarks of
Communication Intelligence Corporation. Sign-On is a trademark of Communication Intelligence Corporation.
. In no event will Gatewa y be liable f or direct, indirect, special,
78
www.gateway.com
 Loading...