


Quick Start & Troubleshooting
Guide
TABLE OF CONTENTS
Product Registration 2
Important Information 3
Computer Basics 4
Safety and Comfort ...................................................... 4
Safety Precautions ................................................ 4
Health Precautions ................................................ 5
Getting to Know your Computer.................................. 6
Control Devices (Keyboard/Touchpad)................. 6
Touchscreen (optional).......................................... 7
Volume Controls.................................................... 8
Remote Control (optional)..................................... 9
Your Computer’s Drives ........................................ 9
Power Supply ...................................................... 11
Ports and Connectors.......................................... 12
Turning your Computer ON or OFF..................... 13
Upgrading your Computer.................................. 15
Internet and Software 16
Using Windows and your Software............................ 16
Welcome Center .................................................. 16
Internet Security Offer........................................ 16
Gateway Recovery Management........................ 17
Your Computer's Documentation....................... 18
Playing Multimedia Files ..................................... 19
Social Networks (optional) .................................. 21
First steps on the Net .................................................. 21
Protecting your computer................................... 21
Choose an ‘Internet Service Provider’................. 21
Network connections .......................................... 22
Surf the Net! ........................................................ 24
Helpdesk 26
Safe Computing........................................................... 26
Maintenance ........................................................ 26
Updates................................................................ 29
Security................................................................ 29
Windows Remote Assistance............................... 34
Diagnose & Repair....................................................... 35
Top Troubleshooting Cases................................. 35
Miscellaneous Troubleshooting........................... 39
Recovering your system ............................................. 46
To recover your system ...................................... 46
Recovering pre-installed software and drivers .. 46
Returning to a previous system condition.......... 47
Returning your system to its factory condition.. 48
Regulatory Information 49
Environment 54
Software License 55
Index 56
Copyright ©2010. All Rights Reserved. GWNB
Table of Contents - 1

PRODUCT REGISTRATION
When using your computer for the first time, it is recommended that you immediately register it. This will give you
access to some useful benefits, such as:
• Faster service from our trained representatives
• Membership in the Gateway community: receive promotions and participate in customer surveys
• The latest news from Gateway
Hurry and register, as other advantages await you!
How to Register
During the initial startup of your computer, a window will invite you to register. Please fill in the information and
Next
click
personable customer service experience.
Another way to register your Gateway product is to visit our website at
your country and follow the simple instructions.
After we receive your product registration, you will be sent a confirmation email with important data that you
should keep in a safe place.
. The second window you'll see contains optional fields that will help us to provide you with a more
Another Option
www.gateway.com/register
Please use this space to write down important information about your computer.
Product name: . . . . . . . . . . . . . . . . . . . . . . . . . . . . . . . . . . . . . . . . . . . . . . .
. Choose
Serial Number: . . . . . . . . . . . . . . . . . . . . . . . . . . . . . . . . . . . . . . . . . . . . . . .
Date of purchase: . . . . . . . . . . . . . . . . . . . . . . . . . . . . . . . . . . . . . . . . . . . . .
Place of purchase: . . . . . . . . . . . . . . . . . . . . . . . . . . . . . . . . . . . . . . . . . . . .
Receipt number: . . . . . . . . . . . . . . . . . . . . . . . . . . . . . . . . . . . . . . . . . . . . . .
Store this guide, the proof of purchase (e.g. receipt), and the warranty in a safe place.
2 -
Quick Start & Troubleshooting Guide
IMPORTANT INFORMATION
Thank you for purchasing a Gateway computer!
This guide has been designed to introduce you to the features of your computer and assist in your computing
experience. It will also help you maintain your computer and troubleshoot in case you encounter a problem.
To make the most of your computer, Gateway recommends you perform the actions described below before you
start working with your computer.
Gateway Recovery Management
If you should ever encounter a problem with your computer and the troubleshooting steps included in the
Start & Troubleshooting Guide
will restore your computer to the same state as when you purchased it, while giving you an option to retain all
settings and personal data for later retrieval (see page 46 for details).
Gateway InfoCentre
To discover more about your computer, please make sure you check
user‘s guide installed on your computer. You need to update the guide at least once online (see page 18 for
details).
Gateway Website
Remember to visit www.gateway.com often! Check out the Support section; it contains up-to-date information,
help, drivers and downloads.
Gateway Support
Make sure you write down your computer serial number, date and place of purchase and
model name on the cover of this guide. Also, save your proof of purchase. If you call us,
please write down any error message causing the problem, and have the computer in front of
you and switched on if possible. Having these items to hand when contacting us will ensure
better and quicker service.
did not help fix it, you can run the
Gateway Recovery Management
Gateway InfoCentre
, the electronic
Quick
program. This
Warranty and Contact Information
You can find information about the warranty for your computer and how to contact technical support in your
computer’s Warranty Guide.
Important Information - 3

COMPUTER BASICS
SAFETY AND COMFORT
Safety Precautions
Please follow the guidelines below to use your computer comfortably and to avoid health problems.
Computer Environment
Make sure that the computer:
• Is used on a stable surface, stand or table. A fall can seriously damage the computer.
• Is not used on a surface that vibrates, or used when taking part in sport, exercise or other activities in a dynamic
environment. Vibration or movement can loosen fastenings, damage internal components and even cause
battery leakage.
• Is away from direct sunlight and sources of heat.
• Is away from magnetic fields or any device generating static electricity.
• Is kept at least 30 centimetres (one foot) away from a mobile phone.
• Is not in a dusty or damp environment.
• Is not used near water. Never spill liquids of any kind on or into your computer.
• Is not placed on a carpet or any other surface that may have an electrical charge.
Cables
Make sure that:
• Cables are not strained and that there is no risk of people walking or tripping over them.
• Other devices do not crush the cables.
• The power cable is connected to the computer before connecting the power cable to the AC power outlet.
• The power cable is unplugged from the power outlet before disconnecting the power cable from the computer.
• Three-pin power cords are connected to a grounded power outlet.
• The power outlet is easily accessible and as close to the computer as possible (do not overload it with too many
adapters).
If your computer uses an external AC adapter:
• Do not cover or place objects on the AC adapter. Allow the adapter to cool properly during use by keeping it clear
of objects.
• Only use the AC adapter that is supplied with your computer. Although other adapters may look similar, using
them can damage your computer. If a replacement is required, use only parts certified for use with your
computer.
Cleaning your Computer
• Always unplug your computer from the power outlet before cleaning it.
• Do not use liquid or aerosol cleaners, use a damp cloth instead.
• Never spray cleaning product directly on the screen.
• If you spill liquid on your computer, switch it off immediately, unplug the AC adapter, remove the battery and
make sure it is completely dry before switching it on again. Wait overnight if necessary.
Note:
If your computer includes slots for memory cards or expansion devices, plastic ’dummies’ may be
installed in the card slots. Dummies protect unused slots from dust, metal objects or other particles. Save the
dummies for use when no cards are in the slots.
Servicing your Computer
Do not attempt to service your computer yourself, as opening or removing covers may expose you to dangerous
voltage or other risks. Refer all servicing to qualified service personnel.
4 -
Quick Start & Troubleshooting Guide

Unplug your computer from the wall outlet and refer servicing to qualified service personnel when:
• the power cord or plug is damaged, cut or frayed,
• liquid was spilled into the product,
• the product was exposed to rain or water,
• the product has been dropped or the case has been damaged
• the product exhibits a distinct change in performance, indicating a need for service
• the product does not operate normally after following the operating instructions
Note:
Adjust only those controls that are covered by the operating instructions, since improper adjustment
of other controls may result in damage and will often require extensive work by a qualified technician to
restore the product to normal condition.
Health Precautions
• The computer and accessories may contain small parts. Keep them out of the reach of small children.
• If you work or play for hours at a time, then make sure you take regular breaks. Look away from the computer's
screen once in a while. Do not use your computer if you are tired.
• Arrange your computer so that you can work in a natural and relaxed position. Place items that you use
frequently within easy reach.
• Position your computer directly in front of you for increased safety and comfort. Ensure that your keyboard and
touchpad are at a comfortable height. The screen should be about 45-70 cm (18-30 inches) from your eyes.
If you use your computer for long periods while sitting at a desk, invest in an external keyboard for improved
comfort.
• To protect your hearing, when using speakers or headphones, increase volume gradually until you can hear
clearly and comfortably; do not increase the volume level after your ears have adjusted. Do not listen to high
volumes for extended periods. Do not increase the volume to block out noisy surroundings; decrease the volume
if you cannot hear people speaking near you.
• The computer’s underside, power adapter and the air from ventilation slots may become hot during
use. Avoid continuous body contact and do not place the computer on your lap while it is operating.
• Ensure that the computer’s ventilation slots and openings are never obstructed or covered. Do not
place the computer on a soft surface (such as a carpet, chair or bed) that may block ventilation slots.
• Do not push objects of any kind into ventilation or case slots as they may touch dangerous voltage points or
short-out parts that may result in a fire or electric shock.
• Some disorders of the hands, wrists, arms, neck, shoulders, legs and back may be associated with, or aggravated
by certain repetitive actions. To reduce your risk of developing these disorders, type with your wrists straight
and your hands and wrists floating above the keyboard. If you experience periods of pain, tingling, numbness or
other discomfort, please contact your doctor.
• We advise that parents monitor the use of games by their children. If you or your child experience any of the
following symptoms: dizziness, blurred vision, eye or muscle twitches, loss of consciousness, disorientation, any
involuntary movement or convulsion, IMMEDIATELY discontinue use and consult your doctor. This may happen
even if the person has no medical history of epilepsy.
Computer Basics - 5
GETTING TO KNOW YOUR COMPUTER
Control Devices (Keyboard/Touchpad)
Keyboard
The keyboard is used to enter text or commands. The functions of the keys depend on the program you are using.
The keyboard displayed in this guide is just an example. The layout of your keyboard may vary slightly. For a full
description of your keyboard, please refer to
9
8
InfoCentre.
1 2 3
4
10 6
1. Numbers: Used to enter numbers and special characters. Press
and press
2. Backspace: Used to go back one space and delete the last key pressed.
3. Del: Deletes any selected items or the character to the right of the cursor when editing text.
4. Optional Numeric keypad: Functions as a second set of number or cursor keys. Press the
between the two functions.
5. Arrow keys: Move the cursor up, down, left and right.
6. Enter: Press to enter a command, insert a paragraph break in a text or accept a chosen option.
7. Space: used to enter an empty space in your text.
8. Shift: Use simultaneously with a letter key to enter capital letters.
9. Esc: Cancels most current tasks.
10. Fn: Use simultaneously with certain keys (such as F1 to F12) to activate optional special functions (shown with
symbols).
Touchpad
The touchpad controls the arrow on the screen; called the pointer or the cursor. When you slide your finger
across the touch-sensitive pad, the pointer will follow this movement.
Ctrl+Alt
for characters on the right.
Note:
To optimise space and weight, certain computers use compact keyboards that do
not provide a numeric keypad. If this is the case, you may use the integrated keypad by
activating
centre-right of the keyboard). Press
functions.
Note:
(please see Social Networks (optional) on page 21). If this application is not installed, the key will
start your instant messenging application.
Num Lock
Certain keyboards feature a Social Networks key that opens the Social Networks application
and using the keys with extra number characters (the keys in the
Num Lock
again to return the keys to their normal
5 67
Shift
simultaneously for characters on the top
Numlock
key to switch
6 -
Quick Start & Troubleshooting Guide
Click one of the touchpad buttons to select or activate the
command the cursor is pointing at. Ensure that you use a light
touch on the touchpad surface.
1. Left-click to select the item under the pointer.
Double-click to start the program under the cursor, or select
an entire word when typing text.
2. Right-click to bring up a pop-up menu.
3. Two quick taps on the surface of a touchpad will perform the
same action as a double-click.
Optional Touchpad features
If your computer supports Multi-gesture, the touchpad can recognise certain movement
patterns across its surface. This allows you to control applications with a few simple gestures.
Please see
Gateway InfoCentre
for more information.
3
1 2
Your computer may feature a
toggles the touchpad on or off to avoid unwanted cursor movements when using the keyboard. This is
most useful if you have connected a mouse to your computer.
On certain computers you may slide your finger up and down the right-side of the touchpad to scroll through a
document.
Note:
Improve the motion and visibility of the pointer! Click on
>
Mouse
>
Sound
Pointer Options
Touchpad Lock
.
button. The
Touchpad Lock
Start
>
Control Panel
button
>
Hardware and
Touchscreen (optional)
Certain computers include a touchscreen that allows simple commands to be given by touching
the screen, instead of cluttering your desk with a keyboard or mouse. Depending on the type and
format of touchscreen you may either use a finger or stylus (or both) to select items on the screen.
’Tapping’ the screen
Instead of clicking with a mouse, or pressing a key, you should lightly
has been provided. The screen should react instantly to the contact.
Caution:
Only use a finger or the stylus provided. Using other items may damage the screen.
To ’right-click’ on a touchscreen, tap and hold on the screen until an animated ring appears and then lift your finger
(or the stylus). To drag content, simply touch the screen over the content, then slide you finger across the screen.
The content will follow your movements.
Multi-gesture
If your computer supports Multi-gesture, the screen can recognise certain movement patterns across its surface.
This allows you to control applications with a few simple gestures; for example, flipping though a slideshow,
pinching in or out to zoom or making a circular swirl to scroll through a document.
Different types and formats of touchscreen may support different gestures; please see
more information.
tap
the screen with a finger, or a stylus if one
Gateway InfoCentre
for
Touch Applications
Your computer may have some touch-specific programs installed, these provide simplified interfaces with larger
buttons and controls that are adapted to touching and sliding items across the screen. Please see the help provided
with these programs for more information.
Computer Basics - 7
Virtual keyboard
A virtual keyboard is available for text input while using a touchscreen. To open the virtual keyboard, tap the screen
and then tap the
it will appear on top of any open windows. You may move it to a convenient position on the screen.
Input Panel
tab that appears on the left edge of the screen. When you open the virtual keyboard,
You can customize the virtual keyboard settings by selecting
and in the
Calibrating your screen
You may find that you need to recalibrate the screen if it does not react properly
to a tap. To do this select
PC Settings
calibrate the screen.
Other options
Additional configuration options are available in
Tablet PC settings
Note:
and resistive touch film. Occasionally, a series of concentric shapes, called
Newton's Rings, may appear due to the reflection of light between two
surfaces with different temperatures and pressures. This is normal and the
rings will disappear after a few minutes of use.
Cleaning the touchscreen
Touchscreens are delicate and no cleaning products should be used when cleaning the surface. Please follow the
advice given in
Other
tab select
. On the
Display
and
Pen and Touch
Certain touchscreens have a thin layer of air between layers of glass
Cleaning your Computer
Go to Input Panel Settings
Start
>
Control Panel
tab, select
.
on page 4.
>
Hardware and Sound
Calibrate...
. Follow the instructions to
Start
>
Control Panel
Start
>
.
Control Panel
>
Tablet
under
>
Tablet PC Settings
Volume Controls
Apart from the volume controls on your computer, keyboard, or speakers (depending on your equipment), you can
also adjust the volume and balance of your speakers from Windows.
Adjusting the Volume
To adjust the volume, simply click on the
the clock.
Drag the slider up or down to adjust the volume.
Click on the small speaker icon to mute the volume. Click again to resume playback.
Speaker
icon located in the
Notification Area
, next to
Click on
Mixer
to access advanced volume control settings.
8 -
Quick Start & Troubleshooting Guide
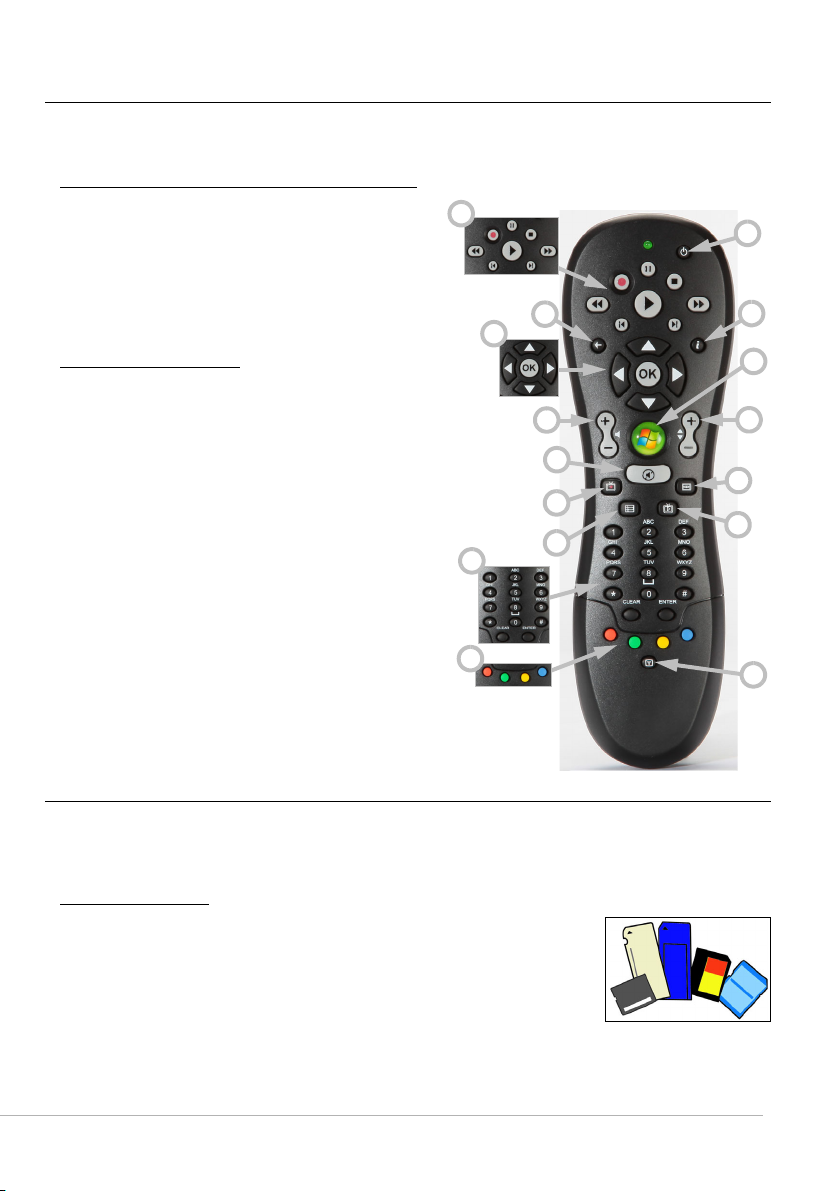
Remote Control (optional)
Enjoy all your favorite digital entertainment in one place with the easy-to-use Media Center (see page 19) and
remote control!
Installing the Remote Control and optional receiver
Before starting
the remote control.
1. If your computer does not feature an internal infrared
receiver, a USB receiver is required. If supplied, connect
the USB receiver to a USB port on the computer.
2. Insert the batteries into the remote control; check the
batteries are orientated correctly.
Remote Control Functions
1. Playback and record controls (Record, Play, Stop, Rewind,
Fast forward, Skip back, Pause, Skip forward).
2. Power ON/OFF or Quick Resume
3. Back
4. More information
5. Direction keys (up, down, left, right) and OK
6. Start (Windows key)
7. Volume controls (Volume up/down)
8. Mute
9. Open Record TV
10. Open Guide
11. Program/Channel up/down
12. DVD Menu
13. Open Live TV
14. Number keys, Clear and Enter
15. Teletext selection (red, green, yellow, blue)*
16. Teletext (switch to Teletext while in TV mode)*
Windows Media Center
(see page 19), prepare
1
14
15
2
3
4
5
6
7
11
8
12
9
13
10
16
* optional - not available in all regions
Your Computer’s Drives
The drives described below are commonly used on Gateway computers. However, this does not mean that they are
present on the computer you have purchased, nor that it is limited to these drives. To view documentation specific
to the model you have purchased, please check
Memory Card Reader
Memory cards are used in a wide selection of digital cameras, PDAs, MP3 players and
mobile phones. Selected computers include an “all-in-one” memory card reader that
allows you to read and write the most common types, such as MMC (Multi Media
Card™), SD/SDHC Card, xD-Picture Card™ or MS (Memory Stick®).
Gateway InfoCentre
.
Computer Basics - 9
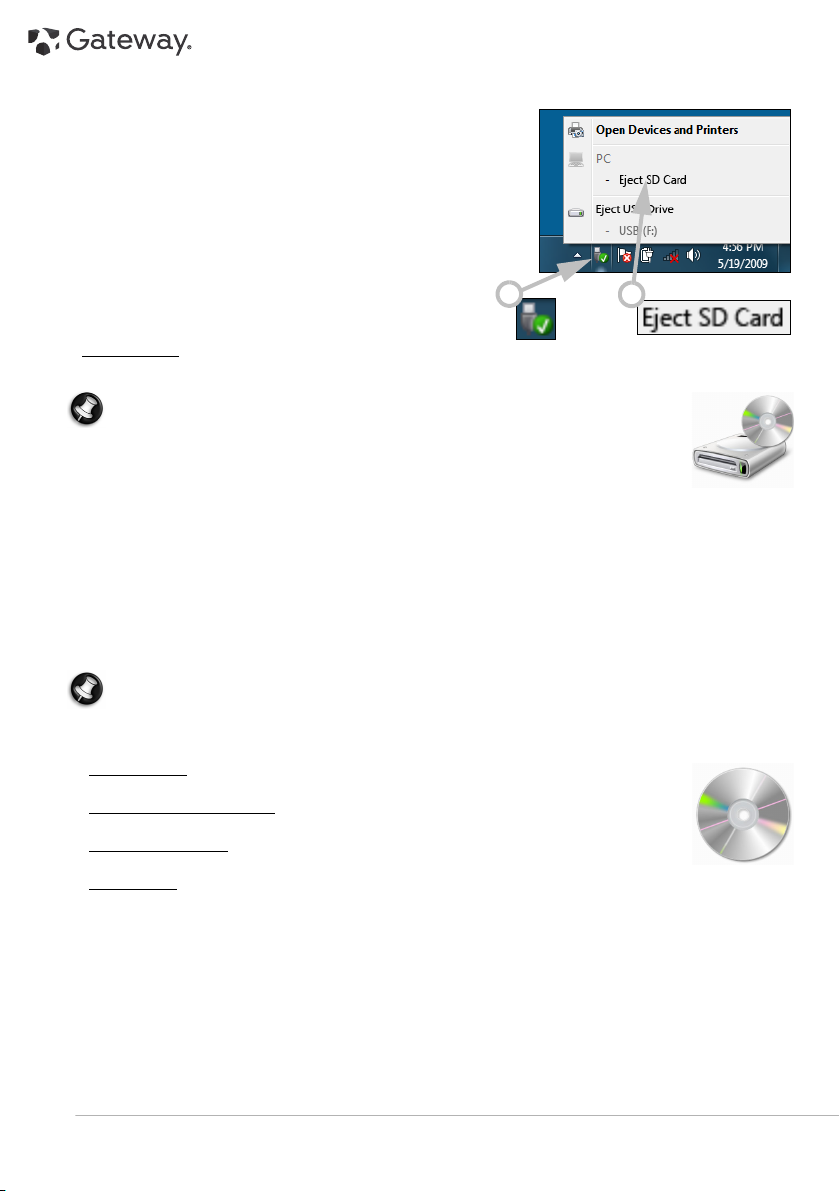
Removing a card from an External Card Reader
1. Click on the
Area
2. Click on
3. Wait until a
4. Remove the card.
Safely Remove Hardware
(next to the clock).
Eject SD Card
Safe to Remove Hardware
icon in the
(or the name of the device).
message is displayed.
Notification
1
Optical Drives
An optical drive is able to read from (or write to) a variety of CD or DVD discs (e.g. Audio CD, CD-ROM, DVD).
Note:
Small computers may omit larger devices such as optical drives. If your computer
does not feature an optical drive and you wish to access files or install a program from an
optical disc, you will need additional equipment; you may use either an external optical
drive, or a computer with an optical drive and a network connection (i.e. add the optical
drive as a resource that may be used over a network).
Read-only (ROM) drives
Some optical drives are only able to read information from a disc, they cannot be used to store new information.
These drives can be used to watch films, install programs and read data such as photos or music.
Recordable (R) or Re-Writable (RW) Drives
In addition to reading data from compatible discs, the optical drive(s) provided with your computer may be able to
write (or 'burn') information to appropriate discs. You can use these drives to duplicate your CDs, create your own
music compilations, digital photo albums or keep a safe copy of your valuable data. Disc recording software must
be used to write information to recordable discs.
Note:
Before copying a CD, make sure that its content is not protected by Trademarks and Copyrights, and
that you are authorized to replicate it. In most countries you are allowed to make an archival backup of
software or copy music for your own personal use.
Disc Compatibility for Recordable Drives
• DVD±RW Writer: DVD±RW drives (or DVD Dual drives) can write to recordable CDs, recordable
DVDs ('-' or '+').
•Double-Layer DVD-RW Writer:
recordable CDs and single- or double-layer recordable DVDs.
• Blu-ray Combo Drive
recordable DVDs (but not 'HD' DVDs) and may read from (but not write to) Blu-ray discs.
• Blu-ray Writer
discs.
Precautions
✓
If a program needs a disc, insert the disc into the drive before you start the program.
✓
Do not force a disc into the drive; make sure the disc is correctly inserted, then close the disc tray.
✓
Do not eject the disc without first closing the program that is using the disc. This could potentially cause your
computer to stop responding. Should this happen, restart your computer by using the
✓
If the tray does not eject, you may try to open it manually:
1. Switch your computer off.
2. Carefully insert a straightened paper clip into the emergency eject port (if available). Do not use a pencil as
the lead may break inside the eject port and damage the drive.
: Blu-ray drives can write to recordable CDs, all 'standard' recordable DVDs and recordable Blu-ray
Double-Layer DVD-RW drives (or DVD+R9 DL drives) can write to
: Blu-ray Combo drives can write to recordable CDs, all 'standard'
2
Windows Task Manager
.
10 -
Quick Start & Troubleshooting Guide
✓
Keep the disc tray closed whenever you are not using the drive. Do not touch the optical lens in the drive, if the
lens is dirty, the optical drive may not function correctly.
✓
Do not wipe the lens with a normal cloth. Use a cotton swab to gently clean the lens.
✓
The optical drive is classified as a Class 1 laser product.
Note:
This product incorporates copyright protection technology that is protected by U.S. patents and other
intellectual property rights. Use of this copyright protection technology must be authorized by Macrovision,
and is intended for home and other limited viewing uses only unless otherwise authorized by Macrovision.
Reverse engineering or disassembly is prohibited.
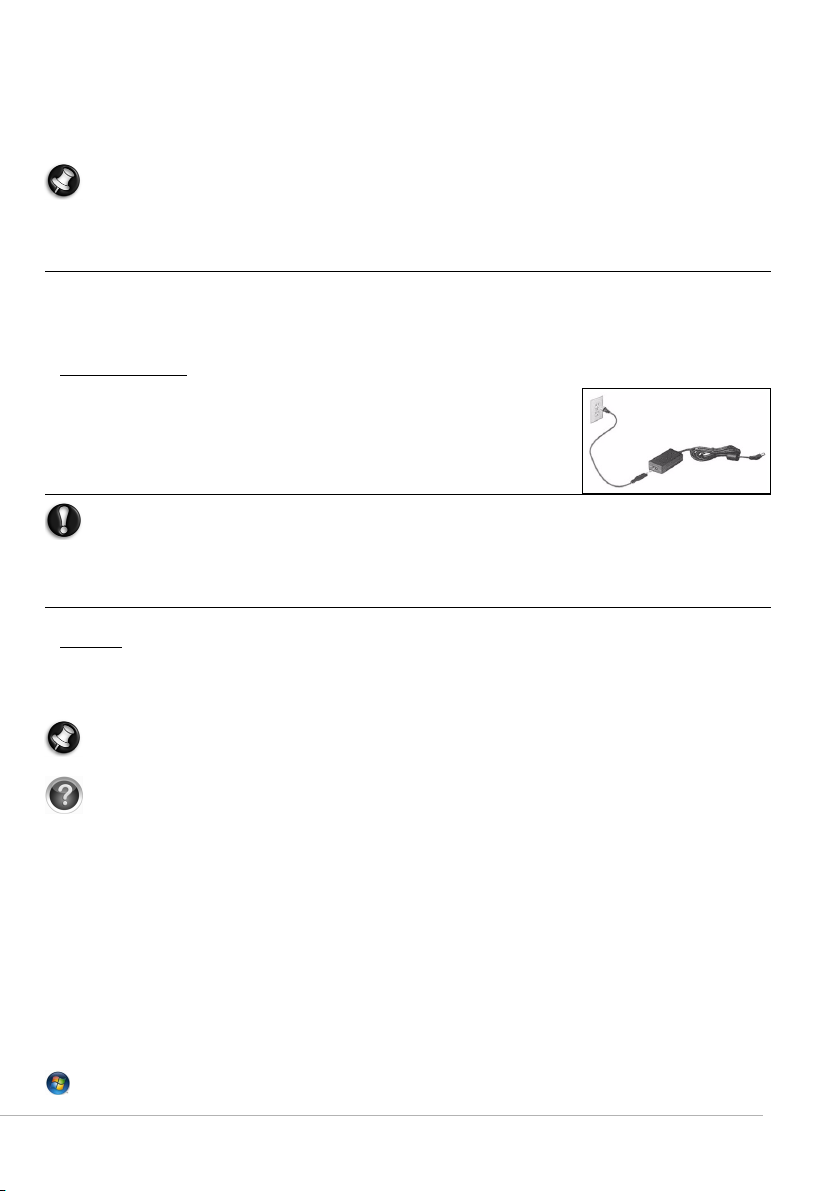
Power Supply
Your computer requires a constant, stable power source to keep running. If you are at home then the AC adapter
can be connected to a mains socket and used for as long as necessary. On the road, or if you simply want to avoid
trailing wires, your computer's battery can power the computer.
AC Power Adapter
Your computer can use the supplied external power adapter (a power 'brick') to run
on AC power. A power cable is provided that is appropriate for the country where
the computer was purchased.
The power adapter provides adequate power to run your computer and recharge
the battery pack at the same time.
Warning:
adapter clear of objects allows the adapter to cool properly during use.
Only use the AC adapter that is supplied with your computer. Although other adapters may look
similar, using them can damage your computer.
The AC adapter and the underside of the computer can become hot after prolonged use. This is
normal, but may cause injury with prolonged contact.
Batteries
While you are away from an AC power supply, your computer uses a rechargeable battery. This battery can be
removed, which allows you to carry multiple batteries for long journeys, or to replace an aged battery that has lost
performance.
Note:
charge. The first time you use your computer, connect the AC power adapter and charge the battery
completely.
Check
Battery Life
Battery life depends on how the computer is used, the battery's capacity and the computer's design. Batteries will
start to perform less effectively with age.
Extending Battery Life
While on the road, it is important to be aware of the simple things you can do to extend the life of the computer's
main battery. Turning down the screen brightness extends battery life (most computers reduce screen brightness
automatically when using battery power). Battery life is best under the following conditions:
✓
The battery is new and fully charged.
✓
No peripherals (such as ExpressCards) or options (such as Wireless LAN features) are active or connected to your
computer.
✓
The computer's hard disk drive, optical drive and processor are idling or under low load.
Power management features are active. You may change the power settings of your computer by clicking on
>
Control Panel
Do not cover or place objects on the AC adapter. Keeping the
Although the battery is charged at the factory, transit and shelf time may reduce the initial battery
InfoCentre
to learn more about your computer’s battery.
>
System and Security
>
Power Options
.
Start
Computer Basics - 11
✓
Certain battery types require maintenance to avoid a reduction in battery life.
✓
Do not leave your battery in direct sunlight. Extreme temperatures can affect the performance of your battery.
It’s best to use and charge your battery at room temperatures.
Replacing Batteries
Battery packs can be removed and replaced. Read the precautions on handling the battery before changing the
battery.
A small lithium battery (‘CMOS’ battery) in some computers maintains basic configuration information (such as the
time and date). In the event that the battery fails to maintain this information, we recommend that you contact a
qualified technician who may replace this battery.
Battery Precautions and Disposal
✓
Batteries contain a mix of chemicals that should be treated with care. Before disposing of the battery, put
adhesive tape over the terminals. Do not disassemble the battery.
✓
Do not place used batteries in your regular waste. Ultimate disposal of the batteries should be handled
according to all national laws and regulations. Contact your local waste management officials for information
regarding environmentally sound collection, recycling and disposal of batteries.
✓
There is a danger of explosion if the battery is incorrectly replaced. Replace only with the same or equivalent
type recommended by the manufacturer.
Ports and Connectors
The ports and connector types described below are commonly used on Gateway computers. However, this does not
mean that they are present on the computer you have purchased, nor that it is limited to these ports. To view
documentation specific to the model you have purchased, please check
Precautions
✓
Before you attach any device, check the installation instructions that were supplied with it.
✓
Do not remove a device if the computer is using it.
✓
Most devices may be added or removed while the computer is on. They will be detected and installed
automatically. However, certain devices must be deactivated before they can be removed from the computer
(for example, see
Removing a card from an External Card Reader
InfoCentre
on page 10).
.
Communication Ports
Network - Connect your computer to a network (‘LAN’) or certain high-speed Internet connections.
Modem - An internal fax/data modem connects you to the Internet over a dial-up connection.
A network port looks very similar to a modem port; they are often found near each other. The network
port is slightly larger than the modem port.
Warning:
unplug the modem from the telephone line, the TV port from the aerial socket and any network
cable. A lightning strike to nearby telephone lines or an aerial could damage your modem, network
or TV card or even your whole computer. Please note that the product warranty does not apply if
damage to your computer is the result of a lightning strike.
Expansion Ports
12 -
Quick Start & Troubleshooting Guide
In thunderstorm conditions, make sure that you disconnect all your connection cables;
USB (Universal Serial Bus) - USB ports allow you to connect many peripheral devices to your computer (for
example: keyboard, printer, scanner).
IEEE 1394 (FireWire) - An IEEE 1394 port (aka FireWire™ or i.LINK) allows you to connect high-speed digital
devices to your computer, such as digital video cameras, external hard disk drives, or scanners.
ExpressCard - This slot allows you to use an ExpressCard/34 or ExpressCard/54 expansion card.
Note:
It is not possible to use a PC Card device in an ExpressCard slot.
eSATA - An eSATA port allows you to connect a compatible external storage device (usually a hard disk
drive) with a high-speed SATA connection.
Display and Audio Ports
VGA Port - Connect to a monitor with a VGA port. The appropriate cable is usually included with the
monitor.
DVI Port - Connect to a monitor with a DVI (Digital Video Interface) port. The appropriate cable is usually
included with the monitor.
Note:
Many monitors use a 15-pin analog connection, so you may need to purchase an adapter or a DVI-to-
Analog cable.
S-Video (TV-Out) Connection - An S-Video TV-Out port allows you to connect a compatible television.
HDMI (TV-Out) Connection - An HDMI TV-Out port allows you to connect a compatible display device (such
as a high-definition television) with a single, easy-to-use connector.
Caution:
If you want to use your television's speakers, you must change the audio output or connect
the Line-Out port of your computer to your television (or a speaker system).
Line-Out - Lets you plug in stereo headphones or powered speakers. Plugging in an audio device
disables any built-in speakers.
Microphone - Allows you to connect an external microphone for mono recording or amplification
through the unit. Plugging in an external microphone disables the built-in microphone.
Other Connectors
Memory Card Reader - Memory cards are used to store and transfer data by a wide selection of digital
cameras, PDAs, MP3 players and mobile phones (see page 9).
TV Tuner - Allows you to connect an aerial and watch analog or digital television on your computer (see
page 19). An adapter may be required to connect to an aerial - if your computer features two TV tuner
ports, use a splitter cable to connect both ports to an aerial.
Note:
The TV tuner must be compatible with signals in your area.
AC Adapter (DC In) - Lets you attach the computer to the the supplied AC adapter. The computer requires a
Gateway-certified adapter.
Other Features
Remote Control Receiver - The remote control receiver (Commercial IR) allows you to control the media
functions of your computer from a distance when used with a compatible remote control (optional).
Caution:
The sensor is not an 'full' IR port and can only receive signals from a remote control. It
cannot be used to communicate with other devices, such as mobile telephones.
Kensington Lock Fixture - This fixture allows you to attach a Kensington security lock or other compatible
lock to protect your computer from theft.
Turning your Computer ON or OFF
Turning your Computer ON
1. First, switch ON any devices connected to your computer by pressing the main power button on these devices.
2. Then switch ON your computer by pressing the main power button.
To share the family computer and have your own system settings every time you turn on the
computer, you can set up accounts for each user. You can access and modify your accounts at any
Computer Basics - 13
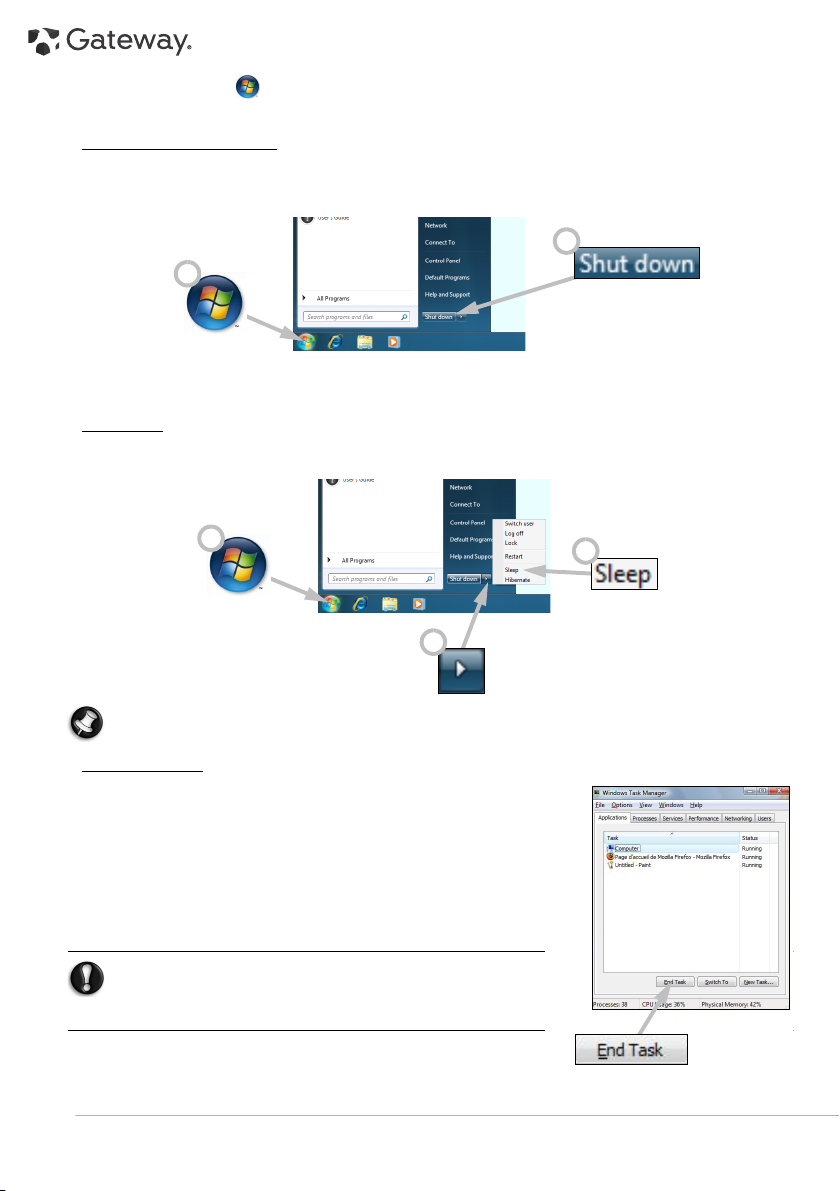
time by clicking on
account management, please see the section
Turning your Computer OFF
Make sure all applications are closed before you turn off your computer. Turning off your computer will ensure that
a data is saved and it will use as little power as possible (there may be a small power drain to charge batteries),
however your computer will take longer to start.
Start
>
Control Panel
>
User Accounts and Family Safety
User Account Control
on page 34.
. To learn more about user
2
1
Once the computer has shut down, switch OFF all external devices (such as a printer or monitor) if they have a
power button.
Sleep mode
Click on the Sleep button to save your session and put the computer in a low-power state so that you may quickly
resume working (see the
Power Options
section on page 15 for details).
1
2
Note:
You may also put your computer into sleep mode without going to the Windows Start menu. Simply
close all your applications and press the power button.
Forced Shutdown
If your computer doesn’t respond, then try using the
utility provides information about your system’s performance and
displays details about programs and processes running on your
computer.
To do so, press the
Task Manager
Click on the
End Task
click on
Warning:
computer power button to turn your computer off. Keep this
button pressed until all of the LEDs turn off and wait for
roughly 30 seconds before turning the computer on again.
Ctrl+Alt+Del
.
Applications
.
If your computer still does not respond, press the
keys simultaneously and select
tab, select the task that you want to end and
Task Manager
. This
Start
3
14 -
Quick Start & Troubleshooting Guide

Power Options
The power options of Windows can control your computer’s power state and allow you to save energy.
Depending on your needs, you can define the power scheme that suits you best. Three power saving
modes are provided:
Sleep
Sleep effectively ’pauses’ your computer, keeping all activity in memory, ready to start again. Rousing your
computer from Sleep takes just a few seconds. A small amount of power is still required to store the contents of the
memory.
Hibernate
Hibernate stores all activity on your computer’s hard drive, and then powers down. No power is required, but your
computer must be powered on normally before you may continue working.
Hybrid Sleep
Hybrid sleep stores all activity on your computer’s hard drive, just like Hibernate; but also keeps a copy in memory,
ready to start in a few seconds. A small amount of power is still required to store the contents of the memory, but
the copy on the disk drive ensures that you work is safe, even in the event of a power failure. Hybrid Sleep may be
disabled on certain computers.
Note:
To learn more about personalising your computer, click on
Sleep, Hibernate
and
Hybrid sleep
.
Start
>
Help and Support
.
Upgrading your Computer
Gateway strives to make your computing experience as easy and pleasant as possible. Because your computing
needs may evolve, Gateway is here to help you choose the right accessories and make the most of your computer.
Memory
Memory (RAM) is a key component of your computer. If you run memory-intensive applications such as image or
digital-video editing or 3D games, adding some memory will increase the computer performance and help your
computer run faster.
Storage (e.g. External Hard Disk Drive)
Whether you need additional storage space, need to create backups or need removable storage to carry your data,
an external hard disk drive will be a convenient solution to expand your computer. Simply plug it into a USB port
and "drag and drop" to transfer your valuable data in a few seconds. To make temporary backups, this is a lot
quicker than burning a CD or DVD! High capacity drives are also ideal for storing your favorite music, photos and
videos and take them with you everywhere you go!
Recycling
You just bought a new computer and wonder what you can do with your old equipment? Don't just throw it out!
Gateway encourages you to recycle!
Most computer equipment contains hazardous materials, which are best kept out of landfills. Through recycling,
many materials used in computers can be recovered and used again. Many charitable organizations collect
computer equipment, other companies can repair and sell used computers.
Please refer to
Environment
on page 54 to learn more about product disposal.
Computer Basics - 15

INTERNET AND SOFTWARE
USING WINDOWS AND YOUR SOFTWARE
Gateway computers include software to help you use your computer; the programs and categories available on
your computer depend on the model purchased. Most of this software is ’pre-installed’ and ready to be used;
however some software may be provided on a CD or DVD and must first be installed if you wish to use it. To do so,
insert the installation CD or DVD. An installation wizard will start automatically and all you have to do is follow the
instructions on the screen.
Welcome Center
The first time you turn on your computer, the
to the new features and tools of Windows. You can access the
Getting Started
.
Welcome Center
window opens. The
Welcome Center
later by clicking on
Welcome Center
introduces you
Start
>
Internet Security Offer
It is vital to protect your computer from viruses and attacks over the Internet (see
comprehensive Internet security program is proposed when you first start your computer. You should activate this
protection as soon as possible, certainly before you connect to the Internet.
The offer allows you to use the software and download updates for a period before you must subscribe to continue
protecting your computer against new threats.
Security
on page 29). An
16 -
Quick Start & Troubleshooting Guide
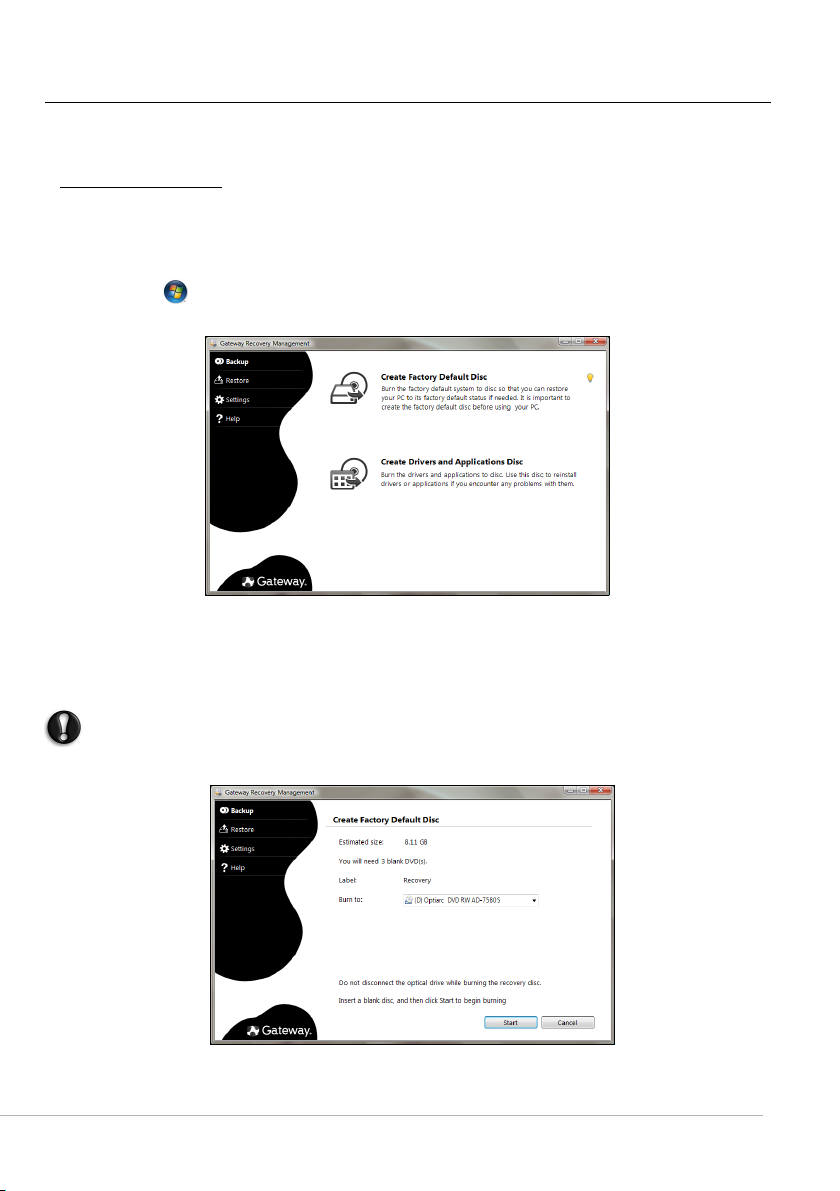
Gateway Recovery Management
To prepare your computer for system recovery options, you should create a set of recovery discs as soon as
possible. Recovery discs take some time to create, but for long-term reliability, the effort is worth it.
Creating recovery discs
If your computer experiences problems that are not recoverable by other methods, you may need to reinstall the
Windows operating system and factory-loaded software and drivers. To reinstall using discs, you must create the
set of recovery discs beforehand. Throughout the process, you will be guided by on-screen instructions. Please read
them carefully!
Start
>
1. Click on
Recovery Management
All Programs
opens.
>
Gateway
, then click on
Gateway Recovery Management. Gateway
2. To create recovery discs for the hard drive’s entire original contents, including Windows and all factory-loaded
software and drivers, click
- OR -
To create recovery discs for only the factory-loaded software and drivers, click
backup disc
The
This dialog box tells you the number of blank, recordable discs you will need to complete the recovery discs. Make
sure that you have the required number of identical, blank discs ready before continuing.
.
Important: We recommend that you create each type of recovery disc as soon as possible.
Create Backup Disc
Create factory default disc
dialog box opens.
.
Create driver and application
Internet and Software - 17

3. Insert a blank disc into the drive indicated in the
you can watch its progress on the screen.
When the disc finishes recording, the drive ejects it.
4. Remove the disc from the drive and mark it with a permanent marker.
Important: Write a unique, descriptive label on each disc, such as ‘Windows Recovery Disc 1 of 2’ or
‘Apps/Drivers Recovery disc’.
5. If multiple discs are required, insert a new disc when prompted, then click OK. Continue recording discs until the
process is complete.
Burn to
list, then click
Next
. The first disc begins recording, and
Your Computer's Documentation
User’s Guide (Gateway InfoCentre)
This guide is not the only reference for information about your computer!
contains information for your computer, giving you the help you need directly on your screen. You need to update
this electronic user’s guide in order to have specific information for the computer you have purchased.
To open
Start
>
InfoCentre
, double-click on the
All Programs
>
Gateway
User’s Guide (Gateway InfoCentre)
>
Gateway InfoCentre
.
InfoCentre
, your electronic user’s guide
icon on the desktop or click on
Select a category...
To update the contents of the User’s Guide (you will need an internet connection) simply click on the
button on the InfoCentre welcome page (see image above).
updates
18 -
Quick Start & Troubleshooting Guide
Check for

The updates will be downloaded from Gateway and automatically installed on your computer. Your updated
version of InfoCentre will contain detailed specific information on your computer’s configuration.
My Computer
The
on how to upgrade your computer.
Other buttons give you access to additional information, such as tutorials on performing day-to-day tasks and tips
and information on using the Internet.
Note:
button contains all the technical information about your computer's components and useful tips
The number of categories and titles available may differ according to the computer you purchased.
Remember to update InfoCentre to view the latest information about your computer! You should also make
regular visits to
help, drivers and downloads.
Software Documentation
Most of the applications preinstalled on your computer by Gateway feature a documentation file.
Note:
If you need help while using a program, press F1 on your keyboard, or click on
(typically a ? sign).
www.gateway.com
and check out the Support section: it contains up-to-date information,
Help
or the help icon
Playing Multimedia Files
You may use the media software on your computer to play music, films or photo slide-shows and watch television
(if your computer has a TV tuner). Other options allow you to create CDs or DVDs.
One or more media programs are installed on your computer,
Media Center
improved media experience.
Windows Media Player
Windows Media Player
Windows Media Center (optional)
Certain computers include all-in-one media
‘centers’ such as
These programs can handle a variety of
multimedia content, presented with simple
menus that may be easily controlled with a
remote control. You may watch live or
recorded TV (if your computer has a TV tuner),
listen to digital music, view pictures and
personal videos, create CDs and DVDs, or
access content from online services.
To start the media program installed on your
computer, click on
Media Center
Setup
The first time you start the media program, it will start a setup wizard, which will configure some basic settings. If
available, select the
are provided by Microsoft. Other media programs may have been installed by Gateway to provide an
may be used to play MP3 or WMA audio files, CDs or most video files.
Note:
It is not recommended that you use Windows Media Player to play DVD movies. Other media players
(such as Windows Media Center) provide additional playback options.
Windows Media Center
Start
.
Caution:
If your computer includes a remote control (page 9) or TV tuner (page 13) they must be
connected and active before starting the media program for the first time.
>
Express
setup option, you may then configure additional options as needed.
.
Windows
Windows Media Player
and optionally
Windows
Internet and Software - 19

Note:
If you have an Internet connection, the
current TV shows. This shows channel and network information, as well as the title, description and scheduled
broadcast time of shows.
Cyberlink PowerDVD
If your computer is equipped with a Blu-ray drive, you may watch Blu-ray movies with
PowerDVD
The Windows
way Windows handles media files on devices with removable
storage (digital camera, CD, DVD, etc).
If you have inserted a disk that contains files (such as a DVD,
USB key or memory card), Windows will display a dialog box
and ask you to choose how you want to open the files.
For example, if you have inserted an audio CD or a DVD
movie, Windows will automatically display a dialog box and
ask you to choose how you want to play it. If Windows asks
you to select a DVD player, we recommend that you always
choose the DVD player included with your software collection
(e.g.
Downloaded files may work with the media programs installed on your computer, or may require specific
programs. Files that include DRM functions may only play in specific programs (e.g. iTunes, Windows Media Player)
or only on devices certified for use with the each type of file. Other formats may require a specific audio or video
codec
A codec is software that is used to compress or
Media Player and other programs use codecs to play and create digital media files.
For example, when you rip a song from an audio CD to your computer, the player uses the Windows Media Audio
codec to compress the song into a compact WMA file. When you play that WMA file (or any WMA file that might be
streamed from a Web site), the media player uses the Windows Media Audio codec to decompress the file so the
music can be played through your speakers.
If you get a message that says that your computer is missing a codec, it may be because you are using a
file that was compressed using a codec that Windows or the media player does not include by default. In
many cases, you can download and install the missing codec by clicking on the Web Help button in the
error message.
Please also see Windows
by inserting a Blu-ray disc and waiting for the program to start automatically.
AutoPlay
AutoPlay
function allows you to choose the
PowerDVD
Playing downloaded files
that may not have been installed on your computer.
Codecs
Why do I get a message that says my computer is missing a codec?
or
Windows Media Player
Help and Support
).
for more information.
Guide
(Electronic Program Guide) allows you to view a list of
PowerDVD
dec
ompress a digital media file, such as a song or video. Windows
. You may start
20 -
Quick Start & Troubleshooting Guide

Social Networks (optional)
The Social Networks application allows you to quickly view your friends' updates, and make
your own updates without leaving the desktop. You can recieve notifications and status
updates directly to your desktop, using the sidebar to monitor multiple social networks (e.g.
Facebook, YouTube
Note:
on certain computers.
Log in or Sign up
Click the icon of the social network that you want to use and click
account. If you do not have an account, click
Note:
Internet before using this application.
and
Flickr
).
The Social Networks application is a pre-installed option and may not be installed
Login
Sign Up
and follow the instructions.
All social activities require Internet access. Make sure you are connected to the
if you already have an
FIRST STEPS ON THE NET
Protecting your computer
It is vital to protect your computer from viruses and attacks over the Internet (see
Security
16 and
computer. You should activate this protection as soon as possible, certainly before you connect to the Internet.
on page 29). An comprehensive Internet security program is proposed when you first start your
Internet Security Offer
on page
Choose an ‘Internet Service Provider’
Using the Internet has become a natural part of daily computing. Just a few simple steps can
connect you to a vast collection of knowledge and communication tools. To accomplish
these steps you should first select an
connection between your computer and the Internet. You should research the ISPs available
in your region, not forgetting to talk to friends and family about their experiences or to
check reviews and consumer reports. The ISP you select will provide instructions on how to
connect to the Internet (you may need additional software or a special ‘box’ that connects
to your phone line).
Connection Types
Depending on your computer model, your location and your communication needs, you have several ways to
connect to the Internet.
Dial-Up
Some computers include a telephone dial-up (‘modem’) connector. This allows you to connect to the Internet using
your telephone line. With a dial-up connection, you cannot use the modem and the telephone simultaneously on a
single phone line. This type of connection is recommended only if you have limited use of the Internet as the
connection speed is low and connection time is typically charged per hour.
DSL (e.g. ADSL)
DSL (Digital Subscriber Line) is an ‘always-on’ connection that runs over the phone line. As DSL and phone do not
use the same frequencies, you can use your telephone at the same time you are connected to the Internet (this
requires a ‘micro-filter’ on each telephone socket to avoid interference). To be eligible for DSL, you must be located
near an DSL-equipped phone exchange (service is sometimes unavailable in rural areas). Connection speeds vary
depending on your location, but DSL generally provides very fast and reliable Internet connection. As the
connection is always-on, it is generally charged at fixed monthly rates.
Note:
A DSL connection requires an appropriate modem. A modem is usually provided by the ISP when you
register. Many of these modems include an ‘router’ that provides network and wi-fi access.
Internet Service Provider
(ISP), which supplies the
Internet and Software - 21

Cable
A cable connection provides fast and ‘always-on’ Internet service via a cable television line. This service is generally
available in large cities. You can use your telephone and watch cable TV at the same time you are connected to the
Internet.
3G (WWAN or 'Wireless Wide-Area Network')
A 3G connection allows you to use cellular networks (such as those used by a mobile phone) to connect to the
Internet while away from home. The socket for a SIM card may be built in to your computer, or may require an
external device, such as a USB modem or even an appropriately equipped mobile phone.
Note:
If your computer includes a SIM card slot, you require a compatible SIM card and a contract with a
cellular provider.
Before using the 3G features, check with your service provider to see if any additional charges will be incurred,
especially roaming charges.
Network connections
A LAN (Local Area Network) is a group of computers (for example, within an office building or home) that share a
common communications line and resources. When you set up a network, you can share files, peripheral devices
(such as a printer) and an Internet connection. You can set up a LAN using wired technologies (such as Ethernet) or
wireless technologies (such as WiFi or Bluetooth).
Wireless networks
A wireless LAN or WLAN is a wireless local area network, which may link two or more computers without using wires.
Setting up a wireless network is easy and allows you to share files, peripheral devices and an Internet connection.
Note:
More detailed information is available in the InfoCentre wireless networks tutorial.
What are Benefits of a Wireless Network?
Mobility
Wireless LAN systems allow you and other users of your home network to share access to files and devices
connected to the network, for example a printer or scanner.
Also you can share an internet connection with other computers in your home.
Installation Speed and Simplicity
Installing a wireless LAN system can be fast and easy and eliminates the need to pull cables through walls and
ceilings.
Components of a Wireless LAN
To set up your Wireless network at home you need to have the following:
Access point (router)
Access points (routers) are two-way transceivers that broadcast data into the surrounding environment. Access
points act as a mediator between wired and wireless network. Most routers have a built-in DSL modem that will
allow you access to a high speed DSL internet connection. The ISP (Internet Service Provider) you have chosen
normally supplies a modem/router with the subscription to their services. Read carefully the documentation
supplied with your Access point/router for detailed setup instructions.
Network Cable (RJ45)
A network cable (also called RJ45 cable) is used to connect the host computer to the access point (see illustration
below); this type of cable may also be used to connect peripheral devices to the access point.
22 -
Quick Start & Troubleshooting Guide

Wireless Adapter
An internal wireless adapter is normally already installed in your computer. A button or controls in Windows
allow you to activate or disactivate the adapter.
Diagram of a working network
1. Access point/router
2. Desktop computer
3. Modem
4. Printer
5. Portable computer
6. PDA/Smartphone
7. Network cables (RJ45)
Ad-Hoc internet sharing
The Internet Connection Sharing (ICS) feature of Microsoft Windows allows you to share a
single Internet connection with multiple computers. Built-in support for IEEE 802.11
wireless LANs (WLANs) allows you to create an ad-hoc wireless network. These two
features can be used together to share a wired Internet connection with the members of
an ad-hoc wireless network. This is the method of connection if you do not possess an
Access Point (router).
Turning On/Off a WiFi Network Connection
Most computers feature a ‘WiFi’ button that turns the network connection on or off. If
your computer does not feature a ‘WiFi’ button, you may turn your wireless network on
or off, or control what is shared over the network with the network management
options. Click on
Sharing Center
Start
.
>
Control Panel
5
6
>
Network and Internet
>
Network and
4
1
7
3
2
Warning: Using wireless devices while flying in aircraft is prohibited. Switch off all devices before
boarding an aircraft; they may be dangerous to the operation of the aircraft, disrupt
communications, and even be illegal.
Internet and Software - 23

Surf the Net!
To surf the Internet, you need a program called an Internet browser.
web browsing experience. As soon as you have your Internet access installed and you are connected, click on the
Internet Explorer shortcut located on the Windows desktop and take your Internet experience to a new level!
Internet Explorer features
The image below shows the Internet Explorer browser’s start page. A brief description of some key aspects of the
browser are listed below.
5
3
Internet Explorer
6
9
provides an easy and secure
2
4
8
1
7
1. Link to the Help menu: click to access the Internet Explorer Help section. There you can find information about
Internet Explorer and take the Internet Explorer Tour. You may also press
2. Reduce, maximize or close the window.
3. Address bar: Type in an Internet address (e.g. www.gateway.com) and press the Enter key on your keyboard,
this will take you directly to the address you typed.
4. Instant Search Box: Search the web without having to open a search provider page. You can customize your
search by setting your favorite search provider as the default. Use the dropdown list to choose a provider.
5. Back and Forward buttons: Navigate through pages you have already visited.
6. Tabs: View multiple sites in a single browser window by switching from one site to another through tabs at the
top of the browser frame.
7. Quick tabs: Select and navigate through open tabs by displaying thumbnails of them all in a single window.
8. Favorites Center: Manage your favorite websites, your browsing history and your RSS Feed subscriptions in just a
few clicks.
9. RSS feeds: Allow you to keep up with your favorite websites in an automated manner. An illuminated icon on the
toolbar indicates that the site offers a feed to which you can subscribe, in order to be notified when content is
updated. Your browser delivers the information to your Favorites Center. Now you can read news headlines,
sports scores, etc. as soon as they arrive.
Caution:
Internet Explorer includes a
from potential or known fraudulent websites (sites that look legitimate but actually are designed to
capture your personal information). The address bar will turn yellow and a warning message will be
displayed if you visit a suspected phishing site.
Phishing Filter
that warns you about and helps to protect you
F1
on your keyboard.
Google Desktop (optional)
Google Desktop™ is a free pre-installed application that allows you to easily
search and personalize your Gateway computer. Google Desktop provides fulltext search over your email, files, music, photos, chats, Web pages you've
viewed, and more. By making your computer searchable, Google Desktop puts
your information easily within your reach and frees you from having to
24 -
Quick Start & Troubleshooting Guide

manually organize your files. Google Desktop also helps you gather new information from the Internet with Sidebar
and Google Gadgets, visually appealing mini-applications that can display anything such as your new email, the
local weather forecast to personalized news. With Google Desktop, you get personalized information when you
want it, right on your computer’s desktop. Simply click on the Google Desktop search icon to start the program.
Note:
To learn more about Google™ products and features, visit www.google.com.
Gateway Website
To get you started why not visit our website, www.gateway.com.
Gateway is dedicated to provide you with on-going personalized support. Check out our
tailored to your needs.
www.gateway.com is your gateway to a world of online activities and services: visit us regularly for the latest
information and downloads!
Support
section to get help
Internet and Software - 25

HELPDESK
SAFE COMPUTING
To make the most of your new computer and ensure it runs smoothly for a long time, you should use the programs
below and regularly perform the actions described in this guide.
Maintenance
Recommended maintenance tasks
There are several tasks you should perform periodically (about once per month) to ensure your computer stays in
good health:
Error Checking
Using the
checks and repairs two types of errors:
✓
✓
1. Click on
2. Click on
3. Tick
The
searches your drive and displays unused files, such as temporary
Internet files, files in the Recycle Bin and other temporary files that you
may safely delete.
1. Click on
2. Select the
3. Tick each category in the
Check Disk
file system errors, such as fragmented files that were not deleted and files with invalid sizes or dates;
physical errors, which may occur on your hard disk as it wears out over time.
Automatically fix file system errors
bad sectors
Click on
Disk Cleanup
Disk Cleanup
Properties
the diagram of the disk drive.
OK.
click on
tool regularly prevents your system from getting unreliable and information getting lost. It
Start
>
Tools
Start
Start
.
General
Computer
and
Check Now
, your computer will carry out the physical error checking when you next restart your computer.
to proceed.
Wizard helps free up space on your disk drive. It
>
Computer
tab and click on the
. Right-click on the OS icon and select
in the
Error-checking
. Right-click on the OS icon and select
Disk Cleanup
Files to delete
area you wish to delete and
field.
in the options area. If you tick
button (next to
Properties
.
Scan for and attempt recovery of
Disk Defragmenter
With the creation and deletion of files over time, scattering occurs all over the hard disk area and affects
performance. The
computer run faster and more efficiently.
Running the
hard drive and thus decrease the chance of a fault developing at a later date.
26 -
Quick Start & Troubleshooting Guide
Disk Defragmenter
Disk Defragmenter
helps you rearrange the items stored on your hard drive to make your
once a month (depending on computer usage) will decrease wear and tear on your

1. Perform a
2. Click on
and select
3. Click on
4. Click on the volume you want to defragment and click on
Defragment
hours to complete. It is best not to use your computer while
running the
system may cause the process to restart. If your hard disk is
divided into several partitions you should perform the same
action for each partition.
Manage your Hard Disk Drive (HDD)
Check the remaining free space on your hard disk drive
1. Click on
2. Right-click on the
3. The
space on your hard disk. If your hard disk is almost full (less than 100 MB
remaining), you should consider freeing some space.
To see easily how much space is used and how much is left, simply place your
pointer over the hard disk drive icon. The information will automatically appear.
Free some Space on your Hard Disk Drive
1. Empty the Recycle Bin: When you delete a file from your computer, Windows places
it in the Recycle Bin. All the deleted files remain there until you decide to
permanently delete them from your computer or to restore them to their original
location. Double-click on the
Empty Recycle Bin
external devices, such as memory cards, do not go to the Recycle Bin, they are
permanently deleted.
2. Uninstall the programs you no longer use:
Click on
3. Archive files on an external hard disk drive, recordable CDs or DVDs (if your computer is equipped with a CD or
DVD writer) and delete them from the hard disk.
Disk Cleanup
Start
Properties
Tools
to start. The whole process may take several
Disk Defragmenter
Start
Hard Disk Properties
Start
and close all open programs.
>
Computer
.
and
Defragment now...
>
Computer
OS
icon and select
or select only the items you want to delete. Items deleted from
>
Control Panel
. Right-click on the OS icon
.
as any changes on your
.
window displays the amount of used space and free
Properties
Recycle Bin
>
Programs
.
on the Windows desktop and click on
>
Programs and Features
.
Run Windows System Tools
Windows includes some convenient tools to keep your computer in good shape. Use these tools on a regular basis
to maintain a reliable and speedy system! To make it easier,
you can customize to run specific tasks regularly.
To access the list of
programs and finally select
System Tools
, click on
System Tools
.
Start
>
System Tools
All Programs
includes a
, then the
Scheduled Tasks
Accessories
utility, which
folder in the list of
Helpdesk - 27

Windows System Restore.
System Restore
previous time if necessary. It can undo harmful changes to your computer and restore its settings and
performance, while saving your personal data files (such as documents, browsing history, drawings, favorites, or
emails).
Starting Windows System Restore from the Windows desktop
Click on
If you cannot access the Windows desktop:
1. Press the
2. Select
Restore
System Restore options
Restore your computer to an earlier time
This option will return to your computer to how it was on an earlier date, without affecting your personal
documents or emails (it will not restore lost documents either). By default Windows saves snapshots of itself when
major changes are made to the Operating System (e.g. driver installations or specific software). This is useful when
a driver installation failed, or when you changed a system setting, and it did not work.
monitors the changes to your computer and automatically creates restore points to revert to a
Note:
When you restore your computer you will need to reinstall any programs you installed after the restore
point was created. These programs will not work until you do this. Windows System Restore does not uninstall
programs. To do this, you should use Programs and Features in the Control Panel.
Start
>
All Programs
Alt+F10
Windows System Restore
.
key upon start-up when the Gateway logo appears. This will open the
>
Accessories
and click on
>
System Tools
Next
. Your computer will automatically restart and open
>
System Restore
.
Recovery Program
.
System
28 -
Quick Start & Troubleshooting Guide

1. Click on
2. Select from the calendar the date when the restore point was created and click on
3. In the confirmation screen, click on
Create a Restore Point
Windows creates restore points automatically at regularly scheduled times or before certain programs or drivers
are installed. This option allows you to create your own restore points when you need to.
1. Click on
2. Enter a description to identify this restore point.
3. To finish, click on
Undo the last restoration
If the system fails after restoring the computer to a certain date, you can use this option to undo the restoration.
Alternately, you can use
worked.
1. Restart the computer, press
2. Use the arrow keys to highlight
Restore my computer to an earlier time
that were created on the selected date are listed by name in the list box to the right of the calendar.
Create a restore point
name.
Create
.
Last Known Good Configuration
Next
to restore the computer to the selected date and time.
, and then click on
F8
to access advanced startup options.
Last Known Good Configuration
, and then click on
Next
.
System Restore
to restore the system to your most recent settings that
Next
.
Next
. All the restore points
automatically adds the date and time to this
and press
Enter
.
Updates
As new viruses, worms, and other threats are discovered everyday, keeping your security applications and
operating system up-to-date is crucial.
protect your computer from Internet attacks and ensure that the latest security updates have been downloaded
and installed on your system. To keep your computer safe with all the latest programs, please perform the
following actions:
✓
Update your antivirus
✓
Update your anti-spyware and anti-malware tools
✓
Perform updates when prompted by
✓
Use Microsoft
✓
Run
Windows Defender
✓
Run
Windows Update
Windows Update
via Internet downloads. It allows you to choose updates for
your computer's operating system, software programs, and
hardware. New content is added to Windows Update regularly,
so you can always get the most recent updates and solutions to
protect your computer and keep it running smoothly.
Start
•
Windows Update.
Windows Automatic Updates
can help you keep your computer up-to-date
>
Control Panel
Norton Internet Security
Windows Action Center
>
System and Security
, combined with other security applications can
>
Security
You are probably eager to explore everything the Internet has to offer. In order for you to be safe online, Gateway
has pre-installed Symantec’s award-winning Norton Internet Security on your computer.
The new Norton Internet Security™ runs quietly in the background to block today’s complex threats and protect
your identity when you shop, bank, or browse online.
Norton Internet Security blocks online identity theft, detects and eliminates spyware, removes viruses and Internet
worms, protects against hackers.
Helpdesk - 29

Definitions
What is a Virus?
Malicious software, typically called ‘viruses’, are programs designed to infect and damage computers. Most viruses
are transmitted over the Internet, emails or malicious Web sites. A typical virus will replicate and pass itself
undetected to multiple computers. Other forms of nuisance, such as Trojan horses, worms or spam can infect your
computer in various ways, using up resources or clogging up a network.
Note:
Gateway guarantees that your computer was 100% virus free at the time of purchase and does not
cover damages due to viruses.
What is Spyware?
Spyware refers to generally unwanted programs that are downloaded onto your computer while connected to the
Internet, often without you knowing it. Once it has infected your computer, it can snoop on your browsing activity,
collect personal information, cause pop-up ads to appear, or even change the configuration of your computer.
Spyware consumes resources on your computer; it can slow down your Internet connection or entire computer
system, and even cause crashes.
Spyware is sometimes used by unscrupulous companies to monitor and track the sites you visit on the Internet so
as to determine your web-surfing habits and display targeted pop-up ads on your screen. However, some kinds of
spyware go beyond simple tracking and actually monitor keystrokes and capture passwords and other functions
which pose a definite security risk.
What is Malware?
Malicious software, also known as
example, viruses, worms, and Trojan horses are malicious software. To help protect your computer against
malware, make sure it is using up-to-date antivirus and anti-malware software.
What is a personal Firewall?
A personal firewall is a software program designed to prevent unauthorized access to or from a private network. It
acts as a shield to protect your Internet connection from unwanted connections, some of which may attempt to
take control of your computer to install or re-distribute viruses or malicious programs. Each connection to your
computer is monitored - programs that attempt to receive information without your permission are detected and
the firewall will display an alert. You can then decide if you will allow the connection, if the connection is to a
program you are currently using then normally you would allow it (i.e. a game connecting to a multi-player server
or an encyclopaedia making a content update).
malware
, is software designed to deliberately harm your computer. For
How to protect your computer
Cybercrime prevention can be straight-forward - when armed with a little technical advice and common sense,
many attacks can be avoided. In general, online criminals are trying to make their money as quickly and easily as
possible. The more difficult you make their job, the more likely they are to leave you alone and move on to an
easier target. The tips below provide basic information on how you can prevent online fraud.
Keep your computer current with the latest patches and updates.
One of the best ways to keep attackers away from your computer is to apply patches and other software fixes
when they become available. By regularly updating your computer, you block attackers from being able to take
advantage of software flaws (vulnerabilities) that they could otherwise use to break into your system.
While keeping your computer up-to-date will not protect you from all attacks, it makes it much more difficult for
hackers to gain access to your system, blocks many basic and automated attacks completely, and might be enough
to discourage a less-determined attacker to look for a more vulnerable computer elsewhere.
More recent versions of Microsoft Windows and other popular software can be configured to download and apply
updates automatically so that you do not have to remember to check for the latest software. Taking advantage of
"auto-update" features in your software is a great start toward keeping yourself safe online.
30 -
Quick Start & Troubleshooting Guide

Protect your computer with security software.
Several types of security software are necessary for basic online security. Security software essentials include
firewall and antivirus programs. A firewall is usually your computer's first line of defense-it controls who and what
can communicate with your computer online. You could think of a firewall as a sort of "policeman" that watches all
the data attempting to flow in and out of your computer on the Internet, allowing communications that it knows
are safe and blocking "bad" traffic such as attacks from ever reaching your computer.
The next line of defense many times is your antivirus software, which monitors all online activities such as email
messages and Web browsing and protects an individual from viruses, worms, Trojan horse and other types of
malicious programs. Your antivirus and antispyware software should be configured to update itself, and it should
do so every time you connect to the Internet.
Integrated security suites such as Norton Internet Security combine firewall, antivirus, antispyware with other
features such as antispam and parental controls have become popular as they offer all the security software
needed for online protection in a single package. Many people find using a security suite an attractive alternative to
installing and configuring several different types of security software as well as keeping them all up-to-date.
A complete version of Norton Internet Security™ is pre-installed on your Gateway system. It includes a
free trial subscription to protection updates. Make sure you Turn it On!
Choose strong passwords and keep them safe.
Passwords are a fact of life on the Internet today; we use them for everything from ordering flowers and online
banking to logging into our favorite airline Web site to see how many miles we have accumulated. The following
tips can help make your online experiences secure:
✓
Selecting a password that cannot be easily guessed is the first step toward keeping passwords secure and away
from the wrong hands. Strong passwords have eight characters or more and use a combination of letters,
numbers and symbols (e.g., # $ % ! ?). Avoid using any of the following as your password: your login name,
anything based on your personal information such as your last name, and words that can be found in the
dictionary. Try to select especially strong, unique passwords for protecting activities like online banking.
✓
Keep your passwords in a safe place and try not to use the same password for every service you use online.
✓
Change passwords on a regular basis, at least every 90 days. This can limit the damage caused by someone who
has already gained access to your account. If you notice something suspicious with one of your online accounts,
one of the first steps you can take is to change your password.
Protect your personal information.
Exercise caution when sharing personal information such as your name, home address, phone number, and email
address online. To take advantage of many online services, you will inevitably have to provide personal information
in order to handle billing and shipping of purchased goods. Since not divulging any personal information is rarely
possible, the following list contains some advice for how to share personal information safely online:
✓
Keep an eye out for phony email messages.
misspellings, poor grammar, odd phrasings, Web site addresses with strange extensions, Web site addresses
that are entirely numbers where there are normally words, and anything else out of the ordinary. Additionally,
phishing messages will often tell you that you have to act quickly to keep your account open, update your
security, or urge you to provide information immediately or else something bad will happen. Don't take the bait.
✓
Don't respond to email messages that ask for personal information.
email messages to ask for your personal information. When in doubt, contact the company by phone or by
typing in the company Web address into your Web browser. Don't click on the links in these messages as they
make take you to fraudulent, malicious Web sites.
✓
Steer clear of fraudulent Web sites used to steal personal information.
address (URL) directly into the Web browser rather than following a link within an email or instant message.
Fraudsters often forge these links to make them look convincing. A shopping, banking or any other Web site
where sensitive information should have an "S" after the letters "http" (i.e.
http://www.yourbank.com
you to login or provide other sensitive data. Another sign that you have a secure connection is the small lock
icon in the bottom of your web browser (usually the right-hand corner).
). The "s" stands for secure and should appear when you are in an area requesting
Things that indicate a message may be fraudulent are
Legitimate companies will not use
When visiting a Web site, type the
https://www.yourbank.com
not
Helpdesk - 31

✓
Pay attention to privacy policies on Web sites and in software.
organization might collect and use your personal information before you share it with them.
✓
Guard your email address.
that may or may not exist in hopes of finding a potential victim. Responding to these messages or even
downloading images ensures you will be added to their lists for more of the same messages in the future. Also
be careful when posting your email address online in newsgroups, blogs or online communities.
Online offers that look too good to be true usually are.
The old saying "there's no such thing as a free lunch" still rings true today. Supposedly "free" software such as
screen savers or smileys, secret investment tricks sure to make you untold fortunes, and contests that you've
surprisingly won without entering are the enticing hooks used by companies to grab your attention.
While you may not directly pay for the software or service with money, the free software or service you asked for
may have been bundled with advertising software ("adware") that tracks your behavior and displays unwanted
advertisements. You may have to divulge personal information or purchase something else in order to claim your
supposed content winnings. If an offer looks so good it's hard to believe, ask for someone else's opinion, read the
fine print, or even better, simply ignore it.
Review bank and credit card statements regularly.
The impact of identity theft and online crimes can be greatly reduced if you can catch it shortly after your data is
stolen or when the first use of your information is attempted. One of the easiest ways to get the tip-off that
something has gone wrong is by reviewing the monthly statements provided by your bank and credit card
companies for anything out of the ordinary.
Additionally, many banks and services use fraud prevention systems that call out unusual purchasing behavior (i.e.
if you live in Texas and all of the sudden start buying refrigerators in Budapest). In order to confirm these out of the
ordinary purchases, they might call you and ask you to confirm them. Don't take these calls lightly; this is your hint
that something bad may have happened and you should take necessary action.
Protect your computer with Windows security tools.
Windows provides a variety of protection applications.
Windows Action Center
Windows provides a central area from where you can control the security settings of your computer, helping you to
protect it from Internet attacks and ensuring that the latest security updates have been downloaded and installed
on your computer.
To open the
Alternatively, if a security alert has been reported (in the
Notification Area, next to the clock) then you can click on the
notification balloon or double-click on the small Security Alert
icon.
The
important applications that protect your computer. In
addition
Automatic Updates
comprehesive system to defend your computer. The antivirus
application varies according to the program installed on your
computer.
Action Center
Action Center
indicates the status and settings used for
Windows Firewall, Windows Defender
are provided by Microsoft as part of a
Spammers and phishers sometimes send millions of messages to email addresses
, click on
Start
>
Control Panel
and
Windows
>
System and Security
It is important to understand how an
>
Action Center
.
32 -
Quick Start & Troubleshooting Guide

Windows Firewall
Windows has a firewall that protects your computer when connected to the Internet. It stops programs from
accessing the Internet without your permission.
Certain program need access to the Internet to function
properly, or even function at all. If this is the case, you will
usually be asked to allow access when you install a
program, or the first time you use it. To check firewall
settings, click on
and Security
Note:
‘Learning mode’, you may see pop-up windows
alerting you that certain programs you know and
trust wish to access the internet. After a period of
time the Firewall will know your list of trusted
programs and won’t ask for permission the next
time the program tries to connect to the internet.
The Firewall also protects your computer from
programs from the internet trying to access your
computer; this sometimes is necessary to allow access for program updates, downloads, etc.
Windows Updates
If you have an active Internet connection, Windows can check for important updates for your computer and install
them automatically. These updates include security patches and program updates that can improve your
computing experience and help protect your computer against new viruses and attacks.
Windows Defender
Windows Defender
against malicious and unwanted software, such as
spyware and adware.
and turned on by default.
To help protect your privacy and your computer,
Windows Defender includes
options. Real-time protection alerts you when spyware
and other potentially unwanted software attempt to
install themselves or run on your computer. You are
also alerted if programs attempt to change important
Windows settings.
Note:
Windows Update settings to automatically install
the latest definitions.
Start
>
>
Windows Firewall
When you first start to use a Firewall it is in a
helps protect your computer
Windows Defender works with your
Control Panel
.
Windows Defender
real-time protection
>
System
is installed
Helpdesk - 33

User Account Control
The
User Accounts
unauthorized changes to your computer. User Accounts will
ask you for permission or an administrator password before
performing actions that could potentially affect your
computer's operation or that change settings that affect other
users. When you see a User Account message, read it
carefully, and then make sure the name of the action or
program that's about to start is one that you intended to
start.
By verifying these actions before they start, User Account
settings can help prevent malicious software (malware) and
spyware from installing or making changes to your computer
without permission.
To access
Accounts
Internet sites use small files called cookies to keep track of user preferences and information. You can adjust your
Internet browser's security settings to determine how much -or how little- information you are willing to accept
from a Web site.
To access Internet Explorer security settings:
1. In Internet Explorer, click on
2. In the
If the
your programs do not work correctly, your computer may be infected by malicious software. However, do not
blame every computer problem on a virus! If you suspect your computer is infected, the first thing to do is update if you have not already done so, and run your antivirus and anti-spyware software.
User Account
.
Note:
settings window.
Internet Explorer Security Settings
Privacy
How do I know when my computer is at risk?
Action Center
control panel can help prevent
settings, click on
You may turn off the User Account Control Messages (not recommended) in the User Account Control
Tools
tab, move the slider up or down to select a setting.
reports an alert, or if your computer behaves erratically, crashes unexpectedly or if some of
Start
>
>
Internet Options
Control Panel
.
>
User Accounts and Family Safety
>
User
Windows Remote Assistance
Remote Assistance allows a Windows user to
temporarily take over a remote Windows computer over
a network or the internet to resolve issues. Remote
Assistance makes it possible to diagnose and repair
problems with a computer without personally visiting it.
You can access Remote Assistance by clicking on
>
All Programs
Remote Assistance
Assistance, you will see a screen giving you the choice of
either inviting someone to help you or offering to help
someone.
34 -
Quick Start & Troubleshooting Guide
>
Maintenance
. Upon launching Remote
>
Start
Windows

HELPDESK
DIAGNOSE & REPAIR
We all experience problems with our computer from time to time... Before calling the Customer Contact Centre,
please read the following. This troubleshooting guide will help you diagnose and solve some common problems.
Please note that the solutions proposed in either one of the cases below may not be limited to that specific case and
may be used to solve other computer issues.
Top Troubleshooting Cases
Have a look at the ‘symptoms’ described below, see if they match the problem you encounter with your computer
and follow the steps to fix the issue. Also remember to read our recommendations in the
(page 26) to get the most of your computer and prevent problems in the future.
Nothing displays on the screen (page 35)
The screen freezes when the Gateway logo displays (page 37)
The screen freezes when the Windows logo displays (page 37)
The Windows desktop displays, but the operating system is not stable (page 38)
The screen displays applications, but they crash or run erratically (page 39)
Safe Computing
section
Nothing displays on the screen
Your computer is in suspend or power saving mode.
1. If the computer is in power saving mode, press a key on the keyboard
to "wake up" the computer.
2. If the computer is in Sleep mode, press the power button. After a short
pause the light should light up and you will be able to use your
computer.
Helpdesk - 35

A screen saver may be active.
1. Press a key to reactivate the display.
2. If you wish to change the screen saver properties:
a. Close all open programs, with the exception of Windows.
b. Right-click on an empty spot on the Windows desktop.
c. Select
d. Click on the
e. Adjust the screen saver properties and the energy saving features
Check your connections:
1. Check the power cable connection between your computer, the AC adapter and the power outlet.
Test the power socket:
1. Plug any other electrical device on the wall socket and check if it works.
2. If it does not, your wall socket is may be faulty.
Try to reset your computer:
1. Unplug the power cable from the wall socket, remove the battery and keep the power button pressed for at
least ten seconds.
2. Then release it, put the battery back, connect the power cable again and press the power button to turn on
your computer.
Check your battery:
1. Check that the battery is correctly inserted.
2. Check that the battery is sufficiently charged.
3. Connect the AC adapter and attempt to start your computer.
Disconnect or remove additional devices:
A faulty device or battery can prevent the system from starting in some situations.
Removing additional external devices
These devices may include a printer, a scanner, a modem, etc.
1. Disconnect all external devices from your computer.
2. Try to restart your computer and check if it works correctly.
3. If it does not, please contact the Customer Contact Center.
Removing the battery
1. Remove the battery. Usually, you just have to unlock it at the bottom of the base and pull it out.
2. Leave the AC power adaptor plugged to both your computer and the wall socket.
3. Try to switch your computer on and wait for at least 15 minutes.
4. Check if the power adapter gets warm.
Removing additional internal hardware
Internal hardware could be items such as additional memory, a network card, etc.
1. Remove any additional internal device you have installed. Note that if a third party installed a device, we advise
you to refer to them to remove the device.
2. Try to restart your computer and check if it works fine.
Personalize
Screen saver
to your needs.
from the menu.
icon.
36 -
Quick Start & Troubleshooting Guide

Check InfoCentre to learn more about your computer. Don’t forget to download your InfoCentre updates!
Caution:
You should only open your computer if you are an advanced user, or if you are asked to do
so by a qualified Gateway technician.
The screen freezes when the Gateway logo displays
When the computer starts, it first performs a test of all system requirements.
When the computer is functioning correctly, it emits a short beep and starts
up. However, if the test fails, the computer may freeze when the Gateway
logo displays.
Restart your computer
Press the
details.
Set the BIOS to default settings.
Press Del or F2 when starting your computer to enter the BIOS. This controls the hardware of your computer. You
should only enter the BIOS if you are an advanced user, or when asked to do so by a qualified technician.
1. Select
2. Select the
3. Select
4. The computer will automatically restart.
Try to start your computer with a different boot device.
Press
comp uter s). If yo ur first boot device is HD D, ch ange it i nto CD or DV D using t he ar row keys and p ress
Disconnect or remove additional devices.
Please read
hardware
TAB
or
ESC
key to while the computer starts to display some
Exit
in the top menu using the arrow keys or mouse (if available).
Default Values
Save Changes and Exit
F12
when starting your computer to enter the boot menu (this feature may not be available on all
Removing additional external devices, Removing the battery
on page 36.
in the menu and press
and press
Enter
Enter
. Press OK to confirm.
. Press OK to confirm.
Enter
and
Removing additional internal
to exit.
The screen freezes when the Windows logo displays
During the start-up process, Windows runs a number of checks. If it detects
incorrect settings, damaged or missing software or hardware components,
the system will likely hang. To fix this, try to restart your computer using one
of the options below.
Start your computer in Safe Mode to use basic files and drivers.
1. Switch your computer on.
2. When the Gateway logo appears, press
start-up options.
3. Use the arrow keys to highlight
Start with the Last Known Good Configuration.
This option will restore the system settings that were in effect the last time the computer started successfully.
This may cause your computer to lose data that you have entered the last time you used it.
1. Switch your computer on.
2. When the Gateway logo appears, press
3. Use the arrow keys to highlight
Safe Mode
Last Known Good Configuration
F8
to access the advanced
and press
F8
on your keyboard to access the advanced startup options.
Enter
.
and press
Enter
.
Helpdesk - 37

Uninstall software.
If your computer does not function correctly after you have installed new programs, try uninstalling them.
Click on
Start
>
Control Panel
Go back to previous restore point with Windows System Restore (see page 28).
Disconnect or remove additional devices.
Please read
hardware
The Windows desktop displays, but the operating system is not
stable
Even when your computer starts successfully, you cannot go further and use
your programs correctly. Ask yourself the following questions and try to find
the solution to your problem with the answers proposed.
Did you install new programs?
Installing new software may cause conflict with your existing software. If
your computer does not function correctly after you have installed new
programs, try to uninstall them.
Click on
Did you notice strange behaviour in Internet browser or email program?
Most problems affecting Internet applications, and potentially your whole operating system are caused by
malicious software propagated when you are connected. To check if your computer has been infected, run a
check with your antivirus and anti-spyware programs. To be fully efficient, these protection programs must be
up-to-date. Please refer to the
Update your system files using Windows Update
Windows Update
Internet products that you can download to keep your computer running smoothly and up-to-date.
1. Click on
2. Select
Did you install new hardware?
When you install a new hardware device, Windows usually detects it automatically and copies the appropriate files
(drivers) to your computer to make it work. This process modifies the system files and can sometimes generate
conflicts within Windows.
Device Manager
1. Open the
Security
hardware devices.
2. If you see any “
previous version of that driver may help:
1. Right-click on your device and select
2. Click on the
Removing additional external devices, Removing the battery
on page 36.
Start
>
Control Panel
is a catalogue of items such as drivers, security fixes, critical updates, the latest Help files, and
Start
>
Check for updates
Device Manager (Start
>
Device Manager
All Programs
!
” or “?” signs in front of a device name, going back to a
Driver
tab and select
>
Programs
>
Programs
Security
chapter (page 29) to learn more about keeping your computer safe.
>
and
Yes
when prompted to install any required software or device drivers.
>
). This allows you to view the status of your
Roll Back Driver
>
Programs and Features
>
Programs and Features
Windows Update
Control Panel
Properties
.
.
.
>
System and
.
and
Removing additional internal
.
38 -
Quick Start & Troubleshooting Guide

Go back to previous restore point with System Restore.
System Restore
previous time if necessary. It can undo harmful changes to your computer and restore its settings and
performance, while saving your personal data files (such as documents, browsing history, drawings, favorites, or
emails). Please see page 38 for more details.
If your computer cannot display the Windows desktop:
Restart your computer, press the
Recovery Program.
The screen displays applications, but they crash or run erratically
When your programs run erratically, there are good chances that your
operating system may not be functioning correctly. Please also check the
recommendations on the previous case (page 38) if the steps below do not
help solve your problem.
Close programs using Windows Task Manager
If you cannot close your programs by clicking on the cross in the top right
corner of the screen, try using the
1. Press the
space on the taskbar and select
2. Select the failing program in the list and click on
Does this happen with only one application?
If you notice that a specific program does not work correctly, try uninstalling and reinstalling it.
Click on
Are there updates available for the erratic application(s)?
If you do not notice improvement after reinstalling your program, please check the software editor's Website for
updates. If the program was originally supplied with your computer, you may check the Gateway Support Website
on www.gateway.com for downloads as well.
Is your computer up-to-date?
Malicious programs such as virus and spyware can infect your computer and cause some of your programs to
malfunction. To fix this problem and avoid it in the future, make sure you run antivirus and anti-spyware regularly
and get the latest updates. For more on keeping your computer up-to-date, please refer to the
on page 29.
If your computer cannot display the Windows desktop:
Restart your computer, press the
Recovery Program.
monitors the changes to your computer and automatically creates restore points to revert to a
Alt+F10
key upon start-up when the Gateway logo appears to start the
Ctrl+Alt+Del
Start
>
Task Manager
keys simultaneously or right-click on an empty
Task Manager
Control Panel
>
Programs
Alt+F10
.
.
End Task
.
>
Programs and Features
key upon start-up when the Gateway logo appears to start the
.
Updates
chapter
Miscellaneous Troubleshooting
Keyboard & Touchpad
My Keyboard Does Not Work
1. The numeric keypad is disabled (only on models featuring a numeric keypad).
When the Num Lock key is active, the numeric keypad can be used to enter numbers, like the
keyboard of a calculator. When the Num Lock key is not activated, the keypad either functions as a
Helpdesk - 39

second set of cursor keys (on "full-sized" keyboards), or they revert to normal letter keys (on certain compact
keyboards).
My touchpad does not work
1. Your computer may feature a
touchpad on or off to avoid unwanted cursor movements when using the keyboard. Check that
this featuree is not active.
2. The controller properties may not be properly set up.
If the pointer moves with difficulty, too quickly or too slowly, or if double
clicking does not work all the time, try adjusting the properties of your
controller.
Start
a. Click on
b. Click on the different tabs to access the properties and modify how the
touchpad acts.
c. Click on
window.
Display
The Display Is Not Centred or Gets Wavy
1. I see thin lines scrolling down the screen, flickering images or wavy displays.
a. Interference from other appliances or magnetic sources may cause irregular images
on your screen.
b. Switch your computer off and restart it. This should automatically adjust your
display.
Note:
The magnitude of interference, noise or distortion depends on your screen's proximity to sources such
as TV sets, mobile phones, other monitors, refrigerators, large stereo speakers, power adapters, halogen
lighting with built-in power supply or motor driven appliances. Faulty fluorescent light assemblies or the
proximity to high voltage lines can also cause distorted images. Place your computer as far as possible from
these sources.
>
Apply
to confirm your settings then on OK to close the
Touch pad Lock
Control Panel
button. The
>
Hardware and Sound
Touch pad Lock
>
Mouse
.
button toggles the
Sound
Upon Startup, My Computer Emits a Continuous Beeping Sound
1. There may be a stuck key on the keyboard or a stuck button on the touchpad:
a. Switch your computer OFF.
b. Press all the keys of your keyboard to ensure that no key is stuck.
c. Tap the touchpad buttons to ensure that none of them are stuck.
d. Switch your computer ON again.
My Computer Has no Sound
1. The speaker volume may be set too low.
Fn
Adjust the volume controls (either on your speakers, keyboard (with an
2. The Windows main volume control needs adjusting.
a. Click on the speaker icon on the right side of the Notification Area to make the volume control bar
appear.
b. If you cannot see this icon, go to the
c. If this icon has "disappeared", click on the arrow in the
(to reduce clutter in the Notification Area, icons that have not been used in a while are hidden).
40 -
Quick Start & Troubleshooting Guide
Control Panel
to display it.
Notification Area
key combination) or on the computer).
and then on the icon to display it

3. Your computer's volume control settings need adjusting.
a. Click on the speaker icon in the
b. Click and hold the slider to adjust the volume level.
c. Make sure the
d. If necessary, click on
(for example, if you are using digital audio over an HDMI cable).
e. To display more volume controls, click on the device or application
image.
4. Your sound hardware does not work properly.
a. Check that your sound card is correctly configured. Click on
and Sound
settings.
5. Your computer will not play audio CDs.
a. Make sure that your computer sound is set up properly (see previous steps).
b. Make sure that the disc's printed side is facing upward in the drive and that the disc is lying flat in the
drive tray.
c. Wait for the disc drive's indicator light (busy signal) to stop flashing before you try to start the CD player
program.
d. Make sure that the disc's surface is clean and scratch free.
e. Make sure the CD is not copy-protected. Some audio CDs include a copy protection mechanism to avoid
illegal copying. This mechanism prevents the CDs from being played or copied on a computer. In this case,
playback is only possible on conventional CD or DVD players.
Internet
In order to get the best possible Internet connection, ensure that you:
✓
Always connect to a grounded power socket (a standard “earthed” 3 pin socket).
✓
Connect your modem directly to the phone socket.
✓
Avoid using telephone extension cables (this degrades the signal quality).
✓
In thunderstorm conditions, make sure that you disconnect your modem from the
telephone line and pull out the power cord from the power outlet.
You Cannot Connect to the Internet
1. Your account details have not been released yet.
a. After you have just performed your online subscription with an Internet Service Provider (ISP), it is
recommended that you restart your computer to complete the Internet setup process.
b. The first time you use your Internet connection, your account may not be accepted immediately. Certain
ISPs require a short setup period to process your account details. Please wait 30 minutes before you try to
connect to their services again.
2. You entered an incorrect user name and/or password.
a. Check your user ID and password. Re-type them if necessary.
b. Check exact spelling (upper and lower case, or any punctuation).
c. Check the login and setup information given to you by your ISP
3. The server you are trying to connect to is out of order.
Check with your ISP whether the service is available.
4. Your Internet settings (browser, email, or connection) may have been changed.
When you subscribe, your ISP usually provides connection details (user name, password, server phone number,
email address, etc.). Check these details and restore your Internet settings, following the procedure given by your
ISP.
5. Your account with your Internet Service Provider has been terminated or your ISP server is unavailable.
Contact your ISP and check the access conditions to their Internet server.
Mute
option is NOT active.
Speakers
>
Sound
. In the
Notification Area
to change the type of audio output
Playback
tab, select an audio device and click on
.
Start
>
Control Panel
>
Properties
Hardware
to modify its
Helpdesk - 41

6. You have moved and your dialling location has changed.
a. Change your settings by clicking on
Panel
. Change the
Phone and Modem
select
b. Specify your new location and any special options for your
phone line.
c. Click on
d. Change the
7. You have used the
a. If your Internet access required you to install software, you
You are using a dial-up modem (optional)
1. The modem may not be connected properly.
Check the modem cable connections between the computer and
the telephone socket.
If your computer has a network port, make sure your modem cable is connected to your modem port and not to
your network port.
2. The telephone line may already be in use.
Free the telephone line before you dial a modem connection. You cannot phone and connect to the Internet at
the same time if both your telephone and your modem use the same line.
3. There is no dial tone
a. Disconnect your modem and plug in a telephone to check the integrity of your telephone line. If you can
b. Check that the dialling type is correctly set-up for your country. Click on
4. The modem is used by another program ("COM port in use" error message).
You may have a telephone or fax program running; These use the modem and make it unavailable for other
applications:
a. Close all programs that might use the modem (e.g. telephone or fax software).
b. Restart the computer. This will reset all connections.
You are using DSL or cable connection
1. Your DSL connection has not been activated.
Your ISP may need to contact your local telephone operator to activate DSL access on your line. Depending on the
chosen provider, this may take several weeks. To enquire about your connection, please contact your ISP.
2. Your DSL modem is not picking up the line.
a. Check all cable connections (e.g., plugs, sockets, filters).
b. Disconnect your modem and plug in a telephone to check the integrity of your telephone line. If you can
3. Your modem is defective.
Check the status lights on your modem and refer to manufacturer's documentation. If the problem persists and
the connection has been previously working, then contact your ISP.
When Surfing the Internet, You Get an Error Message
1. You are not connected.
a. Look at the lower right part of the Notification Area.
b. If you cannot see the connection bars , right click on the
OK
have finished.
should reinstall this software.
hear a normal dialling tone on the phone, then your modem or cable may be defective.
Change the
your phone configuration and click on
hear a normal dialling tone on the phone, then your modem or cable may be defective.
screen and choose
View by:
.
.
View by:
option back to
Recovery Management
View by:
option to
Properties.
Start
option to
Category
Large icons
OK
>
Large icons
program.
, then select
to finish.
Control
, then
when you
Phone and Modem
Start
>
. Make any changes to match
Task Bar
Control Panel
at the bottom of your
.
42 -
Quick Start & Troubleshooting Guide
Click on the
Place a tick in the box in front of
c. The Networks connection icon indicates if you have a reliable network connection (either wireless or over
a cable).
d. Click on the icon, then select
2. A connection to the remote site cannot be established.
Try again later or check with your ISP whether the service is available.
3. A pop up message warns you that the page contains errors (e.g. ‘the page contains javascript errors’).
Simply click on
You Cannot Send or Receive Emails
1. You are not connected.
To send and receive emails, you need to be connected to the Internet. Look for the network connection icon at
the lower right part of the
on page 42.
2. Your ISP or that of your recipient is having technical difficulties.
Try again later or check with your ISP whether the service is available.
3. Using several ISPs or email accounts can cause problems.
Check that you have selected the correct ISP for the account you are attempting to use.
4. Your Internet account settings may have been changed.
a. Disconnect from the Internet: Close
b. Check your connection details (username, password, server phone number, email address, etc.) and
restore your Internet settings, following the procedure given by your ISP.
5. You have sent a message but and get an error message in reply.
a. Check the spelling of your recipient's email address.
b. Check with your recipient that the email address is still valid.
Printer
A printer may have been provided when you purchased your computer, or you may have
purchased one later. Make sure you follow the installation instructions provided with the
printer.
My printer does not work
The guidelines below cover the most common types of problems encountered with printers. Please read your
printer's manual for specific instructions. Should you need further assistance, please contact the manufacturer of
your printer.
Customize
OK
to close the message window.
button in the
Always show all icons and notifications on the taskbar
Open Network and Sharing Center
Notification Area
Notification area
. Please see "
Windows Mail
section.
to see more information.
When Surfing the Internet, You Get an Error Message
and any other applications.
and then OK.
"
Problem/Error
The printer is OFF
The printer is OFF Line
The printer is out of
paper
The paper is jammed
The printer has
generated an error
message
Solution
Switch the printer ON
Press the printer's on line button
Add paper
See your printer's user's guide for information about clearing paper jams.
See your printer's manual for information about resolving error messages.
Helpdesk - 43
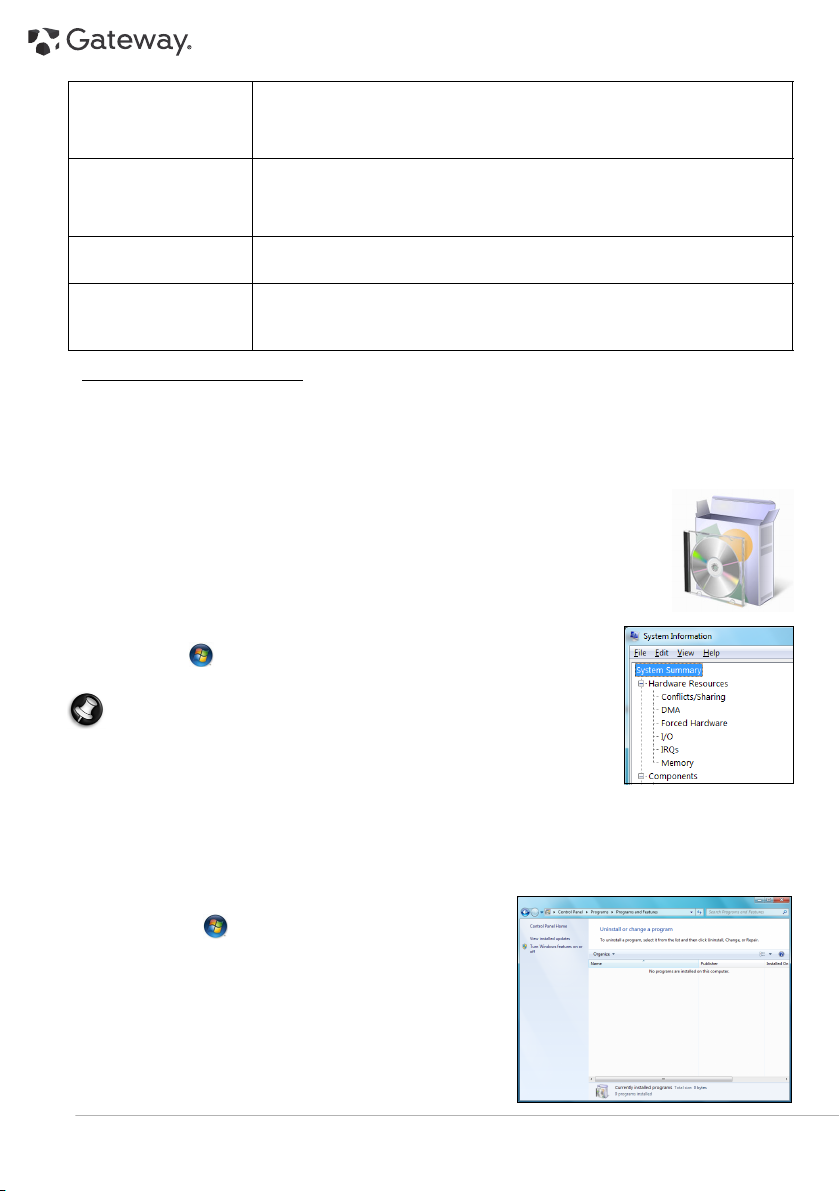
The printer is not
connected properly
No power is supplied to
the printer
The printer cable is
damaged
Your printer is not
installed correctly in
Windows
Adding Software and Hardware
In the event you encounter a problem with a new program or hardware, please check the supplied documentation
as well as the manufacturer's website. For support, please contact the manufacturer's hotline. Gateway cannot be
held responsible for any damage caused by adding hardware or software.
Software
Before purchasing new programs, check that they can run on your computer. Each software
program has system requirements, such as the amount of memory or hard drive space
needed to run. These requirements can usually be found printed on the software box or on
the website for the software.
1. Check your computer's specifications
•System Information
Start
Click on
Information
Note:
model description on your computer's packaging.
2. Installing a program
When you install a new program, first read the instructions included with it as
installation instructions can vary from product to product.
a. Before installing any new program, be sure all other applications are closed.
b. Insert the CD or DVD. Most CDs or DVDs start automatically and display an installation screen. If the disc does
not start automatically:
c. Right-click on the disc's icon and select
on-screen instructions.
3. Uninstalling a program
a. Click on
and Features
b. Select the program you want to uninstall.
c. Click on
process.
>
. Select an item and click on the + to display more options.
For a quick overview of your computer's specifications, please read the
Start
Uninstall/Change
Check that the cables are securely connected to the printer and computer.
Use a grounded AC power outlet (or power strip). Remember to shut down your
computer and printer before disconnecting or reconnecting any cables.
Plug the printer into a different wall socket.
Restart the computer and printer again and try printing to determine if the previous
socket was faulty.
If you have another printer cable, try using it to determine if your printer cable is
faulty.
Try reinstalling your printer. See your printer's manual for information about
installing the printer in Windows.
All Programs
>
Control Panel
.
>
Accessories
Explore
>
Programs
to start the program’s uninstall
>
System Tools
. Double-click on the
>
Programs
>
Setup
System
(or
Install
) icon and follow the
44 -
Quick Start & Troubleshooting Guide

Hardware
Caution:
Gateway strongly recommends that you never change your computer's hardware
configuration. Incorrect operations may damage your computer and is not covered by any warranty.
You should only open your computer when asked to do so by a qualified Gateway technician.
Before purchasing a new hardware device, check that it can be used on your computer.
1. Check your computer's specifications (see
2. Internal hardware component
If you wish to install an internal hardware component, it will be necessary to open your computer. For best results,
an authorized service provider should perform such installation. For further information on upgrading your
system's Random Access Memory (RAM) or Processor (CPU), please refer to
3. External hardware device
Installing a new hardware device such as a printer, scanner, joystick, etc. is not a complicated task.
Each type of device has its own installation specifications, so please check the documentation provided with each
device to know how to install it properly. Remember to shut down your computer and device before
disconnecting or reconnecting any cables.
Note:
If you have problems installing your new hardware, you should check the supplied manual first. If you
are still having difficulties, please contact the manufacturer or retailer, or check their website for more help
and advice.
Resetting your Hardware Configuration
If you encounter some problems with your original computer hardware drivers, you may want to restore the
hardware configuration so that it is exactly as it was when your computer left the factory. Please refer to the
Recovering your system
section on page 46 for details.
Check your computer's specifications
InfoCentre
on page 44).
.
Helpdesk - 45

HELPDESK
RECOVERING YOUR SYSTEM
If the troubleshooting steps (page 35) did not help fix your problem, you can run the
Management
you an option to retain all settings and personal data for later retrieval.
program. This will restore your computer to the same state as when you purchased it, while giving
To recover your system
1. Create recovery discs as soon as you can.
You can use these discs later for recovering your system from significant hardware and software problems. For
instructions, see “
2. Perform minor fixes.
If only one or two items of software or hardware have stopped working correctly, the problem may be solved by
reinstalling the software or the device drivers. To recover software and drivers that were pre-installed at the
factory, see “
and drivers that were not pre-installed, see that product’s documentation or technical support Web site.
3. Revert to a previous system condition.
If reinstalling software or drivers does not help, then the problem may be solved by returning your system to a
previous state when everything was working correctly. For instructions, see “
condition
4. Reset your system to its factory condition.
If nothing else has solved the problem and you want to reset your system to factory condition, see “
your system to its factory condition
Creating recovery discs
Recovering pre-installed software and drivers
” on page 47.
” on page 17.
” on page 48.
” on page 46. For instructions on reinstalling software
Returning to a previous system
Recovering pre-installed software and drivers
As a troubleshooting step, you may need to reinstall the software and device drivers that came pre-installed on
your computer from the factory. You can recover using either your hard drive or the backup discs you have
created.
• New software - If you need to recover software that did not come pre-installed on your computer, you need to
follow that software’s installation instructions.
• New device drivers - If you need to recover device drivers that did not come pre-installed on your computer,
follow the instructions provided with the device.
Gateway Recovery
Returning
To recover your pre-installed software and drivers:
1. Click on
- OR -
If you are recovering from your driver and application recovery disc, insert it into the disc drive, then go to Step 3
after the
2. Click on the
46 -
Start
>
Recovery Management
Gateway Application Recovery
Restore
menu opens.
tab, then click
All Programs
opens.
>
main menu opens.
Reinstall applications/drivers
Quick Start & Troubleshooting Guide
Gateway
, then click on
Gateway Recovery Management. Gateway
. The
Gateway Application Recovery
main

3. Click on
4. Click on the
Contents
. A list of software and device drivers opens.
install
installation. Repeat this step for each item you want to reinstall.
icon for the item you want to install, then follow the on-screen prompts to complete the
Returning to a previous system condition
Microsoft System Restore periodically takes ’snapshots’ of your system settings and saves them as restore points.
In most cases of hard-to-resolve software problems, you can return to one of these restore points to get your
system running again.
Windows automatically creates an additional restore point each day, and also each time you install software or
device drivers.
Help:
For more information about using Microsoft System Restore, click
Type windows system restore in the Search Help box, then press
To return to a restore point:
1. Click on
2. Click on
3. Click on he restore point you want, click on
4. Click on
Start
>
Open System Restore
Yes
minutes, and may restart your computer.
Control Panel
. Your system is restored using the restore point you specified. This process may take several
>
, then
Action Center
Next
.
Next
, then
, then click on
Finish
. A confirmation message box appears.
Enter
.
Recovery
Start
.
, then click
Help and Support
.
Helpdesk - 47

Returning your system to its factory condition
If your computer experiences problems that are not recoverable by other methods, you may need to reinstall
everything to return your system to its factory condition. You can reinstall using either your hard drive or the
recovery discs you have created.
Caution:
This complete recovery deletes everything on your hard drive, then reinstalls Windows and
all software and drivers that were pre-installed on your system. If you can access important files on
your hard drive, back them up now.
• If you can still run Windows, see “
• If you cannot run Windows and your original hard drive is still working, see “
during startup
• If you cannot run Windows and your original hard drive has been completely re-formatted or you have installed
a replacement hard drive, see “
Recovering from within Windows
To reinstall Windows and all pre-installed software and drivers:
1. Click on
Recovery Management
2. Click on the
3. Click on
recovered to.
Caution:
4. Click on OK. The recovery process begins by restarting your computer, then continues by copying files to your
hard drive. This process may take a while, but a Gateway Recovery Management screen shows you its progress.
When the recovery has finished, a dialog box prompts you to restart your computer.
5. Click on
6. Follow the on-screen prompts for first-time system setup.
” on page 48.
Start
>
All Programs
Restore
Yes
, then
Continuing the process will erase all files on your hard drive.
OK
. Your computer restarts.
opens.
tab, then
Start
. A dialog box displays information about the hard drive that the operating system will be
Recovering from within Windows
Recovering from your recovery discs
>
Gateway
, then click on
Restore system to factory default
” below.
” on page 48.
Gateway Recovery Management. Gateway
. The
Recovering from the hard drive
Confirm Restoration
dialog box opens.
Recovering from the hard drive during startup
To reinstall Windows and all pre-installed software and drivers:
1. Turn on your computer, then press
2. Click on
3. Click on
To reinstall Windows and all pre-installed software and drivers:
1. Turn on your computer, insert the first system recovery disc into your optical disc drive, then restart your
2. During startup, press
3. Use your arrow keys to select
4. Insert the second recovery disc when prompted, then follow the on-screen prompts to complete the
48 -
Restore system from factory default
Caution:
Continuing the process will erase all files on your hard drive.
Next
minutes.
Recovering from your recovery discs
computer.
Caution:
from, such as the hard drive or an optical disc.
inserted.
recovery.
. Your hard drive’s original, factory-loaded contents are recovered. This process will take several
Continuing the process will erase all files on your hard drive.
F12
to open the boot menu. The boot menu is where you can select which device to start
Quick Start & Troubleshooting Guide
Alt+F10
CDROM/DVD
during startup.
.
, then press
Gateway Recovery Management
Enter
. Windows installs from the recovery disc you
opens.

REGULATORY INFORMATION
WIRELESS DEVICES
Caution:
Wireless devices are not user-serviceable. Do not modify them in any way. Modification to a
wireless device will void the authorization to use it. Contact Gateway for service information.
Caution:
The transmitting device embedded in this computer may not be used with any antenna other than
the one provided with the computer.
Warning: Using wireless devices while flying in aircraft is prohibited. Switch off all devices before boarding
an aircraft; they may be dangerous to the operation of the aircraft, disrupt communications, and even be
illegal.
FEDERAL COMMUNICATIONS COMMISSION (FCC) INTENTIONAL EMITTER PER FCC PART 15
Low power, Radio transmitter type devices (radio frequency (RF) wireless communication devices), operating in
the 2.4 GHz band and/or 5.15 – 5.35 GHz band, may be present (embedded) in your computer system. This
section is only applicable if these devices are present. Refer to the system label to verify the presence of wireless
devices.
Wireless devices that may be in your system are only qualified for use in the United States of America if an FCC
ID number is on the system label.
Caution:
In order to comply with FCC requirements this transmitter must not be operated (or co-located) in
conjunction with any other transmitter or antenna installed in the computer.
The FCC has set a general guideline of 8 inches (20 cm) separation between the device and the body, for use of
a wireless device near the body (this does not include extremities). This device should be used more than
8 inches (20 cm) from the body when wireless devices are on. The power output of the wireless device (or
devices), which may be embedded in your computer, is well below the RF exposure limits as set by the FCC.
The wireless devices installed in this system are intended to be used indoors. In some areas, use of these devices
outdoors is prohibited.
Operation of this device is subject to the following two conditions: (1) This device may not cause harmful
interference, and (2) this device must accept any interference received, including interference that may cause
undesired operation of the device.
U
NINTENTIONAL EMITTER PER FCC PART 15
This device has been tested and found to comply with the limits for a Class B digital device, pursuant to Part 15
of the FCC rules. These limits are designed to provide reasonable protection against harmful interference in a
residential installation. This equipment generates, uses, and can radiate radio frequency energy and, if not
installed and used in accordance with the instructions, may cause harmful interference to radio or television
reception. However, there is no guarantee that interference will not occur in a particular installation. If this
equipment does cause interference to radio and television reception, which can be determined by turning the
equipment off and on, the user is encouraged to try to correct the interference by one or more of the following
measures:
Reorient or relocate the receiving antenna.
Increase the separation between the equipment and receiver.
Connect the equipment into an outlet on a circuit different from that to which the receiver is connected.
Consult the dealer or an experienced radio/TV technician for help.
Compliance accessories
The accessories associated with this equipment are: shielded video cable when an external monitor is
connected. These accessories are required to be used in order to ensure compliance with FCC rules.
C
ALIFORNIA PROPOSITION 65 WARNING
This product contains chemicals known to the State of California to cause cancer, birth defects, and/or other
reproductive harm. For additional information regarding this product warning, go to www.gateway.com/
prop65.
M
ERCURY WARNING
THE LAMP IN THIS DISPLAY CONTAINS MERCURY. DISPOSE ACCORDING TO LOCAL, STATE, AND FEDERAL
LAW.
Regulatory Information - 49

TELECOMMUNICATIONS PER PART 68 OF THE CODE OF FEDERAL REGULATIONS (CFR 47) (APPLICABLE TO PRODUCTS FITTED
WITH USA MODEMS)
Your modem complies with Part 68 of the Code of Federal Regulations (CFR 47) rules. On the computer or
modem card is a label that contains the FCC registration number and Ringer Equivalence Number (REN) for this
device. If requested, this information must be provided to the telephone company.
A telephone line cord with a modular plug is required for use with this device. The modem is designed to be
connected to the telephone network or premises wiring using a compatible modular jack which is Part 68compliant. See installation instructions for details.
The Ringer Equivalence Number (REN) is used to determine the number of devices which may be connected to
the telephone line. Excessive RENs on a telephone line may result in the devices not ringing in response to an
incoming call. In most areas, the sum of RENs should not exceed five (5). To be certain of the number of devices
that may be connected to a line, as determined by the total RENs, contact the local telephone company.
If this device causes harm to the telephone network, the telephone company will notify you in advance that
temporary discontinuance of service may be required. The telephone company may request that you disconnect
the equipment until the problem is resolved.
The telephone company may make changes in its facilities, equipment, operations, or procedures that could
affect the operation of this equipment. If this happens, the telephone company will provide advance notice in
order for you to make necessary modifications to maintain uninterrupted service.
This equipment cannot be used on telephone company-provided coin service. Connection to party line service
is subject to state tariffs. Contact the state public utility commission or public service commission for
information.
When programming or making test calls to emergency numbers:
Remain on the line and briefly explain to the dispatcher the reason for the call.
Perform such activities in the off-peak hours such as early morning or late evenings.
The United States Telephone Consumer Protection Act of 1991 makes it unlawful for any person to use a
computer or other electronic device to send any message via a telephone fax machine unless such message
clearly contains, in a margin at the top or bottom of each transmitted page or on the first page of the
transmission, the date and time it is sent, an identification of the business, other entity, or other individual
sending the message, and the telephone number of the sending machine or such business, other entity, or
individual. Refer to your fax communication software documentation for details on how to comply with the faxbranding requirement.
I
NDUSTRY CANADA (IC) INTENTIONAL EMITTER PER RSS 210
Caution:
To prevent radio interference to licensed service or co-channel Mobile Satellite systems, this
device is intended to be operated indoors and away from windows to provide maximum shielding.
Equipment (or its transmit antenna) that is installed outdoors is subject to licensing.
Low power, Radio transmitter type devices (radio frequency (RF) wireless communication devices), operating in
the 2.4 GHz band and/or 5.15 – 5.35 GHz band, may be present (embedded) in your computer system. This
section is only applicable if these devices are present. Refer to the system label to verify the presence of wireless
devices.
Wire less dev ices tha t may be i n your system a re on ly qua lifie d for use in Canada i f an Indu stry C anad a ID nu mber
is on the system label.
Caution:
Wireless devices are not user-serviceable. Do not modify them in any way. Modification to a
wireless device will void the authorization to use it. Contact Gateway for service.
Caution:
The transmitting device embedded in thi s computer may not be used w ith any antenna other than
provide with the computer.
Caution:
The 802.11a radio LAN your computer may have been equipped with operates in the same
frequency range as high power radar, which has priority use, and may damage the radio LAN if both are
present and being used in the same area.
As a general guideline, a separation of 8 inches (20 cm) between the wireless device and the body, for use of a
wireless device near the body (this does not include extremities) is typical. This device should be used more than
8 inches (20 cm) from the body when wireless devices are on. The power output of the wireless device (or
devices), which may be embedded in your computer, is well below the RF exposure limits as set by Industry
Canada.
Operation of this device is subject to the following two conditions: (1) This device may not cause harmful
interference, and (2) this device must accept any interference received, including interference that may cause
undesired operation of the device.
50 -
Quick Start & Troubleshooting Guide

UNINTENTIONAL EMITTER PER ICES-003
This digital apparatus does not exceed the Class B limits for radio noise emissions from digital apparatus as set
out in the radio interference regulations of Industry Canada.
Le présent appareil numérique n’émet pas de bruits radioélectriques dépassant les limites applicables aux
appareils numériques de Classe B prescrites dans le règlement sur le brouillage radioélectrique édicté par
Industrie Canada.
T
ELECOMMUNICATIONS PER INDUSTRY CANADA CS-03 (FOR PRODUCTS FITTED WITH AN IC-COMPLIANT MODEM)
The Industry Canada label identifies certified equipment. This certification means that the equipment meets
certain telecommunications network protective, operation, and safety requirements. The Department does not
guarantee the equipment will operate to the users’ satisfaction.
Before installing this equipment, users should make sure that it is permissible to be connected to the facilities of
the local telecommunications company. The equipment must also be installed using an acceptable method of
connection. In some cases, the inside wiring associated with a single-line individual service may be extended by
means of a certified connector assembly. The customer should be aware that compliance with the above
conditions may not prevent degradation of service in some situations.
Repairs to certified equipment should be made by an authorized Canadian maintenance facility designated by
the supplier. Any repairs or alterations made by the user to this equipment, or equipment malfunctions, may
give the telecommunications company cause to request the user to disconnect the equipment.
Warning:
To avoid electrical shock or equipment malfunction do not attempt to make electrical ground
connections by yourself. Contact the appropriate inspection authority or an electrician, as appropriate.
Users should make sure, for their own protection, that the electrical ground connections of the power utility,
telephone lines, and internal metallic water pipe system, if present, are connected together. This precaution may
be particularly important in rural areas.
The Ringer Equivalence Number (REN) assigned to each terminal device provides an indication of the maximum
number of terminals allowed to be connected to a telephone interface. The termination on an interface may
consist of any combination of devices subject only to the requirement that the sum of the Ringer Equivalence
Numbers of all the devices does not exceed 5.
日本
(JAPAN)
本装置は、第二種情報装置(住宅地域またはその隣接した地域において使用されるべき情報装置)デ
住宅地域での電波障害防止を目的とした情報装置等電波障害自主規制協議会(VCCI)基準に適合して
おります。
しかし、本装置をラジオ、テレビジョン受信機に、近接してご使用になると、受信障害の原因となる
ことがあります。本書の説明にしたがって正しい取り扱いをしてください。
Japanese Modem Notice
本製品を日本で使用する場合は必ず日本国モードでご使用ください。他国のモードをご使用になると
電気通信事業法(技術基準)に違反す行為となります。なお、ご購入時は初期値が日本国モードとなっ
ておりますので、そのままご利用ください。
CE C
OMPLIANCE REQUIREMENT
Products with the CE marking comply with both the Electromagnetic Compatibility Directive (2004/
108/EC) and the Low Voltage Directive (2006/95/EC) issued by the Council of the European
Communities.
Compliance with these directives implies conformity to the following European Standards:
EN55022: Radio disturbance characteristics
EN55024: Immunity characteristics
EN61000-3-2: Limitation of harmonic current emissions
EN61000-3-3: Limitation of voltage fluctuation and flicker in low-voltage supply system
EN60950-1: Product Safety. If your computer includes a telecommunication network board, the input/output
socket is classified as Telecommunication Network Voltage (TNV-3).
Note for computers equipped with wireless controllers and wired modems:
Hereby, Gateway, declares that the wireless devices provided with this computer include a low
power radio transmitter in full compliance with the essential requirements and other relevant
provisions of Directive 1999/05/EC for Low Voltage, EMC and RF of the R&TTE.
EN300328 - Electromagnetic compatibility and Radio spectrum Matters (ERM).
EN301489-1/-7/-17/-24 - EMC standard for radio equipment and services, common technical requirements.
Regulatory Information - 51

EN301893 - Broadband Radio Access Network, 5GHz high performance RLAN, harmonized EN covering essential
requirements of article 3.2 of R&TTE directive.
EN62311 - Generic standard to demonstrate the compliance of low power electronic and electrical apparatus
with the basic restrictions related to human exposure to electromagnetic fields.
This product must be used in strict accordance with the regulations and constraints in the country of use. For
further information, contact the local office in the country of use.
List of applicable countries
EU member states as of March 2009 are: Austria, Belgium, Bulgaria, Cyprus, Czech Republic, Denmark, Estonia,
Finland, France, Germany, Greece, Hungary, Ireland, Italy, Latvia, Lithuania, Luxembourg, Malta, The
Netherlands, Poland, Portugal, Romania, Slovakia, Slovenia, Spain, Sweden and United Kingdom.
M
ODIFICATIONS TO THE PRODUCT
CE Marking
Gateway cannot be held responsible for unauthorized modifications made by the user and the consequences
thereof, which may alter the conformity of the product with the CE Marking.
Radio Frequency Interference
The manufacturer is not responsible for any radio or TV interference caused by unauthorized modifications to
this equipment.
ONNECTIONS AND REMOTE EARTHS
C
PELV (Protected Extra Low Voltage)
To ensure the extra-low voltage integrity of the equipment, only connect equipment with mains-protected
electrically-compatible circuits to the external ports.
SELV (Safety Extra Low Voltage)
Every input and output of this product is classified as Safety Extra Low Voltage.
Remote Earths
To prevent electrical shock, connect all local (individual office) computers and computer support equipment to
the same electrical circuit of the building wiring. If you are unsure, check the building wiring to avoid remote
earth conditions.
Building Supply
Only connect the equipment to a building supply that is in accordance with current wiring regulations in your
country. In the U.K., these are the IEE regulations.
OWER SUPPLY AND CABLES
P
Power Supply
The power supply socket-inlet and socket-outlet (if equipped) are classified as Hazardous Voltage.
You must unplug the power supply cord and remove the battery to disconnect the equipment from the power
supply. In that aim, the socket-outlet should be installed near to the equipment and should be easily accessible.
Input rating: Refer to the rating label on the bottom of the computer and ensure that your power adapter
complies with the specified rating.
Under no circumstances should the user attempt to disassemble the power supply. The power supply has no
user-replaceable parts. Inside the power supply are hazardous voltages that can cause serious personal injury.
A defective power supply must be returned to your dealer.
Power Cables and Plug
This Product requires a three-wire grounded power cord and plug. The plug only fits in a grounded power outlet.
Make sure the power outlet is properly grounded before inserting the plug. Do not insert the plug into a nongrounded power outlet. Contact your electrician for details.
The cord length must not exceed 2.5 metres. To prevent electrical hazards, do not remove or disable the ground
contact on the power cord. Replace the power cord if it gets damaged. Contact your dealer for an exact
replacement. In Europe, the plug must be rated for 250 VAC, 10 amp minimum. The plug must display an
international agency approval marking. The cord must be suitable for use in the end-user country. Consult your
dealer or the local electrical authorities if you are unsure of the type of power cord to use in your country.
Cables
For cables which are not delivered with the Product in the computer's packaging:
The EMC performance of the system is guaranteed only if the cable and interface use efficient shielding.
52 -
Quick Start & Troubleshooting Guide

The use of shielded interface cable is required for USB, IEEE1394, serial, printer, game, analog or digital audio/
video, Ethernet LAN, PS2, TV or FM antennas, and generally all high-speed cable interfaces.
Use only UL Listed No. 26AWG or larger telecommunication cords.
Only Ethernet LAN or RTC modem cable can have length exceeding 3 metres.
Gateway recommends that you add a ferrite core round clip to each cable connecting your Gateway computer
to a hardware device that has not been delivered with your computer.
Ferrite reference: 28A-2029 from Steward (two loops)
For Ethernet LAN cable, use FTP shielded cables only (cat ≥ 5).
During product certification, Gateway used the following cable quality:
USB2.0 Certified Cables from Hama 46778
IEEE1394 shielded FireWire from Hama 50011
RCA-RCA shielded Audio/Video Cables from Thomson KHC001M, KHC012M, KHC028M
Stereo Jack shielded Audio cables from Hama 43330H, 42714H
Ethernet Shielded Cables Cat 5e from Hama 50030
Heat Build-up and Portable Computers
The AC adapter and the underside of the computer can become hot after prolonged use. Sustained physical
contact with either should be avoided.
C
HASSIS COVER REMOVAL AND REPLACEMENT
Before removing the chassis cover to service or modify the equipment, you must disconnect all power and
modem cords, and remove the battery.
Caution: Some components inside the computer can become hot after prolonged use.
You then must close the chassis before you plug in and switch on the equipment.
LASER COMPLIANCE STATEMENT
The optical devices are tested and certified to be compliant with International Electrotechnical Commission
IEC60825-1 and European EN60825-1 standards for Class 1 laser products.
Class 1 laser products are not considered hazardous. The optical devices are designed such that there is never
human access to laser radiation above a Class 1 level during normal operation or prescribed maintenance
conditions.
The optical devices installed in your computer are designed for use solely as components of such electronic
product and therefore do not comply with the appropriate requirements of Code of Federal Regulation Sec.
1040.10 and Sec. 1040.11 for COMPLETE laser products.
Because exposure to laser radiation is extremely hazardous, under no circumstances should the user attempt to
disassemble the laser device.
P
ACKAGING
The packaging of this product is compliant with the European Environmental Directive 94/62/EC from December
20 th 1994 and its equivalent in the French Legislation by the Decree 98-638 from july 20 th 1998.
COMPLIANT WITH RUSSIAN REGULATORY CERTIFICATION
Regulatory Information - 53

ENVIRONMENT
GATEWAY’S COMMITMENT TO ENVIRONMENTAL PROTECTION
Environment has been at the heart of our products.
Gateway is committed to limit the environmental impact of its products during product lifecycle.
Starting at design phase, with a very strict procurement policy, maximum attention is given to electronic
components in order to limit their weight in heavy metals such as lead, cadmium, chromium, mercury, etc.
Suppliers are asked, for each part of any product, to respect all regulations.
As far as end-of-life products are concerned, measures have been taken to anticipate and facilitate the recycling
of all our products. Thus, all plastic parts heavier than 25 grams used in Gateway products are labelled ISO
11469. This label allows a quick recognition of the material and eases its valorisation. Likewise, desktop
computers are designed to be easily dismantled, with screws being replaced by clips.
E
NERGY STAR® PARTNERSHIP
Note:
This section is applicable only to systems with an Energy Star® sticker.
Gateway is an official partner of the Energy Star® program.
Energy Star® was introduced by the US environmental Protection Agency in 1992 as a voluntary
labelling program designed to promote energy-efficient products, in order to reduce carbon
dioxide emissions. By joining this program, Gateway will help reduce your energy bill and
contribute to reducing air pollution and protecting the earth's climate for future generations.
Gateway has determined that all Gateway monitors meet the Energy Star® guidelines for energy
efficiency.
You can find more information about Energy Star® on the Energy Star® web site: www.energystar.gov.
P
RODUCT DISPOSAL
The 2002/96/EC Directive, known as Waste Electrical and Electronic Equipment (WEEE)
Directive, requires that used electrical and electronic products must be disposed of separately
from normal household waste in order to promote reuse, recycling and other forms of recovery
and to reduce the quantity of waste to be eliminated with a view to reducing landfill and
incineration. The crossed-out dustbin logo is there to remind you that these products must be
sorted separately for disposal. These rules concern all Gateway products and also all
accessories, such as keyboard, mouse, speakers, remote control, etc. When you have to dispose
of such products, make sure that they are correctly recycled by checking with your local
authority, or by returning your old equipment to your retailer if you are replacing it. For
information, visit www.gateway.com/about/corp_responsibility/environment.php.
Battery Disposal (when applicable)
Before disposing of your equipment ensure that you have removed any batteries that may be fitted in the
equipment. European law states that batteries must be collected for disposal separately from household waste.
Do not throw your used batteries in the dustbin. Dispose of your used batteries via a battery collection scheme
where available, or ask your distributor or local authority what infrastructures you can use. Your efforts will
enable the safe collection, recycling and destruction of used batteries and will help protect the environment and
reduce health hazards.
Caution:
Risk of explosion if battery is replaced by an incorrect type. Dispose of used batteries according to
the instructions.
Mercury advisory
For electronic products containing a non-LED-backlit LCD/CRT monitor or display: Lamp(s) inside this
product contain mercury and must be recycled or disposed of according to local, state or federal laws.
For mor information, contact the Electronic Industries Alliance at www.eiae.org. for lamp-specific
disposal information, check www.lamprecycle.org.
54 -
Quick Start & Troubleshooting Guide

SOFTWARE LICENSE
Note:
Most of the software applications are already preinstalled on your Gateway computer. They are ready to use
or to set up. However, some titles require a CD or DVD to run. You will find these discs in your computer's packaging.
Gateway License Agreement (CD and/or DVD Products). This copy of the original is your proof of license. Please
treat it as valuable property.
Important!
The following License Agreement applies to you. This is a legal agreement between you (either individual or an
entity) and Gateway By installing the software you are agreeing to be bound by the terms of this Agreement. If
you do not agree to the terms of this Agreement, promptly return your entire computer system, the unopened
software packet(s), if any, as well as the accompanying terms (including written materials or other container(s))
in the place you obtained them for a full refund.
G
ATEWAY SOFTWARE LICENSE
1. Grant of License
This Gateway License Agreement (“License”) permits you to use one copy of the specified version of the Gateway
SOFTWARE identified above (which may include at least one CD or DVD disc) on any single computer, provided
the SOFTWARE is in use on only one computer at any time. If you have multiple Licenses for the SOFTWARE, then
at any time you may have as many copies of the SOFTWARE in use as you have Licenses. The SOFTWARE is “in
use” on a computer when it is loaded into the temporary memory (i.e. RAM) or installed in the permanent
memory (e.g. hard disk, CD and/or DVD, or other storage device of that computer, except that a copy installed
on a network server for the sole purpose of distribution of other computer is not “in use.” If the anticipated
number of users of the SOFTWARE will exceed the number of applicable Licenses, then you must have a
reasonable mechanism or process in place to assure that the number of persons using the SOFTWARE
concurrently does no exceed the number of Licenses. If the SOFTWARE is permanently installed on the hard disk
or the storage device of a computer (other than a network server) and one person uses that computer more
than 80% of the time it is in use, then that person may also use the SOFTWARE on a portable or home computer.
2. Copyright
The SOFTWARE is owned by Gateway or its suppliers and is protected by United States copyright laws and
international treaty provision. Therefore, you must treat the SOFTWARE like any other copyrighted material (e.g.
a book or musical recording) except that you may transfer the CD and/or DVD disc portion of the SOFTWARE, if
any, to a single hard disk provided you keep the original solely for backup or archival purposes. You may not
copy the CD and/or DVD disc portion of the SOFTWARE or the written materials accompanying the SOFTWARE.
3. Other Restrictions
You may not rent or lease the SOFTWARE, but you may transfer the SOFTWARE and accompanying written
materials on a permanent basis provided you retain no copies and the recipient agrees to the terms of this
Agreement. You may not reverse engineer, decompile or disassemble the SOFTWARE. Any transfer of the
SOFTWARE must include the most recent update and all prior versions.
T
HIRD PARTY SOFTWARE OR FREE SOFTWARE LICENSE INFORMATION
Software pre-loaded, embedded or otherwise distributed with the products provided by Gateway does contain
free or third party software programs (the “Free Software”), which are licensed under the terms GNU General
Public License (the “GPL”). The Free Software is marked as such. Your copying, distribution and/or modification
of the Free Software shall be subject to the terms of the GPL.
The Free Software is distributed in the hope that, but it will be useful WITHOUT ANY WARRANTY; without even
the implied warranty of MERCHANTABILITY or FITNESS FOR A PARTICULAR PURPOSE. The provisions of the GNU
General Public License shall always apply. You may access http://www.gnu.org directly to obtain a copy of the
GPL or write to the free Software Foundation, Inc. and request a copy. The address of the Free Software
Foundation, Inc is: 59 Temple Place - Suite 330, Boston, MA, 02111-1307, USA.
For a period of three (3) years as commencing from your receipt of this software, you may obtain a complete
machine-readable copy of the source code for the Free Software under the terms of the GPL without charge
except for the cost of media, shipping, and handling, upon a written request to us.
Contact us if you have any further questions. Our mailing address is 8F, 88, Sec. 1, Hsin Tai Wu Rd., Hsichih, Taipei
Hsien 221, Taiwan.
Read carefully before installing the software.
Software License - 55

INDEX
A
AC Adapter
Aerial
Audio CDs
Audio ports
Autoplay
..................................................... 11, 13
................................................................... 13
....................................................... 19, 41
........................................................... 13
............................................................... 20
B
Backups
................................................................ 15
Batteries
......................................................... 11, 54
Battery disposal
Battery life
Replacing batteries
BIOS
..................................................................... 37
Blu-ray
........................................................... 10, 20
Browser
................................................................ 24
........................................ 12, 54
..................................................... 11
......................................... 12
C
Cable modem
Cables
Cleaning your computer
Codec
Computer environment
Connectors
Control devices
Copy protection
Cursor
........................................................ 42
.............................................................. 4, 52
.......................................... 4
................................................................... 20
........................................... 4
........................................................... 12
Keyboard
Touchpad
................................................... 6, 39
................................................. 39, 40
.................................................... 41
.................................................................... 6
D
Device Manager
Diagnose & Repair
Dial-up modem
Disk Cleanup
Disk Defragmenter
Display
Download
Drives
..................................................................... 9
Memory card reader
Optical drives
DSL
................................................................ 21, 42
DVI port
.................................................... 38
................................................. 35
..................................................... 42
......................................................... 26
................................................ 26
................................................................. 40
............................................................. 20
......................................... 9
................................................. 10
................................................................ 13
E
Electronic Program Guide
Email
.................................................................... 43
...................................... 20
Environment
Epilepsy warning
Error checking
eSATA
ExpressCard
External hardware devices
........................................................ 54
.................................................... 5
...................................................... 26
.................................................................. 13
......................................................... 12
.................................... 45
F
Firewall
.......................................................... 30, 33
FireWire
............................................................... 12
G
Google Desktop
.................................................... 24
H
HDD (Hard Disk Drive)
Free space
Management
HDMI
................................................................... 13
Health precautions
Helpdesk
..................................................... 26
................................................. 27
................................................. 5
.............................................................. 26
I
IEEE 1394
InfoCentre
Infrared receiver
Interference
Internal hardware
Internet
Internet Explorer
Internet Service Provider (ISP)
............................................................. 12
........................................................ 6, 22
.............................................. 9, 13
................................................... 40, 52
................................................. 36
Connection
Firewall
.................................................... 21
................................................... 30, 33
.................................................. 24
............................... 21
K
Keyboard
......................................................... 6, 39
virtual
............................................................. 8
L
LAN (Local Area Network)
Last Known Good Configuration
Line-Out
.............................................................. 13
...................................... 22
...................... 29, 37
M
Maintenance
HDD management
System tools
Malware
.............................................................. 30
Memory
............................................................... 15
......................................... 27
.................................................. 27
Index - 56

Memory card reader
Microphone
Modem
.......................................................... 21, 42
Multimedia files
......................................... 9, 13
.......................................................... 13
.................................................... 19
N
Network connections
Norton Internet Security
............................................ 22
.................................. 29, 31
O
Optical drives
....................................................... 10
P
Pointer
................................................................... 6
Ports
.................................................................... 12
Power cords
Power on/off
Power saving modes
Power supply
PowerDVD
Printer
........................................................... 4
........................................................ 13
............................................. 15
....................................................... 11
............................................................ 20
................................................................. 43
R
Recovery
System Restore
Regulatory Information
Remote control
Receiver
Removable media devices
Removing hardware
Removing software
Restore points
.............................................. 28
................................... 49, 54
....................................................... 9
........................................................ 13
..................................... 10
.............................................. 10
............................................... 27
...................................................... 29
S
Safe Computing
Safe mode
Safety precautions
Screen saver
Security
Antivirus
Updates
Windows Action Center
Shutdown
Sleep mode
Social Networks
Software
Removing software
Software License
Speakers
Spyware
Storage
.................................................... 26
............................................................ 37
.................................................. 4
......................................................... 36
........................................................ 30
................................................... 29, 33
............................ 29, 32
............................................................ 14
.................................................... 14, 35
.................................................... 21
........................................ 27
............................................ 55
................................................................ 8
............................................................... 30
................................................................ 15
S-Video
................................................................. 13
System requirements
System Restore
System tools
Disk Cleanup
Disk Defragmenter
Error checking
Windows System Restore
............................................ 44
............................................... 28, 39
.................................................. 26
......................................... 26
................................................ 26
................................ 28
T
Tablet PC
Task Manager
Touchpad
Touchscreen
Troubleshooting
TV tuner
TV-Out
................................................................ 8
....................................................... 39
................................................... 6, 39, 40
........................................................... 7
Display
........................................................... 40
Internet
......................................................... 41
Keyboard
Printer
Sound
Top cases
Touchpad
....................................................... 39
........................................................... 43
............................................................ 40
....................................................... 35
....................................................... 39
......................................................... 13, 19
................................................................. 13
U
Uninstalling hardware
Update
Antispyware
Antivirus
Windows automatic updates
Upgrading
Recycling
Storage
.......................................................... 15
USB
...................................................................... 12
User Account Control
........................................... 10
................................................... 29
........................................................ 29
..................... 29, 33
....................................................... 15
............................................. 34
V
VGA port
............................................................... 13
Virtual keyboard
Volume controls
..................................................... 8
...................................................... 8
W
Warranty
Welcome Center
WiFi
Windows
................................................................ 3
.................................................... 16
...................................................................... 22
System Restore
Using Windows
Welcome Center
Windows Action Center
.............................................. 28
.............................................. 16
............................................. 16
............................. 29, 32
57 -
Quick Start & Troubleshooting Guide

Windows automatic updates
Windows Defender
Windows Media Center
Windows Media Player
Windows Remote Assistance
......................................... 33
............................... 9, 19
................................... 19
..................... 29, 33
........................... 34
58 -
Quick Start & Troubleshooting Guide
 Loading...