

Page 1
Operating Instructions
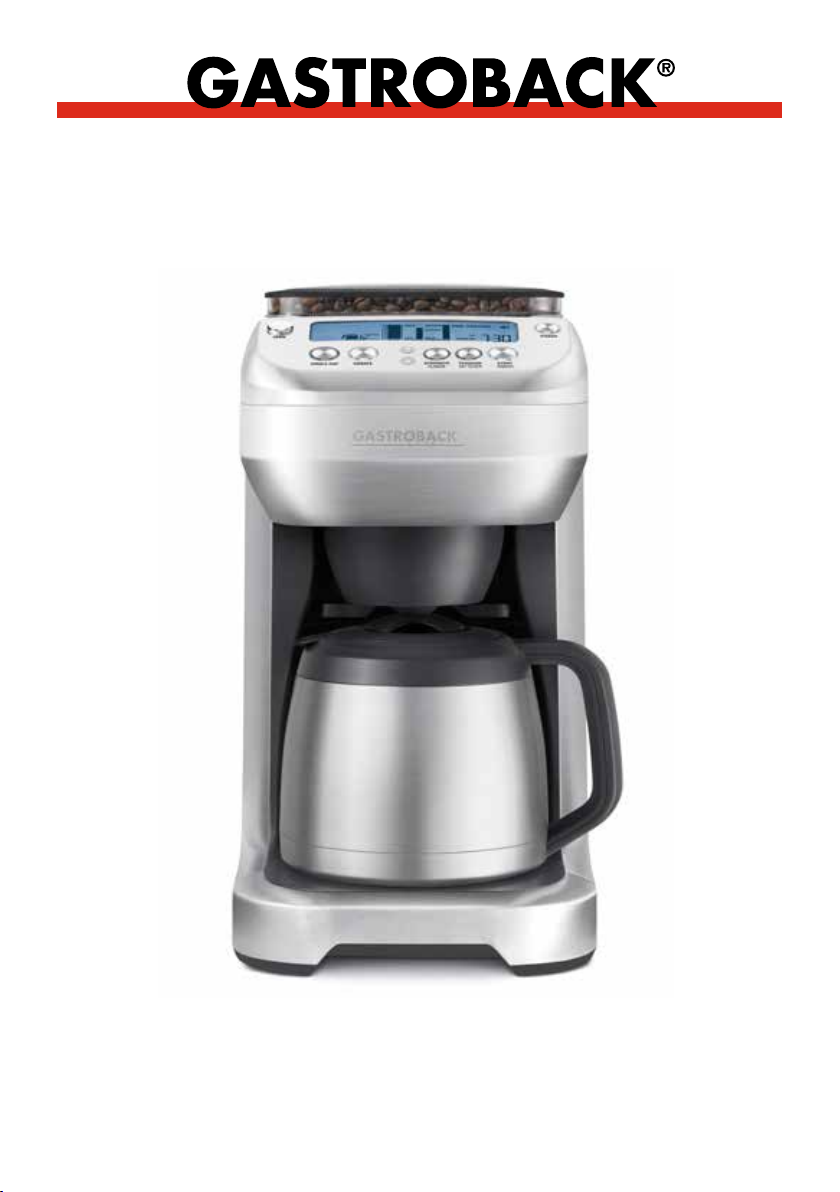
Design Coffee Advanced - Grind & Brew -
Art.-No. 42712 Design Coffee Advanced - Grind & Brew -
Read all provided instructions before first use!
Model and attachments are subject to change!
For household use only!
Page 2

Carefully read all provided instructions before you start running
the appliance and pay attention to the warnings mentioned in
these instructions.
CONTENTS
Knowing the Design Coffee Advanced - Grind & Brew - .............................................36
Important safeguards ........................................................................................38
Important safeguards for all electrical appliance ..................................................39
Technical specifications .....................................................................................40
Using the Design Coffee Advanced
Before first use .............................................................................................40
Initial set up ................................................................................................41
Using the carafe mode .................................................................................42
Using the single cup mode ............................................................................45
Programming the Clock (Optional) .................................................................48
Programming Auto-Start (Optional) .................................................................49
Changing the ‘Ready’ Signal Volume .............................................................50
Helpful tips ................................................................................................................50
Care and cleaning ...........................................................................................51
Troubleshooting ...............................................................................................56
Storage ...........................................................................................................61
Notes for disposal ............................................................................................61
Information and service .....................................................................................61
Warranty ........................................................................................................61
- Grind & Brew - .................................................40
Page 3

DEAR CUSTOMER!
Congratulations on your purchase of the Design Coffee Advanced - Grind & Brew -, the new
Gastroback´s coffee machine with integrated burr grinder. The burr grinder grinds your choice
of beans just prior to brewing for maximum freshness, flavour and aroma. The grind is preset
to the optimal size and can be turned off when using pre-ground coffee. The seven strength
settings vary the amount of freshly ground coffee for a 'MILD', 'STRONG' or 'INTENSE' brew.
The stronger the strength setting selected, the more coffee is ground. There is no need to calculate how much coffee you need for the amount of water in the tank. Simply select the desired
strength and the Brew IQ System will intelligently dose the correct amount of coffee to ensure a
consistent strength regardless of whether you choose a single cup, travel mug or whole carafe.
Five flavour settings vary the steeping time of the coffee and water. The 'LITE' setting steeps
for less time to produce a light-flavoured cup. The 'BOLD' setting steeps for more time for a
bolder, more full-flavoured coffee. Only available in 'Single Cup' mode. The Design Coffee
Advanced gives you the flexibility to brew directly into a cup, travel mug or carafe. Set the
optional Auto-Start feature and have a travel mug ready to go in the morning. Brew a single
cup for one person at night. The Brew IQ System will intelligently pre-heat and dose to ensure
the temperature and strength of your brew is consistent regardless of whether you choose a
single cup, travel mug or whole carafe.
The information in this booklet will easily and quickly exploit many helpful features of your
coffee machine for you to get the delight of a wonderful coffee.
Yours Gastroback GmbH
Page 4
KNOWING THE DESIGN COFFEE ADVANCED - GRIND & BREW -
1
2
3
4
5
6
7
8
10
9
11
12
13
14
15
16
17
1 Bean Hopper Lid
2 250 g Bean Hopper
3 Bean Hopper Locking System
hopper for easy removal, storage and transfer of coffee beans.
4 Cleaning Brush
coffee grinds chute.
5 Integrated Burr Grinder
for maximum freshness, flavour and aroma. Grinder can be turned off
when using pre-ground coffee.
6 12-Cup (1.8L) Water Tank
access filling. Grill prevents large debris from entering the tank while
the ‘MAX’ level float rises when the tank is full.
7 Contoured Control Panel with angled design for easy viewing of the
backlit LCD screen.
8
Coffee Grinds Chute delivers ground coffee from the bean
hopper to the coffee basket.
for convenient cleaning of the grinding burrs and
seals the base of the bean
grinds whole beans just prior to brewing
with flip-top lid for convenient, front-
9 Removable Grinds Catcher
coffee grinds chute.
10 Carafe Lid
11 12-Cup Double-Wall, Stainless Steel Thermal Carafe
12 Removable Longlife-Filter
13 Soft Opening, Swing-Out Door
prevents operation if the coffee basket is not correctly assembled
or the door is not properly closed.
14 Removable Coffee Basket
Holds the included Longlife-Filter or paper filters.
15 Steam Bafe
becomes blocked.
16 Brew Pause Drip Stop
when the carafe is removed so a cup can be poured mid-brew.
17 Drip Tray
travel mugs.
36
assists with water overflow if the coffee basket
can be removed for direct brewing into tall cups &
catches loose grinds from the
with safety interlock system
lifts out for easy filling and leaning.
temporarily ceases the flow of coffee
Page 5
Control panel
18 26
19 20 21
18 OPEN button
·
Press to open the swing-out door.
19 SINGLE CUP button
·
Press to brew a single cup of coffee.
·
Continue pressing to select between 9 brew sizes.
20 CARAFE button
·
Press to brew a carafe of coffee.
·
Continue pressing to select a specific carafe size between
2 cups (minimum) and 12 cups (maximum).
21 button
·
Use in conjunction with the STRENGTH | FLAVOUR button to
increase the volume of the ‘Ready’ signal.
·
Use in conjunction with the STRENGTH | FLAVOUR button to
increase the brew strength and flavour.
·
Use in conjunction with the PROGRAM button to program the
clock and Auto-Start.
22 button
·
Use in conjunction with the STRENGTH | FLAVOUR button to
decrease the volume of the ‘Ready’ signal.
· Use in conjunction with the STRENGTH | FLAVOUR button to
decrease the brew strength and flavour.
· Use in conjunction with the PROGRAM button to program the
clock and Auto-Start.
22 23 24 25
23 STRENGTH | FLAVOUR button
·
Press to adjust the brew strength. 7 settings plus ‘PRE-GROUND’
coffee setting vary the amount of freshly ground coffee for a mild,
strong or intense brew.
·
Press to adjust the flavour. 5 settings vary the steeping time of
the coffee and water to produce a light-flavoured cup or a bolder,
more full-flavoured coffee.
24 PROGRAM | SET CLOCK button
·
Press to program the clock (‘TIME NOW’ time).
·
Press to program the Auto-Start (‘START AT’ time).
25 START | CANCEL button
·
Press to start or cancel the brew cycle.
26 POWER button
·
Press to turn the power on or off, or to exit out of
POWER SAVE mode.
37
Page 6

IMPORTANT SAFEGUARDS
• Carefully read all instructions before operating the appliance for the first time and save for
future reference.
• Do not attempt to use this appliance for any other than the intended use, described in
these instructions. Any other use, especially misuse, can cause severe injuries or damage by
electric shock, heat or fire.
• Any operation, repair and technical maintenance of the appliance or any part of it other
than described in these instructions may only be performed at an authorised service centre.
Please contact your vendor.
• Remove and safely discard any packaging materials and promotional labels before using
the appliance for the first time.
• To eliminate a choking hazard for young children, remove and safely discard the
protective cover fitted to the power plug of this appliance.
• Do not place the appliance near the edge of a bench or table during operation. Ensure
that the surface is level, clean and free of water.
• Always operate the appliance on a stable and heat resistant surface. Do not use on a
cloth-covered surface, near curtains or other flammable materials.
• Do not place the appliance on or near a hot gas burner, electric element or where it could
touch a heated oven.
• Do not operate the appliance on metal surfaces, for example, a sink drain board.
• Position the appliance with a minimum distance of 10cm of space on both sides of the
appliance. This will allow for adequate air circulation.
• Always ensure the appliance is properly assembled before connecting to a power outlet
and operating. Follow the instructions described in this book.
• Do not operate the appliance without water in the water tank. Use only cold, preferably
filtered water. Do not use any other liquid.
• Ensure the supplied Longlife-Filter or a paper filter (Ø 85/215 mm) is placed in the coffee
basket before using the appliance. Do not use the Longlife-Filter in conjunction with a paper
filter.
• Never open the swing-out door and remove the coffee basket while brewing. Hot water
and coffee can cause injury. Allow to drain before removing to avoid scalding.
• The carafe is designed for use with this appliance only. It must never be used on a range
top or in a microwave.
• Always ensure the carafe is completely empty of any contents before brewing.
• Always ensure the carafe lid is securely locked in place onto the carafe then placed under
the drip stop outlet before brewing.
• Scalding may occur if the carafe lid is removed during the brewing cycle.
• Always ensure the carafe lid is securely locked in place onto the carafe before pouring.
• Do not use the carafe with a cracked, loose, weakened or damaged handle.
• Do not touch hot surfaces. Use the handle for lifting and carrying the carafe.
38
Page 7

• Do not set a hot carafe on a wet, cold or heat sensitive surface.
• Do not operate the grinder without the bean hopper lid in position. Keep fingers, hands,
hair, clothing and utensils away from the bean hopper during operation. Avoid contact with
moving parts.
• Check the grinder for presence of foreign objects before using.
• Use the grinder to grind roasted coffee beans only. Grinding other substances, such as
nuts, spices or unroasted beans may dull the burr and cause poor grinding or injury.
• Always switch the appliance off by pressing the POWER button off. Remove the power
plug from the power outlet before attempting to move the appliance, when the appliance
is not in use and before cleaning and storing. Allow to cool before putting on or taking off
parts, and before cleaning the appliance.
• Keep the appliance and accessories clean. Strictly follow the care and cleaning instructions described in this book.
• Do not use cleaners, steel wool pads or other abrasive materials when cleaning any part
of this appliance.
• This appliance is not intended to be operated by means of an external timer or separate
remote control system.
• The use of attachments not sold or recommended by Gastroback may cause fire, electric
shock or injuries.
Important safeguards for all electrical appliance
• Fully unwind cord before use.
• To protect against electric shock, do not immerse cord, plug or appliance in water or any
other liquid.
• Do not let the cord hang over the edge of a bench or table, touch hot surfaces, or become
knotted.
• Do not leave the appliance unattended when in use.
• This appliance is not intended for use by persons (including children) with reduced
physical, sensory or mental capabilities, or lack of experience or knowledge, unless they
have been given supervision or instruction concerning use of the appliance by a person
responsible for their safety.
• Children should be supervised to ensure they do not play with the appliance.
• This appliance is recommended for household use only. Do not use this appliance for
anything other than its intended use. Do not use in moving vehicles or boats. Do not use
outdoors.
• It is recommended to regularly inspect the appliance. Do not use the appliance if power
supply cord, power plug, or appliance becomes damaged in anyway. Return the entire appliance to the nearest authorised service centre for examination and/or repair.
• Any maintenance other than cleaning should be performed at an authorised service
centre.
39
Page 8
• The installation of a residual current device (safety switch) is recommended to provide
additional safety protection when using electrical appliances. It is advisable that a safety
switch with a rated residual operating current not exceeding 30mA be installed in the
electrical circuit supplying the appliance. See your electrician for professional advice.
CAUTION
We recommend using cold, filtered water. We do not recommend the use of de-mineralized
or distilled water as this may affect the taste of brewed coffee and how the coffee machine is
designed to function.
For safety reasons it is recommended you plug the appliance directly into its own electrical
outlet on a dedicated circuit separate from other appliances. If the electric circuit is overloaded with other appliances, your appliance may not function properly. Use in conjunction
with a power strip or extension cord is not recommended.
Technical specifications
Model:
Power supply:
Power consumption:
Length of power cord:
Weight:
Dimensions:
Certification:
Art.-No. 42712 Design Coffee Advanced
- Grind & Brew -
220-240 V, 50 Hz
1000 - 1150 W
approx. 100 cm
approx. 7 kg
approx. 230 x 330 x 420 mm
(width x depth x height)
USING THE DESIGN COFFEE ADVANCED - GRIND & BREW -
Before first use
• Before using the Design Coffee Advanced - Grind & Brew - for the first time, ensure you have
unpacked all parts and accessories before removing and safely discarding all packaging
material and promotional labels. Ensure the power cord is unplugged from the power outlet.
• Wipe the exterior stainless steel housing with a soft, damp cloth. Wash the bean hopper
and lid, coffee basket, Longlife-Filter and carafe in warm, soapy water and a soft cloth.
Do not use abrasive cleansers, pads or cloths which can scratch the surface. Rinse and dry
thoroughly.
40
Page 9
Initial set up
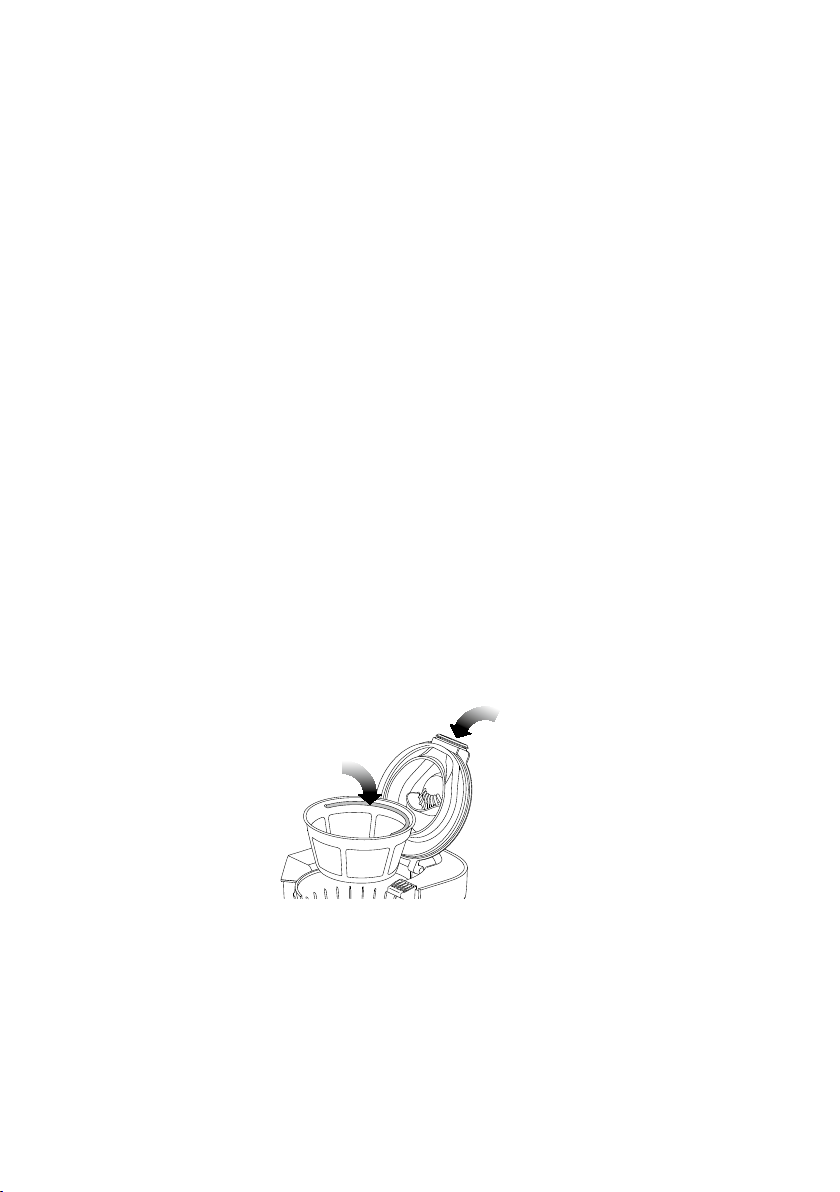
1. Install the Bean Hopper
Position the hopper onto the machine. Turn the locking knob clockwise in the direction of the
LOCK arrow until it clicks. Fill the hopper with fresh beans. We recommend always keeping
the hopper full (250g maximum) to ensure there are sufficient beans. However, never overpack the hopper as this may result in the grinder jamming. Replace the hopper lid.
NOTE: For easy removal, storage and transfer of beans, the hopper can be removed by
turning the locking knob counter-clockwise in the direction of the UNLOCK arrow. If you
have removed the hopper, ensure it is securely reassembled back onto the machine. The
safety interlock system will prevent operation if the hopper is incorrectly assembled. The LCD
screen will flash ‘LOCK BEAN HOPPER’ until the issue is resolved.
2. Plug in the Power Cord
Unwind the power cord completely and insert the power plug into a grounded 230–240V
power outlet. Press the POWER button. The LCD screen will illuminate.
NOTE: The coffee machine will enter POWER SAVE mode after remaining idle for
10 minutes. Press the POWER button to exit POWER SAVE mode and re-start the machine.
3. Install the Coffee Basket
For best results, we recommend pre-heating the coffee basket by running it under hot tap
water. Ensure to dry the coffee basket thoroughly, taking particular care to completely dry
the chute area. Line the coffee basket with either the provided Longlife-Filter or a paper filter.
Never use both at the same time.
a) Provided Longlife-Filter. When using the Longlife-Filter, be sure that the handle is
positioned towards the hinge area of the coffee basket. If you do not, the handle may interfere with the flow of ground coffee into the Longlife-Filter.
HANDLE TOWARDS
COFFEE BASKET HINGE
ENSURE CHUTE
AREA IS
COMPLETELY DRY
NOTE: The Longlife-Filter will allow some fine coffee grounds to fall into the coffee. This will
appear as sediment in the cup or carafe. This is normal. Only use the Longlife-Filter provided
as others may cause the machine to overflow.
b) Paper filter Gastroback Art.-No. 98129 (Ø 85/215 mm). Ensure that the paper filter
is completely open and touching the side walls and bottom of the coffee basket.
41
Page 10
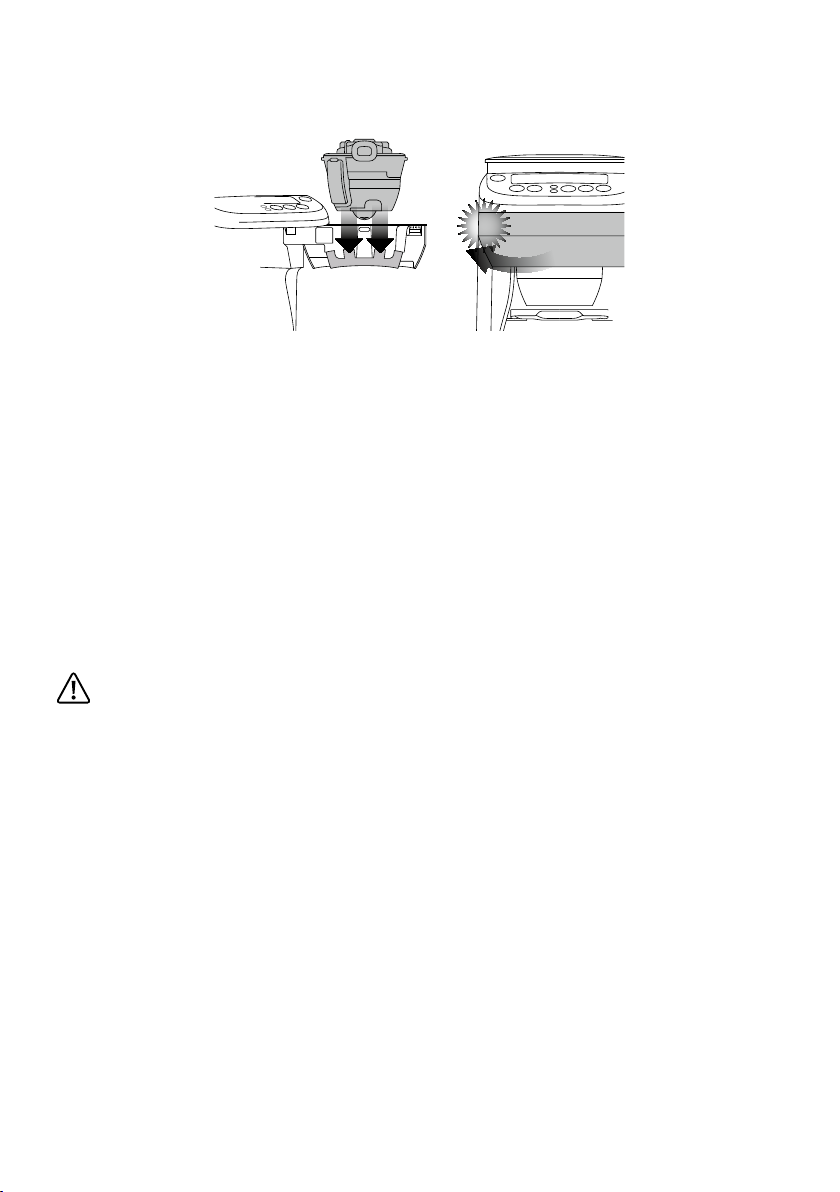
Close the coffee basket lid. Press the OPEN button to open the swing-out door. Attach the
coffee basket to the swing-out door by ensuring the hinge area of the coffee basket is firmly
seated in its most downward position on the two door hooks. Close the door until it clicks
shut.
CLICK
NOTE: The safety interlock system will prevent operation if the coffee basket is not in place,
if it is not firmly seated on the two door hooks, or if the swing-out door is not closed. The LCD
screen will flash ‘EMPTY COFFEE FILTER’ until the issues are resolved.
USING THE CARAFE MODE
First Time Use Only
We recommend flushing the machine to remove any dust particles or residues from the
manufacturing process. Follow the proceeding instructions, ensuring to completely fill the
water tank (Step 1), select ‘12 CUPS’ (Step 3) and the ‘PRE-GROUND’ coffee setting (Step
4). However do not add any coffee to the coffee basket. Once the cycle is complete,
discard the water from the carafe and repeat the cycle again for best results. The machine is
now ready to use.
CAUTION
We recommend using cold, filtered water. We do not recommend the use of de-mineralized
or distilled water as this may affect the taste of brewed coffee and how the coffee machine
is designed to function.
1. Fill the Water Tank
Press open the flip-top lid. Pour the desired amount of cold, preferably filtered water into the
tank using a jug or the provided carafe. If using the carafe, ensure the carafe lid is securely
locked in place. The LCD screen will indicate the amount of water in the tank as it is filled. The
machine will beep when full and the water level float will rise to indicate the maximum level.
Do not exceed the 12 cup maximum. Doing so may cause the carafe to overflow or water
spillage at the back of the machine. Close the flip-top lid.
NOTE:
keeping the water tank full. The water tank should be refilled with cold, preferably filtered
water. Do not fill with any other liquid.
NOTE: Never pour water into the bean hopper or grinding chamber area. Doing so can
cause the grinder to clog. Only re-commence use when the grinding chamber and grinding
burrs are completely dry. Refer to Troubleshooting, ‘Moisture clogging grinder’.
Check the water level on the LCD screen before use. We recommend always
42
Page 11

Note: Never fill the water tank once the coffee machine has started a brewing cycle. This
will affect the volume dispensed into the carafe.
2. Pre-Warm the Carafe
A warm carafe will help maintain the coffee’s optimal temperature and keep coffee hotter
for longer. Remove the carafe lid by turning counter-clockwise then lifting upwards. Fill the
carafe with hot water for about 30 seconds then discard the water. To lock the carafe lid
back into position, align the arrow on the carafe lid with the ALIGN arrow on the carafe.
Turn clockwise until the arrow on the carafe lid aligns with the LOCK arrow on the carafe.
This ensures that the lid is closed and in the proper position for brewing and pouring. Place
the carafe into position under the drip stop outlet.
ALIGN
ARROWS
THEN TURN TO LOCK
Note: Ensure the carafe is completely empty and the lid is securely locked in place before
placing under the drip stop outlet. Starting a brew cycle with water or coffee in the carafe
will cause the carafe to over flow.
3. Select ‘Carafe’ Mode
Press the CARAFE button. The LCD screen will display a carafe symbol and the current
number of cups selected. Continue pressing the CARAFE button to select the desired number
of cups. You can choose less than the current tank level (2 cup minimum), while the maximum
is the amount of water in the tank, up to 12 cups. Each cup is approximately 150 ml.
4. Select the Brew Strength or ‘PRE-GROUND’ Coffee Setting
Press the STRENGTH button. The LCD screen will flash the current strength setting and the
and buttons will illuminate and flash. Use these buttons to cycle through 7 strength set-
tings from ‘MILD’, ‘STRONG’ to ‘INTENSE’ or for the ‘PRE-GROUND’ coffee setting. When
the ‘INTENSE’ strength setting is selected, the maximum number of cups that can be brewed
is 9 cups. This ensures the maximum coffee to water ratio. Press the STRENGTH button to
select. The LCD screen will cease to flash once selected.
Note: If using pre-ground coffee, select the ‘PRE-GROUND’ coffee setting. This will disable
the burr grinder. Add pre-ground coffee to the Longlife-Filter or a paper filter (Ø 85/215 mm).
We recommend 1 level tablespoon of pre-ground coffee per 150 ml cup of water. Adjust the
amount according to your individual taste. The maximum capacity for preground coffee is 16
level tablespoons. Exceeding this amount may cause overflow.
43
Page 12

When using the machine for the first time, we recommend selecting the ‘PRE-GROUND’ coffee setting, however omitting the addition of pre-ground coffee. This will flush the machine
and remove any dust particles or residues from the manufacturing process.
5. Start the Brew Cycle
Press the START | CANCEL button. The grinder will commence grinding the correct amount
of coffee for the selected brew size and strength. If the ‘PRE-GROUND’ coffee setting has
been selected, the grinder will be disabled.
Note: Steam may emit from the rear steam vent during grinding and brewing. This is normal.
The count-down timer will then begin. The time displayed is an estimate only and will depend
on the amount and strength settings you have selected.
The LCD screen will display:
a) ‘PRE-HEATING’ as the water is heated to the optimal temperature. The pre-heating time
will depend on the starting temperature of the water in the water tank.
b) ‘BREWING’ as the coffee is dispensed into the carafe.
To stop the cycle at any time, press the START | CANCEL button. You will hear a winding
noise. This is normal.
CAUTION
Never open the swing-out door and remove the coffee basket while brewing. Hot water and
coffee can cause injury.
6. Using the Brew Pause Feature
The Brew Pause feature temporarily ceases the flow of coffee when the carafe is removed so
a cup can be poured mid-brew. Do not remove the carafe for longer than 20 seconds or the
coffee may overflow the coffee basket.
7. Empty the Coffee Basket
Once the brewing cycle is complete, the ready signal will sound and a winding noise will
be heard. This is normal. The LCD screen will flash ‘EMPTY COFFEE FILTER‘ as a reminder to
remove the coffee basket and discard the used grinds. Wash the coffee basket, taking particular care to rinse the chute area. Then dry the coffee basket and chute area thoroughly.
We also recommend checking the coffee grinds chute disc for any build-up of coffee grinds.
This is the stainless steel disc that is visible when the swing-out door is opened. A build-up
of grinds on this disc can affect the performance of the machine. Wipe the disc clean then
dry thoroughly.
CAUTION
The coffee basket and gold tone or paper filter may still be very hot after brewing. Use
caution and allow to cool before removing.
44
Page 13

8. Pour and Enjoy
Ensure the carafe lid is securely locked in position. There is no need to turn or adjust the
lid before pouring. The lid automatically opens when pouring and closes when not to keep
coffee hot.
CAUTION
Hot steam may rise when pouring. The bottom of the carafe is hot to touch for several
minutes after brewing. Use caution and ensure not to set the carafe on a heat sensitive
surface.
USING THE SINGLE CUP MODE
First Time Use Only
We recommend flushing the machine to remove any dust particles or residues from the
manufacturing process. Follow the instructions, ‘USING THE CARAFE MODE’, ensuring to
completely fill the water tank (Step 1), select ‘12 CUPS’ (Step 3) and the ‘PRE-GROUND’ coffee setting (Step 4). However do not add any coffee to the coffee basket. Once the cycle is
complete, discard the water from the carafe and repeat the cycle again for best results. The
machine is now ready to use.
CAUTION
We recommend using cold, filtered water. We do not recommend the use of de-mineralized
or distilled water as this may affect the taste of brewed coffee and how the coffee machine
is designed to function.
1. Fill the Water Tank
Press open the flip-top lid. Pour the desired amount of cold, preferably filtered water into the
tank using a jug or the provided carafe. If using the carafe, ensure the carafe lid is securely
locked in place. The LCD screen will indicate the amount of water in the tank as it is filled.
The machine will beep when full and the water level float will rise to indicate the maximum
level. Do not exceed the 12 cup maximum. Doing so may cause water spillage at the back of
the machine. Close the flip-top lid.
Note: Check the water level on the LCD screen before use. We recommend always keeping
the water tank full. The water tank should be refilled with cold, preferably filtered water. Do
not fill with any other liquid.
Never pour water into the bean hopper or grinding chamber area. Doing so can
Note:
cause the grinder to clog. Only re-commence use when the grinding chamber and grinding
burrs are completely dry. Refer to Troubleshooting, ‘Moisture clogging grinder’.
Never fill the water tank once the coffee machine has started a brewing cycle. This
Note:
will affect the volume dispensed into the cup.
45
Page 14

2. Pre-Warm the Cup or Travel Mug
INSERT CUP, CLOSE DOOR.
A warm cup will help maintain the coffee’s optimal temperature and keep coffee hotter for
longer. Fill the cup with hot water for about 30 seconds then discard the water. Place the
cup into position under the drip stop outlet.
TIP: For taller cups and travel mugs, remove the drip tray at the base of the machine. Press
the OPEN button to open the swing-out door. Insert the cup/mug into the drip tray cavity
before closing the swing-out door. The maximum cup/mug dimensions are approx 18cm
height, 7cm diameter.
REMOVE DRIP TRAY, OPEN DOOR,
3. Select ‘Single Cup’ Mode
Press the SINGLE CUP button. The LCD screen will display a cup symbol and the current cup
size selected. Continue pressing the SINGLE CUP button to select the desired size.
There are 9 size options to accommodate for different amounts of milk or cup sizes. Below
is a guide to the amount brewed at each setting. Always ensure your cup is an adequate
size for the setting selected.
SETTING AMOUNT BREWED
1 ~ 225 ml
2 ~ 275 ml
3 ~ 325 ml
4 ~ 375 ml
5 ~ 425 ml
6 ~ 475 ml
7 ~ 525 ml
8 ~ 575 ml
9 ~ 625 ml
The amounts above are approximate only. Actual amounts may vary due to the type of filter
used, the coffee bean size, roast, blend and freshness, or amount and type of pre-ground
coffee used.
46
Page 15

4. Select the Brew Strength or ‘PRE-GROUND’ Coffee Setting
MILD KRÄFTIG
Press the STRENGTH button. The LCD screen will flash the current strength setting and the
and buttons will illuminate and flash. Use these buttons to cycle through 7 strength
settings from ‘MILD’, ‘STRONG’ to ‘INTENSE’ or for the ‘PRE-GROUND’ coffee setting. These settings vary the amount of coffee.
Press the STRENGTH button to select. The LCD screen will flash the current flavour setting.
Note: If using pre-ground coffee, select the ‘PRE-GROUND’ coffee setting. This will disable the burr grinder. Add pre-ground coffee to the longlife-filter or a paper filter (Ø 85/
215 mm). We recommend 1 level tablespoon of pre-ground coffee per 150 ml cup of water.
Adjust the amount according to your individual taste. The maximum capacity for pre-ground
coffee is 16 level tablespoons. Exceeding this amount may cause overflow.
5. Select the Flavour Setting
Press the FLAVOUR button until the LCD screen flashes the current flavour setting and the
and buttons illuminate and flash. Use these buttons to cycle through 5 flavour settings
from ‘LITE’ to ‘BOLD’. These settings vary the steeping time of the coffee and water. The ‘LITE’
setting steeps for less time to produce a light-flavoured cup. The ‘BOLD’ setting steeps for
more time for a bolder, more full-flavoured coffee.
Press the FLAVOUR button to select. The LCD screen will cease to flash once selected.
We have already tested for you which setting is good for a mild and a strong coffee (see
picture below).
MILD BOLD
For an individual coffee experience, vary the different components (infusion time / amount
of powder in each cup size) to achieve the perfect results for your coffee.
Note: Steam may emit from the rear steam vent during grinding and brewing. This is normal.
The count-down timer will then begin. The time displayed is an estimate only and will depend
on the amount, strength and flavour settings you have selected.
The LCD screen will display:
a) ‘PRE-HEATING’ as the water is heated to the optimal temperature. The pre-heating time
will depend on the starting temperature of the water in the water tank.
b) ‘STEEPING’ as coffee and water are steeped together.
c) ‘BREWING’ as the coffee is dispensed into the cup.
To stop the cycle at any time, press the START | CANCEL button. You will hear a winding
noise. This is normal.
47
Page 16

CAUTION
Never open the swing-out door and remove the coffee basket while brewing. Hot water and
coffee can cause injury.
7. Empty the Coffee Basket
Once the brewing cycle is complete, the ready signal will sound and a winding noise will
be heard. This is normal. The LCD screen will flash ‘EMPTY COFFEE FILTER’ as a reminder to
remove the coffee basket and discard the used grinds. Wash the coffee basket, taking particular care to rinse the chute area. Then dry the coffee basket and chute area thoroughly.
We also recommend checking the coffee grinds chute disc for any build-up of coffee grinds.
This is the stainless steel disc that is visible when the swing-out door is opened. A build-up
of grinds on this disc can affect the performance of the machine. Wipe the disc clean then
dry thoroughly.
CAUTION
The coffee basket, gold tone or paper filter may still be very hot after brewing. Use caution
and allow to cool before removing.
Note: If using the Longlife-Filter, you may notice the brewing cycle finish before the ready
signal sounds. This is normal. The total brewing time displayed on the LCD screen is calculated
using paper filters as coffee passes through paper filters slower.
PROGRAMMING THE 24 hour CLOCK (OPTIONAL)
You must set the clock to use the Auto-Start feature. Always remember to reset the clock for
time changes, power outages and when you unplug the machine.
1. Press the PROGRAM button until the LCD screen displays ‘TIME NOW’. Once this appears, press and hold the PROGRAM button until the PROGRAM button illuminates red and
the LCD screen displays a flashing hour.
2. Use the and buttons to select the desired hour.
3. Press the PROGRAM button. The LCD screen will display a flashing minute.
4. Use the and buttons to select the desired minute.
TIP: For faster scrolling, press and hold the
5. Press the PROGRAM button to finish. The LCD screen will display ‘TIME NOW’ and the
programmed time.
and buttons.
PROGRAM
SET CLOCK
TIME NOW
48
Page 17

PROGRAMMING AUTO-START (OPTIONAL)
The Auto-Start feature allows you to program the specific time when the coffee machine will
automatically turn on and start the preheating and grinding cycle.
1. Ensure the clock is set.
2. Press the PROGRAM button until the LCD screen displays ‘START AT’. Once this appears,
press and hold the PROGRAM button until the LCD screen displays a flashing hour.
3. Use the and buttons to select the desired hour.
4. Press the PROGRAM button. The LCD screen will display a flashing minute.
5. Use the and buttons to select the desired minute.
TIP: For faster scrolling, press and hold the
6. Press the PROGRAM button. It will illuminate red and the LCD screen will display the
programmed ‘START AT’ time for 5 seconds. During this time, press the START | CANCEL
button. The LCD screen will dim and display ‘PROGRAM ON’ to indicate that the Auto-Start
feature has been successfully turned on. If ‘PROGRAM ON’ does not appear, then the AutoStart feature has not been activated.
and buttons.
Note: During Step 8, the programmed 'START AT' time will appear on the LCD screen for 5
seconds. If the START | CANCEL button is not pressed within 5 seconds, 'TIME NOW' will
appear on the LCD screen and pressing the START | CANCEL button will cause the coffee
machine to start grinding and brewing.
PROGRAM
ON
START
CANCEL
7. Ensure that the coffee machine is correctly assembled and prepared with:
• Sufficient water in the water tank and coffee beans in the bean hopper.
• The coffee basket assembled with an empty Longlife-Filter or paper filter (Ø 85/215 mm).
• Either a cup, travel mug or carafe positioned under the drip stop outlet.
Note: To cancel a programmed Auto-Start, press the START | CANCEL button until the LCD
screen no longer displays ‘PROGRAM ON’.
Note: The Auto-Start feature must be selected each time you want to pre-schedule a brew.
Press the PROGRAM button until the LCD screen displays ‘START AT’. The coffee machine
will remember the last programmed Auto-Start time, so simply press the START | CANCEL
button to re-select. Ensure ‘PROGRAM ON’ is displayed on the LCD screen.
Note: Always remember to reset the clock and Auto-Start time when there is a time change,
power outage or after you unplug the machine.
49
Page 18

CHANGING THE ‘READY’ SIGNAL VOLUME
The volume of the ‘Ready’ signal can be changed to suit your preference.
There are 3 options:
HIGH
LOW
MUTE
Press and hold the STRENGTH | FLAVOUR button until the LCD screen flashes one of the
sound icons pictured above. While the icon flashes, use the or button to select the
desired volume. The volume is selected once the icon stops flashing. The selected volume will
main displayed on the LCD screen.
HELPFUL TIPS
Whole Beans
• Coffee flavour and strength is a personal preference. Vary the type of coffee beans and
the strength and flavour settings to achieve the taste of your preference.
• Freshly ground beans are the key to making coffee with more flavour and body. Use
freshly roasted coffee beans, preferably with a ‘roasted on’ date and use within 2 weeks of
the ‘roasted on’ date.
• Store coffee beans in a dark, cool and dry place. Vacuum seal if possible.
• Buy coffee beans in small batches to reduce the storage time and store no more than one
week’s supply at any time.
• Do not store beans in the bean hopper for a prolonged period.
• Clean the bean hopper and grinding burrs regularly.
Pre-Ground Coffee
• We recommend 1 level tablespoon of pre-ground coffee per 150ml cup of water. Adjust
the amount according to your individual taste. The maximum capacity for pre-ground coffee
is 16 level tablespoons. Exceeding this amount may cause the coffee basket to overflow.
• The grind will affect the rate at which the water flows through the coffee in the coffee basket and therefore the taste of the coffee. If the grind is too fine the water will not flow through
the coffee and may clog or overflow the coffee basket. Alternatively, it may pass through the
50
Page 19

Longlife-Filter leaving sediment in the cup or carafe. The resulting coffee will be over extracted, too dark and bitter. If the grind is too coarse the water will flow through the coffee
too quickly. This will result in an under-extracted coffee lacking in flavour.
• Always use ground coffee suitable for use with a drip filter coffee machine. Never use
espresso grind as the finer grind size may cause the coffee basket to overflow.
General Tips
• Pre-heat the carafe or cup for best results. A pre-heated carafe or cup will help maintain
the coffee’s optimal temperature and keep coffee hotter for longer. Fill with hot water for
about 30 seconds then discard the water.
• Fresh, good-tasting water is essential for a perfect cup. If your water contains excessive
sediment, or has an ‘off’ taste or odor, we recommend using filtered water.
Iced Coffee
• Iced coffee is at its best when the coffee is brewed strong because the coffee is diluted
by the melting ice cubes. We recommend selecting ‘9 CUPS’ and the ‘INTENSE’ strength
setting. This makes approximately 1.3L of brewed coffee, enough for 4-6 servings. Once the
brewing cycle is complete, transfer the coffee to a heatproof jug and let cool to room temperature. Refrigerate until cold, at least 2 hours or up to overnight. Fill glasses with ice cubes.
Pour the coffee into the glasses, filling them to within 4cm of the rim. Top each glass with
milk, syrups or sweeteners as desired.
• If using granulated sugar as a sweetener, add while the coffee is hot to encourage the
sugar crystals to completely dissolve.
• To avoid a diluted taste, you can also use regular strength coffee and serve it over coffee
ice cubes. Prepare coffee ice cubes by pouring cool coffee into ice-cube trays and freezing.
CARE & CLEANING
Always turn the coffee machine off and remove the plug from the power outlet before cleaning.
Cleaning the Coffee Basket and Longlife-Filter
After every use, press the OPEN button to open the swing-out door. Remove the coffee
basket. Discard the ground coffee and paper filter. The coffee basket and Longlife-Filter can
be rinsed under running water. Make sure to thoroughly rinse the chute area of the coffee
basket and ensure the fine holes of the Longlife-Filter are clear. For a deeper clean, wash the
coffee basket and Longlife-Filter in warm, soapy water with a soft bristled brush.
Note: The flap on the side of the coffee basket is the steam baffle which assists with water
overflow if the coffee basket becomes blocked. The flap is hinged from the bottom for easy
cleaning. Pull the flap downwards to clean, however always click it back into the upright
position before use.
51
Page 20

CAUTION
The coffee basket, gold tone or paper filter may still be very hot after brewing. Use caution
and allow to cool before removing.
Cleaning the Carafe
After each use, empty the carafe. Do not let brewed coffee stand overnight as this can cause
the carafe to stain. Rinse the carafe and carafe lid under running water. For a deeper clean, we recommend regularly washing the carafe in warm, soapy water with a soft bristled
brush. Do not use abrasive cleansers, pads or cloths which can scratch the surface. Rinse
and dry thoroughly.
Cleaning the Bean Hopper
Remove the hopper lid and turn the locking knob counter-clockwise in the direction of the
UNLOCK arrow. The bean hopper and lid can be washed in warm, soapy water. Do not use
abrasive cleansers, pads or cloths which can scratch the surface. Rinse and dry thoroughly.
Note: Do not clean any of the parts or accessories in the dishwasher.
Cleaning the Grinding Burrs and Coffee Grinds Chute
The LCD screen will display ‘CLEAN COFFEE CHUTE’ when the grinding burrs and coffee
grinds chute need to be cleaned. We recommend doing this immediately to avoid clogging
and overflowing of the coffee basket. Depending on frequency of use, you may choose to
do this every 2-3 weeks.
1. Press the POWER button to turn the machine on.
2. Unlock and remove the bean hopper.
3. Open the swing-out door. The coffee grinds chute will rotate to the open position. You may
hear a winding noise, this is normal.
COFFEE
CHUTE
OPENS
4. Press the POWER button to turn the machine off and remove the plug from the power
outlet.
5. Remove any beans that remain in the grinding chamber and around the upper burr.
52
Page 21

6. Remove the locking button of the upper burr by turning the handle clockwise.
O
L
C
K
7. Using the provided cleaning brush, thoroughly remove any build-up of coffee grinds that
have formed around the grinding burrs and coffee grinds chute. Ensure the grinds catcher is
in place to catch the loose grinds, then remove and empty the catcher.
E
S
A
E
L
E
R
CLEAN THE
GRINDING
BURRS
8. Wipe the coffee grinds chute disc (the entire stainless steel part) to remove any build-up
of coffee grinds that have accumulated on the surface. Dry thoroughly.
9. Replace the upper burr by aligning the three notches around the upper burr with the
three notches in the grinding chamber. The upper burr should sit flush. Turn the handle
counter-clockwise until it clicks into position.
10. Replace the bean hopper and lock into position.
11. Replace the coffee basket onto the swing-out door and close. The coffee grinds chute
will rotate back to the closed position. You may hear a winding noise, this is normal.
12. The LCD screen will no longer display ‘CLEAN COFFEE CHUTE’. The machine is now
ready to use.
CLEAN THE
COFFEE
GRINDS CHUTE
Cleaning the Grinds Catcher and Drip Tray
Press the OPEN button to open the swing-out door. Remove the grinds catcher located
under the coffee grinds chute and the 2-part drip tray at the base of the machine. Wash in
warm, soapy water. Do not use abrasive cleansers, pads or cloths which can scratch the
surface. Rinse and dry thoroughly.
53
Page 22

Cleaning the Outer Housing
The outer housing and LCD screen can be cleaned with a soft, damp cloth. Apply cleanser
to the cloth and not the LCD surface. Polish with a soft, dry cloth. Cleaning and drying with
dry paper towels or abrasive cloths and cleaners may scratch the surface.
Removing Calcium Build-Up
Your coffee machine may experience build-up from calcium and minerals contained in your
water. This ‘scale’ or mineral build-up will affect the machine’s performance and coffee quality. It is critical that scale build-up, so it has to be removed frequently.
If there is an excessive mineral build-up, the LCD screen will display ‘DE-SCALE’.
TIME NOW
Please use for decalcifying only the Gastroback Premium Descaler (Art. No.: 98175). This
Descaler contains special metal gentle additives and is matched to the components used in
our machines. We recommend a mixture of 150 ml of ›Gastroback Premium Descaler‹ and
max. 1600 ml of water. Due to the differences of water hardness and we can not make any
precise specifications on the frequency on the decalcifying. The following table is a nonbinding recommendation and is for guidance only.
hardness range recommended frequency litre or weeks
(to 1,5 mmol/l) every 120 Liter every 10 to 14 Wochen
mild
medium
(from 1,5 to 2,5 mmol/l)
(up to 2,5 mmol/l) every 60 Liter every 2 to 4 weeks or
hard
every 90 Liter every 4 to 8 Wochen
when ›DE-SCALE‹ lights up
Remove the ‘DE-SCALE’ icon by pressing the SINGLE CUP and CARAFE button together, then
follow these steps:
1. Empty the Water Tank
• Press the CARAFE button to select the number of cups of water that remain in the water
tank.
• Press the STRENGTH button and the
and buttons to select the ‘PRE-GROUND’ coffee
setting. However do not add any coffee to the coffee basket.
• Ensure the carafe is empty and the lid is securely locked. Place the carafe into position
under the drip stop outlet.
• Press the START | CANCEL button.
• Once the cycle is complete, discard the water from the carafe. The water tank is empty
now.
54
Page 23

2. De-Scale the Machine
• Pour a mixture of 1600 ml of water and 150 ml of descaler into the water tank until the
LCD screen displays ‘12 CUPS’.
• Press the CARAFE button to select ‘12 CUPS’.
• Press the STRENGTH button and the
and buttons to select the ‘PRE-GROUND’
coffee setting. However do not add any coffee to the coffee basket.
• Ensure the carafe is empty and the lid is securely locked. Place the carafe into position
under the drip stop outlet.
• Press the START | CANCEL button.
• Once the cycle is complete, discard the water from the carafe.
3. Rinse the Machine
Follow the de-scaling process (Step 2) with two full tanks of fresh and cold water – without
adding ‘Gastroback Premium Descaler’. The machine is ready to use now.
Note: The ‘Gastroback Premium Descaler’ (Art. No.: 98175) is available at specialized
retailers or at Gastroback directly.
Note: Appliance damages, caused by calcium deposits in and on the appliance are not
part of the warranty.
55
Page 24

TROUBLESHOOTING
Problem POSSIBLE CAUSES WHAT TO DO
‘LOCK BEAN HOPPER’
on LCD screen
Unable to lock bean hopper
‘FILL TANK’ on LCD screen
‘EMPTY COFFEE FILTER’
on LCD screen
Grinder starts but operates with
a
loud noise. No coffee in the
coffee basket.
Coffee grinds in coffee
Hopper not locked in place. Turn the locking knob clockwise in the
direction of the LOCK arrow until it clicks.
Coffee beans obstructing bean hopper
locking device.
Water tank is empty. Press open the flip-top water tank lid. Pour
Coffee basket not in place or not correctly
assembled.
Swing-out door not closed properly. Close the door until it clicks shut.
Coffee basket not emptied of used grinds. Remove the coffee basket and discard used
Grinder is blocked with a foreign item. Check the bean hopper for any foreign
Moisture clogging grinder. Clean and thoroughly dry the grinding burrs
Using the Longlife-Filter. The Longlife-Filter will allow some fine
Coffee basket has not been properly
leaned. Residual grinds from previous use.
Remove bean hopper. Clear coffee beans
from the grinding chamber and around the
upper burr. Try re-locking the bean hopper.
the desired amount of cold, preferably
filter water.
Check that the coffee basket lid is closed
and the coffee basket is firmly seated on
the two door hooks.
grinds. Wash the coffee basket, taking
particular care to rinse the chute area. Dry
thoroughly (especially the chute area).
Attach to the swing-out door. Close the
door until it clicks shut.
body. If there is none, refer to ‘Cleaning
the Grinding Burrs and Coffee Grinds Chute’
and coffee grinds chute. Refer to ‘Cleaning
the Grinding Burrs and Coffee Grinds
Chute’. It is possible to use a hair dryer
to blow air into the grinding chamber and
dry the lower burr. Only re-commence use
when the grinding chamber and grinding
burrs are completely dry.
coffee grinds to fall into the coffee. This
is normal. Switch to using a paper filter
(Ø 85/215 mm) if you wish to eliminate
all grinds.
After each use, wash the coffee basket,
taking particular care to rinse the chute
area. Dry thoroughly (especially the chute
area). Ensure there are no grinds in the
coffee basket before lining the coffee
basket with the gold tone or paper filter.
56
Page 25

Problem POSSIBLE CAUSES WHAT TO DO
Coffee basket overows
The coffee basket is clogged. This can occur for a number of reasons:
• If using pre-ground coffee, ensure it is a
drip coffee grind and not too fine. Never
use Espresso grind.
• Check that the coffee basket is lined with
only one paper filter.
• Check that either the Longlife-Filter or
the paper filter is used. Do not use both
together.
• Check that the Longlife-Filter mesh is
clear and unclogged.
• Clean the coffee grinds chute. Refer to
‘Cleaning the Grinding Burrs and Coffee
Grinds Chute’.
Coffee basket drips
Residual grinds in the drip stop outlet. With the coffee basket lid open, push up
the drip stop outlet (the hemisphere on the
underside of the coffee basket). A valve
will rise inside the coffee basket. Ensure
there are no grinds underneath this valve.
Thoroughly dry the coffee basket (especially the chute area) before lining the coffee
basket with the gold tone or paper filter.
Carafe overows
Carafe was not completely empty before
brewing.
Always ensure the carafe is completely
empty before brewing.
No coffee comes out
Coffee is watery
Beans are in the hopper but not
feeding into the grinding burrs
The coffee basket is clogged. Never open the swing-out door and remove
the coffee basket while brewing. Hot water
and coffee can cause injury. Turn the POWER button off and remove the plug from
the power outlet. Wait 10 minutes before
opening the swing-out door and removing
the coffee basket. Follow the solutions for
‘Coffee basket overflows’.
Insufficient beans in the bean hopper. Fill the hopper with fresh beans. We
recommend always keeping the hopper
full (250 g maximum) to ensure there are
sufficient beans.
Bean hopper and/or burr grinder is
blocked.
Dark, oily beans can stick to the sides of
Refer to ‘Cleaning the Grinding Burrs and
Coffee Grinds Chute’.
Stir the beans to loosen.
the hopper.
The hopper is over-packed and the grinder
is jamming.
57
Remove some of the beans.
Stir the remaining beans to loosen.
Page 26

Problem POSSIBLE CAUSES WHAT TO DO
Coffee not strong enough /
too strong
Strength setting is incorrect. Check the selected strength setting
displayed on the LCD screen. To change the
strength setting, refer to ‘Select the Brew
Strength or ‘PRE-GROUND’ Coffee Setting’.
Coffee not hot enough
A pre-heated coffee basket, carafe or cup
will help maintain the coffee’s optimal
temperature and keep coffee hotter for
longer. Fill with hot water for about 30
seconds then discard the water.
I cannot select the
‘FLAVOUR’ setting
Machine takes a long time to
brew
The ‘FLAVOUR’ setting is only selectable in
SINGLE CUP mode.
The Brew IQ System will intelligently
pre-heat and dose grinds for optimum
temperature and taste. This may result in
longer grinding, pre-heating and brewing
times than what you are normally used to.
If you would like to reduce the overall
brewing time and are using SINGLE CUP
mode, select a lower flavour setting.
The ‘LITE’ setting will steep for less
time, however this will produce a lighter
flavoured coffee.
Machine uses a lot of coffee
The Brew IQ System has been calibrated to
dose the optimum water to coffee grinds
If you would like to use less coffee beans,
select a lower strength setting.
ratio to achieve the best flavour profile.
Depending on the strength setting selected,
this may result in more coffee being ground
than what you are normally used to.
However the result will be a bolder, more
full-flavoured coffee.
Amount brewed is too little /
too much
There is excessive mineral build-up affecting
the performance of the machine.
De-scale the machine. Refer to ‘Removing
Calcium Build-Up’.
The volume calibrations need to be reset. Recalibrate the machine by flushing it
twice. Refer to ‘Using the YouBrew - Carafe
Mode. First Time Use Only’.
The water tank was filled once the coffee
machine had already started a brewing
Always fill the water tank before
starting a brewing cycle.
cycle.
The brew sizes are approximate only.
Actual amounts may vary due to the type
of filter used, the coffee bean size, roast,
blend and freshness, or amount and type
of pre-ground coffee used. These factors
affect the amount of water retained by the
coffee grounds.
I cannot select a certain carafe
amount
The minimum carafe amount is 2 cups,
while the maximum is the number of cups
of water in the tank, up to 12 cups.
Press open the flip-top water tank lid. Pour
the desired amount of cold, preferably
filter water.
58
Page 27

Problem POSSIBLE CAUSES WHAT TO DO
I can only select 9 cups
‘INTENSE’ strength setting selected. The
maximum number of cups that can be
To brew 12 cups, select the ‘STRONG’
strength setting.
brewed at the maximum strength is 9 cups.
My cup does not t under the
drip stop outlet.
The maximum cup or travel mug imensions
are approx 18cm height, 7cm diameter.
Remove the drip tray at the base of the
machine. Press the OPEN button to open
the swing-out door. Insert the cup/mug
into the drip tray cavity before closing the
swingout door.
I regularly switch beans.
Buy an additional bean hopper to make
transfer and storage of beans easier.
To grind out any residual coffee beans, lock
an empty bean hopper onto the machine.
Completely fill the water tank, select ‘12
CUPS’ and the ‘INTENSE’ strength setting.
Press the START|CANCEL button. When
the grinder stops grinding, press the
START|CANCEL button to cancel the cycle.
Remove the coffee grinds from the coffee
basket.
‘DE-SCALE’ on LCD screen
There is excessive mineral build-up affecting
the performance of the machine.
Remove the ‘DE-SCALE’ icon by pressing
the SINGLE CUP and CARAFE button
together, then de-scale the machine. Refer
to ‘Removing Calcium Build-Up’.
I want to empty the water tank
Water is leaking from the back of
the machine
Water tank is overfilled. Do not exceed the 12 cup maximum.
Refer to ‘Empty the Water Tank’.
The machine will beep when full and the
water level float will rise to indicate the
maximum level.
Steam when grinding and
brewing
Total brewing time on LCD screen
changes mid-cycle or is different
each time
This is normal. It is the rear steam vent
releasing steam.
The total brewing time displayed at the
start of the cycle is an estimate only and
may change mid-cycle or vary each time
depending on the starting temperature of
the water in the water tank.
59
Page 28

Problem POSSIBLE CAUSES WHAT TO DO
Brewing cycle nishes before the
ready signal
If using the Longlife-Filter, this is normal.
The total brewing time displayed on the
LCD screen is calculated using paper filters
as coffee passes through paper filters
slower.
‘CLEAN COFFEE CHUTE’ on LCD
screen
Grinding burrs and coffee grinds chute
need to be cleaned. We recommend doing
this immediately to avoid clogging and
overflowing of the coffee basket.
• Thoroughly clean the coffee basket and
Longlife-Filter to ensure they are clear and
unclogged of any coffee grinds.
• Check the bean hopper for any foreign
body.
• Refer to ‘Cleaning the Grinding Burrs and
Coffee Grinds Chute’.
Machine beeps and displays ‘1’
on the LCD screen
There is an issue with the coffee grinds
chute disc.
Remove the plug from the power outlet.
Wait 10 seconds then reinsert. Check the
coffee grinds chute disc for any build-up of
coffee grinds. This is the stainless steel disc
that is visible when the swing-out door is
opened. A build-up of grinds on this disc
can affect the performance of the machine.
Wipe the disc clean then dry thoroughly.
If the problem persists, call the next
Consumer Service.
Machine beeps 20 times in fast
Call the next Consumer Service.
succession and ‘2’ is displayed on
the LCD screen
Water level on LCD screen is not
moving or indicating correctly
Using de-mineralized or distilled water
which is affecting how the coffee machine
is designed to function.
We recommend using cold, filtered
water. We do not recommend using
water with no/low mineral content such
as de-mineralized or distilled water. If
the problem persists, contact the next
Consumer Service.
60
Page 29

Storage
Store the entire appliance (including the power base and operating instructions) on a clean
and dry surface, where it may not tilt or fall and no other objects could fall on it and where
it is safe from frost and inadmissible strain (mechanical or electric shock, heat) and where it
is out of reach of young children. Do not place any hard or heavy objects on the appliance
or any parts of it.
Always switch off the kettle and unplug the power base, when the appliance is not in use.
Empty remaining water and place the kettle on the power base to protect the connector pins
in the power base from dust. When the appliance is not in use for a long period of time,
decalcify the interior of the water container. When required, wind the power cord round the
cord storage in the bottom of the power base.
Notes for disposal
Dispose of the appliance and packaging must be effected in accordance with the
corresponding local regulations and requirements for electrical appliances and packaging. Please contact your local disposal company.
Do not dispose of electrical appliances as unsorted municipal waste, use separate
collection facilities. Contact your local government for information regarding the
collection systems available.If electrical appliances are disposed of in landfills or dumps,
hazardous substances can leak into the groundwater and get into the food chain, damaging
your health and well-being.When replacing old appliances with new once, the retailer is
legally obligated to take back your old appliance for disposal at least for free of charge.
Information and service
Please check www.gastroback.de for further information. For technical support, please
contact Gastroback Customer Care Center by phone: +49 (0)4165/22 25-0 or e-mail:
info@gastroback.de.
Warranty
We guarantee that all our products are free of defects at the time of purchase. Any demonstrable manufacturing or material defects will be to the exclusion of any further claim and
within warranty limits of the law free of charge repaired or substituted. There is no warranty
claim of the purchaser if the damage or defect of the appliance is caused by inappropriate
treatment, over loading or installation mistakes. The warranty claim expires if there is any
technical interference of a third party without an written agreement.
The purchaser has to present the sales slip in assertion-of-claim and has to bear all charges
of costs and risk of the transport.
Transport Note:
Please empty the water tank completely. Hold the machine with open lid of the watertank
over your sink upside down and remove all traces of water before you pack it and send it
back.
61
Page 30

Notizen/Notes:
Page 31

Page 32

GASTROBACK GmbH
Gewerbestraße 20 . 21279 Hollenstedt / Germany
Telefon +49 (0)41 65/22 25-0 . Telefax +49 (0)41 65/22 25-29
info@gastroback.de . www.gastroback.de
20140710
 Loading...