

Page 1
Operating Instructions
DESIGN COFFEE AROMA PRO
Art.-No. 42705 Design Coffee Aroma Pro
Read all provided instructions before first usage!
Model and attachments are subject to change!
For household use only!
Page 2

Carefully read all provided instructions before you start running
the appliance and pay attention to the warnings mentioned in
these instructions.
Table of Contents
Knowing Your Design Coffee Aroma Pro .............................................................. 24
Important Safeguards ......................................................................................... 25
Important Safeguards for all Electrical Appliances ............................................. 28
High Temperatures—Risk of Burns ................................................................... 29
Technical Specifications ..................................................................................... 30
Operation ........................................................................................................ 30
Before first use .............................................................................................. 30
Operating the control panel ........................................................................... 31
Setting the clock .......................................................................................... 31
The Auto On Function................................................................................... 31
Selecting the Auto On Function start time ........................................................ 32
Activating the Automatic Operation................................................................ 32
Brewing coffee ............................................................................................. 33
The Pause & Serve Function .......................................................................... 34
Useful Tips........................................................................................................ 35
Care and Cleaning ........................................................................................... 35
Cleaning the coffeemaker and accessories ....................................................... 36
Changing the water filter ............................................................................... 36
Cleaning the filter basket ............................................................................... 36
Carafe care.................................................................................................. 37
Decalcifying your coffeemaker ........................................................................ 38
Storage ............................................................................................................ 38
Notes for Disposal ............................................................................................. 39
Information and Service ..................................................................................... 39
Warranty ......................................................................................................... 39
22 23
Page 3

Dear Customer!
Congratulations on your new Design Coffee Aroma Pro, Gastrobacks new coffee machine.
Wake up to the smell of fresh coffee. Only a few steps are needed to brew coffee an excellent coffee with your new Design Coffee Aroma Pro. By using the Auto On Function your
coffee will be right on time for breakfast or lunch. With the aroma button you can choose
between strong or mild flavor.
With the easy-to-use controls and the backlit LCD display, you can program your coffee
exactly to your taste.
These instructions for use will inform you about the various functions and features, which
make it easy to take pleasure in your new Design Coffee Aroma Pro!
We hope that you will enjoy your new Design Coffee Aroma Pro.
Your Gastroback GmbH
Page 4
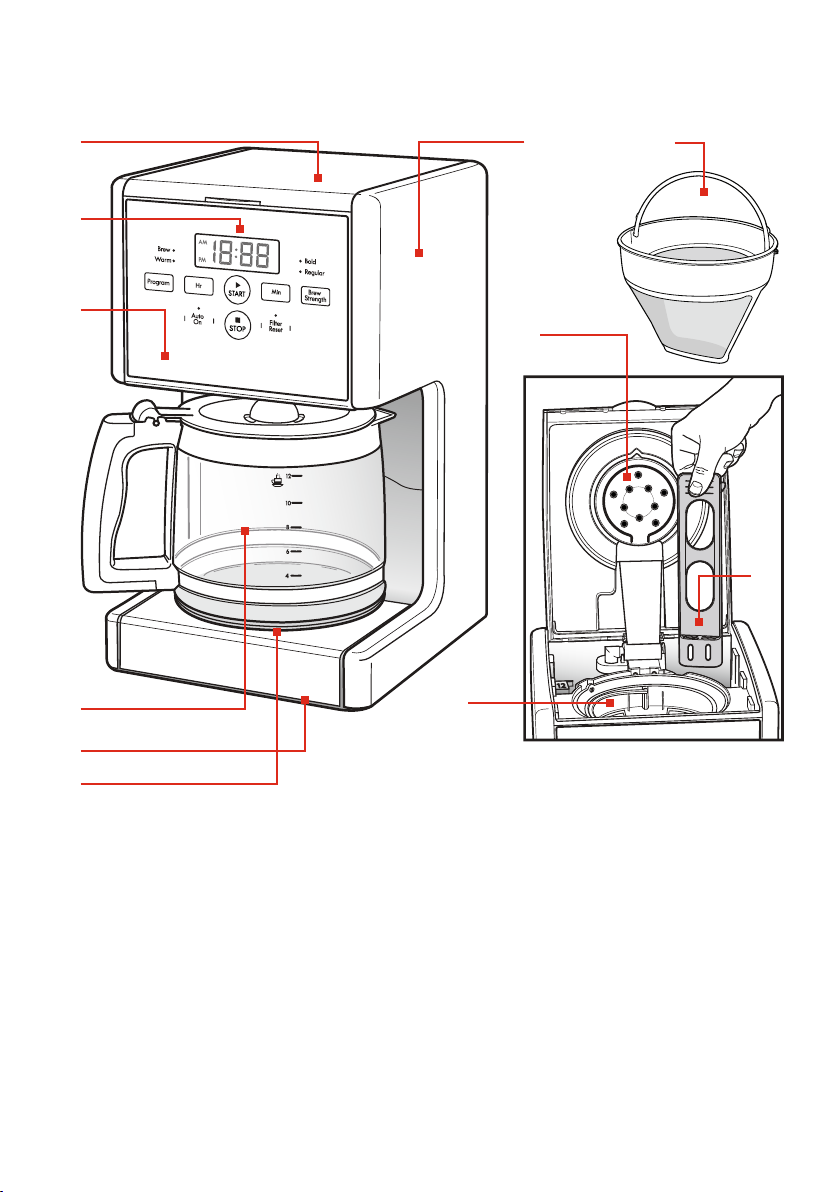
KNOWING YOUR DESIGN COFFEE AROMA PRO
A
B
c
D
J
E G
H
I
F
K
A Cover, hinged
B Control Panel Display
c Control Panel with digital control,
programmable Auto On Function,
aromaadjustment , Clock
D Glass Carafe with Lid and Handle
E Housing, Aluminium diecast
F Base
G Longlife Durable Filter (stainless steel,
gold-coloured) removable – no paper
lters needed
H Water Drain
(High-End-Membran with rising buttons)
I Water Filter replacable
J Filter Insert removable, for easy lling,
holds the Longlife Durable Filter and the paper
lter, dishwasher safe
K Warming Plate
24
Page 5

IMPORTANT SAFEGUARDS
Carefully read all instructions before operating this appliance and save for
further reference. Do not attempt to use this appliance for any other than the intended
use described in these instructions. Any other use, especially misuse, can cause severe injuries or damage by electric shock, heat or fire.
Any operation, repair and technical maintenance of the appliance or any part of it other
than described in these instructions may only be performed at an authorised service centre.
Please contact your vendor.
• This appliance is for household use only and not intended for use in moving vehicles.
Do not operate or store the appliance in humid or wet areas or outdoors. Any use of accessories, attachments or spare parts not recommended by the manufacturer may result in
damage and/or injuries to persons.
• Check the entire appliance regularly for proper operation—especially the power cord.
Do not operate the appliance, when liquids are in the housing of the appliance or accumulate under the appliance or overflow. Do not operate the appliance, when the appliance
or any part of it is likely to be damaged, to avoid risk of fire, electric shock or any other
damage and/or injuries to persons. The appliance is likely to be damaged if the appliance
was subject to inadmissible strain (e.g. overheating, mechanical or electric shock), or if
there are any cracks, excessively frayed or melted parts, or distortions, or if the appliance is
leaking or not working properly. In this case, immediately unplug the appliance and return
the entire appliance (including all parts and accessories) to an authorised service centre for
examination and repair.
• Use only parts and accessories (for example, glass carafe, longlife durable filter and filter
insert) or consumables (paper filters) for the appliance, which are provided and recommended by the manufacturer for this purpose. Damaged or incorrect components can break
during operation, deform, damage the device and / or lead to serious injury or property
damage. In particular, the use of improper paper filters or other containers
than the supplied glass carafe can lead to exposure to hot water, steam,
electricity, and fire.
• Always ensure the appliance is properly assembled before connecting to power outlet
and operating. Follow the instructions provided in this book.
• During operation keep the appliance in an appropriate distance of at least 15 cm on each
side and 1 m above to furniture, walls, boards, curtains, and other objects. Do not operate
the appliance beneath or below any heat-sensitive or moisture-sensitive materials, boards, or
drop-lights to avoid damage caused by steam, heat, or condensate. Operate the appliance
on a well accessible, stable, level, dry, heat-resistant, water-resistant and suitable large table
or counter. Do not place the appliance over a power cord, or near the edge of the table or
counter, or on wet or inclined surfaces, or where it can fall. Always keep the appliance and
the table or counter clean and dry, and wipe off spilled liquids immediately.
• Do not place any clothes or tissue or other objects under or on the appliance during
operation, to avoid risk of fire, electric shock and overheating. Before operation, always
ensure that there are no foreign objects in or under the pot, and the appliance is assembled
properly and not leaking with the lid and upper cover firmly in place. Immediately unplug
the appliance, if there is any kind of malfunction or problem (e.g. leaking, overheating).
Page 6

• This appliance is not intended for use by persons (including children) with reduced physical, sensory or mental capabilities, or lack of experience and knowledge, unless they
have been given supervision or instruction concerning use of the appliance by a person
responsible for their safety. Children must be supervised to ensure that they do not play with
the appliance or any parts of the appliance or the packaging. Do not leave the appliance
unattended, when it is in reach of young children. Always keep the appliance where it is dry
and clean and where young children cannot reach it. Do not place any hard and/or heavy
objects on the appliance or any part of it. Take care that no one will pull the appliance by
the power cord.
• This appliance can be used by children aged from 8 years and above and persons with
reduced physical, sensory or mental capabilities or lack of experience and knowledge if
they have been given supervision or instruction concerning use of the appliance in a safe
way and understand the hazards involved.
• Children shall not play with the appliance.
• Cleaning and user maintenance shall not be made by children without supervision. This
appliance can be used by children aged from 8 years and above if they have been given
supervision or instruction concerning use of the appliance in a safe way and if they understand the hazards involved. Cleaning and user maintenance shall not be made by children
unless they are older than 8 and supervised. Keep the appliance and its cord out of reach
of children aged less than 8 years.
• Remove and safely discard any packaging material and promotional labels or stickers before using Design Coffee Aroma Pro for the first time. Keep the packaging material material
for future transportation.
• To eliminate a choking hazard for young children, remove and safely discard the protective cover fitted to the power plug of this appliance.
• Do not place the appliance near the edge of a bench or table during operation. Ensure
the surface is level, clean and free of water and other substances. Do not use the appliance
on a sink drain board. Do not place the appliance on or near a hot gas or electric burner,
or where it could touch a heated oven.
• The appliance is not intended to be operated by means of an external timer or separate
remote control system.
• Do not use attachments other than those provided with the appliance. The use of accessory attachments not recommended by Gastroback may result in fire, electric shock or injury
to persons.
• Make sure that the appliance is properly and completely assembled before turning the appliance on or activate the Auto On Function (AUTO ON). Very hot water and steam escape
from the holes on the inside of the appliance cover. Always wait until the appliance
has cooled down before you open the appliance lid.
• Do not attempt to operate the appliance by any method other than those described in this
book.
• Always fill for brewing only cold, clean drinking water in the water tank. Never fill other
liquids into the water tank. Never fill the water tank over the maximum mark of 12! Fill up
the water slowly and make sure that it does not run through the appliance. Wipe away any
spilled water immediately. Never operate the appliance without the filter insert! Use only the
included long-life durable filter or recommended paper filters (size 1 x 4) for the appliance.
26 27
Page 7

• Never use the appliance without water in the water tank.
• If liquid is spilled into the housing of the appliance or is running out under
the appliance during the brewing, then turn off the power immediately by
unplugging the power cord from the power outlet. Let the appliance cool to
room temperature and empty the water tank completely. Submit the appliance to a specialised service centre for a thorough check. However, condensati-
on may drip and run down at the back of the appliance with the lid open. Wipe away the
condensation in this case immediately.
• Do not move the appliance whilst in operation. Always grasp the appliance on both sides
of the bottom of the aplliance base, if you want to move the appliance. Do not hold the appliance by the water tank or the housing part for the filter insert in order to avoid damage.
• Do not use abrasive cleaners or cleaning pads (e.g. metal scouring pads) for cleaning.
Do not clean the appliance with any corrosive chemicals (e.g. bleach). Do not immerse the
appliance or power cord in water or any other liquid. Do not spill or drip any liquids on
the appliance or on the power cord to avoid risk of fire and electric shock. When liquids
are spilled in the appliance, immediately switch off, unplug the power cord and wait for the
appliance to cool down. Thereafter, clean and dry the appliance thoroughly (See: ›Care and
Cleaning‹).
• Do not leave the appliance unattended when in use.
• Do not touch hot surfaces. Allow the appliance to cool down before moving or cleaning
any parts.
• Always switch off the appliance and unplug if appliance is to be left unattended, if not in
use, before cleaning, before attempting to move the appliance, disassembling, assembling
and when storing the appliance.
• Keep the appliance and accessories clean. Follow the cleaning instructions provided in
this book.
• The glass carafe of the appliance may break or crack if improperly treated. Therefore,
treate the glass carafe always with caution to avoid injury and damage by hot water and /
or broken glass.
• Never use the glass carafe for other coffee machines, or put on or in a kitchen stove or in a
microwave oven. Never use hard objects (example: spoon, cookware) to stir in the glass carafe.
• Never use the glass carafe when the glass or the handle display a split or crack or the
handle is loose. Never drink the contents of the glass carafe, if the glass is damaged (chips,
cracks, hinged edges). Never drink directly from the glass carafe. Check the contents of the
glass carafe before drinking for any splitter.
• Never give ice cubes into the glass carafe, or put the glass carafe in the fridge. Never
place the hot glas carafe on cold or wet surfaces, as the glass could burst. Grasp the glass
carafe for use only by the handle.
• The appliance is heated by built-in electric heating elements. The appliance or power
cord may never touch hot surfaces. Do not place the appliance or any part of it on or near
hot surfaces (e.g. burner, heater or oven). Do not use any part of the appliance (e.g. pot,
steamer) with any other device.
• The appliance is designed for brewing coffee. Therefore, some components become very
hot during operation and hot water or steam escape.
Page 8

• Do not operate the appliance with a damaged cord or plug or after the appliance malfunctions, or has been damaged in any manner. Immediately cease use and contact an
authorised service center for examination, repair or adjustment.
• Do not apply any force during operation to prevent damage to the components.
• DO NOT place the appliance or power cord in an automatic dishwasher.
• Do not leave any food dry on the appliance. Always clean the appliance after each use
(See: ›Care and Cleaning‹). Always keep the appliance and the accessories clean.
• Store packaging materiasl out of reach of children.
• Do not operate with carbonated water, but only in soft water
• This appliance is intended to be used in household and similar applications such as:
– staff kitchen areas in shops, offices and other working environments;
– farm houses;
– by clients in hotels, motels and other residential type environments;
– bed and breakfast type environments.
• Keep the packaging material out of reach of children.
Important Safeguards for all Electrical Appliances
The appliance is heated electrically. Place the appliance near a suitable wall power socket
to connect the appliance directly to a protected mains power supply with protective conductor (earth/ground) connected properly. Ensure that the voltage rating of your mains power
supply corresponds to the voltage requirements of the appliance (220 - 240 V, 50/60 Hz,
AC, rated for 16 A).
The installation of a residual current operated circuit breaker (r.c.c.b.) with a maximum
rated residual operating current of 30 mA in the supplying electrical circuit is strongly recommended. If in doubt, contact your electrician for further information. In various foreign
countries, the specifications for power supplies are subject to incompatible norms. Therefore
it is possible that power supplies in foreign countries do not meet the requirements for safe
operation of the appliance. Thus, before operating the appliance abroad, ensure that safe
operation is possible.
• Do not to use any extension cords or multisocket outlets.
• Always handle the power cord with care. Always completely unwind the power cord before use. Do not place the appliance on a power cord. Power cords may never be knotted,
twisted, pulled, strained or squeezed. Do not let the plug or power cord hang over the edge
of the table or counter. The power cord may not touch hot surfaces. Ensure that no one will
pull the appliance by the power cord. Take care not to entangle in the power cord. Always
grasp the plug to disconnect the power cord. Do not touch the power plug with wet hands
when the appliance is connected to the power supply.
• Unwind the power cord fully before use.
• To protect against electric shock do not immerse power cord, power plug or appliance in
water or any other substance.
28 29
Page 9

• This appliance is not intended for use by persons (including children) with reduced physical, sensory or mental capabilities, or lack of experience or knowledge, unless they have
been given supervision or instruction concerning use of the appliance by a person responsible for their safety.
• Children should be supervised to ensure they do not play with the appliance.
• The appliance has a short cord as a safety precaution to prevent personal injury or property damage resulting from pulling, tripping or becoming entangled with the cord. Do not
allow children to be near or use this appliance without close adult supervision. If you must
use a longer cord or an extension cord when using the appliance, the cord must include a
3-prong grounding plug. It must be arranged so it will not drape or hang over the edge of a
countertop, tabletop or surface area where it can be pulled on by young children or tripped
over. To prevent electric shock, personal injury or fire, the electrical rating of the extension
cord you use must be the same or more than the wattage of the appliance (wattage is marked on the underside of the appliance).
• This appliance is recommended for household use only. Do not use this appliance for
anything other than its intended use. Do not use in moving vehicles or boats. Do not use
outdoors. Misuse may cause injury.
CAUTION: To ensure continued protection against risk of electric shock, connect to properly earthed outlets only.
High Temperatures – Risk of Burns
• The Design Espresso Advanced – Barista Edition is designed for brewing
espresso and coffee. Therefore, some components, such as the group head, the
portafilter and the steam wand become very hot during operation and hot
water or steam escape.
• Do not touch during operation and shortly thereafter hot parts (eg. group head, porta
filter, swivel steam wand with frothing attachment). Even after switching off the appliance
and the corresponding parts are very hot for some time.
• Hot steam may escape or hot water may drip from the group head and the swivel steam
wand. Therefore always ensure that the swivel steam wand points towards the drip tray
when not in use. Never hold your hands or other body parts or moisture and heat-sensitive
items onto or below the porta filter, group head, swivel steam wand with frothing attachment
when the appliance is turned on.
• Always make sure that the porta filter inserted correctly into the group head before operating the appliance. When brewing the espresso high pressure is produced - risk of burns!
• Never remove the porta filter during brewing.
• Always wait until the appliance is cooled down to room temperature and empty the water
tank and the drip tray before moving or cleaning the appliance. Grasp the appliance on
both sides of the bottom of the appliance base (not the drip tray!) If you want to move the
appliance.
Page 10

TECHNICAL SPECIFICATIONS
Model: Art. No. 42705 Design Coffee Aroma Pro
Power supply: 220-240 V, 50/60 Hz
Power consumption: 1000 W
Length of power cord: 108 cm
Weight: 3.5 kg
Dimensions: 210 x 230 x 360 mm (width x depth x height)
Watertank capacity: 1.8 litre (12 cups)
Filter paper: coffee filter, size 1 x 4
Certification:
OPERATION
Before First Use
WARNING: DO NOT allow young children playing with the appliance, or any
part of it including the packaging!
It is important to carefully remove all packaging and shipping/promotional materials as well as
any price-tags. Ensure that there are no foreign objects (e.g. packaging) in the water reservoir or
filter basket, before use. Exclusively place the appliance on a stable, flat, and heat and moisture
resistant surface of suitable size. (See: “Important Safeguards“) DO NOT place the appli-
ance on an inclined surface.
1. Unpack the appliance carefully, and remove all packaging and shipping/promotional mate-
rials, but DO NOT remove the model label. Check, if there are any parts damaged or
missing. Before the first use of the coffeemaker wash the brew basket, the permanent Longlife
Durable Filter, the carafe and carafe lid in either the top rack of your
dishwasher, or by hand in warm, sudsy water. The exterior of the coffeemaker, the control panel area and the warming plate should only
be cleaned with a soft damp cloth.
NOTE: Never clean the warming plate unless it is completely cool.
To clean the inside of the reservoir cover, open the one piece cover,
allowing it to the rest on the opening position, and wipe surface with
a damp cloth.(Fig. 1)
NOTE: Do not use abrasive cleansers or scouring pads when cleaning your coffeemaker. Never immerse the coffeemaker in water or
any liquid.
2.. Place the coffeemaker on a level (not inclined!), hard, flat surface near a suitable
wall power outlet (See: “Important Safeguards“) and connect the coffeemaker to the
power supply. The time display in the centre of the front panel illuminates.
Fig. 1
30 31
Page 11

3. After all parts are washed for the first time, pour cold water up to the 12 cup level mark in
the water reservoir. Brew it through the coffeemaker as instructed in BREWING Coffee, but do
not add coffee grounds to the Longlife Durable Filter. When done, turn off the coffeemaker and
discard the water from the carafe.
Operating the control panel
Audio signals
1. When the unit is plugged in, one beep can be heard.
2. When the coffee has finished brewing, three beeps can be heard.
3. When the warming state is finished, five beeps can be heard.
Brewing
Warm-Keeping
Program button
for timer function
Clock setting the hours
Activation Auto On
Function
Start button
(activation of the programs)
LCD-Display time
Display coffee bold
Display coffee regular
Setting brew strength
Clock setting the
minutes
Cleaning indicator
Stop button
(deactivation of the
programs)
Setting the clock
You may set the clock any time before, during or after brewing. However, you must connect the
coffeemaker to the power supply. The coffeemaker will keep the setting as long as it is connected
to the power supply.
1. Set the time of day by pressing the hour and minute button. Be sure to set the time with the
correct AM and PM designation.
2. You can make the hours and minutes move more quickly in the clock display by holding the
buttons down.
3. After a few seconds the clock display turns off, but the clock still keeps time.
The Auto On Function
Using the Auto On Function, you can program your coffeemaker to prepare your coffee
automatically on a pre-defined time (e.g. on your lunch break).
WARNING: Please keep in mind that the coffeemaker will be left unattended, while
connected to the power supply, and during operation. Thus, special care is necessary to
avoid injuries to persons or damage caused by fire, electric shock or hot liquids and steam.
Thus, closely and meticulously keep to the instructions in the section Important Safeguards.
Always ensure that you prepared the coffeemaker correctly and completely for the brewing
cycle, before activating automatic operation.
Page 12

We strongly recommend, performing and attending a normal brewing cycle to learn, how
to operate your coffeemaker correctly, before using automatic operation. In this way you
will recognize problems, arising from the handling your coffeemaker.
Note: Automatic operation is only possible, when the clock and start time are adjusted.
WARNING: Special care is necessary, when leaving any electrical appliance unatten-
ded while connected to the power supply and during operation.
Always ensure that the coffeemaker is prepared correctly and completely for a brewing
cycle, according to the instructions in section Preparing Some Cups of Coffee, before starting automatic operation, and leaving the coffeemaker unattended.
Especially ensure that the filter basket and glass carafe are inserted correctly and the cover
of the coffeemaker is closed properly.
WARNING: Before using AUTO ON Function again, make absolutely sure the machine
is properly prepared for a new brew cycle!
Note: The coffee machine stores the entered time as long as it is connected to the power
supply. If you want to brew coffee at the same time within the next 12 hours again, then
prepare the brewing process before carefully and then press the AUTO ON button. A blue
light indicates that the Auto On Function is turned on.
Selecting the Auto On Function start time
Note: For adjusting the start time the clock must be set. (See: “Adjusting the Clock“)
1. Press the PROGRAM button. The standard time of 6 AM, or the last programmed start
time flashes.
2. Adjust the time you want to start the brewing cycle by using the HOUR and MIN buttons
following the procedure for setting the clock.
3. To confirm your auto brew start time, simply press the PROGRAM button and the preset
time is displayed for a few seconds on the display. Now you can modify the start time as
desired.
Activating the Auto On Function
1. Enter milled powder in the long-life filter or a paper filter. Fill the water tank with the
appropriate amount of water and make sure that the glass jug stands on the warming plate.
2. If you set the start time and the ad jump back to the current time, press the AUTO ON
button. A blue lamp will light up on this button to indicate that the coffee machine in autostart mode.
3. The auto-start feature can be canceled any time by pressing the STOP button. The light
on the AUTO ON button turns off. To check what time it is set for auto-start function, press
the PROGRAM button and the time is displayed
32 33
Page 13

Brewing coffee
WARNING: Always special care is necessary, when using any electrical appliance for heating water, to avoid risks of overheating, fire and electric shock.
DO NOT leave the appliance unattended when it is in reach of young children.
Always ensure that the appliance is assembled completely and correctly, before switching ON
(ON/OFF button) the appliance. Do not move the appliance during or immediately after operation.
Do not place any clothes, tissues or any other foreign objects on or under the appliance not either the warming plate. The warming plate is intended for keeping warm the glass carafe solely.
DO NOT place any clothes or napkins/serviettes or any other objects/vessels
except the glass carafe on the warming plate. Other vessels could melt or brake, cause
overheating on the warming plate, and moreover, the Pause & Serve mechanism will not open,
thus the coffee will overflow the filter basket and could get into the interior of the appliance.
Regularly check the entire appliance for proper operation and leakage.
(See: “Important Safeguards“) Do not allow liquids run under or on the appliance. If liquids
got into the housing of the appliance, or run out from under the appliance
during the brewing cycle, immediately switch OFF (ON/OFF button) and unplug the appliance.
(See: “Important Safeguards“) However, when opening the cover, condensate could drip from
the cover and run down on the back of the appliance. In this case, immediately wipe off the
condensate.
Glass could brake or burst on careless handling, and splinters could get into the interior. DO
NOT drink directly from the glass carafe. DO NOT use the glass carafe or drink the contents of
the glass carafe, when there are cracks, scratches or splintered edges in the glass carafe.
Do not overfill the water reservoir. When filling up the water reservoir, always
ensure that the water level may not exceed the water level indicator 12. Only
use clean tap water. Do not fill in mineral water.
DO NOT operate the appliance without the filter basket properly in place! Only
use filter bags of suitable size (1 x 4). Thoroughly coat the filter basket with the filter bag. The filter
bag must fit correctly into the filter basket, and may not protrude from the brim of the filter basket
1. Lift the one- piece cover by pulling up on handle (see Fig. 2).
2. Use the carafe to fill the water reservoir of the coffeemaker to the desired level with cold water.
There is a gauge marked from 2 to 12 cups (300ml to 1800ml) on both the coffeemaker’s water
reservoir and on the sides of the carafe (see Fig. 3). The amount of cold water will differ slightly
from the amount of coffee brewed, because some of the water is absorbed by the grinds in the
process of brewing .
Fig. 2 Fig. 3 Fig. 4
Page 14

3. Place either the permanent Longlife Durable Filter or a size 4 paper filter (not included) into
the brew basket (see Fig. 4)
4. Add ground coffee. The amount of coffee you use is a matter of personal taste (we recommend one heaping tablespoon for every two cups). Try different amounts of ground coffee per
cup until you brew your perfect cup of coffee. You can also try using the paper filter along with
the Longlife Durable Filter.
5. Close the cover. Place carafe on the warming plate and plug in the appliance. The control
display window illuminates blue and the coffeemaker beeps for about 1 second to let you know
the clock is not set. The clock will blink at 12:00 AM. The clock does not have to be set to brew
coffee. To set the clock time, see OPERATING THE CONTROL PANEL.
6. The default setting of the coffeemaker is for the regular strength, indicated by a blue light
next to the word regular. Choose bold strength by pressing the brew strength button. The blue
light will switch to the word bold. Push the START button to turn on the coffeemaker. A blue
light appears by the word Brew to show that the coffeemaker is brewing. When the coffee has
finished brewing, the coffeemaker automatically switches to the warming mode. The blue light
switches from the word brew to the word warm. For delayed brewing , see OPERATING THE
CONTROL PANEL.
NOTE: Bold strength brews the best taste for 2-4 cups of coffee.
7. When you have poured out all the coffee in the carafe, press the STOP button to turn off the
appliance, and remove the carafe from the warming plate.
NOTE: If the coffeemaker is not turned off, it will automatically shut off after 40 minutes.
The Pause & Serve Function
The Pause & Serve function allows you to pour out some coffee, while the brewing cycle is still
running. There is no need to interrupt the brewing cycle manually.
WARNING: DO NOT remove the glass carafe from the coffeemaker for more than 20
seconds, because this will temporarily stop the coffee from dripping into the carafe, it does not
stop the brewing cycle. ALWAYS ensure that the Pause & Serve mechanism is closed
and the coffee will not run on the warming plate, when removing the glass
carafe. When the coffeemaker is switched ON and there is still water in the water reservoir,
the filter basket could overflow and water could run into the housing of the appliance. Thus, the
carafe must be returned to the warming plate immediately to open the Pause & Serve mechanism.
1. You may take the glass carafe out of the coffeemaker for a short time to pour out some
coffee. The Pause & Serve mechanism stops the coffee dripping off the filter basket.
2. IMMEDIATELY replace the glass carafe to the warming plate to avoid overflowing of the filter
basket. Doing so, ensure that the coffee drips into the glass carafe again.
CAUTION: If coffee grounds or lime block the Pause & Serve mechanism, the coffee will drip on
the warming plate. In this case IMMEDIATELY replace the glass carafe to the warming plate, wait
until the filter basket has completely run dry and cooled down. Thereafter, clean the filter basket
thoroughly. (See: “Cleaning the Filter Basket“) However, it is normal, when just one or two drops
fall from the filter basket, after removing the glass carafe.
34 35
Page 15

USEFUL TIPS
You can easily learn how to prepare a good coffee. In this chapter you will find some hints for
this purpose. Generally, coffee is the best and freshest shortly after brewing.
Tip: Choose the taste of your coffee according to your own particular liking. The coffee brand
and the way of grinding the coffee (fine or coarse) are essential for the results. Just give it a
try! Store your coffee (powder or whole beans) in a closely shut container on a cool, dry place.
However, it is better not to place the coffee in the refrigerator or the freezer compartment. You
may buy grinded coffee. In this case, you should consume the coffee within a week, because
the flavour will evaporate gradually. The way of grinding (fine or coarse) will affect the brewing
time, and as a result, the quality of your coffee. However, make sure that the
coffee powder is suitable for drip coffeemakers.
We recommend buying coffee beans and grinding your coffee just before use. Coffee beans
should not be stored for more than 1 month.
Experiment with the amount of coffee in order to adjust the flavour to your taste. Start with the
coffee/water ratio you normally use for preparing coffee. If you prefer strong coffee, we recommend using one level measuring scoop for each cup (ca. 100 – 150 ml) or 10 level measuring
scoops per full pot of coffee, but never use more than 12 level measuring scoops of
coffee powder.
The amount of brewed coffee will be a little less than the water filled in the water reservoir since
some water is absorbed by the coffee grounds and the filter bag.
CARE AND CLEANING
WARNING: Cover, filter basket, glass carafe, and warming plate will get very hot
during operation.
Additionally, hot water and steam can pour out during operation. Always unplug the
appliance and allow the machine to cool down before moving or cleaning the appliance.
Additionally, empty the water reservoir before transportation or storage.
Do not place the appliance or any part of it in an automatic dishwasher! Do not immerse
the appliance or power cord in any liquids. Do not pour any liquids over the appliance
or the power cord.
Do not use aggressive chemicals (bleach, desinfectant, decalcifier), abrasive cleansers or
hard or sharp objects on any part of your coffeemaker.
Do not use violence to avoid damage. Especially the Pause & Serve mechanism of the
filter basket and the hinges of the covers of water reservoir and glass carafe are sensitive
to careless handling. Do not poke in the water reservoir.
WARNING:
DO NOT clean the warming plate unless it is completely cool. DO NOT use abrasive
cleaners or scouring pads.
An authorized service representative should perform any other servicing.
To clean the inside of the reservoir cover, open the one-piece cover, allowing it to rest in
the open position. Wipe surface with a damp cloth. DO NOT use abrasive cleansers or
scouring pads.
Page 16

Cleaning the coffeemaker and accessories
1. Always unplug the appliance and allow cooling down before cleaning.
2. Open the cover of the coffeemaker, grasp the filter basket and the water filter at the
tabs, and pull them out. Clean the coffee supply area of the filter basket thoroughly.
The fine holes of the long-life filter must be clear. For an intense cleaning,
wash the filter element and long-life filter in warm soapy water with a soft
brush and rinse thoroughly with clean water (see: >The use of the Clean coffee filters < ).
CAUTION:
Make sure when cleaning out that the suspension of the device cover and do not damage
the lid on the glass jug.
3. Remove the glass carafe from the coffeemaker and carefully clean the glass jug in
warm dishwater.
4. Wipe the exterior of the coffeemaker and the warming plate with a soft, damp cloth.
Here also take care not to damage the hinge of the lid.
5. Stubborn stains on the warming plate may be removed by use of a plastic mesh pad
or a cloth dampened in vinegar.
6. To clean the inside of the water tank, open the appliance lid so that this
stops in the open position. Wipe all parts with a damp cloth.
7. Thereafter by using a soft and clean cloth, dry the exterior of the coffeemaker and all
its parts thoroughly.
Changing the water filter
After every 70 cycles, or carafe of coffee, a blue light will appear in the control panel
display above the filter reset button. This let you know it is time to clean the inside of the
coffeemaker of all mineral build-up, and change the water filter.
Mineral deposits left by hard water can clog your coffeemaker. Cleaning is recommended
about every 70 uses, when the coffeemaker’s reminder lets you know you have reached
this point.
1. Press the “Filter Reset” button on the control panel to turn off the blue light and
reset the count (Fig. 5).
Fig. 5
Fig. 6 Fig. 7
36 37
Page 17

2.. Open the lid of reservoir, and pull out the water filter (Fig. 6)
3. Open the water filter, pull out the old filter, discard and replace with a new one (Fig. 7).
4. Place the water filter with new filter into the reservoir.
Cleaning the filter basket
WARNING: Do not lift the cover of the coffeemaker during or immediately after the
brewing cycle. Even if the water reservoir seems to be empty, hot water and steam could
spit out of the holes in the middle of the cover and cause scalding. After brewing is completed, there could still be some HOT liquid left in the filter basket.
Always switch OFF the appliance (ON/OFF button), before opening the cover of the
appliance.
Allow to drain completely, and to cool for at least 10 minutes. Remove the filter basket
carefully.
1. Switch OFF the appliance (ON/OFF button), and allow to cool for at least 10 minutes.
Ensure that the cover of the coffeemaker has cooled.
Note: When lifting up the lid of the coffeemaker, condensation can drip down to the back
and onto your counter. This does not mean that the appliance is leaking. Immediately
wipe off the condensate using a clean dry cloth.
2.. Open the lid of the coffeemaker and carefully remove the filter basket. For this, grasp
the tabs on each side of the filter basket, and lift the filter basket straight up from the coffeemaker.
3.. Discard the used filter bag and coffee grounds in the dustbin for domestic refuse.
However, the coffee grounds (without filter bag!) can be composted.
Note: Do not wash away the coffee grounds in the sink.
CAUTION: Always handle the filter basket with care to avoid damage to the Pause &
Serve Function.
4. Rinse the filter basket after each brewing cycle with tap water. On occasion, carefully
clean the filter basket with warm dishwater by using a soft nylon brush.
Carafe care
A damaged carafe may result in possible burns from a hot liquid.
To avoid breaking:
1. DO NOT allow all liquid to evaporate from the carafe while on the warming plate and
never heat the glass carafe when empty.
2. DISCARD the carafe if chipped, cracked, or damaged in any manner.
3. NEVER use abrasive scouring pads or cleaners, they will scratch and weaken the
glass.
4.. DO NOT place the carafe on or near a gas or electric burner, in a heated oven, or in
a microwave oven.
5.. Avoid rough handling and sharp blows.
6.. DO NOT set a hot carafe down on a wet or cold surface.
Page 18

Decalcifying your coffeemaker
CAUTION: Do not immerse the warming plate or main housing in water or any other
liquid
Do not poke around in the water reservoir to avoid damage. Just rinse with cold water
periodically.
Do not operate the appliance without the filter basket properly in place. Do not use any
aggressive chemicals or decalcifier.
The build-up of lime in drip coffeemakers is normal and is caused by the minerals commonly found in drinking water. This result in an increase of energy consumption and
possibly the taste of the coffee will be affected. When your appliance needs to be decalcified a blue light will appear in the control panel display above the filter reset button.
Thus, depending on the water hardness and usage, your coffeemaker needs decalcified
periodically, to remove lime deposits (every 2 – 3 months).
Please use for decalcifying only the Gastroback Premium Descaler (Art. No.: 98175).
This descaler contains special metal gentle additives which are contained in our machines
components. With the Gastroback Premium Descaler use a mixture of 50 ml descaler and
max. 750 ml of water. Due to the different Water hardness and the frequency of use we
cannot provide detailed specifications about the decalcification.
1. Press the “Filter Reset” button on the control panel to turn off the blue light and reset
the count (Fig. 5).
2. Open the lid of reservoir, and pull out the water filter (Fig. 6).
3. Pour Gastroback Premium Descaler in the composition described above
4. Put a paper filter in the brew basket, close cover, and place empty carafe on the war-
ming plate.
5. Turn on the coffeemaker by pressing START and let half of the vinegar water solution
brew through into carafe
6. Turn the coffeemaker off by pressing STOP at this point and let it soak for at least 15
minutes to soften any deposits.
7. Turn the coffeemaker back on by pressing START and brew the remaining solution
into the carafe. When brew cycle has stopped, turn off coffeemaker by pressing STOP,
empty carafe and discard soiled paper filter.
8. Refill reservoir with cold water and turn on by pressing START to turn another brew
cycle. You may want to repeat again to eliminate any vinegar smell/taste.
9. Wash the brew basket, water filter and carafe in warm dishwater and replace all the
parts into the machine.
STORAGE
WARNING: Always unplug the appliance, when it is not in use for a longer period of time.
Always wait until the appliance completely cooled down, than empty the filter basket, glass
carafe and water reservoir before storing. Always place the appliance on a stable, level,
38 39
Page 19

clean, and dry surface, where it is save from inadmissible strain (e.g. fall, shock, frost) and
out of reach of young children. The power cord may never be knotted, twisted or squeezed.
Do not place any hard or heavy objects on the appliance or any part of it. Do not pull or
strain the power cord. Do not let the plug or power cord hang over the edge of the surface.
Ensure that no one can pull the appliance by the power cord.
1. Insert the filter basket properly and close the cover.
CAUTION: Do not grasp the appliance by the water reservoir or filter basket chamber.
2. To move the appliance, grasp it with both hands on the side panels near the bottom. Place
the appliance on a suitable, stable surface, where it is out of reach of young children. Place
the glass carafe on the warming plate of the appliance.
3. Carefully and loosely lay the power cord around the appliance. Doing so, do not pull
or bend the power cord. Ensure that no one will pull the appliance by the power cord,
especially when young children are near.
NOTES FOR DISPOSAL
Dispose of the appliance and packaging must be effected in accordance with the
corresponding local regulations and requirements for electrical appliances and
packaging. Please contact your local disposal company.
Do not dispose of electrical appliances as unsorted municipal waste, use separate
collection facilities. Contact your local government for information regarding the collection
systems available. If electrical appliances are disposed of in landfills or dumps, hazardous
substances can leak into the groundwater and get into the food chain, damaging your health
and well-being. When replacing old appliances with new ones, the retailer is legally obligated to take back your old appliance for disposal at least for free of charge.
INFORMATION AND SERVICE
Please check www.gastroback.de for further information. For technical support, please
contact Gastroback Customer Care Center by phone: +49 (0)4165/22 25-0 or e-mail:
info@gastroback.de.
WARRANTY
We guarantee that all our products are free of defects at the time of purchase. Any demonstrable manufacturing or material defects will be to the exclusion of any further claim and
within warranty limits of the law free of charge repaired or substituted. There is no warranty
claim of the purchaser if the damage or defect of the appliance is caused by inappropriate
treatment, over loading or installation mistakes. The warranty claim expires if there is any
technical interference of a third party without an written agreement.
The purchaser has to present the sales slip in assertion-of-claim and has to bear all charges
of costs and risk of the transport.
Page 20

GASTROBACK GmbH
Gewerbestraße 20 . 21279 Hollenstedt / Germany
Telefon +49 (0)41 65/22 25-0 . Telefax +49 (0)41 65/22 25-29
info@gastroback.de . www.gastroback.de
20140317
 Loading...