

Page 1
Operating Instructions
DESIGN COFFEE electro nic
Art.-No. 42700 Design Coffee electronic
Read all provided instructions before first usage!
Model and attachments are subject to change!
For domestic use only!
21
Page 2

Carefully read all provided instructions before you start running
the appliance and pay attention to the warnings mentioned in
these instructions.
Table of Contents
Knowing Your New Coffeemaker ........................................................................ 23
Important Safeguards ......................................................................................... 24
High Temperature - Risk of Burns ...................................................................... 26
Technical Specifications ...................................................................................... 27
Operation ......................................................................................................... 27
Before First Use .............................................................................................. 27
Preparing Some Cups of Coffee ....................................................................... 28
Freshness Timer and Automatic Switching Off .................................................... 30
The Pause & Serve Function ............................................................................. 30
Adjusting the Warming Plate Temperature ......................................................... 31
Automatic Operation ...................................................................................... 31
Adjusting the Clock ........................................................................................ 31
Selecting the Auto Brew Start Time ................................................................... 31
Starting Automatic Operation .......................................................................... 32
Useful Tips ........................................................................................................ 33
Care and Cleaning ............................................................................................ 33
Cleaning the Filter Basket ................................................................................ 34
Cleaning the Coffeemaker ............................................................................... 34
Decalcifying the Coffeemaker .......................................................................... 35
Storage ............................................................................................................. 35
Information and Service ...................................................................................... 36
Notes for Disposal ............................................................................................. 36
Warranty .......................................................................................................... 36
Trouble Shooting ................................................................................................ 37
22
Page 3
Dear customer!
Congratulations on your purchase of the Design Coffee electronic, the new coffeemaker
from Gastroback. Using the Design coffee electronic, only a few simple touches are necessary to brew an excellent coffee. By means of the automatic operation, the coffeemaker will
wait for you with freshly brewed coffee for instance, on your lunch break.
The information in this booklet will easily and quickly exploit many helpful features of your
coffeemaker for you to get the delight of a wonderful coffee.
Your Gastroback GmbH
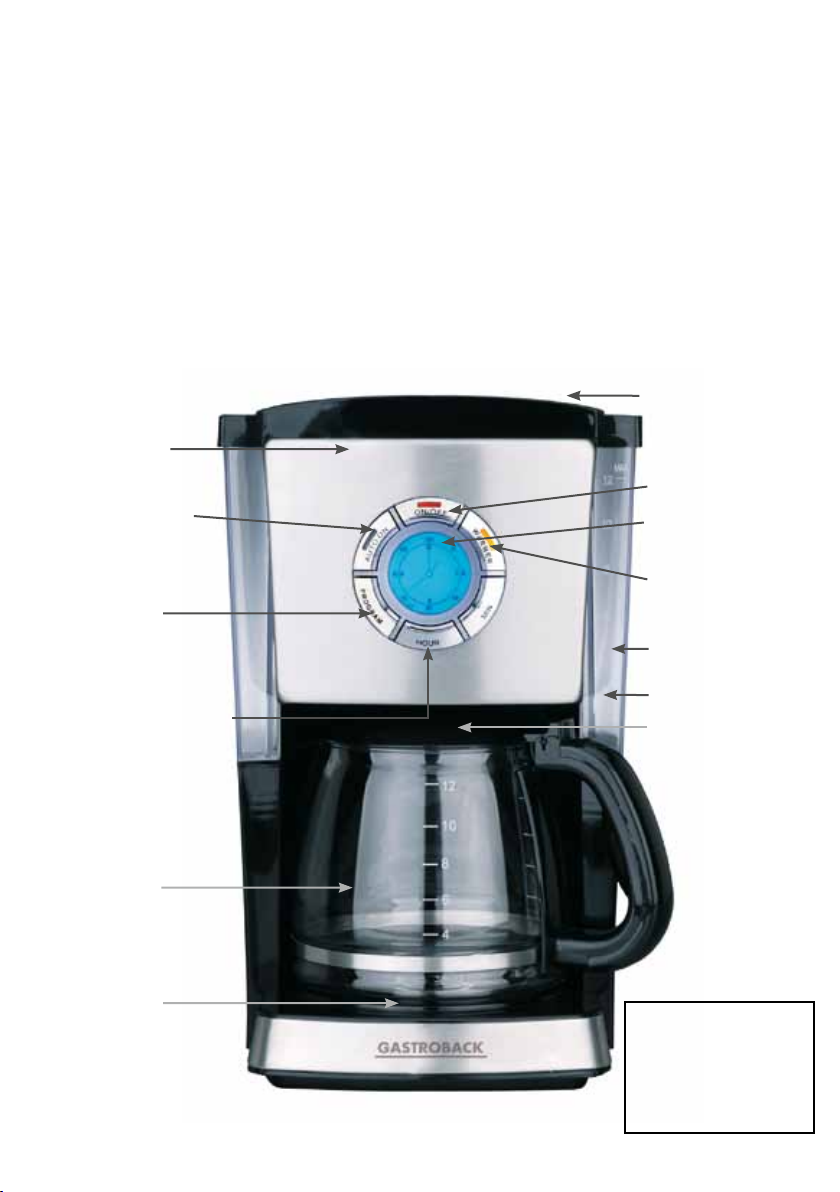
KNOWING YOUR NEW COFFEEMAKER
Pause & Serve mechanism - closes the filter
basket, when you
Filter Basket
AUTO ON Button and
Indicator - activates
automatic operation
PROGRAM Button
activates programming of
automatic operation
Set Buttons HOUR and MIN
Minutes
remove the glass carafe
ON/OFF Button
and Indicator
LCD Digital Clock
WARMER Button and
Indicator (decreases
the temperature of the
warming plate)
Water Level Indicator
Water Reservoir
„Swing-UP“ Reservoir
Cover
Glass Carafe
Warming Plate keeps your coffee warm after
brewing
W/o fig.: Measuring Scoop
Two Overfilling Holes
Prevent surplus water from
running into the housing of
the appliance
23
Page 4

IMPORTANT SAFEGUARDS
Carefully read all instructions before operating this appliance and save the
instructions for further reference. Do not attempt to use this appliance for any other
than the intended use, described in these instructions. Any other use, especially misuse,
can cause severe injuries or damage by electric shock, heat or fire. Any operation, repair
and technical maintenance of the appliance or any part of it other than described in these
instructions may only be performed at an authorised service centre. Please contact your
vendor.
• This appliance is for household use only and NOT intended for use in moving vehicles.
Do not operate or store the appliance in humid or wet areas or outdoors, or where it is
exposed to inadmissible strain. Always keep the appliance and any parts of it where it is
out of reach of young children.
• Checktheentireapplianceregularlyforproperoperation.Waterreservoir,glasscarafe,
and filter basket may not have any scratches or cracks, the power cord may not be broken,
crackly or melted, and the pins of the power plug must be clean, smooth, and without
discoloration. To avoid risk of fire, electric shock or any other damage and/or injuries to
persons, do not operate the appliance, when the appliance or any part of it was subject
to inadmissible strain (e.g. overheating, mechanical or electric shock, leakage), or if the
appliance is not working properly. Do not use the appliance, if water accumulates under
the appliance during proper operation. In this case, immediately unplug the appliance and
return the entire appliance (including all parts and accessories) to an authorised service
centre for examination and repair.
• Donot attempt tooperate the appliancebyusing anypartsor accessories(e.g.glass
carafe and filter basket) or consumables (filter bags) not recommended by the manufacturer
to avoid risk of overheating, fire, and/or electric shock. Damaged or unsuitable parts
could break or become distorted during operation, and cause severe injuries to persons,
or damage to the appliance. Especially, usage of unsuitable filter bags or other
vessels than the supplied glass carafe can cause hazards due to hot water
or steam, or electric shock, or fire.
• Whenmoving the appliance,alwaysgrasp theappliancewith bothhandsat the side
panels near the bottom. DO NOT carry the appliance at the water reservoir or filter basket
chamber to avoid damage.
• Operatetheapplianceonawellaccessible,stable,level,dry,heat-resistant,andsuitable
large table or counter. Do not use the appliance in wet or damp areas. Always keep the
appliance and the table or counter clean and dry, and wipe off spilled liquids immediately.
Do not place the appliance near the edge of the table or counter or on wet
or inclined surfaces or where it can fall.
• Do not place the appliance or any part of it on or near hot surfaces (e.g. heater, gas
burner, grill or oven). Do not operate the appliance beneath any heat-sensitive or moisturesensitive materials or beneath boards or drop-lights to avoid damage caused by steam,
condensate or fire. During operation keep the appliance in an appropriate distance of at
least 20 cm on each side to furniture, walls, boards, curtains and other objects.
• Closesupervisionisnecessarywhentheapplianceisusednearyoungchildren.Do not
let young children play with any parts of the appliance or the packaging.
The appliance is not intended for use by children or infirm persons without supervision. For
storage always keep the entire appliance dry and clean and where young children cannot
reach it.
24
Page 5

• Donot place anyclothes,tissues orotherforeign objects below,oron theappliance,
on the warming plate, in the water reservoir or filter basket, to avoid risk of fire, electric
shock and overheating. Do not place any hard, sharp-edged and/or heavy objects on the
appliance or any part of it.
• Always ensurethat the appliance is assembled completely and correctly, before switching ON. This holds for activating automatic operation (AUTO ON button) as well. Very
hot water and steam pour out of the holes on the inner side of the cover of the appliance.
Always allow the appliance to cool down before opening the cover.
• Fornormaloperationonlyfillpuredrinkingwaterinthewaterreservoir.Fordecalcifying
use vinegar solution. (See: Decalcifying Your Coffeemaker) Do not fill in any other
liquids. DO NOT overfill the water reservoir, exceeding the water level
indicator 12 (maximum)! Fill the water reservoir with care to avoid spilling water on
the appliance. Immediately wipe off spilled water. Do not operate the appliance without the filter basket properly in place. Only use filter bags recommended for the
appliance.
•If liquids got into the housing of the appliance, or run out from under
the appliance during the brewing cycle, immediately switch OFF (ON/OFF
button), unplug, allow to cool down to room temperature and completely
empty the water reservoir. Thereafter send the appliance to an authorized
service centre for repair. However, when opening the cover, condensate could drip
from the cover and run down on the back of the appliance. In this case, immediately wipe
off the condensate.
• AlwaysswitchOFFtheappliance,unplug, and allowto cooldown beforecleaning or
moving the appliance, or if you do not wish to use the appliance for some days.
•DONOTplacetheapplianceoranypartofitinanautomaticdishwasher!
•Do not use abrasive cleaners, cleaning pads or any hard and sharp objects (e.g.
metal scouring pads) or aggressive liquids or chemicals (e.g. desinfectant, decalcifier) for
cleaning. This applies the glass carafe too, because scratches can possibly cause glass to
break. Do not immerse the appliance or power cord in water or any other liquid. Do not
spill or drip any liquids on the appliance, power cord, or the heating plate to avoid risk
of fire and electric shock. When liquids are spilled on the exterior or under the appliance,
immediately switch OFF the appliance, unplug the power cord and dry the appliance and
the table or counter. Do not handle the appliance or any part of it with violence. Do not
attempt to clean or dry the interior of the water reservoir with clothes, brushes or anything
similar.
• Theglasscarafe could breakorburston careless handling.Alwaystakespecialcare,
when handling the glass carafe to avoid severe injuries or damage due to hot water and/
or splinters.
• Do not use the glass carafe for any other than the intended use, or with any other drip-
type coffeemaker, on a range top, or in a microwave oven. Do not stir inside the glass
carafe with any hard objects (e.g. spoon or cooking utensils).
• Donotuseacrackedorscratchedglasscarafeorifthehandleislooseorweakened.Do
not drink the beverage, if the glass carafe is damaged in any way (e.g. cracked, broken).
Do not drink directly from the glass carafe. Always check beverages for broken glass before
drinking.
25
Page 6

• Donotuseicecubesintheglasscarafe,orplacetheglasscarafeintherefrigerator.Do
not place the hot glass carafe on a cold surface, because the glass could burst. When in
use, always grasp the glass carafe by the handle to move it.
A short power cord is provided to reduce the risks of becoming entangled in or tripping
over the power cord.
• Placetheappliancenearasuitablewallpowersockettoconnecttheappliancedirectly
to a mains power supply outlet with protective conductor (earth/ground) connected properly. Ensure that the voltage rating of your mains power supply corresponds to the voltage
requirements of the appliance (220/230 V, 50 Hz, AC, rated for 16 A). Exercise caution,
when using an extension cord. The extension cord must be grounded properly and rated
for 16 A. Do not use a multi socket outlet. The installation of a residual current safety
switch with a maximum rated residual operating current of 30 mA in the supplying electrical
circuit is recommended. If in doubt, contact your electrician for further information.
• Alwayshandlethepowercordwithcare.Thepowercordmayneverbeknotted,twisted
or squeezed. Do not pull or strain the power cord. Do not let the plug or power cord hang
over the edge of the table or counter. Take care that the power cord will not get tangled
up, and no one will trip over the power cord or pull the appliance by the power cord, especially when young children are near. Always grasp the plug to disconnect the appliance
from the power outlet. Do not touch the plug or appliance with wet hands, when the plug
is connected to the power supply.
• Immediatelyunplugtheappliance,whentheapplianceoranypartofthe appliance is
wet or leaks and/or water is running from under the appliance during operation.
• Thisapplianceisintendedtobeusedinhouseholdandsimilarapplicationssuchas:
– staff kitchen areas in shops, offices and other working environments;
– farm houses;
– by clients in hotels, motels and other residential type environments;
– bed and breakfast type environments.
High Temperature - Risk of Burns
• Somepartsoftheappliancegetveryhotduringoperationandhotwaterorsteampour
out (cover, glass carafe). Additionally, the warming plate is electrically heated as long
as the appliance is switched on. Even some minutes after switching off the appliance, the
appliance and some parts of it are still hot. During operation only touch the appliance and
any part of it at the operating buttons and handles.
• Evenwiththecoverproperlyclosed hot steamcan pourout ofthe appliance. Do not
hold your hands, arms, or face, or any objects sensitive to moisture or heat over the appliance to avoid injuries and damage. The warming plate is intended for keeping warm the
supplied glass carafe exclusively. Do not place any other objects on the warming plate.
• Alwaysallowtheappliancetocooldowntoroomtemperaturebeforeopeningthecover
and/or disassembling any part of the appliance (e.g. filter basket) and/or moving or cleaning the appliance. Always empty the water reservoir completely, before transportation,
cleaning or storing the appliance.
26
Page 7

TECHNICAL SPECIFICATIONS
Model: Art.-No. 42700 Design Coffee electronic
Power supply: 220/230 V AC, 50 Hz
Power consumption: 950 Watt
Length of power cord: ca. 110 cm
Weight: ca. 2.7 kg
Dimensions: (width x depth x height) ca. 230 mm x 225 mm x 355 mm
Maximum capacity of water reservoir: 1.7 Litre (ca. 12 cups)
Filter bags: Coffee filter bags, size 1 x 4
Certification:
OPERATION
Before First Use
WARNING: DO NOT allow young children play with the appliance, or any
part of it, or the packaging!
It is important to carefully remove all packaging and shipping/promotional materials as well
as any price-tags. Ensure that there are no foreign objects (e.g. packaging) in the water
reservoir or filter basket, before operating the appliance. Exclusively place the appliance
on a stable, flat, and heat and moisture resistant surface of suitable size. (See: Important
Safeguards) DO NOT place the appliance on an inclined surface.
1. Unpack the appliance carefully, and remove all packaging and shipping/promotional
materials, but DO NOT remove the model label. Check, if there are any parts damaged or
missing.
2. Place the coffeemaker on a level (not inclined!), hard, and flat surface near a suitable
wall power outlet. (See: Important Safeguards) and connect the coffeemaker to the power
supply. The time display in the centre of the front panel illuminates.
3. Before first use and after storing it is recommended that you clean your coffeemaker by
simply running through two brewing cycles with empty filter basket (without filter bag
and coffee powder) as described in the section below. (See ›Preparing Some Cups of
Coffee‹)
27
Page 8

Preparing Some Cups of Coffee
WARNING: Always special care is necessary, when using any electrical
appliance for heating water, to avoid risks of overheating, fire and electric
shock. DO NOT leave the appliance unattended when it is in reach of young
children. Always ensure that the appliance is assembled completely and correctly, before
switching ON (ON/OFF button) the appliance. Do not move the appliance during or immediately after operation.
Do not place any clothes, tissues or any other foreign objects on or under the appliance,
or on the warming plate. The warming plate is intended solely for keeping warm the glass
carafe. DO NOT place any clothes or napkins/serviettes or any other objects/
vessels except the glass carafe on the warming plate. Other vessels could melt
or brake, or cause overheating on the warming plate, and moreover, the Pause & Serve
mechanism will not open, thus coffee will overflow the filter basket and could get into the
interior of the appliance. Regularly check the entire appliance for proper operation and
leakage.
(See: ›Important Safeguards‹) Do not allow liquids run under or on the appliance. If liquids
got into the housing of the appliance, or run out from under the appliance
during the brewing cycle, immediately switch OFF (ON/OFF button), and unplug the appliance. (See Important Safeguards) However, when opening the cover, condensate could
drip from the cover and run down on the back of the appliance. In this case, immediately
wipe off the condensate.
Glass could brake or burst on careless handling, and splinters could get into the interior.
DO NOT drink directly from the glass carafe. DO NOT use the glass carafe or drink the
contents of the glass carafe, when there are cracks, scratches or splintered edges in the
glass carafe.
Do not overfill the water reservoir. When filling up the water reservoir, always
ensure that the water level may not exceed the water level indicator 12.
Only use clean tap water. Do not fill in mineral water.
DO NOT operate the appliance without the filter basket properly installed!
Only use filter bags of suitable size (1 x 4). Thoroughly lay out the filter basket with the
filter bag. The filter bag must fit correctly into the filter basket, and may not protrude from
the brim of the filter basket.
1. Fill the carafe with fresh, cold tap water (preferably filtered).
CAUTION: Always avoid spilling any water on the appliance. While filling the water reser-
voir, please watch the water level indicator to avoid over filling. There are overfilling holes
on the back of the water reservoir to prevent exceeding the capacity of the coffeemaker.
If you add too much water, it will leak out from these holes and run down the back of the
appliance onto your counter. Always wipe off spilled water immediately.
2. Open the cover on top of the appliance and pour the water into the water reservoir to the
desired level. There is a little tab on the right side of the cover you can use to lift the cover.
The number of cups is shown by the water level indicator. We recommend making at least
4 cups.
3. Pour away the residue of water and place the glass carafe on the warming plate of the
coffeemaker. The lid of the glass carafe must be closed! Otherwise, the Pause &
Serve mechanism will not open and coffee will overflow over the brim of the filter basket.
28
Page 9

4. Insert the filter basket into the appliance. The insert guide nipple
at the upper brim of the filter basket must point to the back side of
the coffeemaker. Gently press the filter basket down until it snaps
into place.
5. Fold the seamed edges of a suitable coffee filter bag (size: 1
x 4), and carefully lay out the interior of the filter basket with the
filter bag.
Note: Ensure not to damage the filter bag. Always use one single suitable filter bag that
will not protrude from the filter basket, but fill out the filter basket completely. Ensure that
the filter bag doesn’t bend or fold. Use a fresh filter and fresh coffee powder for each
brewing cycle.
CAUTION: Do not overfill the filter bag to avoid that the coffee will overflow to the brim
of the filter basket. Do not use more than 12 level measuring scoops of coffee.
6. Fill in the desired amount of coffee powder in the filter bag. In most cases, a level measu-
ring scoop of coffee powder pro cup of coffee is suitable.
7. Close the cover of the coffeemaker.
WARNING: Ensure the glass carafe is correctly placed on the warming plate. The
cover of the coffeemaker and the lid of the glass carafe must be closed
during operation. Otherwise, hot water and steam could spill out, and the Pause &
Serve mechanism will not open. The cover of the coffeemaker may not protrude from the
upper edge of the coffeemaker. If the Pause & Serve mechanism is still closed the coffee will
overflow over the brim of the filter basket and drip onto the base of the appliance.
The coffeemaker and the glass carafe get very hot during the brewing cycle. Please handle
with care. DO NOT lift the cover of the appliance during or immediately after the brewing
cycle. Even if no water is draining from the filter basket, extremely hot water/coffee can
spill out from the filter basket and cause scalding. Do not move the coffeemaker during or
immediately after operation.
8. Press the ON/OFF button to switch on the coffeemaker and start the brewing cycle.
Additionally the heating element of the warming plate is activated. The indicator lights of
the ON/OFF button (red) and the WARMER button (orange) illuminate.
9. Ensure that water/coffee is dripping from the filter basket several seconds after switching
ON the coffeemaker. If not, check whether the glass carafe is correctly in place on the warming plate. If the problem still persists, IMMEDIATELY unplug the unit and wait 10 minutes
before opening and checking the filter basket. (See: ›Solving Problems‹)
The brewing time depends on the amount of water in the water reservoir. Expect a brewing
time of about 15 to 20 minutes for 12 cups of coffee. The warming plate will keep your
coffee warm for up to 2 hours. Thereafter, the appliance switches OFF automatically.
Tip: When the brewing cycle needs noticeably too much time but at least after 3 months,
you should decalcify your coffeemaker. Doing so, you will save energy and avoid that the
taste of your coffee will be affected by lime deposits. (See: ›Decalcifying Your Coffeemaker‹)
Connected to the power supply, the appliance uses a little amount of electricity, even when
switched OFF. Do not leave the appliance connected to the power supply needlessly.
29
Page 10

10. When the brewing cycle ends, and the water reservoir is empty, there may still be hot
liquid in the filter basket. Wait a few minutes for the rest of the liquid to drain, before finally
removing the glass carafe.
11. The coffeemaker will switch OFF automatically after 2 hours. However, always switch
OFF the coffeemaker manually (ON/OFF button), when the glass carafe is empty or you
no longer want to keep the coffee hot to avoid wasting energy. When the coffeemaker is
switched OFF, the red light will no longer be illuminated.
12. After the coffee ground have cooled, you can remove and empty the filter basket. (See:
›Cleaning the Filter Basket‹).
13. If two or more pots of coffee are to be made in succession, we recommend allowing
the coffeemaker to cool for 10 minutes and rinse the filter basket between each brewing
cycle.
14. When you finished brewing, you should unplug the coffeemaker, to avoid unnecessary
power consumption. However, keep in mind that any programming for automatic operation
will be deleted by doing so. (See Automatic Operation)
Freshness Timer and Automatic Switching Off
After the brewing cycle has finished, the Freshness Timer
starts counting the elapsed time. Every 5 minutes, a dash will
appear on the outside edge of the clock face.
The coffeemaker will keep your coffee warm during this period
of time. The timer continues running until you switch off, but
up to 120 minutes at the most, at which time the coffeemaker
will switch OFF automatically.
The Pause & Server Function
The Pause & Serve function allows you to pour out some coffee, while the brewing cycle is
still running. There is no need to interrupt the brewing cycle manually.
WARNING: DO NOT remove the glass carafe from the coffeemaker for more than a few
seconds, because this will temporarily stop the coffee from dripping into the carafe, it does
not stop the brewing cycle. ALWAYS ensure that the Pause & Serve mechanism
is closed and the coffee will not run on the warming plate, when removing
the glass carafe. When the coffeemaker is switched ON and there is still water in the
water reservoir, the filter basket could overflow and water could run into the housing of the
appliance. Thus, the carafe must be immediately returned to the warming plate to open the
Pause & Serve mechanism.
1. You may take the glass carafe out of the coffeemaker for a short time to pour out some
coffee. The Pause & Serve mechanism stops the dripping of coffee from the filter basket.
CAUTION: If coffee ground or lime block the Pause & Serve mechanism, the coffee will
drip on the warming plate. In this case IMMEDIATELY place back the glass carafe on
the warming plate, wait until the filter basket has completely run dry and cooled down.
Thereafter, clean the filter basket thoroughly. (See: Cleaning the Filter Basket) However, it
is normal, when just one or two drops fall from the filter basket, after removing the glass
carafe.
30
Page 11

2. IMMEDIATELY put back the glass carafe on the warming plate to avoid that the filter
basket will overflow. Doing so, ensure that the coffee drips into the glass carafe again.
Adjusting the Warming Plate Temperature
The coffeemaker offers the option of adjusting the temperature setting of the warming plate
to slightly reduce the temperature of the coffee after it has been brewed. When starting
a new brewing cycle manually, a steady orange light indicating the higher temperature
setting will appear on the WARMER button.
1. In order to reduce the temperature setting of the warming plate, push the WARMER
button once, and the steady orange light will then blink.
The Temperature setting (high or low) will continue to operate as long as the unit is ON.
After switching off, the coffeemaker will maintain the temperature of the higher setting,
indicated by the steady orange light.
2. To increase the warming plate temperature to normal operation, simply press the
WARMER button again. The orange light will shine continuously.
Automatic Operation
Using the automatic operation feature, you can program your coffeemaker to prepare your
coffee automatically on a pre-defined time (e.g. on your lunch break).
WARNING: Please keep in mind that the coffeemaker will be left unattended, while con-
nected to the power supply, and during operation. Thus, special care is necessary to avoid
injuries to persons or damage caused by fire, electric shock or hot liquids or steam. Thus,
closely and meticulously keep to the instructions in the section Important
Safeguards. Always ensure that you prepared the coffeemaker correctly and completely
for the brewing cycle, before activating automatic operation.
We strongly recommend, performing and attending a normal brewing cycle
to learn, how to operate your coffeemaker correctly, before using automatic
operation. In this way you will recognize problems, arising from handling
your coffeemaker.
Adjusting the Clock
You may set the clock any time before, during or after brewing. However, you must connect
the coffeemaker to the power supply. The coffeemaker will keep the setting as long as it is
connected to the power supply.
1. Press the HOUR or MIN button to set the current time. Press and hold the button and the
hands of the clock will move around the clock face and stop, when you release the button.
Note: AM indicates the morning hours; PM indicates the afternoon.
Selecting the Auto-Brew Start Time
Note: For adjusting the start time the clock must be set. (See: Setting the Clock)
1. Press the PROGRAM button. The letter >P< will blink on the lower left of the display.
2. Adjust the time you want to start the brewing cycle by using the HOUR and MIN buttons
following the procedure for setting the clock.
31
Page 12

Note: Make sure the AM (in the morning) or PM (in the afternoon) indicator is properly
set. If the wrong symbol is displayed, press the HOUR button to let the little hand move
around the clock for additional 12 hours.
3. After ca. 20 seconds without any key pressed, the coffeemaker will automatically switch
back to normal operation, the blinking program icon >P< will be deleted from the display
and the clock will return to the current time.
4. To check or change the auto brew start time, simply press the PROGRAM button and the
pre-set start time will be shown on the LCD display and >P< blinks again. You can change
the adjusted start time as you like. With no buttons pressed, the display will automatically
return to the current time after ca. 20 seconds.
Starting Automatic Operation
WARNING: Special care is necessary, when leaving any electrical appli-
ance unattended while connected to the power supply and during operation. Always ensure that the coffeemaker is prepared correctly and completely for a brewing cycle, according to the instructions in section Preparing
Some Cups of Coffee, before starting automatic operation, and leaving the
coffeemaker unattended, while connected to the power supply and during operation.
Especially ensure that the filter basket and glass carafe are inserted correctly and the cover
of the coffeemaker is closed properly.
Note: Automatic operation is possible only, when clock and start time are adjusted. The
temperature setting of the warming plate used during brewing will be the same as what
was set during programming.
1. Ensure that you prepared the coffeemaker correctly and completely for the brewing cycle.
(See: ›Preparing Some Cups of Coffee‹)
WARNING: Ensure that the filter basket and glass carafe are inserted pro-
perly. The covers of coffeemaker and glass carafe must be closed fully. The
glass carafe must open the Pause & Serve mechanism.
2. Adjust the clock and select the desired start time. (See: ›Adjusting the Clock‹ and
›Selecting the Auto Brew Start Time‹)
3. Press the AUTO ON button. A green light will appear indicating that automatic operati-
on is ON. The prepared brewing cycle will be started on the preselected time without any
further manual action.
Tip: You can switch off automatic operation quite easily by pressing the AUTO ON button
again. The green light will expire and the coffeemaker is in normal operation again.
When the brewing cycle starts, the green light on the AUTO ON button will go out and
the red light of the ON/OFF button will be illuminated to indicate that the coffeemaker
is in operation. After the brewing cycle, the coffeemaker is in normal operation again,
keeping your coffee warm and displaying the Freshness Timer. (See: ›Freshness Timer‹ and
›Automatic Switching Off‹)
WARNING: Before activating the automatic operation again by pressing
the AUTO ON button, always ensure that the coffeemaker is prepared completely and correctly for a brewing cycle!
32
Page 13

Tip: The coffeemaker saves the time settings (clock and start time) as long as it is connected
to the power supply. To restart automatic operation on the same pre-set time within the
next 24 hours, carefully prepare your coffeemaker for the brewing cycle
and, thereafter, simply press the AUTO ON button. The green LCD light will illuminate on
the AUTO ON button.
USEFUL TIPS
You can easily learn how to prepare a good coffee. In this chapter you will find some hints
for this purpose. Generally, coffee is the best and freshest shortly after brewing.
Tip: Choice the taste of your coffee according to your own particular liking. The coffee
brand and the way of grinding the coffee (fine or coarse) are essential for the results.
Just give it a try! Store your coffee (powder or whole beans) in a closely shut container
on a cool, dry place. However, it is better not to place the coffee in the refrigerator or the
freezer compartment.
You may buy grinded coffee. In this case, you should consume the coffee within a week,
because the flavour will evaporate gradually. The way of grinding (fine or coarse) will affect
the brewing time, and as a result, the quality of your coffee. However, make sure that the
coffee powder is suitable for drip coffeemakers.
We recommend buying coffee beans and grinding your coffee just before use. Coffee
beans should not be stored for more than 1 month.
Experiment with the amount of coffee used in order to adjust the flavour to your taste. Start
with the coffee/water ratio you normally use for preparing coffee. If you prefer strong coffee, we recommend using one level measuring scoop for each cup (ca. 100 – 150 ml) or
10 level measuring scoops per full pot of coffee, but never use more than 12 level
measuring scoops of coffee powder.
The amount of brewed coffee will be a little less than the water placed in the water reservoir
since some water is absorbed by the coffee ground and the filter bag.
CARE AND CLEANING
WARNING: Cover, filter basket, glass carafe, and warming plate will get very hot during
operation. Additionally, hot water and steam can pour out during operation. Always switch
OFF (ON/OFF button), unplug, allow cooling down, moving or cleaning the appliance.
Additionally, empty the water reservoir before transportation or storage.
Do not place the appliance or any part of it in an automatic dishwasher! Do
not immerse the appliance or power cord in any liquids. Do not pour any
liquids over the appliance or the power cord.
Do not use aggressive chemicals (bleach, desinfectant, or decalcifier), abrasive cleaners,
or hard or sharp objects on any part of your coffeemaker.
Do not use violence to avoid damage. Especially the Pause & Serve mechanism of the
filter basket and the hinges of the covers of water reservoir and glass carafe are sensitive
to careless handling.
33
Page 14

Cleaning the Filter Basket
WARNING: Do not lift the cover of the coffeemaker during or immediately
after the brewing cycle. Even if the water reservoir seems to be empty, hot water and
steam could spit out of the holes in the middle of the cover and cause scalding. After brewing is completed, there can still be some HOT liquid in the filter basket.
Always switch OFF the appliance (ON/OFF button), before opening the cover of the
appliance. Allow to drain completely, and to cool down for at least 10 minutes. Remove
the filter basket carefully.
1. Switch OFF the appliance (ON/OFF button), and allow to cool down for at least 10
minutes. Ensure that the cover of the coffeemaker has cooled.
Note: When lifting up the cover of the coffeemaker, condensation can drip down the back
and onto your counter. This does not mean that the appliance is leaking. Immediately
wipe off the condensate using a clean dry cloth.
2. Open the cover of the coffeemaker and carefully remove the filter basket. For this, grasp
the tabs on each side of the filter basket, and lift the filter basket straight up from the coffeemaker.
3. Discard the used filter bag and grounds in the dustbin for domestic refuse. However, the
grounds (without filter bag!) can be composted.
Note: Do not wash away the coffee grounds in the sink.
CAUTION: Always handle the filter basket with care to avoid damage to the Pause &
Serve mechanism.
4. Rinse the filter basket after each brewing cycle with tap water. On occasion, carefully
clean the filter basket with warm dishwater using a soft nylon brush.
Cleaning the Coffeemaker
1. Always unplug the appliance and allow cooling down before cleaning.
2. Open the cover of the coffeemaker, grasp the filter basket at the tabs, and pull out the
filter basket. Empty the filter basket. (See: ›Cleaning the Filter Basket‹)
CAUTION: The hinges of the covers of the appliance and/or glass carafe are sensitive to
careless handling. Handle with care to avoid damage.
3. Remove the glass carafe from the coffeemaker, carefully clean the glass carafe in warm
dishwater.
4. Wipe the exterior of the coffeemaker and the warming plate with a soft, damp cloth. In
doing so, take care not to damage the hinge of the cover.
5. Stubborn stains on the warming plate may be removed by use of a plastic mesh pad or a cloth
dampened in vinegar.
6. Thereafter, using a soft, clean cloth, dry the exterior of the coffeemaker and all its parts
thoroughly.
34
Page 15

Decalcifying Your Coffeemaker
CAUTION: Do not immerse the warming plate or main housing in water or any other
liquid. Do not try to clean the interior of the water reservoir with a cloth, as this will leave
a residue of lint that may clog your coffeemaker. Do not poke around in the water reservoir
to avoid damage. Just rinse with cold water periodically. Do not operate the appli-
ance without the filter basket properly in place. Do not use any aggressive
chemicals or decalcifier.
The build-up of lime in drip coffeemakers is normal and is caused by the minerals commonly found in drinking water. When your appliance needs decalcifying you will notice an
obvious slow down in brewing time. This results in an increase of energy consumption and
possibly the taste of the coffee will be affected.
Thus, depending on the water hardness and usage, your coffeemaker needs decalcifying
periodically, to remove lime deposits (every 2 – 3 months). For this, we recommend a solution of two tablespoons of white vinegar in 1.5 Litres of cold water.
1. For decalcifying, always install the empty filter basket properly.
2. Pour the vinegar solution into the water reservoir and place the glass carafe on the war-
ming plate. Do not use a filter bag and coffee.
3. Connect the appliance to the power supply, and press the ON/OFF button to switch ON
the appliance.
4. When the brewing cycle is finished, empty the glass carafe and rinse with water.
5. Refill the water reservoir with cold tap water and repeat the brewing cycle with water
only.
6. Refill the water reservoir again with cold tap water and repeat the brewing cycle a
second time using only water. This will rinse out any remaining vinegar solution. Thereafter,
the coffeemaker is ready for use again.
Alternatively you can use a standard liquid descaler. In this case follow the instructions on the
descaler packaging.
STORAGE
WARNING: Always unplug the coffeemaker, when it is not in use for a lon-
ger period of time. lways wait until the appliance completely cooled down, than empty filter
basket, glass carafe and water reservoir before storing. Always place the appliance on a
stable, level, clean, and dry surface, where it is save from inadmissible strain (e.g. fall, shock,
frost) and out of reach of young children. The power cord may never be knotted, twisted or
squeezed. Do not place any hard or heavy objects on the appliance or any part of it. Do not
pull or strain the power cord. Do not let the plug or power cord hang over the edge of the
surface. Ensure that no one can pull the appliance by the power cord.
1. Insert the filter basket properly and close the cover.
CAUTION: Do not grasp the appliance by the water reservoir or filter basket chamber.
2. To move the appliance, grasp it with both hands on the side panels near the bottom.
Place the appliance on a suitable, stable surface, where it is out of reach of young children.
Place the glass carafe on the warming plate of the appliance.
35
Page 16

3. Carefully and loosely lay the power cord around the appliance. Doing so, do not pull
or bend the power cord. Ensure that no one will pull the appliance by the power cord,
especially when young children are near.
To move the coffeemaker, grasp it with both hands on the side panels. Always place the
coffeemaker on a stable, clean, and dry surface, where it is save from inadmissible strain
(e.g. fall, shock, frost) and out of reach of young children. Do not place any hard or
heavy objects on the coffeemaker.
You may store the coffeemaker with the bun warmer rack hanging on the two hooks on the
rear of the coffeemaker housing.
NOTES FOR DISPOSAL
Dispose of the appliance and packaging must be effected in accordance with the
corresponding local regulations and requirements for electrical appliances and packaging. Please contact your local disposal company.
Do not dispose of electrical appliances as unsorted municipal waste, use separate
collection facilities. Contact your local government for information regarding the
collection systems available. If electrical appliances are disposed of in landfills or dumps,
hazardous substances can leak into the groundwater and get into the food chain, damaging
your health and well-being. When replacing old appliances with new once, the retailer is
legally obligated to take back your old appliance for disposal at least for free of charge.
INFORMATION AND SERVICE
Please check www.gastroback.de for further information. For technical support, please
contact Gastroback Customer Care Center by phone: +49 (0)4165/22 25-0 or e-mail:
info@gastroback.de.
WARRANTY
We guarantee that all our products are free of defects at the time of purchase. Any demonstrable manufacturing or material defects will be to the exclusion of any further claim and
within warranty limits of the law free of charge repaired or substituted. There is no warranty
claim of the purchaser if the damage or defect of the appliance is caused by inappropriate
treatment, over loading or installation mistakes. The warranty claim expires if there is any
technical interference of a third party without an written agreement.
The purchaser has to present the sales slip in assertion-of-claim and has to bear all charges
of costs and risk of the transport.
36
Page 17

TROUBLESHOOTING
Problem Possible Reason The Simple Solution
You cannot close the
cover of the coffeemaker
properly.
Coffee ground is in the
glass carafe.
Coffee drips on the warming plate, when removing the glass carafe.
On each use, the clock
starts at 0:00.
You can not enter the
desired settings for automatic operation.
You can not pre-select
the reduced temperature
of the warming plate for
automatic operation.
The filter basket is not
inserted correctly.
The filter bag is too large. Only use filter bags of suitable size (1 x 4).
The filter bag overflowed. Use less coffee powder.
The filter bag is clogged. Only use one single filter bag at the same time, and coffee pow-
The Pause & Serve mechanism is blocked.
The setting of the clock will
be deleted when the appliance is unplugged. Also after
power failure, the clock starts
at 0:00
The clock is not adjusted. Adjust the clock.
The appliance is switched
OFF during programming.
The insert guide nipple on the filter basket must face to the back
side to the coffeemaker. Gently press down the filter basket until
it engages noticeably.
der that is suited for drip coffeemakers.
IMMEDIATELY place the glass carafe back on the warming plate.
Wait until the filter basket is completely empty. Clean the filter
basket thoroughly. See: ›Care and Cleaning‹
Adjust the clock.
You can only program the temperature of the warming plate,
if the appliance is in operation (red light of ON/OFF button and
orange light of WARMER button are illuminated).
Adjust the clock. Especially, pay attention to the symbols AM (in
the morning) and PM (in the afternoon)
The automatic operation
did not start at the
selected start time.
The coffee does not drip in
the glass carafe. There is
no water in the filter bag.
The setting of the clock is
incorrect.
The start time is not programmed correctly.
The water reservoir is empty. Fill in a sufficient amount of water.
The appliance is switched
OFF; probably automatic
operation (AUTO ON) is
selected.
Adjust the start time. Especially, pay attention to the symbols AM
(in the morning) and PM (in the afternoon).Adjust the start time.
Especially, pay attention to the symbols AM (in the morning) and
PM (in the afternoon).
Press the ON/OFF button to switch the appliance ON.
37
Page 18

Problem Possible Reason The Simple Solution
Coffee runs down on the
outer side of the filter
basket and glass carafe
and drips on the warming
plate
WARNING:
IMMEDIATELY switch OFF
The coffee powder is too fine. Use coffee powder suitable for coffeemakers.
Too much coffee powder is in
the filter bag.
The filter bag is clogged or
unsuited for the coffeemaker.
The filter basket is not instal-
led properly.
Measure out a sufficient amount of coffee powder, using the
measuring scoop. (See Preparing Some Cups of Coffee)
Always use filter bags recommended for your coffeemaker. Do not
use more than one filter bag at the same time.
Insert the filter basket properly. See Preparing Some Cups of
Coffee
and unplug
the appliance.
The Pause & Server mechanism is still closed
The Pause & Server mechanism closes the opening in the bottom
of the filter basket, when the glass carafe is not correctly in place
and/or you use an unsuited glass carafe. Only operate the appliance with the supplied glass carafe.
The brewing cycle needs
too much time.
The pipes in the appliance are
clogged with lime.
Decalcify the appliance.
The coffee runs through
too fast and/or is watery.
The coffee powder is grounded too coarsely.
The used amount of coffee
powder is too small.
The coffee is too cold. The warming plate tempe-
rature is reduced, and the
orange light of the WARMER
button blinks.
The appliance makes pulsing, pumping and sucking
These are normal noises
during operation.
noises during operation.
Only use coffee powder suited for drip coffeemakers.
Measure out a sufficient amount of coffee powder, using the
measuring scoop. (See Preparing Some Cups of Coffee)
Press the WARMER button to switch back to normal temperature.
-/-
38
 Loading...