

Page 1
DESIGN KAFFEEMÜHLE
ADVANCED PLUS
BEDIENUNGSANLEITUNG
Art.- Nr. 42642 » Design Kaffeemühle Advanced Plus «
Bedienungsanleitung vor Gebrauch unbedingt lesen!
Modell- und Zubehöränderungen vorbehalten!
Nur für den Hausgebrauch!
Deutsch
English
www.gastroback.de
Page 2

Wir legen viel Wert auf Ihre Sicherheit. Deshalb bitten wir Sie, alle Hinweise und
Anleitungen, die mit dem Gerät geliefert werden, sorgfältig und vollständig durch-
zulesen, bevor Sie das Gerät in Betrieb nehmen. Dadurch lernen Sie auch alle
Funktionen und Eigenschaften Ihres Gerätes kennen. Bitte befolgen Sie sorgfältig
alle Sicherheitshinweise!
INHALTSVERZEICHNIS
Sicherheitshinweise ................................................................................... 5
Allgemeine Hinweise zur Sicherheit ........................................................ 5
Wichtige Sicherheitshinweise für alle Elektrogeräte .................................... 7
Bewegliche Bauteile – Verletzungsgefahr ................................................. 8
Technische Daten ..................................................................................... 9
Ihre neue Kaffeemühle kennen lernen ......................................................... 10
Eigenschaften Ihrer neuen Kaffeemühle ....................................................... 11
Tipps für beste Ergebnisse ........................................................................ 12
Vor der ersten Verwendung ...................................................................... 12
Bedienung ............................................................................................ 13
Den Mahlgrad einstellen .................................................................... 14
Die abgegebene Menge einstellen ...................................................... 14
Den Bohnentrichter füllen .................................................................... 15
In den Vorratsbehälter mahlen ............................................................. 16
In den Siebträger mahlen ................................................................... 17
Blockierungen des Mahlwerks beseitigen .............................................. 18
Hilfe bei Problemen ................................................................................ 19
Pflege und Reinigung .............................................................................. 21
Das Gerät zerlegen ........................................................................... 21
Das Gerät reinigen ........................................................................... 22
Das Gerät zusammensetzen ................................................................ 23
Aufbewahrung ....................................................................................... 24
Entsorgungshinweise ............................................................................... 25
Information und Service ........................................................................... 25
Gewährleistung/Garantie ........................................................................ 26
2
D
Page 3

WICHTIGER HINWEIS – BITTE SORGFÄLTIG LESEN –
BEVOR SIE DAS GERÄT IN BENUTZUNG NEHMEN!
Alle Produkte von GASTROBACK® sind für die Verarbeitung von Nahrungs- und Lebensmitteln vorgesehen. Aus Gründen des Gesundheitsschutzes und der Hygiene dürfen
deshalb Produkte nicht zurückgegeben werden, die alltäglich benutzt oder auch
nur einmalig gebraucht sind. Prüfen Sie die Ware nur so, wie Sie es in einem Laden-
geschäft auch tun würden.
Sie müssen für einen etwaigen Wertverlust der Waren nur aufkommen, wenn dieser
Wertverlust auf einen zur Prüfung der Beschaffenheit, Eigenschaften und Funktionsweise der Waren nicht notwendigen Umgang zurückzuführen ist.
Ein nicht notwendiger Umgang für die Prüfung der Beschaffenheit, Eigenschaften
und Funktionsweise der Waren ist die Verarbeitung von Lebensmitteln zu Speisen
und Getränken.
Haben Sie Fragen zu Produkten von GASTROBACK® oder funktioniert Ihr Gerät zur
Zeit nicht einwandfrei, benötigen Sie Zubehör oder Ersatzteile für Ihr GASTROBACK®
Produkt, dann nehmen Sie bitte vor der Rücksendung zuerst Kontakt zu unserem Kundenservice auf.
GASTROBACK® Kundenservice Hotline:
Tel.: 04165 – 22 25 0
Montag bis Freitag (außer an Feiertagen) von 8 Uhr bis 16 Uhr
E-Mail: info@gastroback.de
3
D
Page 4

SEHR GEEHRTE KUNDIN, SEHR GEEHRTER KUNDE!
Die DESIGN KAFFEEMÜHLE ADVANCED PLUS zerkleinert die Kaffeebohnen nicht
nur sondern erzeugt ein Kaffeepulver mit gleichmäßiger Korngröße (Mahlgrad), das
perfekt an die verwendete Brühmethode und Ihren individuellen Geschmack angepasst werden kann. Dazu arbeitet die Kaffeemühle mit massiven Mahlwerkzeugen
aus Edelstahl. Die beim Mahlen entstandene Wärme wird zum größten Teil abgeleitet, um das Aroma der Kaffeebohnen beim Mahlen möglichst wenig zu beeinflussen.
Dadurch erfüllt Ihre neue DESIGN KAFFEEMÜHLE ADVANCED PLUS die Anforderungen der amerikanischen und europäischen Barista.
Die gemahlene Menge wird über einen elektronischen Timer gesteuert und kann beliebig vorgewählt werden. Mahlen Sie ohne umständliches Umfüllen direkt in den Siebträger Ihrer Espresso-Maschine (Portafilter) oder in den mitgelieferten Vorratsbehälter.
Die Informationen in dieser Anleitung werden Sie mit den Möglichkeiten des Gerätes
schnell vertraut machen.
Wir wünschen Ihnen viel Freude mit Ihrer neuen DESIGN KAFFEEMÜHLE ADVANCED
PLUS.
Ihre GASTROBACK GmbH
4
D
Page 5
SICHERHEITSHINWEISE
Lesen Sie bitte vor dem Gebrauch des Gerätes alle Hinweise
und Anleitungen, die mit dem Gerät geliefert werden, sorgfältig und vollständig durch und bewahren Sie die Anleitungen gut auf.
Verwenden Sie das Gerät ausschließlich in der darin angegebenen
Weise zu dem beschriebenen Zweck (bestimmungsgemäßer Gebrauch).
Ein bestimmungswidriger Gebrauch und besonders Missbrauch können
zu Sachschäden sowie zu schweren Personenschäden durch gefährliche elektrische Spannung, Feuer, hohe Temperaturen und bewegliche
Bauteile führen. Führen Sie ausschließlich diejenigen Arbeiten am Gerät
durch, die in diesen Anleitungen beschrieben werden. Niemals das
Gerät oder die Bauteile und Zubehöre des Gerätes für andere Geräte
oder zweckentfremdet verwenden. Diese Anleitung ist ein wichtiger
Bestandteil des Gerätes. Geben Sie das Gerät nicht ohne diese Anleitung an Dritte weiter. Reparaturen und technische Wartung am Gerät
und seinen Bauteilen dürfen nur von dafür autorisierten Fachwerkstätten
durchgeführt werden. Wenden Sie sich gegebenenfalls bitte an den Gastroback Kundenservice, Gewerbestr. 20, D-21279 Hollenstedt (Telefon:
(04165) 222500 oder E-Mail: info@gastroback.de).
ALLGEMEINE HINWEISE ZUR SICHERHEIT
• Nur für den Hausgebrauch und für den Betrieb in Innenräumen. Ver-
wenden und lagern Sie das Gerät nicht im Freien oder in feuchten
oder nassen Bereichen. Verwenden Sie das Gerät nicht in Booten
oder fahrenden Fahrzeugen. Bewahren Sie das Gerät immer an
einem trockenen, sauberen, frostfreien Ort auf. Niemals das Gerät
oder seine Bauteile unbeaufsichtigt lassen, wenn sie für kleine Kinder
oder Tiere zugänglich sind.
• Ungeeignete Bauteile, Zubehöre und Ersatzteile, die vom Hersteller
nicht für das Gerät vorgesehen und empfohlen sind, können schwere Personenschäden und Sachschäden verursachen. Überprüfen Sie
regelmäßig die Bauteile und Zubehöre sowie das Netzkabel des
Gerätes auf Beschädigungen (Beispiel: Verformung, Verfärbung, Brüche, Risse, übermäßige Abnutzung). Niemals das Gerät mit Bauteilen betreiben, die beschädigt sind und/oder nicht erwartungsgemäß
arbeiten. Auch verborgene Schäden können einen sicheren Betrieb
5
D
Page 6

des Gerätes unmöglich machen. Betreiben das Gerät deshalb nicht
mehr, wenn sich das Gerät überhitzt oder übermäßigen Belastungen
ausgesetzt war (Beispiel: Sturz, Schlag, ins Gehäuse eingedrungene Flüssigkeiten). Ziehen Sie bei Beschädigungen während des
Betriebes sofort den Netzstecker aus der Steckdose. Lassen Sie das
Gerät in einer autorisierten Fachwerkstatt überprüfen. Versuchen Sie
niemals, das Gerät selbst zu reparieren.
• Stellen Sie das Gerät auf einer gut zugänglichen, ebenen, trockenen,
waagerechten und ausreichend stabilen Arbeitsfläche auf, von der es
nicht herunterrutschen kann. Halten Sie das Gerät und den Arbeitsbereich stets trocken und sauber. Stellen Sie das Gerät nicht an den
Rand oder die Kante der Arbeitsfläche. Niemals das Gerät oder Teile
davon auf oder in die Nähe von starken Wärmequellen und heißen
Oberflächen bringen (Beispiel: Heizung, Grill, Feuer).
• Die Bedienungselemente des Gerätes und die verwendete Steckdose
müssen jederzeit zugänglich sein. Halten Sie während des Betriebes
einen Abstand von mindestens 10 cm zu anderen Gegenständen.
Lassen Sie über dem Gerät mindestens 50 cm frei, um freien Zugang
zum Bohnentrichter zu haben. Niemals das Gerät unbeaufsichtigt
arbeiten lassen.
• Dieses Gerät kann von Personen mit eingeschränkter Wahrnehmung
oder verminderten physischen oder geistigen Fähigkeiten oder einem
Mangel an Erfahrung und Kenntnissen (einschließlich Kinder ab 8
Jahren) verwendet werden, sofern sie beaufsichtigt und/oder bei
der Bedienung angeleitet werden, so dass sie die Gefahren bei der
Bedienung des Gerätes verstehen und beachten. Auch die Reinigung
und Pflege des Gerätes darf von Kindern nicht ohne Beaufsichtigung
durchgeführt werden. Niemals kleine Kinder mit dem Gerät, den
Bauteilen oder dem Verpackungsmaterial spielen lassen!
• Vergewissern Sie sich, dass das Gerät richtig und vollständig nach
den Anleitungen in diesem Heft zusammengesetzt ist, bevor Sie das
Gerät betreiben. Wenden Sie bei der Arbeit mit dem Gerät keine
Gewalt an, um die Bauteile nicht zu beschädigen.
• Legen Sie keine Tücher, Servietten oder ähnliche Materialien unter
6
D
Page 7

oder auf das Gerät, um eine Überhitzung und Gefährdung durch Feuer und elektrischen Schlag zu vermeiden. Legen Sie niemals scharfkantige oder schwere Gegenstände auf oder in das Gerät, um die Bauteile (Beispiel: Bohnentrichter) nicht zu beschädigen. Füllen Sie keinen
gemahlenen Kaffee in den Bohnentrichter. Füllen Sie nur ganze, trockene und frische Kaffeebohnen in den Bohnentrichter, die zum Verzehr
geeignet sind. Mahlen Sie mit dem Gerät keine anderen Materialien
oder Lebensmittel. Lassen Sie niemals Flüssigkeiten in den Bohnentrichter laufen. Halten Sie das Mahlwerk immer absolut trocken.
• Ziehen Sie immer den Netzstecker aus der Steckdose, bevor Sie das
Gerät reinigen oder wenn Sie das Gerät nicht mehr benutzen. Leeren
Sie zusätzlich den Bohnentrichter und das Mahlwerk aus, wenn Sie
das Gerät längere Zeit nicht benutzen. Fassen Sie das Gerät immer
unten am Gehäuse an, wenn Sie das Gerät bewegen wollen. Nie-
mals das Gerät am Bohnentrichter, Mahlwerk oder Netzkabel halten, um es zu bewegen.
• Halten Sie das Gerät und seine Bauteile und Zubehöre stets sauber.
Reinigen Sie das Gerät nach der Verwendung (siehe: ‚Pflege und
Reinigung‘). Niemals das Gerät oder die Bauteile mit Scheuermitteln,
harten Scheuerhilfen (z. B. Topfreiniger), scharfen Putzmitteln oder
ätzenden Chemikalien (Desinfektionsmittel) reinigen.
• Niemals die Kaffeemühle in die Spülmaschine stellen.
WICHTIGE SICHERHEITSHINWEISE FÜR ALLE ELEKTROGERÄTE
Stellen Sie das Gerät in der Nähe einer passenden Wandsteckdose auf
und schließen Sie das Gerät dort direkt an. Das Gerät darf nur an die
ordnungsgemäß abgesicherte Schukosteckdose einer geeigneten Stromversorgung (Wechselstrom; 220 - 240 V, 50/60 Hz, 8 A) mit Schutzleiter
angeschlossen werden. Außerdem sollte die Steckdose über einen Fehlerstromschutzschalter abgesichert sein, dessen Auslösestrom nicht über
30 mA liegen sollte. Wenden Sie sich im Zweifelsfall an Ihren Elektriker.
• Stromversorgungen im Ausland erfüllen die genannten Vorausset-
zungen eventuell nicht. Da im Ausland zum Teil abweichende Normen für Stromversorgungen gelten, können wir das Gerät nicht für alle
7
D
Page 8

möglichen Stromversorgungen konstruieren und testen. Wenn Sie das
Gerät im Ausland betreiben wollen, dann vergewissern Sie sich bitte
zuerst, dass ein gefahrloser Betrieb dort möglich ist.
• Verwenden Sie keine Zeitschaltuhren, Fernbedienungen, Tischsteck-
dosen oder Verlängerungskabel, um eine Gefährdung durch Feuer
und Elektrizität zu vermeiden. Die verwendete Steckdose muss immer
frei zugänglich bleiben, um den Netzstecker im Notfall sofort aus der
Steckdose ziehen zu können.
• Betreiben Sie das Gerät nicht auf Metallflächen. Niemals das Gerät,
das Netzkabel oder den Netzstecker mit nassen Händen berühren,
wenn das Gerät an die Stromversorgung angeschlossen ist.
• Niemals Wasser oder andere Flüssigkeiten über oder in das Gerät
laufen lassen. Niemals das Netzkabel oder das Gerät in Wasser
oder andere Flüssigkeiten tauchen oder stellen. Schützen Sie das
Gerät vor Spritzwasser. Sollte eine Flüssigkeit über oder in das Gerät
gelaufen sein, dann ziehen Sie sofort den Netzstecker aus der Steckdose, reinigen Sie das Gerät und lassen Sie das Gerät mit abgenommenen Bauteilen mindestens 1 Tag an der Luft trocknen (siehe: ‚Pflege
und Reinigung‘).
• Niemals das Kabel knicken, einklemmen, quetschen oder verknoten.
Lassen Sie das Netzkabel nicht von der Tischkante herunterhängen.
Achten Sie darauf, dass niemand in Kabelschlaufen hängen bleiben
oder das Gerät am Kabel von der Arbeitsfläche reißen kann. Fassen
Sie immer am Gehäuse des Netzsteckers an, wenn Sie den Netzstecker aus der Steckdose ziehen.
BEWEGLICHE BAUTEILE – VERLETZUNGSGEFAHR
Die DESIGN KAFFEEMÜHLE ADVANCED PLUS dient zum Mahlen von
ganzen Kaffeebohnen. Dazu rotiert der scharfkantige Mahlkonus im
Mahlwerk. Das Gerät kann deshalb bei unsachgemäßer Handhabung
schwere Verletzungen und Schäden verursachen.
• Niemals in das Mahlwerk greifen, oder irgendwelche Gegenstände
(Beispiel: Bürste, Tücher) in das Mahlwerk, den Bohnentrichter oder
den Pulverauslass halten, wenn das Gerät an die Stromversorgung
8
D
Page 9
angeschlossen ist. Ziehen Sie immer zuerst den Netzstecker aus der
Steckdose, bevor Sie das Gerät bewegen, Bauteile abnehmen und/
oder das Gerät reinigen.
• Versuchen Sie niemals das Gerät zu betreiben, wenn Trichterdeckel,
Bohnentrichter oder Mahlwerk beschädigt, verstopft oder nicht richtig
und vollständig installiert sind.
TECHNISCHE DATEN
Modell:
Stromversorgung:
Maximale Leistungsaufnahme:
Länge des Netzkabels:
Gewicht:
Abmessungen:
Fassungsvermögen Bohnentrichter:
Fassungsvermögen Vorratsbehälter:
Maximale Betriebsdauer:
Prüfzeichen:
Diese Daten können ohne Vorankündigung geändert werden.
42642 Design Kaffeemühle Advanced Plus
220 - 240 V Wechselstrom, 50/60 Hz
130 W
ca. 95 cm
ca. 2,9 kg
ca. 170 x 220 x 390 mm (B x T x H)
max. 325 g
max. 240 g
2 Minuten
9
D
Page 10
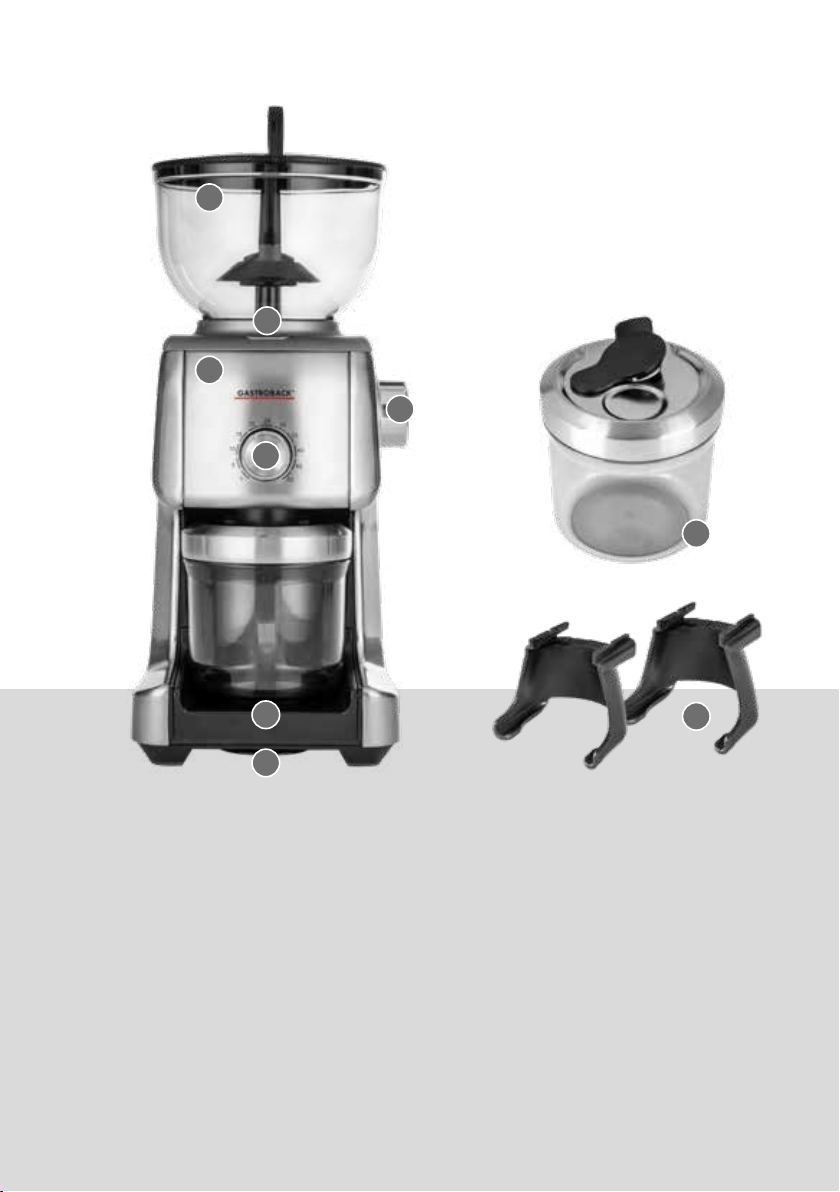
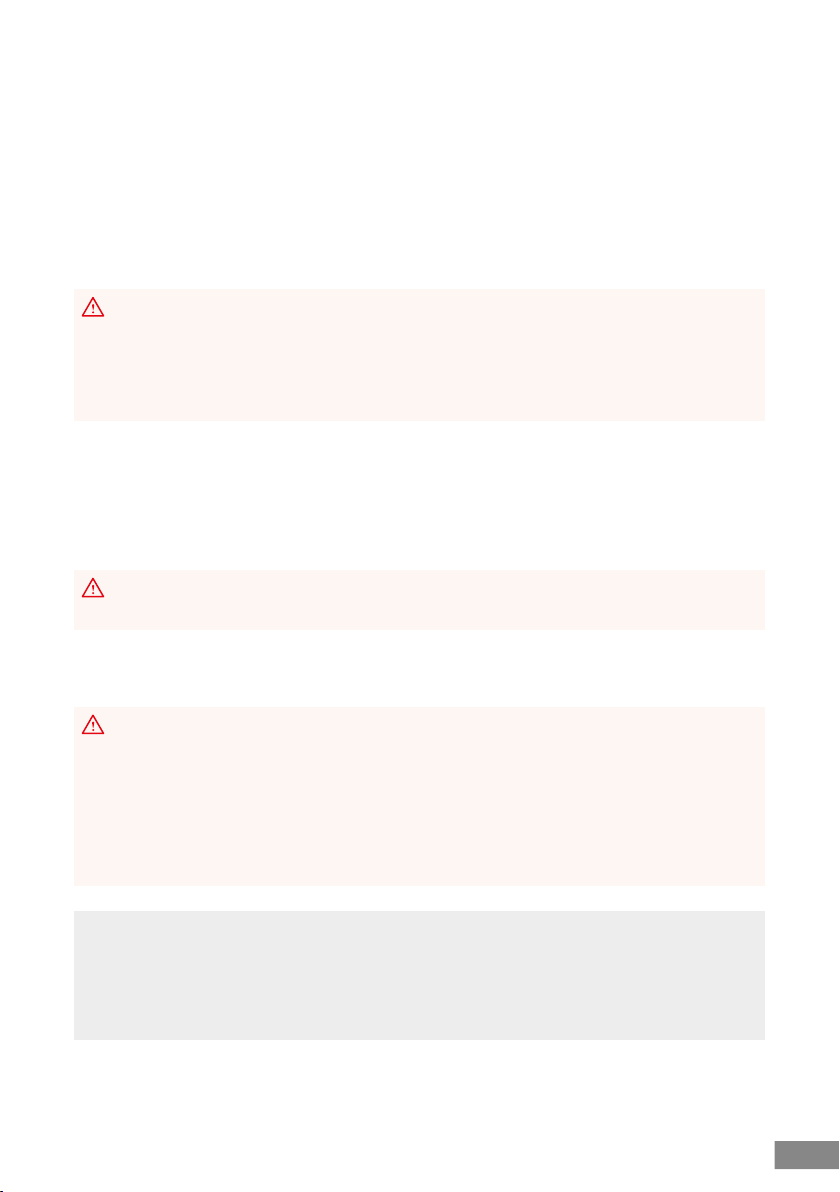
IHRE NEUE KAFFEEMÜHLE KENNEN LERNEN
1
2
3
4
5
8
6
7
1 BOHNENTRICHTER MIT DECKEL - Für bis zu 350 g frische ganze Kaffeebohnen.
2 EIN/AUS-TASTE - Startet und bricht den Mahlvorgang ab.
3 GEHÄUSE AUS ALUMINIUM-GUSS
4 STELLRAD ZUR WAHL DES MAHLGRADS
5 WÄHLSCHALTER FÜR DIE MAHLDAUER IN SEKUNDEN - Mit dieser Einstellung bestimmen Sie die Menge.
6 HERAUSNEHMBARE PULVERSCHALE
7 KABELAUFWICKLUNG
ZUBEHÖR
8 VORRATSBEHÄLTER - Für bis zu 240 g Kaffeepulver – mit luftdicht schließender Verschlusslasche.
9 2 SIEBTRÄGER - MASKEN - Wählen Sie die passende Siebträger - Maske und mahlen Sie direkt in den Siebträger.
REINIGUNGSWERKZEUG FÜR DAS MAHLWERK
10
D
9
Page 11

EIGENSCHAFTEN IHRER NEUEN KAFFEEMÜHLE
• Die DESIGN KAFFEEMÜHLE ADVANCED PLUS mahlt frische, ganze Kaffeeboh-
nen für die Zubereitung Ihres Kaffees direkt vor dem Brühen. Stellen Sie einfach
den Mahlgrad ein, der für Ihre bevorzugte Zubereitungsmethode gebraucht wird.
• Das Gerät erfüllt die hohen Anforderungen der »Speciality Coffee Association of
America« und des »European Coffee Brewing Centre«.
• Sie können einen Vorrat von bis zu 350 g Kaffeebohnen in den Bohnentrichter
füllen.
• Ein Verschlussriegel verschließt automatisch den Boden des Bohnentrichters,
wenn Sie den Bohnentrichter abnehmen. Dadurch fallen die noch enthaltenen
Kaffeebohnen nicht heraus.
• Die massiven, konischen Mahlwerkzeuge aus Edelstahl leiten die Wärme wäh-
rend des Mahlvorgangs ab und schützen dadurch die essentiellen Öle und Aromen des Kaffees während des Mahlens.
• Der Mahlgrad kann mit einem Stellrad in 16 Stufen an die Anforderungen Ihrer
bevorzugten Brühmethode angepasst werden: vom feinsten Pulver für EspressoMaschinen bis zum gröbsten Mahlgrad für Kolbenkaffeemaschinen.
• Stellen Sie die Mahldauer entsprechend ein, um bei jedem Mahlvorgang
genau die gewünschte Menge zu erhalten. Die Verwendung eines Messlöffels
wird dadurch überflüssig. Zum Lieferumfang gehört ein spezieller Vorratsbehälter für max. 240 g Kaffeepulver. Die Füllöffnung im Deckel des Vorratsbehälters
ist an den Pulverauslass des Mahlwerks angepasst. Dadurch können Sie direkt
in den Vorratsbehälter mahlen und die Füllöffnung danach mit der Verschlusslasche schließen. 2 Siebträger-Masken für Siebträger (Portafilter) mit 50 - 54 mm
und 58 mm ermöglichen es, direkt in den Siebträger Ihrer Espresso-Maschine
zu mahlen. Die Bedienung ist denkbar einfach: Sie schieben den vorbereiteten
und vorgewärmten Siebträger unter der Siebträger-Maske in das Gerät, um den
Mahlvorgang zu starten. Das Mahlwerk hält sofort an, sobald Sie den Siebträger heraus ziehen. Um Verletzungen und Schäden durch die scharfen Kanten
des Mahlwerks zu verhindern, ist das Gerät mit Sicherheitsschaltern ausgerüstet.
Der Motor des Gerätes arbeitet nur, wenn das Gerät richtig und vollständig
zusammengesetzt ist und der Vorratsbehälter und/oder Siebträger und Siebträger-Maske richtig eingesetzt sind.
WARNUNG – Versuchen Sie niemals, die Sicherheitsschalter zu blockie-
ren! Wenn das Gerät nicht arbeitet, dann beseitigen Sie das Hindernis. Beachten
Sie dazu bitte die Hinweise im Kapitel ‚Hilfe bei Problemen‘. Ziehen Sie immer
zuerst den Netzstecker aus der Steckdose, bevor Sie Teile des Gerätes abnehmen.
11
D
Page 12

TIPPS FÜR BESTE ERGEBNISSE
Das Aroma Ihres Kaffees hängt außer von der Brühmethode und der Zubereitung
auch von zahlreichen, weiteren Faktoren ab. Dazu gehören nicht nur Kaffeesorte,
Röstung und Frische der Bohnen, sondern auch der Mahlgrad und ganz besonders
die Gleichmäßigkeit mit der eine für die verwendete Brühmethode geeignete Körnung (Mahlgrad) erreicht wird. Eine qualitativ hochwertige Kaffeemühle ist deshalb
ein erster Schritt auf dem Weg zum perfekten Kaffeegenuss.
• Durch den Mahlgrad beeinflussen Sie die Geschwindigkeit, mit der das Wasser
durch das Pulver fließt und bestimmen dadurch den Geschmack Ihres Kaffees.
Das Pulver sollte nicht zu grob und nicht zu fein sein.
• Der optimale Mahlgrad hängt von der verwendeten Brühmethode ab. Stellen Sie
den Mahlgrad am Gerät entsprechend ein.
• Eventuell müssen Sie ausprobieren, wie Sie die Kaffeemühle einstellen müssen,
damit Sie den von Ihnen bevorzugten Geschmack erhalten. Beginnen Sie mit
einem mittleren Mahlgrad in dem Bereich, der für Ihre Brühmethode geeignet
ist. Ändern Sie den Mahlgrad dann in kleinen Schritten, bis Sie das gewünschte
Ergebnis erhalten. Es ist völlig normal, dass Sie bei der Einstellung des optimalen
Mahlgrads mehrere Versuche brauchen.
• Sie sollten die Kaffeebohnen direkt vor dem Brühen mahlen. Wenn Sie immer
dieselbe Menge brauchen, dann stellen Sie am besten vorn am Gerät die Mahldauer entsprechend ein. Das Gerät gibt dann bei jedem Mahlvorgang immer
dieselbe Menge ab.
• Gemahlener Kaffee sollte nicht länger als 1 Woche aufbewahrt werden. Bewah-
ren Sie Kaffeebohnen und Kaffeepulver in ein luftdicht schließendes Gefäß an
einem kühlen, dunklen Ort auf. Sie können den Vorratsbehälter des Gerätes
dafür verwenden.
VOR DER ERSTEN VERWENDUNG
WARNUNG – Niemals kleine Kinder mit dem Gerät, den Zubehören
oder dem Verpackungsmaterial unbeaufsichtigt lassen. Setzen Sie das Gerät
immer vollständig und richtig zusammen, bevor Sie das Gerät in Betrieb nehmen.
Ziehen Sie immer zuerst den Netzstecker aus der Steckdose, bevor Sie Bauteile
abnehmen und/oder das Gerät bewegen oder reinigen.
Halten Sie den Arbeitsplatz des Gerätes sauber und trocken. Lassen Sie keine Flüssigkeiten über oder unter das Gerät laufen. Legen Sie während des Betriebes keine
Tücher, Servietten oder ähnliche Materialien unter oder auf das Gerät.
12
D
Page 13
1. Nehmen Sie das Gerät aus dem Karton und entfernen Sie alle Verpackungen,
Werbematerialien und Aufkleber. Entfernen Sie aber NICHT das Typenschild des
Gerätes. Achten Sie unbedingt darauf, dass kleine Kinder nicht mit dem Verpa-
ckungsmaterial und/oder den Bauteilen und Zubehören des Gerätes spielen.
2. Vergewissern Sie sich, dass die Bauteile und das Zubehör vollständig und unbe-
schädigt sind, bevor Sie die Verpackung entsorgen (siehe: ‚Ihre neue Kaffeemühle kennen lernen‘).
ACHTUNG – Verwenden Sie niemals Scheuermittel oder harte Scheuerhil-
fen (Beispiel: Topfreiniger) zur Reinigung des Gerätes oder der Bauteile, um die
Oberflächen nicht zu beschädigen. Verwenden Sie zur Reinigung keine harten
oder scharfkantigen Gegenstände. Niemals das Gerät oder seine Bauteile in der
Spülmaschine reinigen.
3. Vor der ersten Verwendung und nach einer längeren Aufbewahrung: Reinigen
Sie das Gerät nach der Anleitung in diesem Heft (siehe: ‚Pflege und Reinigung‘).
BEDIENUNG
WARNUNG – Lassen Sie kleine Kinder niemals unbeobachtet, wenn die
Kaffeemühle in ihrer Reichweite ist.
Einige nützliche Tipps zur Verwendung Ihrer neuen Kaffeemühle finden Sie im Kapitel
‚Tipps für beste Ergebnisse‘.
ACHTUNG – Die DESIGN KAFFEEMÜHLE ADVANCED PLUS ist für eine
kurzzeitige Verwendung vorgesehen. Lassen Sie das Gerät nicht länger als 2
Minuten kontinuierlich arbeiten. Schalten Sie das Gerät rechtzeitig aus und las-
sen Sie den Motor ca. 10 Minuten abkühlen, bevor Sie das Gerät erneut verwenden. Wenn Sie eine Überhitzung des Gerätes vermeiden, dann schützen Sie
dadurch nicht nur die Aromen es gemahlenen Kaffees, sondern bewahren auch
das Gerät vor Schaden und erhalten eine lange Lebensdauer des Gerätes.
WICHTIG - Wir empfehlen, die Kaffeemühle auszuleeren (Bohnentrichter und
Mahlwerk) und das Gerät zu reinigen, wenn Sie die Kaffeemühle länger als 1
Woche nicht verwenden werden (siehe: ‚Pflege und Reinigung‘). Dadurch verhindern Sie, dass Kaffeebohnen und Reste des Kaffeepulvers im Gerät verderben und
einen unangenehmen Geschmack des Kaffees verursachen.
13
D
Page 14
DEN MAHLGRAD EINSTELLEN
Der Mahlgrad bestimmt die Geschwindigkeit, mit der das Wasser durch das Kaffeepulver gepresst wird, und wie schnell die Aromastoffe aus dem Kaffeepulver herausgelöst werden. Wenn Sie den Mahlgrad einstellen, sollten Sie die Brühmethode
berücksichtigen, die Sie verwenden werden, da für jede Brühmethode ein bestimmter Mahlgrad gebraucht wird (siehe: ‚Tipps für beste Ergebnisse‘).
HINWEIS
Je niedriger der eingestellte Zahl ist, umso feiner ist das Kaffeepulver. Abhängig
von der verwendeten Brühmethode, empfehlen wir, zunächst einen mittleren Mahlgrad zu wählen. Prüfen Sie dann das Ergebnis und stellen Sie das Mahlwerk bei
Bedarf in kleinen Schritten nach.
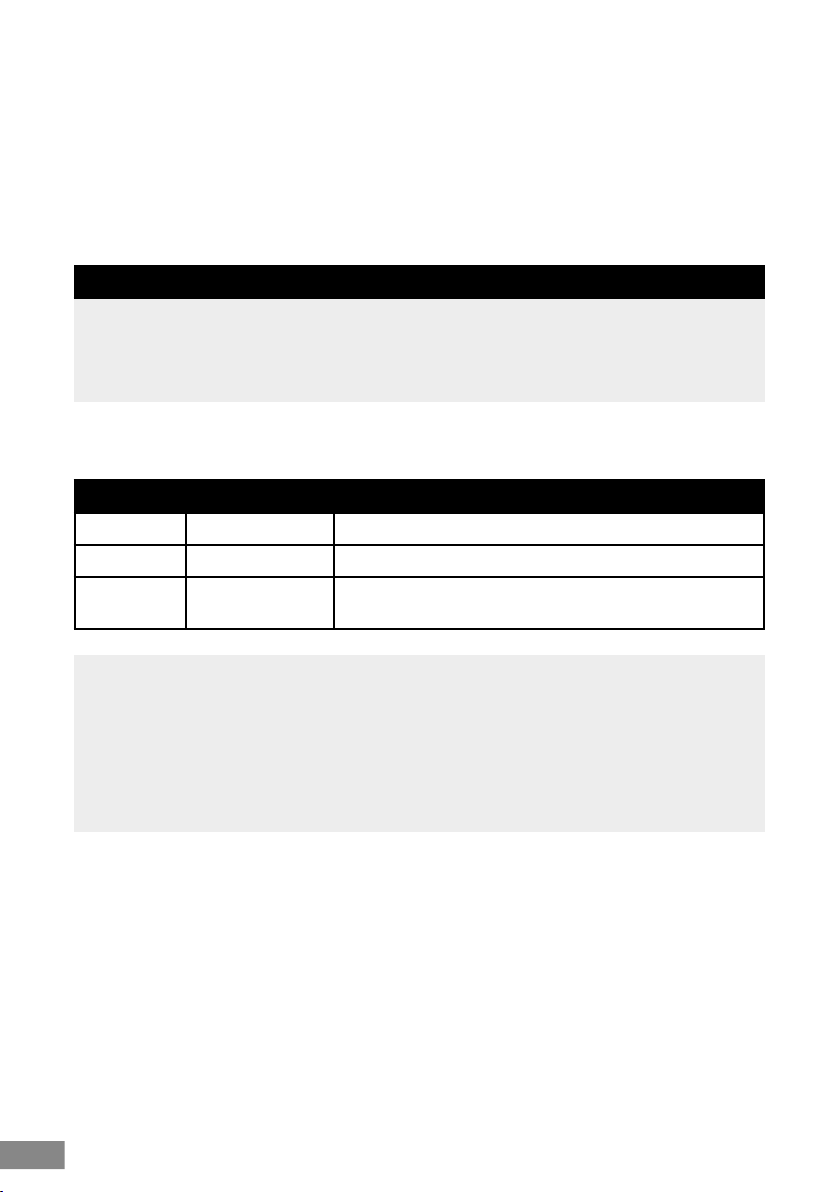
Die Angaben in folgender Tabelle sind nur Näherungswerte. Ihre bevorzugte Einstellung kann deutlich davon abweichen.
Einstellung Mahlgrad Geeignet für …
1 - 3 Extra fein Espresso oder türkischer Kaffee
4 - 7 Fein bis mittel Handfilterung, Filterkaffeemaschinen
8 - 16 Mittel bis grob und
extra grob
WICHTIG - Sie sollten den Mahlgrad einstellen, bevor Sie Kaffeebohnen in den
Bohnentrichter füllen. Das gilt besonders, wenn Sie einen feineren Mahlgrad (niedrigere Zahlen) einstellen wollen. Wenn bereits Kaffeebohnen im Mahlwerk sind,
dann lassen Sie das Mahlwerk arbeiten, während Sie den Mahlgrad langsam
feiner stellen. Andernfalls können Kaffeebohnen zwischen den Mahlwerkzeugen
eingeklemmt werden und den Motor blockieren (siehe: ‚Blockierungen des Mahlwerks beseitigen‘).
Kolbenkaffeemaschinen / French Press
Das Mahlwerk des Gerätes kann mit dem Stellrad an der rechten Seite des Gehäuses auf 16 unterschiedliche Mahlgrade eingestellt werden und bleibt unverändert,
bis Sie eine andere Nummer einstellen.
Wenn bereits Kaffeebohnen im Mahlwerk sind, dann lassen Sie das Gerät arbeiten,
während Sie das Stellrad langsam auf die gewünschte Zahl drehen.
DIE ABGEGEBENE MENGE EINSTELLEN
Die Mahldauer bestimmt die gemahlene Menge. Wenn Sie immer etwa dieselbe
Menge Kaffee brühen, dann können Sie am Gerät eine entsprechende Mahldauer
14
D
Page 15

vorwählen. Diese Einstellung bleibt unverändert, bis Sie eine neue Mahldauer einstellen.
HINWEIS
Die Einstellung der Mahldauer ist nur wirksam, wenn Sie in den Vorratsbehälter
mahlen. Bei Verwendung eines Siebträgers (Portafilter) starten und stoppen Sie den
Mahlvorgang mit dem Siebträger (siehe: ‚In den Siebträger mahlen‘).
ACHTUNG – Achten Sie darauf, dass im Vorratsbehälter genug freier Platz
ist, um die beabsichtigte Menge aufzunehmen, bevor Sie den Mahlvorgang starten. Andernfalls kann der Vorratsbehälter überlaufen und/oder das Kaffeepulver
staut sich zurück in den Pulverauslass und blockiert das Mahlwerk. Sie können
maximal 240 g in den Vorratsbehälter füllen. Beachten Sie aber, dass das Kaffeepulver beim Mahlen einen Haufen unter der Füllöffnung bildet. Dadurch kann der
Vorratsbehälter bereits bei geringeren Mengen überlaufen und das Mahlwerk kann
blockieren. Brechen Sie den Mahlvorgang bei Bedarf rechtzeitig ab. Drücken Sie
dazu die Ein/Aus-Taste.
Sie können eine Mahldauer zwischen 0 (aus) und 50 Sekunden wählen. Für Filterkaffeemaschinen entspricht das 2 bis 10 Tassen Kaffee.
DEN BOHNENTRICHTER FÜLLEN
Sie können maximal 350 g Kaffeebohnen in den Bohnentrichter füllen.
WICHTIG - Füllen Sie nur frische, ganze Kaffeebohnen in den Bohnentrichter. Füllen Sie keine anderen Materialien ein. Überfüllen Sie den Bohnentrichter nicht. Der
Trichterdeckel muss sich noch richtig schließen lassen.
1. Vergewissern Sie sich, dass der Mahlgrad richtig eingestellt ist (siehe oben: ‚Den
Mahlgrad einstellen‘). Bei Bedarf sollten Sie den Mahlgrad einstellen, bevor Sie
den Bohnentrichter füllen.
2. Nehmen Sie den Trichterdeckel ab und vergewissern Sie sich, dass der Bohnen-
trichter richtig auf dem Mahlwerk verriegelt ist (siehe: ‚Pflege und Reinigung /
Das Gerät zusammensetzen‘). Füllen Sie dann bis zu 350 g ganze Kaffeebohnen in den Bohnentrichter.
3. Setzen Sie den Trichterdeckel wieder auf den Bohnentrichter und drücken Sie
den Trichterdeckel vorsichtig nach unten.
15
D
Page 16

IN DEN VORRATSBEHÄLTER MAHLEN
HINWEIS
Normalerweise hält das Mahlwerk automatisch an, sobald die eingestellte Mahldauer abgelaufen ist. Sie können das Mahlwerk aber jederzeit während eines
Mahlvorganges manuell anhalten. Drücken Sie dazu die Ein/Aus-Taste, solange
das Mahlwerk noch läuft.
HINWEIS
Wenn Sie Kaffee für eine Espresso-Maschine mahlen, dann können Sie direkt in
den Siebträger (Portafilter) mahlen (siehe unten: ‚In den Siebträger mahlen‘).
WICHTIG - Vergewissern Sie sich, dass im Vorratsbehälter noch genug Platz ist,
um das gemahlene Kaffeepulver aufzunehmen. Leeren Sie den Vorratsbehälter am
besten ganz aus, bevor Sie eine neue Portion Kaffeepulver mahlen. Die schwarze
Verschlusslasche im Deckel des Vorratsbehälters muss zum Füllen des Vorratsbehälters über die Mulde im Deckel gedreht werden. Andernfalls fällt das Kaffeepulver
neben den Vorratsbehälter und das Mahlwerk kann durch den Rückstau des Kaffeepulvers blockiert werden.
1. Vergewissern Sie sich, dass das Gerät richtig und vollständig zusammengesetzt
ist (siehe: ‚Pflege und Reinigung / Das Gerät zusammensetzen‘). Vergewissern
Sie sich, dass Mahlgrad und Mahldauer richtig eingestellt sind (siehe: ‚Den
Mahlgrad einstellen‘ und ‚Die abgegebene Menge einstellen‘). Füllen Sie bei
Bedarf eine ausreichende Menge ganze Kaffeebohnen in den Bohnentrichter
(siehe: ‚Den Bohnentrichter füllen‘).
2. Leeren Sie den Vorratsbehälter am besten ganz aus. Schließen Sie den Vorrats-
behälter dann mit dem Behälterdeckel. Öffnen Sie die Verschlusslasche im Behälterdeckel und drehen Sie die Verschlusslasche über die Mulde neben der Füllöffnung. Stellen Sie den Vorratsbehälter dann auf die Pulverschale des Gerätes. Die
Füllöffnung im Behälterdeckel muss dazu zur Rückseite des Gerätes zeigen.
HINWEIS
Sie die Pulverschale zum Betrieb immer richtig im Gerät eingelegt haben. Andernfalls kann das Kaffeepulver neben die Füllöffnung des Vorratsbehälters fallen.
3. Schließen Sie die Kaffeemühle an eine geeignete Stromversorgung an (siehe:
‚Wichtige Sicherheitshinweise für alle Elektrogeräte‘). Drücken Sie die Ein/AusTaste, um die Kaffeemühle zu starten. Das Gerät schaltet sich automatisch ab,
sobald die eingestellte Mahldauer erreicht ist.
16
D
Page 17

4. Sobald der Motor des Mahlwerks steht, ziehen Sie den Netzstecker aus der
Steckdose. Nehmen Sie den Vorratsbehälter aus dem Gerät.
HINWEIS
Sie erhalten das optimale Kaffeearoma, wenn Sie die Kaffeebohnen direkt vor
dem Brühen mahlen. Überschüssiges Kaffeepulver sollten Sie in einem luftdicht
schließenden Behälter an einem kühlen und dunklen Ort aufbewahren (Beispiel:
Kühlschrank).
IN DEN SIEBTRÄGER MAHLEN
HINWEIS
Wenn Sie einen Siebträger (Portafilter) füllen, dann müssen Sie die Ein/Aus-Taste
nicht drücken, um das Gerät einzuschalten. Das Mahlwerk startet automatisch,
wenn Sie den Siebträger unter die Siebträger-Maske schieben.
WARNUNG – Niemals im Pulverauslass stochern! Wenn das Mahlwerk
blockiert ist, dann beachten Sie bitte die Hinweise im Abschnitt ‚Blockierungen des
Mahlwerks beseitigen‘.
1. Vergewissern Sie sich, dass das Gerät richtig und vollständig zusammengesetzt
ist (siehe: ‚Pflege und Reinigung / Das Gerät zusammensetzen‘). Vergewissern
Sie sich, dass der Mahlgrad richtig eingestellt ist (siehe oben: ‚Den Mahlgrad
einstellen‘). Füllen Sie bei Bedarf eine ausreichende Menge ganze Kaffeebohnen in den Bohnentrichter (siehe: ‚Den Bohnentrichter füllen‘).
2. Stecken Sie die passende Siebträger-Maske (50 - 54 mm oder 58 mm) in die Füh-
rungsschienen direkt unter dem Pulverauslass und schieben Sie die SiebträgerMaske ganz nach hinten.
3. Schließen Sie die Kaffeemühle an eine geeignete Stromversorgung an (siehe:
‚Wichtige Sicherheitshinweise für alle Elektrogeräte‘).
HINWEIS
Wenn Sie zuerst die Beschaffenheit des Kaffeepulvers prüfen wollen, dann können Sie eine kleine Schale unter der Siebträger-Maske in das Gerät drücken und
etwas Kaffeepulver darin auffangen. Das Mahlwerk sollte arbeiten, während Sie
den Mahlgrad einstellen.
4. Schieben Sie den Siebträger direkt unter der Siebträger-Maske unter den Pul-
verauslass und drücken Sie den Siebträger gegen die schwarze Taste an der
Rückwand des Gerätes. Das Mahlwerk arbeitet, solange die Taste gedrückt ist.
17
D
Page 18

5. Ziehen Sie den Siebträger aus dem Gerät, sobald die gewünschte Menge Kaf-
feepulver im Siebträger ist. Das Mahlwerk hält automatisch sofort an.
BLOCKIERUNGEN DES MAHLWERKS BESEITIGEN
In seltenen Fällen können Stiele oder andere Fremdkörper zwischen den Kaffeebohnen das Mahlwerk blockieren oder die Kaffeebohnen können sich im Mahlwerk verkeilen. Versuchen Sie folgende Maßnahmen, um das Problem zu beseitigen.
ACHTUNG – Niemals in den Öffnungen des Mahlwerks stochern (Boden
des Bohnentrichters und/oder Pulverauslass). Sie können Blockierungen des Mahlwerks auf diese Weise nicht beseitigen! Lassen Sie das Mahlwerk nicht einge-
schaltet, solange das Mahlwerk blockiert ist. Schalten Sie das Mahlwerk immer
sofort wieder aus (Ein/Aus-Taste drücken oder Siebträger aus dem Gerät ziehen), wenn das Mahlwerk nicht arbeitet.
1. Versuchen Sie vorsichtig, das Stellrad für den Mahlgrad auf die höchste Num-
mer (16) zu drehen. Wenden Sie keine Gewalt an! Stellen Sie den Vorratsbehälter in das Gerät und stecken Sie den Netzstecker in die Steckdose. Drücken
Sie die Ein/Aus-Taste, um festzustellen, ob das Mahlwerk wieder arbeitet.
Schalten Sie das Mahlwerk sofort wieder aus (EIn/Aus-Taste erneut drücken),
wenn das Mahlwerk nicht arbeitet.
2. Wenn das Mahlwerk wieder arbeitet, dann lassen Sie das Mahlwerk 2 - 3
Sekunden mit dem gröbsten Mahlgrad (16) laufen. Danach können Sie den
Mahlgrad bei laufendem Mahlwerk langsam wieder auf die gewünschte Einstellung drehen.
3. Wenn Sie das Mahlwerk nicht freibekommen und/oder das Stellrad sich nicht dre-
hen lässt, dann müssen Sie den Bohnentrichter und den Mahlkranz abnehmen, um
das Hindernis zu beseitigen (siehe: ‚Pflege und Reinigung / Das Gerät zerlegen‘).
18
D
Page 19

HILFE BEI PROBLEMEN
Die meisten Probleme können mit den Maßnahmen in folgender Tabelle einfach
behoben werden.
Problem Mögliche Ursache Die einfache Lösung
Notabschaltung erforderlich?
Das Gerät arbeitet nicht. Das Gerät hat keinen
Strom.
Das Mahlwerk ist blockiert.
Sie verwenden ein ungeeignetes Gefäß zum
Mahlen.
Den Vorratsbehälter verwenden: Vorratsbehälter
oder Deckel sind nicht richtig installiert.
Den Vorratsbehälter verwenden: Die Mahldauer
ist auf „0“ gestellt.
Einen Siebträger füllen:
Die Siebträger-Maske ist
nicht oder nicht richtig
installiert.
Einen Siebträger füllen:
Sie halten den Siebträger
nicht richtig.
Ein ernstes Problem ist
aufgetreten.
Der Vorratsbehälter passt
nicht unter den Pulverauslass.
Der Vorratsbehälter ist
nicht in der richtigen Orientierung.
Ziehen Sie den Netzstecker aus der Steckdose.
Ist das Gerät an die Steckdose angeschlossen? Vergewissern Sie sich, dass die verwendete Steckdose Strom hat
(Lampe anschließen).
Schalten Sie das Gerät sofort aus. Ziehen Sie den Netzstecker und beseitigen Sie das Hindernis (siehe: ‚Bedienung / Blockierungen des Mahlwerks beseitigen‘).
ACHTUNG: Stochern Sie nicht in den Öffnungen des
Mahlwerks (Boden des Bohnentrichters und Pulverauslass). Sie können das Hindernis dadurch nicht beseitigen.
Verwenden Sie den mitgelieferten Vorratsbehälter oder
installieren Sie die passende Siebträger-Maske, wenn Sie
einen Siebträger füllen wollen.
Das Gerät arbeitet nicht, wenn der Vorratsbehälter nicht
richtig unter dem Pulverauslass steht, oder wenn der Deckel
fehlt. Arbeiten Sie nach der Anleitung im Abschnitt ‚Bedienung / In den Vorratsbehälter mahlen‘.
Wenn Sie den Vorratsbehälter füllen wollen, dann müssen Sie eine Mahldauer einstellen.
Zum Füllen eines Siebträgers müssen Sie eine SiebträgerMaske installieren. Schieben Sie die Siebträger-Maske in
die Führungsschienen unter dem Pulverauslass und drücken Sie die Siebträger-Maske ganz nach hinten.
Halten Sie den Siebträger direkt unter der Siebträger-
Maske in das Gerät und drücken Sie den Siebträger
gegen die Rückwand des Gerätes bis der Motor startet.
Schalten Sie das Gerät sofort aus und ziehen Sie den
Netzstecker aus der Steckdose. Wenden Sie sich an den
Gastroback Kundenservice, E-Mail: info@gastroback.de .
Die Füllöffnung muss zur Rückseite des Gerätes zeigen.
Drehen Sie den Vorratsbehälter entsprechend.
19
D
Page 20

Problem Mögliche Ursache Die einfache Lösung
Das Kaffeepulver fällt neben
den Vorratsbehälter.
Die übliche Dosis wird nicht
gemahlen und/oder das
Mahlwerk macht ein ungewöhnliches Geräusch.
Sie können den Bohnentrichter nicht entriegeln. Der
Verriegelungshebel dreht
sich nicht.
Eine Siebträger-Maske ist
installiert.
Die Verschlusslasche im
Deckel des Vorratsbehälters ist geschlossen.
Die Pulverschale fehlt. Installieren Sie die Pulverschale auf jeden Fall, wenn Sie
Der Vorratsbehälter ist
überfüllt.
Der Vorratsbehälter ist
elektrostatisch aufgeladen.
Sie haben den Mahlgrad
geändert.
Der Bohnentrichter ist leer. Befüllen Sie den Bohnentrichter.
Kaffeebohnen haben sich
in der Einlassöffnung des
Mahlwerks oder im Boden
des Bohnentrichters verkeilt.
Das Mahlwerk wurde
während des Mahlens
blockiert.
Eine Kaffeebohne hat sich
im Boden des Bohnentrichter verkeilt und blockiert
den Verschluss.
Ziehen Sie die Siebträger-Maske heraus.
Öffnen Sie die Verschlusslasche und drehen Sie die Verschlusslasche über die Mulde neben der Füllöffnung.
in den Vorratsbehälter mahlen.
Vergewissern Sie sich vor dem Mahlen, dass genug Platz
im Vorratsbehälter ist, um die gewünschte Menge aufzunehmen. Beachten Sie bitte, dass sich beim Mahlen
Haufen unter der Füllöffnung bilden, wodurch der Vorratsbehälter bereits überlaufen kann, wenn eigentlich noch
genug Platz ist. Sie sollten den Vorratsbehälter ganz ausleeren, bevor Sie eine neue Portion mahlen.
Das kann bei ungünstigen Wetterlagen und sehr feinem
Mahlgrad passieren. Wischen Sie die Außenseiten des
Vorratsbehälters mit einem feuchten Tuch ab und versuchen Sie es erneut. Vermeiden Sie es, den Vorratsbehälter mit trockenen Tüchern aus Synthetik auszuwischen.
Bevorzugen Sie Tücher aus Leinen.
Nach einer Änderung des Mahlgrads müssen Sie eventuell
die Mahldauer (Menge) entsprechend anpassen (siehe:
‚Bedienung / Die abgegebene Menge einstellen‘).
Ziehen Sie den Netzstecker aus der Steckdose und nehmen Sie den Trichterdeckel ab. Rühren Sie die Bohnen
kurz um. Drehen Sie den Verriegelungshebel vorsichtig
hin und her. Wenn auch das nicht hilft, dann nehmen Sie
den Bohnentrichter ab und nehmen Sie die Kaffeebohnen
heraus, die auf dem Mahlwerk liegen.
Ziehen Sie den Netzstecker aus der Steckdose. Entfernen
Sie das Hindernis (siehe: ‚Bedienung / Blockierungen
des Mahlwerks beseitigen‘).
Drehen Sie den Verriegelungshebel ohne Gewaltanwen-
dung etwas hin und her, um die Kaffeebohne herauszulösen. Wenn das Problem bestehen bleibt, dann bereiten
Sie das Gerät für den Betrieb vor und lassen Sie das
Gerät kurz arbeiten. Versuchen Sie es dann erneut.
20
D
Page 21

PFLEGE UND REINIGUNG
WARNUNG – Achten Sie stets darauf, dass das Gerät sowie alle Bau-
teile und Zubehöre für kleine Kinder und Tiere unerreichbar sind! Ziehen Sie
immer zuerst den Netzstecker aus der Steckdose, bevor Sie das Gerät bewegen
und/oder das Gerät reinigen. Niemals Bauteile entfernen oder einbauen, wenn
das Gerät an die Stromversorgung angeschlossen ist.
Mahlkranz und Mahlkonus sind scharfkantig. Behandeln Sie diese Bauteile mit Vorsicht.
Um eine Gefährdung und Schäden durch Überhitzung, Feuer und Elektrizität zu vermei-
den: Niemals das Gerät in der Spülmaschine reinigen! Niemals Flüssigkeiten über
das Gehäuse, das Netzkabel oder den Mahlkranz laufen lassen oder diese Bauteile
in Flüssigkeiten stellen oder tauchen. Niemals Flüssigkeiten in das Mahlwerk gießen
oder in den Bohnentrichter laufen lassen, wenn der Bohnentrichter auf dem Gerät steht.
Niemals Gewalt anwenden. Niemals Scheuermittel oder Scheuerhilfen (Beispiel:
Topfreiniger) oder irgendwelche harten oder scharfkantigen Fremdkörper zur Reinigung des Gerätes, der Bauteile und/oder Zubehöre verwenden, um die Oberflächen nicht zu beschädigen. Verwenden Sie zur Reinigung des Mahlwerks nur völlig
trockene, kleine Nylonbürsten (Beispiel: das Reinigungswerkzeug). Halten Sie das
Mahlwerk immer absolut trocken.
Eine hygienische Reinigung erreichen Sie, wenn Sie nach den folgenden Anleitungen arbeiten.
WICHTIG - Rechnen Sie damit, dass der Bohnentrichter nach der Reinigung einige
Stunden brauchen wird, um vollständig zu trocknen. Wir empfehlen, das Gerät am
Ende des Tages zu reinigen. Trocknen Sie den Bohnentrichter sorgfältig ab und
lassen Sie den Bohnentrichter dann am besten über Nacht an der Luft trocknen.
HINWEIS
Sie sollten den Bohnentrichter regelmäßig vollständig ausleeren und reinigen,
damit sich keine alten Reste der Kaffeebohnen im Bohnentrichter und Mahlwerk
ansammeln und einen schalen Geruch und Geschmack verursachen. Das ist
besonders wichtig, wenn Sie das Gerät für einige Tage nicht verwenden wollen
(Beispiel: während des Urlaubs).
DAS GERÄT ZERLEGEN
HINWEIS
Der Boden des Bohnentrichters wird automatisch verschlossen, wenn Sie den Bohnentrichter entriegeln. Dadurch fallen restliche Kaffeebohnen nicht heraus, wenn
Sie den Bohnentrichter vom Gerät abnehmen.
21
D
Page 22

1. Ziehen Sie den Netzstecker aus der Steckdose. Nehmen Sie bei Bedarf die
Siebträger-Maske aus dem Gerät.
2. Nehmen Sie den Trichterdeckel ab. Drehen Sie den Verriegelungshebel in der
Mitte des Bohnentrichters gegen den Uhrzeigersinn, bis die Verriegelung spürbar
gelöst wird (ca. 90°). Heben Sie den Bohnentrichter dann vorsichtig nach oben
vom Mahlwerk herunter.
3. Leeren Sie Reste der Kaffeebohnen vollständig aus. Setzen Sie den Bohnentrich-
ter danach wieder auf das Mahlwerk und verriegeln Sie den Bohnentrichter mit
dem Verriegelungshebel auf dem Mahlwerk. Verschließen Sie den Bohnentrichter mit dem Trichterdeckel. Stellen Sie den Vorratsbehälter in das Gerät.
4. Stecken Sie den Netzstecker in die Steckdose und lassen Sie das Gerät arbei-
ten, bis alle noch im Mahlwerk befindlichen Kaffeebohnen gemahlen sind. Ziehen Sie den Netzstecker wieder aus der Steckdose und nehmen Sie die Bohnentrichter wieder ab, wie in Punkt 2 beschrieben.
ACHTUNG – Der Mahlkranz ist im Mahlwerk verriegelt und die Verriegelung
lässt sich eventuell nur mit Widerstand lösen. Fassen Sie den Drahtbügel des Mahlkranzes auf beiden Seiten direkt über den Rändern des Mahlkranzes an, um die Verriegelung zu lösen. Achten Sie darauf, den Drahtbügel nicht zu verbiegen. Der Drahtbügel lässt sich andernfalls nicht wieder ganz in den Rand des Mahlkranz
zurückklappen und der Bohnentrichter kann nicht auf dem Mahlwerk installiert werden.
5. Klappen Sie den Drahtbügel am Rand des Mahlkranzes hoch und drehen Sie
den Mahlkranz mit dem Drahtbügel gegen den Uhrzeigersinn. Sobald die Verriegelung gelöst ist, können Sie den Mahlkranz am Drahtbügel aus dem Mahlwerk heben.
HINWEIS
Der Mahlkonus kann nicht aus dem Gerät genommen werden.
DAS GERÄT REINIGEN
ACHTUNG – Niemals den Mahlkranz in Wasser oder andere Flüssigkeiten
stellen oder tauchen. Niemals Flüssigkeiten in das Mahlwerk laufen lassen. Halten
Sie die inneren Bauteile des Mahlwerks immer völlig trocken (Mahlkranz, Mahlko-
nus, Pulverauslass). Durch Feuchtigkeit verklebt das Kaffeepulver auf den Oberflächen.
Niemals das Gerät und/oder seine Bauteile in der Spülmaschine reinigen.
6. Zerlegen Sie das Gerät (siehe oben: ‚Das Gerät zerlegen‘).
7. Bürsten Sie alle Rückstände des Kaffeepulvers mit einer trockenen Nylonbürste
22
D
Page 23

aus dem Mahlwerk. Verwenden Sie dafür das mitgelieferte Reinigungswerkzeug
oder eine andere, kleine Nylonbürste.
8. Bürsten Sie auch Reste von Kaffeepulver von den Oberflächen im Pulverauslass
ab.
HINWEIS
Die Pulverschale wird durch einen Magneten im Gerät gehalten und kann einfach
herausgezogen werden.
9. Ziehen Sie die Pulverschale aus dem Gerät und leeren Sie die Pulverschale aus.
10. Reinigen Sie die Siebträger-Masken, die Pulverschale, den Bohnentrichter und Trich-
terdeckel in warmer Spülmittellösung. Spülen Sie die Teile danach sorgfältig ab.
11. Wischen Sie die Außenseiten des Gehäuses und das Netzkabel mit einem
feuchten Tuch ab. Trocknen Sie das Gehäuse mit einem trockenen Tuch ab.
12. Lassen Sie alle Teile mindestens 1 Stunde an der Luft trocknen. Den Bohnentrich-
ter sollten Sie bei Bedarf mehrere Stunden trocknen lassen.
DAS GERÄT ZUSAMMENSETZEN
ACHTUNG – Vergewissern Sie sich, dass alle Teile des Gerätes völlig tro-
cken sind, bevor Sie das Gerät wieder zusammensetzen. Feuchtigkeit im Mahlwerk kann zu Verstopfungen im Mahlwerk führen, einen abgestandenen Geschmack
des Kaffees verursachen und sogar zur Bildung von Schimmel im Mahlwerk führen.
13. Fassen Sie den Mahlkranz am Drahtbügel und setzen Sie den Mahlkranz in das
Mahlwerk. Drücken Sie den Mahlkranz vorsichtig nach unten, während Sie den
Mahlkranz drehen bis der Mahlkranz im Mahlwerk nach unten gleitet. Drehen
Sie den Mahlkranz dann im Uhrzeigersinn, bis die Verriegelung mit einem Klicken spürbar einrastet). Klappen Sie den Drahtbügel nach unten.
14. Vergewissern Sie sich, dass der Verriegelungshebel im Bohnentrichter auf die
geöffnete Position (Symbol „offenes Schloss“) gedreht ist. Setzen Sie den Bohnentrichter auf das Mahlwerk und drehen Sie den Bohnentrichter, bis er ohne
Widerstand nach unten gleitet. Drehen Sie dann den Verschlussriegel im Uhrzeigersinn in die geschlossene Position (ca. 90°).
15. Setzen Sie den Trichterdeckel auf den Bohnentrichter und drücken Sie den Trich-
terdeckel leicht nach unten.
16. Schieben Sie die Pulverschale in den Sockel des Gerätes. Der Magnet hält die
Pulverschale fest. Das Gerät kann jetzt wieder verwendet werden.
23
D
Page 24

AUFBEWAHRUNG
WARNUNG – Achten Sie darauf, dass das Gerät zu jeder Zeit für kleine
Kinder und Tiere unerreichbar ist.
ACHTUNG – Legen Sie keine schweren oder harten Gegenstände auf oder
in das Gerät oder seine Bauteile. Halten Sie das Gerät niemals am Mahlwerkkopf,
am Bohnentrichter oder am Netzkabel, um es zu bewegen.
1. Ziehen Sie immer den Netzstecker aus der Steckdose, wenn Sie das Gerät nicht
benutzen oder zur Aufbewahrung wegstellen wollen.
2. Leeren Sie den Bohnentrichter und das Mahlwerk vollständig aus. Reinigen und
trocknen Sie das Gerät danach sorgfältig. Setzen Sie das Gerät wieder vollständig zusammen (siehe unten: ‚Das Gerät zusammensetzen‘).
3. Die Siebträger-Masken und das Reinigungswerkzeug können Sie vorsichtig in
den Vorratsbehälter oder den Bohnentrichter legen.
4. Fassen Sie das Gerät an beiden Seiten am Gehäuse an und stellen Sie es auf
einer festen Oberfläche ab, von der es nicht herunterfallen kann. Bewahren Sie
das Gerät nur aufrecht stehend an einem trockenen Ort auf, an dem es gegen
übermäßige Belastungen (Beispiel: Stromschlag, Stöße, Feuchtigkeit, Hitze, Frost,
direktes Sonnenlicht) geschützt und für kleine Kinder und Tiere unerreichbar ist.
5. Legen Sie das Netzkabel zur Aufbewahrung locker um das Gerät. Sie können
das Netzkabel auch in die Kabelaufwicklung im Boden des Gerätes einlegen.
Das Netzkabel darf nicht geknickt, gequetscht oder verknotet werden.
6. Stellen Sie den Vorratsbehälter unter das Mahlwerk.
WICHTIG - Niemals die Bauteile oder Zubehöre des Gerätes für andere Zwecke
verwenden als zur Arbeit mit dem Gerät. Bewahren Sie alle Bauteile und Zubehöre
des Gerätes am besten immer zusammen mit dem Gerät auf.
24
D
Page 25

ENTSORGUNGSHINWEISE
Gerät und Verpackung müssen entsprechend den örtlichen Bestimmungen zur
Entsorgung von Elektroschrott und Verpackungsmaterial entsorgt werden.
Informieren Sie sich gegebenenfalls bei Ihrem örtlichen Entsorgungsunternehmen.
Entsorgen Sie elektrische Geräte nicht im Hausmüll, nutzen Sie die Sammelstellen der
Gemeinde. Fragen Sie ihre Gemeindeverwaltung nach den Standorten der Sammelstellen. Wenn elektrische Geräte unkontrolliert entsorgt werden, können während der
Verwitterung und Müllverbrennung gefährliche Stoffe in Luft und Grundwasser und
damit in die Nahrungskette gelangen, und die Flora und Fauna kann auf Jahre vergiftet werden. Wenn Sie das Gerät durch ein neues ersetzen, ist der Verkäufer gesetzlich verpflichtet, das alte mindestens kostenlos zur Entsorgung entgegenzunehmen.
INFORMATION UND SERVICE
Weitere Informationen erhalten Sie im Internet unter www.gastroback.de.
Wenden Sie sich mit Problemen, Fragen und Wünschen gegebenenfalls an:
GASTROBACK Kundenservice, Tel.: 04165/2225-0
oder per E-Mail: info@gastroback.de
25
D
Page 26

GEWÄHRLEISTUNG/GARANTIE
Wir gewährleisten für alle Gastroback-Elektrogeräte, dass sie zum Zeitpunkt des
Kaufes mangelfrei sind. Nachweisliche Fabrikations- oder Materialfehler werden
unter Ausschluss weitergehender Ansprüche und innerhalb der gesetzlichen Frist
kostenlos ersetzt oder behoben. Ein Gewährleistungsanspruch des Käufers besteht
nicht, wenn der Schaden an dem Gerät auf unsachgemäße Behandlung, Überlastung und/oder Installationsfehler zurückgeführt werden kann. Ohne unsere schriftliche Einwilligung erfolgte, technische Eingriffe von Dritten, führen zum sofortigen
Erlöschen des Gewährleistungsanspruchs.
Der Käufer muss zur Geltendmachung des Anspruchs den Original-Kaufbeleg vorlegen und trägt im Gewährleistungsfall die Kosten und das Risiko des Transportes.
Dieses Gerät ist nur zur Verwendung im Haushalt und an ähnlichen Orten gedacht, wie:
– Küchenzeilen für Angestellte in Läden und Büros, in Bauernhäusern und anderen
Arbeitsumgebungen;
– für Kunden in Pensionen, Hotels, Motels und anderen Wohnbezirk ähnlichen
Umgebungen.
Bei gewerblichem Gebrauch verkürzt sich die Garantie auf ein Jahr.
Hinweis
Kunden aus Deutschland und Österreich: Für die Reparatur- und Serviceabwicklung
möchten wir Sie bitten, GASTROBACK Produkte an folgende Anschrift zu senden:
GASTROBACK GmbH, Gewerbestr. 20, D - 21279 Hollenstedt, Deutschland.
Kunden anderer Länder: Bitte kontaktieren Sie Ihren Händler. Bitte haben Sie dafür
Verständnis, dass unfreie Sendungen nicht angenommen werden können. Einsendung von Geräten: Bitte verpacken Sie das Gerät transportsicher, ohne Zubehör
und legen Sie den Garantiebeleg sowie eine kurze Fehlerbeschreibung bei. Bearbeitungszeit nach Wareneingang des defekten Geräts beträgt ca. 2 Wochen; wir
informieren Sie automatisch. Bei defekten Geräten außerhalb der Garantie senden
Sie uns das Gerät bitte an die angegebene Adresse. Sie erhalten dann einen
kostenlosen Kostenvoranschlag und können dann entscheiden, ob das Gerät zu
ggf. anfallenden Kosten repariert, unrepariert und kostenlos an Sie zurück gesendet
werden oder vor Ort kostenlos entsorgt werden soll.
Das Gerät ist ausschließlich für den Privatgebrauch bestimmt und ist nicht für
den gewerblichen Betrieb ausgelegt. Verwenden Sie das Gerät nur wie in dieser
Gebrauchsanleitung beschrieben. Jede andere Verwendung gilt als nicht bestimmungsgemäß und kann zu Sachschäden oder sogar zu Personenschäden führen.
Der Hersteller übernimmt keine Haftung für Schäden, die durch nicht bestimmungsgemäßen Gebrauch entstanden sind.
26
D
Page 27

Page 28

Page 29

DESIGN COFFEE GRINDER
ADVANCED PLUS
OPERATING INSTRUCTIONS
Art.- No. 42642 » Design Coffee Grinder Advanced Plus «
Read all provided instructions before first usage!
Model and attachments are subject to change
For household use only!
Deutsch
English
www.gastroback.de
Page 30

We attach a certain importance to your safety. Thus, we ask you to read all provided
instructions and information in this booklet carefully and completely, before you start
running the appliance. This will help you to know all functions and properties of your
new appliance. We especially ask you to adhere strictly to the safety information
mentioned in these instructions.
TABLE OF CONTENTS
Important Safeguards .............................................................................. 34
General Safety Instructions .................................................................. 34
Important Safeguards for Electrical Appliances ....................................... 36
Moving Parts – Risk of Injuries ............................................................. 37
Technical Specifications ........................................................................... 38
Knowing Your New Coffee Grinder .......................................................... 39
Properties of Your New Coffee Grinder ...................................................... 40
Tips for Best Results ................................................................................. 41
Before First Use ...................................................................................... 41
Operation ............................................................................................. 42
Selecting the Grind Size .................................................................... 42
Setting the Amount ............................................................................ 43
Filling the Bean Hopper ..................................................................... 44
Grinding into the Storage Container ..................................................... 44
Grinding into a Portafilter ................................................................... 46
Removing Blockages ......................................................................... 46
Solving Problems .................................................................................... 47
Care and Cleaning ................................................................................ 49
Disassembling the Grinder .................................................................. 50
Cleaning the Grinder ........................................................................ 51
Re-Assembling the Grinder .................................................................. 51
Storage ................................................................................................ 52
Notes for Disposal ................................................................................ 53
Information And Service ........................................................................... 53
Warranty .............................................................................................. 54
EN
30
Page 31

IMPORTANT NOTE - PLEASE READ CAREFULLY BEFORE YOU USE THE DEVICE!
All GASTROBACK® products are intended for food processing of food products and
groceries. For reasons of health protection and hygiene, products that are used
on a daily basis or used only once, are not allowed to be returned. Check the
goods just as you would do in a retail store.
You only have to pay for a possible loss in value of the goods, if this loss of value
is due to a non-necessary for the examination of the nature, characteristics and function of the goods handling.
An unnecessary way to check the nature, characteristics and function of the goods
is the processing of food products or groceries into food and drinks.
If you have any questions about GASTROBACK® products, if your unit is not working properly straight away or if you need any accessories or spare parts for your
GASTROBACK® product please contact our customer service before returning.
GASTROBACK® Customer Service Hotline:
Phone: +49 (0) 4165 – 22 25 0
Monday to friday (except on holidays) from 8am to 4pm
E-Mail: info@gastroback.de
31
EN
Page 32

IMPORTANT NOTE - PLEASE READ CAREFULLY BEFORE YOU USE THE DEVICE!
All GASTROBACK® products are intended for food processing of food products and
groceries. For reasons of health protection and hygiene, products that are used
on a daily basis or used only once, are not allowed to be returned. Check the
goods just as you would do in a retail store.
You only have to pay for a possible loss in value of the goods, if this loss of value
is due to a non-necessary for the examination of the nature, characteristics and function of the goods handling.
An unnecessary way to check the nature, characteristics and function of the goods
is the processing of food products or groceries into food and drinks.
If you have any questions about GASTROBACK® products, if your unit is not working properly straight away or if you need any accessories or spare parts for your
GASTROBACK® product please contact our customer service before returning.
GASTROBACK® Customer Service Hotline:
Phone: +49 (0) 4165 – 22 25 0
Monday to friday (except on holidays) from 8am to 4pm
E-Mail: info@gastroback.de
EN
32
Page 33

DEAR CUSTOMER!
Your new DESIGN COFFEE GRINDER ADVANCED PLUS will assist you during an
essential step in getting your individual coffee delight: grinding fresh, whole coffee
beans directly before brewing, getting a powder perfectly suited for your preferred
brewing method and with consistent particle size (grind size). The heat-conducting
stainless steel grinding tools reduce the effect of warming up the coffee beans during
grinding, therefore preserving the flavours of the beans. This way, DESIGN COFFEE
GRINDER ADVANCED PLUS meets the requirements of the American and European
barista.
The ground amount is set via an electronic timer and can be adjusted to the amount
required for your daily need, thus avoiding the use of a measuring spoon. For brewing your coffee with an espresso machine, you can grind directly into the portafilter.
Alternatively, you may fill the provided storage container that is designed for perfectly fitting into the grinder.
The amount of coffee powder is controlled via an electronic timer. Preselect the
required amount for your daily coffee break or fill the storage container with a stock
for some days.
The instructions in this booklet will inform you on the features of the machine, thus
making it easy to take pleasure in your new coffee grinder.
We hope that you will enjoy your new DESIGN COFFEE GRINDER ADVANCED
PLUS.
Your GASTROBACK GmbH
33
EN
Page 34

IMPORTANT SAFEGUARDS
Carefully read all instructions given in this booklet before ope-
rating this appliance. Save all instructions for further reference.
Do not attempt to use or treat this appliance in any other way or for any
other than the intended use, described in this booklet. Any utilization for
any other purpose is forbidden by the manufacturer. Unintended use and
especially misuse may cause severe injuries and damage due to electric
shock, moving parts, fire, and heat. Do not use the appliance or any
parts or accessories of the appliance with any other device or for any
other purpose than described in this booklet. There is no warranty claim
of the purchaser or liability to recourse of the manufacturer, if any damage and injuries are caused by unintended use or improper treatment.
These instructions are an essential part of the appliance. Do not pass
the appliance without this booklet to third parties. If there are any uncertainties or additional information is required, please feel free to contact
an authorized service centre or the Gastroback Customer Care Center
(phone: +49 (0)4165/22 25-0 or e-mail: info@gastroback.de).
Any operation, repair and technical maintenance of the appliance or any
part of it other than described in these instructions may only be performed
at an authorised service centre. Please contact your vendor.
GENERAL SAFETY INSTRUCTIONS
• This appliance is for household use only and NOT intended for use
in moving vehicles. Do not operate or store the appliance in humid
or wet areas or outdoors. Always keep the appliance where it is dry,
frost-free, and clean, and ensure that young children and animals
cannot reach it.
• Any use of accessories, attachments or spare parts that are not recom-
mended by the manufacturer or damaged in any way may result
in injuries to persons and/or damage. Check the entire appliance
regularly for proper operation (e.g. check for distortion, discolouration, cracks, excessively worn parts). However, even hidden damage
may prevent safe operation. Do not operate the appliance, when the
appliance or any part of it is likely to be damaged, to avoid risk of
fire, electric shock, or any other injuries to persons and/or damage.
34
EN
Page 35

The appliance or its parts are likely to be damaged, if the appliance
has been subject to inadmissible strain (e.g. overheating, mechanical or electric shock, moisture in the interior), or if the appliance is
not working properly. If one of these cases occurs during operation,
immediately unplug the appliance. Get in contact with an authorized
service centre for examination and/or repair.
• Operate the appliance on a well accessible, stable, level, dry, and
suitable large table or counter, where it will not slip. Always keep the
appliance and the table or counter clean and dry, and wipe off spilled liquids immediately. Do not place the appliance on the edge of
the table or counter. Do not place the appliance or any part of it on
or near hot surfaces (e.g. burner, heater, or oven).
• During operation, ensure unhindered access to the front of the appli-
ance and the used power outlet. Keep the appliance in an appropriate distance to other objects of at least 10 cm on each side. Leave at
least 50 cm of free space above the appliance to get free access to
the bean hopper. Do not leave the appliance operate without supervision.
• This appliance can be used by persons with reduced physical, sensory
or mental capabilities or lack of experience and knowledge, including
children aged from 8 years on, if they have been given supervision
or instruction concerning the use of the appliance in a safe way and
understand and handle with the hazards involved. Even care and cleaning shall not be performed by children without supervision. Young
children must always be supervised to ensure that they do not play
with the appliance or any parts of the appliance or the packaging.
• Before operating the appliance, always ensure that the appliance is
assembled completely and correctly according to the instructions in
this booklet. Do not use violence to avoid damage.
• Do not place any clothes or tissues or similar materials on or under the
appliance during operation, to avoid overheating, fire and electric
shock. Do not place any heavy and/or sharp-edged foreign objects
on or in the appliance or any of its parts (e.g. bean hopper), to avoid damage.
35
EN
Page 36

• To avoid damage to the grinder: Do not fill pre-ground coffee pow-
der into the bean hopper. Only fill the bean hopper with fresh, dry,
whole coffee beans that are fit for consumption. Do not use the grinder for grinding any other materials or food. Always keep the grinder
chamber completely dry.
• Always unplug the appliance, before cleaning the appliance, or
when the appliance is not in use. Additionally, empty the bean hopper and interior of the grinder chamber, when the appliance is not in
use for an elongated time. Always hold the machine at the housing
for moving the appliance. Do not hold the appliance at the bean
hopper, grinder head, or power cord for moving the appliance.
• Keep the appliance and its parts and accessories clean (see: ‘Care
and Cleaning’). Do not use any abrasive cleaners, cleaning pads
(e.g. metal scouring pads), or any corrosive cleaners (e.g. disinfectants) for cleaning.
• Do not place the grinder in an automatic dishwasher.
IMPORTANT SAFEGUARDS FOR ELECTRICAL APPLIANCES
Place the appliance near a suitable wall power outlet to connect the
appliance directly to a protected mains power supply with protective conductor (earth/ground) connected properly. Ensure that the voltage rating
of your mains power supply corresponds to the voltage requirements of
the appliance (230 - 240 V, 50/60 Hz, AC, rated for at least 8 A). The
installation of a residual current operated circuit breaker (r.c.c.d.) with a
maximum rated residual operating current of 30 mA in the supplying electrical circuit is strongly recommended. If in doubt, contact your electrician
for further information.
• In various foreign countries, the specifications for power supplies are
subject to incompatible norms. Therefore it is possible that power supplies in foreign countries do not meet the requirements for safe operation of the appliance. Thus, before operating the appliance abroad,
ensure that safe operation is possible.
• Do not use any desk top multi socket outlet, external switching device,
remote control systems, or extension cord to avoid risk of fire or elec-
36
EN
Page 37

tric shock. Ensure that the power outlet socket used is always accessible for unplugging the appliance immediately in case of malfunction
or danger.
• The appliance may not be operated on metal surfaces (e.g. sink) to
avoid risk of electric shock. Do not touch the power plug or the appliance with wet hands, when the appliance is connected to the power
supply.
• DO NOT pour or spill any liquids on or under the housing or on the
power cord or in the bean hopper when the bean hopper is installed
on the grinder chamber. Do not immerse the appliance, power cord,
or power plug in water or other liquids. Do not place the appliance
on wet surfaces. Protect the appliance from splashing water. If liquids
are spilled on or into the appliance, immediately unplug and dry the
appliance and, with all parts disassembled, let it dry naturally for at
least 1 day (see: ‘Care and Cleaning’).
• Power cords may never be knotted, twisted, strained or squeezed.
Do not let the power plug or power cord hang over the edge of the
table or counter. The power cord may not touch hot surfaces or sharp
edges. Ensure that no one will pull the appliance by the power cord.
Take care not to entangle in the power cord. Always grasp the power
plug, when disconnecting the power cord.
MOVING PARTS – RISK OF INJURIES
Your new DESIGN COFFEE GRINDER ADVANCED PLUS is designed
for grinding coffee beans. For this purpose, the sharp-edged grinding
burrs are rotating in the grinder chamber. Improper handling could cause
severe injuries and damage.
• Do not insert your hands or any foreign objects (e.g. clothes, brushes,
cooking utensils) in the grinder chamber, bean hopper, or the powder outlet, with the appliance connected to the power supply. Always
unplug the appliance before moving the appliance, and before
assembling, disassembling, or cleaning the appliance, and before
removing the storage container.
37
EN
Page 38

• Do not attempt to operate the appliance, if the grinding tools (burrs
and sleeve), bean hopper, or hopper lid are damaged, clogged,
misaligned, or not completely and properly installed.
TECHNICAL SPECIFICATIONS
Model:
Power supply:
Power consumption:
Length of power cord:
Weight:
Dimensions:
Capacity, bean hopper:
Capacity, storage container:
Max. time of continuous operation:
Certificates:
These specifications may change without notice.
42642 Design Coffee Grinder Advanced Plus
220 - 240 V AC, 50/60 Hz
130 W
approx. 95 cm
approx. 2,9 kg
approx. 170 x 220 x 390 mm (W x D x H)
max. 325 g
max. 240 g
approx. 2 minutes
EN
38
Page 39

KNOWING YOUR NEW COFFEE GRINDER
1
2
3
4
5
8
6
7
1 BEAN HOPPER WITH LID - For up to 350g fresh, whole coffee beans.
2 POWER BUTTON - Press here for starting or cancelling a grinding cycle.
3 DIE-CAST ALUMINIUM HOUSING
4 GRIND SIZE DIAL
5 GRIND TIME DIAL - Turn this dial for setting the amount via the operating time in seconds.
6 REMOVABLE POWDER TRAY
7 CORD STORAGE
ACCESSORIES
8 STORAGE CONTAINER - With integrated, air-tight closing latch, for storing up to 240g coffee powder.
9 2 PORTAFILTER CRADLES - Slide one of these cradles onto the powder outlet for grinding directly into your portafilter.
CLEANING TOOL FOR CLEANING THE INTERIOR OF THE GRINDER CHAMBER
9
39
EN
Page 40

PROPERTIES OF YOUR NEW COFFEE GRINDER
• The DESIGN COFFEE GRINDER ADVANCED PLUS is perfectly suited for grin-
ding fresh, whole coffee beans just before the brewing cycle. Simply adjust the
grind size to the type of brewing method, you prefer.
• The machine meets the high standards set by the »Speciality Coffee Association
of America« and the »European Coffee Brewing Centre«.
• You may fill up to 350 g coffee beans into the bean hopper.
• The locking system of the bean hopper automatically closes the base of the bean
hopper, avoiding that remaining coffee beans fall out, when removing the bean
hopper.
• The stainless steel grinding tools are designed for minimizing the grinding heat.
Therefore, the essential oils and flavours in the coffee beans are protected during
grinding.
• 16 precise grind size settings can be selected via the grind size dial: from
the finest grind for espresso machines to the coarsest grind for plunger coffee
makers.
• Via setting the grind time, the grinder substitutes the repeated usage of a measu-
ring spoon by giving off the correct dose automatically. The appliance comes
with a special storage container for max. 240 g coffee powder. This container
is perfectly suited for operation with the appliance. In the container lid, the opening for grinding the coffee powder directly into the container is adapted to the
powder outlet of the machine. For grinding, fold back the latch of the container
lid. For storage, the latch may be used for closing the filling hole.
• 2 portafilter cradles sized for 50 - 54 mm and 58 mm portafilters are provided
for directly grinding into the portafilter of your espresso machine. The handling is
as easy as could be: simply push the prepared and pre-warmed portafilter into
the grinder cavity below the portafilter cradle for starting operation. The grinder
stops immediately, when withdrawing the portafilter. To avoid severe injuries
and damage, the safety interlocks of the appliance ensure that the motor cannot be started, when the grinder is not assembled correctly and completely. If
the bean hopper or the storage container / portafilter cradle is not properly in
place, the grinder will not operate.
WARNING – Do not attempt to corrupt the safety interlocks. If the grinder
does not work, refer to the hints given in chapter ‘Solving Problems’ and clear
away the obstacle. Do not remove any parts, while the appliance is connected to
the power supply.
40
EN
Page 41

TIPS FOR BEST RESULTS
Taste and flavour of your coffee depend on a lot of essential constituents. Apart from
the brewing method, type of coffee beans, roast and freshness, an even grind and
perfectly suited grind size of the coffee beans are essential. However, for achieving
best results, the evenness of the grind is crucial too. Therefore, a high-quality grinder
is the first step on the way to your perfect coffee delight. The grind size has a great
influence on the flow of water through the coffee powder, thus determining the taste
and flavour of your coffee. Adapt the grind size to the desired brewing method.
• The optimum grind size depends on your individual liking too. Make the
required fine tuning of the grind size step by step for getting the desired results.
• For adapting the grind size to your favourite taste, begin with a medium grind
size in a range, suited for your preferred brewing method. Change the settings
in small steps to reach the desired optimum. It is normal that a few attempts are
needed for finding the correct grind size.
• It is best to grind coffee beans directly before brewing. When you need the
same amount of coffee powder for each brewing cycle, we recommend to
adjust the grind time dial accordingly. The appliance will give off the allocated
amount and stop automatically.
• Aroma and taste fade quickly, when storing coffee powder for more than a
week. Store coffee beans or coffee powder on a cool, dark place in a dry, airtight container. For this, you may use the storage container of the appliance.
BEFORE FIRST USE
WARNING – Do not leave young children without supervision, while
the appliance, any part of it, or the packaging are in their reach. Before operation, always ensure to assemble the appliance completely and correctly. Always
unplug the appliance, before removing any parts and/or cleaning the appliance.
Always keep the workspace clean and dry. Do not pour or spill any liquids on or
under the appliance. Do not place clothes or similar materials on or under the appliance during operation.
1. Pull the appliance out of the shipping box. Remove and discard all promotional
labels, stickers, and packaging materials attached to the appliance, but do not
remove the model label. Always ensure that young children do not play with
any parts or accessories or the packaging!
2. Before discarding the packaging, ensure that you have found all parts and
accessories (see: ‘Knowing Your New Coffee Grinder’).
41
EN
Page 42

CAUTION – Do not use any abrasive cleaners, cleaning pads (e.g. metal
scouring pads), or any corrosive cleaners (e.g. disinfectants) for cleaning. Do not
use any hard or sharp-edged objects for cleaning the appliance. Do not place the
appliance or any part of it in an automatic dishwasher.
3. Before first use and after an elongated time of storage, clean all removable parts
and the accessories according to the instructions given in this booklet (see: ‘Care
and Cleaning’).
OPERATION
WARNING – Do not leave young children without supervision, if the
grinder or any part of it is in their reach.
For various useful tips concerning the use of the grinder, please refer to ‘Tips for Best Results’.
CAUTION – The DESIGN COFFEE GRINDER ADVANCED PLUS is inten-
ded for short-term operation only. Do not let the appliance operate continuously
for more than 2 minutes. Turn off the appliance after 2 minutes of use and allow
the motor to cool down for 10 minutes before turning it on again. Avoiding overheating will preserve the quality of the ground coffee powder as well as protect
the appliance and ensure a long-lasting lifetime.
IMPORTANT - When the grinder will not be used for more than a week, we
recommend to empty the grinder (bean hopper and grinder chamber) and clean
the appliance thoroughly (see: ‘Care and Cleaning’). This will prevent residues of
coffee beans and coffee powder from going bad within the grinder, causing an
unpleasant, stale taste and flavour of your coffee.
SELECTING THE GRIND SIZE
The grind size influences the water flow rate through the coffee powder and the rate
of extraction of flavours. When selecting the grind size, you should take your brewing method into consideration, because each brewing method requires an appropriately adjusted grind size (see: ‘Tips for Best Results’).
NOTE
The smaller the number, the finer the grind size. We recommend, starting with a
medium grind size within the range that is sufficient for your preferred brewing
method. After checking the results, adjust the setting in small steps as required.
42
EN
Page 43

The values given in the following table are approximations meant for guidance. Your
preferred setting may vary according to your individual liking.
Setting Result Use it for …
1 - 3 Extra fine Espresso or Turkish coffee
4 - 7 Fine to medium Automatic coffee makers
8 - 16 Medium coarse to
extra coarse
IMPORTANT - Whenever possible, set the grind size, before filling the bean hopper. Especially, if you wish to set a finer grind size (smaller numbers) with coffee
beans being in the grinder already, always let the motor run, while setting the
grind size. Otherwise, coffee beans may get caught between the grinding tools
and block the motor (see: ‘Operation / Removing Blockages’).
There are 16 possible settings that can be selected via the grind size dial at the
right side of the grinder head. Your setting will be active, until you change it again.
For setting the grind size with coffee beans in the grinding chamber, start the grinder and turn the grind size dial slowly to the desired number (see: ‘Grinding into the
Storage Container’).
SETTING THE AMOUNT
Pour-over, plunger coffee makers and French press, or cold brew coffee
The grind time determines the amount of coffee powder given off. You may set the
required grind time for getting the desired amount for your preferred brewing method
and amount of brewed coffee. The setting is kept until you change it again.
NOTE
Setting the grind time is effective only for grinding into the storage container.
When grinding into a portafilter, the grinder is started and stopped via the portafilter (see: ‘Grinding into a Portafilter’).
The grind time can be set between 0 (off) and 50 seconds. When using a drip coffee maker, any amount from 2 to 10 cups can be ground in a single grinding cycle.
43
EN
Page 44

CAUTION – Before starting the grinding cycle, always ensure that there is
sufficient free space left in the storage container for the portion you are about to
grind. Otherwise, overflow of the storage container may occur and/or the ground
coffee may tail back in the powder outlet, blocking the grinder. The maximum
capacity of the storage container is 240 g (8.5 ounces). However, caused by
heaps of coffee powder built within the storage container below the filling hole,
overflow may happen even when grinding smaller portions. Have an eye on it
and, if required, cancel the grinding cycle in time via the power button.
FILLING THE BEAN HOPPER
The bean hopper may be filled with max. 350 g coffee beans.
IMPORTANT - Only use fresh, whole coffee beans that are fit for consumption. Do
not fill in any other material. Do not overfill the bean hopper. The hopper lid must
be closed completely during operation.
1. Ensure that the grind size is set to the desired value (see: ‘Selecting the Grind
Size’). If required, whenever possible, you should set the grind size, before filling
the bean hopper.
2. Remove the hopper lid and ensure that the bean hopper is locked securely to
the grinder head (see: ‘Care and Cleaning / Re-Assembling the Grinder’). Then
fill max. 350 g (12.5 ounces) fresh, whole coffee beans into the bean hopper.
3. Replace the hopper lid and gently press the hopper lid down.
GRINDING INTO THE STORAGE CONTAINER
NOTE
Usually, the grinder stops automatically, after the set grind time elapsed. Nevertheless, you can stop the grinder manually by pressing the power button, while the
grinder is still running.
NOTE
When grinding coffee for an espresso machine, you may grind directly into the
portafilter (see below: ‘Grinding into a Portafilter’).
44
EN
Page 45

IMPORTANT - Before starting the grinder, ensure that there is sufficient free space
left in the storage container for taking the desired amount of coffee powder. We
recommend to empty the storage container completely, before grinding a new
portion. Always ensure to fold the latch of the container lid open for filling the container. Otherwise, the grinder may get blocked via coffee powder tailing back in
the powder outlet.
1. Ensure that the appliance is assembled correctly (see: ‘Care and Cleaning / Re-
Assembling the Grinder’). Ensure that the settings of the grind size and grind time
are correct (see: ‘Selecting the Grind Size’ und ‘Setting the Amount’). If required,
fill the bean hopper with a sufficient amount of whole coffee beans (see: ‘Filling
the Bean Hopper’).
2. You should empty the storage container, before grinding a new portion. Close
the storage container via the container lid. Ensure to open the black latch in the
container lid and turn the latch to the well beside the filling hole. Then, place the
storage container onto the powder tray below the powder outlet with the filling
hole orientated to the rear wall of the grinder cavity.
NOTE
You should not operate the grinder without the powder tray. Otherwise, the coffee powder may miss the filling hole of the storage container with a lot of coffee
powder falling out.
3. Connect the appliance to a suited power supply (see: ‘Important Safeguards for
Electrical Appliances’). Press the power button for starting the grinder. The grinding process stops automatically when the selected grind time is reached.
4. When the motor stops, unplug the appliance. Remove the storage container.
NOTE
For ensuring optimum coffee flavour, only the required amount of beans should
be ground immediately before brewing. Any excessively ground coffee should be
stored in an airtight container. Select a cold, dark place (e.g. in the refrigerator).
45
EN
Page 46

GRINDING INTO A PORTAFILTER
NOTE
For filling a portafilter, you do no need to press the power button on top of the
grinder head. The grinder starts automatically, when pushing the portafilter into the
grinder cavity below the portafilter cradle.
WARNING – Do not poke in the powder outlet! When the grinder gets
blocked, refer to the instructions given in the following section ‘Removing Blockages’).
1. Ensure that the appliance is assembled correctly (see: ‘Care and Cleaning / Re-
Assembling the Grinder’). Ensure that the grind size is set correctly (see: ‘Selecting the Grind Size’). If required, fill the bean hopper with a sufficient amount of
whole coffee beans (see: ‘Filling the Bean Hopper’).
2. Position the appropriate portafilter cradle (50 - 54 mm or 58 mm) in the runners
under the grinder outlet and push the portafilter cradle in for fixing the portafilter
cradle stably.
3. Connect the appliance to a suited power supply (see: ‘Important Safeguards for
Electrical Appliances’).
NOTE
If you wish to check the consistency of the coffee powder first, below the portafilter cradle you may push a suited small bowl into the grinder cavity, thus catching
the coffee powder given off in the bowl. If required, let the grinder operate, while
setting the grind size.
4. Hold the portafilter (with the appropriate filter basket mounted correctly) directly
under the portafilter cradle, and push the portafilter into the grinder cavity. Press
the portafilter on the black button at the rear wall of the grinder cavity. The grinder starts operation.
5. Pull out your portafilter, when you are satisfied with the amount of coffee pow-
der. The grinder stops automatically.
REMOVING BLOCKAGES
Rarely, stalks or other foreign objects could be merged with the coffee beans and
block the grinder. Additionally, coffee beans could get wedged within the grinder.
You may try the following procedure for solving the problem.
46
EN
Page 47

CAUTION – Do not poke in the openings of the grinder (in the bean hop-
per base and/or grinder outlet). You cannot remove any blockages this way. Do
not leave the grinder switched on, when the grinder is blocked. If the grinder
does not work, always immediately switch off the grinder (press the power but-
ton or withdraw the portafilter).
1. Without violence, try to turn the grind size dial to the highest number (16). Posi-
tion the storage container correctly in the grinder and, with the appliance live,
press the power button. If the grinder does not work: immediately switch off
the grinder (press the power button again).
2. If the grinder works: leave the grinder run for approx. 2 - 3 seconds with the
coarsest grind size (16). Thereafter, with the grinder still running, slowly turn the
grind size dial back to your preferred setting.
3. If the grinder does not work and/or the grind size dial is blocked too: Remove
the bean hopper and grinding sleeve for removing the obstacle (see: ‘Care and
Cleaning / Disassembling the Grinder’).
SOLVING PROBLEMS
If any problems occur during operation, you will find the solution in this chapter.
Problem Mögliche Ursache Die einfache Lösung
Emergency stop? Unplug the appliance.
The motor does not start. The appliance is not live. Check the connection to the power supply. Is the power
outlet live? Connect a lamp.
The grinder is blocked. Immediately switch off and unplug the appliance.
Remove the obstacle (see: ‘Operation / Removing Blockages’). CAUTION: Do not poke in the openings of the
grinder (bean hopper base or powder outlet). You cannot
remove the blockage this way!
You are using an insufficient vessel.
Using the storage container: The storage container
is not inserted correctly
or the container lid is
missing.
Use the provided storage container or install the appropriate portafilter cradle for grinding into a portafilter.
The grinder can be operated only with the storage container
and container lid correctly in place. Ensure to prepare the
appliance for operation according to the instructions in chapter ‘Operation / Grinding into the Storage Container’).
47
EN
Page 48

Problem Mögliche Ursache Die einfache Lösung
For grinding into the storage container, you must set a
sufficient grind time.
Slide the portafilter cradle into the runners directly below
the grinder outlet and push the portafilter cradle to the
rear wall of the grinder cavity to the stop.
Below the portafilter cradle, push the portafilter into
the grinder cavity until the grinder starts.
Get in contact with an authorized service centre for examination and repair.
When inserting the storage container, the filling hole in the
container lid must face to the rear wall of the grinder cavity.
Remove the portafilter cradle. Then try again.
Open the black latch and turn it to the well in the container lid. Then try again.
storage container.
Before operation, always ensure that there is sufficient
free space left in the storage container. The build-up of
heaps in the storage container may cause overflow, even
when the container is not filled completely. We recommend to empty the storage container completely, before
grinding another portion.
This problem may occur with inclement weather and fine
grind size. The problem may be reduced, when wiping the
exterior of the storage container via a slightly damp cloth.
Avoid wiping the collection container via any dry cloth made
of synthetics. For cleaning, prefer a cloth made of linen.
After changing the grind size, it may be necessary to
adapt the grind time accordingly (see: ‘Operation / Setting the Amount’).
Fill the bean hopper.
The storage container does
not fit in the grinder cavity.
Ground coffee spills from
the storage container.
The usual amount is not
given off, and/or the
grinder makes an unusual
noise.
Using the storage container: The grind time is set
to “0”.
Filling a portafilter: The
portafilter cradle is missing
or not installed correctly.
Filling a portafilter: The
portafilter is not installed
correctly.
A severe problem occurred.
The storage container is in
wrong orientation.
A portafilter cradle is
installed.
The latch at the container
lid is still closed.
The powder tray is missing. Always install the powder tray, when grinding into the
The storage container is
overfilled.
Electrostatic charge may
be the cause, especially,
when a very fine grind
size is selected.
You changed the grind
size.
Not enough coffee beans
in the bean hopper.
EN
48
Page 49

Problem Mögliche Ursache Die einfache Lösung
You cannot unlock the bean
hopper. The lock dial does
not turn.
Coffee beans are wedged
in the bean hopper base
or grinder intake.
The grinder got blocked
during operation.
A coffee bean is jammed at the bean hopper
base, blocking the closing
mechanism.
Unplug the appliance and remove the hopper lid. Carefully stir the coffee beans in the bean hopper a little. Then
try again. Carefully turn the lock dial to and fro. If the
problem persists, remove the bean hopper. Then remove
the coffee beans from the grinder intake.
Unplug the appliance and remove the blockage (see: ‘Operation / Removing Blockages’). CAUTION: Do not poke in
the openings of the grinder (bean hopper base or powder
outlet). You cannot remove the blockage this way!
Without violence, turn the lock dial to and fro a little to
get the coffee bean out of the closing mechanism. If the
problem persists, prepare the appliance for operation and
let the grinder work for a moment. Then try again.
CARE AND CLEANING
WARNING – Always ensure that the appliance and all its parts and
accessories are out of reach of young children and animals. Always unplug the
appliance, before moving and/or cleaning the appliance. Do not disassemble or
assemble any parts, while the appliance is connected to the power supply.
The grinding tools in the grinder chamber are edged. Touch the grinding tools with
care.
To avoid hazards due to electric shock and damage: Do not clean the appliance
in an automatic dishwasher! Do not immerse the housing, grinding sleeve, power
plug, or power cord in any liquid,. Do not spill or drip any liquids on the housing,
power cord, or in the grinder chamber or in the mounted bean hopper. To protect
yourself from electric shock, do not touch the housing or the power cord with wet
hands, while the appliance is connected to the power supply.
Do not use violence. Do not use any abrasive cleaners or cleaning pads (e.g. metal
scouring pads) for cleaning the appliance or any part of it, to avoid damage to the
surfaces. For cleaning the grinder chamber, do not use any hard or sharp-edged
foreign objects. Only use a completely dry brush (provided cleaning brush or another small nylon brush) for cleaning the grinder chamber. Always keep the grinder
chamber completely dry.
Hygienic cleaning is performed according to the following instructions.
49
EN
Page 50

IMPORTANT - Take into account that the bean hopper may need some hours for
getting completely dry after cleaning. However, for correct operation, it is crucial
that the bean hopper is completely dry. We recommend to clean the appliance at
the end of the day and, after wiping dry, leave the parts dry naturally over-night.
NOTE
You should empty and clean the bean hopper regularly to avoid that stale residues
of coffee beans accumulate within the bean hopper and grinder. This is crucial,
if you wish to prepare the appliance for several days without usage (e.g. during
holidays).
DISASSEMBLING THE GRINDER
NOTE
The bean hopper base is closed automatically, when unlocking the bean hopper.
Therefore, remaining coffee beans will not fall out, when removing the bean hopper.
1. Unplug the appliance. If required, remove the portafilter cradle.
2. Remove the hopper lid. Turn the black lock dial in the centre of the bean hopper
counter-clockwise, until the lock of the bean hopper is released tangibly (approx.
90°). Then, pull the bean hopper upwards, thus enabling free access to the grinding burrs.
3. If there are any coffee beans left in the bean hopper, empty the bean hopper
completely. Thereafter, replace the bean hopper and turn the lock dial back to
the closed position. Replace the hopper lid. Position the storage container in the
grinder cavity.
4. Plug in the appliance and leave the appliance operate, until all remaining coffee
beans are ground. Unplug the appliance and remove the bean hopper again,
as described in step 2.
CAUTION – There may be some harsh resistance, when attempting to
unlock the grinding sleeve. In this case, grasp the wire handle at both sides just
above the rim of the grinding sleeve. Avoid bending the wire handle. Otherwise,
the wire handle may no longer fit into the groove at the rim of the grinding sleeve,
making it impossible to re-assemble the bean hopper.
5. Pull up the wire handle at the rim of the grinding sleeve. For unlocking the grin-
ding sleeve, via the wire handle, turn the grinding sleeve counter-clockwise.
Then, pull the grinding sleeve out.
50
EN
Page 51

NOTE
The grinding burr cannot be removed.
CLEANING THE GRINDER
CAUTION – Do not immerse the grinding sleeve in water or any other
liquid to avoid damage. Do not pour or drip any liquids into the grinder chamber. Always keep the inner parts of the grinder completely dry (grinding burrs,
grinding sleeve, grinder outlet). Moisture on the surfaces will make the coffee powder stick to the surfaces. Do not clean any part of the appliance in an automatic
dishwasher.
6. Disassemble the grinder (see above: ‘Disassembling the Grinder’).
7. Via a small, DRY nylon brush, remove any residues of coffee powder from the grin-
ding sleeve and from the grinding burr (in the grinder chamber). DO NOT moisten
the brush! The provided cleaning tool or another suited nylon brush may do.
8. Brush the powder outlet, removing any residues of coffee powder sticking to the
surfaces.
NOTE
The powder tray is held within the grinder base via a magnet. You may simply
pull it out.
9. Pull out the powder tray and empty the powder tray.
10. You may clean the portafilter cradles, powder tray, bean hopper, and hopper
lid via warm dishwater. Thereafter rinse and dry thoroughly.
11. Wipe the exterior of the housing, the grinder cavity, and the power cord with a
slightly moistened cloth. Then wipe dry.
12. Leave all parts dry naturally for at least 1 hour. Take into account that the bean
hopper may need some more time for getting completely dry.
RE-ASSEMBLING THE GRINDER
CAUTION – Ensure that all parts of the grinder are absolutely dry, before
re-assembling the grinder. Moisture in the grinder may lead to blockage of the
grinder, or a stale taste of your coffee, and even mould building up in the grinder
chamber.
51
EN
Page 52

13. Via the wire handle, place the grinding sleeve into the grinder chamber. Pres-
sing the grinding sleeve slightly down, turn the grinding sleeve, until it settles
within the grinder chamber. Then turn the grinding sleeve clockwise until it clicks
tangibly into position. Fold the wire handle down.
14. Ensure that the locking dial in the bean hopper is turned to open (counter-clock-
wise to the open lock icon). Then place the bean hopper onto the grinder intake
and turn the bean hopper until it settles down without resistance. Turn the locking
dial clockwise to the closed position (approx. 90° to the closed lock icon).
15. Replace the hopper lid and gently push it down.
16. Push the powder tray into the base of the appliance. A magnet will keep the
powder tray in position. Thereafter, the appliance is ready for use again.
STORAGE
WARNING – Always ensure that the appliance and all its parts are out of
reach of young children and animals.
CAUTION – Do not place any hard or heavy objects on or in the appliance
or its parts. It is good advice to store all accessories with the appliance. Always grasp
the appliance at both sides of the housing for moving the appliance. Do not grasp the
appliance at the grinder head, bean hopper, or power cord for moving it.
1. When the appliance is not in use and before moving and cleaning the appli-
ance, always unplug the appliance.
2. For storage, completely empty, the bean hopper and grinder chamber. Then tho-
roughly clean the appliance. Thereafter, completely re-assemble the appliance
(see: ‘Care and Cleaning’).
3. You may place the portafilter cradles and cleaning tool into the storage contai-
ner or bean hopper.
4. For storage, grasp the appliance at both sides of the housing and place the
appliance in upright position on a stable, dry, frost-free, and clean surface,
where it cannot fall. Store the appliance, where it is protected against inadmissible strain (e.g. moisture, electric or mechanic shock, heat, frost, direct sunlight),
and where it is out of reach of young children and animals. Lay the power cord
loosely around the appliance or wrap the power cord loosely around the cord
storage at the bottom of the appliance. The power cord may not be knotted,
squeezed, or bent.
52
EN
Page 53

5. Insert the storage container into the grinder cavity.
IMPORTANT - Do not use any parts or accessories of the appliance for any other
purpose than operating the appliance. It is good advice to store the parts and
accessories of the appliance with the appliance.
NOTES FOR DISPOSAL
Dispose of the appliance and packaging must be effected in accordance
with the corresponding local regulations and requirements for electrical
appliances and packaging. Please contact your local disposal company.
Do not dispose of electrical appliances as unsorted municipal waste, use
separate collection facilities. Contact your local government for information regarding the collection systems available. If electrical appliances are disposed of in landfills, dumps, or refuse incineration, hazardous substances can leak into the groundwater or can be emitted into air, thus getting into the food chain, and damaging
your health and well-being as well as poisoning flora and fauna. When replacing
old appliances with new once, the vendor is legally obligated to take back your old
appliance for disposal at least for free of charge.
INFORMATION AND SERVICE
Please check www.gastroback.de for further information.
For technical support, please contact Gastroback Customer Care Center by phone:
+49 (0)4165/22 25-0 or e-mail info@gastroback.de.
Please refer to our home page for a copy of these operating instructions in pdf format.
53
EN
Page 54

WARRANTY
We guarantee that all our products are free of defects at the time of purchase. Any
demonstrable manufacturing or material defects will be to the exclusion of any further
claim and within 2 years after purchasing the appliance free of charge repaired or
substituted. There is no Warranty claim of the purchaser if the damage or defect
of the appliance is caused by inappropriate treatment, over loading or installation mistakes. The Warranty claim expires if there is any technical interference of a
third party without a written agreement. The purchaser has to present the sales slip
in assertion-of-claim and has to bear all charges of costs and risk of the transport.
Note
Customers from Germany and Austria: For repair and service, please send
Gastroback products to the following address:
Gastroback GmbH, Gewerbestr. 20, D-21279 Hollenstedt, Germany.
Please agree that we cannot bear the charge of receipt.
Submission of appliances: Please ensure packing the appliance ready for ship-
ment without accessories. Add the sales slip and a short fault description. The
processing time after receipt of the defective appliance will be approx. 2 weeks;
we will inform you automatically. After the warranty period, please send defective
appliances to the given address. You will get a free quotation and, thereafter,
can decide, whether we shall repair the appliance to the costs possibly accrued,
send back the defective appliance for free of charge, or dispose of the appliance
for free of charge.
The appliance is intended for household use only and NOT suited for commercial, industrial or trade usage. Do not attempt to use this appliance in any other
way or for any other purpose than the intended use, described in these instructions. Any other use is regarded as unintended use or misuse, and can cause
severe injuries or damage. There is no warranty claim of the purchaser if any
injuries or damages are caused by unintended use.
54
EN
Page 55

55
EN
Page 56

GASTROBACK GmbH
Gewerbestraße 20 . 21279 Hollenstedt / Germany
Telefon + 49 (0) 41 65 / 22 25 - 0 • Telefax + 49 (0) 41 65 / 22 25 -29
info@gastroback.de • www.gastroback.de
20190920
 Loading...