

Page 1
BEDIENUNGSANLEITUNG
DESIGN KAFFEEMÜHLE ADVANCED
Art.-Nr. 42602 »Design Kaffeemühle Advanced«
Bedienungsanleitung vor Gebrauch unbedingt lesen!
Modell- und Zubehöränderungen vorbehalten!
Nur für den Hausgebrauch!
Page 2
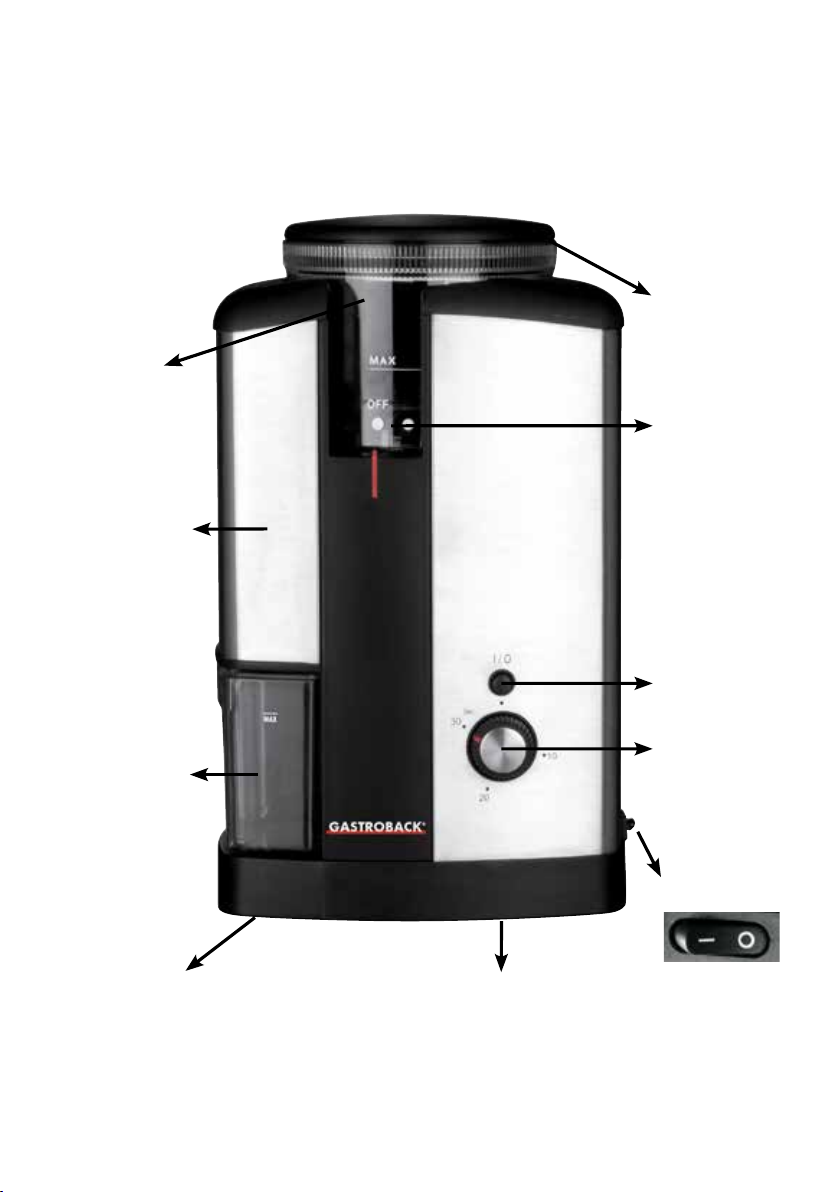
LERNEN SIE IHRE DESIGN KAFFEEMÜHLE ADVANCED KENNEN
Deckel
abnehmbarer Kaffeebohnenbehälter für bis zu
250 g Kaffeebohnen
Edelstahlgehäuse
Mahlgradkontrolle
mit Mahlgradanzeige
herausnehmbarer
Kaffeebehälter
Netzkabelaufnahme Rutschfeste Gummifüße
Start-/Stopp-Taste
Zeitschaltuhr
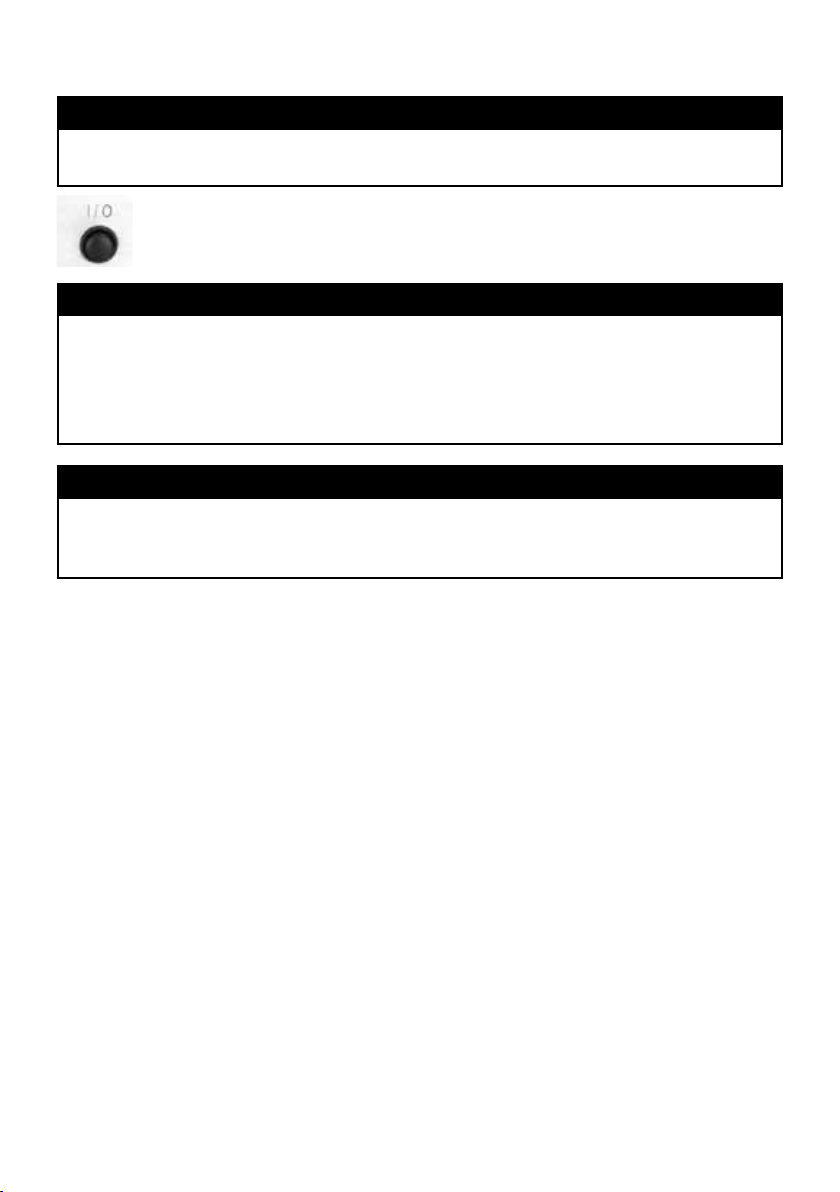
Ein-/Aus-Schalter
Page 3

Wir legen viel Wert auf Ihre Sicherheit. Deshalb bitten wir Sie, alle Hinweise
und Anleitungen, die mit dem Gerät geliefert werden, sorgfältig und voll-
ständig durchzulesen, bevor Sie das Gerät in Betrieb nehmen.
Dadurch lernen Sie auch alle Funktionen und Eigenschaften Ihres Gerätes
kennen. Bitte befolgen Sie sorgfältig alle Sicherheitshinweise!
WICHTIGE INFORMATIONEN
WARNUNG: Schalten Sie das Gerät immer zuerst AUS (Schalterposition
›O‹), warten Sie, bis der Motor vollständig zum Stillstand gekommen ist und
ziehen Sie den Netzstecker, bevor Sie Bauteile einbauen oder abnehmen.
• Stecken Sie niemals Ihre Hände, Kochlöffel oder andere Fremdkörper
(Haare, Kleidungsstücke, Bürsten, Tücher) in den Kaffeebohnenbehälter,
wenn der Kaffeebohnenbehälter auf dem Motorgehäuse steht und der
Netzstecker in der Steckdose steckt.
• Schalten Sie das Gerät nur ein, wenn der Kaffeebohnenbehälter mit
Deckel fest verschlossen ist. Niemals das Antriebsrad des Motorgehäuses
mit den Händen berühren, wenn der Netzstecker eingesteckt ist.
• Das Gerät hat eine Sicherung und läßt sich nicht Einschalten bevor der
Kaffeebohnenbehälter und der Kaffeebehälter richtig eingesetzt sind.
• ACHTUNG:
Befüllen Sie den Kaffeebohnenbehälter nur, wenn er auf dem
Motorgehäuse steht und dort richtig eingerastet ist. Der Kaffeebohnenbehälter hat KEINEN geschlossenen Behälterboden. Die Bohnen würden
beim Anheben des Behälters herausfallen.
• ACHTUNG:
Überfüllen Sie den Behälter nicht. Die auf dem Kaffeeboh-
nenbehälter markierte max Füllhöhe darf nicht überschritten werden.
• WICHTIG:
Vergessen Sie nicht den Kaffeebehälter zwischendurch zu lee-
ren, wenn Sie Kaffeebohnen mahlen!
• Die Kaffeemühle mahlt keine Zutaten, die klebrig oder zu hart sind (wie
z. B. Schokolade, Käse, ganze Muskatnüsse, kandierte Früchte, etc.).
• ACHTUNG: Der Mahlgrad darf bei bereits eingefüllten Kaffeebohnen
NUR während des laufenden Mahlwerks geändert werden!
• Die Kaffeemühle eignet sich nicht zum Herstellen von Pasten aus Früchten,
Samen oder Kräutern, Currypasten oder Nussteig.
3
Page 4

• Niemals das Gerät während des Betriebes transportieren.
• Das Gerät ist nicht für den Dauerbetrieb geeignet. Schalten Sie nach
2 Minuten den Schalter auf ‚OFF‹ (Schalterposition: AUS). Arbeiten Sie
nicht länger als 2 Minuten, um den Motor nicht zu überlasten und eine
Überhitzung zu vermeiden. Lassen Sie den Motor ca. 2 Minuten abkühlen, bevor Sie einen weiteren Mahlvorgang starten. Nach mehreren
Durchgängen und längerem Benutzen lassen Sie das Gerät ca. 10-15
Minuten abkühlen.
• Niemals das Mahlwerk mit Wasser reinigen damit es nicht rostet oder
Flüssigkeit in das Motorgehäuse gelangt.
• Niemals das Motorgehäuse in der Spülmaschine reinigen.
• Das Gerät nur im Haushalt verwenden.
WICHTIGE SICHERHEITSHINWEISE
Lesen Sie bitte alle Hinweise und Anleitungen, die mit dem Gerät geliefert
werden, sorgfältig und vollständig durch und bewahren Sie die Anleitungen
gut auf.
Verwenden Sie das Gerät ausschließlich in der darin angegebenen Weise zu dem beschriebenen Zweck (bestimmungsgemäßer Gebrauch). Ein
bestimmungswidriger Gebrauch und besonders Missbrauch können zu Sachschäden sowie zu schweren Personenschäden durch gefährliche elektrische
Spannung, Feuer und bewegliche Bauteile führen. Führen Sie ausschließlich
diejenigen Arbeiten am Gerät durch, die in diesen Anleitungen beschrieben werden. Lassen Sie das Gerät im Betriebszustand NIEMALS unbeaufsichtigt.
Reparaturen und technische Wartung am Gerät oder Netzkabel dürfen nur
von dafür autorisierten Fachwerkstätten durchgeführt werden. Wenden Sie
sich gegebenenfalls bitte an Ihren Fachhändler.
ALLGEMEINE HINWEISE ZUR SICHERHEIT
• Nur für den Betrieb in Innenräumen und in Haushalten. Verwenden und
lagern Sie das Gerät nicht im Freien. Verwenden Sie nur Bauteile, Ersatzteile und Zubehör für das Gerät, die vom Hersteller für diesen Zweck vor-
4
Page 5

gesehen und empfohlen sind.
• Beschädigte oder ungeeignete Bauteile (Beispiel: Kaffeebohnenbehälter)
können während des Betriebs brechen oder sich bei laufendem Motor
lösen oder undicht werden und dadurch zu schweren Verletzungen und
Sachschäden führen.
• Kinder und gebrechliche Personen müssen Sie bei der Handhabung von
Elektrogeräten stets besonders beaufsichtigen. Bewahren Sie das Gerät
und die Bauteile des Geräts stets an einem trockenen, sauberen, für Kinder unzugänglichen Ort auf.
• Die Arbeitsfläche muss gut zugänglich, fest, eben, trocken und ausrei-
chend groß und stabil sein. Stellen und betreiben Sie das Gerät nur auf
ausreichend standfesten Unterlagen, die weder kippen noch wackeln.
Verwenden Sie das Gerät nicht in feuchten oder nassen Bereichen. Legen
Sie keine Tücher oder Servietten unter das Gerät, um eine Gefährdung
durch Feuer und elektrischen Schlag zu vermeiden.
• Niemals das Gerät an den Rand oder an die Kante der Arbeitsfläche
stellen.
• Niemals das Gerät oder Teile des Geräts in die Nähe von starken Wär-
mequellen und heißen Oberflächen (Beispiel: Heizung, Ofen, Grill) stellen.
• Niemals das Gerät unbeaufsichtigt lassen, wenn der Netzstecker einge-
steckt ist. Schalten Sie immer zuerst AUS (Schalterposition: ›O‹) und ziehen Sie den Netzstecker aus der Steckdose, wenn Sie das Gerät nicht
benutzen, das Gerät bewegen, oder reinigen wollen. Fassen Sie immer
am Gehäuse des Steckers an, wenn Sie den Stecker ziehen.
• Niemals das Gerät oder Teile davon in der Spülmaschine oder mit Scheu-
ermitteln, harten Scheuerhilfen (Beispiel: Topfreiniger) oder scharfen Putzmitteln reinigen. Niemals harte oder scharfkantige Gegenstände für die
Arbeit mit dem Gerät oder zum Reinigen verwenden. Wenden Sie beim
Reinigen keine Gewalt an, um die Bauteile nicht zu beschädigen.
• Drücken Sie die Start-/Stopp-Taste oder drehen Sie den Zeitwahlschalter
ganz gegen den Uhrzeigersinn zurück oder schalten Sie AUS (Schalterposition: ›O‹) und ziehen Sie den Netzstecker aus der Steckdose, wenn
5
Page 6

während des Betriebs eine Störung auftritt (Beispiel: Motorgeräusche sehr
unregelmäßig; verkeiltes Mahlwerk, Rauchbildung). Verwenden Sie das
Gerät nicht mehr, wenn die Kunststoffteile Sprünge oder Risse haben,
verformt oder undicht sind, übermäßigen Belastungen ausgesetzt waren
oder wenn das Antriebsrad schwergängig oder beschädigt ist. Lassen
Sie das Gerät von einer autorisierten Fachwerkstatt überprüfen und reparieren, wenn es nicht mehr erwartungsgemäß arbeitet oder übermäßigen
Belastungen (Beispiel: Sturz, Schlag, Überhitzung, eingedrungene Flüssigkeit) ausgesetzt war.
• Machen Sie den Kaffeebohnenbehälter nicht zu voll und füllen Sie kei-
ne harten Zutaten ein (Beispiel: Nüsse mit Schale), damit das Mahlwerk
nicht stecken bleibt und der Motor nicht überlastet wird.
• Niemals das Gerät während des Betriebes transportieren.
• Das Gerät hat eine Sicherung und läßt sich nicht Einschalten bevor der
Kaffeebohnenbehälter und der Kaffeebehälter richtig eingesetzt sind.
• Schalten Sie nach 2 Minuten den Schalter auf ›O‹ (Schalterposition:
AUS). Arbeiten Sie nicht länger als 2 Minuten, um den Motor nicht zu
überlasten und eine Überhitzung zu vermeiden. Lassen Sie den Motor
ca. 2 Minuten abkühlen, bevor Sie einen weiteren Mahlvorgang starten.
Nach mehreren Durchgängen und längerem Benutzen lassen Sie das
Gerät ca. 10-15 Minuten abkühlen.
• Dieses Gerät ist nur für den Hausgebrauch geeignet.
MÖGLICHE GEFÄHRDUNGEN DURCH BEWEGLICHE BAUTEILE
• Niemals das Antriebsrad des Motorgehäuses mit den Händen berühren,
wenn der Netzstecker eingesteckt ist.
• Schalten Sie immer zuerst AUS (Schalterposition: ›O‹), drücken Sie die
Start-/Stopp-Taste oder drehen Sie den Zeitwahlschalter ganz gegen
den Uhrzeigersinn zurück und warten Sie bis der Motor steht, bevor Sie
den Kaffeebohnenbehälter erneut auffüllen. Lassen Sie das Gerät niemals
unnötig eingeschaltet.
• Stecken Sie niemals Ihre Hände, Kochlöffel oder andere Fremdkörper
(Haare, Kleidungsstücke, Bürsten, Tücher) in den Kaffeebohnenbehälter,
6
Page 7

wenn der Kaffeebohnenbehälter auf dem Motorgehäuse steht und der
Netzstecker in der Steckdose steckt.
• Schalten Sie das Gerät nur ein, wenn der Kaffeebohnenbehälter mit
Deckel fest verschlossen ist. Wenn Fremdkörper wie z. B. kleine Steine
unter die Bohnen gemischt sind, dann könnte der Motor stecken bleiben, stocken, sich zu langsam drehen oder ungewöhnliche Geräusche
von sich geben. Schalten Sie dann sofort AUS (Schalterposition: ›O‹),
drücken Sie die Start-/Stopp-Taste oder drehen Sie den Zeitwahlschalter ganz gegen den Uhrzeigersinn zurück, um eine Überhitzung zu vermeiden. Lassen Sie das Gerät in diesem Fall durch eine Fachwerkstatt
überprüfen.
WICHTIGE SICHERHEITSHINWEISE – ELEKTRIZITÄT
• Stellen Sie das Gerät in der Nähe einer passenden Wandsteckdose auf
und schließen Sie das Gerät dort direkt an. Verwenden Sie keine Verlängerungskabel oder Tischsteckdosen. Das Gerät darf nur an die ordnungsgemäß abgesicherte Schukosteckdose einer geeigneten Stromversorgung
(Wechselstrom; 220 - 230 V, 50 Hz) mit Schutzleiter angeschlossen
werden.
• Niemals am Kabel ziehen oder reißen oder das Kabel knicken, einklem-
men, quetschen oder verknoten. Achten Sie darauf, dass das Netzkabel
nicht über die Tischkante herunterhängt. Achten Sie darauf, dass niemand in Kabelschlaufen hängen bleiben kann oder das Gerät am Kabel
von der Arbeitsfläche reißen kann.
• Niemals Gerät, Kabel oder Netzstecker in Wasser oder andere Flüssig-
keiten tauchen oder stellen oder Flüssigkeiten darüber gießen. Niemals
Wasser oder andere Flüssigkeiten oder Nahrungsmittelrückstände über
oder unter das Gerät laufen lassen, um eine Gefährdung durch Elektrizität
zu vermeiden. Niemals das Gerät betreiben, wenn Flüssigkeiten in das
Motorgehäuse eingedrungen sind. Lassen Sie das Gerät in diesem Fall
durch eine Fachwerkstatt überprüfen.
7
Page 8
TECHNISCHE DATEN
Modell:
Stromversorgung:
Maximale Leistungsaufnahme:
Länge des Netzkabels:
Gewicht:
Abmessungen:
Umdrehungen:
Art.-Nr.: 42602 Design Kaffeemühle Advanced
220-230 V Wechselstrom, 50 Hz
130 W
ca. 90 cm
ca. 1,94 kg
ca. 17 cm x 12,5 cm x 28,5 cm (Breite x Tiefe x Höhe)
400 - 650 Umdrehungen pro Minute
Prüfzeichen:
DAS GERÄT BETRIEBSBEREIT MACHEN
VOR DER ERSTEN VERWENDUNG
Packen Sie das Gerät vorsichtig aus, stellen Sie es auf eine geeignete trockene Arbeitsfläche (siehe: Allgemeine Sicherheitshinweise).
Entfernen Sie vor der ersten Verwendung alle Werbeaufkleber und Verpackungsmaterialien von dem Gerät und dem Zubehör. Lassen Sie kleine Kinder nicht mit dem Verpackungsmaterial spielen: Erstickungsgefahr!
Reinigen Sie die abnehmbaren Bauteile vor der ersten Verwendung und nach längerer
unbenutzter Lagerung mit etwas handwarmer Spülmittellösung nach der Anleitung im
Kapitel ›Pflege und Reinigung‹. Trocknen Sie die Teile gut ab vor dem Einbauen.
DAS GERÄT ZUSAMMENSETZEN
Achten Sie darauf, dass alle Teile sauber sind, bevor Sie die Einzelteile zusammensetzen.
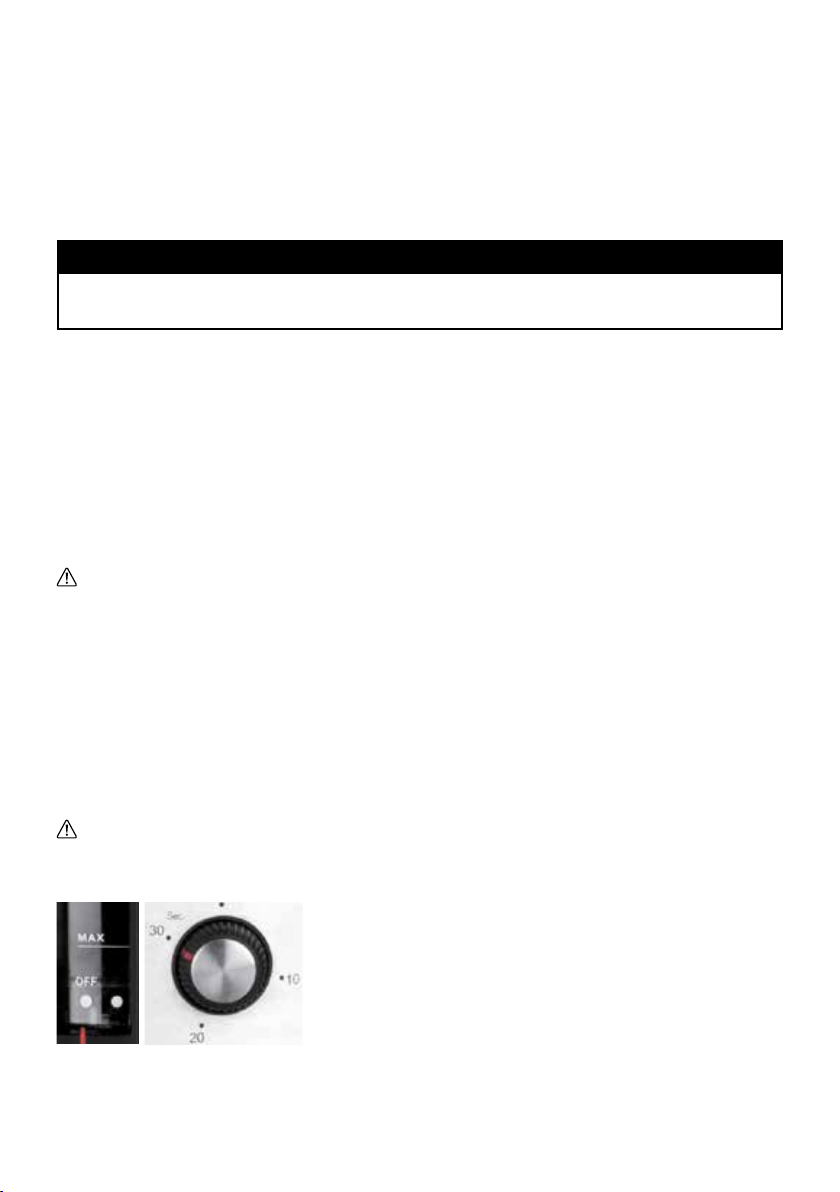
1. Um den Kaffeebohnenbehälter aufzusetzen oder abzunehmen achten Sie darauf, dass der Aufdruck ›OFF‹ direkt
über der roten Markierung steht. Anderenfalls können Sie
den Kaffeebohnenbehälter weder vom Motorgehäuse herunter nehmen, noch den Kaffeebohnenbehälter richtig beim
Aufsetzen einrasten.
Drehen Sie den Kaffeebohnenbehälter beim Aufsetzen solange im Uhrzeigersinn, bis
die Fassung am Motorgehäuse einrastet. Wenn der Behälter richtig sitzt, stellen Sie
den Mahlgrad ein. Drehen sie den Kaffeebohnenbehälter im Uhrzeigersinn auf den
gewünschten Mahlgrad (siehe ›Mahlgradeinstellung‹).
8
Page 9
ACHTUNG: Der Mahlgrad darf bei bereits eingefüllten Kaffeebohnen
NUR während des laufenden Mahlwerks geändert werden!
2. Setzen Sie den Kaffeebehälter im unteren Teil des Motorgehäuses ein. Stellen Sie
sicher, dass der Behälter richtig eingerastet ist. Die Vorderseite des Behälters muss in
einer Linie mit dem Motorgehäuse abschließen.
Hinweis:
Das Gerät läßt sich nur einschalten, wenn der Kaffeebohnenbehälter und der Kaffeebehälter richtig eingesetzt sind.
3. Stecken Sie den Netzstecker in eine geeignete Wandsteckdose für 220 - 230 V,
50 Hz, Wechselstrom (siehe: Vorsichtsmaßnahmen beim Umgang mit Elektrizität). Das
Gerät ist jetzt einsatzbereit.
MIT DEM GERÄT ARBEITEN
ALLGEMEINE HINWEISE
Halten Sie den Arbeitsplatz während der Arbeit sauber und trocken.
WARNUNG: Niemals das Motorgehäuse auf feuchte Unterlagen oder Tücher stel-
len. Niemals Flüssigkeiten unter oder auf das Motorgehäuse laufen lassen. Sollten Flüssigkeiten in das Motorgehäuse eingedrungen sein, dann ziehen Sie sofort den Netzstecker aus der Steckdose und lassen Sie das Gerät in einer Fachwerkstatt überprüfen.
1. Füllen Sie den Kaffeebohnenbehälter mit Kaffeebohnen oder getrockneten Gewürzen und schließen Sie den Deckel.
ACHTUNG: Befüllen Sie den Kaffeebohnenbehälter nur, wenn er auf dem Motorgehäu-
se steht und dort richtig eingerastet ist. Der Kaffeebohnenbehälter hat KEINEN geschlossenen Behälterboden. Die Bohnen würden beim Anheben des Behälters herausfallen.
WARNUNG: Halten Sie niemals Ihre Hände oder Fremdkörper (Beispiel: Kochbe-
steck) in den Kaffeebohnenbehälter, wenn der Kaffeebohnenbehälter auf dem Motorgehäuse steht.
ACHTUNG: Überfüllen Sie den Behälter nicht. Die auf
dem Kaffeebohnenbehälter markierte maximal Füllhöhe
(›MAX‹) darf nicht überschritten werden.
2. Schalten Sie den Ein-/Aus-Schalter auf EIN ›I‹.
3. Die Design Kaffeemühle Advanced ist mit einer Zeitschaltuhr ausgestattet. Mit der Zeitschaltuhr stellen Sie
das Mahlwerk auf die gewünschte Mahldauer ein und dosieren so die Kaffeemenge.
9
Page 10
Hinweis:
Die Dosiermenge ist abhängig von der Kaffeesorte, dem Mahlgrad, der Anzahl an
Tassen und Ihrem persönlichen Geschmack.
Stellen Sie die Zeitschaltuhr im Uhrzeigersinn auf die gewünschte Mahldauer
und drücken Sie die Start-/Stopp-Taste. Das Mahlwerk beginnt zu arbeiten.
Nach Ablauf der Zeit schaltet sich das Mahlwerk automatisch ab.
Hinweis:
Wenn Sie den Mahlvorgang vorzeitig unterbrechen wollen, drücken Sie kurz die
Start-/Stopp-Taste, drehen die Zeitschaltuhr gegen den Uhrzeigersinn auf null oder
stellen Sie den Ein-/Aus-Schalter auf aus ›O‹. Beim einmaligen Drücken der Start-/
Stopp-Taste stoppt das Gerät und beim erneuten Drücken startet das Gerät den an der
Zeitschaltuhr eingestellten Mahlvorgang von vorne.
Hinweis:
Nehmen Sie erst dann den Deckel vom Kaffeebohnenbehälter herunter, wenn das
Mahlwerk vollständig still steht, bevor Sie Kaffeebohnen nachfüllen. Befüllen Sie den
Kaffeebohnenbehälter nur, wenn er auf dem Motorgehäuse sicher eingerastet ist.
WICHTIG: Vergessen Sie nicht den Kaffeebehälter zwischendurch zu leeren, wenn Sie
Kaffeebohnen mahlen!
ACHTUNG: Das Gerät ist nicht für den Dauerbetrieb geeignet. Schalten Sie nach 2
Minuten den Schalter AUS (Schalterposition: ›O‹). Arbeiten Sie nicht länger als 2 Minuten, um den Motor nicht zu überlasten und eine Überhitzung zu vermeiden. Lassen Sie
den Motor ca. 2 Minuten abkühlen, bevor Sie einen weiteren Mahlvorgang starten.
Nach mehreren Durchgängen und längerem Benutzen lassen Sie das Gerät ca. 10-15
Minuten abkühlen.
ACHTUNG: Nehmen Sie den Kaffeebohnenbehälter nur vom Motorgehäuse, wenn er
vollständig leer ist. Anderenfalls würden die Bohnen aus dem undichten Behälterboden
herausfallen.
4. Wenn das Mahlwerk still steht, ziehen Sie den Kaffeebehälter aus dem Motorgehäuse und leeren ihn.
ACHTUNG: Wenden Sie keine Gewalt an, wenn sich Kaffeebohnen oder Fremdkör-
per im Bereich des Mahlwerkes verkeilt haben sollten. Schalten Sie das Gerät aus und
ziehen Sie den Netzstecker aus der Steckdose. Reinigen Sie das Gerät laut Anleitung
›Pflege und Reinigung‹ und versuchen Sie im Anschluss das Gerät wieder in Betrieb zu
nehmen. Sollte es immer noch Probleme geben, lassen Sie das Gerät in einer Fachwerkstatt überprüfen.
10
Page 11

5. Schalten Sie den Ein-/Aus-Schalter auf ›O‹ (Schalterposition: AUS) und ziehen Sie
den Netzstecker, wenn Sie das Gerät nicht mehr benutzen und reinigen Sie das Gerät
sofort nach der Arbeit (siehe ›Pflege und Reinigung‹).
MAHLGRADEINSTELLUNG
Mit den verschiedenen Mahlgradeinstellungen der Kaffeemühle können Sie die Beschaffenheit des Kaffees beeinflussen. Der Mahlgrad ist auf dem Kaffeebohnenbehälter entsprechend gekennzeichnet. Einige Vorschläge zum Gebrauch der einzelnen Mahlgrade
finden Sie in folgender Tabelle.
Coarse: Mahlgrad: grobkörnig
Das Kaffeepulver kann zum Kochen von Kaffee in Espressokannen genommen werden.
Medium: Mahlgrad: mittel
Das Kaffeepulver kann zum Kochen von Kaffee in Bodumkannen (Siebkannen) genommen werden.
Fine: Mahlgrad: fein
Das Kaffeepulver kann zum Kochen von Filterkaffee, Espresso, Latte Machiatto und Cappuccino genommen werden. Verwenden Sie die feinste Einstellung zum Kochen von
Türkischem Kaffee.
ACHTUNG: Der Mahlgrad darf bei bereits eingefüllten Kaffeebohnen NUR
während des laufenden Mahlwerks geändert werden!
TIPPS FÜR DIE ZUBEREITUNG
Die Herstellung von wohlschmeckenden Kaffee-Köstlichkeiten ist ein Prozess bei dem
mehrere veränderbare Komponenten eine wichtige Rolle spielen. Zum Beispiel: die verwendete Kaffeesorte, die Art und die Feinheit des Mahlens die Kaffeemenge und die
Art der Zubereitung.
Bei der Zubereitung mit einer manuellen Espressomaschine kommen Wasserdruck (mindestens 15 bar), Wassermenge, Wassertemperatur und Andruckstärke des Kaffeemehls
im Siebträger hinzu.
Generell sollten Sie folgende Punkte beachten.
• Um das Aroma des Kaffees zu erhalten, lagern Sie die Kaffeebohnen in einem luft-
dichten Behälter.
• Mahlen Sie die Bohnen direkt vor der Verwendung.
• Die Stärke des Kaffees hängt generell vom Mahlgrad und der verwendeten Kaffee-
11
Page 12

menge ab. Je feiner der Kaffee gemahlen wird oder je mehr Kaffee verwendet wird
– desto stärker und koffeinhaltiger das Ergebnis.
• Um den für Ihren Geschmack optimalen Kaffee herzustellen, empfehlen wir Ihnen bei
der Verwendung unserer Kaffeemühle mit dem Mahlgrad und der Kaffeemenge zu
experimentieren.
• Probieren Sie unterschiedliche Kaffeesorten aus, denn manchmal liegt es auch an den
Kaffeebohnen, wenn das gewünschte Ergebnis nicht erreicht wird
TIPPS FÜR DIE ZUBEREITUNG VON ESPRESSO
• Die Kaffeebohnen müssen fein - aber nicht zu fein - gemahlen sein. Das Pulver sollte
leicht körnig, wie z. B. Salz oder Sand aussehen.
• Wenn die Kaffeebohnen zu fein gemahlen sind, läuft das aufgebrühte Wasser nicht
durch das Kaffeepulver - auch nicht mit Druck. Das Kaffeepulver sieht in diesem Fall
wie Pulver aus und fühlt sich beim Reiben zwischen den Fingern wie Mehl an.
• Wenn die Kaffeebohnen zu grob gemahlen sind, läuft das aufgebrühte Wasser zu
schnell durch das Kaffeepulver und der Kaffee hat keinen vollen Geschmack.
PFLEGE UND REINIGUNG
WARNUNG: Ziehen Sie immer zuerst den Netzstecker, bevor Sie mit der Reinigung
beginnen.
ACHTUNG: Niemals harte oder scharfkantige Gegenstände, scharfe Reiniger (Desin-
fektionsmittel), Scheuerhilfen (Topfreiniger) oder Scheuermittel zum Reinigen des Geräts
oder der Einzelteile verwenden. Wenden Sie beim Reinigen keine Gewalt an, um die
Geräteteile nicht zu beschädigen.
1. Nehmen Sie den Kaffeebohnenbehälter vom Motorgehäuse. Hierzu drehen Sie den
Behälter so lange gegen den Uhrzeigersinn bis sich die ›OFF‹-Markierung direkt über der
roten Markierung befindet. Heben Sie den Kaffeebohnenbehälter jetzt nach oben ab.
2. Ziehen Sie den Kaffeebehälter heraus und leeren Sie ihn.
3. Spülen Sie den Deckel, Kaffeebohnenbehälter und Kaffeebehälter mit warmer Spülmittellösung.
4. Spülen Sie den Deckel, Kaffeebohnenbehälter und Kaffeebehälter danach mit klarem
Wasser aus, trocknen Sie die Teile mit einem Geschirrtuch vorsichtig ab und lassen Sie
sie an der Luft trocknen.
5. Der äußere Ring des Mahlwerks lässt sich zum Reinigen nach oben herausnehmen.
Auf diese Weise können Sie bei Bedarf das Mahlwerk mit einem kleinen Pinsel ausbürsten.
12
Page 13

WICHTIG: Verwenden Sie zur Reinigung kein Wasser, damit das
Mahlwerk nicht beschädigt wird oder rostet. Beim Einsetzen achten
Sie auf die Führungsrillen und dass der äußere Ring richtig in der
Vertiefung liegt (evtl. müssen Sie den Ring ein wenig drehen bis er
einrastet).
6. Setzen Sie die Teile nach dem Trocknen wieder zusammen.
DAS MOTORGEHÄUSE REINIGEN
WARNUNG: Niemals das Motorgehäuse in der Spülmaschine reinigen.
WARNUNG: Der Motorblock darf niemals in Wasser oder andere Flüssigkeiten
getaucht werden! Niemals Wasser oder andere Flüssigkeiten über das Motorgehäuse
gießen oder in das Motorgehäuse oder unter das Motorgehäuse laufen lassen. Niemals
das Motorgehäuse in Flüssigkeiten eintauchen oder auf nasse oder feuchte Oberflächen
stellen. Wischen Sie übergelaufene Flüssigkeiten sofort ab.
1. Ziehen Sie immer zuerst den Netzstecker, bevor Sie das Motorgehäuse reinigen.
2. Wischen Sie das Motorgehäuse danach mit einem feuchten, nicht tropfenden Tuch
ab.
ACHTUNG: Achten Sie darauf, das Mahlwerk in der Mitte des Gehäuses nicht zu
beschädigen. Niemals mit festen, harten Gegenständen im Mahlwark des Motorgehäuses stochern. Verwenden Sie notfalls einen weichen Pinsel, um das Mahlwerk zu reinigen. Wenn Feuchtigkeit in das Motorgehäuse gelangt ist, dann reinigen und trocknen
Sie das Gehäuse besonders vorsichtig und sorgfältig.
3. Trocknen Sie das Gerät sorgfältig ab. Das gesamte Motorgehäuse muss ganz
trocken sein, bevor Sie das Gerät wieder zusammensetzen und verwenden.
WARNUNG: Das Gerät darf nur in autorisierten Fachwerkstätten gewartet werden.
AUFBEWAHRUNG
Bauen Sie die Kaffemühle zur Aufbewahrung vollständig und richtig zusammen, um Verletzungen am Mahlwerk und Verlust einzelner Bauteile zu vermeiden. Setzen Sie den
Kaffeebohnenbehälter in die Fassung des Motorgehäuses. Auf diese Weise ist das Mahlwerk am besten vor Schmutz und Beschädigungen geschützt.
Bewahren Sie das Gerät an einem sauberen trockenen Ort auf, an dem es vor übermäßigen Belastungen (Stoß, Schlag, Schmutz, Feuchtigkeit) geschützt und für kleine Kinder
unzugänglich ist. Legen Sie keine schweren, harten Gegenstände auf das Gerät. Der
Aufbewahrungsort sollte frostfrei sein und nicht wärmer als 40 °C werden.
13
Page 14

ENTSORGUNGSHINWEISE
Gerät und Verpackung müssen entsprechend den örtlichen Bestimmungen zur
Entsorgung von Elektroschrott und Verpackungsmaterial entsorgt werden. Informieren Sie sich gegebenenfalls bei Ihrem örtlichen Entsorgungsunternehmen.
Entsorgen Sie elektrische Geräte nicht im Hausmüll, nutzen Sie die Sammelstellen der
Gemeinde. Fragen Sie ihre Gemeindeverwaltung nach den Standorten der Sammelstellen. Wenn elektrische Geräte unkontrolliert entsorgt werden, können während der
Müllverbrennung oder Verwitterung gefährliche Stoffe in die Luft und ins Grundwasser
und damit in die Nahrungskette gelangen, und die Flora und Fauna auf Jahre vergiftet
werden. Wenn Sie das Gerät durch ein neues ersetzen, ist der Verkäufer gesetzlich verpflichtet, das alte mindestens kostenlos zur Entsorgung entgegenzunehmen.
INFORMATION UND SERVICE
Weitere Informationen erhalten Sie im Internet unter www.gastroback.de.
Wenden Sie sich mit Problemen, Fragen und Wünschen gegebenenfalls an:
GASTROBACK Kundenservice, Tel.: 04165/2225-0
oder per E-Mail: info@gastroback.de
14
Page 15

GEWÄHRLEISTUNG/GARANTIE
Wir gewährleisten für alle Gastroback-Elektrogeräte, dass sie zum Zeitpunkt des Kaufes
mangelfrei sind. Nachweisliche Fabrikations- oder Materialfehler werden unter Ausschluss weitergehender Ansprüche und innerhalb der gesetzlichen Frist kostenlos ersetzt
oder behoben. Ein Gewährleistungsanspruch des Käufers besteht nicht, wenn der Schaden an dem Gerät auf unsachgemäße Behandlung, Überlastung und/oder Installationsfehler zurückgeführt werden kann. Ohne unsere schriftliche Einwilligung erfolgte,
technische Eingriffe von Dritten, führen zum sofortigen Erlöschen des Gewährleistungsanspruchs. Der Käufer muss zur Geltendmachung des Anspruchs den Original-Kaufbeleg
vorlegen und trägt im Gewährleistungsfall die Kosten und das Risiko des Transportes.
Hinweis:
Kunden aus Deutschland und Österreich: Für die Reparatur- und Serviceabwicklung
möchten wir Sie bitten, Gastroback Produkte an folgende Anschrift zu senden: Gastroback GmbH, Gewerbestr. 20, 21279 Hollenstedt.
Kunden anderer Länder: Bitte kontaktieren Sie Ihren Händler
Bitte haben Sie dafür Verständnis, dass unfreie Sendungen nicht angenommen werden
können. Einsendung von Geräten: Bitte verpacken Sie das Gerät transportsicher, ohne
Zubehör und legen Sie den Garantiebeleg sowie eine kurze Fehlerbeschreibung bei.
Die Bearbeitungszeit nach Wareneingang des defekten Gerätes beträgt ca. 2 Wochen;
wir informieren Sie automatisch. Bei defekten Geräten außerhalb der Garantie senden
Sie uns das Gerät bitte an die angegebene Adresse. Sie erhalten dann einen kostenlosen Kostenvoranschlag und können dann entscheiden, ob das Gerät zu den ggf. anfallenden Kosten repariert, unrepariert und kostenlos an Sie zurück gesendet oder vor Ort
kostenlos entsorgt werden soll.
Das Gerät ist ausschließlich für den Privatgebrauch bestimmt und ist nicht für den gewerblichen Betrieb ausgelegt. Verwenden Sie das Gerät nur wie in dieser Gebrauchsanleitung
beschrieben. Jede andere Verwendung gilt als nicht bestimmungsgemäß und kann zu
Sachschäden oder sogar zu Personenschäden führen. Der Hersteller übernimmt keine
Haftung für Schäden, die durch nicht bestimmungsgemäßen Gebrauch entstanden sind.
15
Page 16

16
Page 17

OPERATING INSTRUCTIONS
DESIGN COFFEE GRINDER ADVANCED
Art.-No. 42602 »Design Coffee Grinder Advanced«
Read all provided instructions before first usage!
Model and attachments are subject to change
For household use only!
Page 18

GET TO KNOW YOUR COFFEE GRINDER
Removeable
Coffee Bean
Container holds up to
250 g of coffee beans
Stainless steel
motor housing
Lid
Grind Selector
Control with
suggested
coffee style
settings
Removeable
Ground Coffee Grinder
Tidy Cord Storage Non-slip Feet
Start-/Stop-button
Time Selector Dial
Power ON-/OFF-switch
Page 19

We attach a certain importance to your safety. Thus, we ask you to read all
provided instructions and information in this booklet carefully and complete-
ly, before you start running the appliance. This will help you to know all
functions and properties of your new appliance. We especially ask you to
adhere strictly to the safety information mentioned in these instructions.
IMPORTANT INSTRUCTIONS
WARNING: To avoid injury to persons and damage, always turn the
appliance OFF ›O‹, wait for the motor to stop completely and unplug, immediately after use and before assembling/disassembling or cleaning. Never
use force operating, assembling or disassembling the appliance.
WARNING: If the coffee bean container is positioned on the motorblock,
and the plug is connected to the power outlet, do not insert your fingers, a
wooden or plastic spoon or similar cooking utensils or foreign substances in
the Coffee Bean Container.
• Never turn the appliance on without the lid on the Coffee Bean Contai-
ner. Never touch the Grinding Gear when the plug is connected to the
power outlet.
• The appliance has a circuit breaker. If the Coffee Bean Container and the
Coffee Container are not in proper position you can not turn the appliance on.
WARNING: Ensure the Coffee Bean Container is locked securely in position before you fill in the coffee beans. The bottom of the Coffee Bean Container is open. Lifting the Coffee Bean Container the content falls out.
WARNING: Do not overfill the Coffee Bean Container. Pay attention to the
›MAX‹ mark on the Coffee Bean Container.
• IMPORTANT: Do not forget to empty the Coffee Container when grinding
coffee beans.
• The Coffee Grinder will not grind food that is sticky or extremely hard i.
e. chocolate, cheese, whole nutmeg, candied fruits, etc.
• ATTENTION: If the Coffee Bean Container is filled with coffee beans
you can only change the Grinding Selector setting while the motor is
running!
19
Page 20

• The Coffee Grinder will not make pastes of any fruits, seeds or herbs ie.
curry pastes, nut batters.
• Do not move the appliance while operating to avoid personal injury.
• Do not operate this appliance for longer than 2 minutes at a time as this
could cause overheating. Allow to cool for at least 2 minutes after each
use. Allow appliance to cool down for 10-15 minutes after long operation.
• CAUTION: DO NOT clean the Grinding gear with water. Water will
damage the Grinding Gear and motor housing and units might rust.
• CAUTION: DO NOT place the appliance or any parts of it in an auto-
matic dishwasher.
• The appliance is for household only.
IMPORTANT SAFEGUARDS
Carefully read all instructions before operating and save the instructions for
further reference. Do not attempt to use this appliance for any other than
the intended use, described in these instructions. Any other use, especially
misuse, can cause severe injury or damage by electric shock, fire or moving
mechanical parts. These instruction is an essential part of the appliance.
When passing on the appliance to a third person, ensure to include these
instructions. Never leave the appliance unattended when in operational
mode.
Any operation, repair and technical maintenance of the appliance or any
part of it other than described in these instructions may only be performed at
an authorised service centre. Please contact your vendor.
SAFEGUARDS FOR DAILY OPERATION
• The appliance is designed for normal household quantities. Do not ope-
rate or store the appliance outdoors or in damp or wet areas.
• Do not attempt to operate the appliance using any parts or accessories
not recommended by the manufacturer (i.e. Coffee Bean Container). Do
not operate the appliance, when the appliance or any part of it is likely
20
Page 21

to be damaged, to avoid risk of fire, electric shock or any other damage or injury to persons. Do not attempt to open the motor housing or to
repair the power cord. Check the entire appliance regularly for proper
operation. The appliance is likely to be damaged if the appliance was
subject of strain (i.e. overheating, mechanical, or electric shock) or if there are any cracks, excessively frayed parts, distortions or the motor stalls
or stucks. In this case, immediately unplug the appliance and return the
entire appliance (including all parts and accessories) to an authorised
service centre for examination and repair.
• Do not lift, pull or carry the appliance by the power cord. To move or
operate the appliance, always grasp the motor housing and ensure the
appliance is turned off.
• The appliance has a circuit breaker. If the Coffee Bean Container and
the Coffee Container are not in proper position you can not turn the
appliance on.
• Do not operate this appliance for longer than 2 minutes at a time as this
could cause overheating. Allow to cool for at least 2 minutes after each
use. Allow appliance to cool down for 10-15 minutes after long operation.
• Close supervision is necessary when the appliance is used near young
children. Do not let young children play with any parts of the appliance
or the packaging. The appliance is NOT intended for use by children
or infirm persons without supervision. Take care that no one will pull the
appliance by the power cord, especially when young children are near.
• Always place the appliance on a clean, dry and stable surface where
it is protected from inadmissible strain (i.e. mechanical or electric shock,
overheating, frost, moisture) and where young children cannot reach it.
• Operate the appliance on a well accessible, stable, level, dry, and sui-
table large surface. Do not place the appliance or any part of it on or
near hot surfaces (heater, gas burner, grill, or oven). Do not place the
appliance near the edge of the surfaces on a slope or wet surfaces or
where it can fall. Keep the entire appliance away from direct sunlight and
sharp edges. Ensure the Coffee Bean Container is locked securely onto
the motor housing and that you can not knock the appliance over during
21
Page 22

operation to avoid personal injury.
• Never leave the appliance unattended when the plug is connected to the
power outlet. Always IMMEDIATELY turn the appliance OFF ›O‹, wait
for the motor to stop completely, and then unplug the appliance, if the
appliance is not in use (even for a short break) and before assembling,
disassembling or cleaning.
• Do not immerse the motor housing or power cord in water or any other
liquid. Do not pour or drip any liquids on the motor housing or power
cord. When liquids are spilled on the motor housing, immediately unplug
the appliance and dry the motor housing to avoid risk of electric shock
or fire. Do not attempt to operate the appliance, when liquids are on or
in the motor housing.
• Do not place the motor housing in an automatic dishwasher!
• To avoid damage, do not use any abrasive cleaners, corrosive chemicals
(i.e. disinfectants, bleach) or cleaning pads for operation or cleaning.
Do not use any hard or sharp utensils for operation or cleaning. Always
handle the entire appliance and all parts of it with care and without violence.
• Do not use the appliance if it is damaged or units of the appliance are
damaged. Do not use the appliance if it does not function properly or if
it was excessively loaded. The appliance is likely damaged if the appliance or units of the appliance show cracks, exorbitant wearing down,
alterations or leaks. It is also likely damaged if the grinding gear of the
motor housing moves slowly. Take the appliance for technical maintenance and repair to an authorised specialised reparation shop.
WARNING: Do not overfill the Coffee Bean Container.
• Do not grind food that is sticky or extremely hard i. e. chocolate, cheese,
whole nutmeg, candied fruits, etc. to avoid that the motor stalls or stucks
during operation. In this case turn the appliance OFF ›O‹ to avoid overheating.
MOVABLE UNITS – RISK OF INJURY
• Always turn the appliance OFF, wait for the motor to stop moving and
22
Page 23

then pull the plug before taking the Coffee Bean Container off the motor
housing or taking off the lid. Never leave the appliance ON ›I‹ when
not in use.
• Never put your hands, wooden spoons or other foreign substance (such
as hair, cloth, brush, towels) into the Coffee Bean Container when the
motor is running or the appliance is connected to the power outlet.
• Only store the appliance completely assembled. This way all the parts of
the appliance are protected.
Note:
Ensure the appliance is properly assembled before putting the plug into the
power outlet. Never turn the appliance on without the lid on the Coffee
Bean Container. If any foreign substance blocks the Grinding Gear turn
the appliance OFF ›O‹, press the start-/stop-button or turn the Time Selector Dial completely counterclockwise to avoid overheating. Never touch
the Grinding Gear when the plug is connected to the power outlet. Take
the appliance to an authorised service centre for examination and repair.
• The appliance is designed for normal household quantities. Do not ope-
rate this appliance for longer than 2 minutes at a time as this could cause
overheating. Allow to cool for at least 2 minutes after each use. Allow
appliance to cool down for 10-15 minutes after long operation.
IMPORTANT SAFEGUARDS FOR ALL ELECTRICAL APPLIANCES
• Always operate the appliance near a suitable wall power outlet and con-
nect the appliance directly to the power outlet. Do not use any extension
cords or a multiple desk outlet.
• Ensure that the voltage rating of your mains power supply corresponds to
the voltage requirements of the appliance (220 - 230 V, 50 Hz, AC).
Always connect the appliance directly to a mains power supply wall
socket with protective conductor (earth/ground) connected properly.
The installation of a residual current safety switch with a maximum rated
residual operating current of 30 mA in the supplying electrical circuit is
strongly recommended. If in doubt, contact your local electrician for further information.
23
Page 24

• Do not leave the appliance unattended while connected to the power
supply. Always turn the appliance OFF ›O‹ and IMMEDIATELY unplug
the appliance after operation and if it is not in use (even for a short break)
and before cleaning and/or assembling or disassembling. Always grasp
the plug to disconnect the appliance from the power outlet.
• Always handle the power cord with care. Do not pull or strain the power
cord. The power cord may never be knotted or squeezed. Do not let the
power cord hang over the edge of the table or counter. Take care not to
entangle in the power cord. Do not touch the appliance, with wet hands,
to avoid risk of electric shock. Do not touch the appliance, if it is damp
or touching a wet surface, while connected to the mains power supply. In
this case, immediately unplug the appliance and dry the appliance (see
'Care and Cleaning’).
• Do not immerse the motor or power cord in any liquids or spill any liquids
on it or place the motor on wet surfaces. Never let any liquids run into the
motor housing or underneath it to avoid electric shock. When liquids are
spilled on the motor housing, immediately unplug the appliance and dry
the motor housing to avoid risk of electric shock or fire. Do not attempt
to operate the appliance, when liquids are on or in the motor housing.
TECHNICAL SPECIFICATIONS
Model:
Power supply:
Power consumption:
Length of power cord:
Weight:
Dimensions:
Rotation:
Certification:
24
Art. No. 42602 Design Coffee Grinder Advanced
220-230 V AC, 50 Hz
130 W
approx. 90 cm
approx. 1,94 kg
approx. 17 cm x 12,5 cm x 28,5 cm
(width x depth x height)
400 - 650 rpm
Page 25

OPERATING
BEFORE FIRST USE
After unpacking, remove all promotional and packing materials as well as any foreign
objects. Operate the appliance on a well accessible, stable, level, dry, and suitable
large surface.
WARNING: Do not leave young children play with the appliance or any part of it
or the packing material.
Before first use and after a long period of storage, clean the appliance with a damp soft
cloth and warm soapy water (see ›Care and Cleaning`).
ASSEMBLING THE APPLIANCE
Before each use, ensure Coffee Bean Container and Coffee Container are clean and
empty.
1. Place Coffee Bean Container into Grinding Chamber
with ›OFF‹ marker on the Coffee Bean Container aligning
with the red marker on top left-hand side of the Grinder
Base. Turn the Bean Container clockwise to lock into position. If the ›OFF‹ marker and red marker are not aligning you
can not get the Coffee Bean Container off or on the Grinding Chamber.
Rotate the Bean Container clockwise to select the desired fineness of grind by aligning
one of the following selections to the red marker on the front panel of the Grinding Base
(see ›Grind Selector Control‹).
ATTENTION: If the Coffee Bean Container is filled with coffee beans you can
only change the Grinding Selector setting while the motor is running!
2. Place Bean Container into position and make sure the Coffee Container is locked
into position. The front of the Coffee Container has to be in line with the motor housing.
Note:
The appliance has a circuit breaker. If the Coffee Bean Container and the Coffee Container are not in proper position you can not turn the appliance on.
3. Plug the Grinder into a 230/230V power outlet. The appliance is now ready for use.
DIRECTIONS FOR USE
Always keep the working area dry and clean.
WARNING: Do not pour or drip any liquids on the motor housing or power cord.
25
Page 26

When liquids are spilled on the motor housing, immediately unplug the appliance and
dry the motor housing to avoid risk of electric shock or fire. Do not attempt to operate
the appliance, when liquids are on or in the motor housing. Take the appliance to an
authorised service centre for examination and repair.
1. Measure the desired quantity of whole coffee beans or spices directly into the Coffee
Bean Container and cover with lid.
ATTENTION: Ensure the Coffee Bean Container is locked securely in position before
you fill in the coffee beans. The bottom of the Coffee Bean Container is open. Lifting the
Coffee Bean Container the content falls out.
WARNING: Do not overfill the Coffee Bean Container. Pay attention to the
›MAX‹ mark on the Coffee Bean Container.
WARNING: If the coffee bean container is positi-
oned on the motorblock, and the plug is connected to the
power outlet, do not insert your fingers, a wooden or
plastic spoon or similar cooking utensils or foreign substances in the Coffee Bean Container.
2. Turn the Power ON-/OFF-switch to on (›I‹).
3. Rotate the Timer Selector Dial to select the desired grinding time.
Note:
The grinding time depends on the type of coffee beans, amount of coffee, fineness of
grind and your personal flavour preferences.
Rotate the Timer Selector Dial clockwise to the desired time and press the
start-/stop-button on the front of the Grinder Base to begin grinding. The Coffee Grinder will begin grinding the coffee or spices directly into the Ground
Coffee Container and will stop automatically when grinding is complete. To
stop grinding cycle at any time, push the start-/stop-button again. If you press the start-/
stop-button again, the grinder will start from the beginning of timed cycle.
Note:
You can also stop the grinding cycle turning the Power ON-/OFF-switch to ›O‹ or
rotating the Timer Selector Dial completely counterclockwise.
Note:
Always turn the appliance off ›O‹ and wait for the motor to stop moving before refilling
the Coffee Bean Container or taking off the lid. Only refill the Coffee Bean Container
when the Coffee Bean Container is securely locked on the motor housing.
26
Page 27

IMPORTANT: Do not forget to empty the Coffee Container from time to time when
grinding coffee beans.
ATTENTION: Do not operate this appliance for longer than 2 minutes at a time as this
could cause overheating. Allow to cool for at least 2 minutes after each use. Allow appliance to cool down for 10-15 minutes after long operation.
ATTENTION: Only take the Coffee Bean Container of the motor housing when it is
completely empty. The bottom of the Coffee Bean Container is open. Lifting the Coffee
Bean Container the content falls out.
4. As soon as the Grinding Gear stopped you can take out the content of the Coffee
Container.
ATTENTION: Do not use force when the Grinding Gear stocks or stalls. Foreign sub-
stance might be wedged in the Grinding Gear. Turn the appliance OFF ›O‹, unplug the
appliance and clean the appliance according to the instructions ›Care and Cleaning‹.
Try to put the appliance back to operation. If the Grinding Gear is still not running take
the appliance for technical maintenance and repair to an authorised specialised reparation shop.
5. Turn the appliance OFF ›O‹, wait until the motor stops and unplug the appliance
before assembling/disassembling or storing.
GRIND SELECTOR CONTROL
With the different settings on the Grinding Gear you have influence on the coffee you
will get. You can choose the desired fineness of grind on the Coffee Bean Container.
You will find the grind selection following:
Coarse - Percolator:
Fineness: coarse grained - for coffee in a percolator
Medium - Plunger:
Fineness: medium grained - for coffee in a plunger
Fine - Filter:
Fineness: fine grained- for filter coffee, espresso, latte machiatto, cappuccino.
Choose the finest setting for turkish coffee.
ATTENTION: If the Coffee Bean Container is filled with coffee beans you
can only change the Grinding Selector setting while the motor is running!
27
Page 28

TIPS FOR OPERATION
Getting a great tasting delicious coffee is a process that is influenced by several changeable components. For example: the sort of coffee that is used, the consistency and
fineness of the coffee powder and the amount of coffee powder that is used. Using a
manual espresso machine it also depends on the pressure (minimum 15 bar), amount
and temperature of the water and the pressure with which the powder is pressed into
the filter. In general you should pay attention to the following:
• For best flavour, store coffee beans in an airtight container.
• Grind coffee beans immediately before brewing.
• The strongness of the coffee depends on the grind fineness and the amount of coffee
powder. The finer the coffee powder and the more coffee powder is used the stronger
the taste and the more caffeine you will get.
• Coffee flavour and strength is a personal preference. Vary the type of coffee beans,
amount of coffee and fineness of grind to find the flavour you prefer.
TIPS FOR THE GRIND
• The coffee must be finely ground, but not too fine (the correct grind should look gritty,
like salt or sand).
• If the grind is too fine, the water, when brewing, will not flow through the coffee even
under pressure (this grind looks like powder and feels like flour when rubbed between
fingers).
• If the grind is too coarse, the water, when brewing, will flow too fast through the cof-
fee, preventing a full flavoured extraction.
IMPORTANT: Do not overload the motor with food that is oversized or too hard. Turn
the appliance OFF ›O‹ as soon as the motor stalls or stucks to avoid overheating of the
motor.
CARE AND CLEANING
WARNING: To avoid injury to persons and damage, always turn the appliance OFF
›O‹, wait for the motor to stop completely and unplug the appliance, immediately after
operation and before assembling/disassembling or cleaning the appliance.
ATTENTION: Do not use abrasive cleaners, cleaning pads, corrosive chemicals (dis-
infectants, bleach) or any sharp or hard objects (i.e. metal scouring pads) for cleaning,
for this could damage the surfaces. Always handle the entire appliance with care and
without violence.
28
Page 29

1. Unplug the appliance from the power outlet before cleaning.
2. Remove Bean Container by turning counterclockwise to ›OFF‹, then lift straight up.
3. Remove the Ground Coffee Container by pulling out from the left-hand side of the
Coffee Grinder.
4. The Removable Ground Coffee Container, Bean Container and Lid should be washed
in warm soapy water, rinsed and dried thoroughly.
5. Polish with a soft, dry cloth. Do not use abrasives. When the units are dry assemble
the appliance for storage or usage.
CLEANING THE MOTOR HOUSING
WARNING: Do not place the appliance or any parts of it in an automatic dish-
washer or pour boiling water over it. Do not immerse the motor or power cord in any
liquids or spill any liquids on it or place the motor on wet surfaces. Always wipe off spilled liquids immediately. When liquids are spilled on the motor housing, immediately
unplug the appliance and dry the motor housing to avoid risk of electric shock or fire.
Do not attempt to operate the appliance, when liquids are on or in the motor housing.
1. Always turn the appliance OFF ›O‹, wait for the motor to stop completely, and unplug
the appliance from the power outlet before you start cleaning the motor housing.
2. Wipe the motor housing and power cord with a damp soft cloth. Take care not to
spill or drip water or any other liquids on the motor housing.
ATTENTION: Ensure not to damage the Grinding Gear. Never poke with anything into
the motor housing. If necessary use a soft brush for cleaning. If any liquids run into the
motor housing clean and dry the motor housing very carefully.
3. Thoroughly dry the motor housing after each cleaning or leave it dry naturally where
it is out of reach of young children. Polish with a soft, dry cloth. Afterwards assemble
the appliance.
4. You can take out the outer ring of the Grinding Gear for cleaning. Use a small soft brush for cleaning it. Do not use water for
cleaning. Water can damage the Grinding Gear or the units might
rust. Watch the cannelure when assembling the Grinding Gear.
Ensure the outer ring of the Grinding Gear is lockered into position
and properly assembled (you might have to turn the unti a little bit
to place it in the cavity).
Attendance: You do not need to oil the motor. Clean the units only as described in
the instructions.
WARNING: Return the entire appliance (including all parts and accessories) to an
authorised service centre for examination and repair.
29
Page 30

STORAGE
Always clean the appliance before storing (see ›Care and Cleaning‹). Ensure to store
the appliance where it is clean, dry and safe from frost, direct sunlight and inadmissible
strain (mechanical or electric shock, heat, moisture) and where it is out of reach of young
children. Place the appliance on a clean and stable surface, where it can not fall. Do
not place any hard or heavy objects on the appliance.
NOTES FOR DISPOSAL
Dispose of the appliance and packaging must be effected in accordance with
the corresponding local regulations and requirements for electrical appliances
and packaging. Please contact your local disposal company.
Do not dispose of electrical appliances as unsorted municipal waste, use separate collection facilities. Contact your local government for information regarding the
collection systems available. If electrical appliances are disposed of in landfills, dumps,
or refuse incineration, hazardous substances can leak into the groundwater or can be
emitted into air, thus getting into the food chain, and damaging your health and wellbeing as well as poisoning flora and fauna. When replacing old appliances with new
once, the vendor is legally obligated to take back your old appliance for disposal at
least for free of charge.
INFORMATION AND SERVICE
Please check www.gastroback.de for further information. For technical support, please
contact Gastroback Customer Care Center by phone: +49 (0)4165/22 25-0 or e-mail
info@gastroback.de.
Please refer to our home page for a copy of these operating instructions in pdf format.
WARRANTY
We guarantee that all our products are free of defects at the time of purchase. Any
demonstrable manufacturing or material defects will be to the exclusion of any further
claim and within 2 years after purchasing the appliance free of charge repaired or
substituted. There is no Warranty claim of the purchaser if the damage or defect of the
appliance is caused by inappropriate treatment, over loading or installation mistakes.
The Warranty claim expires if there is any technical interference of a third party without
a written agreement. The purchaser has to present the sales slip in assertion-of-claim and
has to bear all charges of costs and risk of the transport.
30
Page 31

Note:
Customers from Germany and Austria: For repair and service, please send Gastroback
products to the following address: Gastroback GmbH, Gewerbestr. 20, D-21279
Hollenstedt, Germany.
Customers from other countries: Please contact your dealer.
Please agree that we cannot bear the charge of receipt. Submission of appliances:
Please ensure packing the appliance ready for shipment without accessories. Add the
sales slip and a short fault description. The processing time after receipt of the defective
appliance will be approx. 2 weeks; we will inform you automatically. After the warranty
period, please send defective appliances to the given address. You will get a free quotation and, thereafter, can decide, whether we shall repair the appliance to the costs
possibly accrued, send back the defective appliance for free of charge, or dispose of
the appliance for free of charge.
The appliance is intended for household use only and NOT suited for commercial usage.
Do not attempt to use this appliance in any other way or for any other purpose than the
intended use, described in these instructions. Any other use is regarded as unintended
use or misuse, and can cause severe injuries or damage. There is no warranty claim of
the purchaser if any injuries or damages are caused by unintended use.
31
Page 32

GASTROBACK GmbH
Gewerbestraße 20 . 21279 Hollenstedt / Germany
Telefon + 49 (0) 41 65 / 22 25 - 0 . Telefax + 49 (0) 41 65 / 22 25 -29
info@gastroback.de . www.gastroback.de
20170110
 Loading...