

Page 1

GASTROBACK
Instructions for use
DESIGN COMBO SET
®
Art.-Nr. 42408
Read all provided instructions before first usage!
Model and attachments are subject to change
Page 2

Carefully read all provided instructions before you start running the
appliance and pay regard to the warnings mentioned in these
instructions.
!
Important Information
• CAUTION! Only fill with pure drinking water. Do not fill any other liquids or foodstuffs
into the kettle and do not add any additional ingredients, such as spices or flavours. Do not
place any foreign objects in the kettle.
• NOTE: If there is not enough water in the kettle during operation, the boil dry cut-out
switches OFF the heating element automatically. Wait 5-10 minutes for the heating elements
to cool down.
•
CAUTION! Only with the lid closed, the kettle automatically switches OFF, once the water has boiled.
• ATTENTION: The exterior of the kettle will get very hot during operation. Do not touch the
exterior of the kettle during operation or shortly after. Always use the soft grip handle for
moving the kettle and take care to keep the kettle level to avoid boiling water pouring out
unintentionally.
• Always keep your hands, face and arm as well as any clothing and other heat-sensitive
objects away from the appliance during operation
• IMPORTANT: Ensure, that the crumb tray is in place before operating the toaster.
Otherwise crumbs may become charred on the bottom of the toaster and stick to the surfaces.
• IMPORTANT: Before each toasting process ensure, that the browning control is set to
the correct level and not to high.
• WARNING: Before operating, always ensure that there are no foreign objects in the
slots. Do not insert any foreign objects in the slots and do not poke in the slots, to avoid
risk of electric shock and damage of the heating elements. Never use force when removing
jammed bread slices.
• ATTENTION: The exterior of the toaster will get very hot during operation. Do not touch
the exterior during operation or shortly after. Wait for the appliance to cool down.
• Only toast slices of simple cakes and pastries without any filling or glaze (i.e. jam,
mayonnaise, or icing) and of suitable size. The slices may not protrude the slots or stick or
jam in the slots.
• During toasting, cakes and pastries can fall to pieces, bend and catch fire when overheated.
Do not leave the appliance unattended, when connected to the power
supply. Immediately unplug the appliance, if there is any kind of malfunction
or problem (i.e. overheating or smoke is coming from the slots).
• NOTE: The on button only operates when the appliance is connected to the power
supply.
• Never place the appliance or any part of it in an automatic dishwasher.
Fill the kettle with enough water and switch the kettle ON.
- risk of getting burned.
Page 3
The Design Combo Set from Gastroback is a stylish device of a kettle and a toaster. The
kettle is designed for boiling drinking quality water. Powerful 1.500 VA heating elements are
integrated in the bottom of the stainless steel kettle and therefore protected against damage,
making cleaning and decalcifying quite easy. For safety reason the kettle has a safety auto
cut out and a boil dry protection. A water gauge will help you to measure off the required
amount of water.
The powerful 900 VA electronic controlled toaster toasts slices of bread, yeast-risen pastry and
similar cakes and pastries quickly and evenly. The slices are automatically centred in the
slots. The ´DEFROST` and ´A BIT MORE` function are part of the particular features of the
toaster.
The kettle and the toaster can be operated separately or together.
For household use only.
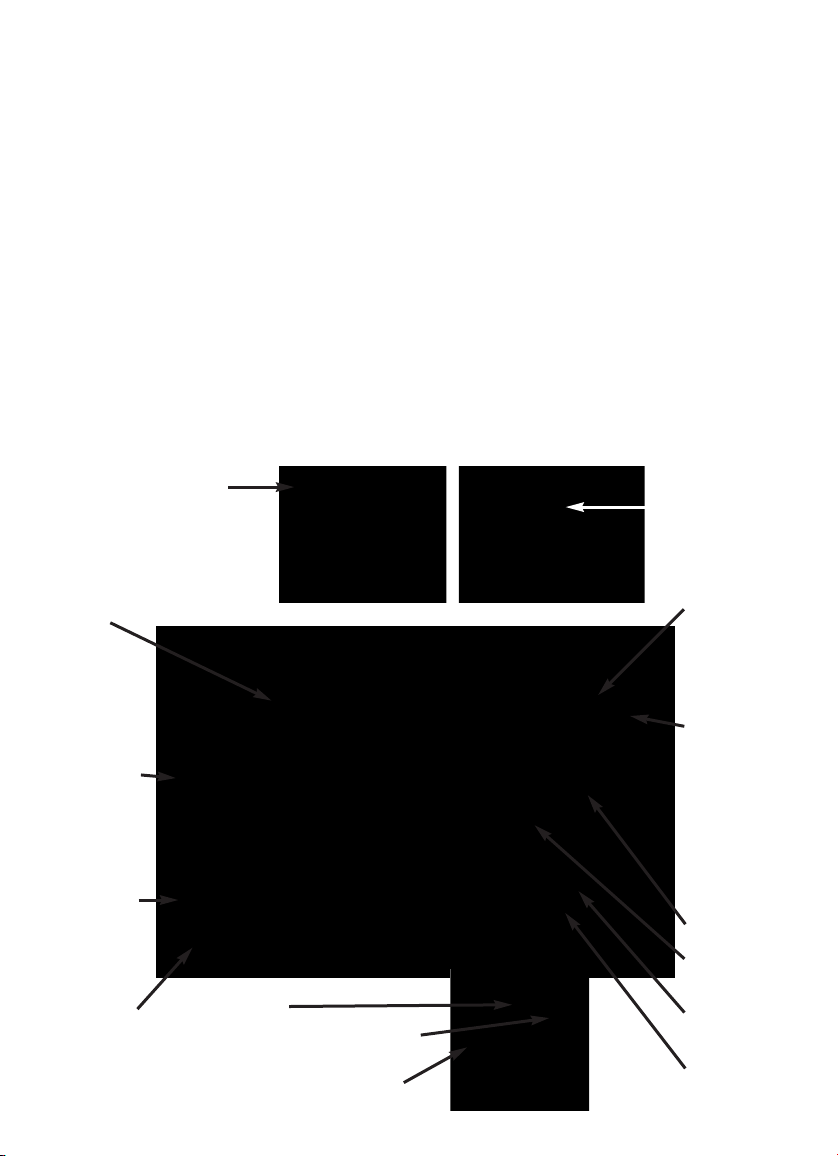
Features of your Design Combo Set
Removable scale filter
Extra wide and deep self centring
toasting slots
On button;
press down
until it clicks
into place for
toasting
HIGH LIFT;
raises bread
higher for
easy removal
CANCEL;
Stop button; to
stop toasting
immediately
Removable
crumb tray
´DEFROST` function
´A BIT MORE` function - when your toast is
not brown and a bit more is all it needs
Electronic browning control dial, variable
from level 1 to 6
Self-opening lid with
viewing window, just press
the opening button
´Open`:
Opening button,
to open the lid
Power button with
LED control lamp;
illuminates red when
kettle is turned ON
Press the LED
control lamp of the
power button to
turn the kettle OFF
Water gauge
1 litre stainless
steel kettle
1.500 Watt concealed
heating element
Power base with
cord storage
Page 4

Important Safeguards
Carefully read all instructions before operating this appliance and save for further reference.
Do not attempt to use this appliance for any other than the intended use, described in these
instructions. Any other use, especially misuse, can cause severe injuries or damage by electric
shock, heat or fire. Never leave the appliance unattended when in use.
Any operation, repair and technical maintenance of the appliance or any part of it other
than described in these instructions may only be performed at an authorised service centre.
Please contact your vendor.
Important Safeguards for Daily Operation
• This appliance is for household use only and NOT intended for use in moving vehicles.
Do not operate or store the appliance in humid or wet areas or outdoors. Do not attempt
to operate the appliance using any parts or accessories not recommended by the manufacturer.
• Check the entire appliance regularly for proper operation–especially the power cord.
The pins of the power cord must be clean, smooth, and without discolouration. Do not
operate the appliance, when the appliance or any part of it is likely to be damaged, to
avoid risk of fire, electric shock or any other damage or injuries to persons. The appliance is
likely to be damaged if the appliance was subject to inadmissible strain (i.e. overheating,
mechanical or electric shock, moisture) or if there are any cracks, excessively frayed
parts, or distortions. In this case, immediately unplug the appliance and return the entire
appliance (including all parts and accessories) to an authorised service centre for
examination and repair.
• Do not attempt to operate the appliance and immediately switch OFF and unplug the
appliance if water leaks out of the kettle.
• Any use of accessories, attachments or spare parts not recommended by the manufacturer
may result in fire, electric shock and injuries to persons. If the appliance or any part of it is
likely to be defective or not operating in the intended way or water leaks out of the kettle,
immediately unplug from the power supply and return the entire appliance to an authorised
service centre for examination and repair.
Any maintenance, repair and operation other than described in these instructions must be
performed at an authorised service centre to avoid risk of electric shock, fire or injuries to
persons.
• Close supervision is necessary when the appliance is used near young children. Do not
let young children play with any parts of the appliance. The appliance is not intended for
use by children or infirm persons without supervision. For storage always keep the entire
appliance dry and clean and where young children cannot reach it. Do not place any hard
and/or heavy objects on the appliance or any part of it.
Page 5

• Always place the appliance on a stable, level, dry, heat-resistant and easy accessible surface. Do
not place the appliance near the edge of the table or counter or on inclined or wet
surfaces or where it can fall. Ensure, that the power base will not tilt or wobble before
placing the kettle on it. Do not place any cloth or tissue beneath or on the appliance to avoid
any risk of fire, electric shock and overheating. Always keep the table or counter clean and
dry and immediately wipe off spilled liquids. During operation keep the appliance in an
appropriate distance of at least 20 cm on each side to furniture, walls, boards, curtains and
other objects.
• Do not place the appliance or any part of it on or near hot surfaces (heater, gas burner,
grill or oven). The kettle and the toaster are heated electrically.
• Always fill the kettle according to the instructions in this booklet before connecting the
appliance to the wall power outlet. Do not switch ON the kettle, when it is empty!
• Let the kettle cool down before filling the kettle with fresh water and always close
the lid before switching the kettle ON.
• Always ensure that the power button of the kettle is turned OFF before connecting the
plug to the power outlet.
• Do not use this appliance to boil any other liquids or foodstuffs others than pure drinking
water without any additional ingredients.
IMPORTANT: Do not remove the kettle from the power base without switching
it OFF first, by pressing the illuminated part of the power button (picture A). The
kettle is switched OFF, if the control lamp is not illuminated. Never open
the lid when the kettle is turned ON.
A
• Beware of hot surfaces! The exterior of the kettle and lid will get very hot during operation.
Only use handles and knobs for handling the appliance. Beware of hot condensate and
steam, when opening the lid.
• Do not handle the appliance or any part of it with violence. The lid will open automatically,
when operating the opening button. Closing the lid must be possible without obstacles or
resistance. Always use the handle for moving the kettle. Never lift the kettle by its lid to avoid
damage to the hinge. Beware of hot steam when opening the lid. Only replace damaged
parts by genuine spare parts. Firmly mounted parts of the appliance may only be replaced
by a authorised service centre.
• The kettle should not be connected to a wall socket when the room temperature is likely to
fall to outdoor winter temperatures, as the automatic control thermostat may reset to boil and
energise the element.
• Bread, cakes and pastries can catch fire, when overheated! During operation do not
place any objects (i.e. cold bread slices) or tissue on the appliance, to avoid overheating of
the heating elements. Do not operate the appliance near inflammable liquids (i.e. high-proof
alcohol) or beneath any heat-sensitive or moisture-sensitive materials or beneath boards or
drop-lights to avoid damage caused by steam, condensate or fire. Before operating, always
Page 6

ensure that there are no foreign objects in the slots. Do not insert wrapped foods (i.e.
kitchen foil), to avoid risk of fire, electric shock, and damage. Immediately unplug the
appliance, if there is any kind of malfunction or problem (i.e. overheating or
smoke is coming from the slots).
• During toasting, cakes and pastries can fall to pieces, bend and catch fire when overheated.
Do not leave the appliance unattended, when connected to the power
supply. Always disconnect the appliance from the power supply, when the appliance
is not in use and before cleaning or moving. Always allow the appliance to cool down
before cleaning or moving. Always grasp the appliance on its side walls for moving or
lifting it. Do not insert any foreign objects in the slots and do not poke in the slots, to
avoid risk of electric shock and damage of the heating elements.
• Only toast slices of simple cakes and pastries without any filling or glaze (i.e. jam,
mayonnaise, or icing) and of suitable size (13 x 13cm; 5 to 22mm thick). The slices may
not protrude the slots or stick or jam in the slots. Do not use the toaster for toasting or cooking
of very dry cakes and pastries (i.e. cookies) filled rolls or sandwiches.
• Do not immerse the toaster or power cord in water, or allow moisture to come in contact
with the appliance. Do not insert any foreign objects in the slots and do not poke in the
slots, to avoid risk of electric shock and damage of the heating elements.
If smoke comes out of the slots or the bread crumbles or bends in the slots, then immediately
cancel the toasting process by pressing the cancel button and unplug the toaster. Wait for the
toaster to cool down, before carefully removing jammed bread slices. Ensure not to damage
the heating elements on each side of the slots.
• Always operate the toaster with the crumb tray in place.
• NOTE: The toaster is electronical controlled. The on button only operates when the
appliance is connected to the power supply.
• Never use abrasive cleaners, cleaning pads or any hard and sharp objects (i.e. metal
scouring pads) for cleaning. Clean the appliance with a damped sponge or tissue and
carefully dry the exterior of the appliance after cleaning. Do not handle the appliance or
any part of it with violence. Never place the appliance or any part of it in an
automatic dishwasher.
• Do not leave the appliance unattended, when connected to the power
supply and in operational mode. Always disconnect the appliance from the
power supply, when the appliance is not in use.
Page 7

Risks Deriving from High Temperatures
• Do not place any objects or clothes on the appliance during operation to avoid overheating.
• Firmly close the lid of the kettle, before switching on the kettle, and keep the lid closed
during operation. Do not hold your face, hands or other parts of your body over the lid
or spout, and always beware of hot steam, when opening the lid after operation to avoid
scalding. The outside walls of the kettle and the lid become very hot during operation
and some minutes after operation. Thus, only touch the kettle by the handle.
• Dry spilled water immediately. When moving the filled kettle, close supervision is necessary
to keep the kettle in an upright position to avoid spilling hot water, and thus avoid injuries
and damage.
• Always keep your hands, face and arm as well as any clothing and other heat-sensitive
objects away from the slots of the toaster during operation to avoid injury
burned.
• ATTENTION: The exterior of the toaster will get very hot during operation. Do not
touch the exterior during operation or shortly after. Wait for the appliance to cool down.
• Always let the appliance cool down before cleaning.
- risk of getting
Important Safeguards for Electrical Appliances
• Ensure that the voltage rating of your mains power supply corresponds to the voltage
requirements of the appliance (220/240 V, 50 Hz, AC, rated for 16 A). Always connect the
appliance directly to a separately protected mains power supply wall socket with protective
conductor (earth/ground) connected properly. Before operation completely unwind the
power cord. Do not use any extension cord or multi socket outlet.
The installation of a residual current safety switch with a maximum rated residual operating
current of 30 mA in the supplying electrical circuit is recommended. If in doubt, contact
your electrician for further information.
• Always handle the power cord with care. The power cord may never be knotted, twisted
or squeezed. Do not pull or strain the power cord. Do not let the plug or power cord
hang over the edge of the table or counter. Take care that no one will pull the appliance by
the power cord, especially when young children are near. Always grasp the plug to
disconnect the appliance from the power outlet. Do not touch the plug or appliance with
wet hands, when the plug is connected to the power supply.
• Always switch OFF and unplug the appliance when not in use and
before moving or cleaning the appliance. Do not leave the appliance
unattended while connected to the power supply.
• Before operation completely unwind the power cord, and ensure that the power base will
not tilt or wobble during operation. Do not place the kettle or power base on the power cord.
Page 8

• Keep the cord away from hot surfaces, including the stove. When the power cord
warms up during operation or is likely to be damaged, it must be replaced by an authorised
service centre. Do not attempt to repair the power cord!
• Do not immerse the kettle, power base or power cord in water or any other liquid. Do
not spill or drip any liquids on the power base, power cord or switch area of the kettle
to avoid risk of fire and electric shock. When liquids are spilled on the exterior of the
appliance or condensate has built up on the power base, immediately switch OFF the
kettle, unplug the power base and dry the appliance. In this case hand over the appliance
to an authorised service centre for examination.
• Immediately switch OFF the kettle, unplug the power base, if liquid is spilled on the
exterior of the appliance or on the power base or the kettle leaks.
• Use the appliance only with the supplied power base. Do not use the power base unit
for any other purpose. To protect against fire, do not operate in the presence of explosive
and/or flammable fumes or gases.
First use of the Kettle
Carefully unpack the appliance and remove any promotional material attached to the
kettle, but do not remove the warning or model labels on the appliance.
CAUTION! Only fill with pure drinking water. Do not fill any other liquids or foodstuffs
into the kettle and do not add any additional ingredients, such as spices or flavours. Do
not place any foreign objects in the kettle.
WARNING: Always connect the appliance directly to a separately protected mains
power supply wall socket with protective conductor (earth/ground) connected properly. Do not
use any extension cord or multi socket outlet. Use the kettle only with the supplied power base.
Using the Kettle
Before first use, fill the kettle to its maximum level 1000/Max with pure drinking water,
boil according the following instructions and, thereafter, discard the water.
IMPORTANT: Do not place any foreign objects in the kettle.
1. Prepare the power base for operation. Completely unwind the power cord of the
power base, and put the cable in the gab in the brim of the power base. Always place
the appliance on a stable, level, dry, heat-resistant and easy accessible surface. Do not
place the appliance on an inclined surface. Ensure, that the power base will not tilt or
wobble before placing the kettle on it. Otherwise, during operation boiling water could
splash from the kettle and cause scalding and damage.
ATTENTION: Do not handle the appliance or any part of it with violence.
The lid will open automatically, when pressing the opening button
(picture A). Ensure no foreign objects are in the kettle.
A
Page 9

2. Open the lid by pushing the opening button. Remove foreign objects
out of the kettle. Fill the kettle with the desired amount of water. Always
be sure your kettle is unplugged when you’re filling it or adding more
water to it.
Max
Min
Always fill the kettle with at least 250ml of water and at most up to the
maximum mark 1000/MAX of the water level indicator on the front wall
of the kettle (picture B). When moving the filled kettle keep the kettle in an
upright position to avoid spilling water.
• Too little water will result in the kettle boiling dry and automatically switching OFF.
• Filling above the maximum mark may result in boiling water splashing from the kettle.
IMPORTANT: Your kettle has an automatic shut-off safety feature that protects against
overheating. It will operate if the kettle is switched ON without enough
water in the kettle. If the automatic safety shut-off has occurred, switch the
kettle OFF by pressing the illuminated part of the power button (picture C).
Disconnect the kettle from the power outlet and allow it to cool for 5–10
minutes. Then, refill the kettle with a sufficient amount of water and switch it ON. The kettle
will now boil and shut off as usual.
3. Close the lid. The lid will lock into position when it is pressed down slightly.
IMPORTANT: Always close the lid, before switching on the appliance. Otherwise
power consumption increases significantly.
CAUTION! Only with the lid closed, the kettle automatically switches OFF,
once the water has boiled.
B
C
4. Place the kettle onto the power base and insert the power plug in a 230/240V wall
power outlet. The electric contacts of the multi-directional power base will slide into a
corresponding opening in the bottom of the kettle. The power base will work out in any
orientation.
You can turn the kettle on the power base until the handle or the spout will hit the side
of the toaster.
5. Press the power button to switch ON the kettle (picture D). The control
lamp of the power button will illuminate and the heating element starts heating.
WARNING! The exterior of the kettle will get very hot during operation
and even some minutes after switching OFF the appliance. In addition, beware of steam
venting from the lid and spout and hot condensate, especially when opening the lid or
pouring out water. Always keep your hands, face and arm as well as any clothing and
other objects away from the lid and spout of the kettle. Always use the handle for moving
the kettle and take care to keep the kettle level to avoid boiling water pouring out
unintentionally.
6. When the water is boiling the kettle will switch OFF automatically after a few seconds.
After allowing the kettle to cool down for 15–20 seconds, the water can be brought back
D
Page 10

to a boil by pressing the power button again.
IMPORTANT: Do not remove the kettle from the power base without switching it
OFF first, by pressing the illuminated part of the power button. The kettle is
switched OFF, if the control lamp of the power button is not illuminated (picture E).
7. To pour the water, lift the kettle from the power base and pour.
NOTE: Use caution when pouring boiling water from the kettle. Do not pour the water
too quickly, as boiling water could splash.
NOTE: Discard the water after first use.
Important: Do not leave remaining water cool down to room temperature in the kettle
to avoid any excessive accumulation of mineral deposits on the interior of the kettle and water
level indicator.
The kettle may be stored on its power base, when not in use to protect the connector pins
from dust and splashes.
If you do not wish to reboil the water, unplug the power base.
WARNING: Always switch OFF the kettle and unplug from power supply,
when the kettle is not in use, to avoid risk of fire and electric shock. DO
NOT leave the power base unattended with the power plug connected to
the power supply.
IMPORTANT: The kettle only works when positioned on the power base and switched
ON at the power button. If there is not enough water in the kettle during operation, the
boil dry cut-out switches OFF the heating element automatically.
E
IMPORTANT: Always ensure that the power button of the kettle is switched OFF before
connecting the plug to the power outlet.
Dry-out Protection
If there is not enough water in the kettle during operation, the boil dry cut-out switches
OFF the heating element automatically. To reset the appliance:
1. Switch OFF the kettle by pressing the illuminated part of the power button
(picture F) and wait some minutes for the heating elements to cool down.
Then press the opening button to open the lid and slowly fill the kettle with
water. Always keep the water level between the minimum and maximum
water level mark (250 to 1000/MAX) during operation.
2. Close the lid, replace the kettle on the power base and switch ON the kettle.
For additional safety your kettle is fitted with an additional thermal cut out. In the event
of overheating, the kettle will automatically shutdown to prevent further damage. In this
case, take your kettle to an authorised service centre for inspection and repair.
WARNING: Do not attempt to operate the appliance after shutdown by the thermal cut
F
Page 11

out. Any maintenance, repair and operation other than described in these instructions
must be performed at an authorised service centre to avoid risk of electric shock, fire or
injuries to persons.
Care and Cleaning - Kettle
WARNING! Always switch OFF, unplug and let the appliance cool down before removing
the mesh filter, moving the power base or cleaning the appliance.
CAUTION! To avoid damage, do not use any chemicals, disinfectants, steel wool,
abrasive cleaners or hard or sharp utensils to clean the appliance. Handle with care. Do
not place or immerse the kettle base, power base or power cord in any liquids. Do not
spill any liquids on the kettle base, switch area, power base or power cord.
Do not place the kettle or power base in an automatic dishwasher.
Removable Mesh Filter
The appliance features a removable mesh filter to filter out scale deposits for clearer
water. Additionally the filter will prevent boiling water from splashing, when you pour
the water. Clean the filter regularly to avoid blockage of the mesh.
CAUTION: Handle the filter mesh with care. Do not scratch, scrub or scrape on the filter
mesh with hard or sharp utensils to avoid damage.
1. Switch OFF and unplug the appliance and allow to cool down.
Press the opening button to open the lid. Grasp the dark bar of the
mesh filter and lift it up and out of the kettle (picture G).
G
2. Clean the mesh filter. Rinse the filter under running water.
Possibly use a plastic cleaning brush or sponge. If the mesh is blocked with lime: leave
the filter overnight in warm vinegar. Carefully rinse with clear tap water.
3. To replace the filter, simply slide the filter in the correct orientation down into the slots
behind the spout of the kettle (see: ´Features of Your Design Combo Set`). Push the filter
down, until the dark bar is in line with the brim of the kettle and the lid of the kettle can
be shut tightly.
Cleaning the Kettle
In normal case there is no need to clean the interior of the kettle. Before first use or after
a longer period of storage rinse the interior of the kettle with clear drinking water.
However, depending on the water hardness in your residential area you should decalcify the
kettle regularly to avoid any loss of performance and excessive power consumption. See
´Decalcifying the Kettle`.
WARNING! Immediately wipe off condensate or spilled water. Do not spill any liquids
on the appliance. Do not immerse the kettle base, switch area, power base or power
Page 12

cord in water to avoid risk of electric shock. Always keep the table or counter clean and
dry and immediately wipe off spilled liquids or condensate. Do not place the appliance
or any part of it in an automatic dishwasher.
1. Wipe the outside of the kettle with a damp cloth. In the same way, the power base
may be cleaned. Make sure not to spill or drip any liquids on the power base.
2. Dry with a soft dry cloth. Polish the stainless steel parts with a soft cloth, when required.
NOTE: If you need to clean the inside of the kettle, put the kettle on a stable surface and
pour in some hot mild liquid detergent. Carefully clean the inner side walls, and the heating
plate at the bottom, using a soft nylon brush without violence. Soak stubborn stains for
some minutes before brushing it off.
3. Thoroughly rinse the interior of the kettle with pure drinking water.
Depending on the hardness of your water supply and how often you use the kettle, a
limescale deposit may form. This reduces the kettle’s working life and heating capacity
and, therefore, increases power consumption. Limescale is not harmful to your health but
may give your beverages an unpleasant appearance or taste. For normal household use
we recommend to descale at least once every 2–3 months. It is advised to descale your
kettle as much as possible, as it prolongs the life and performance of your kettle.
Decalcifying the Kettle
CAUTION: Never use abrasive cleaners, any chemicals, disinfectants, cleaning pads or
any sharp utensils (i.e. metal scouring pads) for cleaning. Handle the kettle and power
base without violence. Never place the appliance or any part of it in an
automatic dishwasher.
1. Mix 400 to 500ml of white vinegar with 800 to 1.000ml of water and pour the mixture to
the maximum level 1000/Max into the kettle.
2. Bring the mixture to boil. Make sure, the room is well ventilated.
3. Switch OFF the kettle and unplug the power base. Allow to stand overnight.
4. Discard the solution. Fill the kettle with clean, cold water up to maximum level 1000/ Max
and boil.
5. Discard the boiled water and any remaining scale and vinegar.
6. Thoroughly rinse the interior of the kettle with clean water.
First use of the toaster
Unpack the appliance carefully and check, if there are any parts damaged or missing.
CAUTION: It is important to carefully remove all packing and shipping materials (in the
slots) as well as any price-tags, but do not remove any warning or model labels on the
appliance. Ensure that there are no foreign objects (i.e. packing materials) in the slots
before operating the appliance.
Page 13

IMPORTANT: The on button only operates when the appliance is connected to the power supply.
When using the toaster for the first time, you may notice a fine smoke haze, because of
the first heating of some of the components. There is no need for concern.
To prevent smell and taste of your food from being affected, you should heat the appliance on browning level 6 before placing any cakes and pastries in the slots. If the burnt
smell occurs again on later use, clean the toaster (see: ‘Care and Cleaning - Toaster’).
If the burnt smell persists stubbornly even after thoroughly cleaning the appliance, return
the appliance to an authorised service centre for examination and repair.
WARNING: Always connect the appliance directly to a separately protected mains
power supply wall socket with protective conductor (earth/ground) connected properly.
Do not use any extension cord or multi socket outlet.
Always place the appliance on a stable, level, dry, heat-resistant and easy accessible
surface. Do not place the appliance near the edge of the table or counter or on an
inclined surface. Ensure, that the appliance will not tilt or wobble.
Operating Your Toaster
WARNING: Always completely unwind the power cord, before connecting the appliance to
the power supply. Ensure, that there are no foreign objects (i.e. shipping material) in the
slots. Do not insert any foreign objects as knives, spoons, or other cooking utensils in the
slots, to avoid risk of fire, electric shock, burns or damage. Always handle with care,
especially, when removing jammed bread slices.
IMPORTANT: Ensure, that the crumb tray is in place before operating the toaster.
Otherwise crumbs may become charred on the bottom of the toaster and stick to the surfaces.
1. Prepare the toaster for use: Completely unwind the power cord, place the toaster on
an appropriate surface (level, dry, and heat-resistant) and connect the power plug to an
appropriate power outlet (see: ‘Important Safeguards for Electrical Devices’).
2. Using a sharp knife, cut the food (bread or similar cakes and pastries) in slices of
even thickness and appropriate size: max. 13 x 13cm; 5 to 22mm thick. Try to get a
smooth cut and remove the crumbs.
3. Insert a slice of bread in each slot of the toaster.
4. Turn the browning control to select the desired browning: 1 (light) to 6
(very dark) (picture A). For the first use, it is recommended to select a light
browning level (example: 2; see: ‘Tips for Best Results’).
5. Press the on button down to lower and centred the bread in the slot.
The cancel button illuminates red (picture B).
Note: The on button only operates when the appliance is connected to
the power supply.
The toasting process is automatically controlled. When the selected browning level is
reached, the toaster switches OFF automatically, and the cancel button eliminates.
A
B
Page 14

´A BIT MORE` function
This function allows you to add ‘A BIT MORE’ if the toast requires a little more toasting or
heating. Place toast into toasting slots, lower the on button until it clicks into place. The
cancel button will illuminate red.
NOTE: The on button only operates when the appliance is connected to
the power supply.
Press ‘A BIT MORE` button which will illuminate (picture C).
NOTE: The toasting, defrosting and ‘A BIT MORE’ functions can be cancelled
at any time by pressing the cancel button.
The toaster will turn off and automatically raise the toast.
´DEFROST` function
To toast frozen bread, place the bread into the toasting slots, select the desired
browning setting, lower the high lift lever until it clicks into place. The cancel button will illuminate red.
NOTE: The on button only operates when the appliance is connected to
the power supply.
Press the defrost button which will illuminate. Selecting this button will
extend the toasting time (picture D).
NOTE: The toasting, defrosting and ‘A BIT MORE’ functions can be cancelled at any time by
pressing the cancel button.
The toaster will turn off and automatically raise the toast.
´HIGH LIFT` function
C
D
To remove smaller items such as crumpets and English muffins, lift the high
lift lever approximately 20mm above the starting position. In the unlikely
event that the bread or crumpet becomes jammed, press the cancel button.
Remove the power plug from the power outlet and then carefully ease the bread
out of the toaster, ensuring that you do not damage the self centring slots
or the elements (picture E).
HIGH LIFTno HIGH LIFT
E
Page 15

Tips for Best Results
• The toasting, defrosting and ‘A BIT MORE’ functions can be cancelled
at any time by pressing the cancel button (picture F).
• The required browning level depends on your special liking and the type and freshness of
the toasted cakes and pastries. For example: a short toasting time (low browning level)
is sufficient for toasting fine white bread; but for toasting rye bread you must select a
higher browning level to get a similar result.
• You can crisp up rolls by cutting the rolls in halves, using a sharp knife. Ensure, that the
slices are max. 22mm thick and will not stick in the slots.
• Ensure to make an even and smooth cut. Use a sharp bread knife for cutting. Remove
crumbs and protruding rims, especially when crisping up halved rolls.
WARNING: Never insert your fingers in the slots, while the toaster is connected to the
power supply. Always switch OFF and unplug the appliance and wait for the appliance
to cool, before removing any jammed bread or crumbs.
• If bread sticks or jams in the slots, switch OFF (cancel button) and unplug the toaster
and let the toaster cool down. Then remove the bread slices carefully and without violence.
Ensure not to touch the heating elements on the sides of the slots to avoid damage.
• To check the doneness during the toasting process, just press the cancel button. The
toasting process will get stopped. When pressing the on button again you start a new
toasting process. Ensure to lower the browning control level to prevent the bread from burning.
• Use the ´A BIT MORE` function if the toast requires a little more toasting
or heating (picture G).
G
F
• Use the ´DEFROST` function to toast frozen bread (picture H).
• It is recommended to empty the crumb tray after each use to avoid
crumbs becoming charred and sticking on the crumb tray (see: ‘Care and
Cleaning - Toaster’). Do not use the toaster without the crumb tray in place.
H
Care and Cleaning - Toaster
WARNING: Always switch OFF the toaster (using the cancel button), unplug the power
cord and allow the toaster to cool down, before removing the crumb tray or cleaning or
moving the toaster. Do not immerse or place the toaster or power cord in any liquids or
drip any liquids on the toaster to avoid risk of electric shock and damage.
Do not place the appliance or any part of it in an automatic dishwasher.
Do not use abrasive cleaners, cleaning pads or any hard and sharp objects (i.e. metal
scouring pads) for cleaning. Clean the toaster and power cord with a damped sponge
or tissue and carefully dry the appliance after cleaning. Do not handle the appliance or
any part of it with violence. Do not insert any foreign objects into the slots.
Page 16

1. Switch OFF the toaster, pressing the cancel button (picture I), unplug
the power connector and allow the toaster to cool down.
2. Pull out the crumb tray and empty the crumb tray (picture J). You may
clean the crumb tray in warm dish-water. Thoroughly dry the tray after
cleaning and leave the tray dry naturally for some minutes.
3. Take the kettle of the power bas, grasp the toaster on both sides and
hold the toaster over a sink or large bowl and turn it upside down.
Carefully shake the crumbs out of the toaster while turning the toaster in all
directions.
4. Wipe the exterior of the toaster with a damp soft cloth. Take care not
to spill or drip water or any other liquids in the toaster. If necessary, clean the power
cord in the same way. Then thoroughly dry the toaster and power cord with a dry soft
cloth.
5. Insert the crumb tray in the bottom of the toaster.
CAUTION: Do not insert the crumb tray, when it is still wet or damp.
IMPORTANT: Ensure, that the crumb tray is in place before operating the toaster.
Otherwise crumbs may become charred on the bottom of the toaster and stick to the surfaces.
IMPORTANT: Do not use the toaster without the slide out crumb tray in
place. Do not allow crumbs to build up in crumb tray. Crumb tray should
be cleaned out regularly.
I
J
Storage
Store the entire appliance (including the power base and operating instructions) on a
clean and dry surface, where it may not tilt or fall and no other objects could fall on it
and where it is safe from frost and inadmissible strain (mechanical or electric shock, heat)
and where it is out of reach of young children. Do not place any hard or heavy objects
on the appliance or any parts of it.
Always switch OFF the kettle and unplug the power base, when the appliance is not in
use. Empty remaining water and place the kettle on the power base to protect the connector pins
in the power base from dust.
When the appliance is not in use for a long period of time, decalcify the interior of the
kettle and clean the toaster. When required, wind the power cord around the cord storage
in the bottom of the power base.
Notes for disposal
Dispose of the appliance must be effected in accordance with the corresponding local
regulations and requirements for electrical appliances. Please contact your local disposal
company.
Page 17

Warranty
We guarantee that all our products are free of defects at the time of purchase.
Any demonstrable manufacturing or material defects will be to the exclusion of any further
claim and within 2 years after purchasing the appliance free of charge repaired or
substituted.
There is no Warranty claim of the purchaser if the damage or defect of the appliance is
caused by inappropriate treatment, over loading or installation mistakes.
The Warranty claim expires if there is any technical interference of a third party without
an written agreement. The purchaser has to present the sales slip in assertion-of-claims
and has to bear all charges of costs and risk of the transport.
Page 18

GASTROBACK GmbH
Gewerbestraße 20 • D-21279 Hollenstedt/Germany
http://www.gastroback.de • E-Mail: info@gastroback.de
 Loading...