

Page 1
Operating Instructions
Design Fleischwolf Pro M
Art.-No. 41408 Design Mincer Pro M
Read all provided instructions before first usage!
Model and attachments are subject to change!
For domestic use only!
Page 2

Carefully read all provided instructions before you start running
the appliance and pay regard to the warnings mentioned in these
instructions.
Table of Contents
Knowing Your Design Mincer Pro M ................................................27
Important Safeguards .....................................................................28
Important Safeguards for Electrical Appliances .............................29
Moving Parts – Risks of Injuries ...................................................30
Technical Specifications .................................................................30
Before First Use .............................................................................31
Properties of Your Design Mincer ....................................................31
Tools .......................................................................................32
Tips for Best Results .......................................................................32
Operation ....................................................................................33
Assembling the Appliance ..............................................................33
Mincing and Mixing ..................................................................36
Making Sausages .....................................................................37
Making Kebbe ..........................................................................38
Making Cookies .......................................................................38
Solving Problems ...........................................................................39
Care and Cleaning .......................................................................41
Disassembling the Appliance ......................................................41
Cleaning the Appliance .............................................................42
Storage ........................................................................................42
Notes for Disposal .........................................................................43
Warranty ........................................................................................43
Information and Service .................................................................... 43
Recipes ........................................................................................44
Index ...........................................................................................45
Page 3
Dear Customer!
Congratulations! A variety of new possibilities for delicious meals comes with your new
mincer; even for vegetarian dishes. Effortless you mince and mix the ingredients for meatballs, vegetable burgers and minced meat. With great refinement you can prepare your own
sausage specialities, or fillings for ravioli or tortellini—always really fresh!
These instructions for use will inform you about the various functions and features which
makes it easy to take pleasure in your new mincer.
We hope that you will enjoy your new mincer.
Your Gastroback GmbH
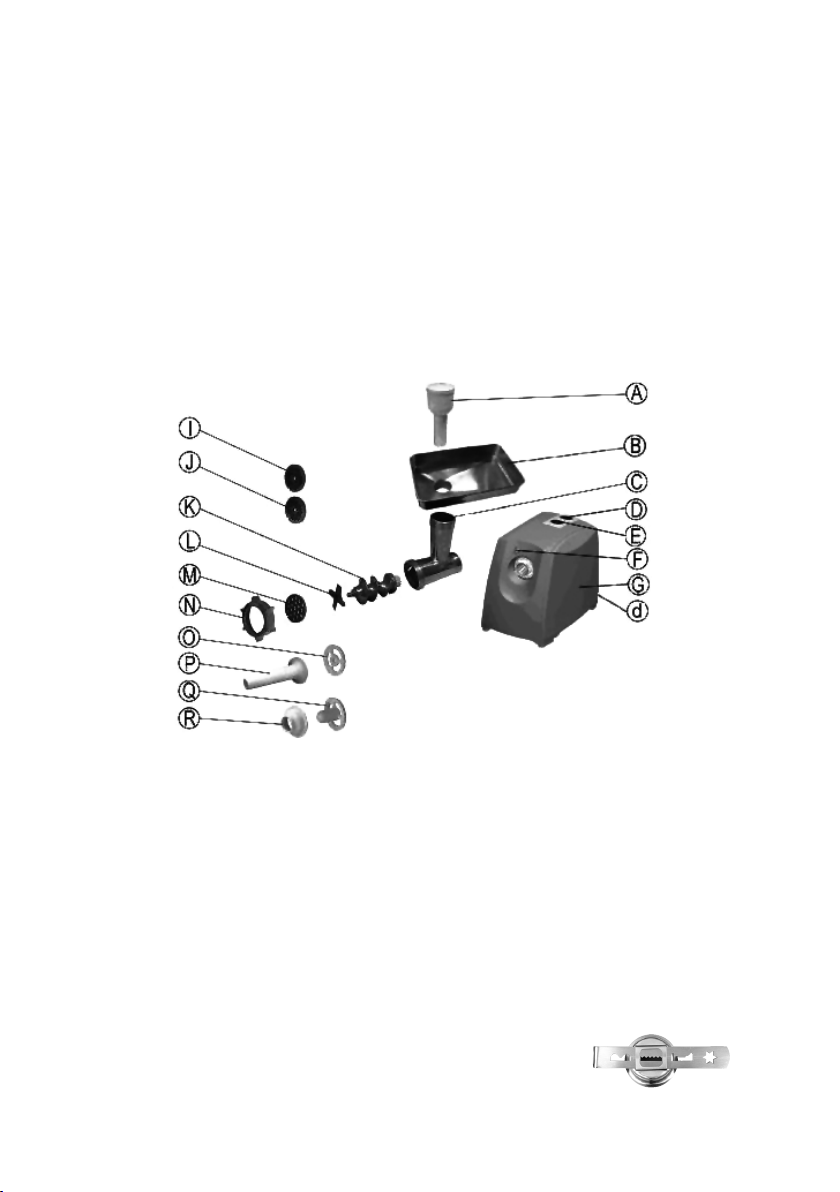
Knowing Your Design Mincer Pro M
A Pusher-forpressingthefooddownintothefeedtube.
B Tray-placethepreparedfoodhere.
C Cutterhousing/Outlet
E ON/OFFbutton-forswitchingoffthemotorand
switchingoninforward(ordinary)direction
D Reversalbutton(REVERSE)-reversestherotarymotion
ofthewormshafttoreleasefoodstuckedinthemincer.
d powerswitch
F Releasebutton
G Motorhousing
Gearhole-thisis,whereyouassemblethecutter
housing.
K Wormshaft-movesthefoodwithinthecutterhousing
N Screwring
Tools
For Mincing and Mixing:
L Cutterblade
M Coarsegrindingdisc
J Mediumgrindingdisc
I Finegrindingdisc
For Making Sausages:
O Separatordisc
P Sausagehorn
For Making Kebbe:
Q Cone
R Plasticnger
For Cookies:
• Cookiemaker
• Former
27
Page 4

Important Safeguards
Carefully read all instructions before operating this appliance, and save for further reference.
Do not attempt to use this appliance for any other than the intended use, described in these
instructions. Any other use, especially misuse, can cause severe injuries or damage by electric shock, moving parts, heat or fire.
Any operation, repair and technical maintenance of the appliance or any part of it other
than described in these instructions may only be performed at an authorised service centre.
Please contact your vendor.
• This appliance is for household use only, and NOT intended for use in moving vehicles. Do
not operate or store the appliance in humid or wet areas or outdoors. Any use of accessories, attachments or spare parts not recommended by the manufacturer may result in damage
and/or injuries to persons.
• Check the entire appliance regularly for proper operation—especially the power cord. Do
not operate the appliance, when the appliance or any part of it is likely to be damaged, to
avoid risk of fire, electric shock or any other damage and/or injuries to persons. The appliance is likely to be damaged if the appliance has been subject to inadmissible strain (e.g.
overheating, mechanical or electric shock), or if there are any cracks, excessively frayed or
melted parts, or distortions, or if the appliance is not working properly. In this case, immediately unplug the appliance and return the entire appliance (including all parts and accessories) to an authorised service centre for examination and repair.
• During operation keep the appliance in an appropriate distance of at least 10 cm on each
side and 50 cm in front and above to furniture, walls, boards, curtains, and any delicate objects. Before operation, always ensure that the appliance is assembled properly and completely. Solely use the appliance for processing edible food. Immediately unplug the appliance,
if there is any kind of malfunction or problem (e.g. the motor gets stuck, overheating).
• Operate the appliance on a well accessible, stable, level, dry, water-resistant and suitable
large table or counter. Always keep the appliance and the table or counter clean and dry,
and wipe off spilled liquids immediately. Do not place any clothes or tissue or other objects
under or on the appliance during operation, to avoid risk of fire, electric shock and overheating. Do not place the appliance over a power cord, or near the edge of the table or
counter, or on wet or inclined surfaces, or where it can fall.
• This appliance is NOT intended for use by persons (including children) with reduced
physical, sensory or mental capabilities, or lack of experience and knowledge, unless they
have been given supervision or instruction concerning use of the appliance by a person
responsible for their safety. Children must be supervised to ensure that they do not play with
the appliance or any parts of the appliance or the packaging. Always keep the appliance
where it is dry and clean and where young children cannot reach it. Do not leave the appliance unattended, when it is in reach of young children or when the appliance is connected
to the power supply. Do not place any hard and/or heavy objects on the appliance or any
part of it. Take care that no one will pull the appliance by the power cord.
• Do not use any hard, sharp or edged objects (e.g. knives, forks) with the appliance. Only
use the provided pusher for feeding food into the feed tube. Do not handle the appliance or
any part of it with violence. Do not let the motor work continuously for more than 3 minutes.
Always use only one matching sets of tools to avoid damage. (See: Knowing Your Design
Mincer Pro M) For mincing, always use only one of the provided grinding discs. Do not
28
Page 5

process bones, nuts, frozen foods or any other hard items.
• Do not place the appliance or any part of it on or near hot surfaces (e.g. burner, heater or
oven). Do not use any parts or tools of the appliance with any other device.
• Do not grasp in the gear hole of the motor housing, with the appliance connected to the
power supply. If you have forgotten to switch OFF the appliance, before dis-
connecting from the power supply, wait at least 10 seconds, before inserting
the plug into the power socket again.
• Do not leave the appliance unattended during operation. Always switch OFF (ON/OFF
button and power switch) at first, then unplug the appliance, and wait until the motor comes
to a standstill, before moving, or cleaning, or assembling or disassembling any parts, or
when the appliance is not in use. Always grasp the motor housing at both sides near the bottom for moving or lifting. Do not hold the appliance at the tray or cutter housing, for moving
the appliance.
• Do not use any abrasive cleaners, cleaning pads (e.g. metal scouring pads), or any corrosive chemicals (e.g. bleach) for cleaning. Do not immerse the motor housing or power cord
in water or any other liquid. Do not spill or drip any liquids on the motor housing, or on the
power cord to avoid risk of fire and electric shock. Do not pour any liquids in the feed tube
with the cutter housing connected to the motor housing! When liquids are spilled in the motor
housing, immediately unplug the appliance, switch OFF the appliance completely (ON/OFF
button and power switch), and wait for the appliance to cool down. Thereafter, clean and
dry the appliance thoroughly. (See: Care and Cleaning)
• Do not place the appliance or any of its parts or tools in an automatic
dishwasher.
• Do not leave any food dry on the appliance. Always clean the appliance after each use to
prevent a build up of baked-on foods (see: Care and Cleaning). Always keep the appliance
and the tools clean.
Important Safeguards for Electrical Appliances
The appliance is driven electrically. Place the appliance near a suitable wall power socket
to connect the appliance directly to a protected mains power supply with protective conductor (earth/ground) connected properly. Ensure that the voltage rating of your mains power
supply corresponds to the voltage requirements of the appliance (230 V, 50 Hz, AC, rated
for at least 8 A).
The installation of a residual current operated circuit breaker (r.c.c.b.) with a maximum rated
residual operating current of 30 mA in the supplying electrical circuit is strongly recommended. If in doubt, contact your electrician for further information.
In various foreign countries, the specifications for power supplies are subject to incompatible
norms. Therefore it is possible that power supplies in foreign countries do not meat the requirements for safe operation of the appliance. Thus, before operating the appliance abroad,
ensure that safe operation is possible.
• Do not to use any extension cords or multi socket outlets.
• Always handle the power cord with care. Always completely unwind the power cord
before use. Do not place the appliance on the power cord. The power cord may never be
knotted, twisted, pulled, strained or squeezed. Do not let the plug or power cord hang over
29
Page 6

the edge of the table or counter. The power cord may not touch hot surfaces. Ensure that no
one will pull the appliance by the power cord. Take care not to entangle in the power cord.
Always grasp the plug to disconnect the power cord. Do not touch the power plug with wet
hands when the appliance is connected to the power supply.
• Do not place or immerse the motor housing or the power cord in water or any other liquid.
Do not spill or drip any liquids on the power cord or exterior of the motor housing. When
liquids are spilled on the motor housing or power cord, immediately unplug and switch OFF
(ON/OFF button and power switch) the appliance.
Moving Parts – Risks of Injuries
The mincer is suited for finely chopping food. Thus, moving parts of the appliance can cause
severe injuries, when used contrary to these instructions.
• Do not insert your hands, hair, clothes, brushes, or other foreign objects (e.g. bones,
stalks of vegetables, cooking utensils) in the feed tube of the appliance or in the outlet of the
cutter housing, when the appliance is connected to the power supply. Before connecting the
appliance to the power supply, always ensure that there are no foreign objects in the feed
tube or cutter housing, and the appliance is assembled completely and correctly. Only use
the provided pusher to push down the ingredients. Do not push with violence, to avoid that
the mincer gets blocked.
• The edges of the cutter blade are very sharp. Ensure not to get injured when handling the
cutter blade.
• Do not hold your face over the feed tube, while the motor is agitating, because splinters
could escape from the feed tube, if you failed to see small pieces of bones or other hard
parts (e.g. stalks, hard seeds, stones) while preparing the foods. DO NOT push the foods
with your hands down in the feed tube, or poke in the feed tube!
Technical Specifications
Model: Art. No. 41408 Design Mincer Pro M
Power supply: 220-240 V AC, 50/60 Hz
Power consumption: 850 W (max locked motor power 2000 W)
Length of power cord: ca. 1.5 m
Weight: 5.35 kg
Dimensions: (width x depth x height) ca. 16.5 cm x 36.0 cm x 37.0 cm
Certification:
30
Page 7

Before First Use
WARNING: DO NOT let young children play with the appliance, or any part
of it, or the packaging!
1. Unpack the appliance and all accessories carefully and check that no parts are damaged
or missing.
Tip: The pusher is hollow, and some tools may be stored in its interior. Remove the cover of
the pusher (just lift it) and take out the tools.
2. Carefully remove all shipping materials and promotional materials, but DO NOT remove
any warning labels or the model label. Especially ensure that there are no foreign objects
(e.g. packaging) in the interior of the appliance.
WARNING! Always switch OFF completely (ON/OFF button and power switch) and
unplug the appliance, before cleaning. Do not immerse the motor housing or power cord in
water or other liquids or spill any liquids on the motor housing or power cord. Do not place
the appliance or any parts of it in an automatic dishwasher.
3. Before first use and after a longer period of storage, clean the appliance and all tools.
(See: Care and Cleaning)
Properties of Your Design Mincer Pro M
CAUTION: Do not operate the appliance continuously for more than 3 minutes. If you wish
to process larger amounts of food, always make brakes in between times, switching the
appliance OFF to avoid overheating.
The appliance is NOT suited for grinding very hard, very fibrous, or watery foods. Cook
hard vegetables (e.g. carrots) and leave to drain, and/or cut to small pieces, before processing with the mincer.
Do not process extremely watery foods (e.g. some fruits). Otherwise, juice could run into the
gear hole of the motor housing and cause damage to the motor.
Power Switch
The appliance is equipped with a separate power switch for switching OFF the appliance
completely (see: Knowing your Design Mincer).
With the power switch ON and the appliance connected to the power supply, the indicators
of the operating buttons on top of the motor housing (ON/OFF and REVERSE) illuminate
white. Always switch OFF the appliance at the power switch, when it is not in use for several
minutes.
The Buttons ON/OFF and REVERSE
Using the operating buttons ON/OFF and REVERSE you switch the motor on and off. The
arrows on the buttons indicate the direction of movement of the food within the
cutter housing.
• For processing your food, generally use the normal forward operation, controlled via the ON/OFF button.
The indicator of this button illuminates white, when the appliance is connected
to the power supply and switched on via the power switch. After pressing the
ON/OFF button, the indicator of this button illuminates blue, and the motor
starts working immediately. The worm shaft moves the foods to the outlet of the
31
Page 8

cutter housing.
Do not let the motor work continuously for more than 3 minutes. Usually, during this time, you
have processed a tablet full of meat. Thereafter, switch OFF the motor for 15 minutes to let
the motor cool down. It is a good idea to use this time for preparing the next portion.
• Reverse operation is only intended for loosening blocked foods in the worm shaft (see:
Loosing Blocked Food—Reverse Operation).
The indicator of this button illuminates white, when the appliance is connected to the power
supply and switched on via the power switch. The indicator flashes blue, when reverse
operation is active.
Tools
The appliance is provided with four sets of tools:
• Cutter blade and three grinding discs—for mincing and mixing.
• Separator disc and sausage horn—for filling sausage skins with minced meat
• Plastic finger and cone—for making special meat pâté / Kebbe
• Cookie maker and former—for preparing cookies. For this, you need the separator disc as well.
CAUTION: Always use only one matching set of tools. For mincing and mixing only use one
single grinding disc.
Select the grinding disc according to the consistency of your foods and your liking.
• Select the coarse grinding disc for firm foods, and for making coarse sausages.
• Select the medium grinding disc for tender foods.
• To get a really fine consistency (e.g. for Kebbe), process the foods several times, beginning with the coarse or medium grinding disc. Then use the fine grinding disc for the second
or third run.
Example: For steak tartare, mince the meat with the medium grinding disc twice.
Tips for Best Results
Only process edible foods that are not off and not over-stored. Only use meat that is really
fresh! Additionally, process meat directly before consuming or cooking it. Even in the refrigerator, chopped meat is highly perishable.
Do not process very hard, very fibrous, or too large pieces of food (e.g. bones, gristle, thick
sinews, seeds, nuts, stringy stalks, hard shells, etc.). Cook hard vegetables, and always
remove any uneatable parts completely, before processing the food.
Cut the foods into suitable pieces that can be inserted effortlessly in the feed tube. When processing larger amounts of food, prepare the foods in portions that can be processed within 2
or 3 minutes. In between times, switch OFF the mincer (ON/OFF button and power switch)
to let the motor cool down. In the meantime, you can prepare the next portion.
Cut meat and food of similar consistency in strips (ca. 10 cm in length and 2 cm thick). Cut
food that is somewhat firmer in 1 cm cubes (at the maximum).
If the motor agitates too slowly and is about to get stuck, cut your food to smaller pieces,
and/or cook firm food (e.g. vegetables), before processing. Slow down your work-speed.
Add onions and finely grinded spices, while mincing the foods for getting an even mixture.
However, hard spices (e.g. pepper, nutmeg, etc.) must be grinded in a mill, before processing with the mincer. It is a good idea to fry onions for minced pork before processing. This
way, onions are more flavoury and wholesome.
32
Page 9

Operation
WARNING: The mincer is intended for mincing food. For this, the appliance is equipped
with sharp-edged knives and other electrically driven moving parts. Do not insert your
hands or any foreign objects (e.g. cooking utensils) in the feed tube, or
outlet of the cutter housing while the appliance is connected to the power
supply, to avoid risks of injuries.
Always switch OFF the ON/OFF button first, then switch OFF the power switch, then unplug
the appliance, before assembling or disassembling any parts. Before operation, always
ensure that you have assembled the appliance completely and correctly according to the
instructions in this booklet, and that there are no foreign objects in the feed tube. Carefully
remove hard, uneatable parts of your foods (e.g. bones, gristle, sinews, seeds, stalks, hard
shells) completely, before mincing.
Do not place clothes, tissues or any other foreign objects on or under the appliance during
operation. Do not place the appliance over a power cord. Only use the provided pusher
with the appliance. Do not use any hard or sharp-edged objects (e.g. forks, knives), to avoid
damage to the appliance. Do not cut your foods on the tray of the appliance. Do not use
violence!
Assembling the Appliance
WARNING: Only place the motor housing on a stable, dry, level, and clean surface. Do
not place any clothes or tissue or other foreign objects on or under the appliance during operation, to avoid risk of fire or electric shock. Do not block the ventilation slots at the bottom
of the motor housing. The buttons for operation and the power switch must be accessible any
time, during operation.
Always ensure that the appliance is NOT connected to the power supply, before assembling
or disassembling the appliance.
Do not pour any liquids over or in the motor housing! Do not pour any liquids in the feed
tube with the cutter housing connected to the motor housing! Always immediately switch
OFF and unplug the appliance, if liquids are spilled on or in the appliance. Then clean the
appliance and let it dry naturally for one day. (See: Care and Cleaning)
1. Place the motor housing on a flat, stable, and moisture-resistant surface near a suitable
wall power outlet. (See: Important Safeguards) Leave at least 10 cm of free space to walls,
curtains, boards and other objects on each side of the appliance. Leave at least 50 cm of
free space above and in front of the appliance to get free access.
2. Hold the cutter housing with the threaded end upwards. Then insert the worm shaft into
the cutter housing, the smaller end with the cogwheel pointing downwards. Doing so, put the
cogwheel through the opening in the lower end of the cutter housing.
3. Insert the appropriate tools.
WARNING: The cutter blade is very sharp-edged. Handle with care! Always assemble only
one matching set of tools. For mincing and mixing, only use one of the provided grinding
discs.
33
Page 10

• Mincing and mixing
Use the cutter blade and one of the grinding discs.
Place the cutter blade on the worm shaft, the edges of the cutter blade facing upwards, and
turn the cutter blade gently until it settles on the shaft. It may not protrude the brim of the
cutter housing.
Select a suitable grinding disc (see: Tools), and place the grinding disc onto the worm shaft.
Ensure that the notch of the grinding disc fits onto the protrusion of the cutter housing.
A
B
• Making sausage
Use the separator disc and the sausage horn.
Place the separator disc over the worm shaft. The separator disc settles into the cutter
housing only in one way. Thus, ensure that the notch at one side of the brim of the separator
disc fits onto the protrusion of the cutter housing.
C
D
A B
34
Page 11

Then place the sausage horn on the separator disc. The wide brim of the sausage horn must
lie firmly on the separator disc.
C D
• Making Kebbe (Middle Eastern meat pâté)
Use the plastic finger and the cone.
Place the plastic finger on the worm shaft. The plastic finger settles into the cutter housing
only in one way. Thus, ensure that the notch in the brim of the plastic finger fits onto the
protrusion of the cutter housing.
Then place the cone on the plastic finger. The wide brim of the cone must lie firmly on the
brim of the plastic finger.
A
B
C
D
35
Page 12

• Preparing Cookies
Use the separator disc, cookie maker and former.
Place the separator disc over the worm shaft. The separator disc settles into the cutter
housing only in one way. Thus, ensure that the notch in the brim at one side of the separator
disc fits onto the protrusion of the cutter housing.
Then place the cookie maker on the separator disc. The notch in the brim of the cookie maker must fit into the protrusion on the brim of the separator disc.
Tip: the former is installed later on.
4. Place the screw ring on the cutter housing, and screw the screw ring clockwise on the
cutter housing, but do not fasten it.
5. Connect the cutter housing to the motor housing.
For this, hold the feed tube pointing to the right (about 45°), and in this orientation insert the
opening of the cutter housing with the cogwheel of the worm shaft into the gear hole of the
motor housing. For this, turn the cutter housing slightly, until it settles in the gear hole. Do not
use violence! If you cannot insert the cutter housing correctly, simply loosen the screw ring a
little, and try again.
Then turn the cutter housing counter clockwise until the feed tube points up vertically and the
cutter housing engages with a click. Ensure that the cutter housing is assembled tightly and
will not wobble or fall out.
6. Screw the screw ring hand-tight without violence.
7. When using the cookie maker, insert the former in the cookie maker. For this, possibly
you must turn the screw ring backwards a little.
Tip: with the former in place, the screw ring cannot loosen during operation.
CAUTION: Do not use any tools for fastening the screw ring to avoid damage to the thread.
8. Place the tray with its outlet on the top of the feed tube and press the tray gently downwards. Ensure that the tray is tightly in place and will not fall or wobble.
Now, the appliance is ready for use.
Mincing and Mixing
WARNING: DO NOT insert your hands or any foreign object (e.g. cooking
utensils) in the feed tube or outlet of the cutter housing, with the appliance
connected to the power supply.
Remove any hard parts of the foods carefully to avoid hazards arising from splinters and/or
damage to the moving parts of the appliance. If you failed to see residues of bones, seeds,
shells or stalks during preparation of the ingredients, splinters could squirt out of the feed
tube. Thus, do not hold your face over the feed tube, while the appliance is in operation.
36
Page 13

Do not process frozen foods.
1. Prepare the foods for processing.
Remove bones, gristle and sinews as much as possible. Cut meat into strips (about 10 cm
length and 2 cm thick (see: Tips for Best Results).
Assemble the mincer according to the instructions above (see: Assembling the Appliance
Place a sufficiently large bowl or dish under the outlet of the cutter housing).
2. Put the meat on the tray. Connect the appliance to the power supply and switch the power
switch on. The indicators of the buttons on top of the motor housing are illuminated white.
WARNING: Do not push the food with your hands or any cooking utensils in the feed tube.
Always use the provided pusher. Do not let the motor work continuously for more than 3 minutes. Switch OFF and let the motor cool down for 15 minutes in between times, if you wish
to process larger amounts of food.
3. Press the ON/OFF button to switch on the motor. Then use the pusher to push the meat
into the feed tube and gently push down without violence.
4. As soon as you finished your work, switch OFF the appliance (ON/OFF switch and power
switch). Then unplug the appliance.
Tip: You can remove some residues of meat in the cutter housing by processing a slice of
bread.
5. Clean the appliance according to the instructions in section Care and Cleaning.
Always clean the appliance immediately after operation. Do not leave any food dry on the
appliance.
Making Sausages
For making sausages, you need a sausage skin, which you can get from your butcher’s
shop.
1. Mince the meat using the cutter blade and grinding disc (see: Assembling the Appliance
and Mincing and Mixing).
2. Switch OFF the appliance (ON/OFF switch and power switch). Then unplug the appliance.
3. Remove grinding disc and cutter blade and assemble separator disc and sausage horn
(see: Disassembling the Appliance and Assembling the Appliance).
4. Soak the sausage skin in lukewarm water for 10 minutes.
5. Mix the already minced ingredients with seasons and herbs to taste. Put the sausage mixture on the tray. Then slide the wet skin onto the sausage horn and tie the end of the sausage
skin.
6. Insert the plug in the power outlet. Switch ON the appliance via the power switch and
ON/OFF button, and then use the pusher to gently push the food into the feed tube.
The sausage skin is filled up with the sausage mixture, while it slips automatically down the
sausage horn. If the skin gets stuck on the sausage horn, switch OFF the motor of the mincer
and wet the sausage skin with some drops of warm water. Ensure that the water does not
drip on the table. Thereafter, loosen the sausage skin and continue working.
37
Page 14

7. After processing your food, switch OFF the appliance (ON/OFF switch and power
switch). Then unplug the appliance. Clean the appliance according to the instructions in
section Care and Cleaning.
Always clean the appliance immediately after operation. Do not leave any food dry on the
appliance.
Making Kebbe
1. Assemble the mincer with cutter blade and grinding disc, and mince the meat and other
ingredients of the Kebbe sleeves and filling separately to the desired consistency, according
to your recipe. See: Assembling the Appliance and Mincing and Mixing, see also the recipe
in this booklet.
Tip: You can remove residues of meat in the cutter housing by processing a slice of bread.
2. Switch OFF the appliance (ON/OFF switch and power switch). Then unplug the appliance.
3. Remove grinding disc and cutter blade and assemble plastic finger and cone (see: Disassembling the Appliance and Assembling the Appliance).
4. Mix the already minced ingredients with seasons and herbs to taste.
5. Place the mixture for the Kebbe sleeves on the tray of the mincer.
6. Insert the plug of the mincer in the power outlet, switch ON the appliance (power switch
and ON/OFF button), and then use the pusher to gently push the food into the feed tube.
7. After processing your food, switch OFF the appliance (ON/OFF switch and power
switch). Then unplug the appliance.
8. Clean the appliance according to the instructions in section Care and Cleaning.
Always clean the appliance immediately after operation. Do not leave any food dry on the
appliance.
9. Cut the continuous hollow cylinder produced by your mincer to the desired length (ca. 7-8
cm) and fill up the pieces with the prepared filling. Press the ends of the filled Kebbe sleeves
together to close them. Now the Kebbe is ready for frying.
Making Cookies
1. Prepare the pastry for your cookies according to your recipe. Possibly, place the pastry in
the refrigerator for about ½ hour.
2. Assemble the mincer for making cookies with separator disc, cookie maker, and former
(see: Assembling the Appliance).
3. Place the pastry on the tray of the mincer.
4. Insert the plug of the mincer in the power outlet, switch ON the appliance (power switch
and ON/OFF button), and then use the pusher to gently push the pastry into the feed tube.
5. After processing your pastry, switch OFF the appliance (ON/OFF switch and power
switch). Then unplug the appliance.
6. Clean the appliance according to the instructions in section Care and Cleaning.
Always clean the appliance immediately after operation. Do not leave any food dry on the appliance.
38
Page 15

7. Bake the cookies according to your recipe.
Solving Problems
If any problems occur during operation, you will find solutions in the following table. Additionally, you can contact your vendor.
Problem Possible Cause Solution
The motor does not work,
the indicators are dark.
The appliance is not live.
Insert the power plug in the
power outlet.
The motor does not
work, the indicators are
illuminated.
The reverse operation
does not work. The
REVERSE button flashes
blue.
The reverse operation
does not work. The ON/
OFF button is illuminated
blue.
The power switch is switched
OFF.
The circuit breaker activates.
The overheat protection switched off the appliance.
The cutter housing is blocked.
The reverse operation starts
after a time delay of 4
seconds.
The cutter housing is blocked.
The overheat protection switched off the appliance.
Malfunction of the motor.
You cannot start reverse operation, while forward operation is switched on.
Switch on the power switch.
Press the red button at the
bottom of the appliance.
Let the motor cool down (See:
Overheat Protection).
Switch to reverse operation
for a moment (See: To Loosen
Blocked Food)
Wait until the motor starts
automatically.
Switch OFF the appliance
completely and unplug. Then
disassemble the appliance
to remove the obstacle (See:
Disassembling the Appliance).
Let the motor cool down (See:
Overheat Protection).
Contact an authorized service
centre for repair.
Switch off the ON/OFF
button. This button must be
illuminated white to activate
reverse operation. Try again.
39
Page 16

The motor works too
slowly.
The cutter housing is blocked.
Switch to reverse operation
for a moment (See: Loosing
Blocked Food – Reverse
Operation).
You push down the pusher too
violently.
Too hard parts are still in the
foods.
The food is too hard.
Decrease the pressure of
pushing.
Remove any hard parts before
processing your foods.
Only process foods that have
a similar consistency as meat.
Cook hard vegetables before
processing. Cut the food in
smaller pieces.
Juice drips from the cutter
housing.
The food is too watery. Do not process food that is
too juicy. Dab dry before
processing.
Loosing Blocked Food – Reverse Operation
CAUTION: Do not operate the motor in reverse direction for more than a few seconds. Re-
verse operation moves the foods to the motor housing. Thus, foods and juices could run into
the gear hole of the motor housing.
If the blockage of the worm shaft is not cleared away after a short moment of reverse operation, switch OFF the appliance via the ON/OFF button and power switch, then unplug and
clean the appliance according to the instructions in chapter Care and Cleaning.
Reverse operation is only intended for loosening blocked foods in the worm shaft by moving
the worm shaft in opposite direction for a short moment.
To activate reverse operation:
1. First switch OFF the motor via the ON/OFF button.
Reverse operation is only available with the motor switched OFF and the power switch ON
(both indicators illuminated white).
2. Press the REVERSE button.
To avoid problems derived from pressing the wrong button during operation, after pressing
the REVERSE button, this button flashes in blue, and the reverse operation starts with a time
delay of 4 seconds.
Additionally, reverse operation is switched OFF automatically after 5 seconds of operation.
However, to release stuck food in the cutter housing, it is sufficient in general, to operate the
motor in reverse direction for just a moment.
3. You can switch OFF the reverse operation of the motor any time. Press the ON/OFF button
to switch OFF reverse operation. Thereafter, the indicators are illuminated in white again.
If the motor gets stuck again or reverse operation does not work, switch OFF the appliance
40
Page 17

completely (ON/OFF button and power switch), unplug and clean the appliance according
to the instructions in chapter Care and Cleaning. However, if the problem persists, slow
down working and cut your foods to smaller pieces, before processing in the mincer (See:
Properties of Your Design Mincer Pro M).
Overheat Protection
This appliance is equipped with an overheat protection that will automatically shut off the
appliance in case of overheating.
If your appliance suddenly stops running:
1. Immediately unplug the appliance and press the power switch and ON/OFF button to turn
off the appliance.
2. Let the appliance cool down, then clean the appliance (see: Care and Cleaning).
3. Wait 60 minutes.
4. Insert the mains plug in the power socket.
5. Now you can operate the appliance as usual. However, if the appliance will not work
again, send the complete appliance to an authorized service centre for examination and
repair.
Slow down your work-speed and use smaller portions. Regularly, switch OFF the appliance
in between times for 15 minutes. Please contact you vendor or an authorized service centre,
if the overheat protection is activated too often, anyhow.
Care and Cleaning
WARNING: Do not insert your hands or any foreign objects in the feed tube or outlet of the
cutter housing, while the appliance is connected to the power supply.
The cutter blade is sharp-edged. Handle with care to avoid cutting your fingers.
Do not place or immerse the motor housing or power cord in water or any other liquids.
Do not spill any liquids on the motor housing or power cord. Do not pour any liquids in the
feed tube, while the cutter housing is assembled to the motor housing. Always disconnect
the cutter housing from the motor housing, before assembling or disassembling any tools or
removing stubborn blockages.
Do not place the appliance or any part of it in an automatic dishwasher.
Do not leave any food dry up on the appliance or any parts of it to prevent a build up of
dried-on foods. Always clean the appliance after each use according to the following instructions.
Disassembling the Appliance
WARNING! Always switch OFF the ON/OFF button and power switch, wait until the
motor comes to complete standstill, and unplug from power outlet, before disassembling or
cleaning the appliance.
1. Switch OFF the ON/OFF button and power switch, wait until the motor comes to complete
standstill, and unplug from power outlet.
2. Remove the pusher. Then lift the tablet upwards to remove it.
41
Page 18

3. Grasp the cutter housing with one hand, then press the release button near the gear hole
in the front plate of the appliance. (See: Knowing Your Design Mincer)
4. With the release button pressed, unlock the cutter housing by turning it clockwise. Then
pull the cutter housing out of the motor housing.
5. Unscrew the screw ring and, thereafter, hold the cutter housing close over a plastic bowl
or kitchen sink and carefully turn the cutter housing with the outlet downwards. This way, the
parts within the cutter housing will fall out.
Possibly, for this you must impress the gear of the worm shaft in the cutter housing.
Cleaning the Appliance
WARNING: The edges of the cutter blade are very sharp. Handle with care to avoid injuries.
Do not use any abrasive cleaners, cleaning pads (e.g. metal scouring pads), or any corrosive chemicals (e.g. bleach) for cleaning the appliance or any parts of it, to avoid damage to
the surfaces. Do not immerse the motor housing or power cord in water or any other liquid.
Do not spill or drip any liquids on the motor housing, or on the power cord to avoid risk of
fire and electric shock. Do not use violence!
Do not place the appliance or any part of it in an automatic dishwasher!
1. Clean pusher, tablet, cutter housing, worm shaft, and screw ring, as well as any used tools
with warm dish-water and a nylon brush. If there are any tools within the pusher, take the
tools out first. Stubborn residues on the surfaces can be removed better by soaking in warm
dishwater for some minutes.
2. Moisture a clean cloth or soft sponge with a little warm dishwater and carefully wipe the
exterior of the appliance and the power cord.
WARNING: Always ensure that the appliance and all parts of it are out of reach of young
children.
3. Thoroughly dry the motor housing and all parts, and let dry naturally for about half an
hour out of reach of young children.
4. It is good advice to lubricate the grinding discs and cutter blade with some vegetable oil.
Storage
WARNING: Always switch OFF completely (ON/OFF button and power switch), unplug
and clean the appliance and all its parts before storing (see: Care and Cleaning).
Ensure to store the appliance where it is clean, dry and safe from frost, direct sunlight and
inadmissible strain (mechanical or electric shock, heat, moisture) and where it is out of reach
of young children. Place the appliance on a clean and stable surface, where it can not fall.
Do not place any hard or heavy objects on the appliance or any part of it.
Always handle the power cord with care. Power cords may never be knotted, twisted,
pulled, strained or squeezed.
Do not use any parts or tools of the appliance for any other purpose than operating the
appliance. It is a good advice to store the parts and accessories of the appliance with the
appliance.
1. Always clean the appliance and its parts before storage (see: Care and Cleaning).
42
Page 19

2. It is good a advice to re-assemble the cutter housing with cutter blade and a grinding disc
before storage, (See: Assembling the Appliance) to avoid injuries by the cutter blade.
3. Additionally, you can insert some tools in the pusher. For this, remove
the cover of the pusher and place the tools into the interior, as shown in
the figure. Then insert the pusher in the feed tube of the cutter housing.
4. Carefully roll up the power cord without knotting or bending it. Then
place the power cord in the cord compartment in the bottom of the motor
housing.
CAUTION: Do not carry the appliance by the tray or cutter housing. To move the motor
housing, always grasp it at both sides near the bottom.
5. Grasp the motor housing with both hands at its sides, and place it and all parts and tools
on a suitable surface, where it can not fall, and is out of reach of young children.
Notes for disposal
Dispose of the appliance and packaging must be effected in accordance with the corresponding local regulations and requirements for electrical appliances and packaging. Please
contact your local disposal company.
Warranty
We guarantee that all our products are free of defects at the time of purchase.
Any demonstrable manufacturing or material defects will be to the exclusion of any further
claim and within warranty limits of the law free of charge repaired or substituted. There is no
Warranty claim of the purchaser if the damage or defect of the appliance is caused by inappropriate treatment, over loading or installation mistakes. The Warranty claim expires if there is
any technical interference of a third party without an written agreement.
The purchaser has to present the sales slip in assertion-of-claim and has to bear all charges of
costs and risk of the transport.
Information and Service
Please check www.gastroback.de for further information. For technical support, please
contact Gastroback Customer Care Center by phone: +49 (0)4165/22 25-0 or e-mail
info@gastroback.de.
43
Page 20

Recipes
Stuffed Kebbe
Kebbe (Bebble) is a traditional Middle Eastern dish made primarily of lamb and bulgur
wheat, which are minced together to form a paste. This mixture is extruded through a Kebbe
maker and cut into short tubes that can be stuffed with a minced meat mixture, the ends
pressed together and then fried.
Outer Sleeves
500 g lamb meat, cut into strips
500 g washed and drained bulgur wheat
1 small onion
Process alternate batches of lamb and bulgur wheat through the mincer fitted with the
medium grinding disc, adding the onion before all the lamb and wheat are minced. Mix the
minced lamb, onion and wheat thoroughly. Then process in the mincer a second and third
time using the fine grinding disc. The mixture is now ready to extrude through the Kebbe
tool.
Filling
400 g lamb meat, cut into strips
15 ml (=1 tablespoon) of oil
2 medium onions, finely chopped
5-10 ml (=1-2 tablespoons) of allspice, grinded
15 ml (=1 tablespoon) of plain flour
Salt and pepper
To make the filling:
Mince the lamb meat using the medium grinding disc, fry the onion in the oil until it is golden
brown, add the lamb meat and allow to brown until it is done. Add the remaining ingredients and cook for 1-2 minutes. Drain off any excess fat if necessary and allow cooling.
Making the sleeves:
Process the sleeve mixture through the Kebbe tool and cut into pieces (approximately 7-8
cm in length). Press one end of the tubes together, and then carefully fill up with the filling,
leaving a small gap at the open end, which can be pressed together to seal. Fry the Kebbe
in batches in hot oil (at ca. 190 °C) for approximately 6 minutes, until it is golden brown
and the filling piping hot.
44
Page 21

Index
| A |
abroad operation ................................. 29
accessories .................................... 28, 42
assembling .......................................... 33
| B |
blade ................................................. 27
buttons .................................... 27, 31, 40
| C |
care and cleaning .......................... 41, 42
cone ....................................... 27, 35, 36
cookie maker ................................. 27, 38
cutter blade ................................... 33, 42
cutter housing .......................... 27, 33,42
| D |
disassemble ........................................ 41
disposal .............................................. 43
| E |
extension cord .................................... 29
| F |
first use ............................................... 31
former ......................................... 27, 42
forward operation .......................... 27, 31
functions ............................................. 31
| G|
gear hole ...................................... 27, 36
grinding disc ..................... 27, 32, 33, 42
| I |
intended use ........................................ 28
| K |
Kebbe ................................................ 37
| M |
motor housing ...................................... 27
moving parts ...................................... 30
| O|
operating elements ............................... 27
operation ............................................ 33
outlet ................................................. 27
overheat protection ............................. 41
| P |
plastic finger .......................... 27, 35, 36
power cord .................................. 29, 30
power supply ................................ 29, 30
power switch ................................ 27, 31
preparation ........................................ 32
problems ............................................ 39
properties ........................................... 31
pusher ................................................ 27
| R |
release button ................................ 27, 42
reverse operation ..................... 27, 31, 40
| S |
safety instructions ................................ 28
sausage .............................................. 37
sausage horn ............................... 27, 34
screw ring ............................... 27, 36, 42
separator disc ................................ 27, 34
storage ............................................... 42
| T |
technical specifications ......................... 30
testing for proper operation ................... 28
tips for best results ............................... 32
tools ...................................... 27, 32, 33
tray .............................................. 27, 42
troubleshooting ................................... 39
| W |
work space ................................... 28, 33
worm shaft .............................. 27, 33, 42
45
Page 22

Notizen/Notes
46
Page 23

GASTROBACK GmbH
Gewerbestraße 20 . D-21279 Hollenstedt / Germany
Telefon +49 (0)41 65/22 25-0 . Telefax +49 (0)41 65/22 25-29
info@gastroback.de . www.gastroback.de
 Loading...