

Page 1
Operating Instructions
Design Stand Mixer Advanced Pro
Art.-No. 40979 Design Stand Mixer Advanced Pro
Read all provided instructions before first usage!
Model and attachments are subject to change!
For household use only!
Page 2

Carefully read all provided instructions before you start running
the appliance and pay regard to the warnings mentioned in these
instructions.
Table of Contents
Knowing the Design Stand Mixer Advanced Pro ..................................................31
Important safegards ..........................................................................................32
Important safegards for all electrical appliance ................................................33
Moving parts - Risks of injuries to persons .......................................................33
Opearating .....................................................................................................34
Before first use .............................................................................................34
Attaching the bowl .......................................................................................34
Attaching the mixing tools .............................................................................34
Dissemble the mixing tools ............................................................................35
Planetary mixing action ................................................................................35
Adjusting the mixing time ..............................................................................36
The count-up timer ........................................................................................36
The count-down timer ....................................................................................36
Pause mode ................................................................................................36
Safety cut-off ...............................................................................................37
Electronic protection cut-off ............................................................................37
Thermo cut-off ..............................................................................................37
Disassembling the stand mixer .......................................................................37
Cleaning after use ............................................................................................38
Storage ...........................................................................................................38
Tips for using ...................................................................................................39
Using the mixing tools ..................................................................................39
Using the programmes ..................................................................................40
More tips ....................................................................................................40
Notes for disposal ............................................................................................41
Information and service .....................................................................................41
Warranty ........................................................................................................41
Technical specifications .....................................................................................42
Troubleshooting ...............................................................................................42
Recipes ...........................................................................................................44
Page 3
Dear customer!
Congratulations on your new Design Stand Mixer Advanced Pro! The high performance
1000 watt motor makes processing food an ease and the planetary mixer evenly mixes all ingredients. The appliance is perfectly suited for mixing, beating and blending foods (i.e. instant
pudding, cocktail sauces, cream, crepe batter) and kneading pastry (i.e. shortcrust pastry or
bread dough) or folding in ingredients (i.e. egg white). The Design Stand Mixer Advanced Pro
is straightforward in use and cleaning is quite easy.
These instructions for use will inform you about the various functions and features, which
make it easy to take pleasure in your stand mixer.
We hope that you will enjoy the Design Stand Mixer Advanced Pro.
Your Gastroback GmbH
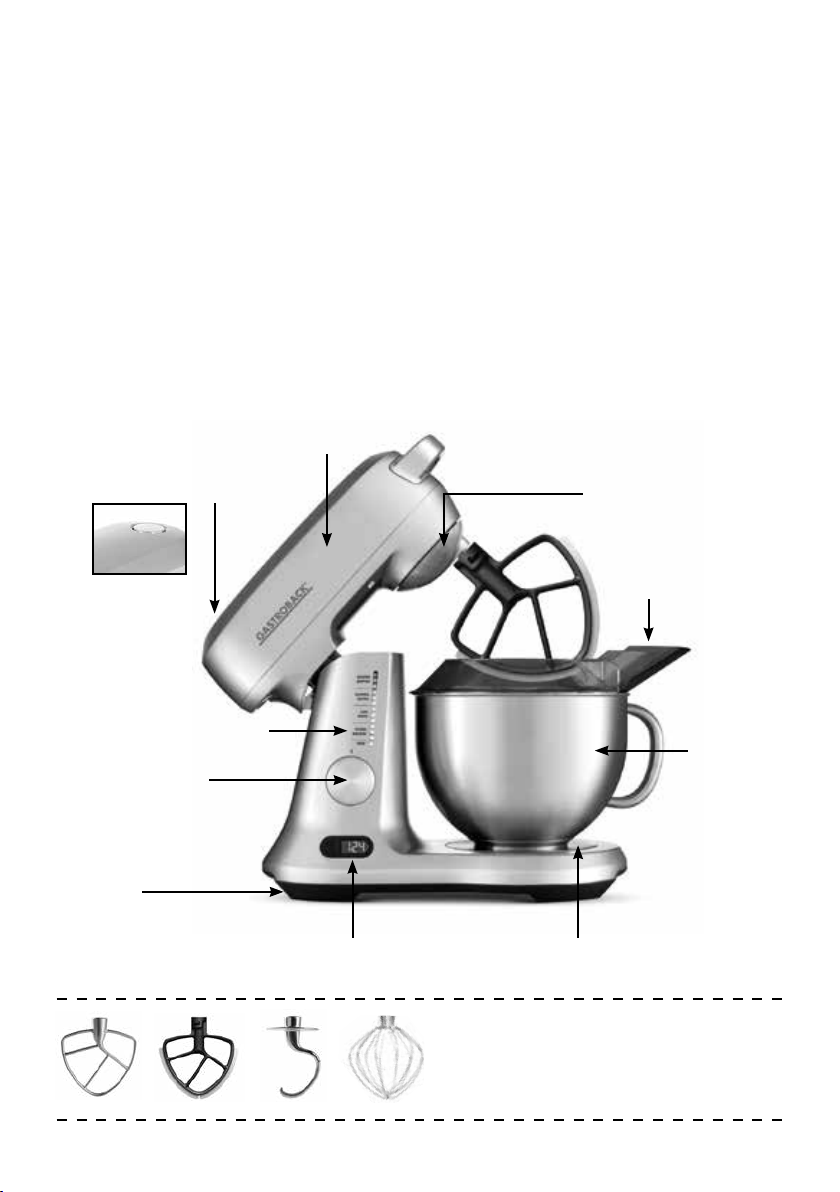
KNOWING THE DESIGN STAND MIXER ADVANCED PRO
mixing arm
mixing arm unlock button
planetary mixer
splash guard
with pouring spout
LED programme indicator band
control dial
(programme-/speed control,
pause, OFF)
mixer base
count up & down timer
A B C D
mixing bowl
with handle
bowl locking recessLCD display
Mixing tools: A: at beater
B: scraper beater
C: dough hook
D: whisk
Attachments: spatula (w/o gure)
31
Page 4

IMPORTANT SAFEGUARDS
• Carefully read all instructions before operating the Design Stand Mixer Advanced Pro for
the first time and save for future reference.
• Remove and safely discard any packaging material and promotional labels before using
the Design Stand Mixer Advanced Pro for the first time.
• To eliminate a choking hazard for young children, remove and safely discard the protective cover fitted to the power plug of this appliance.
• Do not place the Design Stand Mixer Advanced Pro near the edge of a bench or table
during operation. Ensure the surface is level, clean and free of water and other substances.
Vibration during operation may cause the appliance to move.
• Do not use the Design Stand Mixer Advanced Pro on a sink drain board.
• Do not place the Design Stand Mixer Advanced Pro on or near a hot gas, electric burner
or where it could touch a heated oven.
• Always ensure the Design Stand Mixer Advanced Pro is completely assembled before
operating. Follow the instructions provided in this book.
• Ensure the control dial is in the ‘Off’ position and the stand mixer is switched off at the
power outlet and the power cord is unplugged before attaching the beater, whisk or dough
hook.
• Do not use attachments other than those provided with the Design Stand Mixer Advanced
Pro. Use only the beater whisk and dough hook supplied with the mixer.
• Handle the Design Stand Mixer Advanced Pro and attachments with care. Never place
your fingers inside the mixing bowl or near the beater, whisk or dough hook during operation.
• Keep hands, hair, clothing, as well as, spatulas and other utensils away from moving
beater, whisk or dough hook/during operation.
• Should an object such as a spoon or spatula fall into the bowl while mixing, immediately
ensure the control dial is in the ‘Off’ position, turn the Design Stand Mixer Advanced Pro off,
unplug at the power outlet and remove the object.
• Do not place hands in the mixing bowl unless the Design Stand Mixer Advanced Pro is
disconnected from the power outlet. Ensure the control dial is in the ‘Off ’ position, the Design Stand Mixer Advanced Pro is switched off and unplugged from the power outlet before
removing the beater, whisk or dough hook.
• Ensure the motor and beater, whisk or dough hook have completely stopped before disassembling.
• Always remove the beater, whisk or dough hook from the Design Stand Mixer Advanced
Pro before cleaning.
• Care should be taken when removing the food from the mixer bowl by ensuring the motor
and the beater, whisk or dough hook have completely stopped before disassembling. Ensure
the control dial is in the ‘Off” position, the appliance is switched off at the power outlet and
unplugged before unlocking the mixer motor head and moving into the upright position. The
beater, whisk or dough hook should be released from the mixer motor head before removing
the processed food from the mixer bowl and the beater, whisk or dough hook.
32
Page 5

• Ensure the mixer motor head is locked into the horizontal (closed) position when not in use
and before storing.
• Always ensure the control dial is in the ‘Off’ position, the power is switched off at the power outlet and the power cord is unplugged from the power outlet before attempting to move
the stand mixer, before assembling or disassembling, when not in use and before cleaning
or storing.
• Do not move the stand mixer whilst in operation.
• Do not leave the stand mixer unattended when in use.
• Do not place any part of the stand mixer in the dishwasher other than the bowl, splash
guard, beater, dough hook and whisk.
• Do not place any part of the stand mixer in the microwave oven.
• Keep the stand mixer clean. Follow the cleaning instructions provided in this book.
Important safeguards for all electrical appliances
• Ensure that the voltage rating of your mains power supply corresponds to the voltage
requirements of the appliance (220/240 V, 50 Hz, AC). Always connect the appliance
directly to a mains power supply wall socket with protective conductor (earth/ground)
connected properly. The installation of a residual current safety switch with a maximum rated
residual operating current of 30 mA in the supplying electrical circuit is recommended. If in
doubt, contact your local electrician for further information. Do not use any multiple desk
socket.
• Do not leave the appliance unattended while connected to the power supply. Always
switch ´Off` the appliance and IMMEDIATELY unplug the appliance after operation and if it
is not in use, cleaning and/or assembling or disassembling the processing tools. Always
grasp the plug to disconnect the appliance from the power outlet.
• Always handle the power cord with care. Do not pull or strain the power cord. The power
cord may never be knotted or squeezed. Do not let the power cord hang over the edge of
the table or counter. Take care not to entangle in the power cord.
• Do not touch the appliance with wet hands to avoid risk of electric shock. Do not touch
the appliance, when it is damp or wet and connected to the mains power supply. In this
case, immediately unplug the appliance to avoid risk of electric shock and damage.
Moving parts – Risks of injuries to persons
• Do not touch the assembled processing tool (whisk, beater or dough hook) with your hands
or any other objects (hair, clothes, brushes, cooking utensils), when the appliance is
connected to the power supply. Always switch ´Off` the appliance, unplug the appliance
and wait for the motor to stop, before assembling/disassembling or cleaning the appliance
and when not in use.
• ATTENTION: Keep hands and other utensils out of bowl while blending food to reduce
the risk of severe injury to persons or damage to the unit.
• Always handle the whole appliance with care and without violence to avoid injuries to
persons and damage.
33
Page 6

• Always lower the motor head with the assembled processing tool first, then attach the
splash guard and then turn on the appliance. This way you avoid splashing.
• ATTENTION: Never use any other bowls then the provided. Ensure the bowl is firmly
attached before you start operating the appliance.
OPERATING
Before first use
Remove all promotional materials and packing as well as any foreign objects, but do not
remove the model label. Before first use and after a long period of storage, clean the
processing tools in warm soapy water (see ´Care and Cleaning`).
NOTE: When first using the Design Stand Mixer Advanced Pro, you may notice an odour
coming from the motor. This is normal and will dissipate with use.
Attaching the bowl
Place the mixer base on a level, dry surface such as a bench top. The mixer arm should be
in the horizontal (closed) position. Raise the mixer arm by depressing the mixer arm-unlock
button
Fig. A).
Lift the mixer motor arm up until it tilts back and locks into the open position (Fig. B).
Insert the mixing bowl into the bowl locking recess of the mixer stand and turn clockwise until
the bowl locks securely into place (Fig. C).
NOTE: To remove or insert the mixing bowl, the mixer motor arm must be raised and locked
into the open position.
A B C
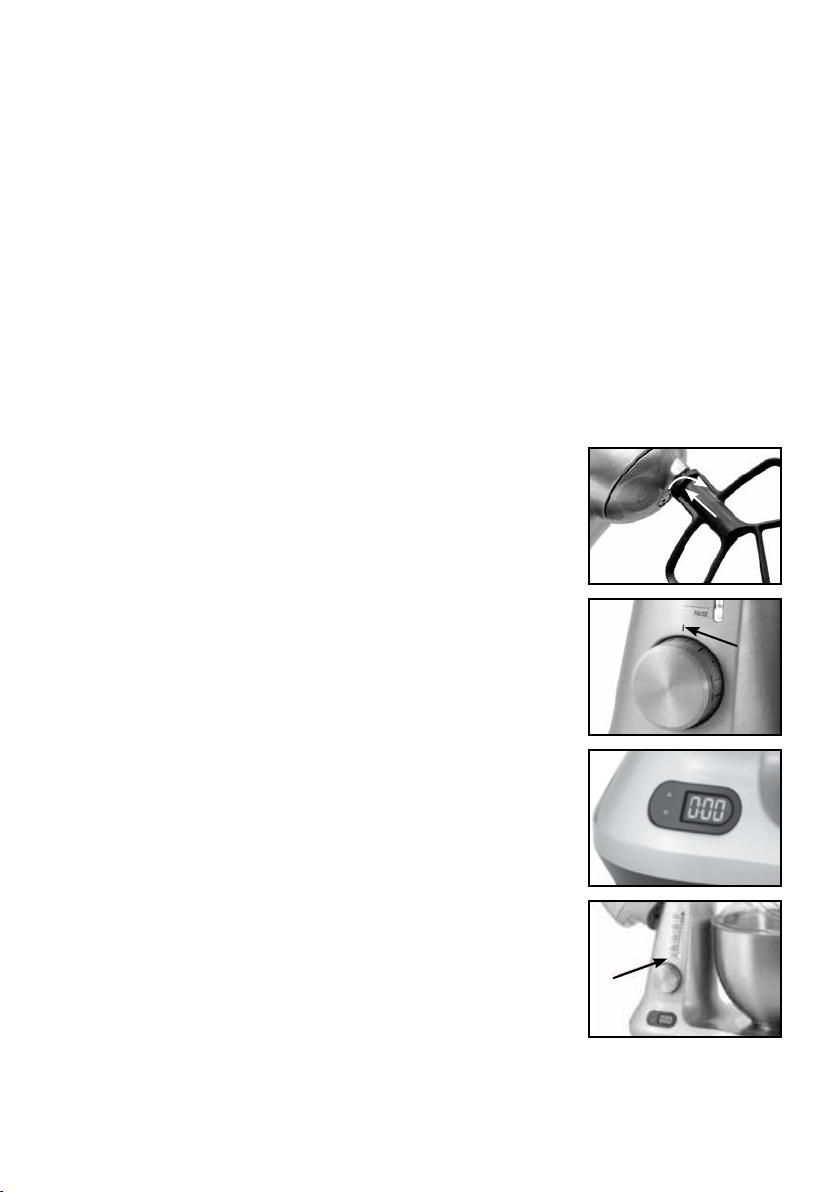
Attaching the mixing tools
Ensure the mixer arm is in the raised/open position. Align the groove in the top of the mixing attachment with the locking pin on the spindle extending down from the mixer arm.
Push the attachment upwards and turn clockwise until it locks
securely onto the locking pin on the spindle.
Lower the mixer arm by depressing the unlock button and gently pushing the mixer arm down until it locks into the horizontal
(closed) position.
34
Page 7
The splash guard can now be assembled if required. Slide the main ring into position on top
of bowl, then assemble the pour spout.
NOTE: When ingredients are in the mixing bowl, the scraper beater may make a slight
noise as it scrapes the sides and bottom of the bowl. This is normal and should not cause
concern. Do not turn the stand mixer on with the scraper beater in place if the mixing bowl is
empty. This will cause the scraper beater to make a loud noise as it scrapes the bowl.
Dissemble the mixing tools
Push the attachment of the processing tool upward until it is released of the indent. Turn the
processing tool anticlockwise until the guiding pin of the motor head fits through the cannelure of the mixing tool. You can release the mixing tool now by pulling it downward. Clean
the appliance after use in accordance to the instructions in chapter ´Care and Cleaning`.
Do not leave any food dry on the surfaces of the appliance.
Planetary mixing action
By replicating a similar mixing action used by commercial mixers
in bakeries and patisseries, The Design Stand Mixer Advanced
Pro head rotates around the bowl whilst rotating the beater in the
opposite direction. This ensures a superior and thorough mixing
result without the need for a rotating bowl.
Ensure the control dial is set to the ‘Off’ position, plug the cord
into a 220-240 V power outlet and switch the power ‘ON’ at the
power outlet. The illuminated LED programme indicator band will
flash and the count up/down timer will display “0:00.” The stand
mixer is now ready to be used.
NOTE: If the stand mixer has not been used for 3 minutes it will
automatically change from ‚Stand by mode‘ to a power saving
‚OFF mode‘ and the illuminated LED will switch off. To exit ‚OFF
mode‘ and begin mixing, turn the dial to the selected speed or
press one of the count up/down timer buttons.
Add ingredients to the mixing bowl as indicated in the recipe.
Always begin mixing by selecting a low speed setting on the
control dial.
This will prevent ingredients splattering. Increase the speed as
suited to the mixing task. The speed setting can be adjusted during
operation by moving the dial clockwise for the main mixing settings.
If necessary, stop the mixer during operation and scrape any food
mixture down the sides of the mixing bowl with a spatula.
NOTE: Always turn the appliance off if you need to scrape the
bowl during use, and then switch back on and continue mixing.
35
Page 8

Adjusting the mixing time
The count-up timer
The count-up timer is especially useful to gauge mixing time. You
can monitor the time it takes to thoroughly mix the ingredients, so
that the next time you mix the same ingredients you can set the
count-down timer for the specific time.
The count-up timer will automatically begin counting up as soon as
the dial is rotated from ‘Off’ to one of the speeds. When the dial is
turned to „Pause“ the total time will be displayed on the LCD and
will flash. When the dial is turned to „OFF“, the LCD display will reset back to „0:00“.
The count-down timer
The count-down timer is especially useful for any recipe that specifies the length of time
ingredients should be mixed. For example, if a recipe reads, “beat for 3 minutes”, you can
set the count-down timer to 3 minutes by pressing the up/down arrows. After 3 minutes of
mixing, an alarm will sound and the motor will automatically turn off. The count-down timer
will flash “OFF”. The control dial must to be rotated to the “OFF” position to reset the timer
and to continue mixing.
To set the count-down timer, press the up or down arrows until the
desired mixing time is displayed on the LCD screen.
NOTE: Press and hold the arrows down to scroll through the timer
setting more quickly.
Rotate the dial clockwise to select the desired speed and to begin
mixing. When the timer has finished counting down, „0:00” will
flash on the LCD screen and a beep will sound to notify you that the time has expired. The
stand mixer will automatically turn the motor off. The control dial must be rotated to the ‚OFF‘
position to reset the timer and to continue mixing.
NOTE: The maximum time displayed on the timer is „9:59“. The stand mixer will automatically switch Off at 9 minutes 59 seconds. The control dial needs to be rotated to the “Off”
position to reset the timer and to continue mixing.
Pause mode
While mixing, at any stage, you can rotate the control dial to the “pause” setting. This
will turn the motor off and “pause” the timer. This enables you to assess the mixing progress
or add additional ingredients without effecting the timer.
For example, if you are mixing using the ‘count-up timer’ mode, you can rotate the control
dial from one of the mixing speeds to “pause”. The mixer motor will stop and the timer will
“pause”. Once ready, you can rotate the dial back to one of the mixing speeds, the timer
will continue to coun tup from the exact time it was paused. Alternatively, if you have turned
the mixer to “pause” you can then reset the timer to 0:00 by rotating the dial to “OFF”
position.
If using the “pause” function in ‘countdown timer’ mode, you can suspend the timer at any
stage during the count-down process by rotating the control dial to the “pause” setting.
36
Page 9

To continue mixing in the ‘count-down timer’ mode, simply rotate the dial back into one of
the mixing speeds or alternatively to the “Off” position to reset the timer to 0:00.
Electronic protection cut-off – Current overload
The stand mixer is equipped with an electric protection cutoff and
will automatically stop operating if the motor is stalled or overloaded. This is normally a result of excessive ingredients being
processed at one time. Should the mixer go into this mode, the LED
programme indicator band will flash and the error message “E1”
will flash on the LCD screen and the buzzer will “beep” 3 times.
If this error occurs, turn the control dial to the ‘OFF” position,
switch the appliance off at the power outlet and unplug the cord. Remove some of the ingredients in the mixing bowl and then restart the mixer.
Thermo cut-off – Temperature overload
The stand mixer is equipped with a self-resetting safety device
which safeguards against overheating the motor with excessive
loads. If overheating occurs, the stand mixer will automatically
activate the overheating protection device and the motor will
switch itself off. Should the stand mixer go into this mode, the LED
programme indicator band will flash and the error message “E2”
will flash on the LCD screen and the buzzer will “beep” 3 times.
If this error occurs, turn the speed control dial to the ‘Off’ position, switch the appliance
off at the power outlet and unplug the cord. Wait at least 15 minutes before restarting the
mixer.
Disassembling the stand mixer
1. When mixing is complete, turn the speed control dial to the ‘Off/Stand by’ position,
switch the appliance off at the power outlet and unplug the cord.
2. Remove splash guard if assembled. Separate pour spout then slide main ring out of position.
3. Raise the mixing arm by depressing the tilt back button and lift the mixing arm up until it
tilts back and locks into the open position.
4. Remove the beater/dough hook/whisk attachment by holding the mixing arm and pressing the attachment upwards on the spindle. Turn the attachment anticlockwise to release it
from the pin on the spindle.
5. Use a soft plastic spatula to remove mixture from the beater, dough hook or whisk attachment.
NOTE: When lowering or lifting the mixer, always support the motor head with your other
hand to prevent from free-falling.
6. Remove the mixing bowl from the indented bowl locking recess of the mixer base and turn
anti-clockwise until the bowl releases. Use a soft plastic spatula to remove mixture from the
mixing bowl.
37
Page 10

7. Lower the mixing arm by depressing the tilt back hinge button and pushing the mixing
arm down until it locks into the horizontal (closed) position.
WARNING: Avoid contact with beater/dough hook/whisk during operation. Keep hands,
hair, clothing, spatulas and other utensils away from beater/dough hook/whisk to prevent
personal injury or damage to the mixer.
CLEANING AFTER USE
1. Always ensure the control dial is in the ‘OFF’ position, the stand mixer is switched off at
the power outlet and the power cord is unplugged.
2. Remove the beater, dough hook or whisk attachment and mixing bowl from the stand
mixer. Follow instructions in the ‘Assembly and operation’ section of this booklet.
3. Wipe the mixing arm and mixer stand with a soft, damp cloth then dry thoroughly.Wipe
any excess food particles from the power cord. Wash the bowl, beater, dough hook, and
whisk in warm soapy water with a soft cloth or they can be washed in the dishwasher. Rinse
and dry thoroughly.
NOTE: Do not use abrasive scouring pads or cleaners when cleaning the mixing bowl, flat
beater, dough hook or whisk as these may scratch the surface. Also ensure that the attachments are not soaked in water for extended periods of time, for example several hours or
overnight, as this may damage the finish.
NOTE: Do not wash or immerse the mixing arm and mixer base in water or any other
liquid. Clean with a soft, damp cloth and dry thoroughly. Do not allow water or any liquid to
enter the gear system as damage may result.
Scraper beater
1. Wash the scraper beater in warm, soapy water using a soft cloth or a soft bristled brush.
Rinse and dry thoroughly.
2. The scraper beater can also be washed in the dishwasher (top shelf only).
3. A small bottle brush can be used to clean inside the neck of the scraper beater if needed.
STORAGE
The Design Stand Mixer Advanced Pro should be kept in a convenient position on your
kitchen bench top or in an accessible cupboard.
Always ensure the control dial is in the ‘OFF’ position, the mixer is switched off at the power
point and the power cord is unplugged.
Store the mixing bowl in the bowl locking recess in the mixer base.
Place the attachments inside the mixing bowl and lower the mixing arm into the horizontal
(closed) position.
The mixing arm cannot be taken off the base for any purpose.
38
Page 11

TIPS FOR USING
Using the mixing tools
The appliance will supplied with 4 mixing tools:
Dough hook:
for heavy dough e.g. bread- or pizza dough.
Whisk:
for whipping (e.g. eggs, cream) and aerating (e.g. egg whites, meringue).
Flat beater:
for folding and beating (e.g. cake and biscuit mix, haevy butter, pastry) and
for creaming (e.g. butter and sugar, icing).
Scraper beater:
for making fluffy, light dough, to froth up eggs, making
whipped cream, egg white, sponge, other airy dough.
The Scraper beater can also be used as a spatula when
removing cake, biscuits or other mixtures form the mixing bowl.
NOTE: Do not use the scraper beater for mixing heavy dough (bread, pizza etc.) or whisking egg whites.
Be sure the whisk and bowl are completely clean and dry before use – a small amount of fat
or egg yolk will affect whipping performance.
When adding flour to the mixing bowl, always use splash guard and ensure the mixer is on
the folding/kneading setting. This will prevent flour from escaping the bowl.
Use the beater for all mixing tasks. Use the whisk for all whipping or aeration tasks. Use
dough hook only for kneading bread dough.
WARNING: Always lower the mixing arm with the assembled mixing tool before you
turn the appliance ´On`. Ensure no foreign utensils such as a spatula, spoon, etc. are inside
the bowl when turning the appliance ´On`.
You change and choose a speed by turning the control dial. Always start the operation on
the lowest speed level. Slowly arise the control dial until reaching the desired speed. This
way you avoid splatter.
ATTENTION: Never process heavy dough with the whisk. The whisk can bend and will
damage.
39
Page 12

Using the programmes
programme- / speed levels Example for using
OFF Assembling and disassembling the mixing tools.
PAUSE While mixing, at any stage, you can rotate the
control dial to the “pause” setting (see:´Pause
modus`).
KNEADING Starting a mixing process, mixing dry ingredients
or to fold liquids into dry dough.
Slow mixing, making yeast dough or other heavy
dough, processing potatoes and other vegetables,
to fold butter into dough and for mixing liquid
dough (e.g. crêpe dough).
LIGHT MIXING Making medium pastry, cookie dough, cake mixes,
or to fold sugar into egg white or sponge mixture.
CREAMING BEATING For whisking and beating dough.
LUFTIG SCHLAGEN / AERATING
WHIPPING
For making fluffy, light dough, to froth up eggs,
making whipped cream, egg white, sponge or
other airy dough.
More tips:
• Attend to add dry and liquid ingredients by turns.
• Choose a slow speed when mixing liquid food to avoid splashes. Wait for the dough to
set before arising the speed. Choose the slowest speed when you start mixing and arise
speed slowly up to the desired speed setting.
• When adding ingredients do not pour them directly onto the processing tool. Add them
on the side of the bowl. The provided splash guard eases the sideways adding.
• Add liquid ingredients slowly otherwise the liquid will gather in the middle of the bowl
and even mixing is getting more difficult.
• Process cake mixtures with the medium speed levels and arise to the faster levels. Refer to
the instructions of the recipe for best mixing results.
• Use the beater for adding heavy ingredients such as nuts, raisins, chocolatepieces or dried
fruit and choose a slow speed level. The added ingredients wont get squashed this way but
get carefully folded into the dough. For adding heavy ingredients the dough should be heavy
otherwise the ingredients will settle on the base of the cake pan. Flour sticky fruit before
adding them to the dough.
• For yeast dough and other heavy dough use dough hook only and a slow speed. Overheating and overloading will damage the appliance.
• For best results warm up the bowl before making yeast dough. Therefore rinse the bowl
with hot water. For the case that the dough sticks to the dough hook keep on processing
the dough until smooth and even.
40
Page 13

• WARNING: Do not process hot food. Wait for the food to cool down. The rising steam
and condensation on the appliance can damage the appliance.
• Use the whisk for beating the white of eggs and ensure the bowl is dry and clean. Slowly
arise the speed up to programme ´LIGHT MIXING` and check the consistency of the eggs.
The white of egg is ready when it is stiff and shiny and when it sticks to the whisk taking the
whisk out of the bowl. Do not beat the white of eggs too long otherwise the froth will irreversible separate from liquid.
• Chill the bowl when making whipped cream and only use chilled whipped cream. Slowly
arise the speed up to programme ´AERATING / WHIPPING`and check the consistency of
the whipped cream. The whipped cream is stiff when it sticks to the whisk taking the whisk
out of the bowl. Do not overprocess the whipped cream.
NOTES FOR DISPOSAL
Dispose of the appliance and packaging must be effected in accordance with the
corresponding local regulations and requirements for electrical appliances and packaging. Please contact your local disposal company.
Do not dispose of electrical appliances as unsorted municipal waste, use separate collection
facilities. Contact your local government for information regarding the collection systems
available. If electrical appliances are disposed of in landfills or dumps, hazardous substances can leak into the groundwater and get into the food chain, damaging your health and
well-being.When replacing old appliances with new once, the retailer is legally obligated to
take back your old appliance for disposal at least for free of charge.
INFORMATION AND SERVICE
Please check www.gastroback.de for further information. For technical support, please
contact Gastroback Customer Care Center by phone: +49 (0)4165/22 25-0 or e-mail:
info@gastroback.de.
WARRANTY
We guarantee that all our products are free of defects at the time of purchase. Any demonstrable manufacturing or material defects will be to the exclusion of any further claim and
within warranty limits of the law free of charge repaired or substituted. There is no warranty
41
Page 14

claim of the purchaser if the damage or defect of the appliance is caused by inappropriate
treatment, over loading or installation mistakes. The warranty claim expires if there is any
technical interference of a third party without an written agreement.
The purchaser has to present the sales slip in assertion-of-claim and has to bear all charges
of costs and risk of the transport.
TECHNICAL SPECIFICATIONS
Model: Art.-No.: 40979 Design Stand Mixer Advanced Pro
Power supply: 230-240 V AC, 50 Hz
Power consumption: 1.000 W
Length of power cord: ca. 1 m
Weight: 8 kg
Dimensions: ca. 41,5 x 20,0 x 35,5 cm (width x depth x height)
Capacity bowl: 4,7 Litre
Certification:
TROUBLESHOOTING
Problem Easy solution
Machine will not work when
switched “ON”
Cannot set the time on the
count-down timer.
Mixer suddenly switches off
during mixing.
Always ensure the speed control dial is in the “Off” position before start.
The “thermo cut-off – Temperature Overload” protection
device has not been activated automatically, allow more
time for the motor to cool down.
Always ensure the speed control dial is in the “Off” position before trying to set the count-down time.
The stand mixer has been stressed by overloading or
stalling. The stand mixer will automatically activate the
overload protection button and the unit will switch itself
off. When this happens it is recommended that the unit is
switched off at the power outlet and unplugged. The safety devices will the be reset and the Design Stand Mixer
Advanced Pro is ready to use again.
42
Page 15

´E1` error message is flashing
on the count-up/down timer
display
´E2` error message is flashing
on the count-up/down timer
display.
Noise is heard when scraper
beater is mixing
The stand mixer will automatically stop operating if the
motor is stalled. If this occurs, the ´E1` error message
will flash on the count-up/down timer display. This is an
electronic safety feature. This is normally a result of too
much ingredients being processed at one time. Try removing some of the ingredients from the bowl. To continue
mixing, turn the speed control dial to the off position and
unplug the stand mixer from the power outlet. Then plug
the stand mixer into the power outlet and use as normal.
This may indicate that the motor has been stressed by
overheating with excessive load. The mixer is fitted with a
selfresetting safety device which safeguards against overheating on the motor with excessive loads. If overheating
occurs, the mixer will automatically activate the overheating protection device and the motor will switch itself
off. When the overheating protection is activated, unplug
the mixer from the power outlet for at least 15 minutes to
allow the unit to cool. Turn the speed control dial to the
“Off” position then plug the mixer into the power outlet
and use as normal.
When ingredients are in the mixing bowl, the scraper
beater may make a slight noise as it scrapes the sides
and bottom of the bowl. This is normal and should not
cause concern. Do not turn the mixer on with the scraper
beater in place if the mixing bowl is empty. This will
cause the scraper beater to make a loud noise as it scrapes the bowl.
43
Page 16

RECIPES
NOTE: Always start the operation on the lowest speed level. Slowly arise the control dial
until reaching the desired speed. (see: „More tips“)
Butter Biscuits (Makes 40)
125g butter, softened
¾ cup caster sugar
1 teaspoon vanilla essence
1 x 60g egg
2 cups (300g) plain flour
1 teaspoon baking powder
1. Operate according to the instructions ´Operating`.
2. Pre-heat oven to 180ºC.
3. Assemble mixer using scraper beater.
4. Using ´BEATING / CREAMING` setting, cream butter and sugar until light and creamy,
about 3 minutes.
5. Add vanilla essence and egg, mix until light and fluffy, about 30 to 40 seconds.
6. Sift flour and baking powder together.
7. Using ´KNEADING` setting, gradually add sifted ingredients into the creamed mixture,
mix until just combined, about 30 to 40 seconds. Do not over mix.
8. Roll heaped teaspoons of biscuit mixture into balls and place evenly onto lightly greased
baking trays. Allow space for spreading. Flatten balls slightly with a lightly floured fork.
9. Bake for 12-15 minutes or until cooked and pale golden.
10. Remove biscuits from tray and cool on a wire rack.
Variations:
Chocolate Biscuits
1 quantity Butter Biscuit mixture
2 tablespoons cocoa
Step 5: Sift flour, baking powder and cocoa together.
Orange Biscuits
1 quantity Butter Biscuit mixture
1 tablespoon finely grated orange rind
Step 3: (Omit vanilla essence) add sugar, orange rind and egg, cream until light and fluffy.
Lemon Biscuits
1 quantity Butter Biscuit mixture
3 teaspoons finely grated lemon rind
Step 3: (Omit vanilla essence) add sugar, lemon rind and egg, cream until light and fluffy.
44
Page 17

Double Choc Chip Cookies (Makes 50)
180g butter, chopped
150g dark chocolate, chopped
1½ cups (225g) plain flour
¾ cup/300g cocoa
1½ cups brown sugar
3 x 60g eggs, lightly beaten
1½ cups dark choc bits
1. Operate according to the instructions ´Operating`.
2. Pre-heat oven to 170ºC.
1. Melt butter and dark chocolate in a small saucepan over a low heat, stirring constantly
until smooth. Allow to cool slightly, mixture should still be warm.
2. Assemble mixer using scraper beater.
3. Using ´KNEADING` setting, mix plain flour, cocoa and brown sugar until
combined, about 30 to 40 seconds.
4. Using ´KNEADING` setting, gradually add the butter mixture and eggs, mix until well
combined, about 1 minute.
5. Add choc bits and mix until just combined.
6. Spoon tablespoons of mixture onto lightly greased and baking paper lined baking trays.
Allow 3cm spaces for spreading.
7. Bake for 15-20 minutes or until firm on top.
8. Cool biscuits on trays for 5 minutes before transferring to wire rack.
Variations:
• Replace ½ cup dark choc bits with ½ cup white choc bits.
• Replace ½ cup dark choc bits with ½ cup chopped macadamia nuts.
• Make chunky double choc chip cookies by baking 2 tablespoons of mixture instead of
1 tablespoon.
Gingerbread Biscuits (Makes 20)
125g butter, softened
1/3 cup brown sugar
1/3 cup golden syrup
1 x 60g egg, lightly beaten
2¼ cups (340g) plain flour
1 tablespoon ground ginger
1 teaspoon baking powder
1 teaspoon bicarbonate of soda
extra flour, for kneading
1. Operate according to the instructions ´Operating`.
2. Pre-heat oven to 180ºC.
3. Assemble mixer using scraper beater.
4. Using Creaming/Beating setting, beat butter, sugar and syrup until light and creamy,
about 3 minutes.
5. Add egg and mix until well combined, about 30 to 40 seconds.
6. Sift flour, ginger, baking powder and soda together.
7. Using ´KNEADING` setting, mix in sifted ingredients until just combined, about 30 to 40
seconds. Do not over mix.
45
Page 18

8. Turn mixture out onto lightly floured board and knead lightly to form a smooth round ball.
9. Roll out dough to 5mm thickness. Cover and refrigerate dough on the board for
20-30 minutes or until firm enough to cut.
10. Cut into rounds using a sharp 4cm round biscuit cutter or use traditional gingerbread
shaped cutters.
11. Place gingerbread shapes onto lightly greased baking trays. Allow 3cm spaces
for spreading.
12. Bake for 10-12 minutes or until cooked and lightly browned. Decorate Gingerbread
biscuit shapes with white vanilla icing and coloured variations and silver cachous if
desired.
Speedy Processor Pizza Dough
2 cups (approx. 240g) all-purpose flour
1 package (7g) active dry yeast
1 tablespoon sugar
3/4 teaspoon salt
1 tablespoon vegetable oil
3/4 cup (180ml) hot tap water
1. Operate according to the instructions ´Operating`.
2. Assemble the dough hook (see: ´Attaching the mixing tools`).
3. Add flour, yeast, sugar and salt to bowl, lower the mixing arm, attach the splash guard
to the bowl and process shortly on low speed to blend.
4. Using ´CREAMING` setting for 5 seconds.
5. Add vegetable oil to hot water.
6. With motor running on low speed ´KNEADING`, slowly add water/oil mixture sideways
(should take about 30 seconds).
7. Continue processing to knead dough for 1/2 to 1 minute.
8. Stop the appliance, and test dough for stickiness. If dough is still sticky, process to knead
for another 15 to 30 seconds.
9. Let dough rest 10 minutes.
10. Remove splash guard, rise the mixing arm and take the dough out of the bowl.
11. On floured board, fold dough over 3 or 4 times to knead slightly. For 1 large pizza
baked in a 38 x 25 x 2 cm backing pan, roll dough out to about that size, and transfer
to greased pan. Gently push dough out to cover pan and form crust edge up sides
of pan. For 2 thin crust pizzas (about 30 cm diameter), divide dough in half.
12. Roll dough out to form a circle, and transfer to greased pizza pans. Shape crust partially
up sides of pan to form crust edge. (Dough will be thin, and be sure to push dough toge
ther if any holes or rips occur.)
13. Cover crust with pizza sauce, vegetables and cheeses as desired.
14. Bake at 220°C for 18 to 20 minutes for large, single pizza, or about 12 to 15 minutes
for thinner, round pizzas. (Makes: 1 large, or 2 smaller pizza crusts.)
Basic White Bread (Makes 1 loaf)
3,5 cups (approx. 420g) all-purpose flour
3 tablespoons soft butter, divided in 4 pieces
2 tablespoons sugar
1 teaspoon salt
1 package (7g) active dry yeast
46
Page 19

1/4 cup (approx. 60ml) warm water
2/3 cup (approx. 160ml) warm water
1. Operate according to the instructions ´Operating`.
2. Assemble the dough hook.
3. Add flour, butter, sugar and salt to bowl, lower the mixing arm, attach the splash guard
to the bowl.
4. Using ´KNEADING` setting and stir the ingredients for 5 seconds.
5. In measuring cup, add yeast to 1/4 cup (60 ml) water. Stir to mix, and allow to
dissolve, about 10 minutes.
6. With motor running on low speed, slowly add yeast mixture and water sideways
(should take about 30 seconds).
7. Continue processing to knead dough for 45 seconds.
8. Stop the appliance, remove splash guard, rise the mixing arm and scrape dough from
sides of the bowl.
9. Lower the mixing arm, replace the splash guard and process to knead for another
minute.
10. Turn off the appliance, remove the splash guard, rise the mixing arm, take the dough
out, shape into ball and place in a greased mixing bowl.
11. Cover; let rise in warm place until doubled in size, about 1 to 1-1/2 hours.
12. Turn the dough once and let rest for another 15 minutes.
13. Shape to fit 23 x 23 x 8 cm greased bread pan.
14. Cover and let rise again in warm place until dough has risen about 1-inch over sides of
pan, about 1 hour.
15. Bake in preheated 190°C oven about 35 to 40 minutes, or until golden brown.
16. Take out of pan immediately.
One Crust Standard Pie Crust (Makes 1 (23 cm) pie crust)
1 cup (approx. 120g) all-purpose flour
1/2 teaspoon salt
1/4 cup (approx. 55g) Palmin Soft
1 tablespoon butter or margarine, well chilled
3 tablespoons cold water
1. Operate according to the instructions ´Operating`.
2. Assemble the dough hook.
3. Add flour, salt, Palmin Soft, and butter to bowl, lower the mixing arm .
4. Attach the splash guard to the bowl and process shortly on low speed (Programme:
´KNEADING`) until particles resemble coarse crumbs, about 15 seconds.
5. Add water all at once sideways with motor running.
6. Process until dough forms a ball, or no more than 20 seconds. If dough does not form a
ball, stop the appliance. Remove splash guard, rise the mixing arm and take out
the dough. Gently shape dough into a ball with hands.
7. Roll out for pie, or as directed in recipe.
8. If crust is to be baked before filling, prick gene rously with fork.
9. Bake in preheated oven at 230°C until golden brown, about 9-10 minutes.
47
Page 20

Baked Lemon Cheesecake
250g plain biscuit crumbs
2 teaspoons nutmeg
125g butter, melted
250ml thickened cream
3 eggs
½ cup caster sugar
2 teaspoon grated lemon rind
2 tablespoons lemon juice
500g cream cheese, room temperature, cubed
1. Operate according to the instructions ´Operating`.
2. Assemble the dough hook.
3. Add biscuit crumbs, nutmeg and melted butter.
4. Process on slow speed (´KNEADING`) until combined. Scrape sides if necessary.
5. Turn the appliance off, remove the splash guard, rise the mixing arm and take out the
dough. Press crumb mixture into the base and sides of a greased 20cm spring form pan.
Place on a baking tray and refrigerate for 30 minutes.
6. Disassemble the dough hook and assemble the whisk.
7. Lower the mixing arm, attach the splash guard, add eggs and sugar to bowl and beat
until creamy.
8. Slowly rise speed until reaching medium speed level (´CREAMING BEATING`).
9. Add thickened cream, lemon juice, lemon rind, and cream cheese by turns sideways
and mix until creamy.
10. Turn off the appliance, remove splash guard, rise the mixing arm and pour mixture into
crust and bake in oven at 160° for approximately 50 minutes or until firm.
11. Cool in oven with door ajar.
12. Refrigerate for several hours before serving.
Chocolate Cake
1½ cups self-raising flour
½ cup cocoa
1½ cups caster sugar
pinch of salt
150g butter or margarine, at room temperature
2 eggs
1 cup milk
1. Operate according to the instructions ´Operating`.
2. Preheat oven to 180 °C, grease and line a 23cm cake tin. Assemble the whisk.
3. Add eggs, butter and sugar to bowl, lower the mixing arm.
4. Attach the splash guard to the bowl and process until creamy.
5. Slowly rise speed until reaching medium speed level (´CREAMING BEATING`).
6. Add flour, cocoa and salt by turns sideways. Mix until combined.
7. With motor running on low speed, slowly add milk and mix for 5-10 seconds.
8. Turn the appliance off, remove the splash guard, rise the mixing arm and scrape sides of
the bowl.
9. Lower the mixing arm, attach the splash guard and beat until smooth.
10. Turn off the appliance, remove splash guard, rise the mixing arm and pour mixture into
prepared cake tin.
48
Page 21

11. Bake in oven for approximately 34-40 minutes or until firm.
12. Allow the cake to cool for 5 minutes then remove from baking pan. In the meantime pre
pare the chocolate icing.
13. Once the cake is completely cooled, ice with the chocolate icing.
Chocolate Icing
40g butter
2 tablespoons cocoa
¼ cup milk
2 cups icing sugar
1. Operate according to the instructions ´Operating`.
2. Add all ingredients to bowl.
3. Assemble the scraper beater, lower the mixing arm.
4. Slowly rise speed until reaching medium speed level (´CREAMING BEATING`).
5. Attach the splash guard to the bowl and beat until well combined.
6. Spread over cooled cake.
Chocolate Mousse
200g plain cooking chocolate
30g butter, cubed, at room temperature
4 eggs
40g sugar
1 tablespoon fresh cream
1. Break chocolate into pieces and place in a bowl.
2. Melt the chocolate by placing the bowl over a saucepan of simmering water.
3. Add 2 tablespoons of water and the cubed butter to the chocolate and stir to obtain a
smooth texture.
4. Operate according to the instructions ´Operating`.
5. Assemble the whisk. Add 2 egg yolks and half the quantity of sugar, lower the mixing arm.
6. Attach the splash guard to the bowl and beat for 30 seconds until creamy.
7. Slowly rise speed until reaching ´AERATING / WHIPPING`.
8. Lower speed and add turn by turn sideways cream and continue to mix for a further 15
seconds slowly rising the speed.
9. Lower speed and slowly add chocolate mixture. Slowly rise speed and mix for
20 seconds.
10. Turn off the appliance, remove splash guard, rise the mixing arm and carefully pour the
mixture into a glass bowl.
11. Clean the bowl and whisk. Assemble the whisk.
12. Add the egg whites to bowl.
13. Lower the mixing arm, attach the splash guard to the bowl and mix until soft and peaks
form. Slowly rise speed until reaching ´AERATING / WHIPPING`.
14. Add a pinch of salt and the remaining quantity of sugar sideways and continue to mix
49
Page 22

for a further 10 seconds.
14. Turn off the appliance, remove splash guard, rise the mixing arm disassemble whisk and
assemble beater.
15. Add chocolate mixture to egg whites, lower the mixing arm, attach splash guard and
slowly fold mixture (as little as possible).
16. Turn off the appliance, remove splash guard, rise the mixing arm and pour mixture into
serving bowls and place in the fridge to chill for at least 2 hours before serving.
Crepes (Serves 4-6)
3 eggs
60g butter, melted
1¼ cups milk
250g plain flour
2 tablespoons castor sugar
pinch salt
1. Operate according to the instructions ´Operating`.
2. Assemble the whisk.
3. Add eggs and sugar to bowl.
4. Lower mixing arm, attach splash guard and mix until creamy.
5. Slowly rise speed until reaching high speed ´AERATING / WHIPPING`.
6. Lower speed and add sideways the remaining ingredients. Mix until well combined
slowly rising the speed.
7. Turn off the appliance, remove splash guard, rise the mixing arm and pour mixture into
a jug and stand for 15 minutes.
8. Heat an electric skillet or crepe pan. Pour about 3 tablespoons of batter into the pan.
9. Tilt the pan to spread the mixture evenly. Cook over a low heat on both sides until golden.
10. Repeat with remaining mixture. Serve crepes with lemon juice and sugar.
Basic Waffle recipe (Makes 1-2 waffles)
1 egg
4 tablespoons unsalted butter, melted and cooled
1 heaped tablespoon sugar
1 small pinch salt
100ml milk (round about)
6 heaped tablespoon flour
1. Operate according to the instructions ´Operating`.
2. Assemble the whisk.
3. Add melted butter and egg, sugar and salt to bowl
4. Lower mixing arm, attach splash guard and mix until creamy.
5. Slowly rise speed until reaching high speed ´AERATING / WHIPPING`.
6. Lower speed and add flour sideways. Mix until combined.
7. Add as much milk as it needs to make the batter easy to pour.
8. Turn off the appliance, remove splash guard, rise the mimxing arm and prepare
your waffles according to the instructions of your wafflemaker.
Tip: Flavour and spice the batter ad libitum using i.e. gingerbread spices, vanilla flavour,
chocolate flavour or cinnamon.
50
Page 23

Classic belgian waffles (Makes 10 waffles)
Classic Belgian waffles have a crispy outside and are soft and moist on the inside.
They are often served as part of a celebration – even to celebrate something as simple as a
beautiful day. Try these waffles with your favourite syrup or a topping such as sliced fresh
strawberries and freshly whipped cream.
355ml water
21/4 teaspoons active dry yeast (one packet)
3 cups (approx. 360g) sifted flour
1/4 teaspoon salt
3 large eggs, separated + 1 egg white
1/3 cup (approx. 75g) sugar
236ml milk
8 tablespoons unsalted butter, melted and cooled
2 teaspoons vegetable oil
2 teaspoons vanilla extract
1. Heat 1/2 of the water to lukewarm.
NOTE: Do not use water that is too hot because the yeast wont rise. In a separate bowl
dissolve the yeast in the water with a pinch of the sugar from the recipe; let stand 5 to
10 minutes, until the mixture begins to foam.
2. Operate according to the instructions ´Operating`.
3. Rinse the bowl with warm water before usage.
4. Assemble the whisk. Add egg yolks, egg white and sugar to bowl.
5. Lower mixing arm, attach splash guard and mix on slow speed ´KNEADING` until just
combined.
6. Add remaining water, milk, oil and vanilla by turns sideways and mix until the mixture is
smooth.
7. Turn off the appliance, remove splash guard, rise the mixing arm disassemble whisk
and assemble beater. Lower the mixing arm, attach the splash guard and add
flour sideways.
8. Beat until smooth. In separate bowl beat the egg whites until stiff peaks form.
9. Turn off the appliance, remove splash guard, rise the mixing arm, add egg whites to mixture.
10. Lower the mixing arm, attach the splash guard and slowly fold the egg whites into the
batter. Let the batter stand for 1 hour, stirring every 15 minutes.
11. Turn off the appliance, remove splash guard, rise the mixing arm and prepare your
waffles according to the instructions of your wafflemaker. Serve with whipped cream,
fruit, jam, powdered sugar or a warm fruit syrup.
51
Page 24

GASTROBACK GmbH
Gewerbestraße 20 . D-21279 Hollenstedt / Germany
Telefon +49 (0)41 65/22 25-0 . Telefax +49 (0)41 65/22 25-29
info@gastroback.de . www.gastroback.de
20140409
 Loading...