

Garmin Zumo XT Motor Europa User manual
ZŪMO® XT
Owner’s Manual

© 2020 Garmin Ltd. or its subsidiaries
All rights reserved. Under the copyright laws, this manual may not be copied, in whole or in part, without the written consent of Garmin. Garmin reserves the right to change or improve its
products and to make changes in the content of this manual without obligation to notify any person or organization of such changes or improvements. Go to www.garmin.com for current updates
and supplemental information concerning the use of this product.
Garmin®, the Garmin logo, zūmo®, inReach®, and TracBack® are trademarks of Garmin Ltd. or its subsidiaries, registered in the USA and other countries. BaseCamp™, Garmin Adventurous
Routing™, Garmin Drive™, Garmin Explore™, Garmin Express™, and myTrends™ are trademarks of Garmin Ltd. or its subsidiaries. These trademarks may not be used without the express
permission of Garmin.
Android™ is a trademark of Google Inc. Apple® and Mac® are trademarks of Apple Inc., registered in the U.S. and other countries. The BLUETOOTH® word mark and logos are owned by the
Bluetooth SIG, Inc., and any use of such name by Garmin is under license. Foursquare® is a trademark of Foursquare Labs, Inc. in the U.S. and in other countries. HISTORY® and the H logo are
trademarks of A+E Networks and are protected in the United States and other countries around the globe. All Rights Reserved. Used with Permission. microSD® and the microSD logo are
trademarks of SD-3C, LLC. TripAdvisor® is a registered trademark of TripAdvisor LLC. Windows® is a registered trademark of Microsoft Corporation in the United States and other countries.
Wi‑Fi® is a registered trademark of Wi-Fi Alliance. Other trademarks and trade names are those of their respective owners.

Table of Contents
Getting Started............................................................... 1
Device Overview......................................................................... 1
Turning the Device On or Off...................................................... 1
Acquiring GPS Signals............................................................... 1
Status Bar Icons......................................................................... 1
Using the On-Screen Buttons..................................................... 1
Adjusting the Volume.................................................................. 1
Using the Audio Mixer............................................................ 1
Adjusting the Screen Brightness................................................ 1
Transportation Modes................................................................. 1
Choosing a Transportation Mode.......................................... 2
Using the Large Button Keyboard.............................................. 2
Installation...................................................................... 2
Mounting Your Device in a Motorcycle....................................... 2
Powered Motorcycle Mount................................................... 2
Installing the Handlebar Base................................................ 2
Attaching the Power Cables to the Motorcycle Mount........... 2
Attaching the Base Plate to the Motorcycle Mount................ 3
Attaching the Base Plate to the Handlebar Base................... 3
Installing Your Device in the Motorcycle Mount..................... 3
Removing Your Device from the Motorcycle Mount................... 3
Mounting Your Device in an Automobile.................................... 3
Rider Awareness Features and Alerts.......................... 3
Enabling or Disabling Rider Alerts.............................................. 4
Red Light and Speed Cameras.................................................. 4
Incident Detection and Notifications........................................... 4
Setting Up an Incident Contact.............................................. 4
Cancelling an Incident Notification......................................... 4
Disabling Incident Notifications.............................................. 4
inReach Remote......................................................................... 4
Connecting an inReach Device............................................. 4
Sending an inReach Message............................................... 4
SOS....................................................................................... 5
Viewing Helmet Law Notifications...............................................5
Searching for Helmet Laws.........................................................5
Navigating to Your Destination..................................... 5
Routes........................................................................................ 5
Starting a Route.......................................................................... 5
Taking a Route Using Garmin Adventurous Routing™......... 5
Changing the Route Calculation Mode.................................. 5
Starting a Route by Using the Map........................................ 6
Going Home........................................................................... 6
Your Route on the Map...............................................................6
Active Lane Guidance............................................................ 6
Viewing Turns and Directions................................................ 6
Viewing the Entire Route on the Map.................................... 6
Arriving at Your Destination........................................................ 6
Parking Near Your Destination.............................................. 6
Changing Your Active Route...................................................... 6
Adding a Location to Your Route........................................... 6
Shaping Your Route...............................................................7
Taking a Detour..................................................................... 7
Stopping the Route..................................................................... 7
Avoiding Delays, Tolls, and Areas.............................................. 7
Avoiding Traffic Delays on Your Route.................................. 7
Avoiding Toll Roads............................................................... 7
Avoiding Toll Stickers.............................................................7
Avoiding Road Features........................................................ 7
Custom Avoidances............................................................... 7
Navigating Off Road................................................................... 8
Fuel Tracking.............................................................................. 8
Enabling Fuel Tracking.......................................................... 8
Setting a Low Fuel Warning................................................... 8
Resetting the Fuel Tank Mileage
Enabling Dynamic Fuel Stops................................................ 8
........................................... 8
Finding and Saving Locations...................................... 8
Finding a Location Using the Search Bar................................... 8
Points of Interest......................................................................... 9
Finding a Location by Category.................................................. 9
Navigating to Points of Interest Within a Venue.................... 9
Viewing Your Garmin Explore™ Points of Interest..................... 9
Synchronizing Garmin Explore Account Data........................ 9
Location Search Results............................................................. 9
Location Search Results on the Map..................................... 9
Changing the Search Area......................................................... 9
Parking........................................................................................9
Finding Parking Near Your Current Location....................... 10
Finding Parking Near a Specified Location.......................... 10
Understanding Parking Colors and Symbols....................... 10
Search Tools.............................................................................10
Finding an Address.............................................................. 10
Finding an Intersection.........................................................10
Finding a Location Using Coordinates................................. 10
Finding HISTORY® Points of Interest...................................... 10
Foursquare............................................................................... 10
Connecting to Your Foursquare Account............................. 10
Searching Foursquare Points of Interest............................. 10
Viewing Foursquare Location Details.................................. 10
Checking in with Foursquare............................................... 10
TripAdvisor®............................................................................. 10
Finding TripAdvisor Points of Interest.................................. 11
Viewing Recently Found Locations.......................................... 11
Clearing the List of Recently Found Locations.................... 11
Viewing Current Location Information...................................... 11
Finding Emergency Services and Fuel................................ 11
Getting Directions to Your Current Location........................ 11
Adding a Shortcut..................................................................... 11
Removing a Shortcut........................................................... 11
Saving Locations...................................................................... 11
Saving a Location................................................................ 11
Saving Your Current Location.............................................. 11
Editing a Saved Location..................................................... 11
Assigning Categories to a Saved Location.......................... 11
Deleting a Saved Location................................................... 11
Using the Map............................................................... 11
Map Tools................................................................................. 12
Viewing a Map Tool............................................................. 12
Up Ahead.................................................................................. 12
Viewing Upcoming Locations............................................... 12
Customizing the Up Ahead Categories................................ 12
Cities Ahead............................................................................. 12
Viewing Upcoming Cities and Exit Services........................ 12
Trip Information.........................................................................12
Viewing Trip Data from the Map.......................................... 12
Viewing the Trip Information Page....................................... 12
Resetting Trip Information....................................................12
Viewing Upcoming Traffic......................................................... 12
Viewing Traffic on the Map.................................................. 13
Searching for Traffic Incidents............................................. 13
Customizing the Map................................................................ 13
Customizing the Map Layers............................................... 13
Changing the Map Data Field.............................................. 13
Changing the Map Perspective............................................ 13
Live Services, Traffic, and Smartphone Features..... 13
Bluetooth Feature Status Icons................................................ 13
Pairing Your Phone and Headset............................................. 13
Smart Notifications....................................................................13
Receiving Notifications.........................................................13
Table of Contents i

Viewing the List of Notifications........................................... 14
Hands-Free Calling................................................................... 14
Setting Up Bluetooth Features for Your Apple® Device........... 14
Disabling Bluetooth Features (iPhone®)............................. 14
Setting Up Bluetooth Features for Your Smartphone with
Android™.................................................................................. 14
Disabling Bluetooth Features (Android)............................... 14
Disconnecting a Bluetooth Device............................................ 14
Deleting a Paired Phone........................................................... 14
Traffic............................................................................ 14
Receiving Traffic Data Using Your Smartphone....................... 15
Receiving Traffic Data Using a Traffic Receiver....................... 15
Traffic Receiver Subscriptions............................................. 15
Viewing Traffic on the Map....................................................... 15
Searching for Traffic Incidents............................................. 15
Using the Apps............................................................. 15
Viewing the Owner's Manual on Your Device........................... 15
Media Player............................................................................. 15
Adding the Music Player Tool to the Map............................ 15
Changing the Media Source................................................ 15
BirdsEye Imagery..................................................................... 15
Downloading BirdsEye Imagery........................................... 15
Trip Planner.............................................................................. 16
Planning a Trip..................................................................... 16
Editing and Reordering Locations in a Trip.......................... 16
Discovering Attractions Along Your Trip.............................. 16
Changing Routing Options for a Trip................................... 16
Navigating to a Saved Trip...................................................16
Sharing a Route........................................................................ 16
Tracks....................................................................................... 16
Recording Tracks................................................................. 16
TracBack®................................................................................ 16
Following Your Recent Track............................................... 16
Saving Your Recent Track as a Trip.................................... 16
Logging Service History............................................................ 16
Adding Service Categories.................................................. 17
Viewing the Weather Forecast..................................................17
Viewing Weather Near a Different City................................ 17
Viewing the Weather Radar................................................. 17
Viewing Weather Alerts........................................................17
Checking Road Conditions.................................................. 17
Creating a Round-Trip Route....................................................17
photoLive Traffic Cameras........................................................17
Viewing and Saving photoLive Traffic Cameras.................. 17
Viewing photoLive Traffic Cameras on the Map.................. 17
Viewing Previous Routes and Destinations.............................. 17
zūmo Settings............................................................... 17
Map and Vehicle Settings......................................................... 17
Enabling Maps..................................................................... 18
Navigation Settings................................................................... 18
Calculation Mode Settings................................................... 18
Setting a Simulated Location............................................... 18
Bluetooth Settings.....................................................................18
Wi‑Fi Settings........................................................................... 18
Driver Assistance Settings........................................................ 18
Display Settings........................................................................ 18
Traffic Settings.......................................................................... 18
Units and Time Settings............................................................19
Setting the Time................................................................... 19
Language and Keyboard Settings............................................ 19
Device and Privacy Settings..................................................... 19
Restoring Settings.................................................................... 19
Device Information....................................................... 19
Viewing E-label Regulatory and Compliance Information........ 19
Specifications............................................................................19
Charging the Device
................................................................. 19
Device Maintenance..................................................... 19
Garmin Support Center.............................................................19
Map and Software Updates...................................................... 19
Connecting to a Wi‑Fi Network............................................ 19
Updating Maps and Software Using a Wi‑Fi Network.......... 20
Product Updates.................................................................. 20
Device Care.............................................................................. 20
Cleaning the Outer Casing...................................................20
Cleaning the Touchscreen................................................... 21
Avoiding Theft...................................................................... 21
Restarting the Device............................................................... 21
Removing the Device, Mount, and Suction Cup....................... 21
Removing the Device from the Mount..................................21
Removing the Mount from the Suction Cup......................... 21
Removing the Suction Cup from the Windshield................. 21
Changing the Fuse in the Vehicle Power Cable....................... 21
Troubleshooting........................................................... 21
The suction cup will not stay on my windshield........................ 21
My device is not acquiring satellite signals............................... 21
My battery does not stay charged for very long........................ 21
My device does not connect to my phone................................ 21
My device does not appear as a removable drive on my
computer................................................................................... 21
My device does not appear as a portable device on my
computer................................................................................... 21
My device does not appear as either a portable device or a
removable drive or volume on my computer.............................21
Appendix....................................................................... 22
Installing a Memory Card for Maps and Data........................... 22
Data Management.................................................................... 22
About Memory Cards........................................................... 22
Connecting the Device to Your Computer........................... 22
Transferring Data From Your Computer.............................. 22
Disconnecting the USB Cable..............................................22
Adding BaseCamp™ Data to Garmin Explore..................... 22
Viewing GPS Signal Status...................................................... 23
Purchasing Additional Maps..................................................... 23
Index.............................................................................. 24
ii Table of Contents
Getting Started
WARNING
See the Important Safety and Product Information guide in the
product box for product warnings and other important
information.
Connect to a Wi‑Fi® network (Connecting to a Wi‑Fi Network,
1
page 19)(optional).
Pair your Bluetooth® phone and headset (Pairing Your Phone
2
and Headset, page 13) (optional).
Update the maps and software on your device (Product
3
Updates, page 20).
Acquire GPS signals (Acquiring GPS Signals, page 1).
4
Mount the device and connect it to power.
5
Adjust the screen brightness (Adjusting the Screen
6
Brightness, page 1).
Navigate to your destination (Starting a Route, page 5).
7
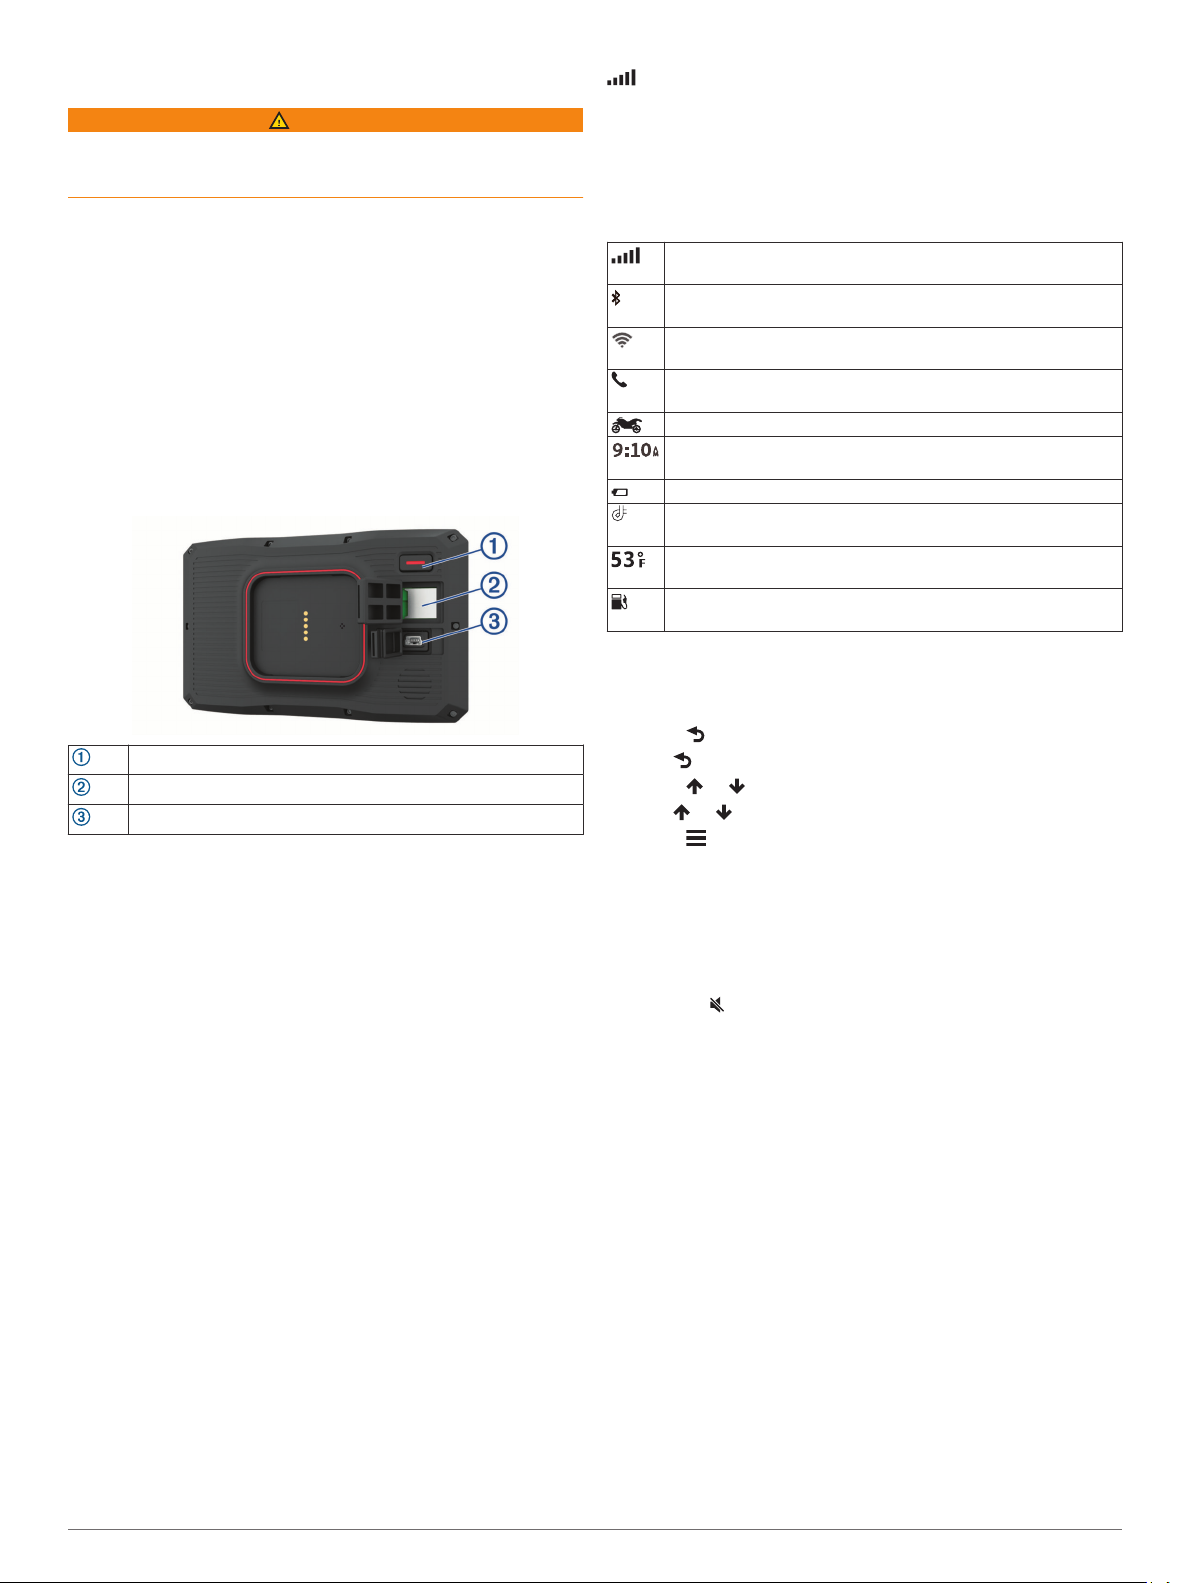
Device Overview
in the status bar indicates the satellite signal strength. When
at least half the bars are filled, the device is ready for navigation.
Status Bar Icons
The status bar is located at the top of the main menu. The status
bar icons display information about features on the device. You
can select some icons to change settings or view additional
information.
GPS signal status. Hold to view GPS accuracy and acquired
satellite information (Viewing GPS Signal Status, page 23).
Bluetooth technology status. Select to view the Bluetooth
settings (Bluetooth Settings, page 18).
Wi-fi signal strength. Select to change the wi-fi settings (Wi‑Fi
Settings, page 18).
Connected to hands-free calling. Select to place a phone call
(Hands-Free Calling, page 14).
Active usage mode. Select to change the usage mode.
Current time. Select to set the time (Setting the Time,
page 19).
Battery charge level.
Garmin Drive™ app connection status (Pairing Your Phone and
Headset, page 13).
Temperature. Select to view the weather forecast (Viewing the
Weather Forecast, page 17).
Fuel status. Select to view fuel tracking information (Fuel
Tracking, page 8).
Power button
microSD® memory card slot
USB power and data port
Turning the Device On or Off
• To turn the device on, press the power button, or connect the
device to power.
• To put the device in power saving mode, press the power
button while the device is on.
While in power saving mode, the screen is off and the device
uses very little power, but it can wake instantly for use.
TIP: You can charge your device faster by putting it in power
saving mode while charging the battery.
• To turn off the device completely, hold the power button until
a prompt appears on the screen, and select Off.
The prompt appears after five seconds. If you release the
power button before the prompt appears, the device enters
power saving mode.
Acquiring GPS Signals
When you turn on your navigation device, the GPS receiver
must collect satellite data and establish the current location. The
time required to acquire satellite signals varies based on several
factors, including how far you are from the location where you
last used your navigation device, whether you have a clear view
of the sky, and how long it has been since you last used your
navigation device. The first time you turn on your navigation
device, it may take several minutes to acquire satellite signals.
Turn on the device.
1
Wait while the device locates satellites.
2
If necessary, go to an open area, away from tall buildings and
3
trees.
Using the On-Screen Buttons
On-screen buttons allow you to navigate the pages, menus, and
menu options on your device.
• Select to return to the previous menu screen.
• Hold to quickly return to the main menu.
• Select or to scroll through lists or menus.
• Hold or to scroll faster.
• Select to see a context-based menu of options for the
current screen.
Adjusting the Volume
Select Volume.
1
Select an option:
2
• Use the slider bar to adjust the volume.
• Select to mute the device.
• Select a check box to enable or disable additional sound
options.
Using the Audio Mixer
You can use the audio mixer to set the volume levels for
different audio types, such as navigation prompts or phone calls.
The level for each audio type is a percentage of the master
volume.
Select Volume.
1
Select Mixer.
2
Use the sliders to adjust the volume for each audio type.
3
Adjusting the Screen Brightness
Select Settings > Display > Brightness.
1
Use the slider bar to adjust the brightness.
2
Transportation Modes
Routing and navigation are calculated differently based on your
transportation mode. The current transportation mode is
indicated by an icon in the status bar.
Getting Started 1
Automobile mode
Motorcycle mode
Off-road mode
Choosing a Transportation Mode
Select the transportation mode icon on the status bar.
Using the Large Button Keyboard
You can enable additional keyboard languages or layouts in the
language and keyboard settings .
• Select or to view more characters.
• Select to switch to other keyboard languages and layouts.
Installation
Mounting Your Device in a Motorcycle
Powered Motorcycle Mount
WARNING
Garmin® strongly recommends having an experienced installer
with the proper knowledge of electrical systems install the
device. Incorrectly wiring the power cable can result in damage
to the vehicle or the battery and can cause bodily injury.
See the Important Safety and Product Information guide in the
product box for product warnings and other important
information.
Tighten the nuts to secure the base.
2
NOTE: The recommended torque is 50 lbf-in (5.65 N-m). Do
not exceed torque of 80 lbf-in (9.04 N-m).
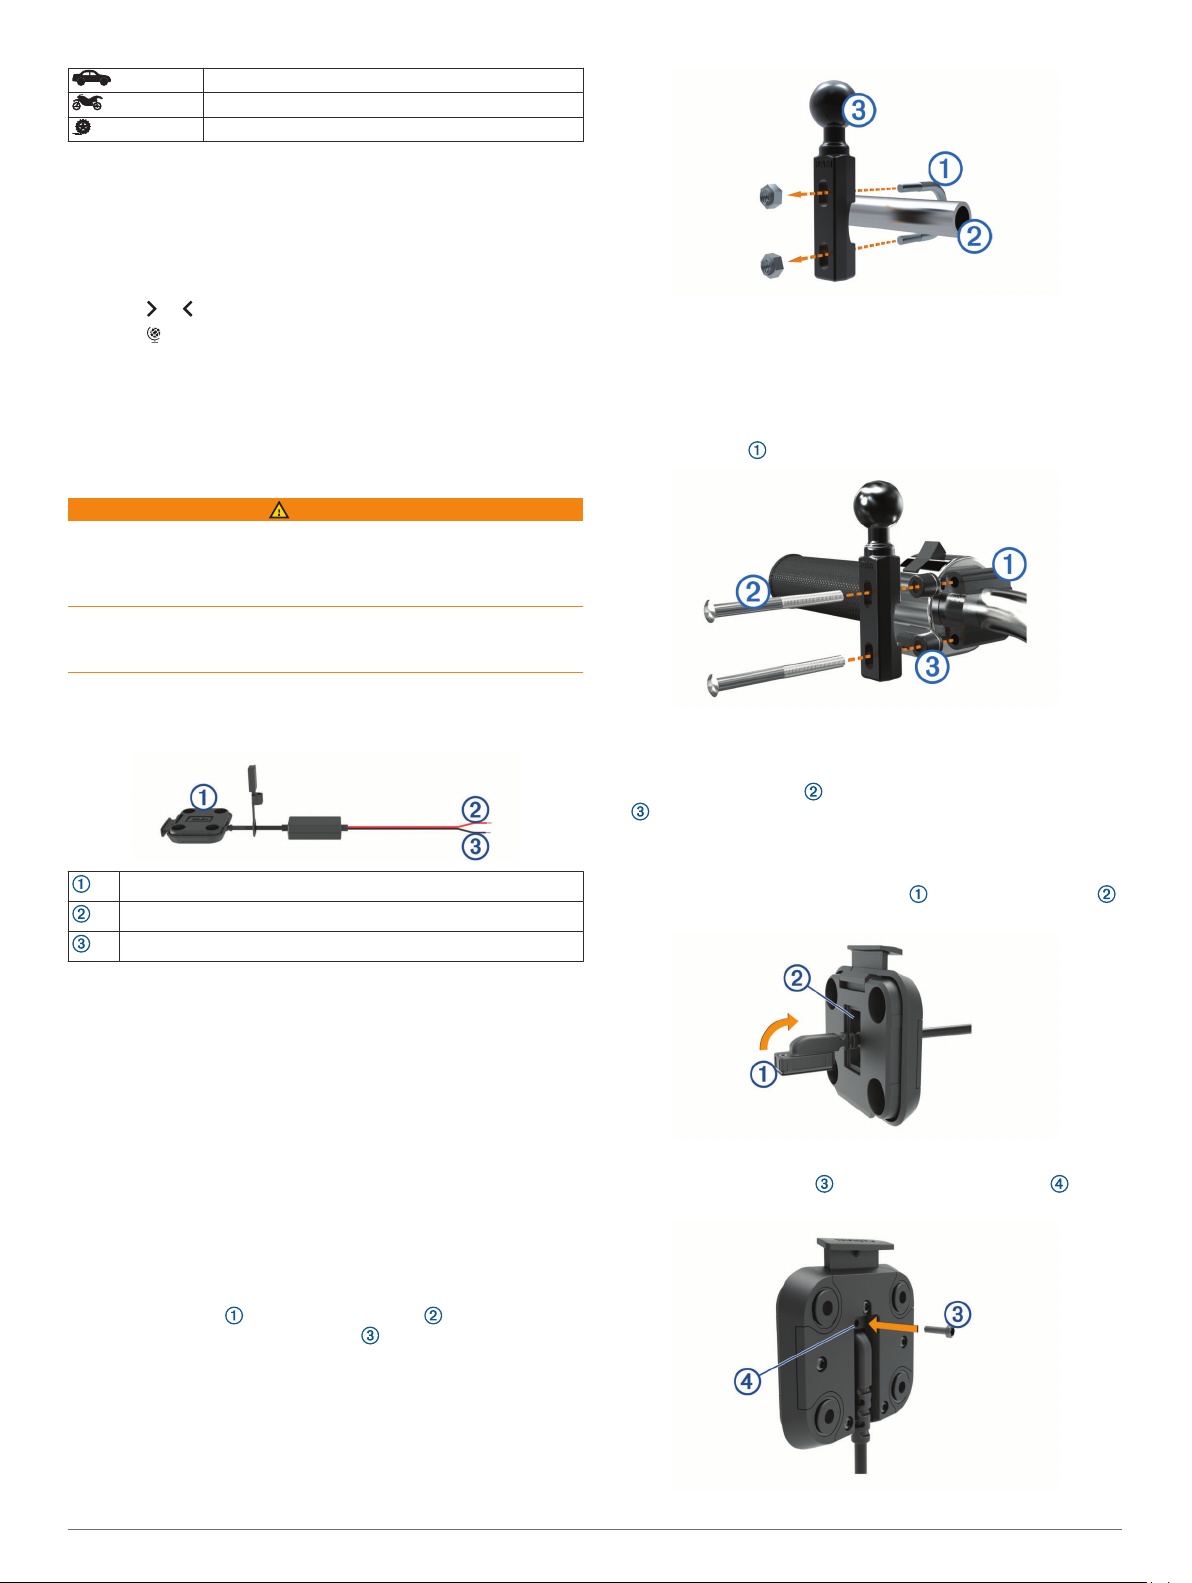
Installing the Handlebar Base to the Clutch-Clamp or BrakeClamp Brackets
Remove the two factory bolts on your clutch-clamp or brake-
1
clamp bracket .
The device must be mounted in a suitable and secure location
on your motorcycle, based on available power sources and safe
cable routing. No fuse is required.
Motorcycle mount
10 to 30 Vdc system power (red)
System ground (black)
NOTE: Additional parts are included with the device to provide
more installation and wiring options. Contact an experienced
installer for more information about using these parts with your
motorcycle.
Crimp Style Ring Terminal: Connects the wiring harness
directly to the battery terminal.
Crimp Style Butt Splice Connector: Connects the wiring
harness to an existing wiring installation or extends the wiring
harness length.
Cable Tie: Secures cables to the motorcycle frame.
Installing the Handlebar Base
The device includes parts for two handlebar installation
solutions. Custom mounts may require additional hardware.
Installing the U-bolt and Handlebar Base
Place the U-bolt around the handlebar , and thread the
1
ends through the handlebar base .
NOTE: Both 1/4 in. standard and M6 bolts are included.
Match the size of the factory bolts on your clutch-clamp or
brake-clamp bracket.
Thread the new bolts through the handlebar base, spacers
2
, and clutch-clamp or brake-clamp bracket.
Tighten the bolts to secure the base.
3
Attaching the Power Cables to the Motorcycle Mount
Thread the power cable connector through the opening
1
in the motorcycle mount.
Pull the cable back until it is snug.
2
Screw the black screw into the back of the mount to
3
hold the cable in place.
2 Installation
NOTE: An additional replacement screw is included in the
box.
Attaching the Base Plate to the Motorcycle Mount
NOTICE
Direct, sustained contact with the base plate, or any part of the
motorcycle, may damage the mount over time. To prevent this
kind of damage, you must place the mounting spacers between
the mount and base plate, and make sure that no part of the
device or mount touches the motorcycle.
Thread the M4 x 20 mm panhead screws through the
1
washers , cradle, spacers , and base plate .
Tighten the nuts to secure the base plate.
2
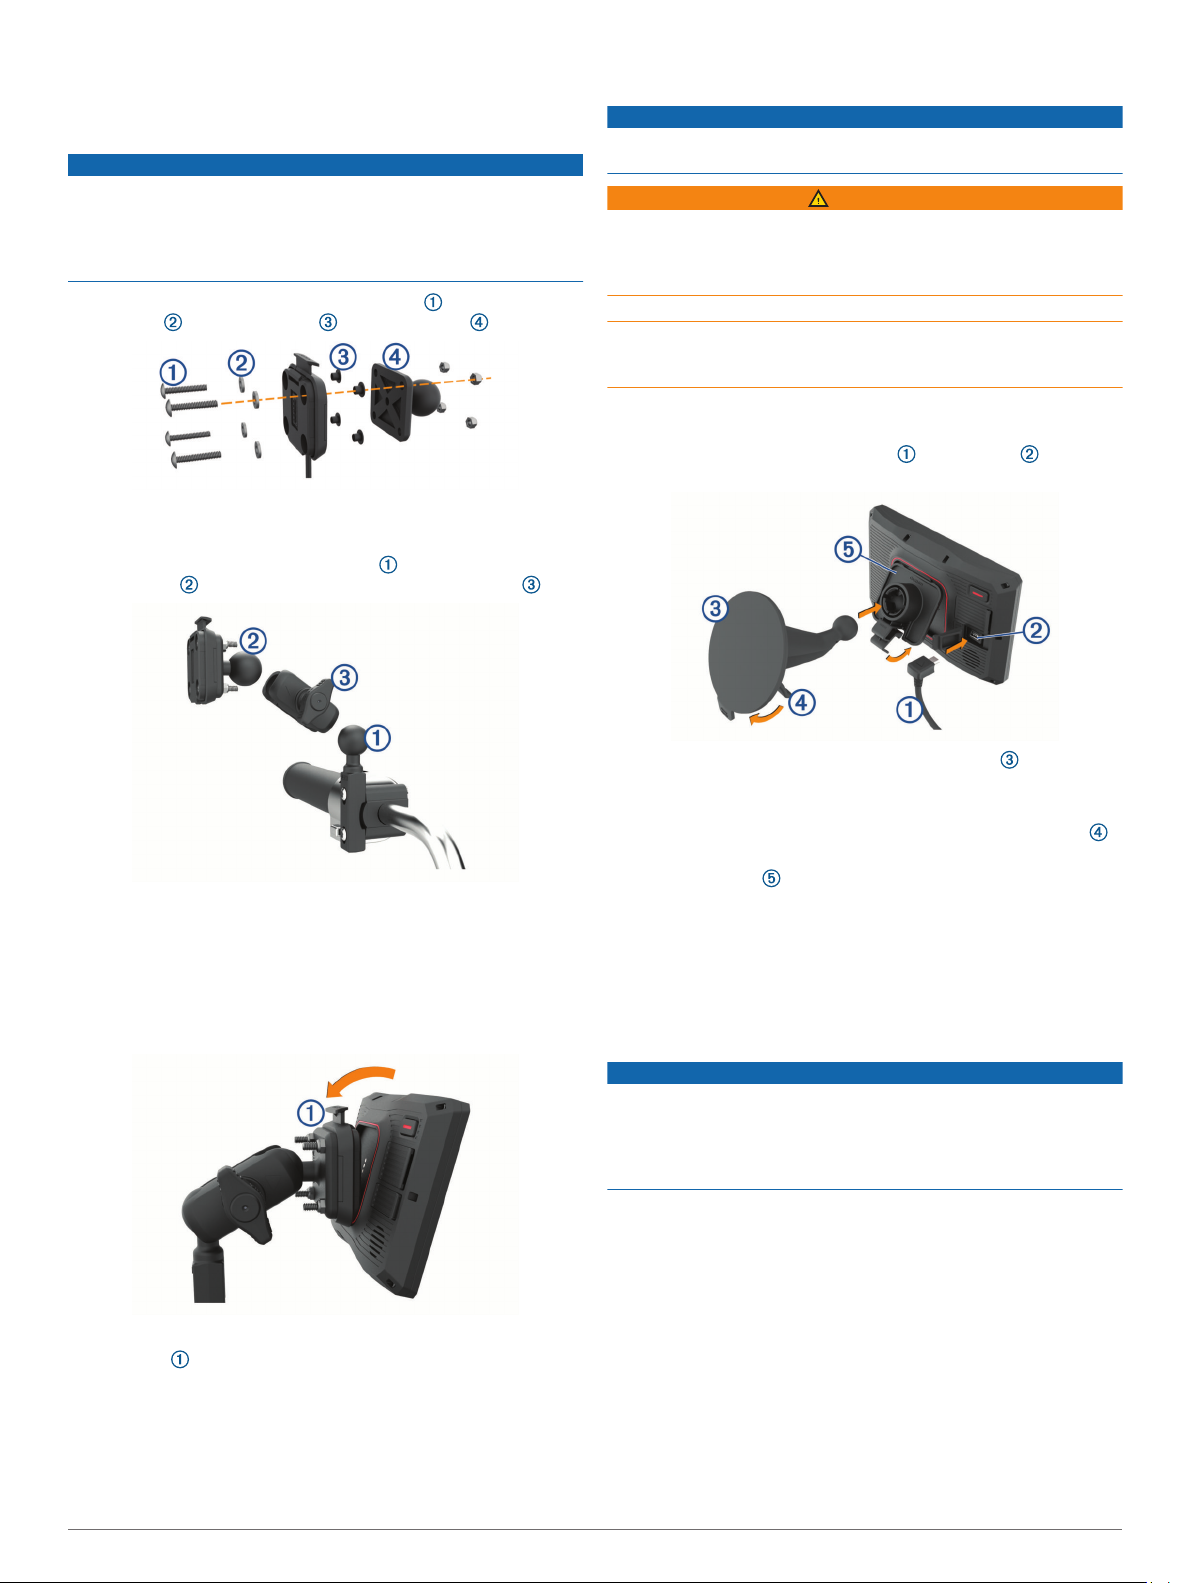
Attaching the Base Plate to the Handlebar Base
Align the ball of the handlebar base and the ball of the
1
base plate with each end of the double-socket arm .
Mounting Your Device in an Automobile
NOTICE
Before mounting the device, check the local laws pertaining to
windshield mounting.
WARNING
This product contains a lithium-ion battery. To prevent the
possibility of personal injury or product damage caused by
battery exposure to extreme heat, store the device out of direct
sunlight.
Do not use the suction cup mount on a motorcycle.
See the Important Safety and Product Information guide in the
product box for product warnings and other important
information.
NOTE: The automobile mount is not included with all device
models. Go to garmin.com to purchase optional accessories.
Plug the automotive power cable into the port on the
1
device.
Insert each ball into the double-socket arm.
2
Tighten the knob slightly.
3
Adjust for optimal viewing and operation.
4
Tighten the knob to secure the mount.
5
Installing Your Device in the Motorcycle Mount
Fit the bottom of your device into the cradle.
1
Push the top of the device forward until it snaps into place.
2
The latch on the mount stays up after you insert the
device.
Removing Your Device from the Motorcycle Mount
Press the release button on the top of the mount.
1
Lift out the device.
2
Remove the clear plastic from the suction cup .
2
Clean and dry your windshield and the suction cup with a lint-
3
free cloth.
Press the suction cup to the windshield, and flip the lever
4
back toward the windshield.
Snap the cradle onto the suction cup arm.
5
Fit the bottom of your device into the cradle.
6
Press the device into the cradle until it snaps into place.
7
Plug the other end of the automotive power cable into a
8
power outlet.
Rider Awareness Features and Alerts
NOTICE
The rider alerts and speed limit features are for information only
and do not replace your responsibility to abide by all posted
speed limit signs and to use safe driving judgment at all times.
Garmin is not responsible for any traffic fines or citations you
receive for failing to follow all applicable traffic laws and signs.
Your device provides features that can help encourage safer
riding, even when you are riding in a familiar area. The device
plays an audible tone or message and displays information for
each alert. You can enable or disable the audible tone or
message for each type of alert. Not all alerts are available in all
areas.
School zone or nearby school: The device plays a tone and
displays the distance to and speed limit (if available) for an
upcoming school or school zone.
Speed limit reduction: The device plays a tone and displays
the upcoming reduced speed limit so you can be prepared to
reduce your speed.
Rider Awareness Features and Alerts 3

Speeding alert: The device plays a tone and displays a red
border on the speed limit icon when you exceed the posted
speed limit for the current road.
Railroad crossing: The device plays a tone and displays the
distance to an upcoming railroad crossing.
Animal crossing: The device plays a tone and displays the
distance to an upcoming animal crossing area.
Curve: The device plays a tone and displays the distance to a
curve in the road.
Slower traffic: The device plays a tone and displays the
distance to slower traffic when you approach slower traffic at
a higher speed. Your device must be receiving traffic
information to use this feature.
Break planning: The device plays a tone and suggests
upcoming rest stops after you have been driving for more
than two hours without stopping.
Enabling or Disabling Rider Alerts
You can turn off individual audible rider alerts. Visual alerts
appear even when the audible alert is disabled.
Select Settings > Driver Assistance > Rider Alerts.
1
Select or clear the check box next to each alert.
2
Red Light and Speed Cameras
NOTICE
Garmin is not responsible for the accuracy of or the
consequences of using a red light or speed camera database.
NOTE: This feature is not available for all regions or product
models.
Information about red light and speed camera locations is
available in some areas for some product models. The device
alerts you when you approach a reported speed or red light
camera.
• In some areas, your device can receive live red light and
speed camera data while connected to a smartphone running
the Garmin Drive app.
• You can use the Garmin Express™ software (garmin.com
/express) to update the camera database stored on your
device. You should update your device frequently to receive
the most up-to-date camera information.
Incident Detection and Notifications
WARNING
The device allows you to send your location to an emergency
contact. This is a supplemental feature and should not be relied
upon as a primary method to obtain emergency assistance. The
Garmin Drive app does not contact emergency services on your
behalf.
Your zūmo device uses built-in sensors to detect a possible
vehicle incident.
• If you set up an incident contact, the device can send an
automated text message to that contact when it detects an
incident and your vehicle stops moving. This can help alert
the contact to your situation if you are not able to call or send
a message. This feature requires a connection to the Garmin
Drive app and an active mobile data connection to send a
message.
• If you have not set up an incident contact, the device
automatically displays the nearest address or geographic
coordinates when it detects an incident. This feature is
helpful if you need to tell emergency personnel your location.
• If you have an inReach® device connected to your zūmo
device, you can manually send an SOS when it detects an
incident.
Setting Up an Incident Contact
Before you can set up an incident detection contact, you must
complete these tasks:
• Connect your device to Garmin Drive (Pairing Your Phone
and Headset, page 13).
• Select Settings > Wireless Networks, and verify the Phone
calls option is enabled for your phone.
The device must have access to the Garmin Drive app and to
your smartphone phone book during the incident contact setup.
If you do not want to use your device for hands-free calling, you
can disable the Phone calls option after the incident contact
setup is complete.
Select Settings > Driver Assistance > Incident
1
Notification > Continue.
A list of your smartphone contacts appears.
Select a contact, and select Next.
2
Verify the contact's phone number, and select Next.
3
Enter your name or nickname, and select Done.
4
Review the sample incident message, and select Next.
5
Follow the on-screen instructions to inform your contact that
6
you have added them as an incident contact.
NOTE: The incident notification message includes the name
or nickname you entered, but it is not sent from your phone
number. The message is sent using a third-party service, and
you should inform your incident contact that the incident
message will come from an unknown number.
Select OK.
7
Review the information, and select Save.
8
Cancelling an Incident Notification
When the device detects an incident, a message and a voice
prompt inform you that a notification will be sent to your incident
contact. A 60-second countdown timer starts when the incident
is detected, and the device sends the notification automatically
when the timer expires. If you do not want to send the
notification, you can cancel it.
Before the timer expires, select Cancel.
Disabling Incident Notifications
While incident notifications are disabled, the device does not
send an SMS notification when it detects an incident.
Select Settings > Driver Assistance > Incident
1
Notification.
Clear the Incident Detection SMS check box.
2
inReach Remote
The inReach remote function allows you to control your inReach
satellite communication device (sold separately) using your
zūmo device. You can send messages, view weather reports,
trigger an SOS alert, and more. Go to buy.garmin.com to
purchase an inReach device.
Connecting an inReach Device
Bring the inReach device within 3 m (10 ft.) of your zūmo
1
device.
On your zūmo device, select Apps > inReach.
2
Follow the on-screen instructions on your zūmo device to
3
complete the pairing process.
After the pairing process is complete, the inReach and zūmo
devices connect automatically when they are within range.
Sending an inReach Message
Before you can send an inReach message using your zūmo
device, you must pair it with a compatible inReach device
(Connecting an inReach Device, page 4).
4 Rider Awareness Features and Alerts

You can use your device to send inReach messages to your
contacts.
Select Apps > inReach > .
1
Select New Message.
2
Select Select Contacts to add one or more contacts.
3
Enter a message.
4
Select Send.
5
SOS
During an emergency, you can contact the GEOS International
Emergency Rescue Coordination Center (IERCC) to request
help. Pressing the SOS button sends a message to the rescue
coordination center, and they notify the appropriate emergency
responders of your situation. You can communicate with the
rescue coordination center during your emergency while you
wait for help to arrive. You should only use the SOS function in a
real emergency situation.
Initiating an SOS Rescue
Before you can initiate an SOS rescue using your zūmo device,
you must pair it with a compatible inReach device (Connecting
an inReach Device, page 4).
NOTE: While in SOS mode, the inReach device cannot be
turned off.
Select Apps > inReach.
1
Select .
2
Wait for the SOS countdown.
3
The device sends a default message to the emergency
response service with details about your location.
Reply to the confirmation message from the emergency
4
response service.
Your reply lets the emergency response service know that
you are capable of interacting with them during the rescue.
For the first 10 minutes of your rescue, an updated location is
sent to the emergency response service every minute. To
conserve battery power after the first 10 minutes, an updated
location is sent every 10 minutes when moving, and every 30
minutes when stationary.
Canceling an SOS Rescue
If you no longer need assistance, you can cancel an SOS
rescue after it is sent to the emergency response service.
Select Cancel SOS > Cancel SOS.
Your device transmits the cancellation request. When you
receive a confirmation message from the emergency response
service, the device returns to normal operation.
Viewing Helmet Law Notifications
Helmet law and eye protection notifications may appear on your
zūmo device the first time your device acquires satellites and
when your device approaches a location with motorcycle safety
rules.
NOTICE
Garmin recommends that all riders wear helmets for safety.
Helmet law notifications are for reference only, are subject to
change, and are not intended to be considered legal advice.
Helmet law notifications are available in the U.S. and Canada
only.
Select the notification to view more details.
Searching for Helmet Laws
You can search for helmet laws by state or province.
Select Apps > Helmet Guide.
1
Select a state or province.
2
Navigating to Your Destination
Routes
A route is a path from your current location to one or more
destinations.
• The device calculates a recommended route to your
destination based on the preferences you set, including the
route calculation mode (Changing the Route Calculation
Mode, page 5) and avoidances (Avoiding Delays, Tolls,
and Areas, page 7).
• The device can automatically avoid roads that are not
appropriate for the active vehicle profile.
• You can start navigating to your destination quickly using the
recommended route, or you can select an alternate route
(Starting a Route, page 5).
• If there are specific roads you need to use or avoid, you can
customize the route (Shaping Your Route, page 7).
• You can add multiple destinations to a route (Adding a
Location to Your Route, page 6).
Starting a Route
Select Where To?, and search for a location.
1
Select a location.
2
Select an option:
3
• To start navigating using the recommended route, select
Go!.
• To choose an alternate route, select , and select a route.
Alternate routes appear to the right of the map.
• To edit the course of the route, select > Edit Route, and
add shaping points to the route (Shaping Your Route,
page 7).
The device calculates a route to the location and guides you
using voice prompts and information on the map (Your Route on
the Map, page 6). A preview of the major roads in your route
appears at the edge of the map for several seconds.
If you need to stop at additional destinations, you can add the
locations to your route (Adding a Location to Your Route,
page 6).
Taking a Route Using Garmin Adventurous Routing
Your device can calculate adventurous routes that prefer curvy
roads, hills, and fewer highways. This feature can provide a
more enjoyable ride, but it may increase the time or distance to
your destination.
NOTE: This feature is not available on all device models or for
all map regions.
Select Where To? > Categories.
1
If necessary, select a subcategory.
2
Select a location.
3
Select .
4
Use the slider to increase or decrease the level of adventure
5
of your route.
Select Go!
6
Changing the Route Calculation Mode
Select Settings > Navigation > Calculation Mode.
1
Select an option:
2
• Select Faster Time to calculate routes that are faster to
drive but can be longer in distance.
• Select Off Road to calculate point-to-point routes (without
roads).
• Select Shorter Distance to calculate routes that are
shorter in distance but can take more time to drive.
™
Navigating to Your Destination 5
 Loading...