

Page 1
VIRB® 360
Owner’s Manual
Page 2

© 2017 Garmin Ltd. or its subsidiaries
All rights reserved. Under the copyright laws, this manual may not be copied, in whole or in part, without the written consent of Garmin. Garmin reserves the right to change or improve its
products and to make changes in the content of this manual without obligation to notify any person or organization of such changes or improvements. Go to www.garmin.com for current updates
and supplemental information concerning the use of this product.
Garmin®, the Garmin logo, ANT+®, fēnix®, and VIRB® are trademarks of Garmin Ltd. or its subsidiaries, registered in the USA and other countries. G-Metrix™ is a trademark of Garmin Ltd. or its
subsidiaries. These trademarks may not be used without the express permission of Garmin.
Android™, Google™, Google Cardboard™, and YouTube™ are trademarks of Google Inc. Apple® and Mac® are trademarks of Apple Inc., registered in the U.S. and other countries. The Bluetooth
®
word mark and logos are owned by the Bluetooth SIG, Inc. and any use of such marks by Garmin is under license. Facebook™ and the Facebook logo are trademarks of Facebook and its affiliate
companies. HDMI® is a registered trademark of HDMI Licensing, LLC. microSD® and the microSDXC logo are trademarks of SD-3C, LLC. Wi‑Fi® is a registered mark of Wi-Fi Alliance
Corporation. Windows® is a registered trademark of Microsoft Corporation in the United States and other countries. Other trademarks and trade names are those of their respective owners.
This product is ANT+® certified. Visit www.thisisant.com/directory for a list of compatible products and apps.
Page 3

Table of Contents
Introduction.....................................................................1
Camera Controls.........................................................................1
Device Overview......................................................................... 1
Installing the Battery................................................................... 1
Installing a Memory Card............................................................ 1
Charging the Battery................................................................... 1
Turning On the Camera.............................................................. 2
Home Screen Overview.............................................................. 2
Camera Mounts.............................................................. 2
Assembling the Tripod and Cradle............................................. 2
Assembling the Action Cradle and Mounts................................. 3
Removing the Camera from the Cradle...................................... 3
Video................................................................................ 3
Preparing to Record a Video...................................................... 3
Recording a Video...................................................................... 4
Lens Modes................................................................................ 4
Video Modes............................................................................... 4
Microphone Modes..................................................................... 5
Outputting Live Video to an External Device.............................. 5
Photos............................................................................. 5
Taking Photos............................................................................. 5
Setting the Default Photo Self Timer.......................................... 5
Photo Modes...............................................................................5
Voice Control.................................................................. 5
Setting Up Voice Control............................................................ 5
Controlling the Camera Using Voice Commands....................... 6
Voice Control Tips...................................................................... 6
G-Metrix........................................................................... 6
G-Metrix Data............................................................................. 6
Garmin VIRB App........................................................... 6
Connecting to the Garmin VIRB App Using NFC....................... 6
Connecting to the Garmin VIRB App Using Wi‑Fi Settings........ 7
Remote Viewfinder..................................................................... 7
App and Camera Settings...........................................................8
Garmin VIRB App Gallery........................................................... 9
Connecting to a Wi‑Fi Network................................................. 10
Multiple Camera Network......................................................... 11
Remote Control............................................................ 11
Controlling Your VIRB Camera Remotely.................................12
Controlling Multiple VIRB Cameras.......................................... 12
Enabling the Remote Wake Up Feature................................... 12
ANT+ Sensors............................................................... 12
Pairing ANT+ Sensors.............................................................. 12
Bluetooth Devices........................................................ 12
Connecting a Wireless External Microphone............................ 12
Connecting an OBD-II Device...................................................12
Removing Paired Bluetooth Devices........................................ 13
VIRB Edit....................................................................... 13
Customizing the Device............................................... 13
Setup Menu.............................................................................. 13
System Settings........................................................................ 13
Device Information....................................................... 13
Status LEDs.............................................................................. 13
Specifications............................................................................14
Viewing Regulatory and Compliance Information..................... 14
Device Care.............................................................................. 14
Replacing a Cover Lens........................................................... 14
Symbol Definitions.................................................................... 15
Troubleshooting........................................................... 15
My camera does not turn on
My camera feels warm while it is operating.............................. 15
Some G-Metrix data is missing................................................. 15
My video recordings do not look smooth.................................. 15
My device turns off when I stop recording video...................... 15
Extending the Battery Life........................................................ 15
..................................................... 15
Index.............................................................................. 16
Table of Contents i
Page 4

Page 5
Introduction
WARNING
See the Important Safety and Product Information guide in the
product box for product warnings and other important
information.
It is your responsibility to use the device in a safe manner.
Garmin® will not be responsible for any property damage, injuries
or deaths resulting from any use of this device in any activities.
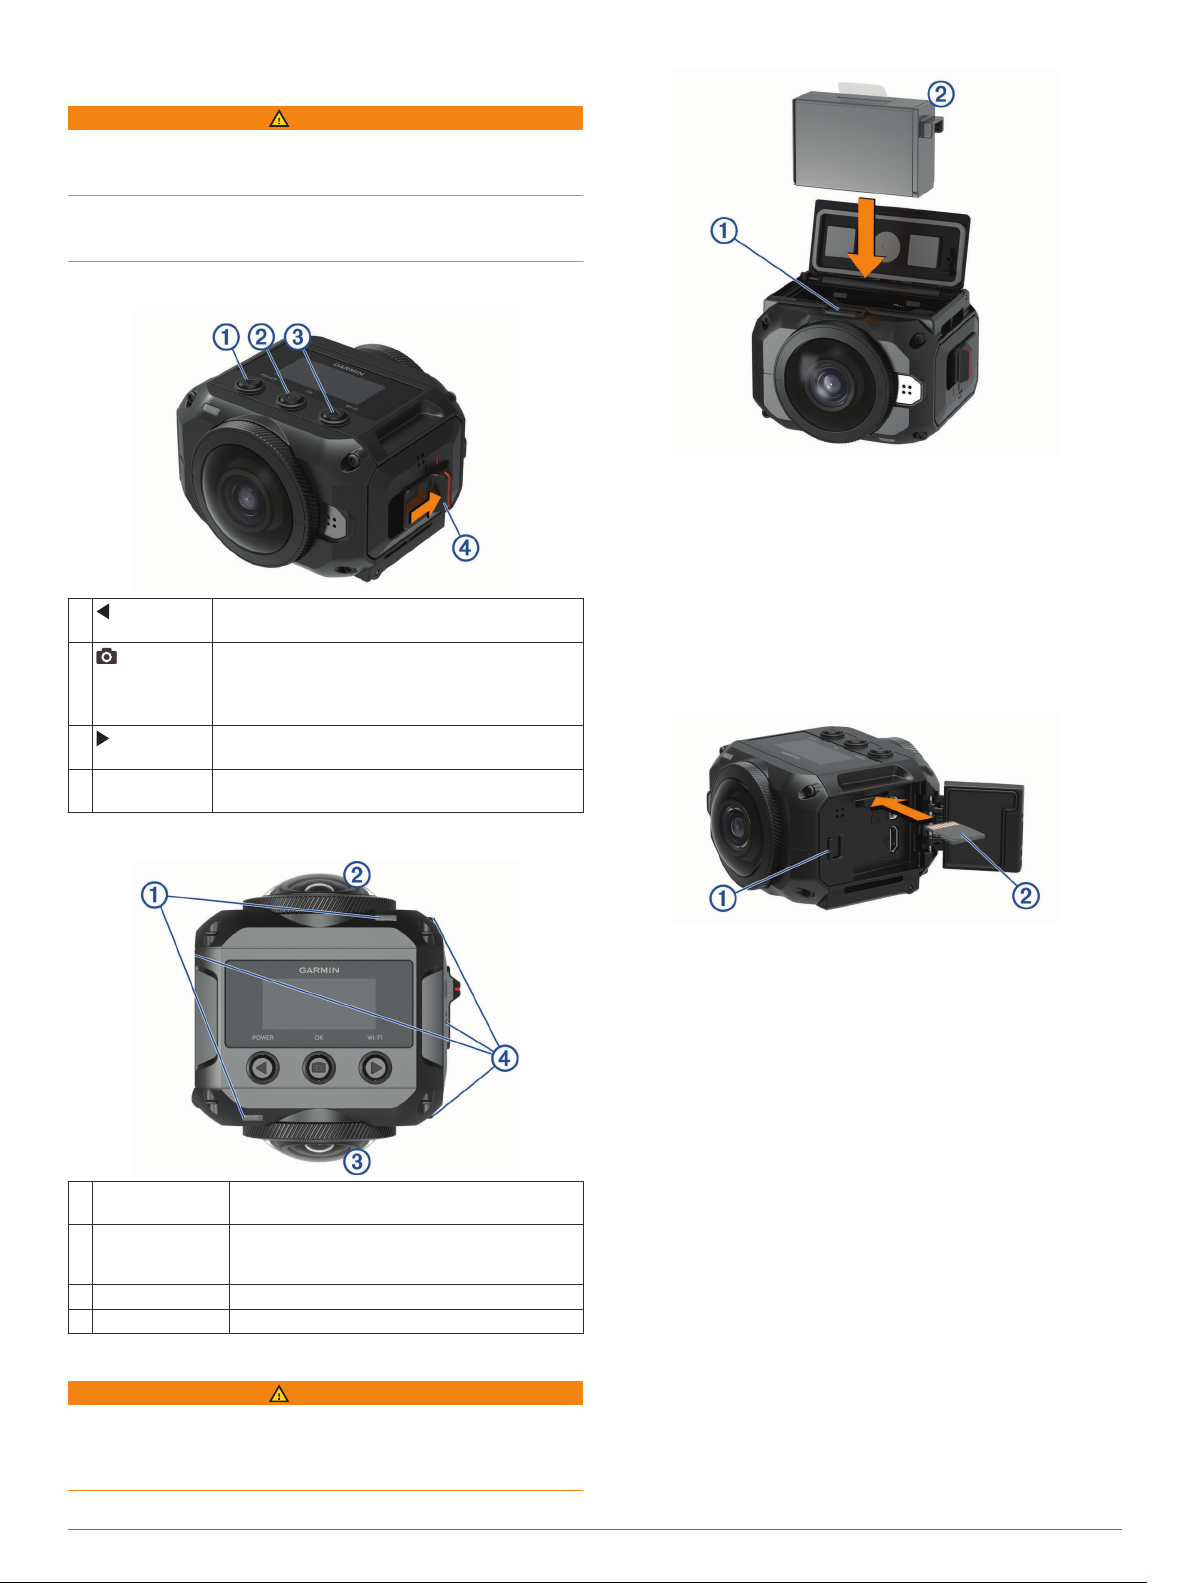
Camera Controls
À
POWER
Á
OK
Â
WI-FI
Recording
Ã
switch
Select to scroll through menus and menu items.
Hold to turn the device on or off.
From the home screen, select to take a photo.
From the home screen, hold to set the photo delay
timer.
From a menu, select to choose a menu item.
Select to scroll through menus and menu items.
Hold to turn the Wi‑Fi® radio on or off.
Move the switch to start or stop recording video
(Recording a Video, page 4).
Insert the battery Á into the compartment.
2
Close the battery compartment door, and press it until it
3
clicks.
Installing a Memory Card
You must install a compatible microSD® memory card to use
your device. You should use a UHS-I microSD card from a
quality manufacturer with a speed class rating of U3 or better
and a storage capacity of up to 128 GB. For more information
about compatible memory cards, go to garmin.com/VIRBcards.
Slide the latch À to open the side door.
1
Device Overview
Status LEDs (2) Indicate status information about the camera
À
Front camera lens Captures the front half of the video sphere. By
Á
Rear camera lens Captures the rear half of the video sphere.
Â
Microphones (4) Capture 360-degree spatial audio.
Ã
and features (Status LEDs, page 13).
default, the starting view for 360-degree videos
is centered on this lens.
Installing the Battery
WARNING
This product contains a lithium-ion battery. To prevent the
possibility of personal injury or product damage caused by
battery exposure to extreme heat, store the device out of direct
sunlight.
Slide the latch À to open the battery compartment door.
1
Insert the memory card Á into the slot, and press it in until it
2
clicks.
TIP: The memory card label must face down.
Close the door, and press it until it clicks.
3
Charging the Battery
The status LEDs flash rapidly when the battery charge level is
low. You can charge the battery using a standard wall outlet or a
USB port on your computer. The camera is powered by a
removable lithium-ion battery.
TIP: The optional external battery charger accessory allows you
to charge up to two batteries outside the camera. Go to
garmin.com/virb to purchase the battery charger accessory and
spare batteries.
NOTE: The battery will not charge when outside the approved
charging temperature range (Specifications, page 14).
Turn off the camera.
1
The camera does not charge the battery while it is turned on.
It is possible to operate the camera using external power, but
the battery charge level does not increase until you turn off
the camera.
Slide the latch À to open the side door.
2
Introduction 1
Page 6
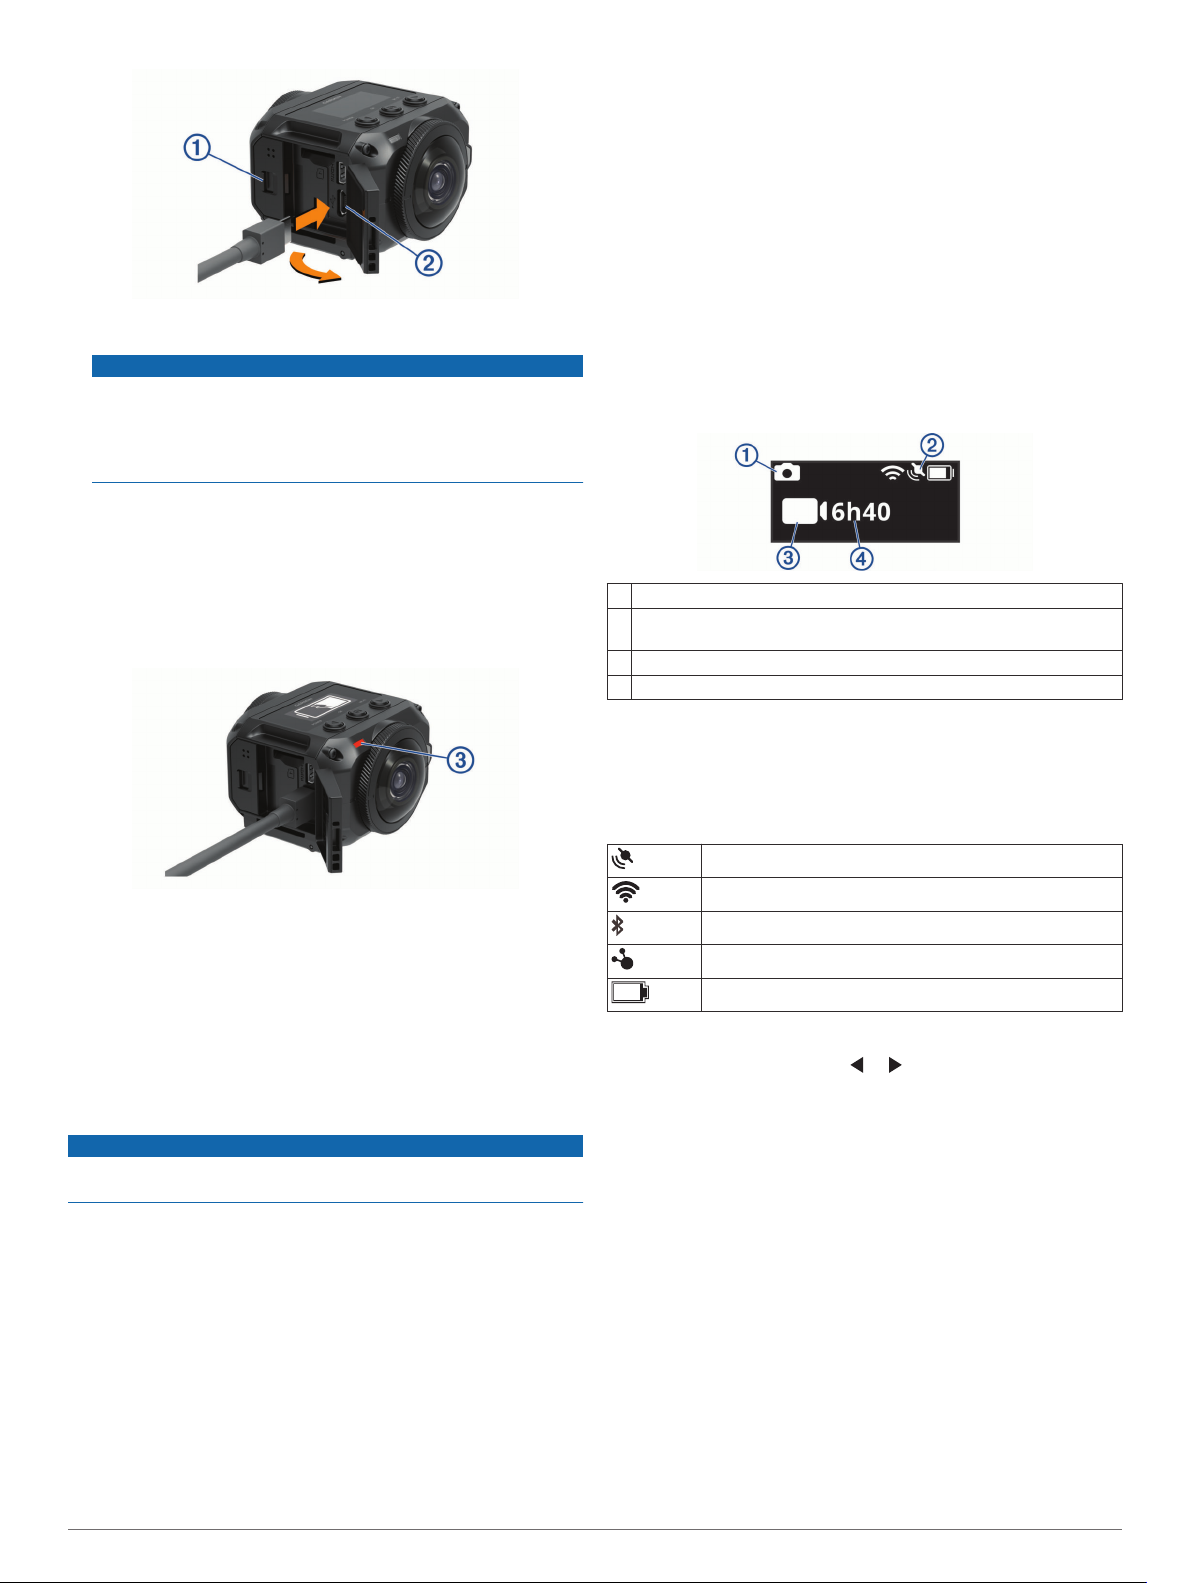
Plug the small end of the USB cable into the micro-USB port
3
on the camera.
Á
NOTICE
Use only the included micro-USB cable or another cable with
a straight micro-USB connector. Do not use a microUSB cable with an right-angle connector. A right-angle
connector may cause damage to the recessed microUSB port.
Plug the large end of the USB cable into a USB wall charger
4
or a computer USB port.
NOTE: For the best results, a USB wall charger that provides
at least a 2 A power output is recommended. Many
USB power adapters for smartphones or tablets may be
compatible.
When you connect the device to a power source, one status
LED Â turns solid red.
allows you to start and stop recording quickly, while
automatically turning off the camera to conserve battery power
when you are not recording.
NOTE: The camera does not turn off using the recording switch
unless you use the recording switch to turn it on.
With the device turned off, move the recording switch
1
forward.
The device turns on and starts recording video.
When you are finished recording, move the recording switch
2
backward.
The device stops recording and turns off.
Home Screen Overview
The home screen provides at-a-glance details about the
remaining memory card space and current settings of your
device.
Displays the photo mode.
À
Displays the sensor status and remaining battery capacity. Includes
Á
ANT+® sensors, Bluetooth®, Wi‑Fi, and GPS.
Displays the video mode.
Â
Displays the remaining memory card space for video recording.
Ã
Charge the battery.
5
It takes approximately two hours to charge the battery to 80%
capacity, and approximately three hours to fully charge the
battery. When the battery is fully charged, the red status LED
turns off.
Turning On the Camera
Hold POWER.
The status LEDs flash green when the camera is on.
Turning Off the Camera
NOTICE
To prevent loss of data, always turn off the camera before
removing the battery.
NOTE: You cannot turn off the camera while recording video.
If necessary, move the recording switch backward to stop
1
recording video.
Hold POWER.
2
The camera saves your data and turns off.
If you need to remove the battery, wait until the screen and
status LEDs turn off before removing the battery.
Turning the Camera On and Off Using the Recording Switch
You can use the recording switch to turn the camera on and
immediately start recording video. If you turn the camera on
using the recording switch, it turns off automatically when you
stop the recording using the recording switch. This feature
Status Bar Icons
Icons appear at the top of the home screen.
• A flashing icon means the device is searching for a signal.
• A solid icon means the signal is acquired or the wireless
device is connected.
GPS status
Wi‑Fi technology status
Bluetooth technology status
ANT+ sensor status
Battery level
Main Menu
From the home screen, select or to scroll through the main
menu.
Video Mode: Sets the video shooting mode (Video Modes,
page 4).
Photo Mode: Sets the photo shooting mode (Photo Modes,
page 5).
Lens Mode: Enables one or both lenses, and sets the field of
view (Lens Modes, page 4).
Wireless: Allows you to connect to other devices, including
mobile devices, Bluetooth microphones and sensors, ANT+
sensors, and compatible Garmin devices and remotes.
Setup: Allows you to set up camera features, change system
settings, and view system information (Setup Menu,
page 13).
Camera Mounts
Assembling the Tripod and Cradle
You can use the universal tripod cradle to attach the camera to
the included tripod or a standard camera tripod.
2 Camera Mounts
Page 7

Screw the tripod into the threaded hole in the bottom of the
1
tripod cradle.
Place one side of the camera into the cradle, fitting the
2
grooves in the side of the camera onto the teeth.
Press the other side of the camera down until it clicks.
2
Place the flanges on the bottom of the action cradle into the
3
compatible mount (not included), and secure the cradle with
a thumbscrew.
Press the other side of the camera down until it clicks.
3
Select an option:
4
• To shoot handheld video, keep the tripod legs closed.
The tripod operates as a handheld grip when the legs are
closed.
• To shoot video from a stationary location, open the tripod
legs and place the camera at the shooting location.
Assembling the Action Cradle and Mounts
You can use the included action cradle to attach your camera to
compatible VIRB action camera mounting accessories (not
included). Go to garmin.com/virb to purchase mounting
accessories.
Place one side of the camera into the cradle, fitting the
1
grooves in the side of the camera onto the teeth.
NOTE: Some mounting accessories may use a different
method to secure the camera to the mount. See the
instructions included with the mounting accessory for more
information.
Removing the Camera from the Cradle
Press the button À to open the cradle.
1
TIP: Avoid squeezing or obstructing the sliding portion of the
cradle Á when you press the button.
Tilt one side of the camera up, and remove the camera from
2
the mount.
Video
Preparing to Record a Video
Before you start recording, you should set up your camera for
the kind of footage you want to capture.
Select a lens mode to choose the size of the video and the
1
lens or lenses to use (Lens Modes, page 4).
Video 3
Page 8

Select a video recording mode (Video Modes, page 4).
2
Attach the camera to a mount or tripod suitable for the kind of
3
video you want to shoot (Camera Mounts, page 2).
Find a good shooting location and camera position (Tips for
4
Shooting 360-degree Video, page 4).
Use the Garmin VIRB app to preview the camera view
5
(Remote Viewfinder, page 7) and fine-tune the video
settings (Pro Settings, page 7).
Start recording (Recording a Video, page 4).
6
Tips for Shooting 360-degree Video
Your VIRB 360 camera may be unlike cameras you have used
before. Traditional cameras capture a fixed, rectangular field of
view, which requires you to frame shots carefully and follow the
subject to keep it in the frame. The VIRB 360 camera captures a
full 360-degree sphere of video, recording everything around it,
in every direction.
Shooting 360-degree video requires some considerations that
may differ from traditional video recording.
• Put the VIRB 360 camera in the middle of the action.
A traditional forward-shooting camera is often placed with all
the action in front of it. Because the VIRB 360 camera
records in all directions, you should consider every angle and
place the camera so that interesting video can be recorded in
front, behind, above, and below the camera.
• Avoid blocking portions of the video sphere.
You may block a large portion of the recorded video sphere if
you hold the camera closely in front of you or place it near a
wall or other obstruction. You should place the camera where
it has a clear view of the surroundings in all directions.
• Point the front lens toward the primary subject.
Although the camera records in all directions, the initial view
for a 360-degree video centers on the front lens.
• Try placing the camera in a higher position to capture a
broader, less-obstructed view.
A higher vantage point often provides a clearer, wider view.
When recording action, you can hold the camera higher using
the included tripod and grip, or you can mount the camera
above you using an optional head mount or helmet mount.
When recording an event, you can use a tripod to place the
camera in a higher location that provides a line of sight above
crowds and other visual obstructions.
• Check the lighting conditions in all directions.
When feasible, you should use the remote viewfinder in the
Garmin VIRB app to verify the lighting conditions in all
directions from the camera.
Recording a Video
NOTE: If the battery power becomes very low while recording
video, the device automatically stops recording, saves the video,
and safely turns off. The status LEDs flash rapidly when the
battery charge level is low.
Move the recording switch forward to start recording video.
1
If the device is off, it turns on automatically. The device starts
recording video immediately, and the red light turns on.
Move the recording switch backward to stop recording video.
2
The video is saved on the memory card as an .mp4 file. The
G-Metrix™ sensor data is saved on the memory card as a .fit
file.
360: Records spherical 360-degree video using both lenses.
The camera automatically stitches video from the two lenses
into one 360-degree video file. The camera captures 360degree video at 4K resolution. When you select 360 mode,
you should select a stitching distance.
Front Only, Rear Only: Records rectangular 16:9 video using
one lens. or points to the active lens. The camera
captures 16:9 video at 1080p resolution.
RAW: Records separate 200-degree hemispherical video files
from each lens, with a combined resolution of up to 5.7K. You
can edit or share the video from each lens separately, or you
can stitch both video files into a complete video sphere using
video editing software.
Changing the Stitching Distance
Each camera lens captures 200 degrees horizontally and
vertically, or slightly more than half of a sphere. When you are
shooting 360-degree video, the camera joins, or "stitches," the
two lens images at a set focal distance and removes the
overlapping parts of the images. This creates a full sphere of
video with little or no transition between the two lens images.
You can select the focal distance used for video stitching based
on your shooting environment.
From the main menu, select Setup > Stitch Distance.
1
Select a stitching distance:
2
• If you are shooting closer objects, indoors, or in closer
surroundings, select Near.
This option sets a stitching distance of about 5 m (16 ft.) to
optimize video stitching for most environments.
• If you are shooting distant objects, outdoors, or in a large,
open venue, select Far.
This sets a farther stitching distance to optimize video
stitching for distant objects or landscapes.
Video Modes
Select > Video Mode.
Video: Captures full motion video using one or both lenses,
based on the Lens Mode setting (Lens Modes, page 4).
Slow-Mo: Captures slow motion video. This mode is not
available when you are using the 360 lens mode.
Time-lapse: Captures time-lapse video at a selected frame
interval.
Recording a Time-Lapse Video
Time-lapse mode captures individual video frames at longer
intervals and creates a video that plays much faster than real
time. You can use time-lapse mode to record movements,
changes, or events that take place slowly over a long period of
time.
Time-lapse videos play at 30 frames per second. The length of
the video depends on the amount of time between video
frames. For example, if frames are recorded at a one-second
interval, each second of video covers 30 seconds of real time. If
frames are recorded at a 60-second interval, each second of
video covers 30 minutes of real time.
From the main menu, select Video Mode > Time-lapse.
1
Select a time interval between video frames.
2
For the best results, mount the device so it does not move
3
while recording.
Record a video.
4
Lens Modes
The lens mode determines which lens or lenses the camera
uses while shooting video, and the size of the field of view.
Select > Lens Mode.
4 Video
Page 9

Video Mode Specifications
Video
Mode
Video 360 4K (3840 × 2160 px) 30 fps
Slow-Mo 360 Not available Not available
Timelapse
Lens
Mode
Front Only
Rear Only
RAW 5K (2 files at 2496 × 2496 px)
Front Only
Rear Only
RAW 5K (2 files at 2496 × 2496 px) 60 fps
360 4K (3840 × 2160 px) User-defined
Front Only
Rear Only
RAW 5K (2 files at 2496 × 2496 px) User-defined
Resolution Framerate
1080p (1920 × 1080 px) 60 fps
30 fps
5.7K (2 files at 2880 x 2880)
NOTE: 5.7K resolution mode
requires the Garmin VIRB
mobile app. (Recording 5.7K
RAW Video, page 9)
1080p (1920 × 1080 px) 120 fps
interval
1080p (1920 × 1080 px) User-defined
interval
interval
Microphone Modes
You can change the microphone mode based on the recording
environment.
From the main menu, select Setup > Microphone.
Spatial: Records spatial audio using all four
microphones. Spatial audio records 360-degree, locationspecific sound. While playing the video using a compatible
player, the audio perspective follows the video perspective
when you view different parts of the video sphere. Spatial
audio is especially effective when viewing a video using a
virtual reality headset. Spatial audio recording is not available
when you are using the Front Only or Rear Only lens modes.
Rear Only: Records mono audio using only the rear
microphone. This can help to reduce wind noise.
Off: Turns off all internal and external microphones, and records
video without audio.
Outputting Live Video to an External Device
You can use a micro HDMI® cable to output live video from the
camera to an external device, such as a broadcasting or livestreaming device.
Slide the latch À to open the side door.
1
Photos
Taking Photos
Your camera can capture spherical 360-degree photos. You can
change the photo mode to capture a single photo, a photo burst,
or a series of time-lapse photos (Photo Modes, page 5).
• To take a photo, select .
The camera takes a photo or photos in the active photo mode
after the default self timer expires (Setting the Default Photo
Self Timer, page 5).
• To increase the self-timer delay, hold until the correct
delay time appears on the screen, and release .
The self-timer counts down, and the status LEDs flash
yellow. The camera beeps to alert you when the self timer is
close to expiring, and it beeps rapidly immediately before the
camera takes a photo. After the self-timer expires, the
camera takes a photo or photos in the active photo mode.
• While recording a video, select .
The camera marks the current video frame as a photo. You
can use the VIRB Edit application to save the marked frame
as a separate photo file (VIRB Edit, page 13). The camera
cannot take a photo burst or time-lapse photos while
recording video.
Setting the Default Photo Self Timer
You can change the default photo self timer from 0 to 60
seconds. The default self timer is used each time you press .
From the main menu, select Setup > Self Timer.
1
Select a time.
2
Photo Modes
You can change the photo mode to capture a single photo, a
photo burst, or time-lapse photos. You can use either the
camera or the Garmin VIRB app to change the photo mode
(Taking a Photo Using the Garmin VIRB App, page 8). Some
options are available only when using the Garmin VIRB app.
On the camera, select > Photo Mode.
Single: Enables you to take a single photo using automatic
exposure.
• Type sets the exposure type (Photo Exposure Types,
page 9). This option is available only in the Garmin
VIRB app.
Burst: Enables you to rapidly take multiple images over a set
number of seconds. This mode is ideal for capturing photos
of people or objects in motion.
• Burst Rate sets the speed at which the camera takes the
sequence of photos.
Time-lapse: Enables you to capture a series of photos at set
time or distance intervals.
• Type sets the time-lapse video type. This option is
available only in the Garmin VIRB app.
• Interval sets the time interval between photos.
Voice Control
Plug the cable into the VIDEO port Á on the camera.
2
NOTE: You cannot connect a power cable and a video cable
at the same time. To provide external power while outputting
video, you can use an optional powered mount
accessory. Go to garmin.com/virb to purchase accessories.
Plug the other end of the cable into your external device.
3
Photos 5
The voice control feature allows you to control your camera
using spoken commands.
Voice control is not available for all device languages. By
default, the voice control language is the same as the software
interface language, when available. You can set your preferred
voice control language separately from the interface.
Setting Up Voice Control
From the main menu, select Setup > Voice Control.
1
Page 10

Select Status to turn on the toggle switch.
2
Select Language, and select a language.
3
Select Things to Try to view a list of available voice control
4
commands (optional).
You can control the camera by saying commands in the
selected language.
Controlling the Camera Using Voice Commands
Say OK, Garmin to activate the voice control feature.
1
The camera plays a tone to indicate the camera is listening
for a command.
Say a command.
2
When the camera recognizes your command, it plays a
success tone. If the camera does not recognize your
command, it plays an error tone.
Voice Control Commands
You can say any of these commands to control your VIRB 360
camera using your voice. You must activate the voice control
feature by saying OK, Garmin before you say a command.
Start Recording: Starts recording video in the current video
mode.
Stop Recording: Stops recording video.
Remember That: Places a bookmark in the video. This
command allows you to mark key moments in the video as
they occur so you can find them easily while editing the
video. This command is available only while you are
recording a video.
Take a Picture: Takes a single photo while not recording video,
or places a bookmark in the video while recording video.
Enable Wi-Fi: Enables the Wi‑Fi radio. This allows you to
connect the camera to the Garmin VIRB app.
Disable Wi-Fi: Disables the Wi‑Fi radio.
Voice Control Tips
• Speak in a normal voice directed at the device.
• Reduce background noise to increase the accuracy of the
voice recognition.
• Before each command, say OK, Garmin.
• Listen for a tone to confirm that the camera successfully
recognized a command.
• Watch the status LEDs to confirm the camera recognized the
command.
The LEDs flash yellow twice to indicate the camera
recognized the command. The LEDs flash red twice to
indicate the command was not recognized.
G-Metrix
Using the built-in GPS receiver and sensors, your camera can
detect G-force, altitude, speed, orientation, and many other
performance metrics. This data is saved automatically as GMetrix data. You can capture even more G-Metrix data by
wirelessly connecting external ANT+ sensors, other Garmin
devices, and compatible Bluetooth sensors, such as OBDII sensors.
You can use the Garmin VIRB mobile app or the VIRB Edit
desktop application to overlay G-Metrix data onto your video
using gauges, graphs, and more. You can play and share your
edited videos to show your speed, acceleration, heart rate, and
other sensor data in real time.
G-Metrix Data
Your camera can record these types of G-Metrix data using the
built-in sensors.
Speed Rotations
G-force RPM
Pace Altitude
Distance Bearing
Lap times Orientation
Lap count Elevation
Jump height Grade
Hang time Pitch
Jump distance Roll
GPS location Vertical speed
Track shape and position Vertical distance
Your camera can record these types of G-Metrix data using
optional external sensors.
G-Metrix Data Required Sensor
Heart rate Compatible ANT+ heart rate monitor
Cadence Compatible ANT+ bicycle cadence sensor
Power output in watts Compatible ANT+ power meter
Temperature Compatible ANT+ temperature sensor
Automotive data Compatible Bluetooth OBD-II sensor
Garmin VIRB App
The Garmin VIRB app is an essential companion for your VIRB
360 camera that extends the camera's features and
functions. The app connects to your camera using a Wi‑Fi
connection and provides remote access to basic and extended
camera features.
• Remotely control video and photo recording.
• Preview your shot on a live 360-degree viewfinder.
• Fine tune the image with on-screen pro settings.
• Change the camera settings.
• View and share recorded videos and photos.
• Live stream video from your camera to the YouTube™ video
community or the Facebook™ social network (Apple® devices
only).
You can download the Garmin VIRB app free from the Apple
App StoreSM or from the Google Play™ Store. For more
information about the Garmin VIRB app features and
compatibility, go to garmin.com/virbapp.
Connecting to the Garmin VIRB App Using NFC
To connect to the Garmin VIRB app using near-field
communication (NFC) technology, you must use a mobile device
with Android™ that has NFC technology. If your mobile device is
not compatible with this feature, you can connect to the app
using the Wi‑Fi settings (Connecting to the Garmin VIRB App
Using Wi‑Fi Settings, page 7).
The Garmin VIRB app connects to your VIRB 360 camera using
Wi‑Fi technology.
Turn on your VIRB 360 camera.
1
On your mobile device, verify the NFC feature is enabled.
2
The NFC feature is usually found in the wireless settings. For
more information, see your mobile device owner's manual.
Touch the NFC area of your mobile device to the camera
3
screen.
The NFC touch area is usually located on the back of the
mobile device, near the middle. This location varies based on
6 G-Metrix
Page 11

the device manufacturer and model. For more information,
see your mobile device owner's manual.
After you touch the camera, the camera's Wi‑Fi access point
turns on, and the access point name and password appear
on the camera screen.
From the app store on your mobile device, install and open
4
the Garmin VIRB app.
The app automatically searches for your camera and displays
a security prompt.
Touch the NFC area of your mobile device to the camera
5
screen.
The app receives the access point password automatically.
The remote viewfinder and camera controls appear in the
Garmin VIRB app.
In the future, you can touch your mobile device to the camera
screen to automatically connect to the camera and open the
Garmin VIRB app.
Connecting to the Garmin VIRB App Using Wi‑Fi Settings
TIP: If you are using a mobile device with Android that has near
field communication (NFC) technology, you can connect your
camera more quickly using NFC (Connecting to the Garmin
VIRB App Using NFC, page 6).
The Garmin VIRB app connects to your VIRB 360 camera using
Wi‑Fi technology. You can connect the app directly to the
camera, or you can connect the app and camera to the same
wireless network.
From the app store on your mobile device, install the Garmin
1
VIRB app.
On your VIRB 360 camera, from the main menu, select
2
Wireless > Wi-Fi, and select the Wi-Fi toggle switch to turn
on the Wi‑Fi radio.
TIP: You can also hold for two seconds to quickly turn the
Wi‑Fi radio on or off.
The camera broadcasts a Wi‑Fi access point. The access
point name and password appear on the camera screen.
While the Wi‑Fi radio is turned on, appears on the home
screen, and the status LED flashes blue periodically.
If you are using an Apple mobile device, go to the Wi‑Fi
3
settings on your mobile device, and connect to the camera
access point using the name and password on the camera
screen.
On your mobile device, start the Garmin VIRB app.
4
The app searches for your camera.
If you are using a mobile device with Android, when the
5
security prompt appears, enter the password for the camera
access point.
TIP: The access point name and password appear on the
camera screen.
The app connects to your camera.
The first time you connect your camera, the app prompts you
to connect to a nearby wireless network.
Follow the on-screen instructions to connect the camera and
6
app to a Wi‑Fi network (optional).
You can also manually connect to a Wi‑Fi network later
(Connecting to a Wi‑Fi Network, page 10).
The remote viewfinder and camera controls appear in the
Garmin VIRB app.
Remote Viewfinder
The remote viewfinder appears in the Garmin VIRB app while
the app is connected to your camera.
Select to enable or change the pro settings (Pro Settings,
page 7).
Displays the sensor status, shooting mode, remaining memory
À
card storage, and battery charge level.
Select to change the camera settings (App and Camera Settings,
page 8).
When you are using the 360 lens mode, swipe left, right, up, or
Á
down to view a different part of the 360-degree video sphere.
Tap to show or hide menu icons.
Select to switch between multiple connected cameras (Switching
Cameras, page 11).
Select to view or share recorded videos and photos (Garmin
Â
VIRB App Gallery, page 9).
Select to start recording a video or to take a photo.
Select to change the video or photo shooting mode (Recording a
Ã
Video Using the Garmin VIRB App, page 8).
Pro Settings
From the viewfinder in the Garmin VIRB app, select .
TIP: While pro settings are enabled, you can swipe left from the
viewfinder to quickly view or change the current pro settings.
: Enables or disables the pro settings. Disabling the pro
settings sets the camera to full automatic mode. Your
preferences are saved while the pro settings are disabled,
and they are restored when you enable the pro settings
again.
Exposure Bias: Sets the exposure bias. Exposure bias
affects the level of brightness.
ISO Limit: Sets the maximum level of sensitivity and image
noise. The camera automatically uses the best ISO level for
the lighting conditions, up to this maximum. Higher ISO
values have more visible noise or grain. Higher ISO values
are best for use in low light environments or indoors. Lower
ISO values are best for use in sunlight. You can use the 6400
option for brighter video in low light, the 1600 option for
moderate brightness in low light, or the 400 option for darker
video in low light.
Color Curve: Sets the color palette. You can use the Vivid
option for a more vibrant color palette, or the Flat option for a
more neutral color palette.
Sharpness: Sets the level of sharpness. You can use the
High option for a sharper look, the Medium option for
moderate sharpness, or the Low option for a softer look.
White Balance: Adjusts the color tone based on your
surroundings. The device can automatically adjust the white
balance, or you can manually adjust the white balance. You
can use the 2800K option for incandescent light, the 4000K
option for fluorescent light, the 5000K option for daylight, the
6500K option for sunny conditions, or the 7500K option for
cloudy conditions.
Exposure Lock: Enables or disables exposure lock for videos.
You can enable exposure lock to ensure consistent light
sensitivity in your video capture. When recording a time-lapse
Garmin VIRB App 7
Page 12

video, this helps eliminate stray frames with slightly brighter
or darker images.
Exposure Balance: Sets which lens or lenses should be
used to determine the exposure level. The camera can set
independent exposure levels for each lens, or it can set a
single exposure level based on the front lens, the rear lens,
or both lenses. Independent exposure levels can improve the
exposure of each lens when the lighting conditions for each
lens are different. A single exposure level improves the
stitching and blending of the two lens images and provides a
more uniform, consistent appearance for the full video
sphere.
Recording a Video Using the Garmin VIRB App
From the viewfinder, select the shooting mode icon in the
1
lower-right corner.
Select .
2
Select a video mode:
3
• To record regular speed video, select Video.
• To record slow-motion video, select Slow-Mo.
• To record time-lapse video, select Time-lapse, and select
a frame interval (Recording a Time-Lapse Video, page 4).
Select to start recording.
4
When you are finished, select to stop recording.
5
Taking a Photo Using the Garmin VIRB App
From the viewfinder, select the shooting mode icon.
1
Select , and select a photo mode (Photo Modes, page 5).
2
Select settings for the photo mode (optional).
3
Select the back button or touch anywhere on the viewfinder
4
background to close the menu.
Select .
5
The camera takes one or more photos based on the active
photo mode.
Broadcasting Live Video
NOTICE
Live broadcasts may be visible to many viewers. Use caution
when broadcasting live video.
It is your responsibility to follow all laws and restrictions for live
broadcasts in your jurisdiction.
Live broadcasting requires the app to upload large amounts of
data. Regular data limits and charges from your carrier or
internet service provider apply. Contact your carrier or internet
service provider for more information about data limits or
charges.
To broadcast live video, your camera must be connected to an
Apple device with the Garmin VIRB app and an active internet
connection. Live broadcasting is not available for mobile devices
with Android.
You can use the Garmin VIRB app to stream live video to social
networks, including the Facebook social network and the
YouTube video community. You can stream 360-degree videos
or standard 16:9 single-lens videos.
Connect your camera to the Garmin VIRB app.
1
From the Garmin VIRB app, select the shooting mode icon in
2
the lower-right corner, and select Broadcast Live.
Select an option:
3
• To stream to the YouTube video community, select
YouTube, select Sign in with Google, and follow the onscreen instructions to sign in to your Google™ account.
• To stream to the Facebook social network, select
Facebook, select Sign in to Facebook, and follow the
on-screen instructions to sign in to your Facebook
account.
Select one or more options to edit the broadcast details:
4
• To change the title of the broadcast, select Title.
• To enter a description of the broadcast, select
Description.
• To change the resolution of the broadcast. select
Resolution.
NOTE: Higher resolutions require a higher-speed internet
connection and consume a larger amount of data.
• To change the privacy setting for the broadcast, select
Privacy.
NOTICE
The broadcast privacy options are provided and
implemented by the selected third-party social network.
Video or data broadcast to the internet may be visible to
third parties. Garmin is not responsible for the privacy of
your video or data.
• To sign out of your account or sign in to a different
account, select Sign Out.
Select the viewfinder image to close the menu.
5
Select GO LIVE to start broadcasting.
6
App and Camera Settings
You can use the Garmin VIRB app to change video, photo, and
system settings on your connected VIRB camera. You can also
change settings and view software information for the Garmin
VIRB app.
From the viewfinder, select .
Friendly Name: Sets the name that identifies your camera to
other Bluetooth devices.
Lens Mode: Sets the lens mode for the connected camera
(Lens Modes, page 4).
Live Preview Audio: Plays the live audio received by the
camera microphone on your mobile device speakers.
Network Name and Password: Sets the network name
(SSID) and password for the camera access point.
WiFi Connections: Allows you to connect the camera to a Wi‑Fi
access point, view saved Wi‑Fi networks, and forget saved
Wi‑Fi networks.
Check for Updates: Allows you to download and install
software updates for the connected camera.
Locate Camera: Plays a repeating tone from the connected
camera. This is useful to identify a specific camera when
multiple cameras are connected. It can also help you to
locate a nearby, misplaced camera.
Video Mode: Sets the video mode (Video Modes, page 4).
Resolution: Sets the video resolution when using RAW lens
mode.
Loop: Allows you to record a video loop and sets the duration of
the loop recording (Recording a Video Loop, page 9).
Type: Sets the time-lapse interval type (Recording a Time-
Lapse or Travelapse™ Video, page 9).
Photo Mode: Sets the photo mode (Photo Modes, page 5).
Self Timer: Sets the photo self timer from 0 to 60 seconds.
Type: Sets the photo exposure type (Photo Exposure Types,
page 9).
GPS: Enables the camera to determine your location, speed,
and elevation using GPS satellite signals. When this setting
is enabled, the camera includes GPS information in the GMetrix data when you record a video or photo.
NOTE: Your camera records GPS position data at all times
when the GPS setting is enabled. This data is not collected
by Garmin.
8 Garmin VIRB App
Page 13

Recording Light: Turns the recording LED on or off. This can
be useful to eliminate ambient light from the LED when
recording in darker environments.
Tones: Turns the camera tones on or off. When this setting is
enabled, tones play to indicate various camera actions and
statuses, such as capturing a photo, starting recording, or
connecting to a device.
Microphone: Allows you to change the microphone mode or
turn the microphones off (Microphone Modes, page 5).
Units: Sets the units of measure used to display G-Metrix data
in the Garmin VIRB app.
About: Displays information about the Garmin VIRB app,
including the version, license information, and the privacy
agreement.
Allow anonymous usage reporting: Shares anonymous data
to Garmin to help improve the app.
Photo Exposure Types
You can use several photo exposure types to take single
photos.
Standard: Takes a single photo at standard exposure. This
option is useful for most daytime photos.
Bracket: Takes three consecutive photos automatically, using
three different exposure values (exposure bracketing). This
option is useful for composing high dynamic range
(HDR) photos.
Recording 5.7K RAW Video
Using the Garmin VIRB app, you can set the camera to record
high-bitrate RAW video at 5.7K resolution. This mode allows you
to capture the highest level of detail in all directions.
When recording in RAW mode, the camera records separate
hemispherical video files from each lens. You can stitch these
files into a spherical video using video editing software.
NOTE: 5.7K mode is a highly demanding mode that causes your
camera to work harder. The camera's battery run time, memory
card recording time, and ability to operate in hot environments
are reduced. The camera protects itself from overheating and
shuts down automatically if the internal temperature exceeds the
operating temperature threshold.
Connect the camera to the Garmin VIRB app.
1
From the app viewfinder, select > Lens Mode > RAW.
2
Scroll to the Video Settings section, and select Resolution
3
> 5.7K.
Recording a Video Loop
You can use the Garmin VIRB app to set your camera to record
a video loop. Loop recording allows you to record video
continuously but save only the most recent video footage. You
can select the number of minutes of video to save. This enables
you to save storage space when you want to capture key
moments but do not want to save all footage of an activity. This
feature is useful when using the device as a driving recorder or
when you want to save only the highlights of an event.
Connect your camera to the Garmin VIRB app.
1
From the app viewfinder, select > Loop.
2
Select the number of minutes of video to save.
3
Start recording video.
4
The most recent footage is saved on the memory card, up to the
number of minutes selected in step 2.
Recording a Time-Lapse or Travelapse™ Video
You can use the Garmin VIRB app to set up the time-lapse
recording mode for your camera. Time-lapse mode captures
individual video frames at longer intervals and creates a video
that plays much faster than real time. You can record a standard
time-lapse video or a Travelapse video.
Standard time-lapse mode captures individual video frames at
set time intervals, and it is useful for recording movements,
changes, or events that take place slowly over a long period of
time. Travelapse mode captures video frames at a set distance
interval. For example, you can capture one video frame for
every kilometer or mile you travel on a road trip. This allows you
to record and share a short video of your whole road trip and the
places you traveled.
Use an appropriate tripod or mounting accessory to mount
1
the camera in a fixed position.
Connect your camera to the Garmin VIRB app.
2
From the app viewfinder, select > Video Mode > Time-
3
lapse.
Select Type, and select an option.
4
• To record standard time-lapse videos, select Standard.
• To record your travels at a distance interval, select
Travelapse.
Select Interval, and select the time or distance interval
5
between video frames.
Start recording a video.
6
The camera records video frames at the selected interval.
Garmin VIRB App Gallery
You can use the Garmin VIRB app to view, edit, and share
videos and photos stored on your camera.
With your camera connected to the app, from the viewfinder,
select the thumbnail image in the lower left corner.
Select to change the G-Metrix gauge overlays for the selected
video.
Select to change the viewing mode for 360-degree video. You
can view 360-degree videos on the screen or in a virtual reality
(VR) headset.
Select to apply image stabilization to the selected video.
Select to change the camera settings.
Displays a preview of the selected photo or video.
À
Drag up or down to expand or shrink the library.
Á
Select to mark the selected video or photo as favorite.
Select to edit, save, and share the selected photo or video.
Select to delete the selected video or photo.
Select a photo or video thumbnail to preview it.
Â
Viewing a Photo or Video
From the Garmin VIRB app viewfinder, select the thumbnail
1
image in the lower-left corner.
From the library in the lower half of the gallery, select a video
2
or photo thumbnail.
A preview of the item appears.
Garmin VIRB App 9
Page 14

NOTE: The app cannot play or preview videos recorded in
RAW mode. You can use the VIRB Edit desktop application
to view and edit RAW videos.
Select an option:
3
• Touch anywhere on the preview image to view the video
or photo on the full screen.
• Rotate your mobile device to view the item in portrait or
landscape mode.
• If you are viewing 360-degree spherical content, drag the
image to view different parts of the video or photo sphere.
• If you are viewing a video, select to start playback.
Using Virtual Reality (VR) Viewing Mode
You can view 360-degree spherical videos in virtual reality (VR)
mode. VR mode allows you to move your phone around you to
view different parts of the video sphere. This allows you to
experience your video differently and discover new details each
time you watch it. If the video was recorded with spatial audio,
the audio perspective changes as you change your view of the
video sphere.
For an even more immersive experience, you can view the video
in a VR headset compatible with the Google Cardboard™ VR
platform, and you can also use headphones to experience the
full effect of the spatial audio.
From the Garmin VIRB app gallery, select a 360-degree
1
video.
Select .
2
Select an option:
3
• To view the video using a VR headset, select Cardboard
VR, and place your device into the VR headset.
This option requires a headset compatible with the Google
Cardboard VR platform.
• To view the video using only your phone screen, select
360°.
Select to start playback.
4
Move your phone around you or look around with your
5
headset to view different parts of the video sphere.
Your phone screen or headset acts as a virtual window into the
video sphere. As you move it, you can look up, down, in front of,
beside, or behind yourself.
Editing and Sharing a Video
From the Garmin VIRB app gallery, select a video.
1
Select an option:
2
• If you are using an Apple device, select .
• If you are using a device with Android, select .
The editing page appears. Tabs along the bottom of the page
allow you to edit different video features.
Select an option:
3
• To edit the video orientation and image stabilization,
select .
• To trim the video, select .
• To change the playback speed, select .
• To change the recorded audio volume or to add a musical
soundtrack, select .
• To edit the G-Metrix overlays, select .
When you are finished editing the video, select Next.
4
The app processes the video. This may take a while
depending on the length of the video.
TIP: By default, the app process the video using a mobile
device quality profile. To save or share a full quality video,
you can select Switch to Highest Quality.
After the app finishes processing the video, select an option:
5
• To save the video to your mobile device, select .
• To share the video to a social network using an Apple
device, select .
• To share the video to a social network using a device with
Android, select .
Connecting to a Wi‑Fi Network
NOTICE
Connecting to a public or unsecured network may expose your
video and sensor data to others. Use caution when connecting
to an unsecured network.
To control the camera using an existing Wi‑Fi network, the
network must be set up to allow connected devices to see and
communicate with each other.
You can use the Garmin VIRB app to connect your VIRB
camera to a Wi‑Fi network. This could be a home network or a
business network.
While connected to a Wi‑Fi network, the Garmin VIRB app
communicates with your camera over the network. If the network
provides access to the Internet, this feature allows your mobile
device maintain an Internet connection while you control your
camera using the Garmin VIRB app.
Connect your camera to the Garmin VIRB app (Connecting to
1
the Garmin VIRB App Using Wi‑Fi Settings, page 7).
From the Garmin VIRB app viewfinder, select > WiFi
2
Connections.
A list of nearby Wi‑Fi access points appears.
Select your Wi‑Fi network, and enter the network password.
3
The app and the camera connect to the Wi‑Fi network.
The app and camera save the network information and connect
automatically the next time the camera is turned on and within
range of the network. Saved networks appear in the Wi-Fi menu
on your camera.
If you have additional VIRB cameras, you can add them to the
network to control multiple cameras using the Garmin VIRB app
(Adding a Camera to the Network, page 11).
Turning the Wi‑Fi Radio On or Off
From the main menu, select Wireless > Wi-Fi, and select the
Wi-Fi toggle switch.
TIP: You can also hold for two seconds to quickly turn the
Wi‑Fi radio on or off.
While the Wi‑Fi radio is turned on, appears on the home
screen, and the status LED flashes blue periodically.
Changing the Wi‑Fi Connection
After you have connected to a Wi‑Fi network, saved networks
appear in the Wi-Fi menu on your camera. You can manually
change the Wi‑Fi connection to connect to a saved network, or
to force the camera to broadcast its own access point.
From the main menu, select Wireless > Wi-Fi.
1
Select or to scroll through the list of Wi‑Fi connections.
2
Select an option:
3
• To enable the camera access point and disconnect from
other networks, select the access point.
appears next to the access point name.
• To disable the camera access point and connect to a
wireless network, select the saved network.
Forgetting a Wi‑Fi Network
You can use the Garmin VIRB app to forget a saved network
and remove it from your camera.
With your camera connected to the Garmin VIRB app, from
1
the app viewfinder, select > WiFi Connections.
10 Garmin VIRB App
Page 15

Saved networks appear at the top of the list, below the AutoConnect To heading.
Select Forget next to the network you want to remove from
2
your camera.
After you forget a network, the camera no longer connects to it
automatically.
Multiple Camera Network
You can create a network of multiple VIRB cameras and control
all the cameras using the Garmin VIRB app. You can switch
between the connected cameras to view the viewfinder and
controls for each camera.
To connect multiple cameras, all the cameras and your mobile
device must be connected to the same wireless access point or
network.
You can set up the network using the access point feature of
one VIRB camera. The app and all your cameras connect to this
access point.
You can also set up a camera network using an existing Wi‑Fi
network. The app and all cameras connect to the Wi‑Fi network.
This option is useful when you want to provide internet access to
your mobile device while controlling your cameras.
Setting Up a Camera Network
You can set up a multiple-camera network using the access
point feature of one VIRB camera. This allows the VIRB app to
control all your cameras through this access point.
The first time you use multiple cameras with the Garmin VIRB
app, you must set up the camera access point and connect
another camera to it.
Turn on the first camera, and turn on the Wi‑Fi radio (Turning
1
the Wi‑Fi Radio On or Off, page 10).
The camera broadcasts a Wi‑Fi access point. You should not
connect this camera to the app yet.
Turn on the second camera, and connect it to the app
2
(Connecting to the Garmin VIRB App Using Wi‑Fi Settings,
page 7).
The camera connects to the app, and the viewfinder appears.
From the Garmin VIRB app viewfinder, select > WiFi
3
Connections.
A list of nearby Wi‑Fi access points appears.
Select the access point broadcast by the first camera, and
4
enter the password.
TIP: The access point name and password appear on the
first camera's screen.
The app and the second camera connect to the access point.
The app communicates with both cameras through the
access point. You can select in the viewfinder to switch
between your connected cameras (Switching Cameras,
page 11).
The app and cameras save the Wi‑Fi network information. The
next time you turn on your cameras, you should turn on the
access point camera first, followed by the other cameras. The
cameras connect automatically.
If you have additional VIRB cameras, you can add them to the
camera network (Adding a Camera to the Network, page 11).
Adding a Camera to the Network
Before you can add a camera to a camera network, you must
complete one of these tasks:
• Set up a camera network using a VIRB camera access point
(Setting Up a Camera Network, page 11).
• Connect one or more cameras and the Garmin VIRB app to a
Wi‑Fi network (Connecting to a Wi‑Fi Network, page 10).
If the Garmin VIRB app is connected to your cameras using a
network or access point, you can add cameras to the camera
network.
With the camera network turned on, turn on the new camera.
1
On the new camera, turn on the Wi‑Fi radio (Turning the
2
Wi‑Fi Radio On or Off, page 10).
The new camera broadcasts a Wi‑Fi access point.
On your mobile device, go to the Wi‑Fi settings, and connect
3
to the access point broadcast by the new camera.
TIP: The access point name and password appear on the
new camera's screen.
For more information about connecting your mobile device to
a Wi‑Fi network, see your mobile device owner's manual.
On your mobile device, start the Garmin VIRB app.
4
The viewfinder for the new camera appears.
Select > WiFi Connections.
5
A list of nearby Wi‑Fi access points appears.
Select the Wi‑Fi access point or network used by your
6
existing camera network, and enter the network password.
This could be a VIRB camera access point or a Wi‑Fi
network.
The app and the new camera connect to the network. You
can select in the viewfinder to switch between your
connected cameras, including the new camera (Switching
Cameras, page 11).
Switching Cameras
When multiple cameras are connected to the Garmin VIRB app,
you can switch between the cameras to control each camera.
While a connected camera is active, you can access the
viewfinder, camera controls, and settings for that camera.
From the viewfinder, select .
1
Select a camera name.
2
The viewfinder for the selected camera appears.
Remote Control
You can remotely start recording, stop recording, and take
pictures on your VIRB camera using the VIRB Remote
accessory or a compatible Garmin device with the VIRB remote
feature, such as a watch, activity tracker, or navigation device.
You can also use one VIRB camera to control one or more other
VIRB cameras. For more information about VIRB remote
compatibility, see the owner's manual for your Garmin device.
Remote Control 11
Page 16

The VIRB Remote accessory is a portable, mountable remote
that can control your VIRB camera using ANT+ wireless
technology. It has tactile buttons that allow you to start
recording, stop recording, or take a photo without looking at the
remote. Go to garmin.com/virb to purchase a VIRB Remote
accessory.
Controlling Your VIRB Camera Remotely
These instructions allow you to enable the remote control
feature for one camera or for your main camera. If you have
multiple cameras, you should follow the instructions for
controlling multiple cameras remotely (Controlling Multiple VIRB
Cameras, page 12).
On your camera, from the main menu, select Wireless >
1
Remote, and select the toggle switch to turn on the remote
control feature.
The camera searches for a nearby main VIRB camera.
After the search times out, select .
2
The remote control settings appear, with this camera set as
the main VIRB camera.
Select an option:
3
• On your compatible Garmin device, launch the VIRB app
or feature. See the owner's manual for the device for more
information.
• On the VIRB remote, follow the pairing instructions in the
accessory manual.
Controlling Multiple VIRB Cameras
You can use one VIRB camera to control one or more other
VIRB cameras. This allows you to perform the same action
using multiple cameras at the same time.
To control multiple cameras, you must choose a main camera.
This camera controls the other cameras, which are called
extended cameras. When you start recording or take a photo on
the main camera, the extended cameras start recording or take
a photo at the same time. When you send a remote command
using a VIRB remote or a compatible Garmin device, the main
camera receives the remote command and sends it to the
extended cameras.
Bring all of your VIRB cameras within 3 m (10 ft.) of each
1
other.
On your main VIRB camera, from the main menu, select
2
Wireless > Remote, and select the toggle switch to turn on
the remote control feature.
The camera searches for a nearby main VIRB camera.
After the search times out, select .
3
The remote control settings appear, with this camera set as
the main VIRB camera.
Exit the menu and return to the home screen.
4
On your extended VIRB camera, select Wireless > Remote,
5
and select the toggle switch to turn on the remote control
feature.
The camera searches for your main VIRB camera and
connects to it automatically as an extended camera.
TIP: If your camera is set to the incorrect mode, you can
select VIRB Type to switch between the Main VIRB and
Extended VIRB modes.
Repeat step 5 for each extended camera.
6
After all of the cameras are connected, select an option:
7
• To start and stop recording on all of your cameras, use the
recording switch on your main camera.
• To take a photo from all of your cameras, select the photo
key on your main camera.
• To control all of your cameras remotely, pair a VIRB
remote or compatible Garmin device with your main
camera (Controlling Your VIRB Camera Remotely,
page 12).
Enabling the Remote Wake Up Feature
The Wake On feature enables your camera to remain in a lowpower state instead of turning off. This allows your remote
control device to wake the camera to start recording or take a
photo.
NOTE: This feature consumes some battery power when the
camera is off. To avoid draining the battery, you should disable
this feature when you are not using the camera, or when you
store the camera overnight or for a longer time period.
Select Wireless > Remote > Wake On.
When you turn off the camera, it enters remote wake-up
mode.
ANT+ Sensors
Your device can be used with wireless ANT+ sensors. For more
information about compatibility and purchasing optional sensors,
go to http://buy.garmin.com.
Pairing ANT+ Sensors
When you pair a compatible ANT+ sensor with your device, the
sensor data is recorded as G-Metrix data.
Put on the heart rate monitor, and install and activate the
1
sensor.
Bring the camera within 3 m (10 ft.) of the sensor.
2
From the main menu, select Wireless > Sensors > Add
3
New.
The camera detects your sensor, and the sensor name
appears on the screen.
Select the sensor name, and select .
4
After the sensor is paired with your device, the sensor status
changes to Connected.
After you pair the first time, your camera automatically
recognizes and connects to the ANT+ accessory each time it is
activated and within range.
Removing Paired ANT+ Sensors
From the main menu, select Wireless > Sensors.
1
Select a sensor.
2
Select Forget Device > .
3
Bluetooth Devices
Connecting a Wireless External Microphone
You can connect a Bluetooth hands-free device with your VIRB
camera.
From the main menu, select Wireless > Bluetooth > Status
1
to turn on Bluetooth wireless technology.
Select Add New.
2
Select the wireless device to pair.
3
After the wireless device is paired, the device status changes
to Connected.
Connecting an OBD-II Device
Your VIRB camera can pair with a compatible Bluetooth
ELM327 on-board diagnostics (ODB-II) device to record
automotive data from your OBD-II compliant vehicle.
NOTE: Different vehicles provide different data. Not all vehicles
and OBD-II devices are compatible with the camera.
12 ANT+ Sensors
Page 17

Install your ELM327 compatible OBD-II device in the OBD-II
1
port of your vehicle.
TIP: See the owner's manual for your vehicle and your OBD-
II device for information about locating the OBD-II port and
installing the OBD-II device.
If necessary, enable pairing mode on your OBD-II device.
2
TIP: See the owner's manual for your OBD-II device to
enable pairing mode.
From the VIRB camera main menu, select Wireless >
3
Bluetooth > Status to turn on Bluetooth wireless technology.
Select Add New.
4
Select the OBD-II device to pair.
5
TIP: If your OBD-II device does not appear in the list, confirm
that it is still in pairing mode and search again.
After the OBD-II device is paired, the device status changes
to Connected.
Removing Paired Bluetooth Devices
From the main menu, select Wireless > Bluetooth.
1
Select a wireless device.
2
Select Forget > .
3
VIRB Edit
The VIRB Edit application provides easy access to these tools
and services for your device.
• Review and edit recorded videos
• Apply image stabilization to recorded videos
• Add G-Metrix gauges, graphs, and more
• Add titles and transitions
• Edit videos from multiple cameras
• Update software and features
• Additional editing, sharing, and playback features
The VIRB Edit application is available for Windows® and Mac
®
computers. Go to garmin.com/VIRBEdit for more information.
Customizing the Device
Setup Menu
NOTICE
Select > Setup.
Stitch Distance: Sets the focal distance used to stitch 360-
degree video (Changing the Stitching Distance, page 4).
Voice Control: Allows you to control your camera using spoken
commands (Voice Control, page 5).
Record Light: Turns the recording LED on or off. This can be
useful to eliminate ambient light from the LED when
recording in darker environments.
Tones: Turns the camera tones on or off. When this setting is
enabled, tones play to indicate various camera actions and
statuses, such as capturing a photo, starting recording, or
connecting to a device.
Self Timer: Sets the length of the default self timer used when
you take a photo.
Microphone: Allows you to change the microphone mode or
turn the microphones off (Microphone Modes, page 5).
System: Allows you to change system settings, such as
language, units, region, and GPS.
SD Card: Allows you to view detailed information about the
installed memory card or format the memory card.
About: Displays important software information, your unit ID,
and regulatory and compliance information.
Formatting Your Memory Card
NOTICE
Erased data cannot be restored.
You can format the memory card installed in your camera to
erase all photos, videos, and other data. You may also need to
format the memory card the first time you use it in your camera.
From the main menu, select Setup > SD Card > Format
Card > .
System Settings
From the main menu, select Setup > System.
GPS: Enables the camera to determine your location, speed,
and elevation using GPS satellite signals. When this setting
is enabled, the camera includes GPS information in the GMetrix data when you record a video or photo.
NOTE: Your camera records GPS position data at all times
when the GPS setting is enabled. This data is not collected
by Garmin.
Language: Sets the on-screen text language.
Units: Sets the system for units of measure to metric or statute.
Auto-Off: Turns off the camera automatically after it has not
been used for five minutes.
External Power: Sets the camera behavior when it is connected
to external power. You can select the Charge Mode option to
enter charging mode automatically or the Power On option to
turn the camera on. While in charging mode, the screen and
all other features turn off (Charging the Battery, page 1).
Factory Reset: Restores all settings to the factory default
values.
Device Information
Status LEDs
The LEDs on the front of the camera indicate the camera status.
LED
Color
Green Flashing The camera is turned on, but it is not
Green Solid The camera is connected to a
Off Off (while not
Off Off (while connected
Red Solid (top LED only) The battery is charging.
Red Flashing The camera is recording video.
Yellow
and red
Green or
red
Blue Flashing
LED Action Status
recording.
computer in USB mass storage
mode.
connected to
external power)
to external power)
One or more yellow
flashes, followed by
a long red flash
Flashing rapidly The camera will turn off or stop
intermittently
The camera is turned off.
The camera is turned off, and the
battery is fully charged.
The camera has captured one or
more photos. The LED flashes yellow
while the self-timer is counting down
and red when the photo is captured.
recording soon. This could be
because the battery is below a 10%
charge level, the memory card has
less than 10 minutes of recording
time remaining, or the internal
temperature is too high.
The Wi‑Fi radio is turned on.
VIRB Edit 13
Page 18

Specifications
Water rating 1 ATM*
Operating temperature range
(external power)**
Operating temperature range
(battery power, cold start)**
Operating temperature range
(battery power, warm start)**
Charging temperature range From 0 to 40° C (from 32 to 104° F)
Input voltage 5 V, 2 A
Wireless frequencies and
protocols
*The device withstands pressure equivalent to a depth of 10 m.
For more information, go to www.garmin.com/waterrating.
The device is not water resistant when either the battery door or
side door is open.
**The operating temperature range is based on the default
camera settings. Several factors may impact the operating
temperature range, including the mount configuration, video
settings, and Wi‑Fi settings. Performance in cold environments
is improved by starting the camera operation using a battery that
has been stored at room temperature (Low Temperature
Performance Tips, page 14).
Low Temperature Performance Tips
• The battery life and video recording performance of the
camera are reduced at low temperatures. If the battery
temperature is below 0°C (32°F), the battery may not provide
enough power for the camera to operate or record video, and
the camera may turn off.
• You can improve the camera's battery life and video
recording performance in low temperatures by storing the
camera battery at room temperature until you are ready to
use it. If the battery is at room temperature when you turn on
the camera, heat generated by the camera operation
prevents the battery from becoming too cold, and the camera
operates and records video in temperatures as low as
-20°C (-4° F).
• You can store the battery indoors, in a heated vehicle, or in
an empty, interior clothing pocket to keep it at room
temperature. If the camera turns off due to a cold battery, you
can place the battery in an empty pocket or in a roomtemperature environment to warm it.
Do not place the battery in a pocket with other objects,
especially sharp or metal objects. Other objects may damage
the battery and may present a risk of damage to the device,
fire, chemical burn, electrolyte leak, and/or injury.
• If you turn off the camera for a long period of time in a lowtemperature environment, you should remove the battery and
keep it at room temperature until you are ready to use the
camera again.
From -20 to 40° C (from -4 to 104° F)
From 0 to 40° C (from 32 to 104° F)
From -20 to 40° C (from -4 to 104° F)
2.4 GHz Wi-Fi
2.4 GHz ANT+
2.4 GHz Bluetooth
NOTICE
WARNING
Thoroughly rinse the device with fresh water as soon as
possible after exposure to chlorine, salt water, sunscreen,
cosmetics, alcohol, or other harsh chemicals. Prolonged
exposure to these substances can damage the plastic
components and finish.
Do not store the device where prolonged exposure to extreme
temperatures can occur, because it can cause permanent
damage.
Water Exposure and Rating
When the battery door and side door are closed and latched, the
device has a water rating of 1 ATM.*
When using your device near liquids, you must observe these
considerations and care tips to help preserve the water rating
and avoid damage to the camera.
• The device is not water resistant when either the battery door
or side door is open.
• You should keep the door gaskets and sealing surfaces clean
and free of dust and debris.
• The device is not water resistant if the lens, lens retainer, or
lens gasket are damaged or removed, or if the lens retainer is
not fully tightened.
If you replace the cover lens, you must ensure the lens
gasket and sealing surfaces are undamaged, clean, and free
of dust and debris, and you must verify the lens retainer is
fully tightened (Replacing a Cover Lens, page 14).
• You should thoroughly rinse the device as soon as possible
after exposure to saltwater or chlorinated water.
*The device withstands pressure equivalent to a depth of 10 m.
For more information, go to www.garmin.com/waterrating.
Cleaning the Device
Wipe the outer casing of the device with a soft, non-scratch
1
cloth dampened with water.
Wipe the device dry.
2
Replacing a Cover Lens
If either of the cover lenses become scratched or damaged, you
can replace them. The VIRB 360 lens replacement kit includes
two cover lenses, two gaskets, and two lens retainer rings. Go to
garmin.com/virb to purchase a lens replacement kit.
Turn the lens retainer ring counter-clockwise to unlock it.
1
Remove the lens retainer ring, cover lens À, and gasket Á.
2
Viewing Regulatory and Compliance Information
From the About menu, select > Regulatory Info.
Wipe the gasket groove  with a lint-free cloth.
Device Care
NOTICE
Avoid contact with chemical cleaners, solvents, gasoline, oil,
insect repellents, or sunscreen. These chemicals can damage
plastic components and finish.
14 Device Information
3
Verify the new cover lens, new gasket, and the gasket groove
4
are clean and free of dust or debris.
NOTICE
The camera may not be water resistant if the gasket and
sealing surface are not clean and free of dust or debris. Dust
Page 19

or debris may damage the gasket or prevent the gasket from
sealing properly.
Place the new gasket, cover lens, and lens retainer ring on
5
the camera.
Rotate the lens retainer ring clockwise until the marks à on
6
the camera and the lens retainer ring are aligned.
NOTICE
The camera is not water resistant when the lens retainer ring
is not fully tightened.
Symbol Definitions
These symbols may appear on the device or accessory labels.
Fuse. Indicates a fuse specification or location.
WEEE disposal and recycling symbol. The WEEE symbol is
attached to the product in compliance with the EU directive
2012/19/EU on Waste Electrical and Electronic Equipment
(WEEE). It is intended to deter the improper disposal of this
product and to promote reuse and recycling.
Hot surface. The surface indicated by this mark may become hot
during device operation.
Troubleshooting
My camera does not turn on
• If the camera is connected to external power and the top
status LED is either off or solid red, hold POWER to turn on
the camera.
The camera does not turn on automatically when connected
to external power. When the top status LED is solid red, the
camera is in charging mode. When the top status LED is off,
the battery is fully charged, and the camera is off.
• If the camera turns off due to a high temperature warning,
wait for the camera to cool down, and move to a lowertemperature area or disable unneeded features.
Some features, such as 5.7K recording mode, require more
processing power and reduce the camera's ability to operate
in high-temperature environments. Using default settings, the
camera operates in temperatures of up to 40°C (104°F).
• Verify the battery is installed correctly (Installing the Battery,
page 1).
• Fully charge the battery (Charging the Battery, page 1).
• Verify the battery temperature is at least 0°C (32°F) (Low
Temperature Performance Tips, page 14).
Location, speed, distance, and altitude data require a GPS
signal.
• Connect additional ANT+ sensors (Pairing ANT+ Sensors,
page 12).
Some data is available only when a compatible ANT+ sensor
is connected.
My video recordings do not look smooth
• If video recordings appear shaky, use the VIRB Edit
application or the Garmin VIRB mobile app to apply image
stabilization to the video.
• If video recordings stutter or skip frames, install a
recommended, high-speed memory card.
For more information about recommended memory cards, go
to garmin.com/VIRBcards.
• Verify your playback device or software is capable of playing
the video smoothly.
For example, if you are playing a 360-degree video, verify the
playback device or software is capable of playing 5K video
and 360-degree video. The VIRB Edit application is
recommended for video playback.
• Transfer the video to your computer or playback device.
Some memory card readers do not read data quickly enough
to play high-resolution video directly from the memory card.
• Use the VIRB Edit application to play and edit video.
Go to garmin.com/VIRBEdit to download the VIRB Edit
application.
My device turns off when I stop recording video
If you turn on the device by moving the recording switch forward,
the device turns off when you move the recording switch
backward. This allows you to maximize battery life by turning off
the device when it is not recording (Turning the Camera On and
Off Using the Recording Switch, page 2).
Extending the Battery Life
• Disable Wi‑Fi.
• Enable Auto-Off in the system settings (System Settings,
page 13).
• Turn the device on and off using the recording switch
(Turning the Camera On and Off Using the Recording Switch,
page 2).
• Disable ANT+, Wi‑Fi, and remote wake-up when not in use.
My camera feels warm while it is operating
It is normal for the camera to feel warm during typical use,
especially while it is recording high-resolution video or
transmitting a Wi‑Fi signal.
Some G-Metrix data is missing
Some G-Metrix data requires you to enable or pair sensors, or
use specific accessories. Some G-Metrix data may not be
available for all recording situations or when you are not
recording video.
• Enable GPS (System Settings, page 13), and go to an area
with a clear view of the sky.
Troubleshooting 15
Page 20

Index
Symbols
360-degree video 4, 10
A
accessories 12
ANT+ sensors 2, 6, 12
forgetting 12
pairing 12
B
battery 13, 14
charging 1
installing 1
life 14, 15
Bluetooth technology 2, 12, 13
broadcasting video 5, 8
C
cadence 6
camera, settings 2, 9, 13
cleaning the device 14
customizing the device 13
D
deleting, all user data 13
E
elevation 6
G
G-Metrix 6
Garmin VIRB app 6, 7, 10, 11
connecting 6, 7
GPS 2, 6
settings 2, 13
H
heart rate 6
I
icons 2
L
language 13
lens, replacing 14
lens mode 4
live streaming video 5, 8
M
memory card 1, 13
microphone 5
connecting 12
microSD card. See memory card
mobile app 6, 7, 10, 11
mounts 3
removing 3
tripod 2
multiple cameras 11
P
photos 9
self timer 5
settings 5, 8
taking 5
time-lapse 9
Travelapse 9
viewing 9
playing video 9
power (force) 6
power key 2
R
recording video 4
remote control 11–13
S
settings 8
software
updating 13
version 13
spatial audio 5
specifications 14
speed 6
system settings 8, 13
T
temperature 6, 14
time-lapse, photos 9
tones 13
tracks 6, 13
Travelapse, photos 9
troubleshooting 15
U
unit ID 13
V
video 6
360-degree 4
broadcasting 5, 8
editing 10, 13
loop 9
output 5
playing 9, 10
recording 2–4, 8, 9, 13
settings 2, 4, 5, 7, 8
stitching 4
time lapse 4
VIRB app 11
connecting 11
multiple cameras 11
virtual reality 10
voice control 5, 6
tips 6
VR headset 10
W
water rating 14
Wi‑Fi 2, 10, 13
connecting 10, 11
16 Index
Page 21

Page 22

support.garmin.com
May 2017
190-02191-00_0A
 Loading...