


OWNER’S MANUAL

© Copyright 2005 Garmin Ltd. or its subsidiaries
Garmin International, Inc.
1200 East 151st Street,
Olathe, Kansas 66062, U.S.A.
Tel. 913/397.8200 or 800/800.1020
Fax 913/397.8282
Garmin (Europe) Ltd.
Unit 5, The Quadrangle, Abbey Park Industrial Estate,
Romsey, SO51 9DL, U.K.
Tel. 44/0870.8501241
Fax 44/0870.8501251
Garmin Corporation
No. 68, Jangshu 2nd Road, Shijr,
Taipei County, Taiwan
Tel. 886/2.2642.9199
Fax 886/2.2642.9099
All rights reserved. Except as expressly provided herein, no part of this manual may be reproduced, copied, transmitted, disseminated, downloaded or stored in any storage
medium, for any purpose without the express prior written consent of DaimlerChrysler Motors Company, LLC and Garmin. Information in this document is subject to change
without notice. DaimlerChrysler Corporation reserves the right to change or improve its products and to make changes in the content without obligation to notify any person
or organization of such changes or improvements. Visit the Garmin Web site at
concerning the use and operation of this unit. Garmin
the express permission of Garmin. Trail Guide
®
, AutoLocate®, and TracBack® are registered trademarks of Garmin Ltd. or its subsidiaries and may not be used without
™
is a trademark of DaimlerChrysler Motors Company, LLC.
http://www.garmin.com/products/trailguide for current updates and supplemental information
Tous droits réservés. Sauf mention explicite contraire, aucune partie du présent manuel ne peut être reproduite, copiée, transmise, diffusée, téléchargée ou enregistrée par
quelque moyen que ce soit, pour quelque objectif que ce soit sans le consentement explicite écrit de DaimlerChrysler Motors Company, LLC et Garmin. L’information
contenue dans le présent document est sujette à modifications sans préavis. DaimlerChrysler Corporation se réserve le droit de modifier ou d’améliorer ses produits et
d’apporter des modifications sans obligation d’information tant auprès des personnes physiques que morales. Visitez le site Web de Garmin,
products/trailguide, pour les mises à jour disponibles et toute information complémentaire relative à l’utilisation de ce produit et des autres produits Garmin. Garmin
http://www.garmin.com/
®
,
AutoLocate® et TracBack® sont des marques déposées de Garmin Ltd. ou une de ses filiales et ne peuvent être utilisées sans le consentement explicite de Garmin.
Trail Guide™ est une marque commerciale de DaimlerChrysler Motors Company, LLC.
Todos los derechos reservados. A menos que en este documento se indique expresamente, ninguna parte de este manual se podrá reproducir, copiar, transmitir, difundir,
descargar ni guardar en ningún medio de almacenamiento ni con ningún propósito, sin el previo consentimiento expreso por escrito de DaimlerChrysler Motors Company,
LLC y Garmin. La información de este documento está sujeta a cambios sin previo aviso. Garmin se reserva el derecho de cambiar o mejorar sus productos y de hacer
cambios en su contenido sin la obligación de comunicar a ninguna persona u organización tales cambios o mejoras. Visite el sitio Web de Garmin, http://www.garmin.
com/products/trailguide, para ver las actualizaciones e información adicional más reciente respecto al uso y funcionamiento de éste y de otros productos de Garmin. Garmin
®
,
AutoLocate® y TracBack® son marcas comerciales registradas y Quest™ es una marca comercial de Garmin Ltd. o de sus subsidiarias, y no se podrá utilizar sin autorización
expresa de Garmin. Trail Guide™ es una marca comercial registrada de DaimlerChrysler Motors Company, LLC.
August 2005 Part Number 190-00542-00 Rev. A Printed in Taiwan

INTRODUCTION
INTRODUCTION
Congratulations on purchasing the Trail Guide™! To get the most
out of your new navigation system, go through this Owner’s
Manual and learn the operating procedures for your unit.
Introduction: Contains the Table of Contents and Safety
Information.
Getting Started: Provides information to help get you started. If
you have never navigated with a GPS unit, try the “Tutorial”
on page 2.
Basic Operation: Teaches you how to use your Trail Guide to find
items, create routes, and initiate a TracBack®.
Using the Main Pages: Describes the Map page and other main
pages of your Trail Guide.
Customizing Your Trail Guide
to meet your specific needs.
Understanding GPS: Describes the basics of GPS navigation and
the features on the GPS Information page.
: Explains how to change settings
Appendix: Contains additional mounting instructions,
specifications, and care and regulatory information.
Index: Provides key words to help you find information.
Manual Conventions
This manual uses the term “select” when you need to choose an
icon, button, or tab. To select something, use the Rocker pad to
move the cursor (or highlighted area) to the position. To activate
the selection, press the OK key.
E
N
This manual uses the term WARNING to indicate a
potentially hazardous situation, which, if not avoided, could
result in death or serious injury.
This manual uses the term CAUTION to indicate a
potentially hazardous situation, which, if not avoided, may
result in minor injury or property damage. It may also
be used without the symbol to alert you to avoid unsafe
practices.
Trail Guide™ Owner’s Manual i

INTRODUCTION > TABLE OF CONTENTS
Introduction ...........................................................................i
E
N
Safety Information .....................................................................iii
Getting Started .....................................................................1
Introducing the Trail Guide ........................................................ 1
Tutorial ....................................................................................... 2
Vehicle Installation ..................................................................... 4
Turning the Trail Guide On and Off ........................................... 5
Using the Keys .......................................................................... 6
Basic Operation ...................................................................8
Finding Places and Routing to Them ....................................... 8
My Locations ........................................................................... 14
Setting Your Home Location .................................................... 18
Using TracBack ....................................................................... 19
Planning and Modifying Routes .............................................. 21
Using the Main Pages .......................................................27
Map Page ................................................................................ 27
Next Turn Page ....................................................................... 30
Current Route Page ................................................................ 31
Trip Information Page .............................................................. 32
Customizing Your Trail Guide .........................................33
Customizing the Map Page ..................................................... 33
Customizing the Display .......................................................... 35
Customizing the Overall System Setup ................................... 36
Customizing the Route Settings .............................................. 37
Customizing the Units Settings ............................................... 38
Changing the Time Settings .................................................... 38
Changing the Track Setup ....................................................... 39
Customizing the Welcome Page ............................................. 40
Viewing Software and Unit Information ................................... 40
Understanding GPS ...........................................................41
The GPS Information Page ..................................................... 41
Appendix ............................................................................45
Trail Guide Shortcuts ............................................................... 45
Data Fields .............................................................................. 45
Adding Maps to Your Trail Guide .............................................47
Caring for the Trail Guide ........................................................ 49
Specifications .......................................................................... 50
Product and Regulatory Information ........................................ 51
Index ...................................................................................53
ii Trail Guide™ Owner’s Manual

INTRODUCTION > SAFETY INFORMATION
Safety Information
Ensure that all persons read this manual carefully before using
the navigation system. It contains instructions on how to use the
system in a safe and effective manner.
WARNING: Please read and obey the following safety
precautions. Failure to do so may result in an accident
involving injury or property damage.
• Consider practicing the unit’s operation by using “simulator
mode” prior to actual use. See page 5 for instructions.
• When in actual use, carefully compare indications from the
Trail Guide to all available navigation sources, including
information from other street signs, visual sightings, and
maps. For safety, always resolve any discrepancies before
continuing navigation.
• Do not input destinations, change settings, or access any
functions that require prolonged use of the unit’s controls
while you are driving. Pull over in a safe and legal manner
and location before you attempt such operations.
• Do not use the navigation system to route you to emergency
services such as police and fire stations or hospitals and
clinics. Not all emergency service locations are contained in
the database. Please use your judgment and ask for directions
in such situations.
• When driving, minimize the amount of time you spend
viewing the screen. Glance at the screen only when
necessary and safe to do so. If prolonged viewing of the
screen is necessary, pull over at a safe location.
• Road conditions and regulations take precedence over
information contained on the map display. Observe actual
traffic restrictions and circumstances while driving.
• Situations may occur where the navigation system
erroneously displays the vehicle’s location. Use your own
driving judgment in this situation, taking into account current
driving conditions. Please be aware that in this situation, the
navigation system should automatically correct the vehicle’s
position within a few minutes.
E
N
Trail Guide™ Owner’s Manual iii

INTRODUCTION > SAFETY INFORMATION
E
N
• Stop use immediately if a problem occurs. Failure to do so
may cause injury or damage to the product. Return it to your
authorized DaimlerChrysler dealer for service.
• Make certain the volume level of the navigation system is
set to a level that still allows you to hear outside traffic and
emergency vehicles.
• The map database is designed to provide you with route
suggestions and does not take into account the relative
safety of a suggested route or factors that may affect the
time required to reach your destination. The system does
not reflect road closures or construction, road characteristics
(such as type of road surface, slope or grade, weight or
height restrictions), traffic congestion, weather conditions, or
• The Global Positioning System (GPS) is operated by the
United States government, which is solely responsible for its
accuracy and maintenance. The system is subject to changes
which could affect the accuracy and performance of all
GPS equipment. The Trail Guide is a precision navigation
system; however, any navigation system can be misused or
misinterpreted and, therefore, become unsafe.
• This product is intended to be used only as a navigational
aid and must not be used for any purpose requiring precise
measurement of direction, distance, location, or topography.
If you have any questions about the operation of the navigation
system, please contact a local DaimlerChrysler dealer or call
800/800.1020.
any other factors that may affect the safety or timing of your
driving experience. Use your own personal judgment if the
navigation system is unable to provide you with an alternate
route.
• The map database supplied with the product contains the
most recent map data that was available to us at the time
of production. We use Navteq data sources. Some parts of
the map may contain inaccurate or incomplete data to some
degree. Because the map data may not be perfect, consider
verifying the unit’s map with your actual surroundings to
confirm that you are arriving at the exact destination.
iv Trail Guide™ Owner’s Manual
GETTING STARTED > INTRODUCING THE TRAIL GUIDE
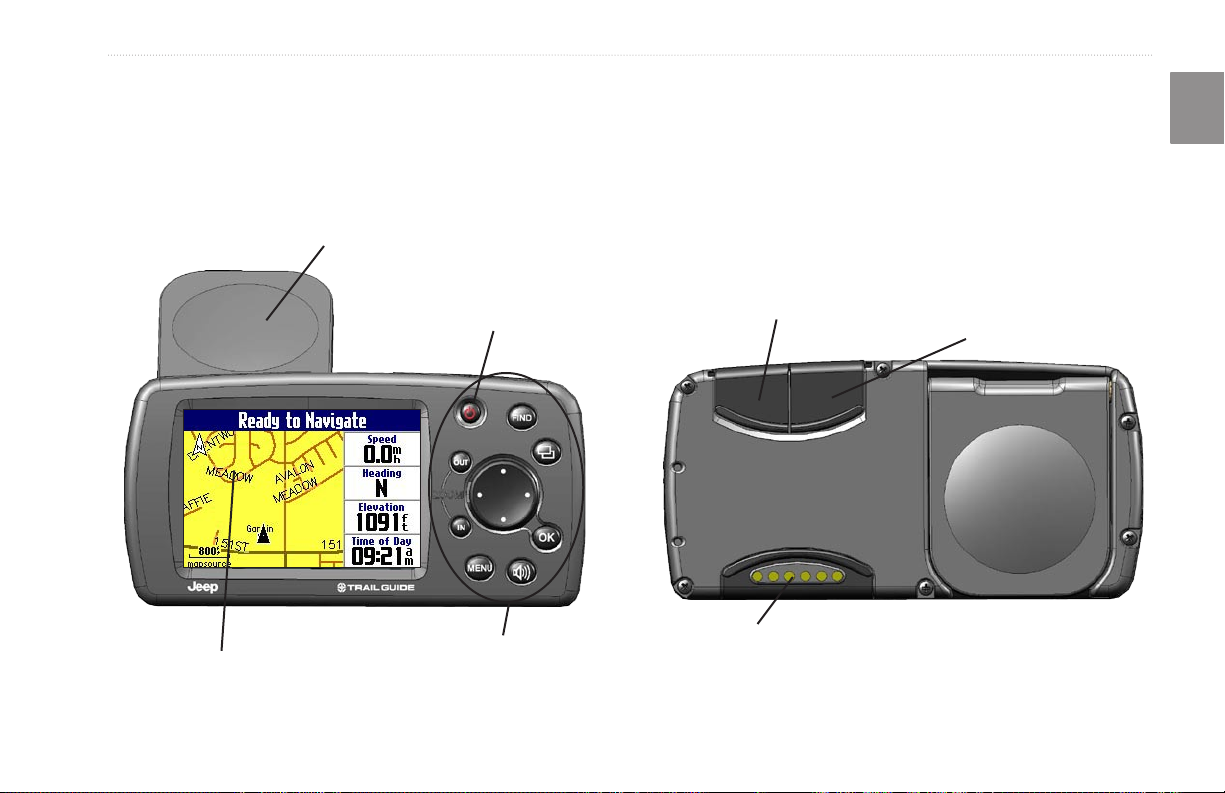
Introducing the Trail Guide
Flip-up GPS antenna
(Position the antenna parallel to
the surface of the road.)
Front View
256-Color high-resolution TFT display
GETTING STARTED
Power Key
Keypad
USB connector
Power/Speaker connector
E
N
External antenna
connector
Back View
Trail Guide™ Owner’s Manual 1
GETTING STARTED > TUTORIAL
Tutorial
E
This tutorial guides you through the steps for finding a restaurant
N
in your area and then creating a route to it. If you have never used
a GPS unit before, try this simple task. You will see that using your
Trail Guide is fast and easy.
Make certain the antenna is unobstructed as it looks for satellites.
For example, it cannot establish a satellite fix if your vehicle is
parked in a garage. Position the antenna so that it is parallel to
the surface of the road so that it can have the best view of the sky.
Step 1: If you have not already done so, flip up the antenna and
snap your Trail Guide into the vehicle mount. See page 4 if you
need additional instructions. Turn on the Trail Guide. When the
unit has established a satellite fix, it displays a “Ready to Navigate”
message.
Map page
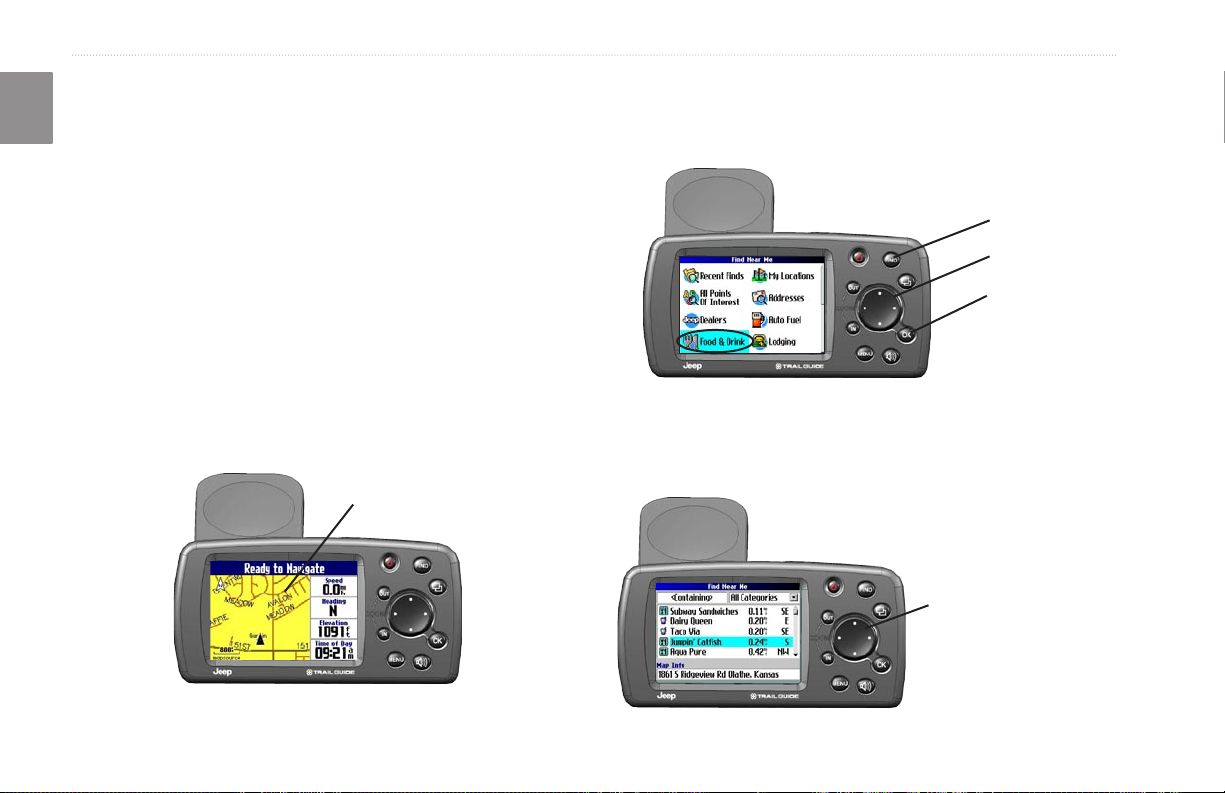
Step 2: Press the FIND key. The Find Menu appears. Highlight the
Food & Drink icon located in the Find Menu and press the
OK key.
FIND key
Rocker pad
OK key
Step 3: A list of restaurants in your area appears on a page similar
to the one shown below. Use the Rocker pad to highlight a
restaurant in the list. Then press the OK key.
Use the Rocker pad to
highlight a restaurant.
2 Trail Guide™ Owner’s Manual
GETTING STARTED > TUTORIAL
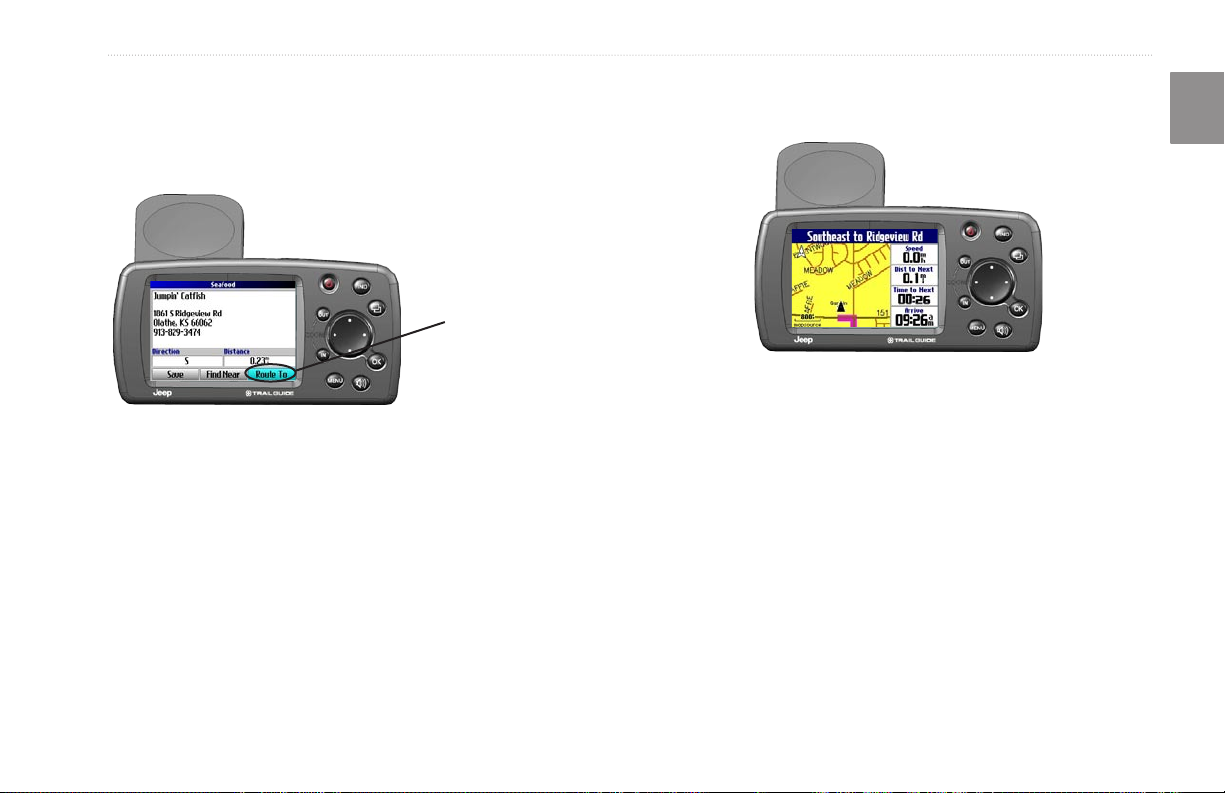
Step 4: Information about the restaurant appears on a page similar
to the one shown below. To create a route to this restaurant,
Your Trail Guide calculates the route and provides directions.
Follow the purple line on the Map page to your destination.
highlight the Route To button located at the bottom of the page.
Then press OK.
Select Route To to
create a route to this
restaurant.
E
N
Trail Guide™ Owner’s Manual 3
GETTING STARTED > VEHICLE INSTALLATION
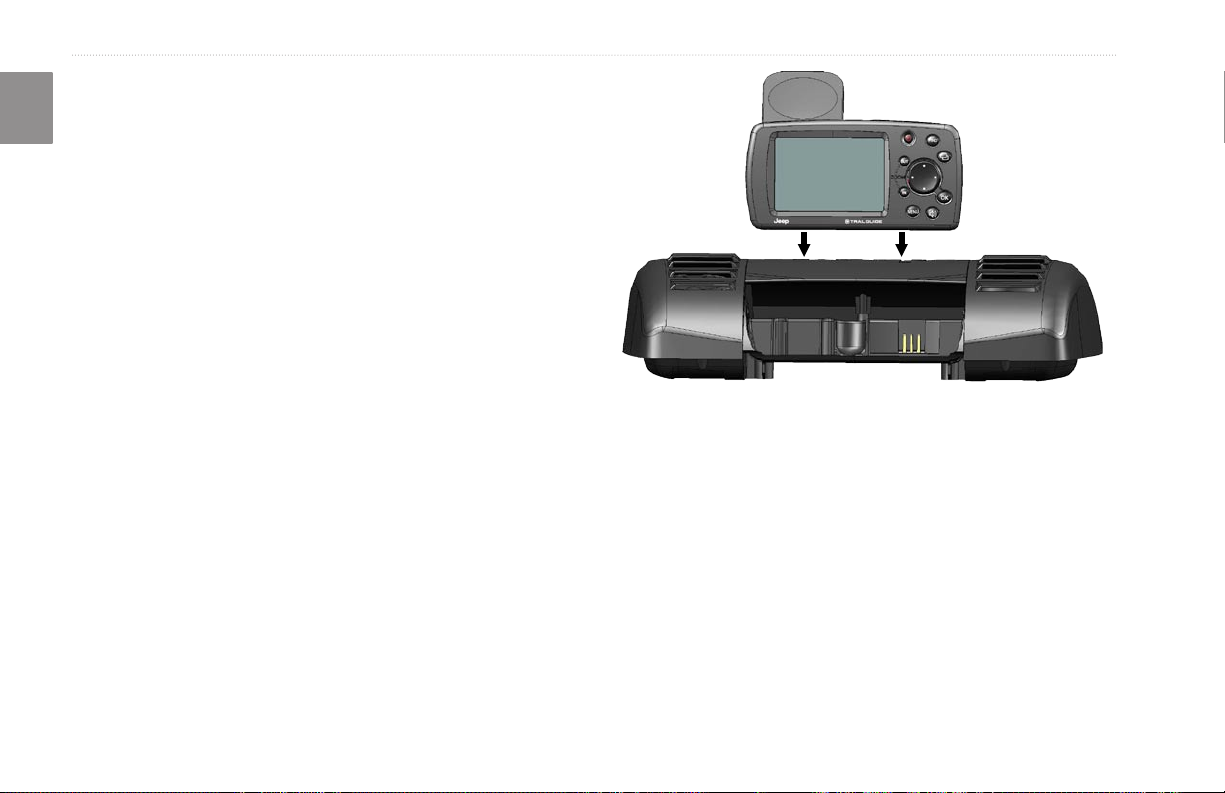
Vehicle Installation
E
You can install and store the Trail Guide in the dealer-installed
N
vehicle mount. The Trail Guide runs off power from your vehicle
when the ignition is turned on. Be sure the vehicle ignition is
turned off before you install or remove the unit from
the mount.
To install the Trail Guide in the mount:
1. Flip up the GPS antenna on the back of the Trail Guide.
2. Position the unit directly above the vehicle mount and line
up the sides of the unit with the sides of the mount.
3. Slide the unit straight down until it clicks into place.
To remove and store the Trail Guide:
1. Pull the Trail Guide straight up and out of the vehicle mount.
2. Store the Trail Guide in the slot behind the vehicle mount.
Pull down the mount door to hide the unit from sight.
4 Trail Guide™ Owner’s Manual
GETTING STARTED > TURNING THE TRAIL GUIDE ON AND OFF
Turning the Trail Guide On and Off
Press and hold the Power
it on or off. When turned on, the Welcome page appears briefly,
followed by a Safe Driving Warning Message. Press the OK
key to acknowledge the message, or wait briefly until the Map
page appears. Your Trail Guide automatically starts searching for
satellite signals to find your current location.
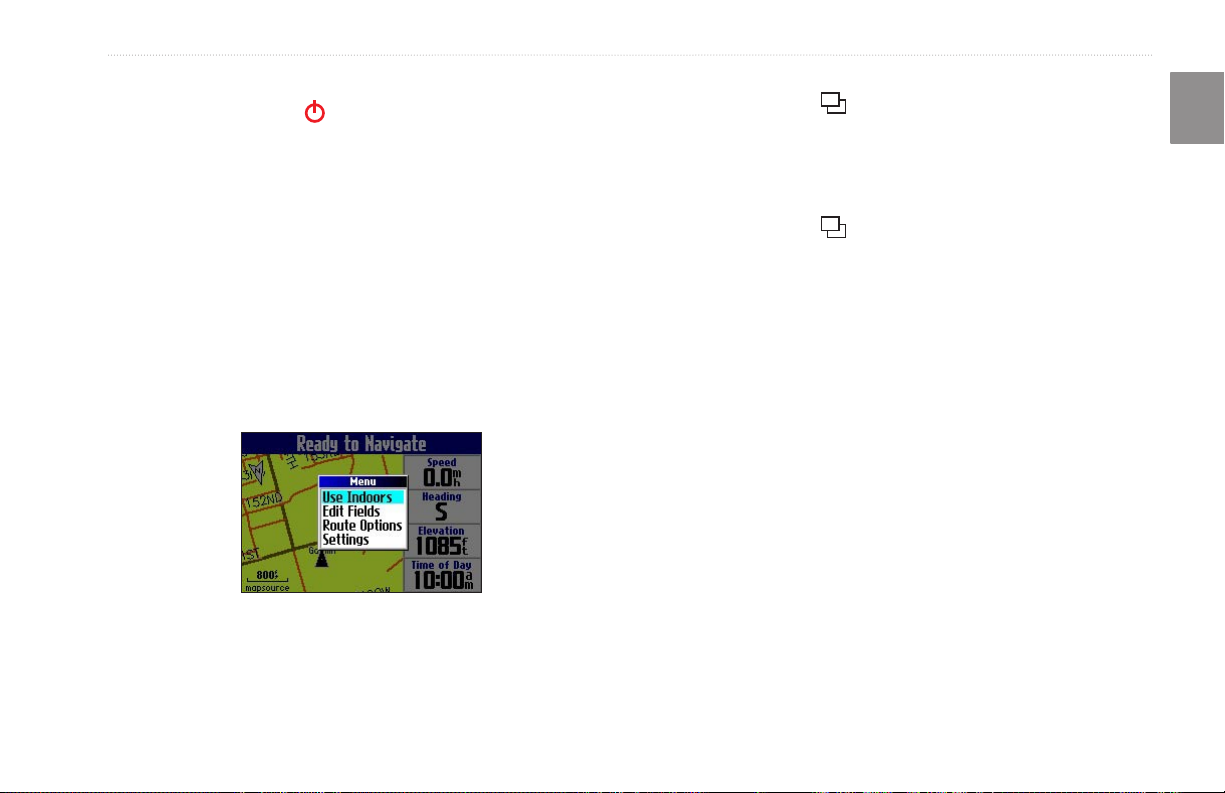
Turning off Satellite Reception for Indoor Use
You can set your Trail Guide to indoor use, which stops satellite
reception and conserves battery power. Thoroughly familiarize
yourself with the routing features of the Trail Guide by
simulating routes.
key on the front of the unit to turn
To turn off satellite reception:
1. Press the Page
2. Press the MENU key.
3. Highlight Use Indoors and press OK. GPS is disabled.
key to open the Map page.
To turn on satellite reception:
1. Press the Page
2. Press the MENU key.
3. Highlight Acquire Satellites and press OK. GPS is
enabled, and your Trail Guide begins to acquire satellite
signals.
key to open the Map page.
E
N
Trail Guide™ Owner’s Manual 5
GETTING STARTED > USING THE KEYS
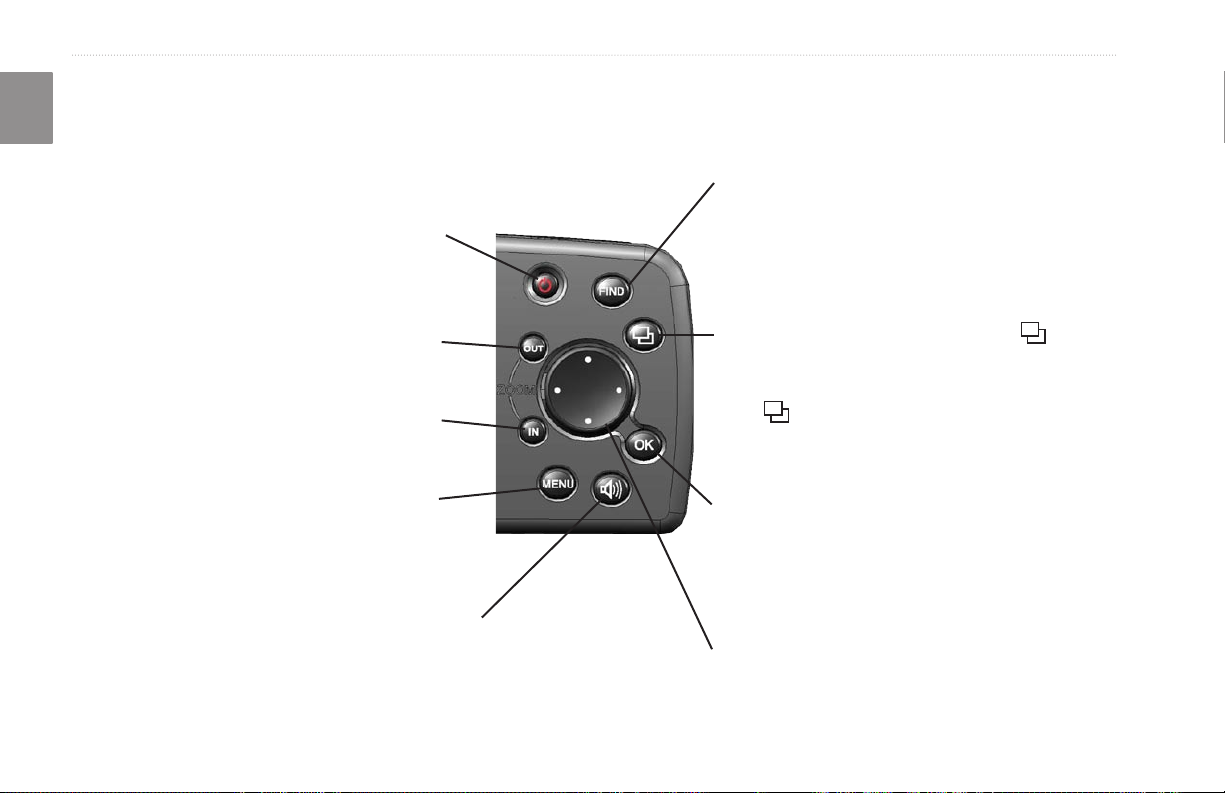
Using the Keys
E
Use the keys to perform specific tasks such as finding places or planning routes. With the exception of the Power key, press and quickly
N
release a key to perform its function. If a key has a secondary function, press and hold the key to activate it.
Power—press and hold to turn the unit on or off.
Press once to adjust the illumination of your screen.
When the illumination window appears, use the
Rocker pad to move the slider to the left or right to
dim or brighten your backlight. Press OK.
OUT—zooms out on the Map page. Also scrolls
down a list.
IN—zooms in on the Map page. Also scrolls up
a list.
MENU—press to display a menu of options for
the current page. Press MENU twice to open the
Settings menu. Press and hold MENU to open the
Route Options menu.
Speak—triggers your unit’s “voice” to repeat the next
turn or current destination when you are navigating a
route. Press and hold to adjust the volume.
6 Trail Guide™ Owner’s Manual
FIND—press to search for cities, addresses, and
other points of interest. Press FIND twice to activate
the Recent Finds menu. Press and hold FIND to
“Route Home” (see page 18).
Page—press to open pages. Press Page
close the current window or menu and return to the
previous page. When you are entering data, press
Page
previous value.
OK—press to select items. Press OK to display
information pages when panning the Map page. To
save your current location in My Locations, press
and hold OK.
Rocker pad—press to highlight options or move the
map pointer in any direction.
to cancel the data entry and restore the
to
GETTING STARTED > USING THE KEYS
Selecting Options and Entering Data
Use the OK key and the Rocker pad to select options and activate
your selections.
To select and activate an option or on-screen button:
1. Use the Rocker pad to move up, down, right, or left to the
selection or on-screen button.
2. Press OK to activate the feature.
To exit a menu or return to the previous setting:
Press Page
your steps or menus.
. The Page key moves backwards through
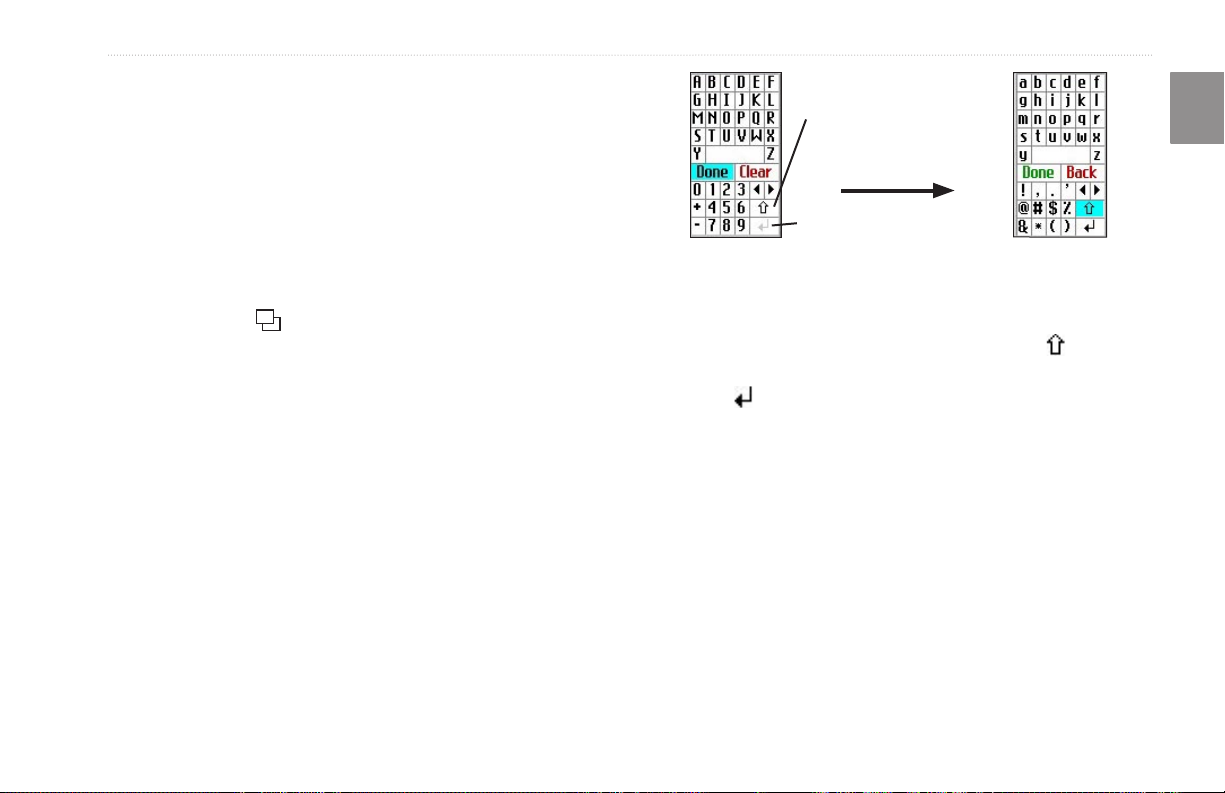
Using the On-screen Keyboard
The on-screen keyboard opens when you need to enter data, such
an address or a city. The on-screen keyboard is used in a variety
of places throughout the Trail Guide. Its appearance may alter,
depending on your purpose for using it, but it always functions the
same way.
Use the Rocker pad to select a letter or number and then press OK.
To create spaces, select the blank space between the Y and Z. Use
the Clear (Back) box to delete letters/numbers. The ◄ and ► keys
are backspace and forwardspace keys. The up arrow changes
the capital letters to lower case and the numbers to symbols. Use
the Return key to create a new line. When you have entered all
text, select Done.
The up arrow changes the
capital letters to lower case
and numbers to symbols.
Return key
E
N
Trail Guide™ Owner’s Manual 7
BASIC OPERATION > FINDING PLACES AND ROUTING TO THEM
E
BASIC OPERATION
N
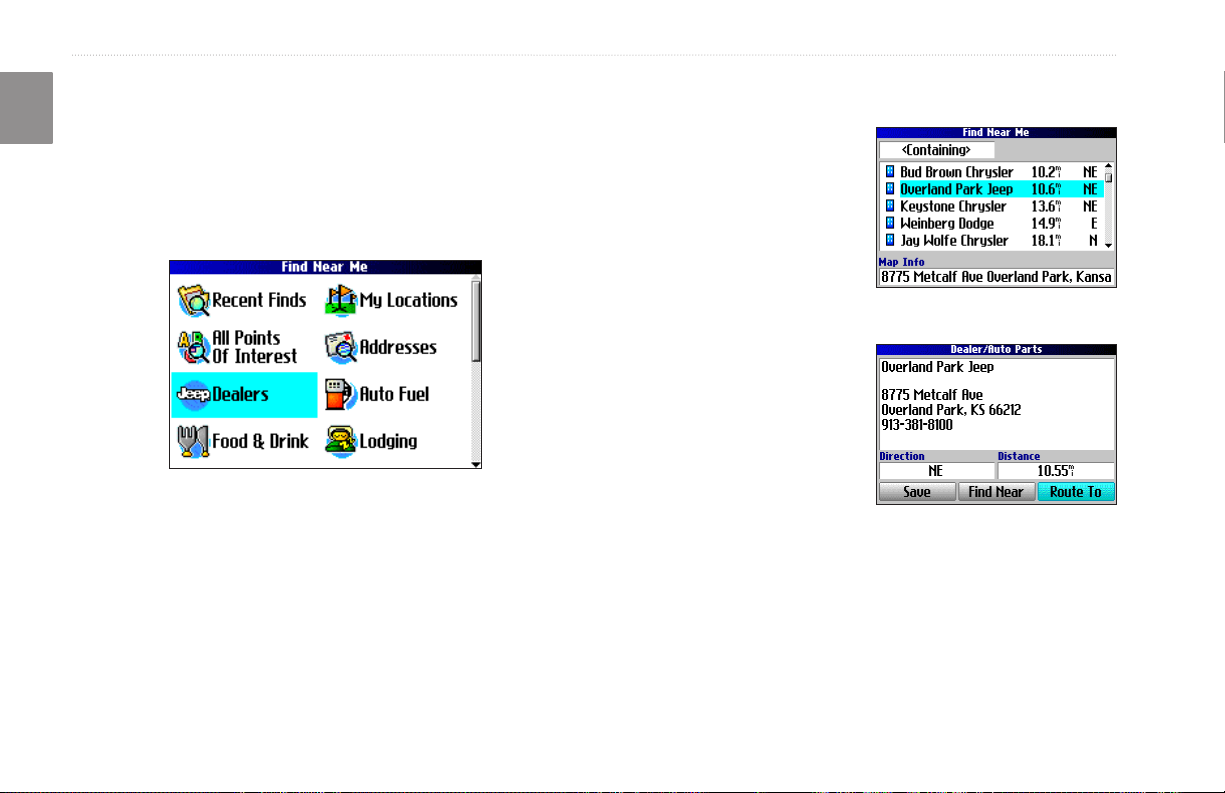
Finding Places and Routing to Them
Use the Find Menu to locate and create routes to cities, addresses,
parks, restaurants, or hotels. You can even use the Find Menu to
locate Jeep dealers in your area.
Find Menu
Press the Rocker pad down to see more Find categories.
To find a place and route to it:
1. Press the FIND key. The Find Menu appears.
2. Highlight a category
to help you find your
destination, such as Food
& Drink, Jeep Dealers,
or All Points of Interest.
Press OK. A list of places
near your current location
appears.
3. Highlight the place and
press OK. An information
page appears.
4. Highlight Route To and
press OK. The Trail Guide
calculates your route.
Find Menu Results List
Information Page
8 Trail Guide™ Owner’s Manual
BASIC OPERATION > FINDING PLACES AND ROUTING TO THEM
Advanced Search Methods and Tips
The search results list can be quite long. Use the following tips to
narrow your search.
Panning and Finding
You can find places that are beyond your current location by
panning to a particular area on the map. Open the Map page
and pan the map to the location. Press the FIND key, and the
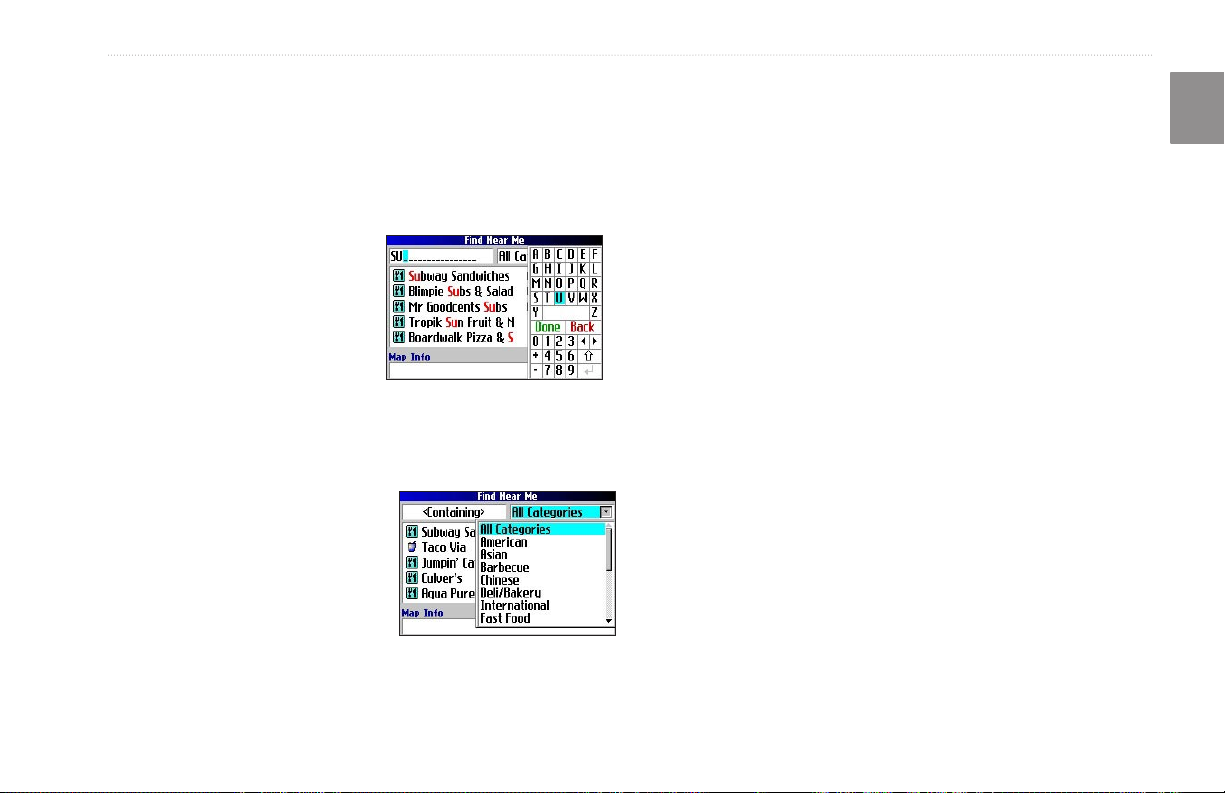
Entering Containing Letters
If you know the name of the place you are searching for, select
unit searches for places near the map pointer. See page 28 for
information about panning the map.
the <Containing> box. Use the
on-screen keyboard to enter letters
contained in the name. The more
fully you type the name, the more
accurate your search results. For
Finding Places Near this Place
After you have found a place, open the item’s information page.
To find another place (such as a hotel or restaurant) near this place,
highlight Find Near and press OK.
example, typing “SU” in order to
find Sun’s Deli returns names such
as Subway and Tropik Sun.
Using the Containing Field
Saving this Place to My Locations
After you have found a place, open the item’s information page.
Highlight Save and press OK to save this place to My Locations.
Searching Sub-Categories
If you would like to search for a
type of food (such as Chinese, Deli,
International, Fast Food), highlight
the All Categories box and press
OK. Highlight a food category
(sub-category) and press OK. A new
list appears filtered with the selected
Using Sub-Categories
Using the Information Page Menu
After you have found a place, open the item’s information page and
press the MENU key to reveal more options.
To see where this item is located on the map, select
For step-by-step directions from the place to your current location,
select Directions to Me. Select Find Near Current Route to list
all places along your current route.
category.
E
N
Show Map.
Trail Guide™ Owner’s Manual 9
BASIC OPERATION > FINDING PLACES AND ROUTING TO THEM
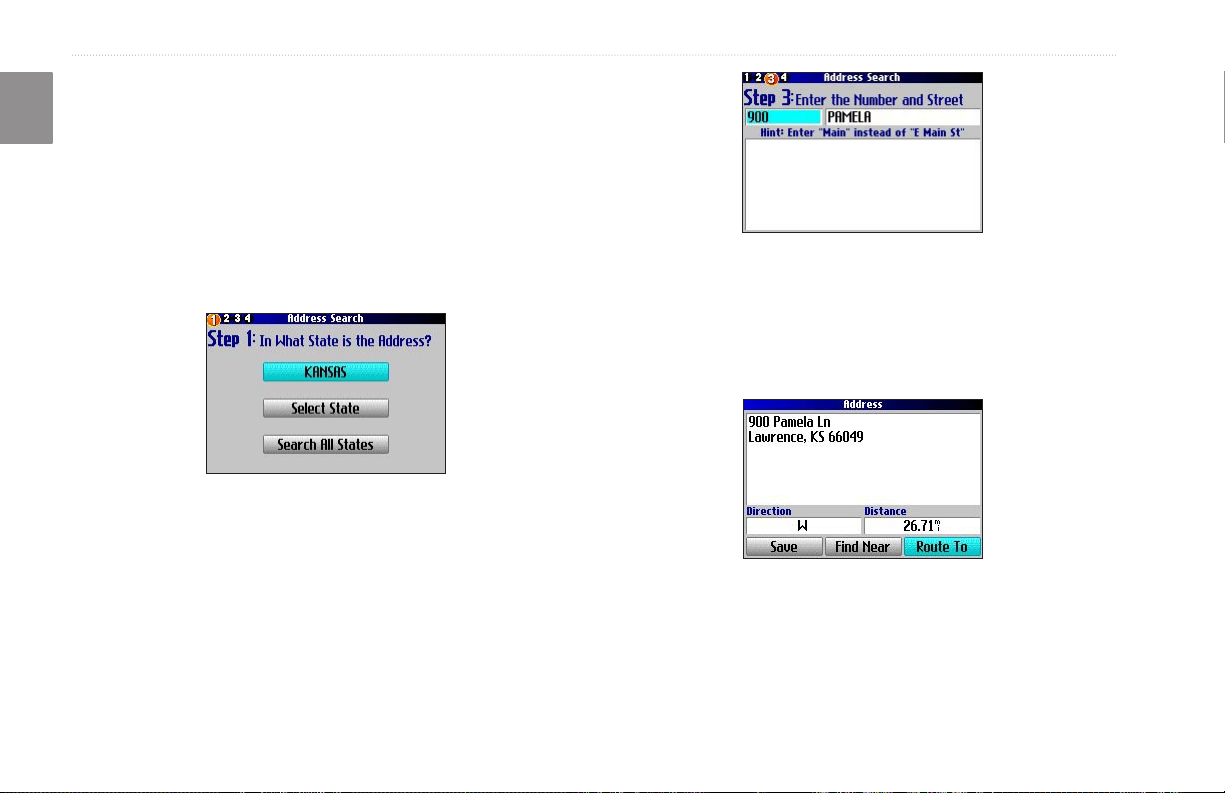
Finding an Address or Intersection
E
To search for an address or intersection, select Addresses or
N
Intersections from the Find Menu. In both cases, a search wizard
appears that allows you to enter street information.
To find an address or intersection:
1. Press FIND, highlight Addresses or Intersections, and
press OK.
2. A Wizard opens. Highlight a state and press OK.
3. Highlight Search All Cities and press OK.
4. Enter the address number and street using the on-screen
keyboard. For intersections, you only need to enter street
names.
5. A list of addresses or intersections appears. Highlight the
place you are looking for and press OK.
6. To create a route to this address, highlight Route To and
press OK.
10 Trail Guide™ Owner’s Manual
BASIC OPERATION > FINDING PLACES AND ROUTING TO THEM
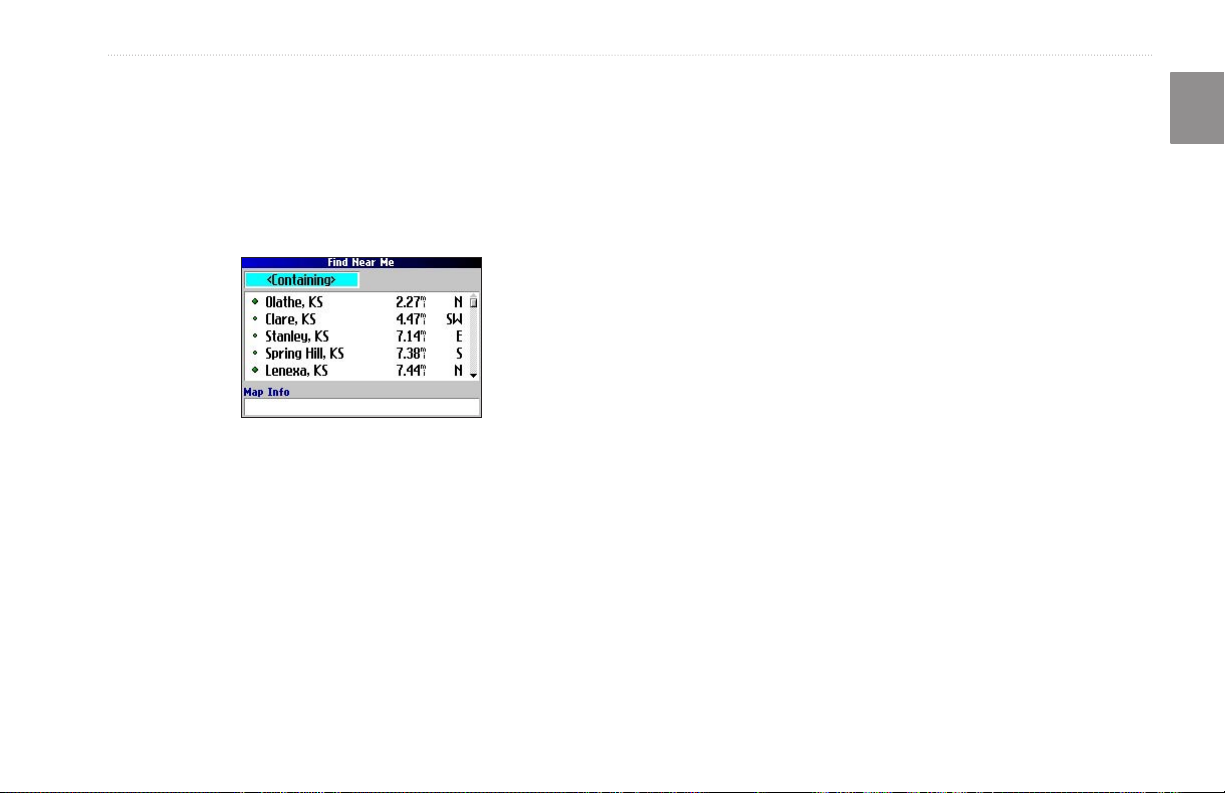
Finding a City
To search for a city, select Cities from the Find Menu. A list of 50
cities near your current location appears.
To find a city:
1. Press FIND, highlight Cities, and press OK. A list of cities
appears. Use the Rocker pad to move down the list.
2. Highlight the <Containing> box and press OK to narrow
your results or find a city not on the list. Enter the name of
the city you are searching for using the on-screen keyboard.
3. Highlight a city and press OK. An information page appears.
4. To go to the city, highlight Route To and press OK.
Finding an Exit
Select Exits from the Find Menu to locate exits on highways,
freeways, and interstates.
To find an exit:
1. Press the FIND key, highlight Exits, and press OK. All exits
on the highway or interstate that is closest to your current
location are listed.
2. To search for a particular road exit, press MENU, highlight
Select Exit Road, and press OK. Enter the name of the
road using the on-screen keyboard.
3. If you know you want to stop at an exit that has a particular
type of service, such as a gas station or rest area, select the
All Categories box and press OK. Then select a category
from the list.
4. Use the Rocker pad to highlight an exit from the search
results list and press OK. An information page for that
exit appears. Services at this exit appear on the exit’s
information page. Highlight the service you want to visit and
press OK to view information about it.
5. To go to the exit, highlight Route To and press OK.
E
N
Trail Guide™ Owner’s Manual 11
BASIC OPERATION > FINDING PLACES AND ROUTING TO THEM
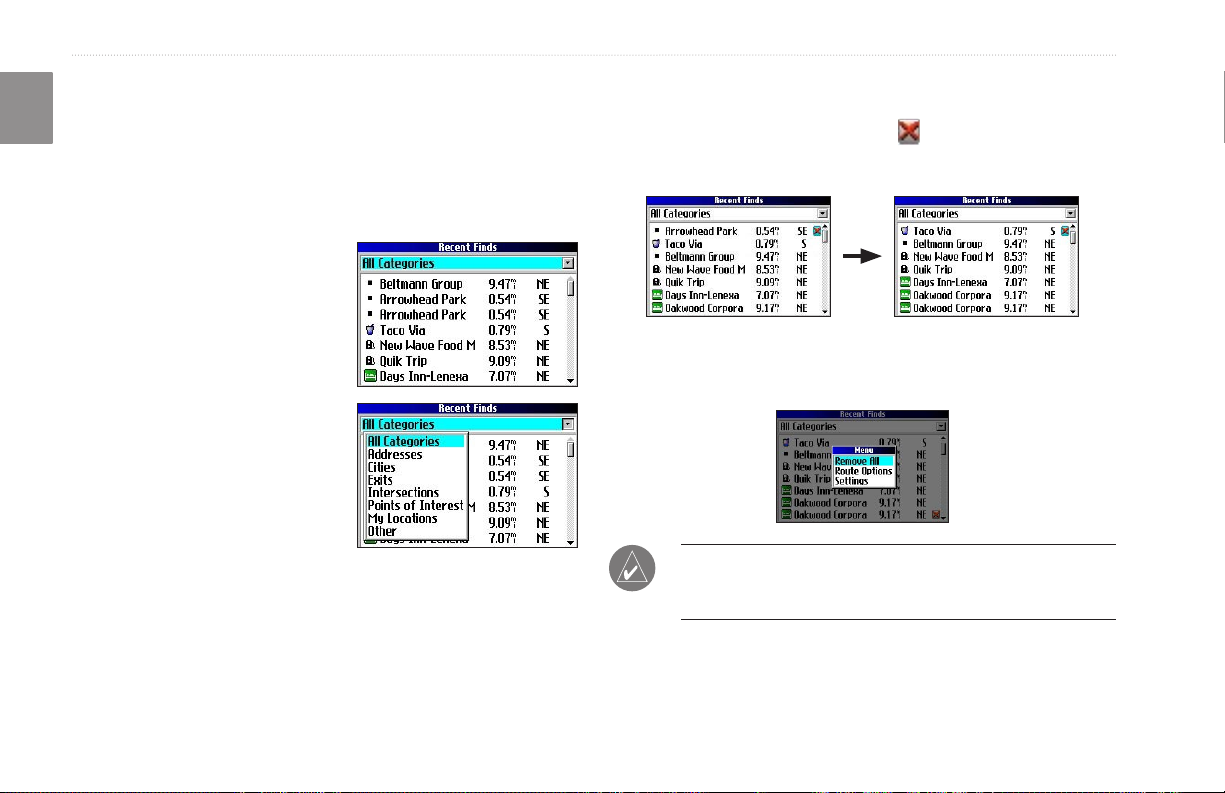
Finding Recently-Found Places
E
Your Trail Guide stores the 50 places you have found most
N
recently. The most recently-reviewed item is at the top of the list.
To find a recently-found place:
1. Press FIND, highlight Recent Finds, and press OK. A list of
recently-found items appears.
2. To narrow your search,
highlight All Categories and
press OK.
3. Highlight a category from the
list and press OK. The 15
most recent finds from the
category appear.
4. Highlight a place and press
OK.
5. To create a route to this
place, highlight Route To
and press OK.
The Trail Guide only stores places that you actually view. For
example, suppose you search for a restaurant by name and five
names appear. If you view information on two of them, then these
two restaurants are stored in your Recent Finds list.
Deleting Recently-Found Places
If you want to delete a place from the Recent Finds list, highlight
the place’s name and highlight the red . Press OK, and the name
is removed from the list.
To remove all names in the Recent Finds list, press MENU while
on the Recent Finds page. Highlight Remove All and press OK.
NOTE: Deleting an item from the Recent Finds list only
removes the item from this list. It does not delete the actual city
from the Map page, your find database, or My Locations.
12 Trail Guide™ Owner’s Manual
BASIC OPERATION > FINDING PLACES AND ROUTING TO THEM
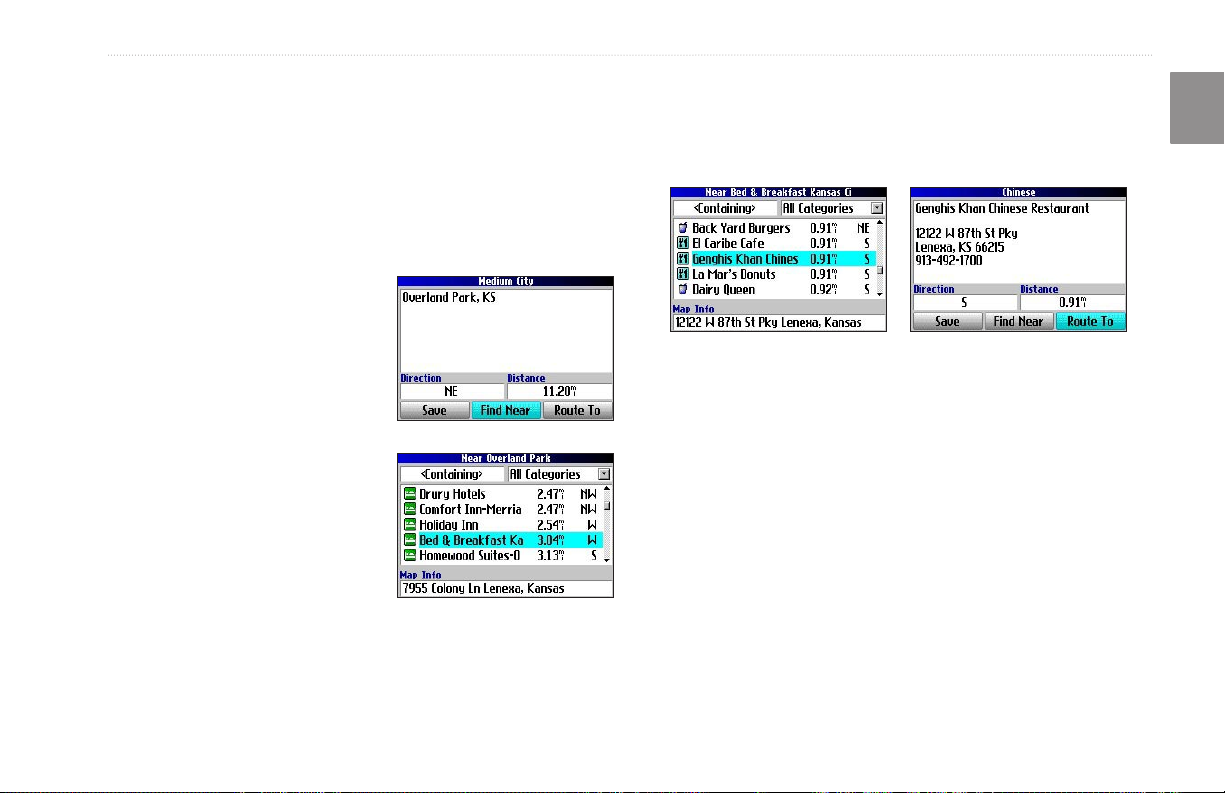
Planning a Trip
If you are planning a trip and would like to find vacation spots
ahead of time, consider using the “chain find” method described
below. You can also follow these instructions for finding places
while you are already on a trip.
1. Find the city you plan to visit. See page 11 for more
instructions. In our example, Overland Park, KS is chosen.
2. Highlight Find Near and
press OK. Highlight Lodging
to look for a place to stay in
Overland Park.
3. Your Trail Guide returns the
names of places to stay.
Highlight a place to stay and
press OK. In our example,
Bed and Breakfast Kansas
City is the lodging place.
4. From the Bed and Breakfast
information page, highlight
Find Near and press OK.
Then highlight Food & Drink
and press OK.
5. A list of all eating establishments near Bed and Breakfast
Kansas City appears. Highlight a restaurant and press OK.
6. To save the restaurant to your My Locations list, highlight
Save from the information page.
Restaurants near your lodging choice in Overland Park
E
N
You can also find entertainment, services, and a variety of other
places near your chosen lodging area in the city of your choice.
When you are ready to take your trip, simply find these places in
your Recent Finds or My Locations list. For more information on
trip planning, see “Planning and Modifying Routes” on page 21.
Trail Guide™ Owner’s Manual 13

BASIC OPERATION > MY LOCATIONS
My Locations
E
You can save your favorite places to the My Locations category of
N
the Find Menu. This allows you to easily find your favorite places
later. For example, if you have found a great campsite, you can
save the place to My Locations. Then when you want to return to
the campsite, you can quickly find and route to it.
Saving Your Favorite Places in “My Locations”
You can save up to 500 locations using four basic methods.
• Save an item you have found using the Find Menu.
• Save your present location from the Where Am I? page.
• Save a new location from the map using the
• Enter a new location’s position coordinates manually.
Saving an Item from the Find Menu
As discussed in the previous sections, you can save items you have
found using the Find Menu.
To save a place from the Find Menu:
1. Press FIND. Highlight the search category and press OK.
2. Highlight the place you want to save and press OK.
3. From the information page, highlight Save and press OK.
Rocker pad.
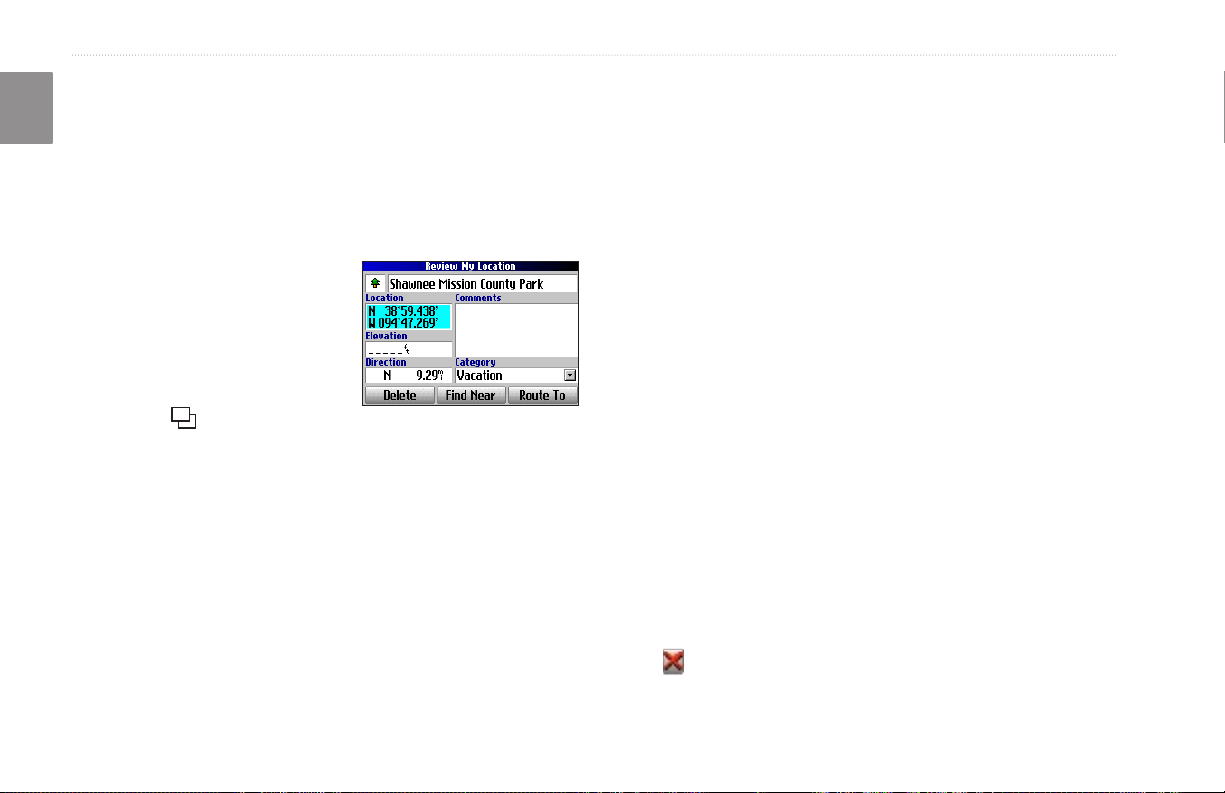
Where Am I?
You will never be lost with your Trail Guide! Use the Where Am
I? feature to find out where you are and save your location. This is
particularly useful if you are traveling off road or any place where
street signs or navigational markers are not available.
You must have a valid position (2D or 3D) fix to mark your present
location. You can determine the satellite fix by looking at the GPS
page.
To find out where you are and save your location:
1. Press the FIND key, highlight Where Am I?, and press OK.
Or, press and hold the OK key.
2. A Where Am I? page
appears, listing your current
location and the nearest
major intersections, if
available. Highlight Save
and press OK to save your
location to My Locations.
14 Trail Guide™ Owner’s Manual

BASIC OPERATION > MY LOCATIONS
Saving a Map Location
As you pan the map, you can save a location you see to My
Locations. See page 28 for information about panning the map.
To save a place on the map to My Locations:
1. Press Page
Map page.
2. Press the Rocker pad to
select the place you want to
save. Press OK.
3. An Information page opens.
Highlight Save and press
OK.
4. A Saved as My Location page
opens. This page allows you
to rename the saved location,
select a new symbol, and
file the saved location in a
category. Highlight the onscreen OK button and press
the OK key when you are
finished.
to open the
Entering a Location’s Coordinates
You can manually enter location coordinates to create a location.
This method can be useful for creating a location at a specific
E
N
latitude/longitude position from a chart.
To enter a location’s coordinates:
1. Press and hold the OK key. Highlight Save and press OK
(or use your favorite method discussed in the previous
section).
2. On the Saved as My Location page, use the Rocker pad to
highlight the Location field and press OK.
3. Use the on-screen keyboard to enter the position
coordinates and press OK when finished.
4. To change other information, highlight the appropriate field
and press OK. After entering your changes, highlight the
on-screen OK button and press the OK key.
Trail Guide™ Owner’s Manual 15
BASIC OPERATION > MY LOCATIONS
Editing a Saved Location
E
You can edit many aspects of a saved location: the name, symbol,
N
location coordinates, comment, elevation, and category.
To edit the saved location:
1. Press the FIND key. Highlight My Locations and press OK.
2. Highlight the saved location you want to edit and press OK.
3. Highlight the item you want to
change and press OK.
4. Use the on-screen keyboard
to enter new information.
5. When you are done editing
the saved location, press the
Page
key to exit.
Organizing Saved Locations into Categories
You can organize your saved locations into categories to help you
manage and use your saved locations. For example, you can create
a “Vacation” category that stores all of the saved locations for your
upcoming vacation. When the vacation is over, you can simply
delete all the saved “Vacation” locations by pushing a few buttons.
To create a saved location category:
1. Press the FIND key. Highlight My Locations and press OK.
2. Highlight the saved location you want to edit and press OK.
3. Highlight the Categories field and press OK.
4. Highlight Edit… and press OK.
5. Highlight Add New… and press OK.
6. Use the on-screen keyboard to enter the name of the new
category. Highlight Done and press OK when finished.
To assign a category to a saved location:
1. Press the FIND key. Highlight My Locations and press OK.
2. Highlight the saved location you want to edit and press OK.
3. Highlight the Categories field and press OK.
4. From the list, highlight the category you want to assign the
saved location to and press OK.
To delete a category:
1. Press the FIND key. Highlight My Locations and press OK.
2. Highlight the location you want to edit and press OK.
3. Highlight the Categories field and press OK.
4. Highlight Edit… and press OK.
5. Highlight the category you want to delete. Highlight the red
to the right of the category and press OK to delete it.
16 Trail Guide™ Owner’s Manual
BASIC OPERATION > MY LOCATIONS
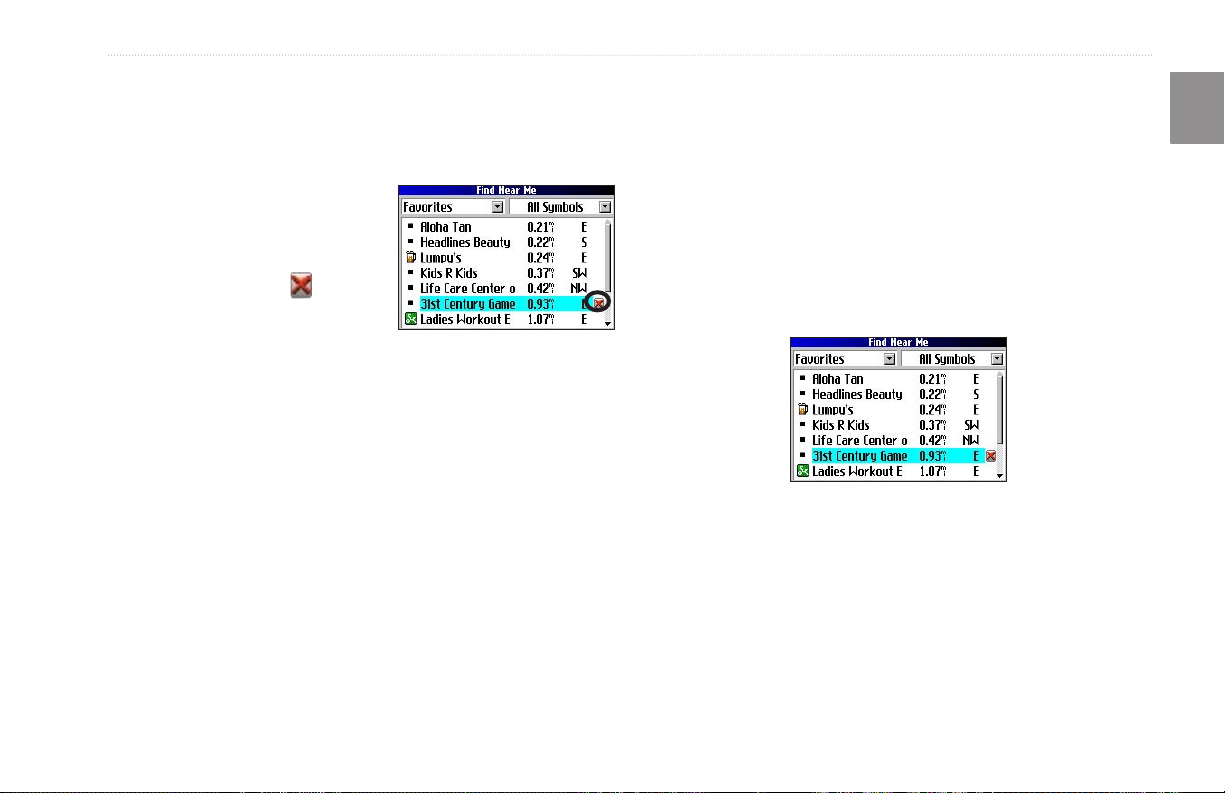
Deleting Saved Locations
You can delete saved locations when they are no longer needed.
Finding My Locations
When you save an item, it is saved in the My Locations category
of the Find Menu. To find a location you have saved, open the My
To delete a saved location:
1. Press the FIND key. Highlight
My Locations and press OK.
2. Highlight the saved location
you want to delete.
3. Highlight the red
right of the location and press
OK to delete it.
to the
Locations category of the Find Menu.
To delete saved locations by symbol or category:
1. Press the FIND key, highlight My Locations, and press OK.
2. Press MENU, highlight Delete…, and press OK.
3. Highlight By Symbol… or By Category… and press OK.
4. When deleting by symbol, highlight the symbol of the saved
location you want to delete and press OK. When deleting
by category, highlight the category you want to delete and
press OK.
5. Highlight Yes and press the OK key to confirm. Highlight No
and press OK to exit without deleting.
E
N
To find a saved location:
1. Press the FIND key, highlight My Locations, and press OK.
2. To narrow your search, highlight All Categories and press
OK. Highlight the category the saved location is assigned to
and press OK.
3. To further narrow your search, highlight All Symbols and
press OK. Highlight the symbol assigned to the saved
location and press OK.
4. Use the Rocker pad to select the saved location and press
OK to open the information page.
5. Highlight Route To and press OK to go to this location.
Trail Guide™ Owner’s Manual 17
BASIC OPERATION > SETTING YOUR HOME LOCATION
Setting Your Home Location
E
Your Trail Guide allows you to set a “Home” location that can
N
be your home, office, or any other place to which you return
most often. After you set your Home location, you can opt to go
Home. For example, if you are traveling in a new city or down an
unknown street and you want to easily find your way home, simply
press and hold the FIND key. Your Trail Guide automatically
redirects you to your Home location.
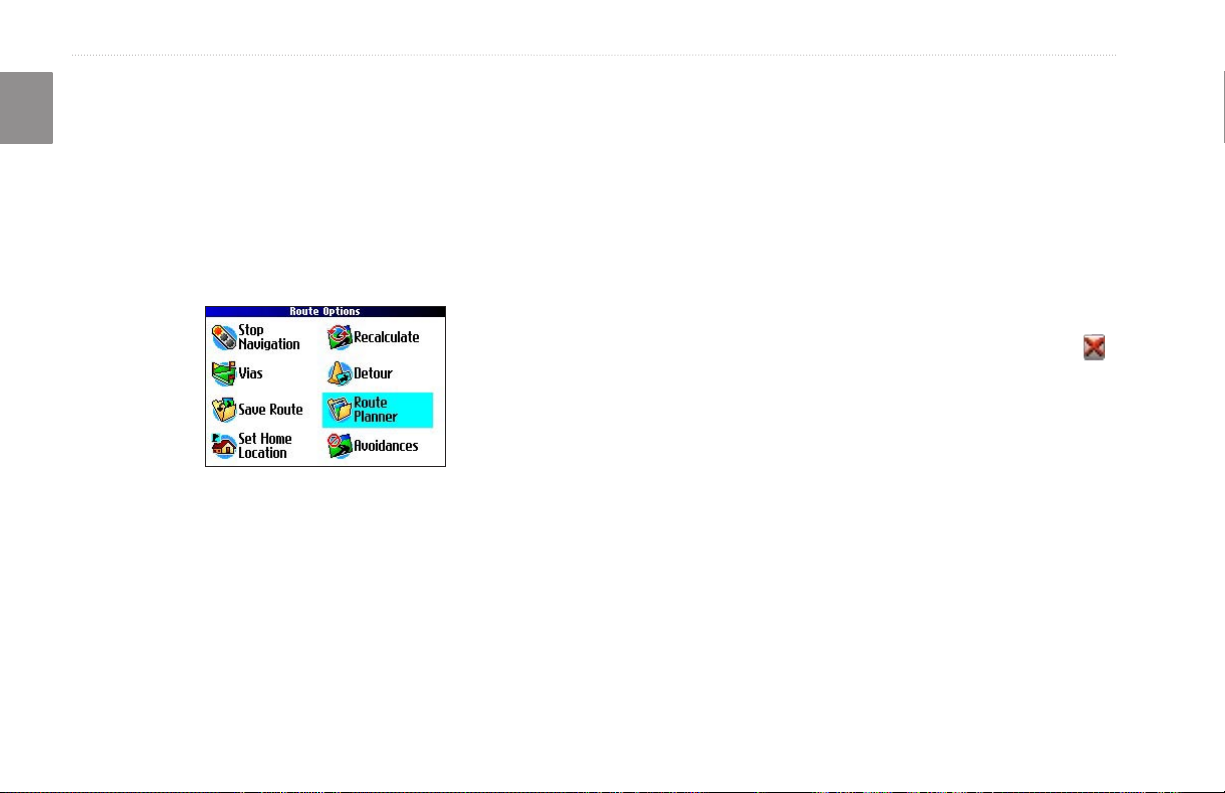
To set a Home location:
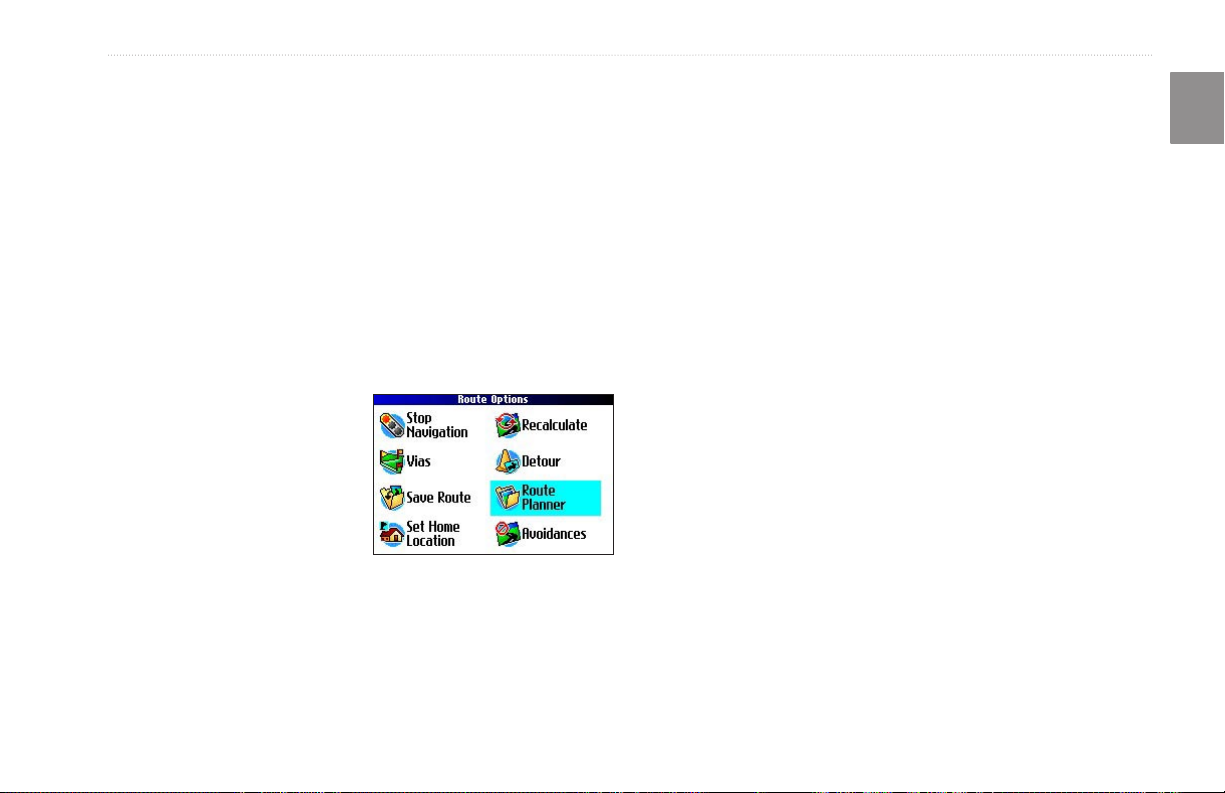
1. Press MENU, highlight Route Options, and press OK. A
Route Options menu appears.
2. Highlight Set Home Location and press OK.
3. Highlight one of the three options and press OK.
4. Find your Home location using the selected option. Your
Home location is set.
To route Home:
Press and hold the FIND key. The Trail Guide automatically
creates a route to your Home location.
Changing Your Home Location
If you travel frequently, you may want to change your Home
location to a new location, such as a hotel or your meeting place, so
you can find your way “home” in unfamiliar surroundings.
To change your Home location:
1. Press FIND, highlight My Locations, and press OK.
2. Highlight your
Press OK. Highlight Yes and press OK to confirm.
3. Follow the previous instructions to reset your Home
location.
Home location and then highlight the red .
18 Trail Guide™ Owner’s Manual

BASIC OPERATION > USING TRACBACK
Using TracBack
The Trail Guide records an electronic breadcrumb trail or “track
log” as you travel. As a result, you can retrace your recent
movements using the TracBack
useful when navigational markers are not readily available.
The track log starts recording as soon as the Trail Guide gets a
location fix. For the best results, clear the track log before you start
traveling. When the track log is full, new track points overwrite the
oldest track points.
To use TracBack:
1. Press the FIND key, highlight Where Am I?, and press OK.
2. Highlight TracBack and press OK.
3. If you want to travel to the beginning of your track, highlight
Yes and press OK.
To select a spot along your track to travel to, highlight No
and press OK. Use the Rocker pad to select the point to
which you want to travel and press OK.
®
feature. This feature is particularly
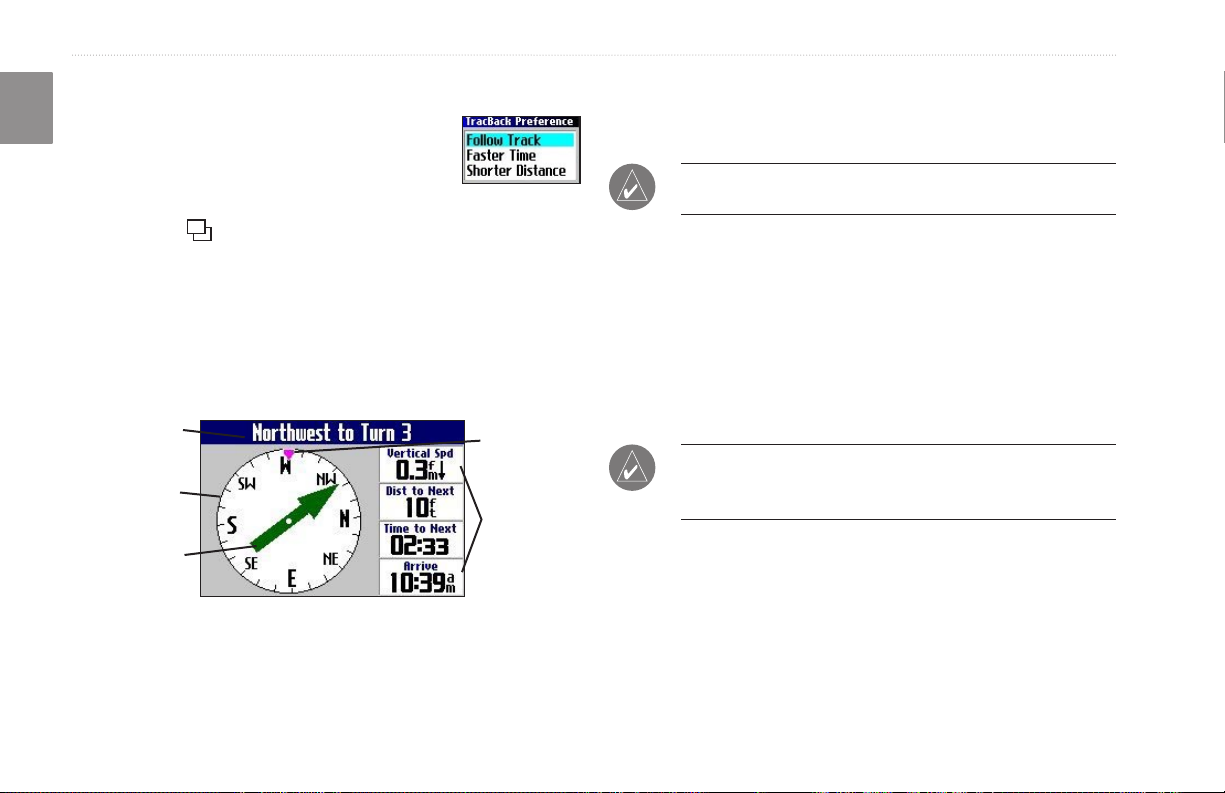
4. A TracBack Preference window appears.
If you have selected to follow roads (Faster Time or Shorter
Distance), the Trail Guide creates a turn-by-turn route to the
selected end point. Follow the route just as you would follow any
route.
If you selected to follow the track, you can use the Map page and
the Compass page to guide you along the path. See the next page
for more information about the Compass page.
E
N
Highlight the preferred method and press
OK.
Trail Guide™ Owner’s Manual 19
BASIC OPERATION > USING TRACBACK
Following Your Track with the Compass Page
E
If you have selected to follow your track (Follow
N
Track), the Trail Guide traces your path to the
destination. You can use the Map page and
Compass page to navigate to your destination.
Press the Page
key to view the Compass page. The middle of
the page features a rotating “compass ring” that shows your course
while you are moving. Your present heading is indicated at the top
of the compass ring. The direction of the next turn is indicated by
an arrow in the middle of the compass ring and a bearing “bug” on
the outside of the compass ring. Directions to your next point or
turn appear in the top text bar.
Text bar
Rotating
compass ring
Bearing pointer
Bug indicator
Data fields
If the arrow points up, you are going in the correct direction. If the
arrow points any direction other than up, turn toward the arrow
until it points up, then continue in that direction.
NOTE: You must be moving for the compass to update and
display your heading accurately.
You can change the data fields on the Compass page just as you can
on the Map page (page 29). For a complete list and description of
data field options, see page 45.
Instead of the bearing pointer, you can use a course pointer. Press
MENU, highlight Course Pointer, and press OK. The course
pointer now appears in the center of the compass to show you how
to get back on course.
NOTE: The Compass page is only available when you are
following a TracBack using the Follow Track method. See
page 19 for more information.
20 Trail Guide™ Owner’s Manual
BASIC OPERATION > PLANNING AND MODIFYING ROUTES
Planning and Modifying Routes
4. From the Route Planner page, highlight
Use Route Planner to plan your routes before you even leave the
house. The Route Planner allows you to select a start point and
a destination, and it automatically saves the route. You can also
modify the route to add extra stops (via points) or avoid certain
roads.
Planning a Route
Planning routes is fast and easy: simply pick a starting location and
an ending location.
To plan a route:
1. Press and hold the
MENU key.
2. Highlight Route Planner
and press OK. From the
Route List page, highlight
New and press OK.
3. From the Route Planner
page, highlight <Select
your starting location> and press OK. Highlight one of the
four options (described to the right) and press OK. Select
your starting location.
Highlight Navigate to start navigating this route. If you want to
stop the route, select Stop Navigation from the Route Options
menu. To resume the route, select Resume Navigation.
Finding Route Points
Your Trail Guide provides four options for selecting your starting
and ending locations:
None—choose this option to begin the route wherever you are
located at the present time.
Current Location
the address at which you are currently located. For example, if your
current location is at 915 Elm, the Trail Guide enters this address as
the Current Location.
Find Menu—choose this option to search for a starting or ending
location using the Find Menu.
Use Map—choose this option to find a point on the Map page.
When the Map page appears, use the Rocker pad to move the map
pointer to the location and press OK.
<Select your
destination> and press OK. Highlight one of the options
and press OK. Select your ending location.
—choose this option to begin or end the route at
E
N
Trail Guide™ Owner’s Manual 21
BASIC OPERATION > PLANNING AND MODIFYING ROUTES
Saving a Route
E
Your Trail Guide automatically saves a route created with the
N
Route Planner. You can also save an active route during navigation
or after you have reached the destination.
To save an active route:
1. Press and hold the MENU key.
2. Highlight Save Route and press OK. Press OK again at the
verification window.
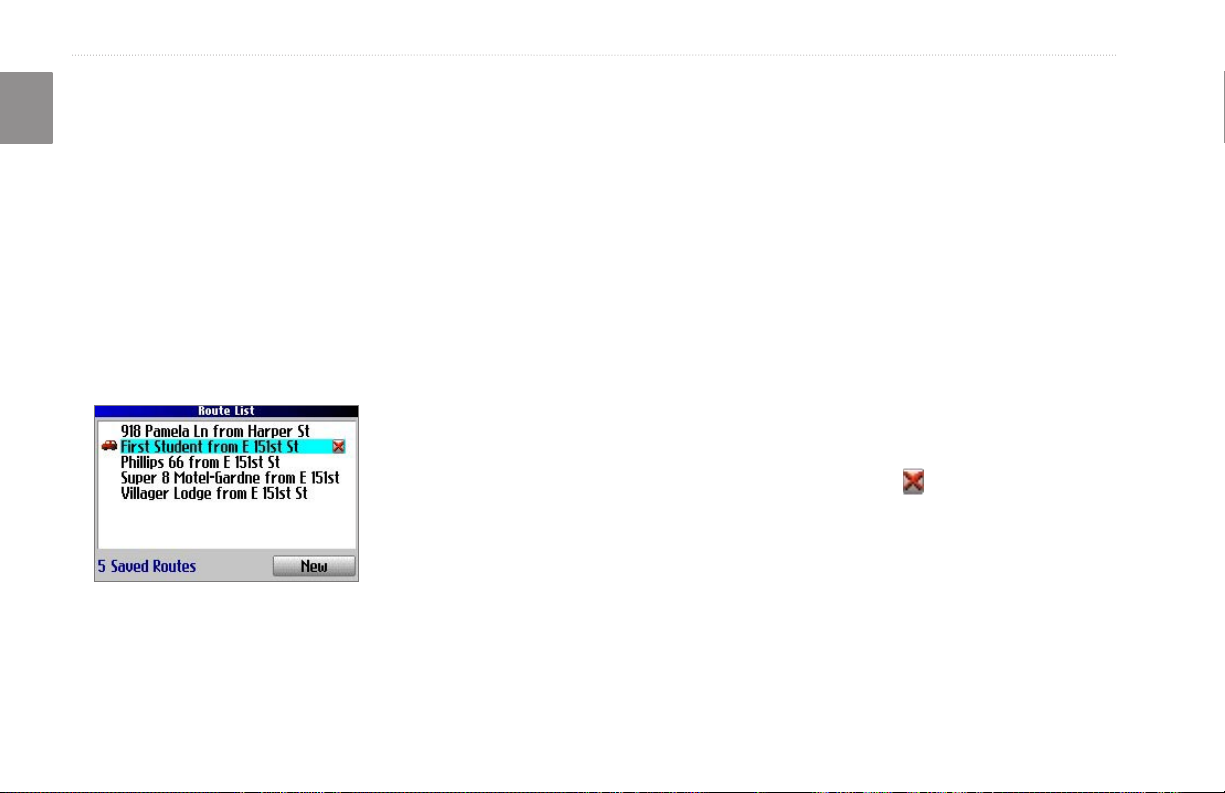
Your Trail Guide can hold up to 50 saved routes. If you save routes
prior to taking a trip, you only need to retrieve the appropriate route
and activate it as you prepare to leave.
The vehicle icon indicates
the route is active.
To select a saved route:
1. Press and hold the MENU key.
2. Highlight Route Planner and press OK. A list of your saved
routes appears.
3. Highlight the name of the route and press
information page for your selected route appears.
4. To activate the route, highlight Navigate and press OK.
5. If you want to change the route by adding via points, use the
Rocker pad to highlight the Via Points box and press OK.
See “Adding Via Points” in this section for more information.
OK. An
Deleting a Saved Route
You can delete a single route or all of the saved routes in your
Trail Guide.
To delete a route:
1. Press and hold the MENU key.
2. Highlight Route Planner and press OK. A list of your saved
routes appears.
3. To delete one route, highlight the name of the route. Use the
Rocker pad to highlight the red to the right of the route
name and press OK. Highlight Yes when the verification
window appears and press OK.
To delete all saved routes, press the MENU key. Highlight
Delete All and press OK. Highlight Yes when the
verification window appears and press OK.
22 Trail Guide™ Owner’s Manual
BASIC OPERATION > PLANNING AND MODIFYING ROUTES
Recalculating a Route
The Trail Guide will automatically recalculate your route if you
stray from the current route. You can also prompt the Trail Guide
to recalculate your route. For example, if you change your route
preference (page 37), you can recalculate your route based on your
Your Trail Guide makes every possible attempt to get you back on
the original route at your requested distance; however, the distance
may be longer if no other roads can take you back to your original
route. Sometimes, the route you are currently taking might be the
only reasonable option. If so, you will not be able to take a detour.
new preference.
Adding Via Points
To
recalculate your route:
1. Press and hold the MENU key.
2. Highlight Recalculate and press OK.
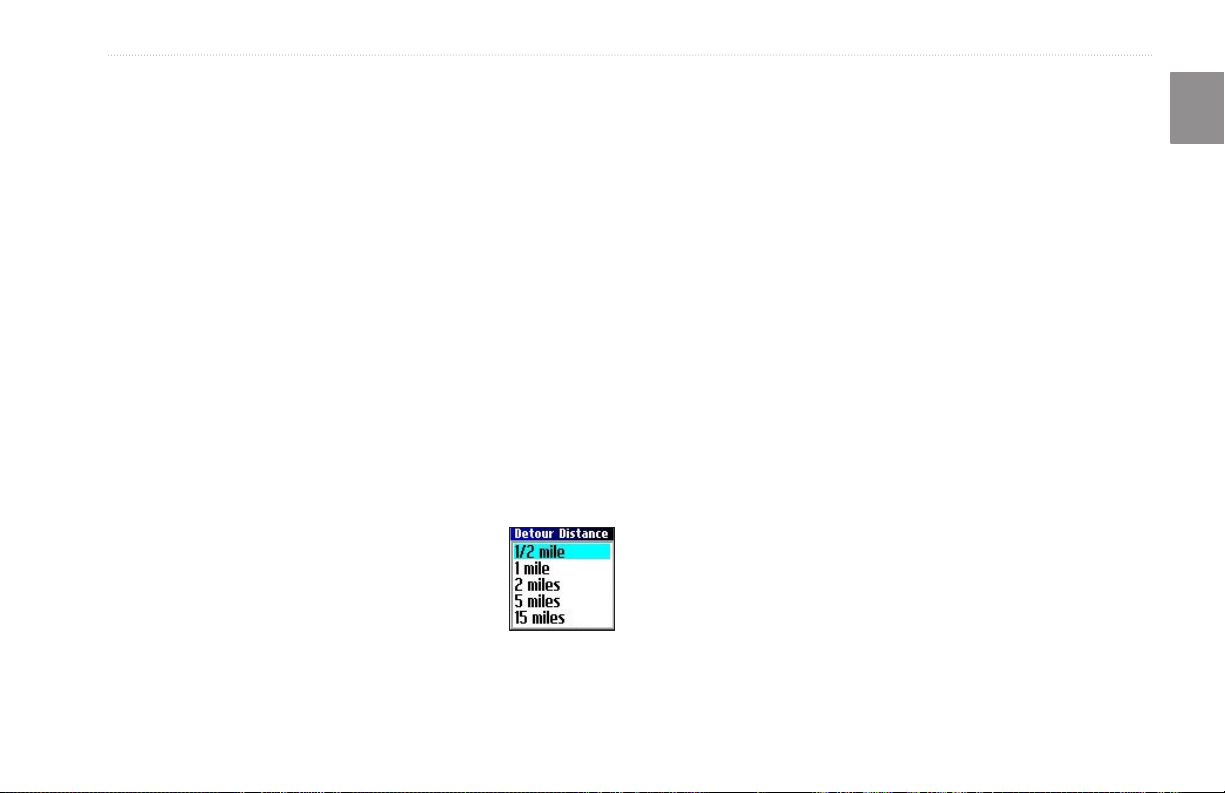
Adding a Detour
When you are navigating a route, you might need to take a detour
to avoid a roadblock or construction. After you select a detour
distance, your Trail Guide calculates a new route and provides you
with new driving instructions. The detour is saved until you stop
the current navigation or until you turn off the unit.
To set a detour:
1. Press and hold the MENU key.
2. Highlight Detour and press OK.
3. Highlight a detour distance and press OK.
Via points are extra stops you make on the way to your final
destination. You can add stops to the route you are currently
navigating, to the route you are planning, or to a route that you
have previously saved.
To add via points to a saved route:
1. Press and hold the MENU key.
2. Highlight Route Planner and press OK.
3. Highlight the route to add extra stops to and press OK.
4. Highlight <Select to add via point> and press OK.
5. Highlight a method to find the location and press OK.
6. Highlight the location of the point. Continue until all points
E
N
are added to the route.
Trail Guide™ Owner’s Manual 23

BASIC OPERATION > PLANNING AND MODIFYING ROUTES
Arranging Via Points
E
When you have entered all of the points, your Trail Guide can
N
arrange them in the most efficient order so that you can visit each
point without a lot of extra traveling.
Adds a via point (extra stop) and places it ahead of the
existing point.
Deletes the point.
Moves the point up or down.
To arrange the order of the via points:
1. Press and hold the MENU key.
2. Highlight Route Planner and press OK.
3. Highlight the route you want to arrange and press OK.
4. Select the point you would like to move in the route order.
Highlight the up or down arrow and press OK. The
point is moved up or down one spot.
5. Continue arranging the points as necessary.
To optimize the route:
1. Press and hold the MENU key.
2. Highlight Route Planner and press OK.
3. Highlight the route you want to arrange and press OK.
4. Press MENU, highlight Optimal Via Order, and press OK.
The unit rearranges all of your extra stops based on your route
preference (Faster Time, Shorter Distance, or Off Road). See
page 37 for more information on route preferences. If you change
your route preference, recalculate the route based upon the new
route preference (page 23).
To reverse the order of the route:
1. Press and hold the MENU key.
2. Highlight Route Planner and press OK.
3. Highlight the route you want to reverse and press OK.
4. Press MENU, highlight Reverse Route, and press OK.
Deleting Via Points
If you decide that you no longer want to visit one of your via
points, select that point and use the Rocker pad to highlight the
red to the right of the via point. Press OK, and the point is
immediately removed from the route.
24 Trail Guide™ Owner’s Manual
 Loading...