

Garmin STRIKER Vivid 4cv Owner's Manual
STRIKER™ VIVID
Owner’s Manual

© 2020 Garmin Ltd. or its subsidiaries
All rights reserved. Under the copyright laws, this manual may not be copied, in whole or in part, without the written consent of Garmin. Garmin reserves the right to change or improve its
products and to make changes in the content of this manual without obligation to notify any person or organization of such changes or improvements. Go to www.garmin.com for current updates
and supplemental information concerning the use of this product.
Garmin®, the Garmin logo, and Ultrascroll® are trademarks of Garmin Ltd. or its subsidiaries, registered in the USA and other countries. ActiveCaptain®, Garmin ClearVü™, Garmin Quickdraw™,
and STRIKER™ are trademarks of Garmin Ltd. or its subsidiaries. These trademarks may not be used without the express permission of Garmin.
Wi‑Fi® is a registered mark of Wi-Fi Alliance Corporation.
The BLUETOOTH® word mark and logos are owned by the Bluetooth SIG, Inc. and any use of such marks by Garmin is under license.

Table of Contents
Introduction.....................................................................1
Device Keys................................................................................ 1
Home Screen.............................................................................. 1
Zooming on the STRIKER Vivid 4.............................................. 1
Panning on the STRIKER Vivid 4............................................... 1
GPS Satellite Signal Acquisition................................................. 1
Customizing the Chartplotter........................................ 1
Customizing the Home Screen................................................... 1
Combination Pages.................................................................... 2
Creating a New Combination Page with the STRIKER Vivid
5/7/9....................................................................................... 2
Creating a New Combination Page with the STRIKER Vivid
4............................................................................................. 2
Customizing a Combination Page..........................................2
Adjusting the Backlight............................................................... 2
Adjusting the Color Mode........................................................... 2
Setting the Beeper...................................................................... 2
ActiveCaptain® App....................................................... 2
ActiveCaptain Roles................................................................... 2
Getting Started with the ActiveCaptain App............................... 2
Enabling Smart Notifications.......................................................3
Updating Software with the ActiveCaptain App.......................... 3
Sonar Fishfinder............................................................. 3
Traditional Sonar View................................................................3
Garmin ClearVü Sonar View.......................................................3
SideVü Sonar View..................................................................... 4
Split-Screen Frequency.............................................................. 4
Flasher........................................................................................ 4
Split-Zoom View..........................................................................4
Selecting the Transducer Type................................................... 4
Sonar Frequencies..................................................................... 4
Selecting the Transducer Frequency..................................... 5
Creating a Waypoint on the Sonar Screen Using the Device
Keys............................................................................................ 5
Pausing the Sonar...................................................................... 5
Adjusting the Zoom..................................................................... 5
Locking the Screen to the Water Bottom............................... 5
Sonar Gain..................................................................................5
Setting the Gain Automatically............................................... 5
Setting the Gain Manually...................................................... 5
Adjusting the Range of the Depth Scale..................................... 5
Sonar Setup................................................................................ 6
Showing and Adjusting the Depth Line.................................. 6
Setting the Scroll Speed........................................................ 6
Setting the Bottom Search Limit............................................ 6
Sonar Appearance Settings................................................... 6
Sonar Noise Rejection Settings............................................. 6
Overlay Number Settings....................................................... 7
Garmin Quickdraw Contours Mapping......................... 7
Mapping a Body of Water Using the Garmin Quickdraw
Contours Feature........................................................................ 7
Adding a Label to a Garmin Quickdraw Contours Map.............. 7
Deleting Garmin Quickdraw Contours........................................ 7
Garmin Quickdraw Community................................................... 7
Connecting to the Garmin Quickdraw Community with
ActiveCaptain......................................................................... 7
Map Settings............................................................................... 8
Garmin Quickdraw Contours Settings........................................ 8
Depth Range Shading........................................................... 8
Navigation with the STRIKER Vivid.............................. 8
Searching for a Destination by Name......................................... 8
Creating a Waypoint on the Map................................................ 8
Navigating to a Waypoint
Creating and Navigating a Route Using the Map....................... 8
Stopping Navigation....................................................................9
Waypoints................................................................................... 9
Marking Your Present Location as a Waypoint...................... 9
Creating a Waypoint at a Different Location.......................... 9
Marking and Navigating to a Man Overboard Location......... 9
Measuring Distance on the Map............................................ 9
Viewing a List of all Waypoints.............................................. 9
Editing a Saved Waypoint...................................................... 9
Deleting a Waypoint or an MOB............................................ 9
Deleting All Waypoints........................................................... 9
Routes........................................................................................ 9
Creating and Navigating a Route Using the Map.................. 9
Creating and Saving a Route................................................. 9
Viewing a List of Routes........................................................ 9
Editing a Saved Route........................................................... 9
Browsing for and Navigating a Saved Route......................... 9
Browsing for and Navigating Parallel to a Saved Route...... 10
Deleting a Saved Route....................................................... 10
Deleting All Saved Routes................................................... 10
Tracks....................................................................................... 10
Showing Tracks................................................................... 10
Clearing the Active Track..................................................... 10
Saving the Active Track....................................................... 10
Viewing a List of Saved Tracks............................................ 10
Editing a Saved Track.......................................................... 10
Saving a Track as a Route...................................................10
Browsing for and Navigating a Recorded Track.................. 10
Deleting a Saved Track........................................................10
Deleting All Saved Tracks.................................................... 10
Retracing the Active Track................................................... 10
Setting the Color of the Active Track................................... 10
Managing the Track Log Memory During Recording........... 10
Configuring the Recording Interval of the Track Log........... 10
............................................................ 8
Device Configuration................................................... 11
System Settings........................................................................ 11
System Information.............................................................. 11
My Vessel Settings................................................................... 11
Setting the Keel Offset......................................................... 11
Setting the Water Temperature Offset................................. 11
Setting Alarms.......................................................................... 12
Navigation Alarms................................................................ 12
System Alarms..................................................................... 12
Sonar Alarms....................................................................... 12
Unit Settings............................................................................. 12
Navigation Settings................................................................... 12
Restoring the Factory Default Settings..................................... 12
Sharing and Managing User Data............................... 12
Connecting to a Garmin Device to Share User Data................ 12
User Data Sharing Cable Wiring Diagram........................... 13
Clearing Saved Data.................................................................13
Appendix....................................................................... 13
Registering Your Device with the Serial Number..................... 13
Specifications............................................................................13
Troubleshooting........................................................................ 13
My device will not turn on or keeps turning off..................... 13
My device will not acquire GPS signals............................... 13
My sonar does not work....................................................... 13
My device is not creating waypoints in the correct
location.................................................................................13
My device does not display the correct time........................ 14
Index.............................................................................. 15
Table of Contents i

Introduction
WARNING
See the Important Safety and Product Information guide in the
product box for product warnings and other important
information.
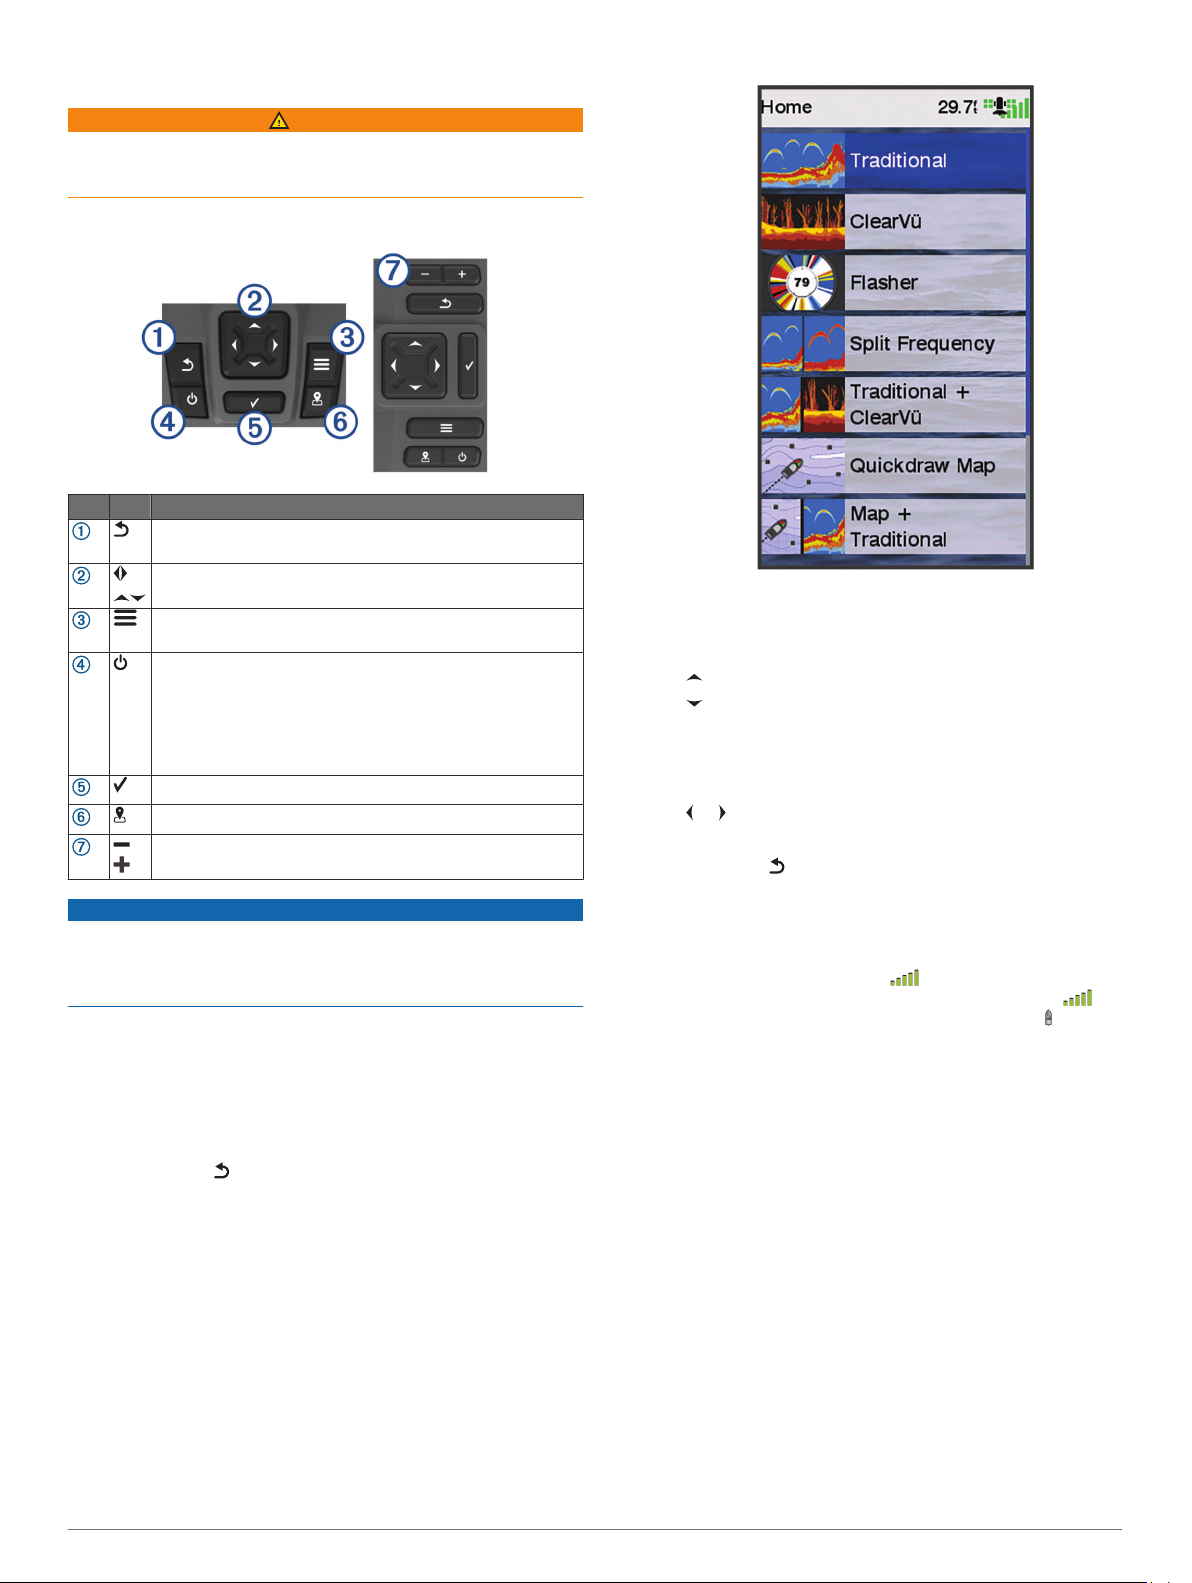
Device Keys
Item Icon Description
Returns to the previous screen.
Returns to the home screen when held.
Scrolls, highlights options, and moves the cursor.
Zooms in and out of a view.
Closes a menu, when applicable.
Opens a menu of options for the page, when applicable.
Turns on and off the device when held.
Performs one or more of these actions when quickly
pressed:
• Adjusts the backlight
• Adjusts the color mode
• Enables and disables sonar
Acknowledges messages and selects options.
Saves the present location as a waypoint.
Zooms out of a view. (Not available on all models.)
Zooms in to a view. (Not available on all models.)
Zooming on the STRIKER Vivid 4
You can zoom in and out of the map.
• Select to zoom in.
• Select to zoom out.
Panning on the STRIKER Vivid 4
You can move the sonar views and maps to view an area other
than your present location.
Select or to start panning.
1
Use the arrow keys to pan.
2
TIP: You can select to stop panning.
NOTICE
Before turning on the device, you must firmly press the
connectors into the appropriate holes in the device. If the cables
are not pressed far enough into the device, the device appears
to lose power or stop working.
Home Screen
The fishfinder home screen provides access to all of the
features in the fishfinder. The features are dependant on the
accessories you have connected to the fishfinder. You may not
have all of the options and features discussed in this manual.
When viewing another screen, you can return to the home
screen by holding . You can customize the layout of the
screens.
GPS Satellite Signal Acquisition
When you turn on the fishfinder, the GPS receiver must collect
satellite data and establish the current location. When the
fishfinder acquires satellite signals, appears at the top of the
Home screen. When the fishfinder loses satellite signals,
disappears and a flashing question mark appears over on the
screen.
For more information about GPS, go to www.garmin.com
/aboutGPS.
Customizing the Chartplotter
Customizing the Home Screen
You can add items to and rearrange items on the Home screen.
From the Home screen, select Customize.
1
Select an option:
2
• To rearrange an item, select Rearrange, select the item to
move, and select the new location.
• To add an item to the Home screen, select Add, and
select the new item.
• To remove an item you have added to the Home screen,
select Remove, and select the item.
• To change the Home screen background image, select
Background, and select an image.
Introduction 1
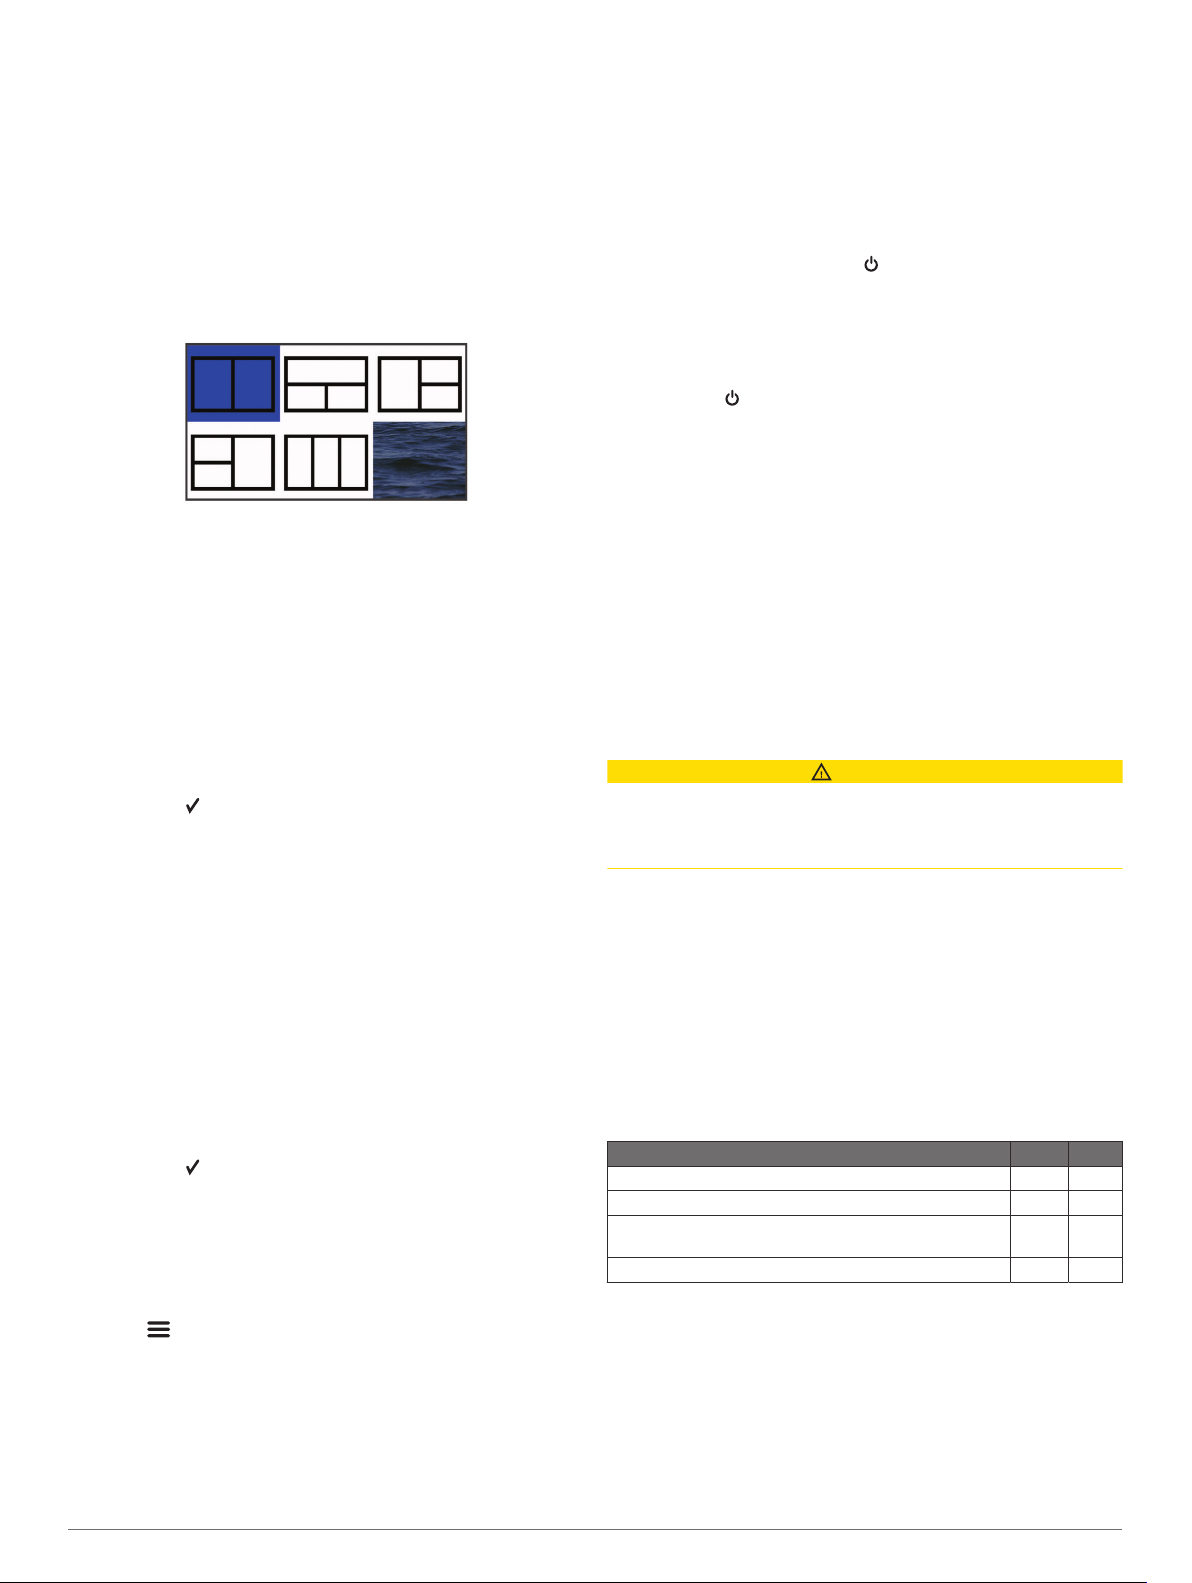
Combination Pages
Some pages combine two or more functions on one page. The
number of options available for combination pages depends on
the optional devices you have connected to your STRIKER Vivid
device. You can edit the combination pages and create new
combination pages.
Creating a New Combination Page with the STRIKER Vivid 5/7/9
You can create a custom screen to suit your needs.
Select Customize > Add > Add Combo.
1
Select a layout.
2
Select an area.
3
Select a screen.
4
Repeat these steps for each area of the page.
5
If necessary, select Data (Hidden), and select an option:
6
• To customize the data shown on the screen, select
Overlay Numbers.
• To turn on and off the compass tape data bar, select
Compass Tape.
Select Done when you are done customizing.
7
Select Next.
8
Enter a name for the page.
9
TIP: Select to select a letter.
Use the arrow keys to resize the windows.
10
Use the arrow keys to select a location on the home screen.
11
Select Done to exit.
12
Creating a New Combination Page with the STRIKER Vivid 4
You can create a custom page to suit your needs.
Select Customize > Add > Add Combo.
1
Select the first function.
2
Select the second function.
3
Select Split to choose the direction of the split screen
4
(optional).
Select Next.
5
Enter a name for the page.
6
TIP: Select to select the letter.
Use the arrow keys to resize the windows.
7
Use the arrow keys to select a location on the home screen.
8
Select Done to exit.
9
Customizing a Combination Page
Open a combination page.
1
Select > Configure.
2
Select an option:
3
• To change the name, select Name, and enter a new
name.
• To change the arrangement of the information on the
screen, select Change Layout, and select a new layout.
• To change the information shown on the screen, select
Change Function, and select new information.
• To resize the information areas shown on the screen,
select Resize Combination.
• To customize the data shown on the screen, select
Overlay Numbers (Overlay Number Settings, page 7).
Adjusting the Backlight
Select Settings > System > Display > Backlight.
1
Adjust the backlight.
2
TIP: From any screen, press repeatedly to scroll through
the brightness levels. This can be helpful when the
brightness is so low you cannot see the screen.
Adjusting the Color Mode
Select Settings > System > Display > Color Mode.
1
TIP: Select > Color Mode from any screen to access the
color settings.
Select an option.
2
Setting the Beeper
You can set when the device makes sounds.
Select Settings > System > Beeper.
1
Select an option:
2
• To have the device beep when you select an item and
when an alarm is triggered, select On (Selections and
Alarms).
• To have the device beep only when alarms are triggered,
select Alarms Only.
ActiveCaptain® App
CAUTION
This feature allows users to submit information. Garmin® makes
no representations about the accuracy, completeness, or
timeliness of information submitted by users. Any use or reliance
on the information submitted by users is at your own risk.
The ActiveCaptain app provides a connection to your STRIKER
Vivid device and the community for a connected boating
experience.
You can use the app to easily and quickly transfer user data,
such as waypoints and routes, connect to the Garmin
Quickdraw™ Contours Community, and update device software.
You can also plan your trip, and view and control the STRIKER
Vivid device from the app.
ActiveCaptain Roles
Your level of interaction with the STRIKER Vivid device using
the ActiveCaptain app depends on your role.
Feature Owner Guest
Register device to account Yes No
Update software Yes Yes
Automatically transfer Garmin Quickdraw contours you
have downloaded or created
Push smart notifications Yes Yes
Getting Started with the ActiveCaptain App
NOTE: The ActiveCaptain feature is only available on models
that have Wi‑Fi® technology.
You can connect a mobile device to the STRIKER Vivid device
using the ActiveCaptain app. The app provides a quick and easy
way for you to interact with your chartplotter and complete such
tasks as sharing data, registering, updating the device software,
and receiving mobile device notifications.
From the STRIKER Vivid device, select ActiveCaptain.
1
Yes No
2 ActiveCaptain® App
 Loading...