

Garmin STRIKER 5 Ice Fishing Bundle, North America Installation Instructions

Ice Fishing Kit
Installation Instructions......................................................... 2
Instructions d'installation.......................................................4
Istruzioni di installazione....................................................... 6
Installationsanweisungen......................................................8
Instrucciones de instalación................................................10
Instruções de instalação..................................................... 12
Installationsvejledning.........................................................14
Installeringsinstruksjoner.................................................... 16
Installationsinstruktioner..................................................... 18
®
and the Garmin logo are trademarks of Garmin Ltd. or its subsidiaries, registered in the USA and other countries. These trademarks may not be used without the express permission of Garmin.
Garmin
February 2016 190-02008-90_0APrinted in Taiwan

Ice Fishing Kit Installation Instructions
Getting Started
Battery Information
Battery Warnings
The fishfinder device uses a user-replaceable, sealed, lead-acid
battery. If these guidelines are not followed, the battery may
experience a shortened life span or may present a risk of
damage to the device, fire, chemical burn, electrolyte leak,
and/or bodily injury.
WARNING
• Do not place the battery near objects that may cause sparks,
flames, or heat.
• Do not incinerate the battery.
• Keep the battery tightly closed.
• Do not use a sharp object to remove the battery.
• Do not disassemble, puncture, or damage the battery.
• Do not swallow, touch, or inhale the contents of an open
battery. Avoid contact with internal acid. Contact with internal
acid may cause irritation or severe burns. Irritation may occur
to the eyes, respiratory system, and skin. Flush with water at
once if contact is made with acid.
• Do not submerge the battery and avoid contact with water.
• Do not short the battery terminals.
• Do not drop or throw the battery.
• Keep the battery away from children.
• Only replace the battery with the correct replacement battery.
Using another battery presents a risk of fire or explosion of
the device or charger.
• Only charge the battery with the included charger.
• Do not charge the battery in an unventilated area.
• Store in a cool, dry, and well-ventilated area.
• Do not charge the battery in a gas-tight container.
• Do not leave the device exposed to a heat source or in a
high-temperature location, such as in the sun in an
unattended vehicle. To prevent damage, remove the device
from the vehicle or store it out of direct sunlight.
• Do not use organic solvents or other cleaners other than
recommended chemical cleaners on the battery.
• Contact your local waste disposal department to dispose of
the battery in accordance with applicable local laws and
regulations.
• When storing the battery for an extended time, store within
the following temperature range: from 5° F to 104°F (from
-15° C to 40° C).
• Do not operate the battery outside of the following
temperature range: from 5° F to 122° F (from -15° C to 50°
C).
Slide the negative connector on the wall charger onto the
2
negative terminal on the battery.
Connect the wall charger to the wall outlet.
3
Battery Tips
• The life expectancy of a sealed lead acid battery can be
extended by recharging often and not completely discharging
the battery.
• Sealed lead acid batteries slowly lose their charge while in
storage. For best results, charge the battery prior to use.
• When used in cold temperatures, sealed lead acid batteries
do not hold the charge as long as in warmer temperatures.
• To avoid spilling the internal acid, keep the battery in the
upright position.
• Sealed lead acid batteries are completely recyclable.
Specifications
Battery type Sealed, lead acid
Battery life About 11 hr.
NOTE: The actual battery life of a fully
charged battery can vary based on the
temperature the battery is operated and
stored in, the age of the battery, and the
depth of the water.
Battery shelf life after
charging
Battery operating
temperature range
Battery charging
temperature range
Battery storage
temperature range
Physical size (assembled
kit with device)
Weight (unassembled kit
with device)
1 month: 92%
3 months: 90%
6 months: 80%
From 5° to 122°F (from -15° to 50°C)
From 5° to 104°F (from -15° to 40°C)
From 5° to 104°F (from -15° to 40°C)
L × W × H: 10.629 in. × 10.629 in. ×
11.02 in. (270 mm × 270 mm × 280 mm)
8.498 lb. (3855 g)
Assembling the Mount
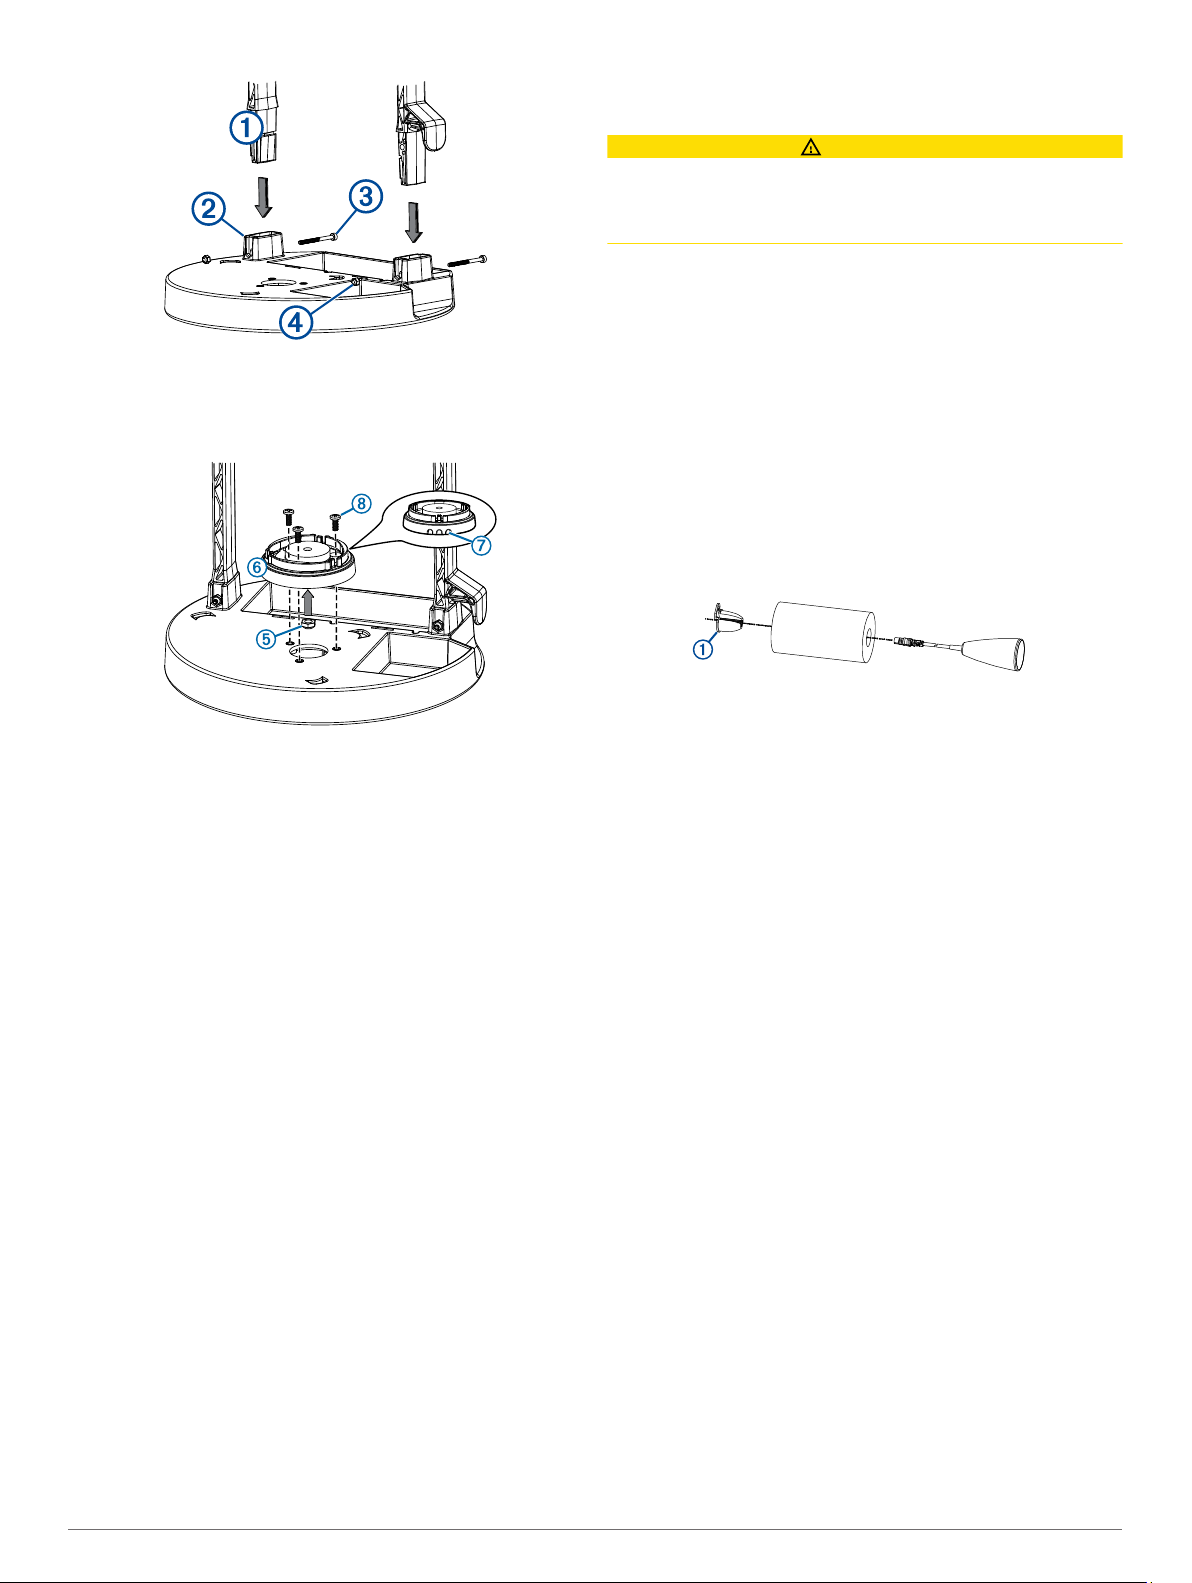
You need a Phillips screwdriver to assemble the mount.
Insert the handle À into the two openings on the portable
1
mount Á.
Charging the Battery
CAUTION
Ensure that you connect the correct connector to the correct
battery terminal. Damage to the battery, device, or bodily harm
may occur if the device is improperly connected to the battery.
Attach the handle to the portable mount using two
2
M4×0.7×40 mm screws  and M4×7 nuts Ã.
Press the M6×1 nut Ä into the bottom of the swivel-mount
3
base Å.
Before you can charge the battery using the charger, you must
disconnect the device power cable from the positive and
negative terminals on the battery.
The battery is rechargeable and can be charged by connecting
the battery to a wall charger.
Connect the positive connector on the wall charger onto the
1
positive terminal on the battery.
2 Installation Instructions
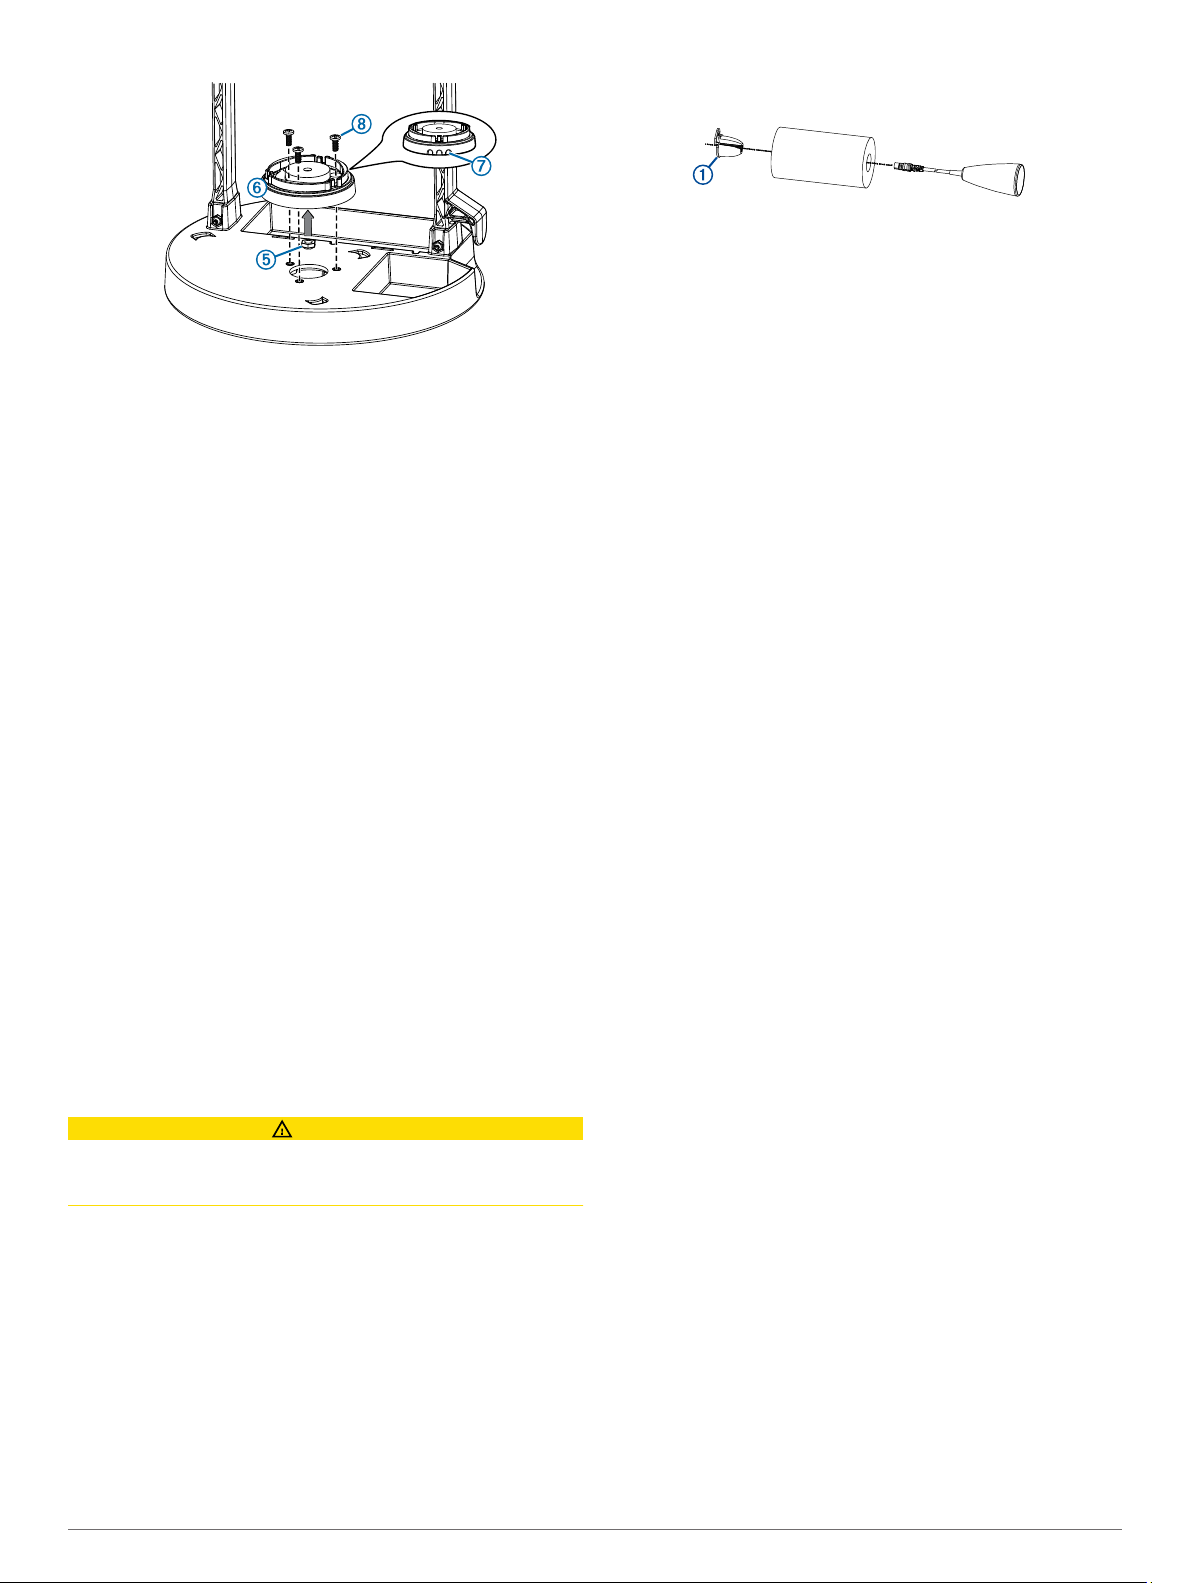
Place the swivel-mount base on the portable mount, route the
4
device power and transducer cables through the passthrough holes Æ, and fasten the swivel-mount base using the
three M4×0.7×10 mm screws Ç.
Place the bail-mount bracket on the swivel-mount base.
5
Install the M6×1.0 mm screw through the bracket and base,
6
and tighten to the preferred position.
Screw the bail-mount knobs into the sides of the device.
7
Place the device in the bail mount bracket and tighten the
8
bail-mount knobs.
If necessary, pull out enough slack from the power and
9
transducer cables so the mount can fully tilt to the preferred
positions when the cables are connected.
Placing the Portable Kit in the Bag
After you have assembled the portable kit mount, you can place
it in the bag, which makes it easier to carry and protects it from
the elements. The bag contains hooks that allow you to tether
the bag to a seat on your boat.
Place the battery in the open space behind the swivel mount.
1
Slide two of the included hook and loop straps through the
2
narrow slots near the battery.
Pull the straps under and around the bottom of the portable
3
mount, and wrap them tightly around the battery.
Place the transducer into the open space next to the swivel
4
mount.
Place the portable kit in the bag.
5
Wrap the flap of nylon found inside the bag around the
6
handle of the portable base and secure it to the opening flap.
Pull the opening flap over the handle.
7
Zip up the opening flap to close the bag.
8
Connecting and Stowing the Cables
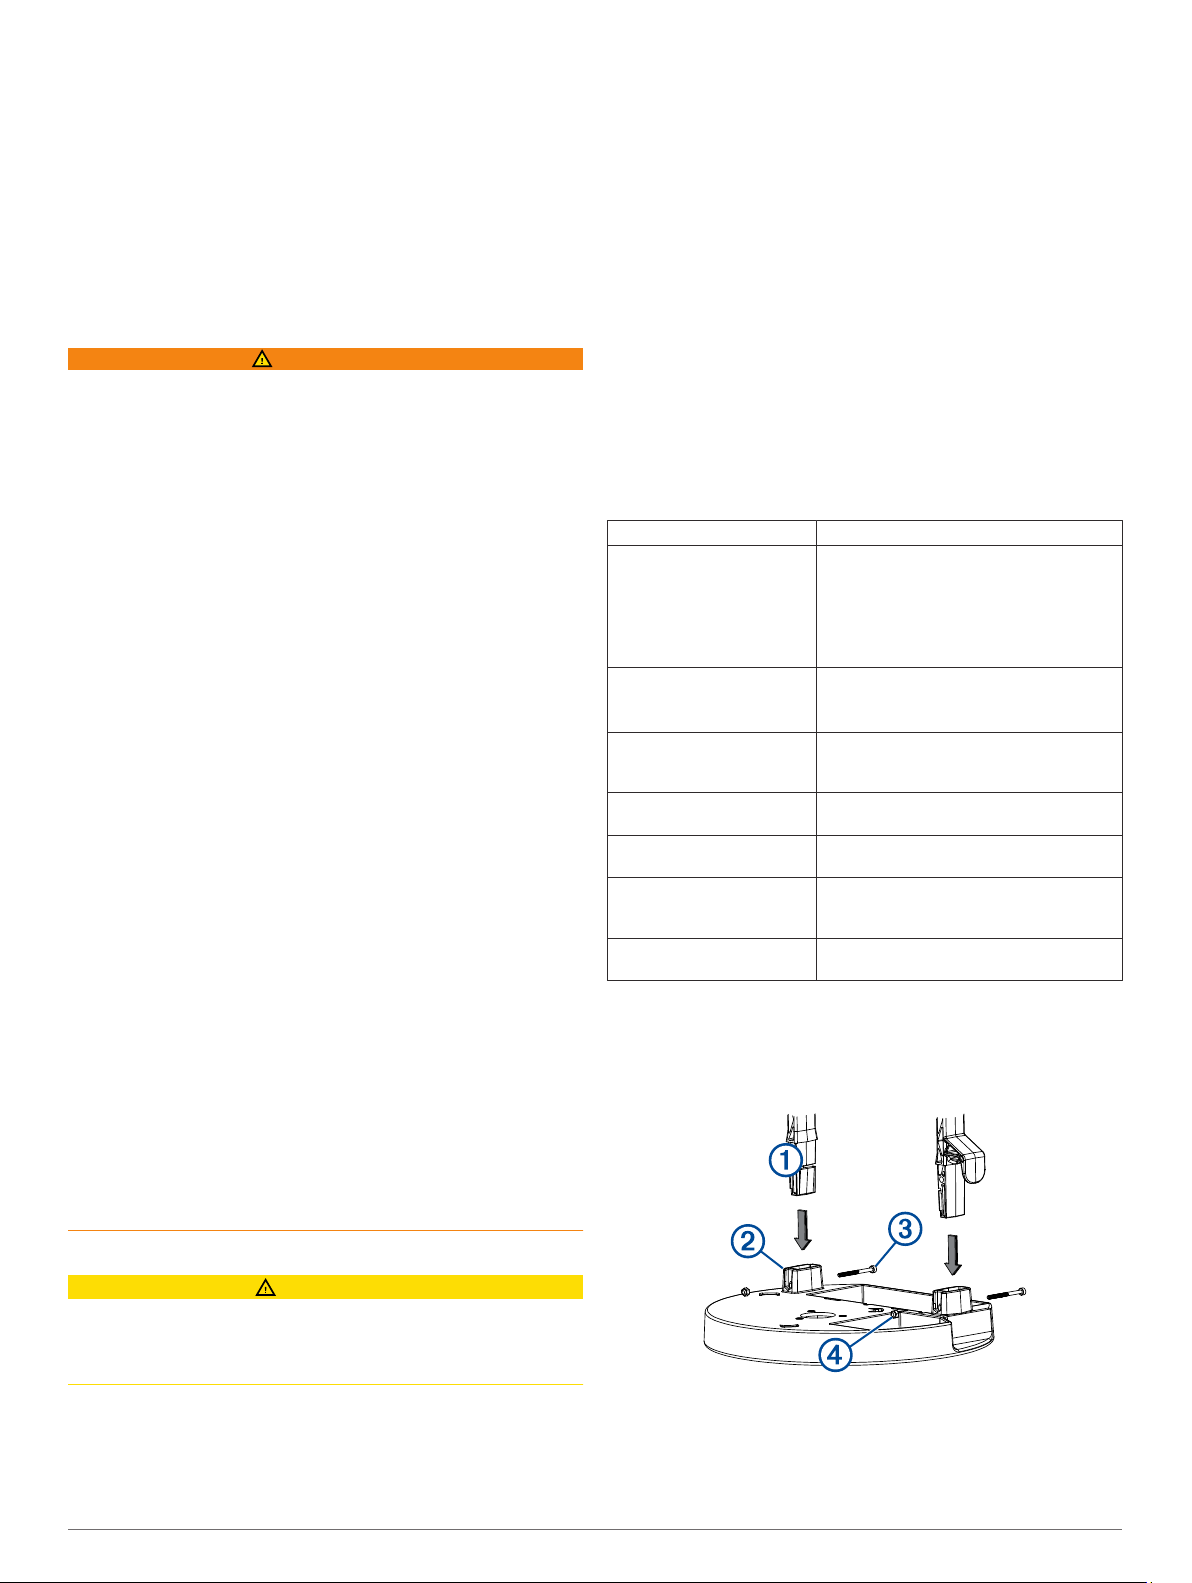
Snap the float stop À onto the transducer cable, on the top of
2
the float.
Adjust the float and float stop so the transducer is hanging
3
beneath the ice.
With the transducer cable connected to the back of the
4
device, drop the transducer into the water.
CAUTION
Ensure that you connect the correct connector to the correct
battery terminal. Damage to the battery, device, or bodily harm
may occur if the device is improperly connected to the battery.
Connect the positive (red) connector onto the positive (red)
1
terminal on the battery.
Connect the negative (black) connector onto the negative
2
(black) terminal on the battery.
Connect the power cable and transducer cable to the
3
fishfinder or chartplotter.
If necessary, wrap the excess power cable around the open
4
section on the underside of the portable mount.
If necessary, wrap the excess transducer cable around the
5
hooks on the side of the handle on the portable mount.
Installing the Transducer
Insert the transducer cable through the float.
1
Installation Instructions 3

Kit de pêche sous la glace
Instructions d'installation
Mise en route
Informations sur la batterie
Avertissements relatifs à la batterie
Le sondeur utilise une batterie plomb-acide scellée remplaçable
par l'utilisateur. Le non-respect de ces consignes peut causer
une diminution de la durée de vie de la batterie, endommager le
GPS ou présenter un risque d'incendie, de brûlure chimique, de
fuite d'électrolyte et/ou de blessure corporelle.
AVERTISSEMENT
• Ne placez pas la batterie à proximité d'objets pouvant
générer des étincelles, des flammes ou de la chaleur.
• N'exposez pas la batterie aux flammes.
• Gardez la batterie hermétiquement fermée.
• N'utilisez pas d'objet pointu pour retirer la batterie.
• Ne démontez pas la batterie, ne la percez pas, ne
l'endommagez pas.
• N'avalez pas, ne touchez pas, n'inhalez pas le contenu d'une
batterie ouverte. Evitez le contact avec l'acide contenu dans
la batterie, vous risqueriez des irritations ou de graves
brûlures. Les irritations peuvent concerner les yeux, le
système respiratoire et la peau. En cas de contact avec
l'acide, lavez-vous immédiatement et abondamment avec de
l'eau.
• N'immergez pas la batterie et évitez tout contact avec l'eau.
• Ne court-circuitez pas les bornes de la batterie.
• Ne faites pas tomber la batterie, ne la jetez pas.
• Gardez la batterie hors de portée des enfants.
• Remplacez toujours la batterie par une batterie neuve
adéquate. L'utilisation d'une autre batterie peut présenter un
risque d'incendie ou d'explosion de la batterie ou du
chargeur.
• Ne chargez la batterie qu'à l'aide du chargeur fourni.
• Ne chargez pas la batterie dans un endroit non ventilé.
• Rangez-la dans un endroit frais, sec et ventilé.
• Ne chargez pas la batterie dans un conteneur étanche aux
gaz.
• Ne laissez pas l'appareil à proximité d'une source de chaleur
ou dans un lieu où la température est très élevée, par
exemple dans un véhicule sans surveillance stationné en
plein soleil. Pour éviter tout dommage, sortez l'appareil de
votre véhicule ou placez-le à l'abri du soleil.
• N'utilisez pas de solvants organiques ni de produits
nettoyants autres que les produits chimiques recommandés
pour nettoyer la batterie.
• Contactez la déchetterie locale pour plus d'informations sur la
mise au rebut de la batterie dans le respect des lois et
réglementations locales applicables.
• Si vous devez ranger la batterie pour une période prolongée,
assurez-vous que la température ambiante du lieu de
conservation soit toujours comprise entre -15 °C et 40 °C
(5 °F et 104 °F).
• Ne faites pas fonctionner la batterie si la température n'est
pas comprise entre -15 °C et 50 °C (5 °F et 122 °F).
risquez d'endommager la batterie ou l'appareil ou risquez des
blessures corporelles.
Pour pouvoir charger la batterie à l'aide du chargeur, vous
devez d'abord déconnecter le câble d'alimentation de l'appareil
des bornes positives et négatives de la batterie.
La batterie est rechargeable ; il suffit pour cela de la connecter à
un chargeur secteur.
Branchez le connecteur positif du chargeur secteur sur la
1
borne positive de la batterie.
Branchez le connecteur négatif du chargeur secteur sur la
2
borne négative de la batterie.
Connectez le chargeur secteur à une prise murale.
3
Conseils concernant la batterie
• La durée de vie d'une batterie plomb-acide peut être
prolongée en la rechargeant souvent et en ne la déchargeant
pas entièrement.
• Les batteries plomb-acide scellées perdent peu à peu leur
charge lorsqu'elles sont inutilisées. Pour des résultats
optimaux, chargez la batterie avant utilisation.
• Lorsqu'elles sont utilisées à des températures basses, les
batteries plomb-acide scellées ne conservent pas leur charge
aussi longtemps qu'à des températures plus élevées.
• Pour éviter toute perte de l'acide qu'elle contient, conservez
la batterie en position verticale.
• Les batteries plomb-acide scellées sont entièrement
recyclables.
Caractéristiques techniques
Type de batterie Plomb-acide scellée
Autonomie de la batterie Environ 11 h
REMARQUE : l'autonomie d'une batterie
pleine peut varier en fonction de la
température d'utilisation et de stockage,
de l'âge de la batterie et de la profondeur
de l'eau.
Autonomie de la batterie en
stockage, après
chargement
Plage de températures du
fonctionnement de la
batterie
Plage de températures du
chargement de la batterie
Plage de températures du
stockage de la batterie
Dimensions (avec l'appareil) L × l × H : 270 × 270 × 280 mm (10,629 ×
Poids (sans l'appareil) 3855 g (8,498 lb)
1 mois : 92 %
3 mois : 90 %
6 mois : 80 %
De -15 à 50 °C (de 5 à 122 °F)
De -15 à 40 °C (de 5 à 104 °F)
De -15 à 40°C (de 5 à 104°F)
10,629 × 11,02 po)
Assemblage du support de montage
Pour assembler le support, vous avez besoin d'un tournevis
cruciforme.
Insérez la poignée À dans les deux emplacements situés sur
1
le support portable Á.
Chargement de la batterie
ATTENTION
Assurez-vous de brancher le connecteur approprié sur la borne
de la batterie qui lui correspond. Dans le cas contraire, vous
4 Instructions d'installation
Fixez la poignée au support portable à l'aide de deux vis
2
M4 × 0,7 × 40 mm  et de deux écrous M4 × 7 mm Ã.
Enfoncez l'écrou M6 × 1 Ä dans le fond de la base de l'étrier
3
pivotant Å.
Zippez le rabat d'ouverture pour fermer le sac.
8
Connexion et fixation des câbles
ATTENTION
Assurez-vous de brancher le connecteur approprié sur la borne
de la batterie qui lui correspond. Dans le cas contraire, vous
risquez d'endommager la batterie ou l'appareil ou risquez des
blessures corporelles.
Connectez le connecteur positif (rouge) sur la borne positive
1
(rouge) de la batterie.
Connectez le connecteur négatif (noir) sur la borne négative
2
(noire) de la batterie.
Connectez le câble d'alimentation et le câble de sonde au
3
détecteur de poissons ou au traceur.
Au besoin, enroulez l'excédent de câble d'alimentation autour
4
de la section ouverte sur le dessous du support portable.
Au besoin, enroulez l'excédent de câble de sonde autour des
5
crochets qui se situent sur les côtés du support portable.
Installation de la sonde
Insérez le câble de sonde à travers le flotteur.
1
Installez le stop float À sur le câble de sonde, au-dessus du
2
flotteur.
Placez la base de l'étrier pivotant sur le support portable,
4
faites passer les câbles d'alimentation et de la sonde par les
trous de passage des câbles Æ, puis fixez la base de l'étrier
pivotant à l'aide de trois vis M4 × 0,7 × 10 mm Ç.
Placez l'étrier de fixation sur la base de l'étrier pivotant.
5
Installez la vis M6 × 1 mm à travers le support et la base,
6
puis serrez jusqu'à atteindre la position souhaitée.
Vissez les vis de montage sur étrier sur les côtés de
7
l'appareil.
Placez l'appareil dans l'étrier de fixation et serrez les vis de
8
montage sur étrier.
Au besoin, laissez suffisamment de mou dans les câbles
9
d'alimentation et de la sonde pour que l'étrier puisse
librement s'incliner dans toutes les positions lorsque les
câbles seront connectés.
Rangement du kit portable dans son sac
Une fois que le support est assemblé, rangez-le dans son sac,
pour faciliter son transport et le protéger des éléments. Le sac
est équipé de crochets pour vous permettre de le fixer à un
siège sur votre bateau.
Placez la batterie dans l'espace situé à l'arrière de l'étrier
1
pivotant.
Faites glisser deux des sangles à serrage autoagrippant à
2
travers les fentes situées à proximité de la batterie.
Tirez les sangles dessous et autour de la base du support
3
portable, puis enroulez-les fermement autour de la batterie.
Placez la sonde dans l'espace situé à proximité de l'étrier
4
pivotant.
Placez le support portable dans son sac.
5
Enroulez le rabat de nylon qui se trouve à l'intérieur du sac
6
autour de la poignée du support portable, puis fixez-le au
rabat d'ouverture.
Tirez le rabat d'ouverture sur la poignée.
7
Ajustez le flotteur et le stop float pour que la sonde reste
3
sous la glace.
Une fois le câble de sonde connecté à l'arrière de l'appareil,
4
plongez la sonde dans l'eau.
Instructions d'installation 5
Kit per la pesca nel ghiaccio Istruzioni
di installazione
Operazioni preliminari
Informazioni sulla batteria
Avvisi sulla batteria
Il fishfinder utilizza una batteria al piombo acido sostituibile
dall'utente. Il mancato rispetto delle seguenti indicazioni può
compromettere la durata della batteria, danneggiare il
dispositivo e causare incendi, combustioni chimiche, perdita di
elettroliti e/o lesioni personali.
AVVERTENZA
• Non posizionare la batteria vicino a oggetti che possono
provocare scintille, fiamme o calore.
• Non bruciare la batteria.
• Mantenere la batteria ben chiusa.
• Non utilizzare oggetti acuminati per rimuovere la batteria.
• Non smontare, forare o danneggiare la batteria.
• Non ingerire, toccare o inalare il contenuto di una batteria
aperta. Evitare il contatto con l'acido interno. Il contatto con
l'acido interno può essere causa di gravi ustioni o irritazioni a
occhi, sistema respiratorio e pelle. Sciacquare
immediatamente con acqua in caso di contatto con l'acido.
• Non immergere la batteria ed evitare il contatto con l'acqua.
• Non creare ponti nei terminali della batteria.
• Non far cadere o lanciare la batteria.
• Tenere la batteria lontano dalla portata dei bambini.
• In caso di sostituzione, utilizzare solo la batteria sostitutiva
corretta, onde evitare il rischio di esplosioni o incendi del
dispositivo o del caricabatterie.
• Ricaricare la batteria solo con il caricabatterie in dotazione.
• Non ricaricare la batteria in un'area poco arieggiata.
• Conservarla in luoghi freschi, asciutti e ben arieggiati.
• Non ricaricare la batteria in un contenitore a tenuta di gas.
• Evitare l'esposizione del dispositivo a fonti di calore o
temperature elevate, ad esempio in un veicolo incustodito
parcheggiato al sole. Per evitare possibili danni, rimuovere il
dispositivo dal veicolo o riporlo lontano dai raggi diretti del
sole.
• Non utilizzare solventi organici o detergenti diversi da quelli
consigliati sulla batteria.
• Per un corretto smaltimento della batteria in conformità alle
leggi e alle disposizioni locali, contattare le autorità locali
preposte.
• Se non viene utilizzata per lunghi periodi, conservare la
batteria a una temperatura compresa tra -15 °C e 40 °C (5 °F
e 104 °F).
• Non esporre la batteria al di fuori dell'intervallo compreso tra
-15 °C e 50 °C (5 °F e 122 °F).
Collegare il connettore positivo del caricabatterie a muro al
1
terminale positivo della batteria.
Inserire il connettore negativo del caricabatterie a muro nel
2
terminale negativo della batteria.
Collegare il caricabatterie a muro a una presa.
3
Suggerimenti per l'uso della batteria
• È possibile allungare il ciclo di vita di una batteria al piombo
acido ricaricandola spesso senza lasciarla scaricare
completamente.
• Le batterie al piombo acido perdono lentamente la loro carica
quando non vengono utilizzate. Per risultati ottimali, caricare
la batteria prima dell'uso.
• Quando vengono utilizzate a temperature fredde le batterie al
piombo acido non mantengono la carica come avviene con le
temperature più calde.
• Per evitare la fuoriuscita dell'acido interno, tenere la batteria
in posizione verticale.
• Le batterie al piombo acido sono completamente ricaricabili.
Caratteristiche tecniche
Tipo di batteria Piombo acido, sigillata
Durata della batteria Circa 11 ore
NOTA: la durata effettiva di una batteria
completamente carica varia in base alla
temperatura di funzionamento e di
stoccaggio, dall'età della batteria e dalla
profondità dell'acqua.
Durata di magazzinaggio
della batteria dopo la
ricarica
Temperatura operativa di
funzionamento della
batteria
Temperatura operativa della
ricarica della batteria
Temperatura di stoccaggio
della batteria
Dimensioni fisiche (kit
assemblato con il
dispositivo)
Peso (kit non assemblato
con il dispositivo)
1 mese: 92%
3 mesi: 90%
6 mesi: 80%
Da da -15° a 50 °C (5° a 122 °F)
Da da -15° a 40 °C (5° a 104 °F)
Da da -15° a 40 °C (5° a 104 °F)
L × P × A: 270 mm × 270 mm × 280 mm
(10,629 poll. × 10,629 poll. × 11,02 poll.)
3855 g (8,498 libbre)
Montaggio del supporto
È necessario un cacciavite Phillips per montare il supporto.
Inserire la maniglia À nelle due fessure del supporto portatile
1
.
Á
Ricaricare la batteria
ATTENZIONE
Assicurarsi di collegare il connettore corretto al giusto terminale
della batteria. Se il collegamento non avviene in modo corretto,
si corre il rischio di danneggiare la batteria o il dispositivo o di
provocare danni fisici alla persona.
Fissare la maniglia al supporto portatile utilizzando due viti
Prima di utilizzare il caricabatterie, è necessario scollegare il
cavo di alimentazione del dispositivo dai terminali positivo e
negativo della batteria.
La batteria è ricaricabile e può essere caricata collegandola a un
2
M4×0,7×40 mm  e i dadi M4×7 mm Ã.
Inserire il dado M6×1 Ä nella parte inferiore della base del
3
supporto girevole Å.
caricabatterie a muro.
6 Istruzioni di installazione
 Loading...