

Garmin nRoute help contents

™
nRoute
GPS navigation software
help contents

© Copyright 2005 Garmin Ltd. or its subsidiaries
Garmin International, Inc.
1200 East 151st Street, Olathe, Kansas 66062, U.S.A.
Tel. 913/397.8200 or 800/800.1020
Fax 913/397.8282
Garmin (Europe) Ltd.
Unit 5, The Quadrangle, Abbey Park Industrial Estate, Romsey, SO51 9DL, U.K.
Tel. 44/0870.8501241
Fax 44/0870.8501251
Garmin Corporation
No. 68, Jangshu 2nd Road, Shijr, Taipei County, Taiwan
Tel. 886/2.2642.9199
Fax 886/2.2642.9099
All rights reserved. Except as expressly provided herein, no part of this manual may be reproduced, copied, transmitted, dissemi
nated, downloaded, or stored in any storage medium, for any purpose without the express prior written consent of Garmin. Garmin hereby grants permission to download a single copy of this manual onto a hard drive or other electronic storage medium to be
viewed and to print one copy of this manual or of any revision hereto, provided that such electronic or printed copy of this manual
must contain the complete text of this copyright notice and provided further that any unauthorized commercial distribution of this
manual or any revision hereto is strictly prohibited.
Information in this document is subject to change without notice. Garmin reserves the right to change or improve its products and
to make changes in the content without obligation to notify any person or organization of such changes or improvements. Visit the
Garmin Web site (
www.garmin.com
) for current updates and supplemental information concerning the use and operation of this
and other Garmin products.
Garmin® and MapSource® are registered trademarks and nRoute
™
is a trademark of Garmin Ltd. or its subsidiaries and may not
be used without the express permission of Garmin.
The Bluetooth ® word mark and logos are owned by the Bluetooth SIG, Inc. and any use of such marks by Garmin is under license.
Other trademarks and trade names are those of their respective owners.
Applebee’s is a registered trademark of Applebee’s International, Inc.
Hilton is a registered trademark of Hilton Hospitality, Inc.
Olive Garden is a registered trademark of Darden Corporation.
Texaco is a registered trademark of ChevronTexaco Corporation.
March 2005 Part Number 190-00308-00 Rev. C

Table of Contents
Getting Started........................................................................................... 4
Welcome .....................................................................................................................................4
How Do I.....................................................................................................................................5
Understanding the Interface........................................................................................................7
Unlocking Maps..........................................................................................................................9
Connecting the GPS Receiver...................................................................................................10
Checking Satellite Status...........................................................................................................12
Checking GPS Battery Status ...................................................................................................14
Using the Graphic Map............................................................................ 15
Understanding the Graphic Map...............................................................................................15
Moving the Graphic Map..........................................................................................................17
Zooming In and Out on the Map...............................................................................................18
Printing the Graphic Map..........................................................................................................19
Showing the Vehicle on the Map..............................................................................................20
Changing Map Orientation........................................................................................................21
Using the InfoBar......................................................................................................................22
Using the Status Tab .................................................................................................................24
Using the Trip Computers Tab..................................................................................................25
Saving Your Data......................................................................................................................26
Opening Saved Data..................................................................................................................27
Setting Display Preferences ......................................................................................................28
Legend of Map Symbols...........................................................................................................30
Legend: Businesses and Attractions..................................................................................................30
Legend: Points of Interest.................................................................................................................31
Legend: Map Lines ...........................................................................................................................32
Legend: Map Areas...........................................................................................................................33
Using the Find Feature............................................................................ 34
Understanding the Find Feature................................................................................................34
Finding Map Features / Points of Interest.................................................................................35
Finding Cities............................................................................................................................37
Finding Addresses.....................................................................................................................38
Finding Intersections.................................................................................................................40
Finding Waypoints....................................................................................................................42
Finding Items Near Your Current Location..............................................................................43
Finding Recently Found Places.................................................................................................45
Finding a Latitude/Longitude Position .....................................................................................46
Setting Find Preferences ...........................................................................................................47
Using the Favorite Finds Feature..............................................................................................48
Understanding the Favorite Finds Feature........................................................................................48
Using the Favorite Finds Tab............................................................................................................49
Adding an Item to Your Favorite Finds............................................................................................50
Finding an Item Using the Favorite Finds Feature............................................................................51
Editing a Favorite Find .....................................................................................................................52
Deleting a Favorite Find ...................................................................................................................53
1

Working with Waypoints......................................................................... 54
Understanding Waypoints.........................................................................................................54
Using the Waypoints Tab..........................................................................................................55
Creating Waypoint Categories..................................................................................................56
Marking Waypoints...................................................................................................................57
Setting Your Home Waypoint...................................................................................................58
Editing Waypoint Properties.....................................................................................................59
Moving Waypoints....................................................................................................................61
Using Customized Waypoint Symbols.....................................................................................62
Setting Waypoint Preferences...................................................................................................63
Deleting Waypoints...................................................................................................................64
Routing..................................................................................................... 65
Understanding Routes...............................................................................................................65
Creating a Route Using the Selection Tool...............................................................................67
Creating a Route Using the Find Places Feature.......................................................................68
Creating a Saved Route Using the Route Properties Window..................................................69
Creating a Route to Selected Waypoints...................................................................................71
Routing to Your Home Waypoint.............................................................................................72
Saving an Active Route.............................................................................................................73
Using the Saved Routes Tab.....................................................................................................74
Activating and Deactivating a Route ........................................................................................75
Using the Driving Directions Tab.............................................................................................76
Editing a Route..........................................................................................................................77
Viewing a Vertical Route Profile..............................................................................................79
Simulating a Route....................................................................................................................81
Setting Route Preferences.........................................................................................................82
Deleting a Route........................................................................................................................83
Using Tracks............................................................................................ 84
Understanding Tracks ...............................................................................................................84
Using the Tracks Tab................................................................................................................85
Recording a Track.....................................................................................................................86
Viewing Active Track Properties..............................................................................................87
Saving an Active Track.............................................................................................................88
Editing Track Properties ...........................................................................................................89
Viewing a Track........................................................................................................................90
Setting the Active Track Filter..................................................................................................91
Deleting a Track........................................................................................................................92
Reference ................................................................................................. 93
Setting Preferences....................................................................................................................93
Toolbars ....................................................................................................................................95
Menus........................................................................................................................................97
File Menu..........................................................................................................................................98
Edit Menu..........................................................................................................................................99
View Menu......................................................................................................................................100
Find Menu.......................................................................................................................................101
Route Menu.....................................................................................................................................102
2

Tools Menu.....................................................................................................................................103
Utilities Menu .................................................................................................................................104
Help Menu ......................................................................................................................................105
Right-Click Menus..................................................................................................................106
Map Feature Right-Click Menu......................................................................................................107
Waypoint Right-Click Menu...........................................................................................................108
Saved Routes Right-Click Menu.....................................................................................................109
Favorite Finds Right-Click Menu ...................................................................................................110
Tracks Right-Click Menu................................................................................................................111
Important Information ........................................................................... 112
Cautions and Warnings...........................................................................................................112
Map Data Information.............................................................................................................112
Software Agreement................................................................................................................113
Consumer Limited Warranty...................................................................................................114
3

Getting Started
Welcome
Thank you for choosing Garmin nRoute™!
Garmin nRoute uses Garmin GPS technology integrated with a laptop or portable computer to provide you
with navigational guidance. You can use nRoute to perform the following tasks:
• Create waypoints, routes, and tracks to help you navigate.
• Find items, addresses, and Points of Interest included in the map data.
• Gather information about your travels, including average speed, trip duration, etc.
• Import and export data.
WARNING: Do not attempt to enter route information or adjust this device while driving. Failure to pay full
attention to the operation of your vehicle could result in death, serious injury, or property damage. You
assume total responsibility and risk for using this software.
This Help system provides you with basic instructions on how to use the features of nRoute.
NOTE: The graphics in this Help system are optimized for monitor displays set at 1024 x 768 screen
resolution. Viewing this help system at resolution settings other than 1024 x 768 may result in reduced image
quality.
Your nRoute packaging includes a Setup Guide to help you install the software and set up your system
properly.
If you should encounter any difficulty while installing nRoute, or if you have any questions about nRoute,
contact Garmin's Product Support Department at:
913/397.8200 or 800/800.1020, Monday—Friday, 8 am—5 pm Central Time
www.garmin.com
For more information on getting started with nRoute, see the following topics:
How Do I...
Understanding the Interface
Unlocking Maps
Connecting the GPS Receiver
Checking Satellite Status
Setting Preferences
4
How Do I...
This Help topic is designed to provide you with quick instructions on how to perform common nRoute tasks.
…Hook Up the GPS Receiver?
See Connecting the GPS Receiver. Your nRoute Setup Guide also contains information on connecting your
GPS receiver.
…Know the GPS is Receiving Signals?
Press F11 to activate the Satellites Tab to verify that the GPS is receiving signals. See Checking Satellite
Status for more information.
…Find Myself on the Map?
Click the Keep Vessel Visible button to show your current location in the center of the map. See Showing
the Vehicle on the Map for more information.
…Move the Map Around?
Use the Hand tool or the scroll bars at the bottom and right-hand side of the screen to move the map. You
can also zoom in and out to show portions of the map not currently displayed.
…Change the Way the Map Looks?
Select Preferences from the Edit menu, then click the Display tab. From there, you can change many features
of the map display, including the amount of visible detail. See Setting Display Preferences for more
information.
To change the orientation of the map, click the Change Map Orientation button
Orientation for more information.
. See Changing Map
…Switch Maps?
If you have multiple products installed, select the desired map from the Product list
. It may be necessary to unlock the desired map if you have not already done
so. NOTE: If you do not have additional maps installed, the Product list is not displayed. See Unlocking
Maps for more information.
…Find Addresses, Intersections, or Items on the Map?
Click the Find Places button , select the type of item you want to find from the Find Places window, then
enter the desired information. See Understanding the Find Feature for more information.
5
…Get Driving Directions to My Current Route Destination?
When you have a route active, you can get driving directions using the following methods:
• Check the InfoBar above the Graphic Map for the next maneuver along the route.
• Press F9 to activate the Driving Directions Tab for a list of all the maneuvers along the active route.
…Get Driving Directions for a Saved Route?
Click the route name in the Saved Routes Tab, select Route Properties from the Edit menu, and then click
the Directions tab. See Editing a Route for more information.
…Get the Voice to Speak?
Press the Space Bar or click the Speak button in the Utilities Toolbar. If you have a route activated,
nRoute gives you voice instructions for the next maneuver. If you do not have a route activated, nRoute tells
you the satellite status.
…Deactivate a Route?
Click the Stop Route button in the Routes Toolbar. See Activating and Deactivating a Route for more
information.
…Track my Travel?
Click the Tracks Tab (F6) and check the Record Track box in the lower right-hand corner.
See Recording a Track for more information.
…Save Waypoints, Routes, or Tracks so I Can Open Them in MapSource?
Select Export from the File menu, enter a file name, select the desired location on your computer to save the
file, and click Save. Your waypoints, routes, and tracks are saved on your computer. See Saving Your Data
for more information.
…Delete Waypoints, Routes, Tracks, or Favorite Finds?
Select the item you want to delete in the appropriate Information Tab, then click the Delete button .
…Update nRoute Software?
Check your software version number by selecting About nRoute from the Help menu. To download the latest
version of nRoute, select Go to nRoute's Software Update Web Page from the Help menu. NOTE: An
Internet connection is required to access the software update Web page.
6
Understanding the Interface
The main nRoute interface screen consists of the following items:
1. Menus—a variety of menus are displayed at the top of the screen. These menus allow you to perform
various tasks in nRoute, including activating toolbars, changing preferences for viewing the Graphic Map,
creating and editing routes, and more. See Menus in the Reference section for more information.
2. Toolbars—toolbars are displayed near the top of the screen, directly below the menus. You can toggle the
toolbars on and off by selecting Toolbars in the View menu, then selecting the desired toolbar. You can also
right-click on any toolbar and select the toolbars you want to show or hide. See Toolbars in the Reference
section for more information.
3. InfoBar—the InfoBar appears above the Graphic Map. While you are navigating, the InfoBar contains
information about the next upcoming maneuver along your route. See Using the InfoBar for more information.
4. Graphic Map—the Graphic Map is your main navigation tool. It displays the basemap and any detailed
maps you have installed. It also shows your current location (indicated by the Vessel icon), a map of the
surrounding area, and any waypoints, routes, or tracks you have created and activated. See Understanding the
Graphic Map for more information.
5. Information Tabs—the Information Tabs are displayed along the bottom of the screen. The Information
Tabs include Waypoints, Saved Routes, Tracks, Favorite Finds, Status, Driving Directions, Trip Computers,
and Satellites. Click the appropriate tab to view the desired information. You can also press the corresponding
Function (F) key on your keyboard to activate a tab. Press F12 on your keyboard to show/hide all the
Information Tabs.
Click items in the Information Tabs to activate them on the Graphic Map, or right-click on an item to display a
menu that allows you to perform various tasks. See Right-Click Menus in the Reference section for more
information.
6. Status Bar—the Status Bar extends across the bottom of the nRoute window. It displays a variety of
information related to the action you are performing. You can right-click on any toolbar to show or hide the
Status Bar. The Status Bar can show the following items:
7

• The number of tab items selected in a tab list.
• The current Position Format and Map Datum (set in the Preferences window).
• The latitude and longitude of the mouse pointer when positioned on the Graphic Map, regardless of which
tool is selected. If you are using map products that include elevation data, the elevation is shown next to
the latitude and longitude.
• When you click a waypoint in the Waypoints Tab, the Status Bar shows the distance and bearing from your
current position to the selected waypoint.
• If you are using the Distance/Bearing Tool, the Status Bar shows the distance and bearing from a beginning
point to the selected point(s) on the map. If you select more than two points, the Status Bar also shows the
area between the points.
• If you are using a Garmin GPS with Bluetooth
®
wireless technology, the lower left-hand corner of the
Status Bar shows the GPS battery status. See Checking GPS Battery Status for more information.
8

Unlocking Maps
nRoute utilizes a basemap and detailed maps installed from MapSource products. The type of detailed map
data available depends on the map product(s) installed. In order to access detailed map data, you must have the
appropriate map product(s) installed and unlocked. If you have multiple MapSource products installed and
unlocked on your computer, you can use many of them with nRoute.
NOTE: nRoute cannot be used with BlueChart or MetroGuide 5.
Your MapSource product contains instructions on how to install and unlock detailed maps.
When you open nRoute, the application automatically detects whether you have unlocked the maps installed on
your computer.
You can use the UnlockWizard to unlock MapSource regions, to redeem an 8-character coupon code, to unlock
maps for a second GPS unit, and to purchase additional unlock codes.
To unlock a map region:
1. Select Unlock Regions from the Utilities menu or press Ctrl+U. The UnlockWizard opens. Click Next to
advance to the next screen.
2. If you have a 25-character unlock code, select Yes, I have a 25-character Unlock Code.
3. If you have an 8-character coupon code, want to unlock maps for a second GPS unit, or want to purchase
an additional unlock code with your credit card, select No, I need to get a 25-character Unlock Code.
NOTE: This option requires an Internet connection.
4. Click Next, then follow the steps on the screen.
To switch MapSource products:
If you have more than one MapSource product installed, you can select the desired MapSource product from
the product selector
.
NOTE: If you have only one MapSource product installed, the product selector is not displayed.
9

Connecting the GPS Receiver
Many features of nRoute will work even if the GPS is disconnected. However, in order for nRoute to
accurately perform some functions, the GPS must be connected and receiving signals from GPS satellites.
To connect the GPS receiver:
Connect the GPS into the appropriate port (serial or USB) on your computer.
• If you are using a Garmin GPS with Bluetooth® wireless technology, make sure the Bluetooth software on
your PC is properly configured. nRoute will connect to your GPS device with Bluetooth wireless
technology via a COM port. See your Garmin GPS owner's manual and your Bluetooth software owner's
manual for more information.
• If you have never used nRoute before, click Select Device
, select the appropriate port (serial or USB),
and click OK. If you are using a serial GPS or a GPS with Bluetooth wireless technology, you can click
AutoDetect to have nRoute automatically detect the device.
• If you have used nRoute before, but without a GPS connected, nRoute prompts you to select a receiver.
Select the appropriate device (serial or USB) and click OK.
• If you have previously connected the GPS to your computer using nRoute, nRoute begins to acquire
satellites and the message "Searching for Satellites" appears in the InfoBar.
• If you are using a serial GPS, verify that it is plugged in to the vehicle's 12-volt receptacle and is receiving
power.
• If there is a discrepancy between the GPS's clock and the clock on your computer, nRoute prompts you to
select the correct time. If you select GPS, nRoute changes the clock on your computer to match the GPS's
time. NOTE: The GPS's time is not necessarily correct if you are connecting it for the first time or if it has
not been used for a while.
• When you connect your GPS for the first time, or if you have traveled more than 600 miles with the
receiver turned off, the initialization process may take several minutes to determine your location.
• To shorten the initialization time, click the Selection tool
, right-click on your approximate location on
the Graphic Map, and select Set Current Location.
After a few moments, nRoute acquires satellites and the message "Ready to Navigate" appears in the InfoBar.
See Checking Satellite Status for more information.
NOTE: If you are using a serial GPS on a computer with a Windows operating system, you may experience
erratic mouse movements. This is because Windows may be identifying your GPS as a serial mouse. If this
happens, follow the steps below:
1. Unplug the serial GPS.
2. From the desktop, right-click the My Computer button and select "Properties."
3. Click the Hardware tab, then click Device Manager (in Windows 98, click the Device Manager tab).
4. Double-click "Mice and other pointing devices."
5. Right-click on "Serial ballpoint mouse" and select Disable.
6. Close the Device Manager.
10

A sensor configuration program is available on the Garmin Web site to further configure your GPS. See the
GPS 18 Tech Specs document (GPN 190-00307-00, also available on the Garmin Web site) for more
information.
11
Checking Satellite Status
After connecting your GPS receiver, you can check the Satellites Tab to verify that your GPS is acquiring
satellites. The Satellites Tab appears along the bottom of the screen. It shows the satellites your GPS has
acquired, their signal strength, the accuracy of navigation, and your current position. You can activate the
Satellites Tab by clicking on it or pressing F11 on your keyboard.
nRoute can utilize WAAS (Wide Area Augmentation System), provided your GPS is enabled to receive
WAAS satellites. WAAS technology is a system of satellites and ground stations that provide GPS signal
corrections, giving you better position accuracy. WAAS is most effective in the U.S.A. If you are located in
another part of the world, it is recommended that you turn off WAAS for the most accurate location fix. See
What is WAAS? on the Garmin Web site for more information.
The Satellites Tab contains the following features:
Connection Status—the Connection Status field contains information about the type of signal that your GPS is
receiving. If your GPS is not connected, the message "Attempting Connection to Unit" appears. When your
GPS is connected, the message "Searching for Satellites" appears. Based upon the satellites your GPS
receives, one of the following connection status messages appears:
Poor GPS Coverage—your GPS is receiving fewer than three GPS satellites and cannot
determine your location accurately.
2D Navigation—your GPS is receiving three GPS satellites and has determined your 2D location
(latitude and longitude).
2D Differential—your GPS is receiving three GPS satellites, one of which is a WAAS satellite.
3D Navigation—your GPS is receiving four or more GPS satellites and has determined your 3D
location (latitude, longitude, and elevation).
3D Differential—your GPS is receiving four or more satellites and has determined your 3D
location (latitude, longitude, and elevation) with WAAS enabled.
GPS Signal Strength—this graph indicates the strength of the GPS signal being received from each
corresponding numbered satellite. Satellites numbered 32 and below are GPS satellites, while satellites
numbered greater than 32 are WAAS satellites.
GPS Satellite Location View—these large white circles show the positions of satellites in the sky overhead,
with the center of the circles representing your current position. The outer circle indicates the horizon; the
inner circle indicates a position 45° from the horizon. The small, numbered circles indicate the satellites and
the numbers assigned to them. These small circles turn green to indicate that a satellite is being used to
determine your location. Yellow indicates a satellite has been located but is still initializing, and is not yet
being used to determine your location. White indicates that no signals are being received.
Accuracy—the accuracy of the GPS system.
12

Enable/Disable WAAS—enable WAAS to increase the accuracy of your GPS system, or disable WAAS for
faster initialization, to preserve battery power, or if WAAS is not available in your area. See What is WAAS?
on the Garmin Web site for more information.
Position—your current position in latitude and longitude.
Date/Time—the current date and time.
nRoute automatically attempts to acquire satellites if you have a GPS unit connected to your computer. If your
GPS does not acquire satellites:
• Make sure your GPS is connected properly to your computer. See Connecting the GPS Receiver for more
information.
• Verify that your GPS is unobstructed. Solid materials (except untinted glass), tall buildings, and dense
overhead tree cover can block satellite signals. In order to receive satellite signals, you must be outdoors or
in a vehicle and have a clear view of the sky.
• Make sure the GPS has enough time to initialize. When the GPS initializes for the first time, or if you have
traveled more than 600 miles with the GPS turned off, the initialization process may take several minutes.
• If you are using a serial GPS, verify that it is plugged in to the 12 volt receptacle and is receiving power.
• Try disconnecting the GPS from your PC and reconnecting it.
• Try closing and re-opening nRoute.
• Try uninstalling and re-installing nRoute.
You can simulate GPS signals by selecting Simulate a GPS from the Utilities menu. This feature can be used
to simulate driving a route. See Simulating a Route for more information.
13
Checking GPS Battery Status
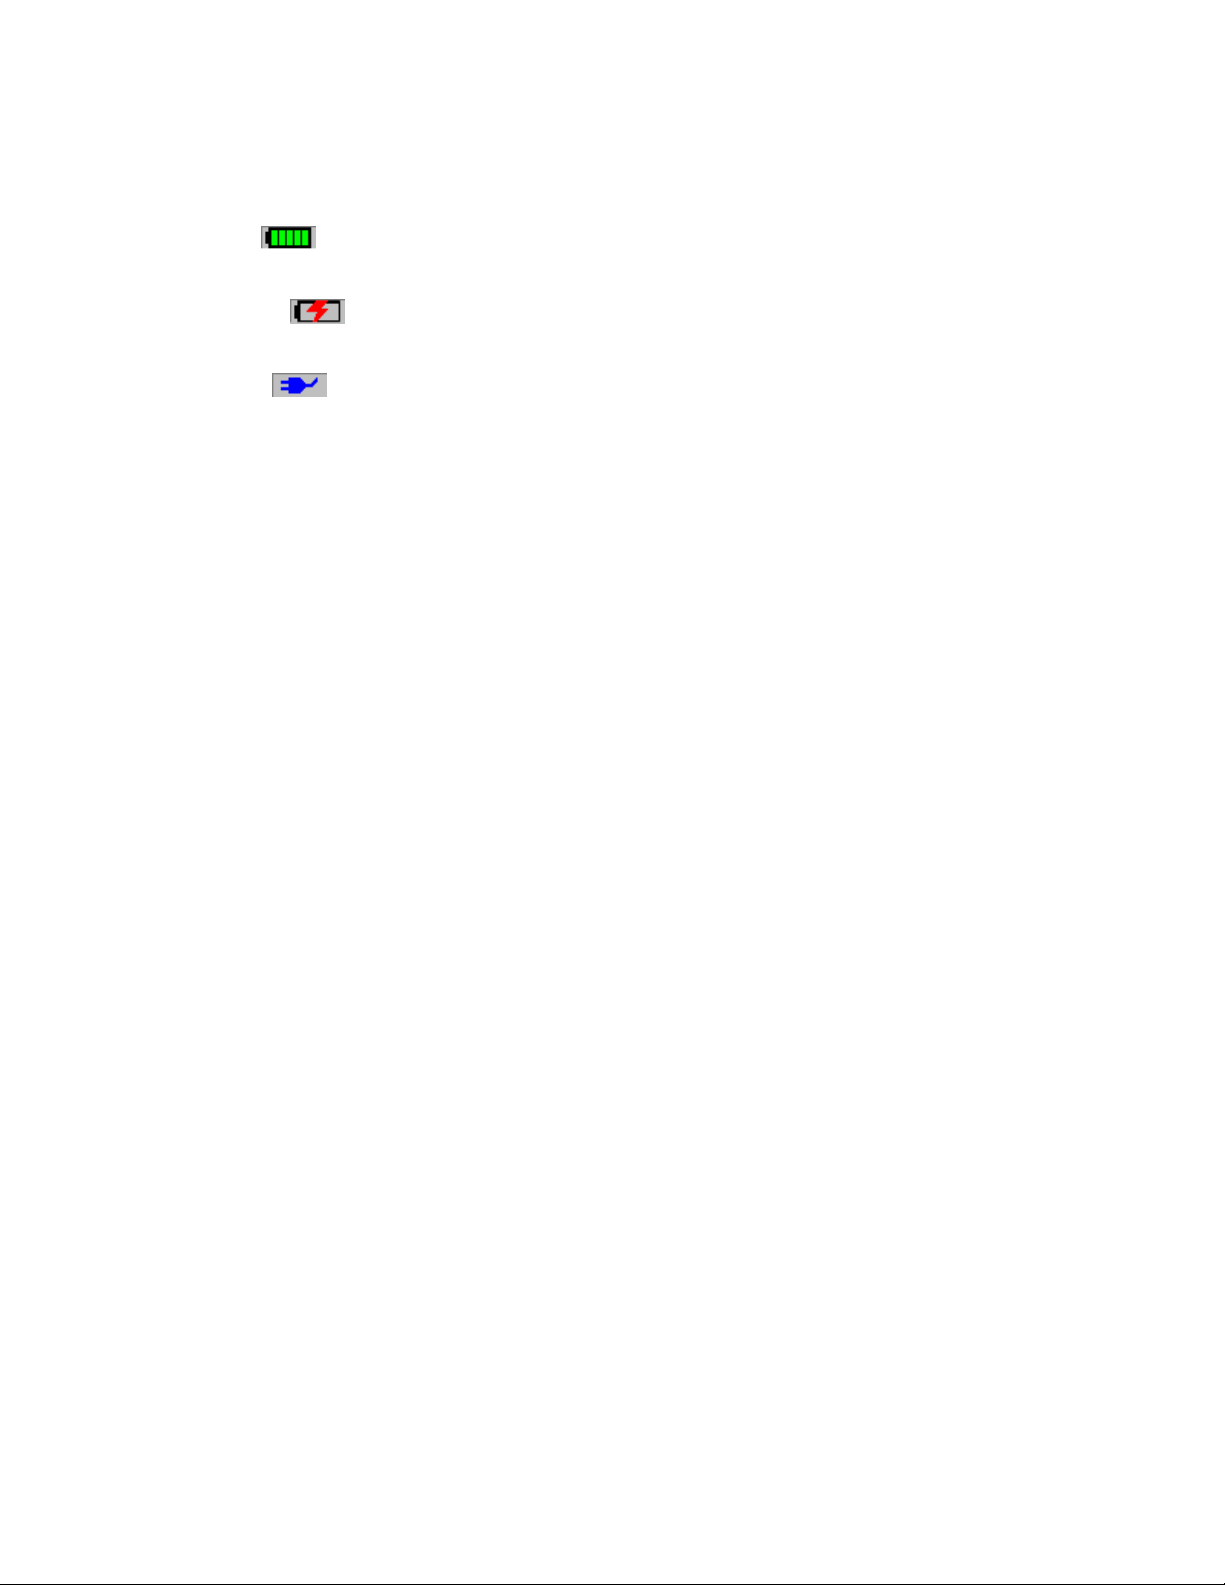
If you are using a Garmin GPS with Bluetooth® wireless technology, nRoute shows the GPS unit's remaining
battery power in the bottom right-hand corner of the Status Bar. One of the following icons appears:
Battery Power
remaining battery power.
Charging Battery
battery is charging.
External Power
is fully charged.
The name of the GPS unit (for example, "GPS 10") appears next to the icon.
To view the exact percentage of remaining battery power, hold the mouse pointer over any of the icons.
You can only view GPS battery status when using a Garmin GPS with Bluetooth
—Indicates that the GPS unit is operating on battery power. The green bars show the
—Indicates that the GPS unit is connected to an external power supply and the
—Indicates that the GPS unit is connected to an external power supply and the battery
®
wireless technology.
14
Using the Graphic Map
Understanding the Graphic Map
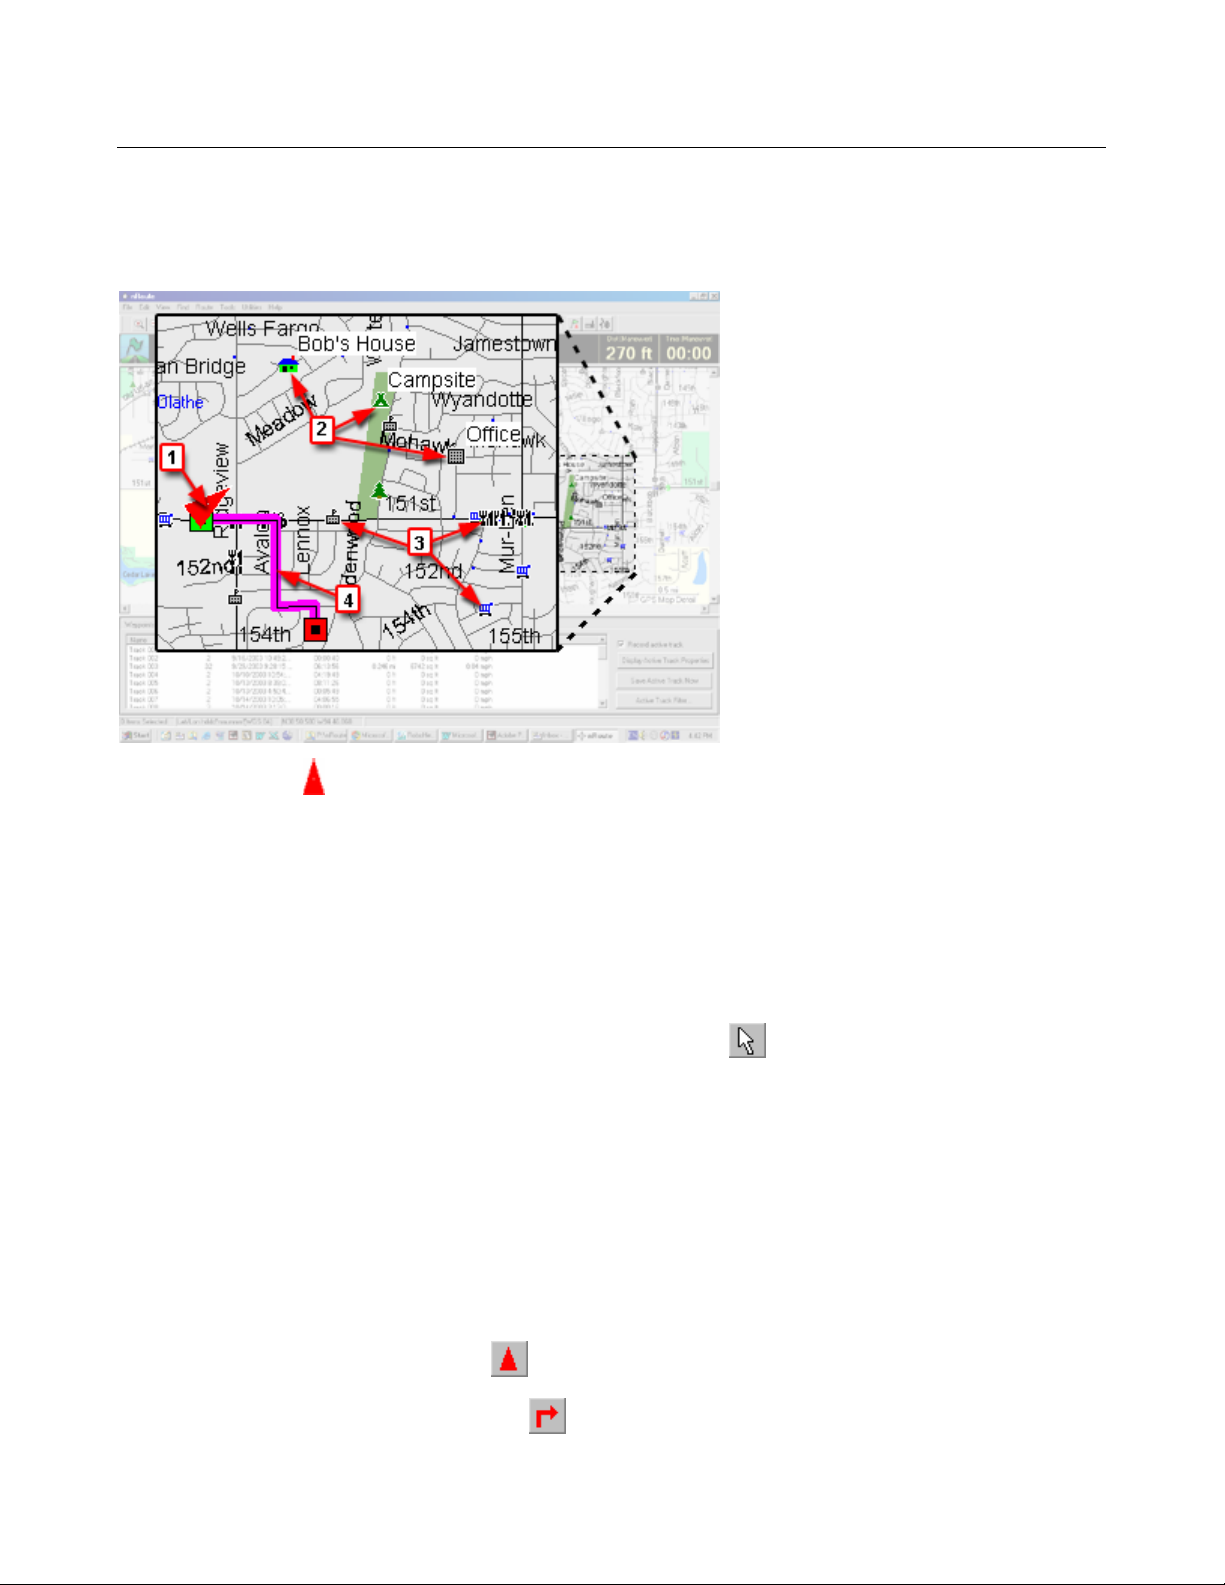
The Graphic Map is nRoute's main navigation tool. nRoute displays the basemap and any detailed maps you
select in MapSource. The basemap contains major cities, roads, and highways, while detailed maps contain
smaller streets, addresses, intersections, and Points of Interest.
1. The Vessel icon indicates your position and heading on the Graphic Map.
2. Waypoints are displayed by symbol and by name.
3. Points of Interest are displayed as symbols. The names of some Points of Interest are displayed on the
map in a different font than waypoint names.
4. Active routes are displayed as colored lines on the map. The beginning point of the route is green; the
ending point of the route is red.
Graphic Map Tips
• To view the name of a Point of Interest, click the Selection Tool , then hold the mouse cursor over the
desired Point of Interest on the map.
• If multiple items are displayed at a single location on the Graphic Map, right-click on the location, then
select the desired item from the list that appears.
• You can perform a variety of tasks by right-clicking on the Graphic Map. See Map Feature Right-Click
Menu for more information.
• The Information Tabs across the bottom of the screen show waypoints, routes, and tracks. To display an
item on the Graphic Map, right-click on the item in the appropriate Information Tab and select Show
Selected Item on Map.
• Click the Keep Vessel Visible button
• Click the Keep Maneuver Visible button
navigating on a route.
to center the Vessel icon on the map.
to show the next maneuver on the map while you are
15

• If you move the map, zoom in or out, or display a different area on the Graphic Map while the Keep
Vessel Visible and/or Keep Next Maneuver Visible buttons are selected, nRoute automatically deselects
those buttons so that you can manipulate the map as needed. After you have finished moving the map,
click the Keep Vessel Visible and/or Keep Maneuver Visible buttons again to re-activate. See Showing
the Vehicle on the Map for more information.
• The Graphic Map can be oriented to display in either "North Up" or "Track Up" mode. See Changing Map
Orientation for more information.
• You can change the color of the text and the background of the Graphic Map by setting your display
preferences.
• You can show or hide the toolbars, InfoBar, Status Bar, and Information Tabs by right-clicking on any
toolbar and checking or unchecking the desired item.
For more information on the Graphic Map, see the following topics:
Setting Display Preferences
Moving the Graphic Map
Zooming In and Out on the Map
Showing the Vehicle on the Map
Changing Map Orientation
Using the InfoBar
Using the Status Tab
Using the Trip Computers Tab
Saving Your Data
Opening Saved Data
Legend: Businesses and Attractions
Legend: Points of Interest
Legend: Map Lines
Legend: Map Areas
16

Moving the Graphic Map
There are several methods for moving (or "panning") the Graphic Map to view portions of the map not
currently displayed on the screen:
• Click the Hand Tool
mouse button and move the mouse in the direction you want to move the Graphic Map.
• Use the scroll bars on the right side and at the bottom of the Graphic Map.
• Click any point on the Graphic Map, then use the Up, Down, Left, and Right arrow keys on the keyboard
to move the map short distances. Hold down the Ctrl key while pressing the arrow keys to move longer
distances.
• Click the Zoom Tool
The selected point is displayed in the center of the map.
, move the mouse cursor over the Graphic Map, then click and hold the left
, then hold down the Ctrl key and click the desired point on the Graphic Map.
17

Zooming In and Out on the Map
The more you zoom in on the Graphic Map, the more details (streets, map features, Points of Interest, etc.) are
displayed.
NOTE: You can set the amount of detail displayed on the Graphic Map by using the Display Preferences
window.
There are several methods for zooming in and out on the Graphic Map:
• Click the Zoom In
• Select the desired map scale using the Map Scale Selector
• Click the Zoom Tool
mouse button and move the mouse cursor to draw a box around the area you want to zoom in on. The
smaller the box, the more the map will zoom in.
• With the Zoom Tool selected, you can also click the left mouse button to zoom in incrementally and the
right mouse button to zoom out incrementally.
• Select Zoom Scale from the View menu, then select the desired map scale.
• Press the Plus (+) and Minus (-) keys on your keyboard to zoom in and out.
and Zoom Ou t buttons.
.
, move the mouse cursor over the Graphic Map, then click and hold the left
18

Printing the Graphic Map
You can print the current Graphic Map display, including routes, tracks, waypoints, and map detail (if
available). You may need to adjust your printer's dpi settings in order to print the Graphic Map display.
• Select Print Setup from the File menu to select a printer and set printing options.
• Select Print Preview from the File menu to show a preview of the document you wish to print.
• Select Print from the File menu to print the current Graphic Map display.
19
Showing the Vehicle on the Map
You can set nRoute to keep your vehicle (shown by the Vessel icon ) visible on the map while you are
navigating along a route. In addition, you can set nRoute to automatically zoom in and out on the map so that
you can see the next maneuver along the route.
• Click the Keep Vessel Visible button
selected, the Vessel icon stays visible on the map as you navigate along the route.
• Click the Keep Next Maneuver Visible button
navigating along a route.
• Click both buttons or press Ctrl+B to keep the Vessel icon visible on the map and automatically zoom in
and out to show the next maneuver along the route.
NOTE: If you move the map, zoom in or out, or display a different area on the Graphic Map while either the
Keep Vessel Visible and/or Keep Next Maneuver Visible buttons are selected, nRoute automatically
deselects those buttons so that you can manipulate the map as needed. After you have finished moving the
map, click the Keep Vessel Visible and/or Keep Maneuver Visible buttons again to re-activate.
to center the Vessel icon on the map. If you leave this button
to automatically show the next maneuver while
20

Changing Map Orientation
The Graphic Map can be oriented to display in either "North Up" or "Track Up" mode.
North Up
North Up means North is always towards the top of the screen. When you turn, your Vessel icon turns to
indicate which direction you are heading.
Track Up
Track Up orients the Graphic Map in the direction of travel with the Vessel icon always pointing towards the
top of the screen. When you turn, the Graphic Map redraws the map to show which direction you are heading,
but the Vessel icon remains pointed towards the top of the screen. In Track Up mode, an arrow appears in the
upper left-hand corner of the Graphic Map indicating which way is North.
There are three ways to change map orientation:
• Click the Change Map Orientation button
• Select Change Orientation in the View menu.
• Press Ctrl+O.
NOTE: If you move the map, zoom in or out, or display a different area on the Graphic Map while in Track
Up mode, nRoute automatically stops redrawing the map so that you can manipulate the map as needed. After
you have finished moving the map, change the map orientation to North Up, then back to Track Up to reactivate Track Up mode.
in the View toolbar.
21
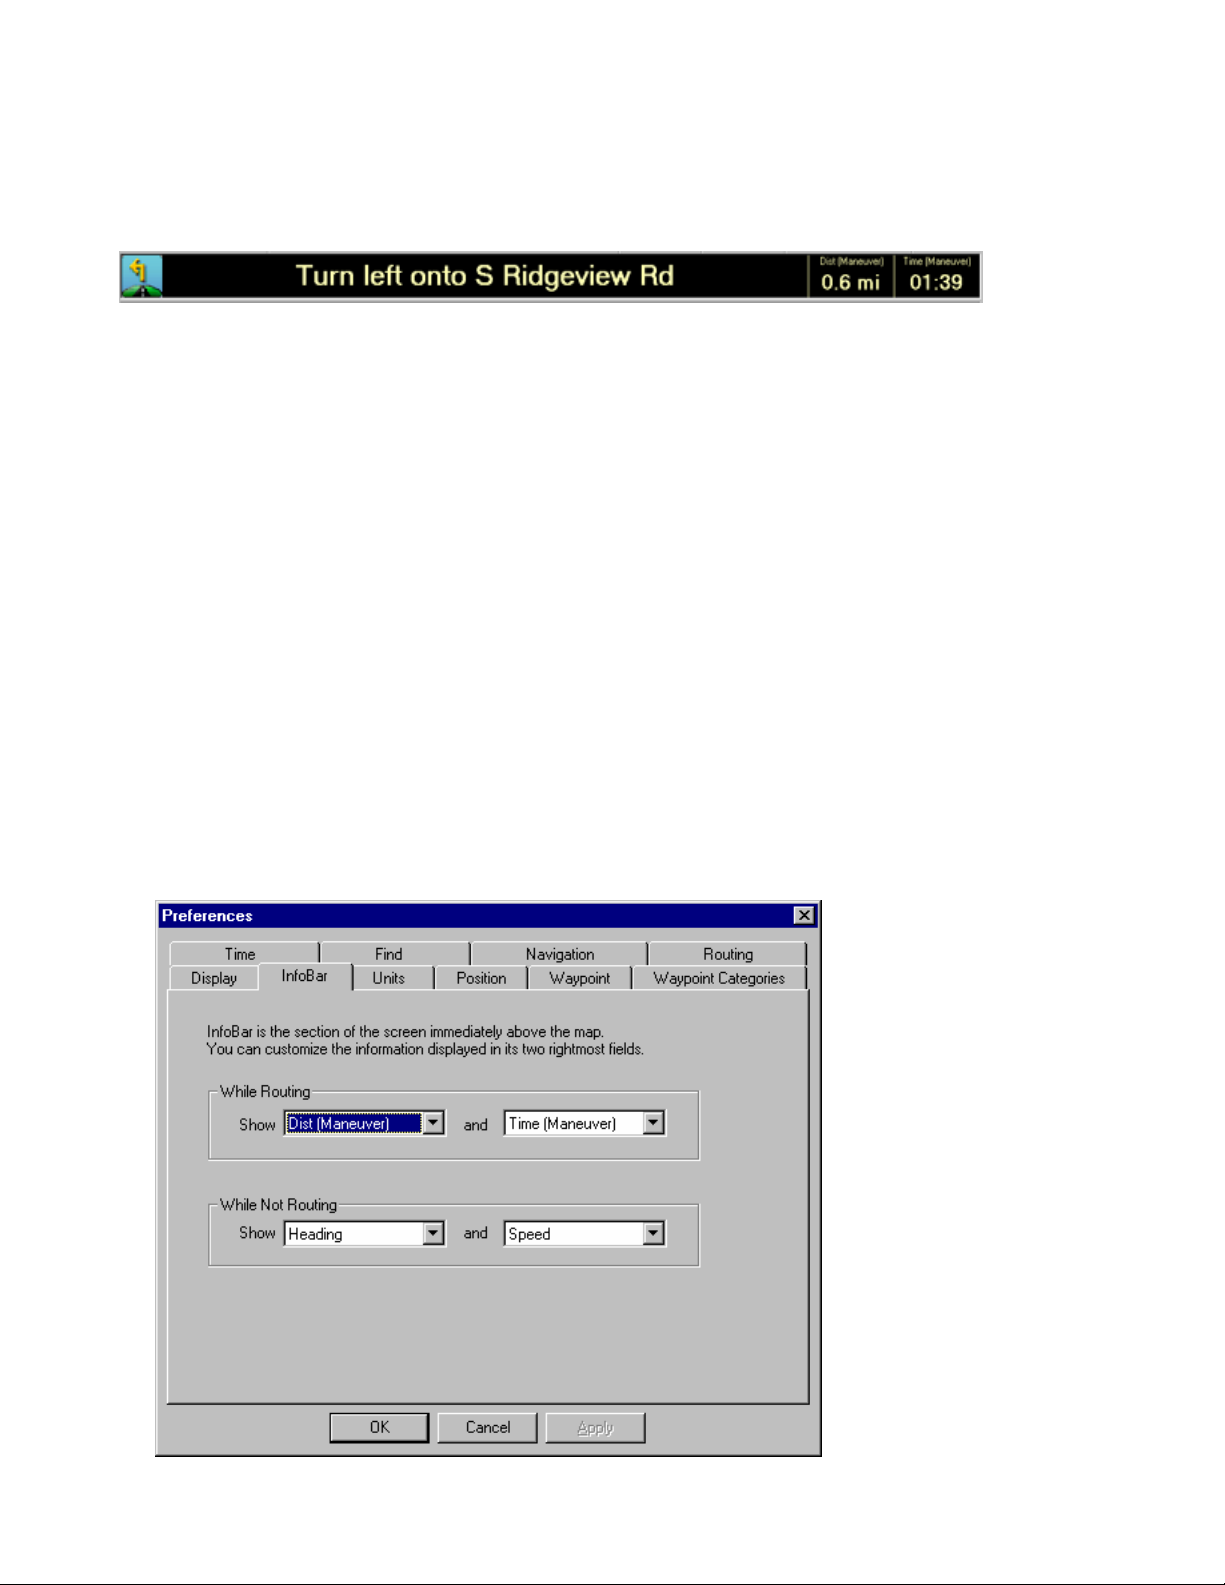
Using the InfoBar
The InfoBar appears above the Graphic Map. You can resize the InfoBar by clicking on its bottom border and
dragging it up or down. You can hide or show the InfoBar by right-clicking on any toolbar and checking or
unchecking the InfoBar option.
The InfoBar displays the following messages:
• If you do not have a GPS connected to your computer, the InfoBar displays the message "Attempting
connection to GPS."
• If you have an active route but do not have a GPS connected, the InfoBar displays the message "Please
connect GPS to start route."
• If you have a GPS connected, but it has not acquired satellites, the InfoBar displays the message
"Searching for satellites."
• If you have a GPS connected and it has acquired satelltes, the InfoBar displays the message "Ready to
Navigate."
• While you are navigating along an active route, the InfoBar contains information about the next maneuver
on your route, including the estimated distance and time to the next maneuver.
• If you do not have a route active, the InfoBar defaults to display your current heading and speed, as well as
the upcoming cross street.
You can customize the information displayed in the InfoBar by changing InfoBar Preferences.
To change InfoBar preferences:
1. Select Preferences from the Edit menu, then click the InfoBar tab. The InfoBar Preferences window
appears.
22

2. Select the desired options for the information displayed in the two rightmost fields while routing (navigating
with an active route):
Accuracy—shows the accuracy of the GPS.
Dist (Destination)—shows the distance to your destination.
Dist (Maneuver)—shows the distance to the next maneuver.
Elevation—shows your current elevation.
ETA (Destination)—shows the estimated time of arrival at your destination.
ETA (Maneuver)—shows the estimated time of arrival at the next maneuver.
Heading—shows your current heading.
Speed—shows your current speed.
Time (Destination)—shows the total time remaining until you reach your destination.
Time (Maneuver)—shows the total time remaining until the next maneuver.
Time of Day—shows the current time of day.
3. Select the desired options for the information displayed in the two rightmost fields while not routing (no
active route):
Accuracy—shows the accuracy of the GPS.
Elevation—shows your current elevation.
Heading—shows your current heading.
Speed—shows your current speed.
Time of Day—shows the current time of day.
4. Click OK to save your changes.
23
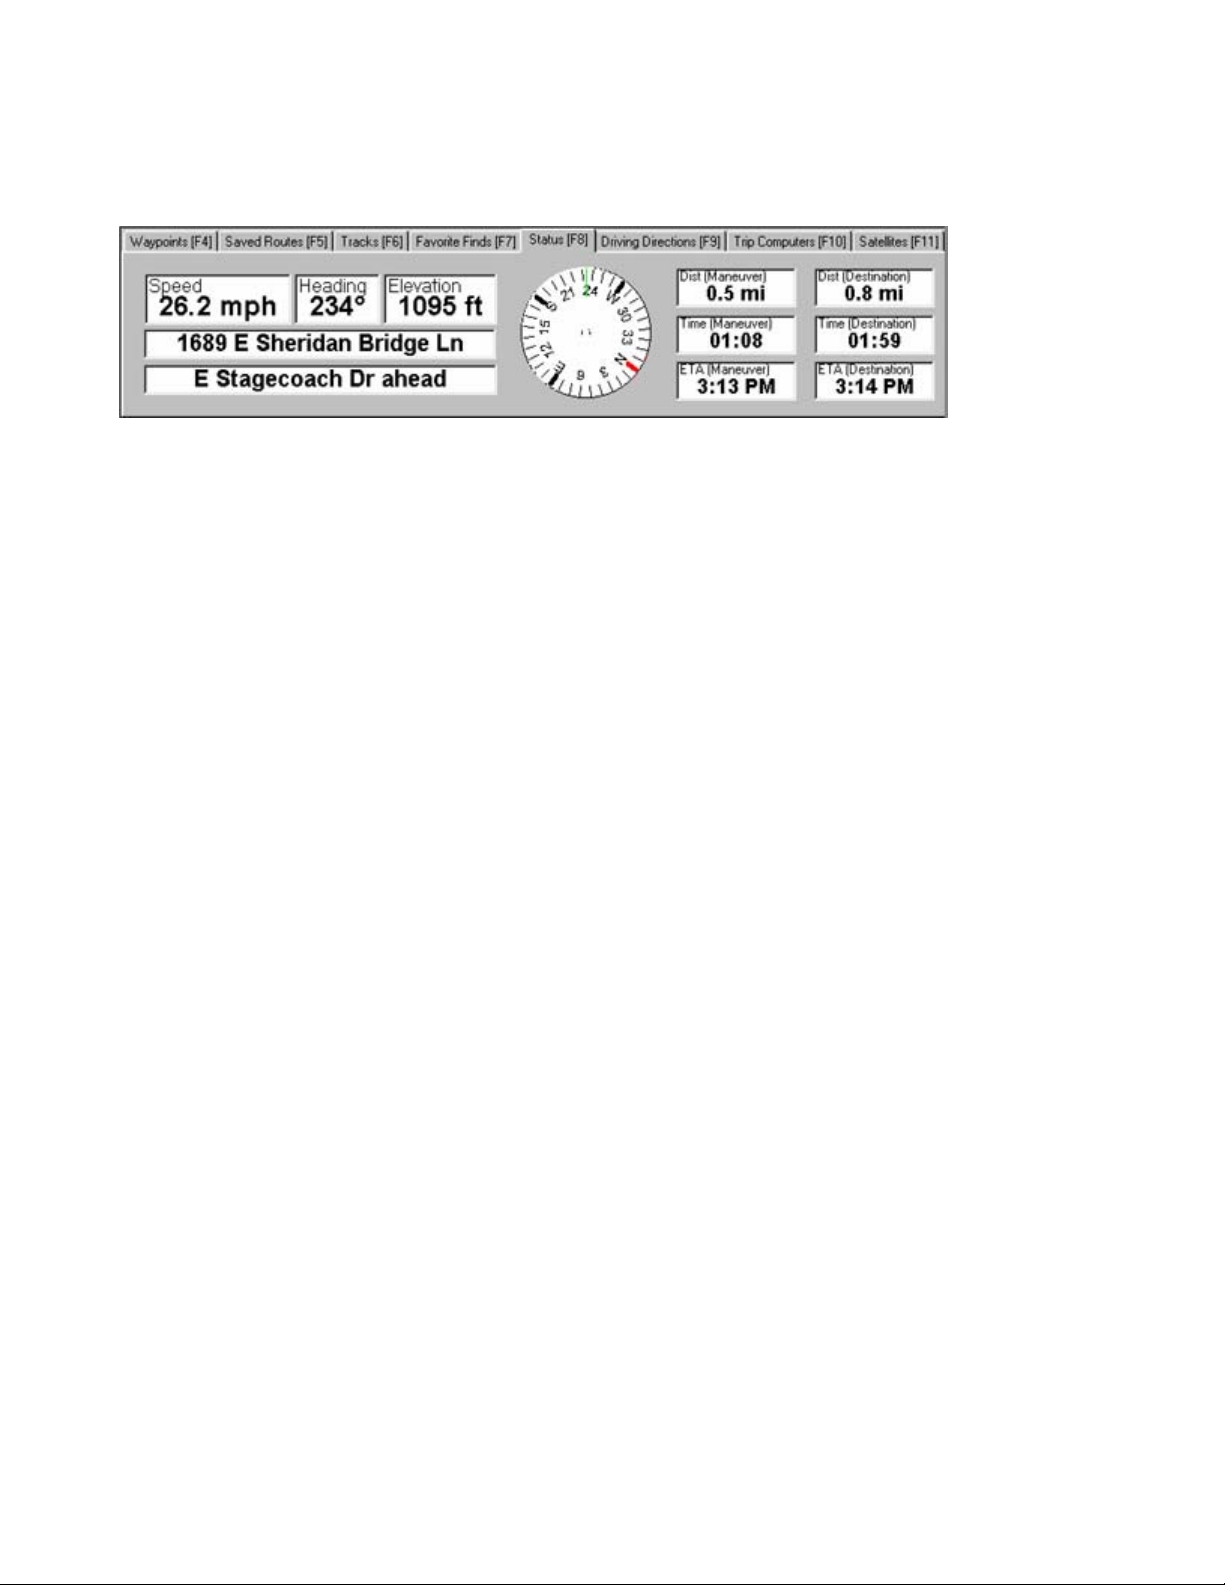
Using the Status Tab
The Status Tab shows your current speed, direction, and elevation. You can access the Status Tab by clicking
on it or pressing F8 on your keyboard.
The Status Tab includes the following features:
Speed—your current speed.
Heading—your current heading.
Elevation—your current elevation.
Address—the street address closest to your current location.
Next Street—the next cross street you are approaching.
Compass—the red line indicates North. The green line at the top of the compass indicates your current
heading. When you are navigating on a direct route, a black arrow showing the direction to the next waypoint
appears on the compass. See Understanding Routes for more information.
Dist (Maneuver)—the estimated distance to the next maneuver in the route.
Dist (Destination)—the estimated distance to the end of the route.
Time (Maneuver)—shows the total time remaining until the next maneuver.
Time (Destination)—shows the total time remaining until you reach your destination.
ETA (Maneuver)—the estimated time of day you will arrive at the next maneuver.
ETA (Destination)—the estimated time of day you will arrive at the end of the route.
24
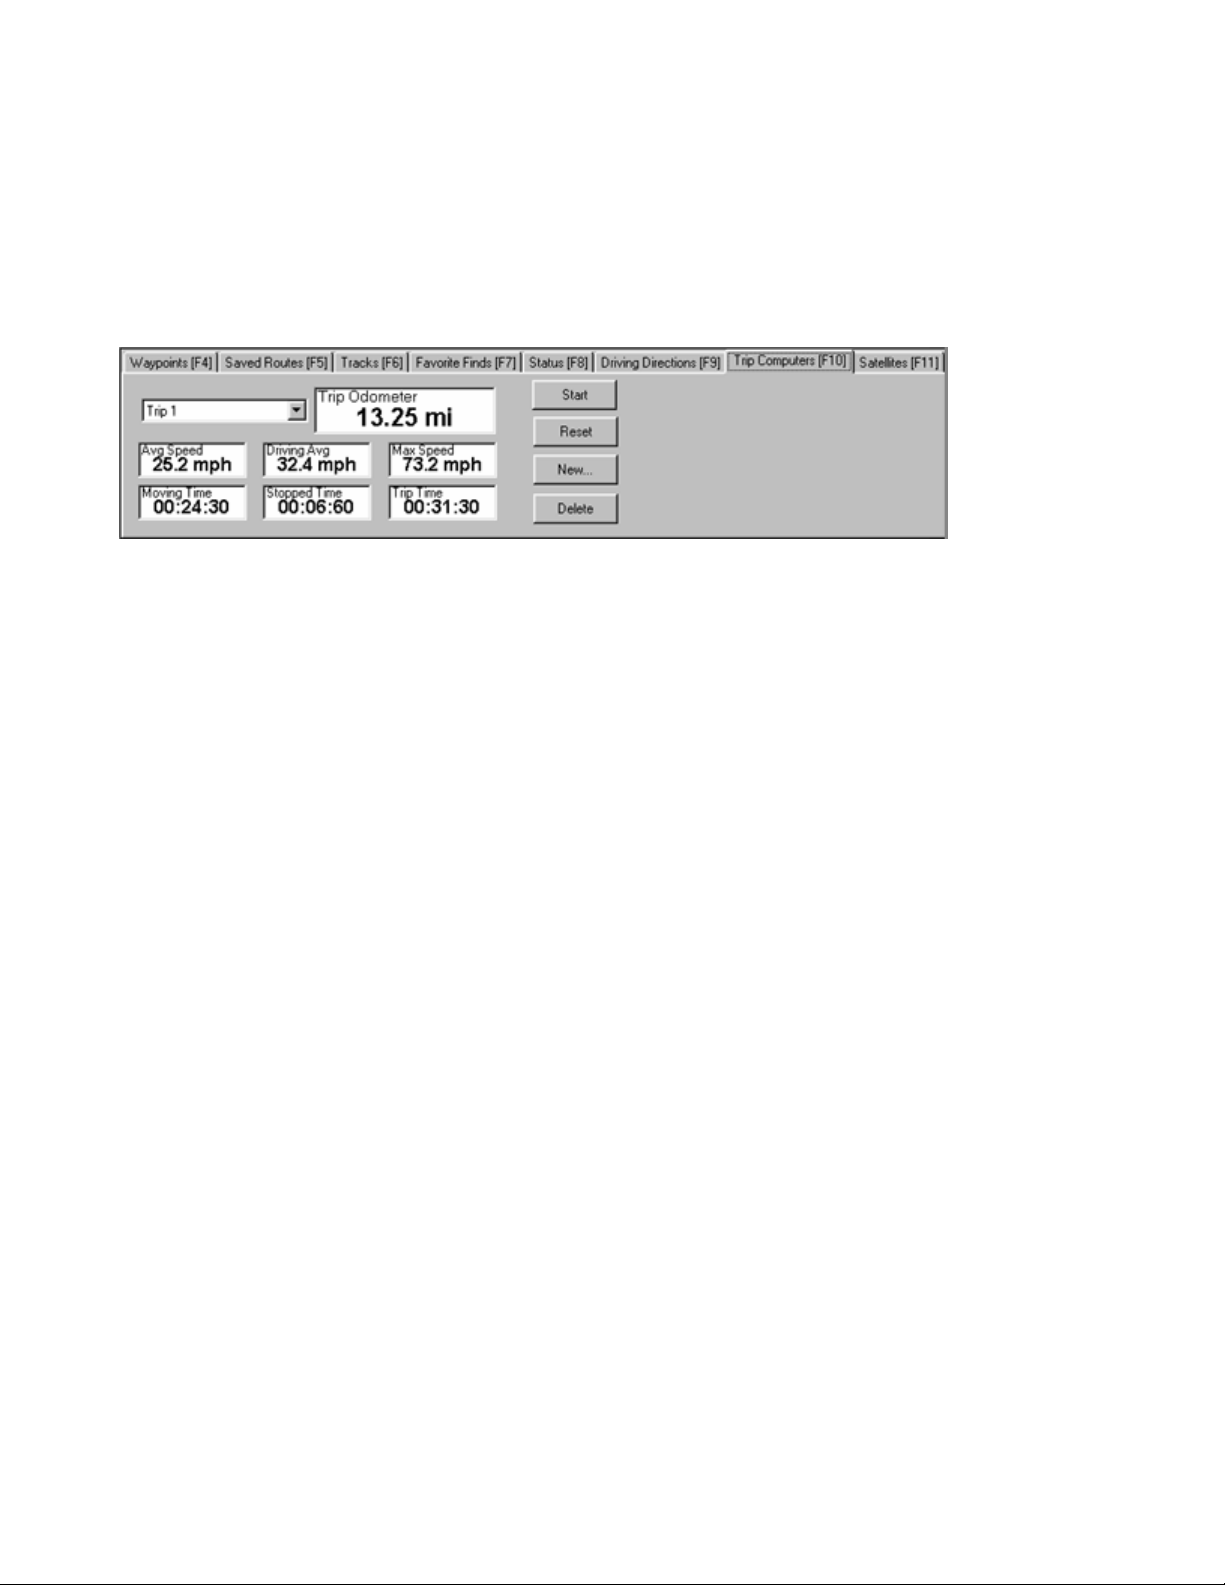
Using the Trip Computers Tab
The Trip Computers Tab keeps track of your speed, time, and mileage while you are navigating. You can
access the Trip Computers Tab by clicking on it or pressing F10 on your keyboard.
You can have multiple trip computers running at the same time, and each can be stopped and started
individually. For example, you can have multiple trip computers recording information for a trip across the
country. You can start a different trip computer for each leg of the trip while your original trip computer keeps
track of the trip as a whole.
The Trip Computers Tab contains the following features:
Trip Name—the name of the trip computer that is currently displayed. If you want to continue a previous trip,
click the drop-down arrow and select the desired trip.
Trip Odometer—the total mileage you have accumulated on the trip.
Avg Speed—your average speed during trip, including stopped time.
Driving Avg—your average speed while your vehicle is in motion during the trip (does not include stopped
time).
Max Speed—your maximum speed during the trip.
Moving Time—the total time your vehicle was in motion during the trip.
Stopped Time—the total time your vehicle was stopped during the trip.
Trip Time—the total time elapsed during your trip.
Reset—click to reset all the above fields to zero.
Start/Stop—click to start and stop the trip computer.
New—to start a new trip, click this button, enter the name for your new trip, and click OK. The trip computer
is reset, and the name of the new trip appears in the Trip Name field.
Delete—to delete the active trip, click this button, then click OK. The active trip is deleted.
25

Saving Your Data
Data in nRoute is automatically saved and will be loaded whenever you start nRoute. Any waypoints, routes,
and tracks you have created using nRoute can also be saved on your computer. These files can be used to back
up your data or share data with Garmin MapSource. You can save files as .gdb (default) or .mps files.
To save waypoints, routes, and tracks:
1. Select Export File from the File menu.
2. Select the file type in the Save as type field.
3. Enter a file name and select the desired location on your computer to save the file.
4. Click Save. The file is saved.
26

Opening Saved Data
You can open saved .gdb, .mps, or .gpx files in nRoute and import waypoints, routes, and tracks from the saved
file. When you open file, nRoute merges the saved data with your current data.
To open a saved file:
1. Select Import File from the File menu.
2. Select the desired file type in the Files of type field.
3. Browse to the desired file on your computer.
4. Click Open. The file opens in nRoute.
You can also open saved .gdb, .mps, or .gpx files in nRoute by dragging and dropping the file directly from
Windows Explorer onto the nRoute screen.
27
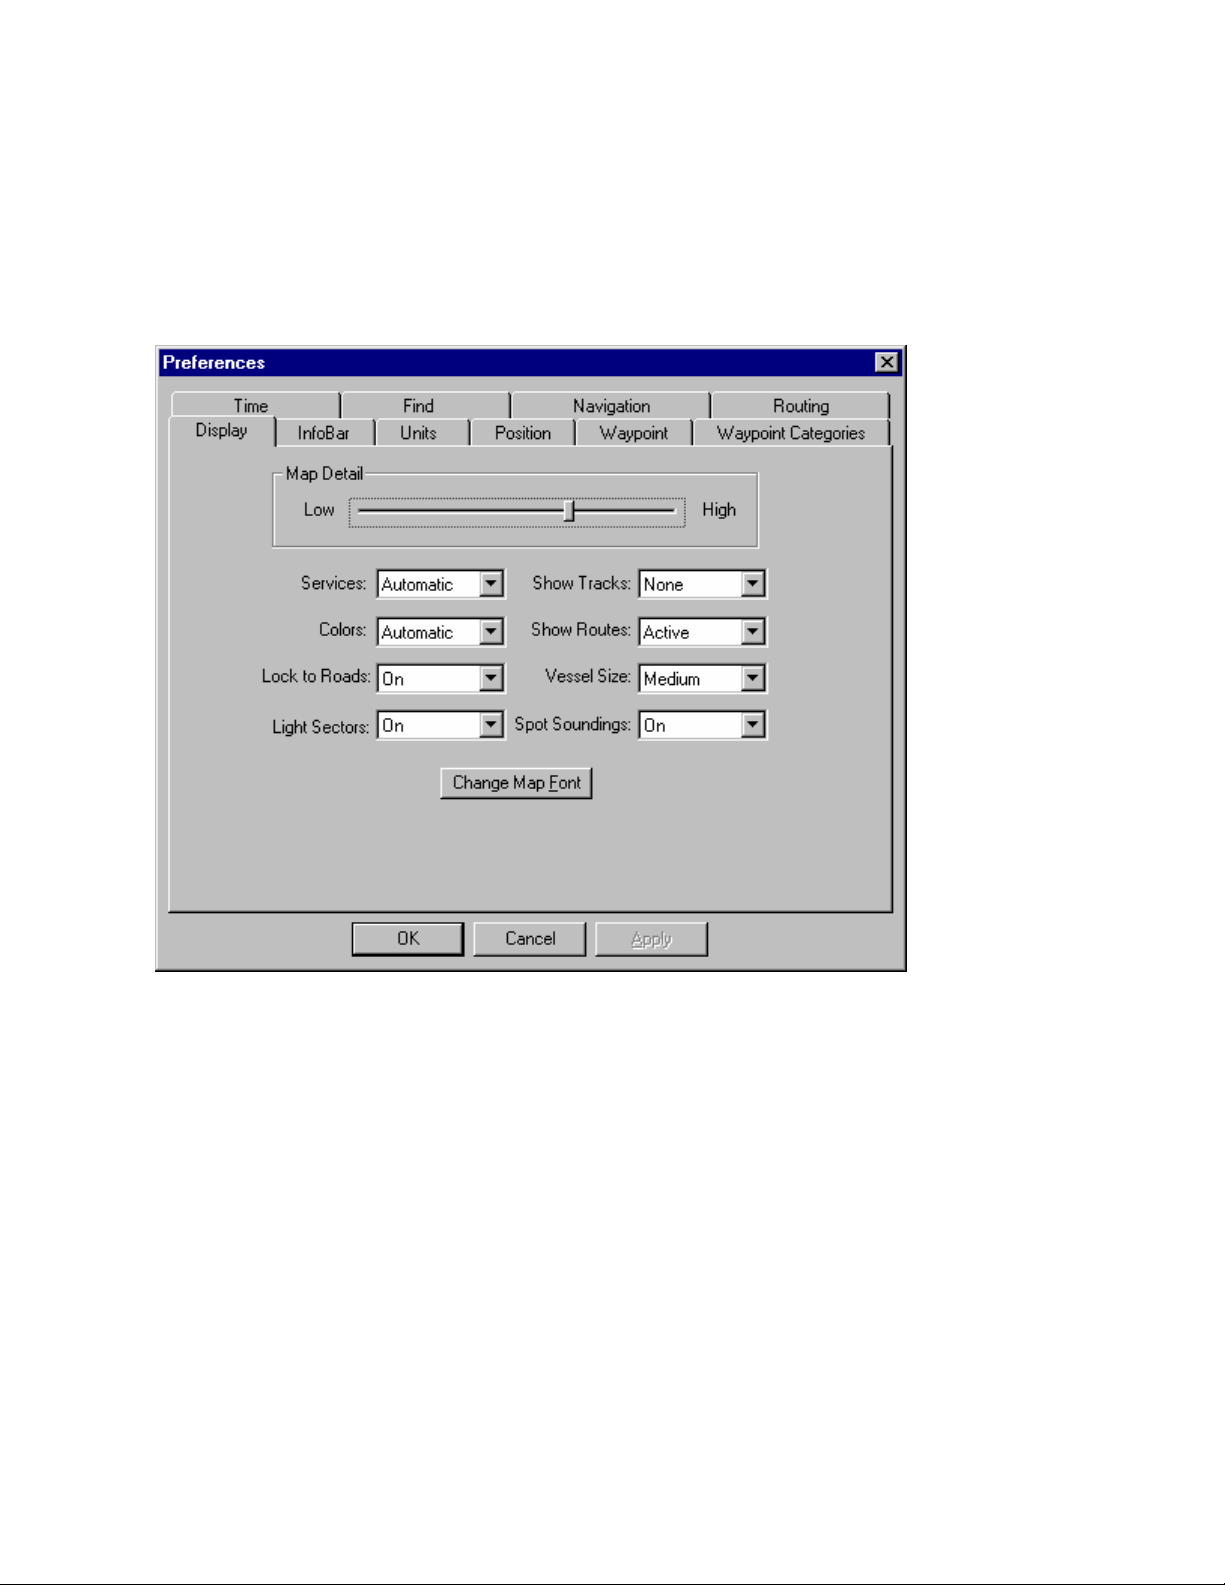
Setting Display Preferences
You can customize the way the Graphic Map appears, including the level of map detail, visible routes, and
colors.
To set display preferences:
1. Select Preferences from the Edit menu. The Preferences window appears.
2. Click the Display tab. The Display Preferences tab appears.
3. Make the desired changes to the following fields:
Map Detail—move the slider to adjust the amount of detail (streets, Points of Interest, waypoints, etc.)
displayed on the Graphic Map.
Services—Use this option to display services and Points of Interest if they are loaded as part of your
detailed maps. Select Automatic to display these items when the map is zoomed in to a low scale. Select
On to display these items regardless of the map zoom scale. Select Off if you do not want these items
displayed.
Colors—this item changes the color of the text and background of the Graphic Map and the Information
Tabs. Select Day for a light background with darker text, Night for a dark background with lighter text, or
Automatic to automatically switch between the Day and Night settings at the appropriate time of day.
Lock to Roads—select On to keep the Vessel icon attached to the nearest road on the map, or select Off
to allow the Vessel icon to go off-road.
Show Tracks—select All to show all tracks, Active to show only the active track, or None to show no
tracks.
Show Routes—select All to show all saved and active routes or Active to show only the active route.
Vessel Size—select the size of the Vessel icon displayed on the Graphic Map.
28
 Loading...