

®
FUSION
Apollo
O W N E R ’ S M A N U A L
®
™
MS-RA770
ENGLISH
FUSIONENTERTAINMENT.COM

© 2019–2021 Garmin Ltd. or its subsidiaries
All rights reserved. Under the copyright laws, this manual may not be copied, in whole or in part, without the written consent of Garmin. Garmin reserves the right to change or improve its
products and to make changes in the content of this manual without obligation to notify any person or organization of such changes or improvements. Go to www.fusionentertainment.com for
current updates and supplemental information concerning the use of this product.
Garmin®, ANT®, Fusion®, and the Fusion logo are trademarks of Garmin Ltd. or its subsidiaries, registered in the USA and other countries. Apollo™, Connect IQ™, Fusion-Link™, Fusion-Link Lite™,
and Fusion PartyBus™ are trademarks of Garmin Ltd. or its subsidiaries. These trademarks may not be used without the express permission of Garmin.
Apple®,AirPlay®, iPhone®, and iPod touch® are trademarks of Apple Inc., registered in the USA and other countries. App StoreSM is a service mark of Apple Inc., registered in the USA and other
countries. Android™ and Google Play™ are a trademarks of Google Inc. Bluetooth® word mark and logos are owned by the Bluetooth SIG, Inc. and any use of such marks by Garmin is under
license. NMEA 2000®, and the NMEA 2000 logo are registered trademarks of the National Marine Electronics Association. SiriusXM®, SportsFlash™, TuneMix™, TuneStart™, and all related marks
and logos are trademarks of Sirius XM Radio Inc. All rights reserved. Wi‑Fi® is a registered mark of Wi-Fi Alliance Corporation. Other trademarks and trade names are those of their respective
owners.

Table of Contents
Getting Started 1
Stereo Controls 1
Playback Controls 1
Gesture Screen 1
Entering Text 1
Using the Dial to Select Items 1
Stereo Screen 1
Status Icons 2
Naming the Device 2
Setting the Home Zone 2
Selecting a Source 2
Adjusting the Backlight and Dial Brightness 2
Audio Control 2
Adjusting the Volume 2
Muting all Connected Stereos 2
Adjusting the Subwoofer Level 2
Adjusting the Tone 2
Disabling the Loud Setting for a Zone 2
Adjusting the Gain for an Auxiliary Device 2
Speaker Zones 3
DSP Settings 3
Configuring the DSP Settings 3
Media Player Connection 3
Bluetooth Device Playback 3
Connecting a Compatible Bluetooth Device 3
Bluetooth Range Information 3
Selecting a Different Bluetooth Device 3
Bluetooth Source Menu and Settings 3
Disabling Bluetooth Auto Connection 4
USB Device Playback 4
USB Device Compatibility 4
Connecting a USB Device 4
Controlling Music Playback on a USB Flash Drive or Media
Player 4
Controlling Music Playback on a Connected Android Device 4
Controlling Music Playback on a Connected Apple Device 4
USB Source Settings 5
Radio 5
Setting the Tuner Region 5
Changing the Radio Station 5
Apple AirPlay 5
Connecting an Apple Device Using AirPlay 5
Setting an AirPlay Password 5
UPnP Playback 5
Connecting a UPnP Device 5
Connecting an Auxiliary Device 6
Optical Audio Connection 6
SiriusXM Satellite Radio 6
Setting the Tuner Region for the SiriusXM Source 6
Locating the SiriusXM Radio ID 6
Activating a SiriusXM Subscription 6
Selecting a Category 6
Using Replay Mode 6
Alerts 6
Adding an Artist or Song Alert 6
Adding Teams for Game Alerts 6
Adding Teams from a Live Game 6
Viewing Active Alerts 7
Managing Alerts 7
TuneMix™ Feature 7
Starting and Stopping a TuneMix Collection
Creating and Customizing a TuneMix Collection 7
SportsFlash Feature 7
Adding Teams to Receive SportsFlash Alerts 7
Changing SportsFlash Team Priority 7
Enabling the TuneStart™ Feature 7
Parental Controls 8
Unlocking the Parental Controls 8
Locking Channels 8
Clearing All Locked Channels 8
Changing the Parental Control Passcode 8
SiriusXM Troubleshooting 8
Clearing SiriusXM Data 8
DAB Playback 8
Setting the Tuner Region 9
Scanning for DAB Stations 9
Changing DAB Stations 9
Selecting a DAB Station from a List 9
Selecting a DAB Station from a Category 9
Presets 9
Saving a Station or Channel as a Preset 9
Selecting a Preset from a List 9
Removing Presets 9
Fusion PartyBus Networking 9
Creating a Group 9
Editing a Group 9
Leaving a Group 9
Grouped Stereo Functions 10
Grouped Stereo Source Considerations 10
General Settings 10
Speaker Zone Settings 10
Disabling the Internal Amplifier 10
Setting the Home Zone 10
Synchronizing the Source and Zone Volume Levels 10
Adjusting the Power-On Volume Limit 10
Disabling a Zone 11
Setting a Zone Name 11
Linking Zones 11
Enabling Volume Control of Zone 3 or 4 from a Connected
Amplifier 11
Adjusting the Subwoofer Filter 11
Adjusting Additional Audio Settings for a Zone 11
Power Options 11
Source Settings 11
Network Settings 11
Connecting the Fusion PartyBus Device to a Wireless Access
Point 11
Connecting the Device to a Wireless Access Point Using
Wi‑Fi Protected Setup 12
Connecting the Device to a Wireless Access Point Using
Apple Wireless Accessory Configuration 12
Setting the Fusion PartyBus Device as a Wireless Access
Point 12
Wireless Access Point Settings 12
Advanced Network Configuration 12
Setting the Fusion PartyBus Device as the DHCP
Server 12
Configuring the Stereo for use with a Garmin Marine
Network 13
Setting a Static IP Address 13
Resetting Network Settings 13
Update Options 13
Additional Stereo Control Options 13
Connecting to a Garmin Watch 13
7
Table of Contents i

Connecting to an ARX70 Remote Control 14
Fusion-Link Wireless Remote Control App 14
FUSION-Link™ Network Technology 14
NMEA 2000 Remote Control and Display 14
Configuring an Optional Wired NRX Remote Control 14
NMEA 2000 Information 14
Appendix 15
Registering Your Fusion Device 15
Cleaning the Device 15
Software Updates 15
Updating the Software Using a USB Flash Drive 15
Updating the Software Using the Fusion Link App 15
Troubleshooting 15
The stereo does not respond to key presses 15
My Bluetooth audio is interrupted by short breaks 15
The stereo does not display all song information from my
Bluetooth source 15
Network Troubleshooting 15
Network Status Icons 16
The stereo keeps locking up when connected to an Apple
device 16
The stereo is not finding my connected Apple device 16
My Apple AirPlay audio is interrupted by short breaks 16
Specifications 16
Stereo Dimension Drawings 16
Side Dimensions 16
Top Dimensions 17
Index 18
ii Table of Contents
Getting Started
WARNING
See the Important Safety and Product Information guide in the
product box for product warnings and other important
information.
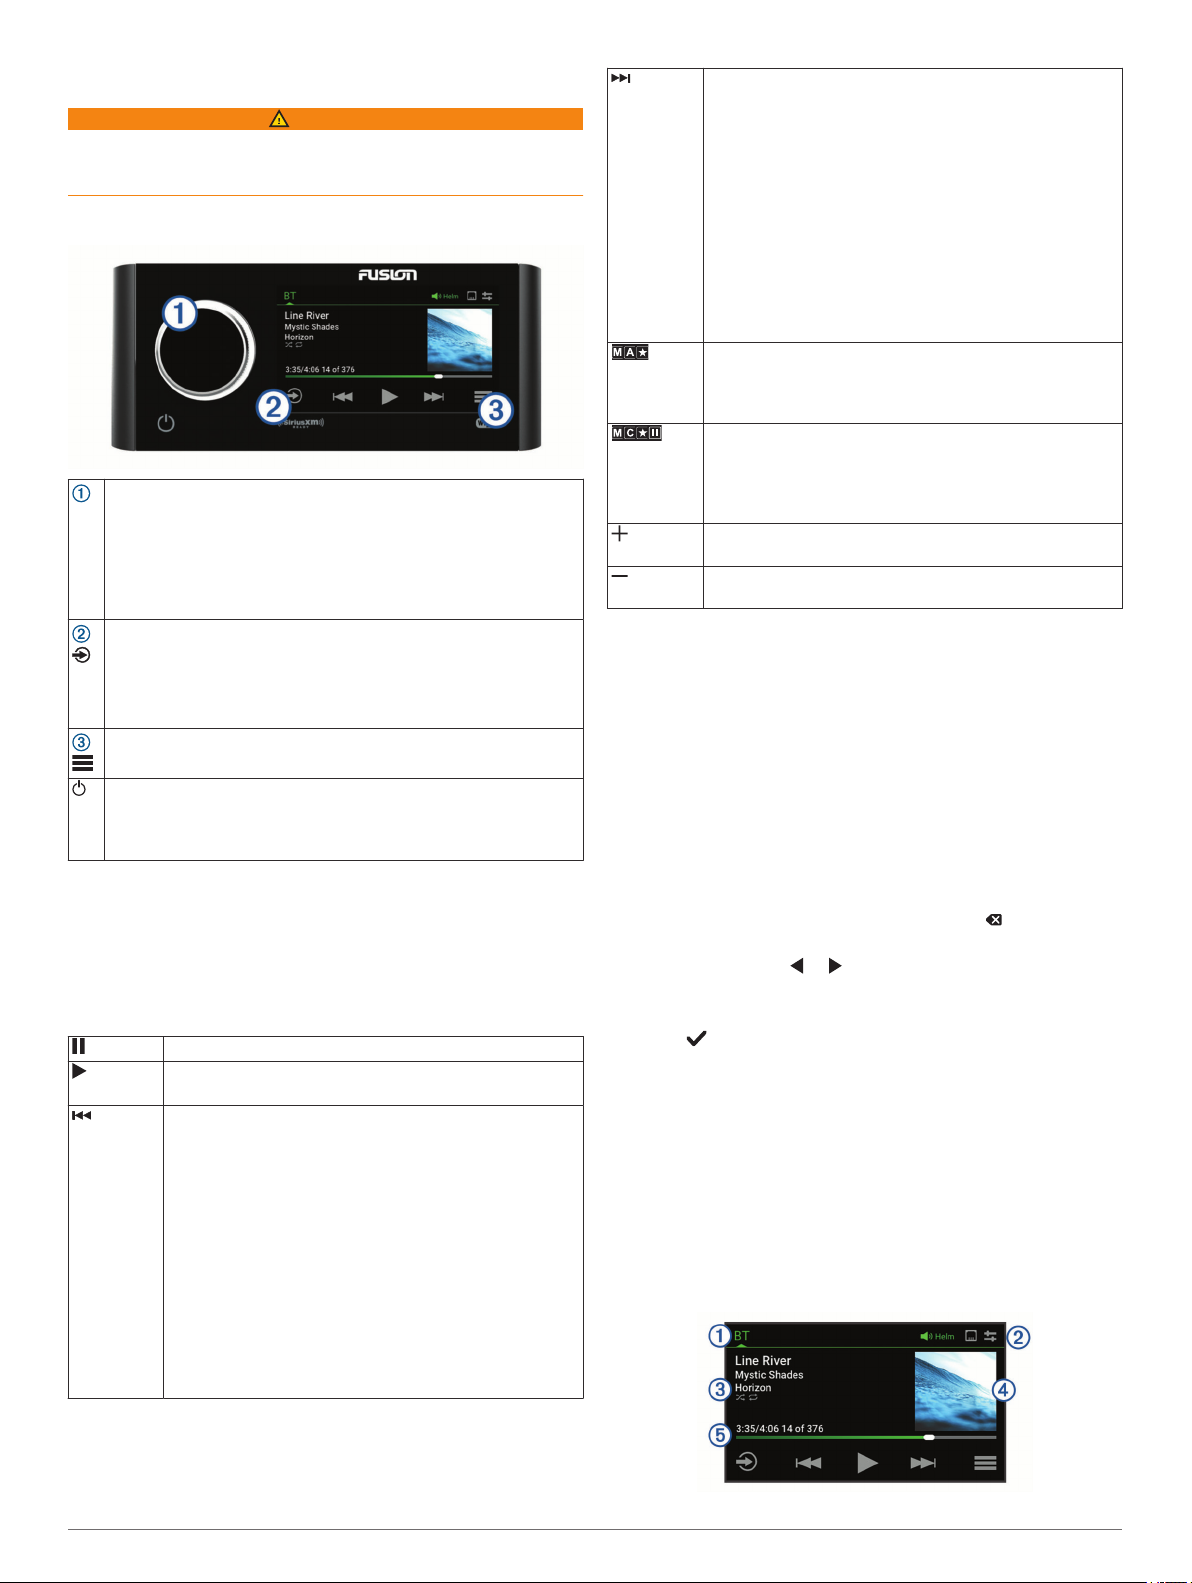
Stereo Controls
• Turn to adjust the volume.
• When adjusting the volume, press to switch between zones.
Dial
• Turn to move through the menus or adjust a setting.
• When in a menu, press to select the highlighted option.
• Press and hold to activate certain functions such as opening
the radio presets or muting all connected stereos from the mute
screen (Muting all Connected Stereos, page 2).
Press to change the source.
TIP: You can turn the dial to browse, and press the dial to select
the source. You can also swipe the screen up and down, and
touch a source on the screen.
Press and hold to open the GROUPS menu.
Press to open the menu.
• Press to turn on the stereo.
• Press to mute the audio.
• Press and hold to turn off the stereo or all stereos on the
network.
Playback Controls
The on-screen playback controls may change depending on the
source selected.
NOTE: After about fifteen seconds, the playback controls are
hidden by the gesture screen feature. You can swipe down on
the screen to view the playback controls (Gesture Screen,
page 1).
Select to pause media playback.
• Select to play media or resume media playback.
• DAB source: press to scan for DAB stations.
• Select to skip to the previous track, when using an
applicable source.
• Hold to rewind the track when using an applicable
source.
• AM, FM, or SiriusXM (in Live Mode) source:
◦ Select to tune to the previous station or preset.
◦ Hold for faster tuning (manual mode only).
• SiriusXM (in Replay Mode) source:
◦ Select to skip to the previous track.
◦ Hold to rewind the current track.
• DAB source: Select to return to the previous DAB
station in the ensemble. When you reach the beginning
of the current ensemble, the stereo automatically
changes to the last available station in the previous
ensemble.
• Select to skip to the next track, when using an
applicable source.
• Hold to fast-forward the track when using an applicable
source.
• AM, FM, or SiriusXM (in Live Mode) source:
◦ Select to tune to the next station or preset.
◦ Hold for faster tuning (manual mode only).
• SiriusXM (in Replay Mode) source:
◦ Select to skip to the next track, if applicable.
◦ Hold to fast-forward the current track, if applicable.
• DAB source: Select to advance to the next DAB station
in the ensemble. When you reach the end of the
current ensemble, the stereo automatically changes to
the first available station in the next ensemble.
Select to cycle through the tuning modes (auto or manual)
(AM, FM, or
DAB
sources)
(SiriusXM
source)
and presets.
Press and hold to save the current station as a preset.
Hold to switch between Replay Mode and Live Mode
(Using Replay Mode, page 6).
Replay Mode: press to pause and play the channel.
Live Mode: Select to cycle through the tuning modes
(manual or category) and presets.
On the Aux or Optical source, select to increase the gain
for the connected source.
On the Aux or Optical source, select to decrease the gain
for the connected source.
Gesture Screen
After about fifteen seconds, a screen appears showing media
information and album art only. You can use the touchscreen to
interact with this screen.
• You can swipe left or right to change the track or preset.
• You can touch the screen for about one second to pause
playback or mute the audio, depending on the source.
• You can swipe down to return to the playback controls
screen.
NOTE: You can disable this screen in the settings (Power
Options, page 11).
Entering Text
In a field that allows you to enter text, select to erase the
1
existing characters.
If necessary, select or to use numerals, symbols, or
2
lower-case letters when available.
Touch a character to select it.
3
Select to save the new text.
4
Using the Dial to Select Items
You can use the dial to highlight and select items on the screen.
• Turn the dial to highlight an item on the screen.
• Press the dial to select the highlighted option.
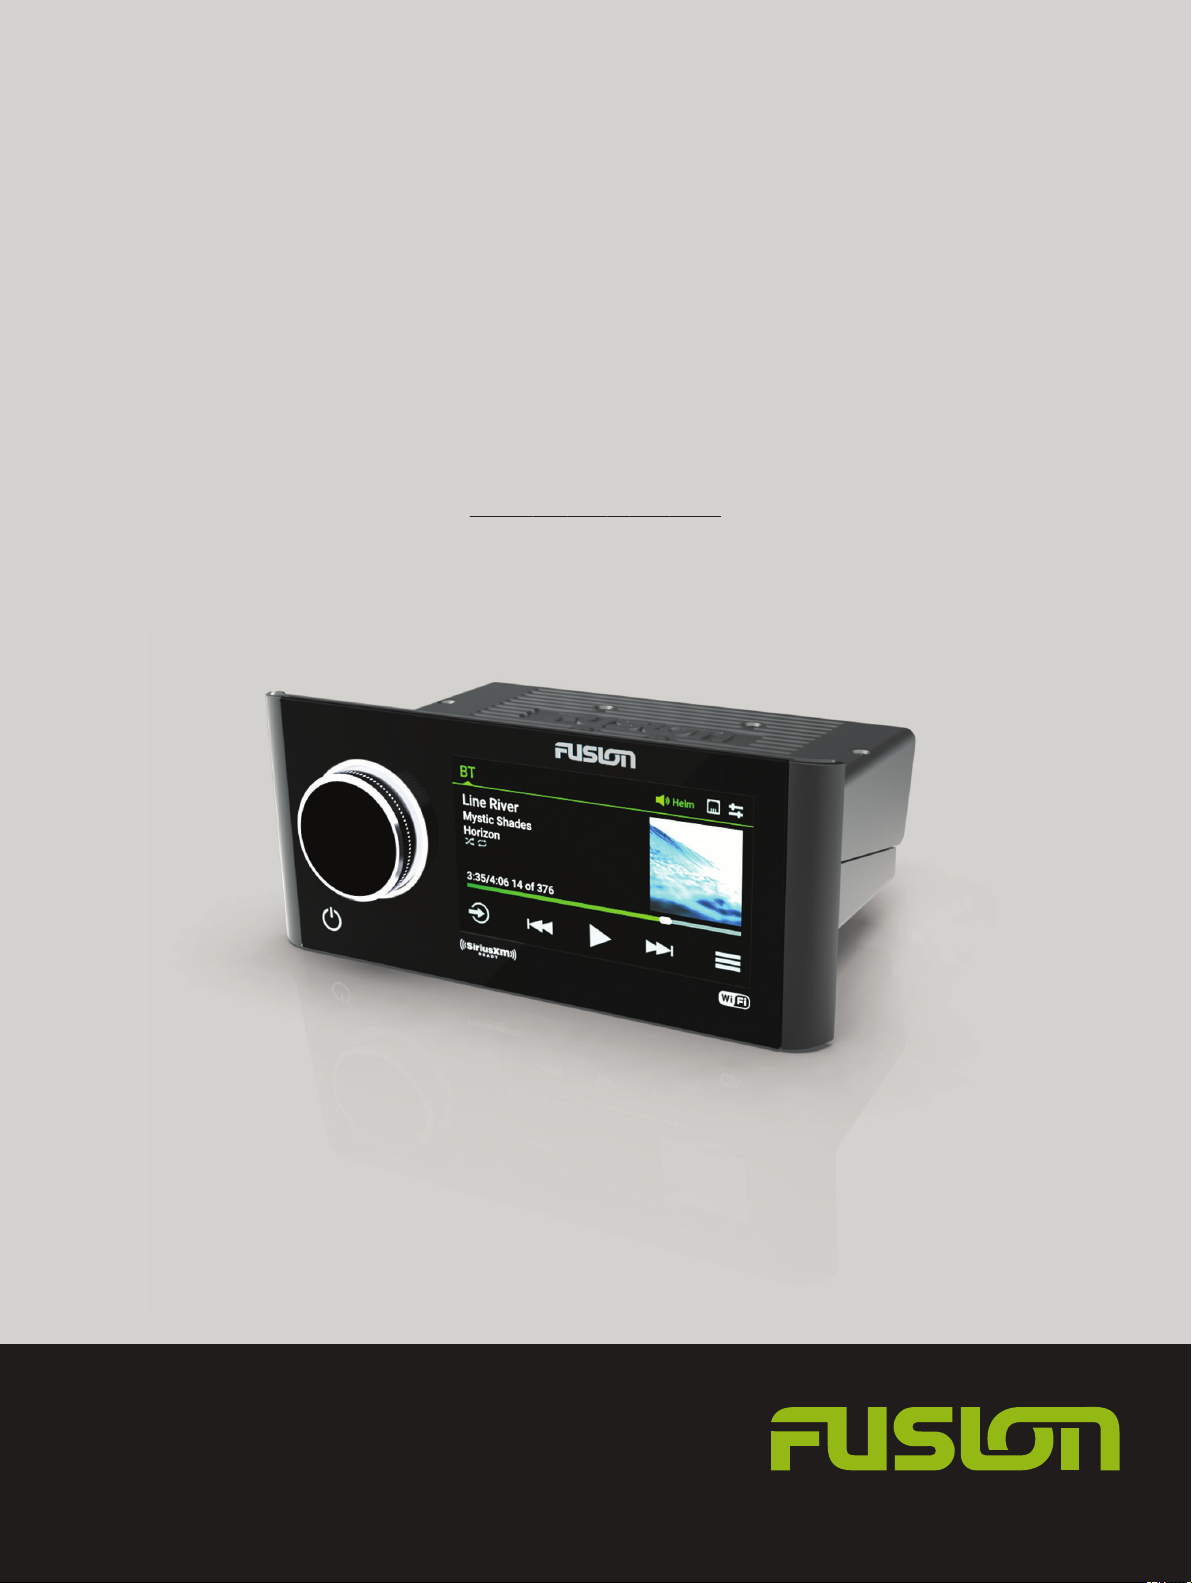
Stereo Screen
The information displayed on the screen varies depending on
the source selected. The on-screen playback controls may
change depending on the source selected (Playback Controls,
page 1). This example shows a track playing on a device
connected using Bluetooth® wireless technology.
Getting Started 1
Source name
Active zone, status icons, and shortcuts (Status Icons, page 2)
TIP: Touch an icon to open the applicable page.
Track details (if available)
Album art (if available from a compatible source)
Elapsed time, track duration, and the current track number out of
the total number of tracks in the playlist (if available)
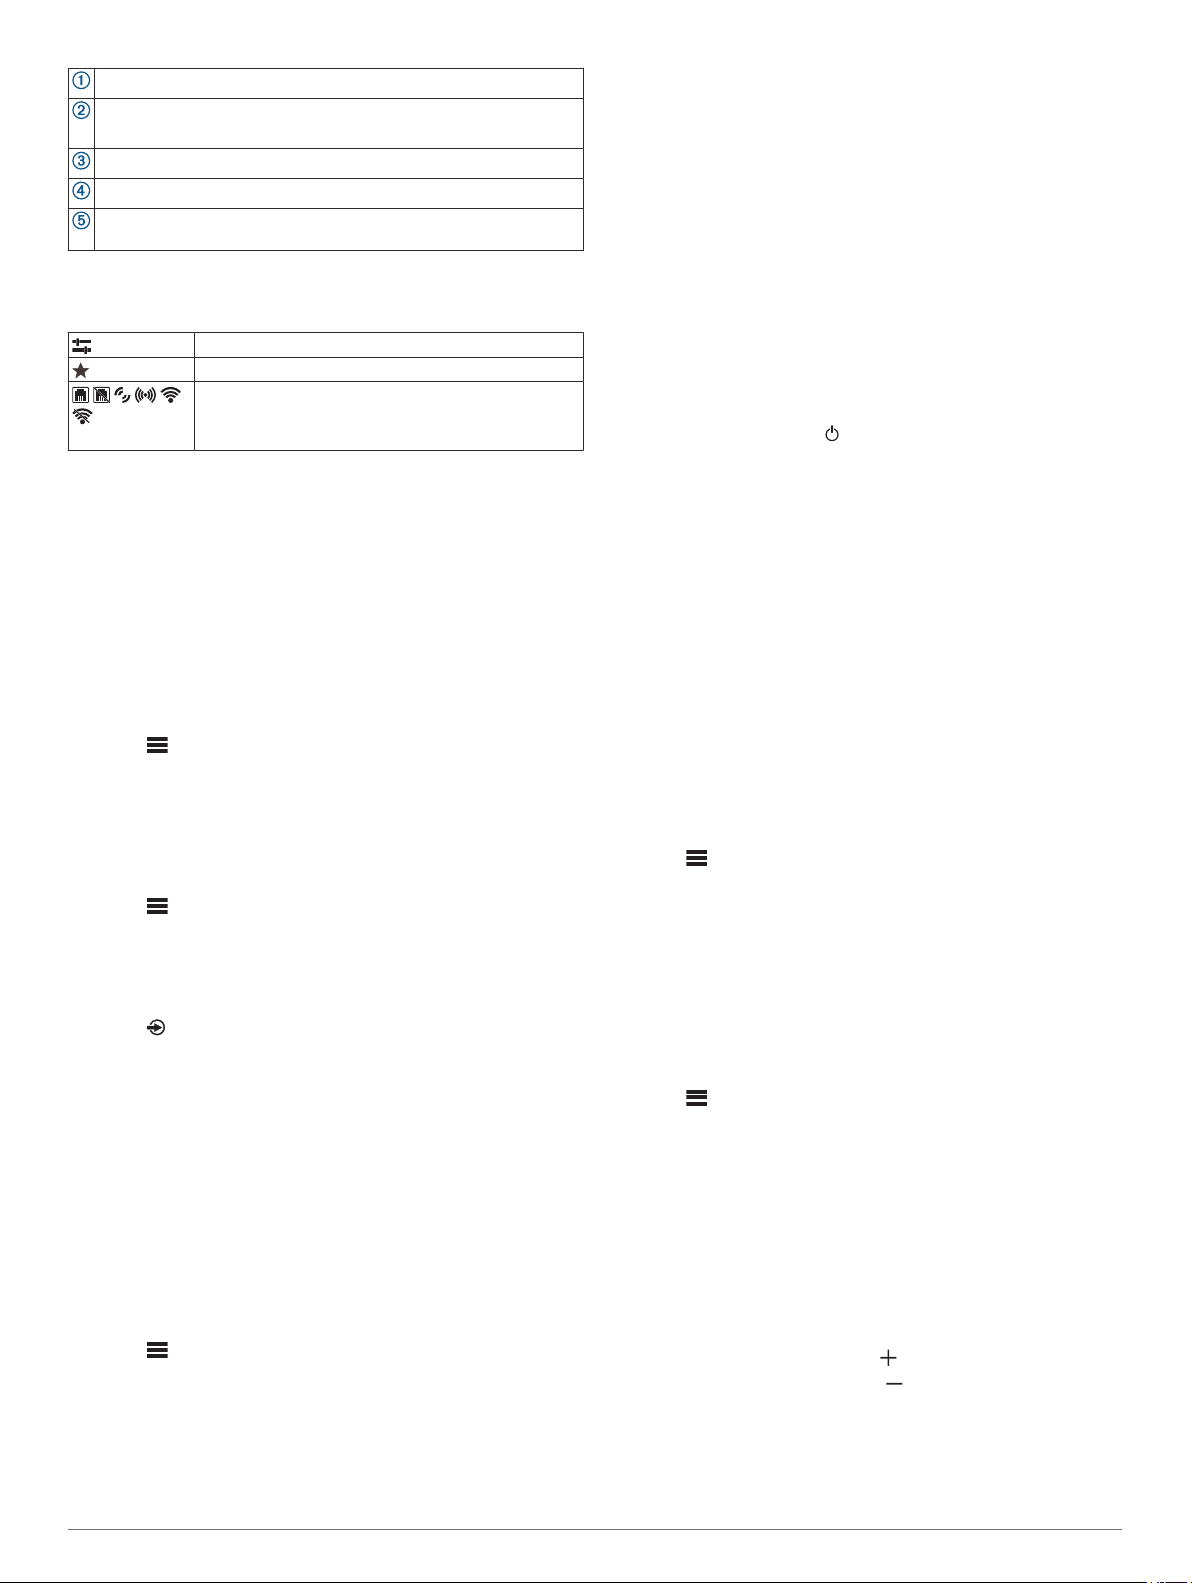
Status Icons
You can touch a status icon to open the relevant screen.
Opens the volume screen.
Opens the PRESET screen.
Opens the network settings.
NOTE: You cannot access the network settings if this
stereo is part of a group.
Naming the Device
You should enter a unique name for this device so you can
easily identify it when viewing devices on the Fusion PartyBus
network.
NOTE: You should provide unique names to all of the devices
and zones on the network to avoid confusion when grouping,
controlling, and setting up stereos and zones. You should also
turn off zones that are not in use (Speaker Zone Settings,
page 10).
For further customization, you can provide unique names for the
sources on each stereo and turn off unused sources (General
Settings, page 10).
Select > SETTINGS.
1
Select DEVICE NAME, and enter a unique name for the
2
device.
™
Audio Control
Adjusting the Volume
Using this stereo, you can control the volume of any zone on
any stereo connected to the Fusion PartyBus network.
Turn the dial to adjust the volume for the home zone on the
1
stereo.
If necessary, press the dial to switch between zones.
2
NOTE: If this stereo is part of a group, you can adjust the
volume of all stereos in the group or individual zones on each
stereo (Creating a Group, page 9).
Muting all Connected Stereos
You can quickly mute the audio from this stereo or from all
stereos connected to the Fusion PartyBus network (Fusion
PartyBus Networking, page 9).
From any source, press .
1
The mute symbol appears and audio from this stereo is
silenced.
NOTE: If the stereo is part of a group, the audio from all
grouped stereos is silenced.
Select MUTE SYSTEM.
2
Audio from all connected stereos is silenced.
Select UNMUTE SYSTEM.
3
Audio is restored to all connected stereos.
Adjusting the Subwoofer Level
You can adjust the subwoofer level for each zone.
Turn the dial, and select a zone with a connected subwoofer.
1
Press and hold the dial.
2
The SUB LEVEL adjustment for the zone appears.
Adjust the subwoofer level and press the dial to set it.
3
Setting the Home Zone
The home zone is the speaker zone that you adjust by default
when you turn the dial.
Select > SETTINGS.
1
Select ZONE > ASSIGN HOME ZONE.
2
Select a zone.
3
Selecting a Source
Select .
1
Turn the dial to highlight a source.
2
NOTE: If the device is part of a group, continue turning the
dial to access the sources on other devices in the group
(Creating a Group, page 9).
If a source cannot be shared with the group, it will appear
gray and you cannot select it.
Press the dial to select the source.
3
Adjusting the Backlight and Dial Brightness
NOTE: If you connected the dim wire on the wiring harness to
the boat's illumination wire, the backlight and dial dim
automatically when the boat lights are on. This may affect how
you adjust the brightness setting.
Select > BRIGHTNESS.
1
Adjust the brightness level.
2
Adjusting the Tone
Select > AUDIO.
1
Select the zone to adjust.
2
Press the dial to select a tone.
3
Adjust the tone level and press the dial to set it.
4
You can drag the slider bar to adjust the tone level.
Disabling the Loud Setting for a Zone
The LOUD setting maintains frequency response at low volumes
and increases perceived loudness at high volumes. This setting
is enabled by default in all zones.
Select > AUDIO.
1
Select a zone to adjust.
2
Select LOUD to clear the check box.
3
Adjusting the Gain for an Auxiliary Device
You can adjust the gain for a connected auxiliary device to
achieve a volume level similar to that of other media sources.
You can adjust the gain in 1 dB increments. You can also adjust
the gain for digital sources using an optical audio connection.
Select an auxiliary source.
1
Select an option:
2
• To increase the gain, select .
• To decrease the gain, select .
NOTE: To achieve the best audio quality when using a
portable media player with headphone output, it may be
necessary to adjust the volume control on the media player,
instead of adjusting the gain.
2 Audio Control

Speaker Zones
You can group speakers in one area into a speaker zone. This
enables you to control the audio level of the zones individually.
For example, you could make the audio quieter in the cabin and
louder on deck.
You can set the balance, volume limit, tone, subwoofer
frequency, and name for each zone, and configure other zonespecific settings (Speaker Zone Settings, page 10).
DSP Settings
This stereo features digital signal processing (DSP). You can
select pre-configured DSP settings for Fusion® speakers and
amplifiers to optimize audio reproduction in their installed
locations.
All DSP settings are configured using the Fusion-Link™ remote
control app (Fusion-Link Wireless Remote Control App,
page 14).
Configuring the DSP Settings
You must download and install the Fusion-Link remote control
app on your compatible Apple® or Android™ device before you
can configure the DSP settings (Fusion-Link Wireless Remote
Control App, page 14).
You can configure the DSP settings to optimize the sound on
each zone with the installed speakers, amplifiers, and
environment.
From the settings menu on your Apple or Android device,
1
connect to the stereo using Bluetooth technology, or connect
to the same wireless network as the stereo.
Open the Fusion-Link remote control app on your compatible
2
Apple or Android device.
If necessary, select the stereo you want to configure.
3
Select .
4
If necessary, select the MUSIC tab.
5
Select a zone.
6
Select DSP SETTINGS.
7
Configure the DSP settings as needed, depending on the
8
models of Fusion speakers and amplifiers connected to the
zone.
Repeat these steps for each zone.
9
After you have finished configuring the DSP settings for all
10
zones, select an option:
• On an Apple device, select > SEND DSP SETTINGS
• On an Android device, select > Zone > SEND DSP
SETTINGS.
Media Player Connection
Bluetooth Device Playback
You can pair the stereo to up to eight Bluetooth media devices.
You can control the playback using the stereo controls on all
Bluetooth devices, and on some devices you can browse the
music collection from the menu on the stereo.
On Bluetooth devices that do not support media browsing, you
should select the song or playlist on the media device.
The availability of song information such as song title, artist
name, track duration, and album art depends on the capability of
the media player and music application.
Connecting a Compatible Bluetooth Device
You can play media from a compatible Bluetooth device using
the Bluetooth wireless connection.
You can control the music playback with the media app on a
Bluetooth device or using the Fusion-Link remote control app
(Fusion-Link Wireless Remote Control App, page 14).
Select the BT source.
1
Select > BT > CONNECTIONS > DISCOVERABLE to
2
make the stereo visible to your compatible Bluetooth device.
Enable Bluetooth on your compatible Bluetooth device.
3
Bring the compatible Bluetooth device within 10 m (33 ft.) of
4
the stereo.
On your compatible Bluetooth device, search for Bluetooth
5
devices.
On your compatible Bluetooth device, select the stereo from
6
the list of detected devices.
On your compatible Bluetooth device, follow the on-screen
7
instructions to pair and connect to the discovered stereo.
When pairing, your compatible Bluetooth device may ask you
to confirm a code on the stereo. The stereo does not display
a code, but it does connect correctly when you confirm the
message on the Bluetooth device.
If your compatible Bluetooth device does not immediately
8
connect to the stereo, repeat steps 1 through 7.
The DISCOVERABLE setting is disabled automatically after two
minutes.
NOTE: On some Bluetooth devices, adjusting the volume on the
device affects the volume level on the stereo.
Bluetooth Range Information
The stereo and Bluetooth wireless devices have a range of 10 m
(33 ft.). For optimal performance, the Bluetooth wireless device
should also have a clear line of sight to the stereo.
NOTE: Wi‑Fi® signals may interfere with Bluetooth device
connections. You should turn off the Wi‑Fi setting on your stereo
if you are not using it.
CAUTION
Always disconnect your media player from the stereo when not
in use and do not leave it in your vessel. This helps reduce the
risk of theft and damage from extreme temperatures.
Do not remove the media player or use your stereo in a
distracting manner while operating the vessel. Check and obey
all marine laws in association with use.
The stereo accepts a variety of media players, including
smartphones and other mobile devices. You can connect a
compatible media player using a Bluetooth wireless connection
or a USB connection to the USB port. The stereo can play
media from Universal Plug and Play (UPnP) devices, such as a
Network Attached Storage (NAS) device connected to the same
network. The stereo can play media from a compatible Apple
device connected to the same network using the AirPlay
feature.
Media Player Connection 3
®
Selecting a Different Bluetooth Device
When you have more than one Bluetooth device paired to the
stereo, you can select a different device when needed. You can
pair the stereo with up to eight Bluetooth devices.
With the BT source selected, select > BT >
1
CONNECTIONS > PAIRED DEVICES.
Select a Bluetooth device.
2
Bluetooth Source Menu and Settings
With the BT source selected, select > BT.
NOTE: The options in this menu vary based on the connected
device.
CONNECTIONS > DISCOVERABLE: Allows the stereo to be
visible to Bluetooth devices. You can turn off this setting to
prevent possible interruption to audio after pairing a
Bluetooth device to the stereo.

CONNECTIONS > PAIRED DEVICES: Shows a list of Bluetooth
devices paired with the stereo. You can select a device in the
list to connect it to the stereo if it is in range.
CONNECTIONS > REMOVE DEVICE: Removes the Bluetooth
device from the stereo. To listen to audio from this Bluetooth
device again, you must pair the device again.
REPEAT: Sets the repeat mode for the current selection. You
can repeat the current selection by selecting the REPEAT
ONE option. You can repeat all items in the selection by
selecting the REPEAT ALLoption.
SHUFFLE: Shuffles the tracks in the folder, album, or playlist.
PLAYLIST: Displays the playlists on the device.
ARTISTS: Displays the artists on the device.
ALBUMS: Displays the albums on the device.
GENRES: Displays the genres of music on the device.
SONGS: Displays the songs on the device.
Disabling Bluetooth Auto Connection
By default, the stereo automatically reconnects to the last
connected Bluetooth device when you turn it on. You can
disable this setting.
Select > SETTINGS > SOURCE > BT > AUTO
CONNECT.
When the AUTO CONNECT checkbox is clear, the stereo will
not attempt to automatically reconnect to a Bluetooth device.
When this feature is disabled, you must select a Bluetooth
device manually to connect it (Selecting a Different Bluetooth
Device, page 3).
USB Device Playback
You can connect various USB media players, USB flash drives,
and smartphones to the stereo. How you access the USB
source depends on the type of connected media player or
smartphone.
Media Player Source Selections
Android device MTP
Apple device iPod
USB flash drive USB
MP3 media player (as a massstorage device)
You can control the playback using the stereo controls on all
USB devices, and on some devices you can browse the music
collection from the menu on the stereo. On USB devices that do
not support media browsing, you should select the song or
playlist on the media device.
The availability of song information such as song title, artist
name, and track duration depends on the capability of the media
player and music application.
USB Device Compatibility
You can use a USB flash drive or the USB cable included with
your media player to connect a media player or mobile device to
the USB port.
The stereo is compatible with iAP2 Apple devices such as the
iPhone® Xs Max, iPhone Xs, iPhone XR, iPhone X, iPhone 8
Plus, iPhone 8, iPhone 7 Plus, iPhone 7, iPhone SE, iPhone 6s
Plus, iPhone 6s, iPhone 6 Plus, iPhone 6, iPhone 5s, and iPod
touch® (6th generation).
USB
NOTE: If your MP3 media player
does not support mass-storage
when connected using USB, you
must connect it to the stereo as an
auxiliary device (Connecting an
Auxiliary Device, page 6).
The stereo is compatible with Android devices that support MTP
mode.
The stereo is compatible with media players and other USB
mass storage devices, including USB flash drives. Music on
USB drives must meet these conditions:
• The music files must be formatted as MP3, AAC (.m4a), or
FLAC, files.
• If you connect a portable hard drive, you must connect it to
an external power source. The USB port on this stereo
cannot provide power for a portable hard drive.
• The USB mass storage device must be formatted using one
of the following systems:
◦ Microsoft®: NTFS, VFAT, FAT1, MSDOS
◦ Apple: HFS, HFSPLUS
◦ Linux: EXT2, EXT3, EX4
Connecting a USB Device
You can connect a USB device to the USB port on the stereo.
You cannot connect a USB device to the remote control. You
must connect a USB device to the stereo you are controlling
with the remote control.
Locate the USB port on the back of the stereo.
1
Connect the USB device to the USB port.
2
Controlling Music Playback on a USB Flash Drive or Media Player
Connect a compatible USB flash drive or media player to the
1
stereo.
Select the USB source.
2
Select > USB.
3
Select the name of the USB device.
4
Browse the music files on the device and begin playback.
5
You can use the stereo controls to select, play, pause, and skip
tracks.
TIP: If the USB media player has a screen and controls, you can
use the controls on the USB media player to control playback.
Controlling Music Playback on a Connected Android Device
You can connect an Android device to the stereo using a USB
cable to play media files stored on the Android device. To play
media from an app on the Android device, you should connect
the device using Bluetooth technology instead (Bluetooth Device
Playback, page 3).
Connect a compatible Android device to the stereo using an
1
appropriate USB cable.
If necessary, enable USB file transfer or MTP on your
2
Android device.
See the documentation available for your Android device for
more information.
Select the MTP source on the stereo.
3
Select > MTP.
4
Browse the music files on the Android device and begin
5
playback.
You can use the stereo controls to select, play, pause, and skip
tracks.
Controlling Music Playback on a Connected Apple Device
Connect a compatible iAP2 Apple device to the stereo using
1
USB.
1
FAT includes most types of FAT file systems except exFAT.
4 USB Device Playback
 Loading...