

Page 1
INREACH® MINI
Owner’s Manual
Page 2

© 2018 Garmin Ltd. or its subsidiaries
All rights reserved. Under the copyright laws, this manual may not be copied, in whole or in part, without the written consent of Garmin. Garmin reserves the right to change or improve its
products and to make changes in the content of this manual without obligation to notify any person or organization of such changes or improvements. Go to www.garmin.com for current updates
and supplemental information concerning the use of this product.
Garmin®, the Garmin logo, Earthmate®, and inReach® are trademarks of Garmin Ltd. or its subsidiaries, registered in the USA and other countries. MapShare™ is a trademark of Garmin Ltd. or its
subsidiaries. These trademarks may not be used without the express permission of Garmin.
The Bluetooth® word mark and logos are owned by the Bluetooth SIG, Inc. and any use of such marks by Garmin is under license. Facebook™ and the Facebook logo are trademarks of
Facebook and its affiliate companies. Iridium® is a registered trademark of Iridium Satellite LLC. TWITTER™ and the Twitter logo are trademarks of Twitter, Inc. or its affiliates. Other trademarks
and trade names are those of their respective owners.
Page 3

Table of Contents
Getting Started............................................................... 1
Device Overview......................................................................... 1
Keys............................................................................................ 1
Turning On the Device................................................................ 1
Status Icons................................................................................ 1
Activating the Device.................................................................. 1
Iridium Satellite Network............................................................. 1
Bluetooth Connected Features..................................... 1
Pairing Your Mobile Device........................................................ 1
Testing the Device.......................................................... 1
Messages........................................................................ 1
Sending a Preset Message........................................................ 2
Sending a Text Message............................................................ 2
Replying to a Message............................................................... 2
Posting to Social Media.............................................................. 2
Checking for Messages.............................................................. 2
Deleting Messages..................................................................... 2
Contacts.......................................................................... 2
Viewing a Contact....................................................................... 2
Deleting a Contact...................................................................... 2
SOS.................................................................................. 2
Initiating an SOS Rescue............................................................2
Canceling an SOS Rescue......................................................... 2
Tracking.......................................................................... 2
Starting Tracking.........................................................................3
Stopping Tracking....................................................................... 3
Navigation....................................................................... 3
Acquiring GPS Satellite Signals..................................................3
Routes........................................................................................ 3
Navigating a Saved Route..................................................... 3
Reversing a Route................................................................. 3
Deleting a Route.................................................................... 3
Waypoints................................................................................... 3
Creating a Waypoint.............................................................. 3
Navigating to a Waypoint....................................................... 3
Editing a Waypoint................................................................. 3
Deleting a Waypoint............................................................... 3
Stopping Navigation....................................................................3
Compass.....................................................................................3
Location...................................................................................... 3
Viewing and Sharing Your Current Location.......................... 3
Weather........................................................................... 3
Adding a Weather Location........................................................ 3
Setting the Weather Location..................................................... 3
Requesting a Weather Forecast................................................. 4
Deleting a Weather Location...................................................... 4
Remote Control...............................................................4
Data Use and History..................................................... 4
Viewing Data Use....................................................................... 4
Resetting the Data Use Counter............................................ 4
Customizing the Device................................................. 4
Display Settings.......................................................................... 4
Tracking Settings........................................................................ 4
Bluetooth Settings.......................................................................4
ANT+ Sensor Settings................................................................ 4
Messages Settings..................................................................... 4
Sounds Settings..........................................................................4
Time Settings.............................................................................. 4
Units Settings..............................................................................4
Changing the Device Language................................................. 5
Adding Owner Information
.......................................................... 5
Device Information......................................................... 5
Support and Updates.................................................................. 5
Attaching the Spine Mount Adapter............................................ 5
Attaching a Lanyard.................................................................... 5
Locking and Unlocking the Keys................................................ 5
Device Care................................................................................ 5
Cleaning the Device............................................................... 5
Troubleshooting.......................................................................... 5
Maximizing Battery Life.......................................................... 5
Resetting the Device.............................................................. 5
Restoring All Default Settings................................................ 5
Viewing Device Information................................................... 6
Charging the Device................................................................... 6
Specifications..............................................................................6
Battery Information.................................................................6
Index................................................................................ 7
Table of Contents i
Page 4

Page 5

Getting Started
WARNING
See the Important Safety and Product Information guide in the
product box for product warnings and other important
information.
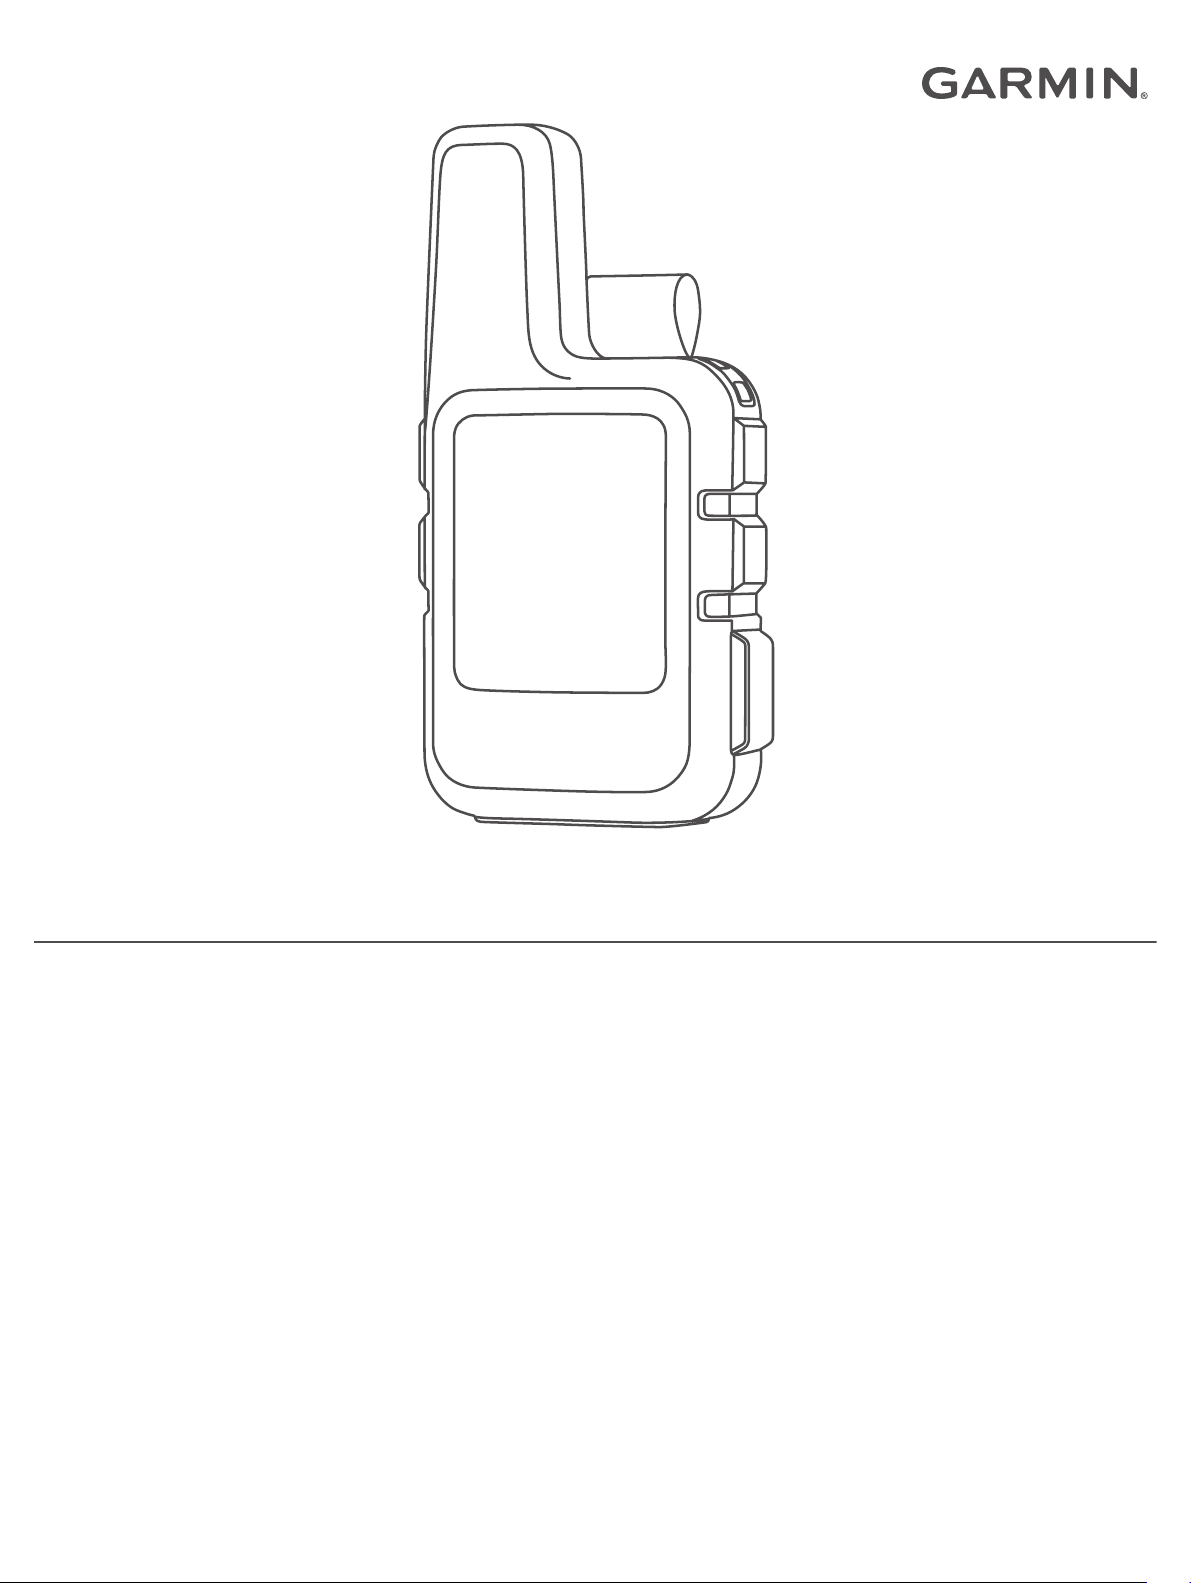
Device Overview
Internal Iridium® antenna
À
Keys
Á
Micro-USB port (under weather cap)
Â
SOS button (under protective cap)
Ã
Power key
Ä
Mounting screw
Å
Keys
Select to scroll through menus, pages, and settings.
Select to cancel or return to the previous page.
OK Select to choose an option or to acknowledge a message.
From the home page, select to open the main menu.
Turning On the Device
Hold .
Status Icons
Sending and receiving data
Unable to send and receive data
Tracking enabled
Bluetooth® technology connection status
Charging battery
Charging complete
Activating the Device
Before you can use your inReach Mini® device, you must
activate it.
Create an account, and select a satellite subscription at
1
explore.garmin.com.
Turn on the device.
2
Follow the on-screen instructions.
3
When prompted, go outdoors to an open area with a clear
4
view of the sky.
Wait while the device communicates with the Iridium satellite
5
network.
NOTE: It may take up to 20 minutes to activate your device.
The device must send and receive several messages, which
takes longer than sending a single message during regular
use.
Iridium Satellite Network
Your device requires a clear view of the sky to transmit
messages and track points over the Iridium satellite network.
Without a clear view of the sky, your device attempts to send the
information until it acquires satellite signals.
TIP: For the best connection with satellites, attach the device to
a backpack or to your upper body.
Bluetooth Connected Features
Your device has several Bluetooth connected features for your
compatible smartphone or mobile device using the Earthmate
app. The Earthmate app allows you to use inReach features
such as maps, tracking, messaging, and SOS on your mobile
device.
Downloadable Features: View downloaded maps, aerial
imagery, USGS quadrangle maps, and NOAA nautical charts
on your mobile device. You should download maps and
charts before going on your trip.
Sync: Earthmate syncs your device with your
explore.garmin.com account, updating presets, waypoints,
and routes.
Messages: Allows you to read and write messages, and access
the contacts list on your mobile device. Messages appear on
both devices.
NOTE: You can have only one mobile device paired with your
inReach device at a time.
Pairing Your Mobile Device
You must pair your inReach device with your mobile device to
use Bluetooth features.
From the app store on your mobile device, install and open
1
the Earthmate app.
Place the inReach device and your mobile device within 3 m
2
(10 ft.) of each other.
From the main menu, select Setup > Bluetooth > Pair
3
Device.
Follow the instructions in the Earthmate app to complete the
4
pairing and setup process.
After the devices are paired, they connect automatically when
they are turned on and within range.
®
Testing the Device
You should test the device outdoors before using it on a trip to
ensure your satellite subscription is active.
From the main menu, select Utilities > Test Service > OK.
Wait while the device sends a test message. When you
receive a confirmation message, your device is ready to use.
Messages
Your inReach Mini device sends and receives text messages
using the Iridium satellite network. You can send messages to
an SMS phone number, an email address, or another inReach
device. Each message you send includes your location details.
Getting Started 1
Page 6

Sending a Preset Message
Preset messages are messages that you created at
explore.garmin.com. Preset messages have predefined text and
recipients.
From the main menu, select Send Preset.
1
Choose a preset message, and select Send.
2
Sending a Text Message
From the Messages page, select OK.
1
Select New Message > Select Contacts.
2
Choose recipients from your contacts list, and select Done.
3
Select an option:
4
• To start with a pre-written message, select Pick Quick
Text.
• To write a custom message, select Write Message.
When you have finished your message, select > Send.
5
Replying to a Message
From the Messages page, select OK.
1
Select a conversation, and select Reply.
2
Select an option:
3
• To start with a pre-written message, select Pick Quick
Text.
• To write a custom message, select Write Message.
When you have finished your message, select > Send.
4
Viewing a Contact
From the main menu, select Utilities > Contacts.
1
Select a contact, and select View Details.
2
Deleting a Contact
From the main menu, select Utilities > Contacts.
1
Select a contact, and select Delete.
2
SOS
During an emergency, you can contact the GEOS International
Emergency Rescue Coordination Center (IERCC) to request
help. Pressing the SOS button sends a message to the rescue
coordination center, and they notify the appropriate emergency
responders of your situation. You can communicate with the
rescue coordination center during your emergency while you
wait for help to arrive. You should only use the SOS function in a
real emergency situation.
Initiating an SOS Rescue
NOTE: While in SOS mode, the device cannot be turned off.
Lift the protective cap À from the SOS button Á.
1
Posting to Social Media
From the Messages page, select OK.
1
Select New Message > Select Contacts.
2
Select one or more options:
3
• To post to your Facebook™ account, select .
• To post to your Twitter™ account, select .
• To post to your MapShare™ web page, select .
Select Done.
4
Select an option:
5
• Select Write Message to create a new message.
• Select Pick Quick Text to select a quick text message.
Select Send.
6
Checking for Messages
Your device listens for new messages at regular listen intervals.
Satellites announce recently sent messages, and your device
receives the message at the next listen interval.
NOTE: Your device must be in view of a satellite at the time of
the listen to receive messages.
You can force a check for messages by manually checking for
messages, sending a message, or sending a track point. During
a check, your device connects to satellites and receives
messages waiting to be sent to your device.
From the Mail Check page, select OK.
Deleting Messages
From the Messages page, select OK.
1
Select a message.
2
Select Delete Thread.
3
Contacts
You can add contacts to the Garmin Explore™ website and sync
them to your device. Go to explore.garmin.com.
Hold the SOS button.
2
Wait for the SOS countdown.
3
The device sends a default message to the emergency
response service with details about your location.
Reply to the confirmation message from the emergency
4
response service.
Your reply lets the emergency response service know that
you are capable of interacting with them during the rescue.
For the first 10 minutes of your rescue, an updated location is
sent to the emergency response service every minute. To
conserve battery power after the first 10 minutes, an updated
location is sent every 10 minutes when moving, and every 30
minutes when stationary.
Canceling an SOS Rescue
If you no longer need assistance, you can cancel an SOS
rescue after it is sent to the emergency response service.
Lift the protective cap, and hold the SOS button.
1
Select Yes.
2
Your device transmits the cancellation request. When you
receive a confirmation message from the emergency
response service, the device returns to normal operation.
Tracking
Tracking records your path. When you start tracking, your
device logs your location and updates the track line at the
specified log interval. Your device records track points and
transmits them over the satellite network at the specified send
interval. You can view the total number of track points sent.
2 Contacts
Page 7

TIP: You can adjust the tracking log interval and the tracking
send interval to maximize battery life (Tracking Settings,
page 4).
NOTE: When the tracking log storage is full, your device
overwrites older track points, but retains a lower-detail tracking
line.
Starting Tracking
From the Tracking page, select OK.
Your track line and track points appear on your MapShare web
page for friends and family to follow your trip.
Stopping Tracking
From the Tracking page, select OK.
1
Select Stop Tracking.
2
Navigation
Acquiring GPS Satellite Signals
Before you can use GPS navigation features, you must acquire
satellite signals.
When you turn on your navigation device, the GPS receiver
must collect satellite data and establish the current location. The
time required to acquire satellite signals varies based on several
factors, including how far you are from the location where you
last used your navigation device, whether you have a clear view
of the sky, and how long it has been since you last used your
navigation device. The first time you turn on your navigation
device, it may take several minutes to acquire satellite signals.
Turn on the device.
1
Wait while the device locates satellites.
2
It may take up to 60 seconds to acquire satellite signals.
If necessary, go to an open area, away from tall buildings and
3
trees.
Routes
A route is a sequence of locations that leads you to your final
destination. You can create and save routes at
explore.garmin.com.
Navigating a Saved Route
Starting navigation updates your MapShare web page, and your
friends and family can view the route you are navigating.
From the main menu, select Navigate > Routes.
1
Select a route, and select Navigate.
2
Reversing a Route
You can switch the start and end points of your route to navigate
the route in reverse.
From the main menu, select Navigate > Routes.
1
Select a route, and select Reverse Route.
2
Deleting a Route
From the main menu, select Navigate > Routes.
1
Select a route, and select Delete.
2
Waypoints
Waypoints are locations you record and store in the device.
Waypoints can mark where you are, where you are going, or
where you have been. Creating or editing a waypoint updates
your MapShare web page.
Creating a Waypoint
You can save your current location as a waypoint or create
custom waypoints.
Choose an option:
1
• To mark your current location as a waypoint, select Mark
Waypoint from the main menu.
• To create a custom waypoint, select Navigate >
Waypoints > New Waypoint from the main menu.
If necessary, edit the waypoint information.
2
Navigating to a Waypoint
From the main menu, select Navigate > Waypoints.
1
Select a waypoint, and select Navigate.
2
Editing a Waypoint
From the main menu, select Navigate > Waypoints.
1
Select a waypoint, and select an option:
2
• To change the name of the waypoint, select Edit Name.
• To change the symbol representing the waypoint, select
Edit Symbol.
• To change the GPS coordinates of the waypoint, select
Edit Coordinates.
Enter the new information, and select if necessary.
3
Deleting a Waypoint
From the main menu, select Navigate > Waypoints.
1
Select a waypoint, and select Delete.
2
Stopping Navigation
From the navigation page, select OK.
1
Select Stop Navigating.
2
Compass
The compass page shows your heading and speed when you
are moving.
Location
You can view your current GPS location and elevation from the
Location page. Each message you send includes a link to your
current location. You can also send your location details as text
within a message.
Viewing and Sharing Your Current Location
From the Location page, select OK.
1
Select Share Location to send your location details as text
2
within a message.
Weather
Your inReach device can send a message to request basic,
premium, or marine weather forecasts. You can receive weather
forecasts for your current location, a waypoint, or GPS
coordinates. Weather forecasts incur data usage charges. For
more information, go to explore.garmin.com.
Adding a Weather Location
You can add waypoints as weather locations.
From the Weather page, select OK.
1
Select Change Location > New Location.
2
Select an option:
3
• To add an existing waypoint as a weather location, select
a waypoint.
• To create a new waypoint to add as a weather location,
select New Waypoint.
Setting the Weather Location
From the Weather page, select OK.
1
Navigation 3
Page 8

Select Change Location.
2
Select a location.
3
Requesting a Weather Forecast
From the Weather page, select OK.
1
Select Update.
2
If necessary, select a forecast type.
3
NOTE: For best results, you should request a marine
forecast for a location away from shore and over a large body
of water.
Deleting a Weather Location
You must set the weather location before you can delete it
(Setting the Weather Location, page 3).
From the Weather page, select OK.
1
Select Remove.
2
Remote Control
You can access some inReach Mini features using another
compatible device with ANT+® wireless technology, such as the
fēnix® watch. You can use remote control to view incoming
messages, send preset messages, start and stop tracking, and
initiate or cancel an SOS.
NOTE: You must enable ANT+ before pairing your device
(ANT+ Sensor Settings, page 4).
Data Use and History
Viewing Data Use
You can view the number of messages, preset messages, and
track points sent during the current billing cycle. You can also
view the details of your current data plan and check for data
plan updates. The data use counter resets automatically at the
beginning of each billing cycle.
From the main menu, select Utilities > Data Use.
Resetting the Data Use Counter
If you are a professional customer, you can reset the data use
counter to monitor your usage.
From the main menu, select Utilities > Data Use > Reset
Counter.
Customizing the Device
Display Settings
From the main menu, select Setup > Display.
Brightness: Sets the backlight brightness.
Timeout: Sets the length of time before the backlight turns off.
Tracking Settings
From the main menu, select Setup > Tracking.
Send Interval: Sets the frequency at which the device records a
track point and transmits it over the satellite network when
you are moving.
Log Interval: Sets the frequency at which the device logs your
location and updates the track line in memory.
Auto Track: Sets the device to start tracking when you turn on
the device.
Extended Tracking: Sets the device to enter sleep mode
between track points to maximize battery life. Sleep mode
disables Bluetooth wireless technology, detailed track lines,
and message checking.
Stationary Interval: Sets the frequency at which the device
records a track point and transmits it over the satellite
network when you are not moving. This setting is only
available for professional customers.
Burst Tracking: When tracking, sets the device to create and
send a detailed track line to provide the best approximation of
your location. You can select the amount of data to use, and
the device will create as many track points as possible. This
setting is only available for professional customers.
Bluetooth Settings
From the main menu, select Setup > Bluetooth.
Enabled: Enables Bluetooth wireless technology.
Pair Device: Connects your device with a compatible Bluetooth
enabled mobile device. This setting allows you to use
Bluetooth connected features using the Earthmate app.
Forget Device: Removes the connected device from the list of
mobile devices to connect to. This option is available only
after the device has paired.
Pair Again: Restarts the pairing process. This option is
available only after the device has paired.
ANT+ Sensor Settings
From the main menu, select Setup > ANT+.
Enabled: Turns ANT+ on or off.
Messages Settings
From the main menu, select Setup > Messages.
Ring Until Read: Sets the device to ring until you read a new
message. This feature is helpful if you are in a noisy
environment.
Adaptive Mail Check: When this setting is enabled, the device
listens more frequently for a reply to a sent message for ten
minutes. If the recipient replies quickly, you can receive the
reply before the next scheduled listen interval. This setting is
only available for professional customers.
Sounds Settings
From the main menu, select Setup > Sounds.
Mute All: Mutes all device tones.
Volume: Sets the device volume level.
Message Received: Sets the tone that sounds when you
receive a message.
Message Sent: Sets the tone that sounds when the you send a
message.
Critical Alert: Sets the tone that sounds when the device
announces a critical alert.
Power Off: Sets the tone that sounds when you turn off the
device.
Time Settings
From the main menu, select Setup > Time.
Time Format: Sets the device to show time in a 12-hour or 24-
hour format.
Time Zone: Sets the time zone for the device.
Daylight Saving: Sets the device to use daylight saving time.
This option is not available when Time Zone is set to
Automatic.
Units Settings
NOTE: You should not change the position-coordinate format or
the map datum coordinate system unless you are using a map
or chart that specifies a different position format.
From the main menu, select Setup > Units.
4 Remote Control
Page 9

Coordinates: Sets the format used for geographical position
coordinates.
Datum: Sets the coordinate system used by the map.
Speed/Distance: Sets the unit of measure for distance.
Temperature: Sets the temperature units to Fahrenheit (°F) or
Celsius (°C).
Pressure: Sets the pressure units.
Bearing: Sets the north reference used on the compass to true
or magnetic north.
Changing the Device Language
From the main menu, select Setup > Language.
1
Select a language.
2
Adding Owner Information
From the main menu, select Setup > Owner Info.
1
Select OK, enter your information, and select .
2
Device Information
Support and Updates
Go to explore.garmin.com for easy access to these services for
inReach devices.
• Product registration
• Firmware updates
• Data uploads and syncing your device with your account
Attaching the Spine Mount Adapter
Remove the short screw À from the carabiner strap Á.
1
Attaching a Lanyard
Insert the loop of the lanyard through the slot in the device.
1
Thread the other end of the lanyard through the loop, and pull
2
it tight.
If necessary, attach the lanyard to your clothing or backpack
3
to tether it during an activity.
Locking and Unlocking the Keys
You can lock the keys to prevent inadvertent key presses.
Select > Lock Screen.
1
Select > Unlock to unlock the keys.
2
Device Care
NOTICE
Avoid chemical cleaners, solvents, and insect repellents that can
damage plastic components and finishes.
Do not store the device where prolonged exposure to extreme
temperatures can occur, because it can cause permanent
damage.
The device is water resistant to IEC Standard 60529 IPX7. It can
withstand accidental immersion in 1 meter of water for 30
minutes. Prolonged submersion can cause damage to the
device. After submersion, be certain to wipe dry and air dry the
device before using or charging.
Thoroughly rinse the device with fresh water after exposure to
chlorinated or salt water environments.
Secure the spine mount adapter À over the back of the
2
device using the long screw Á included with the device.
TIP: The spine mount adapter fits over the carabiner strap.
You can attach the adapter over the strap or remove the
strap.
Cleaning the Device
Wipe the device using a cloth dampened with a mild
1
detergent solution.
Wipe it dry.
2
After cleaning, allow the device to dry completely.
Troubleshooting
Maximizing Battery Life
• Turn on the Extended Tracking setting (Tracking Settings,
page 4).
• Reduce the backlight timeout (Display Settings, page 4).
• Reduce the value of the tracking Log Interval and Send
Interval settings (Tracking Settings, page 4).
• Turn off Bluetooth wireless technology (Bluetooth Settings,
page 4).
• Turn off ANT+ wireless technology (ANT+ Sensor Settings,
page 4).
Resetting the Device
If the device stops responding, you may need to reset it. This
does not erase any of your data or settings.
Hold and until the device turns off.
1
Hold to turn on the device.
2
Restoring All Default Settings
You can restore all device settings to the factory default values.
Device Information 5
Page 10

From the main menu, select Setup > Recovery Options >
Restore Defaults.
Viewing Device Information
You can view the IMEI number, firmware version, regulatory
information, license agreement, and other device information.
From the main menu, select Setup.
1
Select About This Device.
2
Viewing E-Label Regulatory and Compliance Information
The label for this device is provided electronically. The e-label
may provide regulatory information, such as identification
numbers provided by the FCC or regional compliance markings,
as well as applicable product and licensing information.
From the main menu, select Setup.
1
Select About This Device.
2
Select Regulatory.
3
Charging the Device
NOTICE
To prevent corrosion, thoroughly dry the USB port, the weather
cap, and the surrounding area before charging or connecting to
a computer.
NOTE: The device does not charge when it is outside the
approved temperature range (Specifications, page 6).
Lift the weather cap À.
1
Battery Life Mode
Up to 20 days Extended tracking mode with 30-minute tracking send
interval
Up to 1 yr. Turned off
Plug the small end of the power cable into the USB port Á on
2
the device.
Plug the other end of the power cable into an appropriate
3
power source.
Charge the device completely.
4
Specifications
Battery type Rechargeable, built-in lithium-ion battery
Water rating IEC 60529 IPX7*
Operating temperature range From -20° to 60°C (from -4° to 140°F)
Charging temperature range From 0° to 45°C (from 32° to 113°F)
Wireless frequency/protocol 1.6 GHz @ 31.7 dBm nominal
2.4 GHz @ 5 dBm nominal
*The device withstands incidental exposure to water of up to 1 m
for up to 30 min. For more information, go to www.garmin.com
/waterrating.
Battery Information
The actual battery life depends on your device settings, such as
the tracking and message checking intervals.
Battery Life Mode
Up to 30 hr. 10-minute tracking send interval and 1-second log
Up to 50 hr. Default mode with 10-minute tracking send interval and
interval
5-minute log interval
6 Device Information
Page 11

Index
A
ANT+ 4
applications 1
B
backlight 4
battery 5
charging 6
life 6
maximizing 5
Bluetooth technology 1, 4
C
cleaning the device 5
compass 3
contact 2
deleting 2
editing 2
customizing the device 4, 5
D
data 4
data use 4
device, resetting 5
display settings 4
G
GPS 1, 3
accuracy 3
navigation 3
H
history 4
I
icons 1
initial setup 1
K
keys 1
locking 5
L
language 5
license 6
locations
editing 3
saving 3
locking, keys 5
M
maps, updating 5
messages 1–4
deleting 2
mounts 5
N
navigation, stopping 3
P
pairing, smartphone 1
power key 1
product registration 5
R
registering the device 5
remote control 4
resetting the device 5
routes 3
deleting 3
navigating 3
S
satellite signals 1
acquiring 3
screen 4
settings 4, 5
smartphone
applications 1
pairing 1
software, updating 5
SOS 2
canceling 2
sending 2
specifications 6
T
testing the device 1
time, zones and formats 4
time settings 4
tones 4
tracking 2–4
trip planner. See routes
troubleshooting 5
U
units of measure 4
updating software 5
USB, connector 1
W
waypoints 3
deleting 3
editing 3
navigating 3
saving 3
weather 3, 4
wrist strap 5
Index 7
Page 12

support.garmin.com
May 2018
190-02357-00_0A
 Loading...