

Page 1

Keep Away Tag Instructions.............................................................................................................. 2
Instructions relatives au Keep Away Tag .......................................................................................... 3
Keep Away Tag Istruzioni.................................................................................................................. 5
Instrucciones de Keep Away Tag ..................................................................................................... 6
Keep Away Tag instructies................................................................................................................ 7
Instrukcje Keep Away Tag ................................................................................................................ 8
Инструкции по использованию датчика Keep Away Tag............................................................... 9
®
, the Garmin logo, and ANT+® are trademarks of Garmin Ltd. or its subsidiaries, registered in the USA and other countries. Garmin Canine Connect™ is a trademark of Garmin Ltd. or its subsidiaries.
Garmin
These trademarks may not be used without the express permission of Garmin.
The Bluetooth® word mark and logos are owned by the Bluetooth SIG, Inc. and any use of such marks by Garmin is under license. Other trademarks and trade names are those of their respective owners.
This product is ANT+® certified. Visit www.thisisant.com/directory for a list of compatible products and apps.
July 2016 190-01983-91_0APrinted in Taiwan
Page 2
Keep Away Tag Instructions
WARNING
See the Important Safety and Product Information guide in the
product box for product warnings and other important
information.
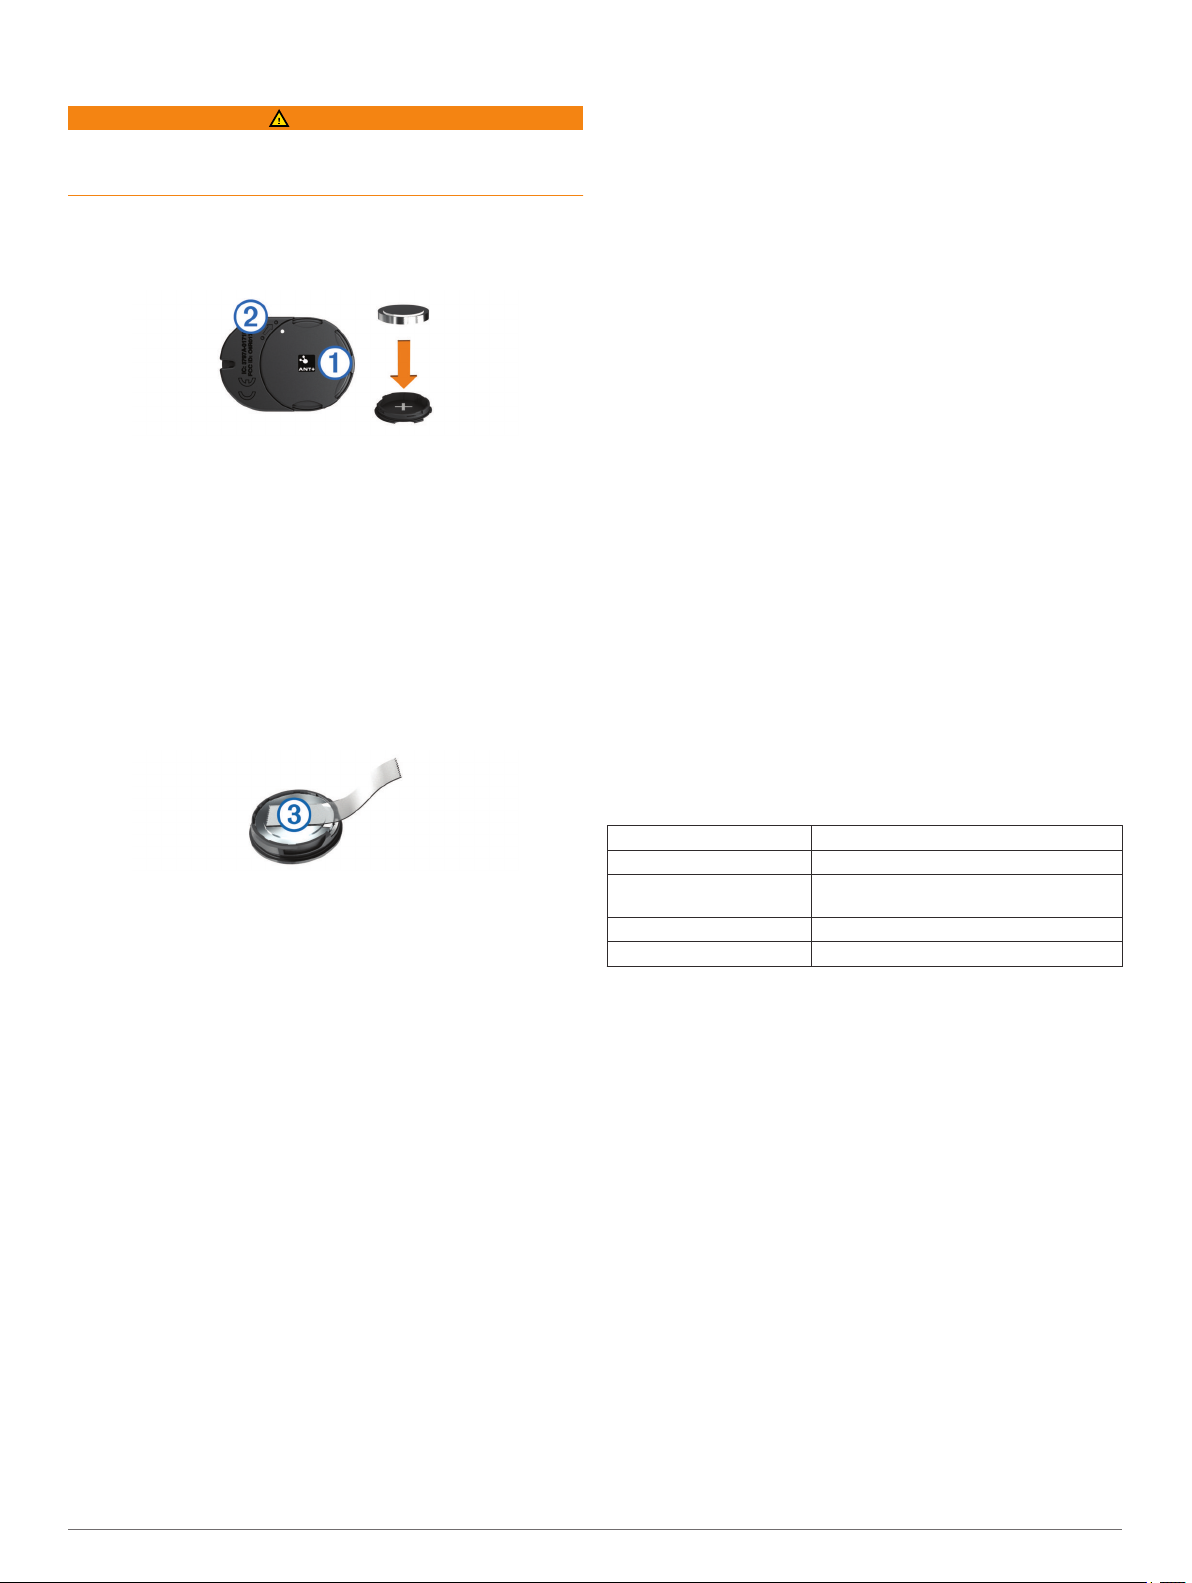
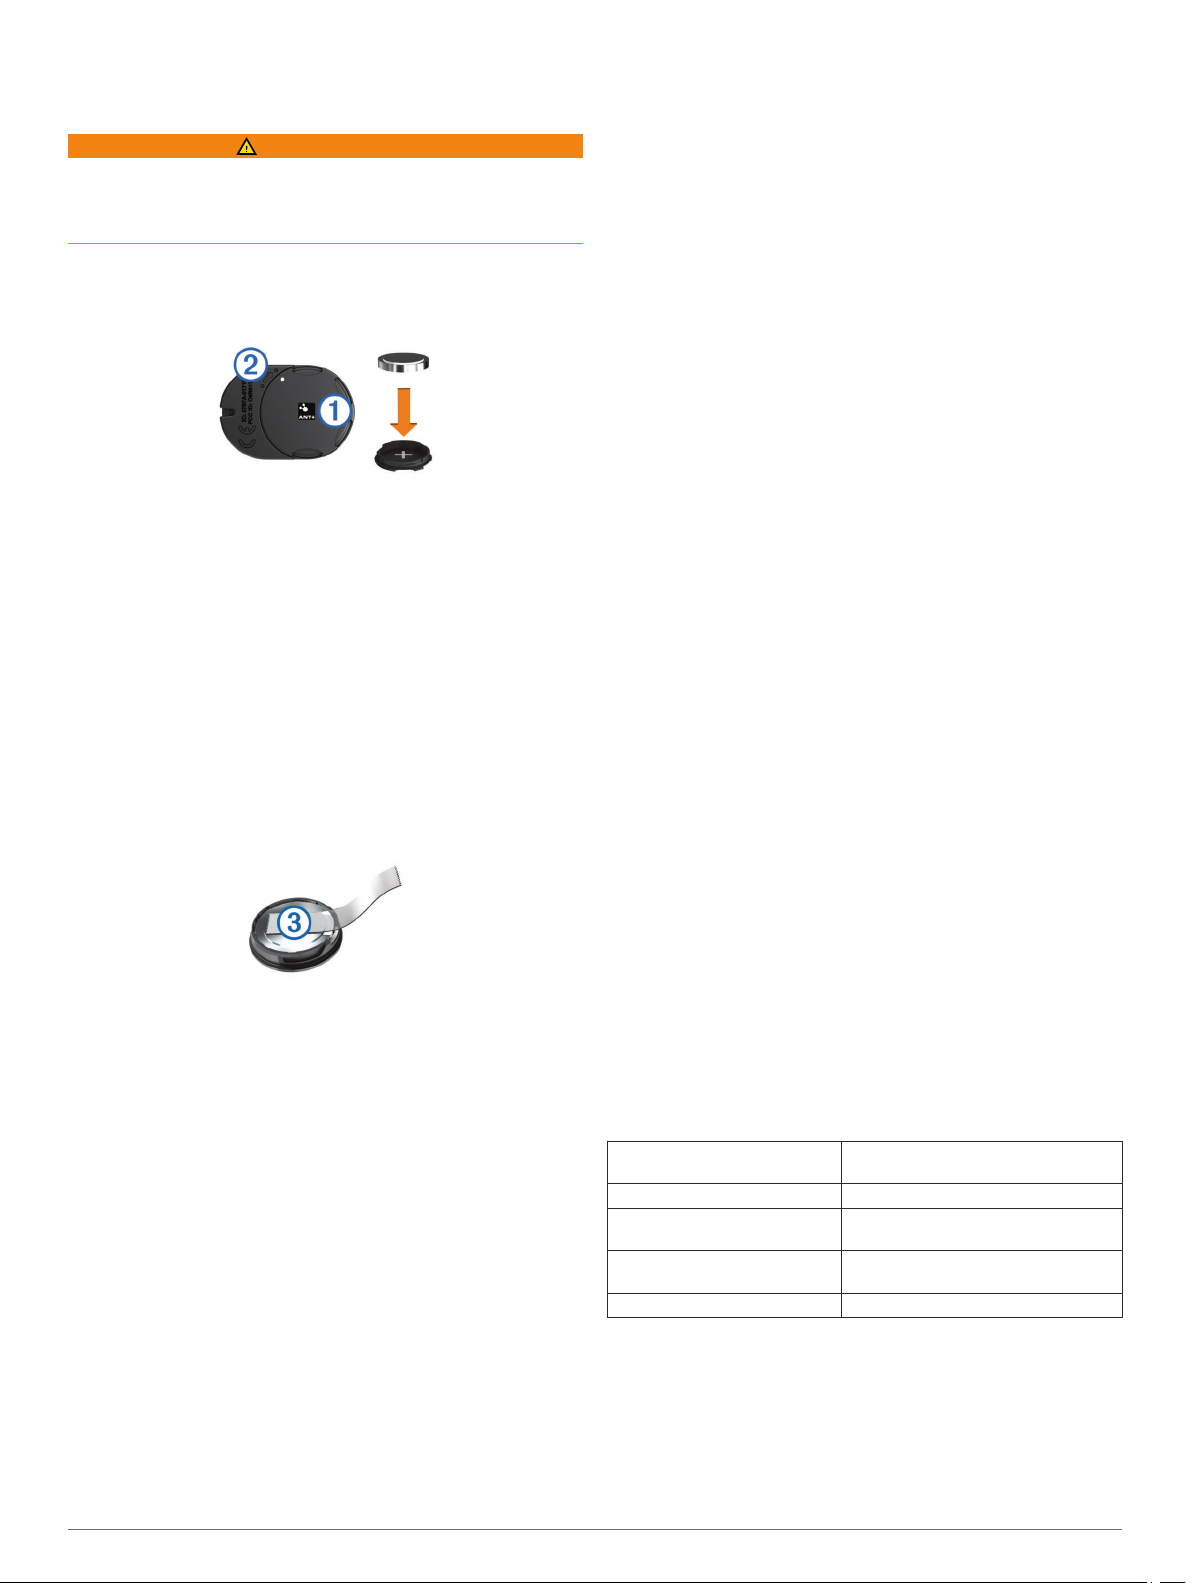
Installing the Battery
Locate the circular battery cover À on the back of the Keep
1
Away Tag sensor.
Twist the cover counter-clockwise until it is loose enough to
2
remove.
Remove the cover.
3
Place the battery into the cover with the positive side facing
4
the inside of the cover.
NOTE: Do not damage or lose the O-ring gasket.
Replace the cover by aligning the dots Á and rotating
5
clockwise.
When paired with a compatible dog collar device, the Garmin
Canine Connect™ app indicates when less than 1 wk. battery life
remains for the sensor.
TIP: To replace the battery, you can use a piece of tape  or a
magnet to remove the battery from the cover.
Follow the on-screen instructions to set the range.
7
Follow the on-screen instructions to select corrective actions.
8
Tips for Setting the Range
You can use the Garmin Canine Connect app to set and test the
effective range of the sensor (up to 3 ft.).
• After the sensor is installed, approach the sensor from
multiple directions with the dog collar device to test the
range.
• Adjust the effective range.
• For best results, select the smallest range necessary to keep
your dog out of undesired areas.
Installing the Sensor
You can use the included adhesive mount to install the sensor in
the location your dog should avoid. For example, a trash can.
You can install multiple sensors. Go to buy.garmin.com, or
contact your Garmin® dealer for information about optional
accessories.
Attach one side of the adhesive mount to the center of the
1
battery door.
Attach the other side of the adhesive mount to the location.
2
Tips for Installing the Sensor
• For maximum transmission range, place the sensor in a
location with an unobstructed view in all directions.
• For best results, do not place the sensor on or inside metal
objects.
For example, to avoid a metal trash can, you can install the
sensor on the wall near the trash can.
• Do not put the sensor in water.
• Do not bury the sensor.
Garmin Canine Connect
The free Garmin Canine Connect app allows you to review your
dog's daily activity and get insights into your dog's behavior.
When you pair a compatible dog collar device, you can train
your dog remotely using tones, vibrations, and stimulations, and
download software updates for your dog device. You can pair
Keep Away Tag sensors to keep your dog out of undesired
areas.
Pairing the Sensor with Your Device
Pairing is the process of connecting an ANT+® wireless sensor,
like the Keep Away Tag sensor, with a compatible dog collar
device. You can use the Garmin Canine Connect app on your
compatible smartphone to pair the sensor with your device.
Install the battery in the sensor.
1
The sensor turns on.
Go to www.garmin.com/apps, and download the Garmin
2
Canine Connect app to your smartphone.
Open the Garmin Canine Connect app on your smartphone.
3
Follow the on-screen instructions to pair the sensor with your
4
device.
Bring your smartphone within 3 m (10 ft.) of the sensor and
5
the device.
NOTE: Stay 10 m (33 ft.) away from other sensors while
pairing.
Hold the sensor and dog collar device together.
6
When the sensor and device are paired, a message appears.
Keep Away Tag Specifications
Battery type User-replaceable CR2032, 3 V
Battery life Up to 3 mo.
Operating temperature
range
Radio frequency/protocol 2.4 GHz wireless communications protocol
Water rating IEC 60529 IPX7*
*The device withstands incidental exposure to water of up to 1 m
for up to 30 min. For more information, go to www.garmin.com
/waterrating.
From -20° to 60°C (from -4° to 140°F)
Limited Warranty
The Garmin standard limited warranty applies to this accessory.
For more information, go to www.garmin.com/support/warranty
.html.
2 Installation Instructions
Page 3
Instructions relatives au Keep Away
Tag
AVERTISSEMENT
Consultez le guide Informations importantes sur le produit et la
sécurité inclus dans l'emballage du produit pour prendre
connaissance des avertissements et autres informations sur le
produit.
Mise en place de la batterie
Repérez le cache circulaire du compartiment à pile À à
1
l'arrière du capteur Keep Away Tag.
Tournez le cache dans le sens inverse des aiguilles d'une
2
montre jusqu'à ce qu'il soit suffisamment desserré pour
pouvoir être retiré.
Retirez le cache.
3
Placez la pile à l'intérieur du compartiment, le pôle positif
4
vers l'intérieur.
REMARQUE : veillez à ne pas endommager ni perdre le joint
torique.
Pour remettre le cache en place, alignez les points Á, puis
5
faites-le tourner dans le sens des aiguilles d'une montre.
Une fois couplée avec un appareil pour collier de chien
compatible, l'application Garmin Canine Connect indique
lorsqu'il reste moins d'1 semaine d'autonomie au capteur.
ASTUCE : pour remplacer la batterie, vous pouvez utiliser un
morceau d'adhésif  ou un aimant pour retirer la pile de son
compartiment.
Garmin Canine Connect
L'application gratuite Garmin Canine Connect vous permet de
vérifier l'activité quotidienne de votre chien et d'obtenir des
informations sur son comportement. Lorsque vous couplez un
appareil pour collier de chien compatible, vous pouvez dresser
votre chien à distance à l'aide de sons, de vibrations et de
stimulations et télécharger des mises à jour logicielles pour
votre appareil pour chien. Vous pouvez coupler des capteurs
Keep Away Tag pour tenir votre chien à l'écart des zones
indésirables.
Couplage du capteur avec votre appareil
Le couplage consiste à connecter un capteur sans fil ANT+, tel
que le capteur Keep Away Tag, à un appareil pour collier de
chien compatible. Vous pouvez utiliser l'application Garmin
Canine Connect sur votre smartphone compatible pour coupler
le capteur à votre appareil.
Installez la batterie dans le capteur.
1
Le capteur s'allume.
Rendez-vous sur www.garmin.com/apps, puis téléchargez
2
l'application Garmin Canine Connect sur votre smartphone.
Ouvrez l'application Garmin Canine Connect sur votre
3
smartphone.
Suivez les instructions à l'écran pour coupler le capteur à
4
votre appareil.
Approchez votre smartphone à moins de 3 m (10 pieds) du
5
capteur et de l'appareil.
REMARQUE : tenez-vous à au moins 10 m (33 pi) d'autres
capteurs pendant le couplage.
Maintenez le capteur et l'appareil pour collier de chien
6
ensemble.
Lorsque le capteur et l'appareil sont couplés, un message
s'affiche.
Suivez les instructions à l'écran pour définir la portée.
7
Suivez les instructions à l'écran pour sélectionner des actions
8
correctives.
Astuces pour définir la portée
Vous pouvez utiliser l'application Garmin Canine Connect pour
définir et tester la portée effective du capteur (jusqu'à 3 pieds).
• Une fois le capteur installé, approchez le capteur de l'appareil
pour collier de chien dans plusieurs directions pour tester la
portée.
• Réglez la portée effective.
• Pour de meilleurs résultats, sélectionnez la plus petite portée
nécessaire pour tenir votre chien à l'écart des zones
indésirables.
Installation du capteur
Vous pouvez utiliser le support adhésif inclus pour installer le
capteur à l'endroit où votre chien ne doit pas aller. Par exemple,
une poubelle. Vous pouvez utiliser plusieurs capteurs. Rendezvous sur le site buy.garmin.com ou contactez votre revendeur
Garmin pour plus d'informations sur les accessoires en option.
Fixez un côté du support adhésif au centre du compartiment
1
à pile.
Fixez l'autre côté du support adhésif à l'endroit souhaité.
2
Conseils sur l'installation du capteur
• Pour une portée de transmission optimale, placez le capteur
à un endroit offrant une vue claire et dégagée dans toutes les
directions.
• Pour de meilleurs résultats, ne placez pas le capteur sur des
objets métalliques ou à l'intérieur de ceux-ci.
Par exemple, pour que votre chien évite une poubelle, vous
pouvez installer le capteur sur le mur à côté de la poubelle.
• Ne mettez pas le capteur en contact avec l'eau.
• N'enterrez pas le capteur.
Caractéristiques techniques de la Keep Away Tag
Type de batterie CR2032 de 3 V remplaçable par l'utili-
Autonomie de la batterie Jusqu'à 3 mois
Plage de températures de fonc-
tionnement
Fréquences radio/protocole Protocole de communications sans fil
Résistance à l'eau IEC 60529 IPX7*
*L'appareil résiste à une immersion accidentelle dans un mètre
d'eau pendant 30 minutes. Pour plus d'informations, rendezvous sur www.garmin.com/waterrating.
sateur
de -20 °C à 60 °C (de -4 °F à 140 °F)
à 2,4 GHz
Garantie limitée
La garantie limitée standard de Garmin s'applique à cet
accessoire. Pour plus d'informations, rendez-vous sur le site
www.garmin.com/support/warranty.html.
Instructions d'installation 3
Page 4

Keep Away Tag Istruzioni
AVVERTENZA
Per avvisi sul prodotto e altre informazioni importanti, vedere la
guida Informazioni importanti sulla sicurezza e sul prodotto
inclusa nella confezione.
Installazione della batteria
Individuare il coperchio rotondo della batteria À sul retro del
1
sensore Keep Away Tag.
Quando il sensore e il dispositivo sono associati, viene
visualizzato un messaggio.
Attenersi alle istruzioni visualizzate per impostare la
7
copertura.
Attenersi alle istruzioni visualizzate per selezionare le azioni
8
correttive.
Suggerimenti per l'impostazione della portata
È possibile utilizzare l'app Garmin Canine Connect per
impostare e testare la portata effettiva del sensore (fino a 1
metro).
• Dopo aver installato il sensore, avvicinare il sensore da più
direzioni al collare per testarne la portata.
• Regolare la portata effettiva.
• Per risultati ottimali, selezionare la portata minima necessaria
a tenere il cane fuori dalle aree indesiderate.
Far ruotare il coperchio in senso antiorario finché non viene
2
allentato sufficientemente per essere rimosso.
Rimuovere il coperchio.
3
Inserire la batteria nel coperchio con il lato positivo rivolto
4
verso l'interno del coperchio.
NOTA: non danneggiare o perdere la guarnizione ad anello.
Reinserire il coperchio allineando i puntini Á e facendolo
5
ruotare in senso orario.
Se associato a un collare compatibile, l'app Garmin Canine
Connect indica quando la durata della batteria rimanente del
sensore equivale a meno di 1 una settimana.
SUGGERIMENTO: per estrarre la batteria, è possibile utilizzare
un pezzetto di nastro adesivo  o un magnete.
Garmin Canine Connect
L'app Garmin Canine Connect gratuita consente di rivedere
l'attività giornaliera del cane e di ottenere informazioni
dettagliate sul comportamento del cane. Quando si associa un
collare compatibile, è possibile addestrare il cane in remoto
utilizzando toni, vibrazioni e stimolazioni, nonché scaricare
aggiornamenti software per il dispositivo. È possibile associare
sensori Keep Away Tag per tenere lontano il cane da aree
indesiderate.
Associazione del sensore al dispositivo
L'associazione è il processo di connessione di un sensore
wireless ANT+, come il sensore Keep Away Tag, a un collare
compatibile. È possibile utilizzare l'app Garmin Canine Connect
sullo smartphone compatibile per associare il sensore al
dispositivo.
Installare la batteria nel sensore.
1
Il sensore è acceso.
Visitare il sito Web www.garmin.com/apps e scaricare l'app
2
Garmin Canine Connect sullo smartphone.
Aprire l'app Garmin Canine Connect sullo smartphone.
3
Attenersi alle istruzioni visualizzate per associare il sensore
4
al dispositivo.
Mantenere lo smartphone a una distanza massima di 3 m
5
(10 piedi) dal sensore e dal dispositivo.
NOTA: mantenersi a 10 m (33 piedi) da altri sensori durante
l'associazione.
Tenere insieme il sensore e il collare.
6
Installazione del sensore
È possibile utilizzare il supporto adesivo incluso per installare il
sensore nella posizione che il cane deve evitare. Ad esempio,
un secchio dell'immondizia. È possibile installare più sensori.
Visitare il sito Web buy.garmin.com oppure contattare il
rivenditore Garmin per informazioni sugli accessori opzionali.
Collegare un'estremità del supporto adesivo al centro dello
1
sportello della batteria.
Fissare l'altro lato del supporto adesivo in posizione.
2
Suggerimenti per l'installazione del sensore
• Per la potenza massima di trasmissione, fissare il sensore in
una posizione con vista priva di ostacoli in tutte le direzioni.
• Per risultati ottimali, non posizionare il sensore sopra o
all'interno di oggetti metallici.
Ad esempio, per evitare un secchio dell'immondizia di
metallo, è possibile installare il sensore sulla parete vicino al
secchio.
• Non immergere il sensore in acqua.
• Non interrare il sensore.
Caratteristiche tecniche di Keep Away Tag
Tipo di batteria CR2032 sostituibile dall'utente, 3 V
Durata della batteria Fino a 3 mesi
Temperatura operativa Da -20° a 60°C (da -4° a 140°F)
Frequenza radio/protocollo 2,4 GHz protocollo di comunicazione
Classificazione di impermeabilità
*Il dispositivo resiste all'esposizione accidentale all'acqua fino a
1 m per 30 min. Per ulteriori informazioni, visitare il sito Web
www.garmin.com/waterrating.
wireless
IEC 60529 IPX7*
Garanzia limitata
Il presente accessorio è coperto dalla garanzia limitata standard
di Garmin. Per ulteriori informazioni, visitare il sito Web
www.garmin.com/support/warranty.html.
Istruzioni di installazione 5
Page 5

Instrucciones de Keep Away Tag
ADVERTENCIA
Consulta la guía Información importante sobre el producto y tu
seguridad que se incluye en la caja del producto y en la que
encontrarás advertencias e información importante sobre el
producto.
Instalación de la batería
Localiza la tapa redonda de la pila À en la parte posterior del
1
sensor de Keep Away Tag.
Gira la pila en el sentido contrario a las agujas del reloj hasta
2
que se afloje lo suficiente para poder retirarla.
Extrae la tapa.
3
Coloca la pila en el interior de la tapa con el extremo positivo
4
orientado hacia el interior de la misma.
NOTA: no deteriores ni pierdas la junta circular.
Vuelve a colocar la tapa alineando los puntos Á y girándola
5
en el sentido de las agujas del reloj.
Cuando el sensor se encuentra vinculado con un collar para
perros compatible, la aplicación Garmin Canine Connect indica
cuándo le queda menos de una semana de autonomía a la pila
del sensor.
SUGERENCIA: para sustituir la pila, puedes utilizar un trozo de
cinta adhesiva  o un imán para extraer la pila de la tapa.
Garmin Canine Connect
La aplicación Garmin Canine Connect gratuita te permite revisar
la actividad diaria de tu perro y obtener mensajes sobre el
comportamiento de tu perro. Al vincular un collar para perros
compatible, podrás adiestrar a tu perro de forma remota
utilizando tonos, vibraciones y estimulaciones, así como
descargar actualizaciones de software para tu dispositivo para
perros. Puedes vincular sensores de Keep Away Tag para
mantener a tu perro alejado de áreas no deseadas.
Vincular el sensor con el dispositivo
La vinculación es el proceso de conexión de un sensor
inalámbrico ANT+, como el sensor de Keep Away Tag, con un
collar para perros compatible. Puedes utilizar la aplicación
Garmin Canine Connect en un smartphone compatible para
vincular el sensor con el dispositivo.
Instala la pila en el sensor.
1
El sensor se enciende.
Visita www.garmin.com/apps y descárgate la aplicación
2
Garmin Canine Connect en tu smartphone.
Abre la aplicación Garmin Canine Connect en el smartphone.
3
Sigue las instrucciones que aparecen en pantalla para
4
vincular el sensor con el dispositivo.
Sitúa el smartphone a una distancia máxima de 3 m (10 ft)
5
del sensor y el dispositivo.
NOTA: aléjate 10 m (33 ft) de otros sensores mientras se
realiza la vinculación.
Mantén juntos el sensor y el collar para perros.
6
Cuando el sensor y el dispositivo estén vinculados,
aparecerá un mensaje.
Sigue las instrucciones que aparecen en pantalla para
7
configurar el alcance.
Sigue las instrucciones que aparecen en pantalla para
8
seleccionar acciones correctivas.
Consejos para la configuración de la distancia
Puedes utilizar la aplicación Garmin Canine Connect para
configurar y probar el alcance de efectividad del sensor (hasta
3 ft).
• Después de instalar el sensor, aproxima el sensor desde
varias direcciones hacia el collar para perros para probar la
distancia.
• Ajusta el alcance de efectividad.
• Para obtener mejores resultados, selecciona la menor
distancia necesaria para mantener a tu perro alejado de
áreas no deseadas.
Instalación del sensor
Puedes utilizar el soporte adhesivo incluido para instalar el
sensor en la ubicación que tu perro debe evitar. Por ejemplo, un
cubo de basura. Puedes instalar varios sensores. Visita
buy.garmin.com o ponte en contacto con tu distribuidor de
Garmin para obtener información acerca de accesorios
opcionales.
Coloca un lado del soporte adhesivo en el centro de la tapa
1
del compartimento de la pila.
Coloca el otro lado del soporte adhesivo en la parte superior
2
de la ubicación.
Consejos para la instalación del sensor
• Para aprovechar el máximo alcance de transmisión, coloca el
sensor en una ubicación con una vista sin obstáculos en
todas las direcciones.
• Para obtener los mejores resultados, no coloques el sensor
encima o dentro de objetos metálicos.
Por ejemplo, para evitar un cubo de basura metálico, puedes
instalar el sensor en una pared próxima al cubo de basura.
• No sumerjas el sensor en el agua.
• No entierres el sensor.
Especificaciones de Keep Away Tag
Tipo de batería CR2032, sustituible por el usuario
Autonomía de la batería Hasta 3 meses
Rango de temperatura de funcio-
namiento
Radiofrecuencia/protocolo Protocolo de comunicación
Clasificación de resistencia al
agua
*El dispositivo resiste la inmersión accidental en el agua a una
profundidad de hasta 1 m durante 30 min. Para obtener más
información, visita www.garmin.com/waterrating.
(3 voltios)
De -20 °C a 60 °C (de -4 °F a
140 °F)
inalámbrica de 2,4 GHz
IEC 60529 IPX7*
Garantía limitada
La garantía limitada estándar de Garmin se aplica a este
accesorio. Para obtener más información, visita
www.garmin.com/support/warranty.html.
6 Instrucciones de instalación
Page 6

Keep Away Tag instructies
WAARSCHUWING
Lees de gids Belangrijke veiligheids- en productinformatie in de
verpakking voor productwaarschuwingen en andere belangrijke
informatie.
De batterij plaatsen
De batterijdeksel À is rond en bevindt zich op de achterkant
1
van de Keep Away Tag sensor.
Draai de deksel linksom tot deze los genoeg zit om te
2
verwijderen.
Verwijder de deksel.
3
Plaats de batterij in het deksel met de pluskant naar de
4
binnenkant van het deksel.
OPMERKING: Zorg dat u de afdichtring niet beschadigt of
verliest.
Plaats de deksel terug door de stippen Á op één lijn te
5
brengen en de deksel rechtsom te draaien.
Na koppeling met een compatibel halsbandtoestel geeft de
Garmin Canine Connect app een waarschuwing als de
resterende batterijduur voor de sensor minder dan 1 week
bedraagt.
TIP: Als de batterij moet worden vervangen, kunt u een stuk
tape  of een magneet gebruiken om de batterij uit de deksel te
verwijderen.
OPMERKING: Zorg ervoor dat u minstens 10 m (33 ft.) bij
andere sensors vandaan bent tijdens het koppelen.
Houd de sensor tegen het halsbandtoestel aan.
6
Als de sensor en het toestel zijn gekoppeld, wordt een bericht
weergegeven.
Volg de instructies op het scherm om het bereik in te stellen.
7
Volg de instructies op het scherm om corrigerende acties te
8
selecteren.
Tips voor het instellen van het bereik
Via de Garmin Canine Connect app kunt u het effectieve bereik
(maximaal 1 m (3 ft.)) van de sensor instellen en testen.
• Als de sensor is geïnstalleerd, kunt u het bereik testen door
de sensor vanuit verschillende richtingen te benaderen met
het halsbandtoestel.
• Stel het effectieve bereik in.
• Selecteer voor optimale resultaten het kleinste bereik dat
nodig is om uw hond uit de buurt te houden van ongewenste
gebieden.
De sensor installeren
Met de meegeleverde plakbeugel kunt u de sensor installeren
op de locatie waar uw hond uit de buurt moet blijven.
Bijvoorbeeld een vuilnisbak. U kunt meerdere sensors
installeren. Ga naar buy.garmin.com of neem contact op met uw
Garmin dealer voor informatie over optionele accessoires.
Bevestig een zijde van de plakbeugel aan het midden van het
1
batterijdeksel.
Bevestig de andere zijde van de plakbeugel op de locatie.
2
Tips voor het installeren van de sensor
• Plaats de sensor voor optimaal zendbereik op een locatie
met vrij zicht in alle richtingen.
• Plaats de sensor niet in of op metalen voorwerpen.
Installeer de sensor bijvoorbeeld op de muur in de buurt van
een metalen vuilnisbak om contact met de vuilnisbak te
vermijden.
• Dompel de sensor niet onder in water.
• Begraaf de sensor niet.
Garmin Canine Connect
Met de gratis Garmin Canine Connect app kunt u de dagelijkse
activiteiten en het gedrag van uw hond bekijken en analyseren.
Als u een compatibel halsbandtoestel koppelt, kunt u uw hond
op afstand trainen met behulp van geluidssignalen, trillingen en
prikkels, en software-updates voor uw hondentoestel
downloaden. U kunt Keep Away Tag sensors koppelen om uw
hond uit ongewenste gebieden te houden.
Keep Away Tag specificaties
Batterijtype CR2032 van 3 V, door gebruiker te
vervangen
Levensduur van batterij Tot 3 maanden
Bedrijfstemperatuurbereik Van -20° tot 60°C (van -4° tot 140°F)
Radiofrequentie/-protocol 2,4 GHz-protocol voor draadloze communi-
catie
Waterbestendigheid IEC 60529 IPX7*
De sensor met uw toestel koppelen
Koppelen is het maken van een verbinding tussen een ANT+
draadloze sensor, zoals de Keep Away Tag sensor, en een
compatibel halsbandtoestel. U kunt de sensor koppelen met uw
toestel via de Garmin Canine Connect app op uw compatibele
smartphone.
Plaats de batterij in de sensor.
1
De sensor wordt ingeschakeld.
Ga naar www.garmin.com/apps en download de Garmin
2
Canine Connect Mobile app op uw smartphone.
Open de Garmin Canine Connect app op uw smartphone.
3
Volg de instructies op het scherm om de sensor te koppelen
4
met uw toestel.
Breng uw smartphone binnen 3 m (10 ft.) van de sensor en
5
het toestel.
Installatie-instructies 7
*Het toestel is bestand tegen incidentele blootstelling aan water
tot een diepte van 1 meter gedurende maximaal 30 minuten. Ga
voor meer informatie naar www.garmin.com/waterrating.
Beperkte garantie
Op dit accessoire is de standaard beperkte garantie van Garmin
van toepassing. Ga voor meer informatie naar www.garmin.com
/support/warranty.html.
Page 7

Instrukcje Keep Away Tag
OSTRZEŻENIE
Należy zapoznać się z zamieszczonym w opakowaniu produktu
przewodnikiem Ważne informacje dotyczące bezpieczeństwa
i produktu zawierającym ostrzeżenia i wiele istotnych
wskazówek.
Instalowanie baterii
Znajdź okrągłą pokrywkę komory baterii À z tyłu czujnika
1
Keep Away Tag.
Przekręć pokrywkę w lewo, aż będzie wystarczająco
2
poluzowana, aby ją zdjąć.
Zdejmij pokrywkę.
3
Połóż baterię na pokrywce tak, aby biegun dodatni był
4
skierowany w stronę wnętrza pokrywki.
UWAGA: Nie należy dopuścić do uszkodzenia lub zgubienia
okrągłej uszczelki.
Nałóż pokrywkę, dopasowując kropki Á i obracając ją
5
w prawo.
Po sparowaniu ze zgodną obrożą z nadajnikiem dla psa
aplikacja Garmin Canine Connect będzie informować
o pozostałym czasie pracy baterii czujnika krótszym niż 1
tydzień.
PORADA: Aby wymienić baterię, możesz użyć kawałka taśmy
lub magnesu w celu zdjęcia baterii z pokrywki.
Â
Garmin Canine Connect
Bezpłatna aplikacja Garmin Canine Connect pozwala na
sprawdzanie dziennej aktywności psa i uzyskiwanie informacji
o jego zachowaniu. Po sparowaniu ze zgodną obrożą
z nadajnikiem dla psa możesz zdalnie szkolić psa za pomocą
dźwięków, wibracji i stymulacji, a także pobierać aktualizacje
oprogramowania obroży. Możesz sparować czujniki Keep Away
Tag, aby trzymać psa z dala od niepożądanych miejsc.
Parowanie czujnika z urządzeniem
Parowanie to proces łączenia czujnika bezprzewodowego
ANT+, takiego jak czujnik Keep Away Tag, ze zgodną obrożą
z nadajnikiem dla psa. Możesz użyć aplikacji Garmin Canine
Connect zainstalowanej na zgodnym smartfonie, aby sparować
czujnik z urządzeniem.
Umieść baterię w czujniku.
1
Czujnik włączy się.
Odwiedź stronę www.garmin.com/apps i pobierz aplikację
2
Garmin Canine Connect na swój smartfon.
Otwórz aplikację Garmin Canine Connect w smartfonie.
3
Postępuj zgodnie z wyświetlanymi instrukcjami, aby
4
sparować czujnik z urządzeniem.
Umieść smartfon w promieniu 3 m (10 stóp) od czujnika
5
i obroży.
UWAGA: Na czas parowania zachowaj odległość co
najmniej 10 m (33 stopy) od innych czujników.
Przyłóż czujnik do obroży z nadajnikiem dla psa.
6
Po sparowaniu czujnika z obrożą wyświetlony zostanie
komunikat.
Postępuj zgodnie z wyświetlanymi instrukcjami, aby ustawić
7
zasięg.
Postępuj zgodnie z wyświetlanymi instrukcjami, aby wybrać
8
działania korygujące.
Wskazówki dotyczące ustawiania zasięgu
Możesz użyć aplikacji Garmin Canine Connect, aby ustawić
i sprawdzić skuteczny zasięg czujnika (do 90 cm / 3 stóp).
• Po zainstalowaniu czujnika podejdź do niego z różnych stron,
trzymając obrożę, aby sprawdzić zasięg.
• Dostosuj skuteczny zasięg.
• Aby uzyskać najlepsze rezultaty, wybierz najmniejszy zasięg
niezbędny do utrzymania psa poza wybranym obszarem.
Instalowanie czujnika
Możesz użyć samoprzylepnego uchwytu, aby zainstalować
czujnik w miejscu, którego pies powinien unikać. Przykładem
takiego miejsca jest kosz na śmieci. Możesz zainstalować wiele
czujników. Odwiedź stronę buy.garmin.com lub skontaktuj się
z dealerem firmy Garmin w celu uzyskania informacji na temat
opcjonalnych akcesoriów.
Przymocuj jedną stronę samoprzylepnego uchwytu pośrodku
1
pokrywy komory baterii.
Drugą stronę samoprzylepnego uchwytu przymocuj do
2
wybranego miejsca.
Wskazówki dotyczące instalowania czujnika
• Dla zapewnienia najlepszego zasięgu transmisji umieść
czujnik w miejscu zapewniającym dobrą widoczność we
wszystkich kierunkach.
• Aby uzyskać najlepsze wyniki, nie umieszczaj czujnika
wewnątrz metalowych przedmiotów ani na ich powierzchni.
Aby na przykład ominąć metalowy kosz na śmieci, możesz
zainstalować czujnik na ścianie w jego pobliżu.
• Nie zanurzaj czujnika w wodzie.
• Nie zakopuj czujnika.
Dane techniczneKeep Away Tag
Typ baterii CR2032, 3 V, wymieniana przez
Czas działania baterii Do 3 miesięcy
Zakres temperatury roboczej Od -20°C do 60°C (od -4°F do 140°F)
Częstotliwość radiowa/
protokół
Klasa wodoszczelności IEC 60529 IPX7*
* Urządzenie jest odporne na przypadkowe zanurzenie
w wodzie na głębokość do 1 metra, na czas do 30 minut. Więcej
informacji można znaleźć na stronie www.garmin.com
/waterrating.
użytkownika
Protokół komunikacji bezprzewodowej
2,4 GHz
Ograniczona gwarancja
To urządzenie objęte jest standardową gwarancją ograniczoną
firmy Garmin. Więcej informacji można znaleźć na stronie
www.garmin.com/support/warranty.html.
8 Instrukcja instalacji
Page 8

Инструкции по использованию
датчика Keep Away Tag
ОСТОРОЖНО
Сведения о безопасности и другую важную информацию см.
в руководстве Правила техники безопасности и сведения
об изделии, которое находится в упаковке изделия.
Установка аккумулятора
Найдите на задней стороне датчика Keep Away Tag
1
круглую крышку отсека для батареи À.
Ослабьте крепление крышки, повернув ее против
2
часовой стрелки.
Снимите крышку.
3
Вставьте батарею в крышку таким образом, чтобы
4
сторона батареи с маркировкой «+» находилась внутри
нее.
ПРИМЕЧАНИЕ. не допускайте повреждения или потери
уплотнительного кольца.
Установите крышку на место, совместив метки Á, а затем
5
поверните ее по часовой стрелке.
При сопряжении с совместимым устройством для собачьего
ошейника в приложении Garmin Canine Connect
отображается уведомление, когда оставшееся время
работы датчика от батареи составляет менее 1 недели.
СОВЕТ. при замене батареи для ее извлечения из крышки
можно использовать кусок клейкой ленты Â или магнит.
Garmin Canine Connect
Бесплатное приложение Garmin Canine Connect позволяет
просматривать данные о ежедневной активности собаки и
получать информацию для анализа ее поведения.
Сопряжение с совместимым устройством для собачьего
ошейника позволяет дистанционно дрессировать собаку с
помощью звуковых сигналов, вибросигнала и
стимулирующих воздействий, а также загружать обновления
программного обеспечения для устройства для собачьего
ошейника. Чтобы не допускать собаку в запретные места,
можно выполнить сопряжение с датчиками Keep Away Tag.
Сопряжение датчика с устройством
Сопряжение — это процесс подключения беспроводного
датчика ANT+, например датчика Keep Away Tag, к
совместимому устройству для собачьего ошейника. Чтобы
выполнить сопряжение датчика с устройством, можно
использовать приложение Garmin Canine Connect на
совместимом смартфоне.
Установите батарею в датчик.
1
Датчик включается.
Перейдите на веб-сайт www.garmin.com/apps и загрузите
2
приложение Garmin Canine Connect на свой смартфон.
Откройте приложение Garmin Canine Connect на
3
смартфоне.
Следуйте инструкциям на экране, чтобы выполнить
4
сопряжение датчика с устройством.
Поместите смартфон в пределах 3 м (10 футов) от
5
датчика и устройства.
ПРИМЕЧАНИЕ. во время сопряжения расстояние до
других датчиков должно составлять не менее 10 м
(33 футов).
Поднесите датчик к устройству для собачьего ошейника.
6
После завершения сопряжения датчика с устройством
отображается сообщение.
Следуйте инструкциям на экране, чтобы настроить
7
область действия.
Следуйте инструкциям на экране, чтобы выбрать
8
корректирующие воздействия.
Рекомендации по настройке области действия
С помощью приложения Garmin Canine Connect можно
настроить и проверить область действия датчика (до
3 футов).
• Чтобы проверить область действия датчика, после
установки обойдите его со всех сторон с устройством для
собачьего ошейника.
• Отрегулируйте область действия.
• Для получения наилучших результатов выберите
наименьшую область действия, которая позволит не
допускать собаку в запретные места.
Установка датчика
Для крепления датчика в месте, в которое не следует
допускать собаку, можно воспользоваться клеящимся
держателем, входящим в комплект поставки. Например, на
контейнере для мусора. Можно установить несколько
датчиков. Для получения информации о дополнительных
аксессуарах посетите веб-сайт buy.garmin.com или
обратитесь дилеру компании Garmin.
Прикрепите клеящийся держатель одной стороной к
1
середине крышки отсека для батареи.
Другой стороной прикрепите клеящийся держатель к
2
требуемому предмету.
Рекомендации по установке датчика
• Чтобы максимально увеличить дальность передачи,
датчик следует размещать в местах с
беспрепятственным обзором со всех сторон.
• Для получения наилучших результатов не следует
размещать датчик на металлических предметах или
внутри них.
Например, чтобы избежать установки на металлическом
контейнере для мусора, можно разместить датчик на
стене рядом с ним.
• Не следует погружать датчик в воду.
• Не следует закапывать датчик в землю.
Технические характеристики Keep Away Tag
Тип батареи CR2032 (3 В), заменяемая пользова-
Время работы от батареи До 3 месяцев
Диапазон рабочих
температур
Радиочастотный диапазон/
протокол
Водонепроницаемость IEC 60529 IPX7*
*Устройство может выдержать случайное погружение в воду
на глубину до 1 м продолжительностью до 30 минут. Для
телем
От -20° до 60°C (от -4° до 140°F)
Протокол беспроводной передачи
данных на частоте 2,4 ГГц
Инструкции по установке 9
Page 9

получения дополнительной информации посетите сайт
www.garmin.com/waterrating.
Ограниченная гарантия
На этот аксессуар распространяется стандартная
ограниченная гарантия Garmin. Дополнительную
информацию см. по адресу www.garmin.com/support/warranty
.html.
© 2016 Garmin Ltd. or its subsidiaries www.garmin.com/support
 Loading...