

Garmin 76S user manual
GPSMAP 76S
chartplotting receiver
owner’s
manual
and
reference
guide

GPSMAP 76S Registration
Registration
Help us better support you by completing your on-line registration
today!
Why should you register your GPSMAP 76S?
• Notifi cation of Product Updates
• Notifi cation of New Products
• Lost or Stolen unit Tracking
Connect to our website (www.garmin.com) and look for the Product Registra-
tion link on the home page.
Thanks for choosing the GARMIN GPSMAP 76S. If you have any questions
or comments regarding the use of the GPSMAP 76S you can visit our website or
contact our Customer Service Department M-F, 8:00-5:00 CST (except holidays)
at 1-800-800-1020.
If you have previously registered a GARMIN product purchase using
F
a mail-in registration card, we invite you to reregister that product
using our NEW on-line system.
Introduction
Registration
POWER
1

Introduction
Warnings and Cautions
WARNING: If you choose to use the GPSMAP 76S in a vehicle, it is the sole
responsibility of the owner/operator of the GPSMAP 76S to secure the GPS unit
so that it will not cause damage or personal injury in the event of an accident. Do
not mount the GPSMAP 76S over airbag panels or in a place where the driver or
passengers are likely to have an impact with it in an accident or collision.
WARNING: If you choose to use the GPSMAP 76S in a vehicle, it is the
sole responsibility of the operator of the vehicle to operate the vehicle in a safe
manner, maintain full surveillance of all driving conditions at all times, and
never become distracted by the GPSMAP 76S to the exclusion of safe operating
practices. It is unsafe to operate the GPSMAP 76S while you are driving. Failure
by the operator of a vehicle equipped with an GPSMAP 76S to pay full attention
to operating the vehicle and road conditions while the vehicle is in motion could
result in an accident or collision with property damage and personal injury.
CAUTION: IT IS THE USER’S RESPONSIBILITY TO USE THIS PRODUCT
PRUDENTLY. THIS PRODUCT IS INTENDED TO BE USED ONLY AS A TRAVEL
AID AND MUST NOT BE USED FOR ANY PURPOSE REQUIRING PRECISE
MEASUREMENT OF DIRECTION, DISTANCE, LOCATION, OR TOPOGRAPHY.
CAUTION: The Global Positioning System (GPS) is operated by the government of the United States, which is solely responsible for its accuracy and
maintenance. The system is subject to changes which could affect the accuracy
and performance of all GPS equipment. Although the GPSMAP 76S is a precision
electronic NAVigation AID (NAVAID), any NAVAID can be misused or misinterpreted and, therefore, become unsafe.
2

NOTE: This device complies with Part 15 of the FCC interference limits for
Class B digital devices FOR HOME OR OFFICE USE (“home or offi ce” interference requirements are more stringent than “outdoor” requirements). Operation of
this device is subject to the following conditions: (1) This device may not cause
harmful interference, and (2) this device must accept any interference received,
including interference that may cause undesired operation.
The GPSMAP 76S does not contain any user-serviceable parts. Repairs should
only be made by an authorized GARMIN service center. Unauthorized repairs or
modifi cations could result in permanent damage to the equipment, and void your
warranty and your authority to operate this device under Part 15 regulations.
FCC Compliance Statement
Introduction
3

Software License Agreement
Introduction
Software License Agreement
BY USING THE GPSMAP 76S, YOU AGREE TO BE BOUND
BY THE TERMS AND CONDITIONS OF THE FOLLOWING
SOFTWARE LICENSE AGREEMENT. PLEASE READ THIS
AGREEMENT CAREFULLY.
GARMIN grants you a limited license to use the software embedded
in this device (the “Software”) in binary executable form in the
normal operation of the product. Title, ownership rights and
intellectual property rights in and to the Software remain in
GARMIN.
You acknowledge that the Software is the property of GARMIN
and is protected under the United States of America copyright laws
and international copyright treaties. You further acknowledge that
the structure, organization and code of the Software are valuable
trade secrets of GARMIN and that the Software in source code
form remains a valuable trade secret of GARMIN. You agree not to
decompile, disassemble, modify, reverse assemble, reverse engineer
or reduce to human readable form the Software or any part thereof
or create any derivative works based on the Software. You agree not
to export or re-export the Software to any country in violation of the
export control laws of the United States of America.
4

Introduction....................................1-6
Registration ........................................ 1
Warnings and Cautions ...................... 2
FCC Compliance Statement ............... 3
Features.............................................. 4
Table of Contents ...............................5
Unit Features...................................... 6
Section Two: Reference ................ 7-54
Initializing the GPS Receiver............ 7-8
GPS Information Page ...................8-11
Map Page..................................... 12-13
Map Page Setup Options .............13-19
Pointer Page ...............................21-22
Highway Page.............................. 22-23
Active Route/Goto Page .................... 24
Plot Page .....................................24-26
Main Menu....................................... 26
Trip Computer ............................27-28
Tracks.......................................... 28-30
Waypoints ................................... 30-34
Points of Interest......................... 35
Cities .......................................... 36
Exits ......................................36-37
Addresses ................................... 37
Intersections ............................... 38
Routes ................................... 38-42
Proximity.................................... 43
Celestial ...................................... 44-46
MapSource Info................................ 47
Setup Menu- General Tab ............ 47-48
Setup Menu-Altimeter Tab................ 49
Setup Menu-Compass Tab................ 50
Setup Menu-Time Tab ................. 50-51
Setup Menu-Units Tab...................... 51
Setup Menu-Location Tab............ 52-53
Setup Menu-Alarms Tab ................... 53
Setup Menu-Interface Tab ................ 54
Appendices.................................55-71
Appendix A: Specifi cations...............55
Appendix B: Wiring & Interfacing....56
Appendix C: Time Offsets ................57
Appendix D: Map Datums...........58-59
Appendix E: Navigation Terms ....60-61
Appendix F: Messages .................62-63
Appendix G: Loran TD................64-65
Appendix H: Accessories ..................66
Appendix I: Index ......................67-70
Appendix J: Warranty.....................71
Introduction
Table of Contents
5
Introduction
Features
ZOOM
NOTE: You should always be prepared and capable of
navigating without the GPSMAP 76S. It is designed to
compliment other forms of basic navigation, not entirely
replace them.
6
The GPSMAP 76S is a 7.5 ounce, 12 channel, hand held GPS receiver with a
built-in Quad Helix antenna. The GPSMAP 76S has nine keys located on the front of
the unit, that allow the user to quickly access all of the units functions. The GPSMAP
76S has a large 180 X 240 pixel, 4 level gray monochrome display for easy viewing.
The GPSMAP 76S is a full function GPS with a built-in Electronic Compass
and Barometer. Built-in cartography of a North American base map that includes
Interstate and State Highways and Exit Information. Using MapSource™, GARMIN’s
map data software (not included), you could choose to have the GPSMAP 76S
display a variety of different map information. We currently offer several mapping
options including our Metroguide™, Topo, Fishing Hot Spots, and BlueChart data.
Check your local dealer or our web site (www.garmin.com) for a complete listing of
MapSource products.
GARMIN designed your GPSMAP 76S with the user in mind. The GPSMAP 76S
is waterproof to IPX 7 standards, fl oats and is rugged enough to endure the most
trying use, and GARMIN’s friendly user interface will allow you to be navigating with
your new GPS in no time. Your GPSMAP 76S can provide one more critical benefi t,
peace of mind. With your GPSMAP 76S you will know where you are, where you’ve
been and where you’re going. And since you’ll always know the way back home, you
can concentrate on what you set out to do, explore the great outdoors.
Thank you for choosing GARMIN!
Other features include:
Waypoints: 500 with name and graphic symbol.
Tracks: Automatic Track Log; 10 saved Tracks.
Routes: 50 Routes that let you navigate through a set of 50 waypoints.
Trip Computer: Trip Odometer, Stopped Time, Moving Average Speed, Moving
Time, Overall Average Speed, Total Time, Max Speed and Odometer.
Celestial Data: Includes Tides, Sun and Moon, and Hunt and Fish times.

The Reference Manual will describe the Main Display Pages and their options
in detail. The Quick Start Guide described the process of navigating the Main
Display Pages and the Option Menus. While the Reference Manual will provide
some direction on how to select an item, its main intention is to describe each
Main Page and it’s Option Menu in detail.
Initializing the GPS Receiver
Initializing the GPS Receiver
Before the GPSMAP 76S can be used for GPS navigation, the GPS receiver
must be initialized. The GPS receiver should only need to be initialized the fi rst
time the unit is used, or if it has been stored several months.
The GPSMAP 76S stores orbital data for each satellite in an Almanac. The
orbital data is supplied in the satellite signals. Each time the unit receives satellite
signals, the Almanac is updated. This is how the GPSMAP 76S knows which
satellites to search for. If you do not use your GPS for several months, or move
the unit several hundred miles between uses, the Almanac can become “cold”,
that is to say that the orbital information is no longer valid. If the Almanac is
“cold”, your unit may have trouble locking on to satellite signals. If the unit is
unable to receive enough satellite signals to determine its location, it will display
an options menu.
Initializing the GPS Receiver:
1. With fresh batteries installed, take the unit outside where a clear 360° view
of the sky can be obtained.
2. Turn the unit on and hold it in front of you with the top of the unit
tilted upward. Follow the screen prompts, pressing PAGE to display the GPS
Information Page.
3. The initialization process is automatic. It should take the GPSMAP 76S
no longer than fi ve minutes to acquire enough satellite signals to become
operational. When the unit is able to navigate, it will display either “2D GPS
Location” or “3D GPS Location” in the Receiver Status Field.
When initializing the receiver or trying to receive satellite
signals, orient the GPSMAP 76S so the top of the unit
points toward the sky. If the unit is held with the top of the
unit pointed toward the horizon, satellite reception may be
severly degraded.
Reference
Getting Started
Point top of unit toward sky
ZOOM
7
Reference
Initializing the GPS Receiver
Initialization Options
8
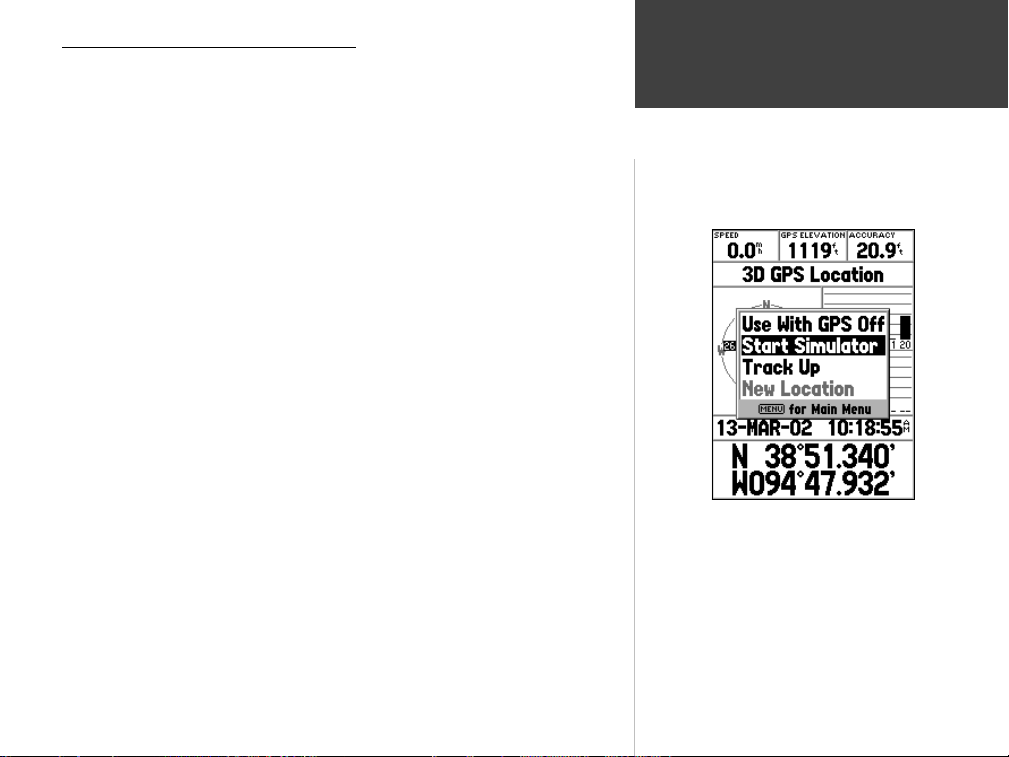
Initialization Options
If the GPSMAP 76S is unable to determine its location, an options menu will
be displayed. Depending on the situation, select the appropriate option to help
the unit acquire satellites.
Use With GPS Off —
option if you are indoors and can not receive satellite signals, or if you wish to
use only the sensors. If this option is selected, it will save battery power and
allow the map to redraw faster.
New Location —
country, and having trouble locking onto satellites, select ‘New Location’.
When you select ‘New Location’, another menu will be displayed. This menu
contains the options ‘Automatic’ or ‘Use Map’. If ‘Automatic’ is selected,
the unit will switch to AutoLocate mode and begin searching for satellites. If
‘Use Map’ is selected, the Pointer on the Map Page can be used to select your
approximate location and the unit will continue to acquire satellites normally.
‘Automatic’ may take longer to acquire satellites.
Stored w/o Batteries —
date stored in the GPS may be incorrect. To check the date, highlight ‘Stored
w/o Batteries’ and verify the date displayed. If the date is incorrect, select
‘Stored w/o Batteries’ to search for satellites.
Continue Acquiring —
lite signals are being temporarily blocked.
GPS Information Page
The GPS Information Page displays your speed, GPS elevation, the estimated
accuracy, receiver status, satellite locations, satellite signal strength, the date, time
and the GPS receiver’s current location. If you have a Location Format other than
the default (hddd° mm.mmm) selected, pressing the ROCKER key in any direction will toggle the current location at the bottom of the page between the two
Location Formats.
This option will turn the GPS receiver Off. Select this
If you have moved the unit to another state, province, or
If you have stored the unit without batteries the
Select this option if you are in an area where the satel-
Speed, GPS Elevation and Estimated Accuracy
When the GPS is receiving at least three satellite signals, it will provide you
with the current GPS Speed, DGPS Status, and the estimated Accuracy of the GPS
Location. The GPS must be receiving at least four satellite signals to report GPS
Elevation.
Current GPS Receiver Status
The current status of the GPS receiver will always be displayed.
Autolocate —
Acquiring Satellites —
Forces the receiver to search for each satellite individually.
The receiver will begin in this mode each time the
unit is turned on. The GPS receiver will remain in this mode until it has
acquired at least 3 satellite signals.
2D GPS Location —
nals. When a 2D GPS Location is achieved, the GPS will display your current
Indicates that the receiver is only using three satellite sig-
Receiver
Status
position but is incapable of providing an altitude reading.
3D GPS Location —
satellite signals and is capable of providing your current position and altitude.
2D Differential Location —
Indicates the receiver is currently using at least four
Indicates the receiver is using DGPS or WAAS
Satellite
Location
differential data on three satellites.
3D Differential Location —
Indicates the receiver is using DGPS or WAAS
Date
differential data on at least four satellites.
Lost Satellite Reception —
Simulating GPS
— Indicates the GPSMAP 76S is running in Simulator Mode
Indicates that the GPS has lost satellite reception.
and the GPS receiver is turned off. It is important to remember when you are
using the Simulator, the GPSMAP 76S can not be used for actual navigation.
GPS Off
— Indicates that the GPS receiver is turned off.
Reference
Getting Started
GPS Information Page
Data Fields
Satellite
Signal
Strength
Time
Location
GPS Information Page
9
Reference
GPS Information Page
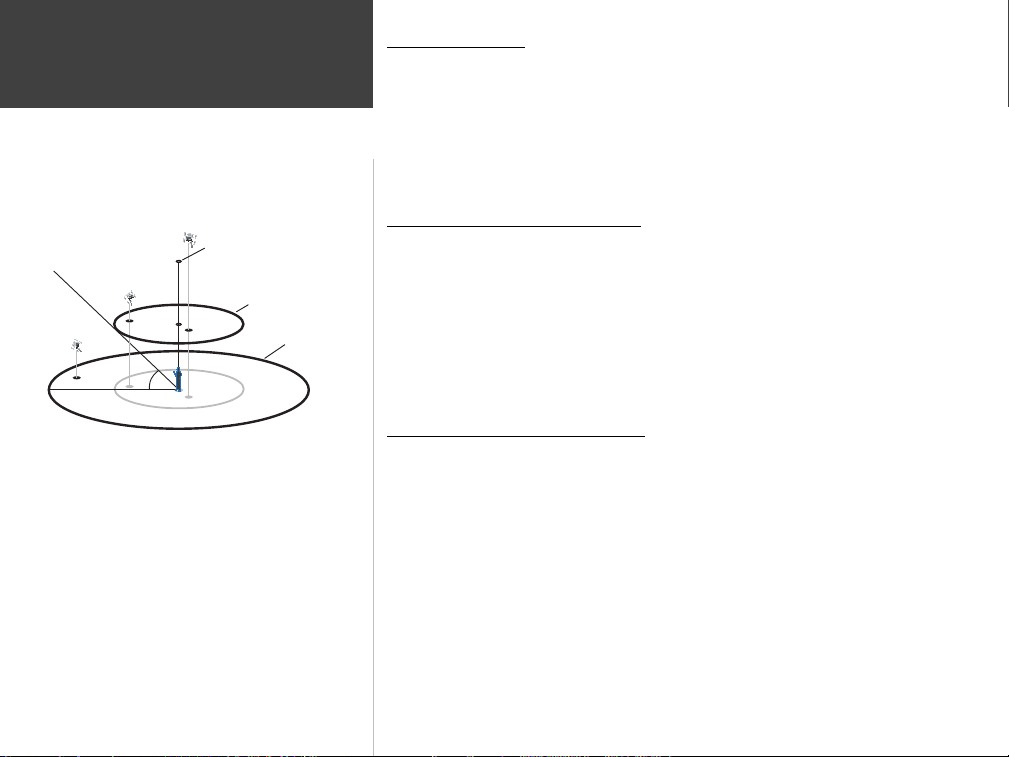
Center dot - 90°
above the horizon
90°
Inner ring- 45°
above the horizon
Outer ring the horizon
45°
Satellite Location
The location of each available satellite is displayed over two location rings.
The outer ring represents the horizon, the inner ring represents 45° above the
horizon and the center represents directly overhead. When the unit is using a
satellite for navigation, the satellite number will become highlighted on the location rings. The unit can be set to display satellite location with North, or your
current track toward the top of the display.
Satellite Strength Indicator Bars
The Satellite Strength Indicator Bars not only show the strength of the signal
being received, they also show the status of the signal. The bars will be either
shaded with a light grey, or fi lled with solid black. If the bar is grey, it means
that the GPS is receiving a signal from the satellite and is in the process of storing
orbital data provided in the GPS signal. When the bar turns solid black, the GPS
is using the satellite signal for navigation. A “D” in or above the bar means that
differential corrections are being applied to that satellite.
Date, Time and Current Location
10
Satellite Sky View
The GPS gets date and time information from the satellites. The satellites
are equipped with an atomic clock that is very accurate. Since the GPS clock
is derived from timing information sent from the satellite, the GPS clock is also
very accurate.
When the GPS receiver has achieved a 2D or 3D GPS Location, the current
location will be displayed in the selected Location Format.
GPS Information Page Options Menu
To activate the Options Menu from the GPS Information Page, press the
MENU Key. To select an option, highlight the desired selection then press
ENTER.
Use With GPS On/Off —
this option if you are indoors and can not receive satellite signals, or if you
wish to use only the sensors. If this option is selected, it will save battery
power and allow the map to redraw faster.
Start/Stop Simulator —
Track Up/North Up —
with the rings oriented with North toward the top of the display or your current track toward the top of the display.
New Location —
country, and you are having trouble locking onto satellite signals select ‘New
Location’.
When you select ‘New Location’, an options menu will be displayed. This
menu contains the options ‘Automatic’ or ‘Use Map’. If you select ‘Automatic’
the unit will switch to AutoLocate and begin searching for satellites. This
method can take up to fi ve minutes for the unit to begin navigation.
If you select ‘Use Map’ you can use the Pointer on the Map Page to select your
approximate location and the unit will continue to acquire satellites normally
using the almanac for satellite reference. Using this method, the unit does not
need to reinitalize and should receive satellite signals quickly.
If the unit is in the ‘Simulator’ mode, the ‘Use Map’ feature will allow you to
move the simulated current location.
This option turn the GPS receiver On of Off. Select
This option is used to Start or Stop the Simulator.
This option determines if the satellites are displayed
if you have moved the unit to another state, province, or
Reference
Getting Started
GPS Information Page
GPS Information Page Options
11

12
Reference
Map Page
User Selectable Data Fields
Zoom Scale
Map Page
The GPSMAP 76S comes with a built-in basemap of North America that
includes a database of Cities, Interstate, State and County Highways, Exit information, Lake and River outlines and Railway Lines. The standard basemap can
be enhanced using GARMIN’s MapSource products.
Changing the Zoom Scale
You can change the Zoom Scale on the Map Page allowing you to either view
a smaller area in greater detail or a larger area with less detail. As referred to in
this manual, when you decrease the Zoom Scale you will view a smaller area with
greater detail. The current Zoom Scale setting is displayed in the lower left corner
of the Map Page. If ‘ Overzoom’ is displayed under the scale, no further map
information is available.
To change the Zoom Scale:
1. Press the IN Key to decrease the Zoom Scale.
2. Press the OUT Key to increase the Zoom Scale.
Map Page Options
To access the Map Page Options, with the Map Page displayed, press the
MENU Key. To select an option from the Menu, highlight the desired selection
then press ENTER.
Full Screen Map —
include the entire display. When ‘Full Screen Map’ is selected the option will
change to ‘Show Data Fields’.
Measure Distance —
between two points. As you move the Map Pointer, the Distance, Bearing and
Location of the Pointer are displayed at the top of the map. To measure the
distance between to map points, press ENTER to set a reference, then move
the Map Pointer to the other location. The Bearing, and Distance are displayed
below the data fi elds.
This option hides the data fi elds and expands the map to
This option will allow you to measure the distance
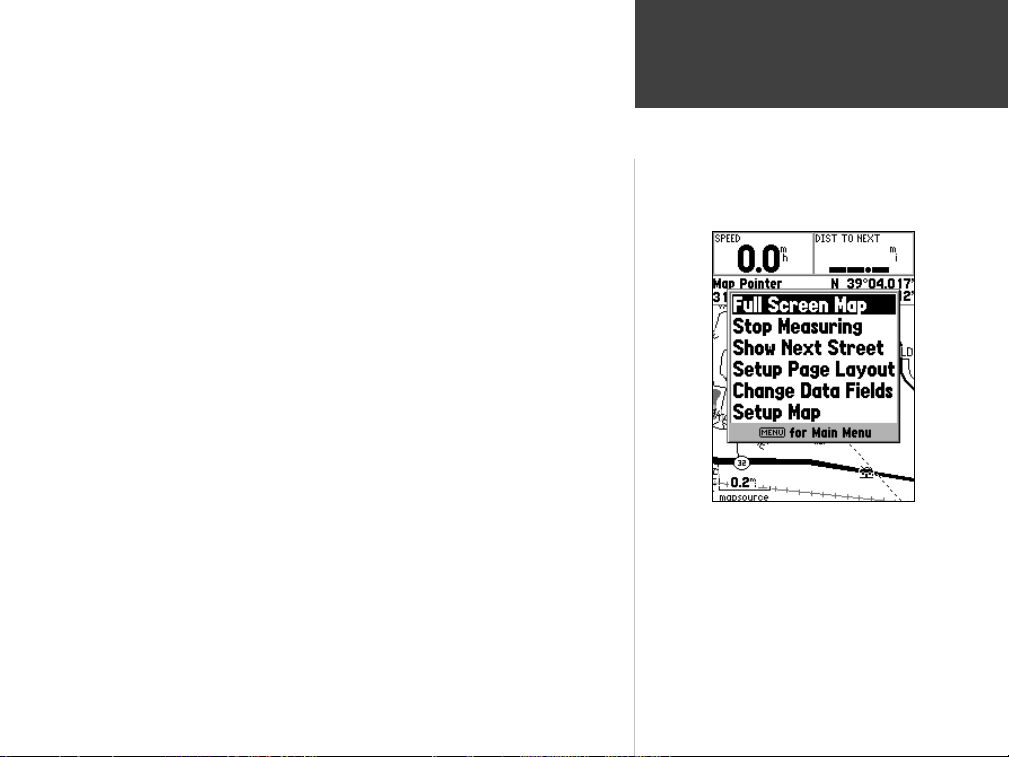
Show Next Street —
will display the name of the next cross street. This will only function if ‘Lock
to Road’ is ‘On’ (see Setup Map — ‘Other’ Tab on page 33) and MapSource
Metroguide or City Navigator data is loaded in the unit.
Setup Page Layout —
fi elds rows and the size of text used in the fi elds. You have the option of
displaying, None, Small (1 Row), Small (2 Rows), Small (3 Rows), Medium
(1 Row), Medium (2 Rows), Medium (3 Rows), Large (1 Row), or Large
(2 Rows). To select an option, highlight the desired selection then press
ENTER. The new confi guration will be displayed on the map.
Change Data Fields —
you want displayed in the data fi elds. To change a data type, place the highlight over the desired data fi eld, then press ENTER. Using the ROCKER,
scroll through the available selections. With the data type highlighted, press
ENTER to accept the selection.
Setup Map —
tures are arranged on a tab menu making it easy to locate the different setup
items.
The ‘General’, ‘Map’, ‘Waypoint’, ‘Point’, ‘Marine’, ‘Line’, ‘Area’, ‘Topo’, ‘City’,
‘Road’, and ‘Other’ Tabs have setting for ‘Text’, ‘Zoom’ or both. Please read
the description of these settings to understand how they affect the display
characteristics of the options on the Map Page.
Text Setting —
•
used when displaying a name or label for an item on the Map Page. There are
four options for the ‘Text’ setting, Off, Small, Med, and Large. If you select
‘Off’, the item will be displayed on the map without a name or label. If you
select ‘Small’, ‘Med’ or ‘Large’, the name, the item will be displayed with a
name or label in the text size selected.
This option adds a window below the Data Fields that
This option allows you to select the number of data
This option allow you to select the type of data that
This option contains the Map Page Setup features. The fea-
The ‘Text’ setting allows you to determine the size of text
Reference
Getting Started
Map Page
Map Page Options
13
Reference
Map Page Options
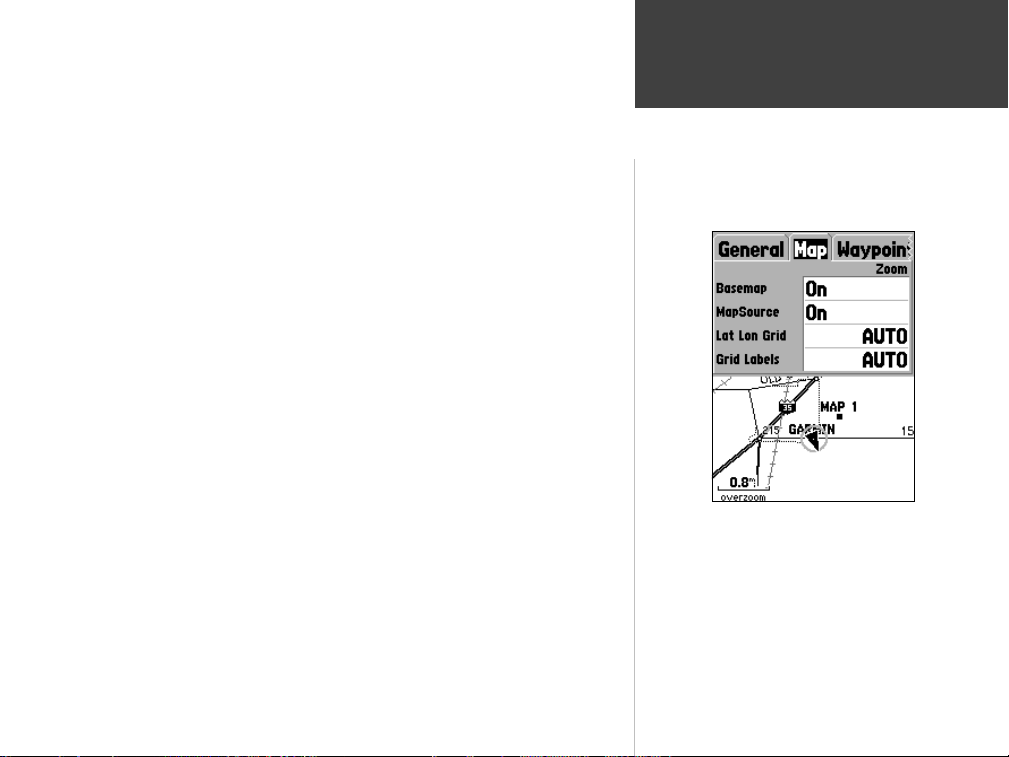
Setup Map — ‘General’ Tab
•
Zoom Setting —
on the map. You have the option of selecting ‘Off’, ‘Auto’ or a ‘Zoom’ Scale
that coincides with the Zoom Scales for the map.
If you select ‘Off’, the items for that option will not be displayed on the Map
Page. If you select ‘Auto’, the GPSMAP 76S will automatically determine the
zoom level at which to display the selected items. If you select a scale set-
ting, the items will be displayed on the map only when the Map Zoom Scale
is at or less than the selected scale .
As an example, if you select 500ft as ‘Zoom’ Scale setting, the selected items
will only be displayed when the Map Zoom Scale is at 500ft or less.
This setting determines when items will be displayed
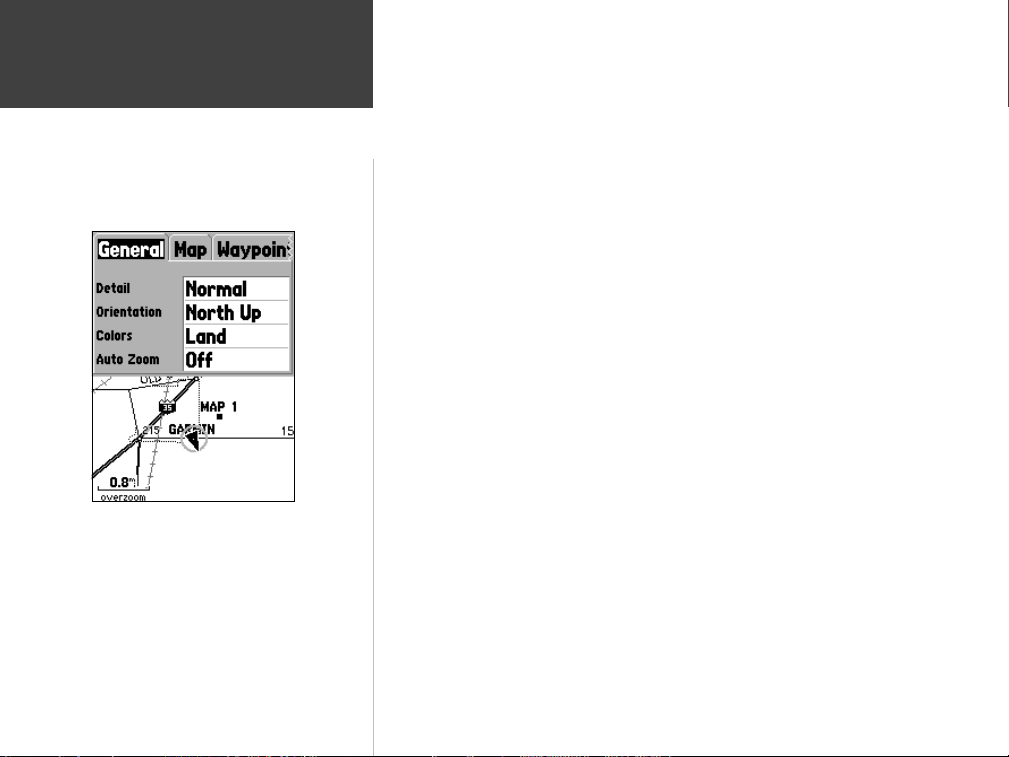
Setup Map — ‘General’ Tab
The ‘General’ Tab contains the settings for Detail, Orientation, Colors, and
Auto Zoom. Below is a description of each feature. To change a setting,
highlight the appropriate fi eld then press ENTER. Make your selection, then
press ENTER to accept the new selection.
Detail —
allow you to control the amount of map data displayed on the unit. If you
select a setting with high detail, the screen redraw times will be slower.
Map Orientation —
options allows you to determine how the map is displayed. If ‘North Up’
is selected, North will always be at the top of the display. If ‘Track Up’ is
selected, your current track will always be toward the top of the display. If
‘Course Up’ is selected, the active course line will always be toward the top
of the display. If you have ‘Course Up’ selected and do not have an active
course, your current track will be toward the top of the display.
Settings: Most, More, Normal, Less, and Least. The Detail settings
Settings: North Up, Track Up, and Course Up. This
14
Colors —
either land or water as white. If you select ‘Land’ the land portion of the
display will be lighter in color than the water. If you select ‘Water’ the water
portion of the display will be lighter in color than the land.
Auto Zoom —
on a waypoint as you approach it.
This option gives you the ability to confi gure the map to display
This option allows you to have the map automatically zoom in
Setup Map — ‘Map’ Tab
The ‘Map’ Tab contains settings for the Basemap, MapSource, Lat Lon Grids,
and Grid Labels. To change a setting, highlight the appropriate fi eld then
press ENTER. Make your new selection then press ENTER to accept the
selection.
Basemap —
you select ‘Off’, the Basemap will no longer be displayed.
MapSource —
loaded into the unit. If MapSource data is available, you can choose whether
or not to display the data on the map by selecting either ‘On’ or ‘Off’. If you
select ‘Off’, the MapSource data will not be displayed on the Map Page.
Lat Lon Grid —
Zoom Level on the Map Page is decreased. The ‘Zoom’ setting for this option
determines when the grids will begin displaying on the Map Page.
If you select ‘Auto’, and have the Basemap or MapSource options set to ‘ON’,
the unit will not display a Lat Lon Grid.
Grid Labels —
You must have the ‘Lat Lon Grid’ displayed for ‘Grid Labels’ to be displayed. If
you select ‘Auto’, and have the Basemap or MapSource options set to ‘ON’, the
unit will not display Grid Labels.
This option allow you to turn the Basemap data ‘On’ or ‘Off’. If
This option is only available if Mapsource CD data has been
Lat Lon Grids will be displayed in smaller increments as the
This option allows you to display the coordinates on the grid.
Reference
Getting Started
Map Page Options
Setup Map — ‘Map’ Tab
15
Reference
Map Page Options
Setup Map — ‘Waypoint’ Tab
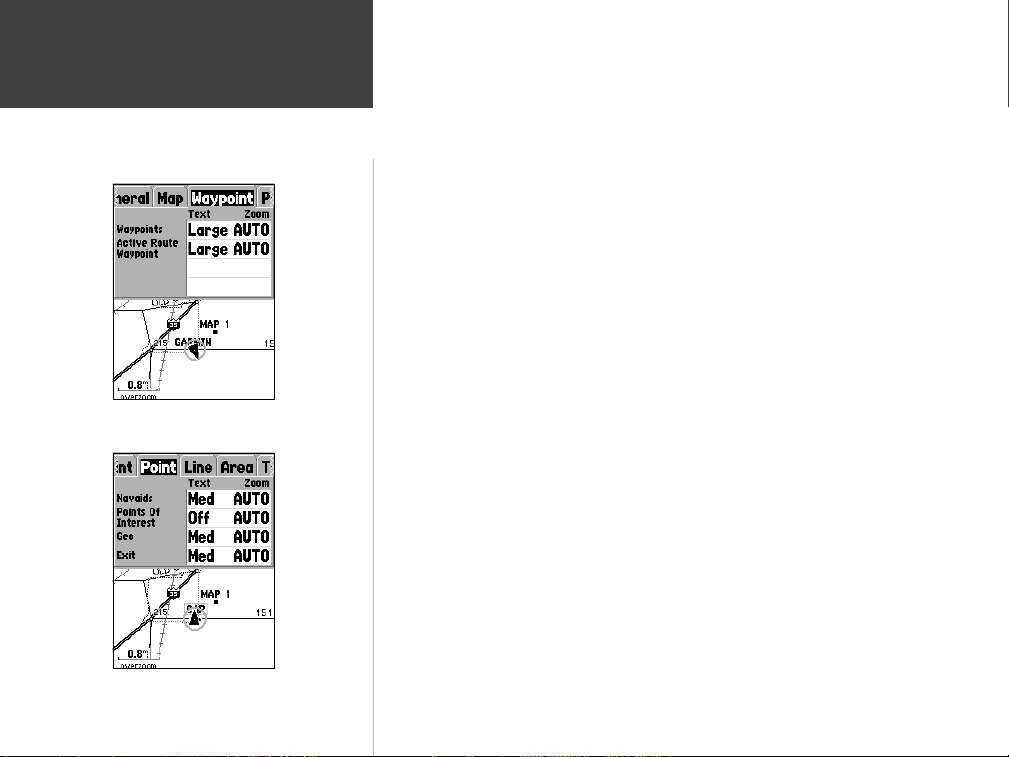
Setup Map — ‘Waypoint’ Tab
The ‘Waypoint’ Tab contains the Waypoint, and Active Route Waypoint
option settings. Each of the options has a ‘Text’ and ‘Zoom’ setting. To
change a setting, highlight the appropriate fi eld then press ENTER. Make
your new selection, then press ENTER to accept the selection.
Waypoints —
Active Route Waypoint —
waypoints that are in an Active Route. As an example, if you have selected
‘Small’ as the text option for all waypoints, but selected ‘Large’ as the setting
for Active Route Waypoints, the waypoints included in an Active Route will
be displayed with large text on the Map Page.
Setup Map — ‘Point’ Tab
The ‘Point’ Tab contains the Navaids, Points of Interest, Geo, and Exit option
settings. Each of the options has a ‘Text’ and ‘Zoom’ setting. To change a
setting, highlight the appropriate fi eld then press ENTER. Make your new
selection, then press ENTER to accept the selection.
Navaids —
be landmarks, milemarkers, hazards, light houses, buoys etc.
Points of Interest —
hotels, gas stations, etc..
Geo —
parks, etc.
Exit —
This option sets the display parameters for all waypoints.
This option sets the display parameters for
are items displayed on the Map that aid navigation. Navaids can
include general business listings such as restaurants,
include points such as schools, cemeteries, churches, towers, glaciers,
includes exit information for the US and Canada.
16
Setup Map — ‘Point’ Tab
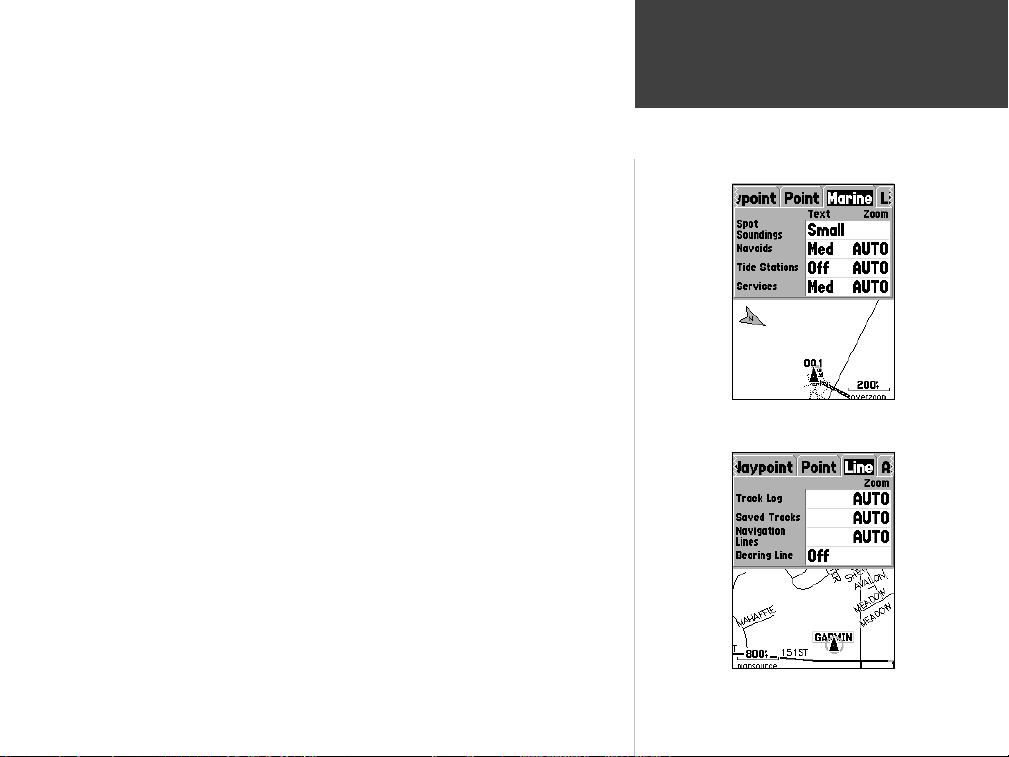
Setup Map — ‘Marine’ Tab
The ‘Marine’ Tab contains ‘Text’ settings for Spot Soundings, Navaids, Tide
Stations, and Services and ‘Zoom’ settings for Navaids, Tide Stations and
Services.
Reference
Getting Started
Spot Soundings —
Navaids —
Tide Stations —
Services —
are depth readings shown in MapSource BlueChart data.
are aids to navigation such as buoys and lighthouses.
are stations where Tide information is gathered.
include Marinas, Gas Stations ect.
Setup Map — ‘Line’ Tab
The ‘Line’ Tab contains the ‘Zoom’ scale settings for Track Log, Saved Tracks,
Course Lines, and the Bearing Line. To change a setting, highlight the appropriate fi eld then press ENTER. Make your new selection, then press ENTER
to accept the selection.
Track Log —
position changes on the Map Page.
Course Lines —
destination waypoint.
Bearing Line —
location to the active waypoint. This can be used to steer the shortest path to
the waypoint.
the Track Log is the bread crumb trail that is left behind as your
shows a line from the point navigation was initiated to a
the Bearing Line will show the bearing from your current
Map Page Options
Setup Map — ‘Marine’ Tab
Setup Map — ‘Line’ Tab
17

18
Reference
Map Page Options
Setup Map — ‘Area’ Tab
Setup Map — ‘Topo ’ Tab
Setup Map — ‘City’ Tab
Setup Map — ‘Area’ Tab
The ‘Area’ Tab contains the ‘Text’ and ‘Zoom’ settings for River/Lakes, Parks,
Other, and Metro. To change a setting, highlight the fi eld then press ENTER.
Make your new selection, then press ENTER to accept the selection.
River/Lake —
Park —
Other —
puses will appear as a shaded area.
Metro —
Rivers and Lakes will appear shaded on the map.
Area Parks will appear as a shaded area.
Geographical areas such as shopping centers and university cam-
Metropolitan areas will appear as a shaded area.
Setup Map — ‘Topo’ Tab
The ‘Topo’ Tab contains the ‘Text’ and ‘Zoom’ settings for Major Contour,
Intermediate Contour, and Minor Contour Lines. The Land Cover option
has a ‘Zoom’ setting. To change a setting, highlight the appropriate fi eld then
press ENTER. Make your new selection, then press ENTER to accept the
selection.
The Contour Line settings are used to de-clutter the map. If ‘Auto’ is the
selected ‘Zoom’ setting, the Major and Minor Contour Lines will be displayed
at a higher Map Zoom Scale setting.
Setup Map — ‘City’ Tab
The ‘City’ Tab contains the ‘Text’ and ‘Zoom’ settings for Large City, Medium
City, Small City and Small Towns. To change a setting, highlight the fi eld then
press ENTER. Make your selection, then press ENTER to accept.
The City settings are used to de-clutter the map. If ‘Auto’ is the selected
‘Zoom’ setting, the Large and Medium cities will be displayed at a higher Map
Zoom Scale setting.
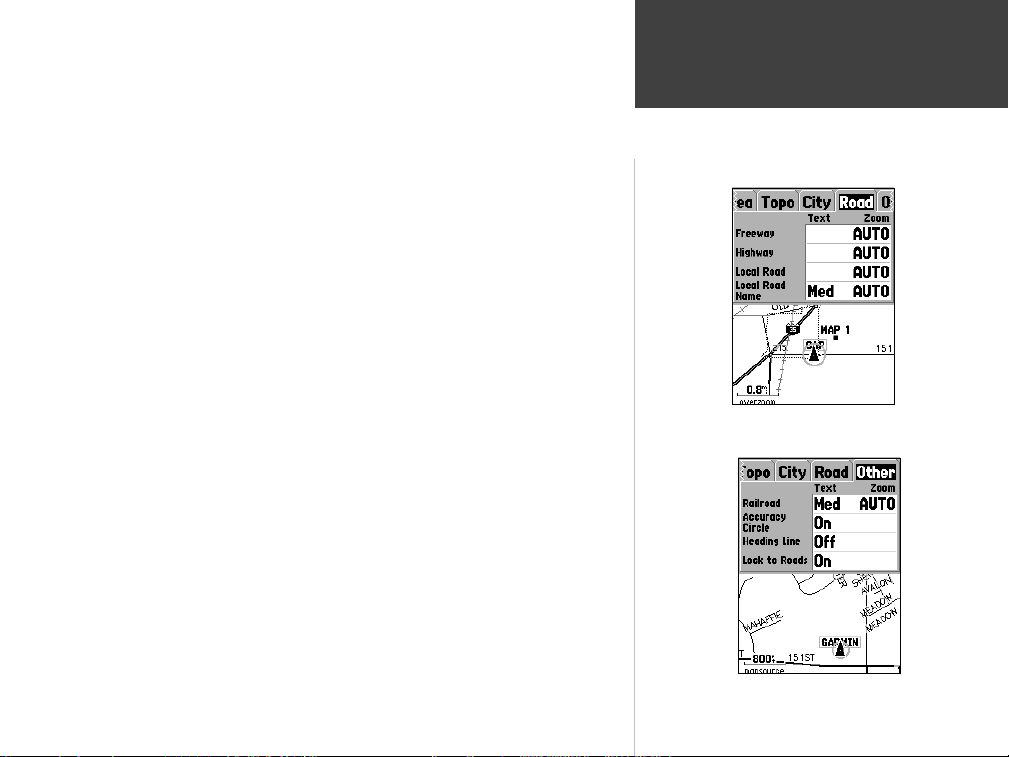
Setup Map — ‘Road’ Tab
The ‘Road’ Tab contains the ‘Text’ and ‘Zoom’ settings for Local Road Names
and ‘Zoom’ settings for Freeway, Highway, and Local Roads. To change a
setting, highlight the appropriate fi eld then press ENTER. Make your new
selection, then press ENTER to accept the selection.
Freeway —
Highway —
Local Roads —
Local Road Names —
Interstate and U.S. Highways
State Highways and Local Highways
All Other Roads
Name Labels for Local Roads
Setup Map — ‘Other’ Tab
The ‘Other’ Tab contains the ‘Text’ and ‘Zoom’ settings for Railroad and an
On/Off setting for the Accuracy Circle. To change a setting, highlight the
appropriate fi eld then press ENTER. Make your new selection, then press
ENTER to accept the selection.
Railroad —
Accuracy Circle —
angle on the Map Page. The Accuracy Circle depicts the estimated accuracy
of the location. If your current location is matched to a road, no Accuracy
Circle will be displayed.
Heading Line —
ing will be projected on the map from the current location. The Heading line
is a thin black line.
Lock to Roads —
location to a road.
controls the display of railways lines on the Map Page.
The Accuracy Circle is displayed around the Location Tri-
If the Heading line is ‘On’, a line showing your current head-
If ‘Lock to Roads’ is ‘On’, the unit will try to match your
Reference
Getting Started
Map Page Options
Setup Map — ‘Road’ Tab
Setup Map — ‘Other’ Tab
19
Reference
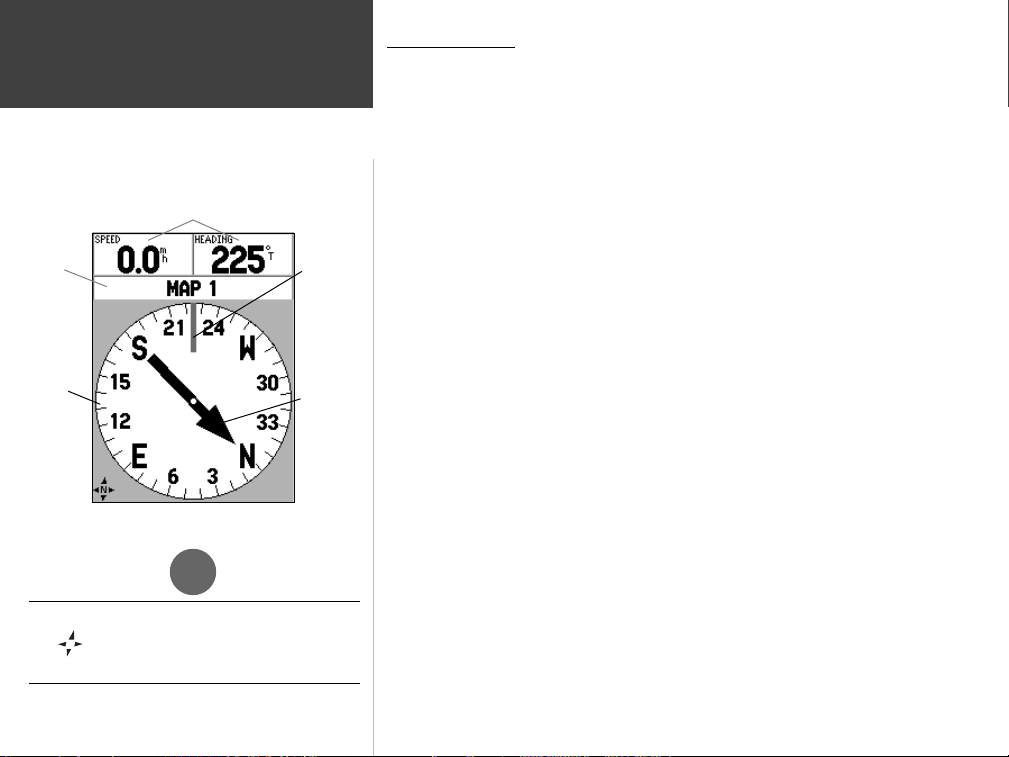
Compass Page
User Data Fields
Status
Bar
Compass
Ring
When the Electronic Compass is “ON”, the compass
icon will be displayed on the Map, Compass, and
N
Highway Pages.
I
20
Vertical
Line
Pointer
Compass Page
The Compass Page is best used for navigation when a straight line course can
not be followed. The Compass Page has User Selectable Data Fields along the
top, a Status Bar, Compass Ring and a Pointer.
The Compass Page can navigate using the Electronic Compass or the GPS
receiver. From the factory the unit will navigate below 10 mph using the Electronic Compass. If the unit’s speed exceeds 10 mph, the unit will automatically
switch to the GPS receiver for navigation. When the unit’s speed drops below 10
mph for more than 90 seconds, the unit will revert to using the Electronic Compass for navigation. These settings can be changed on the Main Menu ‘Compass’
Tab (see pages 47-48).
The Electronic Compass can easily be toggled On/Off by pressing and holding
the PAGE key. A message will be displayed along the bottom of the screen indicating the state of the Electronic Compass. Press the ENTER key to acknowledge
the message. If you would like to save battery power, it is recommended that you
only turn the Electronic Compass on to take a reading then turn it back off. If the
Electronic Compass is turned off, the unit will automatically use the GPS receiver
for navigation.
The Compass Ring is a graphic display of your current heading. As you
change direction, the Compass Ring will rotate, your current heading will always
be at the top of the compass. The Pointer will always point toward the active destination waypoint. When you are going directly toward the waypoint, the Pointer
will align with the vertical line in the Compass Ring. When you arrive at the
waypoint, a message ‘Arriving at Destination’ will be displayed. It is important to
note that while using the GPS receiver for navigation, the Compass Ring does not
act as a true compass. You must be moving for the Compass Ring and Pointer to
update and correctly point towards your destination. When using the Electronic
Compass for navigation, the unit must be held level or the compass reading may
be inaccurate. If the unit is not being held level, a message “Hold Level” will be
displayed.
Compass Page Options
To access the Compass Page Options, with the Compass Page displayed press
the MENU Key.
Setup Page Layout —
fi eld rows and the size of text used in the fi elds. You have the option of
displaying, None, Small (1 Row), Small (2 Rows), Small (3 Rows), Medium
(1 Row), Medium (2 Rows), Medium (3 Rows), Large (1 Row), or Large
(2 Rows). To select an option, highlight the desired selection then press
ENTER. The new confi guration will be displayed on the map. Press QUIT to
exit the option.
Change Data Fields —
want displayed in the data fi elds. To change a data type, place the highlight
over the desired data fi eld, then press ENTER. Using the ROCKER, scroll
through the available selections. With a data type highlighted, press ENTER
to accept the selection. For a list of available data fi elds, see appendix ?.
Calibrate Compass —
the fi rst time batteries are installed and whenever batteries are changed. To
calibrate the compass, with ‘Start’ on the Calibrate Compass Page highlighted
press ENTER. With the unit held level, slowly turn the unit through at
least two revolutions in the same direction. There will be a prompt indicating if you are turning the unit ‘Too Fast’, ‘Just Right’, or ‘Too Slowly’. When
fi nished, the unit will display a message indicating if the calibration was successful of failed. If the calibration was successful, press ENTER to continue, if
the calibration failed, press ENTER to try the calibration again.
Sight ‘N Go —
lock in a magnetic heading to it. Once a heading is locked, the unit will begin
navigation along that heading.
This option allows you to select the number of data
This option allows you to select the type of data you
The Electronic Compass will need to be calibrated
This feature allows the user to visually locate a landmark and
Reference
Getting Started
Compass Page Options
Compass Page Options
21
22
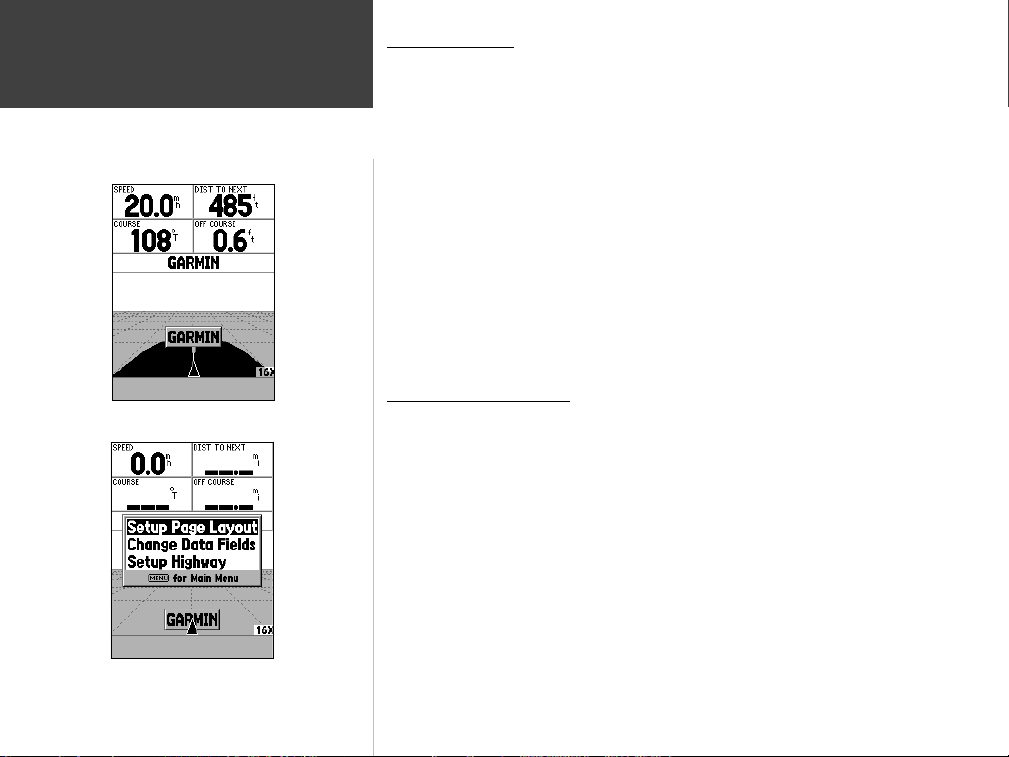
Reference
Highway Page
Highway Page
Highway Page Options
Highway Page
The Highway Page is best used for navigation when a straight line course can
be followed. The Highway Page has User Selectable Data Fields along the top, a
Status Bar, and the Highway Display.
The Highway Page shares many features with the Map Page. Any tracks,
saved tracks or waypoints that are within the display area will be shown, the
Zoom Level can be changed using the IN and OUT Keys, and the Triangle represents your current location.
To navigate using the Highway, follow the road. If the Highway moves to the
right, turn right until the triangle is aligned with the White Line in the middle of
the Highway, and the Highway is pointed toward the top of the display. When
you are approaching a turn, a message “Approaching Turn” will be displayed.
As you approach your destination, a message ‘Arriving at Destination’ will be
displayed. If using the Electronic Compass for navigation, the unit will need to
be held level. If the unit is not level, a message ‘Hold Level’ will be displayed.
Highway Page Options
To access the Highway Page Options, with the Highway Page displayed press
the MENU Key. To select an option from the Menu, highlight the desired selection then press ENTER.
Setup Page Layout —
number of data fi elds rows. You have the option of displaying: None, Small
(1 Row), Small (2 Rows), Small (3 Rows), Medium (1 Row), Medium (2
Rows), Medium (3 Rows), Large (1 Row), or Large (2 Rows). To select an
option, highlight the desired selection then press ENTER. The new confi gu-
ration will be displayed on the map.
Change Data Fields —
want displayed in the data fi elds. To change a data type, place the highlight
over the desired data fi eld, then press ENTER. Using the ROCKER, scroll
through the available selections. With the data type highlighted, press
ENTER to accept the selection.
This option allows you to select the text size and the
This option allow you to select the type of data you
 Loading...