

Page 1

Page 2

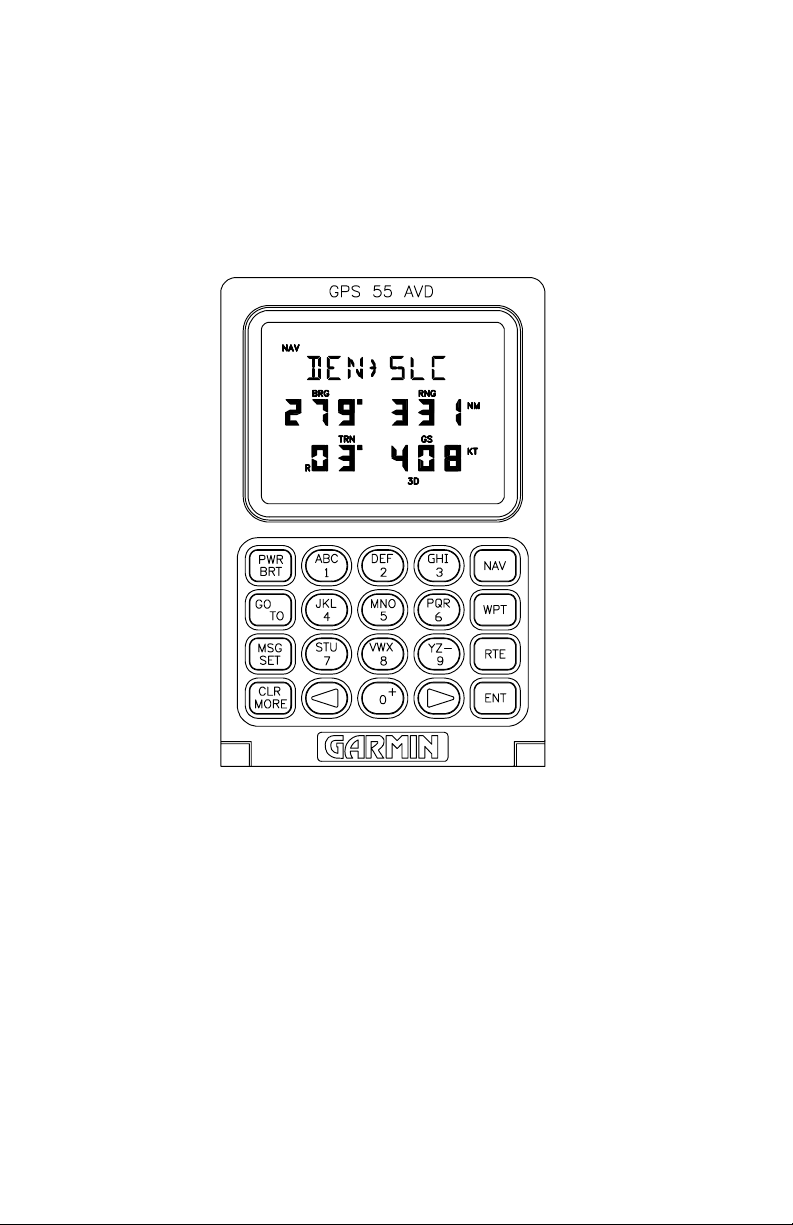
GPS 55 AVD
Personal Navigator
OWNER'S MANUAL
TM
Page 3

© 1992 GARMIN, 9875 Widmer Road, Lenexa, KS 66215
Printed in Taiwan.
All rights reserved. No part of this manual may be reproduced or transmitted
in any form or by any means, electronic or mechanical, including photocopying
and recording, for any purpose without the express written permission of
GARMIN.
Information in this document is subject to change without notice. GARMIN
reserves the right to change or improve their products and to make changes
in the content without obligation to notify any person or organization of such
changes or improvements.
October, 1992 190-00030-00 Rev. D
Page 4

PREFACE
GARMIN thanks you for selecting our high performance, full featured
Personal NavigatorTM. The GPS 55 AVD represents our continued
commitment to provide you with a portable aviation unit that is versatile,
extremely accurate, and easy to use. We are confident you will enjoy using
your unit for many years to come.
The GPS 55 AVD's rugged construction and quality components offer the
reliability demanded by the harshest operating environments. When not
being used in an aircraft, it may be removed for use in marine and land
vehicles, as well as for hunting and hiking. The unit may be operated portably
using its own battery pack, or it may use a 5-40 volt DC external power source
for fixed mounted applications. You can even use a 115- or 230-volt battery
charger for planning trips at home.
This manual and accompanying quick reference guide provide complete
information on safely operating the GPS 55 AVD to its full potential. Two
exciting practice trips have been planned for you to practice your navigation
skills using the built-in simulator. Afterwards, try a trip of your own to realize
the value of the GPS 55 AVD as your Personal Navigator
questions or comments, our Customer Support Department is eager to serve
you. GARMIN is fully committed to your satisfaction as a customer.
TM
. If you have any
GARMIN International, Inc.
9875 Widmer Road
Lenexa, KS 66215
i
Page 5

CAUTION
The GPS system is operated by the government of the United States which
is solely responsible for its accuracy and maintenance. The system is under
development and is subject to changes which could affect the accuracy and
performance of all GPS equipment. Although the GPS 55 AVD is a precision
electronic NAVigation AID (NAVAID), any NAVAID can be misused or
misinterpreted, and therefore become unsafe. Use the GPS 55 AVD at your
own risk. To reduce the risk, carefully review and understand all aspects of
this Owner's Manual and thoroughly practice operation using the simulator
mode prior to actual use. When in actual use, carefully compare indications
from the GPS 55 AVD to all available navigation sources including the
information from other NAVAIDs, visual sightings, charts, etc. For safety,
always resolve any discrepancies before continuing navigation.
The Jeppesen database incorporated in the GPS 55 AVD must be updated
regularly in order to ensure that its information is current. GARMIN issues
an update approximately every 28 days. Contact GARMIN or your local
GARMIN aviation dealer for more information on GPS 55 AVD database
updates. Pilots using an out-of-date database do so entirely at their own risk.
NOTE: This device complies with Part 15 of the FCC Rules. Operation is
subject to the following two conditions: (1) This device may not cause
harmful interference, and (2) this device must accept any interference
received, including interference that may cause undesired operation.
ii
Page 6

TABLE OF CONTENTS
CHAPTER PAGE
BASIC FEATURES
1 INTRODUCING THE GARMIN GPS 55 AVD 1-1
1.1 Capabilities 1-1
1.2 Aviation Database 1-2
1.3 Operations 1-2
2 GETTING STARTED 2-1
2.1 Front Panel 2-1
2.2 Banners 2-1
2.3 Cursor and Fields 2-3
2.4 Keypad Operation 2-3
2.5 Entering Data 2-5
2.6 Viewing Messages 2-5
2.7 Operating Modes 2-6
3 BASIC OPERATION 3-1
3.1 Power On 3-1
3.2 Satellite Status 3-2
3.3 Present Position 3-3
3.4 AutoStore
3.5 CDI and Navigation Summary 3-5
3.6 Waypoints 3-6
3.7 Nearest Waypoints 3-9
3.8 Navigate to a Waypoint 3-10
3.9 Proximity Alarm Waypoints 3-11
3.10 Sample Trip 3-12
TM
3-4
4 UNIT CUSTOMIZATION 4-1
4.1 Setup Menu 4-1
4.2 Operating Mode 4-2
4.3 User Selectable Alarms 4-2
4.4 Backlighting Timeout 4-3
4.5 Audio Settings 4-4
4.6 Navigation Units 4-4
4.7 CDI Scale 4-5
4.8 Magnetic Variation 4-5
4.9 Filter Settings 4-6
4.10 Output 4-7
iii
Page 7

4.11 Map Datum 4-7
ADVANCED FEATURES
5 NAVIGATION PLANNING 5-1
5.1 Navigation Menu 5-1
5.2 Date and Time 5-1
5.3 Event Timer 5-2
5.4 Trip Planning 5-4
5.5 Sunrise/Sunset 5-4
5.6 Alarm Clock 5-5
6 ROUTES 6-1
6.1 Navigating Using Routes 6-1
6.2 Route Catalog 6-2
6.3 Editing Routes 6-3
6.4 Activating Routes 6-5
6.5 Building Routes Using AutoStore
7 SAMPLE SIMULATED TRIP 7-1
TM
6-7
APPENDICES
A MESSAGES A-1
B NAVIGATION TERMS B-1
B.1 Definitions B-1
B.2 Course To Steer (CTS) B-3
C INSTALLATION AND MAINTENANCE C-1
C.1 Specifications C-1
C.2 Electrical Wiring C-3
C.3 Surface Mount Installation C-4
C.4 Portable Antenna Installation C-7
C.5 Battery Pack Operation C-8
C.6 Maintenance C-9
C.7 Customer Support C-9
D MAP DATUMS D-1
E ABBREVIATIONS FOR DATABASE REGIONS E-1
F AIRPORT IDENTIFIERS PREFIX CODES F-1
G INDEX G-1
iv
Page 8

CHAPTER 1
INTRODUCING THE GARMIN GPS 55 AVD
1.1 CAPABILITIES
The GPS 55 AVD provides a host of powerful capabilities which were
previously found only in much larger systems:
TM
· Performance: State-of-the-art MultiTrac
satellites while providing high receiver sensitivity, fast first fix, and
continuous navigation updates.
· Portability: Goes where you go - on land, sea, or in the air. The built-
in simulator allows you to plan your next trip or hone your navigation
skills at home or in your office.
· Navigation: Illuminated keypad and display provide the navigation
information you need at a glance. Store up to 250 alphanumeric
waypoints and 10 reversible routes. The GOTO function sets an
instantaneous course to the waypoint of your choice. The AutoStore
function helps you build routes as you go. A flashing Message
Annunciator and an audible message tone keep you fully informed of
your navigation status.
· Personalized: Configure your unit the way you like by selecting
nautical units, Course Deviation Indicator (CDI) sensitivity, keypad
and display features, map datums, and interface options.
receiver tracks up to eight
TM
· Low Power Consumption: Battery Saver operation, which draws
less than 1.1 watts, provides up to ten hours of continuous operation
with four AA size alkaline batteries.
· Trip Planning: Analyze distance and time requirements for your trip.
Compute the time of sunrise and sunset at your destination.
· Alarms: An alarm clock and timer allow the GPS 55 AVD to watch the
clock for you. Arrival, anchor drag, CDI, and proximity alerts help you
safely navigate your craft.
· Interfaces: Interface with graphics plotters as well as marine autopilots.
We encourage you to read through this manual and experiment using the
built-in simulator. This will help you quickly master the power of the GPS 55
AVD.
1-1
Page 9

1.2 AVIATION DATABASE
The GPS 55 AVD features a built-in Jeppesen NavData® database providing
direct access to worldwide airport (with a runway of 1,000 feet or greater) and
VOR locations. Two versions of the internal database are available to cover
the entire world:
· Americas: Includes North, Central and South America.
· International: Includes everywhere except North, Central or South
America.
This database may be updated by a GARMIN authorized service center on
a one-time basis or every 28 days by subscription service. Contact GARMIN
or your local GARMIN aviation dealer for more information on GPS 55 AVD
database updates. (NOTE: Programmed routes and proximity alarms which
contain database waypoints that are deleted or moved more than 0.33 arc
minutes due to a database update will be deleted.)
1.3 OPERATIONS
You may use your GPS 55 AVD for both portable and fixed operations. The
unit may be operated from external AC power using a battery charger,
external 5-40 volt DC power using the power/data cable or cigarette lighter
adapter, or using a battery pack.
Handheld Operation:
For handheld operation, the GPS 55 AVD is powered by a AA battery pack
which should be filled with four high quality alkaline batteries commonly
found at retail stores. (A rechargeable nicad battery pack is also available.)
In order to track GPS satellites, the unit must be situated with the antenna
pointed straight up and should not be blocked by objects or people (signal
reception through thin fabric such as canvas may be adequate but degraded).
A lanyard is provided to prevent accidental dropping of your GPS 55 AVD.
(Connect the lanyard to the eyelet on the back of the unit.)
Aircraft Operation:
A mounting bracket is supplied for fixed mount installation in an aircraft.
Additionally, six feet cable with a suction cup and hardware is provided for
remote mounting of the portable antenna The unit may be operated using
aircraft power through the power/data cable or it may be operated using the
battery pack. While using aircraft power, you may wish to leave the battery
1-2
Page 10

pack in the unit. In the event of aircraft power failure, the GPS 55 AVD will
automatically switch to battery power.
Marine/Land Operation:
A universal mount is available for swivel mount installation in a boat or land
vehicle. Additionally, a Marine/RV Remote Antenna is available for installations
which require an external antenna for an unobstructed view of the sky. This
weather-proof antenna includes 30 feet of low-loss antenna cable. The
remote antenna has been constructed to thread onto a standard 1" antenna
mount. Antenna mounts, commonly used to attach VHF radio antennas and
Loran-C couplers, are readily available from your local marine accessories
dealer.
A Magnetic Mount Antenna is also available for attaching a remote antenna
to a metallic surface. This weather-proof antenna includes 10 feet of low-loss
antenna cable. A cigarette lighter adapter cable may be used to power the
unit in vehicle applications.
In addition to supplying power to the unit, the power/data cable allows you to
interface your GPS 55 AVD with other electronic devices such as graphical
displays or marine autopilots.
1-3
Page 11
2.1 FRONT PANEL
CHAPTER 2
GETTING STARTED
The front panel consists of a 20-key keypad and a LCD display which
includes three lines of information and various banners. Both the display and
keypad are illuminated for operating in darkness.
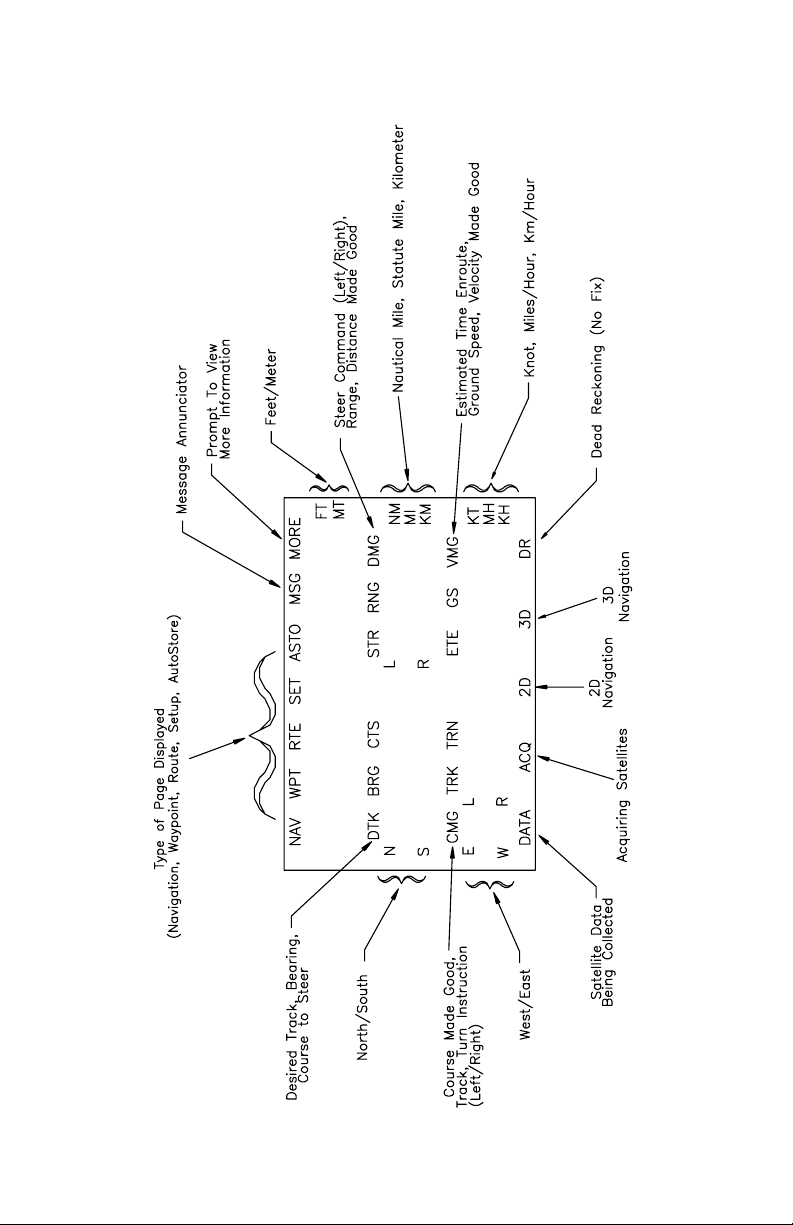
2.2 BANNERS
Information displayed on the LCD is commonly referred to as a “page”. A
page consists of alphanumeric information and banners. Banners, illustrated
below, are used to indicate the type of page, navigation units, and data
displayed (see Appendix B). They also indicate navigation fix type, satellite
tracking, and provide user prompting.
2-1
Page 12
2-2
Page 13
2.3 CURSOR AND FIELDS
Alphanumeric Field Cursor on
Confirmation Field
Numeric Field Cursor on Cyclic Field
The area of the page which is underlined is called the cursor. The cursor
may be moved to locations on the page called fields which allow you to enter
data. You will encounter four types of fields.
· Numeric fields accept numbers. For example, you will enter a
waypoint's latitude in a numeric field.
· Alphanumeric fields accept numbers as well as letters. For example,
you will enter a waypoint's name in an alphanumeric field.
· Cyclic fields allow you to select from one of several available options.
For example, you may select between DTK (desired track), BRG
(bearing to waypoint), or CTS (course to steer) using a cyclic field.
Cyclic fields are indicated on the display by the “MORE” banner.
· Confirmation fields allow you to indicate your approval. For example,
you will be asked to confirm that you want to delete a waypoint.
Confirmation fields always end with a “?” character.
2.4 KEYPAD OPERATION
The PWR/BRT key is a dual function key that controls unit power
and panel backlighting.
When the unit is on, pressing the PWR/BRT key will turn on the
panel backlighting. Pressing the PWR/BRT key again will turn off
the backlighting.
To turn the unit off, press and hold the PWR/BRT key for three
seconds until the display is blank.
2-3
Page 14

Pressing the MSG/SET key allows you to view new messages
when the "MSG" banner is flashing. (See Section 2.6 and Appendix
A.) Pressing the MSG/SET key also selects the Setup Pages which
allow you to view satellite tracking status and customize the unit as
you like. (See Section 3.2 and Chapter 4.)
Pressing the GOTO key once allows you to initiate the GOTO
function, which will set an instantaneous course to any waypoint.
(See Section 3.8.)
Pressing the NAV key selects the Navigation Pages which allow
you to view navigation information and perform planning functions.
(See Sections 3.3 and 3.5 and Chapter 5.)
Pressing the WPT key selects the Waypoint Pages which allow you
to create, edit, delete, and rename waypoints. In addition, you may
view your nearest waypoints and set waypoint proximity alarms.
(See Sections 3.6, 3.7 and 3.9.)
Pressing the RTE key selects the Route Pages which allow you to
edit, review, activate, and delete routes. (See Chapter 6.)
Pressing either of the arrow keys allows you to move the
cursor, scroll through information lists, and enter letters of
the alphabet.
The alphanumeric keys allow you to enter letters and
numbers into the GPS 55.
2-4
If you want to enter a number in a numeric field, for instance
“1”, simply press the 1 key. If you want to enter a letter in
an alphanumeric field, for example “A”, press the 1 key to
display B, then press the left arrow key once to select “A”
(you may also press the right arrow key three times to
display the “A”).
Pressing the CLR/MORE key erases information in the cursor field.
If the cursor is over a cyclic field, pressing the CLR/MORE key will
toggle through several available options.
Pressing the ENT key completes the process of data entry. If the
cursor is over a confirmation field, pressing the ENT key indicates
your approval.
Page 15

2.5 ENTERING DATA
To enter data you must first move the cursor under the desired field by
pressing the right or left arrow key.
To enter a number...
· Press the key that is labeled with the desired number. The numbers
will fill in from the left side of the field similar to a typewriter. You must
enter any leading zeros in the field. For example, if you wish to enter
“51” in a three space field, you must press the 0, 5, and 1 keys in that
order.
· Press the CLR key if you enter an incorrect number.
· Press the ENT key when you have filled all significant digits of the field
with numbers (trailing zeros are automatically filled in by the GPS 55).
To enter a letter...
· Press the key that is labeled with the desired letter.
· Press the right or left arrow key until the desired letter is displayed.
· Press the CLR key if you enter an incorrect letter.
· Press the ENT key when all the characters are entered.
The GPS 55 features a keypad feedback tone which will sound each time you
press a key. If you enter data which is not appropriate for the field, the
feedback tone will quickly sound three times indicating an error. The keypad
feedback tone can be turned off if you wish (see Section 4.5).
2.6 VIEWING MESSAGES
From time to time, the GPS 55 will use a message to tell you of conditions
that need your attention. When the GPS 55 has a new message for you, the
MSG banner will flash. When this occurs, press the MSG key to view new
message(s). Continue to press the MSG key until the page you were viewing
prior to pressing the MSG key is displayed.
While the MSG banner is flashing, the GPS 55 will also generate an audible
tone to alert you of the message (if your unit is connected to an external
alarm, it will also be activated). Messages that demand immediate attention
such as an arrival alarm generate a quick tone that will not stop until you view
the message. All other messages generate a slow tone that will cease after
15 seconds. The message tone may be turned off if you wish (see Section
4.5).
2-5
Page 16

Important messages will remain on the Message Page after being viewed.
If this occurs, the MSG banner will be in view but will not flash (if no messages
exist, the MSG banner will not be visible). To review these messages, press
the MSG key until the “MESSAGES” title is displayed. Then, press the
MORE key until the “END MSGS” title is displayed.
Refer to Appendix A for a complete list of GPS 55 messages.
2.7 OPERATING MODES
Three modes are available which will allow you to operate your GPS 55 in the
way which best suits your needs (see Section 4.2).
Normal mode is most suitable for high dynamics applications. The GPS 55
will typically operate up to six hours on a single pack of batteries.
Battery Saver mode is suitable for most applications and will extend the
battery life to as much as ten hours.
Simulator mode allows you to simulate the operation of the GPS 55 while
at home or in your office. The simulator mode can be used while learning to
use your GPS 55 and is ideal for planning routes and entering waypoints.
Keep in mind that the GPS 55 is not tracking satellites in the simulator mode.
You should never attempt to use the simulator mode for actual navigation.
If you are using your GPS 55 for the first time, we encourage you to review
Chapter 3 which introduces the GPS 55's basic features. Additionally, you
may wish to review Chapter 4 on custom setups. Afterward, you may want
to read through the rest of this manual and make further use of the built-in
simulator to practice with the advanced features.
2-6
Page 17

CHAPTER 3
BASIC OPERATION
3.1 POWER ON
After you turn your GPS 55 on, it will conduct a series of self tests and display
the following notices: “VER x.xx”, “COPYRIGHT”, “1992”, and “GARMIN”.
Following completion of the tests, the Database Page, which indicates the
database version (Americas vs International), effective date, and expiration
date will now be displayed.
Database Version
Effective
Date
Expiration
Date
The GPS 55 will still function with a database which is out of date; however,
you must exercise extreme caution and always verify that the database
information is correct before use. (Warning: The accuracy of the database
information is assured only if the database is current. Pilots using an out-ofdate database do so entirely at their own risk.) After you press ENT to
approve the database, the GPS 55 will begin acquiring satellites. This
process is fully automatic and typically will take two minutes to obtain a
position fix.
Initially, the GPS 55 will display the “ACQ” banner; it will inform you when a
position fix is obtained by transitioning to either the “2D” or “3D” banner.
When four or more satellites with good geometry are available, the GPS 55
will automatically operate in the 3D mode in which latitude, longitude, and
altitude are computed. If only three satellites are available, the unit will
operate in 2D mode in which only latitude and longitude are computed. When
operating in the 2D mode, the unit will use the last computed altitude or your
last entered altitude (Section 3.3 describes how you may enter the altitude).
If less than three satellites with acceptable geometry are available, the “DR”
banner will be displayed.
Your GPS 55 will automatically update satellite orbital data as it operates. If
you have not operated your unit for a period of six months or longer, it will take
approximately 12.5 minutes to search the sky and collect new orbital data.
You will be informed when your unit is searching the sky with the message
3-1
Page 18
“SRCH SKY”. Additionally, the “DATA” banner will be displayed. Once
satellite orbital data is collected, it will be stored in battery backed up memory.
This means the data will not be lost when you turn your GPS 55 off.
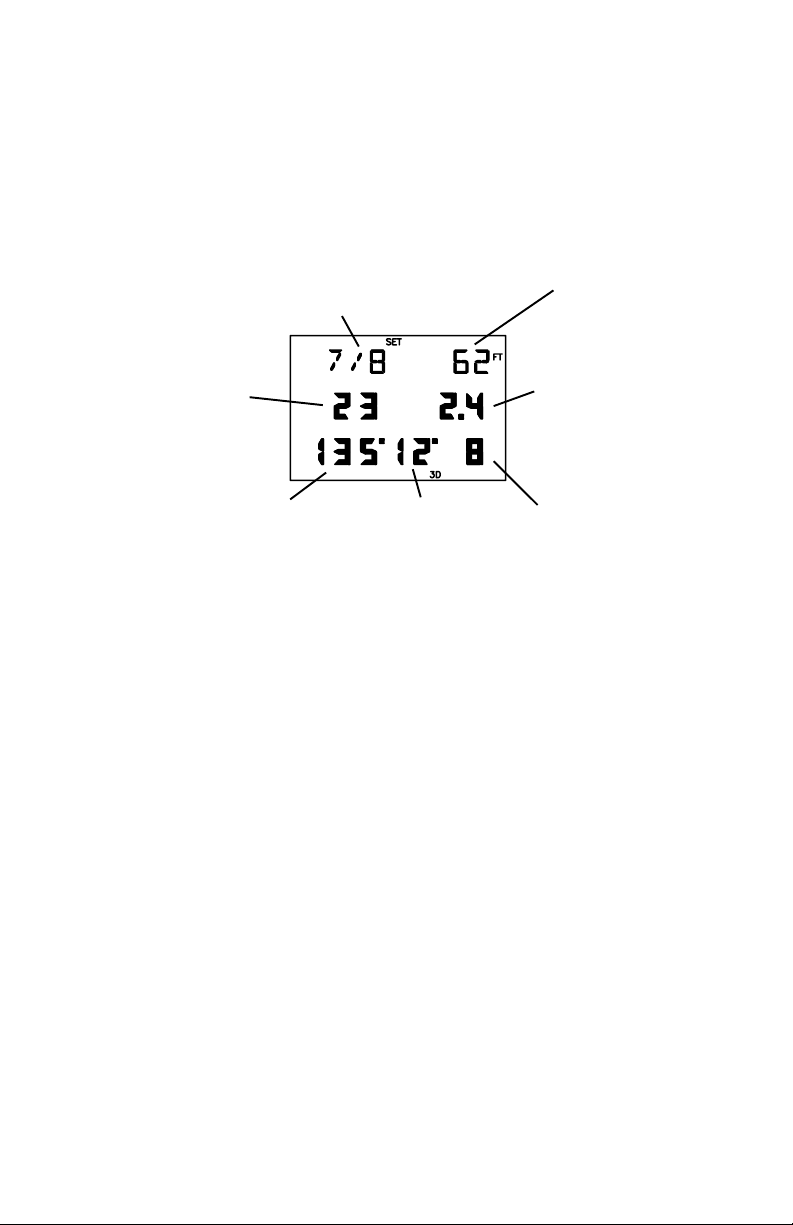
3.2 SATELLITE STATUS
Satellites EPE
Tracked/Visible
Satellite DOP
Identifier
Azimuth Elevation Signal Quality
SATELLITE STATUS PAGE
The Satellite Status Page may be displayed by pressing the SET key. This
page shows the number of satellites tracked and visible, dilution of precision
(DOP), and estimated position error (EPE). DOP is a measure of the satellite
geometry quality and hence the relative accuracy of your position (1 meaning
the best and 10 meaning poor). EPE, which is computed using the satellite
geometry (DOP), signal, and data quality, receiver tracking status and other
factors, is an overall measure of your position accuracy. DOP and EPE are
advisory information only.
The Satellite Status Page also shows the identifier (1-32), azimuth, elevation,
and signal quality of up to eight visible satellites. The azimuth is an angle from
000° to 359° which indicates the bearing from the present position to the
satellite, with 000° representing true north. The elevation is an angle from 00°
to 90° which indicates the height of the satellite above the horizon, where 00°
indicates the horizon and 90° indicates a satellite is directly overhead. The
azimuth and elevation are useful for determining whether a satellite signal is
blocked by buildings, mountains, or other obstructions. The signal quality is
a number from 1 through 9, with 9 indicating the strongest signal. If a satellite
is visible but not tracked, the signal quality will be blank.
The Satellite Status Page will automatically display each satellite’s information
for three seconds. You may also manually scroll through the list of visible
satellites.
3-2
Page 19
To manually scroll through the visible satellite list...
· Use an arrow key to move the cursor under the satellite identifier.
· Press MORE to view each visible satellite’s information.
· Press ENT to remove the cursor and return to automatic mode.
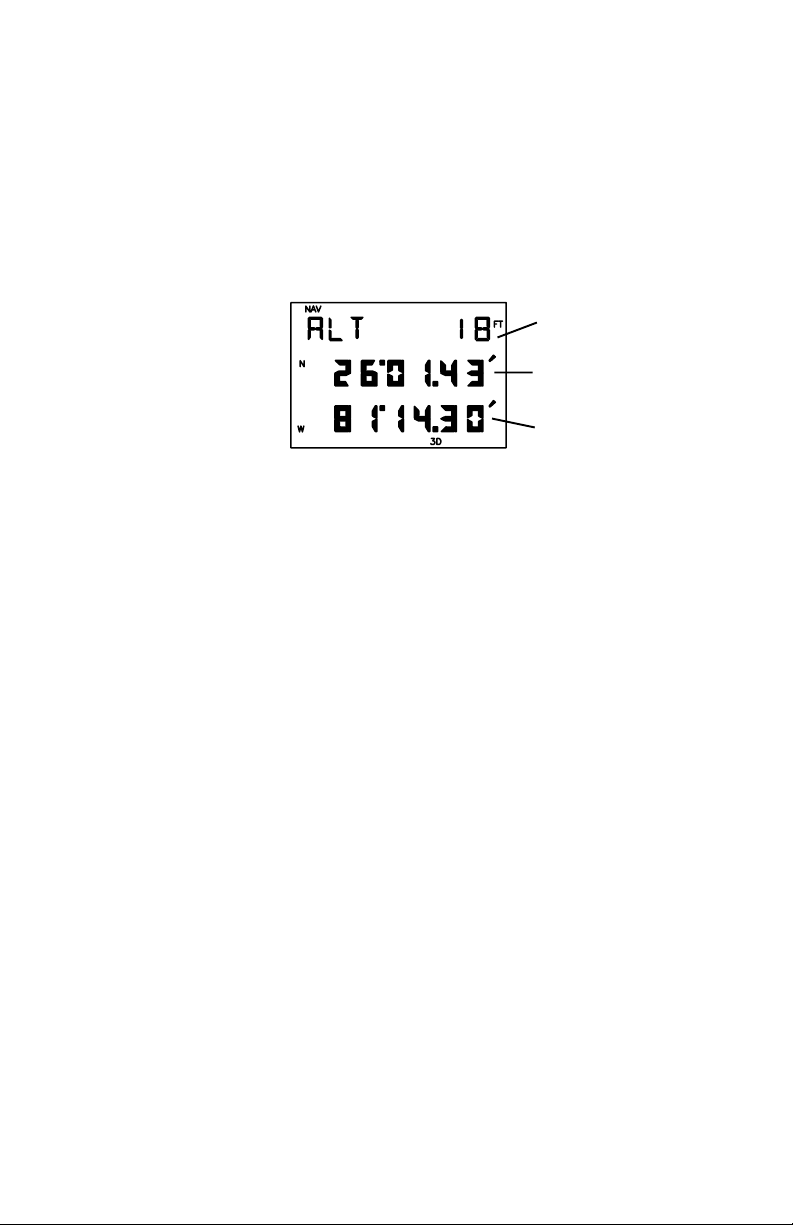
3.3 PRESENT POSITION
Altitude
Latitude
Longitude
POSITION PAGE
The Position Page may be displayed by pressing the NAV key. This page
displays your latitude and longitude relative to the selected earth datum (see
Section 4.11). The altitude displayed is the elevation above mean sea level
(MSL); it is NOT equivalent to the altitude displayed on pressure altimeters
in aircraft and should not be used for vertical navigation. The displayed
altitude is typically less accurate than latitude/longitude due to the arrangement
of the orbiting satellites.
When the GPS 55 is performing 2D navigation, the last known altitude will be
used in the latitude/longitude computation. If your speed is over 65 knots, the
unit will ask you to update your altitude every ten minutes with the message
“NEED ALT.” If the altitude is not accurate within a few hundred feet, you
should manually enter your altitude.
To change the altitude...
· Press NAV to display the Position Page.
· Use an arrow key to move the cursor under the altitude.
· Enter the altitude. If your antenna is mounted on a high mast, make
sure you add the mast height. (Remember to complete the data entry
by pressing ENT.)
During initial satellite acquisition, the displayed position is the last computed
position stored in the GPS 55. If your position has moved more than 1000
nautical miles with the power off, you may wish to enter a more accurate initial
position to speed up the acquisition process. (You may also change the
position at any time when you are operating in simulator mode.)
3-3
Page 20
To change the latitude/longitude...
· Use an arrow key to place the cursor under the latitude field.
· Check the hemispheric designation (“N” or “S”) of the latitude. If it is
correct, go to the next step. If it is incorrect, press the CLR key until
the correct hemispheric designation is displayed.
· Enter the latitude (remember to complete the data entry by pressing
ENT).
· Check the hemispheric designation (“E” or “W”) of the longitude. If it
is correct, go to the next step. If it is incorrect, press the CLR key until
the correct hemispheric designation is displayed.
· Enter the longitude (remember to complete the data entry by pressing
ENT).
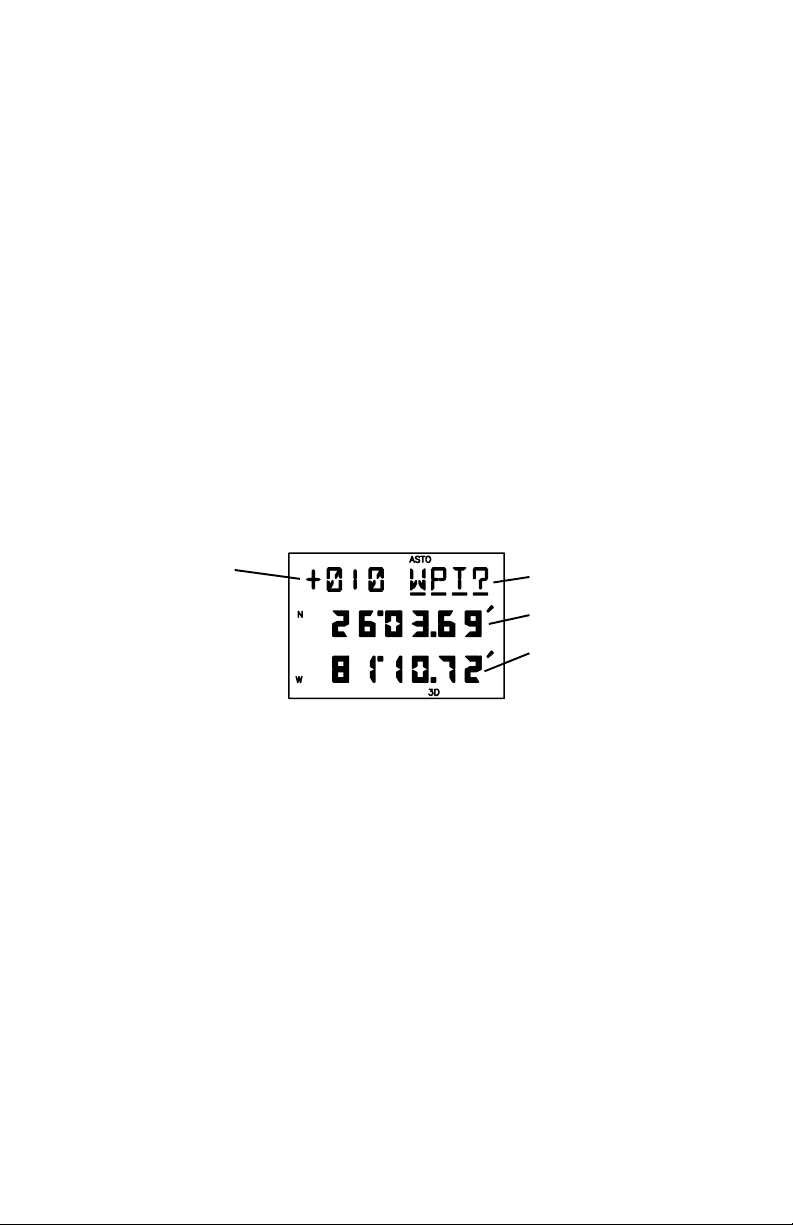
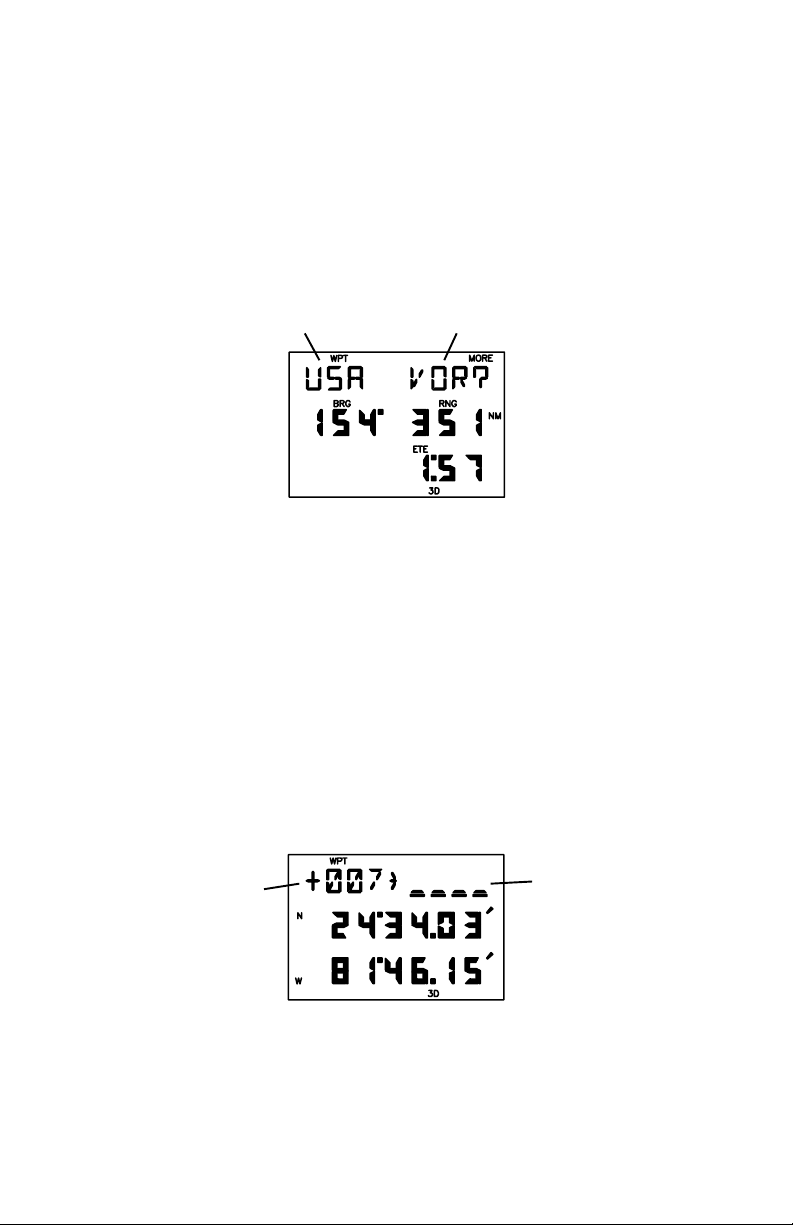
3.4 AUTOSTORE
Waypoint
Name Storage Selection
Latitude
Longitude
AUTOSTORE
TM
PAGE
The AutoStoreTM Page is displayed by pressing the ENT key while viewing
the Position Page. This page allows you to capture your position at the touch
of a button so that you may easily return later. Additionally, you may record
your navigation path by inserting the captured waypoints into a route (see
Section 6.5).
To capture your present position...
· Press NAV until the Position Page is displayed.
· Press ENT. The AutoStoreTM Page will be displayed with the default
waypoint name on line one. The waypoint name begins with a “+”
character followed by a 3-digit number, for example “+010”.
· If you wish to give the waypoint a name of your own, move the cursor
under the waypoint name and enter the name of your choice.
3-4
Page 21

· With the cursor under “WPT?” (the storage selection field), press ENT.
3.5 CDI AND NAVIGATION SUMMARY
Your Position Desired Course “From Waypoint” “To Waypoint”
Direction Distance
( DTK, ( STR,
BRG, RNG,
CTS) DMG)
Direction Speed
( CMG, ( ETE,
TRK, GS,
TRN) VMG)
(CDI on line 1) (Active leg on line 1)
CDI PAGE
The CDI Page may be displayed by pressing the NAV key. This page
displays virtually all the information you need to guide your craft.
The CDI (Course Deviation Indicator) is oriented so that the center represents
your position and the CDI hash represents your desired course. You must
steer toward the hash to eliminate cross track error and stay on course. The
to/from arrow in the center of the CDI indicates if you are navigating to the
waypoint (up arrow) or if you have passed the waypoint (down arrow). You
may set the CDI alarm and CDI scale from the Setup Pages (see Sections
4.3 and 4.7).
You may select the type of information you wish to see on each line. To make
a change, place the cursor under the field and press the MORE key until the
appropriate information is displayed. (See Appendix B for an illustration and
further explanation of the selectable navigation information on lines two and
three.)
On line one, you may elect to display a CDI or the active leg (see Chapter 6).
On line two, you may select one of three direction options (desired track,
bearing, or course to steer). You may also select one of three distance
options (steer direction and distance, range, or distance made good).
On line three, you may select one of three direction options (course made
good, track, or turn instruction). You may also select estimated time enroute
or one of two velocity options (ground speed or velocity made good).
During the process of acquiring satellites, the GPS 55 will not provide
3-5
Page 22
navigation data. The CDI Page will indicate this condition by displaying “NO
POSN” on line 1 and all navigation data on lines 2 and 3 will be blank. If the
GPS 55 is not navigating to a waypoint, the CDI will indicate this condition by
displaying “NO ACT WP” (no active waypoint) and all navigation data except
speed and track will be blank.
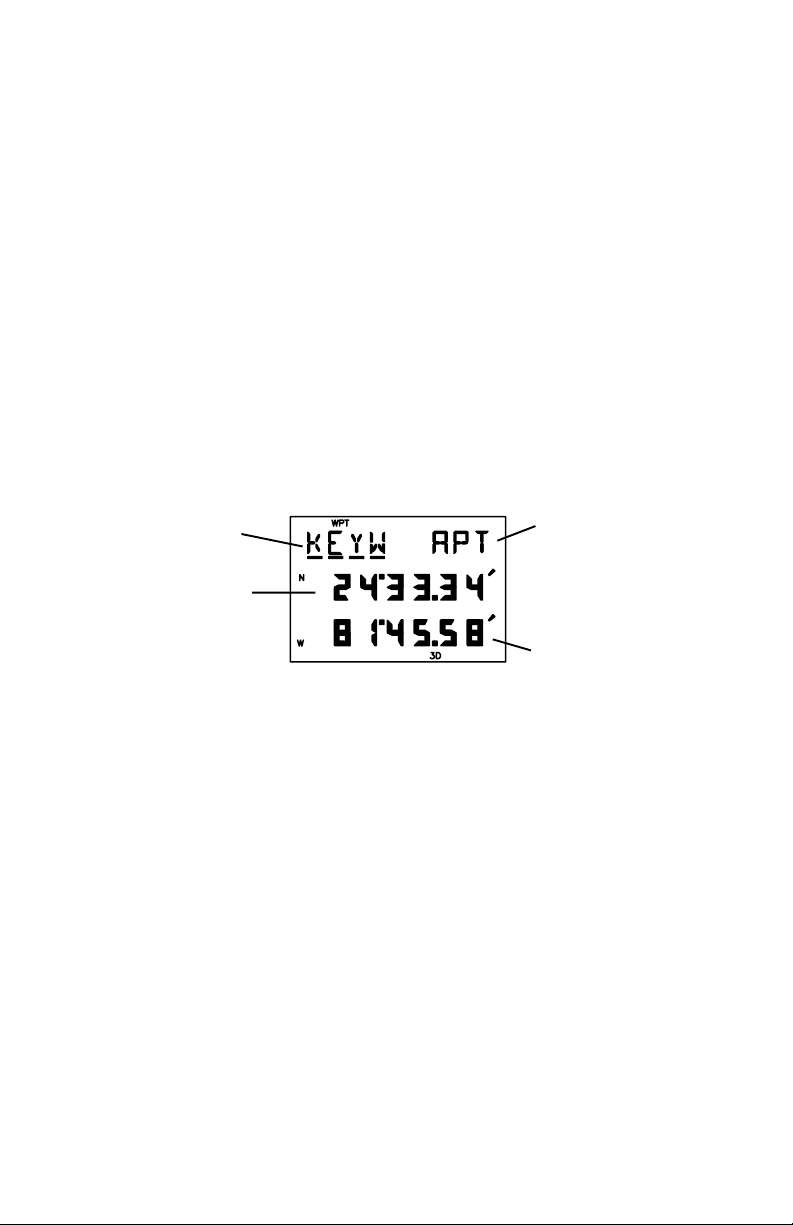
3.6 WAYPOINTS
The GPS 55 contains a public database that provides airport and VOR
locations. Additionally, it allows you to create, store, and use 250 alphanumeric user waypoints. A waypoint consists of a name (up to four letters or
numbers), and its latitude/longitude location. You will have the opportunity
to use waypoints extensively while operating the GPS 55. For example, you
can navigate to a waypoint, build a route using waypoints, and perform trip
planning using waypoints.
Waypoint Waypoint Type/Action
Name (APT, VOR, USR,
REN, DEL)
Latitude
Longitude
WAYPOINT DEFINITION PAGE
The Waypoint Definition Page may be displayed by pressing the WPT key.
It allows you to review, create, modify, delete, and rename waypoints.
To create, modify, or review a waypoint
· With the cursor under the waypoint name field, enter the desired
waypoint name.
· If the waypoint does not exist, the waypoint type on line 1 will be
changed to “USR” (indicating user waypoint). You may then enter the
waypoint latitude and longitude on lines 2 and 3 as described in Section
3.3.
· If the waypoint exists, the Waypoint Definition Page will display the
waypoint type (“APT”, “VOR” or “USR”) and its latitude/longitude.
· To modify a user waypoint position, enter the waypoint latitude and
longitude as described above. (NOTE: If a waypoint is being used for
navigation, its position cannot be modified. An attempt to modify the
3-6
Page 23
position of such a waypoint will result in the message “ACTV WPT”.)
Some waypoints in the database may have the same name. When you have
entered a waypoint whose name is not unique, the Duplicate Waypoint Page
will be displayed with a waypoint region (see Appendix E for a complete list
of the abbreviations for the database regions), type (APT, VOR or USR) and
bearing, range and ETE for you to select the desired waypoint:
Region Type
DUPLICATE WAYPOINT PAGE
To select the desired waypoint from a duplicate waypoint list...
· Press MORE or arrow keys to scroll through the list.
· Press ENT when the desired waypoint type and location is displayed.
To rename a waypoint...
· While a user waypoint is displayed, move the cursor under the
waypoint type/action field.
· Press MORE until “REN?” is displayed.
· Press ENT, the following page will be displayed.
Old New
Waypoint Waypoint
Name Name
· Enter the new waypoint name.
To delete a waypoint from memory...
· While a user waypoint is displayed, move the cursor under the
3-7
Page 24

waypoint type/action field.
· Press MORE until “DEL?” is displayed.
· Press ENT, the waypoint is now deleted from memory. (NOTE: If you
wish to delete a waypoint that is used in a route, first remove it from all
routes before attempting to delete the waypoint. An attempt to delete
a waypoint used in a route will result in the message “ROUTE WPT”.)
A stored waypoint is used by entering its alphanumeric name on a waypoint
name field. (When a waypoint name which does not exist is entered, the error
tone will sound.) As an alternative, the GPS 55 provides a scanning feature
that allows you to select a waypoint by quickly scanning through the nearest
waypoint list, followed by the entire list of waypoints in alphabetical order
(numbers are ordered before the letters of the alphabet).
To select a waypoint by scanning...
· With the cursor under a waypoint name field, press WPT to display the
following page.
Waypoint Type
(APT, VOR, USR)
· Press MORE until the desired type (APT, VOR, or USR) appears.
Press ENT to display the nearest waypoint of the selected type.
· Use the arrow keys to scan through the entire list of waypoints.
· With the desired waypoint shown, press ENT to select the waypoint
(press CLR to cancel the scanning operation at any time).
For example, assume your unit has 15 waypoints, named A1, A2, A3, A4, A5,
N1, N2, N3, N4, N5, Z1, Z2, Z3, Z4, and Z5. Among these waypoints, N1,
N2, N3, N4, and N5 are in the nearest waypoint list in that order. Waypoint
N1 will be displayed from the nearest waypoint list. Successive presses of
the right arrow key will display the other waypoints in this order: N2, N3, N4,
and N5 (from the nearest waypoint list) followed by A1, A2, A3, A4, A5, N1,
N2, N3, N4, N5, Z1, Z2, Z3, Z4 and Z5 (from the alphabetical list). Press the
ENT key when the desired waypoint is displayed.
To avoid scanning through the entire waypoint list, you may want to enter the
first few characters of the waypoint name.
3-8
Page 25

To scan waypoints with specified initial characters...
· Enter the desired number of initial characters of the waypoint name
into a waypoint field as when normally entering a waypoint name.
· Press the WPT key to display the first waypoint that begins with the
character(s) you have entered.
· Use the arrow keys to scan through the list of the waypoints that match
the entered characters.
· With the desired waypoint shown, press the ENT key to select the
waypoint (use the CLR key to cancel the scanning operation at any
time).
For example, assume your unit has the 15 waypoints mentioned previously.
To limit the scan to the waypoints beginning with the letter “Z”, enter the letter
“Z”, then press the WPT key. Waypoint Z1 will be displayed. Successive
presses of the right arrow key will display the other waypoints in this order:
Z2, Z3, Z4, and Z5. Press the ENT key when the desired waypoint is
displayed.
Variable rate scanning is implemented to allow you to quickly go through the
list. When the arrow keys are pressed briefly, you step through the waypoints
one at a time. As the arrow keys are held for a longer period of time, the
waypoint list scrolls more rapidly; the longer the arrow keys are held, the
larger the step through the list.
3.7 NEAREST WAYPOINTS
An important feature of the GPS 55 is the ability to display up to nine
waypoints for each type of waypoint nearest to your position (but not further
than 200 nautical miles). In an emergency, you may use the nearest
waypoint feature to find the closest point of safety in your area.
Waypoint Type Waypoint Name
and Rank
(xxx1...xxx9) Range From Present
Bearing From
Present Position
Position
Estimated Time
Enroute
NEAREST WAYPOINT PAGE
3-9
Page 26

The GPS 55 provides the waypoint name and bearing/range/estimated time
enroute from present position. The entire list of nearest waypoints (indicated
by xxx1 through xxx9) may be viewed by pressing the MORE key while the
cursor is under the waypoint name.
To view nearest waypoint lists...
Waypoint Type
(APT, VOR, USR)
· Press WPT repeatedly until the above page appears.
· Press MORE until the desired type (APT, VOR, or USR) appears.
· Press ENT to display the Nearest Waypoint Page.
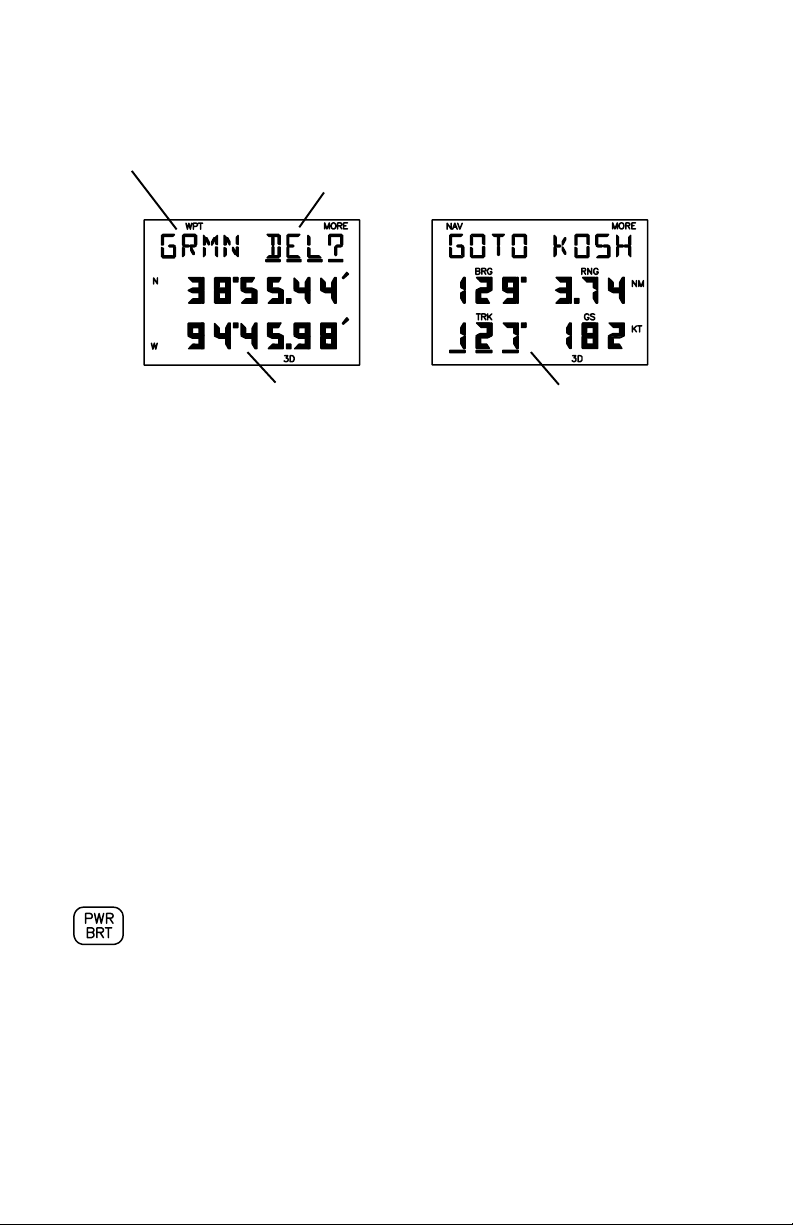
3.8 NAVIGATE TO A WAYPOINT
The GOTO function allows you to quickly set a course from your position to
any waypoint.
GOTO Waypoint
Desired
Track Range
Estimated
Time Enroute
ACTIVE ROUTE PAGE (GOTO MODE)
To activate the GOTO function...
· Press GOTO. The Active Route Page will be displayed with the cursor
under the GOTO waypoint field. If the GPS 55 is currently navigating
to a waypoint, that waypoint will be offered as the default GOTO
waypoint.
· Confirm the default GOTO waypoint by pressing the ENT key (this will
re-center CDI on the CDI page) or enter the desired GOTO waypoint
name. The CDI Page will be displayed.
3-10
Page 27
Alternatively, the GOTO function may be quickly activated from any page
(e.g. the Nearest Waypoint Page) by placing the cursor under the desired
waypoint name and pressing the GOTO key. The Active Route Page will be
displayed with the cursor under the GOTO waypoint name. The GOTO
function will be activated when the ENT key is pressed.
To cancel the GOTO function...
· Press GOTO.
· Press CLR, the GOTO waypoint name will become blank.
· Press ENT. The GPS 55 will start to navigate using the active route,
if it has been programmed (see Chapter 6). Otherwise, the GPS 55 will
cease the computation of all waypoint navigation data.
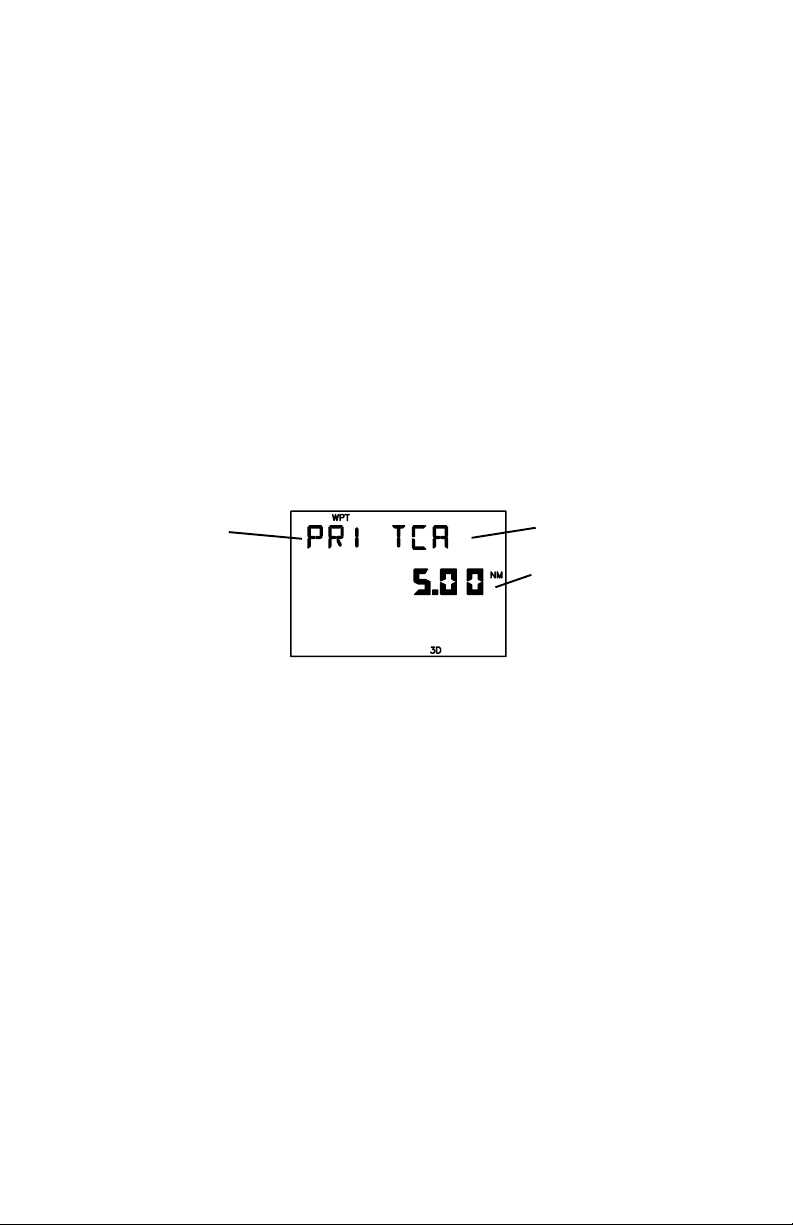
3.9 PROXIMITY ALARM WAYPOINTS
Alarm Waypoint Name
Number
Alarm Radius
PROXIMITY WAYPOINT PAGE
The Proximity Waypoint Page may be displayed by pressing the WPT key.
It allows you to define an alarm circle around a waypoint (you may define a
maximum of nine proximity waypoints). For instance, you may wish to define
a proximity alarm waypoint around a restricted use airspace such as a MOA
or TCA. If you enter the alarm circle, the GPS 55 will notify you with an alarm
tone and the message “PROX ____” (where the blank will be filled in with the
waypoint name).
The Proximity Waypoint Page displays one proximity waypoint at a time.
Additional waypoints are viewed by pressing the MORE key while the cursor
is under the alarm number.
3-11
Page 28

To add a waypoint to the proximity list...
· Scroll through the list until the page is displayed with a blank waypoint
name.
· Enter the desired waypoint name and the radius of the alarm circle.
If the newly entered proximity circle overlaps with any existing circle, you will
be informed with the message “PRX OVRLP”. This message will also be
displayed each time you turn the GPS 55 on as long as the overlap remains.
(WARNING: If you enter the overlap area, the unit will only inform you of the
nearest proximity waypoint.)
To remove a waypoint from the proximity list...
· Place the cursor under the waypoint name you wish to delete.
· Press CLR, the waypoint name will blank.
· Press ENT, the waypoint will be removed from the list.
3.10 SAMPLE TRIP
Now that you have gained a basic understanding of the GPS 55, you are
ready to embark on a sample trip! (The sample illustrations in this section
assume that the factory default settings have not been changed. If you have
changed these parameters, the unit may display slightly different data than
presented here.)
Your GPS 55 is factory initialized with a position of N39°, W095°. A waypoint
named GRMN, located at GARMIN’s Lenexa, Kansas facilities, is also
provided (GARMIN is located 109°, 11.8 nautical miles from the initial
position).
Just for fun, let’s go to GARMIN! Turn on your GPS 55. The power on notices
will be displayed followed by the Satellite Status Page as illustrated below.
The GPS 55 is ready to accept your commands!
3-12
Page 29

Select the simulator mode...
· Press SET until the Set Menu is displayed.
· Press MORE until “OP MODE?” is
displayed.
· Press ENT to display the Operating Mode
Page.
· Press MORE until “SIMULATR?” is
displayed, then press the ENT key. You
have just selected simulator mode.
Set the simulation speed...
· With the cursor under the ground speed
field, press 1, 5, 0, followed by the ENT
key, to indicate 150 knots (you may enter
any speed you wish up to 999 knots). The
simulation speed is now set.
GOTO GARMIN...
· Press GOTO. The Active Route Page will
be displayed with the cursor under the
GOTO waypoint name.
3-13
Page 30

· With the cursor under the GOTO waypoint
name, enter the waypoint name GRMN.
Begin by pressing the 3 key (which also
has a “G” printed on it). The letter “H” is
displayed. Press the left or right arrow key
until “G” is displayed. Press the 6 key
followed by the left or right arrow key until
“R” is displayed. Press the 5 key followed
by the left or right arrow key until “M” is
displayed. Press the 5 key. The letter “N”
is displayed. When finished, press the
ENT key. The CDI Page will be displayed
which indicates your present speed (GS),
track (TRK), range (RNG), and bearing
(BRG) to the waypoint GRMN.
Examine navigation information...
· Press an arrow key to place the cursor under line one. Press MORE
to view the GOTO waypoint.
· Use the arrow keys to move the cursor under the fields on lines two and
three. Press MORE to select a different display option.
Experiment with your GPS 55!
· Now that you are on your way to GARMIN, why don’t you take some
time to experiment with the GPS 55? Press each page selection key
to become familiar with available pages. Practice using the cyclic
fields to display new information. If you want, change the simulation
speed.
· Create a waypoint of your own and GOTO it.
· If you have not customized your unit, this may be a good time to review
Chapter 4 for information concerning custom settings. Doing so will
help you understand what each setting will do.
· If you wish to stop the simulation, simply turn the GPS 55 off.
3-14
Page 31

CHAPTER 4
UNIT CUSTOMIZATION
The GPS 55 is designed for maximum flexibility. The unit features Setup
Pages which allow you to customize your unit by setting a wide variety of
parameters. You may cycle through the Satellite Status, Setup Menu, and
Message Pages as illustrated below by pressing the SET key repeatedly until
the desired page is displayed.
Satellite Status Page Setup Menu Message Page
4.1 SETUP MENU
Menu Select
SETUP MENU
The Setup Menu displays the “SET MENU” title to let you access the
underlying functions. To select a function from the menu, press the MORE
key until the desired function is displayed, then press the ENT key. The
available function selections are: “OP MODE?”, “ALARMS?”, “BACKLGHT?”,
“AUDIO?”, “UNITS?”, “CDI?”, “MAG VAR?”, “FILTERS?”, “OUTPUT?”, and
“MAP DATM?”.
As you change setup parameters, keep in mind the changes you make
become effective immediately if the option does not have a “?”. Otherwise,
if the option has a “?”, you must press the ENT key to confirm it before the
change becomes effective.
4-1
Page 32

4.2 OPERATING MODE
Mode Select
Speed
OPERATING MODE PAGE
The GPS 55 provides you with the capability to select from three modes
which will allow you to operate your unit in the manner which best suits your
needs.
To select the operating mode...
· With the cursor under the mode select field, press MORE until the
desired operating mode is displayed (Normal, Battery Saver, or
Simulator mode as described in Section 2.7).
· Press ENT. The GPS 55 will now transition to the selected operating
mode. (NOTE: Changing modes will cause a momentary interruption
in navigation while the GPS 55 acquires satellites and recomputes
navigation information.)
To enter simulation speed...
· With the cursor under the ground speed field, enter your desired
speed. The GPS 55 will now simulate a moving craft and compute
navigation information using the speed.
4.3 USER SELECTABLE ALARMS
Alarm Select
Alarm Distance
ALARM PAGE
The Alarm Page features three alarms: anchor drag, arrival, and CDI.
4-2
Page 33

To arm/disarm the anchor drag alarm (marine feature)...
· Press MORE until “ANCHR ALR” is displayed. Press the right arrow
key to move the cursor to line two.
· To arm the anchor drag alarm, enter a non-zero distance. If your boat
drifts away from the anchored position more than the specified
distance, you will be informed with an alarm tone and the message
“ANCHR ALR”.
· To disarm the alarm, enter zero for the distance.
To arm/disarm the arrival alarm...
· Press MORE until “ARIVL ALR” is displayed. Press the right arrow key
to move the cursor to line two.
· To arm the arrival alarm, enter a non-zero distance. The arrival alarm
will inform you with an alarm tone and the message “ARIV ____” when
you reach your destination. The alarm distance will also be used to
inform you when you approach a route waypoint with the message
“APCH___”.
· To disarm the alarm, enter zero for the distance.
To arm/disarm the CDI alarm...
· Press MORE until “CDI ALARM” is displayed. Press the right arrow
key to move the cursor to line two.
· To arm the CDI alarm, enter a non-zero distance. The CDI alarm will
notify you with an alarm tone and the message “CDI ALARM” if your
craft has deviated from course beyond the limit you set. (This can be
useful while flying in an airway or navigating a narrow channel.)
· To disarm the alarm, enter zero for the distance.
4.4 BACKLIGHTING TIMEOUT
Light
Timeout
Period
BACKLIGHTING PAGE
4-3
Page 34

The GPS 55 will automatically turn the backlighting off after a specified
number of seconds (backlighting is restored by pressing any key). If you are
using battery power, this feature will help you extend battery life.
To change the timeout period...
· With the cursor under the light timeout period, enter a non-zero value.
· To disable the backlighting timeout, simply enter zero (this means the
backlighting will never turn off while the unit is operating).
4.5 AUDIO SETTINGS
Tone Select
AUDIO SETUP PAGE
The Audio Setup Page allows you to select the characteristics of the audio
tones.
To select audio tones...
· With the cursor under the tone select field, press MORE until the
desired tone setting is selected. Select “ALL TONES” to turn on both
message and keypress feedback, “MSG TONE” to turn on message
tone only, or “NO TONES” to turn off both.
4.6 NAVIGATION UNITS
Units
Select
UNITS PAGE
The GPS 55 allows you to select the distance, speed, and altitude units that
best suit your needs.
4-4
Page 35

To select navigation units...
· Press MORE to select the desired combination of distance, speed,
and altitude units. You may select from Nautical units (nm, kt, ft),
Statute units (mi, mh, ft), or Metric units (km, kh, mt).
4.7 CDI SCALE
CDI Scale
CDI SCALE PAGE
The GPS 55 allows you to set the scale for the CDI displayed on the CDI Page
(see Section 3.5). The CDI scale refers to the distance that is represented
by the CDI. For example, if your CDI scale is set to 1.0 nautical mile, the ends
of the CDI represent left and right 1.0 nautical mile of cross track error.
To set the CDI scale...
· With the cursor under the CDI scale field, enter the desired value.
4.8 MAGNETIC VARIATION
Heading Mode
Select
Magnetic
Variation
MAGNETIC VARIATION PAGE
The GPS 55 offers you three magnetic variation options. You may select
true, automatic magnetic, or user magnetic heading correction for all track,
course, and heading information. If you select true heading, all information
displayed on other pages will be referenced to the true North pole. If you
select automatic magnetic heading, all information will be corrected with the
magnetic variation computed by the GPS 55. If you select user magnetic
heading, all information will be corrected by the magnetic variation you enter.
4-5
Page 36

To select true heading...
· With the cursor under the heading mode select field, press MORE until
“TRUE HDG” is displayed.
To select automatic magnetic heading...
· With the cursor under the heading mode select field, press MORE until
“AUTO MAG” is displayed. The computed magnetic variation at the
present position will be displayed.
To select user magnetic heading...
· With the cursor under the heading mode select field, press MORE until
“USER MAG?” is displayed. Press ENT.
· With the cursor under the magnetic variation field, enter the desired
value. (If the direction [E, W] is incorrect, press CLR until the correct
direction is displayed, then enter the numeric value.)
4.9 FILTER SETTINGS
Position/ Filter Response
Velocity Time Select
Select
FILTER SETTINGS PAGE
The GPS 55 allows you to choose the filter response time for position and
velocity outputs. This may aid you in smoothing the data in rough seas or for
sail boating.
To select filter response time...
· With the cursor under the position/velocity select filter, press MORE
to select “VEL” or “POSN”. Press ENT.
· Press MORE to select FAST (3 seconds), MED (20 seconds), SLOW
(120 seconds), or AUTO.
Typical users will want to choose the “Auto” setting for optimal position and
velocity filtering. This will allow the GPS 55 to respond quickly to changes
in heading and speed while providing smooth data during cruise.
4-6
Page 37

4.10 OUTPUTS
Output
Select
OUTPUT PAGE
You may select the output data format for your interface requirements.
To select the GPS 55 output format...
· Press MORE until the desired output format is displayed. “NMEA
0180”, “NMEA 0182” (also known as NMEA 0180 Complex) and
“NMEA 0183” are available for interfacing with other electronic devices
(see Appendix C for more information on NMEA interfaces).
Alternatively, you may select “NO OUTPUT” if you do not use the
interface (this will help extend battery life).
4.11 MAP DATUM
Map Datum
Select
MAP DATUM PAGE
The GPS 55 calculates your position based on the WGS-84 map datum. If
your charts (or other electronic devices) are created using a different datum,
you must set the GPS 55 map datum for consistency (a position in the WGS84 datum could differ by 1000 feet or more from one calculated using another
datum). The GPS 55 provides 101 standard map datums and allows you to
enter your own, if necessary. Check the datum in the legend of your chart
and the manuals of your other navigation equipment interfaced to the GPS
55 and set the map datum accordingly.
4-7
Page 38

To select a standard map datum...
· With the cursor under the map datum select field, press MORE or the
arrow keys until the desired map datum is displayed. Refer to
Appendix C for a list of the standard map datums.
To select a user map datum...
User Map
Datum
Latitude
Correction
Longitude
Correctio
n
· With the cursor under the map datum select field, press MORE until
“USER?” is displayed. Press ENT.
· Enter the latitude and longitude corrections in the appropriate fields.
(Remember, if the direction [E, W, N, S] is incorrect, press CLR until
the correct direction is displayed, then enter the numeric value.)
4-8
Page 39

CHAPTER 5
NAVIGATION PLANNING
The GPS 55 provides a menu page under the NAV key which allows you to
select from a menu of time and planning functions. You may cycle through
the Navigation Pages by pressing the NAV key repeatedly until the desired
page is displayed.
CDI Page Position Page Navigation Menu
5.1 NAVIGATION MENU
Menu Select
NAVIGATION MENU
The Navigation Menu displays the “NAV MENU” title to let you access the
underlying functions. To select a function from the menu, press the MORE
key until the desired function is displayed, then press the ENT key. The
available function selections are: “DATE TIME?” (current date/time), “TIMER?”
(count down/elapsed timer), “TRIP PLN?” (trip planning), “SUN CALC?”
(sunrise/sunset time calculation), and “ALRM CLK?” (alarm clock).
5.2 DATE AND TIME
Local/UTC Select
Date
Time
DATE/TIME PAGE
5-1
Page 40

The Date/Time Page displays the date and time in either UTC or local format.
In addition, the format you select on this page is used for time displays on
other pages.
To change the time display...
· Press MORE to select either “LCL” (local) or “UTC”.
The GPS 55 will keep track of local as well as UTC time. UTC, which is
essentially the same as Greenwich Mean Time (GMT), does not change with
local time zones. It is the time at 0 degrees longitude which passes through
the city of Greenwich, England. The GPS 55 automatically corrects the UTC
date and time with information received from the satellites.
Due to the irregular nature of time zones, the GPS 55 does not attempt to
correct your local time when you pass from one time zone to another.
To update your local date and time...
· Press MORE until “LCL” is displayed in the time selection field.
· With the cursor under the date field, enter your local date in year,
month, day format.
· With the cursor under the time field, enter your local time in 24-hour
format.
5.3 EVENT TIMER
Timer select
Time
EVENT TIMER PAGE
The GPS 55 features a timer which can be used as either an elapsed timer
or count down timer.
To set the count down timer...
· With the cursor under the time field, enter the count down time in hours,
minutes, and seconds.
· With the cursor under the selection field, press MORE until “COUNT
DN?” is displayed.
5-2
Page 41

· Press ENT. The timer will start counting down. When the timer
reaches zero, you will be informed with the message “TIMER EXP”
and the timer will begin to count up showing you the elapsed time since
the timer has expired.
To stop the count down timer...
· With the cursor under the selection field, press MORE until “STOP?”
is displayed.
· Press ENT. The count down timer will freeze at its last value.
The elapsed timer counts up instead of counting down. It does not generate
a message, but simply measures time from the point at which it was started.
To start the elapsed timer...
· With the cursor under the time field, enter the start time in hours,
minutes, and seconds (you may start or restart the elapsed timer from
a non-zero time).
· With the cursor under the selection field, press MORE until “COUNT
UP?” is displayed.
· Press ENT. The timer will start counting up.
To stop the elapsed timer...
· With the cursor under the selection field, press MORE until “STOP?”
is displayed.
· Press ENT. The elapsed timer will freeze at its last value.
5-3
Page 42

5.4 TRIP PLANNING
From To
Waypoint Waypoint
Desired Distance
Track
Estimated Time
Enroute
TRIP PLANNING PAGE
The Trip Planning Page allows you to calculate the distance, desired track,
and time requirement between any two waypoints.
To perform trip planning...
• Enter the from waypoint. If you wish to use your present position, leave
it blank.
· Enter the to waypoint. If you wish to use your present position, leave
it blank.
The GPS 55 will display the great circle distance and bearing between the
two geographical points. In addition, the time requirement will be displayed
based on your present speed.
5.5 SUNRISE/SUNSET
Waypoint
Sunrise Time
Sunset Time
SUNRISE/SUNSET PAGE
The Sunrise/Sunset Page will display sunrise and sunset times for any
waypoint. This can be helpful if you wish to be at the airport at the crack of
dawn, or if you wish to return home before dark.
To calculate sunrise and sunset times...
· Enter the desired waypoint name. If you wish to use your present
position, leave it blank. The GPS 55 will display the sunrise and sunset
5-4
Page 43

times for the current date at the waypoint. The sunrise and sunset
times will be displayed in local or UTC time based on your selection on
the Date/Time Page (see Section 5.2).
5.6 ALARM CLOCK
Alarm Switch
Alarm Time
Current Time
ALARM CLOCK PAGE
The Alarm Clock Page on the GPS 55 allows you to concentrate on other
important tasks while the GPS 55 watches the clock for you!
To set the alarm clock...
· Press MORE to select “ON” for the alarm clock.
· Enter the desired alarm time in 24-hour format (line three displays the
current time). Enter local or UTC time based on your selection on the
Date/Time Page (see Section 5.2). When the alarm time has been
reached, the GPS 55 will inform you with the message “ALARM CLK”.
To cancel the alarm clock...
· Press MORE to select “OFF” for the alarm clock.
5-5
Page 44

CHAPTER 6
ROUTES
6.1 NAVIGATING USING ROUTES
KSTL
(Active from waypoint)
SGF
Active Leg
EOS
KTUL
MAP
(Active to waypoint)
The GPS 55 offers a route navigation feature for you to navigate along a predefined sequence of waypoints.
The GPS 55 route capability allows you to create and store ten routes, each
containing up to nine waypoints. Routes 1 to 9, the storage routes, can be
activated to travel either in the order you defined the waypoints or in reverse
order. Route A, the active route, is the route you are navigating. The
waypoint toward which you are navigating is called the “active to” waypoint.
The waypoint immediately behind you is called the “active from” waypoint.
The line that connects the “active from” and “active to” waypoints is called the
“active leg”.
The GPS 55 features automatic leg selection which will select the route
segment closest to your position as the active leg. The GPS 55 also features
automatic leg sequencing. As you pass a waypoint in the route, the unit will
automatically select the next waypoint as the “active to” waypoint. If your
speed is greater than 65 knots, the GPS55 will provide smooth steering
around the turn.
6-1
Page 45

You may alternate between the two route pages as illustrated below by
pressing the RTE key.
Route Catalog Page Active Route Page
6.2 ROUTE CATALOG
First and Last Route Waypoints
Total
Distance
Route Number
(rtA, rt1...rt9)
ROUTE CATALOG PAGE
The Route Catalog Page provides a list of the routes stored in the GPS 55.
This page shows the route number, first/last waypoints in the route, and the
total distance traversed by the route. For example, in the illustration above,
route A begins at FMYR (Fort Myers, Florida), ends at NSAU (Nassau in the
Bahamas), and is 365 nautical miles long.
The Route Catalog Page displays one route at a time. Additional routes may
be displayed by pressing the MORE key while the cursor is under the route
number. Alternatively, you may press number key 1 through 9 (or 0 for active
route) to select your desired route.
The Route Catalog Page allows you to initiate various operations on the route
you have selected. By pressing ENT, the Route Catalog Page will change
as illustrated below.
Act ion (ACTIVATE,
INVERT, EDIT, CLEAR,
COPY)
6-2
Page 46

You may press the MORE key to select route editing, activation, copy and
deletion functions.
6.3 EDITING ROUTES
From Waypoint To Waypoint
Desired
Track
Distance
Leg Route
Number Number
(L0...L8) (rtA, rt1...rt9)
ROUTE REVIEW PAGE
The Route Review Page displays the waypoints of a route and allows you to
create, change, and review routes. It shows the route and leg numbers, the
two waypoints composing the leg, and the distance and desired track
between the two waypoints. This page shows one leg at a time. You may
press the arrow keys to review additional legs. (As you scroll past the first
or last waypoint, it will return to the Route Catalog Page.)
To create a route...
· Select an empty route on the Route Catalog Page and press ENT. The
Route Review Page will be displayed as illustrated below.
· With the cursor under the “to waypoint”, enter up to nine waypoints to
create the route.
· Press RTE to return to the Route Catalog Page when editing is
completed.
To display the Route Review Page...
· Select the desired route on the Route Catalog Page and press ENT.
6-3
Page 47

· Press MORE until “EDIT?” is displayed. Press the ENT key. The
Route Review Page will be displayed showing the waypoints of the first
leg. You may view additional legs by pressing the left or right arrow key
while the cursor is under the “to waypoint.”
· Press RTE to return to the Route Catalog Page.To insert a waypoint
into a route...
To insert a waypoint into a route...
· Select the desired route on the Route Catalog Page and press ENT.
· Press MORE until “EDIT?” is displayed. Press ENT. The Route
Review Page will be displayed.
· With the cursor under the “to waypoint”, press the arrow keys to scroll
through the waypoints until the waypoint where you wish to insert
appears.
· Enter the new waypoint. The existing waypoints will shift to the right
to make room for the new waypoint. (If you attempt to add a waypoint
in a route that already contains nine waypoints, you will be informed
with the message “RTE FULL”. )
· Press RTE to return to the Route Catalog Page when editing is
completed.
To delete a waypoint from a route...
· Select the desired route on the Route Catalog Page and press ENT.
· Press MORE until “EDIT?” is displayed. Press ENT. The Route
Review Page will be displayed.
· With the cursor under the “to waypoint”, press the arrow keys to scroll
through the waypoints until the waypoint you wish to delete appears.
· Press CLR followed by ENT to delete the waypoint.
· Press RTE to return to the Catalog Page when editing is completed.
To clear a route...
· Select the desired route on the Route Catalog Page and press ENT.
· Press MORE until “CLEAR?” is displayed. Press ENT. All waypoints
are cleared from the route.
The waypoints of an existing route may be copied to an empty route using
the Route Catalog Page. This is useful if you wish to store the contents of
6-4
Page 48

the active route (route A) before activating another route. Also, you may copy
a route and then make changes to form a new route.
To copy a route...
· Select the desired route on the Route Catalog Page and press ENT.
· Press MORE until “COPY?” is displayed. Press ENT. The Route
Catalog Page will appear as illustrated below.
· Press MORE until the route number of the empty route to which you
wish to copy is displayed, then press ENT. (If no empty routes are
available, you will be informed with the message “NO EMP RT”.)
6.4 ACTIVATING ROUTES
From To
Waypoint Waypoint
Desired Distance
Track
Leg Estimated Time
Number Enroute
(AL, L0...L8)
ACTIVE ROUTE PAGE
Routes are activated using the Route Catalog Page. You may activate any
route in the displayed order or in reverse order. (NOTE: When a new route
is activated, the previous contents of route A will be overwritten. If you wish
to save route A, be sure to copy it to an empty route first.)
To activate a route...
· Select the desired route on the Route Catalog Page and press ENT.
· If you wish to activate the route in the displayed order, press MORE
until “ACTIVATE?” is displayed, then press ENT.
· If you wish to activate the route in reverse order, press MORE until
“INVERT?” is displayed, then press ENT.
6-5
Page 49

Immediately after activating a route, the Active Route Page will be displayed.
This page displays the leg number (L1 to L8, meaning legs 1 through 8 of the
selected route, or AL meaning the active leg), the two waypoints composing
the leg, the desired track between the two waypoints, and the enroute
distance and time from your present position to the “to waypoint”.
Notice the “AL” in the above illustration. This indicates the displayed leg is
the “active leg”, where FMYR is the “active from” waypoint and KWST is the
“active to” waypoint. (NOTE: When activating a route, check the active leg
to be sure you agree with the selection. If not, use the GOTO function to
select the “active to” waypoint you desire.) You may view additional route
legs by pressing the left or right arrow key while the cursor is under the “to
waypoint”.
To add a waypoint to the active route...
· Use the cursor under the “to waypoint”, press the arrow keys to scroll
through the waypoints until the waypoint where you wish to insert the
new waypoint appears.
· Enter the waypoint name. The existing waypoints will shift to the right
to make room for the new waypoint.
To delete a waypoint from the active route...
· With the cursor under the “to waypoint”, press the arrow keys to scroll
through the waypoints until the waypoint you wish to delete appears.
· Press CLR followed by ENT to delete the waypoint.
6-6
Page 50

6.5 BUILDING ROUTES USING AutoStore
TM
GARMIN’s AutoStoreTM feature, introduced in Section 3.4, allows you to
capture your position and store it in the route of your choice at the touch of
a button. By doing so, you are building a route consisting of waypoints stored
along the path you travel.
+005
FLD
+004
+003
+002
HOME
+001
Suppose you are heading out for a trip and want to record your path as you
proceed to your destination so that you can safely return from the opposite
direction. Simply use the AutoStoreTM function to record strategic waypoints
as you travel and insert these waypoints in an empty route from the
AutoStore
TM
Page.
To record your route...
· Press NAV until the Position Page is displayed.
· Press ENT. The AutoStoreTM Page will be displayed with the default
waypoint name.
· If you wish to give the waypoint a name of your own, move the cursor
under the waypoint name and enter the name of your choice.
6-7
Page 51

· With the cursor under the storage select field, press MORE until the
desired route is displayed (e.g., Route 5 as illustrated below).
This route will be the default storage selection for subsequent
AutoStoreTM operations until it is changed or the route becomes full.
· With the desired route selected, press ENT. The AutoStoreTM waypoint
will be stored in the waypoint memory and appended to the selected
route.
When you are ready to return, use the Route Catalog Page to activate the
route you created in reverse order. The GPS 55 will automatically guide you
back to your destination by passing over the waypoints you created! As an
added benefit, you now have a route that will take you back at any time.
6-8
Page 52

CHAPTER 7
SAMPLE SIMULATED TRIP
Now that you have gained a good understanding of the GPS 55 advanced
features, you are ready to embark on a sample route navigation trip! (The
sample illustrations in this chapter assume that the factory default settings
have not been changed. If you have changed these parameters, the unit may
display slightly different data than presented here.)
Fort Myers
Dry Tortugas
Key West
You are planning a trip from Ft. Myers, Florida to the Dry Tortugas and then
on to Key West, Florida. Turn on your GPS 55. The power on notices will
be displayed followed by the Satellite Status Page as illustrated below.
The GPS 55 is ready to accept your commands!
7-1
Page 53

Select the simulator mode...
· Press SET until the Set Menu is displayed.
· Press MORE until “OP MODE?” is
displayed.
· Press ENT to display the Operating Mode
Page.
· Press MORE until “SIMULATR?” is
displayed, then press ENT. You have just
selected the simulator mode.
Set the simulation speed...
· With the cursor under the speed field,
press 1, 5, 0, followed by the ENT key, to
indicate 150 knots (you may enter any
speed you wish up to 999 knots). The
speed is now set.
7-2
Page 54

Since your trip starts at Ft. Myers, you need to set your GPS 55 position to
that location.
Set your GPS 55 position...
· Press NAV until the Position Page is
displayed. NOTE: The position will be
changing by your entered speed.
· Press an arrow key to move the cursor
under the latitude.
· Press CLR until the “N” hemispheric
designation is displayed, then press the 2,
6, 3, 5, 1, 7 keys to enter N26°35.17'.
Press ENT to complete the latitude. The
cursor will move to the longitude.
· Press CLR until the “W” hemispheric
designation is displayed, then press the 0,
8, 1, 5, 1, 8, 1 keys to enter W081°51.81'.
Press ENT to complete the longitude.
Your position is now initialized to Fort
Myers, Florida.
Now you need to create the waypoints used in the sample trip.
Create waypoints...
· Press WPT to display the Waypoint
Definition Page.
7-3
Page 55

Create a waypoint named KEYW, the Key West International Airport. (If your
GPS 55 contains the Americas version database, KEYW should already be
stored as one of the published airports. You will not need to create the
waypoint.)
· With the cursor under the waypoint name,
enter KEYW. Begin by pressing the 4 key
(which also has a “K” printed on it). The
letter “K” is displayed. Press the 2 key
(which also has an “E” printed on it). The
letter “E” is displayed. Press the 9 key
(which also has a “Y” printed on it) followed
by the left arrow key. The letter “Y” is
displayed. Press the 8 key (which also
has a “W” printed on it). The letter “W” is
displayed. When finished, press the ENT
key. The cursor will move under the view
select field.
· Press ENT. The cursor will move under
the latitude field.
· Enter the latitude of Key West International
(N24°33.34') by pressing 2, 4, 3, 3, 3, 4.
Press ENT when you are finished. The
cursor will automatically move under
longitude.
· Enter the longitude of Key West
International (W081°45.58') by pressing
0, 8, 1, 4, 5, 5, 8. Press ENT when you are
finished. You have just created the
waypoint KEWY.
Create a waypoint named DRYT which will be located in the Dry Tortugas
area of the Gulf of Mexico.
· Move the cursor back under the waypoint name field.
7-4
Page 56

· Enter the waypoint name DRYT, latitude
(N24°38.00') and longitude (W082°
55.07').
Create a waypoint named KFMY which is the name for Fort Myers Airport.
(This waypoint should already be stored in the Americas version database.)
· Move the cursor back under the waypoint name field.
· Enter the waypoint name KFMY,
latitude (N26°35.17'), and longitude
(W081°51.81').
Now that the sample waypoints are in memory, create the sample route using
these waypoints.
Create the sample route...
· Press RTE until the Route Catalog Page
is displayed.
· Press MORE until the route 1 is displayed.
(NOTE: This example assumes route 1 is
empty.)
· Press ENT. You have just selected the
Route Review Page for route 1. Notice
that the route does not contain any
waypoints (“L0” indicates leg 0 is
displayed).
7-5
Page 57

· Enter the waypoint name KFMY followed
by the ENT key. You have just entered Ft.
Myers as the waypoint from which your trip
will start.
· Enter DRYT as the second waypoint of
the route.
· Enter KEYW as the third waypoint of the
route. This is the waypoint where your trip
will end.
If you haven’t already guessed, you have just created a route that will take
you from Fort Myers to the Dry Tortugas and on to Key West. You may review
the route leg information (including desired track and range) by pressing the
left arrow key to scroll through the route waypoints.
Activate the sample route...
· Press RTE to display the Route Catalog
Page again.
· Press ENT.
7-6
Page 58

· With the cursor under “ACTIVATE?”,
press ENT to activate the sample route.
The Active Route Page will be displayed.
The sample route is now active. This page displays the waypoint you are
going from (KFMY) and the waypoint you are going to (DRYT) on line one as
well as desired track, distance and time information on lines two and three.
Examine navigation information...
· Press NAV to display the CDI Page. The
page will indicate CDI, bearing, range,
track and speed information.
· Press an arrow key to place the cursor
under line one. Press MORE to view the active leg. Press the MORE
key again to view the CDI.
· Use the arrow keys to move the cursor under the fields on lines two and
three. Press MORE to select a different display option.
Experiment with your GPS 55!
· Now that you have started on your fantasy trip to the Dry Tortugas, why
don’t you take some time to experiment with the GPS 55? Press each
page selection key to become familiar with available pages. Practice
using the cyclic fields to display new information. Examine the Active
Route Page as the simulation progresses. If you want, change the
simulation speed.
· As you progress through the simulation, the GPS 55 will alert you with
a message when you are within one minute of reaching the waypoint
DRYT. When passing DRYT, the GPS 55 will automatically sequence
to the next waypoint which is KWST.
7-7
Page 59

· At some point during the simulation, you
may wish to try the GOTO function.
Suppose severe weather in the Dry
Tortugas area was reported over your
VHF com. You may wish to shorten your
trip by heading directly to Key West,
Florida. Simply press GOTO. The Active
Route Page will be displayed.
· Enter KWST. The GPS 55 will set an instantaneous course and you
are on your way to Key West!
7-8
Page 60

APPENDIX A
MESSAGES
The GPS 55 uses the Message Page to communicate important information
to you. Some messages are advisory in nature, others are warnings that may
require your intervention. This appendix provides a complete list of GPS 55
messages and their meanings. Please pay careful attention to all messages.
ACTV WPT - An attempt has been made to modify the position of the “active
to” or “active from” waypoint. The GPS 55 will not allow the modifications.
ADJST OSC - The GPS 55 has detected excessive drift in its internal crystal
oscillator which may result in longer acquisition time. The unit should be
taken to an authorized GARMIN service center as soon as possible.
ALARM CLK - The alarm clock time has been reached.
ANCHR ALR - Your craft has drifted outside the anchor drag alarm radius
set on the Alarm Page.
APCH ____ - You are less than one minute from reaching the indicated
waypoint or your craft has entered the arrival alarm circle for the waypoint.
ARIV ____ - Your craft has entered the arrival alarm circle for the waypoint.
BATT LOW - The battery pack is low on power. AA batteries should be
replaced or the rechargeable battery pack should be recharged.
CDI ALARM - Your course deviation has exceeded the limit you specified on
the Alarm Page.
DATA LOST - Stored user data, including waypoints, routes, and satellite
orbital data has been lost due to a low memory battery.
EXST ____ - You have renamed the waypoint on the AutoStoreTM Page or
Waypoint Definition Page with a name that already exists in memory. Enter
a waypoint name that does not exist.
HIGH EPE - The accuracy of the GPS 55 position is degraded beyond 500
meters due to satellite geometry or data quality. Additional cross checking
should be performed by the user to verify the integrity of the GPS 55 position.
MEM BATT - The battery that sustains user memory is low and should be
replaced by an authorized GARMIN service center as soon as possible.
Failure to do so may result in loss of stored data, including all waypoints and
routes.
A-1
Page 61

MEM FULL - The waypoint memory is full. You should delete unused
waypoints to make room for new waypoints.
NEED ALT - The GPS 55 needs altitude input in order to start or continue
2D navigation. Press NAV to enter altitude on the Position Page.
NO EMP RT - There are no empty routes available into which another route
may be copied.
POOR CVRG - The GPS 55 cannot acquire sufficient satellites necessary
to provide navigation.
PROX ____ - Your craft has penetrated the alarm circle of the proximity
waypoint. Press WPT to view your position relative to the waypoint.
PROX WPT - An attempt has been made to delete a waypoint which is a
member of the proximity list. You must remove the waypoint from the
proximity list before the waypoint can be deleted.
PRX OVRLP - The circles defined by two proximity waypoints overlap. When
entering the area of the overlap, the GPS 55 will alarm you of the closest
proximity waypoint, but not both. You should be certain this condition is
desirable.
RCVR FAIL - The GPS 55 has detected a failure in the receiver hardware.
If the message persists, the GPS 55 is unusable and should be taken to an
authorized GARMIN service center.
RE-INIT - The GPS 55 is unable to compute a position. Initialize the position
on the Position Page to within 1000 nautical miles of your actual position.
ROM FAILD - The GPS 55 has detected a failure in its memory. The unit is
unusable and should be taken to an authorized GARMIN service center.
ROUTE WPT - An attempt has been made to delete a waypoint which is a
member of one or more routes. You must remove the waypoint from all
routes before the waypoint can be deleted.
RTE FULL - An attempt has been made to add more than nine waypoints to
a route. The GPS 55 will not allow more than nine waypoints per route.
SHORT LEG - The upcoming leg is too short for smooth waypoint transitions.
Expect a rapid change in the CDI.
SRCH SKY - The GPS 55 is in search-the-sky mode. Allow the unit to
complete its data collection before turning it off.
STEEP TRN - This message appears one minute prior to a turn that requires
a bank angle in excess of 25 degrees in order to stay on course.
TIMER EXP - The count down timer has expired.
A-2
Page 62

APPENDIX B
NAVIGATION TERMS
B.1 DEFINITIONS
This section provides an illustration of and definitions for the navigation terms
used in this manual.
B-1
Page 63

Velocity/time terms:
GS Ground speed. GS is the speed measured relative to the ground;
also known as velocity over ground (VOG).
VMG Velocity made good. VMG is velocity in the direction of the desired
course. It is the speed at which you are closing on the “active to”
waypoint.
ETE Estimated time enroute. ETE is the time it will take to reach the
“active to” waypoint based on VMG.
Direction terms:
DTK Desired track. DTK is the course between the “from” and “to”
waypoints.
BRG Bearing. BRG is the direction from your position to the “active to”
waypoint.
CTS Course to steer. CTS is the recommended direction to steer in order
to reduce cross track error and stay on course (see Section B.2 for
an example using CTS).
CMG Course made good. CMG is the bearing from the “active from”
waypoint to your position.
TRK Track. TRK is the direction of movement relative to the ground.
TRN Turn instruction. TRN is the difference between BRG or CTS
(whichever you have displayed) and TRK. “L” indicates you should
turn to the left, “R” indicate you should turn to the right. The degrees
indicate the angle you are off course.
Distance terms:
RNG Range. RNG is the great circle distance from your position to the “to”
waypoint.
DMG Distance made good. DMG is the distance from the “active from”
waypoint to your position.
STR Steer direction and distance. “L” indicates you should steer to the
left, “R” indicates you should steer to the right. The distance
indicates how far you are off course.
B-2
Page 64

B.2 COURSE TO STEER (CTS)
Course To Steer is a GARMIN exclusive that recommends an optimal
direction to steer that will guide you to the course and proceed efficiently
along your route.
B-3
Page 65

As an example, suppose you activate the route illustrated above. The GPS
55 chooses the closest leg with a desired track of 45 degrees but your
position happens to be two nautical miles off course. The unit will automatically
compute the optimal course to steer (which is 15° in this example). Press the
NAV key until the CDI Page is displayed, then select “CTS” on line two and
“TRN” on line three. Turn your craft according to the TRN direction until the
TRN angle reaches zero. Continue to follow the TRN guidance, thus
matching your track (TRK) with the recommended course to steer.
As you approach the course, CTS will slowly change and, once on course,
will be identical to the desired track.
B-4
Page 66

APPENDIX C
INSTALLATION AND MAINTENANCE
C.1 SPECIFICATIONS
GPS 55 SPECIFICATIONS
—————————————————————————————-
PHYSICAL
Case: Main Unit: Waterproof
Battery Pack: Splash Proof
Size: Portable: 3.23"w x 6.26"h x 1.46"d
(82mm x 159mm x 37mm)
Fixed: 3.23"w x 4.87"h x 1.46"d
(82mm x 124mm x 37mm)
Weight: 14 ounces (0.4 kg) without battery pack
19.5 ounces (0.55) with battery pack
POWER
Input Alkaline battery pack (4 AA size)
Rechargeable battery pack
12- or 24-volt DC with power cable (5-40 VDC)
115- or 230-volt AC with battery charger
*
Consumption 1.1 watts in Normal mode (without backlighting)
ENVIRONMENTAL
Temperature: -15°C to +70°C (+5°F to +158°F ) operating
-40°C to +70°C (-40°F to +158°F) storage
Humidity: 95% non-condensing
PERFORMANCE
Receiver: MultiTracTM, tracking up to 8 satellites
Frequency: L1, 1.57542 GHz
Acquisition Time: 2 minutes 2D
(typical) 2.5 minutes 3D
15 seconds Warm Start (with ephemeris)
C-1
Page 67

Update Rate: Once per second, continuously
Accuracy: Position: 15 meters (49 ft) RMS
Velocity: 0.1 knots RMS steady state
Dynamics: 695 knots velocity, 3g dynamics
INTERFACES
NMEA 0180
NMEA 0182
NMEA 0183 (Version 1.5; December 1987)
Approved sentences:
GPBWC, GPGLL, GPRMB, GPRMC, GPR00, GPWPL, GPXTE
Proprietary sentences:
PGRMA
Transmission rate:
GPBWC, GPGLL, GPRMB, GPRMC, GPXTE, and PGRMA
transmitted once every two seconds.
GPR00 transmitted once every (# of route waypoints + 1) * 2
seconds. e.g., if there are two route waypoints, this sentence will
be transmitted once every six seconds.
**
GPWPL transmitted # of route waypoints times in (# of route
waypoints + 1) * 2 seconds. e.g., if there are two route waypoints,
this sentence will be transmitted twice every six seconds.
—————————————————————————————-
NOTES:
* All specifications are subject to change without notice.
** Subject to accuracy degradation to 100m 2DRMS under the United
States Department of Defense imposed Selective Availability program.
C-2
Page 68

C.2 ELECTRICAL WIRING
The GPS 55 power/data cable allows you to connect the unit to vehicle power
systems, other electronics, and a remote alarm/beeper. The harness will
plug into the connector located on the rear panel of the GPS 55. (Note that
the white wire and the red/black stripe wire are not functional and should not
be connected.)
To connect to vehicle power systems...
· Connect the RED harness lead (with fuse) to the positive (+) side of a
5-40 volt DC power source.
· Connect the BLACK harness lead to the negative (-) side of the 5-40
volt DC power source.
The GPS 55 will drive a remote alarm or relay that requires no more than 100
milliamps of current. (WARNING: Devices which draw current in excess of
100 milliamperes may damage your unit and will void your warranty. Consult
the instructions included with the remote alarm or relay for current drain
information.)
To connect to a remote alarm system...
· Connect the BLUE harness lead to the negative side of a transistor
alarm or relay switch.
· Connect the positive side of the alarm or relay to the positive side of
the 5-40 volt DC power source.
The GPS 55 may be connected to other electronics such as a marine
autopilot or plotter which use an NMEA 0180, NMEA 0182 or NMEA 0183
C-3
Page 69

data interface. The unit can provide data for up to three NMEA “listeners”
simultaneously. Refer to installation instructions of these devices for further
information.
To connect the GPS 55 to an NMEA electronic device...
· Connect the BROWN harness lead to the NMEA “A” line of a two-wire,
shielded cable.
· Connect the BLACK harness lead to the NMEA “B” line of the shielded
cable.
· Connect the BLACK harness lead to the shield of the shielded cable.
(The opposite end of the shield should not be grounded.)
C.3 SURFACE MOUNT INSTALLATION
The GPS 55 is equipped with a mounting bracket for fixed installations. The
mount may be attached to a surface as shown below.
Although your GPS 55 is designed to withstand the harshest environments,
it is recommended that it be mounted in a location which provides protection
from sun and spray. Before permanent mounting, you may wish to apply
power to the unit and look at the display in the desired mounting location to
ensure you have the desired viewing angle.
To install the surface mount...
· Remove the screws which mount the power/data cable and remove
the cable.
· Unscrew the coinslot screw and remove the cradle.
C-4
Page 70

· Drill an oblong hole in the mounting surface to allow clearance for the
power/data cable and connector.
· Mount the connector plate to the mounting surface using appropriate
screws (#8 flat head screws are recommended).
· Slide the cradle onto the connector plate and install the coinslot screw.
· Install the power/data cable.
To adjust the surface mount...
The surface mount has been designed to allow the GPS 55 to be installed
either with or without the battery pack attached. To adjust the surface mount
C-5
Page 71

to accept the GPS 55 with the battery pack attached:
· Loosen the coinslot.
· Lower the cradle to its lowest position.
· Tighten the coinslot screw. When adjusted properly, the coinslot
screw should fit completely into the counterbore in the cradle so that
all surfaces are flush.
The surface mount has been designed for easy insertion and removal of your
GPS 55 if you wish to use the unit in another airplane, boat or vehicle, plan
at home, or prevent theft.
To insert the GPS 55 into the surface mount...
· Tilt the top of the GPS 55 into the surface mount as shown.
· Engage the slot in the top of the GPS 55 into the raised bump in the
surface mount.
· Rotate the bottom of the GPS 55 into the mount until the unit latches
securely into place.
· Connect the antenna or antenna cable. No other electrical connections
are required; all power and data connections are made through the 6pin connector installed in the surface mount.
C-6
Page 72

To remove the GPS 55 from the surface mount...
· Disconnect the antenna or antenna cable.
· Apply enough force to the release tab to allow the unit to pass as shown
above.
· Pull the bottom of the GPS 55 out, then rotate the top downward and
out.
C.4 PORTABLE ANTENNA INSTALLATION
The GPS 55 is supplied with a portable antenna mount that allows the
antenna to be affixed to a windshield or any smooth surface using a suction
cup mount and a six foot extension cable. As an alternative, the suction cup
can be removed and replaced with the plastic shoulder washer and selfthreading screw to permanently attach the mounting bracket to the glare
shield.
C-7
Page 73

C.5 BATTERY PACK OPERATION
The GPS 55 is supplied with a 4-cell alkaline battery pack. The battery pack
must be removed from the unit in order to replace the cells.
To remove the battery pack...
· Push down on the spring tab on the right side of the battery pack.
· Pull the battery pack off the right side of the unit.
To replace the alkaline batteries...
C-8
Page 74

· Grip the battery pack around the outside edge (not the bottom).
· Push the top of the battery pack against the edge of a hard surface
which will not mar the plastic. The outer sleeve will slide off the cage,
revealing the batteries inside.
· Replace the batteries, observing the polarity diagram engraved in the
plastic.
· Slide the sleeve over the cage until it snaps into place, taking care that
you do not tear the gaskets which provide the battery pack seal.
C.6 MAINTENANCE
The GPS 55 is constructed of high quality material and should not require
user maintenance. Please refer any repairs to an authorized GARMIN
service center. (The unit contains no user serviceable parts, do not attempt
repairs yourself.)
Never allow gasoline or solvents to come into contact with your unit. Damage
to the case may occur which is not covered by your warranty.
The waypoints, routes, custom settings, and other data stored in the GPS 55
are maintained by an internal battery. (These data will not be lost even if you
remove the AA or rechargeable battery pack for separate storage.) The
internal memory battery should typically last three to five years. If the GPS
55 detects a low memory battery, you will be informed with the message
“MEM BATT”. You should return your unit to an authorized GARMIN service
center as soon as possible for service. Failure to do so may result in loss of
data each time you turn your unit off (indicated by the message “DATA
LOST”).
Your GPS 55 contains a highly accurate crystal oscillator which may drift
after many years of operation. If the unit detects excessive oscillator drift,
you will be informed with the message “ADJST OSC”. You should return your
unit to an authorized GARMIN service center as soon as possible. Failure
to do so may result in degraded acquisition performance.
C.7 CUSTOMER SUPPORT
Should you require additional assistance, please call our Customer Support
Department. Customers in the continental United States may use our toll free
number: 1-800-800-1020. Customers outside the continental United States
may call 1-913-599-1515.
C-9
Page 75

APPENDIX D
MAP DATUMS
The following is a list of the GPS 55 map datum selections and the
corresponding map datum name (including the area of application):
ADINDAN ADINDAN - Ethiopia, Mali, Senegal, Sudan
AFGOOYE AFGOOYE - Somalia
AIN ELABD AIN EL ABD 1970 - Bahrain Island, Saudi Arabia
ANNA1ASTR ANNA 1 ASTRO 1965 - Cocos Islands
ARC 1950 ARC 1950 - Botswana, Lesotho, Malawi, Swaziland,
Zaire, Zambia, Zimbabwe
ARC 1960 ARC 1960 - Kenya, Tanzania
ASCNSN IS ASCENSION ISLAND 1958 - Ascension Island
ASTR BECN ASTRO BEACON “E” - Iwo Jima Island
ASTRSOROL ASTRO B4 SOROL ATOLL - Tern Island
ASTRO DOS ASTRO DOS 71/4 - St. Helena Island
ASTRO STN ASTRONOMIC STATION 1952 - Marcus Island
ASTRLN 66 AUSTRALIAN GEODETIC 1966 - Australia, Tasmania
Island
ASTRLN 84 AUSTRALIAN GEODETIC 1984 - Australia, Tasmania
Island
BELLEVUE BELLEVUE (IGN) - Efate and Erromango Islands
BERMUDA BERMUDA 1957 - Bermuda Islands
BOGOTA OB BOGOTA OBSERVATORY - Colombia
CAMPO INC CAMPO INCHAUSPE - Argentina
CANTON 66 CANTON ASTRO 1966 - Phoenix Islands
CAPE CAPE - South Africa
CAP CNVRL CAPE CANAVERAL - Florida, Bahama Islands
CARTHAGE CARTHAGE - Tunisia
CHATHM 71 CHATHAM 1971 - Chatham Island (New Zealand)
CHUA ASTR CHUA ASTRO - Paraguay
CREGO ALG CORREGO ALEGRE - Brazil
DJAKARTA DJAKARTA (BATAVIA) - Sumatra Island (Indonesia)
DOS 1968 DOS 1968 - Gizo Island (New Georgia Islands)
EASTER IS EASTER ISLAND 1967 - Easter Island
EUROPE 50 EUROPEAN 1950 - Austria, Belgium, Denmark, Finland,
France, Germany, Gibraltar, Greece, Italy, Luxembourg,
Netherlands, Norway, Portugal, Spain, Sweden,
Switzerland
D-1
Page 76

EUROPE 79 EUROPEAN 1979 - Austria, Finland, Netherlands,
Norway, Spain, Sweden, Switzerland
FIN HYFRD FINLAND HAYFORD 1910 - Finland
GANDAJIKA GANDAJIKA BASE - Republic of Maldives
GEOD 49 GEODETIC DATUM 1949 - New Zealand
GUAM 1963 GUAM 1963 - Guam Island
GUX ASTRO GUX 1 ASTRO - Guadalcanal Island
HJORSY 55 HJORSEY 1955 - Iceland
HONG KONG HONG KONG 1963 - Hong Kong
INDN TLND INDIAN - Thailand, Vietnam
INDN BLDS INDIAN - Bangladesh, India, Nepal
IRELND 65 IRELAND 1965 - Ireland
ISTS ASTR ISTS O73 ASTRO 1969 - Diego Garcia
JHNSTN IS JOHNSTON ISLAND 1961 - Johnston Island
KANDAWALA KANDAWALA - Sri Lanka
KERGLN IS KERGUELEN ISLAND - Kerguelen Island
KERTAU 48 KERTAU 1948 - West Malaysia, Singapore
LC5 ASTRO L.C. 5 ASTRO - Cayman Brac Island
LIBRIA 64 LIBERIA 1964 - Liberia
LUZN PHLP LUZON - Phillippines (excluding Mindanao Island)
LUZN MNDN LUZON - Mindanao Island
MAHE 1971 MAHE 1971 - Mahe Island
MARCO AST MARCO ASTRO - Salvage Islands
MASSAWA MASSAWA - Eritrea (Ethiopia)
MERCHICH MERCHICH - Morocco
MIDWAY 61 MIDWAY ASTRO 1961 - Midway Island
MINNA MINNA - Nigeria
NHRN MSRH NAHRWAN - Masirah Island (Oman)
NHRN UAE NAHRWAN - United Arab Emirates
NHRN SADI NAHRWAN - Saudi Arabia
NAPARIMA NAPARIMA, BWI - Trinidad and Tobago
NAD27 CNS NORTH AMERICAN 1927 - Mean Value (CONUS)
NAD27 ALA NORTH AMERICAN 1927 - Alaska
NAD27 BHM NORTH AMERICAN 1927 - Bahamas (excluding San
Salvador Island)
NAD27 SSI NORTH AMERICAN 1927 - San Salvador Island
NAD27 CAN NORTH AMERICAN 1927 - Canada (including
Newfoundland Island)
NAD27 C Z NORTH AMERICAN 1927 - Canal Zone
NAD27 CAR NORTH AMERICAN 1927 - Caribbean (Barbados,
Caicos Islands, Cuba, Dominican Republic, Grand
Cayman, Jamaica, Leeward Islands, Turks Islands)
D-2
Page 77

NAD27 C A NORTH AMERICAN 1927 - Central America (Belize,
Costa Rica, El Salvador, Guatemala, Honduras,
Nicaragua)
NAD27 CUB NORTH AMERICAN 1927 - Cuba
NAD27 GRN NORTH AMERICAN 1927 - Greenland (Hayes
Peninsula)
NAD27 MEX NORTH AMERICAN 1927 - Mexico
NAD83 NORTH AMERICAN 1983 - Alaska, Canada, Central
America, CONUS, Mexico
OBSERV 66 OBSERVATORIO 1966 - Corvo and Flores Islands
(Azores)
OLD EGYPT OLD EGYPTIAN - Egypt
OLD HAWAI OLD HAWAIIAN - Mean Value
OMAN OMAN - Oman
GRT BT 36 ORDNANCE SURVEY OF GREAT BRITAIN 1936 -
England, Isle of Man, Scotland, Shetland Islands, Wales
PICO NIEV PICO DE LAS NIEVES - Canary Islands
PITCRN 67 PITCAIRN ASTRO 1967 - Pitcairn Island
RT90 SWEDEN
S CHILE PROVISIONAL SOUTH CHILEAN 1963 - South Chile
S AMER 56 PROVISIONAL SOUTH AMERICAN 1956 - Bolivia,
Chile, Colombia, Ecuador, Guyana, Peru, Venezuela
PURTO RIC PUERTO RICO - Puerto Rico, Virgin Islands
QATAR NTL QATAR NATIONAL - Qatar
QORNOQ QORNOQ - South Greenland
REUNION REUNION - Mascarene Island
ROME 1940 ROME 1940 - Sardinia Island
SANTO DOS SANTO (DOS) - Espirito Santo Island
SAO BRAZ SAO BRAZ - Sao Miguel, Santa Maria Islands (Azores)
SAPR HILL SAPPER HILL 1943 - East Falkland Island
SCHWARZCK SCHWARZECK - Namibia
S AMER 69 SOUTH AMERICAN 1969 - Argentina, Bolivia, Brazil,
Chile, Colombia, Ecuador, Guyana, Paraguay, Peru,
Venezuela, Trinidad and Tobago
S ASIA SOUTH ASIA - Singapore
SE BASE SOUTHEAST BASE - Porto Santo and Madeira Islands
SW BASE SOUTHWEST BASE - Faial, Graciosa, Pico, Sao Jorge,
and Terceira Islands (Azores)
TIMBLI 48 TIMBALAI 1948 - Brunei and East Malaysia (Sarawak
and Sabah)
TOKYO TOKYO - Japan, Korea, Okinawa
TRISTN 68 TRISTAN ASTRO 1968 - Tristan da Cunha
D-3
Page 78

VITI LEVU VITI LEVU 1916 - Viti Levu Island (Fiji Islands)
WAK-ENWTK WAKE-ENIWETOK 1960 - Marshall Islands
ZANDERIJ ZANDERIJ - Surinam
WGS 72 WORLD GEODETIC SYSTEM 1972
WGS 84 WORLD GEODETIC SYSTEM 1984
D-4
Page 79

APPENDIX E
ABBREVIATIONS FOR DATABASE REGIONS
AFGN Afghanistan
AILA Anguilla
ALBN Albania
ALGR Algeria
ANGL Angola
ANT Antarctica
ANTG Antigua
ARGN Argentina
ARUB Aruba/Neth Antilles
AUST Australia
AUT Austria
AWSM American Samoa/Western
Samoa
BEL Belgium
BELZ Belize
BEN Benin
BHMS Bahamas
BHRN Bahrain
BHTN Bhutan
BIOT Chagos Archipelago/British
Indian Ocean Territory
BLGR Bulgaria
BNGL Bangladesh
BOLV Bolivia
BRAZ Brazil
BRBD Barbados
BRDI Burundi
BRMD Bermuda
BRUN Brunei/Malaysia
BRVG British Virgin Islands
BTWA Botswana
BURK Burkina Faso
CAFR Central African Republic
CAMR Cameroon
CAN Canada
CHAD Chad
CHLE Chile/Easter Island
CHNA China
CIS Amenia/Azerbaijan/
Georgia/Kazakhstan/
Kirgizia/ Moldavia/Ukraine/
Uzbekistan/Tadzhikistan/
Turkmenistan
CNIS Canary Island
COL Colombia/San Andres
CONG Congo
COOK Cook Islands
CPVR Cape Verde
CRI Costa Rica
CROA Croatia
CUBA Cuba
CYMN Cayman island
CYPR Cyprus/Turkey
CZSK Czechoslovakia
DJIB Djibouti
DMCA Dominica
DNK Denmark/Faroe Island
DOMR Dominican Republic
ECUA Ecuador
EGYP Egypt
EQGU Equitorial Guinea
ETHP Ethiopia
FALK Falkland Islands
FIJI Fiji Island/Tonga
FIN Finland
FRAN France
FRGU French Guiana
GABN Gabon
GER Germany
GHAN Ghana
GIBR Gibraltar
GLPE Guadeloupe/Martinique
E-1
Page 80

GMBA Gambia
GN-B Guinea-Bissau
GREC Greece
GR Greenland
GRND Grenada
GTML Guatemala
GUAM Guam/Mariana Islands
GUIN Guinea Republic
GUYN Guyana
HATI Haiti
HKNG Hong Kong
HNDR Honduras
HUNG Hungary
INDA India
INDN Indonesia
IRAN Iran
IRAQ Iraq
IRL Ireland
ISL Iceland
ISRL Israel/Jerusalem
ITAL Italy
IVC Ivory Coast
JAM Jamaica
JAPN Japan
JORD Jordan
JTN Johnston Atoll
KENY Kenya
KIRI Kiribati/Tuvalu
KITT St Kitts/Nevis Islands
KMPC Kampuchea
KUWT Kuwait
LAOS Laos
LBYA Libya, Spa Jamahiriya
LCIA St Lucia
LEBN Lebanon
LIBR Liberia
LNKA Sri Lanka
LSO Lesotho
LUX Luxembourg
MAC Macau
MADG Madagascar/Comoros/
Reunion/Mayotte Islands
MALI Mali
MCRO Caroline Islands/
Micronesia/Palau
MELA Melilla
MEX Mexico
MIDW Midway Islands
MLDV Maldives
MLTA Malta
MLWI Malawi
MLYS Malaysia
MNGL Mongolia
MOZB Mozambique
MRCO Morocco/Ad Dakhla/
La’Youn
MRTN Mauritania
MSHL Marshall Islands
MSRT Montserrat Island
MUS Mauritius
MYAN Myanmar/Burma
NAM Namibia/South African
Republic
NARU Nauru
NCL New Caledonia
NEPL Nepal
NGER Niger
NICA Nicaragua
NIGA Nigeria
NIUE Niue
NKOR North Korea
NLD Netherlands
NOR Norway
NZL New Zealand
OMAN Oman
PAKI Pakistan
PANA Panama
PERU Peru
PHIL Philippines
PNG Papua New Guinea
POL Poland
PRGY Paraguay
PRI Puerto Rico
PRTG Portugal/Azores/Madeira
Islands
E-2
Page 81

PYFR French Polynesia/Society
Islands/Tuamotu Islands
QATR Qatar
ROM Romania
RUSS Belorussia/Latvia/Lithuania/
Russia/Estonia/Kazakhstan
RWAN Rwanda
SAUD Saudi Arabia
SENG Senegal
SEYC Seychelles
SKOR South Korea
SLEO Sierra Leone
SLOV Slovenia
SLV El Salvador
SNGP Singapore
SOLI Solomon Island
SOML Somalia
SP/M St Pierre Island/Miquelon
Island
SPAN Spain
ST/P Sao Tome/Principe
STHN Ascension Island/St Helena
Island
SUDN Sudan
SURN Suriname
SVCT St Vincent/The Grenadines
SWAZ Swaziland
SWE Sweden
SWTZ Switzerland
SYR Syria
T/CA Turks Island/Caicos Island
TANZ Tanzania
THAI Thailand
TOGO Togo
TTOB Trinidad and Tobago
TUN Tunisia
TURK Turkey
TWAN Taiwan
UAE United Arab Emirates
UGAN Uganda
UK United Kingdom
URGY Uruguay
USA United States of America
VENZ Venezuela
VIRG Virgin Islands (U.S.)
VTNM Vietnam
VUTU Vanuatu
WAKE Wake Island
WL/F Wallis Island/Futuna Island
YEMR Yemen Arab Rep
YMD Democratic Yemen
YUGO Yugoslavia
ZAIR Zaire
ZAMB Zambia
ZBWE Zimbabwe
E-3
Page 82

APPENDIX F
AIRPORT IDENTIFIER PREFIX CODES
Most airport identifiers in the database use the International Civil Aviation
Organization (ICAO) assigned prefix. Use the following rules to determine
the ICAO prefix for a country’s airport identifiers.
Continental U.S.
Airport identifiers which contain only alphabetic characters are prefixed with
a “K” followed by the FAA-standard three-character identifier. For example,
the FAA identifier for Johnson County Executive is “OJC”. Use “KOJC” when
entering the airport identifier.
Airport identifiers which contain numeric characters do not require the “K”
prefix.
Outside Continental U.S.
Find the country (or state) name in the table below and use the associated
prefix(es) to identify the airports.
A
Afghanistan OA
Alaska (U.S.) PA, PO, PP
Albania LA
Algeria DA
American Samoa NS
Angola FN
Anguilla Island (U.K.) TQ
Antigua and Barbuda TA
Argentina SA
Armenia UG
Aruba (Netherlands) TN
Ascension Island (U.K.) FH
Australia AB, AD, AM, AP, AS
Austria LO
Azerbaijan UB
Azores (Portugal) LP
B
Bahamas MY
Bahrain OB
Baker Island (U.S.) PB
Bangladesh VG
Barbados TB
Belgium EB
Belize MZ
Belorussia UM
Benin DB
Bermuda (U.K.) TX
Bhutan VQ
Bolivia SL
Botswana FB
Brazil SB
British Indian Ocean Territory FJ
Brunei WB
Bulgaria LB
Burkina Faso DF
Burundi HB
F-1
Page 83

C
Cameroon FK
Canada CU, CW, CY, CZ
Canary Island (Spain) GC
Cape Verde GV
Cayman Island (U.K.) MW
Central African Republic FE
Chad FT
Chile SC
China ZB, ZG, ZH, ZL, ZP,
ZS, ZU, ZW, ZY
Colombia SK
Comoros FM
Congo FC
Cook Islands NC
Costa Rica MR
Croatia LD
Cuba MU
Cyprus LC
Czechoslovakia LK
France LF
French Antilles TF
French Guiana SO
French Polynesia NT
G
Gabon FO
Gambia GB
Georgia UG
Germany ED, ET
Ghana DG
Gibraltar (U.K.) LX
Greece LG
Greenland (Denmark) BG
Grenada TG
Guam (U.S.) PG
Guatemala MG
Guinea Republic GU
Guinea-Bissau GG
Guyana SY
D
Democratic Yemen OD
Denmark EK
Djibouti HF
Dominica TD
Dominican Republic MD
E
East Timor WP
Easter Island (Chile) SC
Ecuador SE
Egypt HE
El Salvador MS
Equitorial Guinea FG
Estonia UL
Ethiopia HA
F
Falkland Islands (U.K.) SF
Faroe Island (Denmark) EK
Fiji Island NF
Finland EF
F-2
H
Haiti MT
Hawaii (U.S.) PH
Honduras MH
Hong Kong VH
Hungary LH
I
Iceland BI
India VA, VE, VI, VO
Indonesia WA, WI, WR
Iran OI
Iraq OR
Ireland EI
Israel LL
Italy LI
Ivory Coast DI
J
Jamaica MK
Japan RJ, RO
Johnston Island (U.S.) PJ
Jordan OJ
Page 84

K
Kampuchea (Cambodia) VD
Kazakhstan UA, UR, UT
Kenya HK
Kirgizia UA
Kiribati NG, PL
Kuwait OK
L
Laos VL
Latvia UM
Lebanon OL
Lesotho FX
Liberia GL
Libyan Arab Jamahiriya HL
Line Islands (U.S.) PL
Lithuania UM
Luxembourg EL
M
Macau (Portugal) VM
Madagascar FM
Madeira Islands (Portugal) LP
Malawi FW
Malaysia WB, WM
Maldives VR
Mali GA
Malta LM
Mariana Islands (U.S.) PG
Marshall Islands (U.S.) PK
Mauritania GQ
Mauritius FI
Mayotte (France) FM
Melilla (Spain) GE
Mexico MM
Micronesia PT
Midway Islands (U.S.) PM
Moldavia UK
Monaco LN
Mongolia ZM
Montserrat Island (U.K.) TR
Morocco GM
Mozambique FQ
Myanmar (Burma) VY
N
Namibia FA
Nauru AN
Nepal VN
Netherlands EH
Netherlands Antilles TN
New Caledonia (France) NW
New Zealand NZ
Nicaragua MN
Niger DR
Nigeria DN
Niue Island (N.Z.) NI
North Korea ZK
Norway EN
O
Oman OO
P
Pakistan OP
Panama MP
Papua New Guinea AY
Paraguay SG
Peru SP
Philippines RP
Phoenix Island (U.K.) PC
Poland EP
Portugal LP
Puerto Rico (U.S.) TJ
Q
Qatar OT
R
Reunion (France) FM
Romania LR
Russia UE, UH, UI, UL, UM, UN,
UO, UR, US, UU, UW
Rwanda HR
F-3
Page 85

S
Sahara Occidental GS
Samoa NS
San Andres Island (Colombia) SK
Sao Tome & Principe FP
Saudi Arabia OE
Senegal GO
Seychelles FS
Sierra Leone GF
Singapore WS
Slovenia LJ
Society Islands NT
Solomon Islands AG
Somalia HC
South African Republic FA
South Korea RK
Spain LE
Sri Lanka VC
St. Helena Island (U.K.) FH
St. Kitts and Nevis TK
St. Lucia TL
St. Pierre/Miquelon Is. (France) CF
St. Vincent and the Grenadines TV
Sudan HS
Suriname SM
Swaziland FD
Sweden ES
Switzerland LS
Syria OS
T
Tadzhikistan UT
Taiwan RC
Tanzania HT
Thailand VT
Togo DX
Tonga NF
Trinidad and Tobago TT
Tuamotu Islands NT
Tunisia DT
Turkey LT
Turkmenistan UT
Turks/Caicos Islands (U.K.) MB
Tuvalu NG
U
Uganda HU
Ukraine UK
United Arab Emirates OM
United Kingdom EG
United States K
Uruguay SU
Uzbekistan UT
V
Vanuatu NV
Venezuela SV
Vietnam VV
Virgin Islands (U.K.) TU
Virgin Islands (U.S.) TI
W
Wake Island (U.S.) PW
Wallis/Futuna Islands (France) NL
Y
Yemen OY
Yugoslavia LY
Z
Zaire FZ
Zambia FL
Zimbabwe FV
F-4
Page 86

APPENDIX G
INDEX
A
Active from waypoint 6-1
Active route 6-1
Active Route Page 6-5
Active to waypoint 6-1
Alarm Clock Page 5-5
Alarm Page 4-2
Alarms 4-2
Alphanumeric field 2-3
Altitude
manual entry 3-3
units 4-4
Anchor drag alarm 4-2
Arrival alarm 4-2
Audio Setup Page 4-4
AutoStoreTM Page 3-4
B
Backlighting
adjusting 2-3
timeout 4-3
Backlighting Page 4-3
Banners 2-1
Battery pack
AA size 1-2
Rechargeable 1-2
Removing C-8
Battery Saver mode 2-6
Bearing (BRG) B-2
C
CDI Page 3-5
CDI Scale Page 4-5
Confirmation field 2-3
Count down timer 5-2
Course Made Good (CMG) B-2
Course To Steer (CTS) B-2
Cursor 2-3
Cyclic field 2-3
D
Data entry 2-5
Database update 1-2
Date/Time Page 5-1
Desired Track (DTK) B-2
Dilution of Precision (DOP) 3-2
Display 2-1
Distance Made Good (DMG) B-2
Duplicate Waypoint Page 3-7
E
Elapsed timer 5-2
Estimated Position Error (EPE) 3-2
Estimated Time Enroute (ETE) B-2
Event Timer Page 5-2
F
Field 2-3
Filter Settings Page 4-6
G
GOTO waypoint 3-10
Ground Speed (GS) B-2
I
Installation C-1
K
Key press tone 2-5
Keypad 2-3
G-1
Page 87

L
Local date/time 5-1
M
Magnetic variation 4-5
Magnetic Variation Page 4-5
Maintenance C-9
Manual altitude entry 3-3
Map datum 4-7
Map Datum Page 4-7
Message banner 2-5
Message Page 4-1
N
Navigation
2D 3-1
3D 3-1
DR 3-1
Navigation Menu 5-1
Navigation units 4-4
Nearest Waypoint Page 3-9
NMEA output 4-7
Normal mode 2-6
Numeric field 2-3
O
Operating mode 2-6
Operating Mode Page 4-2
Output, NMEA 4-7
Output Page 4-7
Routes
Activating 6-5
Building with AutoStoreTM6-7
Clearing 6-4
Copying 6-5
Creating 6-3
Editing active route 6-6
Editing storage routes 6-4
S
Satellite Status Page 3-2
Searching the sky 3-1
Self test 3-1
Setup Menu 4-1
Simulator mode 2-6
Steer (STR) B-2
Sunrise/Sunset Page 5-4
Surface Mount C-4
T
Time
local 5-1
UTC 5-1
Timers 5-2
Track (TRK) B-2
Trip Planning Page 5-4
U
Units Page 4-4
UTC time 5-1
P
Page 2-1
Position Page 3-3
Power On 3-1
Proximity Waypoint Page 3-9
R
Range (RNG) B-2
Route Catalog Page 6-2
Route Review Page 6-3
G-2
V
Velocity Made Good (VMG) B-2
W
Waypoint Definition Page 3-6
Waypoint Scanning 3-8
Waypoints 3-6
Wiring C-3
Page 88

GARMIN International, Inc.
9875 Widmer Road
Lenexa, KS 66215
1-800-800-1020
(913) 599-1515
190-00030-00 Rev. D
 Loading...