

Page 1
Quick Start Manual
®
nüvi
GPS navigator
5000
© 2007 Garmin Ltd. or its subsidiaries
February 2008 Part Number 190-00857-01 Rev. B Printed in Taiwan
1
Page 2
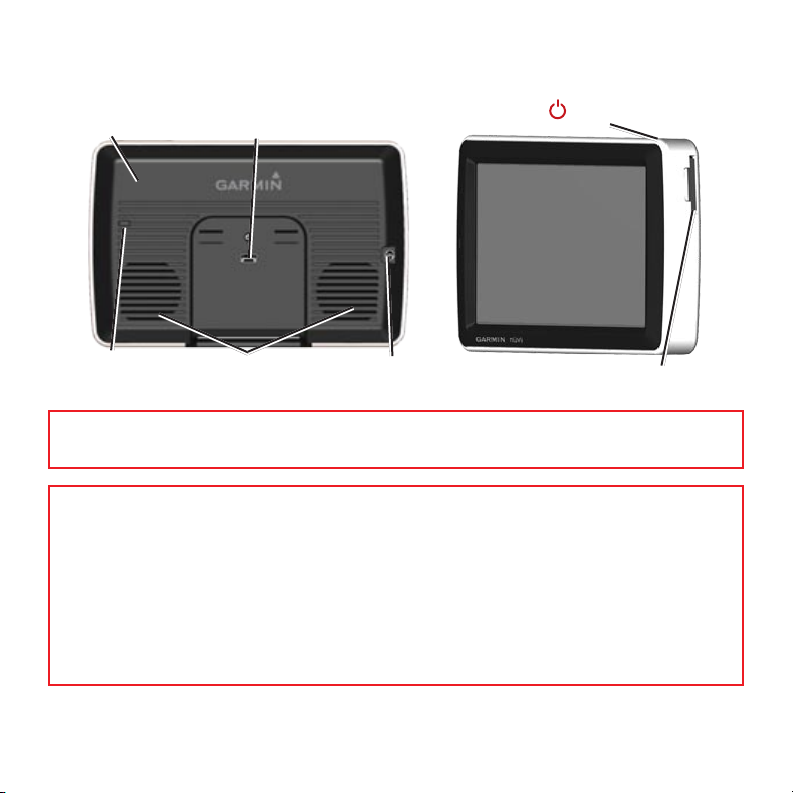
Your nüvi Unit
GPS antenna
Light sensor
mini-USB connector
Speakers
External antenna
connector
Power button
SD card slot
WARNING: See the Important Safety and Product Information guide in the product box
for product warnings and other important information.
State law in Minnesota and California prohibits and/or restricts drivers from using suction mounts on their
windshields while operating motor vehicles. (See California Vehicle Code 26708(a); Minnesota Statutes
Section 169.71.) Other Garmin dashboard or friction mounting options should be used in those states. Check
your state and local laws and ordinances where you drive, as other states may enact similar prohibitions or
related restrictions against windshield objects that obstruct the driver’s vision (Michigan and New Jersey law
currently prohibits windshield objects that obstruct the driver’s vision). Remember to always mount your
Garmin unit in a location that does not obstruct the driver’s view of the road. Garmin does not assume any
responsibility for any nes, penalties, or damages that may be incurred as a result of disregarding this notice or
as a result of any other state or local law or ordinance relating to use of the unit.
2
Page 3
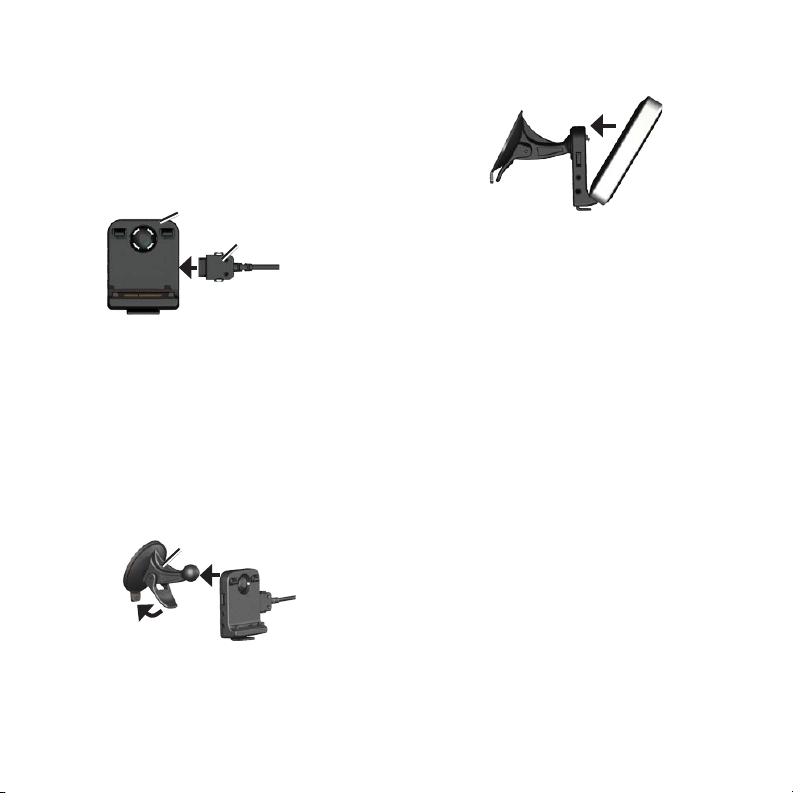
Step 1: Mount the nüvi
To mount the nüvi using the suction
cup mount:
1. Plug the vehicle power cable into the
power connector on the right side of the
cradle.
Cradle
Power cable
2. Clean and dry your windshield with a lintfree cloth. Remove the clear plastic from
the suction cup. Place the suction cup on
the windshield.
3. Snap the cradle onto the suction cup
arm.
4. Flip the lever back, toward the
windshield.
Suction cup mount
5. Fit the bottom of your nüvi into the
cradle.
6. Tilt the nüvi back until it snaps into place.
7. Plug the other end of the vehicle power
cable into a power outlet in your vehicle.
Your unit should turn on automatically
if it is plugged in and the vehicle key is
turned to the ON/ACC position.
Step 2: Congure the nüvi
To turn on your nüvi, connect the power
cable to the unit and plug the other end
of the power cable into a power outlet in
your vehicle. Turn your vehicle key to the
ON/ACC position, and your unit should
turn on automatically. Follow the on-screen
instructions.
3
Page 4
Step 3: Acquire Satellites
Step 4: Use the nüvi
With your nüvi connected to a power outlet
in your vehicle, travel outdoors to an open
area, out of garages, and away from tall
buildings. Stop your vehicle. Acquiring
satellite signals may take a few minutes.
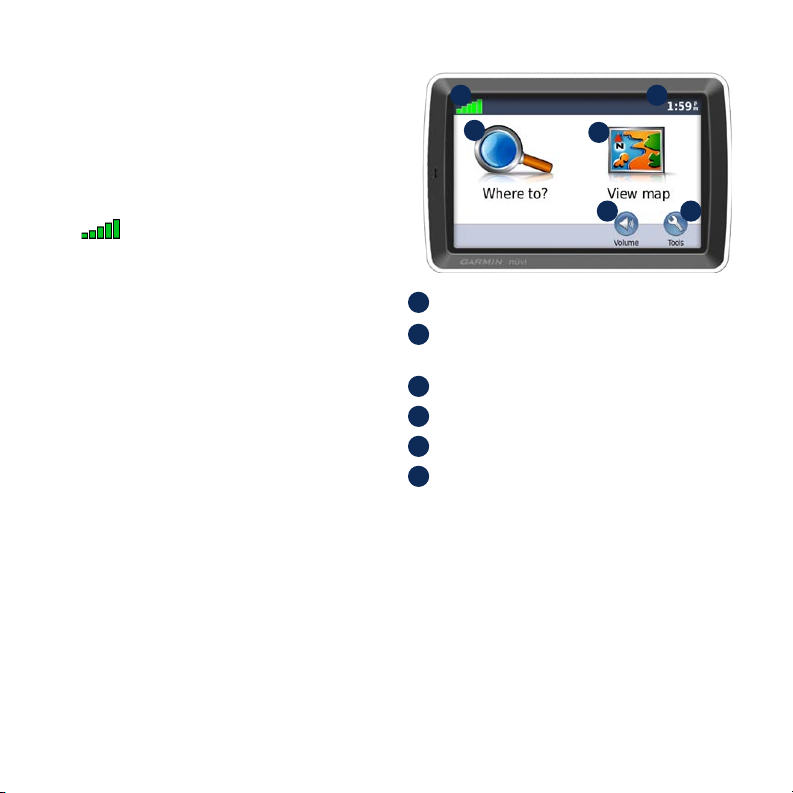
The bars indicate GPS satellite
strength. When one bar is green, the nüvi
has acquired satellite signals. Now you can
select a destination and navigate to it. For
more information about GPS, visit
A
B
www.garmin.com/aboutGPS.
C
D
E
F
A B
C
GPS satellite strength.
Current time; touch to change time
settings.
Touch to nd a destination.
Touch to view the map.
Touch to adjust the volume.
Touch to use the tools such as media
players, settings, and Help.
D
E F
4
Page 5

Using the Main Pages
Touch View map to open the Map page. The vehicle icon shows your current
location. Touch and drag the map to view a different area of the map.
Touch to zoom out.
Touch Menu to
return to the Menu
page.
Touch Arrival or
Speed to open the
Trip Information
page.
Trip Information Page Turn List Page Next Turn Page
Touch the text bar to open the Turn List page.
Touch to zoom in.
Touch the vehicle
icon to save your
current location.
Touch Turn In to
open the Next Turn
page.
5
Page 6

Finding Points of Interest
1. Touch Where to? > Points of Interest.
2. Touch a category and a sub-category, if
necessary.
3. Select a destination, and touch Go!.
To nd a POI by spelling the name, touch
Where to? > Points of Interest > Spell
Name. To search for a location in a different
area, touch Where to? > Near.
Adding a Via Point
1. With a route active, touch Menu > Where
to?.
2. Search for the extra stop.
3. Touch Go!.
4. Touch Add as Via Point to add this stop
before your destination. Touch Set as
new Destination to make this your new
nal destination.
TIP: To add more than one stop to the
route, edit the current route. Touch Where
to? > Routes.
Using Picture Navigation
Panoramio provides pictures that include
location information called geotags. You can
load these pictures onto your nüvi and create
routes to them. See your owner’s manual for
more information.
To load geotagged pictures to your
nüvi:
1. Connect your nüvi to your computer.
2. Go to www.fotoconnect.garmin.com and
select a picture.
3. Select Send to Garmin Device to save
that picture to your nüvi.
To navigate to a picture:
1. Touch Where to? > Favorites >
Panoramio Photos. Pictures you have
saved on the nüvi drive or the SD card
are listed.
2. Select a Panoramio picture.
3. Touch Go! to navigate to the location.
Touch Show Map to view the location on
the map.
6
Page 7

Using the FM Transmitter
Before using the FM transmitter in your area, see
the FM transmitter legal notice in the owner’s
manual. Use of FM transmitters is currently illegal
in certain European countries due to specic radio
frequency restrictions. You must check the local
regulations in all European countries in which
you intend to use the FM transmitter to ensure its
legality.
Trafc on Your Route
When calculating your route, the
nüvi examines the current trafc and
automatically optimizes the route for the
shortest time. You might still be routed
through trafc if no alternative roads exist.
If a severe trafc delay occurs on your
route while you are navigating, the nüvi
automatically recalculates the route.
You can listen to the audio from your nüvi
on your vehicle’s speakers. From the Menu
page, touch Volume > Audio Output > FM
Transmitter. Select an FM channel for the
FM transmitter, and select the same channel
on your nüvi.
The Map page displays or when
there is trafc on your route. The number in
the icon represents the number of minutes
the trafc has added to your route, which
has been automatically calculated into the
arrival time shown on the map. The locale
you selected at initial startup determines
Using FM TMC Trafc
If your nüvi is connected to the optional
FM TMC (Trafc Message Channel) trafc
which type of trafc icon is used: diamond-
shaped icons ( ) for North America,
triangular icons ( ) for Europe.
receiver and you are in a coverage area, the
nüvi can receive trafc information. For
more information about FM trafc receivers
and coverage areas, see www.garmin
.com/trafc.
Using MSN® Direct
With an optional MSN Direct Receiver, you
can access MSN Direct content. For more
information, see www.garmin.com/trafc or
http://garmin.msndirect.com.
7
Page 8

Loading Files on Your nüvi
You can store les, such as MP3s and JPEG
image les, in the internal memory of the
nüvi or on an optional SD card. Connect the
mini-USB connector to the back of the nüvi,
and connect the larger end of the cable to an
available USB port on your computer. You
can also insert an optional SD card in the SD
card slot, and press it until it clicks.
Using the Audible Player
To create an Audible.com account, and
purchase and load audible books, visit
http://garmin.audible.com.
Touch Tools > Audible Player. Touch
Browse. Touch a category, and then touch
a book title. To create and play bookmarks,
touch the Create and View buttons.
Your nüvi and SD card appear as removable
drives in My Computer on Windows®
computers and as mounted volumes on
Mac® computers.
Using the Music Player
Load music les to the internal memory or
SD card. See page 7.
Touch Tools > Music Player. Touch
Browse. Touch a category. To play the entire
category from the beginning of the list,
touch the rst song listed. To play a specic
song, touch the title.
To create, edit, and listen to playlists, touch
Browse > Playlists.
Playing Video
WARNING: Do not attempt to operate
or watch video input while operating a
vehicle. Driver operation or viewing of
video input while the vehicle is moving
could cause an accident or collision
resulting in property damage, serious
injury, or death.
Your nüvi accepts NTSC composite video.
You need an A/V adapter cable, available
from Garmin or an electronics store. For
more information, go to http://buy.garmin
.com or contact your Garmin dealer.
8
Page 9

1. Connect the small end of the A/V adapter
cable to the A/V IN connector on the right
side of the cradle.
A/V IN
connector
2. Connect the red, white, and yellow
connectors to the corresponding plugs on
your video device.
3. Apply external power to the video device,
if necessary. Turn on the video device.
4. Touch Yes to switch to the video. To
automatically switch to the video when
you connect an external video source,
open the Menu page and touch Tools >
Settings > Video Input.
NOTE: To return to the Video Input page
while a video is playing, touch anywhere
on the screen.
NOTE: There will be black lines around
the video image.
Caring for Your nüvi
Your nüvi contains sensitive electronic
components that can be permanently
damaged if exposed to excessive shock or
vibration. To minimize the risk of damage
to your nüvi, avoid dropping your unit and
operating it in high-shock and high-vibration
environments.
Cleaning the nüvi
The nüvi is constructed of high-quality
materials and does not require user
maintenance other than cleaning. Clean
the outer casing of the nüvi (not the touch
screen) using a cloth dampened with a mild
detergent solution, and then wipe it dry.
Avoid chemical cleaners and solvents that
can damage plastic components.
Cleaning the Touch Screen
Clean the touch screen with a soft, clean,
lint-free cloth. Use water, isopropyl alcohol,
or eyeglass cleaner, if needed. Apply the
liquid to the cloth, and then gently wipe the
touch screen.
9
Page 10

Protecting Your nüvi
Carry and store your nüvi in the optional
•
carrying case.
Do not store the nüvi where prolonged
•
exposure to extreme temperatures can
occur because it can cause permanent
damage.
Do not expose the nüvi to water.
•
Contact with water can cause this unit to
malfunction.
Never use a hard or sharp object to
•
operate the touch screen, or damage may
result. Though a PDA stylus can be used
to operate the touch screen, never attempt
this while operating a vehicle.
Avoiding Theft
To avoid theft, remove the unit and
•
the mount from sight when not in use.
Remove the residue on the windshield
left by the suction cup.
Do not keep your unit in the glove
•
compartment.
Register your product at
•
http://my.garmin.com.
Use the Garmin Lock™ feature. See
•
“Locking Your nüvi.”
Locking Your nüvi
1. Touch Tools > Settings > Security.
2. Touch the button beside Garmin Lock.
3. Enter a 4-digit PIN and drive to a security
location.
NOTE: If you forget your PIN and your
security location, you must send your nüvi
to Garmin to get it unlocked. You must
also send a valid product registration or
proof of purchase.
Calibrating the Screen
If the touch screen is not responding
properly, turn off the nüvi. Hold your
nger on the screen, and turn on the nüvi.
Continue holding down on the screen until
the calibration screen appears. Follow the
on-screen instructions.
10
Page 11

More Information
For more information about your nüvi,
touch Tools > Help. You can download the
latest version of the owner’s manual from
www.garmin.com. For information about
accessories, go to http://buy.garmin.com or
contact your Garmin dealer.
Garmin® and nüvi® are trademarks of Garmin Ltd.
or its subsidiaries, registered in the USA and other
countries. Garmin Lock™ is a trademark of Garmin
Ltd. or its subsidiaries.
Windows® is a registered trademark of Microsoft
Corporation in the United States and/or other
countries. Mac® is a registered trademark of Apple
Computer, Inc. Audible.com® is a registered
trademarks of Audible, Inc. © Audible, Inc.
1997–2005. MSN is a registered trademark of
Microsoft Corporation in the United States and/or
other countries. Other trademarks and trade names are
those of their respective owners.
11
Page 12

For the latest free software updates (excluding map data) throughout the life of
your Garmin products, visit the Garmin Web site at www.garmin.com.
© 2007 Garmin Ltd. or its subsidiaries
Garmin International, Inc.
1200 East 151st Street, Olathe, Kansas 66062, USA
Garmin (Europe) Ltd.
Liberty House, Hounsdown Business Park, Southampton, Hampshire, SO40 9RB UK
Garmin Corporation
No. 68, Jangshu 2nd Road, Shijr, Taipei County, Taiwan
www.garmin.com
Part Number 190-00857-01 Rev. B
 Loading...