

Page 1
owner’s manual
®
FORERUNNER
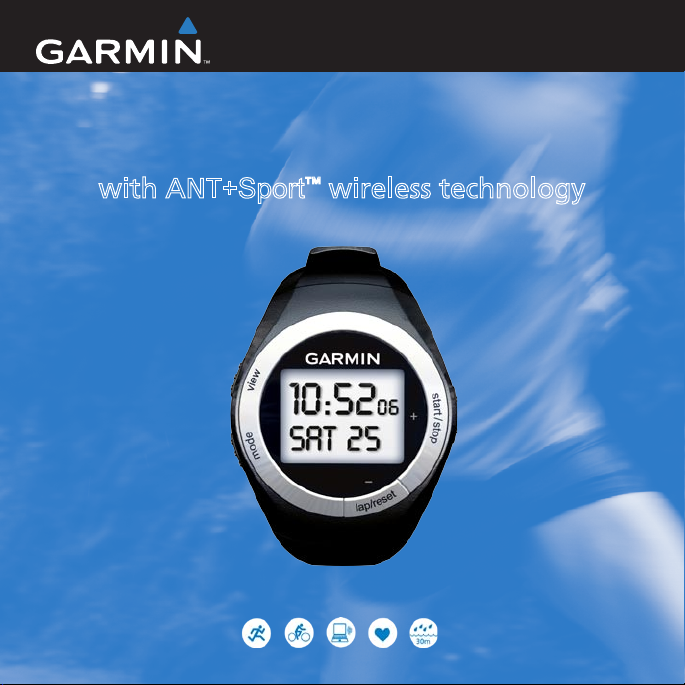
with ANT+Sport™ wireless technology
50
Page 2

© 2007 Garmin Ltd. or its subsidiaries
Garmin International, Inc.
1200 East 151st Street,
Olathe, Kansas 66062,
USA
Tel. (913) 397.8200 or
(800) 800.1020
Fax (913) 397.8282
Garmin (Europe) Ltd.
Liberty House,
Hounsdown Business Park,
Southampton, Hampshire,
SO40 9RB UK
Tel. +44 (0) 870.8501241 (outside the
UK) 0808 2380000 (within the UK)
Fax +44 (0) 870.8501251
Garmin Corporation
No. 68, Jangshu 2nd Road,
Shijr, Taipei County,
Taiwan
Tel. 886/2.2642.9199
Fax 886/2.2642.9099
All rights reserved. Except as expressly
provided herein, no part of this manual may be
reproduced, copied, transmitted, disseminated,
downloaded or stored in any storage medium,
for any purpose without the express prior
written consent of Garmin. Garmin hereby
grants permission to download a single copy
of this manual onto a hard drive or other
electronic storage medium to be viewed and
to print one copy of this manual or of any
revision hereto, provided that such electronic
or printed copy of this manual must contain
the complete text of this copyright notice
and provided further that any unauthorized
commercial distribution of this manual or any
revision hereto is strictly prohibited.
Information in this document is subject to
change without notice. Garmin reserves
the right to change or improve its products
November 2007 Part Number 190-00839-00 Rev. E
and to make changes in the content without
obligation to notify any person or organization
of such changes or improvements. Visit the
Garmin Web site (www.garmin.com) for
current updates and supplemental information
concerning the use and operation of this and
other Garmin products.
Garmin®, Forerunner®, Garmin Training
Center®, and Auto Lap® are trademarks of
Garmin Ltd. or its subsidiaries, registered
in the USA and other countries. Garmin
Connect™, GSC™ 10, Dynastream™, ANT™,
and ANT+Sport™ are trademarks of Garmin
Ltd. or its subsidiaries. These trademarks may
not be used without the express permission of
Garmin.
Other trademarks and trade names are those of
their respective owners.
Page 3

IntroductIon
Thank you for purchasing the
Garmin® Forerunner® 50 sports
monitoring watch.
WARNING: Always consult your
physician before you begin or
modify any exercise program. See
the Important Safety and Product
Information guide in the product
box for product warnings and
other important information.
Product Registration
Help us better support you by
completing our online registration
today. Go to www.garmin.com/
forerunner. Keep the original sales
receipt, or a photocopy, in a safe
place.
IntroductIon
Contact Garmin
In the USA, contact Garmin Product
Support by phone: (913) 397.8200 or
(800) 800.1020, Monday–Friday; or
go to www.garmin.com/support.
In Europe, contact Garmin (Europe)
Ltd. at +44 (0) 870.8501241 (outside
the UK) or 0808 2380000 (within
the UK).
Free Garmin Software
Go to www.garmin.com/forerunner
to download the Garmin Connect™
Web-based software or the Garmin
Training Center® computer software.
Use this software to store and
analyze your workout data.
Forerunner 50 Owner’s Manual i
Page 4

IntroductIon
Table of Contents
Introduction .......................... i
Product Registration ................ i
Contact Garmin ......................... i
Free Garmin Software ............. i
What’s in the Box? .................. iv
Getting Started .................... 1
Buttons ..................................... 1
Icons.......................................... 2
Forerunner Backlight............... 2
Step 1: Turn on Your Forerun-
ner ........................................ 2
Step 2: Set the Time ................. 3
Step 3: Set Up Sensors
(Optional) ............................ 3
Step 4: Go for a Run! ............... 4
Step 5: Download Free
Software .............................. 4
Step 6: Send Workout Data to
Your Computer ................... 4
ii Forerunner 50 Owner’s Manual
Using Accessories ................... 5
Using the Heart Rate
Monitor ............................ 5
Using the Foot Pod .............. 7
Calibrating the Foot Pod ...... 8
Removing the Foot Pod ....... 9
Turning Off the Foot Pod ...... 9
Using the GSC™ 10 .............. 9
Time Mode ......................... 10
Chimes .................................... 10
Set the Time ............................ 10
Set the Alarm .......................... 10
Set a Second Time Zone ....... 11
More Time Options ................ 11
Train Mode ......................... 12
Timed Workout ....................... 12
Training Settings .................... 13
Training Zones ....................... 14
Running Zones ....................... 15
Page 5

Heart Rate Zones ................... 15
How Do Heart Rate Zones
Affect Your Fitness
Goals? .......................... 16
Computer Pairing ................... 18
Interval Timer Mode .......... 19
Setting the Timers .................. 19
Starting the Timers ............. 20
Stopping and Resetting the
Timers ........................... 20
Using Timer Repeat ........... 20
History Mode ..................... 21
Viewing Workout History ...... 21
Managing Memory ................. 22
Deleting Workout History ...... 23
Data Upload Mode ............ 24
Requirements ......................... 24
Appendix ........................... 26
Optional Accessories ............ 26
Bike Accessories ............... 26
Pairing Sensors .................. 26
IntroductIon
Battery Information ................ 27
Forerunner Battery ............. 27
Heart Rate Monitor Battery 28
Foot Pod Battery ................ 29
Specications ........................ 30
Forerunner 50 .................... 30
USB ANT stick .................... 31
Heart Rate Monitor ............. 31
Foot Pod ............................. 32
Troubleshooting ..................... 33
Software License
Agreement ........................ 35
Declaration of Conformity ..... 35
Index .................................. 36
Forerunner 50 Owner’s Manual iii
Page 6
IntroductIon
What’s in the Box?
Forerunner 50 sports monitoring
watch including four modes: Time,
Train, Interval Timer, and History.
USB ANT
send workout data from your
Forerunner to your computer. For
more information, see page 24.
Heart rate monitor (optional)
sends heart rate data to the
Forerunner (see page 5).
Foot pod (optional) sends speed
and distance data to the Forerunner
(see page 7).
For more information about
compatible accessories, go to
http://buy.garmin.com.
™
stick to wirelessly
iv Forerunner 50 Owner’s Manual
Page 7
GettInG Started
Buttons
➊
➍
➋
➌
view
➊
Press and hold to turn the
•
backlight on/off.
Press to scroll through the data
•
pages in Train mode or History
mode.
Press to conrm and advance to
•
the next setting.
GettInG Started
mode
➋
Press to change modes.
•
Press to exit a menu or page.
•
Press and hold to return to the
•
Time page.
lap/reset/-
➌
Press to create a new lap.
•
Press and hold to save your
•
workout in Train mode.
Press to decrease the value for
•
settings.
start/stop/+
➍
Press to start or stop the timer.
•
Press and hold to customize
•
settings.
Press to increase the value for
•
settings.
Forerunner 50 Owner’s Manual 1
Page 8
GettInG Started
Icons
Above high zone setting
Below low zone setting
Bike sensor active
Foot pod sensor active
Heart rate sensor active
Data uploading
Interval timer mode
Alarm on
Chime on
Second time zone
Forerunner Backlight
Press and hold view to turn on the
backlight for 5 seconds. Extend the
backlight for 5 more seconds by
pressing any button.
Step 1: Turn on Your Forerunner
Press and hold start/stop to turn on
your Forerunner. Your Forerunner
ships with the power off to conserve
the battery. For more battery
information, see page 27.
2 Forerunner 50 Owner’s Manual
Page 9

Step 2: Set the Time
1. On the Time page, press and
hold start/stop until the hour
setting blinks.
2. Use
+ and - to adjust the hour.
TIP: Press and hold + or
- to scroll quickly through
the hours, minutes, and
other Time mode settings.
3. Press view to advance to the
minutes setting.
4. Use
+ and - to adjust the
minutes.
5. Continue this process to set
seconds, month, day, year,
and 12/24-hour mode.
6. Whennished,press
resume Time mode.
mode to
GettInG Started
Step 3: Set Up Sensors (Optional)
If your Forerunner included a heart
rate monitor and foot pod, the
ANT+Sport™ sensors are already
paired. Press mode until the Train
page appears. The and
icons appear on the Forerunner
screen when the sensors are paired.
If you purchased an accessory
separately, see Pairing Sensors on
page 26.
For instructions on using the
heart rate monitor, see page 5. For
instruction on using the foot pod, see
page 7.
Forerunner 50 Owner’s Manual 3
Page 10

GettInG Started
Step 4: Go for a Run!
In Train mode, press start to start
the timer. After completing your run,
press stop. Press and hold lap/reset
to save your workout. Use + and - to
toggle YES or NO. Press view to
conrm.
Step 5: Download Free Software
1. Go to www.garmin.com/
forerunner.
2. Create a free myGarmin
account.
3. Choose
4. Follow the on-screen
Garmin Connect or
Garmin Training Center with
Garmin ANT Agent. Click
Download.
instructions.
Step 6: Send Workout Data to Your Computer
NOTE: You must
download software as
instructed in Step 5 so that
the necessary USB drivers
are installed before
connecting the USB ANT
stick to your computer.
1. Plug the USB ANT stick into
an available USB port on your
computer.
2. Bring your Forerunner within
range (5 m) of your computer.
3. Follow the on-screen
instructions.
4 Forerunner 50 Owner’s Manual
Page 11
GettInG Started
Using Accessories
If your Forerunner came with a
sensor (with ANT+Sport wireless
technology) in the box, the sensors
and the Forerunner are already
paired. If you purchased an
accessory separately, see page 26 for
pairing instructions.
For information about purchasing
additional accessories, go to
http://buy.garmin.com.
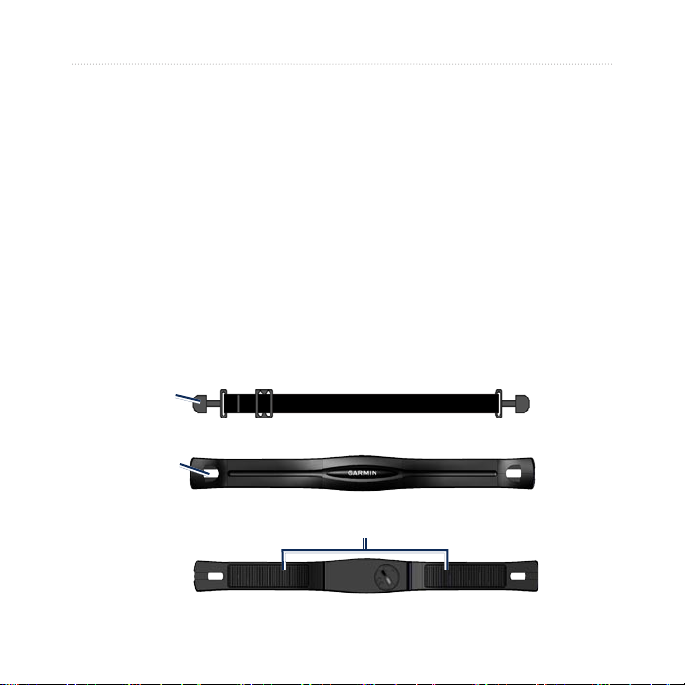
Tab
Heart Rate Monitor Strap
Slot
Heart Rate Monitor (Front)
Heart Rate Monitor (Back)
Forerunner 50 Owner’s Manual 5
Using the Heart Rate Monitor
The heart rate monitor is on standby
and ready to send data. Wear the
heart rate monitor directly on your
skin, just below your breastplate.
It should be snug enough to stay in
place during your run.
1. Push one tab on the strap
through the slot in the heart
rate monitor. Press the tab
down.
Sensors
Page 12
GettInG Started
2. Wet both sensors on the back
of the heart rate monitor to
create a strong connection
between your chest and the
transmitter.
3. Wrap the strap around your
chest and attach it to the other
side of the heart rate monitor.
NOTE: The Garmin logo
should be right-side up.
4. Bring the Forerunner within
range (3 m) of the heart rate
monitor.
5. Press
6. Press
mode to access Train
mode. The heart rate icon
appears on the Train page.
view to advance to the
HEART data page.
7. If or heart rate data does
not appear or if you have
erratic heart rate data, you
may have to tighten the strap
on your chest or warm up for
5–10 minutes. If the problem
persists, you may have to pair
the sensors. See page 26.
NOTE: For instructions
on setting up heart rate
zones, see page 15.
6 Forerunner 50 Owner’s Manual
Page 13

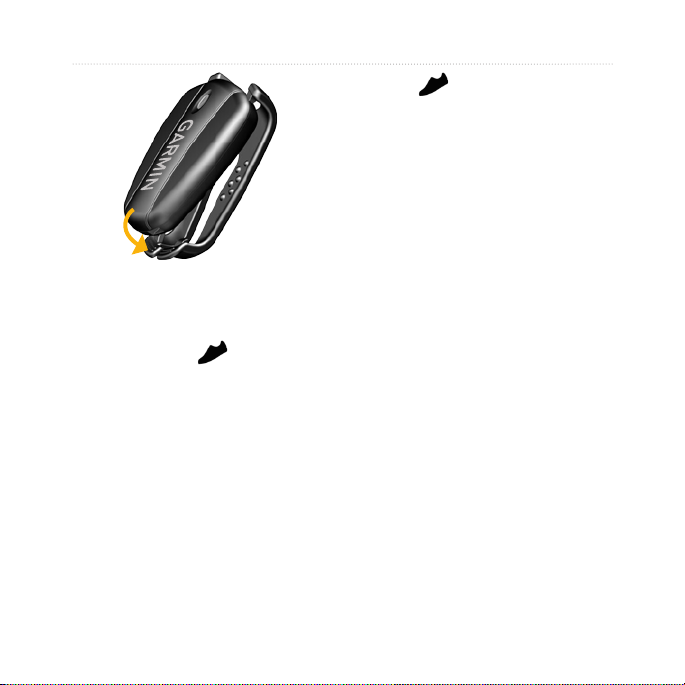
Using the Foot Pod
The foot pod is on standby and
ready to send data (like the heart rate
monitor). When you install or move
the foot pod, the LED blinks three
times.
1. Press the tabs on the lace
clip. Lift and separate the foot
pod from the lace clip.
2. Loosen your shoe laces
slightly.
3. Thread the lace clip through
2–3 secure sections of your
shoelaces, allowing enough
room at the top to tie the
shoelaces.
GettInG Started
Lace clip
4. Tie your shoelaces securely
to keep the foot pod in place
during your workout.
5. Snap the foot pod into the
lace clip. The foot pod must
be pointed toward the front of
your shoe.
Forerunner 50 Owner’s Manual 7
Page 14
GettInG Started
6. Bring the Forerunner within
range (3 m) of the foot pod.
7. Press
8. Press
mode to access Train
mode. The foot pod icon
appears on the Train page.
view to access the
DIST, LAP, or SPEED/PACE
data pages.
9. If
or foot pod data does
not appear, you may have
to pair the foot pod and the
Forerunner. See page 26.
Calibrating the Foot Pod
Calibrating your foot pod is optional
and can improve accuracy. There are
two ways to adjust the calibration:
auto and manual.
Auto Calibration
The minimum calibration distance is
400 m. For best results, calibrate the
foot pod using the longest distance
possible at your typical pace. A
regulation track (one lap = 400 m) is
more accurate than a treadmill.
1. On the Train page, press and
hold start/stop.
2. Press
view to advance to the
PUSH CALIB setting.
8 Forerunner 50 Owner’s Manual
Page 15

GettInG Started
3. Press start to begin recording.
4. Run or walk the known
distance.
5. Press
6. Use
7. Press
stop.
+ and - to adjust the
calibration distance to the
ACTUAL distance.
view to save the
calibrated distance.
Manual Calibration
If your foot pod distance seems
slightly high or low each time you
run, you can manually adjust the
calibration factor.
1. On the Train page, press and
hold start/stop.
2. Press
3. Use
4. Press
Forerunner 50 Owner’s Manual 9
view to advance to the
CALIB setting.
+ and - to adjust the
calibration factor.
view to save the
calibration factor.
Removing the Foot Pod
Press the tabs on the front of the lace
clip to remove the foot pod.
Turning Off the Foot Pod
After 30 minutes of inactivity, the
foot pod automatically turns off to
conserve the battery (the LED blinks
twice).
Using the GSC™ 10
Your Forerunner is compatible with
the GSC 10 speed and cadence
sensor for bikes. The GSC 10 is an
optional accessory that is available
at http://buy.garmin.com. For more
information, see page 26.
Page 16

tIme mode
tIme mode
Time mode is the default view of
the Forerunner. After 30 minutes
of inactivity, the Forerunner
automatically returns to the Time
page. Otherwise, press mode until the
Time page appears.
Chimes
On the Time page, press and hold
view to toggle Chime mode.
Set the Time
See page 3.
Set the Alarm
1. On the Time page, press
start/stop. The Alarm page
appears.
2. Press and hold start/stop until
the hour setting blinks.
3. Use
+ and - to adjust the hour.
TIP: Press and hold + or
- to scroll quickly through
the hours, minutes, and
other Time mode settings.
4. Press view to advance to the
minutes setting.
10 Forerunner 50 Owner’s Manual
Page 17

tIme mode
5. Use + and - to adjust the
minutes.
6. Whennished,press
resume Alarm mode.
7. Press
lap/reset to activate
(or deactivate) the alarm. The
icon appears on the Time
page and the Alarm page.
mode to
More Time Options
Press lap/reset to alternate the
•
view between day and month.
Press and hold lap/reset to
•
alternate time zones.
Set a Second Time Zone
You can set the Forerunner time for
two time zones.
1. On the Time page, press and
hold lap/reset to change to
the second time zone. The
icon appears on the Time
page.
2. Follow the instructions on
page 3 to set the time.
3. Press and hold
changebacktothersttime
zone.
Forerunner 50 Owner’s Manual 11
lap/reset to
Page 18

traIn mode
traIn mode
Train mode displays your current
workout settings and data. Press
mode until the Train page appears.
Timed Workout
1. Press start to begin an active
session.
Press lap to mark a known
•
position or distance during
your workout.
Press view to scroll
•
through data pages.
Press and hold view
•
to view secondary data
pages.
2. Whennished,pressstop.
NOTE: To pause the
active session, press
stop. Press start when
you are ready to continue
the session. Your history
includes a rest lap that
contains rest time only.
3. To save the workout, press
and hold lap/reset. Use + and
- to toggle YES or NO. Press
viewtoconrm.
12 Forerunner 50 Owner’s Manual
Page 19

Training Settings
NOTE: Training settings
cannot be modied during
an active session in Train
mode.
1. On the Train page, press and
hold start/stop.
2. Press
view to advance to the
next setting. The following
settingscanbemodied:
UNITS–change units to
•
miles or kilometers.
PACE SHOW–display
•
pace in minutes per mile/
kilometer.
OR
SPEED SHOW–display
speed in miles/kilometers
per hour.
traIn mode
AUTO–turn Auto Lap® on
•
or off. When AUTO lap
is ON, laps are triggered
by distance; you cannot
use the lap button to
manually mark laps Press
view again to enter the
distance.
•
ZONES–turn the training
zones on or off. See
Training Zones.
•
PUSH CALIB–calibrate
the foot pod by running a
known distance, see
page 8.
•
TxPAIR–see page 18.
•
CALIB–enter a calibration
factor to adjust foot pod
calibration to a known
value. See page 8.
•
WHEEL–enter the wheel
circumference in mm
(GSC 10 required).
Forerunner 50 Owner’s Manual 13
Page 20

traIn mode
WGT LB–enter your
•
weight (pounds or
kilograms determined by
the UNITS setting)
GENDER
•
PUSH PAIR–see page 26.
•
3. Use
+ and - to toggle or
change numeric settings.
4. Press
mode at any time to
return to the Train page.
Audible zone alarms
•
Pace and speed zones
•
(foot pod required)
Heart rate zone (heart rate
•
monitor required)
Bike speed and cadence
•
zones (GSC 10 required)
NOTE: During a workout
with training zones, the
and icons ash if
you are above or below
Training Zones
1. On the Train page, press and
hold start/stop.
2. Press
3. Press
4. Press
14 Forerunner 50 Owner’s Manual
view to advance to the
ZONES setting.
+ to set ZONES to ON.
view to advance to the
next zone setting. Use + and
- to toggle or adjust numeric
values for each zone limit. The
following zone settings can be
modied:
the specied range.
Page 21

Running Zones
Use the foot pod to track speed,
distance, steps, and pace during a
workout on the Forerunner indoors
or outdoors.
You can set the low and high zone
limits based on either speed or pace.
The ZONES must be set to ON.
1. On the Train page, press and
hold start/stop.
2. Press
3. Press
4. Press
5. Press
view, and then select
PACE SHOW or SPEED
SHOW.
view to advance to
ZONES.
+ to set ZONES to ON.
view to advance to ZO
RUN.
traIn mode
6. Press
7. Press
+ to set ZO RUN to ON.
view to advance to the
RUN LO and RUN HI settings.
Use + and - to toggle or adjust
numeric values for each zone
limit.
Heart Rate Zones
Setting the heart rate zone is very
similar to setting speed or pace
zones. See page 14.
Many runners and other athletes are
using heart rate zones to measure and
increase their cardiovascular strength
and improve their level of tness.
A heart rate zone is a set range of
heartbeats per minute. The ve
commonly accepted heart rate zones
are numbered from 1 to 5 according
to increasing intensity. Generally,
heart rate zones are calculated based
on percentages of your maximum
heart rate.
Forerunner 50 Owner’s Manual 15
Page 22

traIn mode
How Do Heart Rate Zones Affect Your Fitness Goals?
Knowing your heart rate zones can
help you measure and improve
your tness by understanding and
applying these principles:
Your heart rate is a good measure
•
of exercise intensity.
Training in certain heart rate
•
zones can help you improve
cardiovascular capacity and
strength.
Knowing your heart rate
•
zones can prevent you from
overtraining and can decrease
your risk of injury.
You can set the low and high heart
rate limits on your Forerunner. If
you know your maximum heart rate,
you can use the following table to
determine the best heart rate zone for
your tness objectives.
If you do not know your maximum
heart rate, use one of the calculators
available on the Internet.
16 Forerunner 50 Owner’s Manual
Page 23

traIn mode
Zone % of
Maximum
Heart Rate
1 50–60% Relaxed, easy pace;
2 60–70% Comfortable pace;
3 70–80% Moderate pace;
4 80–90% Fast pace and a bit
5 90–100% Sprinting pace,
Perceived Exertion Benets
rhythmic breathing
slightly deeper breathing,
conversation possible
moredifculttohold
conversation
uncomfortable;
breathing forceful
unsustainable for long
period of time; labored
breathing
Beginning-level aerobic
training; reduces stress
Basic cardiovascular
training; good recovery
pace
Improved aerobic
capacity; optimal
cardiovascular training
Improved anaerobic
capacity and threshold;
improved speed
Anaerobic and
muscular endurance;
increased power
Forerunner 50 Owner’s Manual 17
Page 24

traIn mode
Computer Pairing
Computer pairing is the setting in
which the Forerunner automatically
detects and pairs additional
computers with a USB ANT stick.
To pair your Forerunner with a
new computer:
1. Verify that the computer is set
up for data upload. See the
requirements on page 24.
2. On the Train page, press and
hold start/stop.
3. Press
4. Press
5. Press
6. Press
view to advance to the
TxPAIR setting.
+ to turn on computer
pairing. Your computer detects
the Forerunner and requests
to pair.
view.
+. The FOUND Comp
conrmationmessage
appears.
After you have paired with your
primary computer, turn computer
pairing off to avoid disruptive
messages on the Forerunner and
nearby computers.
To turn off computer pairing:
1. On the Train page, press and
hold start/stop.
2. Press
3. Press
view to advance to the
TxPAIR setting.
- to turn off computer
pairing.
18 Forerunner 50 Owner’s Manual
Page 25

Interval tImer mode
You can set two timers in Interval
Timer mode. Setting up a Forerunner
timer is very similar to setting the
time of day. Press mode until the
Timer page appears.
Setting the Timers
1. On the Timer page, press and
hold start/stop until the hour
setting blinks.
2. Use
+ and - to adjust the hour.
Interval tImer mode
TIP: Press and hold + or
- to scroll quickly through
the hours, minutes, and
seconds.
3. Press view to advance to the
next setting.
4. Repeat this process for
minutes and seconds.
Whennished,pressview
to advance to the REPEAT
setting (see page 20).
5. Press
6. Press
+ and - to turn on or off
the repeat function.
view to advance to
TIMER 2 settings.
Forerunner 50 Owner’s Manual 19
Page 26

Interval tImer mode
7. Press + and - to turn on or off
the TIMER 2 function.
Stopping and Resetting the Timers
1. Press stop at any time to
pause the timer.
2. Press and hold
reset the timer.
lap/reset to
8. Repeat steps 2–4 to set
TIMER 2.Whennished,
press mode to resume Timer
mode.
Starting the Timers
1. Press view to choose TIMER
1 or TIMER 2.
2. Press
20 Forerunner 50 Owner’s Manual
start. The timer counts
down and beeps when
nished.
Using Timer Repeat
Set the timer to REPEAT to
automatically restart the timer after
it beeps. If both TIMER 1 and
TIMER 2 are active, the repeat
function runs TIMER 1 > TIMER
2 > TIMER 1 > TIMER 2 , and so
forth until you press stop.
Page 27

HIStory mode
Your Forerunner stores workout data
based on the type of workout, the
accessories used, and your training
settings. Press mode until the
History page appears.
Viewing Workout History
1. On the History page, press +
and - to scroll through your
saved runs and workout data.
2. Press view to display the start
time and lap information.
HIStory mode
3. Press
+ and - to view the rest
of the run data depending on
which accessories, settings,
andtrainingzoneswereused:
Total run time
•
Total distance
•
Total steps
•
Total calories
•
Time in each zone
•
(ZONES must be set to
ON).
Forerunner 50 Owner’s Manual 21
Page 28

HIStory mode
4. Press view from any of these
pages to view the next level
of history data. Press + or - to
viewtheavailabledatapages:
Average lap time
•
Average lap speed
•
Average heart rate
•
5. Press
view from any of these
pages to view the next level of
historydata:detailsforeach
lap in your workout. Press +
or - to view the available data
pages.
Managing Memory
Your Forerunner holds up to 100 laps
and up to seven hours of exercise
les. When there is approximately
one hour of memory remaining, the
Lo MEM warning appears on the
Forerunner screen in Train mode.
When the memory is full, the Full
MEM warning appears, and your
Forerunner stops recording data.
For information about uploading data
to your computer, see page 24.
22 Forerunner 50 Owner’s Manual
Page 29

Deleting Workout History
NOTE: See page 24
for information about
transferring workout data
to your computer.
1. On the History page, press
+ or - to scroll through your
saved runs to select the run
you want to delete.
2. Press and hold
delete a single run. Continue
to hold lap/reset to delete all
runs.
lap/reset to
HIStory mode
Forerunner 50 Owner’s Manual 23
Page 30

data upload mode
data upload mode
Requirements
Your Forerunner holds up to 100 laps
and up to seven hours of exercise
les. Periodically upload data to
your computer using the ANT+Sport
wireless technology.
NOTE: By default, the
process of uploading data
deletes that data from
your Forerunner history.
To override this, you must
change the settings in
Garmin Training Center or
Garmin Connect.
1. Turn the computer on. (An
Internet connection is required
for software download and
Garmin Connect.)
2. Download software (see
page 4) so that the necessary
USB drivers are installed
before connecting the USB
ANT stick to your computer.
3. Connect the USB ANT stick
to an available USB port on
your computer. For optimal
performance, keep the area
free of clutter.
4. Bring the Forerunner within
range (5 m) of your computer.
5. Verify that Forerunner is in
Time mode.
24 Forerunner 50 Owner’s Manual
Page 31

6. Verify that there are no
Forerunner timers running or
active training sessions.
The Forerunner automatically
transmits data to the USB ANT stick
so you can use Garmin Training
Center or Garmin Connect to store
and analyze your workout data.
NOTE: If you are having
problems uploading data,
you may need to enable
computer pairing. See
page 18.
data upload mode
Forerunner 50 Owner’s Manual 25
Page 32

appendIx
appendIx
Optional Accessories
For more information about optional
accessories, go to http://buy.garmin
.com. You can also contact
your Garmin dealer to purchase
accessories.
Bike Accessories
For information about the GSC 10
speed and cadence sensor and the
Forerunner bike mount, go to
http://buy.garmin.com.
Pairing Sensors
If you purchased a sensor (with
ANT+Sport wireless technology)
separately, you need to pair it with
your Forerunner.
What Is Pairing?
Pairing is the connecting of sensors,
such as your heart rate monitor,
with your Forerunner. After you
pair the rst time, your Forerunner
automatically recognizes your sensor
each time it is activated. This process
occurs automatically when you turn
on the Forerunner and only takes a
few seconds when the sensors are
activated and functioning correctly.
When paired, your Forerunner only
receives data from your sensor, and
you can go near other sensors.
26 Forerunner 50 Owner’s Manual
Page 33

To pair sensors with your
Forerunner:
1. Move away (10 m) from other
sensors while the Forerunner
is trying to pair with your
sensorforthersttime.Bring
your sensor within range (3 m)
of the Forerunner.
2. Press
3. Press and hold
4. Press
5. Press
mode until the Train
page appears.
start/stop.
view to advance to the
PUSH PAIR page.
start/stop. While the
Forerunner scans for new
sensors, the , , and
icons blink. The icons are
solid when paired.
appendIx
Battery Information
WARNING: The Forerunner,
the heart rate monitor, and the
foot pod contain user-replaceable
CR2032 batteries. See the
Important Safety and Product
Information guide in the product
box for important battery safety
information.
Forerunner Battery
The Forerunner battery will last for
12 months (typical use). When the
battery is low, the Lo BATT warning
blinks on the Forerunner screen in
Time mode.
Forerunner 50 Owner’s Manual 27
Page 34

appendIx
All of your Forerunner settings are
preserved, except the time of day.
NOTE: Before replacing
the battery, save all
of your workout data
to history or to your
computer.
NOTE: Garmin
recommends that you
take the Forerunner to a
professional watch repair
person to have the battery
replaced.
Heart Rate Monitor Battery
The heart rate monitor contains a
user-replaceable CR2032 battery.
The heart rate monitor battery will
last for three years (typical use is one
hour per day).
To replace the battery:
1. Locate the circular battery
cover on the back of the heart
rate monitor.
2. Use a coin to twist the cover
counter-clockwise so the
arrow on the cover points to
OPEN.
28 Forerunner 50 Owner’s Manual
Page 35

3. Remove the cover and
replace the battery with the
positive side facing up.
NOTE: Be careful not to
damage or lose the O-ring
gasket on the cover.
4. Use a coin to twist the cover
clockwise so the arrow on the
cover points to CLOSE.
appendIx
To replace the battery:
1. Locate the circular battery
cover on the back of the foot
pod.
Foot Pod Battery
When the foot pod battery is low, the
LED blinks six times upon activation
(instead of three). Approximately
ve hours of battery life remain.
Also, the Lo BATT warning appears
2. Use a coin to twist the cover
counter-clockwise until it is
loose enough to remove.
3. Remove the cover and
replace the battery with the
positive side facing up.
in Train mode when a workout starts
or stops.
Forerunner 50 Owner’s Manual 29
Page 36

appendIx
NOTE: Be careful not to
damage or lose the O-ring
gasket on the cover.
4. Use a coin to twist the cover
back into place.
NOTE: You do not
need to repeat pairing
or calibration following
battery replacement.
Specications
Forerunner 50
Watch size: 58 mm × 42 mm ×
•
20 mm
Wrist band size: 204 mm ×
•
28 mm × 3 mm
Weight: 44 g
•
LCD Display: 23.75 mm ×
•
18.25 mm, with backlight
Water Resistance: 30 m
•
continuous
NOTE: To maintain
the water resistance, do
not operate Forerunner
buttons under water.
Data storage: Up to 100 laps and
•
up to seven hours of exercise les
Computer interface: Wireless,
•
automatic USB ANT stick
Battery type: User-replaceable
•
CR2032 (3 volts)
Battery life: 12 months,
•
depending on usage
Operating temperature range:
•
5°F–158°F (-15°C–70°C)
Radio frequency/protocol:
•
2.4 GHz/Dynastream ANT+Sport
wireless communications protocol
30 Forerunner 50 Owner’s Manual
Page 37

USB ANT stick
Physical size: 59 mm × 18 mm
•
× 7 mm
Weight: 6 g
•
Transmission range:
•
Approximately 5 m
Operating temperature:
•
14°F–122°F (-10°C–50°C)
Radio frequency/protocol:
•
2.4 GHz / Dynastream ANT
wireless communications protocol
Power source: USB
•
Heart Rate Monitor
Physical size: 34.7 cm × 3.4 cm
•
× 1.1 cm
Weight: 44 g
•
Water Resistance: 10 m
•
Transmission range:
•
approximately 3 m
appendIx
Battery: User-replaceable
•
CR2032 (3 volts)
Battery Life: approximately
•
3 years (1 hour per day)
Operating temperature:
•
14°F–122°F (-10°C–50°C)
NOTE: In cold
conditions, wear
appropriate clothing to
keep the temperature of
the heart rate monitor near
your body temperature.
Radio frequency/protocol: 2.4
•
GHz/Dynastream ANT+Sport
wireless communications protocol
Accuracy may be degraded by
poor sensor contact, electrical
interference, and receiver distance
from the transmitter.
Forerunner 50 Owner’s Manual 31
Page 38

appendIx
Foot Pod
Physical size: 42 mm × 10 mm
•
Weight: 27 g (including battery)
•
Water Resistance: 10 m
•
Transmission range:
•
Approximately 3 m
Speed and distance accuracy:
•
Uncalibrated 95%, calibrated
98%
Battery: User-replaceable
•
CR2032 (3 volts)
Battery life: 200 hours run time
•
NOTE: After 30 minutes
of inactivity, the foot pod
automatically turns off to
conserve the battery.
Operating temperature:
•
14°F–140°F (-10°C–60°C)
Sensor Accuracy Range:
•
32°F–104°F (0°C–40°C)
Radio frequency/protocol:
•
2.4 GHz/Dynastream ANT+Sport
wireless communications protocol
Accuracy may be degraded by
electrical interference, receiver
distance from the transmitter, and
extreme temperatures.
For a complete list of specications,
see www.garmin.com/forerunner.
32 Forerunner 50 Owner’s Manual
Page 39

Troubleshooting
Problem Solution/Answer
NOTE:
This procedure deletes all information that you have
The buttons don’t
respond. How do I
reset the Forerunner?
How do I set the time
to AM or PM?
The Forerunner will
not send data to my
computer.
The heart rate
monitor or foot pod
will not pair with the
Forerunner.
The heart rate monitor
strap is too big.
entered. Press view, mode, and start/stop simultaneously
to reset the Forerunner software. This restores the factory
settings. Workout data is deleted. You must reset the time and
your custom settings. If you are still having problems, remove
and then replace the battery (see page 27).
Verify that the time mode is set to 12-H (12 hour). Use + and
- to select the correct hour. The A or P icon appears above the
seconds on the Time page. For more information, see page 3.
See page 18 to enable computer pairing. See www.garmin
.com/forerunner for additional troubleshooting.
Stay 10 m away from other ANT sensors while pairing.
•
Bring the Forerunner within range (3 m) of the heart rate
•
monitor while pairing.
If the problem persists, replace the battery.
•
A smaller elastic strap is sold separately. Go to http://buy
.garmin.com.
appendIx
Forerunner 50 Owner’s Manual 33
Page 40

appendIx
Problem Solution/Answer
Make sure the heart rate monitor is snug against your body.
•
Warm up for 5–10 minutes. If the problem persists, continue
•
with the following suggestions.
Reapply moisture to the sensors. Use water, saliva, or
•
electrode gel. Clean the sensors. Dirt and sweat residue on
the sensor can interfere with heart rate signals.
Syntheticfabricsthatruborapagainsttheheartrate
•
monitor can create static electricity that interferes with heart
The heart rate data is
inaccurate or erratic.
rate signals. Wear a cotton shirt or wet your shirt if suitable
for your activity.
Position the heart rate monitor on your back instead of your
•
chest.
Strongelectromagneticeldsandsome2.4GHzwireless
•
sensors can interfere with your heart rate monitor. Sources
of interference may include very high voltage power lines,
electric motors, microwave ovens, 2.4 GHz cordless
phones, and wireless LAN access points. After you move
away from the source of interference, your heart rate data
should return to normal.
34 Forerunner 50 Owner’s Manual
Page 41

appendIx
Software License Agreement
BY USING THE Forerunner, YOU
AGREE TO BE BOUND BY THE
TERMS AND CONDITIONS OF THE
FOLLOWING SOFTWARE LICENSE
AGREEMENT. PLEASE READ THIS
AGREEMENT CAREFULLY.
Garmin grants you a limited license to
use the software embedded in this device
(the “Software”) in binary executable
form in the normal operation of the
product. Title, ownership rights, and
intellectual property rights in and to the
Software remain in Garmin.
You acknowledge that the Software
is the property of Garmin and is
protected under the United States
of America copyright laws and
international copyright treaties. You
further acknowledge that the structure,
organization, and code of the Software
are valuable trade secrets of Garmin
and that the Software in source code
Forerunner 50 Owner’s Manual 35
form remains a valuable trade secret of
Garmin. You agree not to decompile,
disassemble, modify, reverse assemble,
reverse engineer, or reduce to human
readable form the Software or any part
thereof or create any derivative works
based on the Software. You agree not to
export or re-export the Software to any
country in violation of the export control
laws of the United States of America.
Declaration of Conformity
Hereby, Garmin declares that this
Forerunner product is in compliance
with the essential requirements and
other relevant provisions of Directive
1999/5/EC.
To view the full Declaration of
Conformity, see the Garmin Web site for
your Garmin product: www.garmin
.com/forerunner.
Page 42

Index
Index
A
accessories 5, 26
alarm 10
Auto Lap 13
B
backlight 2
batteries 27
bike accessories 26
buttons, watch 1
C
cadence sensor 9, 26
calibrating, foot pod 8
changing modes 1
chimes 10
computer pairing 18
F
foot pod 7, 15, 29
calibrating 8
G
Garmin Connect i, 4, 25
Garmin Product Support i
Garmin Training Center i,
4, 25
GSC 10 9, 26
H
heart rate monitor 5, 28
heart rate zones 15
History mode 21
I
icons 2
Interval Timer mode 19
L
D
data uploading 4, 24
downloading software i, 4
drivers, USB 4, 24
36 Forerunner 50 Owner’s Manual
lap 1, 13
license agreement 35
M
memory 22
modes, change 1
MyGarmin i
P
pairing
computer
sensors 3, 26
product registration i
product support i
18
R
running, foot pod 7, 15
running zones 15
S
sensors, pairing 3, 5, 26
setting the time 3
software downloads i, 4
software license
agreement
speed and cadence
sensor
35
9, 26
Page 43

T
technical specications 30
time, setting 3
Time mode 10
timers, setting 19
time zones 11
training zones 14
Train mode 12
transferring data 4, 24
troubleshooting 33
turning on Forerunner 2
U
units 13
uploading data 4, 24
USB ANT stick iv, 4
USB drivers 4, 24
W
workout data 21
Index
Forerunner 50 Owner’s Manual 37
Page 44

For the latest product information and accessories, visit the Garmin
Web site at www.garmin.com.
© 2007 Garmin Ltd. or its subsidiaries
Garmin International, Inc.
1200 East 151st Street, Olathe, Kansas 66062, USA
Garmin (Europe) Ltd.
Liberty House, Hounsdown Business Park, Southampton, Hampshire, SO40 9RB UK
Garmin Corporation
No. 68, Jangshu 2nd Road, Shijr, Taipei County, Taiwan
Part Number 190-00839-00 Rev. E
 Loading...