

Page 1

Forerunner® 101
personal trainer
owner’s manual
Page 2

©
Copyright 2004–2006
Garmin Ltd. or its subsidiaries
All Rights Reserved
Garmin International, Inc.
1200 East 151st Street
Olathe, Kansas 66062 U.S.A.
Tel. 913/397.8200
Fax 913/397.8282
Garmin (Europe) Ltd.
Unit 5, The Quadrangle,
Abbey Park Industrial Estate
Romsey, SO51 9DL, U.K.
Tel. 44/0870.8501241
Fax 44/0870.8501251
Garmin Corporation
No. 68, Jangshu 2nd Road
Shijr, Taipei County, Taiwan
Tel. 886/2.2642.9199
Fax 886/2.2642.9099
Except as expressly provided herein, no part of this manual may be reproduced, copied, transmitted, disseminated, downloaded or stored in
any storage medium, for any purpose without the express prior written consent of Garmin. Garmin hereby grants permission to download a
single copy of this manual and of any revision to this manual onto a hard drive or other electronic storage medium to be viewed and to print
one copy of this manual or of any revision hereto, provided that such electronic or printed copy of this manual or revision must contain the
complete text of this copyright notice and provided further that any unauthorized commercial distribution of this manual or any revision
hereto is strictly prohibited.
Information in this document is subject to change without notice. Garmin reserves the right to change or improve its products and to make
changes in the content without obligation to notify any person or organization of such changes or improvements.
Web Site address: www.garmin.com
Garmin®, Personal Navigator®, Forerunner®, Auto Lap®, and Auto Pause® are registered trademarks, and Virtual Partner™ is a trademark of
Garmin Ltd. or its subsidiaries and may not be used without the express permission of Garmin.
February 2006 Part Number 190-00317-00 Rev. B Printed in Taiwan
Page 3

PACE YOURSELF
Fun is now on the run! Strap this personal trainer to your wrist and let it do all the work,
except the running of course. Welcome to the world of the Forerunner 101; a compact,
lightweight, waterproof GPS sensor that provides you accurate pace/speed, distance, and time
data during your workout. Not only that, it provides a map of your travels and provides assistance in your training using the Virtual Partner’s pace to help achieve your goals. Take your
Forerunner 101 wherever you go in the great outdoors.
To get the most out of your new Forerunner 101, take the time to read through this Owners Manual and the Quick Start Guide to understand the operating features of the unit.
PRODUCT REGISTRATION
Help us better support you by completing your on-line registration today!
Connect to our Web site (www.garmin.com) and look for the Product Registration link on
the home page. Your unit’s serial number is on the back of the unit.
If you have any questions or comments regarding the use of the Forerunner 101 you can
visit our Web Site or contact our Product Support Department M-F, 8:00-5:00 CST (except
holidays) at 1-800-800-1020.
Serial Number
Use this area to record the serial number (8-digit number located on the back of your
unit) in case it is lost, stolen, or needs service. Be sure to keep your original sales receipt in a
safe place or attach a photocopy inside the manual.
Introduction
Product Registration
i
Page 4

Introduction
Table of Contents
ii
INTRODUCTION .............................................I
Product Registration ....................................i
Table of Contents ...................................... ii
Limited Warranty .....................................iii
FCC Compliance ......................................iv
Software License Agreement ...................... v
Warnings & Cautions ...............................vi
Maintenance ............................................vii
Unit Overview ........................................viii
Wrist Strap ...............................................ix
Installing Batteries ...................................... x
GETTING STARTED .......................................1
What is GPS? .............................................1
Turning on your Forerunner ......................2
Main Modes ..............................................3
TIMER MODE ................................................3
Using Timer Mode .....................................3
Data Screens ..............................................4
MENU MODE ................................................ 5
Using Menu Mode .....................................5
History: Last Run ......................................6
History: By Day ..........................................
History: By Week .......................................7
History: History Totals & Delete ................8
Training Assistant: Auto Pause/Lap ............9
Training Assistant: Virtual Partner ...........10
Training Assistant: Interval Training ........13
Training Assistant: Pace/Speed Alert ........15
Training Assistant: Time/Dist Alert ..........16
Navigation: Add/Remove Map Mode .......17
Navigation: Mark Location ......................18
Navigation: Find Location .......................19
Navigation: Back To Start ........................23
Navigation: Orient Map North/Ahead ......23
Settings: Set Time ....................................22
Settings: Set Units ...................................26
Settings: Set Custom Page ........................27
Settings: Set Profile ...................................28
Settings: Set Display ................................29
Settings: Set System .................................30
Settings: Restore Settings .........................31
Settings: About Forerunner .....................31
SPECIFICATIONS ........................................32
INDEX ........................................................33
6
Page 5

LIMITED WARRANTY
This Garmin product is warranted to be free from defects in materials or workmanship for one
year from the date of purchase. Within this period, Garmin will at its sole option, repair or replace any
components that fail in normal use. Such repairs or replacement will be made at no charge to the customer for parts or labor, provided that the customer
shall be responsible for any transportation cost. This warranty does not cover failures due to abuse, misuse, accident or unauthorized alteration or repairs.
THE WARRANTIES AND REMEDIES CONTAINED HEREIN ARE EXCLUSIVE AND IN LIEU OF ALL OTHER WARRANTIES EXPRESS OR IMPLIED
OR STATUTORY, INCLUDING ANY LIABILITY ARISING UNDER ANY WARRANTY OF MERCHANTABILITY OR FITNESS FOR A PARTICULAR PURPOSE,
STATUTORY OR OTHERWISE. THIS WARRANTY GIVES YOU SPECIFIC LEGAL RIGHTS, WHICH MAY VARY FROM STATE TO STATE.
IN NO EVENT SHALL GARMIN BE LIABLE FOR ANY INCIDENTAL, SPECIAL, INDIRECT OR CONSEQUENTIAL DAMAGES, WHETHER RESULTING
FROM THE USE, MISUSE, OR INABILITY TO USE THIS PRODUCT OR FROM DEFECTS IN THE PRODUCT. Some states do not allow the exclusion of
incidental or consequential damages, so the above limitations may not apply to you.
Garmin retains the exclusive right to repair or replace the unit or software or offer a full refund of the purchase price at its sole discretion. SUCH REM
EDY SHALL BE YOUR SOLE AND EXCLUSIVE REMEDY FOR ANY BREACH OF WARRANTY.
To obtain warranty service, call your local Garmin authorized dealer. Or call Garmin Product Support at one of the numbers listed below for shipping
instructions and an RMA tracking number. The unit should be securely packed with the tracking number clearly written on the
unit should be sent, freight charges prepaid, to any Garmin warranty service station. A copy of the original sales receipt is required as the proof of purchase
for warranty repairs.
Online auction confirmations are not accepted for warranty verification. To obtain warranty service, an original or copy of the sales receipt from the
original retailer is required. Garmin will not replace missing components from any package purchased through an online auction.
Introduction
-
outside of the package. The
Garmin International, Inc.
1200 E. 151st Street
Olathe, KS 66062, U.S.A.
Phone: 800/800.1020 or 913/397.8200
FAX: 913/397.0836
www.garmin.com
Garmin (Europe) Ltd.
Unit 5, The Quadrangle, Abbey Park Industrial Estate
Romsey, SO51 9DL, U.K.
Phone: 44/0870.8501241
FAX: 44/0870.8501251
iii
Page 6

Introduction
FCC Compliance
iv
The Forerunner 101 complies with Part 15 of the FCC interference limits for Class B
digital devices FOR HOME OR OFFICE USE. These limits are designed to provide more
reasonable protection against harmful interference in a residential installation, and are more
stringent than “outdoor” requirements.
Operation of this device is subject to the following conditions: (1) This device may not
cause harmful interference, and (2) this device must accept any interference received, including interference that may cause undesired operation.
This equipment generates, uses and can radiate radio frequency energy and, if not
installed and used in accordance with the instructions, may cause harmful interference to
radio communications. However, there is no guarantee that interference will not occur in a
particular installation. If this equipment does cause harmful interference to radio or television
reception, which can be determined by turning the equipment off and on, the user is encouraged to try to correct the interference by one of the following measures:
• Reorient or relocate the receiving antenna.
• Increase the separation between the equipment and the receiver.
• Connect the equipment into an outlet on a circuit different from that to which the
receiver is connected.
• Consult the dealer or an experienced radio/TV technician for help.
The Forerunner 101 does not contain any user-serviceable parts. Repairs should only be
made by an authorized Garmin service center. Unauthorized repairs or modifications could
result in permanent damage to the equipment, and void your warranty and your authority to
operate this device under Part 15 regulations.
Page 7

SOFTWARE LICENSE AGREEMENT
BY USING THE FORERUNNER 101, YOU AGREE TO BE BOUND BY THE TERMS
AND CONDITIONS OF THE FOLLOWING SOFTWARE LICENSE AGREEMENT. PLEASE
READ THIS AGREEMENT CAREFULLY.
Garmin grants you a limited license to use the software embedded in this device (the
“Software) in binary executable form in the normal operation of the product. Title, ownership
rights and intellectual property rights in and to the Software remain in Garmin.
You acknowledge that the Software is the property of Garmin and is protected under the
United States of America copyright laws and international copyright treaties. You further
acknowledge that the structure, organization and code of the Software are valuable trade
secrets of Garmin and that the Software in source code form remains a valuable trade secret of
Garmin. You agree not to decompile, disassemble, modify, reverse assemble, reverse engineer
or reduce to human readable form the Software of any part thereof or create any derivative
works based on the Software. You agree not to export or re-export the Software to any country in violation of the export control laws of the United States of America.
Introduction
Software License
Agreement
v
Page 8

Introduction
government, which is solely responsible for its accuracy and maintenance. The system is
subject to changes which could affect the accuracy and performance of all GPS equipment.
Warnings & Cautions
Although the Garmin GPS receiver is a precision electronic NAVigation AID (NAVAID), any
NAVAID can be misused or misinterpreted and, therefore, become unsafe.
bicycle in a safe manner, maintain full surveillance of all riding conditions at all times, and
not become distracted by the Forerunner 101 to the exclusion of safe practices. It is unsafe
to operate the controls of the Forerunner 101 while you are riding. Failure by the rider of a
bicycle equipped with a Forerunner 101 to pay full attention to operation of the bicycle and
road conditions while in motion could result in an accident or collision with property damage
and personal injury.
WARNING.- This product, its packaging, and its components
contain chemicals known to the State of California to cause
cancer, birth defects, or reproductive harm. This Notice is
being provided in accordance with California’s Proposition 55.
If you have any questions or would like additional informa
tion, please refer to our web site at http:Ilwww.garmin.coml
prop65.
tion, carefully review and understand all aspects of this Owner’s Manual. When in actual use,
carefully compare indications from the Forerunner 101 to all available navigation sources, including the information from other NAVAIDS, visual sightings, charts, etc. For safety, always
resolve any discrepancies before continuing navigation.
-
THIS PRODUCT IS INTENDED TO BE USED ONLY AS A NAVIGATIONAL AID AND MUST
NOT BE USED FOR ANY PURPOSE REQUIRING PRECISE MEASUREMENT OF DIRECTION, DISTANCE, LOCATION OR TOPOGRAPHY. THIS PRODUCT SHOULD NOT BE
USED AS AN AID TO DETERMINE GROUND PROXIMITY FOR AIRCRAFT NAVIGATION.
vi
WARNING: The Global Positioning System (GPS) is operated by the United States
WARNING: When on a bicycle, it the sole responsibility of the rider to operate the
CAUTION: Use the Forerunner 101 at your own risk. To reduce the risk of unsafe opera-
CAUTION: IT IS THE USER’S RESPONSIBILITY TO USE THIS PRODUCT PRUDENTLY.
Page 9

FORERUNNER AND WRIST STRAP CLEANING
The Forerunner 101 is constructed of high quality materials and does not require user
maintenance other than cleaning. Clean the unit using a cloth dampened with a mild
detergent solution and then wipe dry. Avoid chemical cleaners and solvents that may damage
plastic components. The wrist strap should be hand washed with mild detergent in warm or
hot water. Blot dry then air dry. Do not machine wash.
STORAGE
Do not store the Forerunner 101 where prolonged exposure to temperature extremes may
occur (such as in the trunk of a car) as permanent damage may result. User information, such
as locations, tracks, and workout history is retained indefinitely in the units memory without
battery.
WATER IMMERSION
The Forerunner 101 is waterproof to IEC Standard 60529 IPX7. It can withstand immersion in 1 meter of water for 30 minutes. Prolonged submersion can cause damage to the unit.
After submersion, be certain to wipe and air dry the unit (including the battery compartment)
before reuse.
To resolve problems that cannot be remedied using this guide, contact Garmin Customer
Support in the U.S.A. at 800/800.1020 or Garmin Europe at 44/0870.8501241.
Introduction
Maintenance
vii
Page 10
Introduction
mode
reset
enter
lap start/stop
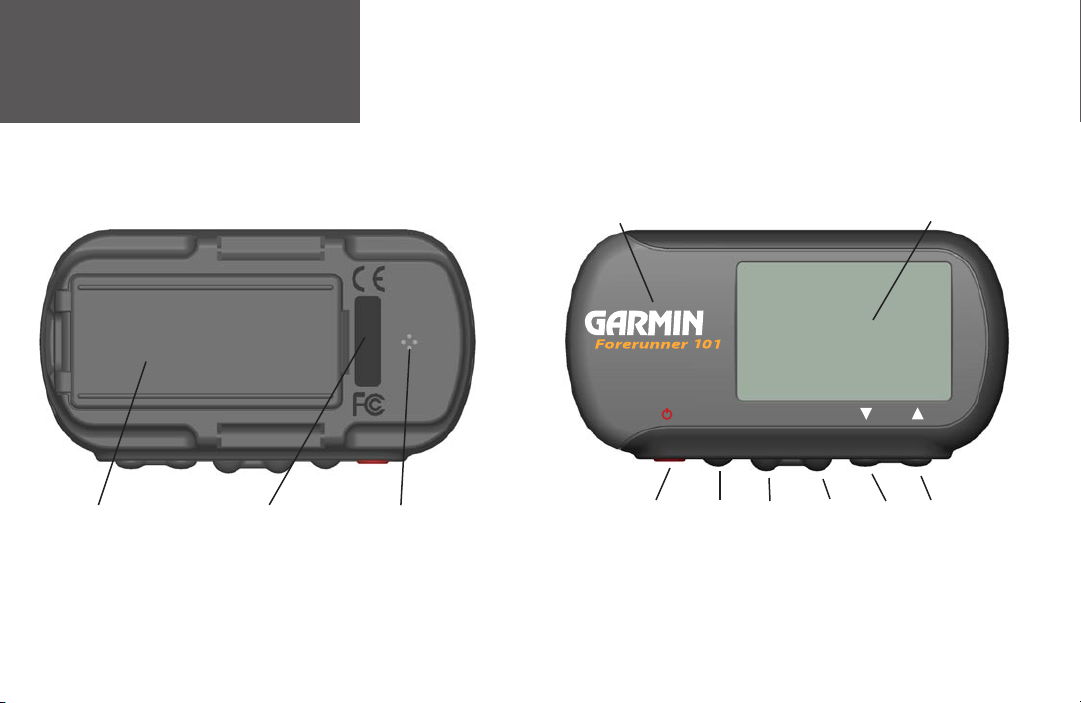
Unit Overview
Back View (without strap)
Battery Cover ENTER
viii
Serial Number Speaker
Built-in GPS
Antenna
POWER
BACKLIGHT
Front View
MODE RESET
LAP
LCD Display
(with Backlight)
DOWN UP
START/STOP
Page 11

The Forerunner has been designed to comfortably fit your wrist. For best performance,
wear the Forerunner like a watch, with the top face of the unit oriented towards the sky. A
strap extension provides additional length and easily attaches to the existing strap.
To fasten the Forerunner to your wrist:
1. With the strap open, place the Forerunner on your wrist.
2. Slide the end of the strap through the connector.
3. Adjust to fit comfortably and secure the strap. Do not adjust too tightly around your wrist as
this may restrict blood circulation.
To add the strap extension:
1. Slide the end of the existing strap through the connector on the extension.
2. Place on your wrist or arm.
3. Slide the end of the extension through the existing connector.
4. Adjust to fit comfortably and secure the strap. Do not adjust too tightly around your wrist/
arm as this may restrict blood circulation.
To remove the wrist strap from the Forerunner:
1. Place your Forerunner on a cloth or soft surface to avoid scratching the case.
2. While holding the Forerunner steady with one hand, use a jewelers band pin removing tool
or a very soft flat head screwdriver to catch the spring bar’s loaded stem and pull it back
enough for the band to clear the case’s edge.
3. To reinstall, insert the spring bar into the wristband and place one side of the spring bar
into one pinhole.
4. Compress the spring bar, and snap it into the other pinhole. Be sure that the spring bars are
secure in the pinholes before using your Forerunner.
Introduction
Wrist Strap
ix
Page 12
Introduction
+
-
+
-
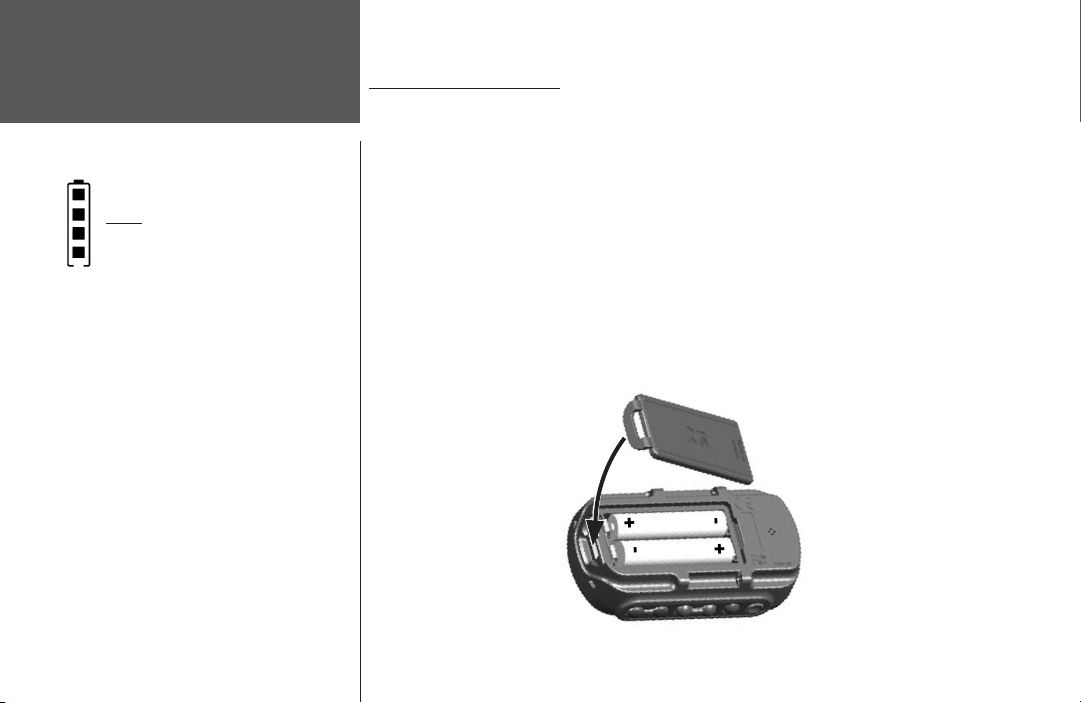
INSTALLING BATTERIES
placed in the back of the unit. Rechargeable alkaline, NiMH, NiCad, or lithium batteries may
Battery Usage
Battery usage icon shows an estimate
of battery life left. Four squares with the
battery outline indicates a full battery.
be used. See page 30 for instructions on selecting battery type.
completely discharged and are not changed within a couple of days, it may take longer for the
unit to get a GPS signal fix.
Important Note
When replacing batteries, use only new or fully charged batteries. Do not mix Alkaline and NiMH batteries. Rechargeable
batteries may typically display less capacity than disposable
batteries.
Remove the batteries from the unit if you don’t plan to use it
for several months. Storing batteries in the unit for prolonged
periods may result in leakage and damage to the battery
compartment.
Follow the manufacturer’s instructions for proper care and
disposal of used batteries. Do not incinerate used batteries, as
internal materials may ignite with explosive violence.
Extensive use of backlighting and key beep tones will signifi
cantly reduce battery life.
x
-
The Forerunner 101 operates on two AAA alkaline batteries (not included), which are
Stored data will not be lost while batteries are being changed. However, if batteries are
To install the batteries:
1. Remove the battery cover by inserting a coin in the bottom slot. Twist the coin to lift the
cover up and pull away.
2. Compare the battery polarity with the diagram in the battery compartment and install the
batteries accordingly.
3. To re-install the battery cover, slide the top portion into the appropriate slot, then snap the
bottom section securely to the base of the unit.
Page 13

WHAT IS GPS?
The Global Positioning System (GPS) is a system of 24 satellites that circle the earth
twice a day in a very precise orbit and transmit information to earth. The Forerunner must
continuously “see” at least three of these satellites to calculate your location and track your
movement. At times, additional satellites may be needed to determine a location. If some of
the satellites in view get blocked or “shaded,” the receiver can simply use an alternate satellite
to maintain the location fix.
Because the Forerunner relies on satellite signals to provide you with navigation guidance,
the receiver needs to have an unobstructed, clear view of the sky for best performance. In a
nutshell, the GPS receiver’s view of the sky generally determines how fast you get a location
fix, or if you get a fix at all. GPS signals are relatively weak and do not travel through rocks,
buildings, people or metal, so remember to keep a clear view of the sky at all times for best
performance.
Your Forerunner needs to be given the opportunity to find or Autolocate itself (“initialization”). Once you initialize the unit to a location, it typically computes a fix within a couple
minutes.
Longer initialization (Autolocate) is only necessary:
• The first time you use your Forerunner (new from the factory).
• After the receiver has been moved over 500 miles (with the power off from the last time
you used it.
Visit the Garmin web site at wwwgarmin.com for more information on GPS.
Getting Started
Down to the
Basics
1
Page 14
Getting Started
Turning on your
Forerunner
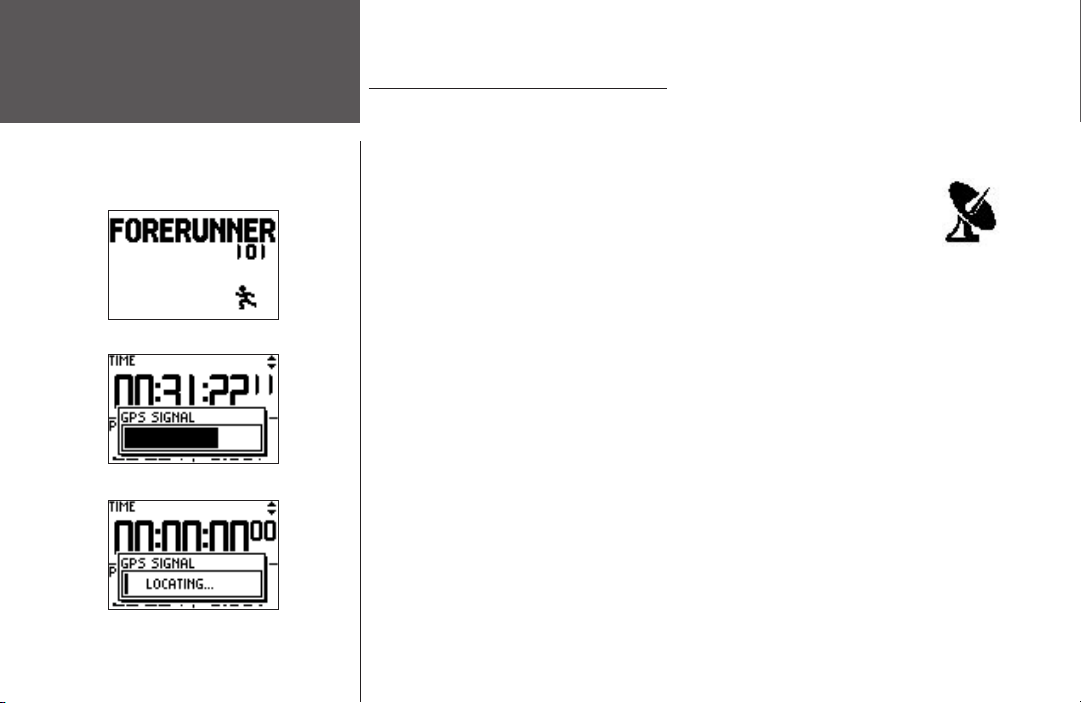
Welcome Screen
GPS Signal Bar
STARTING UP THE FORERUNNER 101
Allow the Forerunner time to track satellites and determine your position the first time you
use it. Upon startup, the GPS signal bar appears. As the Forerunner 101 locates more satellites
and the signal strength increases, the bar moves to the right. The window disappears after the
Forerunner 101 has a satellite lock. It is recommended not to start your workout
until the Forerunner has a satellite lock and knows your location.
To turn on the Forerunner 101:
1. Press and hold the POWER button until the Welcome Page is displayed, then
release.
2. After the Welcome Page disappears, the Timer Mode is displayed with the GPS Signal Bar.
The satellite dish icon on the left side of the screen flashes while the Forerunner determines
your location.
3. Leave the Forerunner with a clear view of the sky for 15-30 minutes initially. If the Forerun
ner does not detect any satellites, a message appears asking if you are indoors. Selecting
‘Yes’ shuts off the GPS to conserve battery life for indoor practice. Selecting ‘No’ prompts
another question asking if the unit has been moved hundreds of miles. Choose ‘Yes’ to have
the unit Autolocate the satellite signals (Also use this option if you are having problems
receiving satellites the first time you use the Forerunner.) The word “Locating..” appears in
the signal bar area when in Autolocate mode. After the first use, it should only take less than
a couple minutes to acquire satellites.
4. When the Forerunner acquires enough satellite signals to determine your location, the satel
lite dish icon on the left side of the screen stops flashing and the GPS Signal Bar disappears.
GPS Satellite
Indicator
-
-
2
Autolocate Mode
Page 15
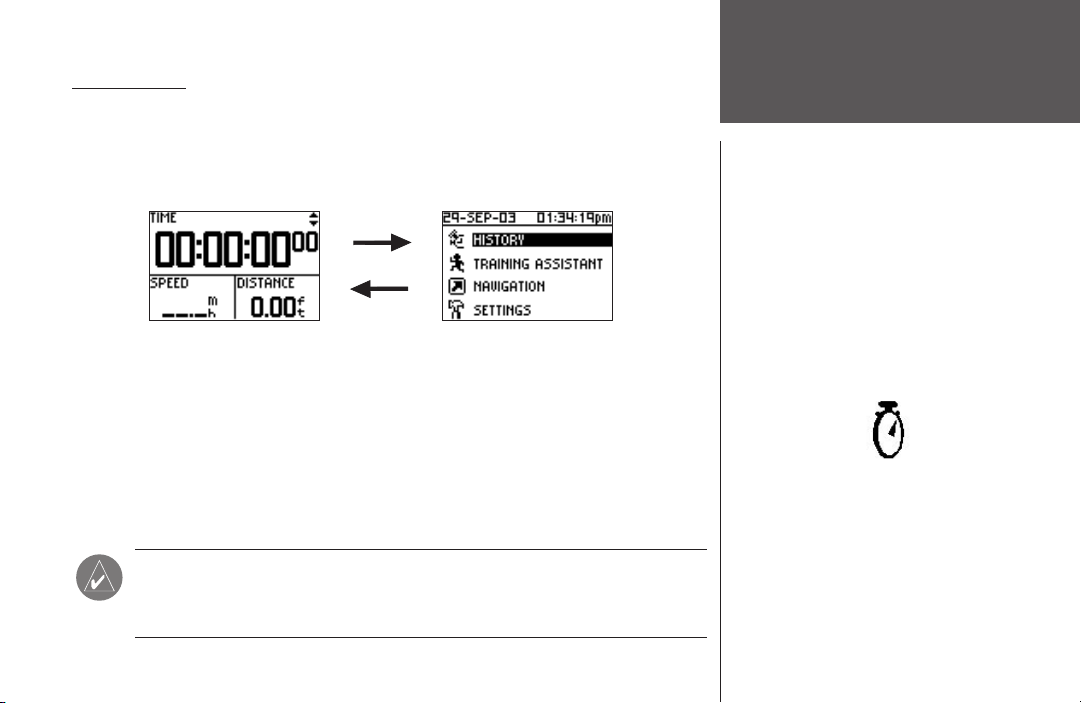
MAIN MODES
All of the information needed to operate the Forerunner 101 is found on two main modes
(or display screens). These modes are the Timer Mode and Menu Mode. Press the MODE
Button to cycle through the 2 modes.
Timer Mode
Using the Timer Mode
Timer Mode
Menu Mode
Using the Timer Mode:
1. In the Timer Mode, press the START/STOP button to start timing and tracking distance.
2. Press the START/STOP button to stop timing and tracking distance data.
3. Press the
4. While in Timer Mode, the data you are recording is called your Current Run. When you reset
the Timer, the data is considered your Last Run. When the timer is stopped, press and hold
RESET for 3 seconds to reset all workout data. The unit automatically stores Last Run and
History information.
LAP button to record when a lap is completed.
NOTE: A manual stop and restart of the Timer automatically starts a new lap.
You can also setup the Forerunner to automatically lap and/or pause at a
specific distance and/or speed (pg. 9-10).
Timer Indicator
3
Page 16
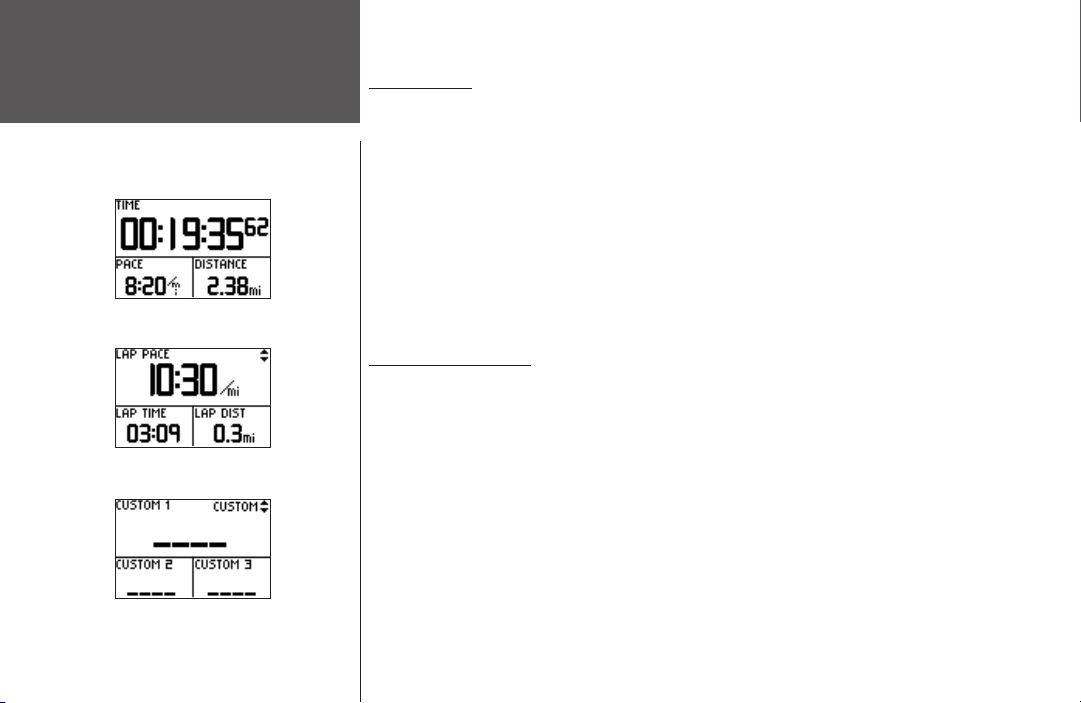
Timer Mode
Data Screens
During your workout there are 3 data screens you can access by pressing the DOWN or
UP buttons. These data screens are:
Data Screens
• Timer Screen - Time/Pace(Speed)/Distance
• Current Lap Screen - Lap Pace(Speed)/Lap Time/Lap Dist(ance)
• Custom Screen - Custom 1/Custom 2/Custom3
For information how to select the custom fields, see ’Set Custom Page’ on page 27. When
’Auto Pause’ is enabled a fourth screen, Rest Time/Rest Dist(ance)/Total Dist(ance), appears
(see page 9). You can also utilize the Timer (stop watch) in this mode. By using a combina-
Timer Screen
tion of the GPS and the Timer, you can start running anywhere you want and let the Forerunner 101 track your speed, distance, and time.
Timer Mode Buttons
The MODE Button:
• Press to go to the next main mode
• Press and hold to change Pace to Speed. Repeat to return to Pace setting.
Current Lap Screen
The RESET/LAP Button:
• Press while timer is running to lap.
• With timer stopped, press and hold for 3 seconds to reset the data fields.
The START/STOP Button:
• Press to start or stop the Timer.
The UP/DOWN buttons:
4
Custom Screen
• Press to cycle through the data screens: Time/Pace(Speed)/Distance, Lap Pace(Speed)/Lap
Time/Lap Dist(ance), Custom 1/Custom 2/Custom 3, Rest Time/Rest Dist/Total Dist (if Auto
Pause enabled).
Page 17

MENU NAVIGATION
Your Forerunner 101 allows you to navigate through menus quickly and efficiently using
a combination of the ENTER button, the UP and DOWN buttons, and the MODE button.
The diagram gives you a quick glance of all available options. To read more about a particular
menu option, turn to the page number indicated to the right in parentheses.
Navigation (17-24)
Add/Remove Map Mode (17)
Mark Location (18-20)
Find Location (20-22)
History (6-8)
Last Run (6)
By Day (6-7)
By Week (7)
History Totals (8)
Delete (8)
Training Assistant (9-16)
Auto Pause/Lap (9)
Virtual Partner (10-11)
Interval Training (12-13)
Pace (Speed) Alert (15)
Time/Dist(ance) Alert (16)
Back to Start (23)
Orient Map North/Ahead (23-24)
Settings (24-31)
Set Time (22-25)
Set Units (26-27)
Set Custom Page (27-28)
Set Profile (28)
Set Display (29)
Set System (30)
Restore Settings (31)
About Forerunner (31)
Menu Modes
Using Menu Mode
Using Menu Mode
The POWER Button:
• Press and release to turn the backlight
on and off
The MODE Button:
• Press to go to the next Main Mode
• Press to ‘undo’ the most recent action
The ENTER Button:
• Press to confirm data entry or menu
selection
The UP/DOWN buttons:
• Press to highlight the options on the
menu
5
Page 18

HISTORY
Menu Mode
Menu Mode
The Forerunner 101 stores up to 5000 laps in memory. A run may contain any number of
laps. The 10 most recent runs have a basic track log of up to 250 saved points. Your most re-
History: By Day
cent run (one you have not reset) contains the most detailed track log with up to 3000 points.
The Forerunner 101 stores up to 2 years worth of run information. This is based on running
48 laps of one mile each, every week, for two years.
This History option organizes your workouts in a layered fashion. ‘History Totals’ gives a
total overview which is then broken down into weeks with ’By Week’ and into the seven days
of that week with ’By Day’. From the ‘History’ menu you can choose which information you
want to start reviewing first. You can review ‘Last Run’, ’By Day’, ‘By Week’, ‘History Totals’, or
you can choose to delete your workout history.
Last Run
Displays a summary of your last run data, after the current run Timer is RESET.
By Day
By selecting this option, you see a list of workout laps organized by day. The upper half
of the display is the list of days, times of your workout, and total laps run. With a day highlighted, the lower half of the display is an overview of the information of your workout that
day such as total time, total distance, average pace, and total calories burned (See side note).
To select a day you want to review:
1. With ‘HISTORY’ highlighted in the Menu Mode, press ENTER.
NOTE: If Pace/Speed Mode (pg. 26)
is set to ‘SPEED (BIKING), calories
are calculated for for biking.
6
2. Highlight ’BY DAY’ and press ENTER.
3. Press the DOWN
more laps for that day, press
lighted, a summary for that day/lap appears on the bottom of the screen showing time,
distance, pace, and total calories.
or UP button to highlight the day you want to review. If there are 2 or
ENTER to view the individual laps. As each day/lap is high-
Page 19

4. Highlight any single lap day or individual lap and press ENTER to view the Options menu.
5. Select ’VIEW ON MAP’ to review your workout or select ’DELETE LAP/ENTIRE RUN’ to erase
that workout.
By Week
History: By Week
Like ‘By Day’, selecting this option allows you to see a list of your workouts organized
by week. The upper half of the display lists weeks that you had workouts. With a week
highlighted, the lower half displays total time, total distance, average speed, and total calories
burned for that week. Once you select the week you want to review, the Forerunner 101
breaks the week down into individual days.
To select a week you want to review:
1. With ‘HISTORY’ highlighted in the Menu Mode, press ENTER.
2. Highlight ‘BY WEEK’ and press
3. Press the DOWN
4. Once highlighted, press
5. Press the DOWN
6. Once highlighted, press
7. Highlight the lap you want to review and press
8. Highlight ‘VIEW ON MAP’ to review the lap, highlight ‘DELETE LAP’ to remove the lap from
that day, or highlight ‘DELETE ENTIRE RUN’ to remove the run from your history. Once
highlighted, press
or UP button to highlight the week you want to review.
or UP button to highlight the day you want to review.
ENTER.
ENTER.
ENTER to display the days of that week.
ENTER to view the laps.
ENTER to review the Options menu.
Menu Mode
7
Page 20

Menu Mode
History:
History Totals and Delete
8
History Totals
Selecting this option allows you to see an overview of your total workouts combined.
To view the History Totals mode:
1. With ‘HISTORY’ highlighted in the Menu Mode, press ENTER.
2. Highlight ‘HISTORY TOTALS’ and press
Delete
ENTER.
This option allows you to delete some or all of your workouts. You can delete ‘Older than
1 month’, ‘Older than 3 months’, ‘Older than 1 year’, or ‘Delete All’. Once you choose one of
the available options a window appears asking if you are sure you want to delete the lap or
workout.
To delete a workout record:
1. With ‘HISTORY’ highlighted in the Menu Mode, press the ENTER button.
2. Highlight ‘DELETE’ and press ENTER.
3. Press the DOWN
4. Once highlighted, press ENTER. A message appears “DO YOU REALLY WANT TO DELETE
THESE LAPS?”. If you do, highlight ‘YES’ and press
and press ENTER.
or UP button to highlight your period of workouts you want to delete.
ENTER. If you do not, highlight ‘NO’
Page 21

TRAINING ASSISTANT
The Forerunner’s 101 Training Assistant has training tools to maximize your workout sessions. This option allows you to set (or use) an auto pause and auto lap, use a virtual partner,
use interval training, use a pace /speed alert, and use a time/distance alert.
Auto Pause/Lap
The Forerunner 101 can automatically pause the timer during your workout. The Auto
Pause works well if your workout includes stop lights or stop signs. Auto Pause does not
pause at exactly the pace you set, but when your pace drops below that setting. The stop
watch indicator flashes when the timer is paused. The Auto Lap is useful if you want the
Forerunner 101 to keep track of your laps without having to press the LAP button each time
you travel a given distance.
To set the Auto Pause:
1. Highlight’ TRAINING ASSISTANT’ in the Menu Mode and press ENTER.
2. With ‘AUTO PAUSE/LAP’ highlighted, press
3. Highlight the ‘ON/OFF’ option next to ‘AUTO TIMER PAUSE:’. Press
‘AUTO TIMER PAUSE’ on or off.
4. Highlight the field to the right of ‘PAUSE WHEN:’. Press ENTER to display the available
option menu. Selections other than ‘CUSTOM’ are based off your ‘SET PROFILE’ settings
(pg. 28).
5. Press the DOWN
‘CUSTOM’. Press
or UP button to highlight ‘JOGGING’, ‘WALKING’, ‘STOPPED’ or
ENTER to select the option you want.
ENTER.
ENTER to turn the
Menu Mode
Training Assistant:
Auto Pause/Lap
9
Page 22

10
Menu Mode
Training Assistant:
Virtual Partner
To set the Auto Lap:
1. Highlight ‘TRAINING ASSISTANT’ in the Menu Mode and press ENTER.
2. Highlight ‘AUTO PAUSE/LAP’ and press ENTER.
3. Highlight the ‘ON/OFF’ option next to ‘AUTO LAP TRIGGER:’. Press
‘AUTO LAP TRIGGER:’ on or off.
4. Highlight the ‘DISTANCE’ option next to ‘LAP DISTANCE:’. Press
available option menu.
5. Press the DOWN
‘5K’, ‘1 MILE’, or ‘CUSTOM’. Press
Virtual Partner
or UP button to highlight ’1/2 MARATHON’, ’10 MILE’, ’10K’, ’5 MILE’,
ENTER to select the option you want.
ENTER to turn the
ENTER to display the
This is a unique feature of the Forerunner 101. You have the option to set up a Virtual
Partner to help you obtain your workout goals. The Virtual Partner always completes the
goal you set. Your job is to keep up with your Virtual Partner. Your Virtual Partner can help
you with ‘Distance & Time’, ‘Time & Pace(Speed)’, or ‘Distance & Pace(Speed)’. The Virtual
Partner mode displays after you enter your settings. In the Virtual Partner mode, the top
character is your Virtual Partner while you are represented on the bottom. As soon as you
press START, your workout begins and your Virtual Partner begins to run. As you move,
your digital self also moves. A message bar appears at the very bottom and shows how far
off you are from your Virtual Partner. Press the DOWN or UP button to view other data in
Virtual Partner Mode, such as distance and time to go. Press STOP to stop the timer after
your goals are complete or select ‘END PARTNER RUN’ from the Training Assistant menu and
a summary screen displays.
Page 23

To set Distance & Time Goals:
1. Highlight ‘TRAINING ASSISTANT’ in the Menu Mode and press ENTER.
2. Highlight ‘VIRTUAL PARTNER’ and press ENTER.
3. Highlight ‘SET DISTANCE &TIME’ and press
4. With ‘DISTANCE’ highlighted, press ENTER.
5. Press the DOWN
select. You can choose ‘CUSTOM’ to set your own distance.
6. Press the DOWN button to highlight the ‘TIME’ field and press
7. Press the DOWN or UP button to select the total time of your workout and press ENTER
to select. You can choose ‘CUSTOM’ to set your own time.
8. Highlight ‘DONE’ and press
9. When you are ready to begin your workout press the START button.
or UP button to select the distance of your workout and press ENTER to
ENTER.
ENTER.
ENTER.
To set Time & Pace/Speed:
1. Highlight ‘TRAINING ASSISTANT’ in the Menu Mode and press ENTER.
2. Highlight ‘VIRTUAL PARTNER’ and press ENTER.
3. Highlight ‘SET TIME & PACE (SPEED)’ and press
4. With ‘TIME’ highlighted, press ENTER.
5. Press the DOWN
to select. You can choose ‘CUSTOM’ to set your own time.
6. Press the DOWN button to highlight the ‘PACE (SPEED)’ field and press
(continued on next page)
or UP button to select the total time of your workout and press ENTER
ENTER.
ENTER.
Menu Mode
Training Assistant:
Virtual Partner
11
Page 24

12
Menu Mode
Training Assistant:
Virtual Partner
7. Press the DOWN or UP button to select the pace (speed) of your workout and press
ENTER to select. You can choose ‘CUSTOM’ to set your own pace/speed.
8. Highlight ‘DONE’ and press
9. When you are ready to begin your workout press the START button.
ENTER.
To set Distance & Pace/Speed:
1. Highlight ‘TRAINING ASSISTANT’ in the Menu Mode and press ENTER.
2. Highlight ‘VIRTUAL PARTNER’ and press
3. Highlight ‘SET DISTANCE & PACE (SPEED)’ and press
4. With ‘DISTANCE’ highlighted, press ENTER.
5. Press the DOWN
select. You can choose ‘CUSTOM’ to set your own distance.
6. Press the DOWN button to highlight the ‘PACE (SPEED)’ field and press
7. Press the DOWN
to select. You can choose ‘CUSTOM’ to set your own pace/speed.
8. Highlight ‘DONE’ and press
9. When you are ready to begin your workout press the START button.
or UP button to select the distance of your workout and press ENTER to
or UP button to select the pace(speed) of your workout and press ENTER
ENTER.
ENTER.
ENTER.
ENTER.
Page 25

Interval Training
Interval Training enables you to improve your workout by alternating time intervals or
distances of exercise with rest periods of stopping or slower speeds. You may choose to set an
exercise distance & a rest time, set an exercise distance & a rest distance, set an exercise time
& a rest time, or set an exercise time & rest distance.
To start Interval Training:
1. From the Training Assistant menu press the DOWN or UP button to highlight ‘INTERVAL
TRAINING’. Press
2. Press the DOWN
ENTER.
3. Press the DOWN or UP button to highlight the setting you wish to change and press
ENTER.
4. Press the DOWN
For ‘CUSTOM’ choices, scroll through the place holders using the DOWN
(UP button moves the cursor right to left, and the DOWN
to right). When you reach the position place you want to change, stop and press
Using the DOWN or UP button, highlight the number you want, and press ENTER. The
minimum Time you may enter is 30 seconds. The minimum Distance you may enter is 0.12
miles (0.20 km). Highlight ‘OK’ and press
5. When you have entered all your settings, highlight ‘DONE?’ and press
6. Press START/STOP to begin your Interval Training. Press START/STOP during your work-
out to pause Interval Training.
ENTER.
or UP button to highlight the desired training method field and press
or UP button to highlight the desired time or distance and press ENTER.
or UP buttons.
button moves the cursor left
ENTER.
ENTER when done
ENTER.
Menu Mode
Training Assistant:
Interval Training
13
Page 26

14
Menu Mode
Training Assistant:
Interval Training
Once Interval Training has started, the Forerunner automatically changes to the Timer
Mode, showing your Lap Speed, Lap Time, and Lap Distance. An audible alarm sounds when
you have reached your rest time or distance period. A Rest Banner displays showing the time
or distance of your rest period. During the rest period, another audible alarm sounds when
you are within 5 seconds or 20 meters of resuming your workout.
Press any button to remove the Rest Banner. To show the Rest Banner again, press the
MODE button until it is displayed.
Press LAP any time during a workout to immediately start a rest period. You may also
press LAP any time during a rest period to immediately resume your workout.
If you wish to stop Interval Training, choose ‘END TRAINING’ from the Training Assistant menu.
While Interval Training is activated, Auto Pause and Auto Lap settings are ignored. Distance and Pace Alerts still function, except during rest periods.
When the number of Reps you specified have completed, a Finished page displays. If you
wish to review the Last Run History (pg. 6), you must first RESET your current run (pg. 3).
By Day and By Week history totals only shows interval data, not rest data.
Page 27

Pace/Speed Alert
Use the Pace/Speed Alert when you want to know when you have reached either your
fastest pace/speed or your slowest pace/speed. When you reach this preset speed during your
workout, an alarm sounds.
To set Fast Pace/Speed Alert:
1. Highlight ‘TRAINING ASSISTANT’ in the Menu Mode and press ENTER.
2. Highlight PACE (SPEED) ALERT’ and press
3. With ‘FAST PACE (SPEED) ALERT’ highlighted, press ENTER and use the DOWN or UP
button to select ‘ON’ or ‘OFF’ from the menu and press
4. Press the DOWN button to highlight the ‘ALERT AT:’ field and press
5. Select from a quick option menu ‘SPRINT’, ‘RUN’, ‘JOG’, ‘SPEED WALK’, ’WALK’, or
‘CUSTOM’ and press
6. Press the MODE button to return to the Training Assistant.
ENTER.
ENTER.
ENTER.
ENTER.
To set Slow Pace/Speed Alert:
1. Highlight ‘TRAINING ASSISTANT’ in the Menu Mode and press ENTER.
2. Highlight ‘PACE (SPEED) ALERT’ and press
3. Press the DOWN
ENTER. Press the DOWN or UP button to select ‘ON’ or ‘OFF’ from the menu and press
ENTER.
4. Press the DOWN button to highlight the ‘ALERT AT:’ field and press ENTER.
5. Select from a quick option menu ‘SPRINT’, ‘RUN’, ‘JOG’, ‘SPEED WALK’, ‘WALK’, or
‘CUSTOM’ and press
6. Press the MODE button to return to the Training Assistant.
or UP button to highlight the ‘SLOW PACE (SPEED) ALERT’ and press
ENTER.
ENTER.
Menu Mode
Training Assistant:
Pace/Speed Alert
15
Page 28

Menu Mode
Training Assistant:
Time/Distance Alert
16
Time/Distance Alert
Like the Pace/Speed Alert, you can set an alarm to sound when you reach a certain time
or a certain distance.
To set Time Alert:
1. Highlight ‘TRAINING ASSISTANT’ in the Menu Mode and press ENTER.
2. Highlight ‘TIME/DIST(ANCE) ALERT’ and press
3. With ‘TIME ALERT’ highlighted, press ENTER to turn the alert ‘OFF’, alert ‘ONCE’, or
‘REPEAT’ the alert whenever the ‘ALERT AT:’ time is reached again.
4. With ‘TIME ALERT’ on, highlight the ‘ALERT AT:’ field and press
5. Select from ‘2 HOURS’, ’1.5 HOURS’, ‘1 HOUR’, ’30 MINUTES’, or ‘CUSTOM’. Press the
DOWN
or UP button to highlight your selection and press ENTER to select.
6. Press the MODE button to return to the Training Assistant mode.
ENTER.
ENTER.
To set Distance Alert:
1. Highlight ‘TRAINING ASSISTANT’ in the Menu Mode and press ENTER.
2. Highlight ‘TIME/DIST(ANCE) ALERT’ and press
3. Use the DOWN
turn the alert ‘OFF’, alert ‘ONCE’, or ‘REPEAT’ the alert whenever the ‘ALERT AT:’ distance is
reached again.
4. With ‘DISTANCE ALERT’ on, highlight the ‘ALERT AT:’ field and press ENTER.
5. Select from ‘1/2 MARATHON’, ’10 MILE’, ’10K’, ’5 MILE’, ’5K’, ’1 MILE’ or ‘CUSTOM’. Press
the DOWN or UP buttons to highlight your selection and press ENTER to select.
6. Press the MODE button to return to the Training Assistant.
or UP button to highlight the ‘DISTANCE ALERT’ field, press ENTER to
ENTER.
Page 29

NAVIGATION
The Navigation Menu provides additional options for traveling with your Forerunner 101.
Refer to this menu option to add or remove the map mode, mark a location, find a location,
return back to your starting point, and orient the map mode by a north reference or ahead
(the direction you are moving).
Add/Remove Map Mode
The Map Mode does not appear on your Forerunner 101 until you activate it from this
menu. Once you add the map, you are immediately taken to the Map Mode where you can
view your position, workout, or locations. It is not possible to load detailed map data into the
Forerunner 101.
The Map Mode shows where you (the animated figure) are and provides a picture of
where you have traveled. As you travel, the animated figure ‘walks’ and leaves a ‘trail’ (track
points). Location names and symbols are also shown on the map. Once the map has been
added, pressing the MODE button scrolls through the Timer Mode, Map Mode, and the
Menu Mode. To make sure you can see your entire ‘trail’, you can change the map scale (from
20 feet minimum to 120 miles maximum) by pressing the UP button to view a larger area,
and the DOWN button for viewing a smaller area. Hold down buttons for a faster zoom.
To add/remove the map mode:
1. Highlight ‘NAVIGATION’ in the Menu Mode and press ENTER.
2. With ‘ADD MAP MODE’ or ‘REMOVE MAP MODE’ highlighted, press
the Map Mode.
ENTER to add/remove
Add/Remove Map Mode
Menu Mode
Navigation:
17
Page 30

18
Menu Mode
Navigation:
Mark Location
Mark Location
The Forerunner 101 can remember a location (latitude/longitude) to which you want to
return later by using the ‘Mark Location’ option. The Forerunner 101 saves your location
using a default three-digit number beginning with 001 and increases by one thereafter. You
may mark and save up to 100 locations. You can change the location symbol, name, known
elevation, and location position (latitude and longitude) any time after the location has been
saved.
To change the location symbol:
1. Highlight ‘NAVIGATION’ in the Menu Mode and press ENTER.
2. Press the DOWN button to highlight the ‘MARK LOCATION’ option and press
Review Location appears. (Flag with symbol, name, and location)
3. Press the DOWN
4. Scroll through the available location symbols using the DOWN or UP buttons. Press
ENTER when you find the location symbol of choice.
5. Press the DOWN
with the new location symbol is now stored in memory.
To change the location name:
1. Highlight ‘NAVIGATION’ in the Menu Mode and press ENTER.
2. Press the DOWN button to highlight the ‘MARK LOCATION’ option and press ENTER. The
Review Location Mode appears. (Flag with symbol, name, and location)
3. Press the DOWN
button to highlight the location symbol and press ENTER.
or UP button to highlight the ‘OK’ field and press ENTER. Your location
button to highlight the location name and press ENTER. (continued)
ENTER. The
Page 31

4. Scroll through the letters holders using the DOWN or UP buttons. (UP button moves the
cursor right to left, and the DOWN button moves the cursor left to right). When you reach
the position place you want to change, stop, and press
button, scroll through the letter, number or symbol choices, highlight the one you want and
press ENTER. The position place is now changed. You can change the name of the location
up to 6 characters. Continue until all positions are changed.
5. Press the DOWN or UP button to highlight the ‘OK’ field and press
Mode appears again with the corrected name.
6. Press the DOWN or UP button to highlight the ‘OK’ field and press
with the new location name is now stored in memory.
ENTER. Using the DOWN or UP
ENTER. The Location
ENTER. Your location
To change the elevation:
1. Highlight ‘NAVIGATION’ in the Menu Mode and press ENTER.
2. Press the DOWN button to highlight the ‘MARK LOCATION’ option and press
‘Review Location Mode appears. (Flag with symbol, name, and location)
3. Press the DOWN button to highlight the ‘ELEV(ATION):’ field and press
4. Scroll through the elevation position places using the DOWN or UP buttons (UP button
moves the cursor right to left, and the DOWN button moves the cursor left to right). When
you reach the position you want to change, stop, and press
UP button, scroll through the choices to highlight the one you want. Press ENTER. The
position place is now changed. Continue until all positions are changed.
5. Press the DOWN or UP button to highlight the ‘OK’ field and press
Mode appears again with the corrected elevation.
6. Press the DOWN or UP button to highlight the ‘OK’ field and press
with the new elevation is now stored in memory.
ENTER. Using the DOWN or
ENTER. The Location
ENTER. Your location
ENTER. The
ENTER.
Menu Mode
Navigation:
Mark Location
19
Page 32

20
Menu Mode
Navigation:
Find Location
To change the location (latitude/longitude):
1. Highlight ‘NAVIGATION’ in the Menu Mode and press ENTER.
2. Press the DOWN button to highlight the ‘MARK LOCATION’ option and press ENTER. The
Review Location appears. (Flag with symbol and name)
3. Press the DOWN button to highlight the location field (latitude/longitude) and press
ENTER.
4. Scroll through the latitude and longitude position places using the DOWN or UP buttons
(UP button moves the cursor right to left, and the DOWN button moves the cursor left to
right). When you reach the position you want to change, stop, and press
the DOWN or UP button, scroll through the choices to highlight the one you want. Press
ENTER. The position place is now changed.
5. Press the DOWN
Mode appears again with the corrected location.
6. Press the DOWN
with the new latitude/longitude is now stored in memory.
or UP button to highlight the ‘OK’ field and press ENTER. The Location
or UP button to highlight the ‘OK’ field and press ENTER. Your location
ENTER. Using
Find Location
The ‘FIND LOCATION’ mode organizes all of your locations in alphabetical order for
easy selection. After searching for your location through the saved alphabetical list, you can
view the location on the map or perform a ‘GOTO’. A ‘GOTO’ leads you from your current
position to the saved location. The Forerunner 101 creates a straight line (as the crow flies)
from your current position to the saved location. It may be necessary to go around obstacles
to arrive at the saved location. ‘Find Location’ has these available options: ‘LIST ALL’,
‘NEAREST’, or ‘DELETE ALL’.
Page 33

To find and select a location:
1. Highlight ‘NAVIGATION’ in the Menu Mode and press ENTER.
2. Press the DOWN button, highlight the ‘FIND LOCATION’ option, and press ENTER.
3. With ‘LIST ALL’ highlighted, press
(0-9) and moves into an alphabetical list .
4. Press the DOWN or UP button to highlight the alphabetical tab containing the desired
location. Press
ENTER. The Review Location appears.
ENTER. Press the DOWN or UP button to select the desired location. Press
ENTER. A locations list appears starting with numbers
To delete a location:
1. In the Review Location mode, press the DOWN or UP button to highlight ‘DELETE’. Press
the ENTER button. A confirmation message box appears asking if you really want to delete
the location. If you do, press the DOWN
2. If you change your mind and do not want to delete the location, press the DOWN or UP
button, highlight ‘NO’, and press
the location remains in memory. You can also press the
or UP button, highlight ‘YES’ and press ENTER.
ENTER. The confirmation message box disappears and
MODE button to exit.
To view the ‘NEAREST’ locations:
1. Highlight ‘NAVIGATION’ in the Menu Mode and press ENTER.
2. Press the DOWN button to highlight the ‘FIND LOCATION’ option and press
3. Press the DOWN button to highlight the ‘
4. The nine closest locations appear in a list showing their name and distance from your
location. You can select a location from this list by pressing the DOWN
selecting the desired location. Once selected, press
allowing you to edit the location, if you desire.
NEAREST’ option and press ENTER.
ENTER. The Review Location appears
ENTER.
or UP button and
Menu Mode
Navigation:
Find Location
21
Page 34

22
Menu Mode
Navigation:
Find Location
To view the selected location on the Map Mode:
1. In the Review Location mode, press the DOWN or UP button to highlight ‘MAP’. Press the
ENTER button. The selected location is displayed on the map. You can use the DOWN/UP
buttons to zoom in and out on the map.
2. With ‘OK’ highlighted, press
ENTER to switch back to the Review Location Mode.
To start a ‘GOTO’:
1. In the Review Location mode, press the DOWN or UP button to highlight ‘GOTO’. Press
ENTER. The ‘GOTO’ is activated with the selected location as the destination.
To stop a ‘GOTO’:
1. Highlight ‘NAVIGATION’ in the Menu Mode and press ENTER.
2. Press the DOWN or UP button to highlight the ‘STOP GOTO’ option and press ENTER.
To delete all locations:
1. In the ‘FIND LOCATION’ mode, press the DOWN or UP button to highlight’ DELETE ALL.
Press the ENTER button. A confirmation message box appears asking if you really want
to delete all locations. If you do, press the DOWN
ENTER.
2. If you change your mind and do not want to delete the location, press the DOWN
button to highlight ‘NO’. Press
the locations remain in memory.
ENTER. The confirmation message box disappears and all of
or UP button to highlight ‘YES’. Press
or UP
Page 35

Back to Start
This option allows you to return to your start point along a traveled path without marking
any locations. The Forerunner 101 draws a ‘track log’ or ‘electronic breadcrumb trail’ as you
travel during your workout. When you are ready to return to where you started, the Forerunner 101 takes you back by following the ‘electronic breadcrumb trail’ you left behind.
To return ‘Back to Start’:
1. In the ‘NAVIGATION’ mode, press the DOWN or UP button to highlight ‘BACK TO START’.
Press ENTER. The Map Mode appears with an arrow pointing in the direction you should
travel.
2. Press the DOWN
to the Menu Mode.
3. To stop, highlight ‘NAVIGATION’, press the
to highlight the ‘STOP GOTO’ option and press
Orient Map North/Ahead
or UP button to zoom in or zoom out on the map. Press MODE to return
ENTER button. Press the DOWN or UP button
ENTER.
When ‘Orient Map North’ is selected, the map is always oriented to the north, As you
travel, the map is stationary and the animated figure moves along the map. When ‘Orient
Map Ahead’ is selected, the top of the map is oriented in the direction you are currently moving. The animated figure is stationary while the map rotates as you change direction with the
Forerunner 101.
To select Orient Map North:
1. In the ‘NAVIGATION’ mode, press the DOWN or UP button to highlight ‘ORIENT MAP
NORTH’. Press
ENTER. The Map Mode appears with the orientation pointing North.
Menu Mode
Navigation:
Back To Start/
Orient Map North/Ahead
23
Page 36

24
Menu Mode
Settings:
Set Time
To select Orient Map Ahead:
1. In the ‘NAVIGATION’ mode, press the DOWN or UP button to highlight ‘ORIENT MAP
AHEAD’, Press
SETTINGS
ENTER. The Map Mode appears with the orientation pointing ahead.
The ‘SETTINGS’ menu allows you to customize your Forerunner 101. You can set the
time, set the units, set the custom page, set your profile, set the display, set the system, restore
settings to the manufacturer’s default, and check the software version of the Forerunner 101.
SET TIME: Time Format
The ‘SET TIME’ menu allows you to select a 12-hour or 24-hour time format, enter the
proper time zone, and choose Daylight Savings Time. When you select 12-hour time formatting, the clock reads like a standard clock with 12-hour AM and 12-hour PM cycles. The
24-hour option sets the Forerunner 101 to display a 24-hour cycle (Military Time).
To change the time format:
1. Highlight ‘SETTINGS’ in the Menu Mode and press ENTER.
2. Press the DOWN
3. Press the DOWN
4. Press the DOWN or UP button, select 12 or 24 hours and press ENTER. Press MODE to
get back to the mode of your choice.
SET TIME: Time Zone
or UP button to highlight ‘SET TIME’. Press ENTER.
or UP button and select the ‘TIME FORMAT’ field and press ENTER.
The time zone can be set to any one of the pre-programmed zones, or by selecting
‘OTHER’ and then entering the UTC Time Offset value in the UTC offset field.
Page 37

To change the Time Zone:
1. Highlight ‘SETTINGS’ in the Menu Mode and press ENTER.
2. Press the DOWN or UP button to highlight ‘SET TIME’. Press ENTER.
3. Press the DOWN
4. Press the DOWN or UP button to scroll through the selections. Press the ENTER button
when you have found the correct Time Zone.
5. Press the
or UP button to highlight the ‘TIME ZONE’ field and press ENTER.
MODE button to return to the mode of your choice.
NOTE. If you select ‘Other’ for the Time Zone choice, you must enter the UTC
offset for your location and the Daylight Savings time option is not available.
SET TIME: Daylight Savings
Daylight savings time can be set to ‘Automatic’, which automatically changes the clock
settings for daylight savings. You can choose ‘Yes’ to manually add daylight savings or ‘No’ to
remain on standard time.
To change the Daylight Savings Field:
1. Highlight ‘SETTINGS’ in the Menu Mode and press ENTER.
2. Press the DOWN or UP button to highlight ‘SET TIME’. Press ENTER.
3. Press the DOWN
4. Press the DOWN
MODE button to return to the mode of your choice.
or UP button to highlight the ‘DAYLIGHT SAVING’ field and press ENTER.
or UP button, highlight ‘AUTO’, ‘YES’, or ‘NO’ and press ENTER. Press the
Menu Mode
Settings:
Set Time
25
Page 38

Menu Mode
Settings:
Set Units
You may also hold down the MODE button to
quickly switch between ‘PACE (RUNNING)’ and
‘SPEED (BIKING)’ from any screen. This setting
affects calorie calculations (pg. 6).
26
Set Units
The Forerunner 101 allows you to select statute (feet, miles, and miles per hour) or metric
(meters, kilometers, and kilometers per hour) units of measure for all speed and distance
readouts. It also allows you to choose either your pace (running) or speed (biking) mode. Pace
Smoothing averages your pace over a certain amount of time to avoid errors in GPS position
and speed. You must have the unit in ‘PACE’ mode to use Pace Smoothing.
To change the units of measure:
1. Highlight ‘SETTINGS’ in the Menu Mode and press ENTER.
2. Press the DOWN
3. Press the DOWN or UP button to highlight the ‘UNITS’ field. Press ENTER.
4. Press the DOWN
the MODE Button to return to the mode of your choice.
or UP button to highlight ‘SET UNITS’. Press ENTER.
or UP button, high light ‘STATUTE’ or ‘METRIC’ and press ENTER. Press
To change the pace/speed mode:
1. Highlight ‘SETTINGS’ in the Menu Mode and press ENTER.
2. Press the DOWN
3. Press the DOWN or UP button to highlight the ‘PACE/SPEED MODE’ field. Press ENTER.
4. Press the DOWN
ENTER. Press the MODE Button to return to the mode of your choice.
or UP button to highlight ‘SET UNITS’. Press ENTER.
or UP button, highlight ‘PACE (RUNNING)’ or ‘SPEED (BIKING)’ and press
To adjust Pace Smoothing:
1. Highlight ‘SETTINGS’ in the Menu Mode and press ENTER.
2. Press the DOWN
or UP button to highlight ‘SET UNITS’. Press ENTER. (continued)
Page 39

3. Press the DOWN or UP button to highlight the ‘PACE SMOOTHING’ field. Press ENTER.
4. Press the DOWN
ENTER. ’MOST’ produces the maximum amount of smoothing. Press the MODE Button to
return to the mode of your choice.
Set Custom Page
This option allows you to customize data fields on the Custom Page, which are accessed
from the Timer Mode. Speed and Pace choices depend whether you have the ‘UNITS’ (page
24) set to ‘SPEED’ or ‘PACE’. The following data types are available:
• AVERAGE PACE/SPEED - overall average speed of workout
• AVG LAP TIME -average time of all the laps
• BEST PACE - fastest speed of workout
• CALORIES - total calories burned since timer started (see also Pace/Speed Mode pg. 26)
• DISTANCE - training distance
• ELEVATION - current altitude
• GRADE - % slope of terrain
• LAP DISTANCE - distance in lap
• LAP PACE/SPEED - average pace of lap
• LAP TIME - time in lap
• LAPS - number of laps in workout
• PACE - current speed
• REST DISTANCE - distance traveled while Auto Paused
• REST TIME - time Auto Paused
• SPEED - current speed
• TIME - current training time
• TIME OF DAY -current time of day
• TOTAL DISTANCE - both training distance and rest distance together
• TOTAL TIME - both training time and rest time together
or UP button, highlight ‘MOST’, ‘MORE’, ’LESS’, or ‘LEAST’ and press
Menu Mode
Settings:
Custom Page
27
Page 40

28
Menu Mode
Settings:
Set Profile
To customize the data screens:
1. Highlight ‘SETTINGS’ in the Menu Mode and press ENTER.
2. Press the DOWN or UP button to highlight ‘SET CUSTOM PAGE’. Press ENTER.
3. Press the DOWN
4. Press the DOWN or UP button, highlight the desired data type and press ENTER. Press the
MODE Button to return to the mode of your choice.
or UP button to highlight the data field to change. Press ENTER.
Set Profile
This feature lets you personalize the Forerunner with weight (in order to calculate the
calories burned. See also Pace/Speed Mode pg. 26.) and performance data customized to you.
This data is also used for the Training Assistant pace and settings.
To change the profile setting:
1. From the Menu Mode press the DOWN or UP button to highlight ‘SETTINGS’. Press
ENTER.
2. Press the DOWN
3. Press the DOWN or UP button to highlight the setting you wish to change and press
ENTER.
4. Scroll through the place holders using the DOWN
cursor right to left, and the DOWN button moves the cursor left to right). When you reach
the position place you want to change, stop and press
button, highlight the number you want, and press
5. Highlight ‘OK’ and press
or UP button to highlight the ‘SET PROFILE’ field and press ENTER.
or UP buttons. (UP button moves the
ENTER. Using the DOWN or UP
ENTER.
ENTER when done.
Page 41

Set Display
This option allows you to change the backlight setting and the contrast of the screen.
To change the backlight setting:
1. From the Menu Mode press the DOWN or UP button to highlight ‘SETTINGS’. Press
ENTER.
2. Press the DOWN
3. With ‘BACKLIGHT’ highlighted, press ENTER.
4. Press the DOWN
5. Press the
or UP button to highlight the ‘SET DISPLAY’ field and press ENTER.
or UP button to highlight your selection and press ENTER.
MODE button to return to the ‘SETTINGS’ mode.
To adjust the display contrast:
1. From the Menu Mode press the DOWN or UP button to highlight ‘SETTINGS’. Press
ENTER.
2. Press the DOWN or UP button to highlight the ‘SET DISPLAY’ field and press ENTER.
3. Press the DOWN
4. Press the DOWN
UP moves the bar right. After adjusting the contrast bar, press ENTER.
5. Press the
or UP button to highlight the ‘CONTRAST’ field and press ENTER.
or UP button to adjust the contrast bar. DOWN moves the bar left and
MODE button to return to the SETTINGS mode.
Menu Mode
Settings:
Set Display
29
Page 42

30
Menu Mode
Settings:
Set System
Set System
This option allows you to change the beeper setting, select the language of your choice,
and select battery type.
To change the beeper setting:
1. From the Menu Mode press the DOWN or UP button to highlight ‘SETTINGS’. Press ENTER.
2. Press the DOWN
3. With ‘BEEPER’ highlighted, press ENTER.
4. Press the DOWN
5. Press the
or UP button to highlight the ‘SET SYSTEM ‘field and press ENTER.
or UP button to highlight your selection and press ENTER.
MODE button to return to the SETTINGS mode.
To change the language:
1. From the Menu Mode press the DOWN or UP button to highlight ‘SETTINGS’. Press ENTER.
2. Press the DOWN or UP button to highlight the ‘SET SYSTEM’ field and press ENTER.
3. Press the DOWN
4. Press the DOWN
5. Press the MODE button to return to the ‘SETTINGS’ mode.
or UP button to highlight the ‘LANGUAGE’ field and press ENTER.
or UP button to highlight your selection and press ENTER.
To change the battery setting:
1. From the Menu Mode press the DOWN or UP button to highlight ‘SETTINGS’. Press ENTER.
2. Press the DOWN
3. Press the DOWN
4. Press the DOWN or UP button to highlight your selection and press ENTER.
5. Press the
or UP button to highlight the ‘SET SYSTEM’ field and press ENTER.
or UP button to highlight the ‘BATTERY’ field and press ENTER.
MODE button to return to the ‘SETTINGS’ mode.
Page 43

Restore Settings
This option allows you to restore the factory settings to options in the SETTINGS menu
ONLY. Data and settings in other menus, such as HISTORY and TRAINING ASSISTANT, are
not affected.
To restore factory settings:
1. From the Menu Mode press the DOWN or UP button to highlight ‘SETTINGS’. Press ENTER.
2. Press the DOWN
3. Press the DOWN or UP button to highlight your selection and press ENTER.
About Forerunner
Displays the software version of your Forerunner.
To view the software version:
1. From the Menu Mode press the DOWN or UP button to highlight ‘SETTINGS’. Press ENTER.
2. Press the DOWN
ENTER.
or UP button to highlight the ‘RESTORE SETTINGS’ field and press ENTER.
or UP button to highlight the ‘ABOUT FORERUNNER’ field and press
Menu Mode
Settings:
Restore Settings/
About Forerunner
31
Page 44

Specifications
Physical
Case: Fully-sealed, high-impact plastic alloy, waterproof to IEC 60529 IPX7
standards (waterproof to 1 meter for 30 minutes)
Size: 3.26”W x 1.71 “H x 0.91”D (83 x 43.5 x 23 mm)
Weight: Approx. 0.6 ounces (55g)
Temperature Range: -4° to 140°F (-20° to 70°C) (operating)
Display: 100 x 64 pixels, 1.44”W x 0.92”H (36.49 x 23.35 mm)
Performance
Receiver: 12 parallel channel
Acquisition time Approx. 15 seconds (warm start)
Approx. 45 seconds (cold start)
Approx. 5 minutes (First Time)
Update Rate: 1 /second, continuous
GPS Accuracy: <15 meters (49 ft) RMS
1
Velocity Accuracy: 0. 1 knot RMS steady state
Dynamics: Performs to specifications to 6 g’s
Antenna: Built-in patch
Power
Input: Two 1.5 volt AAA batteries
Battery Life: 14-15 hours, typical use
Specifications subject to change without notice.
1
Subject to accuracy degradation to 100m 2DRMS under the U.S. DOD-imposed Selective Availability program.
2
The temperature rating for the Forerunner 101 may exceed the usable range of some batteries. Alkaline batteries can rupture at high temperatatures.
3
Alkaline batteries lose a significant amount of their capacity as temperature increases. Use Lithium batteries when operating the Forerunner 101 in below-freezing conditions. Extensive use of
screen backlighting significantly reduces battery life. Different brands of battery vary in performance.
2
3
32
Page 45

A
About Forerunner 31
Add/remove map mode
Auto Lap 10, 14
Auto Pause 4, 9, 14
17
B
Backlight 29
Back to Start 23
Batteries x, 30
Beeper 30
C
Calories 6, 7, 27, 28
Caution vi
Cleaning vii
Contrast 29
Current Lap Screen 4
Custom Page 27
Custom Screen
4
D
Data Screens 4, 28
Daylight Savings 25
Delete, History 8
Delete Location 22
Display Contrast 29
Distance Alert 16
Distance Goals 11
E
Elevation 19
F
Factory Settings 31
FCC Compliance iv
Find Location 20, 21, 22
G
GOTO 22
GPS 1, 2, vi
H
History 6, 7, 8
History: By Day 6
History: By Week
History: Delete 8
History: History Totals 8
History: Last Run
7
6, 14
I
Interval Training 13, 14
L
Language 30
Last Run 6, 14
Latitude/Longitude 20
Index
33
Page 46

Index
Location 18, 19, 20, 21, 22
M
Main Modes 3
Map Mode 17, 22, 23
Mark Location 18, 19
Memory 6, x
Menu Mode 5
N
Navigation 17
Nearest Location
O
Orient Map Ahead 23, 24
Orient Map North 23
P
Pace/Speed Alert 15
Pace Mode 26
Pace Smoothing 26
Product Registration i
R
34
20, 21
Registration i
Restore Settings
31
S
Serial Number i
Set Display 29
Set Profile 28
Set System 30
Set Time 24, 25
Set Units 26
Software License v
Software Version 31
Specifications
Speed/Pace Alert 15
Speed Mode 26
Storage vii
33
T
Table of Contents ii
Time 25
Timer Mode
Timer Screen 4
Time Alert
Time Format 24
Time Goals 11
Time Zone
Track Log 6, 23
3, 4
16
24, 25
Training Assistant
9, 10, 11, 12, 13, 14, 15, 16
U
Units 26
V
Virtual Partner 10, 11, 12
W
Warnings vi
Warranty iii
Water Immersion
Wrist Strap
vii
vii, ix
Page 47

Run Notes
35
Page 48

Run Notes
Page 49

Run Notes
Page 50

Run Notes
Page 51

Page 52

For the latest free software updates (excluding map data)
throughout the life of your Garmin products, visit the Garmin
Web site at www.garmin.com.
© Copyright 2004–2006 Garmin Ltd. or its subsidiaries
Garmin International, Inc.
1200 East 151st Street, Olathe, Kansas 66062, U.S.A.
Garmin (Europe) Ltd.
Unit 5, The Quadrangle, Abbey Park Industrial Estate, Romsey, SO51 9DL, U.K.
Garmin Corporation
No. 68, Jangshu 2nd Road, Shijr, Taipei County, Taiwan
www.garmin.com
Part Number 190-00317-00 Rev. B
 Loading...