

Gardena 5000/5, 4000/5, 6000/6 inox Operator's Manual

DE Betriebsanleitung
Gartenpumpe
EN Operator’s Manual
Garden Pump
FR Mode d’emploi
Pompe de surface pour arrosage
NL Gebruiksaanwijzing
Besproeiingspomp
SV Bruksanvisning
Bevattningspump
DA Brugsanvisning
Trykpumpe
FI Käyttöohje
Puutarhapumppu
NO Bruksanvisning
Hagepumpe
IT Istruzioni per l’uso
Pompa da giardino
ES Instrucciones de empleo
Bomba para jardín
PT Manual de instruções
Bomba de Jardim
PL Instrukcja obsługi
Pompa ogrodowa
HU Használati utasítás
Kerti szivattyú
CS Návod k obsluze
Zahradní čerpadlo
SK Návod na obsluhu
Záhradné čerpadlo
EL Οδηγίες χρήσης
Αντλία κήπου
RU Инструкция по эксплуатации
Садовый насос
SL Navodilo za uporabo
Vrtna črpalka
HR Upute za uporabu
Vrtna pumpa
SR / Uputstvo za rad
BS Baštenska pumpa
UK Інструкція з експлуатації
Садові насоси
RO Instrucţiuni de utilizare
Pompă de grădină
TR Kullanma Kılavuzu
Bahçe pompası
BG Инструкция за експлоатация
Градинска помпа
SQ Manual përdorimi
Pompë kopshti
ET Kasutusjuhend
Aiapump
LT Eksploatavimo instrukcija
Sodo siurblys
LV Lietošanas instrukcija
Dārza sūknis
6000/6 inox Art. 17365000/5 Art. 17344000/5 Art. 1732
LV LT ET SQ BG TR RO UK
SR /
BS
HR SL RU EL SK CS HU PL PT ES IT NO FI DA SV NL FR EN DE
I1
2
1
I2
3
5
4
ß
O1
1
6
7
8
5
O2
<
ß
k
7
6
O3
min.
1 m
5
1
ß
O4
LED
S1
9
M1
q
6
M2
1
0
M3
2
q
T1
w
T2
e
r
z
t
u
i
3
1. SAFETY ...................................11
2. INITIAL OPERATION ..........................12
3. OPERATION ................................13
4. STORAGE .................................13
5. MAINTENANCE .............................14
6. TROUBLESHOOTING ........................14
7. ACCESSORIES .............................15
8. TECHNICAL DATA ...........................16
9. SERVICE / WARRANTY .......................16
Original instructions.
This product may be used under
supervision, or if instruction
regarding the safe use of the
product has been provided and the resulting dangers have been understood, by
children aged 8 and above, as well as by
persons with physical, sensory or mental
disabilities or a lack of experience and
knowledge. Children must not be allowed
to play with the product. Cleaning and
user maintenance must not be performed
by children without supervision. The use
of this product by young people under
the age of 16 is not recommended. Never
operate the product when you are tired,
ill or under the influence of alcohol, drugs
or medicine.
Intended use:
The GARDENA Garden Pump is designed for domestic
use around the house and garden.
When the pump is used for pressure boosting, the
maximum permissible internal pressure of 6 bar
(on the delivery side) must not be exceeded. The
increased delivery pressure and the pump pressure
have to be added together.
• Example: Pressure at the tap = 1.5 bar, maximum
pressure of the Garden Pump 4000/5 = 4.5 bar,
total pressure = 6.0 bar.
Liquids that can be pumped:
The GARDENA Garden Pump can be used for pumping
ground water and rain water, tap water and water containing chlorine.
IMPORTANT! The GARDENA Garden Pump is not
suitable for continuous operation (e. g. industrial
applications, continuous circulat ingoperation).
Corrosive, easily combustible, aggressive or explosive liquids (such as gasoline, petroleum or nitro
thinner), saltwater and food must not be pumped.
The temperature of the liquid must not exceed 35 °C.
1. SAFETY
IMPORTANT!
Read the operator’s manual carefully before use
and keep for future reference.
Electrical safety
DANGER! Electric shock!
Risk of injury due to electric shock.
v Always unplug your Garden Pump before filling, after
operation, when trouble-shooting and before carrying
out any maintenance work.
RISK OF INJURY!
Hot water – risk of scalding!
For pump 4000/5 only: If the pump is operated for
prolonged periods of time (> 5 min.) with the delivery
side closed, the water in the pump may heat up so
that there is a risk of scalding yourself with hot water.
v The pump should not run against the closed
delivery side for more than 5 minutes.
If the water supply on the intake side of the pump
fails, the water in the pump can heat up so that if
water emerges, injuries could be caused by the hot
water.
v Disconnect the pump from the mains via the main
circuit breaker, let the water cool and secure the
suction-side water supply before putting into
operation again.
Location
The product must be supplied through a residual current
device (RCD) having a rated residual operating current
not exceeding 30 mA. The pump must not be used when
people are in water. The pump must be located on solid,
even ground, protected from flooding. Take care that the
pump cannot fall into water. Position the pump at a safe
distance (min. 2 m) from the liquid to be pumped. As an
additional safety device an authorised safety switch can
be used.
v Please ask your electrician for his advice.
When connecting the pump to the water supply system,
the country-specific sanitary regulations must be
observed to prevent water not of drink ing water quality
being drawn back in.
v Please consult a specialist for sanitary installations.
GARDENA Garden Pump 4000/5 / 5000/5 / 6000/6 inox
EN
11

Extension cables
Date indicated on the type plate must match technical
data of the mains supply.
Only use extension cables authorised in accordance with
HD 516.
v Consult your qualified electrician.
v Don’t use the power cable for carrying the pump or for
plugging off.
In Austria
In Austria, the electrical connections must be made
according to ÖVE-EM 42, T2 (2000) / 1979 §22 based
on § 2022. Pursuant to this regulation it’s imperative to
operate pumps for swimming pools and garden ponds
exclusively via an isolating transformer.
v Please ask your electrician.
In Switzerland
In Switzerland mobile appliances which are used outdoors, must be connected via a residual- current device.
Visual check
v Before operating the pump, first make a visual cheek,
if there is any damage of the pump (esp. regarding
power cable and plug).
A damaged pump must not be used.
v In case of damage, please have the pump checked
by our GARDENA Service Centre or by an authorised
electrician.
v If the supply cord is damaged, it must be replaced by
the manufacturer, its service agent or similarly qualified
persons in order to avoid a hazard.
Note
v Protect the pump from rain. Don’t use the pump in wet
or moist area.
In order to avoid dry-running of the pump, take care that
the end of the suction hose is always submerged into the
liquid.
v Before each operation, fill the pump to overflowing with
approx. 2 to 3 l of the liquid to be pumped!
Sand and other abrasive substances in the liquid cause
in-creased wear and reduce the pump’s output.
Pumping dirty water, e.g. stones, pine needles etc., can
cause damage to the pump.
v Do not pump dirty water.
The minimum flow rate is:
4000/5: 90 l/h (= 1.5 l/min);
5000/5: 200 l/h (= 3.3 l/min).
Watering accessories with lower rate must not be
operated.
DANGER! This product makes an electromagnetic field
while it operates. This field may under some conditions
interfere with active or passive medical implants. To
decrease the risk of conditions that can possibly injure or
kill, we recommend persons with medical implants to
speak with their physician and the medical implant manufacturer before you operate the product.
DANGER! Small parts can be easily swallowed. There
is also a risk that the polybag can suffocate toddlers.
Keep toddlers away when you assemble the product.
2. INITIAL OPERATION
Setting up your Garden Pump:
The site must be firm and solid in order to ensure safe and
sturdy operating conditions for the pump.
v Position the pump at a safe distance (min. 2 m) from the
liquid to be pumped.
The pump must be installed in a location with low air
humidity and sufficient ventilation in the area of the ventilation slots. It must be at a distance of at least 5 cm
from the walls. No dirtcontamination (e.g. sand or earth)
may be sucked in through theventilation slots.
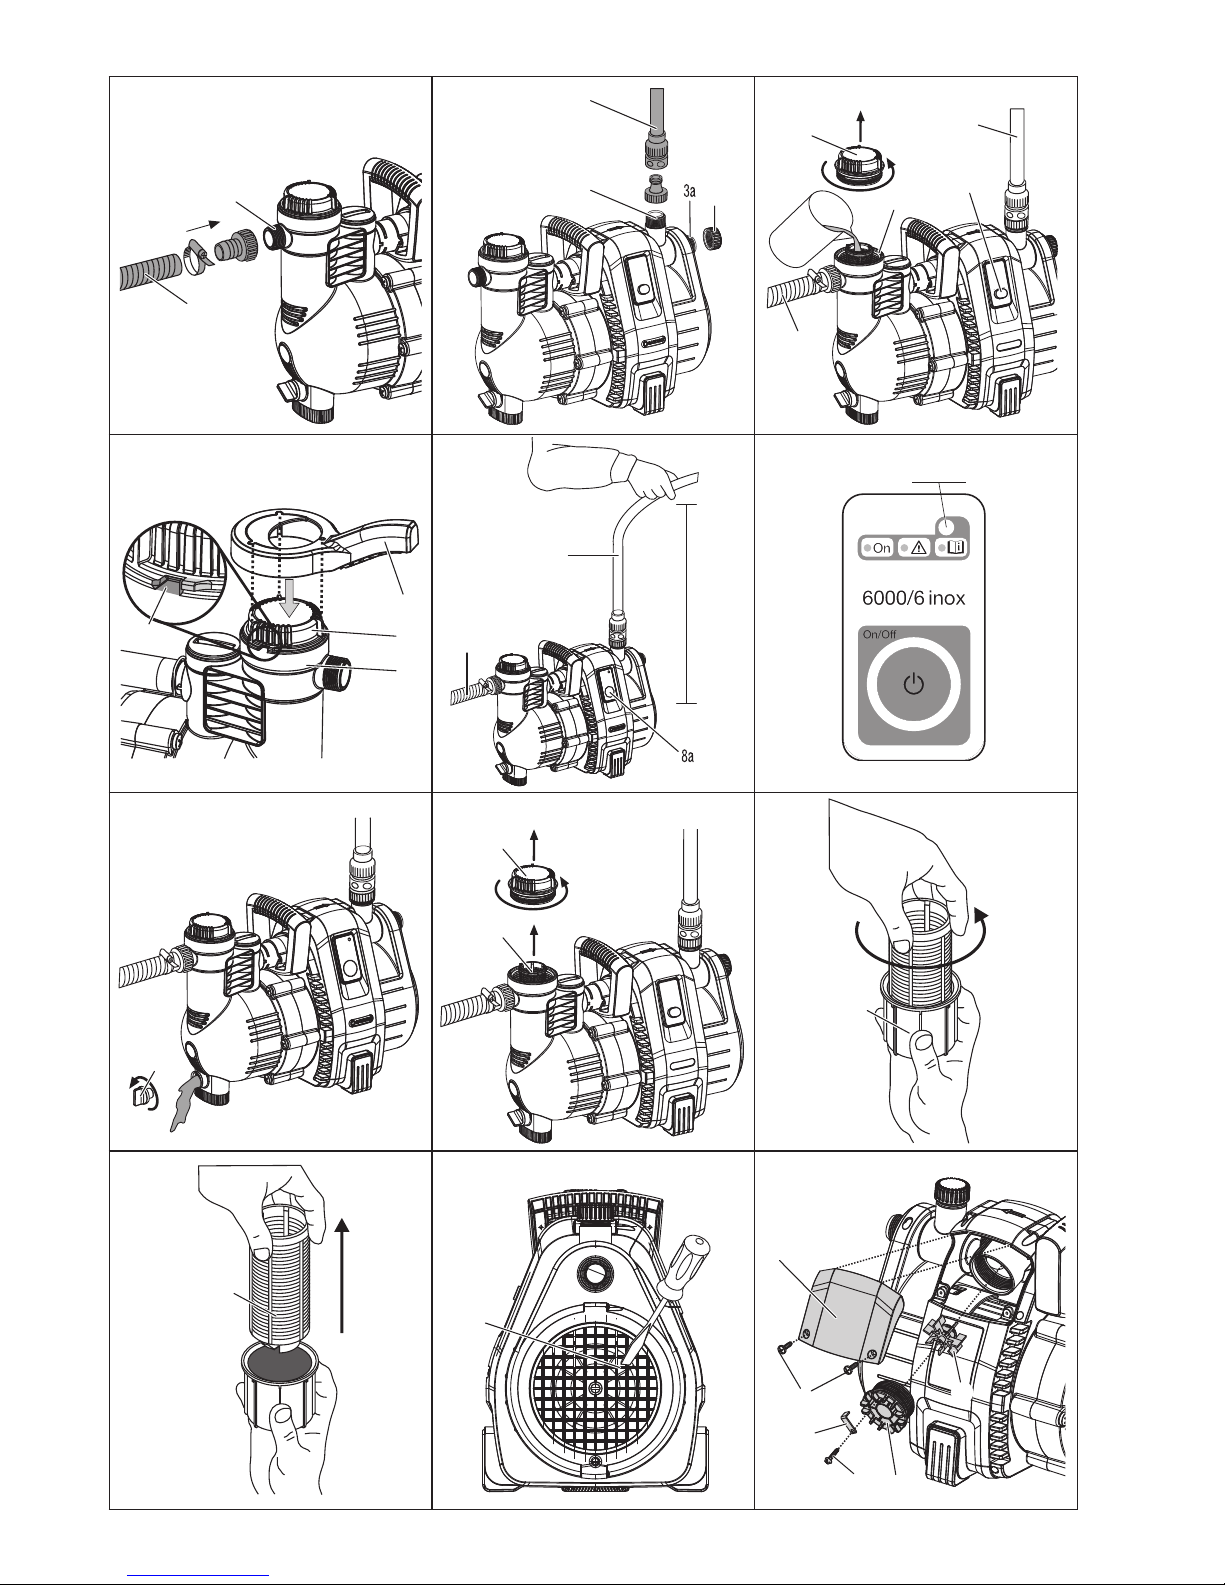
Connecting hose to suction side [ Fig. I1 ]:
Don’t use any hose connection system fittings on the
suction side! A vacuum-resistant suction hose must be
used, e. g. GARDENA Suction Unit, Art. 1411.
In order to reduce the suction time, it is advisable to use
a suction hose with backflow preventer avoiding automatic
draining of the suction hose when the pump is stopped.
1. Screw a vacuum-resistant suction hose
1
airtight onto
the connector on the suction side of the pump
2
.
2. For suction heights exceeding 4 m also secure the
suction hose
1
(e.g. by fastening it to a wooden post).
This relieves the pump of the weight of the suction
hose.
Connecting hose to delivery side [ Fig. I2 ]:
The pumps have 2 connections
3/ß
3a
on the delivery side.
The pump connection not in use has to be closed by the
cap
4
, which can be unscrewed for connecting 2 hoses.
The pump connections
3/ß
3a
are equipped with a 33.3 mm
(G 1") thread which can be used to connect 13 mm (1/2"),
16 mm (5/8") or 19 mm (3/4") hoses via the GARDENA
hose connection system.
Optimised use of the pump capacity is achieved by connecting 19mm (3/4") hoses with e.g. GARDENA Pump
Connection Set Art.1752, or by connecting 25 mm (1")
hoses with GARDENA Quick Thread Coupling with
female thread Art. 7109 / Quick Coupling Hose
Connector Art. 7103.
v Connect the pressure hose
5
to the connector on the
delivery side
3/ß
3a
.
If more than 2 hoses / accessories are connected simultaneously, we recommend using the GARDENA 2-
or 4-Channel Water Distributor Art. 8193 / 8194,
GARDENA Twin-Tap Connector Art. 940 which can
be screwed directly onto the connection on the delivery
side
3/ß
3a
.
EN
12
3. OPERATION
Filling the pump [ Fig. O1 / O2 ]:
DANGER! Electric shock!
Risk of injury due to electric shock.
v Disconnect from the mains before filling the
Garden Pump.
CAUTION!
v Before each operation, slowly fill the pump
with liquid to be pumped until it overflows
(approx. 2 to 3 l).
1. Twist off the cover
6
on the filler 7 with the accompa-
nying key
ß
k
anti-clockwise.
2. Fill the pump via the filler cap
7
to overflowing with
approx. 2 to 3 l of the liquid to be pumped.
3. Twist on cover
6
with the key
ß
k
clockwise only to the
stop < (do not over-twist).
4. Open any shut-off valves in the delivery line (accessories, water stop, etc.).
5. Drain remaining water in pressure hose
5
so that air
can escape during the suction process.
6. Switching on pump 4000/5:
Lift and hold the delivery hose
5
at least 1 m vertically
above the pump, press the On/Off switch
8
(On/Off
switch shines) and wait until the pump has primed.
v If the pump does not deliver after approx.
5 minutes, switch off the pump (press On/Off
switch
8
) (see 6. TROUBLESHOOTING).
6. Switching on pump 5000/5; 6000/6 inox
[ Fig. O3 / O4 ]:
Lift and hold the delivery hose
5
at least 1 m vertically
above the pump, insert the power plug, press the
On/Off button
ß
8a
(the LED shines green) and wait until
the pump has primed.
If the pump does not deliver within approx. 20 seconds, the LED flashes orange.
If the pump does not deliver: 5000/5 within approx.
5 minutes / 6000/6 inox within approx. 6 minutes,
the LED shines red and the pump switches off
auto matically (see 6. TROUBLESHOOTING).
v If the pump does not automatically switch off
then manually switch the pump off and check the
hose for leaks.
The specified maximum self-priming suction height of 8 m
is reached only if the pump is filled via the filler neck
7
up
to the overflow and if, while doing so and during the selfpriming, the delivery hose
5
is held up sufficiently high to
prevent any flow medium escaping from the pump via the
delivery hose
5
.
Special mode:
Additional electrical switching devices (e. g. remote
control systems, pressure switches) can be used only
in the special mode.
Activating the special mode:
1. When switching on, press the On/Off button
ß
8a
for
8 seconds.
During the first 5 seconds, the green LED is illuminated;
then the LED blinks for 3 seconds.
2. When the green LED illuminates again after 8 seconds,
let go of the On/Off button
ß
8a
.
Deactivating the special mode:
1. Plug the mains plug into an energised mains socket.
The pump starts of its own accord.
2. Press the On/Off button
ß
8a
. The pump switches off.
3. When switching on, keep the On/Off button
ß
8a
depressed for 8seconds until the green LED no
longer flashes.
safe-pump-function:
The safe-pump function uses the LED status display to
alert the user that there is no water flow. In addition, it acts
as Dry-Running Safety, guarding against pump damage
if the delivery side is closed too long (e.g. closed valves) or
if the water supply fails (e. g. empty cistern).
LED flashes green: Normal operation
LED flashes orange: No water flow for at least
20 seconds
LED shines red: No water flow for at least
5 minutes (pump has switched
off automatically)
LED flashes red: Alarm! Pump was started
3 times within 20 min. without
water flow. (Pump can no
longer be started for 5 min.
to allow cooling, after
which the LED shines red)
4. STORAGE
To put into storage [ Fig. S1 ]:
Before the start of the frost period the Garden Pump
should be stored protected from frost.
1. Open the water drain screw
9
.
The Garden Pump drains.
2. Store your Garden Pump so that it is protected from
frost.
Disposal:
(in accordance with RL2012/19/EC)
The product must not be disposed of to normal
household waste. It must be disposed of in line
with local environmental regulations.
IMPORTANT!
Dispose of the product through or via your municipal
recycling collection centre.
EN
13
 Loading...