

Gardena 6000 1777, 6000 1790 Operation Instructions Manual
6000
Art. 1777
6000
Art. 1790
D Betriebsanleitung
Tauchpumpe/Schmutzwasserpumpe
GB Operation Instructions
Submersible Pump/Dirty Water Pump
F Mode d’emploi
Pompe pour eaux claires/
Pompe pour eaux chargées
NL Gebruiksaanwijzing
Dompelpomp/Vuilwaterpomp
S Bruksanvisning
Dränkbar pump/Spillvattenpump
DK Brugsanvisning
Dykpumpe/Pumpe til snavset vand
FI Käyttöohje
Uppopumppu/Likavesipumppu
N Bruksanvisning
Lensepumpe/
Lensepumpe for urent vann
I Istruzioni per l’uso
Pompa sommersa/
Pompa sommersa per acqua sporca
E Instrucciones de empleo
Bomba sumergible/
Bomba para aguas sucias
P Manual de instruções
Bomba submersível/
Bomba para esgotos
PL Instrukcja obsługi
Pompa zanurzeniowa/
Pompa do brudnej wody
H Használati utasítás
Merülőszivattyú/Szennyvízszivattyú
CZ Návod k obsluze
Ponorné čerpadlo/Kalové čerpadlo
SK Návod na obsluhu
Ponorné čerpadlo/Kalové čerpadlo
GR Οδηγίες χρήσης
Υποβρύχια αντλία/αντλία λυμάτων
RUS Инструкция по эксплуатации
Погружной насос/Грязевой насос
SLO Navodilo za uporabo
Potopna črpalka/
Črpalka za odpadno vodo
HR Upute za uporabu
Uronjiva pumpa/
Pumpa za prljavu vodu
SRB Uputstvo za rad
BIH Potopna pumpa/
Pumpa za prljavu vodu
UA Інструкція з експлуатації
Занурений насос/
Грязьовий насос
RO Instrucţiuni de utilizare
Pompă submersibilă/
Pompă pentru apă murdară
TR Kullanma Kılavuzu
Dalgıç Pompa/Kirli Su Pompası
BG Инструкция за експлоатация
Потопяема дренажна помпа/
Помпа за мръсна вода
AL Manual përdorimi
Pompë zhytëse/
Pompë për ujin e ndotur
EST Kasutusjuhend
Uputatav pump/Reoveepump
LT Eksploatavimo instrukcija
Panardinamas siurblys/
Purvino vandens siurblys
LV Lietošanas instrukcija
Legremdējamais sūknis/
Netīrā ūdens sūknis
LV LT EST AL BG TR RO UA
SRB
BIH
HR SLO
RUS
GR SK CZ H PL P E I N FI DK S NL F GB D
GARDENA Submersible Pump Type 6000 /
Dirty Water Pump Type 6000
Translation of the original German operating instructions.
Please read the operating instructions carefully and observe the notes given.
Use these operating instructions to familiarise yourself with the product,
the proper use and the safety instructions.
Never operate the product when you are tired, ill or under the influence of alcohol, drugs or
medicine.
This product may be used under supervision, or if instruction regarding
the safe use of the product has been provided and the resulting dangers
have been understood, by children aged 8 and above, as well as by persons with physical, sensory or mental disabilities or a lack of experience
and knowledge. Children must not be allowed to play with the product.
Cleaning and user maintenance must not be performed by children without
supervision. The use of this product by young people under the age of
16 is not recommended.
v Keep these operating instructions in a safe place.
Contents: 1. Where to use your GARDENA Pump .....................10
2. Safety Instructions ...................................11
3. Using the Pump for the First Time ........................12
4. Operation ..........................................13
5. Storage ...........................................14
6. Cleaning ...........................................14
7. Troubleshooting .....................................15
8. Technical Data ......................................16
9. Service / Warranty ....................................16
1. Where to use your GARDENA Pump
Correct use: The GARDENA pump is intended for private use around the house
and garden. It is primarily intended for drainage purposes if flooding
(please ensure this word is not split over 2 lines) occurs but also
for transferring water to and from tanks and pumping them out, for
drawing water from wells and shafts, for draining boats and yachts
and for aerating and circulating water for limited periods.
Liquid conveyed: The GARDENA pump is suitable for conveying:
• Submersible pump Type 6000: clean to slightly dirty water with
a max. particle size of 5 mm,
• Dirty water pump Type 6000: dirty water with a max. particle size
of 25 mm,
and swimming pool water (provided that the additives have been
measured and added in accordance with manufacturers’ instructions)
and soapy water.
The pump can be fully submerged (watertight encapsulation) and
can be lowered down to a depth of 7 m into the water.
10
GB
2. Safety Instructions
Electrical safety
DANGER! Electric shock!
The pump must not be operated if there are
people in the swimming pool or garden pond.
v Ensure that the electrical plug and socket
connections are fitted in an area which
cannot flood.
v Protect power plug from moisture.
DANGER! Electric shock!
With a cut off mains plug, moisture can get
into electrical parts via the mains cable and
cause a short circuit.
v Never cut the mains plug off (e. g. to feed
through wall).
v Don’t use the power cable for plugging off.
According to DIN VDE (German Electrical Engineers’ Association) 0620, mains power cables
must not have a smaller cross-section than
the rubber-sheathed cables of the designation
H05RN-F. The cable length must be at least 10 m.
Data indicated on the type plate must match
technical data of the mains supply.
According to DIN VDE 100 / AS/NZS 3000,
pumps may only be operated in swimming
pools, garden ponds and wells via a fault
current circuit breaker with a nominal fault
current of ≤ 30 mA.
Swimming pools and garden ponds should be
designed according to international and national
design regulations.
For safety reasons we recommend that the pump
is always operated by a residual-current device
(DIN VDE 0100-702 and 0100-738).
v If in doubt please consult a qualified
electrician.
Protect plug and power cable from heat, oil and
sharp edges.
The connection cable of the pump cannot be
replaced. If the cable is damaged the pump must
be scrapped.
v Do not pull out the power cable from the socket
as a method of turning the pump off.
The power cable or the float switch must not be
used for mounting or relocating the pump.
For submerging or lifting/securing the pump,
fix a rope to the pump’s carrying handle.
In Austria, according to ÖVE B/EN 60 555
parts 1 to 3, pumps which are used in swimming
pools and garden ponds, and equipped with
firm power cable should be fed via an ÖVE
approved isolating transformer – rated voltage
must not exceed 230 V.
In Switzerland mobile appliances which are used
outdoors must be connected via a residual-current
device.
Operating instructions
v Before operating the pump look to see if there
is any damage to the pump (especially to the
power cable and plug).
v Clear the outlet line before use. Avoid running
the pump with the outlet side closed off for
more than 10 minutes against closed delivery
side of the pump.
v Observe the minimum water level and the
max. delivery height (see 8. Technical Data).
A damaged pump must not be used.
v In case of damage, please have the pump
checked by our GARDENA Service Centre.
Dry-running operation causes increased wear and
is to be avoided. Therefore, in manual operation
the pump must be immediately unplugged when
water fails to flow.
v Observe the pump at all times during manual
operation.
Take care that the pump is located where
the inlet openings at the suction base are not
obstructed neither completely nor partly.
Please note: The GARDENA pump is not intended for long term use
(e. g. use for continuous circulation) in a pond. The length
of life of the pump will be shortened accordingly if used in
this way. Corrosive, flammable or explosive substances
(e. g. petrol, paraffin, cellulose thinners); grease, oil, salt
water and sewage must not be conveyed by the pump. The
temperature of the liquid conveyed may not exceed 35 °C.
11
GB
Stand the pump on a brick if using in a pond.
Leaking lubricants can contaminate the pumped
liquid.
Safety instructions
Thermal motor protector
The pump is automatically switched off on overheating by the built-in thermal motor protector.
After having cooled down, the motor automatically
switches on again (see 7. Troubleshooting).
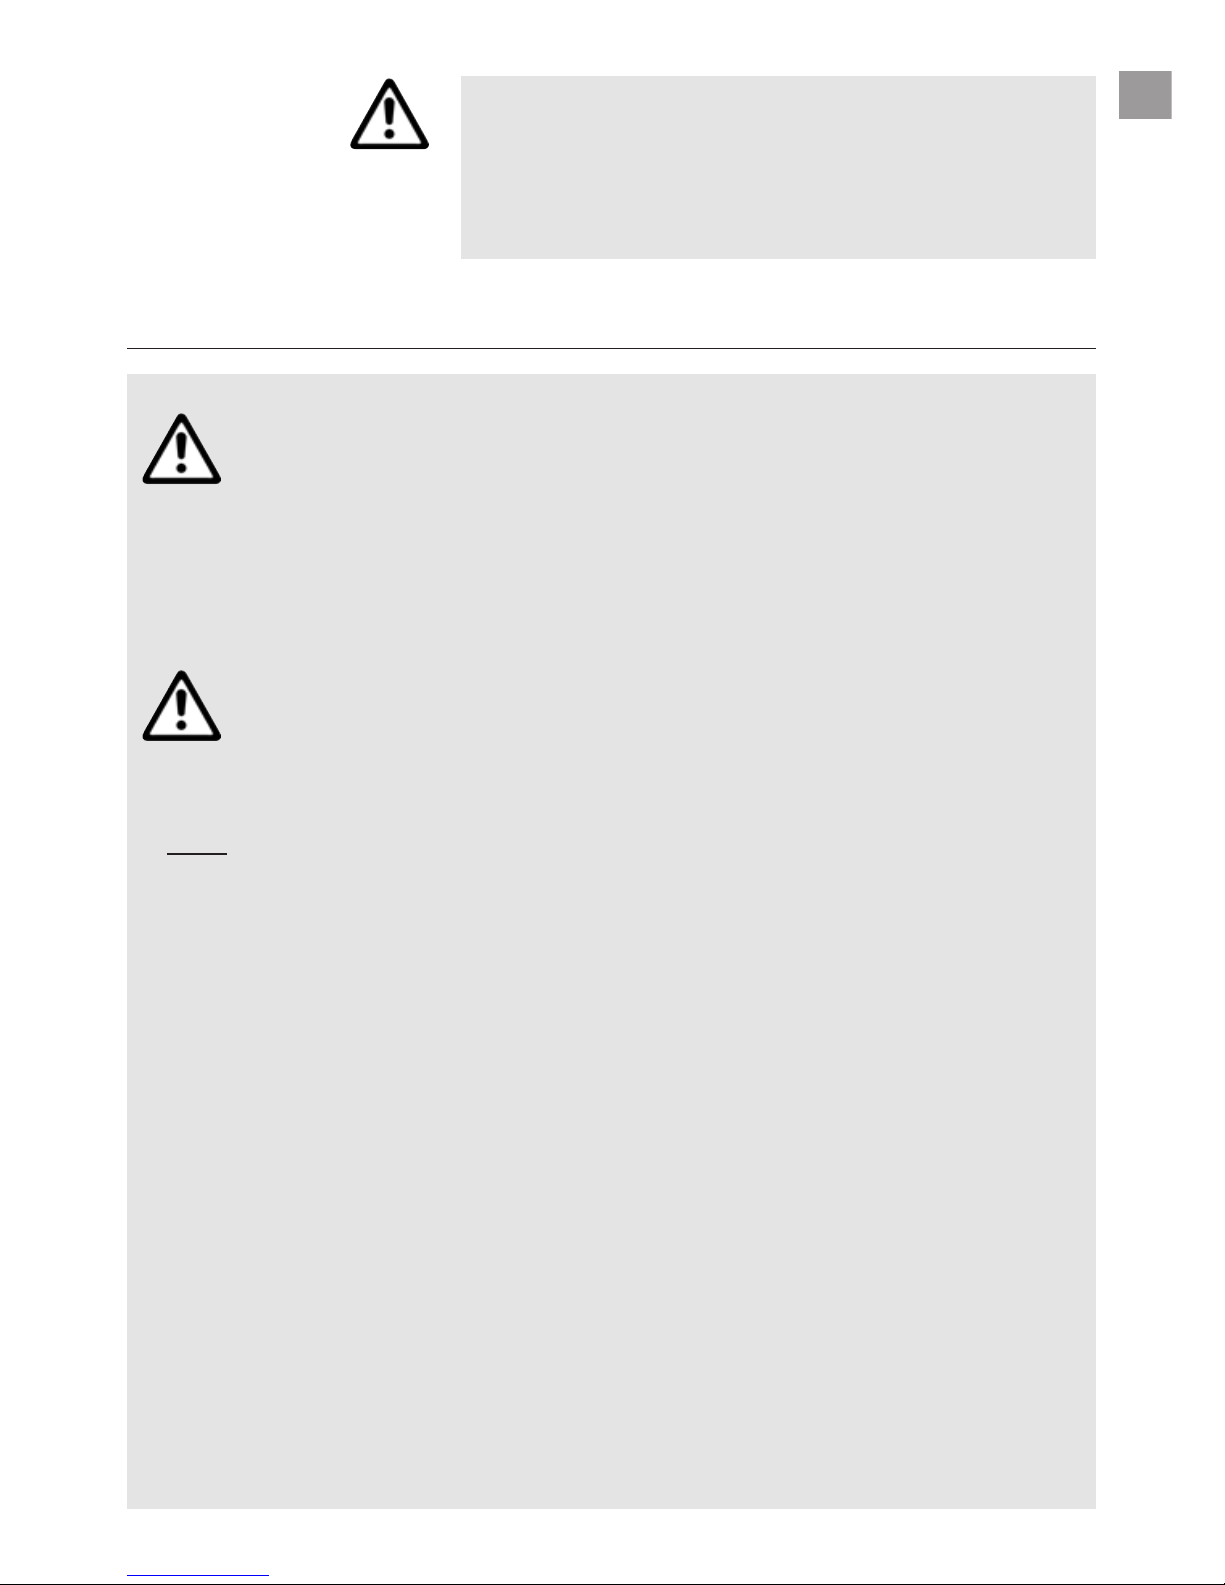
Automatic Air bleed valve
e
The automatic air bleed
valve eliminates any air
pockets in the pump.
During this process, air
escapes through the vent
bores e and air bubbles
appear underwater.
This is not a defect of
your pump, but serves to
deaerate the pump, but serves to remove air from
the pump.
It may take several seconds for the air to escape
when the pump is immersed for the first time.
Warning! This unit makes an electromagnetic field
while it operates. This field may under some conditions interfere with active or passive medical
implants. To decrease the risk of conditions that
can possibly injure or kill, we recommend persons
with medical implants to speak with their physician
and the medical implant manufacturer before
operating.
Warning! Keep toddlers away when you assemble
the unit. Small parts can be easily swallowed.
There is also a risk that the polybag can suffocate
toddlers.
3. Using the Pump for the First Time
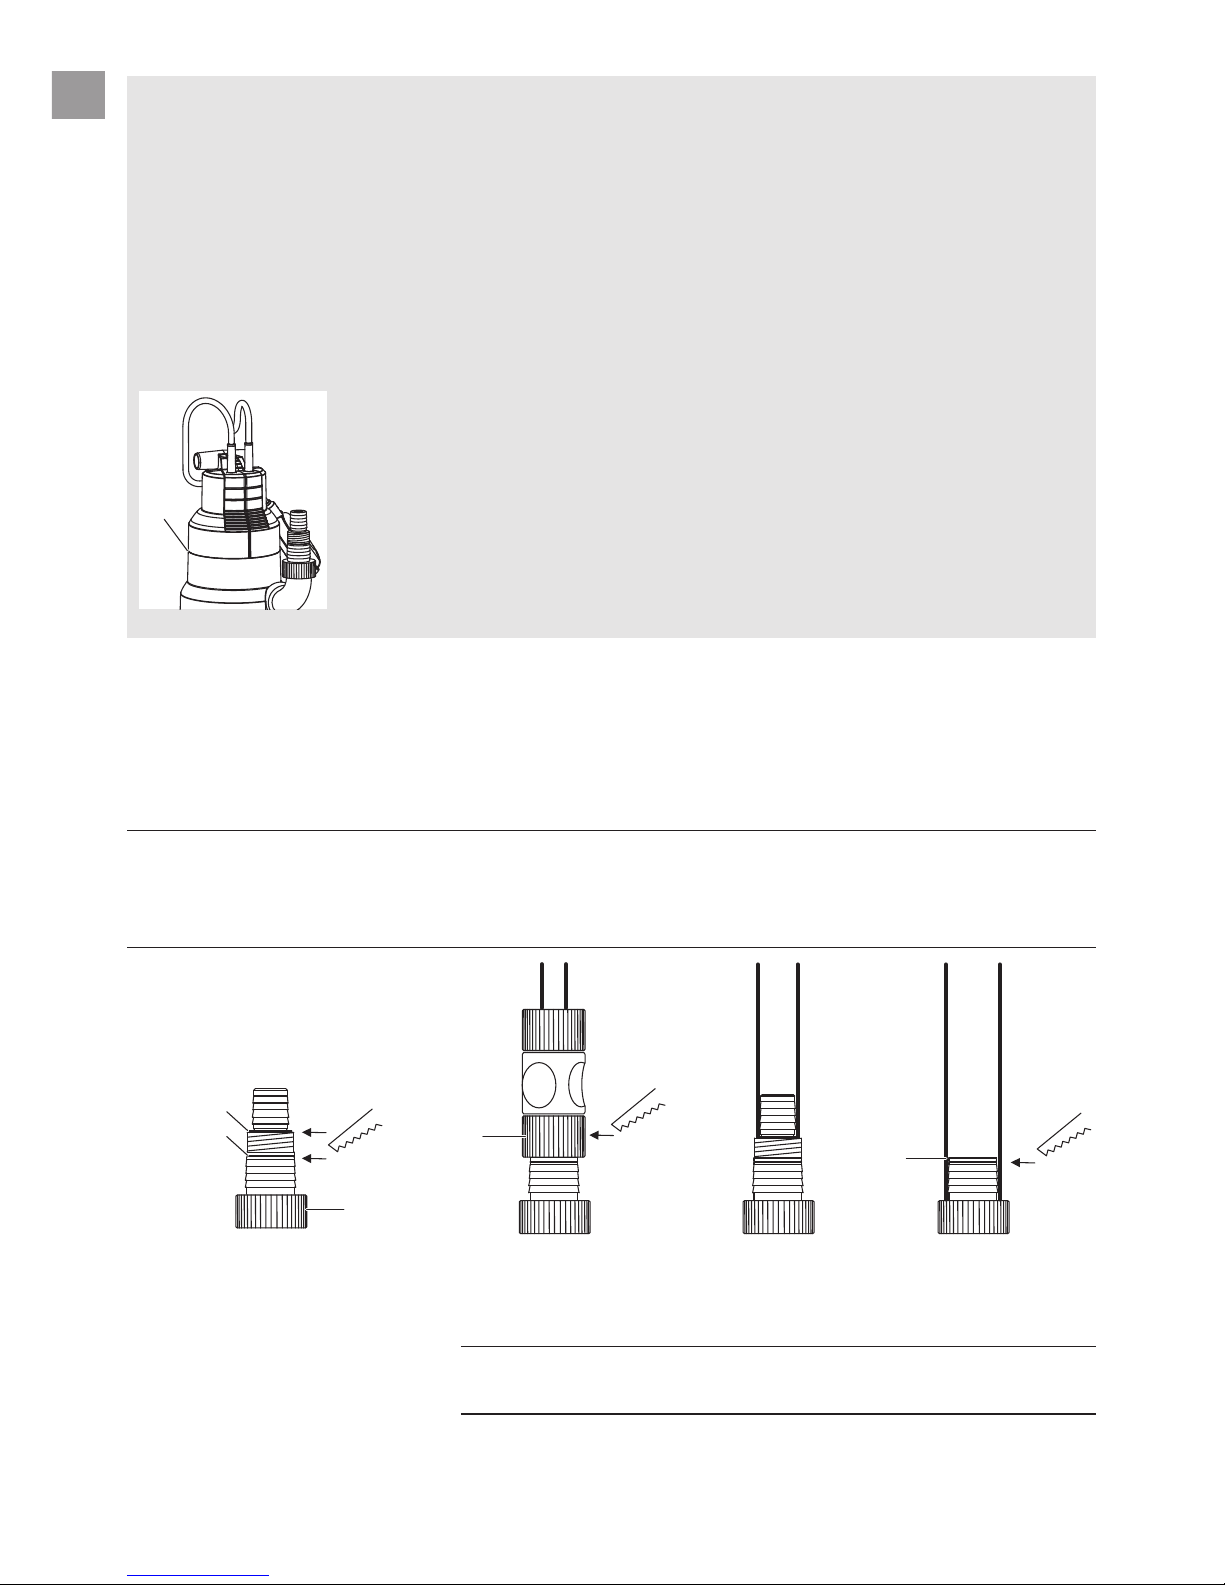
Hose diameter
13 mm (1/2")
15 mm (5/8")
19 mm (3/4")
25 mm (1") 38 mm (1 1/2")
Hose connection of
universal fitting
1
a
b
1
a
b
Hose connection Cut off topmost
nipple at
a
Do not cut off
any nipples
Cut off top two
nipples at
b
Connection kits needed
for 13 – 19 mm hoses:
13 mm (1/2"): GARDENA Pump Connection Set, Art. No. 1750
15 mm (5/8"): Tap Connector Art. No. 18202 and
Hose Connector Art. No. 18216
19 mm (3/4"): GARDENA Pump Connection Set, Art. No. 1752
Best results in delivery capacity are achieved when using
38 mm (1 1/2") hoses.
12
GB
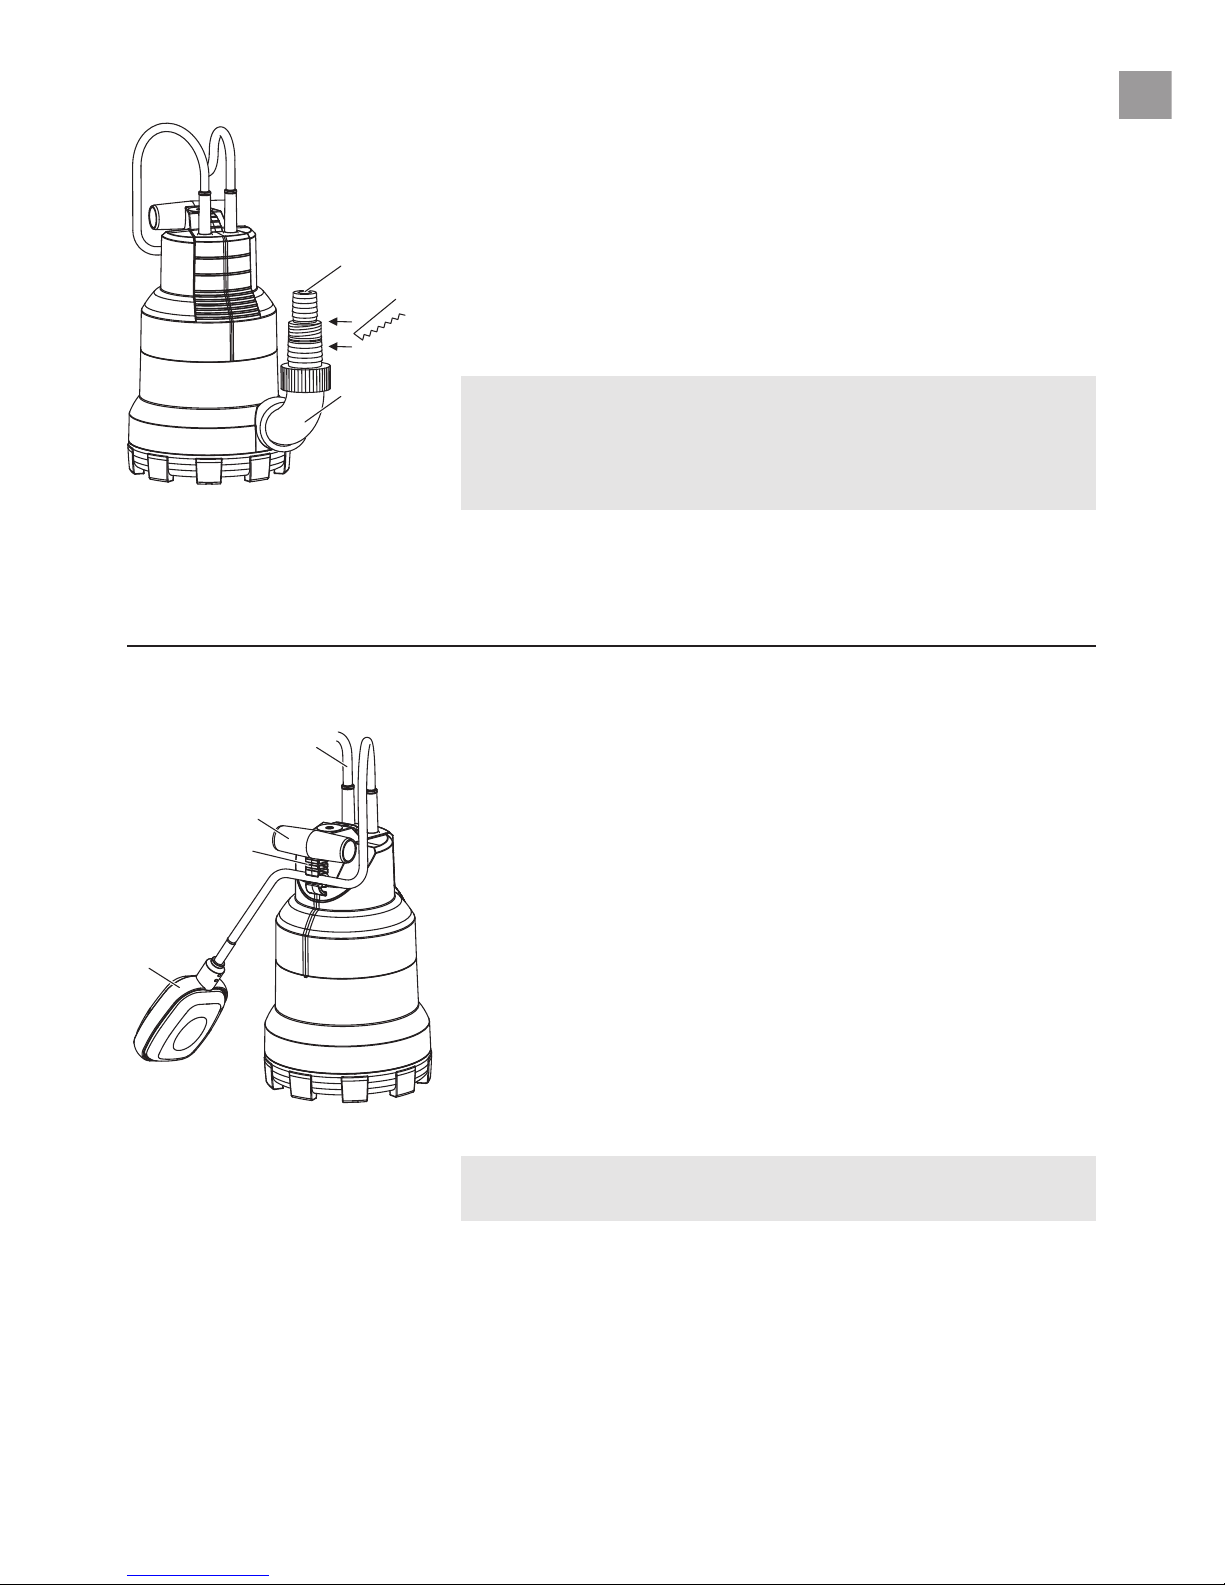
Connecting the hose:
1
2
The universal fitting 1 llows connection of all the hoses listed in the
table above.
1. Screw L-piece
2
into the pump.
2. Cut off nipples of the universal
1
fitting which are not needed,
to match the hose connection.
3. Screw the universal fitting
1
onto the pump.
4. Connect the hose to the universal fitting
1
.
We recommend that 38 mm (1 1/2")- and 25 mm (1") hoses
should be fastened with an additional GARDENA hose clamp
Art. No. 7193.
Only for 13 mm (1/2") hose:
The universal fitting
1
can also be equipped with a GARDENA
Regulator Valve Art. No. 977 so that the contents of the out-
letline do not flow back through the pump after pumping. The
Regulator Valve can be ordered from your GARDENA dealer.
4. Operation
Automatic operation:
5
4
3
6
The float switch 3 turns the pump on automatically when the water
level exceeds the cut-in height and the water is pumped out.
The float switch
3
turns the pump off again as soon as the water
level falls below the cut-out height.
1. Stand the pump on a firm surface
– or –
use a rope attached through the bore hole in the carrying
handle 4 to immerse the pump in a well or shaft.
During automatic operation, ensure that the float switch 3 can
move freely.
2. Plug the power cable
5
into a mains socket.
Adjusting the Cut-in and Cut-out Height:
(Minimum depth for switching on and off, see 8. Technical Data.)
v Push the cable of the float switch
3
into the float switch lock 6.
Do not select a cable length that is too long or short to ensure
that the float switch can turn on and off properly.
The cable length between the float switch
3
and the float switch
lock 6 must always be at least 10 cm.
• The shorter the length of cable between the float switch
3
and
the float switch lock 6, the lower the cut-in height and the higher
the cut-out height.
13
GB
 Loading...