

Page 1
Page 2
1
CONTENTS
Preface 2
Getting Started 3
Controls 4
Main Characters 6
Continuing from Saved Data 10
The Main Menu 11
Game Flow 17
Character Actions 18
Towns & Villages 19
World Map - Field 21
Battles 22
Battle Commands 23
Gear Battles 27
Gear Battle Commands 28
Skills & Weapons 30
Special Abilities 31
Armor & Accessories 33
Gear Parts & Items 34
Abbreviations 35
Credits 36
Limited Warranty 37
TM
WARNING: READ BEFORE USING YOUR PLAYSTATION® GAME CONSOLE.
A very small percentage of individuals may experience epileptic seizures when exposed to certain light patterns
or flashing lights. Exposure to certain patterns or backgrounds on a television screen or while playing video
games, including games played on the PlayStation game console, may induce an epileptic seizure in these
individuals. Certain conditions may induce previously undetected epileptic symptoms even in persons who
have no history of prior seizures or epilepsy. If you, or anyone in your family, has an epileptic condition,
consult your physician prior to playing. If you experience any of the following symptoms while playing a video
game – dizziness, altered vision, eye or muscle twitches, loss of awareness, disorientation, any involuntary
movement, or convulsions – IMMEDIATELY discontinue use and consult your physician before resuming play.
WARNING TO OWNERS OF PROJECTION TELEVISIONS:
Do not connect your PlayStation game console to a projection TV without first consulting the user manual for
your projection TV, unless it is of the LCD type. Otherwise, it may permanently damage your TV screen.
HANDLING YOUR PLAYSTATION DISC:
• This compact disc is intended for use only with the PlayStation game console.
• Do not bend it, crush it or submerge it in liquids.
• Do not leave it in direct sunlight or near a radiator or other source of heat.
• Be sure to take an occasional rest break during extended play.
• Keep this compact disc clean. Always hold the disc by the edges and keep it in its protective case when not
in use. Clean the disc with a lint-free, soft, dry cloth, wiping in straight lines from center to outer edge.
Never use solvents or abrasive cleaners.
SQUARE ELECTRONIC ARTS GAME TIPS
Game Tips are available for all Square Soft PlayStation titles:
1-900-407-KLUE (1-900-407-5583) $.95/min. Automated Tips, $1.25/min. Live Assistance.
Callers under 18 years of age must obtain permission from a parent or guardian before calling. Game tips are
available for callers within the U.S. only. Touch-tone phone required. Live assistance is available for Square Soft
titles published on the PlayStation game console only. Game counselors are available Monday-Friday, 8am 11:45am and 1pm - 5pm, Pacific Standard Time. Automated support is available 24 hours a day, 7 days a week.
Square Soft Online
Visit us online at www.squaresoft.com to register for upcoming sweepstakes, prizes and more!
Page 3
3
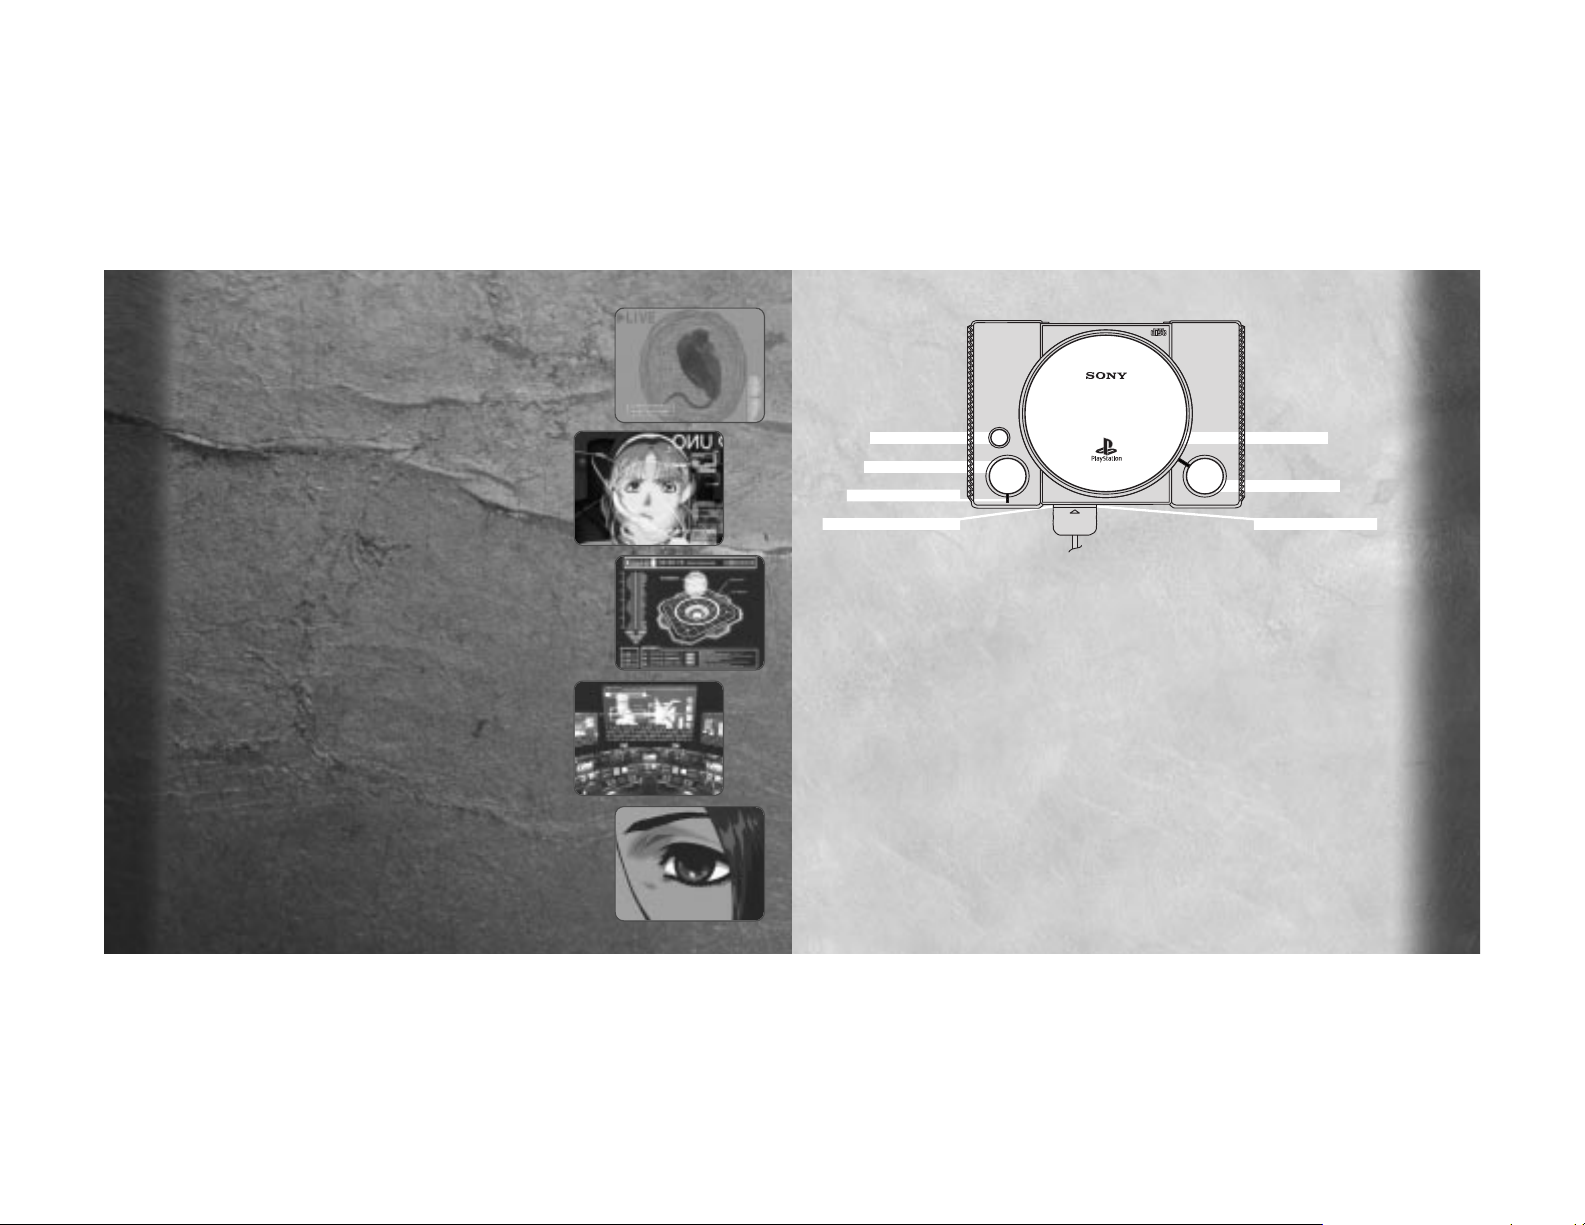
Getting Started
TO START A NEW GAME
Set up your PlayStation game console according to the instructions in its Instruction
manual. Make sure the power is OFF before inserting or removing a compact disc.
Insert Xenogears™DISC 1 into your Playstation game console and close the Disc cover.
Make sure a Controller is inserted into Controller port 1 and turn ON the PlayStation
game console. After the opening movie is completed, the Title Screen will be displayed.
(You can press the ≈ button to skip the opening movie and display the Title Screen.)
Select <New Game> using the Directional buttons and press the ≈ button to start.
MEMORY CARD
A Memory card (sold separately) is required to save your progression in this game.
Insert a Memory card into the PlayStation game console BEFORE starting play. Data can
be saved or loaded from either Memory card slot. Do not remove a Memory card while
saving or loading games; doing so could damage the game data. See pages 10 and 16
for instructions on loading and saving games.
OPEN
®
POWER
RESET
RESET BUTTON
POWER BUTTON
POWER INDICATOR
CONTROLLER PORT ONE
DISC COVER
OPEN BUTTON
MEMORY CARD SLOT
2
Thousands of years ago.
The
Eldridge
, a gigantic interplanetary
emigrant spacecraft, suffered a sudden
shipwide systems malfunction. On the
monitors that warned of the ensuing danger,
a mysterious shadow flickered for but an
instant. Before the spacecraft’s crew could
respond, someone or something had taken
over their entire ship.
As the passengers and crew attempted to
evacuate, the spacecraft’s own laser
cannons coldly turned and shot them down.
The captain had no choice but to activate the
ship’s self-destruct mechanism. In a flash of
light, the spacecraft fell to a nearby planet.
Born from the fallen wreckage, ‘she’ slowly
arose, her long hair blowing in the wind as
her eyes reflected the dawn’s breaking light.
Reflecting the start of the day that ‘god’ and
‘humankind’ fell to earth.
Preface
Page 4
5
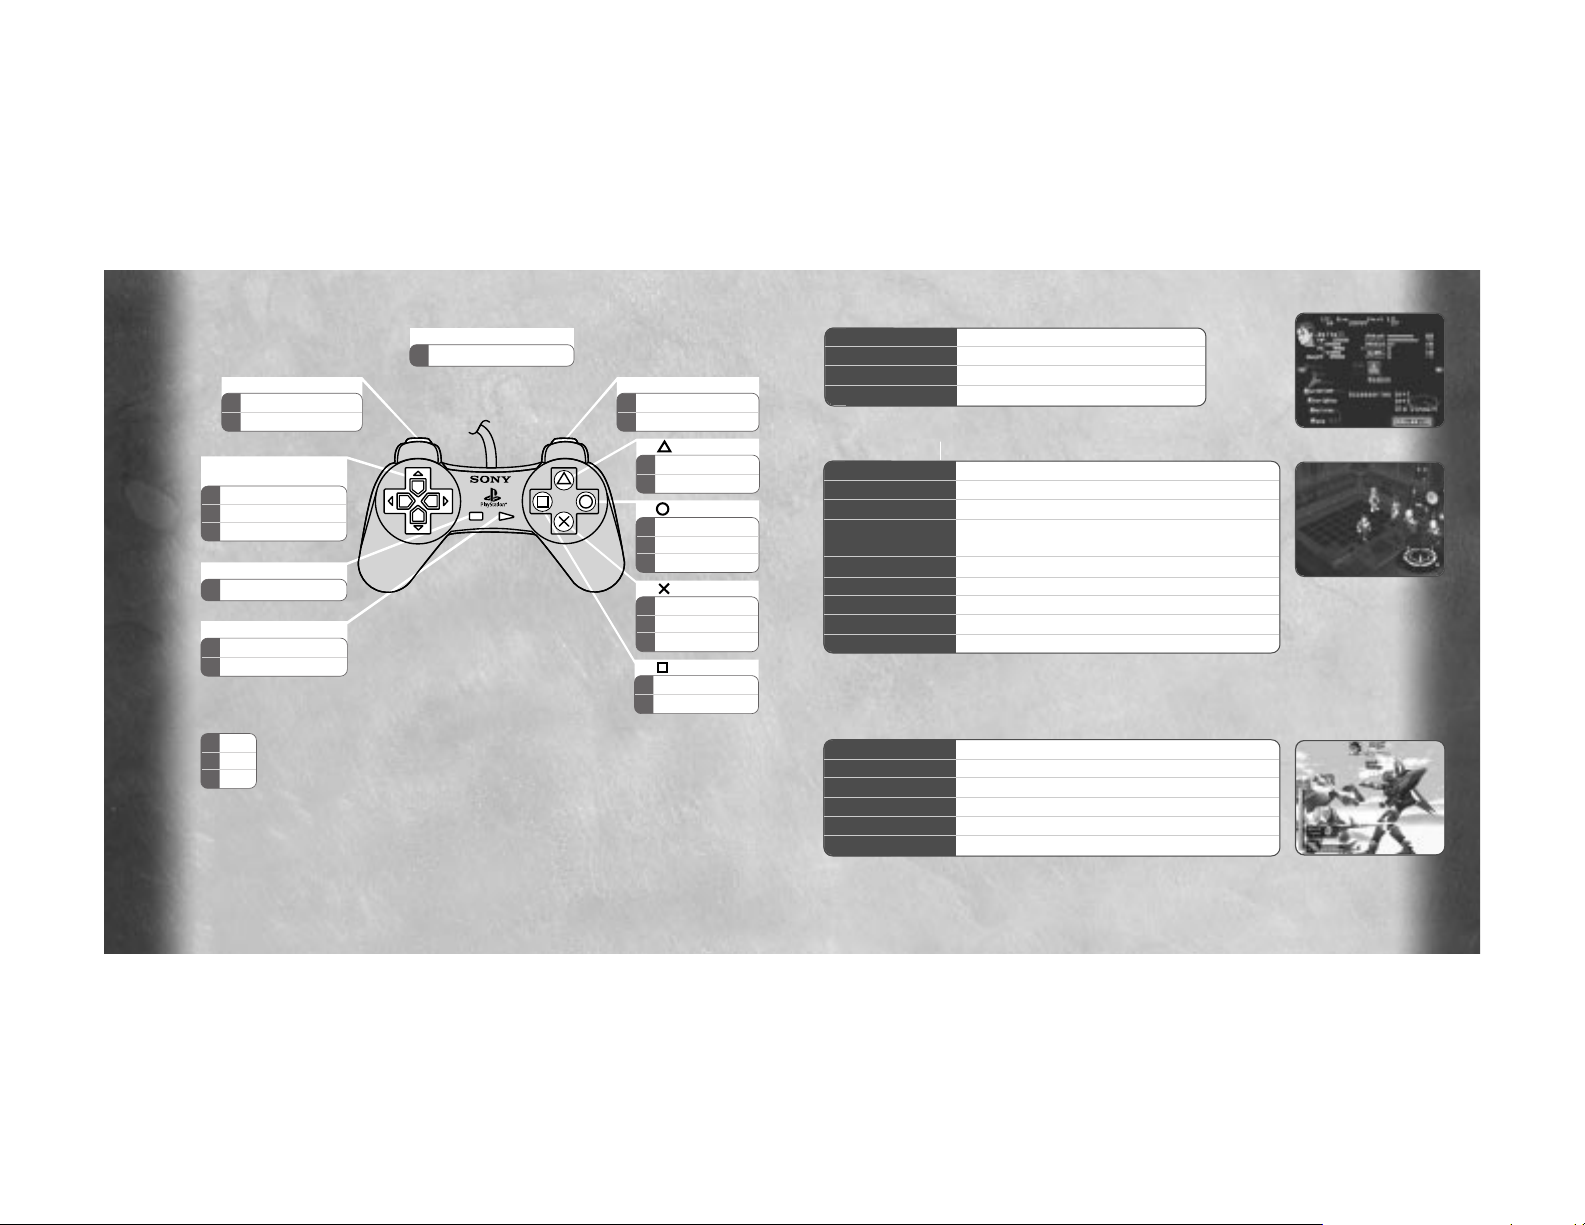
MENU SCREEN CONTROLS:
Directional buttons Move cursor to highlight an action/option
≈ button Confirm/execute highlighted option
Ω button Cancel option and return
R1 button/L1 button Choose between current party characters
FIELD SCREEN CONTROLS:
Directional buttons Move character(s)
≈ button Talk with people, Search scenery, Execute commands
Ω button Hold down to make character(s) run, Cancel commands
ç button Jump (Can also do a bigger jump while running with
the Ω button held down)
√ button Display Menu Screen
R1 button Change viewpoint (Rotates camera right 45 degrees)
L1 button Change viewpoint (Rotates camera left 45 degrees)
START button Pause/continue
SELECT button Turn on/off the mini World Map window
BATTLE SCREEN CONTROLS:
Directional buttons Move cursor/Highlight Battle Option
≈ button 3-point Fierce Attack/Execute highlighted Battle Option
√ button 2-point Strong Attack/Execute highlighted Battle Option
ç button 1-point Weak Attack/Execute highlighted Battle Option
Ω button End battle turn/Cancel Battle Option
START button Pause/continue
(Note: Hold down the R2 and L2 buttons simultaneously as a shortcut for
making all the characters in the party get on/off their Gears at one time.)
4
Controls
L
R
SELECT
START
M
F
B
enu
ield
attle
M
F
B
Cancel
Run, Cancel
End battle turn
MFChoose character
Rotate view right
R1 BUTTON
MFChoose character
Rotate view left
L1 BUTTON
FBPause/continue
Pause/continue
START BUTTON
DIRECTIONAL
BUTTONS
FBJump
Weak attack
BUTTON
FBMenu Screen
Strong attack
BUTTON
BUTTON
M
F
B
Confirm
Talk, Search
Fierce Attack
M
F
B
Move cursor
Move character(s)
Move cursor
SELECT BUTTON
F Toggle World Map
L2 + R2 BUTTONS
F Get on/off Gears (all)
BUTTON
Xenogears has different control functions depending on the screen you are on.
These are divided into Menu Screen, Field Screen and Battle Screen controls.
Master the controls for each situation in order to make smooth progress in
your adventure.
(Note: The game can be reset by simultaneously pressing the START, SELECT, L1, L2,
R1, and R2 buttons.)
Page 5
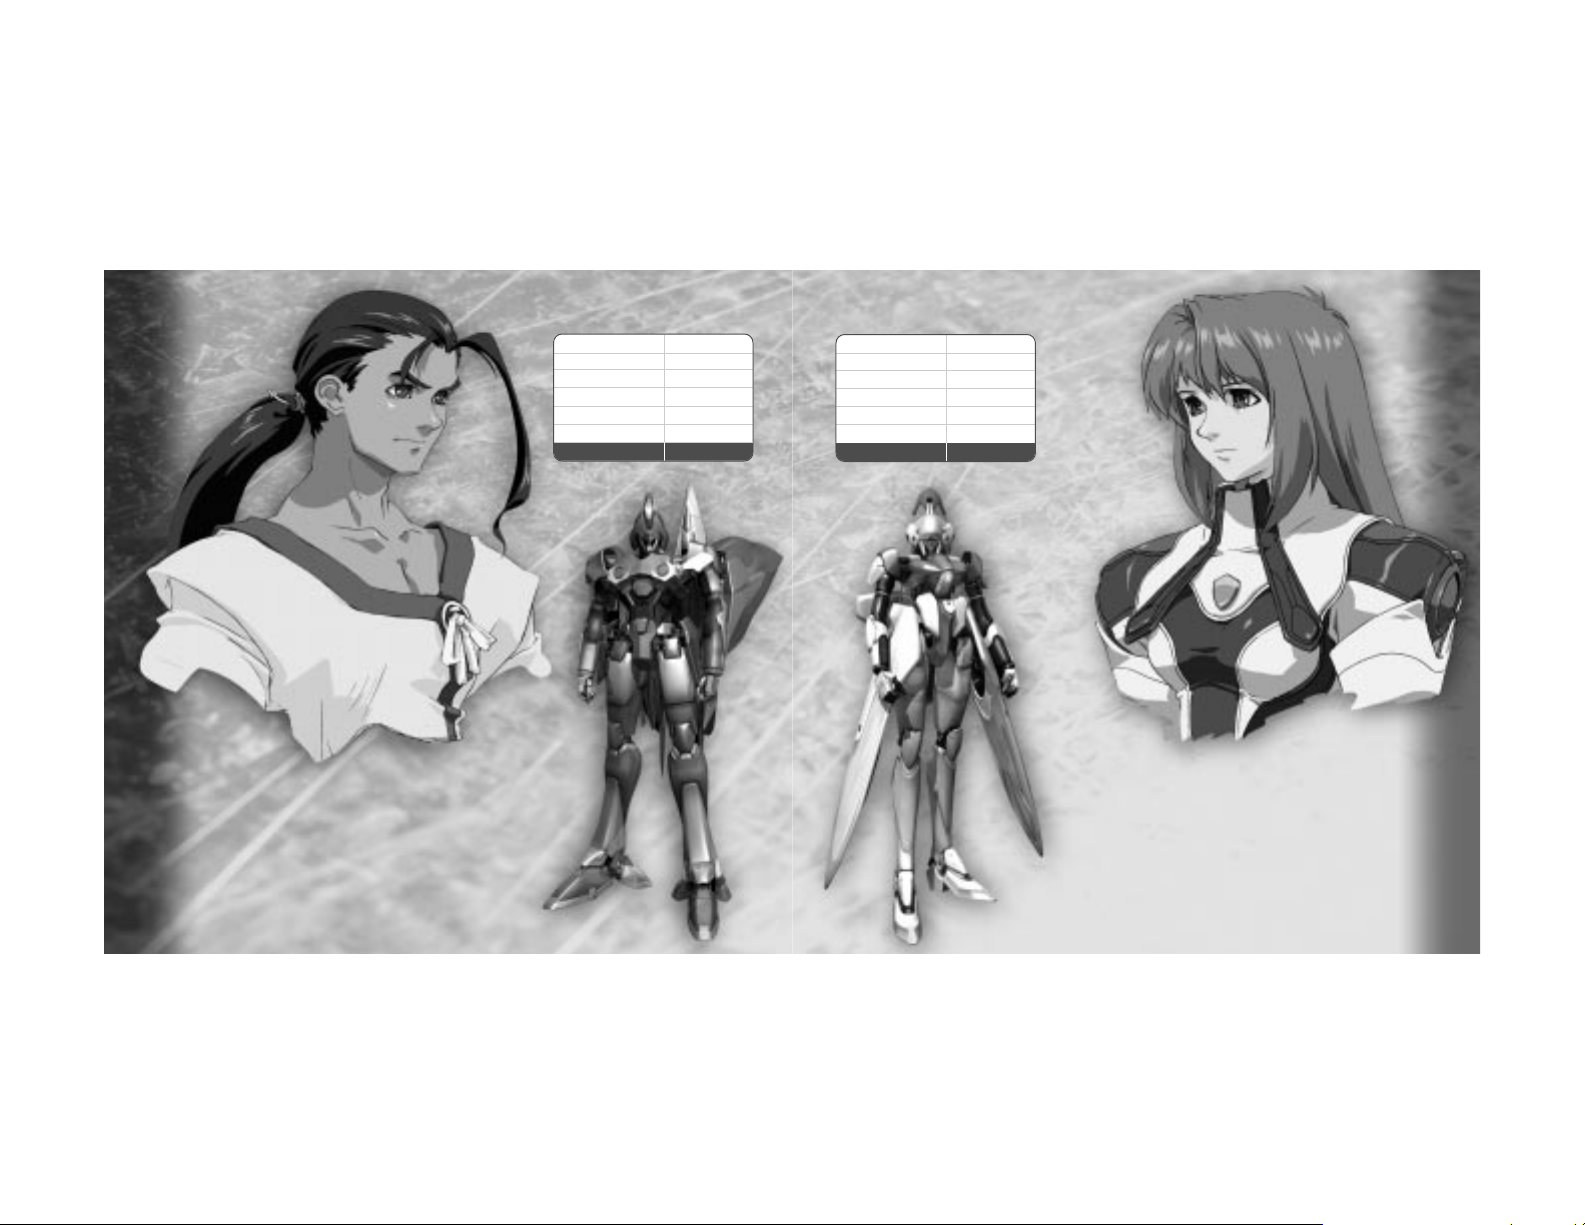
Assigned to a post in Aveh after completing her training
as an officer in the Solaris military. As a spy, she steals
the latest model Gear from the rival Kislev Army, but is
chased down and forced to make an emergency landing
in Lahan. Her coincidental encounter with Fei ultimately
affects her future.
7
Elhaym Van Houten
DATA
Birthplace: Solaris
Age: 18
Gender: Female
Height: 5'6"
Weight: 101 lbs.
Specialty: Rods
Gear: Vierge
A young man living in the small village of Lahan.
He suffers from a partial memory loss due to an
incident prior to his arrival. Fei enjoys teaching
martial arts to the children and is adored by all of the
villagers. His hobby is painting, an ability he appears
to have inherited from a master artist.
6
Main Characters
Main Characters
DATA
Birthplace: Unknown
Age: 18
Gender: Male
Height: 5'11"
Weight: 147 lbs.
Specialty: Martial Arts
Gear: Weltall
Fei Fong Wong
Page 6
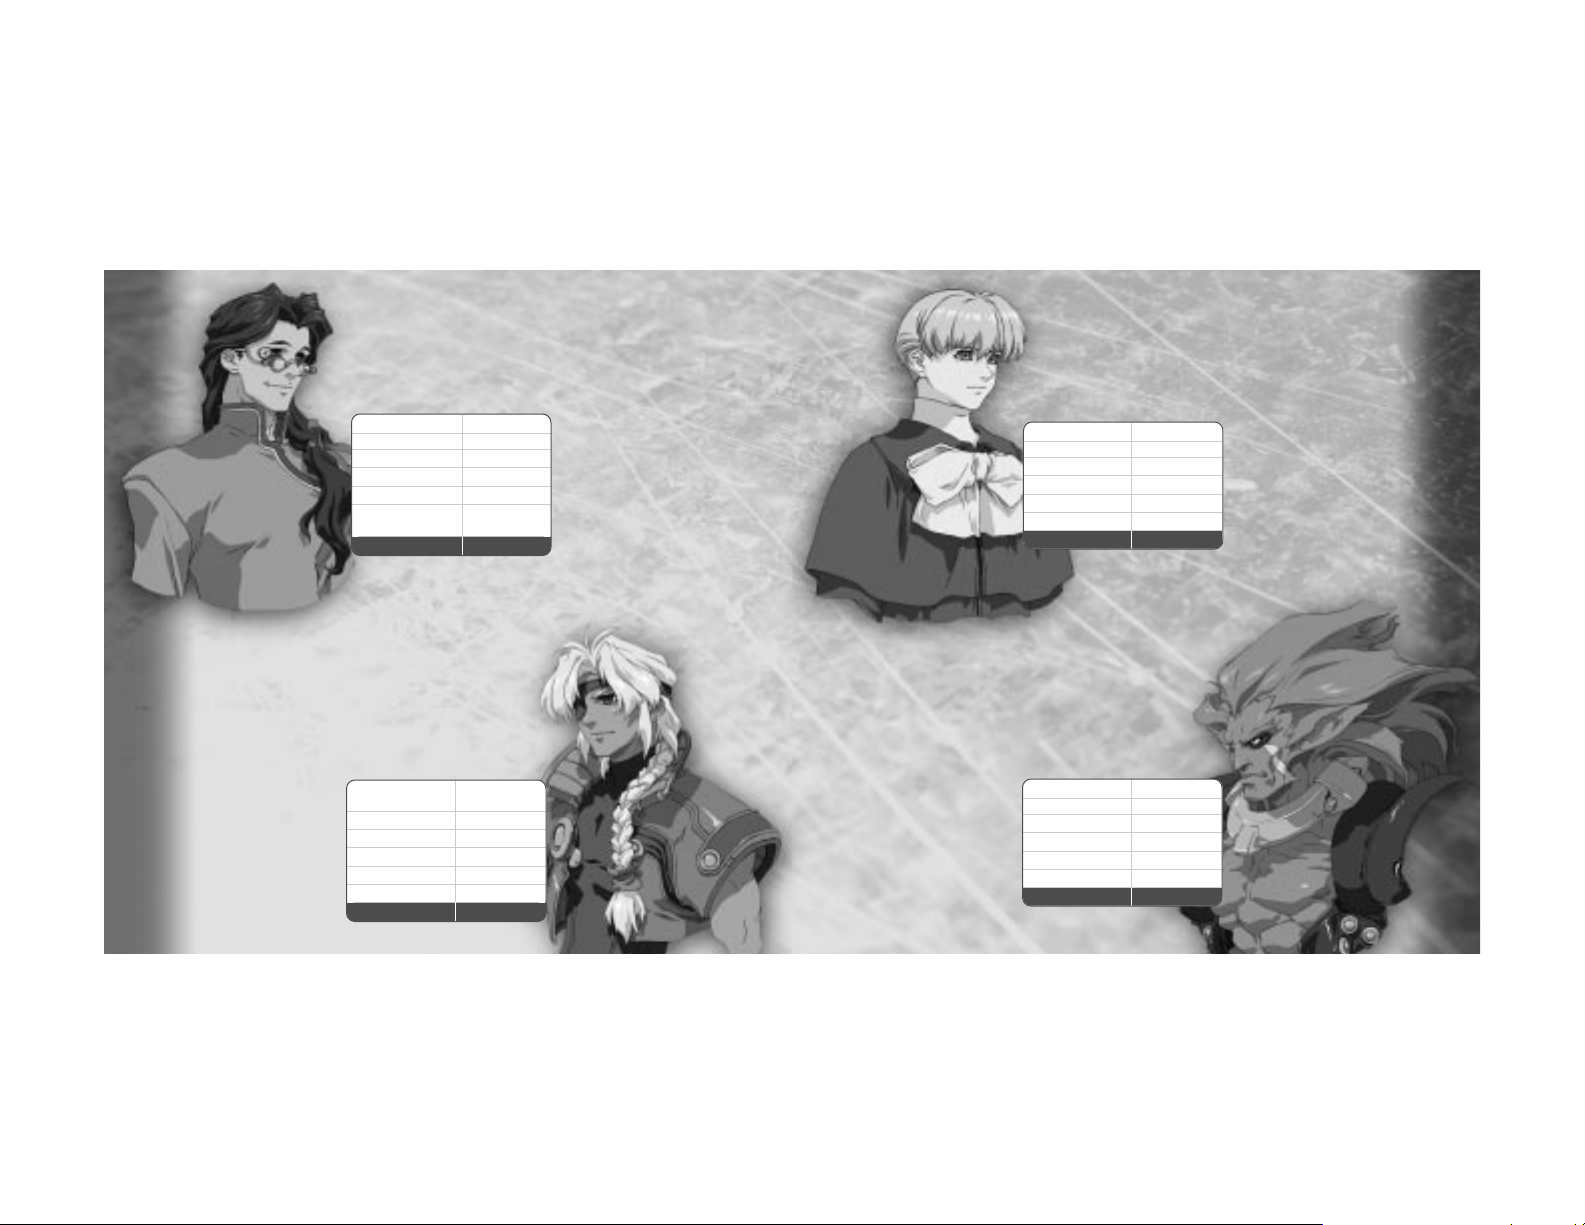
His father disappeared
when he was a young child
and his mother died after
being attacked by undead
Reapers (called ‘Wels’).
He became an etone (an
exorcist/purger of Reapers)
at the recommendation of
his mentor, Bishop Stone.
His younger sister, Primera,
lost her voice from the
shock of her mother’s death
and Billy feels that he is to
blame. Since then, he has
devoted himself completely
to raising Primera.
A giant demi-human,
(half-human/half-beast) who
was created through
biological experiments.
Big and muscular, he is the
champion of the Battling
Arena in Nortune, the
Imperial Capital of Kislev.
Although imprisoned in
Nortune’s D-Block, the
Empire’s penitentiary facility,
his lifestyle is better than
that of many nobles.
9
Billy Lee
Black
Rico
Banderas
DATA
Birthplace: Aquavy Islands
Age: 16
Gender: Male
Height: 5'7"
Weight: 130 lbs.
Specialty: Guns
Gear: Renmazuo
DATA
Birthplace: Kislev
Age: 30
Gender: Male
Height: 7'0"
Weight: 352 lbs.
Specialty: Wrestling
Gear: Stier
A doctor who runs a medical
clinic on the outskirts of
Lahan. Originally from the
Sacred Empire of Solaris,
his identity is shrouded in
mystery. Yet, his abundant
knowledge and strategic
thinking saves Fei from danger
on more than one occasion.
A gentle healer whose hobby
is tinkering with machines.
Leader of a group of
sand pirates who rule the
desert in their sand
cruiser, the
Yggdrasil
.
However, his true identity
is the Crown Prince of
the Fatima Dynasty of
Aveh. Recklessly brave
and hot-tempered, Bart’s
impulsiveness and habit
of shooting anything that
moves causes much grief
for his crew and friends.
8
DATA
Birthplace: Solaris
Age: 29
Gender: Male
Height: 6'1"
Weight: 150 lbs.
Specialty: Martial Arts
and swords
Gear: Heimdal
DATA
Birthplace: Aveh (Fatima
Castle, Bledavik)
Age: 18
Gender: Male
Height: 6'1"
Weight: 158 lbs.
Specialty: Whips
Gear: Brigandier
Citan
Uzuki
Bartholomew
Fatima
Page 7

THE MAIN MENU
Press the √ button to display the Main Menu. (This can be done
at anytime in the game except during battles, movies or midway
through conversations). From this menu, you can view information
about the characters’ current status, including skills and items they
are equipped with. Choose the desired option using the Directional
buttons and press the ≈ button to confirm your choice.
1: Current Party’s Status Summary – Party members’ current
level and conditions. Each character’s current Level of
Experience, Hit Points and Ether Points are
displayed along with the Experience Points
needed for each character to reach their next
Level of Experience.
2: Main Menu – Contains a number of options
such as viewing detailed screens that show
the Status, Equipment, Items and Abilities
possessed by the party’s characters.
Details of each menu option will be given
on the following pages.
3: G – Current monetary balance. (‘G’ is the
monetary unit of the Xenogears world.)
4: Time – Total time of gameplay shown in hours,
minutes and seconds.
11
The Main Menu
1
2
3
4
CONTINUING FROM SAVED DATA
Insert the disc from the previous saved game and the Memory
card with the saved data and turn ON the PlayStation game
console. Choose <Continue> on the Title Screen and press the
≈ button. A File Menu Screen with three options <Load>,
<Copy> and <Delete> will appear. Choose <Load> and press
the ≈ button. Then, choose the memory block that contains the
game you want to resume.
File Menu Options
<Load> Loads saved game data. Select the memory block that contains a previously saved
Xenogears game file that you want to load and press the ≈ button. Do not insert or remove
a Memory card while loading data.
<Copy> Duplicates data saved in one memory block onto a free memory block of another
Memory card. Make sure you have a Memory card that contains a free block of memory
inserted into the other Memory card slot before attempting to copy.
<Delete> Deletes unnecessary data from a Memory card. It is recommended that you erase
unnecessary data when your Memory card is getting full, so that you can save future
progressions in this game.
Sound
Choose the <Sound> option on the Title Screen menu.
A sub-menu will appear where you may select one of
three audio settings: Stereo, Mono and Wide.
10
Continuing from Saved Data
Page 8

EQUIP
Choose the <Equip> option to go to a screen where you can equip the characters with
Weapons, Armor and Accessories. Each character can have one Weapon (if they are able to
use a Weapon) and up to three Accessories (including Armor) equipped at one time.
How to Equip Weapons, Armor and Accessories
The left window lists the Weapon and Accessories (including Armor)
that the character has equipped. The right window contains all
equipment the party currently has in stock. You can change what
items the character has equipped by first pressing the Up or Down
Directional buttons and pressing the ≈ button to select which
Weapon or Accessory to replace in the left window. Then use the
Directional buttons and the ≈ button again to choose which piece of
equipment in the party’s stock to replace it with. The description of the equipment you
choose appears in the lower left window. The effects of equipping Weapons, Armor and
Accessories on the character’s status are shown in the lower right window. (A blue negative
number indicates a decrease, while a red positive number indicates an increase in that
respective status attribute.) Note: In the case of Billy, you can press Left or Right on the
Directional buttons to move to a sub-screen that allows you to reload ammo in Billy’s guns.
ITEMS
Selecting this option will take you to a screen which displays the name, quantity and
description of all items the party currently has in stock. Special ‘Rare Items’ and items that
have special uses or meaning during certain events will also be listed along with other
ordinary items.
How to use Items
Use the Directional buttons to move the cursor to the item you
wish to use and press the ≈ button twice. The faces of the
characters in the current party will then appear. Choose the
character you wish to use the item on and press the ≈ button.
Some items cannot be used at certain times. When a particular
item cannot be used at the present time, it will be displayed in a
darker color than those that can be.
13
STATUS
Displays a more detailed report on the current characters’ status.
Categories displayed are as follows:
1. LV – Current Level of Experience.
2. Exp – Total Experience Points earned so far.
3. Next LV – Experience Points needed to reach the next Level of Experience.
4. HP – Current Hit Points / Maximum Hit Points. A character will not be able to fight when
their current Hit Points fall to 0.
5. EP – Current Ether Points / Maximum Ether Points. Used by the characters when they
perform their special Abilities related to Ether or Chi. Ether and Chi Abilities cannot be
used when this value falls to 0.
6. Weight – Character’s weight.
7. Attack – Character’s attack strength utilizing Weapons/bare hands.
8. Hit% (or Accuracy) – Probability of the character’s attack hitting its target accurately.
9. Defense – Character’s level of resistance against enemy attacks.
10. Evade% – Character’s ability to avoid being hit by enemy attacks.
11. Ether – Power of attacks made by performing special Ether and Chi Abilities.
12. EthDef. – Character’s ability to defend against enemy Ether ability attacks.
13. Agility – Character’s dexterity or speed in making a move (or turn) in battle.
14. Weapon – Weapon currently equipped by the character (if equipped).
15. Accessories – Armor and/or Accessories currently equipped by the character.
16. Gear – Name of the Gear the character pilots.
Note: As with all menu screens where the L1 and R1 arrow icons are displayed, you can
press the L1 or R1 button to change which character’s status is displayed. You are also
able to go to the Skills Screen (where the character’s Deathblow Skills are listed) as well as
to the Abilities and Equip option screens directly from this screen rather than returning to
the Main Menu.
12
1 2 3
4
5
6
7
8
9
10
14 15 16
11
12
13
Page 9

GEAR
Selecting the <Gear> option from the Main Menu takes you to a
screen that informs you of the present status and Abilities of the
characters’ Gears. The categories displayed are as follows:
1. HP – Gear’s current durability (or Hit Points).
2. FL – Amount of Fuel units remaining in the Gear.
3. Weight – Gear’s weight.
4. Attack – Gear’s current attack force.
5. Defense – Gear’s level of resistance against harm caused when hit by enemy attacks.
6. EthDef. – Gear’s level of resistance against harm caused by enemies’ Ether Ability attacks.
7. Response – Value to be added to the character’s HIT% (or Accuracy) to determine the
accuracy of the Gear’s attack. The higher this value is, the more accurate the character’s
Gear attacks will be.
8. Agility – Gear’s speed in making actions (or Attack Turns).
9. EthAmp – Gear’s power to amplify its pilot’s Ether or Chi Abilities.
10. Get on/off – Allows the character to get on or off of their Gear.
11. Gear Option – Takes you to a screen where special equipment (or optional extras) on the
Gear may be checked.
12. Abilities – Takes you to a screen that displays special Ether and Chi Abilities the
character can use while piloting their Gear.
13. Equip – Takes you to a screen where equipped Weapon and Accessories are displayed.
On this screen you can equip various Gear Parts by using the same method as for
characters. As with their pilot characters, Gears can be equipped with only one Weapon
and up to three Accessories (Gear Parts) at a time.
Weapon – Weapon currently equipped by the Gear.
Accessories – Armor and/or Accessories currently equipped by the Gear.
15
1
2
3
4
5
6
7
8
9
10
11
12
13
How to Rearrange Items
Use the Directional buttons to move the cursor to the item you
wish to move. Press the ≈ button once to select that item.
Another cursor will now be displayed. Select another item position
that you want to move to by similarly using the Directional buttons
and pressing the ≈ button. The items in the two places will then
be switched.
ABILITIES
Abilities are mostly for healing and are mainly used to restore
the characters’ status after a battle is over. (Some can serve as
a form of attack during battles, but aren’t usable from the Main
Menu at other times). The lower window explains the effects of
the Ability you have selected. Ability names that appear in a
darker color cannot be used at the current time (such as those
Abilities that can only be used during battles).
How to use Abilities
Move the cursor with the Directional buttons to the Ability you want to use and press the
≈ button. Then move the cursor to the party member you wish to use the Ability on and
press the ≈ button.
What are Abilities?
Abilities are special ‘magic-like’ powers that each
character has. Each character has a different form and
variety of Abilities, but these all consume EP (Ether Points)
upon use. Fei uses ‘Chi’ (the ‘life-force’ or ‘energy’ within his
body), Citan uses ‘Arcane’ magic, while the other characters
use ‘Ether’ (a mysterious power of yet unknown origins).
14
Page 10

GAME FLOW
Xenogears offers you an extensive 3D world to explore. In this world, the main character will
meet innumerable people and carry out many adventures. The following explains the general
flow of the game.
Towns and Villages
In the world of Xenogears, there are many towns ranging from
small hamlets to huge metropolises. Information on the locations
that you want to visit next can be learned from the townsfolk;
new equipment can be purchased at the stores; and you can rest
and rejuvenate at the Inns. Towns and villages are the points of
transition for your adventure.
World Map
You will travel on the World Map when moving between towns or
heading off to explore new dungeons. A map of the entire world
will be shown on the lower right corner of the World Map Screen
to help locate where you are. You will also encounter and battle
enemies while travelling here.
Fields & Dungeons
Fields & Dungeons are locations on the World Map, such as
forests and caves, that are not civilized towns or villages.
Battles with enemies will occur and you will also have a chance
to pick up items and treasure as you explore these areas.
Battles
Battles will occur as you move on the World Map or in Fields
and Dungeons. Characters will earn Experience Points by winning
battles. When a character’s Experience Points have accumulated
to a certain level, their Level of Experience will increase. If the
entire party loses a battle, your adventure will end and the game
will be over.
17
Game Flow
FILE
Selecting this option will take you to the File Menu
Screen where you can save your current game’s
data, as well as copy and delete Memory card data
as with the Title Screen’s File Menu. You can save
your game only when you are on the World Map, or
by touching a Memory Cube. Memory Cubes can be
found in most dungeons and at certain key places.
Make sure to save your game whenever you come
across a Memory Cube.
Acquiring Deathblow Skills
Once a character reaches certain levels, Deathblow Skills will be
acquired depending upon how many times
(and in what combination) each button was
pressed during battle. The buttons pressed to
carry out Deathblow Skills that have already been
acquired will not count towards the learning of new
skills. For example, the use of the ç and ≈
buttons to carry out Fei’s ‘Raijin’ Deathblow Skill will
not count towards acquiring other Deathblow Skills.
(Note: You can view the list of current Deathblow
Skills a character has learned and how close they
are to acquiring new Deathblow Skills by looking at
the screen displayed when you select the Skills option
from a character’s Status Screen. Also note that you
can chain together Deathblow
Skills that use less than 7
Ability Points each into
awesome “Combo
Attacks”. See page 24
for more information.)
16
Memory
Cube
Page 11

TOWNS & VILLAGES
There are many establishments and institutions in the towns and villages. Utilize them to
purchase items, or to gather information from people.
TYPES OF ESTABLISHMENTS
Inns – When you rest at an inn, the HP, EP and Status Effects of
each character in the party will be restored. Talk to the employees
if you wish to stay. Rates vary depending upon the location.
Weaponry/Accessories Shops – Purchase Weapons, Armor and
Accessories to equip the characters or sell any unwanted items you
have in stock. To increase your advantage in battles, check to see if the shops offer stronger
Weapons or Accessories whenever you visit a new town.
Item Shops – Purchase useful items or sell any unwanted items. Items sold at these shops
can restore HP and EP during or after battles and have various effects that you can use to
your advantage.
Gear Shops – At these establishments you can purchase Weapons or Parts and have them
equipped onto Gears. You can also fill up fuel tanks and tune-up Gears.
Village Consultant’s House
There is a Village Consultant’s House or House of Advice in Lahan where you can obtain
information necessary to advance in the game. When you talk to people in this building, they
will explain in detail how to use Memory Cubes, how to acquire Ether Abilities and Deathblow
Skills, and how to use commands during battles. Make sure to visit this place when you first
start your game.
How to Buy and Sell Weapons, Accessories and other Items
1. Talk to the shopkeeper – Face the shopkeeper and press the ≈ button.
2. Select Buy/Sell – Select to buy or sell items.
3. Select items and quantities – When buying Weapons, Accessories and other items from a
shop, a list of the shop’s items for sale will appear. When you want to sell some of your
own items, a list of the items will be displayed according to category. In either case,
19
Towns & Villages
CHARACTER ACTIONS
Characters can perform various actions in different locations.
Talk
Position the character next to a person and press the ≈ button
to talk to people in towns, villages and other locations. Some of
these people will give you important information to assist you in
your adventure. Make sure to talk to people whenever you enter
a new town or village.
Examine
Stand in front of an object and press the ≈ button to examine or search suspicious-looking
objects such as signposts, barrels and treasure chests.
Run
Hold down the Ω button and press the Direction buttons to run or dash. This technique
allows for faster travel, but cannot be used while travelling on the World Map Screen.
Jump
Press the ç button to jump between edges of cliffs or
to climb up to higher areas. When characters jump
while they are running, they will perform an even larger
jump than normal.
Open Doors
Stand in front of doors and press the ≈ button to
open them. Doors will close automatically. Do the
same whenever you want to enter or exit from
buildings or rooms.
18
Character Actions
Page 12

THE WORLD MAP
You will travel on the World Map to move between towns and dungeons. A mini World Map
window will be displayed in the lower-right corner of the World Map Screen which will indicate
your location in the world. This mini World Map window can be turned on or off by pressing
the SELECT button. Use this as a guide to help you explore every
part of the wide and wild world of Xenogears.
When you discover a new town or dungeon, walk around its
perimeter until you find its entrance where the name is displayed.
When the name of a new location is displayed, press the ≈ button
to enter the town, field or dungeon.
FIELDS & DUNGEONS
Compass
When you are in towns, fields and dungeons, a compass will be displayed in the lower-right
corner. The compass will show you the direction the character is heading. To maintain a good
sense of direction, frequently check the compass’ bearings. By using the R1 button and L1
button, you can rotate the direction you view the world from. It helps to play the game from
the viewpoint you are most comfortable with, but changing your viewpoint occasionally may
enable you to discover things you couldn’t see before.
Compass: N – North, W – West, S – South, E – East
Press the L1 button to rotate your viewpoint 45 degrees to the left.
Press the R1 button to rotate your viewpoint 45 degrees to the right.
If you become stuck in dungeons
If you come to a deadend or get lost in a dungeon, try to jump or jump while running.
You may find an unexpected path.
Don’t overlook levels that you can jump up to or gaps you can jump over.
Sometimes it pays to jump off a cliff or a high place. You may find some unexpected hidden
items or treasures.
21
World Map - Field
use the Directional buttons to move the cursor to the items you want to buy or sell.
Then press Left or Right to specify the quantities. The results of your trades will be
reflected in your “G” (money supply). Press the ≈ button to confirm.
4. Check the total – When you finish trading items, the total cost/gain will be displayed.
You will be asked to check that this total is okay. If you wish to accept, select <Yes> and
press the ≈ button. If not, select <No> and you will return to the shop’s menu to make
any changes you want.
The Shop Menu Screen
A. List of Weapons, Accessories and Items that are Available –
Numbers to the right are the unit prices of the items.
B. Item’s Description – If a Weapon or Accessory has a special
effect or function, its description will appear in this window.
C. Quantity of Items – Press Right on the Directional buttons to
increase or Left to decrease the number of items being traded.
D. Characters Currently in the Party – When you select Weapons and Accessories that can be
equipped on these characters, the color of the borders on these pictures will change. If the
statistics of a character increases upon equipping the Weapon or Accessory, the border
around the character’s image will turn red. Otherwise, it will turn blue.
E. The Change in Attack and Defense Abilities Upon Equipping Weapon or Armor – When either
ability improves, a positive number will be displayed in red. When an ability is diminished,
a negative number will be displayed in blue. This will serve as a guide to making good
purchases. When you purchase Weapons or Accessories, make sure to equip them on
the characters.
F. Current Monetary Balance – Total price of the items being traded and the resulting balance.
Not all trades are done in shops...
There are some places besides shops where you can buy and sell Weapons, Accessories
and/or other items. When you come across people or Gears in odd places, such as within
dungeons, talk to them to find out if they have anything to trade.
20
A
D
B
E
C F
Page 13

Attack – When you choose the Attack command, a reference to the functions of the buttons
on the PlayStation controller will appear in the middle of the screen. The ç, √ and ≈
buttons are the three Attack buttons, while the Ω button is the End/Cancel button.
Depending on the Attack buttons pressed, the amount of Action Points used and the
resulting strengths of the attacks will vary. Select the amount of Action Points, taking into
consideration the number of remaining points and the types of enemies you will face. Each
character can perform a variety of Deathblow Skills during battle. A guide to the order of the
buttons to press to perform the Deathblow Skills will appear at the bottom of the screen
when you press the first Attack button. Each attack that hits its mark will damage the
enemy and the total damage will be displayed at the top center of the screen. You can cancel
or end attacks mid-turn to accumulate AP for Combo attacks by pressing the Ω button.
You can keep attacking until the Action Points run out. To acquire
new Deathblow Skills you should continue to try various sequences
of the three levels of attacks: Weak, Strong and Fierce.
The selected Attack buttons will be displayed at the bottom of the
screen. A guide to perform Deathblow Skills will be shown
depending on which Attack buttons you press.
As they mature, characters will learn their own special Deathblow Skills. All of these button
sequences conclude with a press of the ≈ button to signify their execution. Ordinarily, after
the character executes a Deathblow Skill in any Attack Turn, their turn will be over
regardless of the Action Points remaining.
23
Battle Commands
Action Points Consumed by each Attack Button:
ç button 1 Point (Weak Attack)
√ button 2 Points (Strong Attack)
≈ button 3 Points (Fierce Attack)
Xenogears offers two types of battle systems: Character Battles and Gear Battles.
The following pages explain the features of each battle system.
Character Battles
Battle Screen
A. Battle Command Ring – Displays the commands that may be
selected during battles. Up to four commands will be displayed
at one time, but you can display more battle options by
pressing the Directional buttons in any direction twice.
B. Character’s HP – Value on the left is the remaining HP. Value on
the right is the Maximum HP.
C. AT Time Gauge – Commands can be entered when a character’s gauge becomes full
(signaling the start of an Attack Turn for that character).
D. AP Gauge – Current AP (Attack Point) counter. When you fill this counter up to certain
levels, you will be able to perform Combo Attacks. Attack Points are accumulated when you
end the Attack Command midway through an Attack Turn. (Any remaining Action Points for
that Attack Turn become the AP stored in this gauge.) AP will not be accumulated by
choosing Defense or other commands in the Battle Command Ring.
E. Action Point Gauge – Displays how many Action Points the character has left for the
current Attack Turn. Attacks use up Action Points and end when you use up all the Action
Points for that turn, or defeat the current enemy. (Think of Action Points as being the
number of times a character can attack in one Attack Turn.) You will gain a full set of Action
Points at the start of each Attack Turn. If you cancel an Attack in the middle of the Attack
Turn, (by pressing the Ω button) the remaining Action Points for that turn will be stored
into the AP Counter Gauge to be used in Combo Attacks. During a character’s Attack Turn,
two numbers will appear below this gauge. The number on the right is the character’s total
Action Points and the number on the left is the remaining Action Points for this Attack
Turn. The total number of Action Points per turn depends on the character’s Level of
Experience. The total number of Action Points can be increased to a maximum of 7.
F. Graphical Representation of the Battle – Shows the party’s characters and the enemies as
they battle each other.
22
Battles
A
E
F
B C D
Page 14

Special Abilities (Arcane, Chi and Ether) – Each character has their
special ‘magic-like’ Abilities that are used to heal or restore allies
or attack enemies. (Fei uses ‘Chi’, Citan uses ‘Arcane’, while the
other characters such as Elly use ‘Ether’ Abilities – See “What are
Abilities?” on page 14.) After choosing the corresponding Special
Ability Battle Command (Arcane, Chi or Ether), select the Ether
Ability you want to use and whom you want to use it on. When a
character uses Ether Abilities, they will consume a set amount of
their EP (Ether Points).
Items – The Items command allows you to use items during a battle. The list of items you
have in stock will be displayed. (Note that some items cannot be used during battles – these
will be displayed in a darker color and cannot be selected.) Select the item you wish to use
and whom you wish to use it on.
Call Gear – It takes one Battle Turn to summon the Gear and board it. There are certain
places and situations where a character cannot summon their Gear. (You will not be able to
use the “Call Gear” command in these cases). Once a Gear is summoned, you cannot get off
of it until the battle ends.
When you encounter enemies who are Gears or are of comparable size, summon the Gears
as soon as you can. You may be killed in an instant by trying to fight giant beasts or Gears
when you are not in a Gear.
Each character can decide to get on and off their Gear separately.
Defense – This command allows you to concentrate on defending yourself until the next turn.
This will enable you to halve the damage you receive from enemies in that turn.
Escape – This Battle Command option allows the current character to attempt to flee from
battle. If one character succeeds in escaping, the entire party will escape. Note that
Experience Points will not be earned when you run away from the enemy. Also be warned that
escaping does not always succeed. There are certain situations that you cannot escape from.
25
Combo – Usually you can only perform one Deathblow Skill per Attack Turn. But if you use the
AP accumulated in the AP counter, you can perform devastating combinations of Deathblow
Skills one after another in a single Attack Turn. As long as you have enough AP accumulated,
you can perform any number of Deathblow Skills, and in any order. These ‘combos’, or chains
of Deathblow attacks, are particularly useful for defeating the more formidable enemies you
may encounter.
An Example Showing Fei having 5 Action Points
Let’s try a Combo of Fei’s Deathblow Skill – “Raijin” – used twice
in a row. To use “Raijin” just once, Fei needs 4 AP.
First use one Weak Attack and then end the Attack Turn.
Repeat this again to accumulate 8 points in Fei’s AP gauge.
Choose the Combo Attack command and select “Raijin” twice.
Fei’s remaining AP should now be 0. After you confirm by
pressing the ≈ button at the Accept symbol, select the
enemy to perform the Combo attack on. Fei should execute
“Raijin” twice in rapid succession.
24
Page 15

Gear Battles
Gear Battle Screen
A. Battle Command Ring – Displays the commands that may be
used during the battle. As in Character Battles, another set of
command options may be viewed by pressing the Directional
buttons in any direction twice.
B. Gear HP – Remaining HP.
C. AT Time Gauge – Battle Commands can be entered when a Gear’s gauge becomes full
indicating the start of a new Attack Turn.
D. Fuel Gauge – Current fuel level for each Gear. Fuel is consumed for each Attack action
performed during Gear Battles. When a Gear’s fuel level reaches 0, you will not be able
to attack. If this happens, use the “Charge” command to restore small amounts of fuel.
You can only refuel the Gear at certain locations in the game, so conserve fuel as much
as possible.
E. Status Window – Displays the Gear’s status.
F. Fuel Gauge – Enlarged view of the Gear’s fuel gauge showing the amount of remaining fuel.
G. Attack Level – Indicates the current Attack Level of the selected Gear. The Gear’s attack
level accumulates each time an Attack Command is performed. When it reaches a certain
attack level, powerful Gear attacks may be performed.
H. Current Fuel – Numerical description of the amount of fuel in the selected Gear.
The number on the right is the maximum number of fuel units, while the number on the
left is the current number of fuel units remaining.
I. Graphical Representation of the Gear Battle – Portrays the party’s Gears and the enemies
as they battle each other.
27
Gear Battles
A
F I
G
E
BHC D
STATUS EFFECTS
Sometimes the party’s mental and physical status may become
affected upon enduring special enemy attacks. Some Status Effects
can only be removed by using certain items or restored by staying
at Inns, while others naturally wear off during or after battles.
Here is a list of some of the more frequent Status Effects:
Status Effects that occur while Fighting as Characters:
Physical:
Stop – Character’s Time Gauge stops and they will not be able to make their next turn.
Slow – Time to fill the AT Time Gauge is increased.
Poison – Character loses HP after every action or turn.
DUR Down – Character’s durability or constitution (HP) decreases.
Similarly: ACC (Accuracy or HIT%) Down, Atk Down, Def Down, STR Down.
Mental:
Confusion – Character becomes confused and uncontrollable.
Forget – Unable to use Ether and Chi Abilities.
Sleep – Character falls into slumber and is unable to respond until awakened.
Similarly: Ether Effect Down.
Status Effects that occur while fighting in Gears:
Armor Damage – Cracks the Gear’s Armor, decreasing defense against physical damage.
Stop – Gear’s engine (and AT Time Gauge) stops and the Gear will not be able to make its
next turn.
Slow – Gear’s engine slows down, causing less frequent AT turns.
Power Loss – Gear’s attack strength decreases.
Fuel Leak – Causes the Gear to lose fuel each turn.
Camera Damaged – Cameras used for viewing out of the Gear are affected, diminishing
Accuracy (HIT%) and Avoidance (Evade%) capacities.
E Machine out of control – ‘Ether Amplifier Device’ malfunctions, decreasing EP each turn.
E Machine Shutdown – ‘Ether Amplifier Device’ has stopped, leaving the character unable to
use Special Abilities such as Ether, Arcane and Chi attacks.
Pilot Confused – Affected Gear’s pilot character becomes confused and acts uncontrollably.
26
Page 16

Ether Machine – Each Gear is equipped with an “Ether Amplifier Device” or “Ether Machine”
which converts the Ether, Chi and Arcane Abilities of the character piloting it into larger
“Gear-sized” Ether Abilities. Choosing the “Ether Machine” battle command will allow these
abilities to be used during battle. The Ether Abilities that a Gear can use roughly correspond
to the Special Abilities of its pilot. As with Character Battles, you will expend a set amount of
EP (Ether Points) according to the Ability used.
Charge – By defending for a turn, you can “recharge” or restore a small amount of fuel. If a
Gear runs out of fuel, it will not be able to perform any attacks until you “recharge” or refuel it.
Special Options – You are allowed to use special “Optional Equipment
and Weapons” that have been pre-equipped on the Gears. These will
become available when certain conditions have been met
and their functions will vary from Gear to Gear. EP will not
be consumed.
Booster – It takes one Attack Turn to switch a Gear’s
booster on or off. When a Gear’s booster is on, more fuel
will be consumed, but the Gear’s speed will increase,
allowing that Gear to reach the next Attack Turn
quicker. Whether the booster is currently on or off will
be shown in the Gear’s Status Window during its
Attack Turn.
29
Attack – When you choose the Attack command, a reference to
the buttons on the PlayStation controller appears in the center of
the screen. The ç, √ and ≈ buttons are the three Attack
buttons, while the Ω button is the End/Cancel button. Depending
on the Attack buttons pressed, the amount of fuel used and the
inflicting damage of the attacks will vary. Pay close attention to the
amount of remaining fuel and select attacks wisely.
You accumulate one Attack Level each time you attack the enemy. If you use an attack
that is less than or equal to the current Attack Level displayed, an additional Deathblow
Attack will become available.
Once an additional Deathblow Attack is used, the Attack Level will return to 0. To raise
the Attack Level, make sure that you end an attack without performing any additional
Deathblow Attacks.
A guide as to which buttons to use in order to perform the Gear’s additional Deathblow
Attacks will be displayed at the bottom of the screen. The Deathblow Attacks available for
each Gear roughly correspond to the Deathblow Skills that the character piloting the Gear
has. For example, if Fei knows the “Raijin” Deathblow Skill, his Gear can use the additional
“Raigeki” Deathblow Attack at the appropriate level.
28
Gear Battle Commands
Fuel Consumption According to Attack Button:
ç button 10 units (Weak Attack)
√ button 20 units (Strong Attack)
≈ button 30 units (Fierce Attack)
Page 17

31
Special Abilities
Special (Ether & Chi) Abilities
Offensive Abilities:
Name Who is Affected Effect
Guided Shot single enemy No attribute
Radiance single enemy No attribute
Big Bang all enemies No attribute
Anemo Bolt single enemy Wind-elemental
Terra Lance single enemy Earth-elemental
Thermo Cube single enemy Fire-elemental
Aqua Ice single enemy Water-elemental
Anemo Burn several enemies Wind-elemental
Terra Storm several enemies Earth-elemental
ThermoDragon several enemies Fire-elemental
Aqua Mist several enemies Water-elemental
Anemo Wave all enemies Wind-elemental
Terra Ghost all enemies Earth-elemental
Thermo Largo all enemies Fire-elemental
Aqua Lord all enemies Water-elemental
Heaven Cent single enemy Attacks with Ether coin
Steel Mettle single enemy Spirited rapid-fire shots
Restorative Abilities:
Name Who is Affected Effect
Inner Healing single ally Restores HP
Sazanami single ally Restores HP
Ryokusho single ally Removes physical status effects
Reisho single ally Removes mental status effects
Purity Light single ally Restores all status effects
Healing Light single ally Restores HP
Holy Light all allies Restores HP
Goddess Wake single ally Restores incapacitated status
Deathblow Skills
Deathblow Skills vary depending on the sequence of buttons you press.
30
Skills & Weapons
(Note: all lists on the next few pages are samples - you may find additional items as you play.)
Weapons
Rods –
While their attack strengths are not all that strong, some
(Elly) rods add supplemental effects like ‘Sleep’ to Elly’s attacks.
Name: Damage:
Magical Rod 8
Arcane Rod 16
Hot Rod 24
Lunar Rod 40 (+Sleep Effect)
Whips – These can be used to lash at and crush enemies. Some whips
(Bart) also add supplemental effects to Bart’s attacks.
Name: Damage:
Leather Whip 8
Iron Whip 16
WhippaSnappa 24
Cobra Cracka 40 (+Poison Effect)
Fei
Raijin
Senretsu
Hagan
Hoten
Tenbu
Ryujin
Koho
Elly
Screamer
Cyclone Kick
Breakthrough
Double Shock
Sky Attack
Bright Spark
Sting Kick
Citan
Ukigumo
Mufu
Jinrai
Shinrai
Renken
Hakai
Ougi
Citan with Sword
Amaoto
Engetsu
Amagumo
Himatsu
Yako
Zanretsu
Myogetsu
Billy
Adam’s Apple
Gunholic
Hell Blast
Nut Crack
Sky Walker
Devil Blast
Banfrau
Bart
Head Hunter
Twin Sonic
Rhythm Shock
Dynamic
Astral
Bracer
Justice
Rico
Rico Rocket
Death Drive
Banderas
Dragon Fist
Fire Bomb
Pile Crusher
Spin Strike
Page 18

Armor and Accessories
You can equip up to 3 of the following on the characters.
33
Armor & Accessories
Accessories:
Name Effect when worn
Power Ring Increases strength
Stamina Ring Increases Def (HP)
Glasses Increases accuracy (HIT%)
Step Shoes Increases avoidance
Clothing:
Name Defense Value
Martial Wear 2
Fencing Wear 4
Leather Vest 10
Metal Vest 18
Headgear:
Name Defense Value
Martial Cap 1
Fencing Cap 2
Leather Hat 6
Metal Helmet 10
32
Status Affecting Abilities:
Name Who is Affected Effect
Renki self Makes the ability you cast in your next turn effect all allies/enemies
Iron Valor self Increases your strength
CounterForce self Enables counterattack ability
Yang Power self Increases your defense ability but lowers your attack strength
Yin Power self Increases your attack strength but lowers your defense ability
Koga single ally Increases ally’s defense ability but lowers their attack strength
Yamiga single ally Increases ally’s attack strength but lowers their defense ability
Senkei single ally Improves speed/agility
Red Cologne self Increases your strength
Blue Cologne self Improves Accuracy and Avoidance
White Cologne self Enables counterattack ability
Goddess Call single ally Increases ally’s speed/agility
Goddess Eyes single ally Improves physical defense
Steel Fist self Increases your strength
Steel Body self Improves your physical defense
Steel Spirit self Improves your Ether defense
Special Effect Attack Abilities:
Name Who is Affected Effect
Wild Smile single enemy Blinds an enemy
White Lure single enemy Attracts an enemy to aim at caster
Wind Mode single ally Adds wind-elemental to attacks
Earth Mode single ally Adds earth-elemental to attacks
Fire Mode single ally Adds fire-elemental to attacks
Water Mode single ally Adds water-elemental to attacks
Defensive Abilities:
Name Who is Affected Effect
Fuuseii single ally Increases resistance to Wind
Chiseii single ally Increases resistance to Earth
Kaseii single ally Increases resistance to Fire
Suiseii single ally Increases resistance to Water
Wind Shield single ally Total protection against Earth
Earth Shield single ally Total protection against Wind
Fire Shield single ally Total protection against Water
Water Shield single ally Total protection against Fire
Page 19

LIST OF ABBREVIATIONS USED IN THE MENUS AND DURING BATTLES:
35
Abbreviations
PHY physical
MNT mental
EQP equipment /equip
STR strength
DUR durability
ACC accuracy or HIT%
EV evade/Evade%
QUI quickness/agility
REF reflex/response
PWR power
Def Defense
Atk Attack
Weap weapon
vs versus/against
UP raise
DOWN lower
conf confuse/confusion
elem elemental (i.e. Earth/Wind/Fire/Water)
ar armor
circ circuit
V veil
Wnd Wind (Anemo)
Ert Earth (Terra)
Fir Fire (Pyro)
Wtr Water (Hydro/Aqua)
Eth Ether
Mag magic
Grd guard
EthDef Defense against Ether
Slf self/yourself
Aly Ally/Allies (including self)
Enm enemy
Sgl single
Ara area
Gear Parts
Items and extra parts that repair and upgrade the Gears.
Part’s Name Effect
Ar (Extra Ar) Gear’s armor defense+2
Silver Ar Armor defense+5, halves gel damage
Beam Coat Reduces damage from beams by 10%
Old Circuit Increases Responsiveness and Shields
A Circuit Increases speed/agility in barren land
A/C Increases speed/agility in desert areas
Jammer Reduces damage from beams by 25%
Power Magic Improves Ether Amplifier Machine
Frame HP10 Restores Frame HP by 10%
GNRS20 Increases Engine Output by 20%
Items
Items you can purchase in shops. They are mostly for restoration,
but there are other types as well.
34
Gear Parts & Items
Name Who is Affected Effect
Aquasol single ally Restores 50 HP
Alphasol single ally Restores all HP
Rosesol single ally Restores 10 EP
Sigmasol single ally Restores all EP
Zetasol single ally Recovers from incapacitation
Physisol single ally Removes physical status effects
Mentsol single ally Removes mental status effects
Hob-jerky single ally Restores HP by 50
Hard Star single ally Reduces physical damage by half
Speed Star single ally Increases speed during battles
Name Effect
Extra Ar Gear’s armor defense+2
Silver Ar Armor defense +10, halves gel damage
Beam Coat Reduces damage from beams by 50%
Old Circuit Increases Responsiveness and Shields
A Circuit Increases speed/agility in barren land
A/C Increases speed/agility in desert areas
Jammer Reduces damage from beams by 25%
Power Magic Improves Ether Amplifier Machine
Frame HP10 Restores Frame HP by 10%
GNRS20 Increases Engine Output by 20%
Page 20

37
Limited Warranty
For a period of ninety (90) days from the date of purchase, Square Electronic Arts L.L.C. (SQEA)
warrants to the original purchaser of this SQEA software product that the medium on which this
computer program is recorded is free from defects in materials and workmanship. SQEA agrees for
a period of ninety (90) days from the date of purchase, to either repair or replace, at its option, free
of charge, any SQEA software product that does not meet the above warranty, postage paid, with
proof of purchase. This warranty is not applicable to normal wear and tear. This warranty shall not be
applicable and shall be void if the defect in the SQEA software product has arisen through abuse,
unreasonable use, mistreatment or neglect.
LIMITATIONS – The above warranty is in lieu of all other warranties, and no other representations or
claims of any nature shall be binding on or obligate SQEA. ANY IMPLIED WARRANTIES APPLICABLE
TO THIS SOFTWARE PRODUCT, INCLUDING WARRANTIES OF MERCHANTABILITY, COURSE OF
DEALING IN TRADE AND FITNESS FOR A PARTICULAR PURPOSE, ARE LIMITED TO THE NINETY
(90) DAY PERIOD DESCRIBED ABOVE. IN NO EVENT WILL SQEA BE LIABLE FOR ANY SPECIAL,
INCIDENTAL, OR CONSEQUENTIAL DAMAGES RESULTING FROM POSSESSION, USE OR
MALFUNCTION OF THIS SQEA SOFTWARE PRODUCT. Some states do not allow limitations as to
how long an implied warranty lasts and/or exclusions or limitations of incidental or consequential
damages so the above limitations and/or exclusions of liability may not apply to you. This warranty
gives you specific rights, and you may also have other rights that vary from state to state.
NOTICE – This manual and the software described in this manual are copyrighted. All rights in the
manual and the software are reserved. No part of this manual or the described software may be
copied, reproduced, translated, or reduced to any electronic medium or machine-readable form
without the prior written consent of SQEA. The described software may not be reversed engineered,
decompiled or otherwise disassembled.
RETURNS WITHIN 90 DAY WARRANTY PERIOD– To replace defective media within the 90-day warranty
period, send the defective media, a copy of the original sales receipt, a return address, and a small
note describing the difficulties you are experiencing to Electronic Arts Customer Warranty, P.O. Box
9025, Redwood City, CA 94065-9025. If you have warranty questions, you can also contact
Customer Warranty at (650) 628-1900, fax (650) 628-5999. Hours of operation: Monday - Friday,
8:30am - 11:45am and 1pm - 4:30pm, Pacific Standard Time.
RETURNS AFTER WARRANTY – To replace defective media after the ninety (90) day warranty period
has expired, send the original CD to the Electronic Arts' address above. Enclose a statement of the
defect, your name, your return address, and a check or money order for $15.
REPLACEMENT MEDIA – The above provisions apply to any replacement media or software provided by
SQEA hereunder, including the above warranties and limitations.
TECHNICAL SUPPORT – For technical support questions, you can call (714) 428-0599.
Representatives are available Monday-Friday 8am - 11:45am and 1pm - 5pm, Pacific Standard Time.
36
Credits
Square Co., Ltd.
Producer Hiromichi Tanaka
Director/Scenario Writer Tetsuya Takahashi
Script Masato Kato
Main Programming Kiyoshi Yoshii
Music Composition-Arrangement Yasunori Mitsuda
Character Design Kunihiko Tanaka
Mechanical Design Junya Ishigaki
Co-Character Design Tsutomu Terada
Tadahiro Usuda
Co-Mechanical Design Yoshinori Ogura
Art Director Yasuyuki Honne
Chief Artistic Design Koh Arai
Localization Coordinator/Project Leader Richard Honeywood
Localization Assistant Coordinator Aiko Ito
Executive Producers Tetsuo Mizuno
Tomoyuki Takechi
Hironobu Sakaguchi
Square Soft, Inc.
Localization Management Masahiro Nakajima
Randall Fujimoto
Localization Staff Michael Baskett
Naomi Cooper
Brian Bell
Yoshinobu Matsuo
QA Manager Jonathan Williams
Lead QA Technician Sean Camanyag
QA Technicians Andy Hsu
Clayton S. Chan
Sissie Chang
Stephen A. Holder
Vangthonhoua Moua
Stanford Ng
Mari Nishikawa
Takahiro So
Simon Son
James P. Wong
Kyoko Makino
Square Electronic Arts L.L.C.
Customer Service Manager Rick Thompson
Customer Service Supervisor Fernando Bustamante
Gameplay Counselors Patrick Cervantes
James Dilonardo
Tony Kim
Caroline Liu
John Montes
Technical Support Representatives Alaine DeLeon
James Wiggs
PR and Events Manager Lisa Ahern
Business Development Manager Elaine Di Iorio
Third Party Coordinator Beth Faust
Assistant Product Managers Kyoko Yamashita
Keiko Kato
Marketing Associates George Torii
Andrew Shiozaki
Andy Hsu
Product Manager Kenji Mimura
Vice Chairman Yoshihiro Maruyama
President Jun Iwasaki
Packaging/Manual Design Steven Wright,
Beeline Group, Inc.
Special Thanks: Hideo Yotsuya; Beeline Group: Brian Balistreri,
Heather Dougal; The Kenwood Group: Wayne Leonard,
Daniel Pinkham, Christina Crowley; Saatchi & Saatchi:
Andrew Kennedy, Chuck May, Meg Kelly, Kristen Purcell
 Loading...