

Page 1

®
WARNING: READ BEFORE USING YOUR PLAYSTATION
GAME CONSOLE.
A very small percentage of individuals may experience epileptic seizures when exposed to certain light
patterns or flashing lights. Exposure to certain patterns or backgrounds on a television screen or while
playing video games, including games played on the PlayStation game console, may induce an epileptic
seizure in these individuals. Certain conditions may induce previously undetected epileptic symptoms
even in persons who have no history of prior seizures or epilepsy. If you, or anyone in your family, has
an epileptic condition, consult your physician prior to playing. If you experience any of the following
symptoms while playing a video game – dizziness, altered vision, eye or muscle twitches, loss of awareness, disorientation, any involuntary movement, or convulsions – IMMEDIATELY discontinue use and
consult your physician before resuming play.
WARNING TO OWNERS OF PROJECTION TELEVISIONS:
Do not connect your PlayStation game console to a projection TV without first consulting the user manual
for your projection TV, unless it is of the LCD type. Otherwise, it may permanently damage your TV screen.
USE OF UNOFFICIAL PRODUCT:
The use of unofficial products and peripherals may damage your PlayStation game console and invalidate
your console warranty.
HANDLING YOUR PLAYSTATION DISC:
• This compact disc is intended for use only with the PlayStation game console.
• Do not bend it, crush it or submerge it in liquids.
• Do not leave it in direct sunlight or near a radiator or other source of heat.
• Be sure to take an occasional rest break during extended play.
• Keep this compact disc clean. Always hold the disc by the edges and keep it in its protective case
when not in use. Clean the disc with a lint-free, soft, dry cloth, wiping in straight lines from center
to outer edge. Never use solvents or abrasive cleaners.
EIDOS INTERACTIVE LIMITED WARRANTY
EIDOS Interactive warrants to the original purchaser
that this EIDOS Interactive disc is free from defects in
materials and workmanship for a period of ninety (90)
days from the date of purchase. This EIDOS Interactive disc is sold “as is” without expressed or implied
warranty of any kind, and EIDOS Interactive is not
liable for any losses or damages of any kind resulting
from use of this program. EIDOS Interactive agrees
for a period of ninety (90) days to either repair or
replace, at its option, free of charge, any EIDOS
Interactive disc, postage paid, with proof of date
of purchase, at its Factory Service Center.
This limited warranty is not applicable to normal wear
and tear. This limited warranty shall not be applicable
and shall be void if the defect in the EIDOS Interactive
disc has arisen through abuse, unreasonable use,
mistreatment or neglect. This limited warranty is in
lieu of all other warranties and no other representations or claims of any nature shall be binding on or
obligate EIDOS Interactive. Any implied warranties
of merchantability and fitness for a particular purpose
are limited to the ninety (90) day period described
above. In no event will EIDOS Interactive be liable
for any special, incidental or consequential damages
resulting from possession, use or malfunction
of this disc.
Some states do not allow limitation as to how long
an implied warranty lasts and/or exclusions or limitations of incidental or consequential damages, so the
above limitations and/or exclusions of liability may not
apply to you. This warranty gives you specific legal
rights, and you may also have other rights which vary
from state to state.
For warranty support, please contact our Customer
Support department at (415) 547-1244. Our staff is
available Monday through Friday, 9:00 a.m. to 5:00 p.m.
Pacific Time. You’re responsible for all toll charges.
Please note: Customer Support Representatives will
not provide game hints, strategies, or codes.
HINT LINE
If you need assistance with game play, hints or
strategies, please call the Eidos Interactive Hint Line
at (900) 773-4367 (Canada: (900) 643-4367). The cost
of the call is $0.99 per minute. You must be 18 years
or older; or have your parent’s permission to call.
A touch-tone telephone is required.
Page 2
CONTENTS
A Tragic Loss . . . . . . . . . . . . . . . . . . 3
Setting Up . . . . . . . . . . . . . . . . . . . . .4
Console . . . . . . . . . . . . . . . . . . . . 5
Memory Cards . . . . . . . . . . . . . .5
Controls . . . . . . . . . . . . . . . . . . . . . . .6
Menu Screen Controls . . . . . . 7
In-Game Controls . . . . . . . . . . . 7
Starting the Game . . . . . . . . . . . . . 8
Quitting the Game . . . . . . . . . . . . . 8
Pause Menu . . . . . . . . . . . . . . . . . . . 9
Lara's Actions . . . . . . . . . . . . . . . .10
Moving . . . . . . . . . . . . . . . . . . . . 10
Swimming . . . . . . . . . . . . . . . . . 11
Attacking . . . . . . . . . . . . . . . . . . 13
Other Actions . . . . . . . . . . . . . 14
In-Game Inventory . . . . . . . . . . . 18
Saving & Loading . . . . . . . . . . . . .21
Credits . . . . . . . . . . . . . . . . . . . . . . .22
STUCK IN THE MAZES OF TOMB R AIDER: CHRONICLES?
CALL THE EIDOS INTERACTIVE HINT LINE
U.S.: 1-900-77EIDOS (773-4367)
CANADA: 1-900-64EIDOS (643-4367)
Cost of call: $0.99/minute.
Must be 18 years or have parent’s permission.
Touch-tone phone required.
–1 –
Page 3
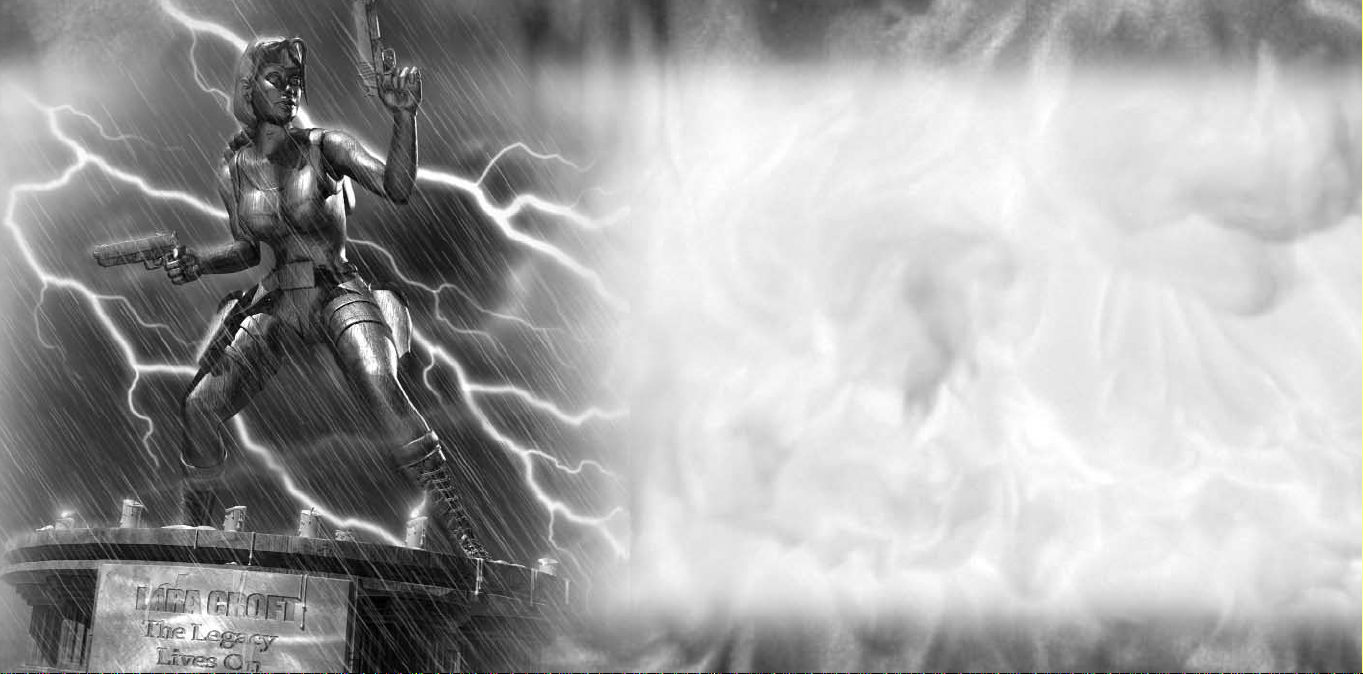
A TR AGIC LOSS ...
It is a cold, dark, rainy day. With the memorial
service for Lara Croft over, her old friends retire
to the Croft Mansion.
As they sadly collect their thoughts, they reminisce
about Lara’s past adventures ...
Meanwhile ...
Hundreds of miles away, Werner Von Croy
co-ordinates the frantic dig – searching for answers
buried deep beneath the Egyptian desert ...
–2 – –3 –
Page 4
SETTING UP
OPEN
POWER
RESET
RESET BUTTON
POWER INDICATOR
POWER BUTTON
CONTROLLER PORT
OPEN BUTTON
DISC COVER
MEMORY CARD
MEMORY CARD
21
MEMORY CARD SLOT 1
MEMORY CARD SLOT 2
CONTROLLER PORT 1
CONTROLLER PORT 2
Top View
Front View
CONSOLE
Set up your PlayStation®game console according
to the instructions in its Instruction Manual. Make
sure the power is off before inserting or removing
a compact disc. Insert the
CHRONICLESdisc and close the Disc Cover. Insert
game controllers and turn on the PlayStation
game console. Follow on-screen instructions
to start a game.
MEMORY CARDS
To save game settings and results or continue
–4 – –5 –
play on previously saved games, insert a
MEMORY CARD into MEMORY CARD slot 1
of the PlayStation game console BEFORE starting
play. If you do not have a MEMORY CARD,
the game will allow you to play without saving
game settings and results.
IMPORTANT: Do not insert or remove a MEMORY
CARD while the PlayStation game console is
turned on. Doing so may destroy game data.
TOMB RAIDER:
Page 5
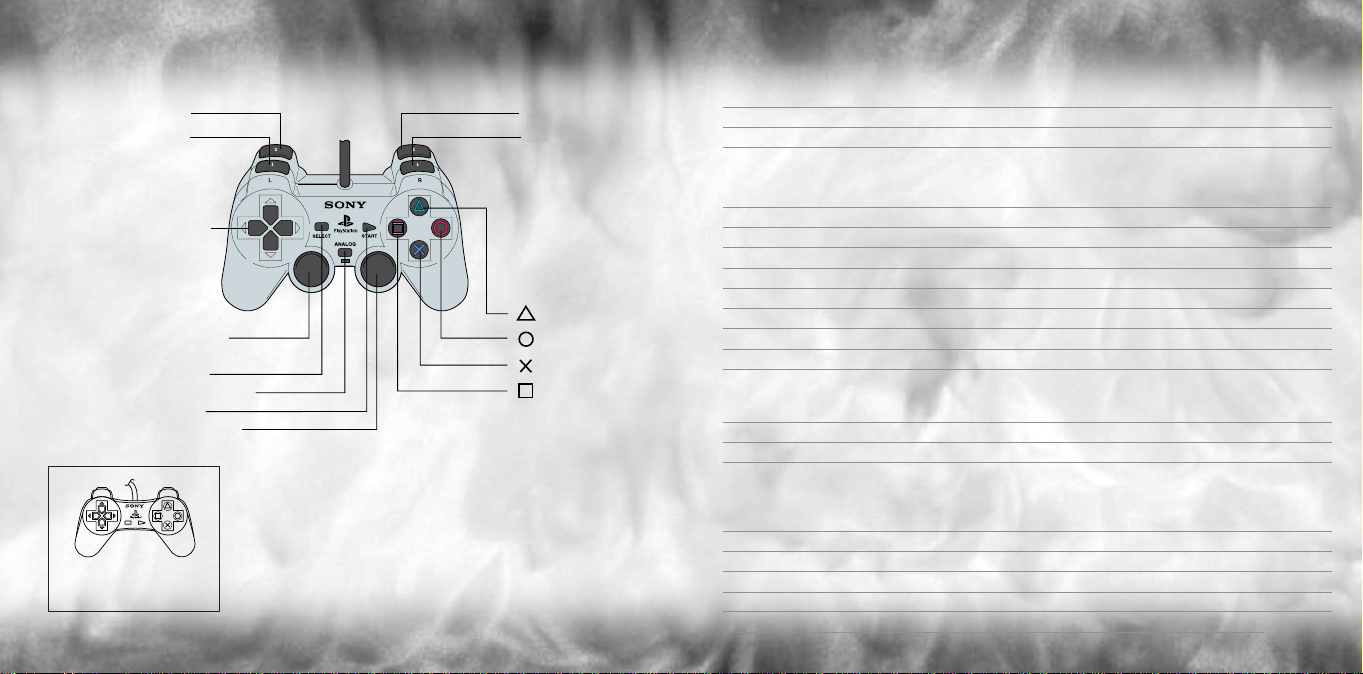
CONTROLS
L
R
SELECT
START
button
button
button
button
directional
buttons
left analog stick
(L3 button
when pushed down)
SELECT button
ANALOG mode switch
START button
right analog stick
(R3 button
when pushed down)
L2 button
L1 button
R2 button
R1 button
–6 –
The controls on this page
are also used for digital
controllers in digital mode.
NOTE: You can turn the DUALSHOCK™vibration function ON/OFF
from the Configure Controls option in Game Settings mode
(see page 9). The vibration function is not affected
by the Analog mode switch setting.
MENU SCREEN CONTROLS
Directional button Navigate through the menu screens/Toggle category options
X button Select option
G button Cancel/Return one level
IN-GAME CONTROLS
Left analog stick Move Lara; push slightly to walk and side-step; push fully to run and turn
Directional button Turn Lara
R1 button (with directional button) Walk forward/Step backward
Directional button $/^ Side-step left/right; also, balance on tightrope
R3 or Xbutton Action (press in the right analog stick or press the button)
G button Draw weapons/Holster weapons
L3 or M button Jump (press in the left analog stick or press the button)
P button Roll
SELECT + R1 buttons Draw flare/Throw flare if Lara has one in her hand
R2 button Sprint while moving forward; press the M button while sprinting
to dive and roll forward/Launch torpedo decoy while wearing EDS
(Extreme Depth Suit)
L2 button Duck while standing still or walking, then Crawl (with directional button)
Right analog stick Look around
L1 button Press and hold to Look (with directional button)
Tap to assign/change target (Manual Targeting mode)
Tap to change target (Automatic Targeting mode)
Press and hold to use laser sight
START button Pause/Unpause
SELECTbutton Display Inventory
L2 button Zoom in (while using binoculars/laser sight)
R2 button Zoom out (while using binoculars/laser sight)
G button Return to normal view (while using binoculars/laser sight)
–7 –
Page 6

STARTING THE GAME
After the introductory FMV sequence, the Title screen/Main menu
will appear. On this screen, the following options are available:
NEW GAME Prepare to join Lara on a new adventure.
LOAD GAME Display the Saved Game screen, where you
can choose to load a previously saved game.
SPECIAL FEATURES View special
bonus materials. Many of the features will be
revealed as you progress through the game.
TOMB RAIDER: CHRONICLES
PAUSE MENU
Press the START button to pause the game and display the Pause menu,
offering these options:
RESUME Carry on with the current game.
GAMESETTINGS Display the Game Settings screen with these options:
• SFX VOLUME - Use the directional button $/^ to adjust
the sound effects volume.
• MUSIC VOLUME – Use the directional button $/^
to adjust the music volume.
• CONFIGURE CONTROLS – Choose your preferred control
method from five pre-selected configurations. Use the
QUITTING THE GAME
While playing the game you can return to the Title screen/Main
menu by holding down the SELECTbutton and then pressing
and holding down the START button for two seconds. You can also
quit the game by selecting QUITfrom the in-game Pause menu
(see page 9).
NOTE:Your settings are automatically saved when you exit the game.
directional button $/^ to toggle through the available
configurations, and press the X button to select. You can
also toggle the vibration function for the DUALSHOCK
analog controller ON/OFF from this menu.
• SCREEN ADJUST – Use the directional button
to re-position the game screen on your TV. Press
the X button to set the new position.
• TARGETING – Press the X button to toggle between
™
Automatic and Manual Targeting modes.
QUIT Return to the Title screen without saving your game.
–8 – –9 –
Page 7

LARA’S ACTIONS
MOVING
Running/Sprinting
Press * to move Lara forward at a running
pace. Press the Sprint button (R2 button)
to make her temporarily sprint. A small
energy bar will appear; when
the bar depletes, Lara reverts
to running. Press @ to make
Lara hop back a short
distance; press $/^ to turn
her left/right.
Walking/Side-Stepping
Press the Walk button (R1 button) together
with the directional button */@ to make
Lara carefully walk forward or backward.
Press $/^ to make Lara side-step. As long
as you hold down the Walk button, Lara will
not fall off any edge; if she walks up to an
edge, she will automatically stop.
Rolling
Press the Roll button (P button) to make
Lara roll forward and finish up facing the
opposite direction. This also works when
Lara is underwater.
Jumping
Lara can jump in any direction to evade her
enemies. Press the Jump button (M button
or press in the left analog stick) and Lara
will jump straight up into the air.
If you move the left analog stick or use the
directional button immediately after
pressing the Jump button, Lara will jump in
that direction. In addition, pressing @ or
the Roll button (P button) immediately
after starting a forward jump makes Lara
somersault in the air and land facing the
opposite direction. This also works when
Lara is jumping backward by pressing *
or the Roll button immediately after takeoff.
SWIMMING
Underwater
When Lara finds a deep pool of water, she
can jump in and swim around. Lara can hold
her breath for about one minute; if she is
still underwater after that, she’ll drown.
Use the left analog stick or directional
button to move Lara in the water. Press the
Jump button (M button or press in the left
analog stick) to make her swim. Lara can
pull levers and pick up objects under water.
Just position Lara as close as you can to an
object and press the Action button (X button
or press in the right analog stick).
Swimming on the Surface
When Lara is swimming on the surface, use
*/@ to make her swim in those directions,
and $/^ to make her rotate. You can also
use the side-step actions to make her swim
left or right. Press the Jump button to make
Lara dive under the surface. Press * plus
the Action button when Lara is close
to an edge to make her climb out.
–10 – –11 –
Page 8

Wading in Shallow Water
Lara won’t swim in waist deep water; instead
she wades. The controls for moving Lara are
basically the same as when she is on dry land,
except it is slower going and she can only
jump on the spot, not in a direction.
Extreme Depth Suit (EDS)
The EDS is used for diving and exploring
the seabed at depths where conventional
divers cannot reach. The suit has its own
propulsion units and is also equipped
with torpedo decoys. If a torpedo is fired
at Lara, launch a decoy by pressing the Sprint
button (R2 button) and then make her swim
away. If you have successfully deployed
the decoy, the torpedo should be attracted
to it, enabling Lara to fight another day.
Swimming in the EDS is controlled in the same
way as swimming on the surface.
Avoid the rock faces on the seabed – colliding
with them will stress Lara, making her breathe
more heavily and use up her air more rapidly!
ATTACKING
Drawing & Firing Weapons
Press the Draw button (G button) to arm
Lara with her currently selected weapon.
Press the Action button (X button or press
in the right analog stick) to fire.
NOTE: When Lara has her guns drawn,
she cannot do anything else that requires
using her hands.
Targeting
Lara has two Targeting modes, Automatic
and Manual. Both modes allow you to switch
lock-on from one enemy to another.
To switch targets, tap the Look button
(L1 button).
NOTE: You can set Targeting mode
in Game Settings mode. See page 9.
1) Automatic Lock-On (Targeting)
Press the Draw button (G button) and Lara
will draw her guns. If she sees a potential
target, she will lock onto it. If there are
multiple enemies, you can change targets
by tapping the Look button (L1 button).
Press the Action button (X button or right
analog stick to shoot at the selected target.
To switch to another enemy, tap the Look
button again.
If Lara loses sight of the enemy, the lock-on
is broken.
2) Manual Lock-On (Targeting)
Similar to Automatic Lock-On except that
Lara will only lock-on to an initial enemy
when you tap the Look button once. Lara
will now target the selected enemy and you
may now cycle through alternate targets
by tapping the Look key again.
–13 ––12 –
Page 9

OTHER ACTIONS
Vaulting
If Lara is faced with an obstacle that
she can climb over, pressing *plus
the Action button (X button or press in
the right analog stick) will make her
vault onto it.
Climbing
Some walls are climbable. If Lara comes
across such a surface, pressing
* plus the Action button
(X button or press in the right
analog stick) will make her
jump up (if there is room)
and catch handholds on the wall.
She will only hang on while you hold
down the Action button.
You can make her climb up, down, left and
right by using the left analog stick or directional button. She can also
climb around the edges of some surfaces. Press the Jump button
(M button or press in the left analog stick) to make Lara jump
backward away from the wall.
When Lara arrives at the top of the ladder, she may be faced with
a small opening. Press the Duck button (L2 button) to make her duck,
and then press * to make her crawl into
the gap (if she will fit). Keep the Action
button held down until Lara is safely
inside the crawl space.
Climbing Poles
Lara will come across certain poles that she
can climb. Either make Lara walk up to the
pole, and then press and hold the Action
button (X button or press in the right analog
stick), or make her run, jump and grab
the pole. You must keep the Action button
pressed or Lara will let go.
While Lara is on the pole, use */@ to
make her climb up and down; press $/^
to make her rotate around the pole; and
press the Jump button (M button or press in
the left analog stick) to make Lara back-flip
off the pole.
Climbing Ropes
On ropes, you can make Lara grab hold,
rotate, climb up and down and jump off
in the same way as for climbing poles.
Press the Sprint button (R2 button) to make
the rope swing from side to side. Press
the Jump button (M button or press in the
left analog stick) to make Lara jump forward
off the rope.
Duck & Crawl
Press the Duck button (L2 button) to make
Lara duck (while either standing or walking),
and keep the button pressed while using
the left analog stick or directional button
to make her crawl.
Grabbing Hold
If Lara is near a ledge while she is jumping,
press and hold the Action button (X button
or press in the right analog stick) to allow
her to grab the ledge in front of her and
hang there. If a wall is climbable, Lara can
catch onto it anywhere (not just onto
ledges). Press $/^ and Lara will shimmy
sideways and even around corners of
certain surfaces. Press * to make Lara
climb up to the level above. Release
the Action button and Lara will drop.
–14 – –15 –
Page 10

Monkey Swing
If Lara discovers an overhead frame, she
may decide to monkey swing across it.
Press the Jump button (M button or press in
the left analog stick) to jump up to the frame,
then press the Action button (X button or
press in the right analog stick) to grab onto
it. While holding the Action button, press *
to make Lara swing forward. Press $/^
to make Lara hang and rotate. Release the
Action button to have Lara release the bars.
Tightrope Walking
Make Lara walk up to a tightrope, then press
the Action button (X button or press in the
right analog stick) and Lara will step onto the
rope. Press * to make Lara walk forward,
and @ to make her turn around. If Lara
starts to lose her balance, press $/^
(opposite to the way she is leaning) to regain
her poise.
Parallel Bars
Look for bars or support beams in the
scenery – Lara can jump and grab onto
some of these to get across gaps. Use the
Action button (X button or press in the right
analog stick) to make Lara grab onto the bar,
then hold down the button to make her spin
on the bar until you release the button.
Picking Up Objects
Lara can retrieve objects and store them
in her Inventory. Position Lara so that the
object to be retrieved is in front of her feet.
Press the Action button (X button or press in
the right analog stick) and she will pick it up.
Some objects in the game can be shattered
by shooting them to reveal valuable
pick-ups. Objects may also be discovered
on pedestals and hidden inside walls
or shelves/cabinets – in this case press
the Action button to have Lara reach in
and grab them.
Using Switches & Solving Puzzles
Many puzzles await Lara – these will take
various unusual forms. You may simply
need to flip a switch – this is achieved by
positioning Lara by a switch and pressing
the Action button (X button or press in the
right analog stick). For other puzzles, you
may need to collect two halves of an object,
combine them in the Inventory, and then
use them as a key. (See page 18.)
The Crowbar
Lara may need to remove items from walls
or pry open doors. To do this, she’ll need
a crowbar. Select the crowbar from the
Inventory to use it.
Using Flares
If Lara finds herself in the dark and has any
flares in her Inventory, you can make her get
one out and light it by pressing the SELECT
and R1 buttons simultaneously. This will
light up her surroundings for a minute or so.
While she is carrying the flare she can still
vault or climb – flares even work
underwater. To discard the flare, drop it
by pressing the Draw button (G button),
or throw it a longer distance by pressing
the SELECT and R1 buttons again.
Pushing/Pulling Objects
Lara can push certain objects around and
use them to operate pressure-sensitive
pads. Stand Lara in front of the object and
hold down the Action button (X button or
press in the right analog stick). Lara will take
her ready stance. Press @ to make Lara pull
the block, and * to push it. Release
the Action button to stop.
Looking Around
Press the Look button (L1 button) to make
the camera move directly behind Lara. With
the Look button held down, use the left
analog stick or directional button to make
Lara look around her. When you release
the Look button, the view returns to normal.
TIP: If you are trying to line Lara up for
a jump but the camera is in an awkward
position, press the Look button to see
the exact direction she is facing.
–16 – –17 –
Page 11

IN-GAME INVENTORY
During a game, press the SELECT button to
display the Inventory. Use the left analog stick
or directional button to navigate through the
Inventory and press the Xbutton to select.
Depending on the object that is highlighted, a
relevant menu may be displayed under the
item. For example, highlighting the HK gun will
present the following options:
• EQUIP– Arm Lara with the weapon.
• COMBINE– Allows the item to be
combined with other relevant items held
in the Inventory, i.e. the silencer.
• CHOOSE AMMO– In some instances Lara
may collect different forms of ammo, and
this option allows you to choose between
available ammunition for that weapon.
Press the SELECT button to exit the Inventory
and return to the game.
Small Medi-Pak
Use a small medi-pak (when collected)
to restore half of Lara’s health. It also acts
as a poison antidote.
Large Medi-Pak
Use a large medi-pak (when collected) to
fully restore Lara’s health. It also acts as a
poison antidote. Beware: some enemies will
poison Lara. If she is poisoned, her health
bar will appear and begin to flash yellow –
decreasing as it flashes. Quickly use either
a small or large medi-pak as an antidote.
Timex TMX Watch
Select the watch to check how you are
progressing through the level. (See page 24.)
Binoculars/Headset
The binoculars are very useful for spying on
distant enemies if you don’t have the laser
sight. The binoculars are replaced with
a headset for the V.C.I. tower levels.
The headset can be switched to infrared
mode (press the Action button [X button or
press in the right analog stick] when
the headset is selected), allowing Lara
to see invisible lasers. It’s also equipped
with a mini-com to allow contact with Lara's
accomplice Zip.
Grappling Hook Launcher
Found later in the adventure, the grappling
hook launcher is an ideal way to get across
some gaps. The capsule it fires can only grip
onto certain surfaces, usually grills or grates
in the ceiling. Use Targeting mode to look
around for a suitable anchor point –
the cursor will flash green – and press
the Action button (X button or press in
the right analog stick) to launch the capsule.
Once the rope is anchored, it is then used
like a standard rope (see page 15).
Save Game/Load Game
Save the game at any point or load
a previously saved game. (See page 21.)
–19 ––18 –
Page 12

SAVING & LOADING
IMPORTANT: You must be using a MEMORY CARD in order to save
your game and load a previously saved game.
SAVING YOUR GAME
Make sure there are at least 2 free blocks on your MEMORY CARD
before commencing play. To save the game at any point, display
the Inventory (press the SELECTbutton) and select SAVE GAME.
Select a file and press the X button. Your saved game will be
named automatically. You can save a total of 7 games; if all the
saved game slots are full, you can select a previously used slot
to overwrite the file.
LOADING A SAVED GAME
To load a previously saved game, display the Inventory and select
LOADGAME. Highlight the game you want to load and press
the X button.
–20 – –21 –
Page 13

CREDITS
Programmers Martin Gibbins
AI Programming Tom Scutt
Animators Phil Chapman
Level Designers Andrea Cordella
FMV Sequences Ex-Machina
Additional Artwork Damon Godley
Music & Sound FX Peter Connelly
Voice-Over Production All in the game Ltd.
Original Story Richard Morton
Script Andy Sandham
Producer Andy Watt
QA Stuart Abrahart
Thanks to Joe Scutt Phillips
Executive Producers Jeremy H. Smith
Derek Leigh-Gilchrist
Jerr O’Carroll
Richard Morton
Andy Sandham
Joby Wood
John Lilley
Andy Sandham
Nick Connolly
Hayos Fatunmbi
Paul Field
Benjamin Twose
Steve Wakeman
Dave Ward
Jason Churchman
Adrian Smith
PUBLISHED BY EIDOS INTERACTIVE, LTD.
Producer Mike Schmitt
Marketing Director Chip Blundell
Product Manager Matt Knoles
PR Manager Greg Rizzer
PR Specialists Bryan Davies
QA Manager Brian King
Lead Tester Franklin Vasquez
Assistant Lead Tester Mike Orenich
QA Nevin Chou
Special Thanks Mike Kelly
Package Design Moore Design Group
Manual Layout Hanshaw Ink & Image
Lars Bakken
Carlo De La Llana
Dan Franklin
Fernando Robles
Tamara Williamson
Nick Wilson
Clifton Wherry
Sutton Trout
Paul Baldwin
Dave Cox
Nick Earl
Rob Dyer
Mike Kawahara
James Poole
Prima’s Official Strategy Guide
®
Comprehensive
walkthroughs of all levels
Solutions to every
mind-boggling puzzle
Strategies for overcoming
every obstacle and trap
Training for all of
Lara’s new moves
Every item
location revealed
Tips for using the
PC level editor
Prima Strategy Guides available where you buy guides
and games. To Order By Phone, Call: (916) 989-0171
© 2000 Core Design Ltd. Eidos, Eidos Interactive, the Eidos Interactive logo, and
Tomb Raider are registered trademarks of Eidos Interactive, Inc. Core, Core Design, the Core
logo and Lara Croft are registered trademarks of Core Design, Ltd. All rights reserved.
–22 –
primagames.com
Page 14

 Loading...