

Page 1

FRONT COVER
Page 2
CONTENTS
Getting Started . . . . . . . . . . . . . . . . . . . . . . . 2
Starting Up . . . . . . . . . . . . . . . . . . . . . . . . . . . 3
Story. . . . . . . . . . . . . . . . . . . . . . . . . . . . . . . . . 4
Basic Controls . . . . . . . . . . . . . . . . . . . . . . . . 6
Game Start. . . . . . . . . . . . . . . . . . . . . . . . . . 10
Dramatic Mode . . . . . . . . . . . . . . . . . . . . . . 11
Challenge Mode . . . . . . . . . . . . . . . . . . . . . . 18
Versus Mode . . . . . . . . . . . . . . . . . . . . . . . . 22
VR Collection . . . . . . . . . . . . . . . . . . . . . . . . 23
System. . . . . . . . . . . . . . . . . . . . . . . . . . . . . . 24
Advice from Sgt. Hatter . . . . . . . . . . . . . . 26
Thank you for purchasing Cyber Troopers Virtual-On Marz™.
Please note that this software is designed only for use with the
PlayStation®2 computer entertainment system. Be sure to read
this instruction manual thoroughly before you play.
WARNING: READ BEFORE USING YOUR PLAYSTATION®2
COMPUTER ENTERTAINMENT SYSTEM.
A very small percentage of individuals may experience epileptic seizures
when exposed to certain light patterns or flashing lights. Exposure to certain
patterns or backgrounds on a television screen or while playing video games,
including games played on the PlayStation 2 console, may induce an
epileptic seizure in these individuals. Certain conditions may induce
previously undetected epileptic symptoms even in persons who have no
history of prior seizures or epilepsy. If you, or anyone in your family, has an
epileptic condition, consult your physician prior to playing. If you experience
any of the following symptoms while playing a video game – dizziness,
altered vision, eye or muscle twitches, loss of awareness, disorientation, any
involuntary movement, or convulsions – IMMEDIATELY discontinue use and
consult your physician before resuming play.
WARNING TO OWNERS OF PROJECTION TELEVISIONS:
Do not connect your PlayStation 2 console to a projection TV without first
consulting the user manual for your projection TV, unless it is of the LCD
type. Otherwise, it may permanently damage your TV screen.
USE OF UNAUTHORIZED PRODUCT:
The use of software or peripherials not authorized by Sony Computer
Entertainment America may damage your console and/or invalidate your
warranty. Only official or licensed peripherals should be used in the
controller ports or memory card slots.
HANDLING YOUR PLAYSTATION 2 FORMAT DISC:
• This disc is intended for use only with PlayStation 2 consoles
with the NTSC U/C designation.
• Do not bend it, crush it or submerge it in liquids.
• Do not leave it in direct sunlight or near a radiator or other source of heat.
• Be sure to take an occasional rest break during extended play.
• Keep this compact disc clean. Always hold the disc by the edges and
keep it in its protective case when not in use. Clean the disc with a lint free, soft, dry cloth, wiping in straight lines from center to outer edge.
Never use solvents or abrasive cleaners.
1
Page 3
2 3
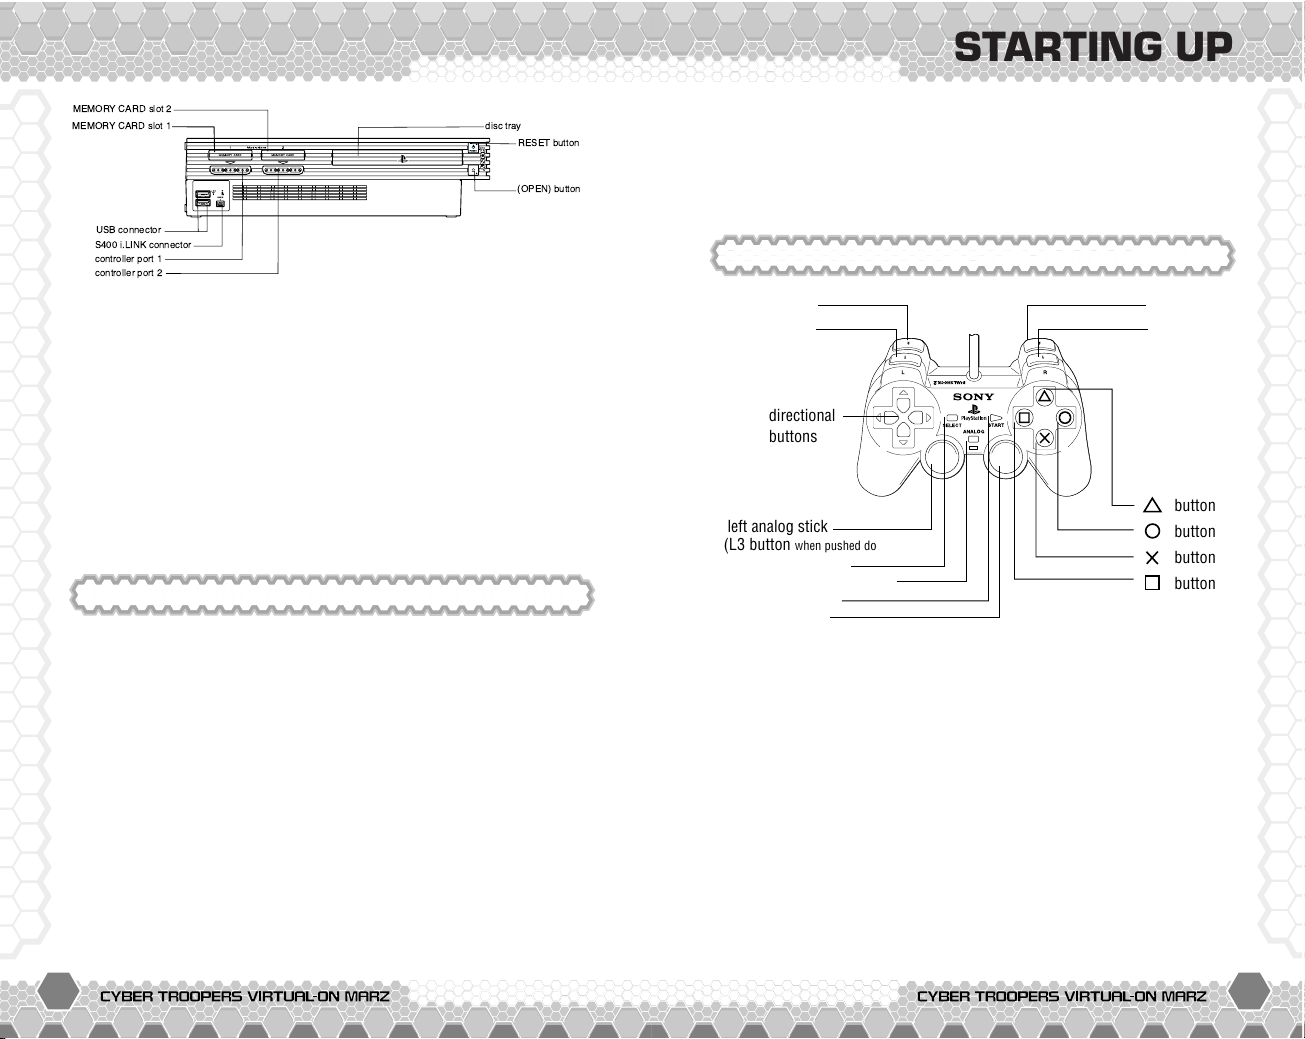
GETTING STARTED
Set up your PlayStation®2 computer entertainment system
according to the instructions in its Instruction Manual. Make
sure the MAIN POWER switch (located on the back of the
console) is turned on. Press the RESET button. When the power
indicator lights up, press the open button and the disc tray will
open. Place the Virtual-On Marz™ disc on the disc tray with the
label side facing up. Press the open button again and the disc
tray will close. Attach game controllers and other peripherals, as
appropriate. Follow on-screen instructions and refer to this
manual for information on using the software.
!
" #$
%&' #$
STARTING UP
button
button
button
button
directional
buttons
left analog stick
(L3 button
when pushed down)
SELECT button
ANALOG mode button
START button
right analog stick
(R3 button
when pushed down)
L2 button
L1 button
R2 button
R1 button
This game can be played by 1 or 2 players using either
DUALSHOCK® analog controller or DUALSHOCK®2 analog
controller. Connect the analog controller to controller port 1
for single player game. For 2 player game, connect the
controller to be used to controller ports 1 and port 2. All
instructions in this manual are based on the controls of
DUALSHOCK®2 analog controller.
● Controls are all set in ANALOG mode (mode indicator: ON)
and cannot be switched to digital mode using the ANALOG
mode button.
● This game supports the vibration function present on the
DUALSHOCK®2 analog controller. This can be set ON/OFF
from Controller Settings of the SYSTEM menu (P.24) or the
Pause screen during action.
Memory Card (8MB) (for PlayStation®2)
Virtual-On Marz™ is a memory card (8MB) (for PlayStation®2)
compatible game. Please insert the memory card (8MB) (for
PlayStation®2) into MEMORY CARD slot 1 or 2 before you turn
on the game. When you save a Cyber Troopers Virtual-On Marz™
file on your memory card (8MB) (for PlayStation®2) for the first
time, a System File will be created for game settings and
records. A minimum of 100KB is required to create a System
File. Do not switch the power to off or remove the memory card
(8MB) (for PlayStation®2) while saving.
Please see P.10 for details on Save and Load.
DUALSHOCK®2 analog controller Configurations
Page 4
4 5
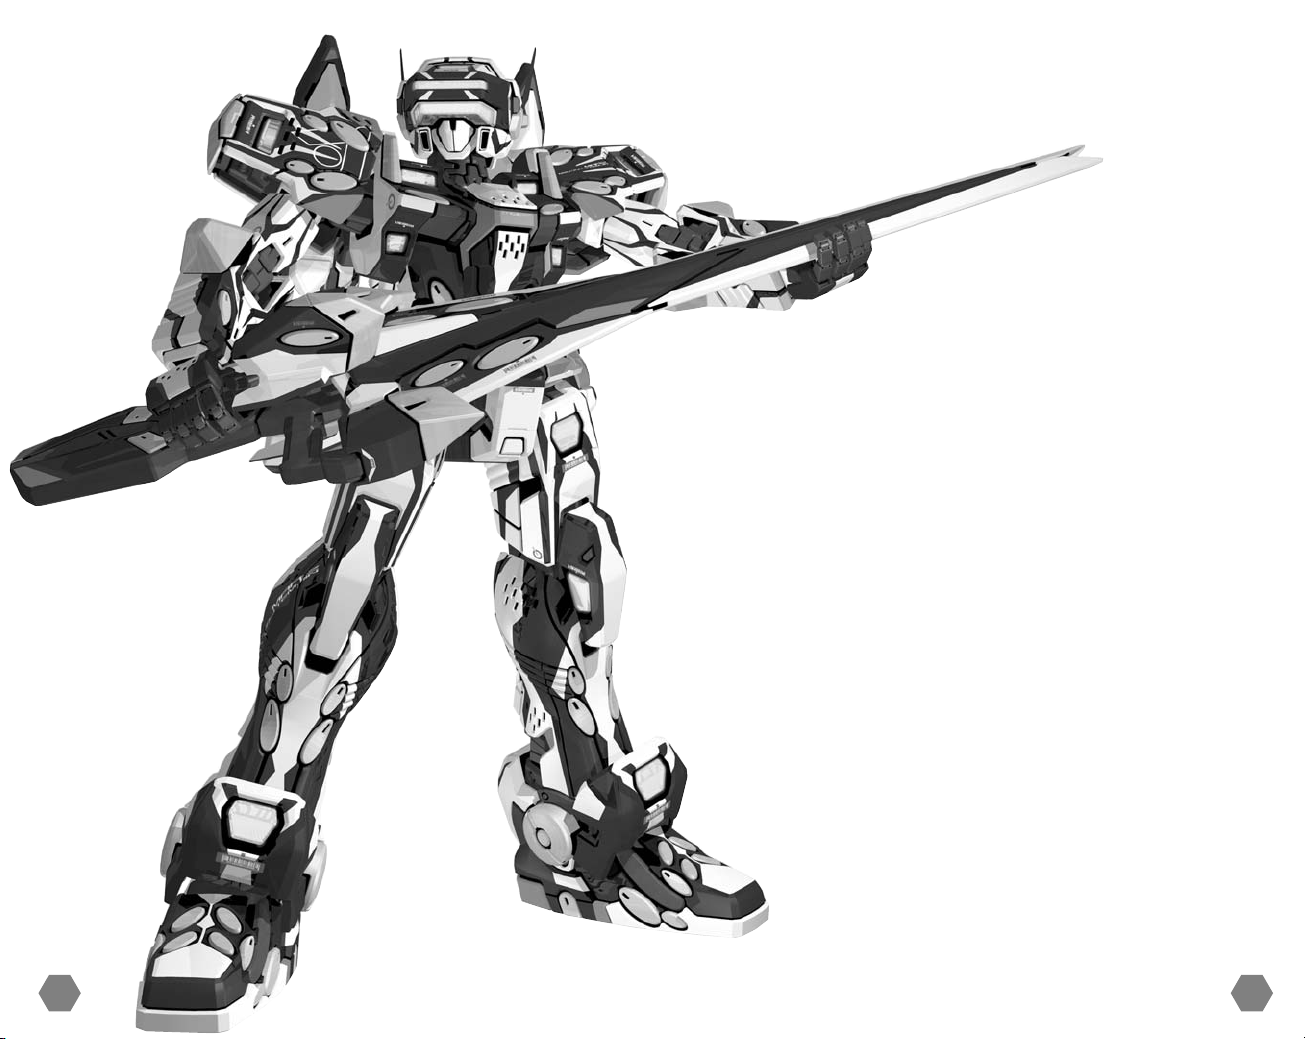
STORY
As human beings responding to the limited capabilities of their
race resigned themselves to newly established legislation,
conventional methods of warfare were abandoned as outdated
and futile. Soon came prosperity in the midst of chaos with the
existing administration disintegrating little by little. In their place
rose multinational conglomerates, strengthening their endeavors
through the utilization of network technology.
The power hungry corporate executives peering disdainfully upon
the great unwashed "consumers", gave birth to a highly
dangerous distraction known as the Limited War. This
industrialized combat performance, and in particular the giant
mechanized warriors known as the Virtuaroids, rapidly gained
widespread acclaim. The people would gaze in awe through
monitors as the battles commenced, intoxicated by the
propaganda and ideals of ever advancing technological feats,
fascinated by the scandalous agitation, and to an extent simply
satisfying their insatiable thirst for widespread destruction and
carnage.
On Mars however, redeveloped as the battleground for the
Limited War, it became inevitable that a dramatic increase in
corporate crime would accompany the highly dramatized battle
over shares. The Special Investigation Unit "MARZ" was
therefore founded as a necessary response to the escalating
criminal activity. Engaging enemies with cutting edge machinery
of destruction, the MARZ Virtuaroids rule the surface of Mars.
Virtual Century
Page 5
6 7
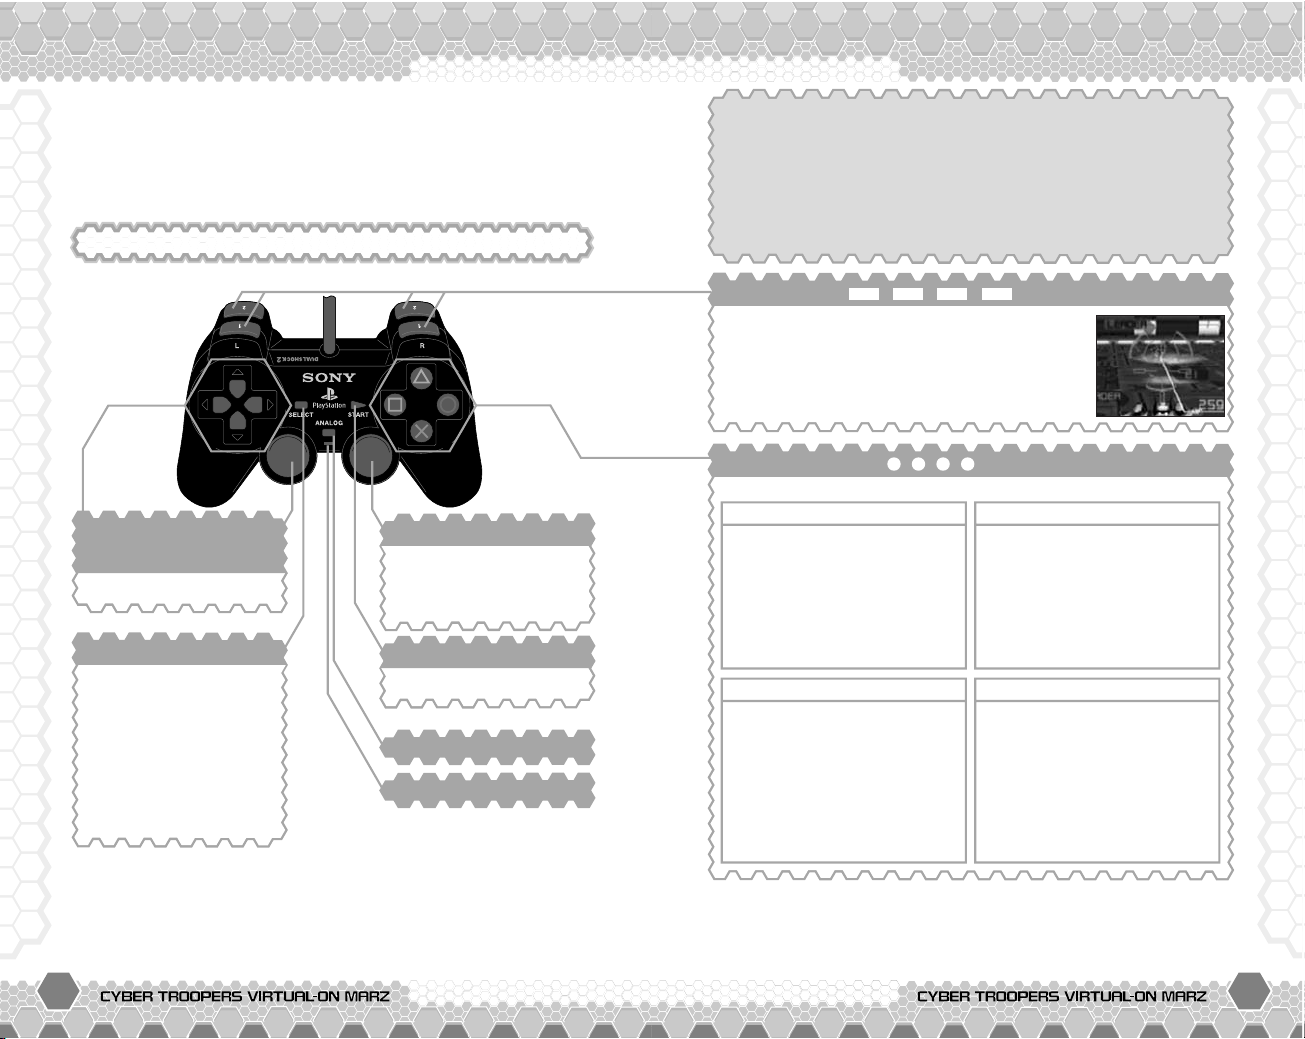
BASIC CONTROLS
BASIC CONTROLS
Controls explained in P.6~9 are based on Auto Type (default
button configuration). See P.25 for details on other types of
control settings. Control settings can be changed from
CONTROLLER SETTINGS of the System menu (P.24) or the Pause
screen during action.
ANALOG CONTROLLER: DUALSHOCK®2
Menu Controls
right analog stick
Rotate
Turn your Virtuaroid
left/right during action.
SELECT button
Use Repair Disc
Recharge your Life during
Dramatic Mode (P.11).
Rescue Dash
Dash towards your
partner and share
remaining Life (P.21).
Directional button/
left analog stick
Maneuver VR
START button
Pause Screen/Start
Directional button:
Select Menu Item
S Button:
Enter Selection
A Button:
Cancel Selection
ACTION CONTROLS
In this game, there are 6 Types of Controller Settings (Auto, Type
A, Type B, Twin A, Twin B, and Edit) from which to choose. For
Auto Type (default setting), an “Automatic AI Control” will assist
your Virtuariod’s AI control features. Also, it is possible to move
at an angle by simultaneously pressing two directional buttons,
allowing you to perform the action assigned for the left analog stick.
CHANGE TARGETS
Press either Q, W, E, or R to
change the target enemy. Use this when
locking-on to attack the enemy Leader, or
double-team and assist your partner.
A button
TURN TO ENEMY/JUMP
Tap the button to turn and
face the enemy, or hold on a
little longer for a jump.
Press
A button during the
jump for immediate landing.
S button
DASH
Press S button to dash for a
limited time in the direction
you are walking. Press
S
button during the dash to
immediately stop.
F button
ATTACK
Attack is performed based on
your distance and position of
your target. Attacking while
the Weapon Gauge is yellow
allows you to perform a
Close Range Attack (P.9).
D button
STRONG ATTACK
Strong Attack is available
for use if the Weapon Gauge
is yellow. When the Gauge is
not yellow, it functions as
the Attack (
Fbutton).
QWERbuttons
ASFDbuttons
Analog mode button
Page 6
8 9
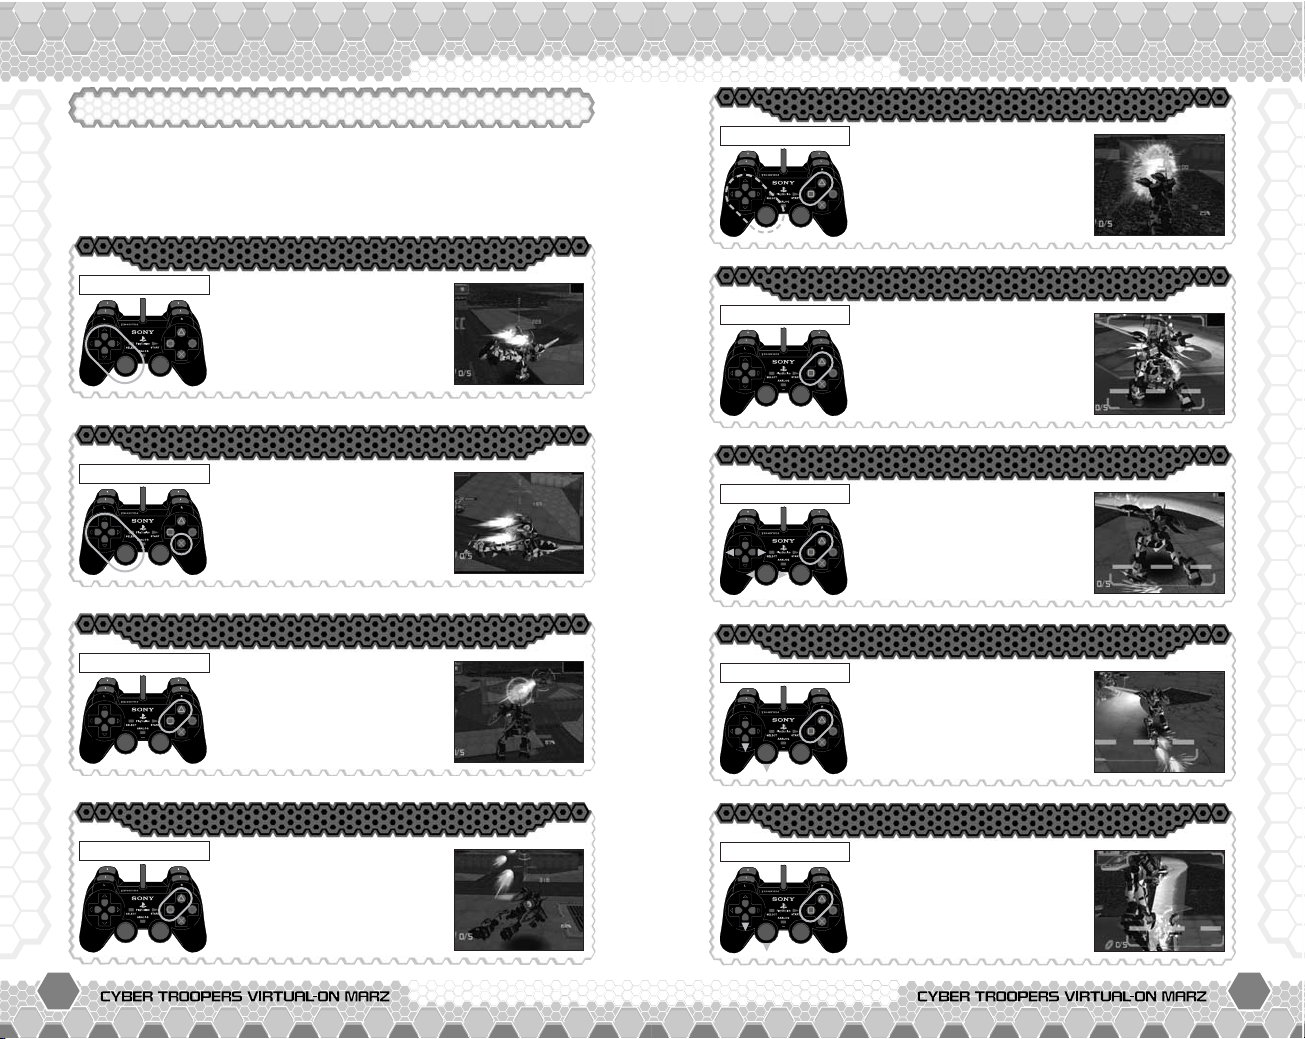
BASIC CONTROLSBASIC CONTROLS
Auto Forward Dash Attack
Lateral Dash
AUTO TYPE ACTIONS
Here are the key actions for Auto Type controls. Even while
playing in Auto type, a variety of actions are performed by
entering the following button combinations. See P.26~35 for
details of each actions.
Release the directional button
(left analog stick) then press
F(D) button during a lateral
or diagonal (moving forward)
dash to Vertical Turn and
perform a Dash Attack.
Close Range Attack
Close Range
When the Weapon Gauge
turns yellow, indicating you
are within close range, press
the
F(D) button to perform
a Close Range Attack.
Close Range Quick Step Attack
Close Range
Press F(D) button while
using either
Z or X button
(left analog stick) to quickly
step into the blind spot of
the enemy for a Close
Range Attack.
Close Range Dash Attack
Forward Dash
Press F(D) button while
holding down the
V button
(left analog stick) during a
forward or diagonal (moving
forward) motion to perform
a Forward Dash Attack.
Vertical Turn
During Dash
Release the directional
button (left analog stick)
during dash and change
your course by entering a
different direction.
Aerial Dash
During Jump
Use both directional buttons
(left analog stick) and
S
button during a jump and
dash while airborne.
Jump Attack
During Jump
Press F(D) button before
reaching the peak of the jump
to perform a Jump Attack.
Dash Attack
During Dash
Press F(D) button either
from a dash or Aerial Dash
to perform a Dash Attack.
Close Range Upper Attack
Close Range
Press F(D) button while
holding down the
V button
(left analog stick) to perform
aspecial Close Range Attack.
Page 7
10 11
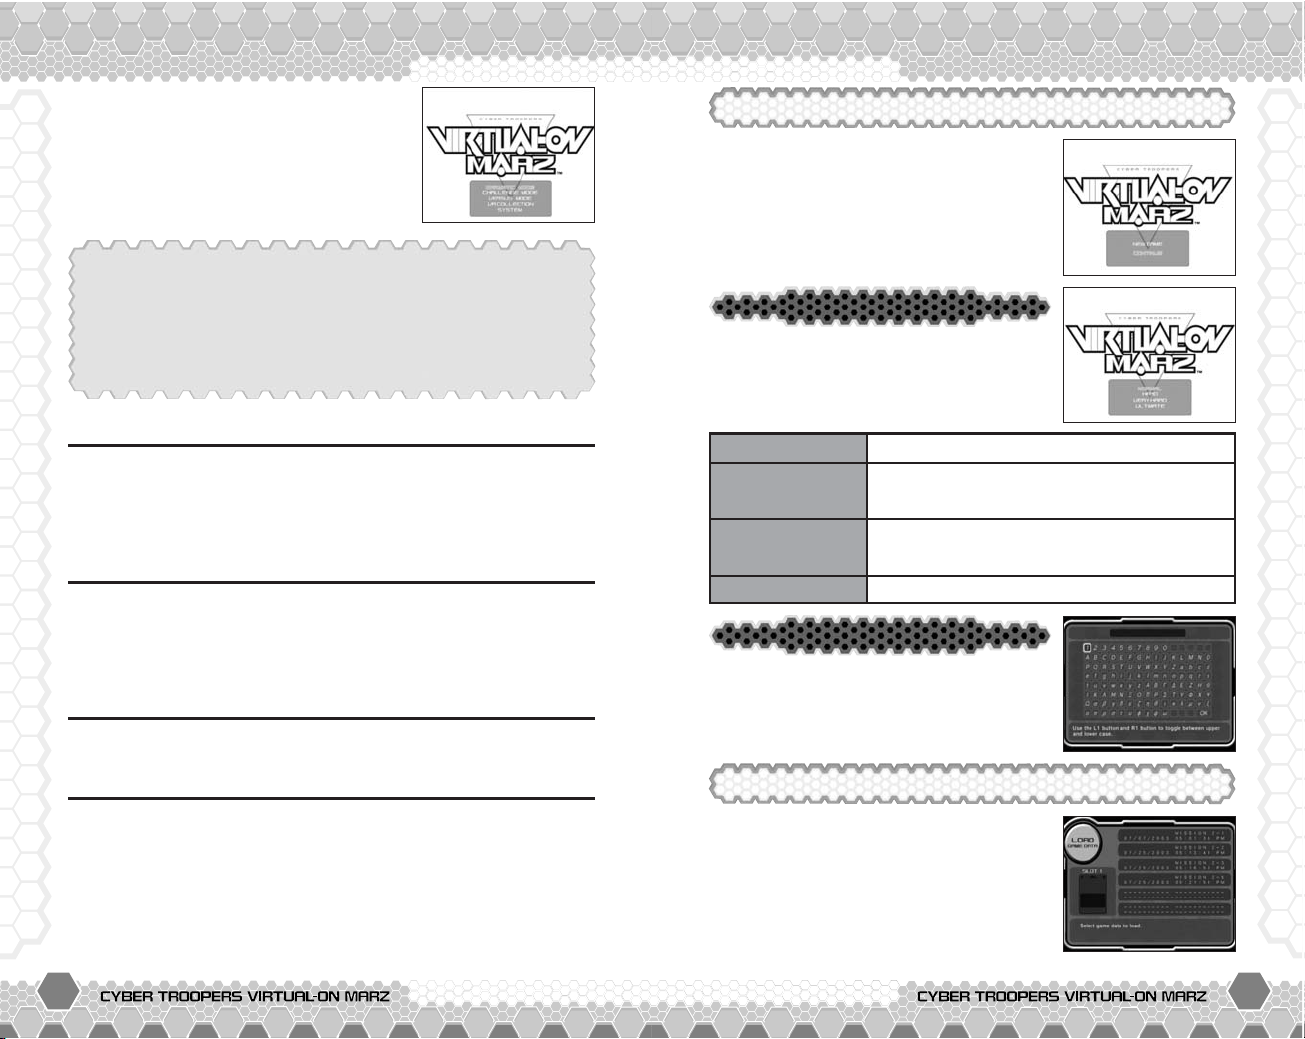
GAME START DRAMATIC MODE
Press the START button when the Title
screen appears to display the Mode
Selection menu of this game. Select the
menu item and press the
S button to enter.
DRAMATIC MODE
Enter a 1 player mode and clear each mission in sequence to
complete the drama. As a member of MARZ (Special Investigation
Unit of Mars) you are responsible for various missions from
headquarters with their trusty Virtuaroid known as Temjin 707S.
Play a 1~2 player split-screen battle mode. Assign Virtuariod to
1P, 2P, and AI for either 1-on-1, 1-on-2, 2-on-2 battle. Select
your battle from 1P VS 2P, 1P VS AI, 1P+2P VS AI x2, or 1P+AI
VS 2P+AI game.
View the Virtuaroids you collected via Dramatic Mode.
>>>P.11
VERSUS MODE >>>P.22
SYSTEM >>>P.24
VR COLLECTION >>>P.23
Change various game settings or save/load your System File.
Create SYSTEM FILE/AUTO LOADING
When saving the game to your memory card (8MB) (for
PlayStation®2) for the first time, a System File that contains
play settings and game data is made. A minimum of 100KB
is required to create a System File. This System File is
automatically loaded when the game is turned on.
Pilot Name
Enter a name using up to 10 characters
as your Pilot Name. Press
Q or E
button to change the available characters
on screen.
Difficulty Level
Choose one of the 4 Difficulty Levels.
Check the chart below for specifications of
each settings.
NORMAL
For beginners.
ULTIMATE
Only for ace pilots.
HARD
For players who previously played the VirtualOn series and are familiar with the controls.
VERY HARD
For Advanced players with superb knowledge
of each of the Virtuaroids.
NEW GAME
Choose NEW GAME from the menu
whenever you want to play the Dramatic
Mode from the very beginning. The
Mission Menu screen will be displayed
once the Difficulty level and Pilot Name
are entered.
CONTINUE
Select CONTINUE from the menu to load
and play your previously saved game.
Choose the saved data from the Load
screen to continue your game.
Page 8

13
DRAMATIC MODEDRAMATIC MODE
START MISSION
Begin your next Mission.
PILOT DATA
View the pilot’s status such as ranking and
battle records. Press the
X button (left
analog stick) to display the Item Data screen
to check your Items available for use.
LOAD
Select a game data from the Load screen and continue your play.
SAVE
Save up to 6 different game data of Dramatic Mode.
CONTROLLER SETTINGS
Choose from 6 Types of control settings (see P.24 for details).
MISSION MENU SCREEN
The Mission Menu screen is the access
point for everything that is offered in this
mode. Start a Mission, save/load your
game data, and other tasks are accessible
from the Mission Menu. Select EXIT to
return to the Title screen.
TACTICAL SCREEN
An order is issued for each Mission from
the Tactical screen. Read the outline of
the next Mission here. Press the
S button
to forward to the next sequence and
START button to skip any sequence.
HANGAR MENU
Hangar Menu is where you are allowed to
make your final preparations before you
start your Mission. The Virtuaroid
currently selected is displayed on the
screen. The pilot will operate the
Virtuaroid displayed for the next Mission.
GO!
Enter the Mission.
VIRTUAROID
SELECT
Enter the Virtuaroid Selection screen and
choose from the VRs you have acquired.
BRIEFING
Review the orders issued from the Tactical
screen.
12
Page 9
14 15
DRAMATIC MODEDRAMATIC MODE
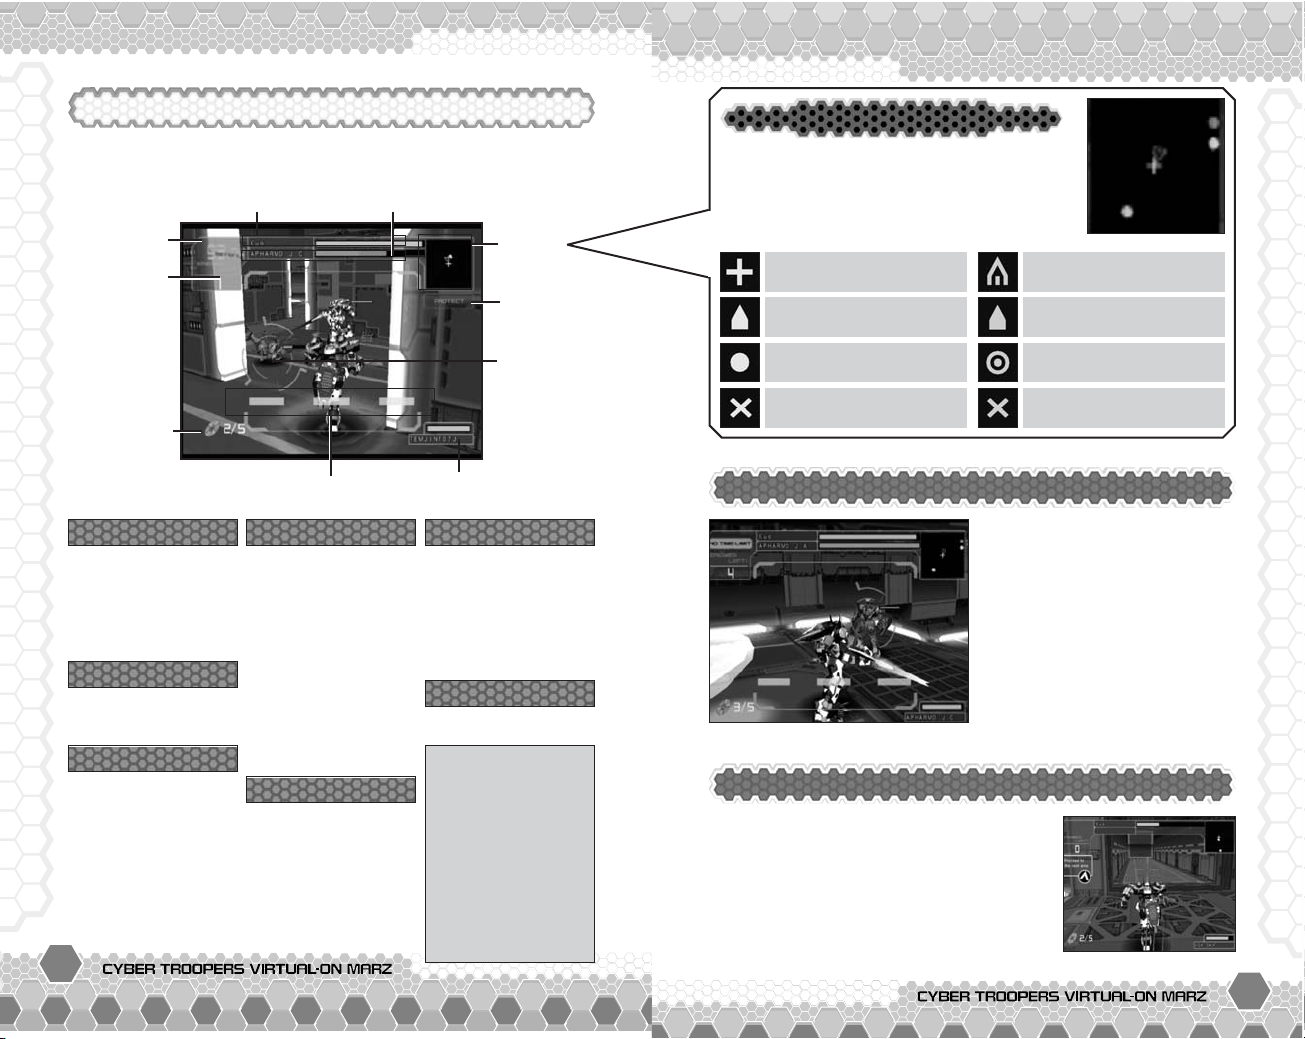
Pilot’s Life Gauge Enemy VR’s Life Gauge
Time Limit
Enemy
Remaining
Radar
Item
Effect
Lock-On
Targe t
Weapon Gauge
Partner Status
Repair Disc
Remaining
Whenever a time is
displayed, you must
complete the Mission
before this counter
reaches zero.
Time Limit
Position and direction of
a target enemy.
Position and direction of
a untargeted enemy.
Target outside the Radar
screen.
Position of an
immobilized enemy.
Position of your VR is the
center of the screen.
Position and direction of
your partner.
Partner outside the
Radar screen.
Position of an
immobilized partner.
When the enemy VR or next battle field is
not present on your screen, a guide
compass will be displayed. Also, a
Warning is given when a pilot is
threatened by an enemy who has just
appeared on the field.
SCREEN DISPLAY
Various information is displayed during gameplay. Take advantage
of displayed information to earn a flawless victory.
Time Limit
Number of enemies
remaining in action.
Enemy Remaining
Enemy Remaining
Repair Disks are
gained when opening
a cargo or defeating
an enemy on the
field. Use the Repair
Disk to recover your
Life Gauge by
pressing the SELECT
button.
Repair Disk Remaining
Repair Disk Remaining
Gauges show the
energy level of each
weapon. From left to
right: LW (Left
Weapon), CW (Center
Weapon), and RW
(Right Weapon). The
energy level of
weapons are
recovered automatically
over time.
Weapon Gauge
Weapon Gauge
Your partner’s name
and Life Gauge are
displayed whenever
the Mission involves
a partner. Rescue
Dash is executed
when you have no
Repair Disk left.
Partner Status
Partner Status
Lock-On Target will
appear if an enemy is
set on the crosshair.
Homing lasers are
fired to the target
during lock-on.
Lock-On Target
Lock-On Target
Information of Items.
Item Effect
Item Effect
■ ATTACK
power up your attack
■ PROTECT
power up your guard
■ SPEED
increase mobility
■ S.A.GUARD
shields off any attacks
■ LUCKY
positive effects...
■ FAKE
negative effects...
Double Lock-On Screen
By charging an enemy VR while
positioned facing front, the
Lock-On Target will zoom in on
the action. During this time,
the Weapon Gauge will turn
yellow and you are able to
directly hit your enemy with a
Close Range Attack. To
execute a Close Range Attack,
press the button that
corresponds to the yellow
Weapon Gauge.
Additional Display Features
Radar Screen
Radar screen will display any VRs and Items
that are nearby. When the VR is within
range, the Radar will also show which way
the VR is facing. Check the positions of your
enemy and partner to establish ground.
Page 10

16 17
DRAMATIC MODEDRAMATIC MODE
Press the START button during action to
display the Pause screen. Use
C or V
button (left analog stick) to select the
menu item and
Z or X button to change
the settings.
PAUSE SCREEN
The Mission is failed when you run out of
time (Time Limit), lose all of your Life
Gauge, or fail the requirements.
Select RETRY from the menu to try the
same Mission again. To return to the
Hangar Menu, select RETURN TO VR
SELECT, and RETURN TO MISSION MENU to
return to the Mission Menu.
MISSION FAILED
RESUME
Return to action.
RETRY
Start over from the beginning of the Stage.
VIBRATION
Toggles the vibration function (ON/OFF).
SUPPORT’S
TARGET
Set your Partner’s target mode from Auto,
Same (same enemy), Another (other enemy).
CONTROLLER
SETTINGS
Change the type of controller settings. See
P.24 for details on each control type.
RETURN TO VR
SELECT
Return to Hangar Menu screen.
RETURN TO
MISSION MENU
Return to Mission Menu screen.
MISSION BONUS
Bonus points earned when Mission is cleared.
TIME
Total time elapsed for the Mission.
DIFFICULTY
Points and level of Difficulty Level selected.
TOTAL SCORE
Total points and highest score is displayed.
BATTLE SKILL
POINTS
Points earned based on your overall battle
technique.
LIFE
Percentage of Life remaining and points
based on remains of your Life Gauge.
RANK
Ranking based on the following system: SS S-A-B-C-D-E(“SS” being the highest.)
MISSION RESULT SCREEN
When you clear the Mission, your VR’s
Life Gauge will be completely recharged.
Press the
S button when you are through
viewing the Result screen to enter the
Mission Menu screen.
NEW VIRTUAROID READY FOR ACTION!
Earn a new VR or color variation of your
VR by clearing Missions in this mode when
you perform well. The VRs you earn are
also available for use in Challenge Mode
(P.18) and Versus Mode (P.22). Newly
acquired VRs are also enlisted in VR
COLLECTION (P.23) for an up-close look.
REPAIR DISK(S)
USED
Points and number of Repair Disk used.
NUMBER OF VR
DESTROYED
Enemy VRs destroyed and points earned.
NUMBER OF EXTRA
ENEMIES
DESTROYED
Non-VR enemies destroyed and points
earned.
Page 11

18 19
CHALLENGE MODE
CHALLENGE MODE
Your Team’s Life Gauge Enemies’ Life Gauge
Time Limit
Double
Attack
Radar
(P.15)
Teams’ Life
Percentage
Total Time
Lock-On
Alert
Leader
Display
MENU SCREEN
Choose from 4 modes (NORMAL, HARD,
VERY HARD, and TIME ATTACK) within the
Challenge Mode. You may also access
your past performances from RECORDS.
Select a menu item and press the
S
button to enter.
SCREEN DISPLAY
Much like the game screen of Dramatic Mode, various
information is displayed during Challenge Mode. Take advantage
of all the displays to earn a flawless victory.
VR SELECTION
After you entered a mode, select the VR
you will operate then your Partner’s VR.
Virtuaroids acquired in Dramatic Mode
are also available in Challenge Mode.
GAME START
All participating Virtuaroids are
introduced before each battle. Win the
battle to advance a Mission, but if you
lose the game is over. Save your
performance by making it on the ranking
charts.
Records
Your all-time records can be checked from
the ranking charts of each Difficulty Level.
Press
Z or X button (left analog stick)
Q or E button to select the Difficulty
Level, and
C or V button to scroll the
Record screen. Press the
S button to start the Demo sequence.
Battle is over when
the counter reaches
zero. The team with
the higher Life
percentage wins.
Time Limit
Time Limit
Alerted whenever
you and your
partner lock-on to
the same enemy.
Double Attack
Double Attack
Indicates the Leader
of the team.
Leader Display
Leader Display
Total time played
from Mission 1.
Total Time
Total Time
Gauge on the top is
your VR’s Life Gauge
and the bottom is
your partner’s
gauge. When the
gauge is completely
empty, the VR is
terminated. Leader
is represented by
the “L” on the left of
the gauge.
Your Team’s Life Gauge
Your Team’s Life Gauge
Leader is represented
by the “L” on the left
of the gauge. Also, the
gauge of the enemy
you are currently
attacking will be
enlarged.
Enemies’ Life Gauge
Enemies’ Life Gauge
Life percentage of
both teams are
displayed. Each
number represents
the total percentage
of Life remaining
between 2 VRs.
Teams’ Life Percentage
Teams’ Life Percentage
Indicates your lockon status on a
single enemy
(“ENE1” and
“ENE2”) or
simultaneously on
both enemies
(“LOCK ON ALERT”).
Lock-On Alert
Lock-On Alert
Page 12

20 21
CHALLENGE MODECHALLENGE MODE
RULES OF BATTLE
One distinct feature of Challenge Mode is the 2-on-2 team battle.
Several rules are in effect especially for this battle. Learn the
following rules to improve your game.
2-on-2 battle is basically a match between
2 VRs per team, but depending on the
Mission, your team will face a single
enemy. In order to win this battle, you
need to utilize the combination of team
and individual skills.
2-ON-2 BATTLE
Press the START button during action to
display the Pause screen. Use
C or V
button (left analog stick) to select the
menu item and
Z or X button to change
the settings.
PAUSE SCREEN
Leader of the Team
There is a Leader for each team, and the
battle is determined when the Leader is
terminated. In this Mode, you will always
take the role of a Leader for your team.
Keep a close eye on both the enemy
Leader’s and your own Life Gauge.
Battle Condition
There are two ways to win a battle in this
Mode. Terminate the Leader of the enemy
team or have a greater percentage of Life
remaining when the time (Time Limit) is up.
REMATCH
● Leaders of both teams are terminated simultaneously.
● Both teams have the same Team Life Percentage when
the time (Time Limit) is up.
*This rule is also in effect for the Versus Mode.
Rescue Dash
Press the SELECT button to perform a
Rescue Dash. When the two VRs tag one
another, the remaining Team Life
Percentage is shared evenly with your
partner. The Weapon Gauge of the VR that
engaged the Rescue Dash are all reset to zero.
RECOVERING IMMOBILIZED PARTNER
When your partner is out of Life and is
immobilized, touch the round force field of
your partner to rescue and share the
remaining Life of your VR. Note that
recovering your partner will not penalize
your Weapon Gauge status.
RESUME
Return to action.
VIBRATION
Toggles the vibration function (ON/OFF).
PARTNER’S
TARGET
Set your Partner’s target mode from Auto,
Same (same enemy), Another (other enemy).
CONTROLLER
SETTINGS
Change the type of controller settings. See
P.25 for details on each control types.
QUICK CONTINUE
Toggles the Quick Continue screen settings
(ON/OFF).
RETURN TO TITLE
SCREEN
Change the type of controller settings. See
P.25 for details on each control types.
Page 13

22 23
VERSUS MODE
VERSUS MODE / VR COLLECTION
1P VS 2P 1P+2P VS AI+AI 1P+2P VS AI
Your Team’s Life Gauge Enemies’ Life GaugeTime Limit
Double
Attack
Radar
Set Count
(Wins)
Lock-On
Alert E1/E2
1P SIDE 2P SIDE
SELECTION SCREEN
Various settings are available in Versus
Mode. The player with the analog
controller connected to controller port 1
is 1P and controller port 2 is 2P. When
your selection is finished, each player
must press the START button to begin.
SCREEN DISPLAY
In Versus Mode, the game will take place in a spilt-screen mode
(left:1P/right:2P) when two players are involved. The Screen will
not be in spilt-screen mode during a 1 player game with AI players.
*Refer to Dramatic Mode & Challenge Mode for basic screen displays
Battle Settings
Select the settings of the 2 player battle. To
select the player status (1P/2P/AI or None),
press the
S button and use Z or X button
(left analog stick). If both players choose to be on the same side,
the player on the top is set to become the Leader.
Select Virtuaroid
Each player can select their own VR and the opponents’ VRs.
Place the cursor where the VRs are displayed. Press the
S
button and use Z or X button (left analog stick) to select the
VR then press the
S button when your selection is over.
Select Stage
Place the cursor where the stage name is displayed. Press S
button and use Z or X button (left analog stick) to select the
stage then press the
S button when your selection is over.
Select Time Limit & Set Match
Highlight the Time Limit/Set Match on the bottom left of the
screen. Press
S button and use Z or X button (left analog stick)
to select the time/sets then press
S button when your selection
is over. *Leader swaps in multiple sets with 1P &2 P on same side.
The Result screen will appear when a
team wins the set Match number. To
continue the Mode, select either Use Same
VRs or Return to VR Select to reconfigure
any settings of the battle.
Select Quit to return to the Title screen.
RESULT SCREEN
Browse the VRs you collected via Dramatic
Mode or preview VRs that you are close to
earning. Use
Z or X button (left analog
stick) to select a VR and press
S button to
open the viewer for the VRs you have
acquired. Use both analog sticks to view
your VRs from any angle you want. Press
A button to return to VR selection screen.
VR COLLECTION
Page 14

24 25
SYSTEM
SYSTEM
Modify various settings of the game. The
changes made for any of the setting is
effective until you switch the console’s
power off. Select SAVE SYSTEM SETTINGS
to save the settings you modified. Press
A button to return to the Title screen.
■ TYPE A/TYPE B CONFIGURATIONS
■ TWIN A/TWIN B CONFIGURATIONS
left analog stick
A button
S button
F button
D button
Q button
W button
E button
R button
directional button
SELECT button
right analog stick
Q+E button
Turn Right
TYPE A
Maneuver
Maneuver
Rotate
Change Targets
Crouch/Guard
Turbo Button
Jump
Turn Left
Left Trigger (use LW)
Right Trigger (use RW)
Use Repair Disk
TYPE B
Maneuver
Rotate
Rotate
Turbo Button
Crouch/Guard
Change Targets
Jump
Left Trigger (use LW)
Right Trigger (use RW)
Use Repair Disk
left analog stick
A button
S button
F button
D button
Q button
W button
E button
R button
directional button
right analog stick
SELECT button
Right Turbo
TYPE A
Left Stick
Right Stick
Left Turbo
Left Trigger (use LW)
Right Trigger (Use RW)
Change Targets
Right Turbo
TYPE B
Left Stick
X Right Stick
V Right Stick
Z Right Stick
C Right Stick
Left Turbo
Left Trigger (use LW)
Right Trigger (Use RW)
Change Targets
Use Repair Disk Use Repair Disk
✚ Use the Turbo Button with directional button (left analog stick) to Dash
towards any direction or with Left or Right Triggers to attack during Dash.
✚ The term “Left Stick” and “Right Stick” refers to the Twin Stick
controller of the arcade Virtual-On series.
Controller Settings
Use Z or X button (left analog stick) to
select the setting and press
S button to
change. See the chart below for details of
each control setting. Refer to P.4~7, 24 &
25 on Auto Type (default controls).
SOUND / BGM VOLUME / SE VOLUME
Adjust each of the sound settings using the Z or X button.
Screen Adjust
Use the left analog stick to adjust the position of the screen.
Save System File/Load System File
Save or load your System File when you have just booted the
game or made any changes to your play settings (System).
TYPE B
Use both analog sticks to rotate left/right.
TWIN A
Replication of arcade controls (Twin Stick).
EDIT
Customize your own Controller Setting.
AUTO
The default control type with simplified controls
and automatic AI support.
TYPE A
Use directional button (left analog stick) to
maneuver and
Q or E buttons to rotate.
TWIN B
Replication of the Twin Stick controls using
directional button and
ASDF buttons.
ADVANCED ACTION CONTROLS
Page 15

26 27
In Auto Type, the attack you execute will
be automatically chosen by the AI. Just
keep hitting the Attack button and the AI
will decide which attack is the most
effective in the given situation (based on
Weapon Gauge and VR position).
Attack varies based on
distance of your target.
ADVICE FROM SGT. HATTER
Yeah! Glad to see you join us!
I, Sgt. Hatter will teach all there is
to know about operating your
Virtuaroids.
ADVICE FROM SGT. HATTER
ADVICE FROM SGT. HATTER
LESSON 1: AUTO TYPE
Auto Attack
When you are within range for a Close Range Attack, simply use
F or D button to execute. If you are operating a Temjin 707S in
this situation, just hold down on that button and convert up to 3
combo attacks. The third hit of this combination is so strong,
you can damage an enemy even if their Guard is up!
Up to 3 combo attacks
by holding down your
button.
Use Z or X button
and attack an enemy
from behind.
Use V button for a
Close Range Upper
Attack.
Auto Close Range Attack
Use F button to attack during Dash to perform
what is called a ‘Dash Attack.’ This Dash Attack
will vary in shots and fire power depending on
the motion of the Dash. What you want to keep
in mind is that the most effective Dash Attack is
executed during forward Dash. Aim to hit the
enemies this way before trying any other
Dash Attacks!
The forward Dash Attack can also be executed
from a diagonal or lateral Dash, by just releasing
the directional button (left analog stick), and
then press
F button. Using this technique, you
will have better transitions in your attacks!!
Dash forward for
the most effective
Dash Attack
Use Various Dash
In Auto Type, the AI will detect enemy
attacks and will automatically put up your
Guard. Auto Guard is not available during
Dash or attack. When the enemy strikes
for a Close Range Attack, just hold still or
jump right away for evasive action!
Hold still for Auto Guard!
Auto Guard
Use D button when you want to perform an
explosive attack! But make sure the
Weapon Gauge is charged or else it will only
be a normal attack. The Special Attack will
vary on the VR you operate.
Use the Weapon Gauge!
When there is more than one enemy, use
either
Q, W, E, or R button to
change the enemy you would like to take. If
you successfully switch, a line is displayed
to guide where your target enemy is at.
Tap the
A button to face your new target!
Cannot change target
while on an attack.
Switch Your Target Enemy
It is critical not to lose sight of the enemy
during your battle. Quickly tap the
A button
to jump. This will cause your VR to rotate
towards where the target enemy is at.
A button and rotate!
Performing Strong Attack
Losing Sight of Enemy VR
Page 16
28 29
ADVICE FROM SGT. HATTERADVICE FROM SGT. HATTER
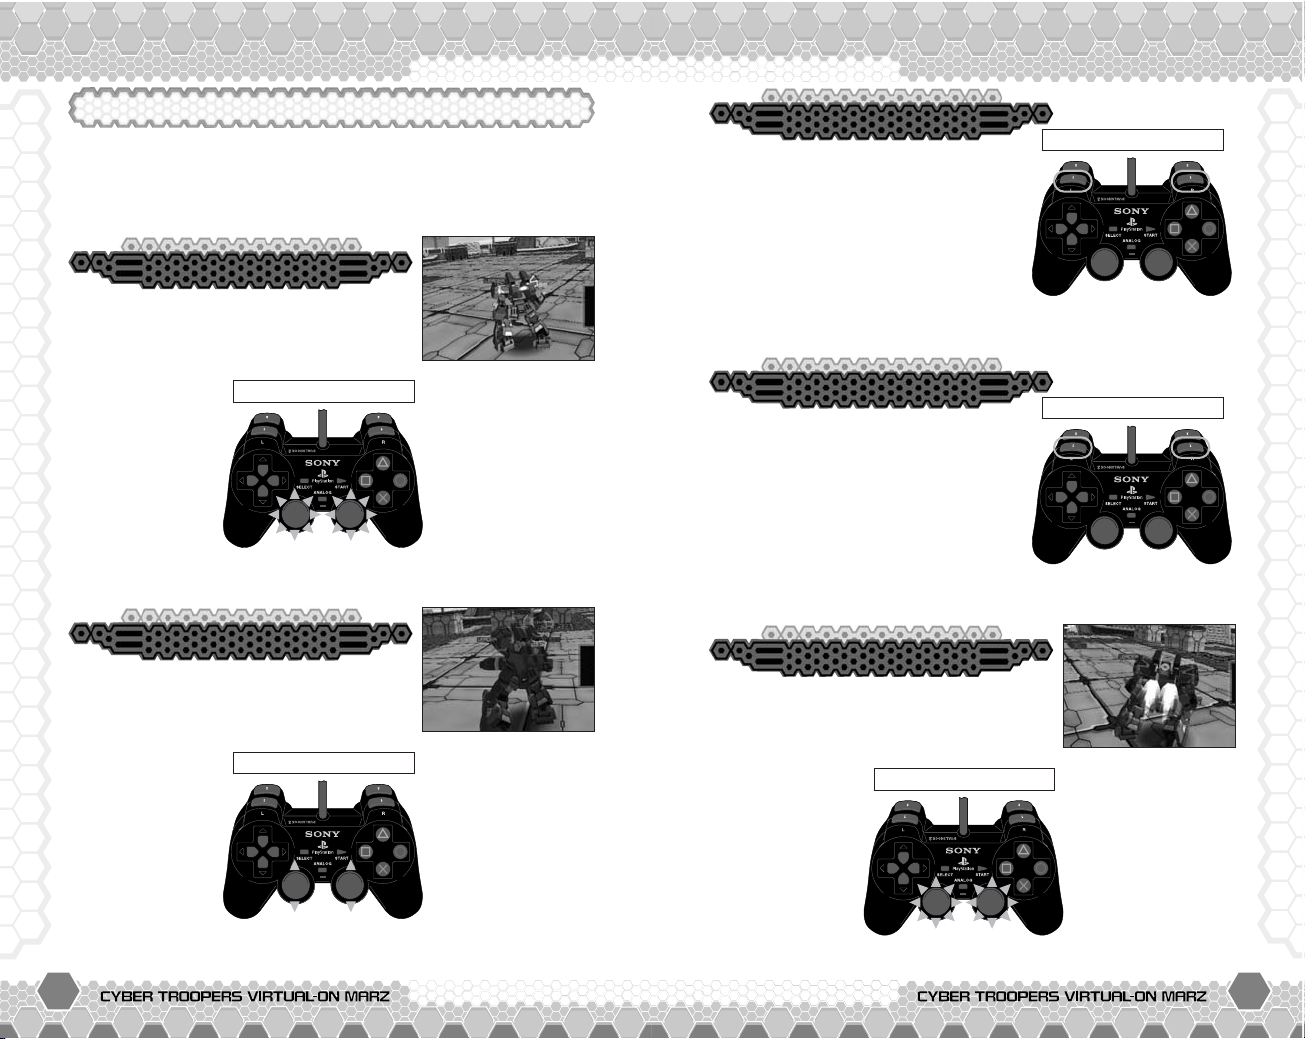
LESSON 2: TWIN TYPE (TWIN A)
Once you master the Auto Type controls, its time to tryout
the Twin Type controls for you to have maximum control of
your Virtuaroids.
Use the left analog stick or right analog
stick to move forward, back, left, right or
diagonally. Agility of the VR will increase
by moving using both Left Stick and Right
Stick. For TWIN B
controls, the
directional buttons
represents the
Left Stick and
Right Stick is the
ASFD buttons.
Move
Stationary Position
In a position where no button is used
(Neutral position) during the Dash, you
can make a Vertical Turn (up to 90 degree
angle) by using the Left or Right Stick.
Vertical Turn
Neutral Position
Use Q or E button while you are
moving to perform a Dash in that
direction. The distance you can Dash
depends on the VR you operate. Use
Q or E button during Dash to stop
your Dash.
Moving or During Dash
In order to rotate your VR, alternately
input
C with either Left or Right Stick and
V with the other Stick. For faster
rotation, use
Q or E button while you
rotate. You can
also slightly turn
as you move by
inputting
C or V
with either left or
right analog stick.
To rotate left, input C
with Left Stick and V
with Right Stick. To
rotate right,
input V
with Left Stick and
C with Right Stick.
Rotate
Stationary Position
Dash & Dash Cancel
Simultaneously press Q and E
button while moving or stationary to
change your target enemy. In order to
win as a team, you must be able to
fight the right enemy at the right time!
Moving or During Dash
Changing Targets
Page 17

30 31
ADVICE FROM SGT. HATTERADVICE FROM SGT. HATTER
Left Weapon Right WeaponCenter Weapon
Simultaneously input Z with left analog
stick and
X with right analog stick while
moving or in a stationary position to make
your VR jump. Your VR will automatically
direct itself to the target enemy. Input
X with the left analog
stick and
Z with the right analog stick during the Jump for an
immediate landing.
Jump & Jump Cancel
Stationary Position During Jump
Simultaneously press W or/and R
button while moving or in a stationary
position for a normal attack. The action
and power of the attack varies with the
VR you operate.
W button is for the
Left Weapon that can be used for
attacking and as a way to negate
enemy porjectiles.
R button is the
Right Weapon that allows you to use combination attacks. And
last but not least is the almighty Center Weapon that can be
used by simultaneously pressing
W and R button.
Moving or Stationed
Normal Attack
While in a stationary position, hold Q or
E button and then use W or R
button to perform
a Turbo Attack.
This is one
powerful attack
that will require
much of your
Weapon Gauge!
Turbo Attack
Stationary Position
As you input X with the Left Stick and Z
with the Right Stick, use W or R
button to perform a
Crouching Attack.
Compared to a
normal attack, the
shots are fired in
a lob. Crouching
Attack is effective
especially when
your enemy is
airborne.
Crouching Attack
Moving or Stationed
Dash Attack can be performed using W
or R button during a Dash. The power
of the attack
depends on the
direction of your
Dash, but the
greatest thing
about this attack
is that it will
automatically
direct your VR to
target the enemy!
Dash Attack
During Dash
Page 18

32 33
ADVICE FROM SGT. HATTERADVICE FROM SGT. HATTER
As you take off for a jump, use W or R
button to perform a Jump Attack. Attack
distant enemies without worrying about any
obstacles being in your way. Beware, this
attack will give your enemies a greater chance for a counter
attack!
Jump Attack
Before Peak of Jump
When the Weapon Gauge turns yellow, use
W or R button or both buttons
simultaneously to perform a Close Range
Attack. Keep hitting the same button so
you can perform a Close Range Combo Attack! But when it looks
like your enemy’s Close Range Attack is coming in before yours,
it is wiser to cancel your attack and put your Guard up.
Close Range Attack
Weapon Gauge Yellow
When the Weapon Gauge turns yellow, hold
Q or E button and then use W or
R button to perform a Close Range Turbo
Attack. Although it takes longer to strike
than a normal Close Range Attack, this attack can really produce
a substantial amount of damage. This attack is so powerful that
it can partially break through an enemy’s Guard. Also, remember
to execute this attack from a stationary position, or else your VR
will start a normal Dash.
Close Range Turbo Attack
Weapon Gauge Yellow
While you Dash forward or diagonally, input
V with either Left Stick or Right Stick and
use
W or R button to perform a Close
Range Dash Attack. Unlike other Close
Range Attacks, this attack is possible even without having the
Double Lock-On Target on.
Close Range Dash Attack
Weapon Gauge Yellow
Page 19
34 35
ADVICE FROM SGT. HATTERADVICE FROM SGT. HATTER
*Input Z with both left and right analog sticks to step around
the left side, and input
X with both left and right analog sticks
to step around the right side.
When the Weapon Gauge turns yellow, use
W or R button while you either input Z
and X with the left analog stick or right
analog stick to perform a Close Range
Quick Step Attack. The actual steps may vary with the VR you
operate, but the result of a blind-sided attack is nothing but fatal!
Close Range Quick Step Attack
Weapon Gauge Yellow
When the Weapon Gauge turns yellow, as
you input
V with either left or right analog
stick use
W or R button to perform a
Close Range Upper Attack.
Close Range Upper Attack
Weapon Gauge Yellow
When the Weapon Gauge turns yellow,
use
W or R button while you input Z
with the left analog stick and X with the
right analog stick to perform a Close
Range Leap Attack.
This Close Range
Attack is executed
while airborne,
unexpectedly
attacking the
enemy on the
ground.
Close Range Leap Attack
Weapon Gauge Yellow
Once you block-off an enemy attack with
your Guard, be ready to strike a counter
attack by using
W or R button.
Guard Reversal is
not the most
powerful attack a
VR has, but it is
lightning fast
attack compared
to other Close
Range Attacks.
Guard Reversal
After Guard
When your enemy is within a certain range,
input
X with the left analog stick and Z with
the right analog
stick to protect
yourself from an
enemy’s Close
Range Attacks.
Keep both analog
sticks together to
hold your Guard
position.
Guard can shield an
attack, but it also
cancels your Close
Range Attack. When
the enemy strikes first,
it is a good idea to put
your Guard up.
Guard
Enemy Within Range
Page 20
36 37
*THIS LIMITED WARRANTY IS VALID FOR SEGA PRODUCTS FOR PLAY ON PLAYSTATION®2
COMPUTER ENTERTAINMENT SYSTEM MANUFACTURED FOR SALE IN AND PURCHASED AND
OPERATED IN THE UNITED STATES AND CANADA, ONLY!
Limited Warranty
Sega of America, Inc. warrants to the original consumer purchaser that the PlayStation 2 product
shall be free from defects in material and workmanship for a period of 90-days from the date of
purchase. If a defect covered by this limited warranty occurs during this 90-day warranty period,
the defective Playtstation 2 product or component will be replaced free of charge. This limited
warranty does not apply if the defects have been caused by negligence, accident, unreasonable
use, modification, tampering or any other causes not related to defective materials or
workmanship. Please retain the original or a photocopy of your dated sales receipt to establish
the date of purchase for in-warranty replacement. For replacement, return the product, with its
original packaging and receipt, to the retailer from which the software was originally purchased.
In the event that you cannot obtain a replacement from the retailer, please contact Sega to
obtain support.
Obtaining technical support/service
To receive additional support, including troubleshooting assistance, please contact Sega at:
• web site . . . . . . . . . . . . . . http://www.sega.com
• e-mail . . . . . . . . . . . . . . . support@sega.com
LIMITATIONS ON WARRANTY
ANY APPLICABLE IMPLIED WARRANTIES, INCLUDING WARRANTIES OF MERCHANTABILITY AND
FITNESS FOR A PARTICULAR PURPOSE, ARE HEREBY LIMITED TO 90-DAYS FROM THE DATE OF
PURCHASE AND ARE SUBJECT TO THE CONDITIONS SET FORTH HEREIN. IN NO EVENT SHALL
SEGA OF AMERICA, INC. BE LIABLE FOR CONSEQUENTIAL OR INCIDENTAL DAMAGES
RESULTING FROM THE BREACH OF ANY EXPRESS OR IMPLIED WARRANTIES. THE PROVISIONS
OF THIS LIMITED WARRANTY ARE VALID IN THE UNITED STATES ONLY. SOME STATES DO NOT
ALLOW LIMITATIONS ON HOW LONG AN IMPLIED WARRANTY LASTS, OR EXCLUSION OF
CONSEQUENTIAL OR INCIDENTAL DAMAGES, SO THE ABOVE LIMITATION OR EXCLUSION MAY
NOT APPLY TO YOU. THIS WARRANTY PROVIDES YOU WITH SPECIFIC LEGAL RIGHTS. YOU MAY
HAVE OTHER RIGHTS WHICH VARY FROM STATE TO STATE.
Sega is registered in the U.S. Patent and Trademark Office. CYBER TROOPERS VIRTUAL-ON
MARZ is a registered trademark or a trademark of Sega Corporation and its affiliates. All Rights
Reserved. Original Game © SEGA © Hitmaker / SEGA, 2003. CHARACTERS © AUTOMUSS
CHARACTER DESIGN KATOKI HAJIME. This game is licensed for use with Playstation 2 only.
Copying and/or transmission of this game is strictly prohibited. Unauthorized rental or public
performance of this game is a violation of applicable laws. SEGA of America, Inc., 650
Townsend Street, Suite 650, San Francisco, CA 94103. All Rights Reserved. www.sega.com.
Programmed in Japan. Made and printed in the USA.
CREDITS
SEGA of America
Executive Vice President
Shinobu Toyoda
Product Manager
Heather Hall
Localization Manager
Osamu Shibamiya
Localization Producer
Jason Kuo
Director of QA
Deborah Kirkham
Project Test Lead
Shawn Dobbins
Release Manager
Andrei Belkin
Project Coordinator
Rick Ribble
Public Relations Manager
Bret Blount
Senior Media Specialist
Te ri Higgins
Creative Services Manager
Arianne McCarthy
Packaging Design
Vicki Morawietz of
VAM Design
Special Thanks
Shinobu Shindo
Yoshihiro Sakuta
Hisakazu Nakagawa
Satoru Ishigami
Te tsuya Honda
Jill Braff
Lori Von Rueden
Entire Virtual-On MARZ team of
Hitmaker!
The following credits list the staff responsible for the localization,
marketing, and manual for the US version of Virtual-On Marz.
See in-game credits for the complete list of the original
development staff.
Page 21

BACK COVER
 Loading...