


WARNING: READ BEFORE USING YOUR PLAYSTATION®2
COMPUTER ENTERTAINMENT SYSTEM.
A very small percentage of individuals may experience epileptic seizures when exposed to certain light patterns or flashing lights. Exposure to certain patterns or backgrounds on a television screen or while playing video games, including games played on the PlayStation 2 console, may induce an epileptic seizure in these individuals. Certain conditions may induce previously undetected epileptic symptoms even in persons who have no history of prior seizures or epilepsy. If you, or anyone in your family, has an epileptic condition, consult your physician prior to playing. If you experience any of the following symptoms while playing a video game – dizziness, altered vision, eye or muscle twitches, loss of awareness, disorientation, any involuntary movement, or convulsions – IMMEDIATELY discontinue use and consult your physician before resuming play.
WARNING TO OWNERS OF PROJECTION TELEVISIONS:
Do not connect your PlayStation 2 console to a projection TV without first consulting the user manual for your projection TV, unless it is of the LCD type. Otherwise, it may permanently damage your TV screen.
USE OF UNAUTHORIZED PRODUCT:
The use of software or peripherals not authorized by Sony Computer Entertainment America may damage your console and/or invalidate your warranty. Only official or licensed peripherals should be used in the controller ports or MEMORY CARD slots.
HANDLING YOUR PLAYSTATION 2 FORMAT DISC:
•This disc is intended for use only with PlayStation 2 consoles with the NTSC U/C designation.
•Do not bend it, crush it or submerge it in liquids.
•Do not leave it in direct sunlight or near a radiator or other source of heat.
•Be sure to take an occasional rest break during extended play.
•Keep this compact disc clean. Always hold the disc by the edges and keep it in its protective case when not in use. Clean the disc with a lint-free, soft, dry cloth, wiping in straight lines from center to outer edge. Never use solvents or abrasive cleaners.
CONTENTS |
01 |
Getting Started . . . . . . . . . . . . . . . . . . . . . . . . 02
Connecting the multitap (for PlayStation®2) . . 03
Controls . . . . . . . . . . . . . . . . . . . . . . . . . . . . . 04
Controls During Battle . . . . . . . . . . . . . . . . . . . 05
Story . . . . . . . . . . . . . . . . . . . . . . . . . . . . . . . 06
Screen Layout . . . . . . . . . . . . . . . . . . . . . . . . . 07
Story Mode . . . . . . . . . . . . . . . . . . . . . . . . . . . 08
Active Character Selection System . . . . . . . . . 08
Saving/Loading . . . . . . . . . . . . . . . . . . . . . 08
Bouncer Points . . . . . . . . . . . . . . . . . . . . . . . . 09
Point Exchange System . . . . . . . . . . . . . . . . . . 10
Other Gameplay Features . . . . . . . . . . . . . . . . . 11
Trinity Rush . . . . . . . . . . . . . . . . . . . . . . . . 11
Special Circumstances . . . . . . . . . . . . . . . . . 11
Versus & Survival Modes . . . . . . . . . . . . . . . . . 12
The Mikado Corporation . . . . . . . . . . . . . . . . . . 13
Character Introductions . . . . . . . . . . . . . . . . . . 14
Sion . . . . . . . . . . . . . . . . . . . . . . . . . . . . . . 14
Volt . . . . . . . . . . . . . . . . . . . . . . . . . . . . . . 16
Kou . . . . . . . . . . . . . . . . . . . . . . . . . . . . . . 18
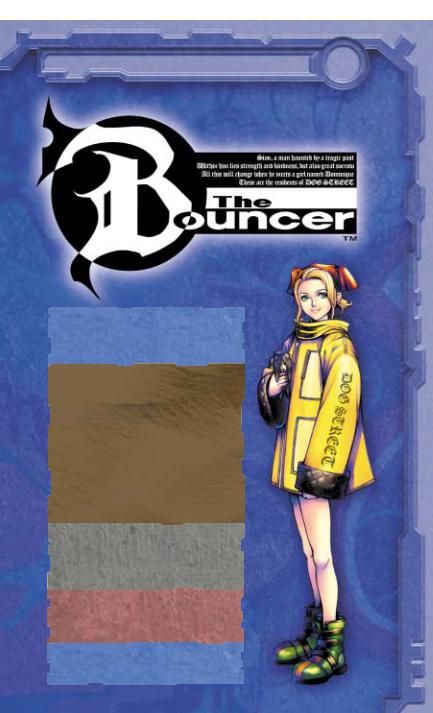
Dominique . . . . . . . . . . . . . . . . . . . . . . . . . 20
Mugetsu . . . . . . . . . . . . . . . . . . . . . . . . . . . 22
Echidna . . . . . . . . . . . . . . . . . . . . . . . . . . . 23
Kaldea . . . . . . . . . . . . . . . . . . . . . . . . . . . . 24
Dauragon . . . . . . . . . . . . . . . . . . . . . . . . . . 25
Theme Song Credits . . . . . . . . . . . . . . . . . . . . . 26
Credits . . . . . . . . . . . . . . . . . . . . . . . . . . . . . . 32
Limited Warranty/Game Tips . . . . . . . . . . . . . . 33
02 |
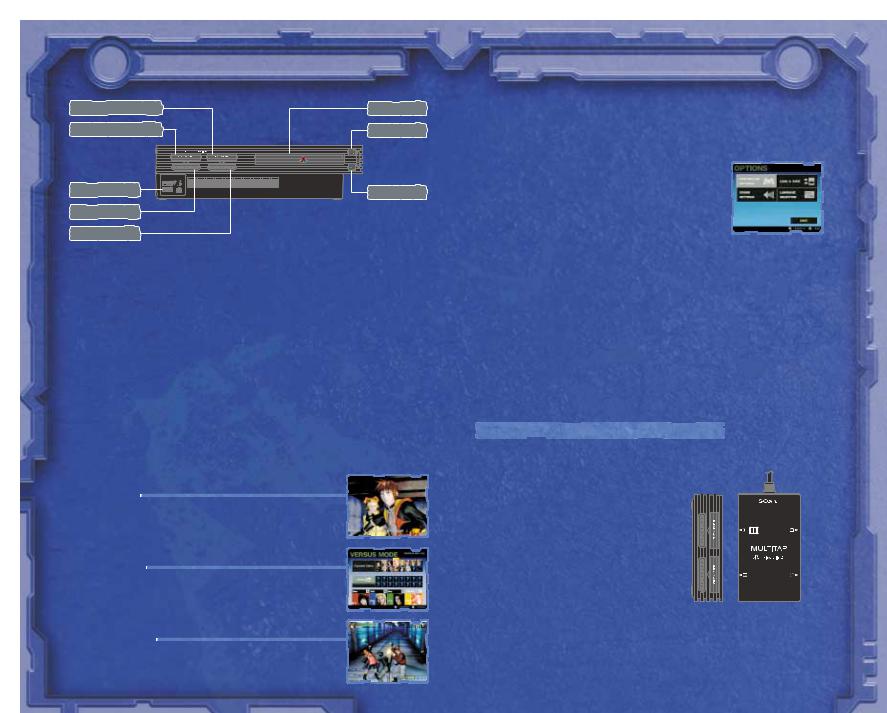
GETTING STARTED |
MEMORY CARD slot 2 |
DISC tray |
MEMORY CARD slot 1 |
RESET button |
USB connectors |
OPEN button |
controller port 1 |
|
controller port 2 |
|
Set up your PlayStation®2 computer entertainment system according to the instructions in its instruction manual. Make sure the MAIN POWER switch (located on the back of the console) is turned on. Press the RESET button. When the power indicator lights up, press the OPEN button, and the disc tray will open. Place The Bouncer™ disc on the disc tray with the label side facing up. Press the OPEN button again and the disc tray will close. Attach game controllers and other peripherals, as appropriate. Follow on-screen instructions and refer to this manual for information on using the software.
NOTE: Due to the analog features of this game, The Bouncer does not support the original PlayStation™ digital controller or the original DUALSHOCK™ analog controller. The game is optimized for use with the analog functions of the DUALSHOCK™2 analog controller.
The title screen showing the opening demo will appear after the Bouncer disc is inserted into your PlayStation®2 computer entertainment system and the power is turned on. Press the START button while on the title screen to view the game modes. Select the game mode you wish to play.
STORY MODE
In this mode, you can develop your characters by completing battles and events to acquire Bouncer Points. See page 08 for details.
VERSUS MODE
A competitive mode that allows up to four players to join. There are two variations, each with different winning conditions. See page 12 for details.
SURVIVAL MODE
GETTING STARTED |
03 |
OPTIONS
Each setting within the game can be changed according to your preference. After changing settings, if the game ends and you haven’t saved the changes, the settings will return to default, so please be sure to save your settings.
Controller Settings |
|
Vibration: |
Select vibration function On/Off. |
Sensitivity: |
Set button sensitivity. |
Button Sensitivity Test: |
Check button sensitivity. |
Button Configuration: |
Change button configuration. |
Sound Settings
Switch between Stereo/Mono, and switch Dolby Digital 5.1 channel surround sound On/Off. 5.1 channel surround sound can only be utilized when the appropriate system and optical cable are used (5.1 channel surround sound only applies to select movies). Once Dolby Digital 5.1 channel is selected and the pause function is activated during a movie sequence, there will be no confirm, cancel, or cursor movement sounds. Additionally, for those systems that have both analog and optical inputs, please connect to either one of the inputs. Please note that The Bouncer utilizes both Dolby Digital and PCM sounds. There may be instances where auto-switching may not be activated for AV amps.
Load & Save
Load and save game data.
Language Selection
Select either Japanese or English dialog, subtitles, and game text.
Connecting the multitap (for PlayStation®2)
Playing in Versus Mode with more than two players requires the multitap (for PlayStation®2).
• You will not be able to use the original PlayStation® multitap.
• When using the multitap (for PlayStation®2), make sure to connect the multitap correctly before turning the unit on.
1. Be sure to connect the multitap (for PlayStation®2) to controller port 2. The multitap (for PlayStation®2) will not function in controller port 1.
2.When using the multitap (for PlayStation®2), make sure that the DUALSHOCK™2 analog controller is connected to the multitap controller port 2-A before connecting to ports 2-B and 2-C.
In this mode, you must defeat as many opponents as possible before your selected fighter’s stamina runs out. This mode is also useful for practicing moves. See page 12 for details.
3.When using characters that have been developed in Story Mode, insert the memory card (8MB) (for PlayStation®2) containing that data into the MEMORY CARD slot (1 or 2-A/B/C) corresponding to the DUALSHOCK™2 analog controller you are operating.

04 |
CONTROLS |
DUALSHOCK™2 analog controller
L1 button
Activate extra skills when combined with other buttons
directional button
Move character/ Move cursor (in menu)
R2 button
Gesture/Signal
(trigger for Trinity Rush– only used in Story Mode)
R1 button
Guard against attacks from enemies while pressed (character cannot move or attack while guarding)
left analog stick
Move character–speed varies depending on the degree to which the analog stick is tilted/ Move cursor (in menu)
SELECT button
ANALOG mode button/LED
START button
Open Pause Menu
NOTE:
button |
High attacks (Weak= H , Strong= H ) |
button |
Mid attacks (Weak= M , Strong= M ) |
button |
Low attacks (Weak= L , Strong= )/
)/
Confirm (in menu)
 button
Jump attacks (Weak= J , Strong= )/ Cancel (in menu)
The Bouncer™ only supports the DUALSHOCK™2 analog controller in analog mode. You cannot use PlayStation™ controllers such as the original DUALSHOCK™ analog controller or digital controllers with this title. Do not remove and re-insert a controller or switch the controller’s analog mode off during play.
CONTROLS DURING BATTLE |
05 |
Movement Near Enemies
During battle, as you approach an enemy while moving, you will be able to move slowly while maintaining a fixed position facing the enemy. Upon reaching a certain distance from the enemy, you will be able to run. Also, while holding down the L1 button, you can maintain the direction you are facing.
Weak Attacks
Press the attack buttons (ç, √, Ω, ≈) lightly to trigger weak attacks. (If they are pressed harder, they will trigger strong attacks.) By repeatedly hitting weak upper attacks, you can execute chain attacks.
Strong Attacks
Press the attack buttons (ç, √, Ω, ≈) firmly to trigger strong attacks.
Extra Skills
Press the attack buttons while holding down the L1 button to activate a character’s special techniques. This is only possible once new techniques have been mastered with the Point Exchange System. See page 10, “Point Exchange System,” for details.
Guard
The guard function is effective against frontal attacks. If you are attacked while guarding, your defense meter will decrease. Once your defense meter drops to zero, you cannot guard anymore for that battle. Hence, guarding ability is directly related to the character's defense status.
06 |
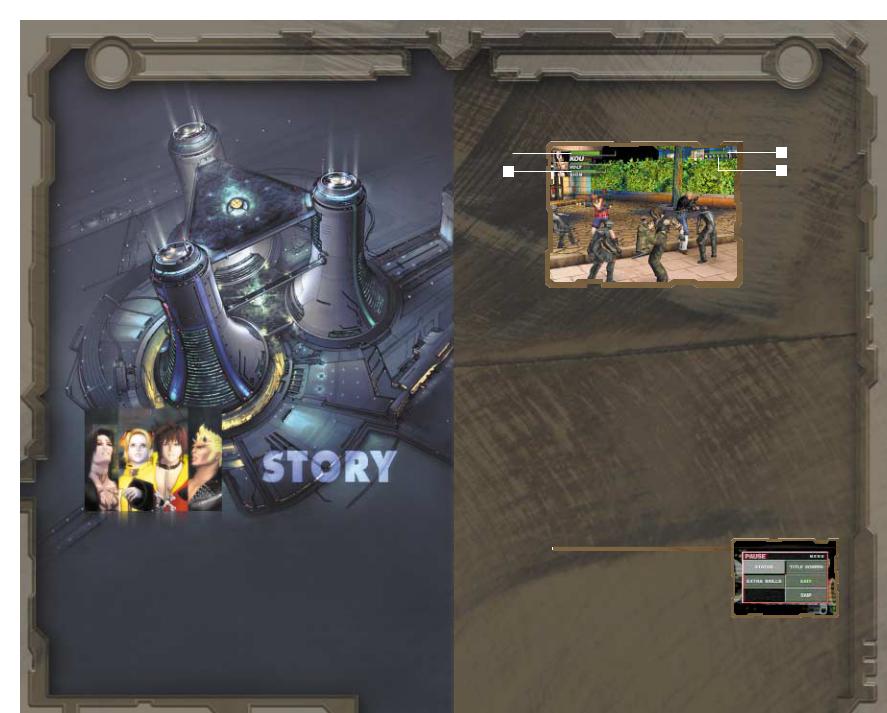
STORY |
The Mikado Building, the heart of the Mikado Group international megacorporation, overlooks Dog Street.
The bars located on this dangerous street are always guarded by bouncers. Sion, Kou, and Volt are three such men, working to protect their bar, Fate, from troublemakers.
Recently, Dominique, a young girl Sion found lost in the city, has become a kind of mascot for Fate. No one knows where she came from or who she really is.
Time passes uneventfully for them… until one day, Dominique is abducted by the Mikado Special Forces. What are Mikado’s motives? Why was Dominique taken? What is her secret? Will Sion, Kou, and Volt be able to rescue Dominique...?
It’s going to be a long night for these three!
SCREEN LAYOUT |
07 |
In each game mode, a screen similar to the one below will appear when you have to fight. Defeat the enemies with your selected character to move on.
A |
B |
C |
D |
A] Stamina of the character being controlled.
Stamina will decrease when the character is attacked by enemies. The game ends when your stamina drops to zero.
B] Stamina of enemy characters.
The stamina of the enemy character the player is currently battling. Stamina will decrease as attacks hit the enemy. When the enemy’s stamina reaches zero, he is defeated.
C] Stamina of ally characters.
The stamina of the ally characters the player does not control. These will not appear when your character is fighting on his own.
D] Life counter of enemy characters.
A separate counter will appear for each enemy. The color of the counter corresponds to the stamina of the enemy character. As an enemy’s stamina decreases, the counter’s color will turn from green to yellow to red. When an enemy is defeated, that enemy’s counter will disappear.
Pause Menu
Press the START button during the game to display the Pause Menu.
STATUS |
Display character status. |
EXTRA SKILLS |
Display the list of Extra Skills. |
TITLE SCREEN |
Return to Title Screen to restart game. |
SKIP |
Skip events and movies. |
EXIT |
Return to game. |
08 STORY MODE
When Story Mode is chosen at the title screen, the following selections will be displayed.
• New Game |
Start a new game. |
• Load Game |
Resume a game from save data. |
• Extra Game |
Play from the beginning using developed character data. |
|
(You must have data from a previously cleared game.) |
The game progresses in the following pattern: “Event Scene” ˜ “Character Selection” ˜ “Battle”. As you complete battles, you will earn “Bouncer Points.” You can improve your characters by distributing the points between techniques and attributes. See page 10, “Point Exchange System” for more information. If you are defeated in battle or are unable to fulfill event requirements, the game will end.
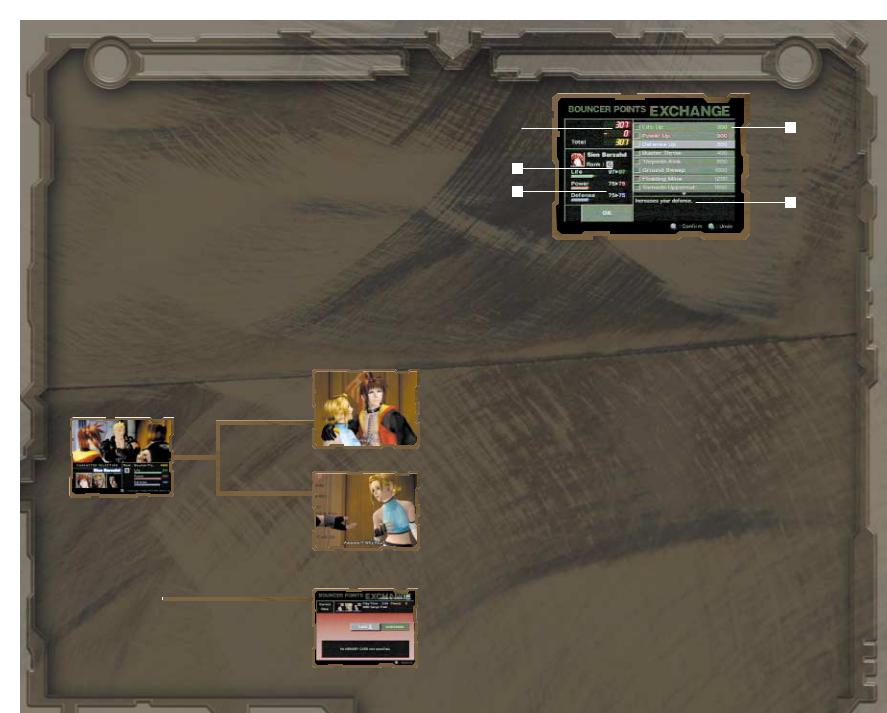
Active Character Selection System
There will be times when Sion, Volt, and Kou’s portraits will appear in the lower half of the screen. With the directional button, select the character you would like to use, and press the ≈ button to confirm. If a character is selected before battle, the selected character will be used in the upcoming fight. However, if a character is selected before an event, that character will be the focus of the upcoming scene. Events will change depending on the character selected, so you might discover new facts by selecting another character when playing through the game again. Play through several times after clearing the game to see the whole story.
Example
One of the three must protect Dominique:
Select Sion
A happy expression if Sion is selected.
Select Kou
An uneasy expression if Kou is selected.
Saving/Loading
In Story Mode, you can save game data after clearing each battle scene. After inserting a memory card (8MB) (for PlayStation®2) into a MEMORY CARD slot, select the location to save to. If there is not enough space on the memory card, you will not be able to save your game. In this case, delete any unnecessary data to make space before saving.
BOUNCER POINTS |
09 |
A |
B |
C
D
E
During Story Mode, if you clear a battle scene, the character you used gains Bouncer Points (BP). By spending BP, you can increase your character’s stamina, attack power, and defense power, or master Extra Skills.
A] Bouncer Points
From the top, Battle Evaluation, Bonus, and Total are listed.
Battle Evaluation |
The points received after finishing off an enemy. The amount received |
|
varies depending on your rank and the power of your enemies. |
Bonus |
Points received for finishing the battle. |
Total |
Total number of Bouncer Points obtained. |
B] Powering Up
The number to the right of each power-up is the BP necessary to enhance / buy that power-up. The top three rows are attribute power-ups. Below those three are the Extra Skills the character can master.
C] Bouncer Rank
An evaluation of the character’s overall power.
D] Character Status
The physical abilities of the character displayed. The value on the left indicates the value of the attribute before BP distribution, and the value on the right shows the value after BP distribution.
Life |
Maximum value of stamina. |
Power |
The higher the value, the more damage you inflict. |
Defense |
The higher the value, the less damage you receive. Raising this attribute also |
|
allows the character to guard against more attacks. |
E] Help Menu
Displays the description of the selected power-up.
 Loading...