

Page 1
™
Page 2
2 GETTING STARTED
❍ Memory Card (8MB)(for PlayStation
®
2) 2 ❍
3 CONTROLLER
❍ Menu Controls 3 ❍
4 JACK’S PLEA
5 DEATH- O-GRAM
6 CONTROLS
7 SETTING UP YOUR GAME
❍ Creating a New Profile 7 ❍ Starting a Game 7 ❍
Main Menu 7 ❍ Single Player Mode 7 ❍
8 GAME SCREEN
8 SCREEN DISPLAYS
❍ Health 8 ❍ Aiming/Direction Cursor 8 ❍ Weapons
& Ammo 9
❍
9 ON-SCREEN HELP
❍ The x Button (Action Button) 9 ❍ Display Orders 9 ❍
9 PAUSE SCREEN
10 OBJECTIVES MENU
10 WEAPONS TRAINING
❍ Police Weapons 10 ❍ Gang Weapons 13 ❍ Non-lethal
Takedowns 14
❍ Other Equipment 15 ❍
16 ORDERS/TEAMMATES
❍ Fire Department 16 ❍ Paramedics 16 ❍ Pol ice
Officers 17
❍
17 REWARDS & EMERGENCIES
❍ Medals & Rewards 17 ❍ Emergency Situations 17 ❍
17 PICK-UPS
18 MULTIPLAYER ONLINE PLAY
❍ The T-Zero Urban Combat Sim 18 ❍ Network
Configuration 18
❍ Online System Requirements 18
❍ Gamespy
™
Match-up 18 ❍ Connecting to a Local
Area Network 19
❍ Connecting to the Internet 19 ❍
Creating an Account 19 ❍ Hosting a Game 20 ❍ Joining
a Game 20
❍ Lobby Options 20 ❍ Multiplayer-Specific
Game Controls 20
❍
21 OPTIONS
21 SAVING & LOADING
❍ Memory Cards, Autosave & Checkpoints 21 ❍
Loading a Game 21 ❍
22 CREDITS
24 TROUBLESHOOTING
CONTENTS
WARNING: READ BEFORE USING YOUR PLAYSTATION®2 COMPUTER
ENTERTAINMENT SYSTEM.
A very small percentage of individuals may experience epileptic seizures when
exposed to certain light patterns or flashing lights. Exposure to certain patterns
or backgrounds on a television screen or while playing video games, including
games played on the PlayStation 2 console, may induce an epileptic seizure
in these individuals. Certain conditions may induce previously undetected
epileptic symptoms even in persons who have no history of prior seizures
or epilepsy. If you, or anyone in your family, has an epileptic condition,
consult your physician prior to playing. If you experience any of the following
symptoms while playing a video game — dizziness, altered vision, eye
or muscle twitches, loss of awareness, disorientation, any involuntary
movement, or convulsions — IMMEDIATELY discontinue use and consult
your physician before resuming play.
WARNING TO OWNERS OF PROJECTION TELEVISIONS:
Do not connect your PlayStation 2 console to a projection TV without
first consulting the user manual for your projection TV, unless it is of
the LCD type. Otherwise, it may permanently damage your TV screen.
USE OF UNAUTHORIZED PRODUCT:
The use of software or peripherals not authorized by Sony Computer
Entertainment America may damage your console and/or invalidate
your warranty. Only official or licensed peripherals should be used
in the controller ports or memory card slots.
HANDLING YOUR PLAYSTATION 2 FORMAT DISC:
• This disc is intended for use only with PlayStation 2 consoles
with the NTSC U/C designation.
• Do not bend it, crush it or submerge it in liquids.
• Do not leave it in direct sunlight or near a radiator or other
source of heat.
• Be sure to take an occasional rest break during extended play.
• Keep this disc clean. Always hold the disc by the edges and
keep it in its protective case when not in use. Clean the disc
with a lint-free, soft, dry cloth, wiping in straight lines from
center to outer edge. Never use solvents or abrasive cleaners.
Page 3
32
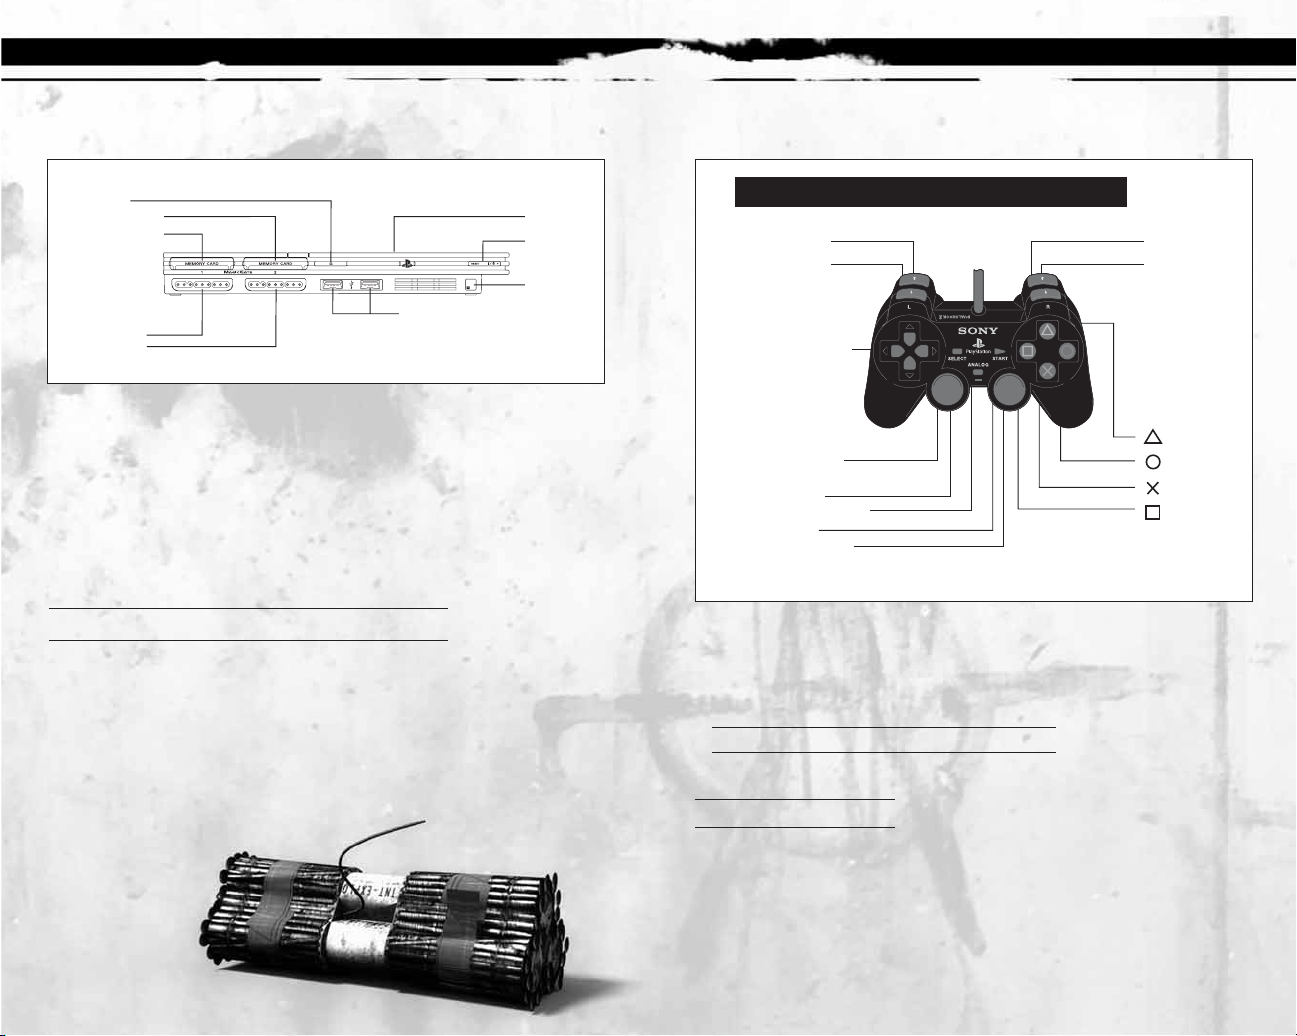
GETTING STARTED CONTROLLER
Set up your PlayStation®2 computer entertainment system according to the instructions
in its Instruction Manual. Make sure the MAIN POWER switch (located on the back of
the console) is turned ON. Press the RESET button. When the power indicator lights up,
press the OPEN button and the disc tray will open. Place the URBAN CHAOS
™
: RIOT
RESPONSE
™
disc on the disc tray with the label side facing up. Press the OPEN button
again and the disc tray will close. Attach game controllers and other peripherals,
as appropriate. Follow on-screen instructions and refer to this manual for information
on using the software.
MEMORY CARD (8MB)(for PlayStation
®
2)
To save game settings and progress, insert a memory card (8MB)(for PlayStation®2)
into MEMORY CARD slot 1 before powering on the system. At least 90KB of free space
on the memory card is required to save game data.
This game supports saving and loading of game data in MEMORY CARD slot 1 only.
You can load saved game data from the same memory card or from any memory card
containing previously saved URBAN CHAOS: RIOT RESPONSE games.
Connect the DUALSHOCK
®
2 analog controller to controller port 1 before starting play.
When the vibration function is On, the controller will vibrate in response to game
events. You can reconfigure the controls and toggle the vibration function On/Off
in Options mode.
NOTE: All controls used in this manual are the default controls.
MENU CONTROLS
You can select and adjust options from the Main Menu and from the in-game Pause
menu (press the
w button during play to pause).
❍ Use the directional buttons to view and cycle through the game options.
❍ Press the x button to select an option, change a current option, confirm any
changes made or progress to the next screen.
❍ Press the t button in a submenu to return to the previous screen.
open button
memory card slot 2
memory card slot 1
controller port 1
controller port 2
USB connectors
disc cover
on/standby/
reset button
IR receiver
DUALSHOCK®2 ANALOG CONTROLLER CONFIGURATIONS
L2 button
L1 button
directional
buttons
left analog stick
(L3 button
when pushed down)
SELECT button
ANALOG mode button
START button
right analog stick
(R3 button
when pushed down)
R2 button
R1 button
button
button
button
button
Page 4
54
Nov 30th
Dear Nick,
Well, it’s been a few weeks since I last wrote you. Hoping that your posting in Ramadi is
going okay and that the insurgents aren’t making too much of a nuisance of themselves on your
daily ops.
Back at home, things are going from bad to worse. Gang violence has reached a level
we’ve not seen since the crackhouse wars of the early nineties — and not just in the rough
neighborhoods, either. The gangs seem to be organizing themselves with almost religious fervor.
I don’t say this lightly, but it feels like the city is at war with itself, and if something isn’t done
soon, we’re going to lose the city to the Burners — a group of psycho-terrorist revolutionaries.
Thing is, with the sons of the city overseas, fighting a war that seems like it’s hell-bent
on nothing, us old-timers are left fighting for the freedom of the city. We need our toughest young
men back. Guys like you with combat experience might not have been the first choice a couple
years back. But right now the Mayor and the Chief of Police are planning to take the fight to
the gangs. We gotta meet these bastards head on, on their terms. “Soft” policing don’t work
with these animals. Hot lead, flash bangs and good old-fashioned brutality is the only language
they understand. A “Zero Tolerance” task force of tooled-up cops seems like the only way to rid
the city of this cancer. If the Mayor gets his way, we’re gonna be ready to hit back by the end of
next month.
I don’t want to sound like a broken record but the Masons have always been city cops
and, while I know you made your decision and have made the Marine Corps your life, maybe now
you should be rethinking where your loyalties lie. To the city and folks that nurtured you or to
those suits in Washington who seem more interested in lining their pockets than anything else.
I’ll say no more but you wouldn’t recognize our neighborhood — it’s gone to hell, and I need to
get back on shift in a couple of hours. Back in the eye of the storm again, trying to get more intel
on these Burner assholes.
Anyway, son, I’ll say so long now — will you write me soon and tell me what you think?
Maybe staying in the Corps feels like the right thing to do career-wise, but your family and your
city need you now.
Love,
Jack
JACK’S PLEA DEATH-0-GRAM
1 December
Dear Nick,
I hoped I'd never have to send this message - but
things have changed in a big way since you headed out
on your latest tour. Your father was out on patrol
yesterday as normal. He and Steve Zuchero had just
arrived in their patrol car to investigate a warehouse
break-in, when a gang surrounded the car, smashed in the
windows and molotoved it. Your dad didn't stand a chance
- Zuchero managed to escape on foot but couldn't do
anything to save Jack. Not only did they let him burn,
but they held off the Emergency Services and back-up
with handguns as he fried.
Nick, I know that me and your dad used to rib you for
the choices you've made over the years, but hear me out.
Right now, this new unit I'm heading up, name of T-Zero,
needs men like you, who've seen the horror of war.
With my connections, graduating the Police Academy is
a formality. Just get your ass back here for Jack's
funeral and maybe you can help take the battle to these
bastards!!
With deepest condolences,
Adam Wolf
Page 5
76
CONTROLS
BUTTON
left analog stick
.
button (push in and hold)
right analog stick
f
button (push in)
directional buttons
1
2
4
3
s
button
t
button
c
button
x
button
l
button (hold)
,
button
r
button
d
button
q
button
w
button
ACTION
Move character
Crouch
Look
Zoom aim
Action order
Open orders (when teamed up)
“Follow me” order/Heal
“Take cover” order/Don’t heal
Cycle through available firearms
Cycle through available thrown weapons
(hold for quick throw)
Cycle through available melee weapons
(hold for quick use)
Reload/Action/Skip Cutscene
Use riot shield
Equip/Unequip thermal breather
(when available)
Fire selected weapon
Use Secondary Fire mode (or flashlight
when using one-handed firearms)
View objectives
Pause
SETTING UP YOUR GAME
CREATING A NEW PROFILE
The first thing you’ll do is create a player profile, which keeps track of your progress
in the game. Make sure you have a memory card inserted in MEMORY CARD slot 1 so
that Autosave can work. To create a profile:
❍ Use the directional buttons to highlight letters and press the x button to select.
❍ When you’re finished inputting your name, highlight DONE at the bottom
of the screen and press the
x button.
STARTING A GAME
1. Make sure the SINGLE PLAYER option is highlighted and press the x button.
2. Use the directional buttons to choose a difficulty setting (ROOKIE is easiest).
3. Press the
x button to begin the game.
MAIN MENU
You access all game modes from this menu and return here when you quit your game.
SINGLE PLAYER Get tooled up and dive into Single Player action
(see below).
LAN Play the game over a Local Area Network
(page 19).
INTERNET Play the game online against other gamers using the Gamespy
match-up service
(page 18).
OPTIONS Modify various in-game settings
(page 21).
SINGLE PLAYER MODE
In Single Player mode, you are recruited by the newly formed special police unit T-Zero.
Your task is to take on and defeat the gangs who are bringing this fair city to its knees.
❍ Use the directional buttons to choose missions from the Single Player Menu.
You’ll unlock additional assignments as you complete missions. You’ll be awarded
Emergency Missions when you complete the Gang Leader Special Objective.
❍ Press the c button to change your difficulty settings.
❍ Press the s button to view all the rewards you’ve earned. Rewards
include Emergency Missions and additional weapons, equipment
and upgrades.
TIP: Only a committed elite officer will earn every medal and unlock every reward!
Page 6

98
GAME SCREEN
Nick’s Health
Teammate’s
Health
Currently Selected Weapon
Number of Rounds/Items
Available
Total Available
Flashlight On/Off
Melee WeaponsFirearms
Thrown Weapons
SCREEN DISPLAYS
HEALTH
This gives you
an idea of how Nick’s doing. If the bar’s almost empty, you’d better find a paramedic.
AIMING/DIRECTION CURSOR
An aiming cursor is always present in the center of the screen.
Its appearance depends on what weapon is currently selected.
If the cursor is green, the target is friendly — so hold your fire.
TIP: If the cursor is red, you’re hitting an enemy target.
Use the right analog stick to change the direction
in which Nick is aiming or looking.
WEAPONS & AMMO
This overlay shows the weapon you’ve selected and how many
rounds of ammunition are in its clip. Note the on-screen buttons.
Press the indicated button to equip that weapon type. Press
the button again to toggle through other weapons of that type.
ON-SCREEN HELP
THE
x
BUTTON (ACTION BUTTON)
Whenever you approach something that Nick can interact with, such as
a door, an on-screen prompt appears. Press the
x button (Action button)
to carry out the command.
NOTE: The x button returns to its normal function when you move away
from a door or other interactive item.
DISPLAY ORDERS
When you move the cursor over certain colleagues or items, a Display Orders
icon appears.
❍ Press the directional button 2 to open the Order Panel.
❍ Use the directional buttons to select the order you want to issue.
PAUSE SCREEN
The Pause Screen provides access to game options.
❍ Press the w button to view the Pause Screen.
❍ Use the directional buttons to highlight the following options and press
the
x button to select:
RETURN TO GAME Get back into the fray.
CONTINUE FROM LAST CHECKPOINT Restart from the last checkpoint
in the current mission.
RESTART MISSION Return to the beginning of the mission.
OPTIONS Open the Options Menu.
OBJECTIVES View the Objectives screen.
QUIT Return to the Main Menu without saving
your progress.
Page 7

1110
OBJECTIVES MENU
The Objectives Menu lets you take a break from the action and check on your progress.
❍ Press the q button to open the Objectives Menu.
❍ Press the directional buttons 1/2 to scroll through the list of objectives.
❍ Press the t button to return to the game.
Objectives are orders that must be completed in order to finish the mission.
The Primary Objective is the key to completing the mission. Complete Special
Objectives to win medals, which bring rewards as well as street cred.
TIP: Weaponry and other upgrades are available to the best of the best. Emergency Missions are
awarded for non-lethal capture of gang leaders. See page 17 for details on rewards or press
the s button in the Single Player/Select Level screen.
WEAPONS TRAINING
T-Zero’s great strength is taking the fight to the gangs. Weapons, though unpopular
among many civilians, are crucial for this task.
REMEMBER: The weapons you are issued are not the only weapons you can use.
Walk over downed gang members to pick up their weapons, too.
POLICE WEAPONS
As a new hire, you’re issued
the following key sidearms. Other
items will be added to your arsenal
as you prove yourself in service
through completion of missions.
Completing Special Objectives
rewards you with weapons
upgrades and other
firepower advantages.
Pistol MK. 1 (Single-Handed Weapons)
A 15-round semi-automatic pistol with excellent
accuracy. A cornerstone of any T-Zero
operative’s armory.
❍ Press the s button to select the pistol.
❍ Press the s button to toggle through any
other firearms you may have picked up.
❍ Press the r button to fire a weapon.
❍ You can use a flashlight while using a
single-handed weapon. Press the
d
button to switch the flashlight on/off.
❍ Push in the f button to zoom in with
the pistol and other selected weapons. This
allows for much more accurate shooting.
TIP: Use your firearms to shoot out lights, gas
canisters and even locks.
Stun Gun
The stun gun is a non-lethal subduing implement,
useful for incapacitating suspects long enough
for them to be locked up and interrogated.
While you may think these scum don’t deserve
to live, key leaders must be taken alive if you’re
to gain intelligence on this organization.
❍ Press the c button to select the stun gun.
❍ When you are arm’s length from the target,
press the
r button to discharge
the stun gun.
TIP: Two-seconds discharge will incapacitate most
perps. Hold the
r button longer than that
and you might smell roast pork!
Page 8

1312
Projectiles
Smoke grenades provide cover so you can get
up close and personal with terrorist flunkies.
Well-aimed riot grenades stun and incapacitate
lawbreakers. Their use may count toward T-Zero’s
non-lethal takedown stats, which could help you
win the PR war.
❍ Cycle through available projectile weapons
with the
t button.
❍ To throw a grenade (or any projectile) press
the
r button. Hold down the button
longer to throw farther.
❍ To roll grenades or other munitions,
press the
d button.
Thermal Breather
You’ll need a thermal breather to be able to take
control of situations involving smoke grenades
and fiery infernos.
❍ Press the , button to equip/unequip
the thermal breather (when available).
Molotov Cocktail
The “Burners” are well-named. They like nothing
better than using fire to spread both terror and
destruction. The flaming Molotov cocktail can be
hurled long distances and explodes on impact.
If its gasoline contents touch you, severe burns,
or a savage “flame-on” death can follow.
❍ At point blank range, press the d button
to smash a Molotov over the head
of an attacker.
TIP: Watch out in close quarters. A Burner could
literally blow flames in your face!
Cleaver
The Burners like to get “in your face” as they
spread a new brand of extremism on the streets.
A meat cleaver may be the sort of implement
you’ve only seen on a butcher’s slab, but these
freaks use them as casually as fly swatters. Why
not give them a taste of their own medicine?
❍ At point blank range, press the d button
to swipe with a cleaver.
❍ At longer distances, press the r button
to hurl cleavers at enemies.
GANG WEAPONS
Page 9

1514
Sawed-off Shotgun (Two-handed Weapons)
The sawed-off shotgun is just one of your
firearms that require two hands to use. It's lethal
at close range, so be careful if you come face
to face with a Burner wielding one.
❍ To loose off a single barrel, press
the
r button.
❍ To let ‘em have it with both barrels,
press the
d button.
TIP: There are only two barrels — and then
it’s time to reload.
NON-LETHAL TAKEDOWNS
Non-lethal takedowns may seem like the wimps’ way out, but you need to fight
a PR war as well as a street war, so taking a few of these bastards alive is essential.
For intelligence gathering reasons, you need to take certain key targets alive.
This means that in certain situations the non-lethal takedown is crucial. Just keep
your ears open for Mission Objective updates.
❍ The stun gun and riot grenade can both inflict a non-lethal takedown
of gang members.
OTHER EQUIPMENT
Riot Shield
The T-Zero riot shield is made of high-impact
resistance polycarbonate, and is designed to
protect T-Zero officers against hand-held melee
weapons and projectiles. It offers reasonable
protection against fire and shrugs off most
sidearm fire. Its use is crucial if you’re going to
stay alive in the face of this savage onslaught.
❍ Press and hold the l button to protect
yourself with the shield. Release the button
to return to your equipped weapon.
❍ While using the shield, you can press
the
s, c and t buttons to cycle through
and select weapons in your possession.
❍ Throw grenades from behind the shield.
Toggle the
t button to select a grenade,
then press the
d button to throw it.
❍ Press the x button to reload your current
firearm behind the shield.
❍ Push in the f button to prepare Zoom
mode behind the shield.
VETERAN TIP: Press the r button to smash
would-be assailants with your shield. Most law
breakin' bastards go down like a sack o’ spuds
after a couple well-timed shield smashes.
Factory-fresh shield ready
for action.
Most T-Zero shields look more
like this after about five
minutes in the war zone.
Flashlight
The flashlight is extremely useful in dark spaces
but it can only be used with the pistol, stun gun
and other one-handed firearms.
❍ Toggle the d button to turn your
flashlight on/off.
Page 10

1716
ORDERS/TEAMMATES
In the course of your duties, you'll team up with other members of the Emergency
Services. In certain situations, an on-screen Orders interface lets you issue orders so
that other members of the City’s Emergency Services can assist you in your missions.
❍ Press and hold the directional button 2 to review available orders.
FIRE DEPARTMENT
The City’s firemen are here to assist you in accessing burning
buildings and finding your way past barriers. Their expertise
allows you to go where others fear to tread.
Use the left analog stick to highlight a blocked or locked
door, then select the AXE icon to order the fireman
to break through.
NOTE: There are other orders, so watch out for situations
where quick thinking and team work are required.
Select the FOLLO W order icon to get your teammate
to follow at a safe distance.
Select the HAND icon to order your colleague to halt
and take cover.
PARAMEDICS
The angels of the city — they’ll even the odds in otherwise
hopeless situations. If you spot a paramedic and your health bar’s
looking pretty desperate, walk up to her for the following options:
Press the directional button
4 to select HEAL.
You’ll receive medical attention from the paramedic,
if she has the supplies.
Select DON’T HEAL to refuse medical attention
and conserve supplies.
POLICE OFFICERS
Regular 5-0 just might save your bacon in a tight squeeze —
they’re there to help disperse crowds, provide extra manpower
and even help out in hostage situations.
Press the directional button
1 to order your cop buddy
to clear the area.
NOTE: There are other context sensitive orders available in the game;
you can issue them in the same way as described above.
REWARDS & EMERGENCIES
MEDALS & REWARDS
Medals are earned by completing Special Objectives. Earning medals is the way to
generate rewards for yourself. Earn enough medals and you might be issued a weapon
upgrade, an ammo magazine upgrade or even a new piece of T-Zero hardware.
❍ Press the s button in the Level Select screen to review rewards you’ve won.
EMERGENCY SITUATIONS
Emergency Situations are unlocked by taking down gang leaders non-lethally.
Whenever you successfully complete an Emergency Situation, you’ll be
issued a prototype T-Zero weapon.
❍ You can select unlocked Emergency Missions in the Single Player Menu.
PICK-UPS
Pick-ups such as weapons, evidence and ammo are scattered
throughout the city. Make sure you keep an eye peeled
for them or you could miss out!
❍ Walk over items to pick them up.
Page 11

1918
MULTIPLAYER ONLINE PLAY
THE T-ZERO URBAN COMBAT SIM
How about a slice of hands-on training in the T-Zero combat simulator?
The Multiplayer online game is where it's at for those who crave the ultimate
challenge — human opposition!
The online portion of this game is subject to the terms and conditions under the User
Agreement found within the game. For a full copy of the User Agreement go to:
www.eidosinteractive.com.
NETWORK CONFIGURATION
In order to play URBAN CHAOS: RIOT RESPONSE online, you need to have a valid
network configuration saved on a memory card. You can use the network adaptor
start-up disc included with your network adaptor (Ethernet/modem)(for PlayStation
®
2)
to set up your network connection. Refer to the instructions that came with your
network adaptor start-up disc.
ONLINE SYSTEM REQUIREMENTS
Up to 8 players can play URBAN CHAOS: RIOT RESPONSE online. In order to play
online, you need:
❍ Memory card (8MB)(for PlayStation
®
2).
❍ Network adaptor (for PlayStation
®
2).
❍ Broadband Internet connection.
❍ Network Configuration set up using the network adaptor start-up disc.
NOTE: When using the network adaptor start-up disc, use the automatic setup. If this doesn't
work, please contact your Internet Service Provider (ISP) for assistance with settings.
For set-up instructions after you're wired up, see page 19.
GAMESPY
™
MATCH-UP
URBAN CHAOS: RIOT RESPONSE uses the Gamespy Match-Up service to let players
find and host games over the Internet.
CONNECTING TO A LOCAL AREA NETWORK
You can play URBAN CHAOS: RIOT RESPONSE Multiplayer games over a Local Area
Network (LAN) by connecting up to eight network-enabled PlayStation 2 consoles
via a network hub/switch (purchased separately). Each console must have a retail copy
of the game. A network adaptor start-up disc is required for LAN setup.
NOTE: You can connect two network-enabled consoles using an Ethernet crossover cable.
1. Connect the PlayStation 2 consoles to the network hub/switch using an Ethernet
cable (NOT a crossover cable).
2. Insert the network adaptor start-up disc into each console. Follow the on-screen
instructions to create a Network Configuration File and save it to a memory card
inserted in the console. Each console MUST have its own memory card.
3. Insert the game disc and select your profile
(page 7).
4. Highlight LAN and press the
x button.
5. When the Network Configuration screen appears, choose the configuration file
from the list and press the
x button.
CONNECTING TO THE INTERNET
For Internet set-up, follow 1-5 above. (In step 4, select INTERNET.) Then:
6. Select CREATE ACCOUNT to set up your Gamespy account and give yourself
a username
(below). OR: If you have already created an account (perhaps
for other games using Gamespy), choose LOGIN ACCOUNT and enter your
name/password.
7. Now, you can either CREATE GAME or FIND GAME or choose QUICK GAME
to search for a game on the Internet.
CREATING AN ACCOUNT
In order to play online, you must create an account containing a user ID and password:
1. From the Profile Select menu, select or create a profile.
2. On the Main Menu, select INTERNET.
3. Select a network configuration to connect to the Internet. Read and accept
the Online Agreement (you must do this in order to play online).
4. From the Internet menu, select CREATE ACCOUNT.
5. Create an account containing an online user ID and password.
NOTE: Be sure to remember or write down your password. Eidos Inc. Customer Service
may not be able to retrieve lost passwords.
6. Select DONE at the Enter Password screen to save your account information
and begin the process of creating an online account. With this information
saved, you can connect easily at a later time by selecting YOUR PROFILE.
NOTE: You cannot switch between multiple accounts within the same user profile.
Page 12

2120
OPTIONS
To adjust various game options before play, select OPTIONS from the Main Menu.
When in-game press the
w button to pause and then select OPTIONS from
the in-game Pause Menu. Use the menu controls
(page 3) to navigate the menu
and adjust the following options:
VIEW CONTROLS View a diagram of the game’s controls.
CONTROLLER Set VIBRATION, INVERT LOOK UP/DOWN, AUTO CENTER,
CROUCH BUTTON, ANALOG STICK SETTINGS, HORIZONTAL
SENSITIVITY, VERTICAL SENSITIVITY.
AUDI O Adjust MUSIC VOLUME, FX VOLUME, SPEECH VOLUME,
VIDEO PLAYBACK VOLUME. Choose MONO, STEREO
or DOLBY
®
PRO LOGIC®II audio output.
VIDEO Adjust the position of the game screen display.
GENERAL Modify SWITCH WEAPONS, SUBTITLES, ENEMY DEATH
CUTSCENES, CROSSHAIR BRIGHTNESS and AUT OSAVE
settings. (In LAN games, only SWITCH WEAPONS
and CROSSHAIR BRIGHTNESS are available.)
SAVING & LOADING
MEMORY CARDS, AUTOSAVE & CHECKPOINTS
To get the most out of your Single Player game, insert a memory card before starting
play. Although you can play without one, you won’t be able to save your progress
or activate Autosave.
When you create a profile, you insert a memory card and ensure that Autosave is on.
This means your progress and any rewards you earn will be saved automatically.
If you switch Autosave off, your progress will not be saved between sessions.
As you advance through each mission, you’ll pass checkpoints in the game. At these
points your progress will be saved automatically (as long as Autosave is On). If you are
killed, you can start the mission again from the last checkpoint you passed.
• To restart at the beginning of a mission, press the
w button to pause and
then select RESTART MISSION. Completing a mission without returning to a
checkpoint gains a Special Objective and the Survivor Medal! So try to ace it!
LOADING A GAME
Make sure you choose the correct profile when you begin your session. Then all your
progress, unlocks and equipment will be available for you.
HOSTING A GAME
1. From the Main Menu, select LAN or INTERNET (depending on your connection)
and choose your network configuration.
2. From the next screen, select HOST GAME and press the
x button. (If you are
connecting via the Internet, you will be asked to login with an account before being able
to host a game.
)
3. Choose a map, noting each faction’s objective. Press the x button to advance.
4. As host, set your game preferences and press the
x button to advance to the
Lobby. Your game will now be visible to other players.
NOTE: Use the Time Advantage option to override the game balancing: for example,
to allocate a weaker team more time to complete a mission.
❍ To end a game before it’s completed, press the w button, select
EXIT TO LOBBY and press the
x button.
JOINING A GAME
1. From the Main Menu, select LAN or INTERNET (depending on your connection)
and choose your network configuration.
2. On the next screen, select QUICK GAME to join in a game immediately, or select
FIND GAME to select from a list of games in progress, and press the
x button.
(If you are connecting via the Internet, you will be asked to login with an account
before you will be able to join a game.
)
3. Choose a game from the list and press the x button to advance to the Lobby.
LOBBY OPTIONS
❍ FRIEND LIST — A list of players you’ve buddied up with. Check here to see their
status and to send a game invite. This feature is only available in Internet games.
❍ RECENT PLAYERS LIST — When playing online, view players you’ve
met in-game and send a Friend Request. Players who respond to your
requests are added to your Friends List. The FRIEND icon indicates
you’ve received a reply to your Friend Request, Game Invite or
Acceptance. View your Friends List to see the players who have
responded and their status.
❍ KICK PLAYER (Host only) — Use this option to remove a player from the game.
MULTIPLAYER-SPECIFIC GAME CONTROLS
❍ Throw Molotov (Burners only) l button
❍ Swipe Molotov (Burners only) , button
❍ Holster Weapon (for faster movement) Directional button 2
❍ Speak to all players Hold directional button 1
NOTE: With a USB headset, you can chat with other players both in the Lobby
and during an online session.
Page 13

EIDOS UK
Chief Executive Officer
Jane Cavanagh
Commercial Director
Bill Ennis
Financial Director
Rob Murphy
Development Director
Darren Barnett
External Development Manager
Lee Singleton
Creative Director
Patrick O'Luanaigh
Marketing Director
Dave Clark
Producer
Alex Camilleri
Assistant Producer
Joe Best
Executive Designer
Dax Ginn
Designer
Russell Kerrison
QA Manager
Marc Titheridge
QA Supervisors
Ian Rowsell, Dave Isherwood
Lead QA
Jason Claridge, Tim Dunn
QA Technicians
Allen Elliott, Damian Bennett, David Klein, David Sangan,
Femi Sani, George Wright,Germaine Mendes,
James Hinchliffe, Matthew Poon, Naomi Westlake,
Neil Delderfield, Carl Perrin, Daniel Webster, Dom Andoh,
Henley Bailey, Hugo Hirsh,Marcus Smilke, Peter Evans,
Richard Acherki, Steve Inman, William Wan,
Alistair Hutchinson
Senior Localisation Manager
Monica Dalla Valle
Localisation Coordinator
Ralf Bauer
QA Localisation Supervisor
Arnaud Messager
Localisation QA Lead Technician
Pedro Geppert
Head of Brand
Larry Sparks
Senior Brand Manager
Fabien Rossini
Brand Manager
Helen Clark
Creative Manager
Quinton Luck
Senior Designer
Jodie Brock
Designer
Philippa Pratley
Webmaster
Olaf Siebert
Company Secretary
Anthony Price
PR
Chris Glover, Gareth Ramsay, Emily Britt
Sales
Justin Gaffney,Trudy Hilary,Chris Walton, Karin Pabon,
Sarah Markwick
Operations
Callum Jay, Richard Lever, James Bailey
Voice Casting
Cheryl Prince, Side UK
Voice Direction
Jon Ashley, Side UK
Sound Engineer
Phil Evans, Side UK
Manual
James Lenoël @ Lenoël Creative
ROCKSTEADY STUDIOS
Executive Producers
Sefton Hill, Jamie Walker
Producer
Nathan Burlow
Audio Manager
Nick Arundel
Lead Animator
James Norman
Lead Artist
John Southgate
Lead Designer
Paul Crocker
Lead Programmers
Jon Forshaw, Anthony Lloyd
Animation
Niamh Tierney
Senior Artists
Dave Moss, David Hego, Glen Saberton, Eros Tang
Artists
Matt Bell, Jack Griffin, Paul Sparkes
Design Team
Ian Ball, Paul Saunders
Multiplayer Design
Adrian Hill
Programming Team
Alice Easey, John Gay, Tim Hanagan, Simon Hargrave,
Martin Piper,Tim Rennie, Ben Wyatt
QA Manager
Gerald Smith
QA Testing
Anthony Pepper
Special Thanks to:
Paul Wright, Luke Timms, Caspar Gray, Katie Blundell,
Emily Jackson, Simon Hewitt, Matthew Freeman,
Larry Young, James Cox, Winnie Leung, Julia Atkinson,
Marc Jackson, Wolf Armouries Camden, Babel Media,
Neil Donnell, Kathryn Clements, Mustapha Bismi,
Steven Blackburn, Mike Merrin, Alex Chapman,
Risa Cohen, Matt Godbolt, Caspar Field,
Martin Hasselbring, Riia Jaakkola, Nicola Corbett,
Nik Hemmings, Lucien Hoare, Callum Jay, Dave Lowry,
Lani Minella and Audiogodz, Ian Palmer, Matt Porter,
Jeff Vanelle, Marc Webb, Steve Manners, all our friends
and family for their support and all who worked on project
“Roll Call”
EIDOS US
CEO & President, Eidos North America
Bill Gardner
Executive Vice President of Sales & Marketing
Robert Lindsey
Vice President of Legal & Business Affairs
James O'Riordan
Vice President of Finance
Malcolm Dunne
Vice President of Human Resources
Edie Dykstra
Senior Product Manager
Kevin Gill
Director of Marketing
Matt Gorman
Director of Public Relations
Michelle Seebach Curran
Senior Public Relations Manager
Oonagh Morgan
Public Relations Manager
Tali Fischer
Online Community Specialist
Matt Dalghren
National Sales Manager
Joe Morici
Senior Channel Marketing Specialist
Ilana Budanitsky
Channel Marketing Coordinator
Rafal Dudziec
Channel Marketing Project Manager
Diane Eng
Director of Marketing Communications
Stephanie Lipetzky
Web Producer
Roderick van Gelder
Web Designer
John Lerma
Creative Services Project Manager
Eileen Buenviaje
Media Specialist
Micheal Tran
Graphic Designer
James Song
Events Specialist
Annie Meltzer
Operations Manager
Gregory Wu
Senior External Producer
Nick Goldsworthy
Associate Manager of Product Operations
Colby McCracken
Front of Box Design
Petrol Advertising
Front of Box Photography
Kevin Lynch, Lynch Photography
Quality Assurance/Customer Service Manager
Mark Cartwright
QA Supervisors
Dan Franklin, Aaron Safronoff
Lead QA Technician
Mackenzie Hume
Quality Assurance Technicians
Clint Waasted, Erik Kennedy, Nick Cooprider,
Rich Hartzell, Aaron Keillor, Chester Lee, Katie Bieringer,
Kip Ernst, Nick Jacobson, Joshua Pfeiffer,
Ergin Dervisoglu, Stephanie Greer,Jeff Lowe,
Tony Perata, Richard Campbell,Wil Dimas
Special Thanks
The Rocksteady Crew, Post Josh, Hanshaw Ink & Image,
Susan Kwon, Danny Jiang, Kevin Witte,Joe Bruce,
Joey Eustler, Jordan Romaidis,Patrick Goodspeed,
Janty Sumimoto, Jason Bergquist, Karl Stewart
MUSIC CREDITS
DJ Quest, “MUFFLED MAYHEM”
Written and Produced by M.Britnell
Licensed by Cyber Music Group (c)2005
Published by Copyright Control
“MODERN ROMANCE” (c)2005 METRO RIOTS
Written by Holmes/Ray/Parker/Holmes
Published by Copyright Control
“HAZCHEM REMEDY” (c)2005 METRO RIOTS
Written by Holmes/Ray/Parker/Holmes
Published by Copyright Control
2322
CREDITS
Page 14

24
FIREWALLS
In order to join or host an URBAN CHAOS: RIOT
RESPONSE game from behind a router with NAT
(Network Address Translation), or firewall, you may need
to enable Port Forwarding. You will need to route, or
forward, all data on port UDP 9103 to the IP address
assigned to your PlayStation 2 system.
Note: Users using DHCP must ensure that their
PlayStation 2 system is always assigned the IP address
specified in the Port Forwarding setup; under these
circumstances you may need to change your network
configuration from Auto Detect (DHCP) to a Static IP
address using the network adaptor start-up disc to
ensure that forwarded data always gets to your
PlayStation 2 system.
If you are still having trouble connecting to other
players, try bypassing the router or firewall by
connecting your PlayStation 2 system directly to your
DSL modem, cable modem, or other broadband device.
STATUS
You can check the status of the game servers and read
news about URBAN CHAOS: RIOT RESPONSE by visiting
www.UrbanChaosGame.com.
USB HEADSET
During gameplay, if your USB headset is plugged into
your PlayStation 2 system but you are not able to chat
with your opponent, your opponent may not have a USB
headset connected to the PlayStation 2 system, or you
and your opponent may have a low quality connection
to each other.
CUSTOMER SUPPORT
For further questions, please visit
www.eidosinteractive.com or contact Eidos Inc.
Customer Support at (415) 615-6220, Monday through
Friday, 9:00 a.m. to 12:00 p.m. and 1:00 p.m. to 5:00 p.m.
Pacific Time.
ONLINE TECHNICAL REQUIREMENTS
Broadband access and the network adaptor
(Ethernet/modem) (for PlayStation
®
2) are required for
Network Capabilities. Players are responsible for all
applicable Internet fees. Network Capabilities may be
subject to change, withdrawal and charge for use. Go to
www.playstation.com for Network Capabilities access
terms and availability.
ONLINE FEATURES
THE ONLINE FEATURES OF THIS GAME ARE SUBJECT
TO ACCEPTANCE OF ONLINE TERMS OF SERVICE. EIDOS
RESERVES THE RIG HTTO CHANG E OR TERMINATE THE
ONLINE FEATURES OF THIS GAME. EIDOS MAKES NO
GUARANTEE AS TO THE AVAILABILITY OF THE ONLINE
FEATURES FOR THIS GAME OR THAT THE EIDOS ONLINE
SERVICE WILL BE UNINTERRUPTED OR E RROR-F REE.
Please read the Eidos Online Terms of Service for full
terms and conditions, a copy of which is available at
www.eidos.com and in-game. Certain online features
may be subject to payment of an additional fee.
RATINGS
The Game’s content has been rated M for MATURE
content. However, the content of the Game may change
due to interactive exchanges between players in Online
mode. Neither Eidos nor Sony Computer Entertainment
accepts any responsibility for content which is external
to the game itself. Please refer to the Terms of Service
for further conditions of use relating to online play.
This Software uses “DNAS” (Dynamic Network
Authentication System), a proprietary authentication
system created by Sony Computer Entertainment Inc.
(“SCEI”). “DNAS” retrieves information about a user’s
hardware and software for authentication, copy
protection, account blocking, system, rules, or game
management and other purposes. The information
collected does not identify the user personally and will
not be shared with any non-SCE company. A PUBLISHER
CAN COMBINE THIS INFORMATION WITH PERSONALLY
IDENTIFYING INFORMATION FROM THE PUBLISHER’S
RECORDS IF THE USER PROVIDES THE PE RSONALLY
IDENTIFYING INFORMATION. BEFORE PROVIDING ANY
PERSONAL INFORMATION TO A PUBLISHER, PLEASE BE
SURE TO REVIEW THE PU BLISHER’S PRIVACY POLICY
AND TERMS AND CONDITIONS OF USE. DO NOT
PROVIDE PERSONALLY IDENTIFYING INFORMATION
TO A PUBLISHER UNLESS YOU ACCEPT THE CONDITIONS
OF USE AND TERMS OF THEIR PRIVACY POLICY. SCEI,
Sony Computer Entertainment America (“SCEA”)
and their affiliates cannot guarantee the continuous
operation of the “DNAS” servers. SCEA shall not be
liable for any delay or failure of the “DNAS” servers
to perform. If you receive a message during login
identifying a “DNAS” authentication error, please
contact SCEA Consumer Services at 1-866-466-5333.
For additional information concerning “DNAS,” visit
www.us.playstation.com/DNAS. In the event of a
systems incompatibility or inoperability with DNAS,
the sole liability of SCEI, SCEA and their affiliates shall
be limited to the repair or replacement of the user’s
affected game software, console or peripherals at the
option of SCEA. SCEA, its parents, affiliates, or licensed
Publishers shall not be liable for any delays, system
failures, authentication failures, or system outages,
which may, from time to time, affect online game play
or access thereto.
EIDOS, INC., LICENSE & LIMITED WARRANTY
Eidos, Inc., warrants to you, the original purchaser of this disc, that for a period of
ninety (90) days from the date of your purchase, this disc shall be free from defects
in materials and workmanship. If, at any time during the applicable ninety (90) day
warranty period you determine that this limited warranty has been breached, Eidos,
Inc., agrees, in its sole option, to repair or replace, free of charge, any such disc,
provided the disc is returned postage-paid to the Eidos, Inc., Factory Service Center
and a proof of date of purchase is included. This limited warranty is not applicable
to normal wear and tear and shall be void with respect to any defects that arise
from disc abuse, unreasonable use, mistreatment or neglect. This disc is sold “as is”
without any warranties of any kind, express or implied, including implied warranties
of merchantability or fitness for a particular purpose, other than the limited warranty
expressly stated above. No other claims arising out of your purchase and use of this
disc shall be binding on or obligate Eidos, Inc., in any manner. Eidos, Inc., will not be
liable to you for any losses or damages incurred for any reason as a result of your
use of this disc, including, but not limited to, any special, incidental, or
consequential damages resulting from your possession, use or malfunction of this
disc. This limited warranty states the entire obligation of Eidos, Inc., with respect
to the purchase of your disc. If any part of this limited warranty is determined to be
void or illegal, the remainder shall remain in full force and effect.
For warranty support please contact our Customer Support department at
(415) 615-6220. Our staff is available Monday through Friday, 9:00 a.m.
to 12:00 noon and 1:00 p.m. to 5:00 p.m. Pacific Time. You are responsible
for all toll charges. Customer Support Representatives will not provide game
hints, strategies or codes.
PRODUCT RETURN PROCEDURE
In the event our support agents determine that your game disc is defective, you will
need to forward material directly to us. Please include a brief letter explaining what
is enclosed and why you are sending it to us. The agent you speak with will give
you an authorization number that must be included and you will need to include
a daytime phone number so that we can contact you if necessary. Any materials
not containing this authorization number will be returned to you unprocessed
and unopened. Send your postage-paid package to the following address:
Eidos, Inc. Customer Services
RMA# (state your authorization number here)
651 Brannan Street, Suite 400
San Francisco, CA 94107
You are responsible for postage of your game to our service center.
© 2006 SCi Games Ltd. Urban Chaos™ and Riot Response™ are trademarks of Eidos Interactive Ltd. Eidos and the Eidos
Logo are trademarks of the SCi Entertainment Group. Published by Eidos, Inc. Developed by Rocksteady Studios Ltd.
The rating icon is a registered trademark of the Entertainment Software Association. RSA BSAFE® SSL-C and Crypto-C
software from RSA Security Inc. have been installed. RSA is a registered trademark of RSA Security Inc. BSAFE is a
registered trademark of RSA Security Inc. in the United States and other countries. RSA Security Inc. All other trademarks
are property of their respective owners. All Rights Reserved.
This software uses “DNAS” (Dynamic Network Authentication System), a proprietary authentication system created by
Sony Computer Entertainment Inc. to provide security and to help protect copyrighted content. The unauthorized transfer,
exhibition, export, import or transmission of programs and devices circumventing its authentication scheme may be
prohibited by law. For additional information, see www.us.playstation.com/DNAS.
TROUBLESHOOTING
DNAS SYSTEM
Register online at www.eidosregistration.com
 Loading...