

Page 1
Page 2
WARNING: READ BEFORE USING YOUR PLAYSTATION®2 COMPUTER
ENTERTAINMENT SYSTEM.
A very small percentage of individuals may experience epileptic seizures when
exposed to certain light patterns or flashing lights. Exposure to certain patterns
or backgrounds on a television screen or while playing video games, including
games played on the PlayStation 2 console, may induce an epileptic seizure in these
individuals. Certain conditions may induce previously undetected epileptic symptoms
even in persons who have no history of prior seizures or epilepsy. If you, or anyone
in your family, has an epileptic condition, consult your physician prior to playing.
If you experience any of the following symptoms while playing a video game —
dizziness, altered vision, eye or muscle twitches, loss of awareness, disorientation,
any involuntary movement, or convulsions — IMMEDIATELY discontinue use
and consult your physician before resuming play.
WARNING TO OWNERS OF PROJECTION TELEVISIONS:
Do not connect your PlayStation 2 console to a projection TV without first consulting
the user manual for your projection TV, unless it is of the LCD type. Otherwise, it
may permanently damage your TV screen.
USE OF UNAUTHORIZED PRODUCT:
The use of software or peripherals not authorized by Sony Computer
Entertainment America may damage your console and/or invalidate
your warranty. Only official or licensed peripherals should be
used in the controller ports or memory card slots.
HANDLING YOUR PLAYSTATION 2 FORMAT DISC:
• This disc is intended for use only with PlayStation 2
consoles with the NTSC U/C designation.
• Do not bend it, crush it or submerge it
in liquids.
• Do not leave it in direct sunlight or near
a radiator or other source of heat.
• Be sure to take an occasional rest
break during extended play.
• Keep this disc clean. Always hold
the disc by the edges and keep it
in its protective case when not
in use. Clean the disc with
a lint-free, soft, dry cloth,
wiping in straight lines
from center to outer edge.
Never use solvents
or abrasive cleaners.
CONTENTS
GETTING STARTED . . . . . . . . . . . . . . 2
CONTROLLER . . . . . . . . . . . . . . . . . . 3
LARA . . . . . . . . . . . . . . . . . . . . . . . . 4
MAIN MENU . . . . . . . . . . . . . . . . . . . . 5
DIFFICULTY LEVELS/SCREEN MODES . . 7
SAVING AND LOADING THE GAME . . . . . 8
CONTROLLING LARA . . . . . . . . . . . . . . 9
Movement Controls 9
Swimming Controls 9
Combat and Item Controls 10
Driving Controls 10
COMBAT . . . . . . . . . . . . . . . . . . . . . 11
Combat Strategies 11
Aiming and Firing Controls 11
Melee Attacks 11
Defensive Combat Controls 12
Targeting 12
HUD (Head’s-Up Display) . . . . . . . . . . . 13
PDA . . . . . . . . . . . . . . . . . . . . . . . . 14
EQUIPMENT . . . . . . . . . . . . . . . . . . . 14
REWARDS . . . . . . . . . . . . . . . . . . . . 16
CREDITS . . . . . . . . . . . . . . . . . . . . . . 17
Page 3
2 3
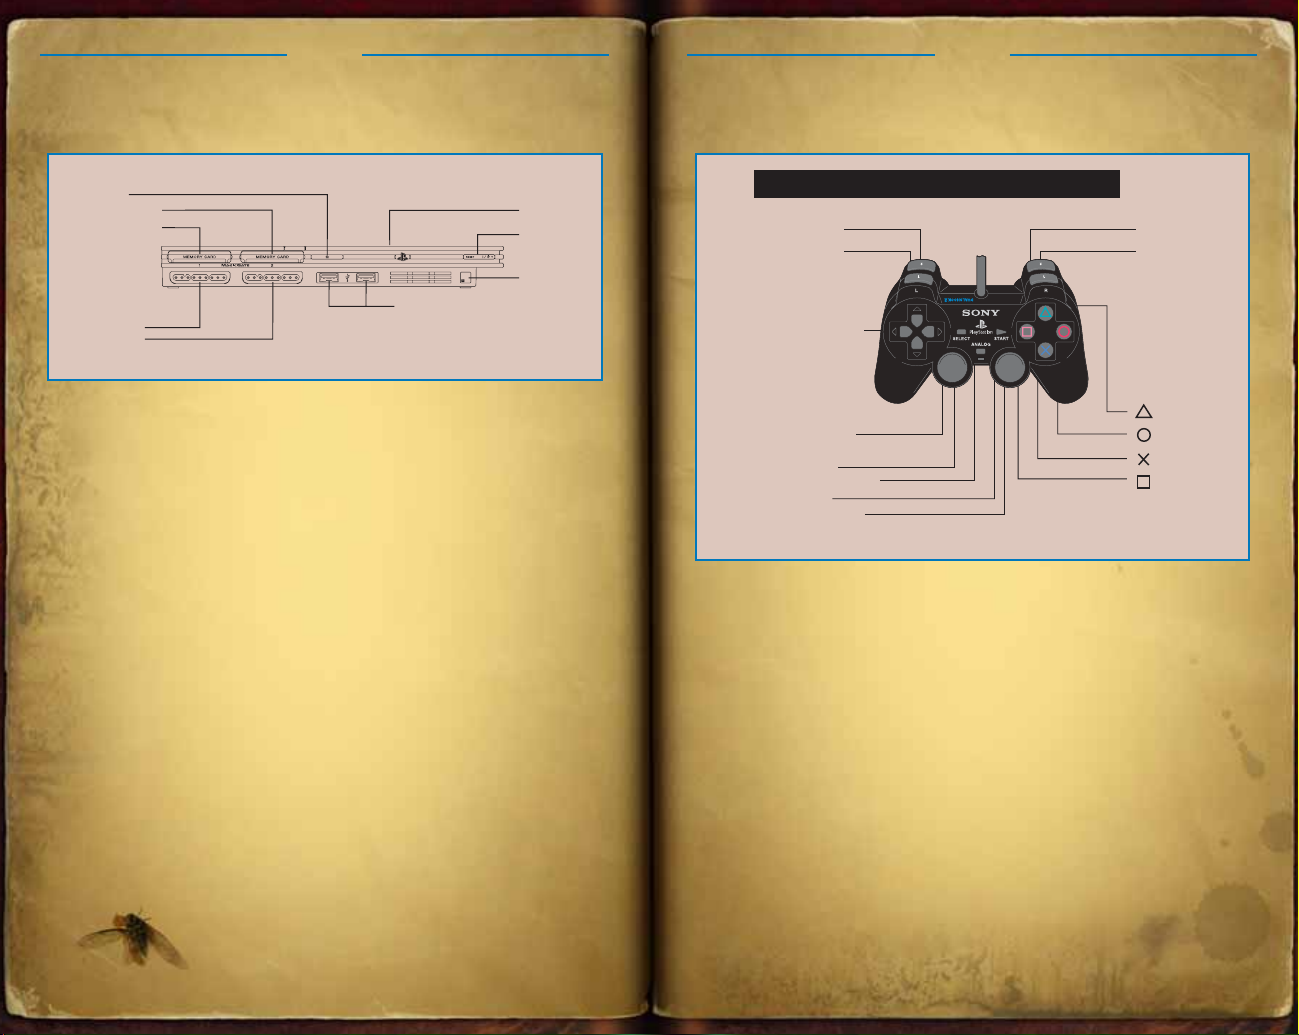
GETTING STARTED CONTROLLER
open button
memory card slot 2
memory card slot 1
controller port 1
controller port 2
USB connectors
disc cover
on/standby/
reset button
IR receiver
Set up your PlayStation®2 computer entertainment system according
to the instructions in its Instruction Manual. Make sure the MAIN POWER
switch (located on the back of the console) is turned ON. Press the RESET
button. When the power indicator lights up, press the OPEN button
and the disc tray will open. Place the
TOMB RAIDER: LEGEND™ disc
on the disc tray with the label side facing up. Press the OPEN button
again and the disc tray will close. Attach game controllers and other
peripherals, as appropriate. Follow on-screen instructions and refer
to this manual for information on using the software.
MEMORY CARD 8MBfor PlayStation®2
To save game settings and progress, insert a memory card (8MB)(for
PlayStation
®
2) into MEMORY CARD slot 1 before powering on the system.
At least 155KB of free space on the memory card is required to save
game data.
This game supports saving and loading of game data in MEMORY CARD
slot 1 only. You can load saved game data from the same memory card
or from any memory card containing previously saved
LEGEND™
games.
TOMB RAIDER:
DUALSHOCK®2 ANALOG CONTROLLER CONFIGURATIONS
L2 button
L1 button
directional
buttons
left analog stick
(L3 button
SELECT button
ANALOG mode button
START button
right analog stick
(R3 button
when pushed down)
when pushed down)
Connect the DUALSHOCK
®
2 analog controller to controller port 1 before
R2 button
R1 button
button
button
button
button
starting play. When the vibration function is ON, the controller will vibrate
in response to game events. You can reconfigure the controls and toggle
the vibration function ON/OFF in Options mode
(page 6).
NOTE: All controls used in this manual are the default controls.
MENU CONTROLS
You can select and adjust options from the Main Menu and from
the in-game Pause menu (press the
■ Use the directional buttons to view and cycle through the game options.
■ Press the x button to select an option, change a current option,
confirm any changes made or progress to the next screen.
■ Press the t button in a submenu to return to the previous screen.
NOTE: See pages 5-7 for a list of game options.
w button during play to pause).
Page 4
4 5
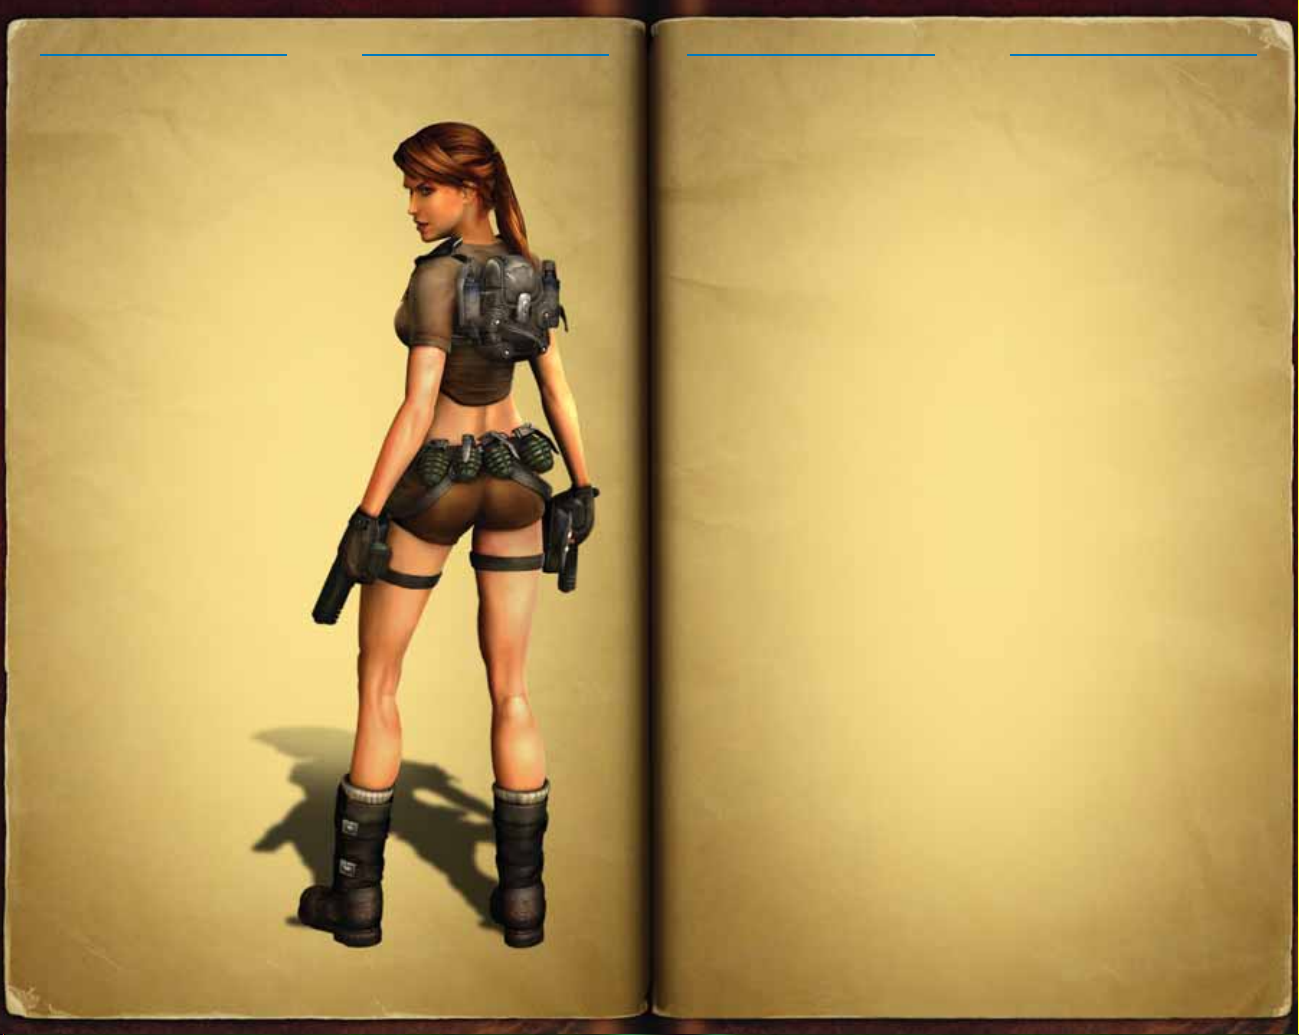
LARA
At the age of nine, Lara survived a plane
crash in the Himalayan mountains that led to
the death of her mother. After miraculously
surviving a ten-day solo trek from the crash
site to Kathmandu, she spent the rest of her
childhood under the close tutelage of her
archeologist father — the late Earl
of Abbingdon, Richard Croft.
At the age of 18, after the death of her
father, Lara inherited the Croft estates
and became Countess of Abbingdon.
Since then she has been credited
with the discovery of some 16 archeological
sites of international significance.
Lara Croft has been hailed both as an
Archeological Wunderkind and a glorified
Treasure Hunter, depending on whom
you listen to. There are thousands
of rumors surrounding Lara's
exploits, invariably involving
the unexplained or outright
unbelievable. Lady Croft herself
is rarely available for comment,
which further adds to the fog
of mystery that surrounds
her life and work.
Consequently, Lara Croft
continues to be the focus
of wild speculation and
intense debate. Idealized
and vilified in equal
measure, she is perhaps
one of the most fascinating
and enigmatic figures
of our times.
MAIN MENU
START GAME
Start a new game. If saved data is present on your memory card, this
option changes to
LOAD
■ NEW GAME Start a new game.
■ LOAD GAME Displays a list of saved games. Select a save
■ LOAD LEVEL Displays a list of completed levels (present in the loaded
CROFT MANOR
You can visit Lara’s expansive manor via the Main Menu throughout
the game. However, to gain full access you must have a saved game
containing at least one completed mission. Only then will all the Manor's
secrets become approachable for you to discover.
OPTIONS
Press the left analog stick or directional buttons */@ to select an option
and
$/^ to change the setting. Press the x button to confirm your
Options changes, or press the
without change.
■ SOUND Adjust the volume of MUSIC, SFX and VOICE VOLUME.
■ DISPLAY Use the Display Menu to adjust the following options:
SUBTITLES Set subtitles ON/OFF or to your
SCREEN POSITION U/D Use the slide bar to adjust the screen
SCREEN POSITION L/R Use the slide bar to adjust the screen
WIDESCREEN Turn ON/OFF. Selecting ON enables
PROGRESSIVE SCAN MODE Turn ON/OFF. Selecting ON switches
RESUME GAME and resumes play from the last save.
and press the
x button to load it.
save). Replay these levels to collect rewards, play
in different difficulty modes, or attempt a Time Trial.
t button to return to the Main Menu
preferred language.
position up/down.
position left/right.
a widescreen 16:9 aspect ratio image.
to a 525p image. Progressive scan offers
higher-quality pictures but requires
a screen that supports this feature.
Page 5

6 7
OPTIONS continued
■ CAMERA Set the following camera options to YES or NO:
INVERT X-AXIS
INVERT Y-AXIS
AIM & BINOCS INVERT X-AXIS
AIM & BINOCS INVERT Y-AXIS
■ CONTROL Set the following control option:
CONTROLLER CONFIGURATION Select DEFAULT, ALTERNATIVE 1,
ALTERNATIVE 2
or ALTERNATIVE 3.
Then choose from the following (for any control option):
COMBAT MODE Select STANDARD, ADVANCED HOLD,
or ADVANCED TOGGLE.
VIBRATION
■ CALIBRATION Press the left analog stick $/^ to adjust
the screen
Select ON or OFF.
BRIGHTNESS and CONTRAST.
EXTRAS
Access information and bonus content within TOMB RAIDER: LEGEND™.
By completing levels and collecting rewards along the way, you will unlock
items that you can then select and view here.
DIFFICULTY LEVELS/SCREEN MODES
When you start a new game, you’ll be prompted to select a difficulty level
and set two screen options:
■ DIFFICULTY Choose EXPLORER (easy), ADVENTURER (medium)
■ WIDESCREEN Turn ON/OFF. Selecting ON enables a widescreen
■ PROGRESSIVE SCAN Turn ON/OFF. Selecting ON switches to a 525p
NOTE: Once you make your screen mode selections, you will not be prompted
again unless you start a New Game. However, you can change these options
at any time from the Pause Menu/Options Menu (press the
to pause the game and select
or
TOMB RAIDER (hard).
16:9 aspect ratio image.
image. Progressive scan offers higher-quality
pictures than does interlaced scan, but requires
a screen that supports this feature.
w button
OPTIONS).
Page 6

98
SAVING AND LOADING THE GAME
Press the w button during play to display the Pause Menu; from here you
can save your progress and rewards and load a saved game.
SAVING YOUR PROGRESS
Every game level has several checkpoints to pass. The word CHECKPOINT
will appear in the bottom right of the screen to inform you when Lara
has passed a checkpoint. This is a good place to save your progress.
Press the
From here you can choose to create a new save game or overwrite
an existing save.
You can also save between checkpoints, but Lara will always appear
at the most recently saved checkpoint when a save is loaded again.
NOTE: There is no automatic save when you leave the game. However,
if Lara dies during a game, she automatically restarts at the last checkpoint
passed, regardless of whether or not you saved there. If you quit the game
without saving, you lose all progress since the last saved checkpoint.
SAVING REWARDS
When you replay a previously completed level, you will have the option to
select
LOADING A SAVED GAME
You can load any saved game on your memory card from the Main Menu
or from the in-game Pause Menu. Select
one of the four save slots. If data is present, details of the save will be
shown at screen right. Press the
If you have a save that was created at the end of the game, you cannot
load it during gameplay. Instead, you can revisit any part of the game via
the
NOTE: If you’re using save files that were copied from one memory card
to another, the save file MOST RECENTLY copied becomes your “current”
save, and will be selected when you choose
data does not represent the most up-to-date game progress.
w button to access the Pause Menu and select SAVE.
SAVE REWARDS to save any collected rewards to your current game.
LOAD, then choose a save from
x button to load and resume that game.
LOAD LEVEL option (page 5) in the Main Menu.
RESUME GAME, even if this save
CONTROLLING LARA
The controls shown in this section are default. You can view all the
CONTROLLER CONFIGURATION settings (page 6) in the Options Menu.
MOVEMENT CONTROLS
left analog stick Movement: Sneak, Walk
c button Crouch/Roll.
t button Interact/Action: while standing
x button Jump. Hold button to jump
right analog stick Rotate camera.
, button Reset camera angle and view
SWIMMING CONTROLS
left analog stick Swim left, right, forward.
c button Dive. Hold button
t button Interact/Action/Pick up
x button Swim toward the surface/
right analog stick Rotate camera.
and Run.
next to objects or vehicles.
Pick up new weapon: when
standing over weapon.
Safety Grab: prevent Lara
from falling from ledges.
farther.
HUD
(page 13).
to dive deeper.
rewards.
Fast Stroke.
Surface.
NOTE: When Lara is swimming underwater, her air meter slowly drains.
If it runs out, Lara will start to take damage to her standard health
bar
(page 13). If Lara does not surface for air in time, she will drown.
Page 7

1110
COMBAT AND ITEM CONTROLS
r button Fire.
d button Throw grenade/flare.
f button Accurate Aim Mode: toggle.
l button Combat Mode lock-on.
, button Realign camera behind Lara.
s button Throw grapple.
t button Pull grapple/Interact
directional pad * Use health pack.
DRIVING CONTROLS
left analog stick Steer.
x button Accelerate.
s button Brake/Reverse.
r button Fire weapon.
l button Select target.
t button Shoot Hazard target.
directional pad * Use health pack.
right analog stick Rotate camera.
with environmental targets
(explosive barrels, etc.).
@ Switch weapons.
$ Personal Light Source
(PLS) on/off.
^ Binoculars. Activate the
RAD
(page 15) by pressing the
t button in Binocular view.
COMBAT
COMBAT STRATEGIES
In combat, always remember these two key elements:
■ KEEP MOVING
Keeping Lara moving is the most important factor in combat; her
continually changing position slows the enemy's advance. A moving target is
much harder to hit than a static one.
■ MANIPULATE THE ENVIRONMENT
Constantly check for objects in the environment that Lara can manipulate
to her advantage. For example, she can thwart enemies by blocking paths,
collapsing structures, detonating nearby explosives and releasing obstacles.
AIMING AND FIRING CONTROLS
l button Lock-on target.
r button Fire weapon.
right analog stick Change target: Flick */@/$/^ during
l button (hold) + d button Throw grenade at target.
d button Grenade free throw: hold button
MELEE ATTACKS
■ SLIDE ATTACK Target enemies while running toward them, then press
the
c button to slide. Lara slides into enemies, knocking
them off balance and setting them up for her guns.
■ AERIAL ATTACK Press the x button twice when close to the enemy.
With the first press, Lara jumps at an enemy.
As she lands on the enemy, press the
again to activate slow time, then immediately press
the
r button to fire, shooting the target.
■ POWER KICK Hold the l button and press the t button to kick
the target enemy away with Lara’s boot.
■ GRAPPLE Hold the l button and press the s button to use
Lara’s grapple to pull enemies toward her and inflict
some damage.
NOTE: Melee attacks are ineffective against animal enemies.
lock-on.
for distance.
x button
Page 8

1312
DEFENSIVE COMBAT CONTROLS
While Lara is locked-on to a target, she can perform various maneuvers
to avoid enemy attacks.
■ ROLL Hold the l button, press the left analog stick
■ FLIP Hold the l button, press the left analog stick
in any direction, then press the
in any direction, then press the
c button.
x button.
TARGETING
The targeting reticle will appear when a target is within sight. The color
of the reticle changes to indicate the target status:
■ GRAY RETICLE Target is out of range.
■ RED RETICLE Target is within rage at the current distance.
■ BLUE RETICLE Target can be grappled.
TIP: If the target is within distance but off-screen,
an arrow appears showing the direction
of the target’s location.
HUD Heads-Up Display
WEAPONS, ITEMS AND HEALTH
■ HEALTH BAR The health bar gauge displays Lara's current health level.
■ USE ITEMS (PLS, Health Pack, Binoculars) To use an item or gadget
When Lara's health gets dangerously low, you need to
replenish it using a health pack
(page 14) if available.
from Lara's inventory, press the corresponding direction
on the
directional buttons:
* Health pack (use)
@ Switch weapons (toggle)
$ PLS (on/off)
^ Binoculars (on/off)
Page 9

1514
PDA
The PDA is Lara's automatic data capture and wireless communication
device. It holds all of her mission data and real time objective and
equipment information. Press the
q button to access Lara’s PDA, which
displays the following data:
■ OBJECTIVES Provides Lara with information on her current objectives
and overall mission objectives.
■ DATA Provides information for completed missions, and allows
you to keep a tally of rewards collected while playing
the missions.
COMPLETION TIME Records your fastest time for the Mission.
COMPLETED TIME TRIAL Yes/No.
GOLD REWARDS Shows number collected and total rewards
available (of each type) in the Mission.
SILVER REWARDS Shows number collected and total rewards
available (of each type) in the Mission.
BRONZE REWARDS Shows number collected and total rewards
available (of each type) in the Mission.
■ GEAR Provides Lara with information on all her inventory. Here
you can view stats and descriptions of each weapon and
item Lara has.
EQUIPMENT
HEALTH PACK
A staple of the rough-and-rugged adventurer, health packs allow Lara
to treat her injuries in the field.
NOTE: Lara can carry a maximum of three health packs.
PERSONAL LIGHT SOURCE PLS
Ultra-bright LED portable light source.
Kinetically charged, the PLS shines for
a limited time before shutting off to recharge.
MAGNETIC GRAPPLE
Using her grapple, Lara can
manipulate objects from a distance,
climb or drop to different heights,
and swing across large gaps.
The grapple consists of a magnetic
grapple head that can latch
onto discrete, visually distinct
surfaces, plus a lengthy wire
and an automatic recoiler.
NOTE: The grapple can only be used
on specific shiny metallic surfaces.
BINOCULARS/REMOTE ANALYSIS DEVICE RAD
The RAD, a pair of high-tech lenses
in Lara’s inventory, perform the
following functions:
■ BINOCULARS Magnify the image
in the field of view.
■ RAD MODE Analyze and provide
a readout for
objects in view
that have significant
archeological or
technological interest. Data collected include:
CHEMICALLY UNSTABLE Object explodes given the right impulse.
TECHNICAL Object is part of machinery large
or small, ancient or modern, electronic
or physical.
MOVABLE Object can be moved, either with direct
Lara interaction or by other means.
PHYSICALLY UNSTABLE Object can be made to topple or break.
USING THE BINOCULARS/RAD
■ Press the left analog stick ^ to activate the binoculars. (Press again to
deactivate.) Press and hold the
■ Press the t button to activate RAD mode. (Press again to deactivate.)
r or l button to zoom in or out.
Page 10

16 17
REWARDS
Throughout Lara's archeological adventure, various artifacts and relics
become available for discovery and collection. Collecting rewards opens up
bonus content and extra features such as outfits (which you can view
in Croft Manor), pistol upgrades, concept art and much more. Make sure
Lara scours the environment thoroughly.
Each mission has a number of different types of collectables:
■ BRONZE REWARDS Informational content.
■ SILVER REWARDS Game content.
■ GOLD REWARDS Special game rewards.
NOTE: The most valuable unlockables are only obtained by collecting
a combination of all three reward types. When each level is complete, you
will be notified about which type of reward(s) you have managed to unlock.
Select
EXTRAS from the Main Menu to view and select your rewards.
TIP: Select LEVEL LOAD from the Main Menu to replay completed missions
and pick up missed rewards.
CREDITS
DEVELOPMENT TEAM
Senior Producer
Matthew Guzenda
Producer
Morgan Gray
Production Staff
Alex Jones, Lulu LaMer, Elio Rutigliano,
Rosaura Sandoval, Nate Schaumberg
Additional Production
David Baker, Juli Logemann
PROGRAMMING STAFF
Technical Director
Jason Bell
Lead Programmer
Rob Pavey
Player Character Lead Programmer
Gary Snethen
Senior Programmers
Scott Krotz, Erin Catto
Programmers
Joshua Criz, Darrell Dennies, Matthew Gaston, Sean Gugler,
Komei Harada, Anne-Lise Hassenklover, Andrew Hynek,
David Modiano, Hong Park, Stephen Perez, Sean Skelton,
Anthony Thibault
Additional Programming
Dan Archard, Stanislav Baranov, Michael Davies,
Nathan Frost, Mike Gonzales, Joel Hunter, Ted Johnson,
Thomas Mayer, Matthew McKinnon, Paul Taylor,
Meilin Wong
Scripting
Tom Fong, Brad Johnson, Josie Nutter, Matt Roberts
Art Director
Jacob Wendler
Lead Artists
Jason Botta, Drew Medina
Artists
Matthew Abbott, Lucas Aceituno, Scott Anderson,
Matt Bein, Jim Conrad, Chris Gregory, Yaroslav Grabovskyy,
Yu Gu, Jeff Johnsrude, Justin Lamperski, Freddie Lee,
Shao Wei Liu, Dan Neuberger, Ross Patel, Kristen Russell,
Patrick Sirk, Caleb Strauss, Chris Strugill, Andrew Wood
Visual Effects Lead
Gavin Wood
Environment Concept Art
Joel Boucquemont, Bill Stoneham
Lara Design & Creative Consultant
Toby Gard
Lead Character Designer
Kam Yu
Lead Character Artist
Daniel Cabuco
Character Artists
Chris Anderson, David Gustlin
Lead Animators
Brandon Fernández, Jeff Wilcox
Animators
Ryan Goldsberry, Ben Harrison, Barry Nardone,
Michael Smith, Jake Spence
Animation Intern
Shaun Budhram
DESIGN STAFF
Lead Designer
Riley Cooper
Assistant Lead Designer
Harley Baldwin
Lead Level Designer
Martin Dufour
Designers
Jeremy Bredow, John Dumala, Steve Goodale,
Jesse Johansen, Kyle Mannerberg, Darren Mckinsey,
Matt McManus, Stephen McManus, Jon Vosovic,
Jason Weesner, Steve Yoshimura
Story Designer
Eric Lindstrom
Dialogue Writer
Aaron Vanian
ART STAFF
Page 11

1918
Music Composed by
AUDIO STAFF
Troels B. Folmann
Audio Engineer
Karl Gallagher
Sound Designer
Mike Peaslee
Junior Sound Engineer
Gregg Stephens
Creative Services Director
David Goodwine
Title Sequence Created by
Jake Hughes
AV Support
Estuardo Sandoval
AV Interns
Rick Gilliland, Jae Shin
Playtest Coordinator
Daniel Atkins
Original Design
Doug Church
Voice Acting
Lara Croft . . . . . . . . . . . . . Keeley Hawes
Zip . . . . . . . . . . . . . . . . . . Alex Desert
Alistair . . . . . . . . . . . . . . . Greg Ellis
Winston . . . . . . . . . . . . . . Alan Shearman
Amanda . . . . . . . . . . . . . . Kath Soucie
Anaya . . . . . . . . . . . . . . . . Melissa Lloyd
Rutland . . . . . . . . . . . . . . . Rino Romano
Nishimura . . . . . . . . . . . . . Paul Nakauchi
Takamoto . . . . . . . . . . . . . Michael Hagiwara
Narrator . . . . . . . . . . . . . . Alister Duncan
Archeologist (Kent) . . . . . . Alister Duncan
Lady Croft . . . . . . . . . . . . . Eve Karpff
Child Lara . . . . . . . . . . . . . Charlotte Sparey
Voice Director (UK)
Jonathan Ashley
Voice Director (US)
Kris Zimmerman
Voice Consultant (UK)
Andy Emery
Voice Consultant
Gordon Hunt
Joe Allen, Marianne Arotzarena, Eric Beerbaum, Kim Chew,
Rolef Conlan, Patrick Connor, Rusty Drake, Mike Ellis,
Jennifer Fernández, Rutherford Gong, Austin Grossman,
Jon Guilford, Jim Hedges, David Hong, Noor Khawaja,
Sam Kolb, Richard Lemarchand, Art Matsuura,
Martin McDonald, Billy Mitchell, Robert Quattlebaum,
Calvin Rein, Cory Ringdahl, Andre Rodriguez, Sally Short,
Ian Slutz, John Spinale, Alex Vaughan, Brian Venturi,
Mark Wilhelm, Salami Studios (US), Side (UK),
Everyone at Crystal Dynamics for their support!
The Tomb Raider Development team would like to thank
our families, husbands, wives, children, significant others,
pets and everyone else who helped us during the making
of Tomb Raider: Legend. We could not have made it
without you!
SPECIAL THANKS
General Manager
Sean Vesce
Director of Production
Graeme Bayless
Director of Design
Noah Hughes
Director of Technology
John Pursey
Director of Art
Darrell Gallagher
Quality Assurance Manager
Chris Bruno
Lead Tester
Benny Ventura
Platform Leads
Bill Gahr, John Hsia, Daniel Kim, Oliver Villa Piega
Testers
David Pogan, John Allen, Flynn O'Hare, Bryan Enriquez
E IDOS UK
CEO
Jane Cavanagh
Commercial Director
Bill Ennis
Financial Director
Rob Murphy
Company Secretary
Anthony Price
Head of European Publishing
Scott Dodkins
Product Acquisition Director
Ian Livingstone
Worldwide CTO
Julien Merceron
Development Director
Darren Barnett
Senior Producer
Greg Hounsom
Creative Development Director
Patrick O'Luanaigh
Executive Designer
Dax Ginn
Head of Global Brand
Larry Sparks
Senior Brand Manager
Matt Gorman
Brand Manager
Alex Price
Head of Support Services
Flavia Timiani
Senior Localisation Manager
Monica Dalla Valle
CRYSTAL DYNAMICS
Localisation Manager
Guillaume Mahouin
Creative Manager
Quinton Luck
Senior Designer
Jodie Brock
Designer
Philippa Pratley
QA Manager
Marc Titheridge
QA Supervisor
Dave Pettit
QA Lead Technicians
Richard Abbott, Tyrone O'Neill, Andrew Standen,
Anthony Wicker, George Wright
QA Technicians
Dominic Andoh, Sam Beard, Warren Beckett,
Neil Delderfield, Jonathan Fuguet, James Hinchliffe,
Hugo Hirsh, Alistair Hutchison, David Klein,
Daniel Mills, Mark Parker, Garth Philip, Matthew Poon,
Jonathon Redington, David Sangan, Daniel Webster
Special Thanks
A big thanks to all our European Marketing, Sales and Web
teams as well as our Finance department who have done a
wonderful job to make this game happen. Your tremendous
work is much appreciated. A big thanks also to Tom Waine
for writing this manual
EIDOS US
CEO & President, Eidos North America
Bill Gardner
Executive Vice President of Sales & Marketing
Robert Lindsey
Vice President of Legal & Business Affairs
James O’Riordan
Vice President of Finance
Malcolm Dunne
Vice President of Human Resources
Edie Dykstra
National Sales Manager
Joe Morici
Global Brand Manager
Matt Gorman
Associate Marketing Manager
Mike Schmitt
Director of Public Relations
Michelle Seebach Curran
Public Relations Manager
Tali Fischer
Senior Public Relations Manager
Loretta Stevens
Online Community Specialist
Matt Dalghren
Channel Marketing Manager
Janty Sumimoto
Senior Channel Marketing Specialist
Ilana Budanitsky
Channel Marketing Coordinator
Rafal Dudziec
Director of Marketing Communications
Stephanie Lipetzky
Web Producer
Roderick van Gelder
Web Designer
Boon Khoo
Creative Services Project Manager
Eileen Buenviaje
Media Specialist
Micheal Tran
Graphic Designer
James Song
Events Specialist
Annie Meltzer
Music Licensing
Kevin Gill
Publishing Support Coordinator
Clint Waasted
Operations Manager
Gregory Wu
Senior External Producer
Nick Goldsworthy
Associate Manager of Product Operations
Colby McCracken
Quality Assurance/Customer Service Manager
Mark Cartwright
QA Supervisors
Dan Franklin, Aaron Safronoff
Lead QA Technician
Elizabeth Rutlin
Assistant Lead QA Technicians
David Bushee, John Hayes
Quality Assurance Technicians
Katie Bieringer, Jonathan Brown, Richard Campbell,
Nicholas Cooprider, Ergin Dervisoglu, Wil Dimas,
Kip Ernst, Joe Greer, Stephanie Greer, Richard Hartzell,
Mackenzie Hume, Nick Jacobson, Jason Johnson,
Aaron Keillor, Erik Kennedy, Chester Lee, Jeff Lowe,
Nicholas Lutz, Peter Panagiotis, Tony Perata,
Joshua Pfeiffer, Brandon Reed, Matthew Trudell,
Clint Waasted
Special Thanks
Kjell Vistad, Ashley Schwartz, Stefania Clapci,
Hanshaw Ink & Image
Jeep® is a registered trademark of DaimlerChrysler
Corporation. Jeep® Wrangler® Rubicon®, Commander
and their trade dress are used under license by
DaimlerChrysler. ©DaimlerChrysler Corporation 2006.
DUCATI LOGOS are all trademarks of Ducati Motor
Holding S.p.A.
Page 12

PIGGYBACKINTERACTIVE.COM
BECAUSE X NEVER MARKS THE SPOT
Six months in the making,
and designed with exclusive
insight and assistance from the
Crystal Dynamics development team,
Tomb Raider Legend - The Complete
Guide is an essential companion for
those who would like to enjoy Lara’s
latest adventure to its fullest.
Key Features:
Unique two-speed walkthrough
enables players to either fi nd hints
as required, or follow step-by-step
guidance
Comprehensive “Secrets” chapter:
discover the location of every single
Gold, Silver and Bronze Reward,
and learn about the bonus features
they unlock
How to master control of Lara, with
every move explained and explored
Dozens of detailed annotated maps
provide an at-a-glance guide to
every locale Lara visits
Includes tried-and-tested combat
strategies and techniques
Features an exclusive behind-
the-scenes interview with the
Tomb Raider Legend development
team, plus background information
on the Tomb Raider story to date
Tomb Raider Legend - The Complete
Guide is on sale now. Visit
www.piggybackinteractive.com for
Unearth every last secret, sight and
solution with Tomb Raider Legend The Complete Guide
free sample pages and further details.
S.R.P. USA: $ 16.99
S.R.P. Canada: $ 23.95
EIDOS, INC., LICENSE & LIMITED WARRANTY
Eidos, Inc., warrants to you, the original purchaser of this disc, that for a period of
ninety (90) days from the date of your purchase, this disc shall be free from defects
in materials and workmanship. If, at any time during the applicable ninety (90) day
warranty period you determine that this limited warranty has been breached, Eidos,
Inc., agrees, in its sole option, to repair or replace, free of charge, any such disc,
provided the disc is returned postage-paid to the Eidos, Inc., Factory Service Center
and a proof of date of purchase is included. This limited warranty is not applicable
to normal wear and tear and shall be void with respect to any defects that arise
from disc abuse, unreasonable use, mistreatment or neglect. This disc is sold “as is”
without any warranties of any kind, express or implied, including implied warranties
of merchantability or fitness for a particular purpose, other than the limited warranty
expressly stated above.
No other claims arising out of your purchase and use of this disc shall be binding
on or obligate Eidos, Inc., in any manner. Eidos, Inc., will not be liable to you for
any losses or damages incurred for any reason as a result of your use of this disc,
including, but not limited to, any special, incidental, or consequential damages
resulting from your possession, use or malfunction of this disc.
This limited warranty states the entire obligation of Eidos, Inc., with respect to the
purchase of your disc. If any part of this limited warranty is determined to be void
or illegal, the remainder shall remain in full force and effect.
For warranty support please contact our Customer Support department at
(415) 615-6220. Our staff is available Monday through Friday, 9:00 a.m. to 12:00
noon and 1:00 p.m. to 5:00 p.m. Pacific Time. You are responsible for all toll
charges. Customer Support Representatives will not provide game hints,
strategies or codes.
PRODUCT RETURN PROCEDURE
In the event our support agents determine that your game disc is defective, you will
need to forward material directly to us. Please include a brief letter explaining what
is enclosed and why you are sending it to us. The agent you speak with will give
you an authorization number that must be included and you will need to include
a daytime phone number so that we can contact you if necessary. Any materials
not containing this authorization number will be returned to you unprocessed
and unopened.
Send your postage-paid package to the following address:
Eidos, Inc. Customer Services
RMA# (state your authorization number here)
651 Brannan Street, Suite 400
San Francisco, CA 94107
You are responsible for postage of your game to our service center.
Register online at
www.eidosregistration.com
© 2006 Piggyback Interactive Limited. All rights reserved. Piggyback, PIGGYBACKINTERACTIVE.COM
and the Piggyback logo are trademarks of Piggyback Interactive Limited.
Lara Croft Tomb Raider: Legend © 2006 Core Design Ltd. Developed by Crystal Dynamics, Inc. Published by Eidos, Inc. 2006.
Lara Croft Tomb Raider: Legend, Lara Croft, Tomb Raider, the Tomb Raider logo, Eidos and the Eidos logo, Crystal Dynamics and the
Crystal Dynamics logo are all trademarks of SCi Entertainment Group.
 Loading...