

Page 1

WARNING:READ BEFORE USING YOUR
PLAYSTATION®2 COMPUTER ENTERTAINMENT SYSTEM.
A very small percentage of individuals may experience epileptic seizures when exposed
to certain light patterns or flashing lights. Exposure to certain patterns or backgrounds on
a television screen or while playing video games, including games played on the
PlayStation 2 console, may induce an epileptic seizure in these individuals. Certain
conditions may induce previously undetected epileptic symptoms even in persons who have
no history of prior seizures or epilepsy.If you,or anyone in your family, has an epileptic
condition, consult your physician prior to playing. If you experience any of the following
symptoms while playing a video game—dizziness, altered vision, eye or muscle twitches,
loss of awareness, disorientation, any involuntary movement, or convulsions—
IMMEDIATELY discontinue use and consult your physician before resuming play.
WARNING TO OWNERS OF PROJECTION TELEVISIONS:
Do not connect your PlayStation 2 console to a projection TV without first consulting the user
manual for your projection TV, unless it is of the LCD type. Otherwise, it may permanently
damage your TV screen.
USE OF UNAUTHORIZED PRODUCT:
The use of software or peripherals not authorized by Sony Computer Entertainment America
may damage your console and/or invalidate your warranty.Only official or licensed
peripherals should be used in the controller ports or Memory Card slots.
HANDLING YOUR PLAYSTATION 2 FORMAT DISC:
•This disc is intended for use only with PlayStation 2 consoles with the
NTSC U/C designation.
•Do not bend it,crush it or submerge it in liquids.
•Do not leave it in direct sunlight or near a radiator or other source of heat.
•Be sure to take an occasional rest break during extended play.
•Keep this compact disc clean.Always hold the disc by the edges and keep it in its
protective case when not in use. Clean the disc with a lint-free, soft, dry cloth, wiping in
straight lines from center to outer edge. Never use solvents or abrasive cleaners.
THE MARK OF KRI™
PLAYSTATION 2 HINT LINE
Hints for all games produced by SCEA are available:
Within the U.S. 1-900-933-SONY (1-900-933-7669)
Within Canada: 1-900-451-5757
For U. S. callers, automated assistance is available 24 hours a day, 7 days a week. This hint line supports games
produced by Sony Computer Entertainment America. No hints will be given on our Consumer Service Line.
Callers under 18 years of age, please obtain permission from a parent or guardian before calling. This service
requires a touch-tone phone.
Consumer Service/Technical Support
Call this number for help with technical support, installation or general questions regarding the PlayStation 2 game
console and its peripherals. Representatives are available Monday-Saturday, 6AM-8PM PST, Sunday 7AM-6:30PM PST.
PlayStation 2 Online www.playstation.com
Our news is always hot! Visit our website and find out what’s happening—new titles, new products and the latest
information about the PlayStation 2 computer entertainment system.
$0.95/min. auto hints,
$5.00-$20.00 for card recharge
$1.50/min. auto hints
1-800-345-SONY (1-800-345-7669)
1
TM
Getting Started . . . . . . . . . . . . . . .2
Controller Diagram . . . . . . . . . . . .3
Controls . . . . . . . . . . . . . . . . . . . .4
Introduction . . . . . . . . . . . . . . . . .6
Quick Start . . . . . . . . . . . . . . . . . .7
Getting Started . . . . . . . . . . . . . . .8
Welcome to the Inn . . . . . . . . . . . .9
Playing the Game . . . . . . . . . . . . .10
The Combat System . . . . . . . . . . .12
Stealth Attack . . . . . . . . . . . . . . .16
Weapons . . . . . . . . . . . . . . . . . . .20
The Enemies . . . . . . . . . . . . . . . .24
Important Items to
Discover/Pick-Up . . . . . . . . . . . . .26
Saving the Game . . . . . . . . . . . . .28
The Pause Menu . . . . . . . . . . . . .29
Options . . . . . . . . . . . . . . . . . . . .30
The Sage . . . . . . . . . . . . . . . . . . .34
Credits . . . . . . . . . . . . . . . . . . . . .36
Warranty . . . . . . . . . . . . . . . . . . .41
Page 2
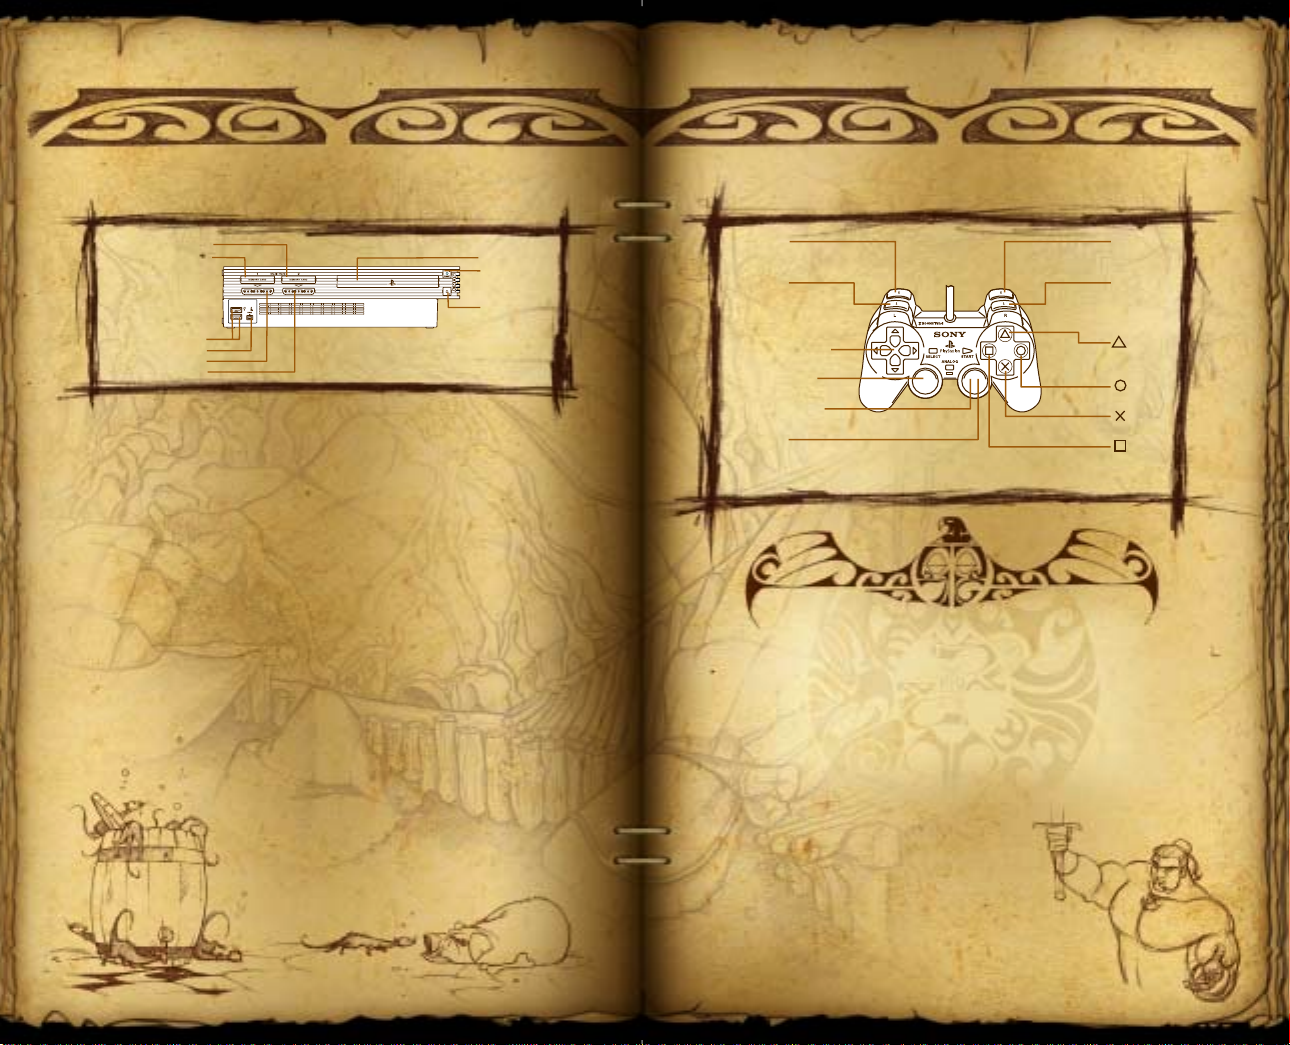
2
MEMORY CARD slot 1
MEMORY CARD slot 2
USB connector
S400 i.LINK connector
controller port 1
controller port 2
disc tray
RESET button
(OPEN) button
L2 button
Send or Bring
back Kuzo
L1 button
Camera view /
Manual Aim with Bow
Directional buttons
Left analog stick
Move
Right analog stick
Lock enemy
R3 button
(push Right analog
stick like a button)
Unlock enemies
R2 button
Select Weapon /
Retrieve Weapon
R1 button
Defend/Disarm Enemy
button
Use item/ bird flight and
view functions
button
Attack
button
Attack
button
Attack
3
GETTING STARTED
Set up your PlayStation®2 computer entertainment system
according to the instructions in the Instruction Manual.
Make sure the MAIN POWER switch (located on the back
of the console) is turned on.
Press the STANDBY/RESET button. When the power indicator
lights up, press the OPEN button and the disc tray will open.
Place the The Mark of Kri disc on the disc tray with the label
side facing up. Press the OPEN button again and the disc tray
will close.
Attach game controllers and other peripherals as appropriate.
Follow the on-screen instructions and refer to this manual for
information on using the software.
Memory Cards
To save game settings and progress, insert a Memory Card
(8MB) (for PlayStation2) into the MEMORY CARD slot 1 of
your PlayStation 2 computer entertainment system. You can
load saved game data from the same card or any memory card
containing previously saved games.
CONTROLLER DIAGRAM
TIPS & STRATEGIES
MELEE COMBAT
• Block/defend is essential to your survival, learn this skill well.
• Deselect targeted enemies by pressing down on the Right analog stick.
Assigning and reassigning comfortably during combat is a valuable skill
that should be practiced.
•You do not always need to use the analog stick to move Rau towards an
enemy. If he is selected but too far to hit, pressing the corresponding
button will turn Rau to face the enemy and pressing the button again
will make him leap towards the target.
Page 3
4
5
CONTROLS
Start/Pause game START button
Select menu item Directional button or Left
analog stick + ≈ button
Previous screen ç button
Move Directional button or
Left analog stick
Defend/Disarm Enemy R1 button (Disarms enemy
when Rau is unarmed)
Focus on enemy Right analog stick
Attack ≈ Icon enemy ≈ button
Attack √ Icon enemy √ button
Attack Ω Icon enemy Ω button
Ground impale ≈ button (When close to living,
unlocked enemy on ground)
Break focus on enemy R3 button (Press Right analog
stick like a button)
Select weapon R2 button (Hold) + Directional
button or Left analog stick
Put away weapon R2 button (Hold) + Directional
(Stealth Mode) button or Left analog
stick to select HAND
Quick Weapon Retrieve R2 button (Tap) when unarmed
Send Kuzo L2 button (When bird
icon in beam of light
is spinning in view)
Toggle to/from Kuzo’s vision ç button
Hurry Kuzo to perch ç button (while Kuzo is in
flight to perch)
Open doors/Pull switches/Talk ç button
Sneak along wall With no weapon drawn, run
into wall. Use Directional
buttons or Left analog stick
to maneuver along wall
Sneak along roof With no weapon drawn, run
to edge of roof. Use Directional
buttons or Left analog stick to
maneuver along edge of roof
Center Camera View L1 button
Camera View/
First Person Bow L1 button (hold)
Swing camera view L1 button (hold) +
Directional button
or Left analog stick
Page 4
6
7
INTRODUCTION
Long ago, during the first age, a
series of dark spells were created.
One of these spells had the power
to bridge our world and the one
of darkness. It was an evil spell
with no purpose but that
of destruction.
Before it could be invoked
it was stolen and broken into
six separate parts, six lines,
six incantations.
The spell however was dark and
powerful, and not easily destroyed.
So instead it was hidden away
in a place where none would find it. Scattered about the world
in six separate locations, six different families entrusted with
its safekeeping.
But men are mortal, and time can be the enemy of fear.
All too soon we forget how the bee will sting and the
fire will burn.
As time passed the families forgot what these marks were
for, mankind dismissed the ancient warnings about these
words of power. They were merely stories; tales from a long
passed time.
But the denizens of the world of darkness knew nothing of
time, with infinite patience they waited. Then after a
millennia, to their dark joy, the spells were rediscovered….
TIPS & STRATEGIES
Remember a head shot with the bow
is a silent kill. If it takes more than
one arrow to kill an enemy he will
possibly alert others. While in first
person bow view, wait for the
to stop flashing. This signifies your
arrow will be a clean kill. You will have
to adjust your aim with great care for
this to happen.
WEAPONS
≈ icon
QUICK START
1.Press START at the Title screen.
2.Highlight New by pressing the Directional button or
Left analog stick µ/≤ and pressing the ≈ button.
3.Select a slot to save new game in by pressing the
Directional button or Left analog stick ∫/ñ.
4.Press the ≈ button to
begin the game.
5.After the Introduction movie
Rau will begin at the Inn.
6.Talk to Rongo the Innkeeper.
7.Press the ç button to speak
to him.
8.Rongo will give you a quest.
9.Exit the Inn by moving to
the front door and
pressing the ç button.
TIPS & STRATEGIES
• Stealth (when all weapons are
put away) is the only time that
Rau can move silently around
the world.
• Flock of birds as a threat:
Watch out for flocks of birds
that could be disturbed by you
when walking near them, as
they will attract attention to
your location.
Stealth
Page 5
8
9
GETTING STARTED
New Game
1.Press START at the
Title screen.
2.Highlight New by pressing
the Directional button or
Left analog stick µ/≤ and
pressing the ≈ button.
3.Select a slot to save new
game in by pressing the
Directional button or Left
analog stick ∫/ñ.
4.Press the ≈ button to
begin the game.
Load Game
If you have saved The Mark of Kri
games:
1.Press START at the
Title screen.
2.Highlight Load by pressing the
Directional button or
Left analog stick µ/≤ and
pressing the ≈ button.
3.Select a game to load by pressing
the Directional
button or Left analog stick ∫/ñ.
4.Press the ≈ button to continue
the game or choose to see the
Sage to quickly access rewards
and cheats.
Delete Game
If you have saved The Mark of Kri
games:
1.Press START at the Title screen.
2.Highlight Delete by pressing the Directional button or
Left analog stick µ/≤ and pressing the ≈ button.
3.Select a game to delete by pressing the Directional
button or Left analog stick ∫/ñ.
4.Press the ≈ button to delete the game.
TIPS & STRATEGIES
Getting out of trouble: If you are
attacked while using the bow, assign
targets as you would with any other
weapon. Pressing the corresponding
button will auto-aim and shoot at
the target. You can fire arrows
quickly using this style of attack,
but be warned your targets will take
multiple arrows before being killed,
and will not die silently.
WEAPONS
WELCOME TO THE INN
Moving Around
Use the Directional buttons or
Left analog stick to move Rau.
Talking
To find out what a person has to say, walk
up to them and press the ç button to let the
person tell his or her story. Some may not feel
like talking just yet.
Beginning a Quest
All of Rau’s adventures will begin at the Inn. In
order to begin a quest, Rau must strike up a
conversation with one of the Inn patrons. Each
will have a story to tell that implores Rau to
take action with his warrior skills. Upon
completion of a task, those you assisted will
show their appreciation with weapons, gold
or valuable information.
Training
Each one of Rau’s missions will demand
a new set of skills. It is vital that he
train with his adopted father, Baumusu.
With the help of some willing dummies,
Baumusu will school you in the fine
points of attack and defense. Each
training session will be customized to a
specific type of fighting including
weapon attacks and attack combos,
stealth, ambush and ways to use the
bird Kuzo. To receive training, walk up
to Baumusu at the Inn and press the
ç button to talk to him. When he
asks if you want to train, select
YES. When you are finished
training, go to the door of the
Inn and press the ç button or
choose “Return to Inn” from the
Pause Menu.
Page 6
10
11
PLAYING
THE GAME
Rau will embark on
various quests to rid the
land of the barbarians
and thieves that have
come to power in this
lawless realm.
Moving Around
•Press the Directional
buttons or Left analog
stick to move Rau.
• If you want Rau to
climb up a ladder or hoist himself up on a ledge, walk
him close to where he will climb. He will put away his
weapon (if holding one) and begin climbing. Use the
Directional button or Left analog stick µ/≤ to move
Rau up and down on a ladder.
KUZO
Kuzo is a magical, ancient bird who has been a friend to
Rau’s family since before his birth. Now, Kuzo acts as
Rau’s spirit guide.
Scouting Danger
Kuzo can fly ahead or into places that Rau cannot access.
Rau can then view everything from Kuzo's position. Take
special notice of icons above enemy heads such as arrows,
horns or armor. Use the information from Kuzo's view to
devise attack strategies or figure out how to navigate
seemingly impassible obstructions.
It is helpful to hold the L1 button while
looking around to spot perches above.
Then while still holding L1, press L2 to
send Kuzo.
• Use the Directional button or Left
analog stick to scan around Kuzo’s
surroundings. To switch back and
forth between views, press the
ç button.
•To send Kuzo to another perch center the next Perch Icon
in Kuzo’s field of vision and press the L2 button. Kuzo will
reposition himself on the new perch.
•To bring Kuzo back to Rau, press the R2 button when no
perch is in the center of either Rau’s or Kuzo’ vision.
Performing Tasks with Kuzo
Kuzo can also perform tasks for Rau.
• If a switch or device is situated below a Perch
Icon, Kuzo will activate it when he lands on it.
• If a Save Scroll is next to a Perch Icon, Kuzo
will retrieve it.
1st Person Camera
At any time during the game the player can look around by
pressing and holding L1 and using the Left analog stick or
Directional buttons. When the button is released the camera
will return to the original 3rd person view.
End of Level
When Rau stands victorious against all forces in a level, a ring
of fire appears. Walk Rau into the ring of fire and he will
complete the mission at hand.
To send Kuzo to a perch, find a Perch Icon and center your
vision on it. The Icon will begin to spin. Press the R2 button
and Kuzo will fly to the perch. While in flight Kuzo can be
accelerated to his perch by pressing the ç button.
Page 7
12
THE COMBAT
SYSTEM
Focus Beam
Point or sweep the Right
analog stick in the direction
of the enemy or enemies you
wish to attack. A beam of
light will extend from Rau
and when touching an
enemy, an Attack Icon will
be assigned. While carrying
the Broadsword, the focus
beam is narrow and allows
Rau to focus on three
enemies at a time. The
Taiaha has a broader beam,
allowing Rau to focus on up
to six enemies at a time.
The Broad Axe allows Rau to
lock up to nine enemies at a
time. To break focus, press
in on the Right analog stick
R3, using it as a button.
Attack Icons
Sweep the Right analog stick to focus on enemies. The first
locked enemy or enemies will always carry the ≈ Icon,
followed by the √ icon, then the Ω icon.
TIPS & STRATEGIES
MELEE COMBAT
Shocking enemies with your skills:
Some well-executed kills will
shock the opposition, causing
them to back away in fear. This
temporary retreat can be used
to your advantage if you want
to switch weapons or reassign
your targets.
13
Moving in Combat
Rau will automatically face and center his motion around the
first enemy locked. When Rau faces a new locked enemy, his
motion will be centered around the new enemy.
Health Meter
The semi-circle at Rau’s feet or the enemy’s feet represents
health and health capacity. You can judge the health of Rau
or the enemy by the color of the Health Meter.
• On Rau, the Health Meter appears when he is
injured, when R2 is held or pressed, or briefly after
resuming the game from Pause. The Health Meter
can be set to “always on” via the Pause Menu.
• On an enemy, the Health Meter appears when
Rau scores a hit.
The Health Meter color codes are:
• Green – Healthy and uninjured
Yellow – Moderate damage
•
Red – Heavy damage and dangerously close to
•
falling in battle
Basic Attack
To attack one enemy:
1.Use the Right analog stick
to pass the Focus Beam
over an enemy. When Rau
is focused an ≈ Attack
Icon will appear over the
enemy’s head.
2.Press the ≈ button.
Page 8

14
To attack multiple enemies:
1.While holding a weapon, use the Right analog stick to pass
the focus beam over all enemies in range. The type of
weapon Rau is holding dictates the maximum number of
enemies that can be locked in focus at one time.
Note: See “Weapons” on page 21 to see more about each weapon.
2.Press the button that matches the Attack Icon over the
enemy you want to attack.
• Rau will vary his attack based on the direction he is
facing in relation to the enemy, as well as the distance.
• For example, if he is facing enemy ≈ but you press the
button that matches the enemy close behind, Rau will
thrust his sword backward to strike the enemy behind
but will continue to face enemy ≈.
• If facing enemy ≈ but you press the button that matches
the enemy far behind, Rau will do a more reaching attack
and change his focus to the far behind enemy.
TIPS & STRATEGIES
• Remember that your attack will damage any enemy that is between
you and your target. When using the Axe or Taiaha this tactic can be
put to good use.
• When in a bow fight you do not always have to try for a headshot.
If you quickly lock and shoot, your arrow will hit its target causing
the enemy to stagger back. Use this pause in attacks to lock, and
adjust for a headshot.
WEAPONS
15
Basic Defense
Hold the R1 button to defend attacks from any direction.
If Rau is holding the bow, he does not have the ability to
block/defend.
Disarming the enemy
If Rau is unarmed, he may not block, but tapping R1 as the
enemy attacks will allow Rau to disarm the enemy and kill the
enemy with his or her own weapon. When done, surrounding
enemies will become scared and back away, allowing time to
draw a weapon & gather your thoughts for your next attack.
Do not abuse this method as the
enemies will learn to escape
the disarm attempt.
Attack Combos
Perform attack combos with multiple
presses on the attack buttons (the ≈,
ç and Ω buttons).
• When you have one or two enemies
in focus, the free button or buttons,
called modifiers, can be used in attack combos. For example,
if you have the ≈ and √ Attack Icons over focused enemies,
you can use the Ω button in a combo.
If you have only one enemy assigned the ≈ Icon, you can use
both the Ω and √ buttons in your attack combo. Combos
always begin by pressing the button of the enemy you
are facing.
•Timing is important and must be practiced. With the sword,
try practicing with no enemies around. Press the ≈ button,
then quickly press the Ω button before the first strike ends.
If your timing is right, Rau will strike then say “Fua” and do
two overhead strikes. Try again and when Rau says “Fua”,
press the Ω button again before the two overhead strikes
end. Rau will say “Toko”
and do a third head strike.
Use this technique to study
combos, but be aware,
sometimes the last part
of the combo will only
be unleashed when an
enemy is close to the
receiving end.
Page 9

16
17
• If you want to do a combo on an enemy Rau is locked
on to but not facing, first press the button that matches
the enemy, then quickly press that button again to begin
your combo.
Check the Moves List in the Pause Menu during play to see
the various combinations available with the weapon in hand.
The Moves List is dynamic and will tell you the combos
available at the specific moment you have paused to review
the Moves List.
Note: See “Moves List” on page 31 to see more about using the Moves List.
Instant Kill Combos
Some combos result in an instant kill. When done,
surrounding enemies will become scared and back away,
allowing time to gather your thoughts for your next attack.
The more these combos are used, the better the enemies
become at defending the instant kill attacks.
STEALTH ATTACK
In a stealth mode, Rau can quietly ambush enemies with his
bare hands. Up to two enemies can be stealth attacked at
once. The victims must not make eye or physical contact with
Rau as he moves in for the kill.
To stealth attack one enemy:
1.Put away Rau’s weapon by pressing and holding the R2
button and selecting the hand.
2.Approach the enemy from his blind side and focus on him
with the Right analog stick. A flashing ≈ Icon will appear
over the enemy.
3.When in range, the ≈ Icon will stop flashing. Press the
≈ button to execute the attack. If you are too close and
near to bumping the enemy, the ≈ Icon will flash rapidly
as a warning.
Multiple stealth attacks:
To stealth attack two or three enemies,
proceed as with one enemy. When you
use the Right analog stick to focus on
the enemies and are in kill range, note
the order of the Attack Icons as they
blink from left to right. When you
execute the attack by pressing the ≈
button, follow quickly with the next two
attack buttons in the left to right order.
Wall Stealth
1.Put away Rau’s weapon by pressing
and holding the R2 button and
selecting the hand.
2.Run Rau into the wall so that
Rau turns his back to the wall.
3.Press the ∫/ñ Directional button
or Left analog stick to move Rau
to the edge of the wall closest to
the enemy.
4.Use the Right analog stick to focus
on the enemy. If you are in range,
the ≈ icon will be solid and you
can press the ≈ button for the kill.
Rau can wall stealth around corners so be careful not to go
around the wall and bump into an enemy!
Page 10

18
Roof Stealth
1.Put away Rau’s weapon by pressing
and holding the R2 button and
selecting the hand.
2.Run Rau to the roof edge above
an enemy. The camera will appear
above Rau to give a view of the
enemy below. Release the
Directional button or Left
analog stick so you do not
run Rau off the roof.
3.Use the Right analog stick to
focus on the enemy. If you are in
range, the ≈ icon will be solid
and you can press the ≈ button
for the kill.
19
TIPS & STRATEGIES
• Always be aware of the sign of the Kasai. A bloody face painted
crudely on a door means enemies are probably close by.
• Not all walls are useful for stealth. Rau will turn and back up against
walls that can help you.
• Flock of birds as a tactic: Sometimes Kuzo can be used to disturb a
flock of birds. This will draw attention to the disturbance and not
Rau, allowing you to use the situation to your advantage.
STEALTH
Page 11

20
21
WEAPONS
As Rau’s combat skills become keener,
and he lends his services to those in
need, he will win possession of more
powerful weapons. Each weapon varies
in striking power, speed and range of
effectiveness. Learn to select the
correct weapon for the task at hand.
THE WEAPON
INVENTORY
The weapons Rau carries are stored
in his inventory.
•To open the Weapon Inventory,
press and hold the R2 button.
•To change weapons, use the
Directional button or Left Analog
stick while holding down the
R2 button.
•To put away all weapons, use the
Hand Icon. Select the Hand Icon
when you want to use Stealth
attacks or combat with your fists
and attempt a disarm.
• When unarmed, retrieve your
last weapon held by tapping the
R2 button.
• Not all weapons are available in
the beginning of the quest so
there will be empty weapon slots
in the inventory.
• The Bow slot will show the number
of arrows Rau has remaining.
TIPS & STRATEGIES
STEALTH
• Other ambient creatures
as a tactic: Watch for
other animals that can be
used to your advantageif shot with an arrow
they will draw attention
to themselves, and away
from you.
• Be on the lookout for
objects within the
environment that can
benefit your situation.
Gongs and switches are
especially helpful.
The Broadsword
Rau begins his quest with a
Broadsword. With it, Rau can attack
up to a maximum of three enemies.
The Broadsword is swift, easy to
control, and has a definite advantage
in close range combat against a Taiaha
or Axe. Be aware that defending
against an Axe will cause Rau to
stumble back from the blow, knocking
Rau out of optimal range.
Taiaha
With this spear-like weapon, Rau can
focus and strike simultaneously at two
enemies per button (for a total of six
focused enemies). The bladed end of
the Taiaha is used to stab or slash
while the other end is used to
bludgeon an opponent. When fighting
Broadsword opponents, it is wise to
be just out of their attack range,
which still keeps them in Taiaha attack
range. This gains a reach advantage
over sword speed.
Battle Axe
Though heavier than a sword and
harder to swing, the Axe delivers the
most forceful blows of any weapon and
is able to focus on three enemies per
button (for a total of nine). When
fighting Broadsword or Taiaha
enemies, the Axe is best used
outside Taiaha attack range. This
keeps enemies in Axe range, gaining
a reach advantage over the
opponent’s speed.
Page 12

22
23
The Bow
With the Bow, Rau can strike from a
distance or get in some quick shots
from close range.
Focused Attack
To hit a focused target, use the Right
analog stick to focus the enemy.
When the Attack Icon appears over his
head, press the matching button to
launch the arrow. Enemies attacked in
this way may take several arrows
before falling in defeat.
TIPS & STRATEGIES
MELEE COMBAT
•You do not have to see a
targeted enemy if you want to
attack him. Watch the edge of
the screen for his icon,
pressing the corresponding
button will make you face him
then send you in his direction.
• Getting out of trouble: If a
group of enemies are
attacking you, and you feel
overwhelmed, try locking on
and attacking a target outside
of the pack. Doing this will
cause Rau to leap out of
trouble, and may buy you
a second or two.
Manual Aim
To manually aim the Bow for a body shot:
1.Press and hold the L1 button.
2.Use the Left analog stick or
Directional button to center the
enemy in your view. Unless the
enemy is too close, auto targeting
will snap to the enemy and assign
him a flashing ≈ Icon.
3.When the flashing ≈ Icon
appears over the target’s
head, press the ≈ button
to release the arrow.
To fire at the head and drop the
enemy in one shot, carefully adjust
TIPS & STRATEGIES
• Be on the lookout for golden
your aim until the ≈ Icon stops
flashing and release the arrow.
The Hazards of
• Remember to save as often as
Sword Fighting
• If fighting in a confined area,
the sword may strike a wall
and stop the completion of
the swing or combo.
• If you are in combat and Rau
swings a weapon into wood
or other soft material, his
sword may become stuck,
leaving him vulnerable until
he can pull the weapon free.
• It is best to avoid swinging
weapons near walls or
wooden objects. Try to
draw the fight out to an
optimal position.
STRATEGY
perches. They are more difficult
to find than others are, but will
reveal more of the storyline as
Kuzo translates the symbols
for you.
possible, but be warned; saving
when you are weak, or in a
dangerous situation could be
devastating, as you will always
be returned to that state of
health when reloading.
Page 13

24
THE ENEMIES
Just like Rau, different types of
enemies have different weapons.
Enemy weapons have the same
characteristics as Rau’s, so make
sure you wisely choose the correct
weapon for each combat situation.
Armored Enemies
Some opponents in the
game will be wearing body
armor. Before Rau can defeat
them he must pound away
on the armor to remove it.
You cannot inflict damage
upon an armored adversary
with the Bow and arrow.
Archers
Rau isn’t the only one who can use a
Bow and arrow. Watch out for enemy
archers and don’t get caught in the
open. Their long distance arrows can
be deadly.
Horn Blowers
Dispatch these tattle-tales quickly.
When they spot intruders, they blow a
horn to call their comrades who
converge and attack. Many of these
lookouts will also be posted outside
enemy huts and barracks (marked by
the sign of the Kasai). Look for the
glowing glint of their horns or the
horn symbol above their heads while
in Kuzo view.
25
ENFORCERS
Notice that some enemies do not immediately rush into
attack, but stand back and watch the proceedings. These
enforcer opponents are more of a threat, but do not
challenge Rau until all other enemies are dispatched.
Page 14

26
IMPORTANT ITEMS TO
DISCOVER/PICK-UPS
Health Icons
These Icons can replenish Rau’s current
health capacity by 25, 50 or even 100%.
Rune of Power
Find this to increase Rau’s maximum
health capacity. Up to four Runes can be
collected per level, but are only effective
within the level in which they are found.
Save Scroll
In order to save your progress during
Rau’s quest, you will need to use a Save
Scroll. Rau can carry up to four Save
Scrolls at a time, but these can only be
used within the level in which they are
Note:Please see the section entitled
found.
‘Saving the Game’ on page 28 for further
information on how to use Save Scrolls.
27
TIPS & STRATEGIES
• Always prioritize your targets,
• Learn to switch back and
• Combos and quick kills are
STRATEGY
and kill accordingly. An enemy
that holds a horn, or an archer,
poses a greater threat than
men at arms do.
forth between Kuzo and
Rau’s view, when sneaking
up on a moving target.
particularly effective against
armored enemies, as they
are much more difficult to
kill otherwise.
Arrows
When Rau receives his Bow, he initially
carries 20 arrows. However, he can find
quivers of fifteen additional arrows each.
Rau may carry a maximum of 99 arrows.
Page 15

28
SAVING THE GAME
29
To save game settings and progress, insert a Memory Card
(8MB) (for PlayStation
of your PlayStation 2 computer entertainment system.
Please note: ‘The Mark of Kri’ uses only MEMORY CARD slot 1.
You can load saved game data from the same card or any
memory card containing previously saved games.
®
2) into the MEMORY CARD slot 1
Once Rau has collected a Save Scroll, press the
START button to access the Pause Menu.
Highlight the ‘Use Save Scroll’ option and
press the ≈ button. The game will then
ask if you would like to save your
progress. The game will be saved in
slot A, B, or C depending on which
one was chosen at the beginning of
the game. Your progress can be saved
at almost any point during gameplay
play, as long as Rau has at least one
Save Scroll available. Every time the
game is saved, Rau uses up one
Save Scroll. If Rau has no Save
Scrolls available the ‘Use Save
Scroll’ option will be grayed out
and unavailable.
Also, you may be prompted to save
at various points in the game, such
as returning to the Inn, or after
finding or unlocking hidden items.
Saving at these points does not use
any of your collected Save Scrolls.
Saved games can only be loaded from
the Main Menu at the start of the
game. To return to the Main Menu
during gameplay, press the START
button to access the Pause Menu.
Choose ‘Quit Game’ at the bottom
of the menu. This will return
you to the main start screen.
If Rau is defeated, you will be given the choice to continue.
If YES is selected and Rau’s progress has been saved in the
current level, the game will restart from the last save.
Otherwise, the game will restart from the beginning of the
current level. If NO is selected, the game will return to the
main start screen.
THE PAUSE MENU
Press the ÷ button during play to
open the Pause Menu. Press the
÷ button or the ç button to exit
out of the current menu or to return
to gameplay. Press the ≈ button to
select a highlighted option or accept
your changes.
RESUME GAME
Return to play.
USE SAVE SCROLL
When you have a Save Scroll
in your possession, it will
appear here.
‘Saving the Game’ on page 28 for
further information on how to use
Save Scrolls.
Note: Please see
Page 16

30
31
RESTART LEVEL
Start the current level from the
beginning. When prompted,
“Are you sure?” select YES.
OPTIONS
Camera Control
Choose between the camera styles
below for combat sequences.
Cinematic – The camera will
move about the fight for
maximum impact.
Side – The camera will move to a
side-on position between Rau and
the enemy he is
currently facing.
Camera Shake – This turns on or off the camera shake
that occurs when Rau is struck by an enemy.
Sound
Press the Directional button or Left analog stick ∫/ñ to
change the volume of sound effects and music or set sound
to MONO or STEREO.
Gamplay
• Always Show Health –
Choose ‘on’ to always
have Rau’s health
status displayed
during gameplay.
Show Hint Messages –
•
This turns on or off
the hints that appear
during gameplay.
TIPS & STRATEGIES
• The color of a perch beam
STRATEGY
reflects what they are used
for. Light blue is a regular
perch, gold is for a story
perch, and red is for an
action perch.
Centering Menu
Use the Directional buttons or Left analog stick to center
the screen. Press the Ω button if you want to return to the
default setting.
Controller
This displays the controller layout and also allows the
vibration function to be turned on or off.
MOVES LIST
The Moves List is dynamic and
will tell you the specific button
combinations available based on
the number of enemies locked
when the Moves List was called up.
Notice that there are no combos
available when Rau has the Bow and
only one combo when he is unarmed
in combat.
Understanding the Combo Tree
On the three Combo Tree Explanations at the top of the list,
highlight one and press the Directional button or Left analog
stick ñ to gain full understanding of its relation to the combo
tree & to better understand combos.
Knowing what buttons to press
Below the Combo Tree Explanations, you will see the number
of enemies locked, the enemy Rau is currently facing, and the
combos available at the specific moment you have paused to
review the Moves List. Notice that the first button press of any
combo begins with the button of the enemy Rau is facing and
that the relation to the Combo Tree is the same.
Page 17

32
Toggle down to a specific
combo name. The Combo
Tree to the left shows the
progression of button
commands while the
corresponding actual button
presses are shown to the
right, illustrating how to
perform a specific combo in
your specific situation.
Notice that more locked
enemies means less
available combos.
Note: See “Attack Combos” on page 15 for detailed information.
TIPS & STRATEGIES
• Enemies carrying horns are
• Rationing health and other
• Always be on the lookout
STRATEGY
more of a threat than regular
men at arms, as they will alert
others to your presence.
pickups will help you to last
longer in a battle. Grabbing all
of the health before you need it
could be a mistake.
for switches that can open
secret areas.
BAUMUSU’S
CHALLENGES
Each level contains
Challenges that Rau must
meet in order to gain
rewards. Each Challenge
will involve performing a
specific task or combat
technique, many of which
can be learned in training.
When a level Challenge is
accomplished, a notice
will flash on-screen and
the Challenge will be
checked off the list.
When all Challenges in a
level are completed, visit
the Sage in the Inn for
your reward.
33
Recall Hints
Select this to show previously viewed gameplay hints. Press
the √ button to move back to the previous hint, and the Ω
button to move forward through the hints. If you turned off
the hint messages, missed messages will still be found here.
Press the ç button to close the hint screen.
Note: See “Gameplay” on page 30 to learn how to turn off the Hint
Popup Messages.
Return to Inn
Select this when you want to leave a Training Session
or Arena.
Quit Game
Select this to quit your current
game and return to the main
title screen.
Page 18

34
35
THE SAGE
When you return to the Inn during
gameplay, be sure to visit the Sage.
He will be sitting upstairs with his
two hounds. When you speak to
him, the prompt asking if you want
to see his Options cards will appear.
Select YES, and the Sage
will show you the cards he has.
Press the Directional button
or Left analog stick ∫/ñ to cycle
through the cards, and press the
≈ button to make your selection.
Levels
Choose this option to replay any levels you have already
completed. You can also check here to see if you have
completed all of a level’s Challenges or found the Tuku.
Rewards
Check here to see what rewards Rau has earned.
TIPS & STRATEGIES
• Be warned that Rau has to put
• Look for Tukus, as they will
STRATEGY
all weapons away to throw a
switch, leaving him vulnerable
to enemy attacks.
unlock a secret upon
completing the game.
ARENAS
Battle Arenas are unlocked
each time Rau completes all
of Baumusu’s Challenges for
each level. You can then choose
to enter an Arena and try to
complete further Challenges
in each of two modes:
Time Attack: Rau must defeat nine
enemies as quickly as possible.
Body Count: Rau must defeat as
many enemies as possible in a
given amount of time.
Each of these modes have additional Challenges specific to
each Arena. Go to the PAUSE menu and then select ‘Arena
Challenges’ to view the additional Challenges.
TIPS & STRATEGIES
In first-person Bow view you can
auto-lock on targets if within range.
Targets outside your range cannot be
locked, and are more difficult to hit.
WEAPONS
MOVIES & ART
Movies and Art are unlocked as you progress through the
game and by completing Challenges in the Arenas. Press the
≈ button to play the selected movie.
OUTFITS
Rau may earn new outfits by completing Challenges in the
Arenas. Whenever you meet all the Challenges in an Arena,
return to the Sage to see what your clothing options are.
Press the ≈ button to change to the selected outfit.
CHEATS
The Sage has a number of tricks up his sleeve. Activate any
cheats you may find here…
DEFEAT
If Rau falls in defeat, the
prompt to CONTINUE will
appear. Select YES to continue
your quest from the last place
you used a Save Scroll. Or, if
Rau’s progress has not been
saved, you will continue from
the beginning of the current
level with full health. Select
NO to return to the main
title screen.
Page 19

36
37
CREDITS
VP OF DEVELOPMENT
Shuhei Yoshida
EXECUTIVE PRODUCER
Jonathan Beard
PRODUCER
Tim Neveu
ASSOCIATE PRODUCER
Dan Mueller
ASSISTANT PRODUCER
Keith Friedly
LEAD PROGRAMMERS
Rich Karpp
Haesuk Pak
PROGRAMMERS
Steve Conrad
Alique Edwards
John McCarthy
Ayo Orimoloye
Gerald Tachiki
LEAD ARTIST
Jeff Remmer
LEAD TECHNICAL ARTIST
Bryan Gaier
CREATIVE LEAD
Jeff ‘Maka’ Merghart
ARTISTS
Matt Case
Greg Faccone
Hong Hoang
Andrew Jaros
Sam Liu
Rozella Markee
Leonard McVicker
Steve Merghart
Tim Neveu
Greg Newton
Brian O’Hara
Dale Sedenquist
Eddie Smith
Ivaylo Vaklinov
LEAD ANIMATOR
Erik Medina
ANIMATORS
Steve Aguilar
Craig Gilmore
Dave Oelkers
Jeff Merghart
John Scharmen
GAME DESIGN
Jonathan Beard
Dan Mueller
Erik Medina
Keith Friedly
Tim Neveu
IN GAME
CINEMATICS DIRECTOR
Erik Medina
DIRECTOR OF AUDIO
Buzz Burrowes
MUSIC DIRECTOR
Chuck Doud
MUSIC
Greg Hunter
Juno Reactor
INTRO AND ENDING MUSIC
Jack Wall
INTERACTIVE MUSIC
PROGRAMMING
Chuck Doud
LEAD SOUND DESIGNER
Brad Aldredge
SOUND DESIGN MANAGER
Dave Murrant
ADDITIONAL SFX EDITING
Chris Jahnkow
ADDITIONAL MUSIC
AND SOUNDSCAPING
NK and LZ
VOICE CASTING
& PRODUCTION
Blindlight
VOICE ACTORS
Andre Stojka
“Mauruku”
Daran Norris
“Rongo”
Brian Cummings
“Baumusu”
Keone Young
“Kuzo”
Hayden Panettiere
“Tati”
Edith Diaz
“Simka”
Barry Dennen
“The Dark One”
Mari Weiss
“The Oracle”
ADDITIONAL
CHARACTER VOICES
Daran Norris
Wally Wingert
SKETCH CINEMATICS ARTIST
Jeff Merghart
Page 20

38
39
DIRECTOR OF
PRODUCT DEVELOPMENT
SERVICES GROUP
Dwayne Mason
CINEMATIC SUPERVISOR
Scott McMahon
CINEMATIC PROJECT
MANAGER
Gina Cafasso
Kate Johnson-Page
LEAD PRE-VISUALIZATION
ARTISTS
Steve High
Ron Padua
LEAD CINEMATIC
EDITOR/COMPOSITOR
Jeff Vargas
CINEMATIC
EDITOR/COMPOSITOR
Don Lacy
CINEMATIC TECHNICAL
ENGINEER
David Randolph
CINEMATIC AUDIO
POST PRODUCTION
Tristan des Pres
TOOLS ENGINEER
Joe Wilkerson
DEV. TOOLS &
ACCOUNTS ADMINISTRATOR
Jason Young
SAN DIEGO FIRST
PARTY QUALITY
ASSURANCE
DIRECTOR
Michael Blackledge
TEST TEAM
SENIOR MANAGER
Ritchard Markelz
CORE MANAGER
Mike Veigel
USABILITY /
ONLINE MANAGER
Doug Damron
GAME TEST ENGINEERS
Robert Helsel
Gary Valois
ANALYSTS
Heath Aeria
Matt Bolger
Robert Chantier
Cameron Larkins
Derrick Maddox
Conrad Noche
Terrance Oppenheimer
Jose Osio
Mark Ranallo
Monty Rimorin
Greg Tyler
Jason Umbreit
Sean Valencia
Michael A. Willette
Rich Wilson
John Zimmerman
TECHNOLOGY TEAM
TECHNOLOGY MANAGER
Kevin Simmons
LAB TECHNICIAN
Vince Loughney
PROJECT
MANAGEMENT TEAM
PROJECT COORDINATOR
Fred Dodson
DIRECTOR OF MARKETING
Ami Blaire
ASSOCIATE
MARKETING MANAGER
Jamie Tica
We would like to thank each
individual at Sony Computer
Entertainment America for
their contributions, support
and dedication to the success
of The Mark of Kri with
special recognition to the
Executive Management
team including:
Kaz Hirai
Jim Bass
Masayuki Chatani
Andrew House
Steve Ross
Riley Russell
Jack Tretton
Marilyn Weyant
SPECIAL THANKS
Kelly Flock
Tammy Schwinegruber
Felice Standifer
MANAGER OF TOOLS
& TECHNOLOGY
Brian Dawson
MAYA TECHNICAL
SUPPORT GROUP
Rick Harding
David Marshall
Chris Mayberry
RELEASE COORDINATOR
Eric Ippolito
ASSISTANT TO
PROJECT MANAGEMENT
Jason Villa
Page 21

40
41
LIMITED WARRANTY
Sony Computer Entertainment America (SCEA) warrants to the
original purchaser of this SCEA product that this software is
free from defects in material and workmanship of a period of
ninety (90) days from the original date of purchase. SCEA
agrees for a period of ninety (90) days to either repair or
replace, at its option, the SCEA product. You must call
1-800-345-SONY to receive instructions to obtain
repair/replacement services.
This warranty shall not be applicable and shall be void if the
defect in the SCEA product has arisen through abuse,
unreasonable use, mistreatment or neglect.
THIS WARRANTY IS IN LIEU OF ALL
OTHER WARRANTIES AND NO OTHER
REPRESENTATIONS OR CLAIMS OF
ANY NATURE SHALL BE BINDING
ON OR OBLIGATE SCEA. ANY
IMPLIED WARRANTIES
APPLICABLE TO THIS
SOFTWARE PRODUCT,
INCLUDING WARRANTIES
OF MERCHANTABILITY AND
FITNESS FOR A PARTICULAR
PURPOSE, ARE LIMITED TO THE NINETY (90) DAY PERIOD
DESCRIBED ABOVE. IN NO EVENT WILL SCEA BE LIABLE
FOR INCIDENTAL OR CONSEQUENTIAL DAMAGES RESULTING
FROM POSSESSION, USE OR MALFUNCTION OF THE SCEA
SOFTWARE PRODUCT.
Some states do not allow limitations as to how long an
implied warranty lasts and/or exclusions or limitations of
consequential damages, so the above limitations and/or
exclusions of liability may not apply to you. This warranty
gives you specific legal rights, and you may also have other
rights which vary from state to state.
Page 22

 Loading...