

Page 1

Page 2

WARNING: READ BEFORE USING YOUR PLAYSTATION®2
COMPUTER ENTERTAINMENT SYSTEM.
A very small percentage of individuals may experience epileptic
seizures when exposed to certain light patterns or flashing lights.
Exposure to certain patterns or backgrounds on a television screen
or while playing video games, including games played on the
PlayStation 2 console, may induce an epileptic seizure in these
individuals. Certain conditions may induce previously undetected
epileptic symptoms even in persons who have no history of prior
seizures or epilepsy. If you, or anyone in your family, has an
epileptic condition, consult your physician prior to playing. If you
experience any of the following symptoms while playing a video
game – dizziness, altered vision, eye or muscle twitches, loss of
awareness, disorientation, any involuntary movement, or
convulsions – IMMEDIATELY discontinue use and consult your
physician before resuming play.
WARNING TO OWNERS OF PROJECTION TELEVISIONS:
Do not connect your PlayStation 2 console to a projection TV
without first consulting the user manual for your projection TV,
unless it is of the LCD type. Otherwise, it may permanently damage
your TV screen.
USE OF UNAUTHORIZED PRODUCT:
The use of software or peripherals not authorized by Sony Computer
Entertainment America may damage your console and/or invalidate
your warranty. Only official or licensed peripherals should be used
in the controller ports or memory card slots.
HANDLING YOUR PLAYSTATION 2 FORMAT DISC:
• This disc is intended for use only with PlayStation 2 consoles
with the NTSC U/C designation.
• Do not bend it, crush it or submerge it in liquids.
• Do not leave it in direct sunlight or near a radiator or other
source of heat.
• Be sure to take an occasional rest break during extended play.
• Keep this compact disc clean. Always hold the disc by the
edges and keep it in its protective case when not in use. Clean
the disc with a lint-free, soft, dry cloth, wiping in straight lines
from center to outer edge. Never use solvents or abrasive cleaners.
TABLE OF CONTENTS
GETTING STARTED . . . . . . . . . . . . . . . . . . . . . . . .2
STARTING UP . . . . . . . . . . . . . . . . . . . . . . . . . . . .3
SETTING UP . . . . . . . . . . . . . . . . . . . . . . . . . . . . . .4
MEMORY CARDS . . . . . . . . . . . . . . . . . . . . . . . . . .4
CONTROLS . . . . . . . . . . . . . . . . . . . . . . . . . . . . . .6
MAIN MENU . . . . . . . . . . . . . . . . . . . . . . . . . . . . . .7
SUB-SYSTEM . . . . . . . . . . . . . . . . . . . . . . . . . . . . .8
GAMESCREEN . . . . . . . . . . . . . . . . . . . . . . . . . . . .9
HACKING . . . . . . . . . . . . . . . . . . . . . . . . . . . . . . .10
EVOLUTION . . . . . . . . . . . . . . . . . . . . . . . . . . . . .12
SUPPORT ITEMS . . . . . . . . . . . . . . . . . . . . . . . . .13
PAUSE MENU . . . . . . . . . . . . . . . . . . . . . . . . . . . .15
OPTIONS . . . . . . . . . . . . . . . . . . . . . . . . . . . . . . . 17
CREDITS . . . . . . . . . . . . . . . . . . . . . . . . . . . . . . . .19
NOTES . . . . . . . . . . . . . . . . . . . . . . . . . . . . . . . . .20
Page 3
Set up your PlayStation®2 computer entertainment system
according to the instructions in its Instruction Manual. Make sure
the MAIN POWER switch (located on the back of the console) is
turned on. Press the RESET button. When the power indicator
lights up, press the open button and the disc tray will open.
Place the REZ disc on the disc tray with the label side facing up.
Press the open button again and the disc tray will close. Attach
game controllers and other peripherals, as appropriate. Follow
on-screen instructions and refer to this manual for information
on using the software.
GETTING STARTED
STARTING UP
2 3
GETTING STARTED STARTING UP
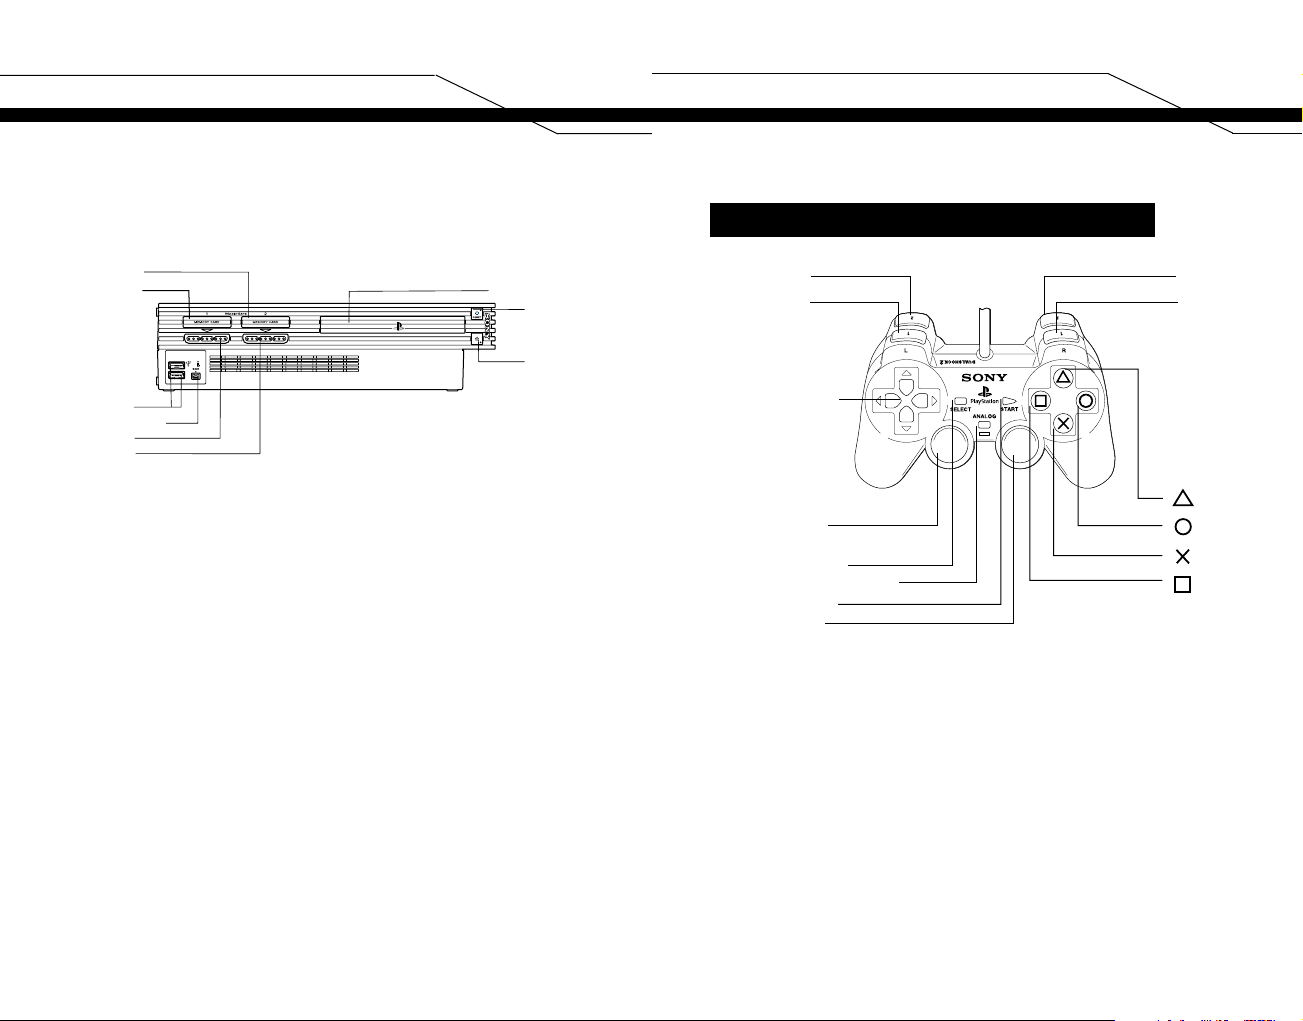
DUALSHOCK®2 ANALOG CONTROLLER CONFIGURATIONS
MEMORY CARD slot 2
MEMORY CARD slot 1
USB connector
S400 i.LINK connector
controller port 1
controller port 2
disc tray
RESET button
(OPEN) button
L2 button
L1 button
directional
buttons
left analog stick
(L3 button
when pushed down)
SELECT button
ANALOG mode button
START button
right analog stick
(R3 button
when pushed down)
R2 button
R1 button
button
button
button
button
Page 4
The world has become massively overpopulated. The rapidly
expanding network society has been crippled by rising crime rates
and is on the verge of meltdown.
A new system, ‘Project-K’, has been created in an attempt to resolve
the situation. At the core of the system is an artificial intelligence
center named ‘Eden’.
Eden has more advanced A.I. than any machine that has ever
previously existed. It has the ability to process vast amounts of
information at once, and to use that information to form its own
uniquely advanced independent thoughts. Some would say that Eden
has even developed a consciousness.
However, Eden became confused when the flow of information being
sent to it began to greatly increase in speed and volume. Eden started
to question the meaning of its existence and the consequences of its
actions. Finding itself surrounded by paradoxes, and realizing the
power of autonomy which it possessed, Eden began to shut itself down.
Now you are about to travel into the cyberspace of the Project-K
Network on a mission to re-awaken Eden. You must gain access to
each area and level of the system, destroying any Viruses and
Firewalls you encounter.
Open your senses...
Set up your PlayStation®2 computer entertainment system according
to the instructions in its instruction manual. Make sure the MAIN
POWER switch (located on the back of the console) is turned off.
Attach game controllers / other accessories as appropriate BEFORE
you switch your console on. It is advised that you do not insert or
remove accessories once the power is turned on.
Now turn the console ON by pressing the MAIN POWER switch and
press the [STANDBY]/RESET button. When the [STANDBY] indicator
lights up green, press the [OPEN] button and the disc tray will open.
Place the Rez™ disc on the disc tray with the label side facing up.
Press the [OPEN] button again and the disc tray will close. Finally,
press the [STANDBY]/RESET button again before commencing play.
PLEASE NOTE: the information in this manual was correct at the time
of going to print, but some minor changes may have been made late in
the game’s development. All screenshots for this manual have been
taken from the English version of this game, and some screenshots
might have been taken from pre-completion screens that differ slightly
from those in the finished game.
PLEASE NOTE: throughout this manual, the term ‘Memory Card’ is
used to describe the Memory Card (8MB) (for PlayStation®2) (product code SCPH-10020 E). Memory Cards (SCPH-1020 E)
designed for use with PlayStation® (PS one™) format software
are not compatible with this game.
To save game settings and progress, insert a Memory Card into
MEMORY CARD slot 1 of your PlayStation®2. You can load saved
game data from the inserted Memory Card, or any Memory Card
containing previously saved Rez™ data. Make sure there is enough
free space on your Memory Card before commencing play.
SETTING UP
MEMORY CARDS
4 5
Page 5

STARTUPCONTROLS
DISPLAYING THE MAIN ACCESS MENU
LOAD DATA
If there is a Memory Card containing previously saved Rez™ data
inserted into MEMORY CARD slot 1, the data will be automatically
loaded on startup. A message notifying you of this will be displayed.
Press the ✖ button to continue.
Press the START button at the Title Screen to display the Main
Access Menu. You will be given the following options:
TRAVELLING, PLAY, OPTIONS and HOW TO PLAY.
These options are explained in more detail later in this manual.
NOTE: Two additional modes, Score Attack and Beyond Mode,
eventually become available based on your performance within
the game.
Aim laser sight /
select menu option
Aim laser sight
Fire laser / confirm
menu selection
Use overdrive item /
cancel menu selection
Pause
NOTE: This is the default button configuration. You can change the
SHOT and OVERDRIVE buttons from the Options screen.
6 7
Page 6

SUB-SYSTEM SELECT SCREEN THE GAMESCREEN
INFORMATION WINDOW (Heads Up Display)
Displays details of the Viruses you have destroyed and the current status
of the Sub-System you are hacking.
SCORE
Your current score (only displayed in Score Attack Mode and Direct
Assault Modes).
PROGRESS GAUGE
For each Progress Node you
collect, one bar in this gauge will
turn white. When the gauge is full,
you will evolve into a new form.
OVERDRIVE GAUGE
Shows how many Overdrive Nodes
you have collected – each red bar
equals one Overdrive.
LASER SIGHT
Aim this at Viruses and press the ✖ button to lock-on.
The number of Viruses you are currently targeting will be displayed in
the Cursor Sight. Release the ✖ button to open fire.
Score
Overdrive
Progress gauge
Laser sight
Information
window
This screen gives you access to the Network Sub-Systems or ‘Areas’.
Initially, you will only be able to enter Area 1 - other Sub-Systems will
be unlocked as you progress through the Network.
The stats for each Area you have cleared will be displayed in the
bottom right-hand corner of the Sub-System Select Screen:
ANALYZATION - the percentage of layer levels you accessed
SHOT DOWN - the percentage of Viruses you successfully
destroyed
SUPPORT ITEM - the percentage of support items you
collected
You can exit the Sub-System Select Screen by pressing the button.
This will reset your status to the default First Form, so you must select
YES to confirm.
8 9
Page 7

Before you can gain access to Eden, you must unlock the various Area
Sub-Systems by destroying the Viruses that inhabit them.
THE LOCK-ON LASER
To lock onto a Virus, aim the cursor at it and press the ✖ button.
If you hold the ✖ button down, you can then aim the cursor
at other targets, up to a maximum of eight. When you release the
✖ button, the laser will open fire, and all the Viruses you have locked
onto will be destroyed.
AREAS
Each Area is made up of two phases – the Infiltration Phase, where
you must destroy Viruses to hack into the System, and the Boss
Phase, where you will face the Firewall protecting the Network Core.
To clear the Area, you must defeat the Firewall Boss.
Areas are unlocked successively. To unlock Area 5, you must achieve
100% analyzation in Areas 1-4 by shooting every single Network
Opening. Your analyzation percentage is determined by the number
of Network Openings you shoot – for example, if you only shoot eight
of the Network Openings in an area, you will only score 80%.
Network Openings are explained in the next section.
HACKING PROCEDURE
LAYER LEVELS
Each Area is made up of ten layer levels. To enter a new Layer Level,
first destroy the Password Protector. This will give you access to the
Network Opening, which you must then shoot eight times.
CHANGING YOUR PERSPECTIVE
When you are in the network, you move along a predetermined system
corridor and cannot change your position. Nor can you dodge attacks
from missiles – you must use your Lock-On cursor to protect yourself
before they hit you. However, you can change your perspective by
pushing up, down, left, or right direction with the left analog stick. The
range of your viewpoint can be up to 150º in the Infiltration Phase.
However, in the Boss Phase, you will have a 360º clear view.
10 11
Page 8

These items will appear when you destroy certain Viruses.
To collect an item, lock onto it and shoot as you would an enemy.
PROGRESS NODE
If you fill up the Progress Gauge by collecting eight of these, you
will evolve into the next form.
3X PROGRESS NODE
These will fill up three bars in your Progress Gauge.
SUPPORT ITEMS
Level 00
Level 01 Level 02 Level 03
Level 04
Level 05
EVOLUTION
These are the forms you can evolve and devolve into. When your
hacking session begins, you will be in the First Form state. Evolution
only occurs when the user acquires enough Progress Nodes to fill the
8 blocks in the Progress Gauge. Keep in mind that normal Progress
Nodes fill only 1 block in the Progress Gauge, while a 3X Progress
Node will fill 3. If you are damaged by a Virus, you will devolve into
the previous form. If you are already in the Zero Form state when you
are damaged, it’s game over.
12 13
Page 9

AUTOSAVE
PAUSING THE GAME
To save data, insert a Memory Card with at least 54KB of space into
MEMORY CARD slot 1 of your console. Data will then be
automatically saved when:
• You exit the Options Screen
• You log-out of an Area via the Pause Screen
• You clear an Area
• You improve your high score in Score Attack Mode
MEMO: Do not turn the console off or remove the Memory Card while
data is being saved.
Press the START button during a hacking session to display the Pause
Screen. This will give you a range of options, and allow you to change
certain settings. Any changes you make will be automatically saved
when your session is over.
CONTINUE
Select this option to resume the game.
LOG-OUT
Quit the game and return to the Sub-System Select Screen.
VIBRATION
Turn the vibration function of your (DUALSHOCK®2) analog controller
ON or OFF.
UP / DOWN
If you select REVERSE, you will need to push the left analog stick up
to aim down and down to aim up.
OVERDRIVE NODE
Each time you collect one of these, your Overdrive Gauge will fill up by
one red bar. To use an Overdrive Node, press the button. All the
Viruses on-screen will be automatically destroyed for a limited time.
Overdrive Nodes are very effective when facing Firewalls.
BONUS NODES
These items increase your score (only available in Score Attack and
Direct Assault modes).
14 15
Page 10

If you get a high score, you can enter your name in the ranking table
(even if you do not clear the area). Push left or right direction with the
left analog stick to select each letter and press the ✖ button to confirm.
To delete a letter, press the button. When you are done, select
END.
You can change the game settings and check ranking data here.
Press the button when you are finished to return to the Main Access
Menu – any changes you have made will be automatically saved.
SOUND MODE
Select the correct audio output for your TV.
BGM VOL.
Adjust the volume of the background music.
BGM VOL.
Adjust the volume of the background music.
SOUND EFFECTS VOL.
Adjust the volume of the sound effects.
TRAVELLING
In Travelling Mode, you can explore areas that you have unlocked in
Play Mode without the risk of being damaged by Viruses. To begin,
choose an area from the Sub-System Select Screen. When you want
to quit, press the START button to access the Pause Screen and
choose LOG-OUT. Select YES to confirm.
PLAY
Select this mode to gain access to the Project-K system and begin
your mission to awaken Eden.
SCORE ATTACK
Begin by selecting an Area to play in (only those you have already
cleared in Play Mode will be available). In Score Attack, you earn
points for destroying Viruses. Score enough points and you can enter
your name in the ranking table. Your current score will be displayed in
the top right hand corner of the screen.
If you clear an Area, the following results will be displayed:
INFILTRATION PHASE - points scored in the Infiltration Phase
BOSS PHASE - points scored in the Boss Phase
AREA TOTAL - overall score
OPTIONS
16 17
Page 11

SOUND EFFECTS VOL.
Adjust the volume of the sound effects.
UP / DOWN
If you change this setting to REVERSE, you will need to push the left
analog stick UP to aim down and DOWN to aim up.
SHOT BUTTON
Select the button that will have the ‘Fire’ function.
OVERDRIVE BUTTON
Select the button that will have the ‘Overdrive’ function.
VIBRATION
Turn the vibration function of your DUALSHOCK®2 analog controller
ON or OFF.
HEADS UP DISPLAY
Select ON to display your Overdrive Gauge, information window etc.
during the game, or OFF to hide them.
POINT DISPLAY
If this is set to ON, the points scored for shooting Viruses will be
displayed as you destroy them. (This only applies to Score Attack and
Direct Assault Modes – you cannot see the point value of Viruses in
any of the other modes.)
RANKING DATA
Select this option to view the Score Attack ranking tables.
Push left or right on the directional buttons to see the scores for the
different Areas. Press the button when finished to return to the
Options screen.
RETURN
Select this to back to the Options Screen (any changes made will
be saved automatically).
HOW TO PLAY
Select this option for a basic tutorial. To quit and return to the Main
Access Menu at any time, press the START button.
CREDITS
SEGA CREDITS
Product Manager
Rob Alvarez
Associate Product Manager
Cord Smith
Director of Marketing
Mike Fischer
Director of Creative Services
Robert Schonfisch
Graphic Design
Package: Vicki Morawietz
Manual: Miguel A. Osorio
CS Project Coordinator
Arianne Pitts
PR
Kirsten Merit
Gwen Marker
Vice President of Product Development
Jin Shimazaki
Localization Manager
Osamu Shibamiya
Localization Producer
Klayton Vorlick
Lead Tester
Jordan Romaidis
Assistant Lead Testers
Beejey Enriquez
Chester Lee
Core tester
Jason Jensen
Special Thanks:
Peter Moore
Chris Gilbert
Charles Bellfield
Molly Fitzpatrick
Peter Nguyen
Sega.com
18 19
Page 12

20 19
NOTES
*THIS LIMITED WARRANTY IS VALID FOR SEGA PRODUCTS
FOR PLAY ON PLAYSTATION®2 COMPUTER ENTERTAINMENT
SYSTEM MANUFACTURED FOR SALE IN AND PURCHASED AND
OPERATED IN THE UNITED STATES AND CANADA, ONLY.
Limited Warranty
Sega of America, Inc. warrants to the original consumer purchaser that the
Playstation 2 product shall be free from defects in material and workmanship
for a period of 90-days from the date of purchase. If a defect covered by this
limited warranty occurs during this 90-day warranty period, the defective
Playstation 2 product or component will be replaced free of charge. This
limited warranty does not apply if the defects have been caused by
negligence, accident, unreasonable use, modification, tampering or any other
causes not related to defective materials or workmanship. Please retain the
original or a photocopy of your dated sales receipt to establish the date of
purchase for in-warranty replacement. For replacement, return the product,
with its original packaging and receipt, to the retailer from which the software
was originally purchased. In the event that you cannot obtain a replacement
from the retailer, please contact Sega to obtain support.
Obtaining technical support/service
To receive additional support, including troubleshooting assistance, please
contact Sega at:
• web site . . . . . . . . . . . . . . http://www.sega.com
• e-mail . . . . . . . . . . . . . . . support@sega.com
• number . . . . . . . . . . . . . . 1-716-650-6702
LIMITATIONS ON WARRANTY
ANY APPLICABLE IMPLIED WARRANTIES, INCLUDING WARRANTIES OF
MERCHANTABILITY AND FITNESS FOR A PARTICULAR PURPOSE, ARE HEREBY
LIMITED TO 90-DAYS FROM THE DATE OF PURCHASE AND ARE SUBJECT TO
THE CONDITIONS SET FORTH HEREIN. IN NO EVENT SHALL SEGA OF
AMERICA, INC. BE LIABLE FOR CONSEQUENTIAL OR INCIDENTAL DAMAGES
RESULTING FROM THE BREACH OF ANY EXPRESS OR IMPLIED WARRANTIES.
THE PROVISIONS OF THIS LIMITED WARRANTY ARE VALID IN THE UNITED
STATES ONLY. SOME STATES DO NOT ALLOW LIMITATIONS ON HOW LONG AN
IMPLIED WARRANTY LASTS, OR EXCLUSION OF CONSEQUENTIAL OR
INCIDENTAL DAMAGES, SO THE ABOVE LIMITATION OR EXCLUSION MAY NOT
APPLY TO YOU. THIS WARRANTY PROVIDES YOU WITH SPECIFIC LEGAL
RIGHTS. YOU MAY HAVE OTHER RIGHTS WHICH VARY FROM STATE TO STATE.
Sega is registered in the U.S. Patent and Trademark Office. Sega, the Sega
logo, and REZ are either registered trademarks or trademarks of Sega
Corporation © SEGA CORPORATION/UGA, 2001. All Rights Reserved.
www.sega.com. Made and printed in the USA.
Page 13

 Loading...