

Page 1
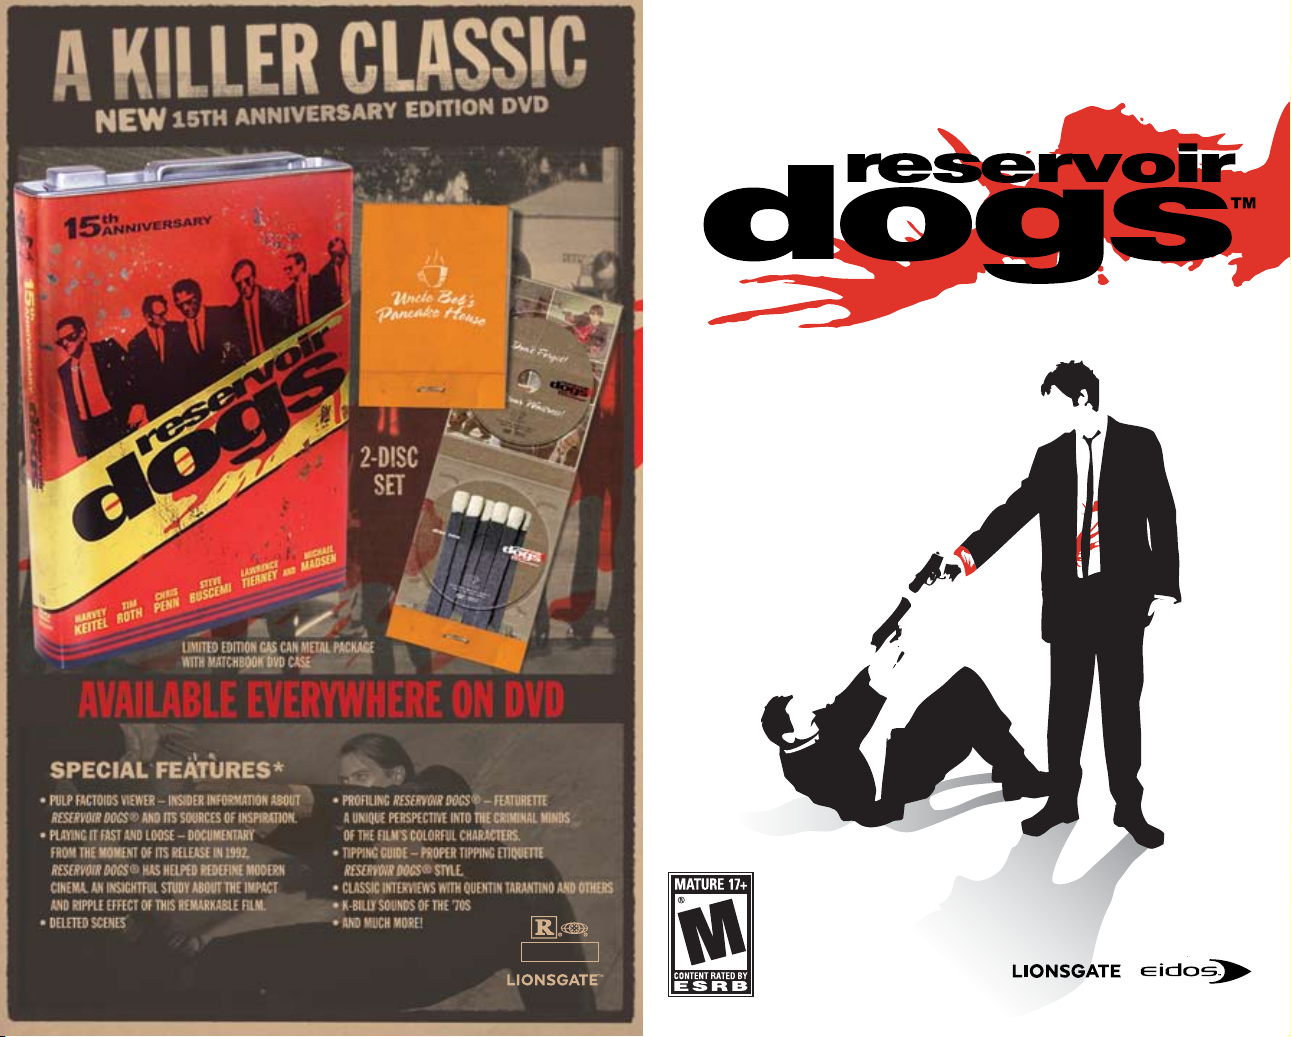
TM
*Not Rated
Program Content: © 1991 Dog Eat Dog Productions, Inc. All Rights Reserved. www.lionsgate.com
FOR STRONG VIOLENCE
AND LANGUAGE
[NYSE: LGF]
PRESDSUS03
Page 2
TM
WARNING: READ BEFORE USING YOUR PLAYSTATION®2 COMPUTER
ENTERTAINMENT SYSTEM.
A very small percentage of individuals may experience epileptic seizures when
exposed to certain light patterns or flashing lights. Exposure to certain patterns
or backgrounds on a television screen or while playing video games, including
games played on the PlayStation 2 console, may induce an epileptic seizure
in these individuals. Certain conditions may induce previously undetected
epileptic symptoms even in persons who have no history of prior seizures
or epilepsy. If you, or anyone in your family, has an epileptic condition, consult
your physician prior to playing. If you experience any of the following symptoms
while playing a video game — dizziness, altered vision, eye or muscle twitches,
loss of awareness, disorientation, any involuntary movement, or convulsions —
IMMEDIATELY discontinue use and consult your physician before resuming play.
WARNING TO OWNERS OF PROJECTION TELEVISIONS:
Do not connect your PlayStation 2 console to a projection TV without first
consulting the user manual for your projection TV, unless it is of the LCD type.
Otherwise, it may permanently damage your TV screen.
USE OF UNAUTHORIZED PRODUCT:
The use of software or peripherals not authorized by Sony Computer
Entertainment America may damage your console and/or invalidate your
warranty. Only official or licensed peripherals should be used in the controller
ports or memory card slots.
HANDLING YOUR PLAYSTATION 2 FORMAT DISC:
• This disc is intended for use only with PlayStation 2 consoles with the NTSC
U/C designation.
• Do not bend it, crush it or submerge it in liquids.
• Do not leave it in direct sunlight or near a radiator or other source of heat.
• Be sure to take an occasional rest break during extended play.
• Keep this disc clean. Always hold the disc by the edges and keep it in its
protective case when not in use. Clean the disc with a lint-free, soft, dry cloth,
wiping in straight lines from center to outer edge. Never use solvents
or abrasive cleaners.
getting started 2
controller 3
pro or psycho? 4
in-game controls 5
getting into the game 7
let’s go to work 9
game screen 12
pausing the action 13
driving screen 14
saving your progress 16
other characters 16
professional or psycho route? 17
credits 18
Page 3
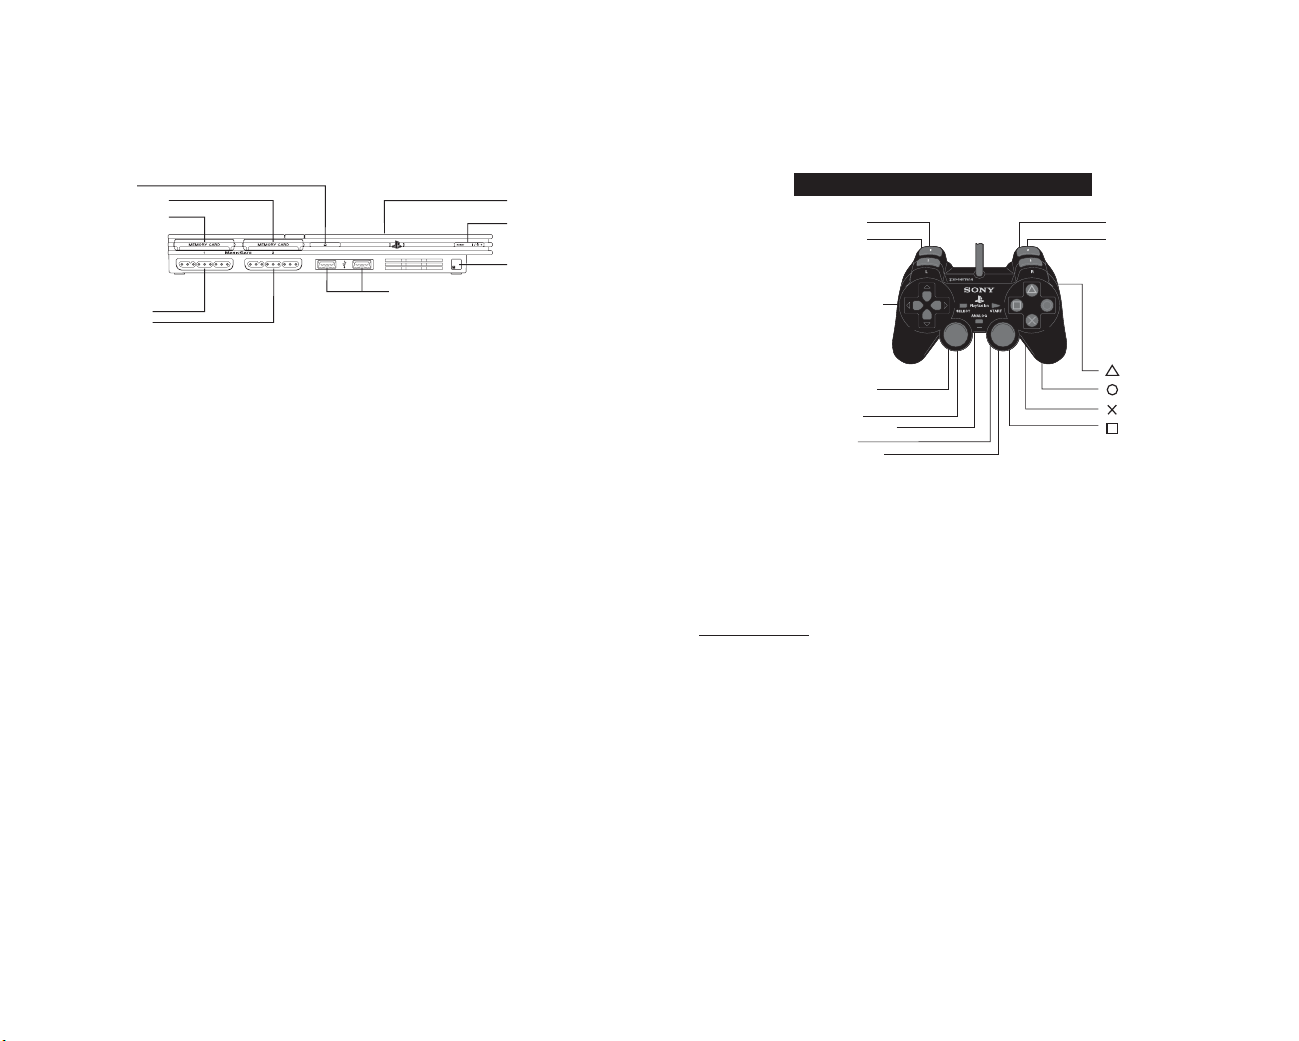
3
2
getting started
controller
Set up your PlayStation®2 computer entertainment system according to the instructions
supplied with your system. Check that the system is turned on (the on/standby indicator is
green). Press the OPEN button to open the disc cover. Place the
RESERVOIR DOGS™disc
with the label side facing up in the disc holder, and then close the disc cover. Attach game
controllers and other peripherals as appropriate. Follow the on-screen instructions and refer
to this manual for information on using the software.
MEMORY CARD (8MB)(for PlayStation
®
2)
To save game settings and progress, insert a memory card (8MB)(for PlayStation®2)
into MEMORY CARD slot 1 before powering on the system.At least 120KB of free space
on the memory card is required to save game data.
This game supports saving and loading of game data in MEMORY CARD slot 1 only.
You can load saved game data from the same memory card or from any memory card
containing previously saved
RESERVOIR DOGS™games.
Before starting play, connect the DUALSHOCK
®
2 analog controller to controller port 1.
• You can turn the controller’s vibration function on/off in Option Mode
(see page 8). When vibration is on, the controller will vibrate in response
to game events.
open button
on/standby/
reset button
IR receiver
USB connectors
disc cover
controller port 1
controller port 2
memory card slot 1
memory card slot 2
button
button
button
button
directional
buttons
left analog stick
(L3 button
when pushed down)
SELECT button
ANALOG mode button
START button
right analog stick
(R3 button
when pushed down)
L2 button
L1 button
R2 button
R1 button
DUALSHOCK®2 ANALOG CONTROLLER CONFIGURATIONS
MENU CONTROLS
Select option directional buttons / left analog stick
Action / Confirm settings x button
Back t button
Page 4

4
5
in-game controls
WEAPONS
Shoot* r button
Aim* right analog stick
Lock-on target* l button (hold)
Reload x button
Precise Target* l + f button
Zoom* f button
Sniper Rifle f button x2
Change weapon 4/3 directional buttons
Draw / Holster weapon 1 directional button
Pick up weapon x button
Drop shield c button
Bullet Festival t button
Signature Move* (requires Adrenaline) t button (with hostage only)
MOVING AROUND & COVER
Walk / Run forward / back* left analog stick 1/2
Sidestep / Strafe left / right* left analog stick 4/3
Roll 1/2 + s button
Crouch . button
Aim* right analog stick
Enter cover s button (against an object)
Exit cover s button or left analog stick back (while in cover)
Blindfire r button
Aim from cover (lean out) right analog stick (+ r button to fire)
Move around cover s button (hold) at edge of cover
NOTE: Controls marked with an asterisk (*) will also work when you are holding a hostage.
pro or psycho?
Six professionals have been brought together
by crime boss Joe Cabot and his son Nice Guy Eddie
for a heist at Karina’s Wholesale Diamonds.
They don’t know each other; they don’t want
to know each other.
Each man has a job to do and each has a colorcoded name to protect his identity: Mr. White,
Mr. Blonde, Mr. Brown, Mr. Orange, Mr. Blue
and Mr. Pink.
It’s the perfect setup — it’s planned to be
the perfect crime. The orders are simple: get in,
get the diamonds and then get out quick.
Two minutes max and away with the rocks that will
fetch big bucks.
But the heist goes wrong. Cops come out of nowhere
and all hell breaks loose. Alarms are triggered and
the cops are breathing down the team’s necks.
That’s when this game kicks off.
What happens next? Six professionals are out there,
on their own and put to the test. How do they
handle it? The cool Mr. Professional or loose-cannon
Mr. Psycho?
Now that’s your job to sort out.
Page 5

6
7
getting into the game
When the game first begins you can select from two on-screen options:
• Load Game
Continue with a previously saved game. You will be taken to the last saved
checkpoint. (If no memory card is inserted, you will be prompted to insert one
into MEMORY CARD slot 1.)
• New Game
Begin a new game of
RESERVOIR DOGS™. This takes you to the Main
Menu screen.
MAIN MENU
The Main Menu screen gives you options to:
•Play
Start a new game of
RESERVOIR DOGS™from the beginning. Get your black suit
and shades ready — you will be thrown into the full game.
When you start a game from scratch you can select a difficulty level:
– Easy
A more forgiving difficulty level and ideal for a rookie who can easily screw up
under pressure.
– Normal
Requires more precision in aiming and shooting. If you get shot, those bullets
are gonna hurt a lot more.
• Select Chapter
Choose a chapter to play from the 16 available missions in the game.
Scroll through the list with the left analog stick or the 4/3 directional buttons and press
the x button to select a chapter.
After you select a chapter, you will have the options to:
– Resume from Last Checkpoint
Begin the chapter from your last saved checkpoint
(if any).
– Restart Chapter
Play the chapter from the beginning.
• A Matter of Business
Come here to brush up your skills in firing weapons, using cover,
controlling people (including cops) and taking hostages. Joe and the boys will guide you
through the basics and won’t mind you trying things over and over — they appreciate the
hard work that goes into making a professional. They don’t want you shot when you’ve got
a job to do for them.
• The Missions
You can also select any of the other 15 chapters for a one-off blast of
action. Return here as often as you like for a dose of your favorite missions. These missions
include at least one of the team and sometimes, in the driving missions, several of them.
TAKING CHARGE: HOSTAGES & STANDOFFS
Target person* l button
Herd target person* l button (hold) + right analog stick
Look back* , button
Neutralize* d button (when against a wall or object)
Threaten (with gun)* d button
Order (e.g. “open safe”) / Disarm d button
Take / Release hostage* c button (toggle)
Beat up hostage* x button
Knock out hostage* x + r buttons
Head Slam* x button + left analog stick 1 when facing
a wall or low horizontal surface.
DRIVING
Accelerate x button
Steer left analog stick 4/3
Brake / Reverse s button
Handbrake c button
Speed Boost d button (hold)
Horn . button
Change view t button (Chase / Extreme / Bumper)
Look behind , button
Move camera right analog stick
Center camera behind car f button
Shoot r button
Lock-on target l button
Skip song 4/3 directional buttons
Pause w button
NOTE: Controls marked with an asterisk (*) will also work when you are holding a hostage.
Page 6

8
9
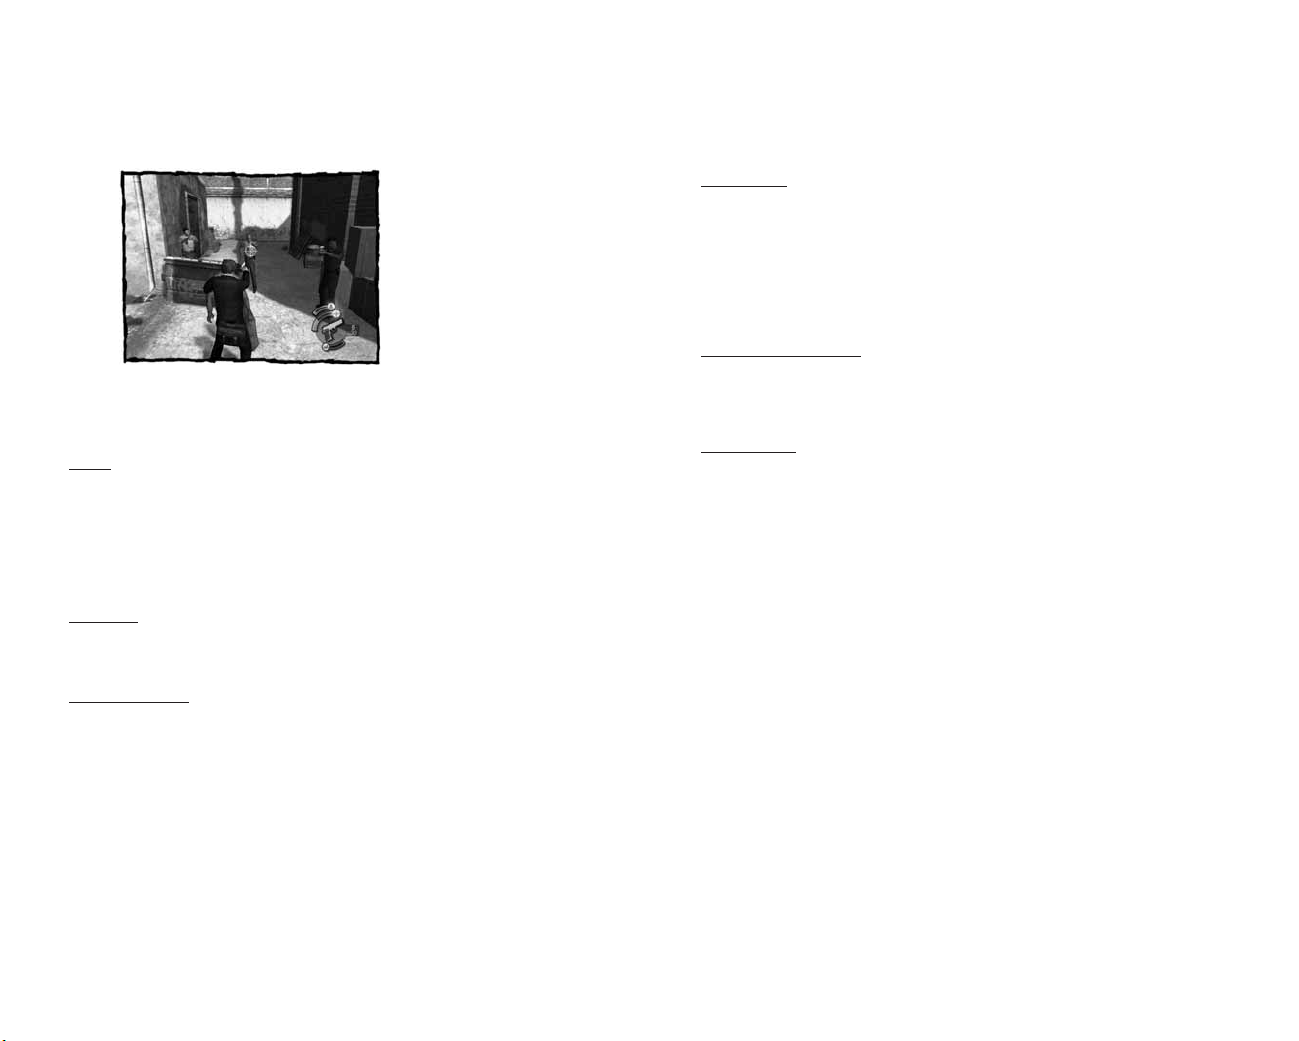
let’s go to work
If you’re new to the game, then you’ve got to start somewhere. This is it.
• Select
Play
from the Main Menu.
After the opening titles you will go to the first chapter of
RESERVOIR DOGS™, “A Matter
of Business,” the training session in Joe Cabot’s warehouse.
TRAINING (A MATTER OF BUSINESS)
You might think you know it all, but there’s a lot to learn in a short space of time. This training
session is in five sections: Weapons, Cover, Crowd Control, Hostage-Taking and Neutralizing;
these are all key elements in the game.
Some controls will seem complex to start with but you’ve got to practice them ‘til they’re
second nature. Be cool.Take your time. Learn your lesson.
WEAPONS
The first training session explains all aspects
of weapons.
Your weapons and how you handle them are
key to your survival. You’ll get away with
a lot with accurate aim, straight shooting and
a quick reload. You do not have an unlimited
capacity to carry all the weapons you might
find, only a maximum of two handguns
and one machine gun/rifle or shotgun
(with suitable ammo).
NOTE: See WEAPONS controls, page 5.
WEAPON TYPES
RESERVOIR DOGS™features an extensive range of different weapons: pistols, silenced
pistols, semi-automatic pistol, machine pistols (all of which can be carried and fired in both
hands at the same time); sub-machine guns, assault rifles, shotguns, sniper rifles and
tranquilizer rifles. All have varying degrees of effectiveness (fire rate, accuracy and damage)
and ammo clip size. Remember to use the right weapon for the right job; against armored
SWAT team personnel you might try to bring something a little more substantial than a pistol
to the party.
The Training session lets you get used to firing pistols, a sub-machine gun, sniper rifle
and a shotgun.
• Options
Provides a list of options for adjusting game settings, including:
– Controls
Includes the following:
> Camera Sensitivity
Set the sensitivity of the camera control (right analog stick).
Set a level between minimum and maximum on the slider.
> Invert Vertical Axis
Turn on/off.
> Invert Horizontal Axis
Turn on/off.
> Hold Lock-on to Target
Turn on/off.
> Controller Vibration
Turn on/off.
> View Controls
See a display of game controls.
– Display
Set up display controls to suit your
monitor and personal preferences:
> Subtitles
Turn on/off to display/hide
character speech on screen.
> Aspect Ratio
Select a screen aspect ratio
(4:3 or 16:9) to suit your monitor.
> Adjust Screen Position
Use the left
analog stick or the directional buttons
to position the game screen
on your monitor.
– Audio
Use the directional buttons
or left analog stick to adjust:
> Effects Volume
Adjust the game’s
sound effects volume.
> Speech Volume
Adjust the game’s
speech volume.
> Music Volume
Adjust the game’s
music volume.
• Extras
Check out bonus extras, including:
– Movie Viewer
Watch the FMV movies
from the game. Scroll through the list
and play your favorites.
– Art Gallery
View concept art you’ve found
while playing the game.
– Cheats
See a list of cheats that you might
appreciate when you replay the game.
– Credits
Look at a line-up of the people
responsible for getting
RESERVOIR DOGS
™
to you.
– Quit
End the game.
Page 7

10
11
SIGNATURE MOVE
Each of the heist team has his own Signature Move. This can be quite persuasive against cops
or guards who won’t cooperate. This usually encourages most people, no matter how tough
they think they are, to cooperate. The others? Well, that’s for you to find out!
To perform a Signature Move, you must have a hostage and a full adrenaline bar.
• Take a hostage (hit the c button).
• Hit the t button.
KNOCKING OUT A HOSTAGE
Sometimes you’ll just want to silence a hostage you are holding.
• Hold the x + r buttons to knock the hostage unconscious.
BULLET FESTIVAL
If you’re high on adrenaline in any firefight you might enjoy
a few moments of Bullet Festival. This slows down
the action (in super slo-mo) and you can target an enemy,
fire your weapon and watch the bullets travel through
the air and pierce the target in a blood-splattering
gore fest.
• Make sure you have a full Adrenaline Bar.
• Hit the t button.
• Aim (right analog stick).
• Fire a number of rounds (hit the r button).
• Watch the bullets hit the target.
The action will then return to normal.
COVER
Joe and the boys will also teach you the importance of using movement and cover — all that
commando shit they talk about in cop school might save your sorry ass from getting shot up.
Remember that it’s not just you who’ll be using effective cover. Cops and SWAT teams are
trained in the same way and will also be in cover so you’ve got to use your brain (if you don’t
want to see it splattered over the floor). Outflank them, try a shot from the side or behind,
or a precise shot to the head.
NOTE: See MOVING AROUND & COVER controls, page 5.
CROWD CONTROL
In this part of the Training session you’ll learn the basics of controlling people. Ordinary people
will get in your way, raise the alarm or tell the police where you are when you’re trying to get
away.You’ve got to focus on key issues and control them. Taking them out permanently is
an option. but that’s just more noise and alarm and if cops are around they’ll hear you.
You’ve got to use good judgment: get the civilians safely out of
the way or put them somewhere where they can do you no harm
(neutralize them).
NOTE: See TAKING CHARGE: HOSTAGES & STANDOFFS
controls, page 6.
USING HOSTAGES
If civilians are around, you might also think about using
them to your advantage. In this part of the Training session
you’ll learn the basics of hostage-taking and how to use
hostages: to help get you out of a tight spot or to give
you leverage to get others to do something for you.
Taking hostages isn’t just a matter of using “human
shields”; you’ve got to figure out how security guards
or cops will react when they see you threaten or rough
up an “innocent victim.”You’ll also find that you’ll get
away with a lot more by aggressive intimidation —
waving a big gun in the face of a security guard might
just get you through a locked door super fast.
Page 8
12
13
Target Cursor
The Target Cursor will appear if you have a weapon in your hand. Use it to aim before pulling
the trigger. If you want a more precise aim, press in the f button and the view will zoom-in.
If you have picked up a Sniper Rifle, press in f twice to get a super accurate zoom-in shot.
Press again to toggle back to normal mode.
The Target Cursor will flash to indicate if you have targeted (locked-on) to a person (either to
shoot or to control by moving). The Target Cursor will disappear if you do not have a weapon
in hand but will reappear if you press the l (lock-on) button. Your weapon will then be
placed in your hand, ready for action.
Hostage Tolerance Meter
If you have a hostage, you will see the hostage’s current tolerance level on the red bar just
above your own Health level. The bar reduces when you do something with or to the hostage.
It is an indication of how far you can push before the hostage collapses/faints and becomes
useless to you.
End of Mission
You can also view a statistical breakdown of the mission summary. The ranking you get depends
on your performance:
• Time Taken • Disarms
• Shots Fired • Threats Neutralized
• Targets Hit • Body Count
• Accuracy • Unlockables
• Hostages Taken
pausing the action
It’s going to get hot in there when you’re in the thick of it and you’ll want to take a breather
at times. Even the toughest player wants an occasional break in the commotion.
• Press the w button to pause the action at any point.
Pausing the game opens the Pause Menu with the following selections:
• Options
Access the game options (see page 8).
• Restart
Restart the current level.
• Save
Save your current level.
• Quit
Quit the current game.
game screen
1 TARGET CURSOR
2 HOSTAGE TOLERANCE METER
3 HEALTH METER
4 WEAPON(S) IN HAND
5 AMMO IN WEAPON / TOTAL AMMO
6 ADRENALINE
The Game Screen is generally left clear and uncluttered to let you concentrate on the action,
but some important stuff is shown that you should know about.
Health
The green meter shows the amount of current Health for your character in the mission. Keep
an eye on this — too low and he’ll never make it out of there alive.You can boost your Health
levels by using the Medical Boxes found in various places throughout the mission. Keep a look
out for them — they’re marked with a white border with a green cross — they might just make
the difference.
• Approach a Medical Box and press the x button when you see the prompt to add Health
on the meter.
Adrenaline
The blue meter shows your character’s Adrenaline level. Adrenaline is boosted by killing
or neutralizing cops and civilians. A high Adrenaline level will also let you carry out your
character’s specialty Signature Move or give you a blast of Bullet Festival.
Weapon(s) in Hand
This icon shows the active weapon (or weapons) in hand. You can carry one large weapon
(such as a sub-machine gun or shotgun) and a maximum of two handguns (one in each hand).
If you are holding a grenade or shield it is also shown here.
When a large weapon is holstered (directional button 1) it will be shown on the character’s
back. To draw a weapon, press the directional button 1 again.
To the right side of the weapon icon are two numbers. The top number is the total number
of bullets held in the current clip; the bottom number is the number of bullets you have
in reserve. When the top number reaches zero, the weapon is reloaded with the bullets taken
from your reserve (if available).
1
2
3
4
5
6
Page 9
14
15
Mini-map
A top down view of the route you are driving on the mission. Often there are several different
ways to get through to your objective. Keep an eye on the map — you might spot a shortcut.
• The compass needle shows where North (N) is located to help you orient your car.
• Your car is shown as the red triangle.
• Other cars relevant to the mission are shown as yellow circles.
• Cops are shown as blue circles.
• The green arrow points in the direction you should be heading.
Toward the end of the mission, a green marker shows your destination. When you get there you
will see a green circle. Drive into the circle to end the mission.
Other Driving Screen Graphics
Certain missions require extra HUD elements such as timers and additional Health gauges.
For example, in the mission where Mr. Orange is bleeding in the back of the car, an additional
Health meter appears on screen. Drive carefully with Mr. Orange, as collisions will cause him
to lose more blood.
DRIVING TIPS
Lock-on and shoot while driving:
• Press the l button to lock-on to the nearest target (car or person).
• Fire with the r button.
An erratic driving style will lead to loss of lock-on. A good lock-on for a prolonged period
of time will lead to a more accurate and damaging shot.
Precision Immobilization Technique (PIT)
The PIT or “fishtail” maneuver is very effective against cop cars.
• At speed, sideswipe the rear quarter of the target vehicle.
• The target vehicle should spin out, leaving you free to put your foot down.
The Boost
When you have a high Adrenaline level, press the d button to kick off a Speed Boost. If you
collide with oncoming vehicles under boost, those vehicles will be destroyed. Any traffic going
in your direction will be shoved away with a greater force.
Driving Missions
At the end of a driving mission you will receive a mission summary with the following details:
• Time Taken • Pedestrians Killed
• Max Speed • Shots Fired
• Average Speed • Accuracy
• Police Vehicles Destroyed • PIT Maneuvers
• Civilian Vehicles Destroyed
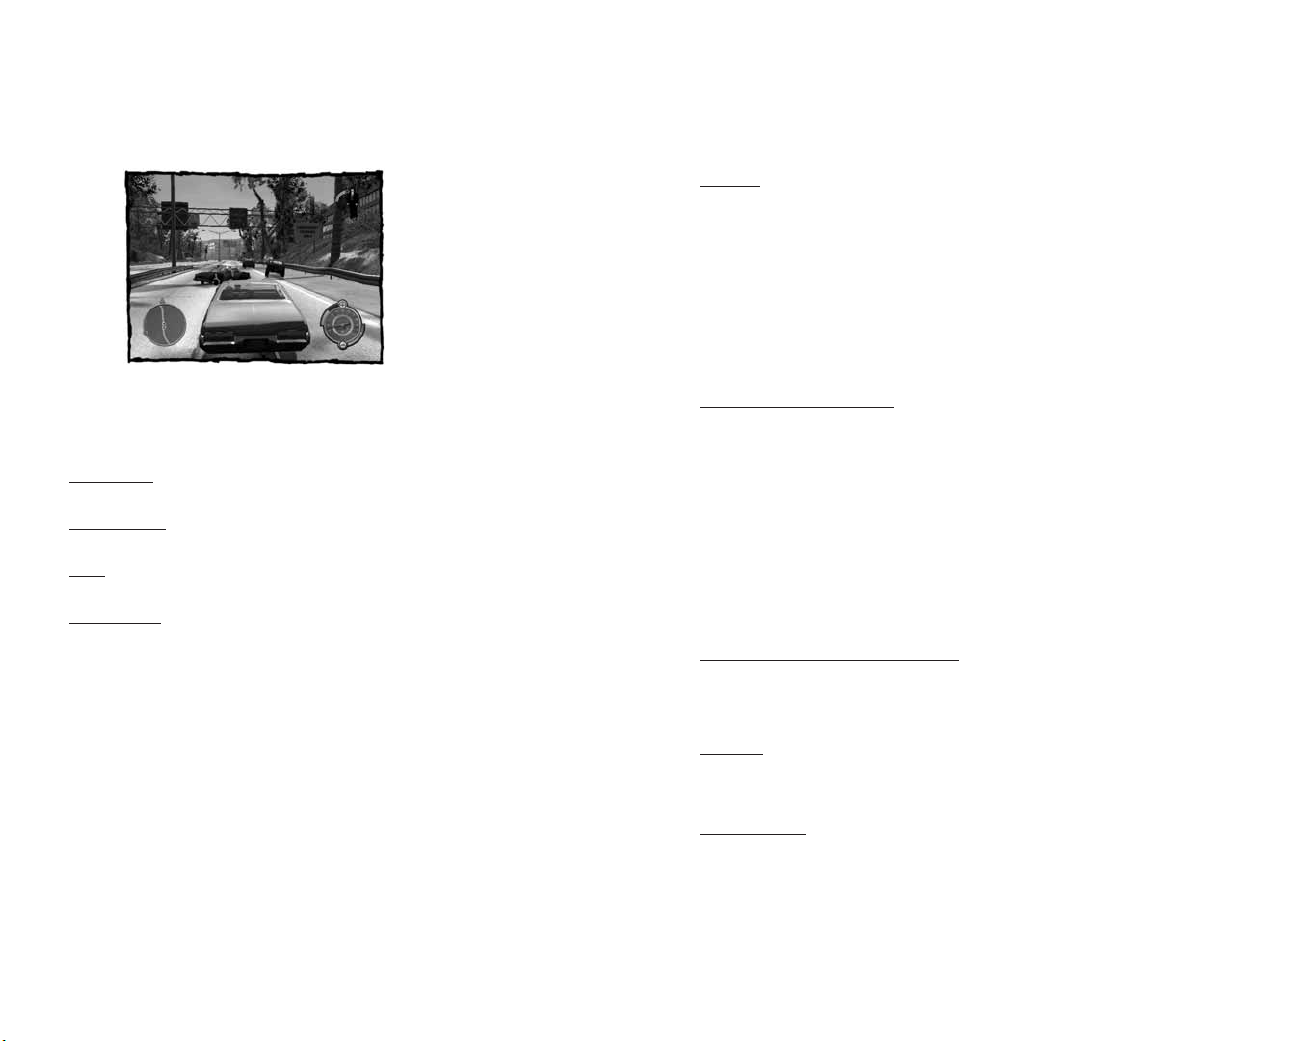
driving screen
RESERVOIR DOGS™features six driving missions that put a character from the team
behind the wheel of a car.The game screen you’ll see for Driving Missions is different
from the normal screen.
NOTE: See DRIVING controls, page 6.
Speedometer
Shows the speed of your car in miles per hour.
Damage Gauge
Shows your vehicle’s status.As the car takes more damage, this meter reduces.
Timer
In timed missions, the timer will appear on the HUD. It flashes red when you run out of time.
BOOST GAUGE
Your car’s “Adrenaline” level. The following will cause the Boost Gauge to rise:
• Fast driving
• Performing handbrake turns
• Driving over jumps
• Near misses into oncoming traffic
• Crashing though gates or other barriers
• Narrowly missing pedestrians
A high Adrenaline level allows you to get a Speed Boost (hit the d button when the Boost
Gauge is at least one-third full).
1 COMPASS
2 MINI MAP
3 YOUR CAR (RED) / OPPONENT CARS
4 TIMER
5 DAMAGE GAUGE
6 SPEEDOMETER
7 BOOST GAUGE
1
2
3
4
5
6
7
Page 10

16
17
saving your progress
At the end of each level, or when you quit the game, you will have the chance to store your
current position in the game on a memory card.
• Don’t insert or remove accessories once the power is turned on, or you may lose
game data.
• For the easiest save, make sure there is enough free space (120KB) on your memory card
before starting play.
other characters
CIVILIANS
Civilians might seem like nobodies to you but they could make
the difference between you getting out of this mess or sinking
in the shit. Most times they’ll react the way you expect them
to (if you think about it long enough).
If a civilian sees you with a gun, that person is going to run —
and raise the alarm. It’s in your best interests to stop this from
happening — but how you do it is up to you. If you take the
professional approach (threatening), you’ll find that a civilian
can be moved around, ordered to unlock doors and
neutralized (made to kneel against a wall).
Neutralizing is the only safe way of preventing a civilian
from posing a threat. But be warned — if you start
shooting the place up, everyone is going to panic and run.
Every character has a “tolerance” level that will appear
when you take the person hostage.This level is
represented by a red bar that appears above your own
Health bar.The red bar diminishes when a hostage is
moved, threatened or beaten. If it empties completely,
the hostage will collapse and you’ll be left
completely exposed.
COPS
Cops will behave the way you’d expect them to. They’ll try and arrest you and if you resist,
they’ll open fire. Cops won’t respond to verbal threats alone, but if you rough up a hostage
or perform a Signature Move in front of the cops, it usually persuades them to drop their guns.
Disarmed cops will act in much the same way as a civilian. If you can neutralize them, they
shouldn’t bother you. Just be aware that if you suddenly decide to go psycho on them,
they won’t hesitate to break away and look for the nearest dropped weapon.
If you find yourself in a firefight, taking a hostage is a sure-fire way to calm things down —
and buy yourself some precious seconds. Just don’t take this as a license to start shooting
people without consequence, because it won’t be — cops will return fire.
And don’t assume that taking a hostage is a guarantee of avoiding getting shot.
Cops will try and flank you, and will fire at the first opportunity.
SECURITY GUARDS
Although security guards appear to behave exactly like cops, they are not as tough mentally
or physically.After all, what’s in it for them to be the big hero? If you have a hostage,
a simple threat will be enough to disarm a guard. From that point on, guards act exactly
like disarmed cops.
professional or psycho route?
At the end of each mission, you are rated
on how you played through the chapter.
The game also gives you an overall rating
as you progress through the story.Three main
ratings are available: Professional, Psycho
and Career Criminal.
If you progress by mostly shooting and killing,
you’ll end up with a Psycho rating. Conversely,
if you mostly threaten and neutralize, you’ll
end up with a Professional rating. Engaging
in a combination of the two will yield
a Career Criminal Rating.
The Driving sections are rated in a similar way. Causing damage and shooting will give you
a Psycho rating; driving fast and carefully will give you a Professional rating.
Two additional ratings can be achieved by playing exclusively as a Professional or Psycho:
Consummate Pro and Stone Cold Psycho.
Page 11

18
19
Project Manager
Dave Manuel
Technical Manager
Tony Povey
Creative Manager
Ian Pestridge
Design Manager
Nick Adams
Assistant Project Manager
Vicky Page
Assistant Technical Manager
Claude Dareau
Assistant Creative Manager
Darren Nourish
Initial Pre-Dev Manager
Jon Cartwright
Programmers
Matt Hampton, Michael Higgs, Will Myles,
Tim Page, Phil Palmer, Nathan Pritchard,
Craig Rushforth, Johnny Trainor, Andrew Wallen,
Fred Williams, Toby Jones
Concept Artist
Stephen Baskerville
Character Artists
Nadine Mathias, Rob Price
Run & Gun Artists
Auburn Hodgson, Sebastian Livall, Soo-Ling Lyle,
Wayne Peters, Chris Southall, Chris Brooker
Lead Driving Artist
Rupert Lewis Jones
Driving Artists
Malcolm Burke, Mike Procter, Simon Reed
Lead Animator, Jason Tassell
Animators
Paul Gartland, Gerald Udogaranya,
Peter Whiting, Alan Paul
Run & Gun Designers
Benjamin M. Fisher, Bob Hands,
James Hargreaves, James Parker,
Lauren Grindrod, Simon Smith
Lead Driving Designer
Mark Digger
Driving Designers
David Fewtrell, Aron Tomlin
Lead Audio Designer
Rob Blake
Audio Designers
Todd Baker, Chris Hockey
QA Manager
Joe Lenton
QA
Daniel Brock, Duncan Fewkes, Lee Roberts,
Nick Scurr
volatile games
credits
Senior Executive Producer
Simon Prytherch
CEO
Jane Cavanagh
Commercial Director
Bill Ennis
Financial Director
Rob Murphy
Company Secretary
Anthony Price
Head of European Publishing
Scott Dodkins
Product Acquisition Director
Ian Livingstone
Development Director
Darren Barnett
Development Manager
Grant Dean
Senior Producer
Pete Hickman
Assistant Producer
Luke Timms
Development Support
Louise Fisher
VP Licensing
Simon Hewitt
Creative Development Director
Patrick O’Luanaigh
Designer
Paul Wright
Head of Global Brand
Larry Sparks
Brand Director
Fabien Rossini
Brand Manager
Helen Lawson
Head of Support Services
Flavia Timiani
QA Manager
Marc Titheridge
QA Supervisor
Dave Isherwood
QA Lead Technicians
Lawrence Day, Hugo Hirsh, William Wan
QA Technicians
Richard Abbott, Dom Andoh, Sam Beard,
Warren Beckett, David Klein, Andrae McKenzie,
Daniel Mills, Andrew Nicholas, Matthew Poon,
Zesh Sadique
Mastering Supervisor
Jason Walker
Mastering Engineer
Ray Mullen
Senior Localisation Manager
Monica Dalla Valle
Localisation Manager
Jan Buchner
Localisation QA Supervisor
Arnaud Messager
Lead Localisation QA Technicians
Laure Diet, Augusto d’Apuzzo
Localisation QA Technicians
Curri Barceló, Edwige Béchet, Arianna Pizzi,
Laëtitia Wajnapel
Creative Manager
Quinton Luck
Senior Designer
Jodie Brock
Web Manager
Christophe Taddei
Lead Online Creative
Olaf Siebert
Senior Online Designer
Leigh Kirwan
Junior Coder Designer
Shane Auckland
Manual Support Services
Tom Waine
Manual Writer
Alkis Alkiviades
Special Thanks
A big thanks to all our European Marketing
and Sales teams as well as our Finance
Department who have done a wonderful job
to make this game happen — your tremendous
work is much appreciated
eidos u.k.
Senior VP, Business & Legal Affairs
J. David Nonaka
EVP of Marketing
Anne Parducci
Executive Director of Marketing
Chela Johnson
lionsgate entertainment
Marc Canham, Richard Aitken, Edwin Scroggie
written by
Nimrod @ Nimrod Studios www.nimrodproductions.com
recorded, produced, mixed & mastered by
Page 12

20
Register online at www.eidosregistration.com
EIDOS, INC., LICENSE & LIMITED WARRANTY
Eidos, Inc., warrants to you, the original purchaser of this disc, that for a period of
ninety (90) days from the date of your purchase, this disc shall be free from defects
in materials and workmanship. If, at any time during the applicable ninety (90) day
warranty period you determine that this limited warranty has been breached, Eidos,
Inc., agrees, in its sole option, to repair or replace, free of charge, any such disc,
provided the disc is returned postage-paid to the Eidos, Inc., Factory Service Center
and a proof of date of purchase is included. This limited warranty is not applicable
to normal wear and tear and shall be void with respect to any defects that arise
from disc abuse, unreasonable use, mistreatment or neglect. This disc is sold “as is”
without any warranties of any kind, express or implied, including implied
warranties of merchantability or fitness for a particular purpose, other than the
limited warranty expressly stated above. No other claims arising out of your
purchase and use of this disc shall be binding on or obligate Eidos, Inc., in any
manner. Eidos, Inc., will not be liable to you for any losses or damages incurred
for any reason as a result of your use of this disc, including, but not limited to,
any special, incidental, or consequential damages resulting from your possession,
use or malfunction of this disc. This limited warranty states the entire obligation
of Eidos, Inc., with respect to the purchase of your disc. If any part of this limited
warranty is determined to be void or illegal, the remainder shall remain in full force
and effect.
For warranty support please contact our Customer Support department at
(415) 615-6220. Our staff is available Monday through Friday, 9:00 a.m. to 12:00
noon and 1:00 p.m. to 5:00 p.m. Pacific Time. You are responsible for all toll
charges. Customer Support Representatives will not provide game hints,
strategies or codes.
PRODUCT RETURN PROCEDURE
In the event our support agents determine that your game disc is defective, you will
need to forward material directly to us. Please include a brief letter explaining what
is enclosed and why you are sending it to us. The agent you speak with will give
you an authorization number that must be included and you will need to include
a daytime phone number so that we can contact you if necessary. Any materials not
containing this authorization number will be returned to you unprocessed and
unopened. Send your postage-paid package to the following address:
Eidos, Inc. Customer Services
RMA# (state your authorization number here)
651 Brannan Street, Suite 400
San Francisco, CA 94107
You are responsible for postage of your game to our service center.
CEO & President, Eidos North America
Bill Gardner
Executive Vice President of Sales & Marketing
Robert Lindsey
Vice President of Legal & Business Affairs
James O’Riordan
Vice President of Finance
Malcolm Dunne
Director of Marketing
Matt Gorman
Senior Product Manager
Kevin Gill
Director of Public Relations
Michelle Seebach Curran
Senior Public Relations Manager
Oonagh Morgan
Public Relations Manager
Tali Fischer
Senior Public Relations Specialist
Matt Dalghren
Community Specialist
Tony Perata
Events Specialist
Annie Meltzer
National Sales Manager
Joe Morici
Channel Marketing Manager
Janty Sumimoto
Channel Marketing Project Manager
Diane Eng
Channel Marketing Coordinator
Rafal Dudziec
Sales & Marketing Analyst
Ilana Budanitsky
Director of Marketing Communications
Stephanie Lipetzky
Web Producer
Roderick van Gelder
Web Designer
John Lerma
Media Manager
Micheal Tran
Creative Director
Karl Stewart
Creative Services Project Manager
Eileen Buenviaje
Graphic Designer
James Song
Operations Manager
Gregory Wu
Publishing Support Coordinator
Clint Waasted
Senior External Producer
Nick Goldsworthy
Associate Manager of Product Operations
Colby McCracken
QA/Customer Service Manager
Mark Cartwright
QA Supervisor
Aaron Safronoff
Lead QA Technicians
Aaron Keillor, Joshua Pfeiffer
QA Technicians
David Bushee, Nicholas Lutz, Stephen Cavoretto,
Nicholas Cooprider, Wilfredo Dimas,
Mackenzie Hume
Special Thanks
Danny Jiang, Kevin Witte, Joe Bruce,
Joey Eustler, Rudy Hill, Sumer Thompson,
Mike Schmitt, Jeff Green, Patrick Laciste,
John Hayes, Hanshaw Ink & Image
eidos u.s. publishing
Michael Madsen’s name, voice and likeness Licensed by Choctaw, Inc and Represented by Vicki Roberts,
Esq., www.restmycase.com™.
Additional music tracks courtesy of Nimrod Productions 2006 © 2006 Eidos.
RESERVOIR DOGS ™ interactive game, software and packaging © 2006 SCi Games Ltd. "Eidos" and the
Eidos logo are trademarks of Eidos Plc, Eidos Interactive Ltd and Eidos Inc. RESERVOIR DOGS ™ motion
picture © 1991 Dog Eat Dog Productions, Inc. LIONSGATE and the logo are trademarks of Lions Gate
Entertainment Inc. All rights reserved. All rights reserved. The rating icon is a registered trademark
of the Entertainment Software Association.
additional credits
 Loading...