

Page 1

MADDEN NFL 2003
PLAYSTATION2 MANUAL
40 pages + ENVELOPE
209 Redwood Shores Parkway
Redwood City, CA 94065
Part #1451505
Page 2

WARNING:
CONTENTS
READ BEFORE USING YOUR PLAYSTATION®2
COMPUTER ENTERTAINMENT SYSTEM.
A very small percentage of individuals may experience epileptic seizures when
exposed to certain light patterns or flashing lights. Exposure to certain patterns
or backgrounds on a television screen or while playing video games, including
games played on the PlayStation 2 console, may induce an epileptic seizure in these
individuals. Certain conditions may induce previously undetected epileptic symptoms
even in persons who have no history of prior seizures or epilepsy. If you, or anyone in
your family, has an epileptic condition, consult your physician prior to playing. If you
experience any of the following symptoms while playing a video game—dizziness,
altered vision, eye or muscle twitches, loss of awareness, disorientation, any
involuntary movement, or convulsions—IMMEDIATELY discontinue use and consult
your physician before resuming play.
WARNING TO OWNERS OF PROJECTION TELEVISIONS:
Do not connect your PlayStation 2 console to a projection TV without first consulting
the user manual for your projection TV, unless it is of the LCD type. Otherwise, it may
permanently damage your TV screen.
USE OF UNAUTHORIZED PRODUCT:
The use of software or peripherals not authorized by Sony Computer Entertainment
America may damage your console and/or invalidate your warranty. Only official or
licensed peripherals should be used in the controller ports or MEMORY CARD slots.
HANDLING YOUR PLAYSTATION 2 FORMAT DISC:
This disc is intended for use only with PlayStation 2 consoles with the NTSC U/C
➥➥
designation.
Do not bend it, crush it, or submerge it in liquids.
➥➥
Do not leave it in direct sunlight or near a radiator or other source of heat.
➥➥
Be sure to take an occasional rest break during extended play.
➥➥
Keep this compact disc clean. Always hold the disc by the edges and keep it in
➥➥
its protective case when not in use. Clean the disc with a lint-free, soft, dry cloth,
wiping in straight lines from center to outer edge. Never use solvents or abrasive
cleaners.
This product has been rated by the Entertainment Software Rating Board.
For information about the ESRB rating, or to comment about the appropriateness
of the rating, please contact the ESRB at 1-800-771-3772.
GETTING STARTED . . . . . . . . . . . . . . . . . . . . . . . 2
COMMAND REFERENCE . . . . . . . . . . . . . . . . . . . 3
BASIC CONTROLS . . . . . . . . . . . . . . . . . . . . . . . 4
COMPLETE CONTROL SUMMARY . . . . . . . . . . . . 5
SETTING UP THE GAME . . . . . . . . . . . . . . . . . . . 9
MAIN MENU . . . . . . . . . . . . . . . . . . . . . . . . . . . . . . . . . . . . . 9
PLAY NOW—STARTING AN EXHIBITION GAME . . . . . . . . . . 9
PLAYING THE GAME . . . . . . . . . . . . . . . . . . . . . 11
PLAYCALLING SCREEN . . . . . . . . . . . . . . . . . . . . . . . . . . . . . 11
GAME SCREEN. . . . . . . . . . . . . . . . . . . . . . . . . . . . . . . . . . . 12
PAUSE ME N U. . . . . . . . . . . . . . . . . . . . . . . . . . . . . . . . . . . . 14
OTHER GAME MODES. . . . . . . . . . . . . . . . . . . . 14
MINI-CAMP . . . . . . . . . . . . . . . . . . . . . . . . . . . . . . . . . . . . . 14
ONLINE . . . . . . . . . . . . . . . . . . . . . . . . . . . . . . . . . . . . . . . . 15
FRANCHISE . . . . . . . . . . . . . . . . . . . . . . . . . . . . . . . . . . . . . 18
TOURNAMENT . . . . . . . . . . . . . . . . . . . . . . . . . . . . . . . . . . . 23
TWO MINUTE DRILL . . . . . . . . . . . . . . . . . . . . . . . . . . . . . . 24
FOOTBALL 101 . . . . . . . . . . . . . . . . . . . . . . . . . . . . . . . . . . . 24
PRACTICE . . . . . . . . . . . . . . . . . . . . . . . . . . . . . . . . . . . . . . 24
SITUATION. . . . . . . . . . . . . . . . . . . . . . . . . . . . . . . . . . . . . . 25
FEATURES . . . . . . . . . . . . . . . . . . . . . . . . . . . 25
SETTINGS. . . . . . . . . . . . . . . . . . . . . . . . . . . . 32
SAVING AND LOADING . . . . . . . . . . . . . . . . . . . 35
PROFILE MANAGER . . . . . . . . . . . . . . . . . . . . . 35
LIMITED 90-DAY WARRANTY . . . . . . . . . . . . . . 36
-1
-
Page 3
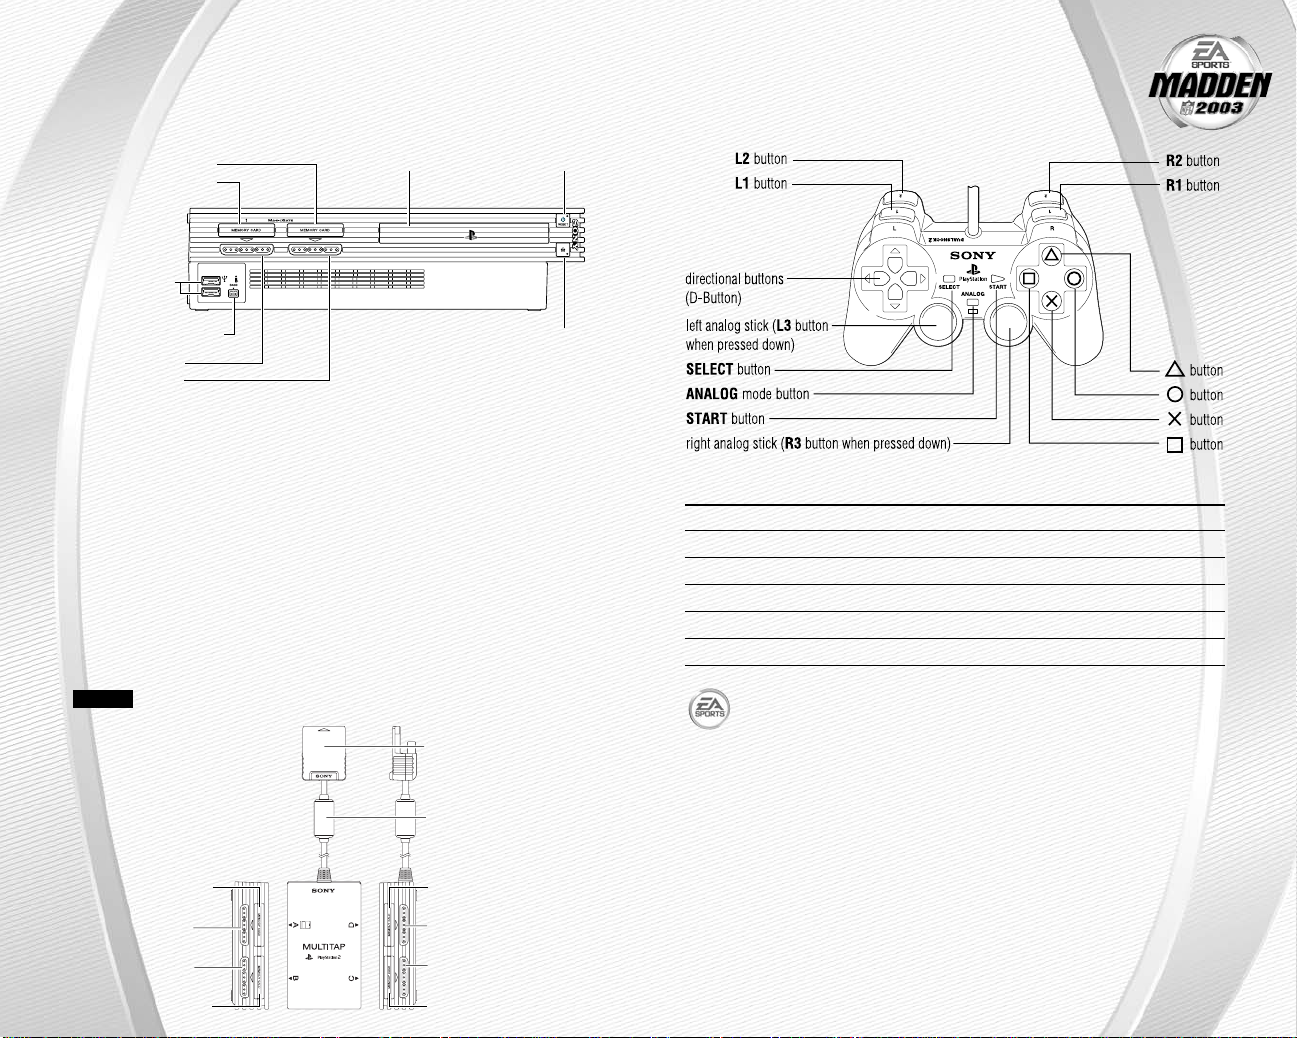
GETTING STARTED
COMMAND REFERENCE
PLAYSTATION®2 COMPUTER
ENTERTAINMENT SYSTEM
MEMORY CARD slot 2
MEMORY CARD slot 1
USB connector
S400 i.LINK connector
controller port 1
controller port 2
1. Set up your PlayStation
®
2 computer entertainment system according to the
instructions in its Instruction Manual.
2. Make sure the MAIN POWER switch (located at the back of the console)
is turned on.
3. Press the RESET button. When the power indicator lights up, press the open
button and the disc tray will open.
4. Place the Madden NFL
™
2003 disc on the disc tray with the label side facing up.
Press the open button again and the disc tray will close.
5. Attach game controllers and other peripherals, as appropriate.
6. Follow on-screen instructions and refer to this manual for information on using
the software.
NOTE:
(for PlayStation®2).
Up to 8 players can play Madden NFL 2003 by using the Multitap
disc tray RESET button
(OPEN) button
multitap connector
(for PlayStation
®
2)
DUALSHOCK®2 ANALOG
CONTROLLER CONFIGURATIONS
MENU CONTROLS
Highlight menu item D-Button or left analog stick
Change highlighted item D-Button or left analog stick
Select/Go to next screen ✖button
Cancel/Return to previous screen ▲ button
Help menu ■ button
Change music track ■ button + L1 button/R1 button
For more info about this and other titles, visit EA SPORTS™on the web
at www.easports.com.
↕
↔
RFI filter
MEMORY CARD slot A
controller port A
controller port B
-2
-
MEMORY CARD slot B
MEMORY CARD slot D
controller port D
controller port C
MEMORY CARD slot C
-3
-
Page 4
BASIC CONTROLS
Run the table on the gridiron with the use of these basic controls.
GENERAL GAMEPLAY
Pause game start button
Call timeout select button
PLAY SELECTION
Cycle sets and formations D-Button or left analog stick
Select sets and formations ✖ button
Select play D-Button or left analog stick ↕and then
■ button, ✖ button, or ● button
KICKING
Start kick meter/Kick the ball ✖ button (three-clicks mode)
OFFENSE
Snap the ball ✖ button
Passing:
Bring up passing icons ✖ button
(when Quick Passing is OFF)
Throw the ball ✖ button, ■ button, ● button, L1 button,
or R1 button
Move player D-Button or left analog stick
DEFENSE
Switch player ✖ button
Move player D-Button or left analog stick
Dive ■ button
NOTE:
on p. 5.
For information on ALL game controls, ➤ Complete Control Summary
COMPLETE CONTROL
SUMMARY
NOTE:
ON, a red light illuminates from the mode indicator on your controller.
OFFENSE (BEFORE THE SNAP)
Call an audible (➤ p. 12) ■ button then ■ button, ✖ button, ● button,
Cancel an audible ▲ button
(before selecting an audible)
Run original play ■ button then L2 button
(after selecting an audible)
Flip play (at the line of scrimmage) ■ button then R2 button
Quiet the crowd L3 button
Coach’s cam (with passing routes) R2 button
Coach’s cam (without routes) L2 button
Fake snap ● button
Call timeout select button
Snap the ball ✖ button
RUNNING
Move player/Run D-Button or left analog stick
Sprint ✖ button
Dive ■ button
Slide/Dive (QB) ■ button (tap)/ ■ button (hold)
Jump/Hurdle ▲ button or right analog stick i
Spin ●button or right analog stick g +
Juke left/right L1 button/R1 button
Stiff arm left/right L2 button/R2 button or right analog stick
You can play Madden NFL 2003 in Analog mode. When
L1 button, L2 button, or R1 button
D-Button or left analog stick
↔
↔
PASSING
Bring up passing icons ✖ button
(when Quick Passing is Off)
Pass to the receiver with ✖ button, ■ button, ● button, L1 button,
corresponding icon or R1 button
Throw ball away L2 button + ▲button
(while passing icons are up)
-4
-
-5
-
Page 5

PASSING CONT.
Toggle passing icons OFF/ON ▲ button
Route-based passing L2 button + ✖ button, ■ button, ● button,
L1 button, or R1 button
Pump fake R2 button
RECEIVING
Control intended receiver ✖ button (while ball is airborne)
Dive for pass ■button
Sprint ● button
Jump for pass ▲button or right analog stick i
BLOCKING
Switch to closest blocker/receiver ✖ button
Cut block ■ button
Sprint/Engage block ● button
AFTER THE PLAY
Bypass cutscene ✖ button
Spike ball ●button (Hold)
Instant Replay L1 button + R1 button
Fake spike ball ■ button (Hold)
No Huddle ▲ button (Hold)
Timeout select button
DEFENSE (BEFORE THE SNAP)
Cycle through defenders ✖ button or ● button
Reposition player D-Button or left analog stick
Defensive line shift L1 button then D-Button i, g, h, or f
Reset defensive line shift L1 button then L2 button
Linebacker shift R1 button then D-Button i, g, h, or f
Reset linebacker shift R1 button then L2 button
Call an audible ■ button then ■ button, ✖ button, ● button,
L1 button, L2 button, or R1 button
Call a coverage audible (➤on p. 14) ▲ button then D-Button i, g, or f
Cancel an audible ▲ button
(before selecting an audible)
DEFENSE CONT.
Reset coverage ▲ button then L2 button
Reset original play ▲ button then L2 button
(after calling an audible)
Flip play ■ button then R2
Pump up crowd L3 button
Coach’s cam (with assignments) R2 button
Coach’s cam (without assignments) L2 button
Call timeout select button
DEFENSE (AFTER THE SNAP)
Control player nearest to the ball ✖ button
Move player D-Button or left analog stick
Dive ■ button or right analog stick g
Sprint ● button
Jump ▲ button or right analog stick i
Strip ball L2 button/R2 button
Spin move left/right (engaged) L2 button/R2 button
Swim move left/right (engaged) L1 button/R1 button
KICKING GAME
Direction/Elevation of kick D-Button or left analog stick
Start Kick Meter ✖ button
Stop Kick Meter upswing (power) ✖ button
Stop Kick Meter downswing ✖ button
(accuracy)
Delay the kick (Kickoff only) ✖button (Hold)
Call an audible (➤ p. 12) ■ button then ✖ button, ■ button,
● button, L1 button, L2 button, or R1 button
Cancel an audible ▲ button
Reset play ■ button then L2 button
Flip play ■ button then R2 button
Call timeout select button
-6
-
-7
-
Page 6
KICKING THE BALL
The Kick Meter appears at the bottom left hand corner of the screen during kicks
and punts.
Over-kick area
Highest
desirable
point
Best accuracy
Over-kicking adds power to a kick. However, the Kick Meter speeds up on the
A
downswing and your chance for making an accurate kick decreases. Try to stop
the Kick Meter in the middle of the yellow accuracy range for best results.
Aim your kick or change the trajectory with the directional arrow by pressing
➥➥
the D-Button or left analog stick.
KICKOFF/PUNT RETURNING
Switch players ✖ button
Move return man D-Button or left analog stick
Fair catch (you must have control ▲ button
of the return man)
NOTE:
catches a punt or kickoff, he kneels down for a touchback.
If you cause your return man to remain in the endzone after he
SETTING UP THE GAME
Before the Main menu appears, Madden NFL 2003 gives you
the option to play with Auto Save ON/OFF. When ON, game files
are automatically generated and saved only to the first memory
card (8MB) (for PlayStation®2) found. Any files that were previously
loaded will be overwritten with a new version of the file when any
change is made to that file. To save your files to a different memory
card slot, ➤ Saving and Loading on p. 35.
MAIN MENU
➤ Settings
on p. 32
Inside
➤ Starting
an Exhibition
Game below
➤ Game Modes
on p. 14
➤ Features
on p. 25
NOTE:
Default options are listed in bold in this manual.
PLAY NOW—STARTING AN EXHIBITION GAME
Play an Exhibition game between any two teams.
TEAM SELECT SCREEN
Select the teams for your game.
Away team
Team ratings
and record
Press the
select button
to select
stadium and
game conditions
Access Help
menu
EA SPORTS:
Get a Season
Preview and
view game
credits
➤ Profile
Manager
on p. 35
Home team
Press the ●
Button to load a
Created Team to
the Team Select
screen (➤ Create-
A-Team p. 27)
Away and Home Teams
Press the L1 button or the R1 button to cycle through Classic (historical)
➥➥
teams, press the L2 button to select any team at random, or press
the R2 button to randomly select a “current” 2003 team.
-8
-
-9
-
Page 7
Stadium Select (Weather and Time of Day)
Play your game at any stadium. You can also select the weather conditions and
kickoff time: 1:00 PM, 2:30 PM, 4:15 PM, or 8:30 PM.To play in the rain or snow, adjust
the weather options to vary your playing conditions. Increasing the precipitation
while decreasing the temperature creates snow.
Press the
➥➥
NOTE:
▲ button to go back to the team select screen.
▲
Changing the home team will change the stadium.
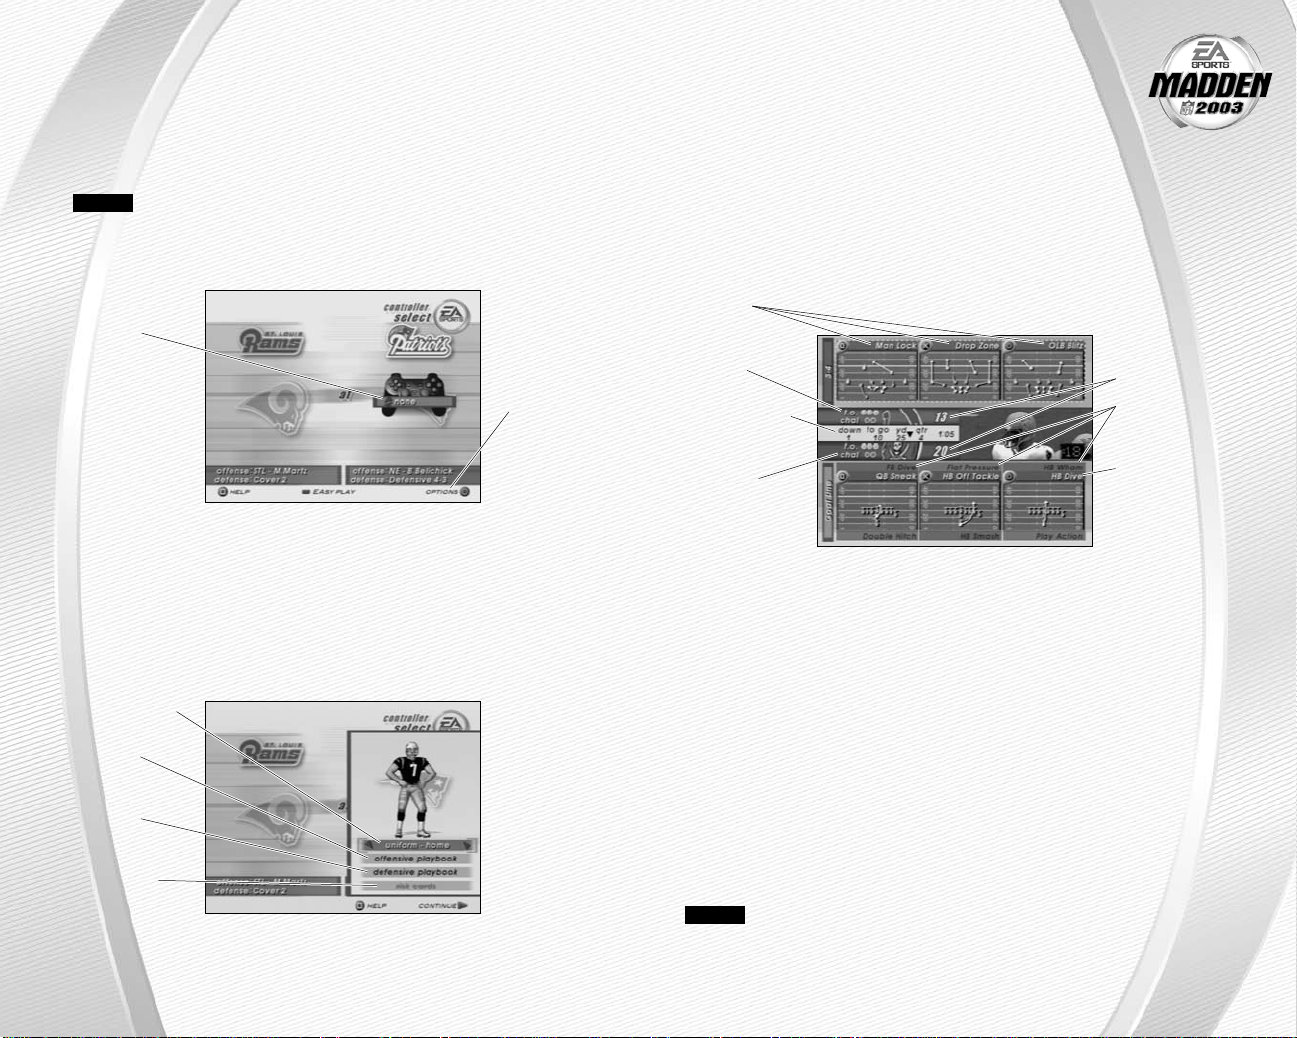
CONTROLLER SELECT SCREEN
Select a team to control in the game.
To choose
a team, press
the D-Button
and position
the controller
icon under your
desired team
Press the select button at the Controller Select screen to play with EAsy Play
➥➥
ON. When enabled, the game is simplified throughout for easier learning.
Press the start button or press the ✖ button from the Controller Select screen
➥➥
to begin the game.
↔
Press the
● button to
select more
options
OPTIONS MENU
From the Options menu, you can select your team uniform, risk Madden Cards,
and select a playbook.
Uniform select
(Home team)
Offensive
Playbook
select
Defensive
Playbook
select
Risk Madden
Cards
PLAYING THE GAME
After all the pre-game adjustments, the captains meet midfield
for the coin toss.
COIN TOSS
Before the coin toss, the playing conditions are displayed. To bypass these
➥➥
screens, press the ✖ button.
PLAYCALLING SCREEN
From the Playcalling screen, select the plays for your controlled team or ask
John Madden for his suggestion.
Defensive
Formation/
Play windows
Timeouts
remaining
Down, quarter,
and clock
information
Number of
Coaches
Challenges
remaining
To select a play:
1. Press the D-Button or press the left analog stick to select a formation and set,
then press the ✖ button.
From the Formation window, you can view fatigue levels for your players.
A
When red, players are tired and need rest, yellow means players are slightly
winded, and players are fresh when their symbol is white.
2. To select the desired play, press the ■ button, ✖ button, or ● button. To go back
to the previous window, press the ▲button.
To flip formations or plays to the opposite side of the field, press the R2 button.
➥➥
On offense to call a play from the header below the selection window, press the
➥➥
L2 button + the ■ button, ✖ button, or ● button. To call a play from the header
above, press the L1 button + the ■ button, ✖ button, or ● button.
To ask John Madden for coaching assistance on your next play, press the
➥➥
■ button and a suggested play is highlighted in the play selection window.
NOTE:
timeouts) to select a play before a delay of game penalty is called. The defense
has five seconds to choose a play after the offense is ready to break the huddle.
After each play, the offense has 40 seconds (25 after penalties and
Score
Offensive
Set/Formation/
Play windows
List the plays in
the next window
(press the d-button
↕
to cycle through
windows)
-10
-
-11
-
Page 8

Special Teams Plays
From the Playcalling screen, you’ll find punt, kick, and special “trick” plays.
GAME SCREEN
If your player is off-screen, an arrow the same color as your control indicator points
toward him from the edge of the screen. Press and hold the D-Button in the opposite
direction of the arrow to bring the player on-screen.
Time
remaining in
Controlled
player
Player
identifier
GAMEPLAY TIPS
Audibles (Offense and Defense)
If you see a weakness from the opposition, call an audible and set up a new play at
the line of scrimmage (before the ball is snapped).
To call an Audible:
1. Before the ball is snapped press the ■ button, then press the ■ button, the ✖
button, the ● button, the L1 button, or the R1 button. The players adjust their
set and/or formation as the new play is called out on the field.
2. Press the ▲ button to cancel (before selecting an audible). To customize your
offensive and defensive audibles, ➤ Audibles on p. 33.
Hot Routes
Hot Routes quickly change a receiver’s original route before the ball is snapped.
To call a Hot Route:
1. Press the ▲ button, then press the button symbol of the receiver whose route
you want to change.
2. After the receiver’s original route is cancelled, press the D-Button i to send him
on a fly pattern, press the D-Button g for a curl pattern, or press the D-Button
to run an in/out pattern. (You may also press the left analog stick to change the
receiver’s route).
-12
-
quarter
Down and
yards to go
Play clock
↔
Blocking Hot Routes
Change your blocking assignments for your halfbacks, fullbacks, and
tight ends. Call these at the line of scrimmage when you anticipate
the defensive pressure coming from an unprotected side of the line.
To call a Blocking Hot Route:
1. Press the ▲ button, then press the button symbol of the
running back or tight end whose passing/blocking route you
want to change.
2. Press the L2 button to change to a blocking assignment to the left.
Press the R2 button to change it to the right.
Receiver/Back Motion
Move a player in motion before play begins. Once the ball is snapped, the player
runs the same assigned route as before but from his current location on the field.
To call man in motion:
1. At the line of scrimmage, press the D-Button or press the left analog stick
i or g to highlight an eligible player.
2. Press the D-Button or press the left analog stick ↔to send that player in motion
and then snap the ball to begin the play.
Bullet/Touch Pass
Throw a bullet pass (hold down the button that corresponds to the targeted receiver)
and the quarterback fires the ball to the receiver. To drop the ball in over coverage,
throw a touch pass (tap the button).
Route-Based Pass
On a route-based pass, the quarterback leads the receiver based on the player’s
route instead of the current direction the player is running.
To throw a route-based pass, press and hold the L2 button and press the button
➥➥
of the receiver you want to throw to and the quarterback leads the receiver
through his route while he’s running.
QB Scramble
If your quarterback is under heavy pressure, press the ▲ button while he’s still
behind the line of scrimmage and scramble for yardage. During the run, you can
press the ▲ button again to bring up the passing symbols. Once the quarterback
crosses the line of scrimmage, he’s not allowed to throw the ball downfield.
Hurry-Up Offense
To run a hurry-up offense, hold the ▲ button immediately at the end of the play
(just after the whistle blows). The offense skips the huddle, hurries to the line
of scrimmage, and repeats the previous play.
If you want your quarterback to call the “spike ball” play, press and hold the
➥➥
● button at the end of a play to run a stop clock play. To call a “fake spike”
trick play, press and hold the ■ button.
-13
-
Page 9

Coverage Audibles
Coverage audibles allow you to change the strategy of the defensive backs at the line
of scrimmage. Press the ▲ button then press the D-Button g to put the defensive
backs into bump and run. Press the ▲ button then press the D-Button i to put the
defensive backs 3–5 extra yards off the ball in loose coverage. Press the ▲ button
then press the D-Button f to shift the safeties and linebackers into better position
to cover their assigned man.
Defensive Line Shift
Position your defensive lineman in tight between the gaps or outside the tackles.
Press the L1 button then press the D-Button i to spread the defensive ends outside
the tackles, or L1 button then press the D-Button g to move the line in tight between
the tackles. Press the L1 button then press the D-Button h to shift the line left, or
press the L1 button then press the D-Button f to shift all lineman to the right.
Linebacker Shift
Shift your linebackers around the field before the offense gets the play off. Press
the Press the R1 Button then press the D-Button i to spread the linebackers out,
or R1 Button then press the D-Button g to move them in tight, protecting the middle
of the field. R1 Button then press the D-Button f to shift the linebackers to the left,
or press the R1 Button then press the D-Button h to shift all linebackers to the right.
PAUSE MENU
During the game, press the start button to reach the Pause menu.
Use one of the
two Coaches
Challenges on
questionable
plays. If you
challenge a play
and it’s not
overruled, you
lose a timeout
For information
on Coaching
Strategies,
➤ Rosters
on p. 30
See Madden
Cards, ➤ p. 28
See Settings,
➤ p. 3 2
OTHER GAME MODES
Go endzone to endzone with one of the game modes featured in Madden NFL 2003.
MINI-CAMP
Tour NFL cities in the Madden Cruiser and fine-tune your playing skills in Mini-Camp
mode. Earn trophies along the way in various drills for Madden Cards.
To play Mini-Camp:
Each NFL city hosts its own Mini-Camp. Compete in the drill
A
for that particular venue and follow the on-screen instructions
for help. Earn at least a bronze trophy to unlock the game situation
at the same city as well as the next difficulty setting for that drill.
Use the skills that you learned at Mini-Camp to complete each stage.
Press the L1 button or press the R1 button to change the skill level and
➥➥
visit more NFL cities.
ONLINE
Create your online profile, login, and take on players from across the country
in Online mode.
NOTE:
Adaptor (Ethernet/modem) (for PlayStation®2) installed, an active Internet connection via your own Internet Service Provider (ISP) account, and a memory
card with at least 256 KB of free space. Prior to playing online, you will need to
set up your Network Configuration file. Madden NFL 2003 includes a utility for
setting up these files.
MADDEN ACCOUNT SETUP
Before you can begin playing online, you must create a new account or use an
existing one.
➥➥
NOTE:
31, 2003. Use subject to the Online Agreement. All features may not be
available at the time of purchase. Please check the online feature in
game and the Online Agreement for more information.
MADDEN SERVER LOGIN
1. Your active Profile is the profile that appears by default. If multiple profiles are
2. Assign a password to ensure that you are the only one who can use that profile.
3. Highlight LOGIN and press the ✖ button.
4. If you have not registered, highlight REGISTER and press the ✖ button. If you
In order to play online, you will need the following items; a Network
If you have already created a profile, press the D-Button, highlight EXISTING
ACCOUNT and then press the ✖ button. If you have not created a profile, highlight NEW ACCOUNT and press the ✖ button to begin the process. If you want to
log off and return to the previous screen, select DISCONNECT FROM ISP.
Online gameplay server will be available only through August
loaded, you can select the one you want by pressing the D-Button ↔.
You can have up to four profiles. Change active profiles or create a new one in the
A
Profile Manager.
have registered, you will go directly to the Online Main Menu screen. If you have
not registered, follow the on-screen instructions.
-14
-
-15
-
Page 10

NOTE:
To save a profile from the Profile Manager, highlight SAVE PROFILE
and press the ✖button. The profile saves to your memory card. You can also turn
Autosave ON so that any updates to your profile such as stats will be saved
automatically.
WELCOME TO MADDEN ONLINE
Play Now Join Madden NFL 2003 online.
News Get the latest info from system administrators and from
the world of EA SPORTS Online.
Roster Update Check for updates to the current NFL roster, or select
a roster from a previous update. Press the D-Button
to highlight the roster you want to use, then press the
✖ button.
Stat Book See the rankings for the best players and where you
stand. Press the L1 button or press the R1 button to
cycle among the top 100 players, where you stand in the
rankings, or search for a particular player’s stats.
Settings Adjust your gameplay, system, or online settings. The
gameplay options are determined by the player hosting
the game.
PLAY NOW – MAIN LOBBY
From the Main Lobby, you can Find a Player, Enter a Room, or Create a Room of your
own. Rooms are where players gather to chat and challenge each other to a game.
Find a Player
If you know someone’s profile name, you can search to see if they are online.
Highlight FIND PLAYER and press the ✖ button to find a player. If they are online, you
will have the option to go directly to the room they are in, where you can chat or play
a game. Use the on-screen keyboard to enter the profile name and then select DONE.
Keep in mind that profile names are case sensitive.
Enter/Create a Room
There are four main rooms corresponding to the four difficulty settings—ROOKIE,
PRO, ALL-PRO, and ALL-MADDEN. Press the D-Button ↕to move among the rooms,
Press D-Button
to create your own room.
↔
to select different sub-rooms (east or west). Press the ●button
CHAT LOBBY
From the Chat Lobby, you can greet and meet other players or challenge someone
to a game.
NOTE:
the whole room or to an individual player. Whenever you bring up the on-screen
keyboard in the Chat Lobby, or when chatting with an individual player, you can
use a USB keyboard to type in messages.
-16
-
Madden NFL 2003 supports a USB keyboard for typing messages to
Room Options
From Room Options you can block incoming challenges or send
a message to the entire chat room. When you send a message,
you are presented with a virtual keyboard. Press the D-Button to
move around the letters or hit a Q button to send a message. Highlight
OK and press the ✖ button to save any changes, or highlight CANCEL and
press the ✖ button to quit without saving your changes.
Player Options
Press the D-Button to highlight the name of another player or press the ✖ button
to bring up the player options. From here you can challenge another player to a
game, send a private message, choose to ignore that player, or check that player’s
connection. Press the D-Button to highlight the option you want, and then press the
✖ button to accept.
Player Connections
In the upper left portion of the screen, you will see a list of players along with
five circles. Each circle represents a player’s connection speed to the Internet.
The more lit circles there are, the better the connection. One red circle represents
a weak connection; five green circles represent a strong connection.
NOTE:
is lit, that means that player has a ping time of over 400 milliseconds. If all five
circles are lit, the ping time is less than 100 milliseconds.
Each empty circle represents 0 – 100 milliseconds. If only one circle
Player Stats
In the upper right portion of the screen are player stats.
Rank A player’s overall rank.
Disconnection % How often a player loses connection or quits.
Record Player record including number of wins, losses, and ties.
Current Streak How many games in a row a player has won (W) or lost (L).
Rushing yards The average number of yards a player gains per game.
Passing yards The average number of yards a player gains per game.
Rush: Pass A player’s rushing vs. passing ratio.
Avg PF-PA A player’s average points for (PF) and points against (PA).
Avg Opp Rank The average rank of a player’s previous opponents.
-17
-
Page 11

FRANCHISE
Run the table for 30 seasons in Franchise mode.
FRANCHISE SETUP SCREEN
Franchise Mode
Options: When
your options
are selected,
press the ✖
button to select
a team and
a coach from
the bottom half
of the screen
Number of Users Select the number of users you want to have in your
league (1–32).
Coaching Changes Coaches may resign after a season when their coaching
points reach 0 in the Coach Options.
Trade Deadline No trading is allowed after Week 6.
Salary Cap The NFL salary cap is enforced and you have a limited
budget to sign free agents and draft picks.
Cap Penalties Releasing a player incurs a monetary penalty for the
remaining years of that player’s contract or until another
team signs him.
Fan tasy Draft Teams create a custom roster by drafting players from
the entire pool of every active NFL player. For more
information, ➤ Fantasy Draft below.
Fantasy Draft
With this option ON, all active NFL players are thrown into a single draft
pool. Teams then add players to their rosters in a 47-round Fantasy Draft.
Once the draft is concluded, the league begins.
To run a Fantasy Draft:
1.
After you set up your Franchise (with Fantasy Draft option ON), press
the START button to begin the draft. The first team on the clock must
select a player. (The CPU drafts players for CPU-controlled teams.)
2.
To draft a player, highlight a name of the player you wish to select
and press the ✖ button. You can browse through the positions lists
by pressing the L2 button or by pressing the R2 button. Move
through the available players by pressing the D-Button ↕↕.
3.
After you select a player, he is added to the team roster and the draft
continues.
NOTE:
-18--20
To simulate the draft at any time, press the start button.
Created Teams:
Press the ●
button to load
a created team
to Fr anchise
Team Select
menu
SELECTING A TEAM
You can run any team of your choice.
To select a team:
From the Team Select/Coach Select menu. Press the D-Button
➥➥
↔
to select a team and press the ✖ button to reach the Franchise menu.
SELECTING A COACH
All 32 NFL coaches and their original playbooks are available for you. You can also
create one of your own.
To select a coach:
From the Coach pop-up box, highlight START FRANCHISE if you wish to start the
➥➥
season with the current coach, or scroll through the list of coaches if you wish to
change. Press the ✖ button and your first NFL season begins.
To create a coach:
1. Highlight NEW COACH from the Coach pop-up box and press the ✖ button.
The New Coach menu appears. Highlight COACH and press the ✖ button again
to edit your coach’s name.
2. Create a name from the edit box, select DONE when complete, and then select
a body type for your coach by pressing the D-Button ↔.
3. Highlight OK and then press the ✖button when complete.
4. Once your coach is created, highlight START FRANCHISE and press the ✖ button.
The Preseason Year 1 menu appears.
FRANCHISE MAIN MENU
Play Week This screen lists the schedule and standings.
Rosters View team rosters and make all player movements.
For more information, ➤ Rosters on p. 30.
Coach Options Gameplan: Set your coaching gameplan and strategies
for your team during simulated games.
Management: Set player preferences and assign various
off-season assistance options to be run by the USER or
the CPU.
Job Openings: View all of the user coaches and their
current positions. You can also modify which team you
are coaching, if coaching slots are open.
Ratings: View player-controlled coach career stats.
Stats book Access all the team and individual stats for the season
and career. View rankings and coach stats as well.
League News League news and injury reports are available from
this menu.
-19
-
Page 12

Features Madden Cards: Trade Madden Cards between active
profiles and view season and game performance records.
For more information, ➤ Madden Cards on p. 28.
Export Team: Export your Franchise team to a memory
card and make it available for Exhibition and
Tournament modes.
Create-a-Player: Create a new player and add him to
a team or the free agent list, or edit an existing player,
➤ Create-a-Player on p. 27.
Settings Gameplay: Adjust your game settings for the season.
For more information, ➤ Game Settings on p. 32.
System: Adjust your audio and visual settings for
the season. For more information, ➤ Game Settings
on p. 32.
Save: Save or delete your season to/from your memory
card. For more information, ➤Saving and Loading
on p. 35.
PLAY WEEK MENU
View the weekly schedule, view schedules team by team, and view the league standings.
Weekly Schedule Menu
View the week
match-ups by
week number
Selected game
Playing/Simulating a Game
To advance through your season, you must either play your designated games or
simulate them.
To play or simulate a game in Franchise mode:
1. Scroll through the games on the weekly schedule and then highlight a game that
you wish to play. Press the ● button and a red checkmark appears next to your
selected game.
2. With a user-controlled game highlighted, press the ✖button to advance to the
Controller Select screen.
-
3. Press the ● button to uncheck the user controlled game(s).
Press the ✖ button again and select your option: PLAY GAME,
SIMULATE GAME, SIMULATE WEEK, or SIMULATE SEASON.
Press the ✖ button again on your final choice.
If you highlight a user-controlled game and press the ✖button,
➥➥
all non-user games are simulated automatically.
NOTE:
of weeks, user-controlled games are not simulated.
If you are only simulating the current week rather than a group
PRESEASON
Before you begin the regular season, each team plays four preseason games. After
the preseason is over, you can evaluate player progression before moving on to the
regular season. Use this information to help finalize your roster for the upcoming
season.
NOTE:
starters play the first half, while rookies and backups play the second half.
The CPU automatically sets your preseason depth charts so that
DURING THE SEASON
During a Season, you can control any team, on any week, at any point during the
year (you can only run user-controlled teams in Franchise mode). You can also make
player trades (before the sixth week of the season), sign free agents, and change
game settings.
AFTER THE SEASON
Every season ends with the AFC-NFC Pro Bowl. After pro football’s annual All-Star
game, you are prompted to advance to the off-season.
THE OFF-SEASON
Build your dynasty through the draft or by signing key free agents. You control
the moves for your team and the computer handles the other teams.
OFF-SEASON SCHEDULE
Before jumping to the offseason, be sure to review stats and league news from
the previous season. You can also view the draft order and check out current rosters.
Import Draft Class
At the end of every season, you can load a Draft Class file from NCAA
Football 2003 to Madden NFL 2003 from your memory card.
To import a Class:
1.
After the Pro Bowl has been played, Select Import Draft Class from
the end of season pop-up menu.
2.
Load the desired Draft Class file from your memory card. The players
are imported to Madden NFL 2003 and the off-season begins.
®
-21
-
Page 13

Retired Players View the retired players from every roster.
Rookie Scouting For more information, ➤ Rookie Scouting below.
Re-Sign Players Negotiate contracts with players from your own team.
To begin contract negotiations, highlight an unsigned
➥➥
player and press the ✖ button. Offer a salary and press
the ✖ button again to submit the offer sheet. The player
either accepts or declines the offer.
Free Agent Signing Before the draft you have a 30-day period to sign
available free agents. You must fit all players you
wish to sign under the salary cap.
NFL Draft Begin the seven-round rookie draft. Each team selects
one player per round. You can simulate the draft at any
time. The NFL Draft is run similar to a Fantasy Draft
(➤ p. 18).
Sign Draft Picks After the draft, you must sign your draft picks to your
roster. You must fit these players under the salary
cap in order to keep them on your roster.
Re-Order Depth Charts Modify the roster before the new season.
Start New Season Begin a new year of football.
NOTE:
them; however, if your Coaching Options are not set to CPU for a given step,
then your team will not participate in that part of the off-season. After all the
off-season steps are complete, a new schedule is generated, and the next
season begins.
If you wish to skip any steps in the off-season, you can simulate past
Rookie Scouting
Use your scouts to evaluate rookies and help you make a much more informed
decision at the NFL draft.
Scout a rookie through one round of the combine and receive a player note. Scout
him through two rounds, and receive three notes. Scout a player through all three
rounds and receive five notes.
Scouted Player
Total P lay ers
Scouted
-22
-
To scout a rookie:
1. Press the L1 button or press the R1 button to toggle between
user-controlled teams. Press the L2 button or press the R2
button to cycle among the different player positions. Press the
● button to sort a column.
2. To view a Scouting Report, highlight a player and press the select button.
To r eturn to the Rookie Scouting screen, press the ▲ button.
3. Pick up to 15 players to scout per round. Press the ✖ button on their name to flag
them. To unflag a player, press the ✖button again.
4. Once you have flagged the 15 players, press the start button to proceed to the
Scouting Combine.
5. At the Scouting Combine, check up on your scouted rookies. Press the L2 button
or press the R2 button to cycle among player positions until you come to
“Targets.” A list of players that you scouted appears.
6. Press the select button to bring up the Rookie Scouting Report. You should now
see that player’s combine numbers, along with a scouting note.
7. Repeat this process for all of your scouted players. You can scout a player
through two more rounds (scouting workout and then scouting list), or you can
choose 15 new players to scout. However, you only receive five scouting notes
if you scout a player through all three rounds.
NOTE:
players will likely be selected early in the draft by other teams before you get
a chance to draft them. Instead, scout some players for the later rounds and
try to look for a superstar in the making.
Don’t waste all your scouting slots on 1st and 2nd rounders! Those
TOURNAMENT
Compete in a tournament with playoff-like pressure.
TOURNAMENT SETUP BOX
Tournament Type Choose a SINGLE ELIMINATION, DOUBLE ELIMINATION,
ROUND ROBIN, or DOUBLE ROUND ROBIN tournament.
Number of Players The number of teams you can choose is dependent
on the type of tourney you have selected.
Playoff Teams The number of playoff teams is only for round robin
tournaments.
Fantasy Draft When ON, conduct a Fantasy Draft before playing in
a tournament (➤ Fantasy Draft on p. 18). The default
is set at OFF.
To start a Tournament:
1. From the Team Selection, press the D-Button
and press the start button when all the desired teams have been chosen.
↔
to cycle through available teams
-23
-
Page 14

2. To play a game, select Tournament Tree or Team Schedule at the Tournament
Main menu and press the ✖ button on the desired match-up. The Options pop-up
screen appears. From here, you can choose to simulate, forfeit, or play the game.
TWO MINUTE DRILL
The pressure is on and the clock is winding down. Run the Two Minute Drill and
rack up as many points—and tokens—as you can before the final gun sounds.
TWO MINUTE DRILL MENU
Players Play with up to four players in the Two Minute Drill.
CPU Defense Choose the defense to play against. All players play
against the same squad.
Play For Tokens When ON, players can earn points during the Two
Minute Drill and use them to obtain Madden Cards.
(For more information, ➤ Madden Cards on p. 28).
Skill Level Choose your playing difficulty level: ROOKIE, PRO,
ALL-PRO, and ALL-MADDEN. The higher the level, the
more points you can earn.
NOTE:
are saved to your settings file.
Press the ● button to view high scores in this game mode. High scores
Press the start button or press the ✖ button to reach the
➥➥
Controller Select screen. After you select a team, press the
start button or press the ✖ button to reach the practice field.
PRACTICE FIELD
Once you’re on the practice field, you can run every play in your playbook.
To r e-spot the ball, press the L1 button. Then press the D-Button to select
➥➥
the new spot on the field, and press the ✖ button when finished.
To choose a different play, press the select button and the Play Select
➥➥
screen appears.
SITUATION
Throw yourself in any game situation.
To select your Situation settings:
1. To set the game situation, press the D-Button
setting.
2. Press the D-Button
↕
to choose a new setting to change.
3. Press the start button to advance to the Controller Select screen. Continue
as you would in an Exhibition Game (➤ Starting an Exhibition Game on p. 9).
↔
to change the highlighted
NOTE:
start a new drive from the opponent’s 20-yard line.
If you score before time expires, you keep possession of the ball and
FOOTBALL 101
With the help of John Madden, get in-depth knowledge of each play and learn how
each formation can help you during a game. Madden runs the play first and then you
take control for a chance to earn tokens.
NOTE:
information, ➤ Practice below.
Football 101 is run similar to Practice Mode (NORMAL mode). For more
PRACTICE
Brush up on your playing skills or master a team’s playbook.
PRACTICE SETUP SCREEN
From the Practice Setup screen, select the offensive and defensive teams that you
want to practice with. You must also select a practice type in the Mode bar.
Mode bar
These options give you the ability to select what aspect of your team you want to
practice (NORMAL, OFFENSE ONLY, or KICKOFF). If you want to practice offensive
plays without a defense on the field, choose OFFENSE ONLY. If you want to practice
playing offense or defense, choose NORMAL. If you want to practice kickoffs or
returning kickoffs, choose KICKOFF.
-24
-
FEATURES
CREATE-A-PLAYBOOK
Create a custom play and formation from scratch and add it to your playbook,
or modify a current playbook.
To create a playbook:
1. From the Create Playbook menu, highlight OFFENSE or DEFENSE and press the
✖ button. The Create-a-Playbook screen appears.
2. From the Create-a-Playbook screen, highlight CREATE NEW PLAYBOOK
(or highlight an existing playbook to edit) and press the ✖ button. The
New Playbook pop-up box appears.
3. Select a team playbook, highlight CONTINUE, and press the ✖ button.
The Create-a-Playbook menu appears.
Modify Playbook
To modify a playbook:
1. From the Modify Playbook screen, highlight a coach’s
playbook (or basic formation) and press the ✖ button.
The Custom Playbook screen appears.
2. Highlight a play you wish to add to the playbook and
press the ✖ button (press the ✖ button again to remove
it). You have 81 total plays and 14 sets available. A red
check mark appears next to selected plays.
-25
-
Page 15

Create Formation
Create Play
To add all the plays from a formation to a playbook,
A
highlight the formation name and press the ✖ button.
Press the L1 button or press the R1 button to view
A
Run, Pass, and All plays/formations.
To preview a playbook/swap plays:
1. Press the ● button to preview a playbook. The
Formation window appears.
2. From the formation window, press the D-Button to
highlight a set you wish to edit and press the ✖ button.
Select the first play that you wish to move and press
the ✖ button, then select a second play and press the
✖ button again. The two plays trade places in the
formation window.
To create a formation:
1. From the Create Formation screen, highlight NEW (or
highlight an existing formation to edit) and press the
✖ button.
2. Press the D-Button and move the cursor around the grid
to highlight the player you wish to move. Press the
✖ button to select the highlighted player.
3. Press the D-Button again to move the highlighted player
around the grid, and press the ✖ button to re-assign the
personnel at a different spot on the field.
4. From the personnel window, highlight the player you
want represented in the particular play and press the
✖ button. Press the start button when complete and
the formation is added to the playbook.
To create a play:
1. From the Create Play screen, highlight a formation you
wish to edit and press the ✖ button. Select Run or Pass
(for new created plays) or highlight the current play and
press the ✖ button again.
2. Press the D-Button to move the cursor around the grid,
highlight the player you wish to move, and press the
✖ button. The Routes screen appears.
3. From the Routes screen, highlight an existing route
or assign a blocking assignment for your player and
press the ✖ button. Highlight a distance, rushing route
or type of block for the player and press the ✖ button.
The new route is set.
To customize a route, use the D-Button
A
to diagram the route or assign blocking
assignments on the field. Press the
✖ button to alter the route in another
direction, or to complete a player’s route.
Press the start button when complete.
Save Playbook
To save a play or formation:
Press the L1 button or press the R1 button to cycle
➥➥
through offensive playbook or defensive playbook.
Press the L2 button or press the R2 button to switch
between memory cards. Press the ✖ button to save your
play or formation, or highlight an existing file and press
the ✖ button to overwrite that file.
CREATE-A-TEAM
Create a custom team and add them to the NFL.
To create a new team:
1. From the Team Information menu, set your team options. Press the ✖ button
or press the D-Button ↔to change/choose the options. Press the start button
to continue.
2. From the Stadium Editor screen, select a name for your stadium, pick a stadium
type, and field surface, and more. Press the start button to continue.
3. From the Uniform Editor screen, press the D-Button to browse through the
options and the color panel to create your Home and Away uniforms. Press
the L1 button or press the R1 button to toggle to the helmet, jersey, and pants
editing screens. Press the start button when your uniform is complete.
NOTE:
they have to replace in Franchise mode.
NOTE:
to your memory card. After a team is saved, it can be loaded to any game mode.
The team roster chosen for your Create-a-Team determines the team
Before you exit out of the Create-a-Team menu, be sure to save the team
CREATE-A-PLAYER
Create a player for a position in need.
To create a new player:
1. From the Create-a-Player Information screen, create a first and last name,
pick an age, college, team, position, jersey number, years pro, and throwing
hand for your new player.
2. From the Appearance screen, select your player’s height, weight, skin color,
hair color, hairstyle, face, and face shape.
-26
-
-27
-
Page 16

3. From the Build screen, you can adjust the muscle and fat percentage of several
areas of the player’s body. Press the L1 button or R1 button to cycle through
Body, Rear, Arms, Legs, and Equipment and press the D-Button to adjust features
in each section.
4. From the Equipment screen, pick your player’s equipment and adjust the
equipment used for games on Turf, Grass, or Both.
5. From the Attributes screen, set up your player attributes by pressing the
D-Button ↔for each attribute. Keep in mind that the higher attributes a player
has, the higher the salary.
6. Highlight CREATE AND EXIT and press the start button and select Save to save
the player to the current mode’s roster list.
MADDEN CARDS
Earn tokens for each Madden Challenge task completed, then use those tokens to
buy Madden Cards. Activate one of five types of cards (Current Players, Historic
Players, Teams, Stadiums, and Cheats) to give your game a boost. Or initiate a trade
to get that coveted card.
Card Book
View the cards you have collected or buy new packs.
To buy a pack of Madden Cards:
1. From the Card Book screen press the l button. If you have tokens available,
you should receive a message asking if you would like to buy a new pack.
Select YES and press the ✖ button.
2. Scroll through the pack to see if you earned any new cards.
To play or sell a Madden Card:
1. From the Card Book screen select a card to sell by highlighting it and pressing
the ✖ button. The View/Play Card screen appears.
2. Choose either Play CARD (in-game only) or SELL CARD and press the ✖ button.
The Card Book screen reappears.
Press the ● button to flip a card over to see its attributes.
➥➥
You can sell back a Madden Card to recoup tokens. Activate a card to reap
A
its benefits.
NOTE:
during a game.
To risk a Madden Card:
Some cards, such as cheats and current players, can only be activated
Madden Cards can only be risked in 2-Player games where each player is using
A
a User Profile (and has cards to wager).
1. From the Controller Select screen, select a User Profile (for each player) and
press the ● button to bring up the options. Press the D-Button to highlight
RISK CARDS.
-28
-
NOTE:
you can proceed to the Risk Cards screen.
Both players must have a profile already loaded before
1. Browse through your cards by pressing the D-Button or press
the L2 button or press the R2 button. Press the ✖ button to select
a card to risk. Press the ▲ button to deselect a card.
1. When done, press the start button to return to the Options screen.
Status
Earned Status of points earned.
Balance Current number of tokens for that user.
Spent Number of tokens spent.
Level Select Press the L1 button or press the R1 button to cycle
through the five Challenge Levels.
Token Scale Table The number of tokens earned on each skill level for
completing a task.
Challenge Task Table List of tasks for the selected level.
Rating System
There are four categories in which Madden Cards are rated: POWER indicates
how “strong” a card is. VALUE determines the number of tokens the card is worth.
RARITY tells you the odds of getting a particular card and LIFE equals the life
expectancy of a card.
Trade
To trade a Madden Card:
1. From the Madden Cards main screen, choose TRADE, then press the ✖button.
The Trade Cards screen appears.
2. Select the User Profile from which to trade a card by pressing the L1 button
or R1 button and then scroll through available cards by pressing D-Button
or the L2 button or R2 button. Press the ✖ button to select the highlighted card.
↔
3. Select ADD, then press the ✖ button. The card has now been added to the trade
(you can include up to three cards in a trade).
4. The second player repeats steps 1–3.
5. When all cards have been added to the trade proposal, press the start button
to bring up the current trade and select MAKE THIS TRADE. A pop-up screen
prompts you to confirm the trade. To accept, highlight YES and press the
✖ button.
NOTE:
and then selecting Remove.
You may remove a card from a trade by selecting a card, flipping it,
-29
-
Page 17

Save
To save a Madden Card:
1. From the Madden Card save screen, highlight the file you wish to SAVE and press
the ✖ button.
2. Enter the name of the file using the keyboard pop-up, highlight DONE, and press
the ✖ button to complete the save.
ROSTERS
Make key roster moves to strengthen your lineup. Trade players, sign free agents,
release players, and organize your Depth Chart.
View Roster
View all NFL team rosters by team and position.
Press the L1 button or press the R1 button to change teams or press the
➥➥
L2 button or press the R2 button to focus on a particular position.
Depth Chart
Re-order the depth chart of all NFL teams.
To change the order of the depth chart:
1. From the Depth Chart screen, highlight a player from the depth chart screen
(on top) and press the ✖ button. Your cursor moves to the team roster.
2. Highlight a player from the team roster and press the ✖button. The new player
is inserted into the depth chart.
Press the ● button and the depth chart reorders automatically.
➥➥
NOTE:
3RD down situation. 3RD down backs typically have better hands and/or are
a little faster then the starting running back.
To set a substitution:
3RD down running backs (3DRB) sub in for the halfback on every
1. From the Substitution screen (only available in Franchise mode and in the
Pause menu during a game), select a situation (press the L2 button or press
the R2 button to scroll through the selections) and then a formation and set
(pressing the D-Button ↕).
2. Select a position by pressing the D-Button
a set and then press the ✖ button on the desired player.
↔
to scroll through the players in
3. From the Available Players list, highlight a player to be substituted in the starting
spot and press the ✖ button. The new depth chart is set.
-30
-
Trade Player
Trade players from team to team.
To trade a player:
1. From the Trade Player screen, highlight a player from any team
roster and press the ✖ button. His last name appears in the trade window.
2. Press the L1 button or press the R1 button, highlight the player (from another
team) that you wish to trade for and press the ✖ button.
3. Press the start button and the trade is either accepted or declined.
If the trade is accepted highlight YES and press the ✖ button to proceed.
NOTE:
is about a trade. RED = Not likely to make trade. GREEN = Likely to make trade.
In Franchise mode a color bar indicates how enthusiastic a CPU team
Free Agents
Sign a free agent to a team.
To sign a free agent:
1. From the Free Agents screen, press the L1 button or R1 button to change teams
and view salary cap information for that team.
2. If the selected team has enough room under the cap, highlight the player you wish
to sign and press the ✖ button. The player either accepts or declines the offer.
In Franchise mode, the player must be offered a salary that he may accept
A
or reject.
Release Player
Release a player from any team. Once that player is released, he moves to the
Free Agent list and his salary is deducted from your team payroll.
To release a player:
1. From the Release Player screen, press the L1 button or press the R1 button to
view a team’s roster. Scroll through the players list by pressing the D-Button ↕.
2. Highlight the player you wish to release and press the ✖ button.
3. When prompted, select YES and press the ✖button to confirm the player’s release.
Edit Player
Change the attributes, equipment, appearance, and personal information of any player.
To edit a player:
1. Select View Roster from the Roster menu. Highlight the player you wish to edit
and press the ✖ button. The Edit Player screen appears.
2. From the Edit Player screen, find the player you wish to edit and press the
✖ button.
3. Highlight the desired section to be edited and press the ✖ button (Information,
Appearance, Build, Equipment, or Attributes). For more information, ➤ Create-a-
Player on p. 27.
-31
-
Page 18

Breakdown
View all NFL team rosters by team and position. If a team requires a player for a
particular position, it appears highlighted in blue. Press the L1 button or R1 button
to cycle teams.
STAT BOOK
View personal and league stats from the Stat Book. Here you can view career stats
for every active coach, general stats for all User Profiles, user vs. user stats, and
user records. You can also view game records and check out the Two Minute Drill
leaderboard.
SETTINGS
Most of the settings featured in Madden NFL 2003 are self-explanatory. The others
are listed below.
GAMEPLAY
Game
Pre-Existing Injuries Certain players begin the first season with the same
injuries as their real-world counterparts.
NOTE:
preseason will not carry over into the regular season of a Franchise.
Madden Challenge When ON, you can take the Madden Challenge and earn
Custom Game
Player Lock Defense only, the player that you select before the snap
Auto Sub OUT Determines the energy level at which your players are
Auto Sub IN Determines the energy level at which your players are
Pass Lead Sensitivity Determines how much the QB leads his receivers on
Passing Mode Select NORMAL for traditional button-based passing, or
Remember Formations When ON, the playcalling screen automatically returns to
When pre-existing injuries are set to ON, injuries that occur during the
tokens for completing tasks during your game (1 Player
games only).
becomes the default player that you control at the start
of the next play.
subbed out.
subbed back into the game.
pass plays.
QUICK to simplify passing—you no longer need to press
the ✖ button again to bring up the passing symbols.
the same formation that you called for the previous play.
Penalty
Offsides When ON, defensive players can
jump offsides, although they will be
called for it (if Penalties are turned ON).
When Offsides is turned OFF, defenders
are physically barred from running offsides.
Penalty Sliders Adjust the sensitivity for the penalties. Change
the setting by moving the slider towards + or –
by pressing the D-Button ↔.
AI
Pass/Catch/Run Assist Turns Pass, Catch, or Run Assistance ON/OFF. When ON,
AI settings are adjusted to make gameplay easier.
NOTE:
Pass/Catch/Run Assist can only be turned on if EAsy Play is set to ON.
Other AI Settings Adjust various offensive or defensive AI settings for
the user or CPU controlled teams by moving the slider
towards + or – by pressing the D-Button ↔.
EAsy Play
EAsy Play EAsy Play allows novice users to play the game with ease.
NOTE:
play. The defaults below are with Easy Play set ON.
If EAsy Play is set to OFF, the settings listed below do not affect game
Penalties When OFF, no penalties are called.
Play Clock When OFF, the play clock is not a factor.
Play Notification When set to ON, the play(s) chosen are displayed
as you are lining up.
Play Call Mode Select NORMAL for the traditional play calling system
or EAsy to choose plays based on a key player.
Pause Menu Select NORMAL for the traditional pause menu or
EAsy to use a simplified menu.
Controller Config.
Scroll through the available controller configurations to choose the one that best
suits your playing style by pressing the D-Button ↔.
Off/Def Audibles
Set your offensive and defensive audibles for each profile. Each team has 10 audibles
to set — five on offense and five on defense.
-32
-
-33
-
Page 19

To set an Audible:
1. Press the D-Button
✖ button. Your cursor moves to the play windows.
↕
to highlight either OFFENSE or Defense and press the
2. Highlight one of the audible slots from the play windows and press the ✖ button.
Select a playbook. The cursor moves to the formation window.
3. Select the audible you wish to change and press the ✖ button.
4. Select a formation and set by pressing the D-Button
the ✖ button. Highlight the desired play and press the ✖ button to accept it.
To flip any audible, press the R2 button while it’s highlighted.
➥➥
↔
or ↕and then pressing
SYSTEM
Audio
Volume Sliders Adjust the volume for all sounds of the game.
Change the setting by moving the slider towards
+ or – by pressing the D-Button ↔.
Visual
Field Lines Set the field line display to NONE, FIRST DOWN,
LOS, or BOTH. When set to FIRST DOWN, a yellow
first down marker is displayed across the field.
When set on LOS, the line of scrimmage is highlighted
with a blue field marker. When set to BOTH, the FIRST
DOWN and LOS lines are on.
Online
Gameplay Set the gameplay options you want to use online.
The gameplay options are determined by the player
hosting the game.
System Set the audio/video controls for your online games.
Online Create and edit your quick messages.
To create/edit a message:
Highlight the message you wish to edit and press the
➥➥
✖ button, then use the keyboard pop-up to enter the
text. To use that quick message in a chat room, bring up
the keyboard pop-up and hit the Q key to quickly enter
the message.
Save Save your settings to your memory card.
SAVING AND LOADING
Save or load files from your memory card.
NOTE:
saving files.
To load, save, or delete a file:
Never insert or remove a memory card when loading or
1. From the Main menu, select SETTINGS then MEMORY CARD to get to the
Load/Save/Delete screen.
2. Highlight LOAD, SAVE, or DELETE and press the ✖button.
Press the R1 button/L1 button to browse the file types.
A
Press the R2 button/L2 button to switch between MEMORY CARD slots.
A
3. Highlight the file you wish to LOAD, SAVE, or DELETE and press the ✖button.
When saving, enter the name of the file using the keyboard pop-up, highlight
➥➥
DONE and press the ✖ button to complete the save.
NOTE:
the existing file instead of saving a new file.
NOTE:
it will be auto loaded during the initial boot up from any available memory card
slot. Rosters and settings will be set to the first ones found while User Profiles
will load the first four found.
If you have already saved the file, you will be prompted to overwrite
If a Roster, User Profile, or Settings file is present on a memory card,
PROFILE MANAGER
Keep track of your career stats with a User Profile. If an active User Profile is
associated with a team during a game, the computer keeps track of the YOUR
statistics.
NEW/EDIT PROFILE
Keep track of your personal stats by creating a User Profile.
To create a new User Profile:
1. From the Main menu, press the ● button. The Choose Active Profile screen
appears. Highlight CREATE PROFILE and press the ✖ button.
2. Use the Edit Box to create a name for your User Profile. Highlight DONE and
press the ✖ button to accept the new Profile name.
To Load, Save, or Delete a User Profile from your memory card:
From the Load, Save, or Delete screen, highlight the Profile you wish to
➥➥
load, save or delete and press the ✖ button. The Profile is now loaded
or saved to a memory card, or deleted from in the game.
-34
-
-35
-
Page 20

LIMITED 90
-
DAY
WARRANTY
ELECTRONIC ARTS LIMITED WARRANTY
Electronic Arts warrants to the original purchaser of this product that the recording medium on which the software program(s) are recorded (the
product (the “Manual”) are free from defects in materials and workmanship for a period of 90 days from the
date of purchase. If the Recording Medium or the Manual is found to be defective within 90 days from the date
of purchase, Electronic Arts agrees to replace the Recording Medium or Manual free of charge upon receipt of
the Recording Medium or Manual at its service center, postage paid, with proof of purchase. This warranty is
limited to the Recording Medium containing the software program and the Manual that were originally provided by Electronic Arts. This warranty shall not be applicable and shall be void if, in the judgment of Electronic
Arts, the defect has arisen through abuse, mistreatment or neglect.
This limited warranty is in lieu of all other warranties, whether oral or written, express or implied, including any
warranty of merchantability or fitness for a particular purpose, and no other representation of any nature shall
be binding on or obligate Electronic Arts. If any such warranties are incapable of exclusion, then such warranties applicable to this product, including implied warranties of merchantability and fitness for a particular
purpose, are limited to the 90-day period described above. In no event will Electronic Arts be liable for any special, incidental, or consequential damages resulting from possession, use or malfunction of this Electronic Arts
product, including damage to property, and to the extent permitted by law, damages for personal injury, even
if Electronic Arts has been advised of the possibility of such damages. Some states do not allow limitation as
to how long an implied warranty lasts and/or exclusions or limitation of incidental or consequential damages
so the above limitations and/or exclusion of liability may not apply to you. In such jurisdictions, the Electronic
Arts’ liability shall be limited to the fullest extent permitted by law. This warranty gives you specific rights. You
may also have other rights that vary from state to state.
RETURNS WITHIN THE 90-DAY WARRANTY PERIOD
Please return the product along with (1) a copy of the original sales receipt, showing the date of purchase, (2)
a brief description of the difficulty you are experiencing and (3) your name, address and phone number to the
address below and Electronic Arts will mail a replacement Recording Medium and/or Manual to you. If the
product was damaged through misuse or accident, this 90-day warranty is rendered void and you will need to
follow the instructions for returns after the 90-day warranty period. We strongly recommend that you send your
product using a traceable delivery method. Electronic Arts is not responsible for products not in its possession.
RETURNS AFTER THE 90-DAY WARRANTY PERIOD
If the defect in the Recording Medium or Manual resulted from abuse, mistreatment or neglect, or if the
Recording Medium or Manual is found to be defective after 90 days from the date of purchase, please return
the product along with (1) a check or money order for $15.00 made payable to Electronic Arts, (2) a brief
description of the difficulty you are experiencing and (3) your name, address and phone number to the address
below, and Electronic Arts will mail a replacement Recording Medium and/or Manual to you. We strongly
recommend that you send your product using a traceable delivery method. Electronic Arts is not responsible
for products not in its possession.
ea warranty mailing address
Electronic Arts Customer Warranty, P.O. Box 9025, Redwood City, CA 94063-9025
ea warranty contact info
Email and Web Page:
Phone:
(650) 628-1900
NOTICE
Electronic Arts reserves the right to make improvements in the product described in this manual at any time
and without notice. This manual and the software described in this manual are copyrighted. All rights are
reserved. No part of this manual or the described software may be copied, reproduced, translated, or reduced
to any electronic medium or machine readable form without the prior written consent of Electronic Arts.
-36
-
“Recording Medium”
http://techsupport.ea.com
) and the documentation that is included with this
NEED A HINT?
Call the EA HINTS & INFORMATION
HOTLINE for recorded hints, tips, and passwords 24 hours
a day, 7 days a week!
In the US, dial 900-288-HINT (4468). 95c per minute.
In CANADA, dial 900-451-4873. $1.15 (Canadian) per minute.
If you are under 18, be sure to get a parent’s permission before calling. Hotline
requires a touch-tone telephone. Call length determined by user; average length is
four minutes. Messages subject to change without notice.
TECHNICAL SUPPORT
If you need technical assistance with this product, call us at (650) 628-4322 Monday through Friday between
8:30–11:45 AM or 1:00–4:30 PM, Pacific Standard Time. No hints or codes are available from (650) 628-4322.
You must call the EA Hints & Information Hotline for hints, tips, or codes.
ea tech support contact info
Email and Web Page:
FTP Site:
ftp.ea.com
Mailing Address: Electronic Arts Customer Warranty, P.O. Box 9025, Redwood City, CA 94063-9025
If you live outside of the United States, you can contact one of our other offices.
In Australia, contact: In the United Kingdom, contact:
Electronic Arts Pty. Ltd. Electronic Arts Ltd.
P. O. Box 432 P.O. Box 181
Southport Qld 4215, Australia Chertsey, KT16 OYL, UK
In Australia: For Technical Support and Game Hints & Tips, phone: 1 902 261 600 (95 cents per min.) CTS 7 days
a week 10:00 AM–8:00 PM. If you are under 18 years of age parental consent required.
Pac kage Cover Photography:
This product contains Font Software licensed from Agfa Monotype Corporation and its suppliers, which may not
be distributed, copied, reformatted, reverse engineered, or decompiled for any purpose. You may transfer the
Font Software as part of the product to a third party provided that (i) the third party agrees to all the terms of
this agreement and (ii) you have destroyed all copies of the Font Software in your custody or control, including
any installed in your computer, immediately upon transferring such product. The Font Software is also
protected by copyright and any copying or distribution of the Font Software, with or without the product,
constitutes both copyright infringement and a theft of valuable property. You acquire no right, title or interest
in the Font Software except the personal right to use such software, consistent with this agreement, as part of
the product when installed in your computer. All rights reserved.
To see Agfa Monotype’s complete Font software End User License Agreement please go to their website
www.agfamonotype.com.
Software and documentation © 2002 Electronic Arts Inc. Electronic Arts, EA SPORTS, the EA SPORTS logo and
John Madden Football are trademarks or registered trademarks of Electronic Arts Inc. in the U.S. and/or other
countries. All rights reserved. © 2002 NFL Properties LLC. Team names and logos are trademarks of the teams
indicated. All other (NFL-related marks) are trademarks of the
National Football League. Officially licensed product of
PLAYERS INC. The PLAYERS INC logo is registered trademark of
the NFL players. www.nflplayers.com © 2002 PLAYERS INC.
“PlayStation” and the “PS” Family logo are registered trademarks and DUALSHOCK is a trademark of Sony Computer
Entertainment Inc.
All other trademarks are the property of their respective owners.
EA SPORTS™ is an Electronic Arts™ brand.
http://techsupport.ea.com
Phone (0870) 2432435
Elsa/Getty Images
Proof of Purchase
MADDEN NFL 2003
-37
-
Page 21

Electronic Arts Registration
P.O. Box 9012
Redwood City, CA 94063-9012
PLACE
STAMP
HERE
 Loading...