

Page 1

GAGGIA S.p.A.
Società soggetta a direzione e
coordinamento di Philips Saeco S.p.A.
Sede Amministrativa/Administrative O ce
Via Torretta, 240
40041 Gaggio Montano - Bologna - Italia
+39 0534 771111 / Fax +39 0534 31025
Sede Legale/Registered O ce
Piazza A. Diaz, 1
20123 Milano - Italia
Capitale Sociale Euro 104.000 i.v.
REA MI1387376 - R.I. Cod.Fisc. 020069680367
Part. IVA : IT-13054780153
COD. - Rev.01 - 03/09/18
www.gaggia.it www.gaggia.com
Page 2
NEW CLASSIC
ITALIANO
ENGLISH
DEUTSCH
FRANÇAIS
ESPAÑOL
NEDERLANDS
POLSKI
ΕΛΛΗΝΙΚΑ
MAGYAR
ROMÂNĂ
RI9480(SIN035UR)
Istruzioni per l'uso
Operating instructions
Bedienungsanleitung
Mode d’emploi
Instrucciones para el uso
Gebruiksaanwijzing
Instrukcje użytkowania
Οδηγιες χρησης
Használati utasítás
Instrucţiuni de folosire
Page 3
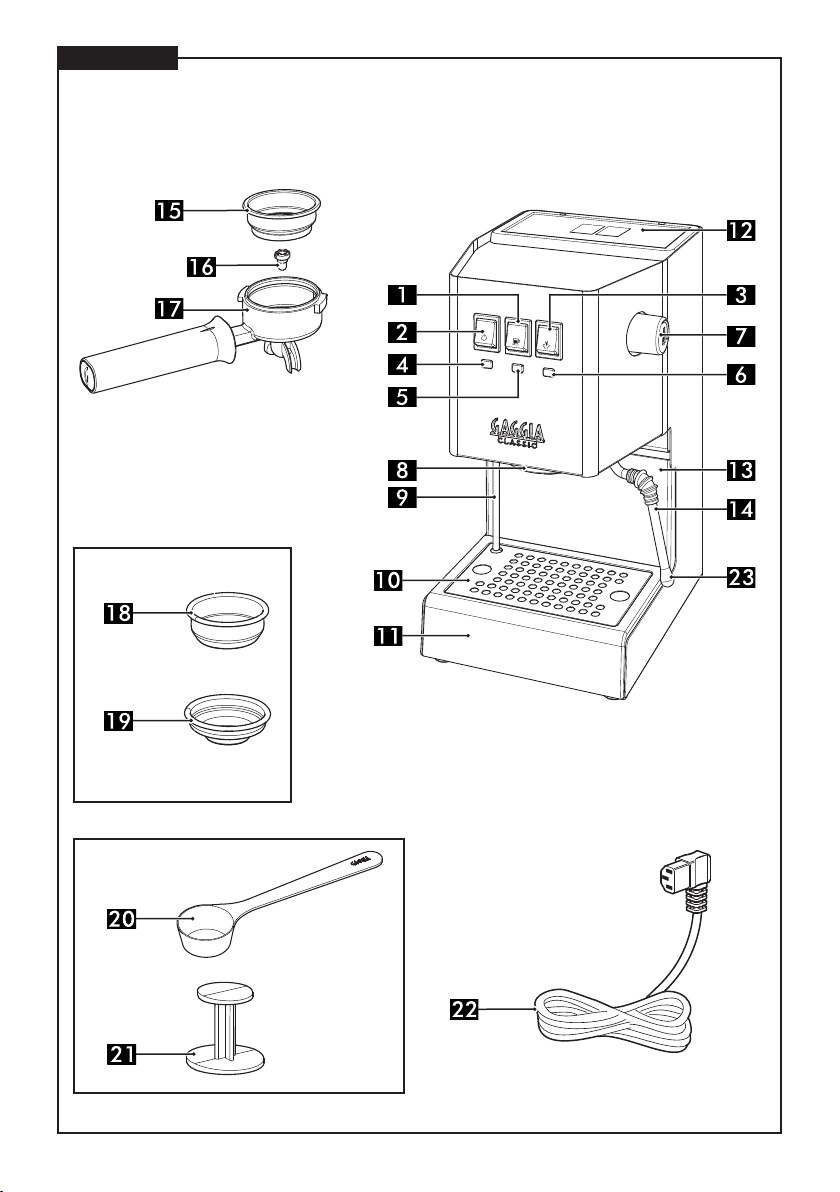
FIG.1
Page 4
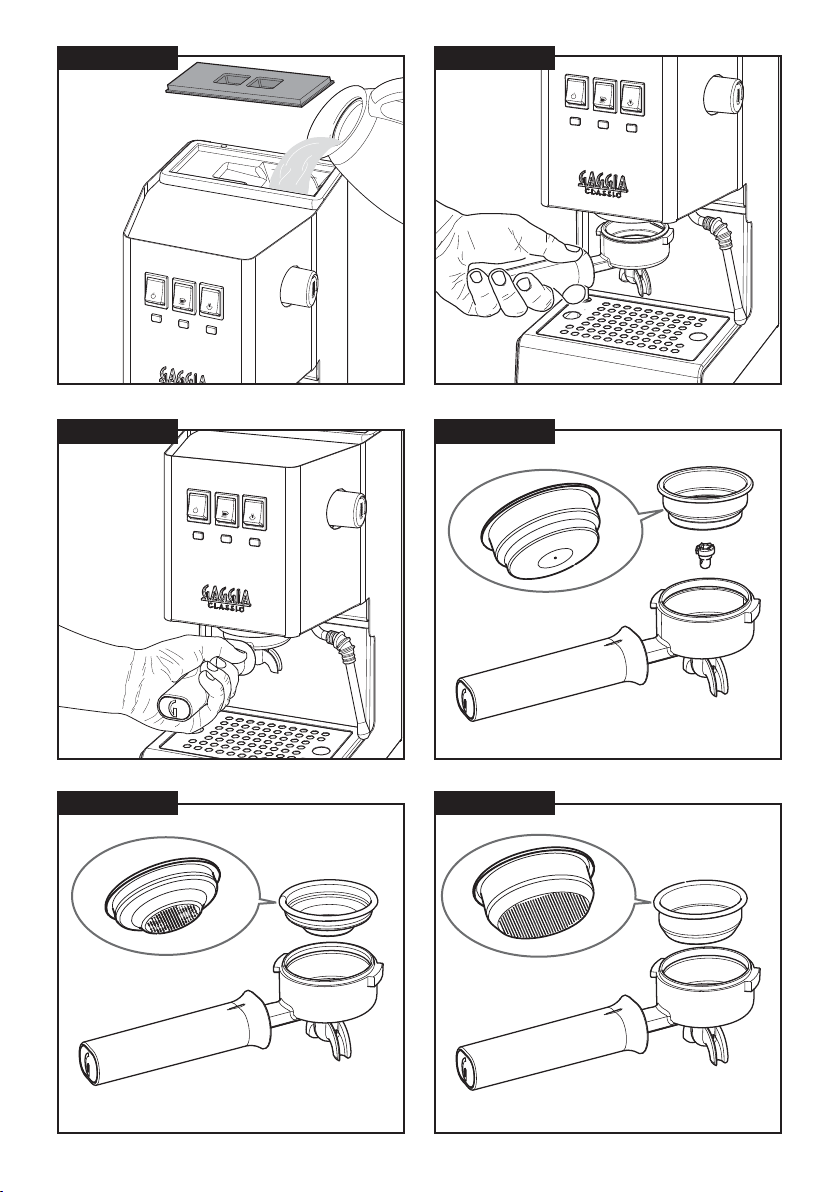
FIG.2
FIG.3
FIG.4
FIG.6
FIG.5
FIG.7
Page 5
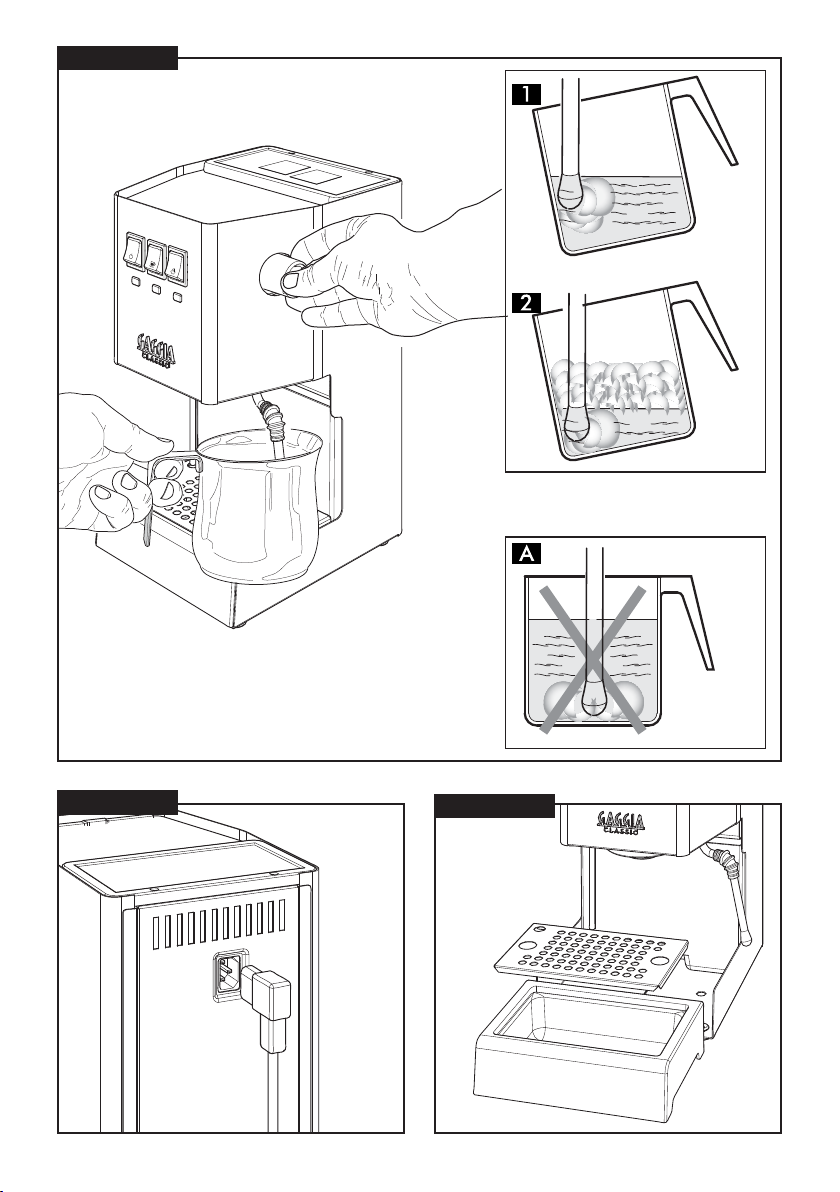
FIG.8
OK
FIG.9
NO
FIG.10
Page 6
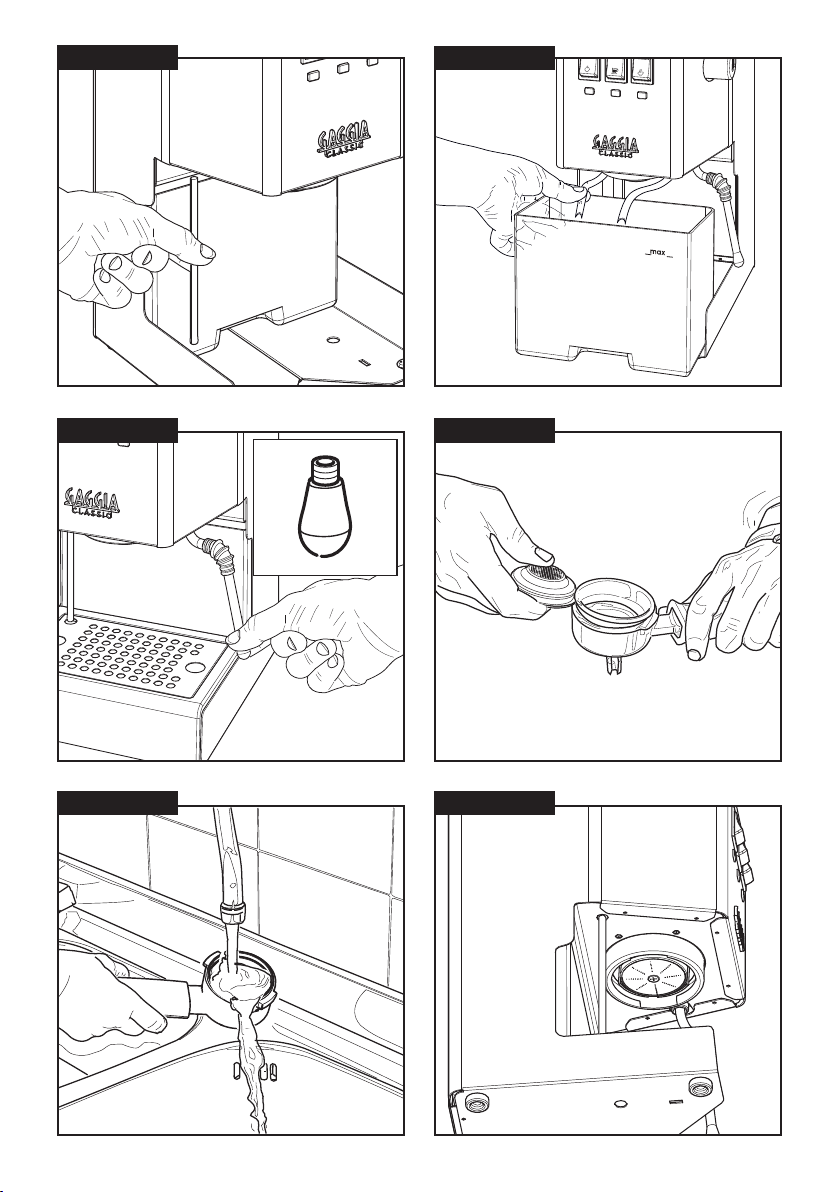
FIG.11
FIG.12
FIG.13
FIG.15
FIG.14
FIG.16
Page 7

ITALIANO
CI CONGRATULIAMO PER LA VOSTRA SCELTA!
Acquistando la nuova Gaggia Classic avete scelto un model lo di macchina che vi permetterà di diventare un vero barista a domicilio, ritrovando ad ogn i pausa ca è i tradizional i gesti dei professionisti dell’espresso. L’utilizzo di Classic
ri chi ed e at te nzi on e ad og ni d et ta gli o, p ro pri o co me avv ie ne c on u na mac chi na pro fe ssi ona le da b ar : la mac ch ina de ve
essere ben calda ed il porta ltro deve essere sempre montato per mantenere una temperatura omogenea in tutto
il gruppo erogatore, la macinatura del ca è deve essere ne ma non troppo, bisogna inserire la giusta quantità di
ca è macinato nel ltro e pressare con la giusta intensità nè poco, per evitare che il ca è esca troppo velocemente,
nè troppo, che renderebbe molto di cile l’erogazione.
La nuova Classic è dotata di un gruppo porta ltro e una lancia vapore che riprendono quello delle macchine professionali.
SOMMARIO
DESCRIZIONE .........................................................................................................................3
COSE DA SAPERE .....................................................................................................................3
INTRODUZIONE ......................................................................................................................4
FILTRI IN DOTAZIONE ..............................................................................................................4
Filtro “crema perfetta” per 1 o 2 tazze (Fig.5). ..........................................................................................................4
Filtro tradizionale 2 tazze (Fig.7). ............................................................................................................................4
Filtro tradizionale 1 tazza/cialda monodose (Fig.6). ................................................................................................4
PRIMA INSTALLAZIONE ...........................................................................................................4
Caricamento del circuito. .........................................................................................................................................4
Al primo utilizzo o dopo un periodo di inattività superiore alle 2 settimane. ...........................................................4
PREPARAZIONE DI UN ESPRESSO CON CAFFÈ MACINATO ..............................................................5
Procedere alla preparazione dell’espresso: ..............................................................................................................5
PREPARAZIONE DI UN ESPRESSO CON CAFFÈ IN CIALDE ..............................................................6
PREPARAZIONE DI UN CAPPUCCINO ..........................................................................................6
EROGAZIONE ACQUA CALDA .....................................................................................................7
COME ABBASSARE LA TEMPERATURA DELLA CALDAIA .................................................................7
FUNZIONE DI AUTOSPEGNIMENTO ............................................................................................7
PULIZIA E MANUTENZIONE ......................................................................................................7
Pulizia della lancia vapore ......................................................................................................................................8
Pulizia del porta ltro e dei ltri ..............................................................................................................................8
Pulizia della griglia e della vasca raccogligocce ......................................................................................................8
Pulizia del serbatoio acqua ......................................................................................................................................8
Pulizia della doccetta ..............................................................................................................................................8
Pulizia dopo un periodo di inutilizzo .......................................................................................................................8
DECALCIFICAZIONE .................................................................................................................8
IN CASO DI MALFUNZIONAMENTO...........................................................................................10
• 2 •
Page 8

DESCRIZIONE
PANORAMICA DELLA MACCHINA FIG.1
1 Tasto ca è
2 Tasto di accensione/spegnimento
3 Tasto vapore
4 Spia di accensione
5 Spia temperatura ca è
6 Spia temperatura vapore
7 Manopola vapore/acqua calda
8 Gruppo di erogazione ca è
9 Tubo di scarico
10 Griglia
11 Vasca raccogligocce
12 Coperchio serbatoio
13 Serbatoio acqua (estraibile)
14 Lancia vapore/acqua calda con gommino di prote-
zione
15 Filtro “crema perfetta” 1 e 2 tazze
Da usare solo con il rompigetto emulsionatore
(Fig.1-16)
16 Rompigetto emulsionatore
17 Porta ltro
18 Filtro tradizionale 2 tazze
19 Filtro tradizionale 1 tazza / cialde
20 Misurino
21 Pressino
22 Cavo e spina di alimentazione
23 Ugello vapore
ITALIANO
COSE DA SAPERE
1. Il sapore dell’espresso dipende dalla quantità e dal
tipo di ca è utilizzato.
2. Il particolare sapore di un chicco di ca è dipende da
diversi fattori ma il suo gusto ed il suo aroma sono il
risultato del processo di torref azione. I chicchi di ca è
torrefatti per un periodo più lungo e a temperature
più elevate presentano un colore più scuro. Chicchi
più scuri liberano più aroma rispet to a chicchi chiari.
Troverete sul mercato diverse qualità di ca è. Ogni
tipo di torrefazione è caratterizzato da una miscela
di chicchi torrefatta ad una particolare temperatura
e con un particolare tipo di aroma.
Esistono decaffeinati contenenti soltanto il 2%
di caffeina. Sperimentate con la vostra macchina
espresso uno dei vari tipi di ca è in vendita. Scopr irete
probabilmente un aroma migliore rispetto a quello
della miscela nora utilizzata.
3. Le macchine espresso a pompa richiedono una miscela nemente macinata. Assicurarsi di acquistare
la miscela desiderata con un grado di macinatura
adatto per l’utilizzo con macchine da ca è espresso.
E’ preferibile usare un macinino a macine piuttosto
che un macinino a lama perché questo libera troppa
polvere di ca è e produce una miscela macinata in
modo irregolare.
4. Sarebbe l’ideale macinare il caffè appena prima
dell’uso. Non dimenticare che deve essere macinato
per la macchina espresso a pompa.
5. E’ consigliabile conservare il caffè macinato o in
chicchi, in barattoli ermetici nel frigorifero. Il ca è
macinato assorbe facilmente gli odori.
6. Il vero espresso si riconos ce dal colore scuro, dal gusto
ricco e dalla tipica “crema naturale”.
7. Il cappuccino è una speciale combinazione di ca è
espresso e latte c aldo emulsionato. Si può servire con
una spruzzata di cannella, noce moscata o cacao.
8. Servire immediatamente il c a è espresso dopo averlo
preparato.
9. Servire il caffè espresso in tazzine da caffè ed il
cappuccino in tazze da prima colazione.
• 3 •
Page 9

ITALIANO
INTRODUZIONE
Prima di utilizzare la macchina pe r la prima volta, leggete
attentamente l’opuscolo sulla sicurezza fornito a parte e
conservatelo per eventuali riferimenti futuri.
FILTRI IN DOTAZIONE
Filtro “crema perfetta” per 1 o 2 tazze
(Fig.5).
Questo ltro è già montato sul porta ltro e permette di
avere un espresso con crema anche durante i primi ut ilizzi
della macchina.
Caricamento del circuito.
Attenzione! Non attivare il tasto ca è senza aver
prima fatto il caricamento circuito.
1. Collocare una tazza vuota sotto il gruppo erogatore
(Fig.1-8) senza inserire il por ta ltro e premere il tasto
ca è (Fig.1-1).
Si potrà udire il suono della pompa che è st ata attivata
e dopo qualche secondo l’acqua comincerà a scendere
dal gruppo erogatore (Fig.1-8).
2. Dopo aver lasciato riempire la tazza (circa 150cc),
premere nuovamente il tasto ca è (Fig.1-1).
Nota. Questo ltro deve essere utilizzato solo abbinato
con il rompigetto emulsionatore. (Fig.1-16).
Filtro tradizionale 2 tazze (Fig.7).
Filtro tradizionale 1 tazza/cialda monodose
(Fig.6).
Questi ltri sono come quelli utilizzati da macchine professionali da bar e richiedono manualità ed esperienza.
Nota. Questi ltri non devono essere utilizzati con il
rompigetto emulsionatore. (Fig.1-16).
Il nostro consiglio è quello di iniziare con il ltro crema
perfetta e una volta acquisita manualità ed esperienza
passare a quelli tradizionali per apprezz are un vero utilizzo
da barista
PRIMA INSTALLAZIONE
1. Togliere il coperchio del serbatoio dell’acqua (Fig.2)
e riempirlo con acqua fredda no al livello MAX del
serbatoio (Fig.1-13).
2. Inserire la spina nella presa di corrente p osta sul retro
della macchina (Fig.9) e l’estremità opposta del cavo
di alimentazione in una presa di corrente a muro con
tensione adeguata.
Premere il tasto di accensione/spegnimento (Fig.1-2),
la spia di di accensione si illumina (Fig.1-4).
Nota. Può accadere che l’auto-innesco della pompa non
funzioni temporaneamente a causa di una “bolla d’aria”.
Qualora non scendesse acqua dal gruppo erogatore (Fig.1-
8) operare come segue:
1. Collocare una tazza sotto la lancia vapore (Fig.1-14).
2. Ruotare la manopola (Fig.1-7) in senso antiorario per
aprire il rubinetto di erogazione vapore/acqua calda
3. Premere il tasto ca è (Fig.1-1) per at tivare la pompa.
4. Dopo pochi secondi, inizierà ad uscire acqua dalla
lancia vapore.
Far fuoriuscire circa una tazza di acqua.
5. Chiudere la manopola di erogazione vapore/acqua
calda (Fig.1-7).
6. Premere nuovamente il tasto ca è (Fig.1-1).
Al primo utilizzo o dopo un periodo di inattività superiore alle 2 settimane.
Nota. L’acqua erogata durante questo processo deve essere
buttata e non può essere utilizzata per l’alimentazione. Se il
contenitore si riempe, durante il ciclo, fermare l’erogazione
e vuotarlo prima di riprendere l’operazione.
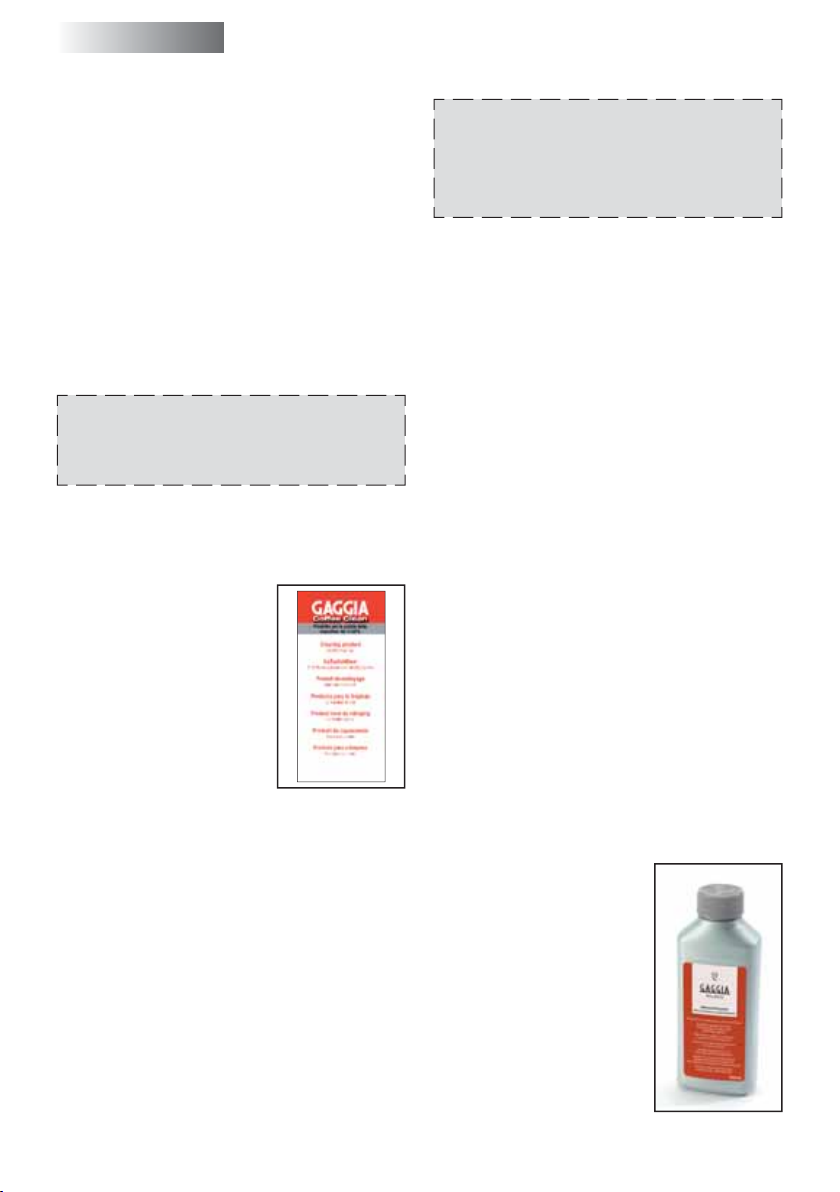
1. Risciacquare il serbatoio acqua (Fig.2) (vedi paragr afo
“pulizia serbatoio acqua”) e riempirlo con acqua fre sca
potabile.
2. Sistemare un contenitore sotto alla lancia vapore (Fig.1 -14).
3. Aprire lentamente la manopola vapore/acqua calda
• 4 •
Page 10

(Fig.1-7) ruotandola in senso antiorario.
4. Premere il tas to ca è (Fig.1-1) ed il tasto vapore (Fig.1-
3).
5. Erogare tutto il contenuto del serbatoio dell’acqua
dalla lancia vapore.
6. Per terminare l’erogazione premere nuovamente il
tasto ca è (Fig.1-1) ed il tasto vapore (Fig.1-3).
7. Chiudere la manopola del rubinetto (Fig.1-7) ruotandola in senso orario.
8. Riempire il serbatoio con acqua fresc a potabile.(Fig.2).
9. Inserire dal basso il porta ltro (Fig.3) nel gruppo
erogazione e ruotarlo da sinistra verso destra no al
suo bloccaggio (Fig.4).
10. Inserire un contenitore adeguato sotto al porta ltro.
11. Premere il tasto ca è (Fig.1-1) ed erogare tutta l’acqua
presente nel serbatoio.
12. Terminata l’acqua, fermare l’erogazione premendo
nuovamente il tasto caffè (Fig.1-1) e svuotare il
contenitore.
13. Rimuovere il porta ltro dal gruppo ruotandolo da
destra verso sinistra e sciacquarlo con acqua fresca
portabile.
14. La macchina è pronta per l’utilizzo.
ITALIANO
ruotarlo verso destra per bloccarlo in posizione. Il
manico del porta ltro dovrà trovarsi in posizione
perpendicolare alla macchina o leg germente spostato
verso destra.
2. Posizionare una tazza grande sotto al portafiltro
(Fig.1-17) e premere il tasto ca è (Fig.1-1)
3. Dopo che si è riempita la tazza di acqua, (ca. 150cc)
ripremere il tasto ca è e attendere qualche minuto
che la macchina raggiunga la temperatura corretta
con il porta ltro inserito.
Nota. All’interno del portafiltro potrebbe rimanere un
residuo di acqua che va eliminata prima di riempire il ltro
con il ca è macinato.
Procedere alla preparazione dell’espresso:
4. Togliere il porta ltro (Fig.1-17) e riempirlo con ca è
macinato utilizzando il misurino fornito con la macchina (Fig.1-20).
Considerare un misurino per ogni tazza di ca è.
Nota. Si sug ger isce di c hie der e in tor ref azi one od a cqu ist are
nella grande distribuzione un ca è con una macinatura ne
indicata per l’utilizzo per macchine da ca è.
PREPARAZIONE DI UN ESPRESSO CON
CAFFÈ MACINATO
Il por ta lt ro i n do ta zio ne m ont a d i fa bb ric a i l lt ro “c re ma
perfetta” per la preparazione di uno o due ca è.
Attenzione! Se si ut ili zz a i l l tr o c re ma p er fe t ta s en za
rompiget to la macch ina schiz za vistosamente il ca è
con il rischio di ustionarsi.
Nota. Se s i pre fe risc e ut ili zza re i l lt ro t rad izi ona le ( Fig .6/7 )
togliere sia il ltro crema perfetta (Fig.5) che il rompigetto
emulsionatore (Fig.1-16).
Per erogare il primo ca è è necessario prerisc aldare prima
il porta ltro (Fig.1-17):
1. Ins eri re i l p or ta ltr o (F ig .1-17) nel gruppo erogazione
(Fig.1-8) con un movimento a 45° verso sinistra e
• 5 •
5. Premere utilizz ando l’apposito pre ssino (Fig.1-21). La
pr ess at ura de ve a vve nir e i n mo do u ni for me per ave re
una super cie ben livellata e piana.
6. Pulire il bordo del porta ltro (Fig.1-17) da eventuali
residui di ca è.
7. In ser ir e il por ta lt ro ( Fig .1-17) nel gruppo erogazione
(Fig.1-8) con un movimento a 45° verso sinistra e
ruotarlo verso destra per bloccarlo in posizione. Il
manico del porta ltro dovrà trovarsi in posizione
perpendicolare alla macchina o leg germente spostato
verso destra.
8. Attendere che si accenda la spia (Fig.1-5).
9. Premere il tasto ca è (Fig.1-1).
10. Quando le tazze saranno piene per 3/4, premere
nuovamente il tasto ca è (Fig.1-1).
Il caffè sarà più o meno intenso a seconda della
quantità di acqua utilizzata e s e preparato s eguendo
la procedura corretta avrà la tipica “crema naturale”
color nocciola/marrone.
Page 11

ITALIANO
Per preparare un altro espresso, togliere lentamente ed
attentamente il porta ltro muovendolo verso sinistra.
Fare attenzione a non scottarsi con l’acqua rimasta sui
fondi di ca è. Un po’ d’acqua continuerà a sgocciolare una
volta rimosso il por ta ltro. Questo è dovuto alla pressione
dell’acqua nel sistema. Togliere i fondi dal ltro e possibili
residui dalla doccetta (Fig.16).
Nota. Vi sug ge ri amo di t en ere il por ta lt ro pul it o mo nt ato
sulla maccc
sempre una temperatura ottimale di tutto il gruppo di
erogazione.
hina senza stringerlo troppo, per garantire
PREPARAZIONE DI UN ESPRESSO CON
CAFFÈ IN CIALDE
Nota. Per l’utilizzo di cialde, utilizzare esclusivamente il ltro
1 tazza tradizionale (Fig.6).
Se gui te le i st ruz ion i p er l a pr ep ara zio ne di u n es pr ess o co n
ca è macinato utilizzando al posto del ca è macinato la
cialda di ca è premacinato monodose. Inserite la cialda
nel porta ltro (Fig.1-17) assicurandovi che la carta della
cialda non fuoriesca dal porta ltro.
A questo punto procedere come segue:
1. Preparare l’espresso in una tazza grande da cappuccino come speci cato nel paragrafo “Preparazione di
un espresso con ca è macinato”.
2. Premere il tasto vapore (Fig.1-3).
3. Dopo 15-20 secondi e quando la Spia temperatura
vapore (Fig.1-6) si accenderà.
4. Girare leggermente, in senso antiorar io, la manopola
vapore/acqua calda per eliminare la condensa dalla
lancia e richiudere la manopola.
5. Collocare il bricco riempito a metà con latte freddo
sotto la lancia vapore.
6. Disporre l’ugello della lancia appena sotto la super cie del latte, se è troppo dentro il latte non monta,
se è troppo fuori si producono grandi bolle che poi
smontano subito.
E’ importante mantenere l’ugello non centralmente
ma vicino al bordo del bricco, con un’angolazione
adatta per produrre un vortice consistente (Fig.8-1).
7. Ruotare la manopola del rubinetto di erogazione
vapore (Fig.1-7) in senso antiorario per far fuoriuscire
il vapore, in questa fase c’è il massimo assorbimento
d’aria; il latte deve montare quasi a freddo.
PREPARAZIONE DI UN CAPPUCCINO
Per la preparazione di un cappuccino tradizionale si
consiglia
- l’utilizzo di latte fresco, intero, a temperatura fredda
preferibilmente della tipologia alta qualit à. La densità
del latte emulsionato dipende dal contenuto di grassi
del latte.
- l’utilizzo di bricchi latte in acciaio inossidabile, di
forma circolare, bombata, con un restringimento sulla
parte superiore e il becc uccio, necessario per eseguire
cappuccini decorati.
La l ancia vapo re (Fi g.1-14) p rodur rà tu tto i l vapo re ne cessario per emulsionare il latte senz a portarlo ad ebollizione.
Con due o tre prove ed un po’ di impegno diventerete
esperti nella preparazione del cappuccino.
Prima di iniziare è importante spostare le ggermente verso
l’est erno la l ancia va pore in modo ta le da ins erire il bri cco
direttamente sotto la lancia vapore e facilitare i movimenti
necessari per una corretta emulsione del latte.
Nota. La pressione del vapore aumenta col ruotare della
manopola.
Nota. Si consiglia un’erogazione massima di 60 secondi.
Un’erogazione continua di vapore per più di 60 secondi può
svuotare completamente la caldaia. In questo caso procedere
come indicato nel paragrafo “Caricamento del circuito”.
Nota. Per una corretta emulsione del latte l’ugello vapore
(Fig.1-23) deve essere sempre a contatto con il latte e non
con l’emulsione di latte (Fig.8-2). Quindi mano a mano che lo
strato di emulsione aumenta, bisogna alzare leggermente il
br icco cerc and o d i ten ere l’u gel lo a con tat to c on i l la tt e, se nza
toccare il fondo del bricco (Fig.8-A).
8. Una volta ottenuta l’emulsione desiderata, si deve
spingere la lancia vapore più a fondo per scaldare
bene il latte.
Nota. Si suggerisce di tenere sempre una mano sulla parte
bombata del bricco per sentire l’aumento della temperatura
• 6 •
Page 12

della parte di latte non emulsionato.
9. Ottenuto il risultato desiderato chiudere, in senso orario, la manopola vapore per interrompere l’erogazione
del vapore e togliere il bricco.
Nota. Terminata l’operazione di montaggio del latte, per
ompattare l’emulsione si consiglia di battere leggermente
c
il bri cco s u un pia no e di l asc iar e ri pos are alm eno 30 s eco ndi.
Il latte diventa così più omogeneo.
Attenzione! È importante montare solo il latte
occorrente. Il latte caldo che rimane nel bricco non va
riutilizzato; si danneggerebbe la qualità dell’emulsione
e soprattutto il gusto del cappuccino. Va pertanto
destinato ad altri usi.
10. Premere il tasto vapore (Fig.1-3).
Versare il latte emulsionato nel caffè. Guarnire a
piacere con cannella, cacao, noce moscata.
ITALIANO
e il tasto vapore (Fig.1-3) contemporaneamente per
consentire l’erogazione di acqua calda.
4. Una volta ottenuta la quantità di acqua calda
desiderata, interrompere l’erogazione premendo
nuovamente il tasto ca è (Fig.1-1) ed il tasto vapore
(Fig.1-3) contemporaneamente e ruotare la manopola
vapore in senso orario.
Per preparare subito un’altro ca è, abbassare la temperatura della caldaia mediante l’erogazione di acqua calda dal
Gruppo di erogazione ca è (Fig.1-8). Seguire le istruzioni
riportate nel paragrafo “Come abbassare la temperatura
della caldaia”, in caso contrario, il ca è potrebbe sapere
di bruciato.
Nota. Si consiglia un’erogazione massima di 60 secondi.
Attenzione! La lancia vapore durante e dopo l’utilizzo
potrebbe avere una temperatura elevata. Per evitare
scottature muovetela solo posizionando le dita sul
gommino di protezione montata sulla lancia vapore.
Per preparare subito un altro ca è, abbassare la temperatura della caldaia mediante l’erogazione di acqua calda dal
Gruppo di erogazione ca è (Fig.1-8). Seguire le istruzioni
riportate nel par agrafo “Come abbassare la temperatura”,
in caso contrario, il ca è potrebbe sapere di bruciato.
Attenzione! La l anci a vap ore d uran te e d opo l ’uti liz zo
potrebbe avere una temperatura elevata. Per evitare
scottature muovetela solo posizionando le dita sul
gommino di protezione montata sulla lancia vapore.
Attenzione! Se viene erogato il ca è senza aver abbassato la tem peratura media nte l’erogazione di acqua c’è
il pericolo di scottature!
EROGAZIONE ACQUA CALDA
1. Accendere la macchina e attendere qualche minuto
fino a quando la spia temperatura corretta caffè
(Fig.1-5) si accende.
2. Collocare una tazza sotto la lancia professionale.
3. Ruotare lentamente la manopola vapore (Fig.1-7)
in senso antiorario e premere il tasto ca è (Fig.1-1)
COME ABBASSARE LA TEMPERATURA
DELLA CALDAIA
1. Non inserire il porta ltro.
2. Collocare una tazza vuota sulla griglia.
3. Premere il tasto ca è (Fig.1-1) e riempire la tazza di
acqua.
4. Premere nuovamente il tasto ca è (Fig.1-1).
La macchina è ora pronta per erogare un altro ca e.
FUNZIONE DI AUTOSPEGNIMENTO
La macchina è dotata di una funzione di risparmio
energetico. Dopo 20 minuti di inattività la macchina si
spegne automaticamente. Per riattivarla premere il tasto
di accensione/ spegnimento.
PULIZIA E MANUTENZIONE
Una pulizia e una manutenzione regolari mantengono la
macchina in condizioni ottimali e garantiscono un ca è
di ottimo gusto per un lungo periodo di tempo, un usso
costante di ca è e una schiuma di latte eccellente.
• 7 •
Page 13
ITALIANO
Pulizia della lancia vapore
Dopo ogni emulsione di latte:
1. Pulire la lancia vapore con un panno umido. Per una
pulizia più approfondita potete svi tare l’ugello (Fig.13)
e lavarlo con acqua corrente.
2. Aprire la manopola vapore lasciando fuoriuscire il
vapore per uno o due secondi per liberare il foro
dell’ugello (Fig.1-23).
Pulizia del porta ltro e dei ltri
I Filtri devono essere mantenuti puliti per garantire un
perfetto risultato.
Attenzione! La sostituzione del ltro deve avvenire
solo a ra reddamento completo della coppa porta ltro
per evitare scottature.
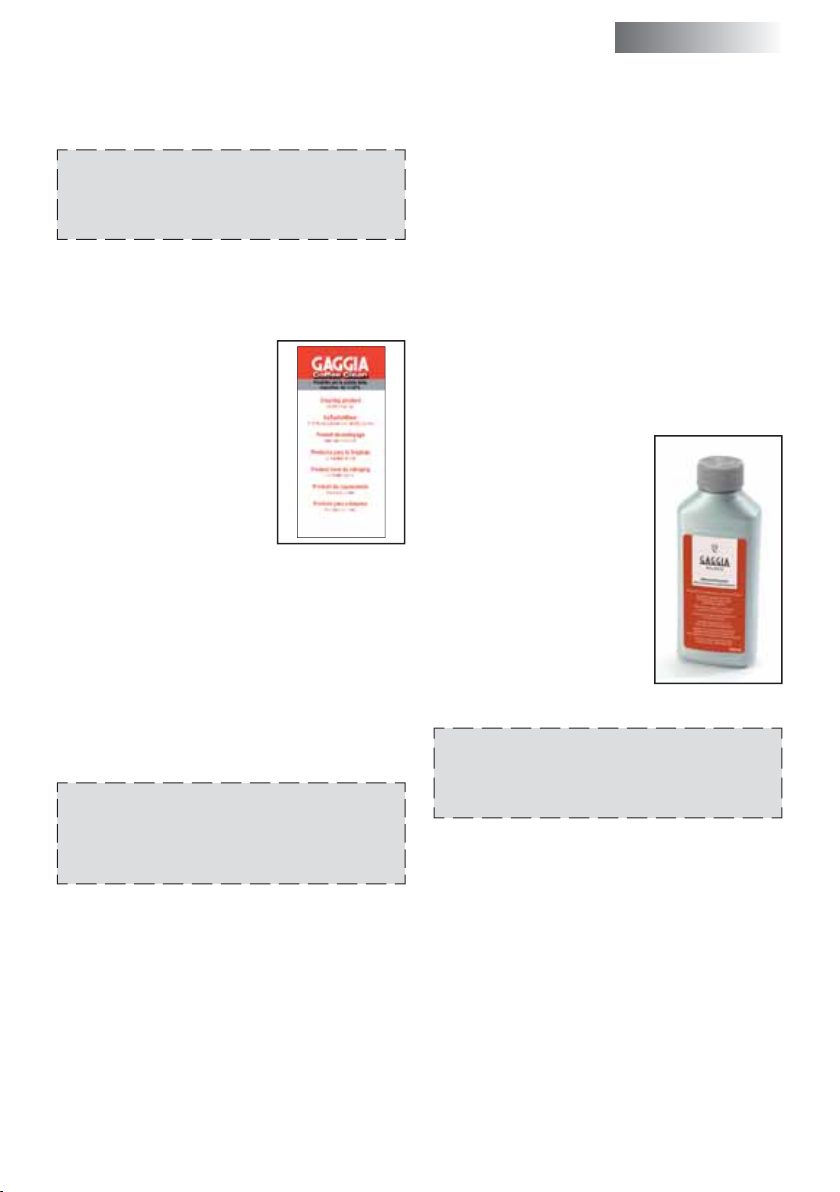
Quotidianamente togliere il ltro dal porta ltro come
descritto nella (Fig.14) e lavare con acqua tiepida.
Nel caso in cui si notasse un malfunzionamento nell’erogazione del
caffè, immergere i filtri in acqua
bollente per 10 minuti e successivamente sciacquarli con acqua
corrente.
Per una migliore pulizia dei ltri,
consigliamo l’acquisto delle pastiglie GAGGIA per la pulizia appositamente realizzate per mantenere
in perfetta e cienza la vostra macchina.
Pulizia della griglia e della vasca raccogligocce
Estrarre la vasca raccogligocce e la griglia (Fig.1-10,11) e
lavarle con acqua. Non usare abrasivi.
Pulizia del serbatoio acqua
Attenzione! La pulizia del serbatoio deve avvenire
solo quando la macchina è spenta per evitare scottature.
Durante l’utilizzo il tubo di scarico (Fig.11) potrebbe
raggiungere temperature elevate.
Rimuovere il serbatoio acqua (Fig.1-13) e lavarlo con
acqua corrente.
Per rimuovere il serbatoio acqua, rimuovere prima la vasca
raccogligocce (Fig 1-11), e poi s lare il tubo di scarico
(Fig.11) tirandolo verso il basso.
Nota. Reinserendo il serbatoio assicurarsi che i tubi in
silicone siano all’interno del serbatoio e che non siano né
attorcigliati né bloccati (Fig.12).
Pulizia della doccetta
Eliminare regolarmente eventuali residui di fondi ca è
dalla doccetta (Fig.16) con uno spazzolino ed e ettuare
una pulizia con acqua calda seguendo le istruzioni de scritte
nel paragrafo “Come abbassare la temperatura”.
Pulizia dopo un periodo di inutilizzo
Quando la macchina rimane inutilizzata per lungo tempo
(più di due settimane) seguire le istruzioni riportate nel
paragrafo “Al primo utilizzo o dopo un periodo di inat tività
superiore alle 2 settimane”.
DECALCIFICAZIONE
La formazione di calcare è una con seguenza naturale dell’uso dell’apparecchio. Usare esclusivamente
il prodotto decalci cante GAGGIA,
formulato specificatamente per
mantenere al meglio la performan ce e la funzionalità della macchina
per tutta la sua vit a, nonchè per evitare, se correttamente usato, ogni
alterazione del prodotto erogato.
Non utilizzare in nessun caso aceto
o altri prodotti anticalcare.
• 8 •
Page 14

La decalci cazione è necessaria ogni 2 mesi di utilizzo
della macchina.
Attenzione! Non bere la soluzione decalci cante ed i
prodotti erogati no al completamento del ciclo.
1. Inserire dal basso il porta ltro nel gruppo erogazione
(Fig.1-8) e ruotarlo da sinistra ver so destra no al suo
bloccaggio.
2. Rimuovere e svuotare il serbatoio dell’acqua (vedi
capitolo “Pulizia del serbatoio acqua“).
3. Versare METÀ del contenuto della bottiglia di decalci cante GAGGIA nel serbatoio dell’acqua e riempire
con acqua fresca potabile no al livello MAX.
4. Accendere la macchina premendo il tasto di accensione (Fig.1-2)
Erogare dalla lancia vapore 2 tazze di acqua (circa
150 ml. ciascuna) (vedi capitolo “preparazione acqua
calda”), e spegnere la macchina premendo il tasto di
accensione (Fig.1-2).
5. Lasciare agire il decalci cante circa 20 minuti con la
macchina spenta.
6. Accendere la macchina premendo il tasto di accensione (Fig.1-2).
Erogare dalla lancia vapore 2 tazze di acqua (circa 150
ml. ciascuna), spegnere la macchina premendo il tasto
di accensione (Fig.1-2) e lasciarla spenta per 3 minuti.
7. Ripetere l’erogazione acqua come descritto al punto
6 no al completo svuot amento del serbatoio dell’acqua.
8. Risciacquare il serbatoio e riempirlo con acqua f resca
potabile.
9. Sistemare un contenitore sotto alla lancia vapore.
Aprire lentamente la manopola vapore/acqua calda
(Fig.1-7) ruotandola in senso antiorario.
Premere il tasto caffè (Fig.1-1) ed il tasto vapore
(Fig.1-3)
10. Erogare tutto il contenuto del serbatoio dell’acqua
dalla lancia vapore. Per terminare l’erogazione
premere nuovamente il tasto caffè (Fig.1-1) ed il
tasto vapore (Fig.1-3) poi chiudere la manopola del
rubinetto ruotandolo in senso orario.
11. Riempire il serbatoio con acqua fresca potabile.
ITALIANO
12. Inserire un contenitore adeguato sotto al por ta ltro.
13. Premere il tasto caffè (Fig.1-1) ed erogare tutta
l’acqua presente nel serbatoio. Terminata l’acqua,
fermare l’erogazione premendo nuovamente il tasto
ca è (Fig.1-1) ed il tasto vapore (Fig.1-3). Al termine
svuotare il contenitore.
14. Rimuovere il porta ltro dal gruppo ruotandolo da
destra verso sinistra e sciacquarlo con acqua fresca
portabile.
15. Ripetere un’altra volta le operazioni dal punto 8 per
un totale di 8 serbatoi. Dopo la macchina è pronta per
l’utilizzo.
16. Il ciclo di decalci cazione è cosi concluso.
17. Riempire nuovamente il ser batoio con acqua fresca. Se
necessario e ettuare il caric amento del circuito come
descritto nel capitolo “Caricamento del circuito”.
• 9 •
Page 15

ITALIANO
IN CASO DI MALFUNZIONAMENTO
Problema: Controllare:
Che vi sia acqua nel serbatoio.
Mancata erogazione di ca è.
Che il ltro non sia otturato perché la miscela è troppo ne o il ca è troppo pressato.
Che la doccetta sia pulita.
L’erogazione del ca è è troppo
rapida (minore di 20 secondi).
La pompa fa troppo rumore.
Eccessiva perdita di acqua dal
porta ltro.
L’espresso ha poca “crema”.
Il ca è è troppo freddo.
Il latte non viene emulsionato
su cientemente.
La macchina schizza ca è dal
porta ltro.
Che il ca è non sia stato macinato troppo grossolanamente.
Che il ca è sia stato premuto con il pressino.
Che ci sia acqua nel serbatoio.
Che la pompa sia attivata (vedi caricamento circuito).
Che la quantità di ca è sia su ciente.
Che il porta ltro sia stato inserito correttamente (Fig.1-17).
Che la guarnizione non sia sporca (Fig.16).
Che non vi siano residui di ca è sul bordo del porta ltro.
Che il ca è non sia stato macinato troppo grossolanamente.
Che il ca è sia stato premuto con il pressino.
Che il ca è non sia troppo vecchio o secco.
Che sia stato utilizzato il ltro tradizionale con il rompigetto (Fig.1-16).
Che la macchina sia stata riscaldata.
Che il ca è non sia stato macinato troppo grossolanamente.
Che il ca è è stato erogato in tazze fredde. Si consiglia di erogare il ca è sempre in
tazzine calde.
Che non sia stato e ettuato il preriscaldamento del porta ltro (Solo per il 1° ca è).
Che l’ugello vapore non siano otturato.
Che l’ugello vapore non sia troppo in profondità nel bricco.
Che il latte non sia troppo caldo.
Che il rompigetto sia stato montato con il ltro crema perfetta.
La carcassa della macchina e il
tubo di scarico sono molto caldi.
Che il tasto vapore sia spento.
• 10 •
Page 16

ENGLISH
CONGRATULATIONS ON YOUR CHOICE!
Thanks to the new Gaggia Classic machine, you will become a real home barista and rediscover the traditional
gestures of espresso professionals during each co ee break. When using Classic Co ee machine, it is important to
pay attention to every detail, just like when using a professional bar machine: the machine must be very hot and
the lter holder must always be installed to maintain a homogeneous temperature in the brew unit. Furthermore,
the co ee must be ground nely but not too much, the right amount of ground co ee must be placed in the lter
and it must be pressed with just the right intensity, to prevent the co ee from coming out too quickly, but not too
much as this would make brewing very di cult.
The new Classic features a lter holder unit and a steam wand just like professional machines.
CONTENTS
DESCRIPTION .......................................................................................................................12
THINGS TO KNOW .................................................................................................................12
INTRODUCTION ....................................................................................................................13
FILTERS SUPPLIED ................................................................................................................ 13
“Crema perfetta” lter for 1 or 2 cups (Fig.5). ........................................................................................................13
Traditional lter for 2 cups (Fig.7). ........................................................................................................................13
Traditional lter for 1 cup / single-dose pod (Fig.6)...............................................................................................13
FIRST INSTALLATION ............................................................................................................. 13
Loading the circuit. ................................................................................................................................................13
When using for the rst time or after a period of inactivity of more than 2 weeks. ...............................................13
BREWING AN ESPRESSO USING GROUND COFFEE ......................................................................14
Continue preparing the espresso: .......................................................................................................................... 14
BREWING AN ESPRESSO USING COFFEE PODS .......................................................................... 15
PREPARING A CAPPUCCINO ...................................................................................................15
DISPENSING HOT WATER .......................................................................................................16
HOW TO LOWER THE BOILER TEMPERATURE ............................................................................16
AUTOMATIC SWITCH-OFF FUNCTION .......................................................................................16
CLEANING AND MAINTENANCE ...............................................................................................16
Cleaning the steam wand .....................................................................................................................................16
Cleaning the lter holder and the lters ...............................................................................................................17
Cleaning the grill and drip tray .............................................................................................................................17
Cleaning the water tank ........................................................................................................................................17
Cleaning the screen ..............................................................................................................................................17
Cleaning after a long period of inactivity...............................................................................................................17
DESCALING ..........................................................................................................................17
IN CASE OF MALFUNCTION ..................................................................................................... 19
• 11 •
Page 17

ENGLISH
DESCRIPTION
OVERVIEW OF THE MACHINE FIG.1
1 Brew button
2 On/o button
3 Steam button
4 Power indicator light
5 Co ee temperature light
6 Steam temperature light
7 Steam / hot water knob
8 Co ee brew unit
9 Drain pipe
10 Grill
11 Drip tray
12 Water tank lid
13 Water tank (removable)
14 Hot water/steam wand with rubber tip
15 “Crema perfetta” lter for 1 and 2 cups.
To be used only with a frothing jet device (Fig.1-16)
16 Frothing jet device
17 Filter holder
18 Traditional lter for 2 cups
19 Traditional lter for 1 cup / pods
20 Measuring scoop
21 Tamper
22 Power cord and plug
23 Steam nozzle
THINGS TO KNOW
1. The taste of espresso depends on the amount and
type of co ee used.
2. The particular taste of a coffee bean depends on
several factor s, but its taste and aroma are the result
of the roasting process. Co ee beans roasted for a
longer time and at higher temperatures are darker in
colour. Darker co ee beans release more avour than
lighter ones. You will nd di erent co ee qualities on
the market. Each type of roasting is characterised by
a mixture of beans roasted at a certain temperature
and with a certain type of aroma.
There are decaffeinated coffees containing only
2% ca eine. Try di erent types of co ee with your
es pre ss o ma chi ne. You wil l pr ob abl y di sco ver a b et ter
aroma than the one previously used.
3. Pump espresso machines require a finely ground
blend. Be sure to purchase the desired blend with
a grinding degree that can be used with espresso
machines. It is preferable to use a grinder mill rather
than a blade mill because the lat ter releases too much
co ee powder and produces an irregularly ground
blend.
4. It would be ideal to grind the co ee just before use.
Do not forget that it must be ground for the pump
espresso machine.
5. It is recommended to store ground co ee or beans
in airtight jars in the refrigerator. Pre-ground co ee
easily absorbs odours.
6. Real espresso can be recognised by its dark colour,
rich taste and typical "natural cream".
7. Cappuccino is a special combination of espresso and
hot frothed milk. It can be served with a sprinkling
of cinnamon, nutmeg or cocoa.
8. Serve espress o co ee immediately after preparing i t.
9. Serve espresso in coffee cups and cappuccino in
breakfast cups.
• 12 •
Page 18

INTRODUCTION
Before using your machine for the rst time, please read
the safety manual provided separately very carefully and
store it for future reference.
FILTERS SUPPLIED
“Crema perfetta” lter for 1 or 2 cups (Fig.5).
This lter is already inst alled on the lter holder and allows
you to obtain an espresso with cream even when using the
machine for the rst time.
Note. This lter must be used only together with the
frothing jet device. (Fig.1-16).
ENGLISH
Loading the circuit.
Warnin g! Do not activate the brew button without
loading the circuit rst.
1. Place an empty cup under the brew unit (Fig.1-8)
without inserting the lter holder and press the brew
button (Fig.1-1).
You will hear the sound of the pump being activated
and after a few seconds the water will start to come
out of the brew unit (Fig.1-8).
2. After lling the cup (about 150cc), press the brew
button again (Fig.1-1).
Note. The pump self-primer might not work temporarily
because of an "air bubble".
Traditional lter for 2 cups (Fig.7).
Traditional filter for 1 cup / single-dose
pod (Fig.6).
These lters are like those used in professional bar machines and require manual skills and experience.
Note. These lters must not be used with the frothing
jet device. (Fig.1-16).
Our advice is to start with the “crema perfetta” lter and
then, once you have acquired manual skills and experience,
mo ve on to t rad iti ona l on es to app rec iat e re al b ari sta use .
FIRST INSTALLATION
1. Remove the water tank cover (Fig.2) and ll it with
cold water up to the MAX level of the tank (Fig.1-13).
2. Insert the plug into the outlet at the back of the
machine (Fig.9) and the other end of the power cord
into a wall socket with suitable voltage.
Press the on / o but ton (Fig.1-2), the power indicator
light turns on(Fig.1-4).
If water does not come out of the brew unit (Fig.1-8),
continue as follows:
1. Place a cup under the steam wand (Fig.1-14).
2. Turn the knob (Fig.1-7) counter-clockwise to open the
steam/hot water dispensing knob.
3. Press the brew but ton (Fig.1-1) to activate the pump.
4. After a few seconds, water will start coming out of
the steam wand.
Dispense about a cup of water.
5. Close the steam/ hot water dispensing knob (Fig.1-7).
6. Press the brew button again (Fig.1-1).
When using for the first time or after a
period of inactivity of more than 2 weeks.
Note. The water dispensed during this process must be
th row n awa y a nd i s no t su ita ble for foo d us e. I f th e co ntai ne r
lls up during the cycle, stop dispensing water and empty the
container before resuming the operation.
1. Rinse the water tank (Fig.2) (see section “Cleaning
the Water Tank”) and ll it with fresh drink ing water.
2. Place a container under the steam wand (Fig.1-14).
3. Open the steam/hot water knob (Fig.1-7) slowly by
turning it counter-clockwise.
• 13 •
Page 19

ENGLISH
4. Press the br ew button (Fig.1-1) and the steam button
(Fig.1-3).
5. Dispense the whole water tank content through the
steam wand.
6. To stop dispensing, press the brew button (Fig.1-1)
and the steam button (Fig.1-3) again.
7. Close the knob (Fig.1-7) by turning it clockwise.
8. Fill the water tank with fresh drinking water (Fig.2).
9. Insert the lter holder into the brew unit from the
bottom (Fig.3) and turn it from left to right until it
locks into place (Fig.4).
10. Place a suitable container under the lter holder.
11. Press the brew button (Fig.1-1) and dispense all the
water in the tank.
12. Once the water tank is empty, stop dispensing by
pressing the brew button again (Fig.1-1) and empty
out the container.
13. Remove the lter holder from the unit by turning
it from right to left and rinse it with fresh drinking
water.
14. The machine is now ready for use.
BREWING AN ESPRESSO USING GROUND
COFFEE
The lter holder supplied features the “crema perfetta”
lter to prepare one or two co ees.
Warnin g! If t he “cr em a p er fe tt a” l ter is us ed wi tho ut
the frothing jet device, the machine will squir t out the
co ee, which may result in burns.
Note. If you prefer to use the traditional lter (Fig.6/7),
remove both the “crema perfetta” filter (Fig.5) and the
frothing jet device (Fig.1-16).
To brew the rst co ee, it is necessary to p reheat the lter
holder rst (Fig.1-17):
1. Insert the lter holder (Fig.1-17) into the brew unit
(Fig.1-8) with a 45° movement to the left and turn it
to the r igh t to l ock it i n pla ce. T he lter hol der hand le
must be perpendicular to the machine or slightly
tilted towards the right.
2. Place a large cup under the lter holder (Fig.1-17) and
press the brew button (Fig.1-1)
3. After the cup of water has been lled (about 150cc),
press the brew button again and wait a few minutes
for the machine to reach the correc t temperature with
the lter holder inserted.
Note. Any residual water inside the lter holder must be
removed before lling the lter with ground co ee.
Continue preparing the espresso:
4. Remove the lter holder (Fig.1-17) and ll it with
ground co ee using the measuring scoop provided
with the machine (Fig.1-20).
Add one measuring scoop of co ee for each cup.
Note. It is recommended to ask roasting companies for
nely ground co ee suitable for use in co ee machines or
to purchase it from large retailers.
5. Press the co ee using the dedicate d tamper (Fig.1-21).
The co ee must be pressed evenly to obtain a well
levelled and at surface.
6. Re mo ve a ny c o ee re sid ue s fr om the ed ge o f th e l ter
holder (Fig.1-17).
7. Insert the lter holder (Fig.1-17) into the brew unit
(Fig.1-8) with a 45° movement to the left and turn it
to the r igh t to l ock it i n pla ce. T he lter hol der hand le
must be perpendicular to the machine or slightly
tilted towards the right.
8. Wait until the indicator light turns on (Fig.1-5).
9. Press the brew button (Fig.1-1).
10. When the cups are 3/4 full, press the brew button
again (Fig.1-1).
The co ee will be more or less intense depending on
the amou nt of wat er used and, if prep ared follow ing
the correct procedure, it will have the typical hazelnut/brown coloured "natural cream".
To brew another espresso, slowly and carefully remove
the lter holder, moving it to the left. Be careful not to
burn yourself with the water left on the co ee grounds.
• 14 •
Page 20

Once the lter holder has been removed, some water will
still drip. This is due to the water pressure in the system.
Remove the grounds from the lter and any residues from
the screen (Fig.16).
Note. Keep the clean lter holder installed on the machine
without tightening it too much, so that the entire brew
unit is always at the correct temperature.
BREWING AN ESPRESSO USING COFFEE
PODS
Note. To use co ee pods, remember to only use the tradi-
tional 1 cup lter (Fig.6).
Follow the instructions to make an espresso with ground
co ee using the single-dose pre-ground co ee pod instead of ground co ee. Inser t the pod into the lter holder
(Fig.1-17); make sure that the paper of the pod does not
stick out of the lter holder.
PREPARING A CAPPUCCINO
To prepare a traditional cappuccino, we recommend:
- using f resh whole milk at a cold temperature, preferably high quality. The density of the frot hed milk will
depend on the milk fat content.
- using stainless steel, circular, rounded milk jugs,
narrower at the top, with a spout, necessar y to make
cappuccino decorations.
The steam wand (Fig.1-14) will dispense all the steam
required to froth the milk without bringing it to a boil.
With two or three attempts and a little e ort you will
become experts in preparing cappuccino.
Before star ting, it is important to slightly move the steam
wand outwards in order to insert the jug directly under it
and facilitate the movements required to froth the milk
correctly.
At this point continue as follows:
ENGLISH
4. Turn the steam/hot water knob slightly counterclockwise to eliminate any condensation from the
wand then close the knob again.
5. Place the jug, half- lled with cold milk, under the
steam wand.
6. Place the steam nozzle just below the surface of the
milk; if it has been inser ted too deep, the milk will not
be frothed; if it has not been inserted deep enough,
big bubbles will be produced and then disappear
immediately.
It is important to keep the nozzle not at the centre
but close to the edge of the jug, with an appropriate
angle to produce a stronger vortex (Fig.8-1).
7. Turn the steam dispensing knob (Fig.1-7) counterclockwise to let th e steam come out. During this phase
there is maximum air absorption and the milk must
be frothed almost cold.
Note. The steam pressure increases as the knob is turned.
Note. The dispensing operation should last no longer than
60 seconds.
Dispensing steam continuously for more than 60 seconds
can empty the boiler out completely. In this case, continue
as indicated in the section "Loading the circuit".
Note. To froth the milk correctly, the steam nozzle (Fig.1-23)
must always be in contact with the milk and not with the
froth (Fig.8-2). Therefore, as the layer of froth increases,
the jug must be slightly raised trying to keep the nozzle in
contact with the milk, without touching the bottom of the
jug (Fig.8-A).
8. Once the desired frothing has been achieved, the
steam nozzle must be pushed fur ther to heat the milk
well.
Note. It is advisable to always keep a hand on the rounded
part of the jug to feel the temperature increase of the
unfrothed milk.
1. Prepare the espresso in a large cappuccino cup as
indicated in the paragraph "Brewing an espresso
using ground co ee".
2. Press the steam button (Fig.1-3).
3. After 15-20 seconds and when the steam temperature
indicator light (Fig.1-6) turns on.
• 15 •
9. Once the desired result has been achieved, close the
steam knob, by turning it clock wise, to stop dispensing steam and remove the jug.
Note. After frothing the milk, to make the froth more com-
pac
t, it is advisable to lightly tap the jug on a at surface and
Page 21

ENGLISH
leave it to rest for at least 30 seconds. The milk will become
more homogeneous.
Warning! It is important to froth only the milk you
need. The remaining hot milk in the jug should not be
reused; it would damage the quality of the froth and
above all the taste of the cappuccino. It should therefore
be used in other ways.
10. Press the steam button (Fig.1-3).
Pour the frothed milk into the co ee. Decorate as
desired with cinnamon, cocoa, nutmeg.
To prepare another co ee immediately, lower the boiler
temperature by dispensing hot water from the co ee brew
unit (Fig.1-8). Follow the instructions in the paragraph
"How to lower the temperature"; otherwise, the co ee
may taste burnt.
Warning! The steam wand may be very hot during
and after use. To avoid burns, move it only by placing
your ngers on the rubber tip tted on the steam wand.
Warning! If co ee is brewed without reducing the
temperature by dispensing water, you may get burnt!
unit (Fig.1-8). Follow the instructions given in the paragraph "How to lower the boiler temperature", otherwise
the co ee may taste burnt.
Note. The dispensing operation should last no longer than
60 sec
onds.
Warning! The steam wand may be very hot during
and after use. To avoid burns, move it only by placing
your ngers on the rubber tip tted on the steam wand.
HOW TO LOWER THE BOILER TEMPERATURE
1. Do not insert the lter holder.
2. Place an empty cup on the grill.
3. Press the brew button (Fig.1-1) and ll the cup with
water.
4. Press the brew button again (Fig.1-1).
The machine is now ready to brew another co ee.
AUTOMATIC SWITCH-OFF FUNCTION
The machine is equipped with an energy saving function. After 20 minutes of inactivity, the machine turns o
automatically. To reactivate it, press the on/o button.
DISPENSING HOT WATER
1. Turn the machine on and wait a few minutes until the
correct co ee temperature indicator light (Fig.1-5)
turns on.
2. Place a cup under the professional wand.
3. Slowly turn the steam knob (Fig. 1-7) counter-
clockwise and press the brew button (Fig.1-1) and
the steam button (Fig.1-3) at the same time to allow
for hot water to be dispensed.
4. Once the desired amount of hot water has been dispe nse d, s to p di spe nsi ng by p res sin g th e b rew but to n
(Fig.1-1) and the steam but ton (Fig.1-3) again and turn
the steam knob clockwise.
To prepare another co ee immediately, lower the boiler
temperature by dispensing hot water from the co ee brew
• 16 •
CLEANING AND MAINTENANCE
Regular cleaning and maintenance keep the machine in
perfect conditions and ensure perfect co ee avour, a
constant co ee ow and excellent milk froth for a long
period of time.
Cleaning the steam wand
After each milk frothing:
1. Clean the steam wand with a damp cloth. To clean it
more thoroughly, you can unscrew the nozzle (Fig.13)
and wash it with running water.
2. Open the steam knob, allowing the s team to escape for
one or two seconds to clear the noz zle hole (Fig.1-23).
Page 22
Cleaning the lter holder and the lters
The filters should be kept clean to guarantee perfect
results.
Warnin g! The lter must only be replaced when the
lter holder cup has cooled down completely to avoid
burns.
Every day, remove the lter from the lter holder as described in (Fig.14) and wash it with warm water.
If you notice a malfunction when
brewing co ee, immerse the lters
in boiling water for 10 minutes and
then rinse them with running water.
To clean the lters more thoroughly,
we recommend using the GAGGIA cleaning tablets specifically
designed to keep your machine in
perfect working order.
Cleaning the grill and drip tray
Remove the drip tray and the grill (Fig.1-10,11) and wash
them with water. Do not use abrasive cleaning tools.
Cleaning the water tank
Warnin g! To avoid burns, the tank should be cleaned
only when the machine is turned o . The drain hose
(Fig. 11) may reach high temperatures during operation.
Remove the water tank (Fig.1-13) and wash it with fresh
water.
To remove the water tank, rst remove the drip tray (Fig
1-11), and then remove the drain pipe (Fig.11) by pulling
it downwards.
Note. When reinserting the tank, make sure that the silicone
tubes are inside the tank and that they are neither twisted
nor blocked (Fig.12).
ENGLISH
Cleaning the screen
Regularly remove any residual co ee grounds from the
screen (Fig.16) using a brush and wash with hot water
following the instructions given in the section "How to
lower the temperature".
Cleaning after a long period of inactivity
When the machine is not used for a long time (more than
two weeks), follow the instructions given in the section
"When using for the rst time or af ter a period of inactivity
of more than 2 weeks".
DESCALING
Limescale normally builds up with
the use of the appliance. Use the
GAGGIA descaling product only.
Its formula has been designed to
ensure better machine perfor mance
and operation for its whole operating life. If correctly used, it also
avoids alterations in the brewed
product. Never use vinegar or other
descaling agents.
Descaling should be performed
every 2 months.
Warning! Never drink the descaling solution or any
products dispensed until the cycle has been carried out
to the end.
1. In se rt the lte r h old er i nto th e br ew u ni t (F ig.1- 8) an d
turn it from lef t to right until it locks into place.
2. Remove and empty the water tank (see the chapter
"Cleaning the water tank").
3. Pour HALF the content of the descaling solution into
the water tank and ll it with fresh water up to the
max level.
4. Turn the machine on by pressing the on/o button
(Fig.1-2).
Dispense 2 cups of water (about 150 ml each) from
the steam wand (see the chapter "Preparing hot
• 17 •
Page 23

ENGLISH
water"), and switch o the machine by pressing the
on/o button (Fig.1-2).
5. Let the descaling solution take e ect for approximately 20 minutes with the machine turned o .
6. Turn on the machine by pressing the on/o button
(Fig.1-2).
Dispense 2 cups of water (about 150 ml each) from the
steam wand, switch o the machine by pressing the
on/o button (Fig.1-2) and leave it o for 3 minutes.
7. Repeat the water dispensing described in s tep 6, until
the water tank is completely empty.
8. Rinse the water tank and ll it with fresh drinking
water.
9. Place a container under the steam wand. Open the
steam/hot water knob (Fig.1-7) slowly by turning it
counter-clockwise.
Press the brew button (Fig.1-1) and the steam button
(Fig.1-3).
10. Dispense the whole water tank content through the
steam wand. To stop dispensing, press the brew button (Fig.1-1) and the steam but ton (Fig.1-3) again and
close the knob by turning it clockwise.
11. Fill the water tank with fresh drinking water.
12. Place a suitable container under the lter holder.
13. Press the brew button (Fig.1-1) and dispense all the
water in the tank. Once the water tank is empt y, stop
dispensing by pressing the brew button (Fig.1-1) and
the steam button (Fig.1-3) again. At the end, empty
the container.
14. Remove the lter holder from the unit by turning
it from right to left and rinse it with fresh drinking
water.
15. Repeat the operations from step 8 once again, for a
total of 8 tanks. The machine is now ready to
16. The descaling cycle is now complete.
17. Re ll the water tank with fresh water. If necessary,
load the circuit as described in the chapter "Loading
the Circuit".
be used.
• 18 •
Page 24

IN CASE OF MALFUNCTION
Problem: Make sure that:
There is water in the tank.
No brewing.
The lter is not clogged because the mixture is too ne or the co ee is too pressed.
The screen is clean.
ENGLISH
The co ee brews too fast (less
than 20 seconds).
The pump is too noisy.
Excessive loss of water from the
lter holder.
The espresso is not creamy
enough.
The co ee is too cold.
The milk does not froth enough.
The machine squirts co ee out
from the lter holder.
The co ee has not been ground too coarsely.
The co ee has been pressed with the tamper.
There is water in the tank.
The pump has been activated (see circuit loading).
There is enough co ee.
The lter holder has been inserted correctly (Fig.1-17).
The seal is not dirty (Fig.16).
There are no co ee residues on the edge of the lter holder.
The co ee has not been ground too coarsely.
The co ee has been pressed with the tamper.
The co ee is not too old or dry.
The traditional lter has been used with the frothing jet device (Fig.1-16).
The machine has been heated.
The co ee has not been ground too coarsely.
The co ee has b een brewed i n cold cups. I t is recommen ded to alway s brew co ee in
warm cups.
The lter holder has not been preheated (Only for the 1st co ee).
The steam nozzle is not clogged.
The steam nozzle has not been inserted too deep in the jug.
The milk is not too hot.
The frothing jet device was installed with the “crema perfetta” lter.
The machine housing and the
drain hose are hot.
The steam button is o .
• 19 •
Page 25

DEUTSCH
WIR GRATULIEREN IHNEN ZU IHRER WAHL!
Mit dem Kauf des neuen Gaggia Classic haben Sie sich für ein Maschinenmodell entschieden, mit dem Sie zu Hause
ein echter Barista werden un d bei jeder Ka e epause die traditionellen Handgri e der Espresso-Pro s nachem p nden
können. Der Einsat z von Classic erfordert gena u wie bei einer professionellen Masch ine in einem Café die Beachtung
jedes Details: Di e Maschine muss sehr heiß sein und de r Siebträger muss immer eingesetz t sein, um die Temperatur
in der gesamten Brühg ruppe gleichmäßig zu erhalten, der Ka ee muss fei n, aber nicht zu fein gemahlen sein, ma n
muss die richtige Menge gemahlenen Ka ees in den Filter geben und mit dem richtigen Druck anpressen, nicht zu
wenig, weil der Ka ee sonst zu schnell durchläuf t, und nicht zu stark, weil die Ausgabe erschwert würde.
Die neue Classic ist wie bei den professionellen Maschinen mit einer Siebträgereinheit und einer Damp anze
ausgestattet.
INHALT
BESCHREIBUNG ....................................................................................................................21
DINGE, DIE MAN WISSEN SOLLTE ............................................................................................21
EINFÜHRUNG .......................................................................................................................22
IM LIEFERUMFANG ENTHALTENE FILTER .................................................................................22
Filter “Crema Perfetta” für 1 oder 2 Tassen (Abb.5).................................................................................................22
Herkömmlicher Filter 2 Tassen (Abb.7). .................................................................................................................22
Herkömmlicher Filter 1 Tasse / Pad für 1 Portion (Abb.6). ......................................................................................22
ERSTE INBETRIEBNAHME ......................................................................................................22
Laden des Systems. ...............................................................................................................................................22
Bei der ersten Verwendung oder nach einer Inaktivität von mehr als 2 Wochen....................................................22
AUSGABE EINES ESPRESSO MIT GEMAHLENEM KAFFEE .............................................................23
Fahren Sie mit der Zubereitung des Espressos fort: ...............................................................................................23
ZUBEREITUNG EINES ESPRESSO MIT KAFFEEPADS ...................................................................24
ZUBEREITUNG EINES CAPPUCCINO .........................................................................................24
HEISSWASSERAUSGABE ........................................................................................................25
SO SENKEN SIE DIE BOILERTEMPERATUR ................................................................................25
SELBSTAUSSCHALTUNGSFUNKTION ........................................................................................26
REINIGUNG UND WARTUNG ................................................................................................... 26
Reinigung der Damp anze ...................................................................................................................................26
Reinigung des Siebträgers und der Filter ..............................................................................................................26
Reinigung des Gitters und der Abtropfschale .......................................................................................................26
Reinigung des Wassertanks ...................................................................................................................................26
Reinigung der Dusche ..........................................................................................................................................26
Reinigung nach längerer Nichtbenutzung .............................................................................................................26
ENTKALKEN .........................................................................................................................27
BEI FUNKTIONSSTÖRUNGEN .................................................................................................. 28
• 20 •
Page 26

BESCHREIBUNG
ÜBERSICHT ÜBER DIE MASCHINE ABB.1
1 Ka eetaste
2 Ein-/Ausschalter
3 Dampftaste
4 Einschalt-Kontrolllampe
5 Kontrolllampe Ka eetemperatur
6 Kontrolllampe Dampftemperatur
7 Drehknopf für Dampf-/Heißwasserausgabe
8 Brühgruppe Ka eeausgabe
9 Ablaufschlauch
10 Gitter
11 Abtropfschale
12 Deckel Wassertank
13 Wassertank (herausnehmbar)
14 Dampf-/Heißwasserlanze mit Gummischutz
15 Filter für "Crema Perfetta" 1 und 2 Tassen Nur mit
einem Perlstrahl-Aufschäumer zu verwenden
(Abb.1-16)
16 Perlstrahl-Aufschäumer
17 Siebträger
18 Herkömmlicher Filter 2 Tassen
19 Herkömmlicher Filter 1 Tasse / Pads
20 Messlö el
21 Stampfer
22 Netzkabel und Stecker
23 Dampfdüse
DEUTSCH
DINGE, DIE MAN WISSEN SOLLTE
1. Der Geschmack von Espresso hängt von der Menge
und der Art des verwendeten Ka ees ab.
2. Der besondere Geschmack einer Ka eebohne hängt
von mehreren Faktoren ab, aber ihr Güte und ihr
Aroma sind das Ergebnis des Röstprozesses. Die
länger und bei höheren Temperaturen gerösteten
Ka eebohnen haben eine dunklere Farbe. Dunklere
Bohnen geben mehr Geschmack als hellere Bohnen
ab. Sie werden verschiedene Qualitäten von Ka ee im
Handel nden. Je de Art von Röstung ist eine Mischung
aus bei einer bestimmten Temperatur gerösteten
Bohnen und eines bestimmten Aromatyps.
Es gibt ko einf reie Sorten, die nur 2% Ko ein enthalten. Experimentieren Sie mit Ihrer E spressomaschine
eine der verschiedenen Ka eesorten im Handel. Sie
werden wahrscheinlich ein besseres als das bisher
verwendete Aroma nden.
3. Pumpen-Espressomaschinen er fordern eine fein gemahlene Mischung. Achten Sie darauf, die gewünschte Mischung in einer Körnung zu kaufen, die für die
Espressomaschine geeignet ist. Es ist vorzuziehen,
eine Mahlmühle anstelle einer Messermühle zu verwe nde n, d a le tz te re z u vi el Ka e ep ulv er f re ise tz t u nd
eine unregelmäßig gemahlene Mischung erzeugt.
4. Der Kaffee sollte im Idealfall erst kurz vor dem
Gebrauch gemahlen werden. Denken Sie daran, den
Ka ee f ür die Pumpen-Espressomaschine zu mahlen.
5. Es ist ratsam, gemahlenen Ka ee oder Bohnen in
hermetisch schließenden Dosen im Kühlschrank zu
aufzubewahren. Der gemahlene Ka ee nimmt leicht
Gerüche auf.
6. Den echten Espresso erkennt man an seiner dunklen
Farbe, seinem intensiven Geschmack und seiner
typischen "natürlichen Creme".
7. Cappuccino ist eine spezielle Kombination aus Espresso und heißer aufgeschäumter Milch. Man kann
ihn mit einer Prise Zimt, Muskatnuss oder Kakao
servieren.
8. Servieren Sie Espresso sofort nach der Zubereitung.
9. Servieren Sie Espresso in Mokkatassen und Cappuc-
cino in Frühstückstassen.
• 21 •
Page 27

DEUTSCH
EINFÜHRUNG
Bevor Sie das Gerät zum ersten Mal benutzen, sollten
Sie das Heft mit den Sicherheitshinweisen, das separat
geliefert wird, auf merksam lesen und für eine eventuelle
zukünftige Verwendung aufbewahren.
IM LIEFERUMFANG ENTHALTENE FILTER
Filter “Crema Perfetta” für 1 oder 2 Tassen
(Abb.5).
Dieser Filter ist bereits am Siebträger montier t und bereitet
Espresso mit Creme schon bei den ersten Einsätzen der
Maschine zu.
Hinweis. Dieser Filter darf nur verwendet werden
zusammen mit dem Perlstrahl-Aufschäumer. (Abb.1-16).
Herkömmlicher Filter 2 Tassen (Abb.7).
Herkömmlicher Filter 1 Tasse / Pad für 1
Portion (Abb.6).
Diese Filter sind wie die von professionellen Maschinen
und erfordern Fingerfertigkeit und Erfahrung.
Hinweis. Diese Filter dürfen nicht verwendet werden
mit dem Perlstrahl-Aufschäumer. (Abb.1-16).
Wir empfehlen, mit dem Filter „Crema Perfett a“ zu beginnen und zu den herkömmlichen überzugehen, sobald Sie
manuelle Fähigkeiten und Erfahrung er worben haben, um
wie ein echter Barista zu hantieren.
Laden des Systems.
Achtung! Aktivieren Sie nicht die Ka ee-Taste, ohne
zuerst den Wasserkreislauf gefüllt zu haben.
1. Stellen Sie eine leere Tasse unter die Brühgruppe
(Abb.1-8) ohne den Siebträger einzuführen und
drücken Sie die Ka eetaste (Abb.1-1).
Sie werden die Pumpe arbeiten hören, die aktiviert
wurde, und nach einigen Sekunden beginnt das
Wasser aus der Brühgruppe zu laufen (Abb.1-8).
2. Nachdem Sie die Tasse gefüllt haben (ca. 150 ml),
drücken Sie erneut die Ka eetaste (Abb.1-1).
Hinweis. Es kann sein, dass sich die Pumpe wegen einer
Luftblase zeitweilig nicht von selbst einschaltet.
Wenn kein Wasser aus der Brühgruppe ießt (Abb.1-8),
wie folgt vorgehen:
1. Stellen Sie eine Tasse unter die Damp anzen (Abb.1-
14).
2. Drehen Sie den Drehknopf (Abb.1-7) gegen den
Uhrzeigersinn, um den Dampf- / Heißwasserhahn zu
ö nen
3. Drücken Sie die Ka ee-Taste (Abb.1-1), um die Pumpe
zu aktivieren.
4. Nach einigen Sekunden tritt Wasser aus der Dampflanze aus.
Lassen Sie etwa eine Tasse Wasser herauslaufen.
5. Schließen Sie den Drehknopf für die Ausgabe von
Dampf- / Heißwasser (Abb.1-7).
6. Dann erneut die Ka eetaste drücken (Abb.1-1).
ERSTE INBETRIEBNAHME
1. Entfernen Sie den Wassertankdeckel (Abb.2) und
füllen Sie ihn mit kaltem Wasser bis MAX des Tanks
(Abb.1-13).
2. Den Stecker in die Strombuchse auf der Rücks eite der
Maschine (Fig.9) und das andere Ende des Netzkabels
in eine Wandsteckdose mit geeigneter Spannung
stecken.
Drücken Sie den Ein-/Ausschalter (Abb.1-2), die Einschalt-Kontrolllampe leuchtet auf (Abb.1-4).
• 22 •
Bei der ersten Verwendung oder nach einer
Inaktivität von mehr als 2 Wochen.
Hinweis. Das während dieses Verfahrens ausgegebene
Wasser muss weggeschüttet und darf nicht für Lebensmittelzwecke verwendet werden. Sollte der Behälter während
des Zyklus voll werden, muss die Ausgabe gestoppt und der
Behälter geleert werden, bevor der Vorgang fortgesetzt wird.
1. Den Wassertank (Abb.2) ausspülen (siehe Abschnitt
„Reinigung des Wassertanks“) und mit frischem
Trinkwasser füllen.
Page 28

2. Einen Behälter unter die Damp anze stellen (Abb.1-14).
3. Den Drehknopf der Dampf-/Heißwasserausgabe
(Abb.1-7) langsam gegen den Uhrzeigersinn drehen.
4. Drücken Sie die Ka eetaste (Abb.1-1) und die Dampftaste (Abb.1-3).
5. Den gesamten Inhalt des Wassertanks über die
Heißwasser-/Damp anze ab ießen lassen.
6. Um die Ausgabe zu beenden, erneut die Taste für die
Ka ee- und Dampfausgabe drücken (Abb.1-1 und
1-3).
7. Den Drehknopf des Hahns (Abb.1-7) langsam ö nen,
indem er im Uhrzeigersinn gedreht wird.
8. Den Wassertank mit frischem Trinkwasser füllen
(Abb.2).
9. Den Siebträger von unten in die Brühgruppe (Abb.3)
einsetzen und von links nach rechts drehen, bis er
festsitzt (Abb.4).
10. Einen geeigneten Behälter unter den Siebträger
stellen.
11. Die Ka eetaste (Abb.1-1) drücken und das gesamte
im Tank vorhandene Wasser ablassen.
12. Ist kein Wasser mehr vorhanden, die Ausgabe mit erneuter Betätigung der Ka eetaste (Abb.1-1) beenden
und den Behälter leeren..
13. Den Siebträger durch Drehen von rechts nach links
aus der Brühgruppe herausnehmen und mit frischem
Trinkwasser ausspülen.
14. Die Maschine ist betriebsbereit.
DEUTSCH
Perfetta“ (Abb.5), als auch den Perlstrahl-Aufschäumer
(Abb.1-16).
Bei der Zubereitung des ersten Ka ees muss zuerst der
Siebträgers vorgewärmt werden (Abb.1-17):
1. Setzen Sie den Siebträger (Abb.1-17) mit einer 45 °
Bewegung nach links in die Brühgruppe (Abb.1-8)
ein und drehen Sie ihn nach rechts, um ihn in seiner
Position zu arretieren. Der Gri des Siebträger muss
rechtwinklig zur Maschine oder leicht nach rechts
verstellt stehen.
2. Stellen Sie eine große Tasse unter den Siebträger
(Abb.1-17) und drücken Sie die Ka eetaste (Abb.1-1)
3. Nachdem die Tasse Wasser gefüllt ist (ca. 150 ml),
drücken Sie erneut die Ka eetaste und warten Sie
ein paar Minuten, bis die Maschine mit eingesetz tem
Siebträger die richtige Temperatur erreicht hat.
Hinweis. Im Siebträger kann ein Wasserrückstand verbleiben, der zu beseitigen ist, bevor der Filter mit gemahlenem
Ka ee gefüllt wird.
Fahren Sie mit der Zubereitung des Espressos fort:
4. Den Siebträger (Abb.1-17) herausnehmen und ihn
mit dem mitgelieferten Messlö el mit Ka eepulver
befüllen (Abb.1-20).
Ein Messlö el pro Tasse verwenden.
AUSGABE EINES ESPRESSO MIT
GEMAHLENEM KAFFEE
Der mitgelieferte Siebträger ist ab Werk mit dem Filter
„Crema Perfett a“ für die Zubereitung von einem oder zwei
Ka ees ausgestattet.
Achtung! Wenn der Filter „Crema Perfetta“ ohne Perlstrahl-Aufschäumer ver wendet wird, spritzt die Maschine
den Ka ee heraus, und es besteht Verbrennungsgefahr.
Hinweis. Wenn Sie den herkömmlichen Filter (Abb.6/7)
verwenden möchten, entfernen Sie sowohl den Filter „Crema
• 23 •
Hinweis. Es wird empfohlen, in Röstereien oder im Groß-
handel nach einem Ka ee mit einer feinen Mahlung zu fragen, der für die Verwendung in Ka eemaschinen geeignet ist.
5. Den Ka ee mithilfe des Stampfers (Abb.1-21) andrücken. Der Ka e ist gleichmäßig zu pressen, um eine
ebene und glatte Ober äche zu erhalten.
6. Mögliche Ka eer ückstände am Rand des Siebträgers
(Abb.1-17) ent fernen.
7. Setzen Sie den Siebträger (Abb.1-17) mit einer 45 °
Bewegung nach links in die Brühgruppe (Abb.1-8)
ein und drehen Sie ihn nach rechts, um ihn in seiner
Position zu arretieren. Der Gri des Siebträgers muss
rechtwinklig zur Maschine oder leicht nach rechts
verstellt stehen.
Page 29

DEUTSCH
8. Abwarten, bis die Kontrolllampe au euchtet (Abb.1-5).
9. Die Ka eetaste (Abb.1-1) drücken.
10. Wenn die Tassen zu 3/4 gefüllt sind, drücken Sie
erneut die Ka eetaste (Abb.1-1).
Der Ka ee wird je nach Wassermenge mehr oder
weniger stark sein, und wenn Sie ihn nach dem
richtigen Verfahren zubereiten, wird er die typische
„haselnussbraune" natürliche Creme haben.
Für die Zubereitung eines weiteren Espressos den Siebträger langsam und vorsichtig nach links drehen und
herausnehmen. Darauf achten, dass Sie Hände nicht am
verbleibenden Wasser auf dem Ka eesatz verbrennen.
Nachdem der Siebträger herausgenommen wurde, tropft
noch etwas Wasser aus der Brühgruppe. Dies ist auf den
Druck des Wassers im System zurückzuführen. Entfernen
Sie den Satz aus dem Filter und mögliche Rück stände von
der Dusche (Abb.16).
Hinweis. Wir empfehlen Ihnen, den sauberen Siebträger
n d er M as chi ne zu b ef es tig en, oh ne i hn z u s ta rk f es tz uz ie-
a
hen, um immer eine optimale Temperatur der gesamten
Brühgruppe zu gewährleisten.
ZUBEREITUNG EINES ESPRESSO MIT
KAFFEEPADS
Hinweis. Für die Verwendung von Pads ist ausschließlich
den herkömmlichen 1-Tassen-Filter (Abb.6) verwenden.
Befolgen Sie die Anweisungen zum Herstellen eines
Espressos mit gemahlenem Ka ee und verwenden Sie
anstelle von gemahlenem Ka ee das Pad mit vorgemahlenem Ka ee f ür eine Portion. Das Ka eepad in den Siebt räger einlegen (Abb.1-17) und sichers tellen, dass das Papier
des Ka eepads nicht aus dem Siebträger heraussteht.
werden und einen Ausguss haben, der für dekorierte
Cappuccinos notwendig ist.
Die Dampflanze (Abb.1-14) erzeugt genügend Dampf,
um die Milch aufzuschäumen, ohne sie zum Kochen zu
bringen.
Mit zwei oder drei Tests und wenig Aufwand werden Sie
zu einem Experten für die Zubereitung von Cappuccino.
Vor Beginn ist es wichtig, die Damp anze leicht nach
außen zu verstellen, um den Krug direk t unter die Dampflanze stellen zu können, was die für eine korrekte Milchaufschäumung notwendigen Bewegungen erleichter t.
Nun gehen Sie folgendermaßen vor:
1. Bereiten Sie den Espresso, wie im Abschnitt „Zubereitung eines Espresso mit gemahlenem Ka ee"
beschrieben, in einer großen Cappuccinotasse vor.
2. Die Dampftaste (Abb.1-3) drücken.
3. Nach 15-20 Sekunden leuchtet die Kontrolllampe der
Dampftemperatur (Abb.1-6) auf.
4. Drehen Sie den Drehknopf der Dampf/Heißwasserausgabe leicht gegen den Uhrzeigersinn, um Kondensat
aus der Lanze zu lassen, und schließen Sie den Knopf
wieder.
5. Stellen Sie die halb mit kalter Milch gefüllte Kanne
unter die Damp anze.
6. Tauchen Sie die Düse der Lanze bis knapp unter die
Milchober äche ein, wenn Sie zu tief in der Milch ist,
schäumt die Milch nicht, wenn sie zu weit draußen
ist , werde n große Blasen erzeugt, d ie sofort platze n.
Es ist wichtig, die Düse nicht mit tig, sondern nahe des
Krugrands zu halten, und in einem Winkel, in dem ein
gleichmäßiger Wirbel erzeugt wird (Abb.8-1).
7. Drehen Sie den Drehknopf für den Dampfhahn
(Abb.1-7) gegen den Uhrzeigersinn, um den Dampf
entweichen zu lassen. In dieser Phase wird ein Ma ximum an Luft aufgenommen und die Milch schäumt
fast im kalten Zustand auf.
ZUBEREITUNG EINES CAPPUCCINO
Für die Zubereitung eines traditionellen Cappuccino
empfehlen wir:
- die Verwendung von f rischer, möglichst hochwertiger
kalter Vollmilch. Die Dichte der aufgeschäumten Milch
hängt vom Milchfettgehalt ab.
- die Verwendung von runden, bauchförmigen Milchkrügen aus rostf reiem Stahl, die nach oben hin enger
• 24 •
Hinweis. Der Dampfdruck erhöht sich mit dem Drehen
rehknopfes.
des D
Hinweis. Es wird empfohlen, die Ausgabe auf maximal 60
Sekunden zu beschränken.
Eine länger Dampfabgabe als 60 Sekunden kann den Boiler
vollständig entleeren. Verfahren Sie in diesem Fall wie im
Abschnitt „Füllen des Kreislaufs" beschrieben.
Page 30

Hinweis. Für ein richtiges Aufschäumen der Milch muss die
Dampfdüse (Abb.1-23) immer in die Milch getaucht sein und
nicht im Milchschaum (Abb.8-2). Wenn die Schaumschicht
zunimmt, muss die Kanne leicht angehoben werden, damit
die Düse in der Milch bleibt, ohne dabei jedoch den Boden
der Kanne zu berühren (Abb.8-A).
8. Sobald der gewünschte Milchschaum hergestellt
wurde, muss die Dampflanze weiter in die Milch
getaucht werden, um sie gut zu erhitzen.
Hinweis. Es wird empfohlen, immer eine Hand auf den
bauchigen T
turanstieg des nicht aufgeschäumten Teils der Milch unter
Kontrolle zu haben.
9. Sobald das gewünschte Ergebnis erreicht ist, drehen
Hinweis. Um den Milchschaum zu verdichten, emp ehlt es
sich, nach dem Aufschäumen die Kanne leicht auf eine Fläche
zu klopfen und mindestens 30 Sekunden ruhen zu lasse n. Die
Milch wird dadurch homogener.
Achtung! Es ist wichtig, nur die Milch, die Sie brauchen,
zu schäumen. Die heiße Milch, die im Topf verbleibt, sollte nicht wiederverwendet werden; es würde die Qualität
des Milchschaums und vor allem den Geschmack des
Cappuccinos beeinträchtigen. Es sollte daher für andere
Zwecke weiterverwendet werden.
eil der Kanne zu halten, um den Tempera-
Sie den Dampf-Drehknopf im Uhrzeigersinn, um die
Dampfzufuhr zu beenden, und nehmen Sie den Kr ug
heraus.
DEUTSCH
Achtung! Wird der Ka ee zubereitet, ohne dass die
Temperatur durch die Ausgabe von Wasser abgesenkt
wurde, besteht Verbrennungsgefahr!
HEISSWASSERAUSGABE
1. Schalten Sie das Gerät ein und warten Sie einige
Minuten, bis die Kontrolllampe für die richtige Kaffeetemperatur (Abb.1-5) au euchtet.
2. Stellen Sie eine Tasse unter den Pro -Dampfhahn.
3. Den Dampf-Drehknopf (Abb. 1-7) langsam gegen den
Uhrzeigersinn drehen und gleichzeitig die Ka eetaste
(Abb.1-1) und die Dampftaste (Abb.1-3) drücken, um
heißes Wasser auslaufen zu lassen.
4. Sobald die gewünschte Menge an heißem Wasser
erreicht ist, stoppen Sie die Ausgabe durch erneutes
Drücken der Ka eetaste (Abb.1-1) und der Dampftas te
(Abb.1-3) und schließen Sie den Dampf-Drehknopf im
Uhrzeigersinn.
Um sofort einen weiteren Ka ee zuzubereiten, senken
Sie die Temperatur im Boiler, indem Sie heißes Wasser
aus der Ka eebrühgruppe ablassen (Abb.1-8). Befolgen
Sie die Anweisungen im Abschnitt „So senken Sie die Boilertemperatur", andernfalls könnte der Ka ee verbrannt
schmecken.
Hinweis. Es wird empfohlen, die Ausgabe auf maximal 60
Sekunden zu beschränken.
10. Die Dampftaste (Abb.1-3) drücken.
Gießen Sie die aufgeschäumte Milch in den Ka ee.
Nach Belieben mit Zimt, Kakao oder Muskat s ervieren.
Um sofort einen weiteren Ka ee zuzubereiten, senken Sie
die Temperatur im Boiler, indem Sie heißes Wasser aus der
Ka eebrühgruppe ablassen (Abb.1-8). Befolgen Sie die
Anweisungen im Abschnitt „So senken Sie die Temperatur", andernfalls könnte der Ka ee verbrannt schmecken.
Achtung! Die Damp anze kann während und nach
dem Gebrauch sehr heiß sein. Um Verbrennungen zu
vermeiden, bewegen Sie sie nur am Gummischutz an
der Damp anze.
• 25 •
Achtung! Der Dampfhahn kann während und nach
dem Gebrauch sehr heiß sein. Um Verbrennungen zu
vermeiden, bewegen Sie sie nur am Gummischutz am
Dampfhahn.
SO SENKEN SIE DIE BOILERTEMPERATUR
1. Setzen Sie den Siebträger nicht ein.
2. Legen Sie eine leere Tasse auf das Gitter.
3. Drücken Sie die Ka eetaste (Abb.1-1) und füllen Sie
die Tasse mit Wasser.
4. Dann erneut die Ka eetaste drücken (Abb.1-1).
Die Maschine ist für eine weitere Ka eeausgabe bereit.
Page 31

DEUTSCH
SELBSTAUSSCHALTUNGSFUNKTION
Die Maschine ist mit einer Energiesparfunktion ausgestattet. Nach einem Zei traum von 20 Minuten, in dem das
Gerät nicht betätigt w ird, schaltet es automatisch ab. Um
es wieder zu aktivieren, drücken Sie den Ein-/Ausschalter.
REINIGUNG UND WARTUNG
Mit einer regelmäßigen Reinigung und Wartung werden die optimalen Betriebsbedingungen der Maschine
erhalten und gewährleisten langfristig einen Ka ee mit
optimalem Geschmack, einen konstanten Ka ee uss und
einen exzellenten Milchschaum.
Für eine optimale Reinigung der Filter wird der Kauf von
Reinigungstabs GAGGIA empfohlen, die extra für die
perfekte P ege Ihrer Maschine gedacht sind.
Reinigung des Gitters und der Abtropfschale
Die Abtropfschale und das Git ter (Abb.1-10,11) herausnehmen und unter laufendem Wasser waschen. Verwenden
Sie keine Scheuermittel.
Reinigung des Wassertanks
Reinigung der Damp anze
Nach jedem Milchaufschäumen:
1. Reinigen Sie die Damp anze mit einem feuchten Tuch.
Für eine gründlichere Reinigung können Sie die Düse
(Abb.13) abschrauben und mit ießendem Wasser
abwaschen.
2. Ö nen Sie den Dampf-Drehknopf und lassen Sie den
Dampf für ein oder zwei Sekunden entweichen, um
das Düsenloch freizumachen (Abb.1-23).
Reinigung des Siebträgers und der Filter
Die Filter müssen stets sauber gehalten werden, um ein
optimales Ergebnis zu gewährleisten.
Achtung! Der Filter darf erst ausgetauscht werden,
wenn der Topf des Siebträgers vollständig abgekühlt
ist, um Verbrennungen zu vermeiden.
Entfernen Sie täglich den Filter wie
in (Abb. 14) beschrieben aus dem
Siebträger und waschen Sie ihn mit
warmem Wasser.
Wenn Sie eine Störung in der Kaffeeausgabe feststellen, tauchen
Sie die Filter 10 Minuten lang in
kochendes Wasser und spülen Sie
sie dann mit ießendem Wasser ab.
Achtung ! Die Reinigung des Tanks darf nur bei abgeschalteter Maschine erfolgen, um Verbrennungen zu vermeiden. Während der Verwendung des Ab ussschlauchs
(Abb. 11) können hohe Temperaturen erreicht werden.
Den Wassertank (Abb.1-13) herausnehmen und mit ießendem Wasser ausspülen.
Um den Wassertank zu entfernen, entfernen Sie zuerst
die Abtropfschale (Abb. 1-11) und entfernen Sie dann den
Ablaufschlauch (Abb.11), indem Sie ihn nach unten ziehen.
Hinweis. Setzen Sie den Tank wieder ein und vergewissern
Sie sich, dass sich die Silikonschläuche im Tank be nden und
weder verdreht noch eingeklemmt sind (Abb.12).
Reinigung der Dusche
Entfernen Sie regelmäßig Ka eereste mit einer Bürste
aus der Dusche (Abb.16) und reinigen Sie sie mit heißem
Wasser gemäß den Anweisungen im Abschnitt "Absenken
der Temperatur".
Reinigung nach längerer Nichtbenutzung
Wenn das Gerät für längere Zeit nicht benutzt wird
(mehr als zwei Wochen), folgen Sie den Anweisungen im
Abschnitt „Bei der ersten Verwendung oder nach einer
Nichtbenutzung von mehr als 2 Wochen".
• 26 •
Page 32

ENTKALKEN
Die Bildung von Kalk ist eine natürliche Folge des Betriebs der
Maschine. Verwenden Sie nur den
Entkalker von GAGGIA, der entwickelt wurde, um die Leistungen und
den Betrieb des Gerät für dessen
gesamte Lebensdauer optimal zu
erhalten und bei sachgemäßer
Anwendung Beeinträchtigungen
des ausgegebenen Produktes zu
vermeiden. Verwenden Sie niemals
Essig oder andere Entkalker.
Das Entkalken muss alle 2 Monate der Maschinennutzung
ausgeführt werden.
Achtung! Das Entkalkungsmittel und die bis zum
Abschluss des Zyklus ausgegebenen Produkte dürfen
keinesfalls getrunken werden.
1. Den Siebträger von unten in die Brühgruppe (Abb.1-
8) einsetzen und von links nach rechts drehen, bis er
festsitzt.
2. Entfernen und leeren Sie den Wassertank (siehe
Kapitel „Wassertank reinigen").
3. Die HÄLFTE des Inhalts der Flasche mit Entkalker
GAGGIA in den Wassertank einfüllen und den Tank
mit frischem Trinkwasser bis zum Füllstand MAX.
au üllen.
4. Die Maschine an des Einschalter s (Abb. 1-2) einschalten.
Lassen Sie aus der Damp anze 2 Tassen Wasser (etwa
zu je 150 ml) laufen (siehe Kapitel „Ausgabe von
heißem Wasser") und schalten Sie das Gerät durch
Drücken des Einschalters aus (Abb.1-2).
5. Den Entkalker für etwa 20 Minuten bei ausgeschalteter Maschine einwirken lassen.
6. Die Maschine an des Einschalters (Abb. 1-2) einschalten.
Lassen Sie 2 Tassen Wasser (etwa zu je 150 ml) aus
der Damp anze ab, schalten Sie die Maschine durch
Drücken des Einschalters (Abb. 1-2) aus und lassen Sie
sie für 3 Minuten ausgeschaltet.
DEUTSCH
7. Die unter Punkt 6 beschriebene Wasserabgabe bis zur
vollständigen Leerung des Wassert anks wiederholen.
8. Den Tank ausspülen und mit frischem Trinkwasser
füllen.
9. Einen Behälter unter die Damp anze stellen.. Den
Drehknopf der Dampf-/Heißwasserausgabe (Abb.1-7)
langsam gegen den Uhrzeigersinn drehen.
Drücken Sie die Ka e etaste (Abb.1-1) und die Dampftaste (Abb.1-3).
10. Den gesamten Inhalt des Wassertanks über die
Heißwasser-/Damp anze ab ießen lassen. Um die
Ausgabe zu beenden, erneut die Taste für die Wasserabgabe (Abb.1-1) und die Dampftaste (Abb.1-3)
drücken, dann den Drehknopf des Hahns zum Sie
schließen im Uhrzeigersinn drehen.
11. Den Wassertank mit frischem Trinkwasser füllen.
12. Einen geeigneten Behälter unter den Siebträger
stellen.
13. Die Ka eetaste (Abb.1-1) drücken und das gesamte
im Tank vorhandene Wasser ablassen. Ist kein
Wasser mehr vorhanden, die Ausgabe mit erneuter
Betätigung der Ka eetaste (Abb.1-1) und der Dampftaste (Abb.1-3) beenden. Abschließend den Behälter
entleeren.
14. Den Siebträger durch Drehen von rechts nach links
aus der Brühgruppe herausnehmen und mit frischem
Trinkwasser ausspülen.
15. Die Vorgänge ab Punkt 8 für insgesamt 8 Tank-
füllungen wiederholen. Danach ist die Maschine
betriebsbereit.
16. Der Entkalkungszyklus ist nun abgeschlossen.
17. Den Tank erneut mit frischem Wasser füllen. Sofern
erforderlich, das System, wie im Kapitel „Inbetriebnahme" des Handbuchs beschrieben, füllen.
• 27 •
Page 33

DEUTSCH
BEI FUNKTIONSSTÖRUNGEN
Problem: Prüfen:
Ist Wasser im Tank?
Ka ee wird nicht ausgegeben.
Ist der Filter verstopft, weil die Mischung zu fein gemahlen ist oder der Ka ee zu
stark gepresst wurde?
Ist die Dusche sauber?
Die Ka eeausgabe erfolgt zu schnell
(weniger als 20 Sekunden).
Macht die Pumpe starke Geräusche?
Übermäßiger Wasseraustritt am
Siebträger.
Der Espresso hat wenig „Creme“.
Der Ka ee ist zu kühl.
Die Milch schäumt sich nicht
ausreichend.
Die Maschine spritzt Ka ee aus dem
Siebträger.
Wurde der Ka ee zu grob gemahlen?
Wurde der Ka ee mit dem Stampfer gepresst?
Ist Wasser im Tank?
Ist die Pumpe aktiviert (siehe Kreislauf füllen)?
Ist die Menge an Ka ee ausreichend?
Wurde der Siebträger richtig eingesetzt (Abb.1-17)?
Ist die Dichtung schmutzig (Abb. 16)?
Be nden sich Ka eerückstände am Rand des Siebträgers?
Wurde der Ka ee zu grob gemahlen?
Wurde der Ka ee mit dem Stampfer gepresst?
Ist der Ka ee zu alt oder trocken.
Wurde der herkömmliche Filter mit dem Perlstrahl-Aufschäumer verwendet
(Abb.1-16)?
Wurde die Maschine erhitzt?
Wurde der Ka ee zu grob gemahlen?
Wurde der Ka ee in kalte Tassen ausgegeben? Es wird empfohlen, den Ka ee
stets in warme
Tassen auszugeben.
Wurde der Siebträger vorgewärmt (nur für den 1. Ka ee)?
Ist die Dampfdüse verstopft?
Ist die Dampfdüse zu tief in der Kanne getaucht?
Ist die Milch zu heiß?
Wurde der Perlstrahl-Aufschäumer mit dem Filter „Crema Perfetta“ moniert?
Das Maschinengehäuse und der
Ab ussschlauch sind sehr heiß.
Ist die Dampftaste abgeschaltet?
• 28 •
Page 34

FRANÇAIS
NOUS VOUS FÉLICITONS POUR VOTRE CHOIX!
En achetant la nouvelle Gaggia Classic, vous avez choisi un modèle de machine qui vous permettra de devenir un
vrai garçon de café à la maison et de red écouvrir, à chaque pause café, les g estes traditionnels des professionnels de
l'expresso. L'utilisation de la machine Classic requiert une attention particulière à chaque détail, tout comme pour
une machine à café professionne lle: la machine doit être bien chaude et le por te- ltre do it toujours être monté pour
maintenir une température homogène dans tout le groupe de distribution; la mouture du café doit être ne, mais
pa s tro p; i l fa ut i ntr odu ir e la b on ne q uan tit é de c afé mou lu d ans le ltr e et pre sse r av ec l a ju ste i nte nsi té, ni t rop peu
pour éviter que le café ne sorte trop vite ni excessivement pour éviter que la distribution ne devienne très di cile.
La nouvelle Classic est équipée d'un groupe porte- ltre et d'une lance vapeur qui s’inspirent de ceux des machines
professionnelles.
SOMMAIRE
DESCRIPTION .......................................................................................................................30
CE QU’IL FAUT SAVOIR ...........................................................................................................30
INTRODUCTION ....................................................................................................................31
FILTRES FOURNIS ................................................................................................................. 31
Filtre «crema perfetta» pour 1 ou 2 tasses (Fig. 5). ..............................................................................................31
Filtre traditionnel 2 tasses (Fig. 7). ........................................................................................................................31
Filtre traditionnel 1 tasse/dosette unidose (Fig. 6). .............................................................................................31
PREMIÈRE INSTALLATION ...................................................................................................... 31
Amorçage du circuit. .............................................................................................................................................31
À la première utilisation ou après une période d'inutilisation de plus de 2 semaines. ...........................................31
PRÉPARATION D'UN EXPRESSO AVEC DU CAFÉ MOULU ...............................................................32
Procéder à la préparation de l'expresso: ...............................................................................................................32
PRÉPARATION D'UN EXPRESSO AVEC DES DOSETTES DE CAFÉ ....................................................33
PRÉPARATION D'UN CAPPUCCINO ........................................................................................... 33
DISTRIBUTION D'EAU CHAUDE ...............................................................................................34
COMMENT ABAISSER LA TEMPÉRATURE DE LA CHAUDIÈRE ........................................................34
FONCTION D'ARRÊT AUTOMATIQUE ......................................................................................... 34
NETTOYAGE ET ENTRETIEN ..................................................................................................... 35
Nettoyage de la lance vapeur ...............................................................................................................................35
Nettoyage du porte- ltre et des ltres .................................................................................................................35
Nettoyage de la grille et du bac d’égouttement ....................................................................................................35
Nettoyage du réservoir à eau .................................................................................................................................35
Nettoyage de la douchette ...................................................................................................................................35
Nettoyage après une période d’inutilisation ..........................................................................................................35
DÉTARTRAGE ........................................................................................................................ 36
EN CAS DE DYSFONCTIONNEMENT ..........................................................................................37
• 29 •
Page 35

FRANÇAIS
DESCRIPTION
VUE D’ENSEMBLE DE LA MACHINE FIG. 1
1 Touche café
2 Touche allumage/arrêt
3 Touche vapeur
4 Voyant d’allumage
5 Voyant température café
6 Voyant température vapeur
7 Bouton vapeur/eau chaude
8 Groupe de distribution du café
9 Tuyau de vidange
10 Grille
11 Bac d'égouttement
12 Couvercle du réservoir
13 Réservoir à eau (amovible)
14 Lance vapeur/eau chaude avec sou et de protec-
tion en caoutchouc
15 Filtre «crema perfet ta » 1 et 2 tasses
À n’utiliser qu’avec le brise-jet mousseur (Fig. 1-16)
16 Brise-jet mousseur
17 Porte- ltre
18 Filtre traditionnel 2 tasses
19 Filtre traditionnel 1 tasse/dosettes
20 Mesure
21 Presse-café
22 Cordon d'alimentation et che
23 Buse vapeur
CE QU’IL FAUT SAVOIR
1. Le go ût d e l' exp re sso dé pen d de la q ua nti té e t du ty pe
de café utilisé.
2. Le goût particulier d'un grain de café dépend de
plusieurs facteurs, mais son goût et son arôme sont
le résultat du processus de torréfaction. Les grains
de café torré és pendant plus longtemps et à des
températures plus élevées ont une couleur plus
foncée. Les grains plus foncés libèrent plus d’arôme
que les grains clairs. Il existe di érentes marques de
café sur le marché. Chaque type de torréfaction est
caractérisé par un mélange de grains torré és à une
température particulière et avec un type particulier
d'arôme.
Il existe des cafés décaféinés ne contenant que 2%
de caféine. Il convient d’essayer l'un des di érents
types de café dans le commerce avec la machine à
café expresso, ceci a n de découvrir probablement
un meilleur arôme que celui du mélange utilisé
jusqu’à présent.
3. Les machines à café ex presso à pompe requièrent un
mélange nement moulu. Veiller à acheter le mélange
désiré avec un degré de mouture adapté aux machines
à café expresso. Il est préférable d'utiliser un moulin
à café à meules plutôt qu'un moulin à café à lame
parce que ce dernier libère trop de poudre de café et
la mouture obtenue est irrégulière.
4. L’idéal serait de moudre le café juste avant de l’utiliser.
Ne pas oublier qu'il doit être moulu pour une machine
à café expresso à pompe.
5. Il est conseillé de conserver le café moulu, ou en
grains, dans des boîtes hermétiques rangées dans le
réfrigérateur. Le café moulu absorbe facilement les
odeurs.
6. Le véritable exp resso se reconnaît à sa couleur foncée,
son goût riche et sa «crème naturelle» typique.
7. Le cappuccino est une combinaison spéciale de café
expresso et de lait chaud émulsionné. Il peut être servi
avec une pincée de cannelle, de noix muscade ou de
cacao.
8. Servir le café expresso immédiatement après l'avoir
préparé.
9. Servir le café expresso dans des tasses à café et le
cappuccino dans des tasses pour le petit déjeuner.
• 30 •
Page 36

INTRODUCTION
Avant d'utiliser la machine pour la première fois, lire
attentivement le livret de sécurité fourni séparément et
le conserver pour toute référence future.
FILTRES FOURNIS
Filtre «crema perfetta» pour 1 ou 2 tasses
(Fig. 5).
Ce ltre est déjà monté sur le porte- ltre et il permet de
préparer un expresso avec de la crème même lors des
premières utilisations de la machine.
Remarque. Ce filtre doit toujours être combiné au
brise-jet mousseur. (Fig. 1-16).
Filtre traditionnel 2 tasses (Fig. 7).
FRANÇAIS
Amorçage du circuit.
Attention! Ne pas appuyer sur la touche café sans
avoir d’abord fait l’amorçage du circuit.
1. Placer une tasse vide sous le groupe de distribution
(Fig. 1-8) sans insérer le porte- ltre et appuyer sur la
touche café (Fig. 1-1).
La pompe émettra le son typique correspondant à
sa mise en marche et après quelques secondes, l'eau
commencera à descendre du groupe de distribution
(Fig. 1-8).
2. Après avoir attendu que la tasse se remplisse (150cm3
environ), appuyer à nouveau sur la touche café (Fig.
1-1).
Remarque. Il peut arriver que l’autoamorçage de la
pompe ne fonctionne pas temporairement à cause d'une
«bulle d'air».
Filtre traditionnel 1 tasse/dosette unidose
(Fig. 6).
Ces ltres sont identiques à ceux utilisés sur les machines
à café professionnelles et ils requièrent de la dextérité et
de l'expérience.
Remarque. Ces ltres ne doivent pa s être utilisés avec
le brise-jet mousseur. (Fig. 1-16).
Il est conseillé de commencer avec le ltre «crema perfetta» et après avoir acquis la dextérité et l’expérience nécessaires, de passer aux ltres traditionnels pour appréc ier
une utilisation digne d’un garçon de café.
PREMIÈRE INSTALLATION
1. Retirer le couvercle du réservoir à eau (Fig. 2) et le
remplir avec de l’eau froide jusqu'au niveau MAX du
réservoir (Fig. 1-13).
2. Introduire la che dans la prise de courant située à
l’arrière de la machine (Fig. 9) et l’extrémité opposée
du cordon d’alimentation dans une prise de courant
murale ayant une tension appropriée.
Appuyer sur la touche d’allumage/arrêt (Fig. 1-2), le
voyant d'allumage s'allume (Fig. 1-4).
• 31 •
Si l'eau ne descend pas du groupe de distribution (Fig. 1-8),
procéder de la façon suivante:
1. Placer une tasse sous la lance vapeur (Fig. 1-14).
2. Tourner le bouton (Fig. 1-7) dans le sens inverse
des aiguilles d'une montre pour ouvrir le robinet de
distribution de vapeur/eau chaude.
3. Appuyer sur la touche café (Fig. 1-1) pour mettre la
pompe en marche.
4. Après quelques secondes, de l'eau commencera à
sortir de la lance vapeur.
Laisser se remplir une tasse d’eau environ.
5. Fermer le bouton de distribution de vapeur/eau
chaude (Fig. 1-7).
6. Appuyer à nouveau sur la touche café (Fig. 1-1).
À la première utilisation ou après une période d'inutilisation de plus de 2 semaines.
Remarque L'eau distribuée lors de cette phase doit être jetée
et ne peut pas ê tre destin ée à la conso mmation h umaine. S i
le récipient se remplit, pendant le cycle, arrêter la distribution
et le vider avant de recommencer l'opération.
1. Rincer le réser voir à eau (Fig. 2) (voir la section «nettoyage du réservoir à eau») et le remplir avec de l’eau
Page 37

FRANÇAIS
fraîche potable.
2. Placer un récipient sous la lance vapeur (Fig. 1-14).
3. Ou vr ir l ent eme nt le b out on v ap eur /ea u ch aud e (F ig.
1-7) en le tournant dans le sens inverse des aiguilles
d'une montre.
4. Appuyer sur la touche café (Fig. 1-1) et sur la touche
vapeur (Fig. 1-3).
5. Distrib uer tout le contenu du réservoir à eau à travers
la lance vapeur.
6. Pour terminer la distribution, appuyer à nouveau sur
la touche café (Fig. 1.1) et sur la touche vapeur (Fig.
1-3).
7. Fermer le bouton d u robinet (Fi g. 1-7) en le t ournant
dans le sens des aiguilles d'une montre.
8. Remplir le réservoir avec de l’eau fraîche potable (Fig.
2).
9. Introduire le porte- ltre par le bas (Fig. 3) dans le
gr oup e d e di st ri but io n et le t ou rne r de ga uch e à d ro ite
jusqu'à ce qu'il soit bloqué (Fig. 4).
10. Placer un récipient approprié sous le porte- ltre.
11. Appuyer sur la touche café (Fig. 1-1) et distribu er toute
l'eau contenue dans le réservoir.
12. Lorsque l’eau est terminée, arrêter la distribution en
appuyant à nouveau sur la touche café (Fig. 1-1) et
vider le récipient.
13. Enlever le porte- ltre du groupe en le tournant de
droite à gauche et le rincer avec de l'eau potable
fraîche.
14. La machine est prête à l'emploi.
Pour distribuer le premier café, il est nécessaire de préchau er d’abord le porte- ltre (Fig. 1-17):
1. Introduire le porte- ltre (Fig .1-17) dans le groupe
de d istri butio n (Fig . 1-8) ave c un mou vemen t de 45 °
ve rs l a ga uc he e t, p ui s, l e to urn er v er s la dro it e po ur l e
bloquer en position. La poignée du por te- ltre devra
être perpendiculaire à la machine ou un peu dép lacée
vers la droite.
2. Placer une grande tasse sous le por te- ltre (Fig. 1-17)
et appuyer sur la touche café (Fig. 1-1)
3. Après avoir rempli la tasse avec de l’eau (150cm3
environ), appuyer à nouveau sur la touche café et
attendre pendant quelques minutes que la machine
atteigne la température correcte avec le porte- ltre
inséré.
Remarque. Il pourrait y avoir un reste d’eau dans le porte ltre. Cette eau doit être éliminée avant de remplir le ltre
avec le café moulu.
Procéder à la préparation de l'expresso:
4. Enlever le porte- ltre (Fig. 1-17) et le remplir avec
du café moulu en utilisant la mesure fournie avec la
machine (Fig.1-20).
Il faut compter une mesure par tasse de café.
Remarque. Il est conseillé de demander en phase de
to rréf ac tio n ou d’ac he ter d ans la g ran de d ist rib uti on un c afé
moulu nement, indiqué pour les machines à café.
PRÉPARATION D'UN EXPRESSO AVEC DU
CAFÉ MOULU
Le porte- ltre fourni de série est équipé du ltre «crema
perfetta» pour la préparation d'un café ou deux.
Attention! Si le ltre «crema perfetta» est utilisé
sans le brise-jet mousseur, la machine projette le c afé,
ce qui comporte un risque de brûlures.
Remarque. Pour utiliser le ltre traditionnel (Fig. 6/7),
retirer le ltre «crema perfetta» (Fig. 5) ainsi que le brise-jet
mousseur (Fig. 1-16).
• 32 •
5. Presser à l'aide du presse- café (Fig. 1-21). Le press age
doit être uniforme pour obtenir une surface bien
nivelée et plate.
6. Éliminer tout résidu éventuel de café du bord du
porte- ltre (Fig. 1-17).
7. Introduire le porte- ltre (Fig .1-17) dans le groupe
de d istri butio n (Fig . 1-8) ave c un mou vemen t de 45 °
ve rs l a ga uc he e t, p ui s, l e to urn er v er s la dro it e po ur l e
bloquer en position. La poignée du por te- ltre devra
être perpendiculaire à la machine ou un peu dép lacée
vers la droite.
8. Attendre que le voyant s’allume (Fig. 1-5).
9. Appuyer sur la touche café (Fig. 1-1).
Page 38

10. Lorsque les tasses seront aux 3/4 pleines, appuyer à
nouveau sur la touche café (Fig. 1-1).
Le café aura un goût plus ou moins intense en fonc-
tion de la quantité d'eau utilisée et s’il a été préparé
en suivant la procédure correcte, il aura sa «crème
naturelle» typique, couleur noisette/marron.
Pour préparer un autre express o, enlever lentement et avec
prudence le porte- ltre en le déplaçant vers la gauche.
Faire attention à ne pas se brûler avec l'eau restée sur le
marc de café. Quelques gouttes d'eau continueront à couler
une fois le porte- ltre retiré. Cela est dû à la pression de
l'eau dans le système. Retirer le marc de café du ltre et
les résidus éventuels de la douchette (Fig. 16).
Remarque. Il est conseillé de laisser le po rte- ltre propre
monté sur la mac
jours une température optimale du groupe de distribution.
hine sans trop le serrer, pour garantir tou-
PRÉPARATION D'UN EXPRESSO AVEC DES
DOSETTES DE CAFÉ
Remarque. Pour utiliser des dosettes, n'employer que le
ltre 1 tasse traditionnel (Fig. 6).
Suivre les instructions pour la préparation d’un expresso
av ec d u c af é mo ul u en ut il isa nt la d os et te de c af é p ré mou lu
un ido se à la pl ace du caf é m ou lu. Int ro du ire la d os et te dan s
le porte- ltre (Fig. 1-17) en veillant à ce que le papier de
la dosette ne sorte pas du porte- ltre.
FRANÇAIS
Avant de commencer, il est important de déplacer légèreme nt l a la nce va peu r ve rs l'e xt éri eu r a n de p la cer le p ic het
directement sous la lance vapeur et de faciliter les mouvements nécessaires pour une émulsion correcte du lait.
Ensuite procéder de la façon suivante:
1. Préparer l'expresso dans une grande tasse à cappuccino comme expliqué à la section «Préparation d'un
expresso avec du café moulu».
2. Appuyer sur la touche vapeur (Fig. 1-3).
3. Après 15-20secondes et lor sque le voyant de tempé-
rature vapeur (Fig. 1-6) s'allume.
4. Tourner légèrement le bouton vapeur/eau chaude
dans le sens inverse des aiguilles d'une montre pour
éliminer la condensation de la lance et refermer le
bouton.
5. Placer le pichet à moitié rempli de lait froid sous la
lance vapeur.
6. Placer la buse de la lance juste en de ssous de la surface
du lait. Si elle est trop profonde, le lait ne monte pas,
si elle ne l’est pas assez, elle produit de grosses bulle s
qui disparaissent immédiatement.
Il est important de garder la buse près du bord du
pichet, et non au centre, avec un angle adapté pour
produire un tourbillon considérable (Fig.8-1).
7. Tou rn er le bou to n d u r obi ne t d e d is tri bu ti on de vap eu r
(Fig. 1-7) dans le sens inverse des aiguilles d'une
mo ntr e p our fa ire so rt ir l a va peu r. L or s de cet te pha se ,
l’absorption d’air est maximale, le lait doit monter
presque à froid.
PRÉPARATION D'UN CAPPUCCINO
Pour préparer un cappuccino traditionnel, il est conseillé
d’utiliser
- du lait f rais, entier, à basse température, de préférence
haute qualité. La densité du lait émulsionné dépend
de la teneur en matière grasse du lait.
- des pichets de lait en acier inoxydable, circulaires,
bombés, avec un rétrécissement sur le dessus et
une buse, nécessaire pour préparer des cappuccino
décorés.
La lance vapeur (Fig. 1-14) produira toute la vapeur
nécessaire pour émulsionner le lait sans le faire bouillir.
Après deux ou trois essais et quelques e orts, la préparation du cappuccino sera un jeu d’enfant.
• 33 •
Remarque. La pre ssi on de l a va peu r a ugm ent e en tou rna nt
le bouton.
Remarque. Une distribution de 60secondes maximum
est conseillée.
Une distribution continue de vapeur pendant plus de 60secondes risque de vider complètement la chaudière. Dans ce
cas, procéder de la façon indiquée à la section «Amorçage
du circuit».
Remarque. Pour une émulsion correcte du lait, la buse
vapeur (Fig. 1-23) doit toujours être en contact avec le lait et
non avec l'émulsion de lait (Fig.8-2). Par conséquent, au fur et
à mesure que la couche d’émulsion augmente, il faut soulever
légèrement le pichet en essayant de maintenir la buse en
contact avec le lait sans toucher le fond du pichet (Fig.8-A).
Page 39

FRANÇAIS
8. Ap rè s avo ir obt enu l’ém uls io n so uha ité e, i l f aut pou sser la lance vapeur plus à fond pour bien chau er le
lait.
Remarque. Il est conseillé de toujours laisser une main sur
la pa rtie bombée du pich et pou r senti r l'aug mentat ion de l a
température du côté du lait non émulsionné.
9. Après avoir obtenu le résultat souhaité, fermer le b outon vapeur en le tournant dans le sens des aiguilles
d'une montre pour arrêter la distribution de vapeur,
puis retirer le pichet.
Remarque. Après avoir fait monter le lait, pour compacter
’émulsion, il est conseillé de frapper légèrement le pichet
l
contre une surface et de laisser reposer pendant 30secondes
au moins. Le lait devient plus homogène.
Attention! Il est important de ne faire monter que la
quantité de lait nécessaire. Le lait chaud qui reste dans le
pichet ne doit pas être réutilisé a n de ne pas détériorer
la qualité de l’émulsion et surtout le goût du cappuccino.
Il doit donc être destiné à d’autres ns.
10. Appuyer sur la touche vapeur (Fig. 1-3).
Verser le lait émulsionné dans le café. Garnir avec de
la cannelle, du cacao ou de la noix muscade selon
son goût.
DISTRIBUTION D'EAU CHAUDE
1. Allumer la machine et attendre quelque s minutes que
le voyant de température correcte du café (Fig. 1-5)
s'allume.
2. Placer une tasse sous la lance professionnelle.
3. Tourner lentement le bouton vapeur (Fig. 1-7) dans
le sens inverse des aiguilles d'une montre et appuyer
simultanément sur la touche café (Fig. 1-1) et sur la
touche vapeur (Fig. 1-3) pour permettre la distribution
d’eau chaude.
4. Après avoir obtenu la quantité d’eau chaude souhaitée, arrêter la distribution en appuyant à nouveau
simultanément sur la touche café (Fig. 1-1) et sur la
touche vapeur (Fig. 1-3), puis tourner le bouton vapeur
dans le sens des aiguilles d'une montre.
Pour préparer immédiatement un autre café, abaisser la
température de la chaudière en distribuant de l'eau chaude
à travers le groupe de distribution du c afé (Fig. 1-8). Suivre
les instructions gurant à la section «Comment abaisser
la température de la chaudière». Dans le cas contraire, le
café risquerait d’avoir un goût de brûlé.
Remarque. Une distribution de 60secondes maximum
Attention! La lance vapeur pourrait atteindre une
onseillée.
est c
température élevée pendant et après son utilisation.
Pour éviter toute brûlure, ne la déplacer qu’en touchant
le sou et de protection en caoutchouc, monté sur la
lance vapeur.
Pour préparer immédiatement un autre café, abaisser la
température de la chaudière en distribuant de l'eau chaude
à travers le groupe de distribution du c afé (Fig. 1-8). Suivre
les instructions gurant à la section «Comment abaisser
la température». Dans le cas contraire, le café risquerait
d’avoir un goût de brûlé.
Attention! La lance vapeur pourrait atteindre une
température élevée pendant et après son utilisation.
Pour éviter toute brûlure, ne la déplacer qu’en touchant
le sou et de protection en caoutchouc, monté sur la
lance vapeur.
Attention! Il existe un risque de brûlures si le café
est distribué sans avoir abaissé la température en
distribuant de l’eau!
• 34 •
COMMENT ABAISSER LA TEMPÉRATURE
DE LA CHAUDIÈRE
1. Ne pas insérer le porte- ltre.
2. Placer une tasse vide sur la grille.
3. Appuyer sur la touche café (Fig. 1-1) et remplir la tasse
d'eau.
4. Appuyer à nouveau sur la touche café (Fig. 1-1).
La machine est à présente p rête pour distribuer un autre café.
FONCTION D'ARRÊT AUTOMATIQUE
La machine est équipée d'une fonction d'économie
d'énergie. Après 20 minutes d'inactivité, la machine
Page 40

s’éteint automatiquement. Pour la rallumer, appuyer sur
la touche d’allumage/arrêt.
NETTOYAGE ET ENTRETIEN
Un nettoyage et un entretien réguliers maintiennent la
machine dans des conditions optimales et garantissent
pendant longtemps un café au goût excellent, un débit
constant de café et une excellente mousse de lait.
Nettoyage de la lance vapeur
Après chaque émulsion de lait:
1. N et toy er l a la nce vap eu r av ec u n ch i o n hu mi de. Pou r
un nettoyage plus approfondi, dévisser la buse (Fig.
13) et la nettoyer à l'eau courante.
2. Ouvrir le bouton vapeur et laisser sortir la vapeur
pendant une seconde ou deux pour libérer le trou de
la buse (Fig. 1-23).
Nettoyage du porte- ltre et des ltres
Les ltres doivent toujours être propres a n de garantir
un résultat parfait.
Attention! Le ltre ne doit être remplacé que lorsque
la coupe porte- ltre est complètement refroidie pour
éviter toute brûlure.
Retirer quotidiennement le ltre du
porte- ltre de la façon décrite sur
la (Fig. 14) et le laver à l'eau tiède.
En cas de dysfonctionnement de
la distribution du café, plonger les
ltres dans l ’eau bouillante pendant
10minutes et puis les rincer à l’eau
courante.
FRANÇAIS
Nettoyage de la grille et du bac d’égouttement
Retirer le bac d’égouttement et la grille (Fig. 1-10,11), puis
les laver à l’eau. Ne pas utiliser d’abrasifs.
Nettoyage du réservoir à eau
Attention ! Pour éviter tout risque de brûlure, le nettoyage du rése rvoir doit ê tre e e ctué, lorsq ue la machine
est éteinte. Lors de l’utilisation, le tuyau de vidange (Fig.
11) peut atteindre des températures élevées.
Retirer le réservoir à eau (Fig. 1-13) et le laver à l’eau
courante.
Pour retirer le réservoir à eau, retirer d'abord le bac
d'égouttement (Fig. 1-11), puis ex traire le tuyau de vidange
(Fig. 11) en le tirant vers le bas.
Remarque. Au moment de remettre le réservoir en place,
s'assurer que les tuyaux en silicone sont à l'intérieur du
réservoir et qu'ils ne sont ni torsadés ni bloqués (Fig. 12).
Nettoyage de la douchette
Éliminer régulièrement les résidus de marc de café de
la douchette (Fig. 16) à l’aide d’une brosse et e ectuer
un nettoyage à l'eau chaude en suivant les instructions
gurant à la sec tion «Comment abaisser la température».
Nettoyage après une période d’inutilisation
Lorsque la machine n'est pas utilisée pendant une pério de
prolongée (plus de deux semaines), suivre les instructions
fournies à la sec tion «À la première utilisation ou ap rès une
période d’inutilisation de plus de 2 semaines».
Pour une meilleure propreté des
ltres, il est conseillé d ’acheter des past illes de nettoyage
GAGGIA spécialement conçues pour maintenir la machine
en parfait état de fonctionnement.
• 35 •
Page 41

FRANÇAIS
DÉTARTRAGE
La formation de calcaire est une
conséquence naturelle de l'utilisation de l'appareil. N’utiliser
que le produit détartrant GAGGIA,
spécialement conçu pour garantir le
rendement et le fonctionnement de
la machine pendant toute sa durée
de vie et pour éviter toute altération
du produit distribué s’il est utilisé
correctement. Ne jamais utiliser
de vinaigre ou d'autres produits
anticalcaire.
Le détartrage doit ê tre e ect ué tous les 2 mois d’utilisation
de la machine.
Attention! Ne pas boire la solution détartrante ni
les produits distribués jusqu'à ce que le cycle ne soit
complètement terminé.
1. Introd uire le porte - ltr e par le b as dans le grou pe de
di st rib uti on (Fi g. 1- 8) e t le tou rn er d e ga uch e à d ro ite
jusqu'à ce qu'il soit bloqué.
2. Retirer et vider le réservoir à eau (voir chapitre «Nettoyage du réservoir à eau»).
3. Verser la MOITIÉ du contenu de la bouteille de détartrant GAGGIA dans le réservoir à eau et le remplir
avec de l’eau fraîche potable jusqu'au niveau MAX.
4. Allumer la machine en appuyant sur la touche d ’allumage (Fig. 1-2).
Distribuer 2 tasses d'eau (environ 150ml chacune) à
travers la lance vapeur (voir chapitre «Préparation
d’e au c ha ude »), p uis éte in dre la m ac hin e en app uy ant
sur la touche d’allumage (Fig. 1-2).
5. L ais se r ag ir l e dé ta rt ran t pe nd ant 20m inu te s env ir on
avec la machine éteinte.
6. Allumer la machine en appuyant sur la touche d’allumage (Fig. 1-2).
Distribuer 2 tasses d'eau (environ 150ml chacune)
à travers la lance vapeur, puis éteindre la machine
en appuyant sur la touche d’allumage (Fig. 1-2) et la
laisser éteinte pendant 3minutes.
7. Répéter la distribution d’eau de la façon décrite au
point 6 jusqu’à ce que le réservoir à eau soit complè-
tement vide.
8. Rincer le réservoir et le remplir avec de l’eau fraîche
potable.
9. Placer un récipient sous la lance vapeur. Ouvrir lentement le bouton vapeur/eau chaude (Fig. 1-7) en
le tournant dans le sens inverse des aiguilles d'une
montre.
Appuyer sur la touche café (Fig. 1-1) et sur la touche
vapeur (Fig. 1-3).
10. Distribuer tout le contenu du ré servoir à eau à travers
la lance vapeur. Pour terminer la distribution, appuyer
à nouveau sur la touche café (Fig. 1-1) et sur la touche
vapeur (Fig. 1-3), puis fermer le bouton du robinet en
le tournant dans le sens des aiguilles d'une montre.
11. Remplir le réservoir avec de l’eau fraîche potable.
12. Placer un récipient approprié sous le porte- ltre.
13. Appuyer sur la touche café (Fig. 1-1) et distribuer
toute l'eau contenue dans le réservoir. Lorsque l’eau
est terminée, arrêter la distribution en appuyant à
nouveau sur la touche café (Fig. 1-1) et sur la touche
vapeur (Fig. 1-3). À la n, vider le récipient.
14. Enlever le porte- ltre du groupe en le tournant de
droite à gauche et le rincer avec de l'eau potable
fraîche.
15. Répéter encore une fois les opérations à partir du
point 8, et ce pour un total de 8 réservoirs. Ensuite,
la machine est prête à l'emploi.
16. Le cycle de détartrage est à présent terminé.
17. Remplir à nouveau le réservoir avec de l’eau fraîche.
Le cas échéant, réamorcer le circuit de la façon dé crite
au chapitre «Amorçage du circuit».
• 36 •
Page 42

EN CAS DE DYSFONCTIONNEMENT
Problème: Contrôler:
Qu’il y a de l’eau dans le réservoir.
Absence de distribution de café.
Que le ltre n’est pas bouché parce que le mélange est trop n ou le café trop pressé.
Que la douchette est propre.
FRANÇAIS
La distribution du café est trop
rapide (moins de 20secondes).
La pompe est trop bruyante.
Perte excessive d'eau au niveau
du porte- ltre.
L’expresso ne mousse pas.
Le café est trop froid.
Le lait n'est pas su samment
émulsionné.
La machine projette du café par le
porte- ltre.
Que le café n'a pas été moulu trop grossièrement.
Que le café a été pressé avec le presse-café.
Qu’il y a de l’eau dans le réservoir.
Que la pompe est en marche (voir amorçage du circuit).
Que la quantité de café est su sante.
Que le porte- ltre a été inséré correctement (Fig. 1-17).
Que le joint n'est pas sale (Fig. 16).
Qu’il n'y a pas de résidus de café sur le bord du porte- ltre.
Que le café n'a pas été moulu trop grossièrement.
Que le café a été pressé avec le presse-café.
Que le café n'est pas trop vieux ou trop sec.
Que le ltre traditionnel a été utilisé avec le brise-jet mousseur (Fig. 1-16).
Que la machine a été chau ée.
Que le café n'a pas été moulu trop grossièrement.
Que le café n’a pas été distribué dans des tasses froides. Il est conseillé de toujours
distribuer le café dans des tasses chaudes.
Que le porte- ltre a été préchau é (seulement pour le 1er café).
Que la buse vapeur n'est pas bouchée.
Que la buse vapeur n'est pas trop profonde dans le pichet.
Que le lait n'est pas trop chaud.
Que le brise-jet mousseur a été monté avec le ltre «crema perfetta».
Le châssis de la machine et
le tuyau de vidange sont très
chauds.
Que la touche vapeur soit éteinte.
• 37 •
Page 43

ESPAÑOL
LE FELICITAMOS POR SU ELECCIÓN!
Al comprar la nueva Gaggia Classic, ha e legido un modelo de máquina que le permitirá convertirse en un auténtico
barman hogareño, redescubriendo en cada pausa para el café los gestos tradicionales de los profesionales del café
exprés. El uso de Classic requiere poner atención a cada detalle, al igual que con una máquina de bar profesional:
la máquina debe estar bien caliente y el porta ltro debe estar siempre montado para mantener una temperatura
homogénea en todo el grupo de café, el molido del café debe ser no pero no demasiado, es necesario poner la
cantidad correcta de café molido en el ltro y prensarlo con la intensidad adecuada, ni mucho ni poco, para evitar
que el café salga demasiado rápido o demasiado lento, lo que di cultaría en gran medida el suministro.
La nueva Classic está equipada con un grupo porta ltro y un tubo de vapor que recuerdan los de las máquinas
profesionales.
ÍNDICE DE CONTENIDOS
DESCRIPCIÓN .......................................................................................................................39
COSAS QUE DEBE SABER ........................................................................................................39
INTRODUCCIÓN ....................................................................................................................40
FILTROS INCLUIDOS ..............................................................................................................40
Filtro “crema perfetta” para 1 o 2 tazas (Fig.5). ......................................................................................................40
Filtro tradicional 2 tazas (Fig.7). ............................................................................................................................40
Filtro tradicional 1 taza/pastilla de café monodosis (Fig.6). ...................................................................................40
PRIMERA INSTALACIÓN ......................................................................................................... 40
Carga del circuito. ..................................................................................................................................................40
Antes del primer uso o después de un período de inactividad de más de 2 semanas. ............................................40
PREPARACIÓN DE UN CAFÉ EXPRÉS CON CAFÉ MOLIDO ..............................................................41
Proceder a la preparación del café exprés: .............................................................................................................41
PREPARACIÓN DE UN CAFÉ EXPRÉS CON PASTILLAS DE CAFÉ .....................................................42
PREPARACIÓN DE UN CAPUCHINO ..........................................................................................42
SUMINISTRO DE AGUA CALIENTE ............................................................................................43
CÓMO BAJAR LA TEMPERATURA DE LA CALDERA .......................................................................43
FUNCIÓN DE AUTOAPAGADO...................................................................................................44
LIMPIEZA Y MANTENIMIENTO ................................................................................................44
Limpieza del tubo de vapor ..................................................................................................................................44
Limpieza del porta ltro y de los ltros .................................................................................................................44
Limpieza de la rejilla y de la bandeja de goteo .....................................................................................................44
Limpieza del depósito de agua ..............................................................................................................................44
Limpieza de la ducha ............................................................................................................................................44
Limpieza tras un período sin utilizar la máquina ...................................................................................................44
DESCALCIFICACIÓN ...............................................................................................................45
EN CASO DE MAL FUNCIONAMIENTO ........................................................................................46
• 38 •
Page 44

DESCRIPCIÓN
VISTA GENERAL DE LA MÁQUINA FIG.1
1 Botón de café
2 Botón de encendido/apagado
3 Botón de vapor
4 Piloto luminoso de encendido
5 Piloto luminoso de temperatura del café
6 Piloto luminoso de temperatura del vapor
7 Mando de vapor/agua caliente
8 Grupo de suministro del café
9 Tubo de desagüe
10 Rejilla
11 Bandeja de goteo
12 Tapa del depósito
13 Depósito de agua (extraíble)
14 Tubo de vapor/agua caliente con cierre de goma de
protección
15 Filtro “crema perfetta” 1 y 2 tazas
Destinado a ser usado solo con el rompe-chorro
espumador (Fig.1-16)
16 Rompe-chorro espumador
17 Porta ltro
18 Filtro tradicional 2 tazas
19 Filtro tradicional 1 taza/pastilla de café
20 Cuchara dosi cadora
21 Prensador
22 Cable y clavija de alimentación
23 Boquilla de vapor
ESPAÑOL
COSAS QUE DEBE SABER
1. El sabor del café exprés depende de la cantidad y del
tipo de café utilizado.
2. El sabor especí co de un grano de café depende de
varios factores, pero su s abor y aroma son el resultado
del proceso de tueste. Los granos de café tostados
durante un período más prolongado y a temperaturas
más altas tienen un color más oscuro. Los granos más
oscuros liberan más aroma que los granos claros.
Encontrará diferentes marcas de café en el mercado.
Cada tipo de tueste se caracteriza por una mezcla de
granos tostados a una temperatura especí ca y con
un tipo especí co de aroma.
Hay descafeinados que contienen solo un 2% de
cafeína. Pruebe con su máquina de café exprés uno de
los distintos tipos de café a la venta. Probablemente
descubrirá un aroma mejor que el de la mezcla utilizada hasta ahora.
3. Las máquinas de café exprés con bomba requieren
una mezcla namente molida. Asegúrese de comprar
la mezcla deseada con un grado de molido adecuado
pa ra s u u so c on m áq uin as d e c afé ex pré s. Es p re fer ib le
usar un molinillo de muelas en lugar de un molinillo
de cuchilla ya que este libera demasiado polvo de c afé
y produce una mezcla irregularmente molida.
4. Lo ideal sería moler el café justo antes de usarlo. No
olvide que su molido debe ser idóneo para máquinas
de café exprés con bomba.
5. Es aconsejable conservar el café molido o en grano
en latas herméticas en el frigorí co. El café molido
absorbe fácilmente los olores.
6. El verdadero café exprés se reconoce por su color
oscuro, su sabor intenso y su típica “crema natural”.
7. El capuchino es una combinación especial de café
exprés y leche caliente espumada. Se puede servir
con una pizca de canela, nuez moscada o cacao.
8. Sirva inmediatamente el café exprés después de
prepararlo.
9. Sirva el c afé exprés en tazas de café y el capuchino en
tazas para el desayuno.
• 39 •
Page 45

ESPAÑOL
INTRODUCCIÓN
Antes de usar la máquina por primera vez, lea cuidadosamente el folleto de seguridad entregado aparte y
consérvelo para futuras consultas.
FILTROS INCLUIDOS
Filtro “crema perfetta” para 1 o 2 tazas
(Fig.5).
Este ltro ya está montado en el porta ltro y permite
obtener un café exprés con crema incluso durante los
primeros usos de la máquina.
Nota. Este ltro solo debe usarse en combinación con el
rompe-chorro espumador. (Fig.1-16).
Filtro tradicional 2 tazas (Fig.7).
Filtro tradicional 1 taza/pastilla de café
monodosis (Fig.6).
Estos filtros son como los utilizados en las máquinas
profesionales de bar y requieren destreza y experiencia.
Nota. Estos ltros no deben ser usados junto con el
rompe-chorro espumador. (Fig.1-16).
Nuestro consejo es comenzar con el ltro “crema perfet ta”
y, una vez que haya adquirido destreza y experiencia,
pasar a los tradicionales para preparar café como un
verdadero barman
Carga del circuito.
¡Atención! No activar el botón de café sin haber
realizado antes la carga del circuito.
1. Colocar una taz a vacía debajo del grupo de café (Fig.1-
8) sin insertar el porta ltro y pulsar el botón de café
(Fig.1-1).
Se oirá el sonido de la bomba que se ha activado
y, después de unos segundos, el agua comenzará a
descender a través del grupo de café (Fig.1-8).
2. Después de dejar que la taza se llene (aproximadamente 150 cc), pulsar el botón de café nuevamente
(Fig.1-1).
Nota. Puede que el sistema de cebado automático de la
bomba no funcione temporalmente debido a una “burbuja
de aire”.
Si no bajase agua por el grupo de café (Fig.1-8), realizar
lo siguiente:
1. Colocar una taza debajo del tubo de vapor (Fig.1-14).
2. Girar el mando (Fig.1-7) en el sentido contrario a las
agujas del reloj para abrir la llave de suministro de
vapor/agua caliente
3. Pulsar el botón de café (Fig.1-1) para activar la bomba.
4. Después de unos se gundos, comenzará a salir agua a
través del tubo de vapor.
Dejar que salga aproximadamente una taza de agua.
5. Cerrar el mando de suministro de vap or/agua caliente
(Fig.1-7).
6. Pulsar de nuevo el botón de café (Fig.1-1).
PRIMERA INSTALACIÓN
1. Retirar la tapa del depósito de agua (Fig.2) y llenarlo
con agua fría hasta el nivel MAX del depósito (Fig.1-
13).
2. Insertar la clavija en la toma de corriente situada en
la parte trasera de la máquina (Fig.9) y conectar el
extremo opuesto del cable de alimentación a una
toma de corriente de pared de tensión adecuada.
Pulsar el botón de encendido/apagado (Fig.1-2), el
piloto luminoso de encendido se enciende (Fig.1-4).
• 40 •
Antes del primer uso o después de un período de inactividad de más de 2 semanas.
Nota. El agua suministrada durante este proceso debe ser
desechada y no debe ser consumida. Si durante el ciclo el
recipiente se llena, detener el suministro y vaciarlo antes de
seguir con la operación.
1. Enjuagar el depósito de agua (Fig.2) (consultar el
apartado “limpieza del depósito de agua”) y llenarlo
con agua potable fresca.
Page 46

2. Co loc ar un r ec ipi ent e d eba jo d el tub o de va por (Fi g.1-14).
3. Abrir lentamente el mando de vapor/agua caliente
(Fig.1-7) girándolo en el sentido contrario a las agujas
del reloj.
4. Pulsar el botón de café (Fig.1-1) y el botón de vapor
(Fig.1-3).
5. Suministrar to do el contenido del depósito de agua a
través del tubo de vapor.
6. Para terminar el suministro, pulsar de nuevo el botón
de café (Fig.1-1) y el botón de vapor (Fig.1-3).
7. Cerrar el mando de la llave (Fig.1-7) girándolo en el
sentido de las agujas del reloj.
8. Llenar el depósito con agua potable fresca (Fig.2).
9. Introducir el porta ltro (3) por abajo en el grupo de
suministro y girarlo de izquierda a derecha hast a que
quede bloqueado (Fig.4).
10. Colocar un rec ipiente adecuado debajo del porta ltro.
11. Pulsar el botón de café (Fig.1-1) y suministrar toda el
agua presente en el depósito.
12. Una vez terminada el agua, detener el suministro
pulsando otra vez el botón de café (Fig.1-1) y vaciar
el recipiente.
13. Retirar el por ta ltro del grupo girándolo de derecha
a izquierda y enjuagarlo con agua fresca potable.
14. La máquina está lista para ser utilizada.
PREPARACIÓN DE UN CAFÉ EXPRÉS CON
CAFÉ MOLIDO
El por ta lt ro s umi nis trad o ll eva d e fá bri ca e l ltr o “cr ema
perfetta” para la preparación de uno o dos cafés.
¡Atención! Si se utiliza el ltro “crema perfetta” sin el
rompe-chorro espumador, la máquina salpicará vistosamente el café, lo que supone un riesgo de quemaduras.
Nota. Si se pre ere usar el ltro tradicional (Fig.6/7), retirar
tanto el ltro “crema pe rfetta” (Fig.5) como el rompe-chorro
espumador (Fig.1-16).
Para suministrar el primer café, es necesario precalentar
ESPAÑOL
antes el porta ltro (Fig.1-17):
1. Insertar el porta ltro (Fig.1-17) en el grupo de suministro (Fig.1-8) con un movimiento de 45° hacia la
izquierda y girarlo hacia la derecha para bloquearlo.
El mango del porta ltro deberá encontrarse perpendicularmente a la máquina o ligeramente desplazado
hacia la derecha.
2. Colocar una taza grande debajo del porta ltro (Fig.1-
17) y pulsar el botón de café (Fig.1-1)
3. Una vez que la taza se haya llenado de agua (aproximadamente 150 cc), pulsar nuevamente el botón de
café y esperar unos minutos a que la máquina alc ance
la temperatura correcta con el porta ltro insertado.
Nota. Pueden quedar restos de agua dentro del porta ltro
que debe elim inar se an tes d e llen ar el ltro c on caf é mol ido.
Proceder a la preparación del café exprés:
4. Qu itar el por ta ltr o (Fig .1-17) y l lenar lo co n café molido utilizando la cuchara dosi cadora suministrada
junto con la máquina (Fig.1-20).
Considerar una cuchara dosi cadora por cada taza
de café.
Nota. Se sugiere comprar en una tienda donde se tueste café
o e n un a gr an s upe r cie un café con un mol ido no ade cua do
para ser usado con máquinas de café.
5. Prensar utilizando el correspondiente prensador
(Fig.1-21). El prensado debe realizarse de manera
uniforme para obtener una superficie nivelada y
plana.
6. Limpiar los posibles restos de café presentes en el
borde del porta ltro (Fig.1-17).
7. Insertar el porta ltro (Fig.1-17) en el grupo de suministro (Fig.1-8) con un movimiento de 45° hacia la
izquierda y girarlo hacia la derecha para bloquearlo.
El mango del porta ltro deberá encontrarse perpendicularmente a la máquina o ligeramente desplazado
hacia la derecha.
8. Esperar a que se encienda el piloto luminoso (Fig.1-5).
9. Pulsar el botón de café (Fig.1-1).
• 41 •
Page 47

ESPAÑOL
10. Cuando las tazas se hayan llenado hasta los 3/4 de su
ca paci dad, p uls ar de n uevo el bo tón d e caf é (Fi g.1-1).
El café será más o menos intenso dependiendo de la
cantidad de agua utilizada y si se prepara siguiendo
el procedimiento correcto tendrá la típica “crema
natural” color avellana/marrón.
Para preparar otro café exprés, quitar lentamente y con
cuidado el portafiltro moviéndolo hacia la izquierda.
Prestar atención a no quemarse con el agua que queda
en los posos de café. Después de quitar el porta ltro,
continuará goteando un poco de agua. Esto se debe a la
presión del agua en el sistema. Retirar los residuos del
ltro y los posib les residuos presentes en la ducha (Fig.16).
Nota. Su ger im os m ant ene r el po rt a lt ro lim pio mon ta do
en la máquina sin ap
siempre una temperatura óptima de todo el grupo de
suministro.
retarlo demasiado, para garantizar
PREPARACIÓN DE UN CAFÉ EXPRÉS CON
PASTILLAS DE CAFÉ
Nota. En caso de utilizar pastillas de café, usar únicamente
el ltro 1 taza tradicional (Fig.6).
Seguir las instrucciones para la preparación de un café
exprés con café molido pero utilizando, en lugar de
café molido, una pastilla de café premolido monodosis.
Introducir la pastilla de café en el porta ltro (Fig.1-17),
comprobando que el papel de la pastilla de café no salga
del porta ltro.
Con dos o tres pruebas y un poco de dedic ación, uno puede
convertirse en un exp erto en la preparación del capuchino.
Antes de comenzar, es importante desplaz ar ligeramente
hacia el exterior el tubo de vapor para poder introducir
la jarra directamente bajo el tubo de vapor y facilitar
los movimientos necesarios para el correcto espumado
de la leche.
Con todo ello, realizar lo siguiente:
1. Preparar el café exprés en una taza grande de
capuchino con arreglo a lo indicado en el apartado
“Preparación de un café exprés con café molido”.
2. Pulsar el botón de vapor (Fig.1-3).
3. Tras 15 -20 segu ndos, e l piloto lumi noso de temp era-
tura del vapor (Fig.1-6) se encenderá.
4. Girar ligeramente, en el sentido contrario a las agujas
del reloj, el mando de vapor/agua caliente para eliminar la condensación presente en el tubo y volver a
cerrar el mando.
5. Colocar la jarra llena con leche fría hasta la mitad
debajo del tubo de vapor.
6. Colocar la boquilla del tub o ligeramente por debajo de
la sup er ci e de la l ec he; si e st á de mas iad o s ume rgi da ,
la leche no se montará, y si está demasiado fuera, se
producirán grandes burbujas que se desvanecerán
rápidamente.
Es importante mantener la boquilla no en el centro,
sino cerca del borde de la jarra, con un ángulo adecuado para producir un remolino consistente (Fig.8-1).
7. Girar el mando de la llave de suministro de vapor
(Fig.1-7) en el sentido contrario a las agujas del reloj
para que salga el vapor, en esta fase hay una absorción
de aire máxima; la leche debe montarse casi en frío.
PREPARACIÓN DE UN CAPUCHINO
Para preparar un capuchino tradicional recomendamos:
- usar leche fresca, entera, a temperatura fría, preferiblemente de alta calidad. La densidad de la leche
espumada depende del contenido en grasas de la
leche;
- usar jarras de leche de acero inoxidable, de forma
circular, curvada, con un estrechamiento en la parte
superior y dotada de vertedor, necesario para hacer
capuchinos decorados.
El tub o de va por (Fi g.1-14) p ro duc ir á to do e l va po r ne ces ario para espumar la leche sin llevarla a ebullición.
• 42 •
Nota. La presión del vapor aumenta cuanto más se gire
el mando.
Nota. Se r eco mi end a u n su mi ni str o m áxi mo de 60 s eg und os .
Un suministro continuo de vapor durante más de 60 segundos
puede vaciar por completo la caldera. En ese caso, realizar lo
indicado en el apartado “Carga del circuito”.
Nota. Para un c orr ect o es pum ado de l a le che , la boq uil la d e
vapor (Fig.1-23) siempre debe estar en contacto con la leche
y no con el espumado de leche (Fig.8-2). Así pues, a medida
que la ca pa de espu mad o aum ente, es ne cesa rio i r sub iend o
ligeramente la jarra intentando mantener la boquilla en
Page 48

contacto con la leche, sin tocar el fondo de la jarra (Fig.8-A).
8. Una vez obtenido el espumado deseado, se debe
sumergir más a fondo el tubo de vapor para calentar
bien la leche.
Nota. Se sugiere mantener siempre una mano en la parte
ur vad a de la j ar ra pa ra s ent ir e l au men to d e la tem per atu ra
c
de la parte de la leche no espumada.
9. Una vez obtenido el resultado deseado, cerrar el
mando de vapor en el sentido de las agujas del reloj
para detener el suministro de vapor y retirar la jarra.
Nota. Tras terminar de montar la leche, para compactar el
espumado se aconseja golpear ligeramente la jarra sobre una
super cie y dejar reposar durante al menos 30 segundos. De
este modo, la leche se vuelve más homogénea.
¡Atención! Es importante montar solo la leche
necesaria. La leche caliente que quede en la jarra no
debe reutilizarse; dañaría la calidad del espumado y,
sobre todo, el sabor del capuchino. Así pues, es mejor
destinarla a otros usos.
ESPAÑOL
SUMINISTRO DE AGUA CALIENTE
1. Encender la máquina y esperar unos minutos hasta
que se encienda el piloto luminoso de temperatura
correcta del café (Fig.1-5).
2. Colocar una taza debajo del tubo profesional.
3. Girar lentamente el mando de vapor (Fig.1-7) en el
sentido contrario a las agujas del reloj y pulsar el botón
de café (Fig.1-1) y el botón de vapor (Fig.1-3) al mismo
tiempo para permitir el suministro de agua caliente.
4. Una vez obtenida la cantidad deseada de agua
caliente, detener el suministro pulsando de nuevo el
botón de café (Fig.1-1) y el botón de vapor (Fig.1-3)
simultáneamente y girar el mando de vapor en el
sentido de las agujas del reloj.
Para preparar otro café inmediatamente después, es necesario bajar la temperatura de la caldera suministrando
agu a cal ient e por el gr upo d e sum inis tro d e ca fé (Fi g.1-8).
Seguir las instrucciones indicadas en el apartado “Cómo
ba jar la t emp era tur a de la c ald era ”; de lo c ont rar io, el c afé
podría saber a quemado.
Nota. Se r eco mi end a u n su mi ni str o m áxi mo de 60 s eg und os .
10. Pulsar el botón de vapor (Fig.1-3).
Verter la leche espumada en el café. Adornar al gus to
con canela, cacao o nuez moscada.
Para preparar otro café inmediatamente después, es necesario bajar la temperatura de la caldera suministrando
agu a cal ient e por el gr upo d e sum inis tro d e caf é (Fi g.1-8).
Seguir las instrucciones indicadas en el apartado “Cómo
ba jar la te mpe rat ura ”; de lo c ont rar io, e l c afé pod ría sab er
a quemado.
¡Atención! El tubo de vapor, durante y después del
uso, podría tener una temperatura elevada. Para evitar
quemaduras, moverlo colocando los dedos únicamente
sobre el cierre de goma de protección montado en el
tubo de vapor.
¡Atención! ¡Si se suministra café sin haber bajado la
temperatura mediante el suministro de agua existe
riesgo de quemaduras!
• 43 •
¡Atención! El tubo de vapor, durante y después del
uso, podría tener una temperatura elevada. Para evitar
quemaduras, moverlo colocando los dedos únicamente
sobre el cierre de goma de protección montado en el
tubo de vapor.
CÓMO BAJAR LA TEMPERATURA DE LA
CALDERA
1. No insertar el porta ltro.
2. Colocar una taza vacía sobre la rejilla.
3. Pulsar el botón de café (Fig.1-1) y llenar la taza con
agua.
4. Pulsar de nuevo el botón de café (Fig.1-1).
La máquina ya está lista para suministrar otro café.
Page 49

ESPAÑOL
FUNCIÓN DE AUTOAPAGADO
La máquina está dotada de una función de ahorro de
energía. Tras 20 minutos de inactividad, la máquina se
apaga de manera automática. Para reactivarla, pulsar el
botón de encendido/apagado.
LIMPIEZA Y MANTENIMIENTO
Una limpieza y un mantenimiento regulares mantienen la
máquina en óptimas condiciones y garantizan un café con
un exquisito sabor durante un largo períod o de tiempo, un
ujo constante de café y una excelente crema de leche.
Limpieza del tubo de vapor
Tras cada espumado de leche:
1. Limpiar el tubo de vapor con un paño húmedo. Para
una limpieza más profunda, desenroscar la boquilla
(Fig.13) y lavarla con agua corriente.
2. Abrir el mando de vapor dejando salir vapor durante
uno o dos segundos para liberar el orificio de la
boquilla (Fig.1-23).
pastillas de limpieza GAGGIA, espec í camente estudiadas
para mantener la máquina en perfectas condiciones.
Limpieza de la rejilla y de la bandeja de
goteo
Extraer la bandeja de goteo y la rejilla (Fig.1-10, 11) y
lavarlas con agua. No usar abrasivos.
Limpieza del depósito de agua
Atencion! El depósito se debe limpiar solo cuando la
máquina está apgada para evitar quemaduras. Durante
el uso, el tubo de desa güe (Fig.11) podría alcanzar altas
temperat uras.
Extraer el depósito de agua (Fig.1-13) y lavarlo con agua
corriente.
Para extraer el depósi to de agua, retirar primero la bandeja
de goteo (Fig.1-11), y luego extraer el tubo de desagüe
(Fig.11) tirando de él hacia abajo.
Limpieza del porta ltro y de los ltros
Los ltros deben mantenerse limpios para garantizar un
resultado perfecto.
¡Atención! El filtro solo debe sustituirse cuando el
cuerpo porta ltro se haya enfriado por completo para
evitar quemaduras.
Quitar diariamente el ltro del porta ltro con arreglo a
lo descrito en la (Fig.14) y lavar con
agua tibia.
Si se nota un mal funcionamiento
durante el suministro de café, sumergir los ltros en agua hirviendo
durante 10 minutos y luego enjuagarlos con agua corriente.
Para una mejor limpieza de los
filtros, se aconseja comprar las
• 44 •
Nota. Al volver a colocar el depósito, asegurarse de que los
tubos de silicona están dentro del depósito y que no están
retorcidos ni plegados (Fig.12).
Limpieza de la ducha
Eliminar regularmente los restos de posos de café que
puedan haber quedado en la ducha (Fig.16) con un cepillo
y realizar una limpieza con agua caliente siguiendo las
instrucciones descritas en el apartado “Cómo bajar la
temperatura”.
Limpieza tras un período sin utilizar la
máquina
Cuando la máquina no se haya utilizado durante un período
prolongado (más de dos semanas), seguir las instrucciones
que guran en el apar tado “Antes del primer uso o después
de un período de inactividad de más de 2 semanas”.
Page 50

DESCALCIFICACIÓN
La formación de cal es una consecuencia natural del uso del aparato.
Usar exclusivamente el producto
descalci cante GAGGIA, formulado
especí camente para mantener al
máximo el rendimiento y la funcionalidad de la máquina durante
toda su vida operativa, así como
para evitar, siempre que se utilice
correctamente, cualquier alteración
de los productos suministrados. No
utilizar en ningún caso vinagre u
otros productos antical.
La descalci cación debe efectuarse cada 2 meses de uso
de la máquina.
¡Atención! No beber la solución descalcificante ni
los productos suministrados hasta que el ciclo se haya
completado.
1. Introducir el porta ltro por abajo en el grupo de
suministro (Fig.1-8) y girarlo de izquierda a derecha
hasta que quede bloqueado.
2. Retirar y vaciar el depósito de agua (consultar el
capítulo “Limpieza del depósito de agua”).
3. Verter la MITAD del contenido de la botella de descalci cante GAGGIA en el depósito de agua y rellenarlo
con agua potable fresca hasta el nivel MAX.
4. E nce nde r la máq ui na p uls an do e l bo tó n de enc end id o
(Fig.1-2).
Suministrar 2 tazas de agua (aproximadamente 150
ml cada una) a través del tubo de vapor (consultar el
capítulo “preparación de agua caliente”) y apagar la
máquina pulsando el botón de encendido (Fig.1-2).
5. Dejar que el descalci cante actúe durante unos 20
minutos con la máquina apagada.
6. En cen de r la máq uin a p uls and o e l bo tón de e nc end ido
(Fig.1-2).
Suministrar 2 tazas de agua (aproximadamente 150
ml cada una) a través del tubo de vapor, apagar la
máquina pulsando el botón de encendido (Fig.1-2) y
dejarla apagada durante 3 minutos.
ESPAÑOL
7. Repetir el suministro de agua según lo descrito en
el punto 6 hasta que el depósito de agua quede
completamente vacío.
8. Enjuagar el depósito y llenarlo con agua potable
fresca.
9. Colocar un recipiente debajo del tubo de vapor. Abrir
le nta me nte el m and o d e va por /agu a c ali ent e (F ig .1-7)
girándolo en el sentido contrario a las agujas del reloj.
Pulsar el botón de café (Fig.1-1) y el botón de vapor
(Fig.1-3).
10. Suministrar todo el contenido del depósito de agua a
través del tubo de vapor. Para nalizar el suministro
volver a pulsar el botón de café (Fig.1-1) y el botón
de vapor (Fig.1-3) y luego cerrar el mando de la llave
girándolo en el sentido de las agujas del reloj.
11. Llenar el depósito con agua potable fresca.
12. Colocar un recipiente adecuado debajo del porta ltro.
13. Pulsar el botón de café (Fig.1-1) y suministrar toda
el agua presente en el depósito. Una vez terminada
el agua, detener el suministro pulsando de nuevo el
botón de café (Fig.1-1) y el botón de vapor (Fig.1-3).
Al nalizar, vaciar el recipiente.
14. Retirar el porta ltro del grupo girándolo de derecha
a izquierda y enjuagarlo con agua fresca potable.
15. Repetir una vez más las operaciones desde el punto
8 hasta un total de 8 depósitos. Después, la
máquina está lista para su uso.
16. El ciclo de descalci cación ha concluido.
17. Volver a llenar el depósito con agua fresca. Si fuera
necesario, efectuar la carga del circuito tal como se
describe en el capítulo “Carga del circuito”.
• 45 •
Page 51

ESPAÑOL
EN CASO DE MAL FUNCIONAMIENTO
Problema: Comprobar:
Que hay agua en el depósito.
La máquina no suministra café.
Que el ltro no está obstruido debido a que la mezcla es demasiado na o a que se
ha prensado demasiado el café.
Que la ducha está limpia.
El suministro del café es
demasiado rápido (menos de 20
segundos).
La bomba hace demasiado ruido.
Pérdida excesiva de agua por el
porta ltro.
El café exprés tiene poca “crema”.
El café está demasiado frío.
La leche no se espuma lo
su ciente.
La máquina salpica café por el
porta ltro.
Que no se haya molido demasiado grueso el café.
Que el café se ha prensado con el prensador.
Que hay agua en el depósito.
Que la bomba está activada (ver carga del circuito).
Que la cantidad de café es su ciente.
Que el porta ltro se ha insertado correctamente (Fig.1-17).
Que la junta no está sucia (Fig.16).
Que no hay restos de café en el borde del porta ltro.
Que no se haya molido demasiado grueso el café.
Que el café se ha prensado con el prensador.
Que el café no es demasiado viejo ni está demasiado seco.
Que se ha utilizado el ltro tradicional con el rompe-chorro espumador (Fig.1-16).
Que la máquina se ha calentado.
Que no se haya molido demasiado grueso el café.
Si e l ca fé se ha su min istr ado e n ta zas f rías . Se acon seja sumi nis trar el ca fé s iemp re e n
tazas calientes.
Si no se ha efectuado el precalentamiento del porta ltro (solo para el primer café).
Que la boquilla de vapor no está obstruida.
Que no se haya sumergido demasiado la boquilla de vapor en la jarra.
Que la leche no esté demasiado caliente.
Que se ha montado el rompe-chorro espumador con el ltro “crema perfetta”.
La carcasa de la máquina y el tubo
de desagüe están muy calientes.
Que el botón de vapor esté apagado.
• 46 •
Page 52

NEDERLANDS
GEFELICITEERD MET UW KEUZE!
Met de aanschaf van de nie uwe Gaggia Classic heeft u een machi ne gekozen waarmee u een echte thuisbarista kunt
worden en tijdens elke ko epauze vakkundig een espresso kunt maken zoals professionals dat al jarenlang doen.
Het gebruik van de Classic vereist, ne t als bij een professionele machine, aa ndacht voor elk detail: de machine moet
goed warm zijn en de lterhouder moet er altijd in zitten om een gelijkmatige temperatuur in de gehele zetgroep
te behouden, de ko emaling mo et jn zijn, maar niet té jn, de juiste hoeveelheid gem alen ko e moet in het lter
worden gedaan en deze moet niet te zacht worden aangedrukt om te voorkomen dat de ko e er te snel uitkomt,
maar ook niet te hard omdat er anders problemen ontstaan met de afgifte.
De nieuwe Classic is uitgerust met een lterhoudergroep en een stoompijpje dat op dezelfde manier werkt als bij
professionele machines.
INHOUDSOPGAVE
BESCHRIJVING .....................................................................................................................48
WAT U MOET WETEN .............................................................................................................. 48
INLEIDING ...........................................................................................................................49
BIJGELEVERDE FILTERS .........................................................................................................49
"Crema Perfetta"- lter 1- of 2-kops ( g. 5). ..........................................................................................................49
Gewoon lter 2-kops ( g. 7)..................................................................................................................................49
Gewoon lter 1-kops/1 enkele ko epad ( g. 6). ..................................................................................................49
EERSTE INSTALLATIE ............................................................................................................. 49
Het vullen van het circuit. ......................................................................................................................................49
Bij eerste gebruik of als de machine meer dan 2 weken niet is gebruikt. ...............................................................49
HET ZETTEN VAN ESPRESSO MET GEMALEN KOFFIE ...................................................................50
Ga als volgt verder met de bereiding van de espresso: ..........................................................................................50
HET ZETTEN VAN ESPRESSO MET KOFFIEPADS .........................................................................51
HET ZETTEN VAN EEN CAPPUCCINO ......................................................................................... 51
AFGIFTE VAN HEET WATER .....................................................................................................52
HET VERLAGEN VAN DE BOILERTEMPERATUUR ........................................................................ 52
AUTOMATISCHE UITSCHAKELINGS-FUNCTIE ............................................................................. 52
REINIGING EN ONDERHOUD ................................................................................................... 53
Reiniging van het stoompijpje ..............................................................................................................................53
Reiniging van de lterhouder en de lters ...........................................................................................................53
Reiniging van het rooster en de lekbak .................................................................................................................53
Reiniging van het waterreservoir ..........................................................................................................................53
Reiniging van de douchezeef ................................................................................................................................53
Reiniging na een periode van inactiviteit ..............................................................................................................53
ONTKALKING ....................................................................................................................... 53
IN GEVAL VAN STORING ......................................................................................................... 55
• 47 •
Page 53

NEDERLANDS
BESCHRIJVING
OVERZICHT VAN DE MACHINE FIG.1
1 Ko eschakelaar
2 Aan-/uitschakelaar
3 Stoomschakelaar
4 Controlelampje voor inschakeling
5 Controlelampje voor de ko etemperatuur
6 Controlelampje voor de stoomtemperatuur
7 Draaiknop voor stoom/heet water
8 Ko eafgiftegroep
9 Afvoerleiding
10 Rooster
11 Lekbak
12 Deksel waterreservoir
13 Waterreservoir (uitneembaar)
14 Pijpje voor stoom/heet water met beschermrubber
15 "Crema Perfetta"- lter 1- en 2-kops
Alleen te gebruiken met de straalbreker ( g.1-16)
16 Straalbreker
17 Filterhouder
18 Gewoon lter 2-kops
19 Gewoon lter 1-kops/ko epads
20 Maatlepel
21 Stamper
22 Netsnoer en stekker
23 Spuitmond voor stoom
WAT U MOET WETEN
1. De smaak van espresso is af hankelijk van de hoeveelheid en het type ko e dat wordt gebruikt.
2. De speci eke smaak van een ko eboon is afhankelijk
van verschillende factoren, maar de smaak en het
aroma zijn het resultaat van het brandproces. D e kof ebonen die langere tijd en bij hogere temperaturen
zijn gebrand hebben een donkerdere kleur. Donkerdere bonen geven meer aroma af dan lichtere bonen. Er
zijn verschillende soorten ko e op de markt. Iedere
soort ko e wordt gekenmerkt door een combinatie
van bonen die op een bepaalde temperatuur en met
een bepaald soort aroma zijn gebrand.
Er bestaat decafé die slechts 2% cafeïne bevat.
Probeer met uw espressomachine de verschillende
ko esoorten die er te koop zijn uit. U ontdekt waarschijnlijk een beter aroma dan wat u gewend bent
van de ko e die u tot nu toe gebruikte.
3. Espressomachines met pomp werken met jngemalen ko e. Zorg ervoor dat de ko e die u koopt een
maalgraad heeft die geschikt is voor het gebruik in
espressomachines. Het verdient de voorkeur om een
ko emolen met schijven in plaats van met mesjes te
gebruiken, omdat er met deze laatste te veel ko epoeder vrijkomt en de ko e onregelmatig gemalen
wordt.
4. Het is het beste om de ko e vlak voor gebruik te
malen. Denk eraan dat deze moet worden gemalen
voor een espressomachine met pomp.
5. U kunt gemalen ko e of bonen het beste in een
hermetisch afgesloten pot in de koelkast bewaren.
Gemalen ko e neemt gemakkelijk geuren op.
6. Echte espresso is te herkennen aan de donkere kleur,
de rijke smaak en de karakteristieke "natuurlijke
crèmelaag“.
7. Cappuccino is een speciale combinatie van espresso
en warme, opgeschuimde melk. Deze kan worden
geserveerd met een beetje kaneel, nootmuskaat of
cacao.
8. Serveer espresso onmiddellijk na de bereiding.
9. Serveer espresso in kleine ko ekopjes en cappuccino
in grote koppen.
• 48 •
Page 54

INLEIDING
Lees het apart geleverde veiligheidsboekje zorgvuldig
door voordat u de machine voor de eerste keer gebruikt,
en bewaar dit voor toekomstig gebruik.
BIJGELEVERDE FILTERS
"Crema Perfetta"- lter 1- of 2-kops ( g. 5).
Dit lter is al op de lterhouder gemonteerd en zorgt
ervoor dat u vanaf het eer ste gebruik van de machine een
crèmige espresso krijgt.
Let op. Dit filter mag alleen worden gebruikt in
combinatie met de straalbreker ( g. 1-16).
NEDERLANDS
Het vullen van het circuit.
Let op! Druk de ko eschakelaar niet in zonder eerst
het circuit te vullen.
1. Plaats een leeg kopje onder de zetgroep ( g. 1 - 8)
zonder de lterhouder erin te stoppen en druk op de
ko eschakelaar ( g. 1-1).
U hoort het geluid van de geactiveerde pomp en na
enkele seconden begint het water uit de zetgroep te
druppelen ( g. 1-8).
2. Als het kopje vol is (ongeveer 150cc), druk t u opnieuw
op de ko eschakelaar ( g. 1-1).
Let op. Het kan gebeuren dat de ontsteking van de pomp
tijdelijk niet werkt vanwege een "luchtbel".
Gewoon lter 2-kops ( g. 7).
Gewoon lter 1-kops/1 enkele ko epad
( g. 6).
Deze lters zijn vergelijkbaar met die van professionele
espressomachines en vereisen behendigheid en ervaring.
Let op. Deze lters mogen niet worden gebruikt met
de straalbreker ( g. 1-16).
Wij adviseren u om te beginnen met het "Crema Perfetta"- lter en als u daar handigheid in heeft gekregen,
stap dan over op de gewone filters voor een echte
barista-espresso.
EERSTE INSTALLATIE
1. Haal het deksel van het waterreservoir ( g. 2) en vul
dit met koud water tot de MAX-lijn van het reservoir
( g. 1-13).
2. Steek de stekker aan het ene uiteinde van de voedingskabel in de aansluiting aan de achterkant van
de machine ( g. 9) en het andere uiteinde in een
stopcontact met voldoende spanning.
Druk op de aan-/uitschakelaar ( g. 1-2), het controlelampje licht op ( g. 1-4).
Als er geen water uit de zetgroep komt ( g. 1-8), ga dan
als volgt te werk:
1. Plaats een kopje onder het stoompijpje ( g. 1-14).
2. Draai de knop ( g. 1-7) tegen d e klok in om de kraan
voor stoom/heet water te openen.
3. Druk op de ko eschakelaar ( g. 1-1) om de pomp te
activeren.
4. Na een paar seconden be gint er water uit het stoompijpje te stromen.
Laat er ongeveer een kopje water uitstromen.
5. D raai de k nop v oor sto om/h eet wat er ( g. 1-7) di cht .
6. Druk opnieuw op de ko eschakelaar ( g. 1-1).
Bij eerste gebruik of als de machine meer
dan 2 weken niet is gebruikt.
Let op. Het water dat er tijdens dit proces uitkomt, moet
worden weggegooid en mag niet worden gebruikt voor
consumptie. Als het bakje vol raakt tijdens de cyclus, moet
de afgifte worden gestopt en het bakje worden geleegd
alvorens verder te gaan.
1. Spoel het waterre servoir ( g. 2) (zie paragraaf “reiniging waterreservoir “) en vul dit met vers drinkwater.
2. Plaats een bakje onder het stoompijpje ( g. 1-14).
3. Draai de knop voor stoom/heet water (fig. 1-7)
langzaam open tegen de klok in.
• 49 •
Page 55

NEDERLANDS
4. Druk op de ko eschakelaar ( g. 1-1) en de stoomschakelaar ( g. 1-3).
5. Laat de gehele inhoud van het waterr eservoir uit het
stoompijpje stromen.
6. Om de afgifte te stoppen drukt u nogmaals op de
ko esc ha kel aar ( g. 1-1) en de s to om sch ake laa r ( g.
1-3).
7. Draai de knop van de kraan ( g. 1-7) langzaam met
de klok mee open.
8. Vul het reservoir met vers drinkwater ( g. 2).
9. Plaats de lterhouder van onderaf in de zetgroep
( g. 3) en draai deze van links naar rechts totdat hij
geblokkeerd is ( g. 4).
10. Plaats een passend kopje onder de lterhouder.
11. Druk op de koffieschakelaar (fig. 1-1) en laat het
resterende water uit het reservoir lopen.
12. Als he t water op is, moet u de afgifte te stoppen door
opnieuw op de ko eschakelaar ( g. 1-1) te drukken
en vervolgens het bakje te legen.
13. Haal de lterhouder uit de zetgroep door deze van
rechts naar links te draaien en spoel deze om met
vers drinkwater.
14. De machine is nu klaar voor gebruik.
rechts te draaien om hem te vergrendelen. De handgreep van de lterhouder moe t loodrecht of enigszins
naar rechts ten opzichte van de machine staan.
2. Plaats een grote kop onder de lterhouder ( g. 1-17)
en druk op de ko eschakelaar ( g. 1-1).
3. Nadat de kop is gevuld met water (ongeveer 150cc),
drukt u opnieuw op de ko eschakelaar en wacht u
enkele minuten totdat de machine de juiste temperatuur heeft bereikt met de lterhouder erin.
Let op. In de lterhouder kan een restant water achterblijven. Dit moet worden verwijderd alvorens het lter met
gemalen ko e te vullen.
Ga als volgt verder met de bereiding van
de espresso:
4. Haal de lterhouder eruit ( g. 1-17) en vul deze met
gemalen ko e met behulp van bijgeleverde maatlepel ( g. 1-20).
Reken één maatlepel voor ieder kopje.
Let op. We raden u aan om bij de ko ewinkel of de groot-
handel ko e met een jne maling te nemen die geschikt is
voor espressomachines.
HET ZETTEN VAN ESPRESSO MET GEMALEN
KOFFIE
De meegeleverde lterhouder is uitgerus t met het "Crema
Perfetta"- lter voor de bereiding van een of twee kopjes
ko e.
Let op! Als het "Crema Perfet ta"- lter wordt gebruikt
zonder de straalbreker, spat er ko e uit de machine
waardoor u brandwonden kunt oplopen.
Let op. Als u liever het gewone lter gebruikt ( g. 6/7),
moet u zowel het "Crema Perfetta"- lter ( g. 5) als de
straalbreker ( g. 1-16) verwijderen.
Alvorens het eerste kopje ko e te zetten, moet u eerst de
lterhouder voorverwarmen ( g. 1-17):
1. Plaats de lterhouder ( g. 1-17) in de zetgroep ( g.
1-8) door deze 45° naar links te bewegen en naar
• 50 •
5. Druk de ko e aan met de speciale stamper ( g. 1-21).
Het stampen moet gelijkmatig gebeuren om een goed
geëgaliseerd en vlak oppervlak te verkrijgen.
6. Verwijder eventuele ko eresten van de rand van de
lterhouder ( g. 1-17).
7. Plaats de lterhouder ( g. 1-17) in de zetgroep ( g.
1-8) door deze 45° naar links te bewegen en naar
rechts te draaien om hem te vergrendelen. De handgreep van de lterhouder moe t loodrecht of enigszins
naar rechts ten opzichte van de machine staan.
8. Wacht tot het controlelampje gaat branden ( g. 1-5).
9. Druk op de ko eschakelaar ( g. 1-1).
10. Als de kopjes voor 3/4 vol zijn, drukt u opnieuw op de
ko eschakelaar ( g. 1-1).
Afhankelijk van de hoeveelheid water die wordt
gebruikt, zal de ko e sterker of minder sterk zijn
en - mits bereid volgens de juiste procedure - de
kenmerkende "natuurlijke crèmelaag" hebben.
Page 56

Om nog een espresso te zetten moet de filterhouder
langzaam en voorzichtig worden verwijderd door hem
naar links te bewegen. Pas op voor brandwonden door
het hete water dat op het ko eresidu is blijven staan.
Er blijft altijd nog een beetje water druppelen nadat de
lterhouder is verwijderd. Dit komt door de druk van het
water in het systeem. Maak het lter schoon en verwijder
eventuele resten uit de douchezeef ( g. 16).
Let op. We raden u aan om de gereinigde lterhouder
n de machine te plaatsen zonder deze te hard aan te
i
draaien, om altijd een optimale temperatuur van de gehele
zetgroep te garanderen.
HET ZETTEN VAN ESPRESSO MET
KOFFIEPADS
Let op. Voor het gebruik van ko epads mag uitsluitend het
gewone 1-kops lter ( g. 6) worden gebruikt.
Volg de instructies voor het maken van een espresso met
gemalen ko e, waarbij u in plaats van gemalen ko e
een ko epad gebruikt met een enkele dosis voorgemalen
ko e. Plaats de ko epad in de lterhouder ( g. 1-17).
Controleer of het papier van de koffiepad niet uit de
lterhouder steekt.
NEDERLANDS
Ga hierna als volgt te werk:
1. Zet de espresso in een grote cappuccinokop zoals
aangegeven in de paragraaf "Het zetten van espress o
met gemalen ko e".
2. Druk op de stoomschakelaar ( g. 1-3).
3. Na 15-20 seconden en als het controlelampje voor de
stoomtemperatuur ( g. 1- 6) oplicht.
4. Draai de knop voor stoom/heet water iets tegen de
klok in om condens uit het pijpje te verwijderen en
draai de knop weer dicht.
5. Plaats de kan tot de helft gevuld met koude melk
onder het stoompijpje.
6. Plaats de spuitmond van het pijpje net onder het
mel koppe rvla k. Als hij te diep i n de me lk zit , schu imt
de m elk n iet op, al s hij niet diep geno eg z it, o nts taan
er grote bellen die meteen weer neerslaan.
He t is be lan gri jk om d e sp ui tmo nd n ie t in het mi dde n,
maar dicht bij de rand van de kan te houden, in een
hoek waarmee een regelmatige draaistroom wordt
verkregen ( g. 8-1).
7. Draai de stoomtoevoerknop ( g. 1-7) tegen de klok
in om de stoom te laten ontsnappen. In deze fase is
er maximale luchtopname; de melk moet bijna koud
opschuimen.
HET ZETTEN VAN EEN CAPPUCCINO
Voor het zetten van een traditionele cappuccino raden
we u aan
- o m ko ud e, v ers e, v ol le m elk te g eb rui ken , bi j vo or keu r
van goede kwaliteit. De dikte van de opgeschuimde
melk hangt af van het vetgehalte van de melk.
- om e en bolronde, roestvrijstalen melkkan te gebruiken, met afgeronde rand en versmalde bovenkant,
voorzien van een tuit om cappucc ino's mee te kunnen
garneren.
Het stoompijpje (fig. 1-14) produceert alle stoom die
nodig is om de melk op te schuimen zonder deze aan de
kook te brengen.
Met twee of drie tests en wat moeite wordt u een expert
in het maken van cappuccino.
Voordat u begint is het belangrijk om het stoompijpje
iets naar buiten te draaien om de kan direct onder het
stoompijpje te kunnen zetten om zodoende de melk
gemakkelijker op te kunnen schuimen.
• 51 •
Let op. De stoomdruk neemt toe met het draaien van de
knop.
Let op. Aanbevolen wordt om de stoomafgifte niet langer
dan 60 seconden te laten duren.
Bij een continue stoomafgifte van meer dan 60 seconden
raakt de boiler volledig leeg. Ga in dit geval te werk zoals
aangegeven in de paragraaf "Het vullen van het circuit".
Let op. Voor het juiste melkschuim moet de spuitmond ( g.
1-23) altijd in contact zijn met de melk en niet met het schuim
( g. 8-2). D aa rom moe t, n aar ma te de sch uim la ag to en eem t,
de kan enigszins omhoog worden bewogen om de spuitmond
in contact te houden met de melk, zonder de bodem van de
kan te raken ( g. 8-A).
8. Zodra de gewenste schuimdikte is verkregen, moet
het stoompijpje verder naar beneden worden gedu wd
om de melk goed te verwarmen.
Page 57

NEDERLANDS
Let op. Aanbevolen wordt om altijd een hand op het bolle
deel van de kan te houden om de temperatuurstijging van
het niet opgeschuimde deel van de melk te voelen.
9. Zodra het gewenste result aat is verkregen, draait u de
stoomknop met de klok mee dicht om de s toomafgifte
te stoppen en haalt u de kan eronder vandaan.
Let op. Nadat de melk is opgeschuimd, wordt het schuim
ompacter door met de onderkant van de kan kort tegen een
c
plat oppervlak te tikken en de kan daarna tenminste 30 se-
con den t e late n sta an. D e mel k wor dt da ardo or ho mog ener.
Let op! Het is belangrijk om alleen de melk die u nodig
heeft op te schuimen. De warme melk die achterblijft
in de pot kan niet opnieuw worden gebruikt; het zou
de kwaliteit van het schuim en vooral de smaak van de
cappuccino nadelig beïnvloeden.. Het moet daarom voor
andere doeleinden worden gebruikt.
2. Plaats een kopje onder het professionele stoompijpje.
3. Draai de stoomknop ( g. 1-7) langzaam tegen de klok
in en druk de ko eschakelaar ( g. 1-1) tegelijk met
de stoomschakelaar ( g. 1-3) in voor de afgifte van
heet water.
4. Zodra de gewens te hoeveelheid heet water is verkregen, stopt u de afgifte door nogmaals tegelijker tijd op
de ko eschakelaar ( g. 1-1) en de stoomschakelaar
( g. 1-3) te drukken en de stoomknop met de klok
mee te draaien.
Als u direct daarna nog een ko e wilt zetten, moet u de
temperatuur van de boiler verlagen door heet water uit
de zetgroep te laten stromen ( g. 1-8). Volg de instruc ties
uit de paragraaf "Het verlagen van de boilertemp eratuur",
anders kan de ko e een aangebrande smaak krijgen.
Let op. Aanbevolen wordt om de stoomafgifte niet langer
n 60 seconden te laten duren.
da
10. Druk op de stoomschakelaar ( g. 1-3).
Giet de opgeschuimde me lk i n de ko e. Garneer naar
wens met kaneel, cacao of nootmuskaat.
Als u direct daarna nog een ko e wilt zetten, moet u de
temperatuur van de boiler verlagen door heet water uit de
zetgroep te laten stromen ( g. 1-8). Volg de instruc ties uit
de paragraaf "Het verlagen van de temperatuur", anders
kan de ko e een aangebrande smaak krijgen.
Let op! Het stoompijpje kan tijdens en na gebruik
heet worden. Om brandwonden te voorkomen, moet
u ervoor zorgen dat u bij het verdraaien van het
pijpje alleen het beschermrubber op het stoompijpje
aanraakt.
Let op! Als de ko e wordt gezet zonder dat de temperatuur is verlaagd door de afgifte van water, is er risico
op verbrandingsgevaar!
AFGIFTE VAN HEET WATER
1. Zet de machine aan en wacht een paar minuten tot het
controlelampje voor de ko etemperatuur ( g. 1-5)
gaat branden.
• 52 •
Let op! Het stoompijpje kan tijdens en na gebruik heet
worden. Om brandwonden te voorkomen, moet u ervoor
zorgen dat u bij het verdraaien van het pijpje alleen het
beschermrubber op het stoompijpje aanraakt.
HET VERLAGEN VAN DE BOILERTEMPERATUUR
1. Stop de lterhouder er niet in.
2. Plaats een leeg kopje op het rooster.
3. Druk op de ko eschakelaar ( g. 1-1) en vul het kopje
met water.
4. Druk opnieuw op de ko eschakelaar ( g. 1-1).
De machine is nu klaar om ko e te zetten.
AUTOMATISCHE UITSCHAKELINGSFUNCTIE
De machine is uitgerust met een energiebesparende
functie. Na 20 minuten van inac tiviteit wordt de machine
automatisch uitgeschakeld. Om hem opnieuw te ac tiveren,
drukt u op de aan-/uitschakelaar.
Page 58

REINIGING EN ONDERHOUD
Door de machine regelmatig te reinigen en te onderhouden blijft deze in optimale staat en bent u langdurig
verzekerd van een uitstekend aroma, een continue
ko evoorziening en perfect melkschuim.
NEDERLANDS
Reiniging van het waterreservoir
Let op! De reiniging van het reservoir mag enkel
plaatsvinden wanneer de machine uitgeschakeld is,
om brandwonden te vermijden. Tijdens het gebruik kan
de afvoerleiding (Fig.11) hoge temperaturen bereiken.
Reiniging van het stoompijpje
Iedere keer na het opschuimen van de melk:
1. Het stoompijpje reinigen met een vo chtige doek. Voor
een grondigere reiniging kunt u de spuitmond losschroeven ( g. 13) en schoonspoelen met stromend
water.
2. Open de stoomknop, zodat de stoom gedurende één
of twee seconden kan ontsnappen om de opening
van de spuitmond vrij te maken ( g. 1-23).
Reiniging van de lterhouder en de lters
De filters moeten schoon gehouden worden om een
perfect resultaat te garanderen.
Let op! Het lter mag alleen worden vervangen als de
lterhouderkop volledig is afgekoeld om brandwonden
te voorkomen.
Haal het lter dagelijks uit de lterhouder zoals beschreven in ( g. 14) en spoel het met lauw water schoon.
Als u een storing in de ko eafgifte
opmerkt, dompelt u de lters gedurende 10 minuten onder in kokend
water en spoelt u ze vervolgens af
met stromend water.
Voor een betere reiniging van de
filters adviseren wij de aankoop
van GAGGIA-reinigingstabletten,
die speciaal zijn vervaardigd om uw
machine in perfecte staat te houden.
Reiniging van het rooster en de lekbak
Verwijder de lekbak en het rooster ( g. 1-10, 11) en spoel
deze met water schoon. Gebruik geen schuurmiddelen.
• 53 •
Haal het waterreservoir eruit ( g. 1-13) en was het onder
stromend water schoon..
Om het waterreservoir eruit te halen, verwijdert u eerst
de lekbak ( g. 1-11) en daarna de afvoerleiding ( g. 11)
door deze naar beneden te trekken.
Let op. Zorg ervoor dat de siliconenslangetjes zich bij het
terugplaatsen van het reservoir in het reservoir bevinden en
dat ze niet vervormd of geblokkeerd zijn ( g. 12).
Reiniging van de douchezeef
Verwijder regelmatig eventuele koffieresten uit de
douchezeef ( g. 16) met een tandenborstel en reinig de
zeef daarna met warm water volgens de instructies in de
paragraaf "Het verlagen van de temperatuur".
Reiniging na een periode van inactiviteit
Wanneer het apparaat gedurende langere tijd (meer dan
2 weken) niet wordt gebruikt, volg dan de instructies in
de paragraaf “Bij eerste gebruik of als de machine meer
dan 2 weken niet is gebruikt”.
ONTKALKING
De vorming van kalkaanslag is een
natuurlijk gevolg van het gebruik
van het apparaat. Gebruik uitsluitend het ontkalkingsproduct van
GAGGIA. Dit is speciaal ontwikkeld
om de performance en de werking
van de machine gedurende de
gehele levensduur ervan zo goed
mogelijk te waarborgen. Tevens
voorkomt het, mits op de juiste
manier gebruikt, defecten aan het
geleverde product. Gebruik nooit
Page 59

NEDERLANDS
azijn of andere antikalkproducten.
Ontkalking is om de 2 maanden nodig of wanneer de
machine dit aangeeft.
Let op! Drink no oit de ontkalkingsoplossi ng of de tijdens
de ontkalkingscyclus afgegeven vloeistof.
1. Plaats de lterhouder van onderaf in de zetgroep
( g. 1-8) en draai deze van links naar rechts totdat
hij geblokkeerd is.
2. Verwijder en leeg het waterreservoir (zie het hoofdstuk "Reiniging van het waterreservoir").
3. Giet de HELFT van de es met het GAGGIA-ontkalkingsmiddel in het waterreser voir en vul het met vers
drinkwater tot de MAX-lijn.
4. Schakel de machine in door op de aan-/uitschakelaar
te drukken ( g. 1-2).
Laat 2 kopjes water (ieder ongeveer 150 ml) uit
de stoompijp stromen (zie hoofdstuk "Afgifte van
warm water") en zet de machine uit door op de aan-/
uitschakelaar te drukken ( g. 1-2).
5. Laat het ontkalkingsmiddel circa 20 minuten inwerken terwijl de machine is uitgeschakeld.
6. Schakel de machine in door op de aan-/uitschakelaar
te drukken ( g. 1-2).
Laat 2 kopjes water (ieder ongeveer 150 ml) uit de
stoompijp stromen, zet de machine uit door op de
aan-/uitschakelaar te drukken ( g. 1-2) en laat hem
3 minuten uit staan.
7. Herhaal de handelingen beschreven bij punt 6 totdat
het waterreservoir helemaal leeg is.
8. Spoel het reservoir en vul het met vers drinkwater.
9. Plaats een bakje onder het stoompijpje. Draai de
kn op v oo r st oo m/h ee t wa ter ( g. 1-7) lan gz aam op en
tegen de klok in.
Druk op de ko eschakelaar ( g. 1-1) en de stoomschakelaar ( g. 1-3).
10. Laat de gehele inhoud van het waterreservoir uit
het stoompijpje stromen. Om de afgifte te stoppen,
drukt u nogmaals op de ko eschakelaar ( g. 1-1) en
de stoomschakelaar ( g. 1-3). Vervolgens draait u de
knop van de kraan dicht door deze met de klok mee
te draaien.
• 54 •
11. Vul het reservoir met vers drinkwater.
12. Plaats een passend kopje onder de lterhouder.
13. Druk op de koffieschakelaar (fig. 1-1) en laat het
resterende water uit het reser voir lopen. Als het water
op is, moet u de afgifte te stoppen door opnieuw op
de ko eschakelaar ( g. 1-1) en de stoomschakelaar
( g. 1-3) te drukken. Leeg na a oop het bakje.
14. Haal de lterhouder uit de zetgroep door deze van
rechts naar links te draaien en spoel deze om met
vers drinkwater.
15. Herhaal nogmaals de handelingen vanaf punt 8 tot
het reservoir in totaal 8 keer is geleegd. Hierna is
de machine klaar voor gebruik.
16. De ontkalkingscyclus is nu voltooid.
17. Vul het waterreservoir opnieuw met vers water.
Vul indien nodig het circuit zoals beschreven in het
hoofdstuk "Het vullen van het circuit".
Page 60

IN GEVAL VAN STORING
Probleem: Controleer:
Of er water in het reservoir zit.
Er vindt geen ko eafgifte plaats.
Of het lte r nie t ver sto pt is doo rda t de k o e te jn gemalen of te hard aangedrukt is.
Of de douchezeef schoon is.
NEDERLANDS
De ko eafgifte gaat te snel
(minder dan 20 seconden).
De pomp maakt te veel lawaai.
Overmatig waterverlies uit de
lterhouder.
De espresso heeft weinig crème.
De ko e is te koud.
De melk wordt niet goed opgeschuimd.
Er spat ko e uit de lterhouder. Of de straalbreker in het “Crema Perfetta“- lter zit.
De behuizing van de machine en
de afvoerleiding zijn zeer warm.
Of de ko e niet te grof gemalen is.
Of de ko e aangedrukt is met de stamper.
Of er water in het reservoir zit.
Of de pomp geactiveerd is (zie vullen van het circuit).
Of er genoeg ko e in zit.
Of de lterhouder correct geplaatst is ( g. 1-17).
Of het leertje niet vies is ( g. 16).
Of er geen ko eresten op de rand van de lterhouder zitten.
Of de ko e niet te grof gemalen is.
Of de ko e aangedrukt is met de stamper.
Of de ko e niet te oud of te droog is.
Of u het gewone lter met de straalbreker gebruikt heeft ( g. 1-16).
Of de machine verwarmd is.
Of de ko e niet te grof gemalen is.
Of de ko e in koude kopjes geserveerd wordt. Wij adviseren de ko e altijd te serveren
in warme kopjes.
Of de lterhouder voorverwarmd is (dit hoeft alleen voor de 1e ko e).
Of de spuitmond niet verstopt is.
Of de spuitmond niet te diep in de kan zit.
Of de melk niet te heet is.
Of de stoomknop uitgeschakeld is.
• 55 •
Page 61

POLSKI
GRATULUJEMY WYBORU!
Kupując nowy ek spres Gaggia Classic, wybrałeś model ur ządzenia, który pozwoli ci stać się prawdziwym ba ristą we
własnym domu, bowiem przy każd ej przerwie na kawę będziesz mógł wykony wać czynności typowe dla specja listów
od espresso. Korzystanie z modelu Cl assic wymaga szczególnej dba łości o każdy szczegół, podobnie ja k w przypadku
profesjonalnego ek spresu do kawy: urządzenie musi być dobrze rozgrzane, a uchwyt ltra musi być zawsze zamontowany, aby utrzymać jednolitą temperaturę w całym bloku zaparzającym. Kawa powinna być zmielona drobno,
ale nie zbyt mocno. Należy wsypać odpowiednią ilość kawy mielonej do ltra i odpowiednio ubić, nie zbyt słabo,
aby uniknąć zbyt szyb kiego wydostania się kawy, ale też nie zbyt mocno, bowiem utrudnił oby to właściwe parzenie.
Nowy ekspres Classic j est wyposażony w uchwy t ltra i dyszę pa ry, które nawiązują do tych z urządze ń profesjonalnych.
SPIS TREŚCI
OPIS .................................................................................................................................... 57
CO NALEŻY WIEDZIEĆ ............................................................................................................ 57
WSTĘP.................................................................................................................................58
FILTRY Z WYPOSAŻENIA .........................................................................................................58
Filtr „crema perfetta” na 1 lub 2 liżanki (Rys. 5). ..................................................................................................58
Filtr tradycyjny na 2 liżanki (Rys. 7). ....................................................................................................................58
Filtr tradycyjny na 1 liżankę/saszetkę jednodawkową (Rys. 6). ...........................................................................58
PIERWSZA INSTALACJA ......................................................................................................... 58
Napełnianie obwodu. ............................................................................................................................................58
Przy pierwszym użyciu lub po okresie nieużytkowania trwającym dłużej niż 2 tygodnie. .....................................58
PRZYGOTOWYWANIE ESPRESSO Z KAWY MIELONEJ ..................................................................59
Dalszy ciąg przygotowywania espresso: ................................................................................................................59
PRZYGOTOWYWANIE ESPRESSO Z KAWY W SASZETKACH ...........................................................60
PRZYGOTOWYWANIE CAPPUCCINO .........................................................................................60
NALEWANIE GORĄCEJ WODY ..................................................................................................61
JAK OBNIŻYĆ TEMPERATURĘ BOJLERA ....................................................................................61
FUNKCJA AUTOMATYCZNEGO WYŁĄCZANIA SIĘ ......................................................................... 61
CZYSZCZENIE I KONSERWACJA ................................................................................................62
Czyszczenie dyszy pary .........................................................................................................................................62
Czyszczenie uchwytu ltra i ltrów ......................................................................................................................62
Czyszczenie kratki i tacy ociekowej .......................................................................................................................62
Czyszczenie pojemnika na wodę ...........................................................................................................................62
Czyszczenie sitka bojlera ......................................................................................................................................62
Pierwsze użycie lub użycie po okresie nieużytkowania ..........................................................................................62
ODWAPNIANIE .....................................................................................................................62
W PRZYPADKU NIEPRAWIDŁOWEGO DZIAŁANIA .......................................................................64
• 56 •
Page 62

OPIS
GŁÓWNE ELEMENTY URZĄDZENIA RYS. 1
1 Przycisk kawy
2 Przycisk włączania/wyłączania
3 Przycisk pary
4 Kontrolka sygnalizująca, że urządzenie jest włączo-
ne
5 Kontrolka temperatury kawy
6 Kontrolka temperatury pary
7 Pokrętło pary/gorącej wody
8 Blok zaparzając y kawę
9 Rurka spustowa
10 Kratka
11 Taca ociekowa
12 Pokrywa pojemnika na wodę
13 Pojemnik na wodę (wyjmowany)
14 Dysza pary/gorącej wody z zabezpieczającym
gumowym uchwytem
15 Filtr „crema perfetta” na 1 i 2 liżanki
Stosować wyłącznie z zaworem ltra (Rys. 1-16)
16 Zawór ltra
17 Uchwyt ltra
18 Filtr tradycyjny na 2 liżanki
19 Filtr tradycyjny na 1 liżankę/saszetki
20 Miarka
21 Tamper
22 Przewód zasilający i wtyczka
23 Dysza pary
POLSKI
CO NALEŻY WIEDZIEĆ
1. Sma k espres so zale ży od il ości i ro dzaju użytej kawy.
2. Specyficzny smak ziaren kawy zależy od różnych
czynników, ale jej smak i aromat są efektem procesu
prażenia. Dłużej prażone ziarna kawy, w wyższych
temperaturach mają ciemniejszy kolor. Ciemniejsze
ziarna uwalniają więcej aromatu niż ziarna jasne. Na
rynku dostępne są k awy o różnej jakości. W przypadku
każdego procesu prażenia ziarna poddawane są
działaniu specy cznej temperatury, w efekcie czego
wydobywa się z nich specy czny aromat.
Występują kawy bezkofeinowe, k tóre zawierają tylko
2% kofeiny. Najlepiej wypróbować w swoim ekspresie
wiele różnych rodzajów dostępnej na rynku kawy.
Można w ten sposób odkryć aromat lepszy od tego,
jaki zapewniała dotychczas stosowana mieszanka
ziaren.
3. Ekspresy wyposażone w pompkę wymagają drobno
zmielonej mieszanki. Należy się upewnić, że zakupio na mieszanka posiada odpowie dni stopień mielenia,
odpowiedni do użycia z tego typu ekspresami do
kawy. Lepiej jest używać młynka żarnowego aniżeli
młynka o strzowego, ponieważ ten ostatni powoduje
zbyt mocne sproszkowanie kaw y i powstała mieszanka ma nieregularną konsystencję.
4. Idealnym rozwiązaniem jest mielenie kawy tuż
przed użyciem. Nie należy zapominać, że musi ona
być zmielona tak, aby nadawała się do ekspresu z
pompką.
5. Kawę mieloną lub w ziarnach dobrze jest przechowywać w hermetycznych pojemnikach w lodówce.
Kawa mielona łatwo pochłania zapachy.
6. Prawdziwe espresso można rozpoznać po ciemnym
kolorze, bogatym smaku i typowej „naturalnej
piance”.
7. Cappuccino to specy czne połąc zenie kawy espresso
i gorącego spienionego mleka. Można je podawać z
posypką z c ynamonu, gałki muszkatołowej lub kak ao.
8. Kawę espresso należy podawać natychmiast po
przygotowaniu.
9. Kawę espresso należy serwować w liżankach do
espresso, a cappuccino w liżankach śniadaniowyc h.
• 57 •
Page 63

POLSKI
WSTĘP
Przed pierwszym uruchomieniem urządzenia należy
przeczytać uważnie dołączoną osobno ulotkę dotyczącą
bezpieczeństwa i zachować ją w razie potr zeby skorzystania z niej w przyszłości.
FILTRY Z WYPOSAŻENIA
Filtr „crema perfetta” na 1 lub 2 liżanki (Rys. 5).
Filtr ten jest od razu zamontowany na uchwycie ltra i
pozwala na zaparzenie espresso z pianką nawet podczas
pierwszego użycia urządzenia.
Napełnianie obwodu.
Uwaga! Nie naciskać przycisku kawy bez wcześniejszego napełnienia obwodu.
1. Umieścić pustą liżankę pod blokiem zaparzającym
(Rys. 1-8), nie wkładając uchwytu ltra, i nacisnąć
przycisk kawy (Rys. 1-1).
Słychać będzie dźwięk włączanej pompki i po kilku
sekundach woda zac znie wypły wać z bloku zaparzającego (Rys. 1-8).
2. Po napełnieniu liżanki (około 150 cm3) ponownie
nacisnąć przycisk kawy (Rys. 1-1).
Ważne: ltr ten powinien być używany wyłącznie w
połączeniu z zaworem ltra. (Rys. 1-16).
Filtr tradycyjny na 2 liżanki (Rys. 7).
Filtr tradycyjny na 1 filiżankę/saszetkę
jednodawkową (Rys. 6).
Filtry te są podobne do ltrów stosowanych w profesjonalnych urządzeniach barowych i wymagają zręczności
oraz doświadczenia.
Ważne: l t r ó w t y c h nie należy stosować z zaworem
ltra. (Rys. 1-16).
Zalecamy zacząć od ltra „crema perfetta” i dopiero po
nabyciu zręcznośc i oraz doświadczenia skorzyst ać z ltrów
tradycyjnych, aby docenić obsługę urządzenia godną
prawdziwego baristy.
PIERWSZA INSTALACJA
1. Zdjąć pokr ywę pojemnika na wodę (Rys. 2) i napełnić
ją zimną wodą do poziomu MAX zaznaczonego na
pojemniku (Rys. 1-13).
2. Włożyć wt yczkę do gniazda zasilania na tylnej części
urządzenia (Rys. 9), a przeciwległą końcówkę kabla
zasilającego do ściennego gniazdka prądowego o
odpowiednim napięciu.
Nacisnąć przycisk włączania/wyłączania (Rys. 1-2),
wtedy kontrolka sygnalizująca, że urządzenie jest
włączone zaświeci się (Rys. 1-4).
• 58 •
Ważne: m oże się zda rz yć, że f unk cja sam oc zy nne go u ruc ha -
miania się pompki tymczasowo nie będzie działać z powodu
„pęcherzyków powietrza”.
Gdyby woda nie wypływała z bloku zaparzającego (Rys.
1-8), należy:
1. Umieść liżankę pod dyszą pary (Rys. 1-14).
2. Obróć pokrętłem (Rys. 1-7) w kierunku przeciwnym
do ruchu wskazówek zegara, aby otworzyć zawór
dozowania pary/gorącej wody.
3. Nacisnąć prz ycisk kawy (Rys. 1-1), aby włączyć pomp kę.
4. Po kilku sekundach woda zacznie wydobywać się
przez dyszę pary.
Napełnić wodą około jednej liżanki wody.
5. Zamknąć po krętło dozowania pary/gorącej wody (Rys.
1-7).
6. Nacisnąć ponownie przycisk kawy (Rys. 1-1).
Przy pierwszym użyciu lub po okresie
nieużytkowania trwającym dłużej niż 2
tygodnie.
Ważne: wodę nalaną podczas tej czynności należy wylać i
nie należy jej stosować do celów spożywczych. Jeżeli pojemnik napełni się podczas cyklu, należy zatrz ymać nalewanie i
opróżnić go przed kontynuowaniem czynności.
1. Wypłukać pojemnik na wodę (Rys. 2) (patrz punkt
„Czyszczenie pojemnika na wodę”) i napełnić go
świeżą pitną wodą.
Page 64

2. Ustawić pojemnik pod dyszą pary (Rys. 1-14).
3. Otworzyć powoli pokrętło pary/gorącej wody (Rys.
1-7), obracając nim w kier unku przeciwnym do ruchu
wskazówek zegara.
4. Nacisnąć przycisk kawy (Rys. 1-1) i przycisk pary (Rys.
1-3).
5. Wylać całą zawartość pojemnika na wodę poprzez
dyszę pary.
6. Aby zakończ yć nalewanie, należy nacisnąć ponownie
przycisk kawy (Rys. 1-1) i przycisk pary (Rys. 1-3).
7. Zamknąć pokrętło zaworu (Rys. 1-7), obracając nim
w kierunku zgodnym z ruchem wskazówek zegara.
8. Napełnić pojemnik świeżą pitną wodą (Rys. 2).
9. Od dołu włożyć uchwyt ltra (Rys. 3) do bloku za-
parzającego i przekręcić nim od lewej do prawej do
momentu zablokowania (Rys. 4).
10. Ustawić odpowiedni pojemnik pod uchwytem ltra.
11. Nacisnąć przycisk kaw y (Rys. 1-1) i wylać całą znajdu-
jącą się w pojemniku wodę.
12. Po wylaniu całej wody zatrzymać nalewanie, ponownie naciskając przyc isk kawy (Rys. 1-1) i opróżnić
pojemnik.
13. Wyjąć uchwyt ltra z bloku, przekręcając nim od
prawej do lewej i opłukać go świeżą pitną wodą.
14. Urządzenie jest gotowe do użytku.
POLSKI
Aby zaparzyć pierwszą kawę, należy najpierw podgrzać
uchwyt ltra (Rys. 1-17):
1. Włożyć uchwyt ltra (Rys. 1-17) do bloku zaparzającego (Rys. 1-8), wykonując ruch w lewo pod kątem
45°, a następnie obracając w prawo, aby zablokować
go na swoim miejscu. Rączka uchwytu ltra musi
być ustawiona prostopadle do urządzenia lub lekko
przesunięta w prawo.
2. Umieścić dużą liżankę pod uchwytem ltra (Rys.
1-17) i nacisnąć przycisk kawy (Rys. 1-1).
3. Po napełnieniu liżanki wodą (około 150 cm3), pono wn ie n ac isn ąć p rz yc is k ka wy i o dc zek ać kil ka min ut ,
aż urządzenie osiągnie prawidłową temperaturę z
założonym uchwytem ltra.
Ważne: wewnątrz ltra może pozostać pewna ilość wody,
którą należy usunąć przed napełnieniem ltra mieloną kawą.
Dalszy ciąg przygotowywania espresso:
4. Wyjąć uchwy t ltra (Rys. 1-17) i napełnić go mieloną
kawą za pomocą miarki dołączonej do urządzenia
(Rys. 1-20).
Należy uwzględnić jedną miarkę na jedną liżankę
kawy.
PRZYGOTOWYWANIE ESPRESSO Z KAWY
MIELONEJ
Dołączony do urządzenia fabryczny uchwyt ltra to tak
zwany ltr „crema perfetta” do przygotowania jednej
lub dwóch kaw.
Uwaga! Jeśli ltr „crema perfetta” zostanie użyty
bez zaworu, kawa będzie nalewana zbyt gwałtow nie,
co może doprowadzić do poparzenia użytkownika.
Ważne: jeśli użytkownik woli korzystać z tradycyjnego ltra
(Rys. 6/7), powinien wyjąć zarówno ltr „crema perfetta”
(Rys. 5), jak i zawór ltra (Rys. 1-16).
• 59 •
Ważne: zaleca się zamawiać w palarni kawy lub kupować
kawę drobno mieloną najlepiej nadającą się do tego typu
ekspresów do kawy.
5. Ubić, posługując się specjalnym tamperem (Rys.
1-21). Ubijanie powinno być wykonywane w sposób
jednolity, aby uzyskać dobrze wypoziomowaną i
równą powierzchnię.
6. Ocz yścić krawędź uchwytu ltra (Rys. 1-17) z resztek
kawy.
7. Włożyć uchwyt ltra (Rys. 1-17) do bloku zaparzającego (Rys. 1-8), wykonując ruch w lewo pod kątem
45°, a następnie obracając w prawo, aby zablokować
go na swoim miejscu. Rączka uchwytu ltra musi
być ustawiona prostopadle do urządzenia lub lekko
przesunięta w prawo.
8. Poczekać na zaświecenie się kontrolki (Rys. 1-5).
Page 65

POLSKI
9. Nacisnąć przycisk kawy (Rys. 1-1).
10. Gdy filiżanki będą wypełnione w 3/4, ponownie
nacisnąć przycisk kawy (Rys. 1-1).
W zależności od ilości użytej wody kawa będzie
mniej lub bardziej intensywna, a jeśli zostanie
przygotowana zgodnie z właściwą procedurą, będzie
miała typową „naturalną piankę” w orzechowym/
brązowym kolorze.
Aby przygotować kolejne espresso, należy powoli i
ostrożnie wyjąć uchwyt ltra, przesuwając go w lewo.
Uważać, aby nie poparz yć się wodą pozostałą na fusach.
Po wyjęciu uchwytu ltra niewielka ilość wody nadal
będzie kapać. Jest to spowodowane ciśnieniem wody
występującym w układzie. Usunąć fusy z ltra i ewentualne pozostałości z sitka bojlera (Rys. 16).
Ważne: zale camy pozostawianie czystego uc hwytu ltra
zamontowanego na urządzeniu, bez zbytniego dokręcania
go, aby zawsze zapewniać optymalną temp eraturę całego
bloku zaparzającego.
PRZYGOTOWYWANIE ESPRESSO Z KAWY
W SASZETKACH
Ważne: aby używać saszetek, należy stosować wyłącznie
tradycyjny ltr na 1 liżankę (Rys. 6).
Postępować zgodnie z instrukcjami przygotowywania
espresso z kawy mielonej, używając zamiast kawy mielonej jednodawkowej saszetki z kawą. Włoż yć saszetkę do
uchwytu ltra (Rys. 1-17), upewniając się, że krawędzie
saszetki nie wystają poza uchwyt ltra.
Wystarcz ą dwie lub trzy próby i odrobina wy siłku, by stać
się ekspertem w przygotowywaniu cappuccino.
Przed rozpoc zęciem ważne jest, aby dyszę pary p rzesunąć
delikatnie na zewnątrz, co umożliwi włożenie dzbanka
bezpośrednio pod dyszę pary i ułatwi ruchy niezbędne
do prawidłowego spienienia mleka.
Należy wówczas wykonać następujące czynności:
1. Przygotować espresso w dużej liżance na cappuccino, zgodnie z opisem w punkcie „Przygotowywanie
espresso z kawy mielonej”.
2. Nacisnąć przycisk pary (Rys. 1-3).
3. Po 15 – 20 sekundach i zaświeceniu się kontrolki
temperatury pary (Rys. 1-6).
4. Obrócić delikatnie w kierunku przeciwnym do ruchu
wskazówek zegara pokr ętłem pary/gorącej wody, aby
usunąć z dyszy skropliny i zamknąć pokrętło.
5. Umieścić dzbanek wypełniony do połowy zimnym
mlekiem pod dyszą pary.
6. Umieścić dyszę tu ż pod powierzchnią mleka. Jeśli jest
zbyt głęboko, mleko nie spienia się, jeśli jest zbytnio
na zewnątrz, powstają duże pęcherzyki, które później
szybko opadają.
Ważne jest, aby dysza nie znajdowała się na samym
środku, a bliżej krawędzi dzbank a, pod takim kątem,
przy którym powstaje jednostajny wir (Rys. 8-1).
7. Obrócić p okrętłem zaworu wy twarzania pary (R ys. 1-7)
w kierunku przeciwnym do ruchu wskazówek zegara,
aby rozpocząć wydobywanie się pary. Na tym etapie
następuje maksymalne pochłanianie powietrza. Mleko
powinno być spieniane niemal „na zimno”.
Ważne: ciśnienie pary wzrasta wraz z obracaniem pokrętła.
PRZYGOTOWYWANIE CAPPUCCINO
Do przygotowy wania tradycyjnego cappuccino zaleca się:
- s tosowanie świeżego zimnego mleka pełnotłustego,
najlepiej wysokiej jakości. Gę stość spienionego mleka
zależy od zawartości tłuszczu w mleku;
- s tosowanie dzbanków na mleko ze stali nierdzewnej,
okrągłych, z wypukłym dnem i przewężeniem w
części górnej oraz z dzióbkiem niezbędnym w celu
wykonywania dekoracji na cappuccino.
Dysza pary (Rys. 1-14) wytworzy całą parę niezbędną
do spienienia mleka, nie doprowadzając go do wrzenia.
• 60 •
Ważne. zaleca się wytwarzanie pary przez maksymalnie
60 sekund.
Ciągłe wytwarzanie pary przez ponad 60 sekund może
spowodować całkowite opróżnienie bojlera. Należy wówczas postępować zgodnie z opisem w punkcie „Napełnianie
obwodu”.
Ważne: aby prawidłowo spienić mleko, dysza pary (Rys.
1-23) musi cały czas stykać się z mlekiem, a nie z warstwą
spienioną (Rys. 8-2). Dlatego, gdy spieniona warstwa
zwiększa swoją objętość, należy unieść delikatnie dzbanek,
starając się utrzymać kontakt dyszy z mlekiem, nie dotykając
dna dzbanka (Rys. 8-A).
Page 66

8. Po uzyskaniu pożądanej ilości spienione go mleka dysz ę par y na leż y wsu nąć g łęb iej, aby d obr ze po dgr zać
mleko.
Ważne: zaleca się zawsze trzymać dłoń na w ypukłej części
dzbanka, aby wyczuć wzrost temperatury tej części mleka,
która nie jest spieniona.
9. Po uzyskaniu pożądanego rezultatu zamknąć, w
kierunku zgodnym z ruchem wskazówek zegara,
pokrętło par y, aby przerwać wyt warzanie pary i w yjąć
dzbanek.
Ważne: po zakończeniu spieniania mleka, aby je zagęścić,
aleca się delikatnie stuknąć dzbankiem o blat i pozostawić
z
na co najmniej 30 sekund. Mleko staje się wtedy bardziej
jednolite.
Uwaga! Ważne jest, aby spieniać tylko taką ilość mleka,
jaka jest potrzebna. Gorące mleko, które pozostaje w
dzbanku, nie powinno być ponownie używane; wpłynęłoby bowiem niekorzystnie na konsystencję napoju, a
przede wszystkim na smak cappuccino. Można go jednak
użyć do innych celów.
POLSKI
NALEWANIE GORĄCEJ WODY
1. Włączyć urządzenie i odczekać kilka minut do
momentu zaświecenia kontrolki prawidłowej temperatury kawy (Rys. 1-5).
2. Umieścić liżankę pod profesjonalną dyszą.
3. Powoli przekręć pokrętło pary (Rys. 1-7) w kierunku
przeciwnym do ruchu wskazówek zegara i nacisnąć
równocześnie przycisk kawy (Rys. 1-1) i przycisk pary
(Rys. 1-3), aby umożliwić nalewanie gorącej wody.
4. Po uzyskaniu pożądanej ilości gorącej wody przerwać
nalewanie, naciskając ponownie równocześnie
przycisk kawy (Rys. 1-1) i przycisk pary (Rys. 1-3), a
następnie obrócić pokrętłem pary w kierunku zgodnym z ruchem wskazówek zegara.
Aby natychmiast przygotować kolejną kawę, należy obniżyć temperaturę bojlera poprzez wypuszczenie gorącej
wody z bloku zapar zającego kawę (Rys. 1-8). Postępować
zgodnie z instrukcjami podanymi w punkcie „Jak obniż yć
temperaturę bojlera”, w przeciwnym razie będzie smakować, jakby była przypalona.
Ważne: zaleca się wytwarzanie pary przez maksymalnie
ekund.
60 s
10. Nacisnąć przycisk pary (Rys. 1-3).
Wlać spienione mleko do kawy. Udekorować w
dowolny sposób, cynamonem, kakao lub gałką
muszkatołową.
Aby natychmiast przygotować kolejną kawę, należy obniżyć temperaturę bojlera poprzez wypuszczenie gorącej
wody z bloku zapar zającego kawę (Rys. 1-8). Postępować
zgodnie z instrukcjami podanymi w punkcie „Jak obniż yć
temperaturę”, w przeciwnym razie będzie smakować,
jakby była przypalona.
Uwaga! Dysza pary podczas korzystania z niej i po jej
uż yci u mo że m ieć wy sok ą te mpe rat urę . Ab y un ikn ąć opa rzeń, należy poruszać dyszą pary jedynie umieszczając
palce na zamontowanym na niej gumowym uchwycie.
Uwaga! Jeśli kawa zostanie zaparzona bez obniżenia
temperatury poprzez odpuszczenie wody, istnieje
niebezpieczeństwo poparzeń!
• 61 •
Uwaga! Dysza pary podczas korzystania z niej i po jej
użyciu może mieć wysoką temperaturę. Aby uniknąć
oparzeń, należy poruszać dyszą pary jedynie umieszczając
palce na zamontowanym na niej gumowym uchwycie.
JAK OBNIŻYĆ TEMPERATURĘ BOJLERA
1. Nie wkładać uchwytu ltra.
2. Umieścić pustą liżankę na kratce.
3. Nacisnąć przycisk kawy (Rys. 1-1) i napełnić liżankę
wodą.
4. Nacisnąć ponownie przycisk kawy (Rys. 1-1).
Urządzenie jest teraz gotowe do parzenia kolejnej kawy.
FUNKCJA AUTOMATYCZNEGO WYŁĄCZANIA SIĘ
Urządzenie to jest wyposażone w funkcję zapewniającą
oszczędność energii. Po upływie 20 minut bezczynności
urządzenie automatycznie się wyłącza. Aby ponownie je
włącz yć, należ y nacisnąć przycisk włącz ania/wyłączania.
Page 67

POLSKI
CZYSZCZENIE I KONSERWACJA
Regularne cz yszczenie i konserwacja pozwalają na utr zymanie urządzenia w optymalnym s tanie i przez długi czas
gwarantują dobry smak kawy, stały przepł yw kawy oraz
doskonałą piankę mleka.
Czyszczenie pojemnika na wodę
Uwaga! Pojemnik należy cz yścić tylko przy wyłączonym
urządzeniu, aby uniknąć oparzeń. Podczas działania
rurka spustowa (Rys. 11) może osiągać wysokie temperatury.
Czyszczenie dyszy pary
Po każdym spienieniu mleka należy:
1. Oczyścić dyszę pary wilgotną ściereczką. W celu
dokładniejszego oczyszczenia jej można odkręcić
dyszę (Rys. 13) i umyć ją pod bieżącą wodą.
2. Otworzyć pokrętło pary, pozwalając parze wydostawać się przez jedną lub dwie sekundy, aby udrożnić
otwór dyszy (Rys. 1-23).
Czyszczenie uchwytu ltra i ltrów
Filtry należy utrzymywać w czystości, aby zapewnić
doskonały rezultat.
Uwaga! Filtr można wymienić tylko wtedy, gdy sitko
ltra jest całkowicie schłodzone, aby uniknąć oparzeń.
Codziennie wyjmować ltr z uchwytu ltra zgodnie z
opisem na (Rys. 14) i myć ciepłą wodą.
W razie zauważenia nieprawidłowego działania podczas parzenia
kawy, należy zanurzyć ltry na 10
minut we wrzącej wodzie, a następ nie spłukać je pod bieżącą wodą.
Aby lepiej oczyścić ltry, zalecamy
zakupić pastylki czyszczące GAGGIA
zaprojektowane specjalnie z myślą
o utrzymy waniu w czystości opisywanego urządzenia.
Czyszczenie kratki i tacy ociekowej
Wyjąć tacę ociekową i kratkę (Rys. 1-10, 11) i umyć je pod
bieżącą wodą. Nie stosować środków ściernych.
• 62 •
Wyjąć pojemnik na wodę (Rys. 1-13) i umyć go bieżącą
wodą. Aby wyjąć pojemnik na wodę, najpierw należy
wyjąć tacę ociekową (Rys. 1-11), a następnie wysunąć
rurkę spustową (Rys. 11) poprzez pociągnięcie jej w dół.
Ważne: podczas wkładania pojemnika na miejsce należy się
upewnić, że silikonowe rurki znajdują się w zbiorniku i że ani
nie są poskręcane, ani zablokowane (Rys. 12).
Czyszczenie sitka bojlera
Należy regularnie usuwać z sitk a bojlera (Rys. 16) wszelkie
resztki fusów z kawy za pomocą szczoteczki i czyścić
gorącą wodą zgodnie z instrukcjami opis anymi w punkcie
„Jak obniżyć temperaturę”.
Pierwsze użycie lub użycie po okresie nieużytkowania
Jeśli urządzenie nie będzie użytkowane przez dłuższy
czas (ponad dwa tygodnie), należy postępować zgodnie
z instrukcjami podanymi w punkcie „Przy pierwszym
użyciu lub po okresie nieużytkowania trwającym dłużej
niż 2 tygodnie”.
ODWAPNIANIE
Tworzenie się kamienia jest naturalną konsekwencją użytkowania urządzenia. Należy stosować
wyłącznie środek odwapniający
GAGGIA. Został on opracowany
specjalnie w celu utrzymania jak
najlepszej wydajności i funkcjonalności urządzenia przez cały okres
jego użytkowania, jak również, aby
uniknąć sytuacji, w k tórych – mimo
iż jest ono prawidłowo użytkowane
Page 68

– dochodziłoby do zmian parzonego produktu. Nigdy
nie używać octu ani innych produktów zapobiegających
osadzaniu się kamienia.
Odwapnianie jest wymagane co 2 miesiące użytkowania
urządzenia.
Uwaga! Nie pić roztworu odwapniającego ani nalewanych produktów aż do zakończenia cyklu.
1. O d do łu wło ży ć uc hw yt ltr a d o bl oku za par za jąc ego
(Rys. 1-8) i przekręcić go od lewej do prawej strony,
do momentu zablokowania.
2. Wyjąć i opróżnić pojemnik na wodę (patrz rozdział
„Czyszczenie pojemnika na wodę”).
3. Wlać POŁOWĘ zawartości butelki odwapniacza
GAGGIA do pojemnika na wodę i napełnić go świeżą
pitną wodą aż do poziomu MAX.
4. Włączyć urządzenie poprzez naciśnięcie przycisku
włączania (Rys. 1-2).
Nalać przez dyszę pary 2 liżanki wody (około 150
ml k ażda) ( patr z rozd ział „ Prz ygoto wyw anie go rącej
wody”) i wyłączyć urządzenie, naciskając przycisk
włączania (Rys. 1-2).
5. Poczekać około 20 minut, gdy urządzenie jest wyłączone, aż odwapniacz zadziała.
6. Włączyć urządzenie poprzez naciśnięcie przycisku
włączania (Rys. 1-2).
Nalać przez dyszę pary 2 liżanki wody (około 150
ml każda), wyłączyć urządzenie, naciskając przycisk
włączania (Rys. 1-2) i pozostawić wyłączone przez
3 minuty.
7. Powtórzyć nalewanie wody, jak opisano w punkcie 6,
aż do całkowitego opróżnienia pojemnika na wodę.
8. Wy pł uk ać p oje mni k i nap eł nić go ś wi eżą pi tną wod ą.
9. Ustawić pojemnik pod dyszą pary. Otworzyć powoli
pokrętło par y/gorącej wody (Rys. 1-7), obracając nim
w kierunku przec iwnym do ruchu wskazówek zegara.
Nacisnąć przycisk kawy (Rys. 1-1) i przycisk pary
(Rys. 1-3).
10. Wylać całą zawartość pojemnika na wodę poprzez
dyszę pary. Aby zakończ yć nalewanie, należy nacisnąć
ponownie przycisk kawy (Rys. 1-1) i przycisk pary (Rys.
1-3), aby zamknąć pokrętło zaworu, obracając nim w
• 63 •
POLSKI
kierunku zgodnym z ruchem wskazówek zegara.
11. Napełnić pojemnik świeżą pitną wodą.
12. Ustawić odpowiedni pojemnik pod uchwytem ltra.
13. Nacisnąć przycisk kawy (Rys. 1-1) i wylać całą
znajdującą się w pojemniku wodę. Po wylaniu całej
wody zatrzymać nalewanie, ponownie naciskając
przycisk kawy (Rys. 1-1) i przycisk pary (Rys. 1-3). Po
zakończeniu opróżnić pojemnik.
14. Wyjąć uchwyt ltra z bloku, przekręcając nim od
prawej do lewej i opłukać go świeżą pitną wodą.
15. Powtórzyć jeszcze raz opisane czynności od punktu 8
dla 8 kolejnych pojemników. Wtedy urządzenie
będzie gotowe do użytku.
16. W ten sposób cykl odwapniania został zakończony.
17. Ponownie napełnić pojemnik świeżą wodą. W razie
konieczności wykonać napełnianie obwodu, jak
opisano w rozdziale „Napełnianie obwodu”.
Page 69

POLSKI
W PRZYPADKU NIEPRAWIDŁOWEGO DZIAŁANIA
Problem: Sprawdzić:
Czy w pojemniku jest woda.
Parzenie kawy nie następuje.
Czy ltr nie jest zatkany, ponieważ mieszanina jest zbyt drobna lub kawa jest zbyt
mocno dociśnięta.
Czy sitko bojlera jest czyste.
Parzenie kawy odbywa się zbyt
szybko (mniej niż 20 sekund).
Pompka pracuje zbyt głośno.
Nadmierna utrata wody z uchwytu ltra.
Espresso ma zbyt mało pianki.
Kawa jest zbyt zimna.
Mleko nie jest wystarczająco
spienione.
Urządzenie rozbryzguje kawę
przez uchwyt ltra.
Czy kawa nie została zmielona zbyt grubo.
Czy kawa została ubita tamperem.
Czy w pojemniku znajduje się woda.
Czy pompka uruchomiła się (patrz „Napełnianie obwodu”).
Czy ilość kawy jest wystarczająca.
Czy uchwyt ltra został prawidłowo włożony (Rys. 1-17).
Czy uszczelka nie jest zabrudzona (Rys. 16).
Czy na krawędzi uchwytu ltra nie ma resztek kawy.
Czy kawa nie została zmielona zbyt grubo.
Czy kawa została ubita tamperem.
Czy kawa nie jest zbyt stara lub sucha.
Czy został użyty tradycyjny ltr z zaworem (Rys. 1-16).
Czy urządzenie rozgrzało się.
Czy kawa nie została zmielona zbyt grubo.
Czy kawa nie została zaparzona do zimnych liżanek. Zaleca się nalewanie kawy
zawsze do ciepłych liżanek.
Czy nie zostało wykonane wstępne podgrzanie uchwytu ltra (tylko w przypadku
pierwszej kawy).
Czy dysza pary nie jest zatkana.
Czy dysza pary nie została włożona do dzbanka zbyt głęboko.
Czy mleko nie jest zbyt gorące.
Czy w przypadku ltra „crema perfetta” został zamontowany zawór.
Obudowa urządzenia i rurka
spustowa są bardzo gorące.
Czy przycisk pary jest w pozycji wyłączonej.
• 64 •
Page 70

ΕΛΛΗΝΙΚΑ
ΣΥΓΧΑΡΗΤΗΡΙΑ ΓΙΑ ΤΗΝ ΕΠΙΛΟΓΗ ΣΑΣ!
Αγοράζοντας τη νέα μηχανή Gaggia Classic επιλέξατε ένα μοντέλο που θα σας επιτρέψει να γίνετε ένας πραγματικός
κατ’οίκον barista καθώς, στο διάλειμμα για καφέ, θα εκτελείτε τις παραδοσιακές χειρονομίες των επαγγε λματιών του
εσπρέσο. Η χρήση της μηχανής Classic απαιτεί προσοχή σε κάθε λεπτομέρεια, ακριβώς όπως μια επαγ γελματική μηχανή
για bar: η μηχανή πρέπει να είναι αρκετά ζεστή και το κλείστρο πρέπει πάντα να είναι τοποθετημένο για να διατηρείται
ομοιόμορφα η θερμοκρασία σε όλη τη μονάδα άντλησης, ο αλεσμένος καφές πρέπει να είναι λεπτοκομμένος αλλά όχι
σε υπερβολικό βαθμό, πρέπει να τοποθετείτε τη σωστή ποσότητα αλεσμένου καφέ στο φίλτρο και να τον πιέζετε με τη
σωστή ένταση αλλά όχι πολύ λίγο ώστε να αποφύγετε να τρέχει υπερβολικά γρήγορα ο καφές, αλλά ούτε πάρα πολύ
γιατί έτσι θα δυσκολεύεται πολύ να βγει ο καφές.
Η νέα μηχανή Classic διαθέτει μονάδα κλείστρου και κάνουλας ατμού με πρότυπο την αντίστοιχη των επαγγε λματικών
μηχανών.
ΠΕΡΙΕΧΟΜΕΝΑ
ΠΕΡΙΓΡΑΦΗ .........................................................................................................................66
ΤΙ ΠΡΕΠΕΙ ΝΑ ΓΝΩΡΙΖΕΤΕ ......................................................................................................66
ΕΙΣΑΓΩΓΗ ............................................................................................................................67
ΠΑΡΕΧΟΜΕΝΑ ΦΙΛΤΡΑ ........................................................................................................... 67
Φίλτρο για "crema perfetta" για 1 ή 2 φλιτζάνια (Εικ.5). ........................................................................................67
Παραδοσιακό φίλτρο για 2 φλιτζάνια (Εικ.7). .........................................................................................................67
Παραδοσιακό φίλτρο για 1 φλιτζάνι / μερίδα μίας δόσης (Εικ.6). ...........................................................................67
ΠΡΩΤΗ ΕΓΚΑΤΑΣΤΑΣΗ ...........................................................................................................67
Φόρτιση του κυκλώματος. .....................................................................................................................................67
Για την πρώτη χρήση ή έπειτα από διάστημα μη χρήσης πέραν των 2 εβδομάδων. ................................................67
ΠΑΡΑΣΚΕΥΗ ΕΣΠΡΕΣΟ ΜΕ ΑΛΕΣΜΕΝΟ ΚΑΦΕ ............................................................................68
Προχωρήστε στην παρασκευή του καφέ εσπρέσο: .................................................................................................68
ΠΑΡΑΣΚΕΥΗ ΕΣΠΡΕΣΟ ΜΕ ΚΑΦΕ ΣΕ ΜΕΡΙΔΕΣ .......................................................................... 69
ΠΑΡΑΣΚΕΥΗ ΚΑΠΟΥΤΣΙΝΟ .....................................................................................................69
ΑΝΤΛΗΣΗ ΖΕΣΤΟΥ ΝΕΡΟΥ ......................................................................................................70
ΠΩΣ ΝΑ ΜΕΙΩΣΕΤΕ ΤΗ ΘΕΡΜΟΚΡΑΣΙΑ ΣΤΟ ΒΡΑΣΤΗΡΑ ...............................................................71
ΛΕΙΤΟΥΡΓΙΑ ΑΥΤΟΜΑΤΗΣ ΔΙΑΚΟΠΗΣ .......................................................................................71
ΚΑΘΑΡΙΣΜΟΣ ΚΑΙ ΣΥΝΤΗΡΗΣΗ .............................................................................................. 71
Καθαρισμός της κάνουλας ατμού ..........................................................................................................................71
Καθαρισμός του κλείστρου και των φίλτρων ......................................................................................................... 71
Καθαρισμός της σχάρας και του δίσκου απόσταξης ...............................................................................................71
Καθαρισμός του δοχείου νερού ..............................................................................................................................71
Καθαρισμός της βρύσης ροής ...............................................................................................................................71
Καθαρισμός έπειτα από διάστημα μη χρήσης ........................................................................................................72
ΑΦΑΙΡΕΣΗ ΑΛΑΤΩΝ ...............................................................................................................72
ΣΕ ΠΕΡΙΠΤΩΣΗ ΔΥΣΛΕΙΤΟΥΡΓΙΑΣ ............................................................................................ 73
• 65 •
Page 71

ΕΛΛΗΝΙΚΑ
ΠΕΡΙΓΡΑΦΗ
ΕΠΙΣΚΟΠΗΣΗ ΤΗΣ ΜΗΧΑΝΗΣ ΕΙΚ.1
1 Διακόπτης καφέ
2 Διακόπτης για το άναμμα/σβήσιμο
3 Διακόπτης ατμού
4 Ενδεικτική λυχνία λειτουργίας
5 Ενδεικτική λυχνία θερμοκρασίας καφέ
6 Ενδεικτική λυχνία θερμοκρασίας ατμού
7 Περιστρεφόμενο κουμπί ατμού / ζεστού νερού
8 Μονάδα άντλησης καφέ
9 Σωλήνας αποστράγγισης
10 Σχάρα
11 Δίσκος απόσταξης
12 Καπάκι δοχείου νερού
13 Δοχείο νερού (αποσπώμενο)
14 Κάνουλα ατμού / ζεστού νερού
με φλάντζα προστασίας
15 Φίλτρο για “crema perfetta” για 1 και 2 φλιτζάνια
Χρησιμοποιείται μόνο με το ακροφύσιο για το
αφρόγαλα (Εικ.1-16)
16 Ακροφύσιο για το αφρόγαλα
17 Κλείστρο
18 Παραδοσιακό φίλτρο για 2 φλιτζάνια
19 Παραδοσιακό φίλτρο για 1 φλιτζάνι / μερίδα
20 Μεζούρα
21 Πατητήρι
22 Καλώδιο και βύσμα τροφοδοσίας
23 Ακροφύσιο ατμού
ΤΙ ΠΡΕΠΕΙ ΝΑ ΓΝΩΡΙΖΕΤΕ
1. Η γεύση του εσ πρέσο εξαρτάται από την ποσότητα και
τον τύπο του καφέ που χρησιμοποιείται.
2. Η ιδιαίτερη γεύση ενός κόκκου καφέ εξαρτάται από
διάφορους παράγοντες, αλλά η γεύση και το άρωμά
του είναι αποτέλεσμα της διαδικασίας καβουρδίσματος. Οι κόκκοι καφέ που καβουρδίστηκαν για
μεγαλύτερο χρονικό διάστημα και σε υψηλότερες
θερμοκρασίες έχουν πιο σκούρο χρώμα. Οι σκουρόχρωμοι κόκκοι απελευθερώνουν περισσότερο
άρωμα σε σχέση με τους ανοιχτόχρωμους κόκκους.
Θα βρείτε διαφορετικές ποιότητες καφέ στην αγορά.
Οι τύποι καβουρδίσματος ξεχωρίζουν από το μείγμα
κόκκων που έχουν καβουρδιστεί σε συγκεκριμένη
θερμοκρασία και με συγκεκριμένου είδους άρωμα.
Υπάρχουν είδη ντεκαφεϊνέ που περιέχουν μόνο 2%
καφεΐνη. Θα δοκιμάσετε με τη μηχανή σας έναν από
τους διάφορους τύπους καφέ που πωλούνται. Θα
ανακαλύψετε κατά πάσα πιθανότητα ένα καλύτερο
άρωμα σε σχέση με το μείγμα καφέ που χρησιμοποιούσατε ως τώρα.
3. Οι μηχανές εσπρέσο με αντλία απαιτούν ένα λεπτοαλεσμένο μείγμα. Βεβαιωθείτε ότι έχετε αγοράσει
το επιθυμητό μείγμα με τον κατάλληλο βαθμό
αλέσεως για μηχανές εσπρέσο. Είναι προτιμότερο να
χρησιμοποιείται μύλος με δίσκους κοπής παρά μύλος
με λεπίδες γιατί απελευθερώνει πάρα πολλή σκόνη
καφέ και παράγει ένα ακανόνιστα αλεσμένο μείγμα.
4. Το ιδανικό είναι να αλέθετε τον καφέ λίγο πριν τη
χρήση. Μην ξεχνάτε ότι πρέπει να τον αλέθετε για
χρήση σε μηχανή εσπρέσο με αντλία.
5. Συνισ τάται η αποθήκευση του αλεσμένου καφέ ή των
κόκκων, σε δοχεία ερμητικά κλειστά στο ψυγείο. Ο
αλεσμένος καφές απορροφά εύκολα τις οσμές.
6. Ο πραγματ ικός εσπρέσο αναγνωρίζε ται από το σκούρο
χρώμα, την πλούσια γεύση και τη χαρακτηριστική
"φυσική κρέμα".
7. Ο καπουτσίνο είναι ένας ιδιαίτερος συνδυασμός καφέ
εσπρέσο με ζεστό αφρόγαλα. Μπορεί να σερβιριστεί
με λίγη κανέλα, μοσχοκάρυδο ή κακάο.
8. Σερβίρετε αμέσως τον καφέ εσπρέσο μόλις τον φτιάξετε.
9. Σερβίρετε τον εσπρέσο σε φλιτζανάκια του καφέ και
τον καπουτσίνο σε φλιτζάνια για το πρωινό.
• 66 •
Page 72

ΕΙΣΑΓΩΓΗ
Πριν χρησιμοποιήσετε τη μηχανή την πρώτη φορά, διαβάστε προσεκτικά το ξεχωριστό φυλλάδιο ασφαλείας και
φυλάξτε το για μελλοντική αναφορά.
ΠΑΡΕΧΟΜΕΝΑ ΦΙΛΤΡΑ
Φίλτρο για "crema perfetta" για 1 ή 2 φλιτζάνια (Εικ.5).
Αυτό το φίλτρο είναι ήδη τοποθετημένο στο κλείστρο
και σας δίνει τη δυνατότητα να παρασκευάζετε εσπρέσο
με κρέμα ακόμα τις πρώτες φορές που χρησιμοποιείτε
τη μηχανή.
Σηείωση. Αυτό το φίλτρο πρέπει να χρησιοποιείται
όνο σε συνδυασμό με το ακροφύσιο για το αφρόγαλα.
(Εικ.1-16).
ΕΛΛΗΝΙΚΑ
Πατήστε το διακόπτη λειτουργίας για το άναμμα/
σβήσιμο (Εικ.1-2), ανάβει η ενδεικτική λυχνία
λειτουργίας (Εικ.1 - 4).
Φόρτιση του κυκλώματος.
Προσοχή! Μην ανάβετε το διακόπτη καφέ χωρίς να
έχετε πρώτα φορτίσει το κύκλωμα.
1. Τοποθετήστ ε ένα άδειο φλιτζάνι κάτω από τη μονάδα
άντλησης καφέ (Εικ. 1-8) χωρίς να τοποθετήσετε το
κλείστρο και πατήστε το διακόπτη καφέ (Εικ.1-1).
Θα ακούσετε τον ήχο της αντλίας που ενεργοποιείται
και έπειτα από μερικά δευτερόλεπτα το νερό θα
αρχίσει να τρέχει από τη μονάδα άντλησης (Εικ. 1-8).
2. Αφού γεμίσει το φλιτζάνι (περίπου 150cc), πατήστε
ξανά το διακόπτη καφέ (Εικ.1-1).
Παραδοσιακό φίλτρο για 2 φλιτζάνια (Εικ.7).
Παραδοσιακό φίλτρο για 1 φλιτζάνι / μερίδα
μίας δόσης (Εικ.6).
Αυτά τα φίλτρα είναι όμοια με εκείνα που χρησιμοποιούνται στις επαγγελματικές μηχανές για bar και απαιτούν
επιδεξιότητα και εμπειρία.
Σηείωση. Αυτά τα φίλτρα δεν πρέπει να χρησιοποι-
ούνται με το ακροφύσιο για το αφρόγαλα. (Εικ.1-16).
Σας συμβουλεύουμε να ξεκινήσετε με το φίλτρο “crema
perfetta” και εφόσον αποκτήσετε δεξιότητα και εμπειρία
να προχωρήσετε στα παραδοσιακά φίλτρα, ώστε να απολαμβάνετε να τα χρησιμοποιείτε σα ν πραγματικός barista.
ΠΡΩΤΗ ΕΓΚΑΤΑΣΤΑΣΗ
1. Αφαιρέστε το καπάκι του δοχείου νερού (Εικ. 2) και
γεμ ίστ ε το δ οχείο με κ ρύο νε ρό μ έχρι τη σ τάθμ η MA X
(Εικ.1-13).
2. Τοποθετήστε το βύσμα στην πρίζα του ηλεκτρικού
ρεύματος που βρίσκε ται στο πίσω μέρος της μηχανής
(Εικ.9) και το άλλο άκρο του καλωδίου τροφοδοσίας
σε μια πρίζα του ηλεκτρικού ρεύματος σ τον τοίχο που
διαθέτει την κατάλληλη τάση.
• 67 •
Σηείωση. Ενδέχεται να μην λειτουργεί προσωρινά η αυ-
τόματη ενεργοποίηση της αντλίας σε περίπτωση που υπάρχει
«φυσαλίδα αέρα».
Εά ν το νερ ό δ εν τ ρέ χει κ άτ ω απ ό τη μον άδ α άν τλ ηση ς (Ε ικ.
1-8), ακολουθήστε τα εξής βήματα:
1. Τοποθετήστε ένα φλιτζάνι κάτω από την κάνουλα
ατμού (Εικ. 1-14).
2. Περιστρέψτε το κουμπί (Εικ.1-7) αριστερόσ τροφα για
να ανοίξετε την κάνουλα άντλησης ατμού / ζεστού
νερού.
3. Πατήσ τε το διακόπτη καφέ (Εικ.1-1) για να ενεργοποιήσετε την αντλία.
4. Έπειτα από μερικά δευτερόλεπτα, θα αρχίσει να
βγαίνει νερό από την κάνουλα ατμού.
Αφήστε να βγει σχεδόν ένα φλιτζάνι νερό.
5. Κλείστε το περιστρεφόμενο κουμπί άντλησης ατμού
/ ζεστού νερού (Εικ. 1-7).
6. Πατήστε ξανά το διακόπτη καφέ (Εικ.1-1).
Για την πρώτη χρήση ή έπειτα από διάστημα
μη χρήσης πέραν των 2 εβδομάδων.
Σηείωση. Το νερό που βγαίνει με αυτήν τη διαδικασία πρέ-
πει να το πετάξετε και να μην το χρησιμοποιήσετε στην
κουζ ίνα. Εάν, κατά τη διάρκ εια του κύκλο υ, το δο χείο γεμ ίσει,
Page 73

ΕΛΛΗΝΙΚΑ
σταματήστε την άντληση και αδειάστε το πριν συνεχίσετε.
1. Ξεπλύνετε το δοχείο νερού (Εικ.2) (βλ. ενότητα
«καθαρισμός του δοχείου νερού») και γεμίστε το με
φρέσκο πόσιμο νερό.
2. Τοποθετήστε ένα δοχείο κάτω από την κάνουλα ατμού
(Εικ.1 -14).
3. Ανοίξτε αργά το περιστρεφόμενο κουμπί ατμού / ζεστού νερού (Εικ. 1-7) γυρίζοντάς το αριστερόστροφα.
4. Πατήστε το διακόπτη καφέ (Εικ.1-1) και το διακόπτη
ατμού (Εικ.1-3).
5. Αντλήσ τε όλο το περιεχόμενο του δοχείου νερού από
την κάνουλα ατμού.
6. Για να ολοκληρώσετε τη διαδικασία άντλησης ατμού,
πατήστε ξανά το διακόπτη καφέ (Εικ.1-1) και το
διακόπτη ατμού (Εικ.1-3).
7. Κλείστε το περιστρεφόμενο κουμπί ροής (Εικ.1-7)
γυρίζοντάς το δεξιόστροφα.
8. Γεμίστε το δοχείο με φρέσκο πόσιμο νερό (Εικ.2).
9. Τοποθετήστε το κ λείστρο (Εικ.3) κάτω από τη μονάδα
άντλησης και περιστρέψτε το από αριστερά προς τα
δεξιά μέχρι να ασφαλίσει (Εικ.4).
10. Τοποθετήστε ένα κατάλληλο δοχείο κάτω από το
κλείστρο.
11. Πατήστε το διακόπ τη καφέ (Εικ.1-1) και αντλήστε όλο
το νερό που υπάρχει στο δοχείο.
12. Όταν τελειώσει το νερό, πατήστε ξανά το διακόπτη
καφέ (Εικ.1-1) για να σταματήσετε την άντληση και
αδειάστε το δοχείο.
13. Αφαιρέστε το κλείστρο από τη μονάδα περιστρέφοντας από δεξιά προς τα αριστερά και ξεπλύνετε με
φρέσκο πόσιμο νερό.
14. Η μηχανή είναι έτοιμη για χρήση.
Σηείωση. Εάν προτιμάτε να χρησιμοποιήσετε το παραδοσι-
ακό φίλτρο (Εικ.6/7), αφαιρέστε το φίλτρο “cre ma pe rfe tt a”
(Εικ.5) καθώς και το ακροφύσιο για το αφρόγαλα (Εικ.1-16).
Για να αντλήσετε τον πρώτο καφέ, είναι απαραίτητο να
προθερμάνετε το κλείστρο (Εικ.1-17):
1. Τοποθετήστε το κλείστρο (Εικ.1-17) στη μονάδα
άν τλ ηση ς (Ε ικ.1- 8) π ερι στ ρέφ ον τας κατ ά 45 ° πρ ος τ α
αριστερά και γυρίστε το προς τα δεξιά για να το ασφαλίσετε στη θέση του. Η λαβή του κλείστρου πρέπει να
βρίσκεται παράλληλα με τη μηχανή ή ελαφρά προς
τα δεξιά.
2. Τοποθετήστε ένα μεγάλο φλιτζάνι κάτω από το κλείσ τρο (Ει κ.1-17) και πατ ήσ τε το δ ιακ όπ τη καφ έ (Ε ικ.1-1)
3. Αφού γεμίσει το φλιτζάνι με νερό (περίπου 150cc),
πατή στε ξανά το διακόπ τη καφέ και πε ριμένε τε μερικά
λεπτά για να φτάσει η μηχαν ή στη σωστή θε ρμοκρασία
με το κλείστρο τοποθετημένο σ τη θέση του.
Σηείωση. Μέσα στο κλείστρο ενδέχεται να απομείνει λίγο
νερό που πρέπει να αφαιρεθεί πριν γεμίσετε το φίλτρο με
αλεσμένο καφέ.
Προχωρήστε στην παρασκευή του καφέ
εσπρέσο:
4. Αφαιρέστε το κλείστρο (Εικ. 1-17) και γεμίστε το με
αλεσμένο καφέ με τη μεζούρα που παρέχεται με τη
μηχανή (Εικ. 1-20).
Υπολογίστε μία μεζούρα για ένα φλιτζάνι καφέ.
Σηείωση. Συνιστάται να ζητήσετε από το καφεκοπτείο ή
να αγοράσετε από τα σημεία λιανικής πώλησης ένα λεπτοκομμένο καφέ κατάλληλο για καφετιέρες.
ΠΑΡΑΣΚΕΥΗ ΕΣΠΡΕΣΟ ΜΕ ΑΛΕΣΜΕΝΟ ΚΑΦΕ
Το παρεχόμενο κλείσ τρο είναι εξοπλισμένο από κατασκευής με το φίλτρο για "τέλεια κρέμα" για την παρασ κευή ενός
ή δύο καφέδων.
Προσοχή! Σε περίπτωση που το φίλτρο για τέλεια
κρέμα χρησιμοποιηθεί χωρίς το ακροφύσιο για το
αφρόγαλα, η μηχανή θα πιτσι λίσει με δύναμη τον καφέ
με κίνδυνο να προκληθεί έγκαυμα.
• 68 •
5. Πατήσ τε τον καφέ με το πατητήρι (Εικ.1-21). Η συμπί εση πρέπει να γίνεται ομοιόμορφα ώστε η επιφάνεια
να είναι λεία και επίπεδη.
6. Καθαρίστε το άκρ ο του κλείστρου (Εικ.1-17) από τυχόν
υπολείμματα καφέ.
7. Τοποθετήστε το κλείστρο (Εικ.1-17) στη μονάδα
άν τλ ηση ς (Ε ικ.1- 8) π ερι στ ρέφ ον τας κατ ά 45 ° πρ ος τ α
αριστερά και γυρίστε το προς τα δεξιά για να το ασφαλίσετε στη θέση του. Η λαβή του κλείστρου πρέπει να
βρίσκεται παράλληλα με τη μηχανή ή ελαφρά προς
Page 74

τα δεξιά.
8. Περιμένετε να ανάψει η ενδεικτική λυχ νία (Εικ. 1-5).
9. Πατήστε το διακόπτη καφέ (Εικ.1-1).
10. Ότα ν τα φλιτζάνια γεμίσουν κατά τα 3/4, πατήστε ξανά
το διακόπτη καφέ (Εικ.1-1).
Ο καφές θα είναι περισσότερο ή λιγότερο έντονος
ανάλογα με την ποσότ ητα νερού που χρησιμοποιήθηκε
και εφόσον παρασκευάστηκε με τη σωστή διαδικασία
θα έχει τη χαρακτηριστική «φυσική κρέμα» σε φουντουκί / καφέ χρώμα.
Για να παρασκευάσετε δεύτερο καφέ εσπρέσο, αφαιρέστε
αργά και προσεκτικά το κλείστρο περιστρέφοντάς το προς
τα αριστερά. Προσέξτε να μην καείτε με το νερό που έχει
απομείνει στα ιζήματα του καφέ. Συνεχίζει να στάζει λίγο
νερό όταν αφαιρείτε το κλείστρο. Αυτό οφείλεται στην
πίεση του νερού που υπάρχει στο σύστημα. Αφαιρέστε
τα ιζήματα από το φίλτρο και πιθανά υπολείμματα από το
βρυσάκι ροής (Εικ.16).
Σηείωση. Προτείνουμε να αφήνετε το κλείστρο πάνω
τη μηχανή χωρίς να το σφίγγετε υπερβολικά, για να
σ
εξασφαλίζετε πάν τα ότι η θερμοκρασία είναι βέλτιστη για
ολόκληρη τη μονάδα άντλησης.
ΠΑΡΑΣΚΕΥΗ ΕΣΠΡΕΣΟ ΜΕ ΚΑΦΕ ΣΕ
ΜΕΡΙΔΕΣ
Σηείωση. Με τις μερίδες χρησιμοποιείτε αποκλειστικά το
παραδοσιακό φίλτρο 1 φλιτζανιού (Εικ.6).
Ακολουθήστε τις οδηγίες για την παρασ κευή ενός εσπρέσο
με αλεσμένο καφέ χρησιμοποιών τας αντί για τον αλεσμέ νο
καφέ τη μερίδαπροαλεσμένου καφέ μίας δόσης. Τοποθετήστε τη μερίδα στο κλείστρο (Εικ.1-17) και βεβαιωθείτε
ότι το χαρτί της μερίδας δεν προεξέχει από το κλείστρο.
ΠΑΡΑΣΚΕΥΗ ΚΑΠΟΥΤΣΙΝΟ
Για να παρασκευάσετε έναν παραδοσιακό καπουτσίνο,
συνιστούμε
- να χρησιμοποιείτε πλήρες φρέσκο γάλα σε χαμηλή
θερμοκρασία και κατά προτίμηση υψηλ ής ποιότητας.
Η πυκνότητα που έ χει το αφρόγαλα εξαρτάται από την
περιεκτικότητα του γάλακτος σε λιπαρά.
- για το γάλα, να χρησιμοποιείτε γαλατιέρες από ανο-
• 69 •
ΕΛΛΗΝΙΚΑ
ξείδωτο χάλυβα, στρογγυλές και με στρογγυλεμένα
άκρα, που στενεύουν στην επάνω πλευρά, όπως και
το στόμιο που είναι απαραίτητο εάν θέλετε να διακοσμήσετε τον καπουτσίνο σας.
Η κάνουλα ατμού (Εικ.1-14) θα βγάλει όλον τον ατμό που
χρειάζεται για να αφρίσει το γάλα χωρίς να βράσει.
Με δύο τρεις δοκιμές και λίγη προσ πάθεια θα γίνετε ειδικοί
στην παρασκευή του καπουτσίνο.
Πριν ξεκινήσετε, είναι σημαντικό να μετακινήσετε ελαφρά
την κάνουλα ατμού προς τα έξω έ τσι ώστε να τοποθετήσε τε
τη γαλατιέ ρα ακριβώς κάτω από την κάνουλα ατμού και να
εκτελεί τε με μεγαλύτερη άνεση τ ις κινήσεις που χρειάζεται
για να παρασκευάσετε σωστά το αφρόγαλα.
Σε αυτό το σημείο ακολουθήστε τα εξής βήματα:
1. Ετοιμάστε τον εσπρέσο σε ένα μεγάλο φλιτζάνι για
καπουτσίνο, όπως ορίζεται στην ενότ ητα «Παρασκευή
εσπρέσο με αλεσμένο καφέ».
2. Πατήστε το διακόπτη ατμού (Εικ.1-3).
3. Έπειτα από 15-20 δευτερόλεπτα θα ανάψει η ενδει-
κτική λυχνία θερμοκρασίας του ατμού (Εικ.1-6).
4. Γυρίστε το περιστρεφόμενο κουμπί ατμού / ζεστού
νερού λίγο προς τα αριστερά για να βγει η συμπύκνωση που έχει μείνει στην κάνουλα και ξανακλείστε
το περιστρεφόμενο κουμπί.
5. Τοποθετήστε τη γαλατιέρα γεμάτη μέχρι τη μέση με
κρύο γάλα κάτω από την κάνουλα ατμού.
6. Τοποθετήστε το ακροφύσιο της κάνουλας ακριβώς
κάτω από την επιφάνεια του γάλακτος γιατί εάν είναι
πολύ βαθιά μέσα στο γάλα δεν αφρίζει ενώ εάν είναι
πολύ έξω θα σχηματιστούν μεγάλες φυσαλίδες που
πέφτουν αμέσως.
Είναι σημαντικό να κρατάτε το ακροφύσιο όχι στη
μέση αλλά κοντά στο άκρο της γαλατιέρας, σε γωνία
κατάλληλη για να στροβιλίζεται αδιάκοπα (Εικ.8-1).
7. Γυρίστε το περιστρεφόμενο κουμπί άντλησης ατμού
(Εικ.1-7) αριστερόστροφα για να βγει ο ατμός καθώς
σε αυτό το στάδιο σημειώνε ται η μέγιστη απορρ όφηση
αέρα. Το γάλα πρέπει να αφρίσει σχεδόν κρύο.
Σηείωση. Η πίεση του ατμού αυξάνεται όσο περιστρέφετε
ο κουμπί.
τ
Σηείωση. Συνιστάται η άντληση ατμού να μην ξεπερνά
τα 60 δευτερόλεπ τα.
Τυχόν συνεχής άντληση ατμού που ξεπερνά τα 60 δευτερόλεπτα μπορεί να αδειάσει εντελώς το βραστήρα. Σε αυτή την
Page 75

ΕΛΛΗΝΙΚΑ
περίπτωση ακολουθήστε τα βήματα που περιγράφονται στην
ενότητα «Φόρτιση του κυκλώματος».
Σηείωση. Για να φτιάξετε σωστά αφρόγαλα, το ακροφύσιο
ατμού (Εικ.1-23) πρέπει πάντα να έρχεται σε επαφή με το γάλα
και όχι με το αφρόγαλα (Εικ.8-2). Επομένως, όσο αυξάνεται
η στρώση με το αφρόγαλα, πρέπει να σηκώνετε ελαφρά τη
γαλατιέρα ώστε το ακροφύσιο να έρχεται σε επαφή με το
γάλα χωρίς να ακουμπάει στον πάτο της γαλα τιέρας (Εικ.8-A).
8. Εφόσον φτιάξετε το επιθυμητό αφρόγαλα, πρέπει να
σπρώξετε την κάνουλα ατμού προς τα κάτω για να
ζεστάνετε καλά το γάλα.
Προσοχή! Η κάνουλα ατμού κατά τη διάρκεια της
χρήσης αλλά και μετά μπορεί να έχει υψηλή θερμοκρασία. Για να αποφύγετε τυχόν εγκαύματα, μετακινήστε
την τοποθετώντας μόνο τα δάχτυλά σας στη φλάντζα
προστασίας της κάνουλας.
Προσοχή! Εάν αρχίσει να βγαίνει ο καφές χωρίς να έχετε
προηγουμένως μειώσει τη θερμοκρασία αφήνοντας να
τρέξει νερό, υπάρχει κίνδυνος εγκαυμάτων!
Σηείωση. Προτείνεται να κρατάτε πάντα με το ένα χέρι το
τρογγυλεμένο μέρος της γαλατιέρας για να νιώθετε πόσο
σ
ζεσταίνεται το γάλα που δεν έχει αφρίσει.
9. Μόλις επιτευχθεί το επιθυμητό αποτέλεσμα, κλείστε
το περιστρεφόμενο κουμπί ατμού δεξιόστροφα για
να σταματήσετε την άντληση ατμού και αφαιρέστε
τη γαλατιέρα.
Σηείωση. Αφού ολοκληρώσετε τη διαδικασία για το
αφρόγαλα, για να συμπιέσετε το αφρόγαλα, συνιστάται να
χτυπήσετε ελαφρά τη γαλατιέρα στον πάγκο και να την
αφήσετε να ξεκουραστεί για τουλάχιστον 30 δευτερόλεπτα.
Έτσι, το γάλα αποκτά μεγαλύτερη ομοιογένεια.
Προσοχή! Είναι σημαντικό να χρησιμοποιήσετε για
αφρόγαλα μόνο την ποσότητα γάλακτος που χρειάζεστε.
Το ζεστό γάλα που παραμένει στη γαλατιέρα δεν πρέπει να
επαναχρησιμοποιηθεί. Χαλάει την ποιότητα στο αφρόγαλα
και κυρίως την γεύση του καπουτσίνο. Για το λόγο αυτό,
πρέπει να χρησιμοποιηθεί για άλλους σκοπούς.
10. Πατήστε το διακόπτη ατμού (Εικ.1-3).
Ρίξτε το αφρόγαλα στον καφέ. Γαρνίρετε με κανέλα,
κακάο, μοσχοκάρυδο, ανάλογα με τις προτιμήσεις σας.
ΑΝΤΛΗΣΗ ΖΕΣΤΟΥ ΝΕΡΟΥ
1. Ανάψτε τη μηχανή και περιμένε τε λίγα λεπτά μέχρι να
ανάψει η ενδεικτ ική λυχνία της σωστής θε ρμοκρασίας
καφέ (Εικ.1-5).
2. Τοποθετήστε ένα φλιτζάνι κάτω από την επαγγελματική κάνουλα ατμού.
3. Γυρίστε αργά το περιστρεφόμενο κουμπί ατμού
(Εικ.1-7) αριστερόστροφα και ταυτόχρονα πατήστε
το διακόπτη καφέ (Εικ.1-1) και το διακόπτη ατμού
(Εικ.1-3) για να βγει ζεστό νερό.
4. Μόλις επιτευχ θεί η επιθυμητή ποσότητα ζεσ τού νερού,
σταματήσ τε την άντληση πατών τας ξανά ταυτόχρονα
το διακόπτη καφέ (Εικ.1-1) και το διακόπτη ατμού
(Εικ.1-3) και γυρίστε το περιστρεφόμενο κουμπί ατ μού
δεξιόστροφα.
Για να παρασκευάσε τε αμέσως μετά κι άλ λον καφέ, μειώστε
τη θερμοκρασία σ το βραστήρα αφήνοντας να τρέξει ζεσ τό
νε ρό α πό τη μ ον άδα άν τλ ηση ς κα φέ ( Εικ .1-8) . Ακ ολο υθή στ ε
τις οδηγίες που περιγράφονται στην ενότητα «Πώς να
μειώσετε τη θερμοκρασία στο βραστ ήρα», διαφορετικά ο
καφές μπορεί να μυρίζει καμένος.
Σηείωση. Συνιστάται η άντληση ατμού να μην ξεπερνά
τα 60 δευτερόλεπ τα.
Για να παρασκευάσε τε αμέσως μετά δεύτερο καφέ, μειώστε
τη θερμοκρασία σ το βραστήρα αφήνοντας να τρέξει ζεσ τό
νε ρό α πό τη μ ον άδα άν τλ ηση ς κα φέ ( Εικ .1-8) . Ακ ολο υθή στ ε
τις οδηγίες που περιγράφονται στην ενότητα «Πώς να
μειώσετε τη θερμοκρασία», διαφορετικά ο καφές μπορεί
να μυρίζει καμένος.
• 70 •
Προσοχή! Η κάνουλα ατμού κατά τη διάρκεια της
χρήσης αλλά και μετά μπορεί να έχει υψηλή θερμοκρασία. Για να αποφύγετε τυχόν εγκαύματα, μετακινήστε
την τοποθετώντας μόνο τα δάχτυλά σας στη φλάντζα
προστασίας της κάνουλας.
Page 76

ΠΩΣ ΝΑ ΜΕΙΩΣΕΤΕ ΤΗ ΘΕΡΜΟΚΡΑΣΙΑ
ΣΤΟ ΒΡΑΣΤΗΡΑ
1. Μην τοποθετήσετε το κλείστρο.
2. Τοποθετήστε ένα άδειο φλιτζάνι στη σχάρα.
3. Πατήστε το διακόπτη καφέ (Εικ.1-1) και γεμίστε το
φλιτζάνι με νερό.
4. Πατήσ τε ξανά το διακόπτη καφέ (Εικ.1-1).
Η μηχανή είναι πλέον έτοιμη για τ ην παρασκευή δεύτερου καφέ.
ΛΕΙΤΟΥΡΓΙΑ ΑΥΤΟΜΑΤΗΣ ΔΙΑΚΟΠΗΣ
Η μηχανή διαθέτει λειτουργία εξοικονόμησης ενέργειας.
Έπειτα από 20 λεπτά που δεν χρησιμοποιείται, η μηχανή
σβήνει αυτόματα. Για να την επανενεργοποιήσετε, πατ ήστε
το διακόπτη για το άναμμα / σβήσιμο.
ΚΑΘΑΡΙΣΜΟΣ ΚΑΙ ΣΥΝΤΗΡΗΣΗ
Ο τακτικός καθαρισμός και η συντήρηση διατηρούν τη
μηχανή σε άριστη κατάσ ταση και εγγυών ται άριστη γεύση
του καφέ για μεγάλο χρονικό διάστ ημα, σταθερή ροή καφέ
και εξαιρετικό αφρόγαλα.
ΕΛΛΗΝΙΚΑ
Καθημερινά αφαιρείτε το φίλτρο από το κλείστρο όπως
περιγράφεται στην (Εικ.14) και πλύνετε με χλιαρό νερό.
Σε περίπτωση δυσλειτουργίας σ την
άντληση καφέ, βυθίσ τε τα φίλτρα σε
βραστό νερό για 10 λεπτά και μετά
ξεπλύνετε με τρεχούμενο νερό.
Για καλύτερο καθαρισμό των φίλτρων, σας συνιστούμε να αγοράσετε
τις ταμπλέτες καθαρισμού GAGGIA
που είναι ειδικά σχεδιασμένες για να
διατηρούν τη μη χανή σας σε άριστη
κατάσταση λειτουργίας.
Καθαρισμός της σχάρας και του δίσκου
απόσταξης
Αφαιρέστε το δίσκο απόσταξης και τη σχάρα (Εικ.1-10,11)
και πλύνετε με νερό. Μην χρησιμοποιείτε λειαντικά
προϊόντα.
Καθαρισμός του δοχείου νερού
Καθαρισμός της κάνουλας ατμού
Έπειτα από κάθε παρασκευή αφρού γάλακτος:
1. Καθαρίστε την κάνουλα ατμού με ένα υγρό πανί. Για
βαθύτερο καθαρισμό, μπορείτε να ξ εβ ιδώ σε τε τ ο ακ ρο φύσιο (Εικ.13) και να το πλύνετε με τρεχούμενο νερό.
2. Γυρ ίσ τε το πε ρι σ τρ εφ όμ εν ο κ ου μπ ί α τμ ού κι αφ ήσ τε να
βγει ατμός για ένα ή δύο δευ τερόλεπτα για να ανοίξει
η οπή του ακροφύσιου (Εικ.1-23).
Καθαρισμός του κλείστρου και των φίλτρων
Τα φίλτρα πρέπει να διατηρούνται καθαρά για να εξασφαλίζουν τέλειο αποτέλεσμα.
Προσοχή! Το φίλτρο πρέπει να αντικατασταθεί μόνο
όταν η κούπα του κλείστρου έχει κρυώσει εντελώς, για
να αποφύγετε τυχόν εγκαύματα.
• 71 •
Προσοχή! Ο καθαρισμός του δοχείου πρέπει να πραγματοποιείται μόνο όταν η μηχανή είναι σβηστή για να
αποφευχθεί ο κίνδυνος εγκαύματος. Κατά τη χρήση, ο
σωλήνας αποστράγγισης (Εικ.11) ενδέχεται να φτάσει σε
υψηλές θερμοκρασίες.
Αφαιρέστε το δοχείο νερού (Εικ.1-13) και πλύνετε με
τρεχούμενο νερό.
Για να αφαιρέσετε το δοχείο νερού, αφαιρέστε πρώτα το
δίσκο απόσταξης (Εικ. 1-11) και στη συνέχεια αφαιρέστε
το σωλήνα αποστράγγισης (Εικ.11) τραβώντας τον προς
τα κάτω.
Σηείωση. Σημείωση. Όταν τοποθετείτε ξανά το δοχείο,
βεβαιωθείτε ότι οι σωλήνες σιλικόνης που βρίσκονται μέσα
στο δοχείο δεν έχουν στρίψει ούτε βουλώσει (Εικ.12).
Καθαρισμός της βρύσης ροής
Αφαιρείτε τακτικά τυχόν υπολείμμα τα καφέ από το βρυσάκι
ροής (Εικ.16) με βουρτσάκι και καθαρίζετε με ζεστό νερό
Page 77

ΕΛΛΗΝΙΚΑ
σύμφωνα με τις οδηγίες που περιγράφ ονται στην ενότητα
«Πώς να μειώσετε τη θερμοκρασία».
Καθαρισμός έπειτα από διάστημα μη
χρήσης
Όταν η μηχανή δεν χρησιμοποιείται για μεγάλο χρονικό
διάστημα (περισσότερο από δύο εβδομάδες), ακολουθήστε τις οδηγίες που περιγράφονται στην ενότητα «Για την
πρώτη χρήση ή έπειτα από διάστημα μη χρήσης πέραν
των 2 εβδομάδων».
ΑΦΑΙΡΕΣΗ ΑΛΑΤΩΝ
Ο σχηματισμός αλάτων είναι φυσικό επακόλουθο της χρήσης της
συσκευής. Χρησιμοποιείτε αποκ λειστικά το προϊόν αφαίρεσης αλάτων
GAGGIA, ειδικά σχεδιασμένο για να
διασφαλίζει την απόδοση και τη
λειτουργία της μηχανής σε όλη τη
διάρκεια ζωής της, καθώς ε πίσης και
για να μην υποστεί, εφόσον χρησιμοποιείται σωστά, καμία μεταβολή
το προϊόν που αντλείται. Σε καμία
περίπτωση μην χρησιμοποι είτε ξύδι
ή άλλα προϊόν τα αφαίρεσης αλάτων.
Η αφαίρεση αλάτων είναι απαραίτητο να γίνεται ανά 2
μήνες χρήσης της μηχανής.
Προσοχή! Μην πίνετε το διάλυμα αφαίρεσης
αλάτων καθώς και τα προϊόντα που αντλούνται μέχρι
να ολοκληρωθεί ο κύκλος.
1. Τοπ οθ ετ ήσ τε τ ο κ λεί στ ρο κ άτω απ ό τη μον άδ α άν τλ ησης (Εικ.1-8) και περιστρέψτε το από αριστερά προς
τα δεξιά μέχρι να ασφαλίσει.
2. Αφαιρέστε και αδειάστε το δοχείο νερού (βλ. κεφά λαιο
«Καθαρισμός του δοχείου νερού»).
3. Ρίξτε το ΜΙΣΟ περιεχόμενο της φιάλης με το προϊόν
αφαίρεσης αλάτων GAGGIA στο δοχείο νερού και
γε μίσ τε με φ ρέ σκο πόσ ιμ ο νε ρό μ έχ ρι τ η σ τά θμη MA X.
4. Αν άψ τε τ η μη χα νή π ατ ώντ ας τ ο δ ιακ όπτ η λ ειτ ου ργί ας
(Εικ.1-2).
• 72 •
Αντλήστε 2 φλιτζά νια νερό (περίπου 150 ml το καθένα)
από την κάνουλα ατμού (βλ. κεφάλαιο «Πρ οετοιμασία
ζεστού νερού») και σβήστε τη μηχανή πατώντας το
διακόπτη λειτουργίας (Εικ.1-2).
5. Αφήστε το προϊόν αφαίρεσης αλάτων να δράσει
περίπου 20 λεπτά με σβηστή τη μηχανή.
6. Αν άψτ ε τ η μη χα νή π ατώ ντ ας τ ο δι ακό πτ η λ ειτ ουρ γί ας
(Εικ.1-2).
Αντλήστε 2 φλιτζά νια νερό (περίπου 150 ml το καθένα)
από την κάνουλα ατμού, σβήστε τ η μηχανή πατώντας
το διακόπτη λειτουργίας (Εικ.1-2) και αφήστε την
σβηστή για 3 λεπτά.
7. Επαναλάβετε την άντληση που περιγράφεται στο
σημείο 6 μέχρι να αδειάσει εντελώς το δοχείο νερού.
8. Ξεπλύνετε το δ οχείο και γεμίσ τε το με φρέσκο πόσιμο
νερό.
9. Τοποθετήστε έ να δοχείο κάτω από την κάνουλα ατμού.
Ανοίξτε αργά το περιστρεφόμενο κουμπί ατμού / ζεστού νερού (Εικ. 1-7) γυρίζοντάς το αριστερόστροφα.
Πατήστε το διακόπτη καφέ (Εικ.1-1) και το διακόπτη
ατμού (Εικ.1-3).
10. Αντλήστε όλο το περιεχόμενο του δοχείου νερού
από την κάνουλα ατμού. Για να τερματίσετε την
άντληση, πατήστε ξανά το διακόπτη καφέ (Εικ.1-1)
και το διακόπτη ατμού (Εικ.1-3) και στη συνέχεια
κλείστε το περιστροφικό κουμπί ροής γυρίζοντάς το
δεξιόστροφα.
11. Γεμίστε το δοχείο με φρέσκο πόσιμο νερό.
12. Τοποθετήστε ένα κατάλληλο δοχείο κάτω από το
κλείστρο.
13. Πατήστε το διακόπτη καφέ (Εικ.1-1) και αντλήστε
όλο το νερό που υπάρχει στο δοχείο. Όταν τελειώσει
το νερό, πατήστε ξανά το διακόπτη καφέ (Εικ.1-1)
και το διακόπτη ατμού (Εικ.1-3). Στο τέλος αδειάστε
το δοχείο.
14. Αφαιρέστε το κλείστρο από τη μονάδα περιστρέφοντας από δεξιά προς τα αριστερά και ξεπλύνετε με
φρέσκο πόσιμο νερό.
15. Επαναλάβετε ξανά τη διαδικασία που περιγράφεται
στο σημείο 8, συνολικά για 8 δοχεία. Στη συνέχεια η
μηχανή είναι έτοιμη για χρήση.
16. Ο κύκλος αφαίρεσης αλάτων ολοκληρώθηκε.
17. Γεμίστε ξανά το δοχείο με φρέσκο νερό. Εάν είναι
απαραίτητο φορτίσ τε το κύκλωμα όπως περιγράφε ται
στην ενότητα «Φόρτιση του κυκλώματος».
Page 78

ΣΕ ΠΕΡΙΠΤΩΣΗ ΔΥΣΛΕΙΤΟΥΡΓΙΑΣ
Πρόβληα: Ελέγξτε:
Εάν το δοχείο έχει νερό.
Δεν αντλείται καφές.
Εάν το φίλτρο έχει βουλώσει επειδή το μείγμα είναι πολύ λεπτό
ή ο καφές είναι πολύ συμπιεσμένος.
Εάν το βρυσάκι είναι καθαρό.
ΕΛΛΗΝΙΚΑ
Η άντληση καφέ γίνεται πολύ
γρήγορα (λιγότερο από 20
δευτερόλεπτα).
Η αντλία κάνει πολύ θόρυβο.
Υπερβολική απώλεια νερού από
το κλείστρο.
Ο εσπρέσο έχει λίγη «κρέμα».
Ο καφές είναι πολύ κρύος.
Δεν αφρίζει αρκετά το γάλα.
Η μηχανή πιτσιλάει καφέ από το
κλείστρο.
Εάν ο καφές είναι υπερβολικά χοντροκομμένος.
Εάν ο καφές έχει συμπιεστεί με το πατητήρι.
Εάν υπάρχει νερό στο δοχείο.
Εάν η αντλία έχει ενεργοποιηθεί (βλ. Φόρτιση κυκλώματος).
Εάν η ποσότητα καφέ επαρκεί.
Εάν το κλείστρο έχει τοποθετηθεί σωστά (Εικ.1-17).
Εάν η φλάντζα είναι βρώμικη (Εικ.16).
Εάν υπάρχουν υπολείμματα καφέ στο άκρο του κλείστρου.
Εάν ο καφές είναι υπερβολικά χοντροκομμένος.
Εάν ο καφές έχει συμπιεστεί με το πατητήρι.
Εάν ο καφές είναι πολυκαιρισμένος ή ξηρός.
Εάν χρησιμοποιήθηκε το παραδοσιακό φίλτρο με το ακροφύσιο για το αφρόγαλα
(Εικ.1-16).
Εάν η μηχανή έχει προθερμανθεί.
Εάν ο καφές είναι υπερβολικά χοντροκομμένος.
Εάν ο καφές αντλήθηκε σε κρύα φλιτζάνια. Συνιστάται να αντλείτε πάντα τον καφέ σε
ζεστά φλιτζάνια.
Εάν έχει προθερμανθεί το κλείστρο (μόνο για τον 1ο καφέ).
Εάν έχει βουλώσει το ακροφύσιο ατμού.
Εάν το ακροφύσιο ατμού βρίσκεται πολύ βαθιά μέσα στη γαλατιέρα.
Εάν το γάλα είναι πολύ ζεστό.
Εάν έχει τοποθετηθεί το ακροφύσιο για το αφρόγαλα με το φίλτρο “crem a per fet ta”.
Ο σκελετός της μηχανής και ο
σωλήνας αποστράγγισης είναι
πολύ ζεστοί.
Εάν το κουμπί ατμού είναι σβηστό.
• 73 •
Page 79

MAGYAR
GRATULÁLUNK A VÁLASZTÁSÁHOZ!
Az új Gaggia Classic megvásárlásával olyan géptípust választott, amely lehetővé teszi az Ön számára, hogy igazi
bárpultossá váljon otthonában és minden kávészünetben újra felfedezze az eszpresszó szakembereinek a hagyományos gesztusait. A Classic haszná lata során gyeln i kell minden részletre ugyanúgy, mint egy professzio nális kávézói
kávéfőzőgép esetén: a gépnek forróna k kell lennie, a szűrőtartónak mindig bes zerelt állapotban kell lennie, hogy a
teljes kieresztő egységben egyenletes hőmérsékletet biztosítson. A kávé darálása legyen no m, de nem túlságosan.
A megfelelő mennyiség ű őrölt kávét kell a szűrőbe helyezni és ez t megfelelő nyomással kell lenyomni, a nnak érdekében, hogy elkerülj e a kávé túl gyors kifolyását (túl gyenge nyomás) vagy a kifolyás nehézkességét (túl erős nyomás).
Az új Classic rendelke zik egy szűrőtartó egységgel és egy gőzfúvókával, melye k a professzionális gépekével azonosak.
TARTALOMJEGYZÉK
LEÍRÁS ................................................................................................................................75
TUDNIVALÓK ........................................................................................................................75
BEVEZETÉS .......................................................................................................................... 76
MELLÉKELT SZŰRŐK ..............................................................................................................76
„Crema perfetta” szűrő 1 vagy 2 csészéhez (5. ábra). .............................................................................................76
Hagyományos szűrő 2 csészéhez (7. ábra). ............................................................................................................76
Hagyományos szűrő 1 csészéhez/egyadagos patronhoz (6. ábra). .........................................................................76
ELSŐ TELEPÍTÉS ....................................................................................................................76
A rendszer feltöltése. .............................................................................................................................................76
Első használat esetén vagy 2 hetet meghaladó inaktivitás után. ...........................................................................76
ESZPRESSZÓ KÉSZÍTÉSE ŐRÖLT KÁVÉVAL ................................................................................. 77
Folytassa az eszpresszó elkészítésével: ..................................................................................................................77
ESZPRESSZÓ KÉSZÍTÉSE PATRONOS KÁVÉVAL ..........................................................................78
KAPUCSÍNÓ KÉSZÍTÉSE .......................................................................................................... 78
MELEG VÍZ KIERESZTÉSE ........................................................................................................ 79
A KAZÁN HŐMÉRSÉKLETÉNEK CSÖKKENTÉSE ........................................................................... 79
ÖNKIKAPCSOLÓ FUNKCIÓ ......................................................................................................79
TISZTÍTÁS ÉS KARBANTARTÁS ................................................................................................79
A gőzfúvóka tisztítása ...........................................................................................................................................79
A szűrőtartó és szűrők tisztítása ............................................................................................................................80
A rács és a cseppgyűjtő tálca tisztítása .................................................................................................................80
A víztartály tisztítása .............................................................................................................................................80
A felső szűrő tisztítása ..........................................................................................................................................80
Tisztítás hosszú állásidő után ................................................................................................................................80
VÍZKŐMENTESÍTÉS ................................................................................................................80
MEGHIBÁSODÁS ESETÉN ........................................................................................................82
• 74 •
Page 80

LEÍRÁS
A GÉP ÁTTEKINTÉSE 1. ÁBRA
1 Kávé gomb
2 Be/ki gomb
3 Gőzölés gomb
4 Be/ki kijelző
5 Kávéhőmérséklet-kijelző
6 Gőzhőmérséklet-kijelző
7 Gőzölés/meleg víz forgatógomb
8 Kávékieresztő egység
9 Kieresztő cső
10 Rács
11 Cseppgyűjtő tálca
12 Víztartály fedele
13 Víztartály (kivehető)
14 Gőzfúvóka/meleg víz kieresztő védőgumival
15 „Crema perfetta” szűrő 1 és 2 csészéhez.
Csak sugártörő emulgeálóval használható (1-16. ábra)
16 Sugártörő emulgeáló
17 Szűrőtartó
18 Hagyományos szűrő 2 csészéhez
19 Hagyományos szűrő 1 csészéhez/patronhoz
20 Mérőkanál
21 Tömörítő
22 Tá pkábe l és dugó
23 Gőzfúvóka
MAGYAR
TUDNIVALÓK
1. Az eszpresszó kávé íze az alkalmazott kávé mennyiségétől és típusától függ.
2. A kávébab különleges íze számos tényezőtől függ,
ám íze és aromája a pörkölés eredménye. A hoszszabb ideig és magasabb hőmérsékleten pörkölt
kávébab sötétebb színű. A sötétebb kávébabok több
ízanyagot eresztenek ki, mint a világos szemek.
Kereskedelemben különböző minőségű kávéfajták
vannak forgalomban. Valamennyi pörköléstípust egy
bizonyos hőmérsékleten pörkölt kávébabok keveréke
és egy különleges aromatípus jellemez.
Vannak olyan ko einmentes fajták, amelyek c sak 2%
ko eint tar talmaznak. Próbálja ki eszpresszógépével
a kereskedelemben kapható különböző kávéfajták
egyikét. Valószínűleg jobb aromát fog felfedezni az
eddig alkalmazott keverékekhez képest.
3. A szivatt yús eszpresszógépek nomra őrölt keveréket
igényelnek. Győződjön meg róla, hogy eszpresszó
kávé gépekkel való használatra alkalmas darálási
nomsággal rendelkező keveréket vásárol. Tanácsos
malomköves darálót használni pengés daráló helyett,
me rt ez t úl sok káv ép or t er es zt ki é s s zab ál yt ala n őr öl t
keveréket eredményez.
4. Ideális esetben a k ávét közvetlenül használat előtt kell
őrölni. Ne felejtse, hogy szivattyús eszpresszógéphez
kell őrölni.
5. Tanácsos az őrölt kávét vagy k ávébabot légmentesen
lezárt dobozokban hűtőszekrényben tárolni. Az őrölt
kávé könnyen felszívja a szagokat.
6. Az igazi eszp resszó sötét színű, gazdag ízű és tipikusan
"természetes krém".
7. A kapucsínó az eszpress zó kávé és az emulgeált meleg
tej különleges kombinációja. Felszolgálható fahéj jal,
szerecsendióval vagy kakaóval megszórva.
8. Az eszpresszó kávét elkészítés után azonnal fel kell
szolgálni.
9. Az eszpresszó kávét kávéscsészékben, a kapucsínót
bögrében szolgálja fel.
• 75 •
Page 81

MAGYAR
BEVEZETÉS
A gép első használata előtt, olvassa el figyelmesen a
mellékelt biztonsági tájékoztatót, és őrizze meg későbbi
használatra.
MELLÉKELT SZŰRŐK
„Crema perfetta“ szűrő 1 vagy 2 csészéhez
(5. ábra).
Ez a szűrő már be van szerelve a szűrőt artóba, és lehetővé
teszi krémes eszpresszó készítését a gép első használataikor is.
A rendszer feltöltése.
Figyelem! A kávé gomb bekapcsolása előtt először
töltse fel a rendszert.
1. Helyezzen egy üres csészét a kieresztő egység alá
(1-8. ábra) anélkül, hogy behelyezné a szűrőtartót,
és nyomja meg a kávé gombot (1-1. ábra).
A szivattyú aktiválásakor hangjelzés hallható és néhány másodperc múlva a víz elkezd kifolyni a kieres ztő
egységből (1-8. ábra).
2. Mi ut án h agy ta , ho gy a c sés ze fel töl tő djö n (k b. 1 50c c),
nyomja meg újra a kávé gombot (1-1. ábra).
Megjegyzés. Ezt a szűrőt csak sugártörő emulgeálóval
szabad használni. (1-16. ábra).
Hagyományos szűrő 2 csészéhez (7. ábra).
Hagyományos szűrő 1 csészéhez/egyadagos
patronhoz (6. ábra).
Ezek a szűrők olyanok, mint a professzionális kávézói
gépekhez használatos szűrők, és ügyességet és tapasztalatot igényelnek.
Megjegyzés. Ezeket a szűrőket nem szabad sugártörő
emulgeálóval használni. (1-16. ábra).
Javasoljuk, hogy „Crema perfetta“ szűrővel kezdje el a
gép használatát és miután megfelelő ügyességgel és
tapasztalattal rendelkezik, térjen át a hagyományos szűrő
használatára valódi bárpultos használatot élvezhessen.
ELSŐ TELEPÍTÉS
1. Távolítsa el a víztar tály fedelét (2. ábra), és töltse fel
hideg vízzel a tartály MAX szintjéig (1-13. ábra).
2. Dugja be a dugót a gép hátulján lévő nyílásba (9.
ábra) és a hálózati kábel másik végét dugja be egy
megfelelő feszültségű fali konnektorba.
Nyomja meg a be/ki gombot (1-2. ábra), a be/ki kijelző
kigyullad (1-4. ábra).
Megjegyzés. Előfordulhat, hogy a szivattyú önindítója
ideiglenesen nem működik egy „légbuborék“ miatt.
Ha a kieresztő egységből nem jön víz (1.-8. ábra), az
alábbiak szerint járjon el:
1. Helyezzen egy csészét a gőzfúvóka alá (1-14. ábra).
2. Az óramutató járásával ellentétes irányba fordítsa
el a forgatógombot (1-7. ábra) a gőzölés/meleg víz
kieresztő csap kinyitásához.
3. A szivatt yú aktiválásához nyomja meg a kávé gombot
(1-1. ábra).
4. Néhány másodperc múlva a víz elkezd kifolyni a
gőzfúvókából.
Hagyjon kifolyni kb. egy csészényi vizet.
5. Zárja el a gőzölés/meleg víz k ieresztés forgatógombot
(1-7. ábra).
6. Ezután nyomja meg ismét a kávé gombot (1-1. ábra).
Első használat esetén vagy 2 hetet meghaladó inaktivitás után.
Megjegyzés. A folyamat során kieresztett vizet ki kell
önteni, mert nem alkalmas fogyasztásra. Ha a ciklus során
az edény feltöltődik, állítsa le a kieresztést és a művelet
folytatása előtt ürítse ki.
1. Öblítse el a víztartályt (2. ábra) (lásd a „víztartály
tisztítása“ bekezdést) és töltse fel hideg ivóvízzel.
2. Helyezzen egy edényt a gőzfúvóka alá (1-14. ábra).
• 76 •
Page 82

3. Lassan nyissa ki a gőzölés/meleg víz forgatógombot
(1-7. ábra) az óramutató járásával ellentétes irányba
forgatásával.
4. Nyomja meg a kávé gombot (1-1. ábra) és a gőzölés
gombot (1-3. ábra).
5. Eressze ki a víztartály teljes tartalmát a gőzfúvókán
keresztül.
6. A kieresztés befejezéséhez nyomja le ismét a kávé
gombot (1-1. ábra) és a gőzölés gombot (1-3. ábra).
7. Zárja el a csap forgatógombját (1-7. ábra) az óramutató járásával megegyező irányba tör ténő elforgatásával.
8. Töltse fel a tartályt hideg ivóvízzel (2. ábra).
9. Alulról helyezze be a szűrőtartót (3. ábra) a kieresztő
egységbe és forgassa el balról jobbra egészen a
rögzüléséig (4. ábra).
10. Tegyen egy megfelelő edényt a szűrőtartó alá.
11. Nyomja meg a kávé gombot (1-1. ábra), és eressze ki
a tartályban lévő összes vizet.
12. Amikor a víz elfogyott, fejezze be a kieresz tést a kávé
gomb ismételt lenyomásával (1-1. ábra), és ürítse ki
az edényt.
13. Vegye ki a szűrőtartót az egységből jobbról balra
forgatva, és öblítse ki hideg ivóvízzel.
14. A gép használatra készen áll.
ESZPRESSZÓ KÉSZÍTÉSE ŐRÖLT KÁVÉVAL
A mellékelt szűrőtartó „Crema perfetta“ szűrővel van
felszerelve egy vagy két kávé elkészítéséhez.
Figyelem! Ha a „Crema perfetta“ szűrőt alkalmazza
sugártörő emulgeáló nélkül, a gép erősen ereszti ki a
kávét és fennáll az égési sérülés veszélye.
Megjegyzés. Ha hagyományos szűrőt szeretne használni
(6/7. ábra), távolítsa el a „Crema perfetta“ szűrőt (5. ábra)
és a sugártörő emulgeálót (1-16. ábra).
Az első kávé kieresztéséhez először elő kell melegíteni a
szűrőtartót (1-17. ábra):
1. Helyezze be a szűrőtartót (1-17. ábra) a kieresztő
egységbe (1-8. ábra), 45°-kal balra mozgatva és jobb
• 77 •
MAGYAR
felé forgatva, hogy a helyére rögzítse. A szűrőtartó
fogantyújának merőlegesen kell elhelyezkednie a
gépen, vagy egy kissé jobbra.
2. Helyezzen egy nagy csészét a szűrőtartó alá (1-17.
ábra), és nyomja meg a kávé gombot (1-1. ábra)
3. Miután a csésze megtelt vízzel (kb. 150cc), nyomja
meg ismét a kávé gombot és várjon néhány percet,
amíg a gép, a behelyezett szűrőtartóval, eléri a
megfelelő hőmérsékletet.
Megjegyzés. A szűrőtartó belsejében maradhat egy kis
víz, melyet el kell távolítani, mielőtt teletöltené a szűrőt az
őrölt kávéval.
Folytassa az eszpresszó elkészítésével:
4. Távolítsa el a szűrőtar tót (1-17. ábra), és tölt se fel őrölt
kávéval a géphez mellékelt mérőkanállal (1-20. ábra).
Csészénként egy mérőkanálnyi kávét számoljon.
Megjegyzés. Javasoljuk, hogy pörköljön vagy kiskereske-
delemben kapható nom darálású kávét vásároljon, amely
kávéfőző gépekkel használható.
5. Nyomja le a megfelelő tömörítővel (1-21. ábra). A
tömörítést egységes módon kell elvégezni, hogy
egyenletes sík felületet kapjon.
6. Tisztítsa meg a szűrőtartó szélét (1-17. ábra) az
esetleges kávémaradékoktól.
7. Helyezze be a szűrőtartót (1-17. ábra) a kieresztő
egységbe (1-8. ábra), 45°-kal balra mozgatva és jobb
felé forgatva, hogy a helyére rögzítse. A szűrőtartó
fogantyújának merőlegesen kell elhelyezkednie a
gépen, vagy egy kissé jobbra.
8. Várja meg, hogy a kijelző kigyulladjon (1-5. ábra).
9. Nyomja meg a kávé gombot (1-1. ábra).
10. Amikor a csészék 3/4-ig vannak tele, nyomja meg
ismét a kávé gombot (1-1. ábra).
A kávé az alkalmazott vízmennyiségtől függően
többé-kevésbé erős lesz, és ha megfelelő eljárással
készítette, akkor tipikus mogyorószínű/barna „természetes krémet“ kap.
Egy másik eszpresszó elkészítéséhez lassan és óvatosan
távolítsa el a szűrőtartót balra mozgatva. Ügyeljen arra,
Page 83

MAGYAR
hogy ne égesse meg magát a kávéz accban maradt vízzel.
A szűrőtartó eltávolítása után még kifolyik egy kevés víz.
Ezt a rendszerben lévő víznyomás okozza. Távolítsa el a
zaccot a szűrőből és a lehetséges maradékokat a felső
szűrőből (16. ábra).
Megjegyzés. Tanácsos a szűrőtartót tisztán tartani a
, de ne húzza meg túlságosan, hogy mindig optimális
gépen
hőmérsékletet biztosítson a teljes kieresztő egységben.
ESZPRESSZÓ KÉSZÍTÉSE PATRONOS
KÁVÉVAL
Megjegyzés. A patronok használatához csak a hagyomá-
nyos 1 csészés szűrőt használja (6. ábra).
Kövesse az őrölt kávéval készült eszpresszó készítéséhez
szükséges ut asításokat és az őrölt kávé helyett használja a z
egyadagos előre őrölt kávés patront. Helyezze be a patront
a szűrőtartóba (1-17. ábra). Győződjön meg róla, hogy a
patron papírja ne lógjon ki a szűrőtartóból.
KAPUCSÍNÓ KÉSZÍTÉSE
Hagyományos kapucsínó készítéséhez az alábbiakat
javasoljuk
- lehetőleg kiváló minőségű friss hideg teljes tej használata. Az emulgeált tej sűrűsége a tej z sírtartalmától
függ.
- rozsdamentes acélból készült, kerek, domború, felül
összeszűkülő csőrös tejkiöntő használata díszített
kapucsínók készítéséhez.
A gőzfúvóka (1-14. ábra) elegendő gőzt eresz t ki a tej forrás
nélküli emulgeálásához.
Két vagy három kísérlettel és e gy kis erőfeszítéssel pro vá
válhat a kapucsínókészítésében.
A készítés elkezdése előtt tolja kissé kifelé a gőzfúvókát,
hogy a tejkiöntőt közvetlenül a gőzfúvóka alá helyezze
és megkönnyítse a megfelelő tejemulzióhoz szükséges
mozgásokat.
Ekkor az alábbiak szerint járjon el:
2. Nyomja meg a gőzölés gombot (1-3. ábra).
3. 15-20 másodperc után és amikor a gőzhőmérsék-
let-kijelző (1-6. ábra) kigyullad.
4. Forgassa el a gőzölés/meleg víz forgatógombot egy
kissé az óramutató járásával ellentétes irányb a, hogy
eltávolítsa a kondenzvizet a gőzfúvókából és zárja el
a forgatógombot.
5. Helyezze a hide g tejjel félig teli tejkiöntőt a gőzfúvóka
alá.
6. Helyezze a gőzfúvóka csövét egy kissé a tej felülete
alá, ha a cső nagyon belelóg, akkor a tej nem habosodik, ha pedig túlságosan kint van, akkor nagy buborékok keletkeznek, melyek azonnal kipukkannak.
Fontos, hogy a fúvóka ne középen, hanem a kiöntő
széléhez közel legyen, olyan szögben, amely alkalmas
egy állandó örvény létrehozására (8-1. ábra).
7. Fordítsa el a gőzkieresztő csap forgatógombját (1-7.
ábra) az óramutató járásával ellentétes irányba a gőz
kieresztéséhe z. Ebben a fázisban a levegő felszívása a
legnagyobb. A tejet szinte hidegen kell emulgeálni.
Megjegyzés. A gőznyomás a forgatógomb forgatásával nő.
Megjegyzés. A kieresztést max. 60 másodpercig ajánljuk.
A 60 másodpercet meghaladó folyamatos gőzkieresztés
teljesen kiüríti a kazánt. Ebben az esetben a „Rendszer
feltöltése“ c. bekezdésben leírtaknak megfelelően járjon el.
Megjegyzés. A helyes tejemulzióhoz a gőzfúvókának (1-23.
ábra) mindig érintkeznie kell a tejjel, és nem a tejemulzióval
(8-2. ábra). Ezért, amint az emulziós réteg növekszik, a
kiöntőt kissé fel kell emelni, és próbálja meg a fúvókát a
tejjel érintkezve tartani anélkül, hogy elérné a kiöntő alját
(8-A. ábra).
8. A kívánt emulzió elérése után a gőzfúvókát lejjebb
kell nyomni a tej alapos felmelegítéséhez.
Megjegyzés. Javasoljuk, hogy mindig tartsa a kezét a
kiöntő domború részén, hogy érezze a még nem emulgeált
tej hőmérsékletének emelkedését.
1. Az eszpresszót egy nagy kapucsínós csészébe készítse
el az „Eszpresszó kávé készítése őrölt kávéval“ című
bekezdésben leírtaknak megfelelően.
• 78 •
9. A kívánt eredmény elérése után zárja el a gőzölés
forgatógombot az óramutató járásával megegyező
irányba, hogy félbeszakítsa a gőz kieresztését és
távolítsa el a kiöntőt.
Page 84

Megjegyzés. Miután befejezte a tej habosítását, az emulzió
tömörítése érdekében tanácsos enyhén megütni a kiöntő
egyik oldalát, majd hagyja legalább 30 másodpercig pihenni.
Így a tej homogénebb lesz.
Figyelem! Fontos, hogy csak a szükséges tejet habosítsa fel. A kiöntőben maradt meleg tejet nem szabad újra
használni; ez károsíthatja az emulzió minőségét és főleg
a kapucsínó ízét. Ezért ezt más célokra kell felhasználni.
10. Nyomja meg a gőzölés gombot (1-3. ábra).
Öntse az emulgeált tejet a kávéba. Díszítse fahéjjal,
kakaóval, szerecsendióval.
Egy másik kávé azonnali elkészítéséhez, hűtse le a kazán
hőmérsékletét úgy, hogy kiereszti a meleg vizet a kávékieresztő egységből (1-8. ábra). Kövesse a „Hőmérséklet
cs ökken tése “ című beke zdés u tasí tása it, kü lönbe n a káv é
íze égett lehet.
Figyelem! Használat közben és után a gőzfúvóka forró
lehet. Az égési sérülések elkerülése érdekében ujjait csak
gőzfúvókára szerelt gumibetétre helyezze.
MAGYAR
tató járásával megegyező irányba.
Egy másik kávé azonnali elkészítéséhez, hűtse le a
kazán hőmérsékletét úgy, hogy kiereszti a meleg vizet
a kávékieresztő egységből (1-8. ábra). Kövesse a „Kazán
hőmérsékletének csök kentése“ című bekezdés utasításait,
különben a kávé íze égett lehet.
Megjegyzés. A kieresztést max. 60 másodpercig ajánljuk.
Figyelem! Használat közben és után a gőzfúvóka forró
lehet. Az égési sérülések elkerülése érdekében ujjait csak
gőzfúvókára szerelt gumibetétre helyezze.
A KAZÁN HŐMÉRSÉKLETÉNEK CSÖKKENTÉSE
1. Ne helyezze be a szűrőtartót.
2. Helyezzen egy üres poharat a rácsra.
3. Nyomja meg a kávé gombot (1-1. ábra), és töltse fel
a csészét vízzel.
4. Ezután nyomja meg ismé t a kávé gombot (1-1. ábra).
A gép készen áll egy másik kávé kieresztésére.
Figyelem! Ha a kávét kiereszti anélkül, hogy lehűtené
a víz hőmérsékletét, fennáll az égési sérülés veszélye!
MELEG VÍZ KIERESZTÉSE
1. Kapcsolja be a gépet és várjon néhány percet, amíg
a megfelelő kávéhőmérséklet-kijelző (1.-5. ábra) ki
nem gyullad.
2. Helyezzen egy c sészét a professzionális gőz fúvóka alá.
3. Az óramutató járásával ellentétes irányban lassan
forgassa el a gőzölés forgatógombot (1-7. ábra), és
nyomja meg egyszerre a kávé gombot (1-1. ábra) és
a gőzölés gombot (1-3. ábra), hogy lehetővé tegye a
meleg víz kieresztését.
4. M iut án el ér te a kí ván t m enn yi sé gű m el eg v iz et , ál lí ts a
le a kieresztést a kávé gomb (1-1. ábra) és a gőzölés
gomb (1-3. ábra) ismételt együttes me gnyomásával,
majd forgassa el a gőzölés forgatógombot a z óramu-
• 79 •
ÖNKIKAPCSOLÓ FUNKCIÓ
A gép energiatakarékos funkcióval rendelkezik. 20 perc
inaktivitás után a gép automatikusan kikapcsol. A viszszakapcsoláshoz nyomja meg a be/ki gombot.
TISZTÍTÁS ÉS KARBANTARTÁS
A rendszeres tisztítás é s karbantartás a gépet optimális állapotban tartja, és nom ízű kávét, egyenletes ki eresztést
és kiváló tejhabot biztosít hosszú időn át.
A gőzfúvóka tisztítása
Minden tejemulzió után:
1. A gőzfúvókát nedves ruhával tisztítsa meg. Az alaposabb tisztításhoz csavarja le a fúvókát (13. ábra),
és mossa le folyóvízzel.
2. Nyissa ki a gőzölés forgatógombot, és hagyja, hogy
a gőz egy vagy két másodpercig elhagyja a fúvókát
és kitisztítsa a fúvóka nyílását (1-23. ábra).
Page 85

MAGYAR
A szűrőtartó és szűrők tisztítása
A szűrőket tisztán kell tartani, hogy tökéletes eredményt
biztosítson.
Figyelem! A szűrőt csak akkor szabad cserélni, ha a
szűrőtartó csésze teljesen lehűlt, hogy elkerülje az égési
sérüléseket.
Naponta vegye ki a szűrőt a szűrőtartóból a (14. ábrán)
leírtak szerint és mossa le langyos vízzel.
Ha a kávékieresztés során rendellenes működést észlel, 10 percig
merítse a szűrőket for ró vízbe, majd
folyóvízzel öblítse le őket.
A szűrők jobb tisztítása érdekében,
a tisztításhoz javasoljuk GAGGIA
tabletták vásárlását, amelyeket
kifejezetten úgy terveztek, hogy
a gépet tökéletes üzemben tartsa.
A rács és a cseppgyűjtő tálca tisztítása
Vegye ki a cseppgyűjtő t álcát és a rácsot (1-10,11. ábra), és
mossa el vízzel. Ne használjon abrazív hatású anyagokat.
A felső szűrő tisztítása
Rendszeresen távolítsa el a maradék kávézaccot a felső
szűrőből (16. ábra) egy kefével és végezze el a tisztítást
meleg vízzel, a „Hőmérséklet c sökkentése“ c. bekezdésben
leírtak szerint.
Tisztítás hosszú állásidő után
Ha a gépet hosszabb időn keresztül (több mint két hétig)
nem használja, kövesse az „Első használatkor vagy 2
hétnél hosszabb inaktivitási idő esetén“ c. bekezdésben
megadott utasításokat.
VÍZKŐMENTESÍTÉS
A vízkőképződés a készülék használatával járó természetes jelenség.
Kizárólag csak a GAGGIA vízkőmentesítő szert használja, mely kifejezetten arra lett kifejlesztve, hogy a
segítségével a gép a teljes élettartama alatt maximálisan megőrizze
teljesítményét és funkcióit, illetve
hogy megfelelő használat esetén a
kieresztett italok minősége ne változzon. Soha ne használjon ecetet
vagy egyéb vízkőmentesítő szert.
A víztartály tisztítása
Figyelem! A tartály tisztítását csak kikapcsolt gép
mellett kell elvégezni az égési sérülések elkerülése
érdekében. Használat során a kieresztő-cső (11. ábra)
magas hőmérsékleteket érhet el.
Vegye ki a víztartály (1-13. ábra), és mossa el folyóvízzel.
A víztartály eltávolításához először távolítsa el a cseppgyűjtő tálcát (1-11. ábra), majd lefelé húzza ki a kieresztő
csövet (11. ábra).
Megjegyzés. Helyezze vissza a tartályt, és győződjön meg
róla, hogy a szilikon csövek a tartály belsejében legyenek,
és ne legyenek megcsavarodva, sem blokkolva (12. ábra).
• 80 •
A gép vízkőmentesítését 2havonta kell elvégezni.
Figyelem! Ne igya meg a vízkőmentesítő oldatot és a
vízkőmentesítési ciklus végéig kieresztett italokat.
1. Alulról helyezze be a s zűrőtartót a kieresztő eg ységbe
(1-8. ábra) és forgassa el balról jobbra egészen a
rögzüléséig.
2. Vegye ki és ürítse ki a víztartályt (lásd a „Víztartály
tisztítása“ c. fejezetet).
3. Töltse a GAGGIA vízkőmentesítőszer-koncentrátumos
palack FELE tart almát a víztartályba, majd tölts e fel a
víztartályt hideg ivóvízzel a MAX jelzésig.
4. A be/ki gomb (1-2. ábra) megnyomásával kapcsolja
be a gépet.
Eresszen ki 2 csé sze vizet (kb. 2 x 150 ml) a gőzfúvókán
Page 86

keresztül (lásd a "“Meleg ví z készítés“ c. fejezetet), és
kapcsolja ki a gépet a be/ki gomb megnyomásával
(1-2. ábra).
5. Kikapcsolt gép mellett hagyja 20 percig hatni a
vízkőmentesítő szert.
6. A be/ki gomb (1-2. ábra) megnyomásával kapcsolja
be a gépet.
A gőzfúvókán keresztül eresszen ki két csésze vizet
(kb. 2 x 150 ml-t), kapcsolja ki a gépet a be/ki gomb
(1-2. ábra) megnyomásával, és hagyja kikapcsolva
3 percig.
7. Ismételje meg a vízkieresz tést a 6. pontban leírtaknak
megfelelően, míg a víztartályban lévő víz teljesen ki
nem ürül.
8. Öblítse ki a t artályt, majd töltse meg hideg ivóvíz zel.
9. Helyezzen eg y edényt a gőzfúvóka alá. Lassan nyissa
ki a gőzölés/meleg víz forgatógombot (1-7. ábra) az
óramutató járásával ellentétes irányba forgat ásával.
Nyomja meg a kávé gombot (1-1. ábra) és a gőzölés
gombot (1-3. ábra).
10. Eressze ki a víztartály teljes tartalmát a gőzfúvókán
keresztül. A kieresztés befejezéséhez nyomja meg
újra a kávé gombot (1-1. ábra) és a gőzölés gombot
(1-3. ábra), majd az óramutató járásával megegyező
irányba elforgatva zárja le a csap forgatógombját.
11. Töltse fel a tartályt hideg ivóvízzel.
12. Tegyen egy megfelelő edényt a szűrőtartó alá.
13. Nyomja meg a kávé gombot (1-1. ábra), és eressze ki
a tartályban lévő ös szes vizet. Amikor a víz elfogyott,
fejezze be a kieresztést a kávé gomb (1-1. ábra) és
a gőzölés gomb (1-3. ábra) ismételt lenyomásával.
Ezután ürítse ki az edényt.
14. Vegye ki a szűrőtartót az egységből jobbról balra
forgatva, és öblítse ki hideg ivóvízzel.
Ismételje meg a műveleteket a 8. ponttól, mind a 8
15.
tartályhoz. Ezután a gép használatra készen áll.
16. A vízkőmentesítési ciklus véget ért.
17. Töltse fel ismét a tartályt hideg vízzel. Szükség
esetén töltse fel a rendszert a „Rendszer feltöltése“
c. fejezetben leírtak szerint.
MAGYAR
• 81 •
Page 87

MAGYAR
MEGHIBÁSODÁS ESETÉN
Probléma: Ellenőrizze, hogy:
legyen víz a tartályban.
nincs kávékieresztés.
a szűrő nincs-e eltömődve, mert a keverék túl nom vagy a kávé nincs-e túlságosan
tömörít ve.
a felső szűrő tiszta-e.
a kávé kieresztése túl gyors
(kevesebb, mint 20 másodperc).
a szivattyú túl zajos.
a szűrőtartóból túl sok víz folyik.
az eszpresszó nem elég „krémes“.
a kávé túlságosan hideg.
a tej nem emulgeálódik megfelelően.
a gép a szűrőtartóból kifújja a
kávét.
a kávé őrlése nem-e túl durva.
a kávé le lett-e nyomva a tömörítővel.
legyen víz a tartályban.
a szivattyú aktiválva van-e (lásd a rendszer feltöltését).
elegendő-e a kávé mennyisége.
a szűrőtartó helyesen van-e behelyezve (1-17. ábra).
a tömítés nem-e piszkos (16. ábra).
nincsenek-e kávémaradékok a szűrőtartó szélén.
a kávé őrlése nem-e túl durva.
a kávé le lett-e nyomva a tömörítővel.
a kávé nem-e túl régi vagy száraz.
a hagyományos szűrőt használja-e a sugártörő emulgeálóval (1-16. ábra).
a gép fel lett-e fűtve.
a kávé őrlése nem-e túl durva.
a kávé hideg csészékbe lett-e kieresztve. Javasoljuk, hogy a kávét mindig
meleg csészékbe eressze ki.
a szűrőtartót nem-e melegítették elő (csak az 1. kávé esetében).
a gőzfúvóka nincs-e eltömődve.
a gőzfúvóka nincs-e túl mélyen a kiöntőben.
a tej nem-e túl forró.
a sugártörő emulgeáló „Crema perfetta“ szűrővel van-e felszerelve.
a gép burkolata és a kieresztő-cső
nagyon melegek.
a gőzölés gomb ki legyen kapcsolva.
• 82 •
Page 88

ROMÂNĂ
VĂ FELICITĂM PENTRU ALEGEREA FĂCUTĂ!
Achiziționând noul Gaggia Classic, ați ales un model de aparat care vă va permite să deveniți un adevărat barman
la domiciliu, regăsind în ecare pauză de cafea gesturile tradiționale ale profesioniștilor din domeniul espresso.
Utilizarea aparatului Classic necesită atenție la ecare detaliu, la fel cum se întâmplă și cu un aparat profesional
de bar: aparatul trebu ie să e bine încălzit și supo rtul de ltru trebuie să e întotdeauna mo ntat, pentru a menține
o temperatură omogenă în tot grupul de infuzare, gradul de măcinare al cafelei trebuie să e n, dar nu excesiv,
trebuie să se introducă cantitatea exactă de cafea măcinată în ltru și să se preseze cu intensitatea exactă, nu doar
ușor, pentru a evita ieșirea prea rapidă a cafelei, nici prea mult, ceea ce ar îngreuna mult distribuirea.
No ul a pa ra t Cl ass ic e st e do ta t cu un g ru p de su por t d e l tr u și o du ză d e a bu r si mi lar ă ce le i de la apa ra tel e p rof es ion al e.
CUPRINS
DESCRIERE...........................................................................................................................84
LUCRURI DE ȘTIUT ................................................................................................................ 84
INTRODUCERE ......................................................................................................................85
FILTRE ÎN DOTARE ................................................................................................................ 85
Filtru „crema perfetta” pentru 1 sau 2 cești (Fig. 5). ...............................................................................................85
Filtru tradițional 2 cești (Fig. 7). ............................................................................................................................85
Filtru tradițional 1 ceașcă/capsulă monodoză (Fig. 6). ..........................................................................................85
PRIMA INSTALARE ................................................................................................................85
Încărcarea circuitului. ............................................................................................................................................85
La prima utilizare sau după o perioadă de inactivitate mai mare de 2 săptămâni. ................................................85
PREPARAREA UNUI ESPRESSO CU CAFEA MĂCINATĂ..................................................................86
Continuați prepararea cafelei espresso: .................................................................................................................86
PREPARAREA UNUI ESPRESSO CU CAPSULE DE CAFEA ..............................................................87
PREPARAREA UNUI CAPPUCCINO ...........................................................................................87
PREPARAREA DE APĂ CALDĂ ..................................................................................................88
MODUL DE REDUCERE A TEMPERATURII CENTRALEI .................................................................. 88
FUNCȚIA DE OPRIRE AUTOMATĂ .............................................................................................88
CURĂȚARE ȘI ÎNTREȚINERE .................................................................................................... 88
Curățarea duzei de abur ........................................................................................................................................88
Curățarea suportului de ltru și a ltrelor .............................................................................................................89
Curățarea tăviței și a cuvei de colectare a picăturilor .............................................................................................89
Curățarea rezervorului de apă ................................................................................................................................89
Curățarea sitei ......................................................................................................................................................89
Curățarea după o perioadă de nefolosire ...............................................................................................................89
DECALCIFIERE ......................................................................................................................89
ÎN CAZ DE DEFECȚIUNE .......................................................................................................... 91
• 83 •
Page 89

ROMÂNĂ
DESCRIERE
IMAGINE DE ANSAMBLU A APARATULUI
.1
FIG
1 Tastă cafea
2 Tastă de pornire/oprire
3 Tas tă abur
4 Indicator luminos de pornire
5 Indicator luminos pentru temperatura cafelei
6 Indicator luminos pentru temperatura aburului
7 Manivelă abur/apă caldă
8 Grup de infuzare cafea
9 Tub de evacuare
10 Tăviţă
11 Cuvă de colectare a picăturilor
12 Capac pentru rezervor
13 Rezervor de apă (detașabil)
14 Duză de abur/apă caldă cu cauciuc de protecție
15 Filtru „crema perfetta” 1 și 2 cești De utilizat doar
cu aeratorul dispozitivului de spumare a laptelui
(Fig.1-16)
16 Aerator dispozitiv de spumare a laptelui
17 Suport de ltru
18 Filtru tradițional 2 cești
19 Filtru tradițional 1 ceașcă/capsule
20 Măsură
21 Presă
22 Cablu și ștecher de alimentare
23 Ajutaj de abur
LUCRURI DE ȘTIUT
1. Savoarea cafelei espresso depinde de cantitatea și de
tipul cafelei utilizate.
2. Savoarea speci că a unei boabe de cafea depinde de
div erși fac tori, însă gust ul și a roma s a sun t rez ultat ul
procesului de prăjire. Boabele de cafea prăjite prea
mu lt ș i la tem per at uri pr ea r idi ca te p rez int ă o cul oar e
mai închisă. Boabele mai închise la culoare emană
mai multă aromă decât boabele deschise la culoare.
Veți găsi pe piață diverse calități de c afea. Fiecare tip
de prăjire este caracterizat de un amestec de boabe
prăjite la o anumită temperatură și cu un anumit tip
de aromă.
Există variante decofeinizate care conțin doar 2%
cofeină. Experimentați cu aparatul dvs. de espresso
unul dintre diversele tipuri de cafea disponibile în
comerț. Veți descoperi probabil o aromă mai bună
decât cea a amestecului folosit până acum.
3. Aparatele de espresso cu pompă necesită un amestec
măcinat n. Asigurați-vă că achiziționați amestecul
dorit cu un grad de măcinare adecvat pentru utilizarea cu aparatele de cafea espresso. Este de preferat
să utilizați mai degrabă o râșniță cu piatră decât o
râșniță cu lamă, deoarece aceasta din urmă produce
prea multă pulbere de cafea și un amestec măcinat
neregulat.
4. Ar ideal să măcinați cafea exac t înainte de a o folosi.
Nu uitați că trebuie să e măcinată pentru aparatul
de espresso cu pompă.
5. Este recomandat să păstrați cafeaua măcinată sau
boabe în borcane ermetice în frigider. Cafeaua măcinată absoarbe ușor mirosurile.
6. Un espresso adevărat se recunoaște după culoarea
închisă, gustul bogat și tipica „spumă naturală”.
7. Cappuccino este o combinație specială de cafea
espresso și lapte cald spumat. Se p oate servi cu puțină
scorțișoară, nucșoară sau cacao.
8. Serviți c afeaua espresso imediat după ce o preparați.
9. Serviți cafeaua espresso în cești de cafea și cappuccino
în cești pentru micul-dejun.
• 84 •
Page 90

INTRODUCERE
Înainte de a folosi aparatul pentru prima dată, citiți cu
atenție broșura referitoare la sigur anță, furnizată separat
și păstrați-o pentru consultare ulterioară.
FILTRE ÎN DOTARE
Filtru „crema perfetta” pentru 1 sau 2 cești
(Fig. 5).
Acest ltru este deja montat pe suportul de ltru și permit e obți nere a unui espre sso c u spum ă înc ă de la p rime le
utilizări ale aparatului.
ROMÂNĂ
Încărcarea circuitului.
Atenie! Nu activați tasta cafea fără a efectua mai întâi
încărcarea circuitului.
1. Așezați o ceașcă goală sub grupul de infuzare (Fig.
1-8 ) f ără a in tro du ce s upo rt ul d e lt ru și a păs aț i ta st a
cafea (Fig. 1-1).
Se va putea auzi sunetul pompei care a fost activată
și, după câteva secunde, apa va începe să curgă din
grupul de infuzare (Fig.1-8).
2. După ce umpleți ceașca (circa 150 cc), apăsați din nou
tasta cafea (Fig.1-1).
Notă. Acest ltru trebuie să e utilizat doar împreună
cu aeratorul dispozitivului de spumare a laptelui. (Fig.1-16).
Filtru tradițional 2 cești (Fig. 7).
Filtru tradițional 1 ceașcă/capsulă monodoză (Fig. 6).
Aceste filtre sunt similare celor utilizate la aparatele
profesionale de bar și necesită dexteritate și experiență.
Notă. Aceste ltre nu trebuie să e folosite cu aeratorul
dispozitivului de spumare a laptelui. (Fig.1-16).
Sf atu l no st ru e st e să înc ep eți cu lt rul „cr em a pe rf et ta” și,
după ce căpătați dexteritate și experiență, puteți trece la
ltrele tradiționale, pentru a apre cia o adevărată utilizare
de barman
PRIMA INSTALARE
1. Scoateți capacul rezervorului de apă (Fig.2) și umpleți-l cu apă rece până la nivelul M AX al rezervorului
(Fig.1-13).
2. Introduceți fișa în priza de curent de pe spatele
aparatului (Fig.9) și extremitatea opusă a cablului de
alimentare într-o priză electric ă de perete, cu tensiune
corespunzătoare.
Apăsați tasta de pornire/oprire (Fig.1-2), indicatorul
luminos se pornire se aprinde (Fig.1-4).
Notă. Se poate întâmpla ca autodeclanșarea pompei să nu
funcționeze temporar din cauza unei „bule de aer”.
În cazul în care nu curge apă din grupul de inf uzare (Fig.1-
8), procedați în modul următor:
1. Așezați o ceașcă sub duza de abur (Fig.1-14).
2. Rotiți manivela (Fig.1-7) în sens antiorar pentru a
deschide robinetul de preparare a aburului/apei calde
3. Apăsați tasta cafea (Fig.1-1) pentru a activa pompa.
4. După câteva secunde, va începe să iasă apă din duza
de abur.
Lăsați să iasă aproximativ o ceașcă de apă.
5. Închideți manivela de preparare a aburului/apei calde
(Fig.1-7).
6. Apăsați din nou tasta cafea (Fig.1-1).
La prima utilizare sau după o perioadă de
inactivitate mai mare de 2 săptămâni.
Notă. Apa distribuită în timpul acestui proces trebuie să
e aruncată și nu poate folosită pentru alimentație. Dacă
recipientul se umple în timpul ciclului, opriți distribuirea și
goliți-l înainte de a relua operația.
1. Clătiți rezer vorul de apă (Fig.2) (a se vedea paragraf ul
„curățarea rezervorului de apă”) și umpleți-l cu apă
potabilă proaspătă.
2. Așezați un recipient sub duza de abur (Fig.1 -14).
3. Deschideți ușor manivela de abur/apă caldă (Fig.1-7)
rotind-o în sens antiorar.
• 85 •
Page 91

ROMÂNĂ
4. Apăsați tasta cafea (Fig.1-1) și tasta abur (Fig.1-3).
5. Distrib uiți tot conținutul rezervorului de apă prin duza
de abur.
6. Pentru a termina distribuirea, apăsați din nou tasta
cafea (Fig. 1-1) și tasta abur (Fig. 1-3).
7. Închideți manivela robinetului (Fig.1-7) rotind-o în
sens orar.
8. Umpleți rezervorul cu apă potabilă proaspătă.(Fig.2).
9. Introduceți de jos în sus suportul de ltru (Fig.3) în
grupul de infuzare și rotiți-l de la stânga la dreapta
până când se blochează (Fig.4).
10. Așezaţi un recipient adecvat sub suportul de ltru.
11. Apăsați tasta c afea (Fig.1-1) și distribuiți toată ap a din
rezervor.
12. După ce se termină apa, opriți distribuirea apăsând
din nou tasta cafea (Fig.1-1) și goliți recipientul.
13. Îndepărtați suportul de ltru din grup, rotindu-l de la
dreapta la stânga și clătiți-l c u apă potabilă proaspătă.
14. Aparatul este pregătit pentru utilizare.
2. Așezați o ceașcă mare sub supo rtul de ltru (Fig.1-17)
și apăsați tasta cafea (Fig.1-1)
3. După ce s-a umplut ceașca cu apă, (circa 150 cc),
apăsați din nou tasta c afea și așteptați câteva minute
pâ nă c ân d ap ara tul aju ng e la tem per atu ra cor ec tă c u
suportul de ltru introdus.
Notă. În interiorul suportului de ltru ar putea rămâne
reziduuri de apă, care vor eliminate înainte de a umple
ltrul cu cafea măcinată.
Continuați prepararea cafelei espresso:
4. Scoateți suportul de ltru (Fig.1-17) și umpleți-l cu
cafea măcinată, folosind măsura furnizată împreună
cu aparatul (Fig.1-20).
Folosiți o măsură pentru ecare ceașcă de cafea.
Notă. Este recomandat să solicitați la fabrica de prăjit
cafea sau să achiziționați din comerț o cafea cu un grad de
măcinare nă, indicat pentru utilizarea în aparatul de cafea.
PREPARAREA UNUI ESPRESSO CU CAFEA
MĂCINATĂ
Suportul de ltru din dotare prezintă din fabrică ltrul
„crema perfetta” pentru prepararea uneia sau a două
cafele.
Atenie! Da că se uti liz eaz ă lt rul „cr ema pe rfe tta ” fă ră
aeratorul dispozitivului de spumare a laptelui , cafeaua
țâșnește cu forță din aparat, existând riscul de arsuri.
Notă. Dacă preferați să utilizați ltrul tradițional (Fig.6/7),
îndepărtați atât ltrul „crema perfetta” (Fig.5), cât și aeratorul dispozitivului de spumare a laptelui (Fig.1-16).
Pentru a prepara prima cafea, trebuie să preîncălziți mai
întâi suportul de ltru (Fig.1-17):
1. Introduceți suportul de ltru (Fig.1-17) în grupul de
infuzare (Fig.1-8) cu o mișcare la 45° spre stânga și
rotiți-l la dreapta pentru a-l bloca pe poziție. Gâtul
suportului de ltru v a trebui s ă e în poziție perpendiculară pe aparat sau ușor deplasat la dreapta.
• 86 •
5. Apăsați folosind presa corespunzătoare (Fig.1-21).
Presarea trebuie efectuată în mod uniform, pentru
a avea o suprafață bine nivelată și plană.
6. Curățați marginea suportului de ltru (Fig.1-17) de
eventualele reziduuri de cafea.
7. Introduceți suportul de ltru (Fig.1-17) în grupul de
infuzare (Fig.1-8) cu o mișcare la 45° spre stânga și
rotiți-l la dreapta pentru a-l bloca pe poziție. Gâtul
suportului de ltru v a trebui s ă e în poziție perpendiculară pe aparat sau ușor deplasat la dreapta.
8. A șteptați până se aprinde indicatorul luminos (Fig.1-5).
9. Apăsați tasta cafea (Fig.1-1).
10. Când ceștile sunt pline la 3/4, apăsați din nou tasta
cafea (Fig.1-1).
Cafeaua va mai mult sau mai puțin intensă în func ție
de cantitatea de apă folosită și, dacă este preparată
fo lo sin d pr oc edu ra cor ec tă , se va o bț ine tip ic a „s pu mă
naturală” de culoarea alunei/castanei.
Pentru a prepara alt espresso, scoateți încet și cu atenție
su por tul de l tru , dep las ând u-l la s tân ga. Fiț i ate nți să n u
vă ardeți cu apa rămasă pe zațul de cafea. Va continua să
Page 92

curgă puțină apă după scoaterea supor tului de ltru. Acest
lucr u este c auzat d e presiu nea apei în siste m. Îndep ărtaț i
zațul din ltru și eventualele reziduuri din sită (Fig.16).
Notă. Vă sugerăm să păstrați suportul de ltru curat
montat pe aparat, fără a-l strânge prea mult, pentru a
garanta întotdeauna o temperatură optimă a întregului
grup de infuzare.
PREPARAREA UNUI ESPRESSO CU
CAPSULE DE CAFEA
Notă. Pentru utilizarea capsulelor, folosiți exclusiv ltrul 1
ceașcă tra dițională (Fig.6).
Urmați instrucțiunile pentru prepararea unui espresso cu
cafea măcinată, folosind în loc ul cafelei măcinate capsula
de cafea premăcinată monodoză. Introduceți capsula
în suportul de ltru (Fig.1-17), asigurându-vă că hârtia
capsulei nu iese din suportul de ltru.
ROMÂNĂ
„Prepararea unui espresso cu cafea măcinată”.
2. Apăsați tasta abur (Fig.1-3).
3. După 15-20 secunde și când indicatorul luminos
pentru temperatura aburului (Fig.1-6) se aprinde.
4. Rotiți ușor, în sens antiorar, manivela de abur/apă
caldă, pentru a elimina condensul din duză și închideți
la loc manivela.
5. Așez ați ibricul plin pe jumătate cu lapte rece sub duza
de abur.
6. Așezați vâr ful ajutajului exact sub supraf ața laptelui,
dacă este introdusă pr ea mult, laptele nu se spumează, dacă este introdus ă prea puțin, se produc bule mari
care se descompun repede.
Este important să mențineți ajutajul nu în centru, ci
aproape de marginea ibricului, într-un unghi adecvat
pentru a produce un vortex puternic (Fig.8-1).
7. Rotiți manivela robinetului de preparare a aburului
(Fig.1-7) în sens antiorar pentru a distribui aburul,
în această fază se produce absorbția maximă de aer;
laptele trebuie să se spumeze aproape la rece.
PREPARAREA UNUI CAPPUCCINO
Pentru prepararea unui cappuccino tradițional, se recomandă
- utilizarea laptelui proaspăt, integral, la temperatură
scăzută, de preferință de înaltă calitate. Densitatea
laptelui spumat depinde de conținutul de grăsimi al
laptelui.
- utilizarea ibricelor de lapte din oțel inoxidabil, cu
formă circulară, bombată, cu o por țiune mai îngustă
în partea superioară și aplicatorul, necesar pentru a
efectua cappuccino decorate.
Duza de abur (Fig.1-14) va produce tot aburul necesar pentru a spuma laptele, fără a-l aduce în punc tul de erbere.
Cu două sau trei probe și un pic de dedicare, veți deveni
experți în prepararea de cappuccino.
Înainte de a începe, este important să deplasați ușor spre
exterior duza de abur, pentru a introduce ibr icul direct sub
du za d e ab ur ș i pe ntr u a f aci lit a mi șcă ril e ne ces are pen tr u
spumarea corectă a laptelui.
În acest punct, procedați în modul următor:
1. Preparați cafeaua espresso într-o ceașcă mare de
cappuccino, după cum se specifică în paragraful
• 87 •
Notă. Presiunea aburului crește la rotirea manivelei.
Notă. Se recomandă o preparare de maxim 60 de secunde.
O preparare continuă a aburului mai mult de 60 de secunde
poate goli complet centrala. În acest caz, procedați conform
indicațiilor din paragraful „Încărcarea circuitului”.
Notă. Pentru o spumare corectă a laptelui, ajutajul de abur
(Fig.1-23) trebuie să e întotdeauna în contact cu laptele și nu
cu spu ma d e la pte (Fi g.8 -2). Pr in u rma re, pe măsu ră c e st rat ul
de spumă crește, trebuie să ridicați ușor ibricul, încercând
să țineți ajutajul în contact cu laptele, fără a atinge fundul
ibricului (Fig.8-A).
8. După ce obțineți spuma dorită, trebuie să împingeți
duza de abur mai adânc pentru a încălzi bine laptele.
Notă. Este recomandat să țineți întotdeauna o mână pe
partea bombată a ibricului, pentru a simți creșterea temperaturii părții de lapte nespumat.
9. După ce obțineți rezultatul dorit, închideți în sens
orar manivela de abur, pentru a întrerupe prepararea
aburului și îndepărtați ibricul.
Page 93

ROMÂNĂ
Notă. După terminarea operației de spumare a laptelui,
pentru a compacta spuma, este recomandat să bateți ușor
ibri cul pe u n blat și să lăsați să se odi hnească cel puțin 30 de
secunde. Laptele devine astfel mai omogen.
Atenie! Este important să spumați doar laptele
necesar. Laptele cald care rămâne în ibric nu trebuie
refo losit; a r depr ecia cal itatea s pumei ș i mai al es gust ul
de cappuccino. Prin urmare, trebuie folosit în alte scopuri.
10. Apăsați tasta abur (Fig.1-3).
Vărsați laptele spumat în cafea. Garnisiți după cum
doriți cu scorțișoară, cacao, nucșoară.
Pentru a prepara rapid altă cafea, reduceți temperatura
centralei distribuind apă caldă din grupul de infuzare
a cafelei (Fig.1-8). Urmați instrucțiunile din paragraful
„M od ul d e re du cer e a t em per at uri i”, î n ca z c ont ra r, ca fe aua
ar putea avea gust de ars.
Pentru a prepara rapid altă cafea, reduceți temperatura
centralei distribuind apă caldă din grupul de infuzare a
cafelei (Fig.1-8). Urmați instrucț iunile din paragraful „Modul de reducere a temperaturii centralei”, în caz contrar,
cafeaua ar putea avea gust de ars.
Notă. Se recomandă o preparare de maxim 60 de secunde.
Atenie! Duza de abur, înainte și după utilizare, ar pu-
tea avea o temperatură ridicată. Pentru a evita arsurile,
mutați-o așezând degetele doar pe cauciucul de protecție
montat pe duza de abur.
MODUL DE REDUCERE A TEMPERATURII
CENTRALEI
1. Nu introduceți supor tul de ltru.
2. Așezați o ceașcă goală pe tăviță.
3. Apăsați tast a cafea (Fig.1-1) și umpleți ceașca cu apă.
4. Apăsați din nou tasta cafea (Fig.1-1).
Atenie! Duza de abur, î nainte ș i după u tilizar e, ar putea avea o temperatură ridicată. Pentru a evita arsurile,
mutați-o așezând degetele doar pe cauciucul de protecție
montat pe duza de abur.
Atenie! Dacă se prepară cafea fără a reduce temperatura prin distribuirea apei, există pericolul de arsuri!
PREPARAREA DE APĂ CALDĂ
1. Porniți aparatul și aștept ați câteva minute până când
indicatorul luminos pentru temperatura corectă a
cafelei (Fig.1-5) se aprinde.
2. Așezați o ceașcă sub duza profesională.
3. Ro ti ți î nce t ma niv ela de abu r (F ig.1-7 ) în sen s a nti ora r
și apăsați tasta cafea (Fig.1-1) și tasta abur (Fig.1-3)
simultan, pentru a permite prepararea apei calde.
4. După obținerea cantit ății de apă caldă dorită, întrerupeți prepararea apăsând din nou tas ta cafea (Fig.1-1)
și tasta abur (Fig.1-3) simultan și rotiți manivela de
abur în sens orar.
Aparatul este pregătit acum pentru a prepara altă cafea.
FUNCȚIA DE OPRIRE AUTOMATĂ
Aparatul este prevăzut cu o funcție de economisire a
energiei. După 20 de minute de inactivitate, aparatul se
oprește automat. Pentru a-l reactiva, apăsați tasta de
pornire/oprire.
CURĂȚARE ȘI ÎNTREȚINERE
O curățare și o întreținere periodică mențin aparatul în
stare optimă și garantează o cafea cu gust optim pentru
o lungă perioadă de timp, un ux constant de cafea și o
spumă de lapte excelentă.
Curățarea duzei de abur
După ecare spumare a laptelui:
1. Curățați duza de abur cu o cârpă umedă. Pentru o
curățare mai aprofun dată, deșurubați ajutajul (Fig.13)
și spălați-l sub jet de apă.
2. Deschideți manivela de abur, lăsând să iasă abur timp
de una sau două secunde, pentru a elibera ori ciul
ajutajului (Fig.1-23).
• 88 •
Page 94

Curățarea suportului de ltru și a ltrelor
Filtrele trebuie să e păstrate curate pentru a garanta un
rezultat perfect.
Atenie! Înlocuirea ltrului trebuie să aibă loc doar
după ce se răcește complet cupa suportului de ltru,
pentru a evita arsurile.
Scoateți zilnic ltrul din suportul de ltru, conform descrierii din (Fig.14) și spălați cu apă călduță.
În cazul în care observați o eroare
în timpul preparării cafelei, introduceți ltrele în apă erbinte timp
de 10 minute și apoi clătiți-le sub
jet de apă.
Pentru o curățare mai bună a ltrelor, vă recomandăm să achiziționați
pastilele GAGGIA pentru curățare,
special concepute pentru a menține
aparatul dvs. în stare de e ciență perfectă.
Curățarea tăviței și a cuvei de colectare a
picăturilor
Extrageți cuva de colectare a picăturilor și tăvița (Fig.110,11) și spălați-le cu apă. Nu folosiți substanțe abrazive.
ROMÂNĂ
Curățarea sitei
Eliminați periodic eventualele reziduuri de zaț de cafea
din sită (Fig.16) cu o perie și curățaț i cu apă caldă, urmând
instrucțiunile descrise în paragraful „Modul de reducere
a temperaturii”.
Curățarea după o perioadă de nefolosire
Când aparatul rămâne nefolosit o perioadă îndelungată
(mai mult de două săptămâni), urmați instrucțiunile din
paragraful „La prima folosire sau după o perioadă de
nefolosire mai mare de 2 săptămâni”.
DECALCIFIERE
Formarea calcarului este o consecință normală a utilizării apar atului.
Folosiți exclusiv produsul decalci ant GAGGIA, formulat special pentr u
a păstra la maxim per formanțele și
funcționalitatea apar atului pe toată
durata sa de viață, cât și pentru
evitarea, atunci când este utilizat
corect, oricărei alterări a produsului
preparat. Nu utilizați sub nicio formă oțel sau alte produse anticalcar.
Decalci erea este necesară la ecare 2 luni de utilizare
a aparatului.
Curățarea rezervorului de apă
Atenie! Curățarea rezervorului trebuie efectuată
doar cu mașina oprită, pentru a evita arsurile. În timpul
utilizării, tubul de evacuare (Fig. 11) ar putea atinge
temperaturi ridicate.
Scoateți rezervorul de apă (Fig.1-13) și spălați-l sub jet de
apă. Pentru a scoate rezervorul de apă, scoateți mai întâi
cuva de colectare a pic ăturilor (Fig 1-11) și apoi deșurubați
tubul de evacuare (Fig.11) trăgându-l în jos.
Notă. Reintroducând rezervorul, asigurați-vă că tubulețele
din silicon se a ă în interiorul rezervorului și că nu sunt
răsucite sau blocate (Fig.12).
• 89 •
Atenie! Nu ingerați soluția de decalci ere și produsele
distribuite până la nalizarea ciclului.
1. Introduceți de jos în sus suportul ltrului în grupul
de in fuza re (Fig.1-8) și ro tiți-l de la stâng a la dre apta
până la blocarea sa.
2. Sc oa teț i ș i go li ți r ez er vor ul de apă (a s e ve de a c api to lul
„Curățarea rezervorului de apă”).
3. Vărsați JUMĂTATE din conținutul st iclei de decalci ant
GAGGIA în rezervorul de apă și umpleți cu apă p otabilă
proaspătă până la nivelul MAX.
4. Porniți aparatul apăsând tasta de pornire (Fig. 1-2).
Distribuiți prin duza de abur 2 cești de apă (circa 150
ml ecare) (a se vedea capitolul „Prepararea de apă
Page 95

ROMÂNĂ
caldă”) și opriți aparatul apăsând tasta de pornire
(Fig. 1-2).
5. Lăsați să acționeze decalcifiantul pentru circa 20
minute cu aparatul oprit.
6. Porniți aparatul apăsând tasta de pornire (Fig. 1-2).
Distribuiți prin duza de abur 2 cești de apă (circa 150
ml ecare), opriți aparatul folosind tasta de pornire
(Fig. 1-2) și lăsați-l oprit timp de 3 minute.
7. Repetați distribuirea apei conform descrierii de la
punctul 6, până la golirea completă a rezervorului
de apă.
8. Clătiți rezervorul și umpleți-l cu apă potabilă proaspătă.
9. Așezați un re cipient sub duza de abur. Deschideți ușor
man ivel a de a bur/a pă ca ldă ( Fig.1-7) roti nd- o în s ens
antiorar.
Apăsați tasta cafea (Fig.1-1) și tasta abur (Fig.1-3).
10. Distribuiți tot conținutul rezervorului de apă prin
duza de abur. Pentru a încheia distribuirea, apăsați
din nou tasta cafea (Fig.1-1) și tasta abur (Fig.1-3),
apoi închideți manivela robinetului, rotind-o în sens
orar.
11. Umpleți rezervorul cu apă potabilă proaspătă.
12. Așezaţi un recipient adecvat sub suportul de ltru.
13. Apăsați tasta cafea (Fig.1-1) și distribuiți toată apa din
rezervor. După ce se termină apa, opriți distribuirea
apăsând din nou tasta cafea (Fig.1-1) și tasta abur
(Fig.1-3). La sfârșit, goliți recipientul.
14. Îndepăr tați suportul de ltru din grup, rotindu-l de la
dreapta la stânga și clătiți-l c u apă potabilă proaspătă.
15. Re pet aț i a d oua oar ă o per ați il e de la p unc tu l 8 p ent ru
un total de 8
pregătit pentru utilizare.
16. Ciclul de decalci ere este astfel nalizat.
17. Umpleți din nou rezervorul cu apă proaspătă. Dacă
este necesar, efectuați încărcarea circuitului după
cum se descrie în capitolul „Încărcarea circuitului”.
rezervoare. După aceea, aparatul este
• 90 •
Page 96

ÎN CAZ DE DEFECȚIUNE
Problemă: Asigurai-vă că:
Există apă în rezervor.
Lipsa preparării cafelei.
Filtrul nu este obturat, deoarece amestecul este prea n sau cafeaua este presată
excesiv.
Sita este curată.
ROMÂNĂ
Prepararea cafelei este prea rapidă (mai mică de 20 secunde).
Pompa face prea mult zgomot.
Pierdere excesivă de apă la
suportul de ltru.
Cafeaua espresso are spumă
puțină.
Cafeaua este prea rece.
Laptele nu este spumat su cient.
Aparatul scoate cafeaua țâșnind
pe la suportul de ltru.
Cafeaua nu a fost măcinată prea grosier.
Cafeaua a fost presată cu ajutorul presei.
Există apă în rezervor.
Pompa este activată (a se vedea încărcarea circuitului).
Cantitatea de cafea este su cientă.
Suportul de ltru a fost introdus corect (Fig.1-17).
Garnitura nu este murdară (Fig.16).
Nu există reziduuri de cafea pe marginea suportului de ltru.
Cafeaua nu a fost măcinată prea grosier.
Cafeaua a fost presată cu ajutorul presei.
Cafeaua nu este prea veche sau uscată.
A fost folosit ltrul tradițional cu aeratorul dispozitivului de spumare a laptelui
(Fig.1-16).
Aparatul a fost încălzit.
Cafeaua nu a fost măcinată prea grosier.
Cafeaua a fost preparată în cești reci. Se recomandă prepararea cafelei întotdeauna în
cești calde.
Nu a fost efectuată preîncălzirea suportului de ltru (doar pentru prima cafea).
Ajutajul de abur nu este obturată.
Ajutajul de abur nu este introdusă prea adânc în ibric.
Laptele nu este prea cald.
Aeratorul dispozitivului de spumare a laptelui nu a fost montat cu ltrul „crema
perfetta”.
Carcasa mașinii și tubul de
evacuare sunt foarte erbinți.
Tasta de abur este oprită.
• 91 •
 Loading...